

Page 1
Operating Guide
Manuel d’utilisation
Gebruiksaanwijzing
Manual de funcionamiento
Guida all’uso
Gebrauchsanweisung
ST-100
Remote Trainer
Système de dressage
Trainer met afstandsbediening
Sistema de adiestramiento
Sistema di addestramento
Ferntrainer
Please read this entire guide before beginning
Veuillez lire ce manuel en entier avant de commencer
Gelieve deze gids volledig door te lezen voordat u begint
Por favor, lea detenidamente este manual antes de empezar
Si prega di leggere attentamente la guida all’uso prima di utilizzare il collare
Bitte lesen Sie die ganze Gebrauchsanleitung vor der Inbetriebnahme aufmerksam durch
Page 2

2 www.petsafe.net
FR ENES
NL
IT
DE
IMPORTANT SAFETY INFORMATION
Explanation of Attention Words and Symbols Used in this Guide
This is the safety alert symbol. It is used to alert
you to potential personal injury hazards. Obey
all safety messages that follow this symbol to
avoid possible injury or death.
WARNING indicates a hazardous situation
which, if not avoided, could result in death or
serious injury.
CAUTION, used with the safety alert symbol,
indicates a hazardous situation which, if not
avoided, could result in minor or moderate injury.
CAUTION, used without the safety alert symbol,
indicates a hazardous situation which, if not
avoided, could result in harm to your pet.
• Not for use with aggressive dogs. Do
not use this product if your dog is aggressive,
or if your dog is prone to aggressive
behaviour. Aggressive dogs can cause severe
injury and even death to their owner and
others. If you are unsure whether this product
is appropriate for your dog, please consult
your veterinarian or certi ed trainer.
• Risk of explosion if battery is replaced
by an incorrect type. Do not short circuit,
mix old and new batteries, dispose of in re, or
expose to water. When batteries are stored or
disposed, they must be protected from shorting.
Dispose of used batteries properly.
Page 3
www.petsafe.net 3
FREN
ES
NL
IT
DE
• The PetSafe® ST-100 Remote Trainer is not a
toy. Keep away from the reach of children. Use
it only for its training purpose.
• Safety during on-lead training. It is vitally
important that you and your dog remain safe
while learning during on-lead training. Your dog
should wear a flat collar or a harness attached
to a strong lead, long enough for him to attempt
to chase an object, but short enough for him not
to reach a road or other unsafe area. You must
also be physically strong enough to restrain your
dog when he tries to chase.
Risk of skin damage. Please read and follow
the instructions in this manual. Proper t of the collar
is important. A collar worn for too long or made
too tight on the pet’s neck may cause skin damage.
Ranging from redness to pressure ulcers; this
condition is commonly known as bed sores.
• Avoid leaving the collar on the dog for more than
12 hours per day.
• When possible reposition the collar on the pet’s
neck every 1 to 2 hours.
• Check the t to prevent excessive pressure; follow
the instructions in this manual.
• Never connect a lead to the electronic collar; it
will cause excessive pressure on the contacts.
• When using a separate collar for a lead, don’t
put pressure on the electronic collar.
• Wash the dog’s neck area and the contacts of the
collar weekly with a damp cloth.
• Examine the contact area daily for signs of a rash
or a sore.
• If a rash or sore is found, discontinue use of the
collar until the skin has healed.
• If the condition persists beyond 48 hours, see
your veterinarian.
For additional information on bed sores and
pressure necrosis, please visit our website.
Page 4

4 www.petsafe.net
FR ENES
NL
IT
DE
These steps will help keep your pet safe and
comfortable. Millions of pets are comfortable
while they wear stainless steel contacts. Some
pets are sensitive to contact pressure. You
may nd after some time that your pet is very
tolerant of the collar. If so, you may relax some
of these precautions. It is important to continue
daily checks of the contact area. If redness or
sores are found, discontinue use until the skin
has fully healed.
• The PetSafe
®
ST-100 Remote Trainer must be
used only on healthy dogs. We recommend
that you take your dog to a veterinarian before
using the collar if he is not in good health.
• Do not shave the pet’s neck as this may
increase the risk of skin irritation.
• You should not make the collar any more tight
than is required for good contact. A collar that
is too tight will increase the risk of pressure
necrosis in the contact area.
Training Guide
Please visit our website at www.petsafe.net to download a detailed
Training Guide for this unit or contact our Customer Care Centre for
further assistance. For a listing of telephone numbers in your area,
visit our website at www.petsafe.net.
Page 5

www.petsafe.net 5
FREN
ES
NL
IT
DE
Thank you for choosing the PetSafe® brand. You and your pet deserve
a companionship that includes memorable moments and a shared
understanding together. Our products and training tools promote a
lifestyle of protection, teaching, and love—essentials that in uence
memories for a lifetime. If you have any questions about our
products or training your pet, please visit our website at
www.petsafe.net or contact our Customer Care Centre.
For a listing of Customer Care Centre telephone numbers,
visit our website at www.petsafe.net.
To get the most protection out of your warranty, please register your
product within 30 days at www.petsafe.net. By registering and
keeping your receipt, you will enjoy the product’s full warranty and
should you ever need to call the Customer Care Centre, we will be
able to help you faster. Most importantly, PetSafe
®
will never give
or sell your valuable information to anyone. Complete warranty
information is available online at www.petsafe.net.
Table of Contents
Components . . . . . . . . . . . . . . . . . . . . . . . . . . . . . . . . . . . . . . . . . . . . . .6
Other Items You May Need . . . . . . . . . . . . . . . . . . . . . . . . . . . . . . . . . . .6
How the System Works . . . . . . . . . . . . . . . . . . . . . . . . . . . . . . . . . . . . . .6
Features . . . . . . . . . . . . . . . . . . . . . . . . . . . . . . . . . . . . . . . . . . . . . . . . .7
Key De nitions . . . . . . . . . . . . . . . . . . . . . . . . . . . . . . . . . . . . . . . . . . . .8
Operating Guide . . . . . . . . . . . . . . . . . . . . . . . . . . . . . . . . . . . . . . .10
Prepare the Remote Transmitter . . . . . . . . . . . . . . . . . . . . . . . . . . . . . .10
Prepare the Receiver Collar . . . . . . . . . . . . . . . . . . . . . . . . . . . . . . . .13
Fit the Receiver Collar . . . . . . . . . . . . . . . . . . . . . . . . . . . . . . . . . . . .15
Pair the Remote Transmitter and Receiver Collar . . . . . . . . . . . . . . . . . .18
Training Guide . . . . . . . . . . . . . . . . . . . . . . . . . . . . . . . . . . . . . . . . .19
Test the Remote Trainer . . . . . . . . . . . . . . . . . . . . . . . . . . . . . . . . . . .19
General Tips . . . . . . . . . . . . . . . . . . . . . . . . . . . . . . . . . . . . . . . . . . 19
Teaching the Positive Tone . . . . . . . . . . . . . . . . . . . . . . . . . . . . . . . . .20
Find the Best Stimulation Level for Your Pet . . . . . . . . . . . . . . . . . . . . . .21
+2 Boost . . . . . . . . . . . . . . . . . . . . . . . . . . . . . . . . . . . . . . . . . . . . .22
Dog Training Recommendations . . . . . . . . . . . . . . . . . . . . . . . . . . . . . 22
Accessories . . . . . . . . . . . . . . . . . . . . . . . . . . . . . . . . . . . . . . . . . . . . .24
Frequently Asked Questions . . . . . . . . . . . . . . . . . . . . . . . . . . . . . .24
Troubleshooting . . . . . . . . . . . . . . . . . . . . . . . . . . . . . . . . . . . . . . . .26
Test Light Tool Instructions . . . . . . . . . . . . . . . . . . . . . . . . . . . . . . . . . . .27
Battery Disposal . . . . . . . . . . . . . . . . . . . . . . . . . . . . . . . . . . . . . . . . . .28
Important Recycling Advice . . . . . . . . . . . . . . . . . . . . . . . . . . . . . . . . . .28
Compliance . . . . . . . . . . . . . . . . . . . . . . . . . . . . . . . . . . . . . . . . . . . . .28
Terms of Use and Limitation of Liability . . . . . . . . . . . . . . . . . . . . . . . . . . .30
Page 6

6 www.petsafe.net
FR ENES
NL
IT
DE
Components
Other Items You May Need
• Small Phillips screwdriver
• Pliers
• Scissors
• Lighter
• Non-metallic collar and 10 m lead
How the System Works
Now you can experience the difference a Remote Trainer can make.
Spend less time training and more time enjoying your dog. The
PetSafe® ST-100 Remote Trainer is easy to use with an advanced
digital display that tells you exactly what level of Static Stimulation
you areusing.
The PetSafe
®
ST-100 Remote Trainer assists you in controlling your
pet without a lead in a range of up to 100 metres. At the push of a
button, your Remote Transmitter sends a signal activating your dog’s
Receiver Collar. He receives a safe but annoying Static Stimulation.
He’ll quickly learn the association between his behaviour and your
training; in no time, you’ll have a better-behaved pet. The PetSafe®
Big Dog
Receiver Collar
Remote
Transmitter
Operating
Guide
Little Dog
Receiver Collar
3-volt
Lithium
Batteries
(CR2032)
Test Light
Tool
Wrist Strap
Page 7
www.petsafe.net 7
FREN
ES
NL
IT
DE
ST-100 Remote Trainers have been proven safe, comfortable, and
effective for both small and large dog breeds.
Using the Remote Trainer consistently and correctly, any basic
obedience commands can be taught and many misbehaviours that
your pet exhibits can be corrected.
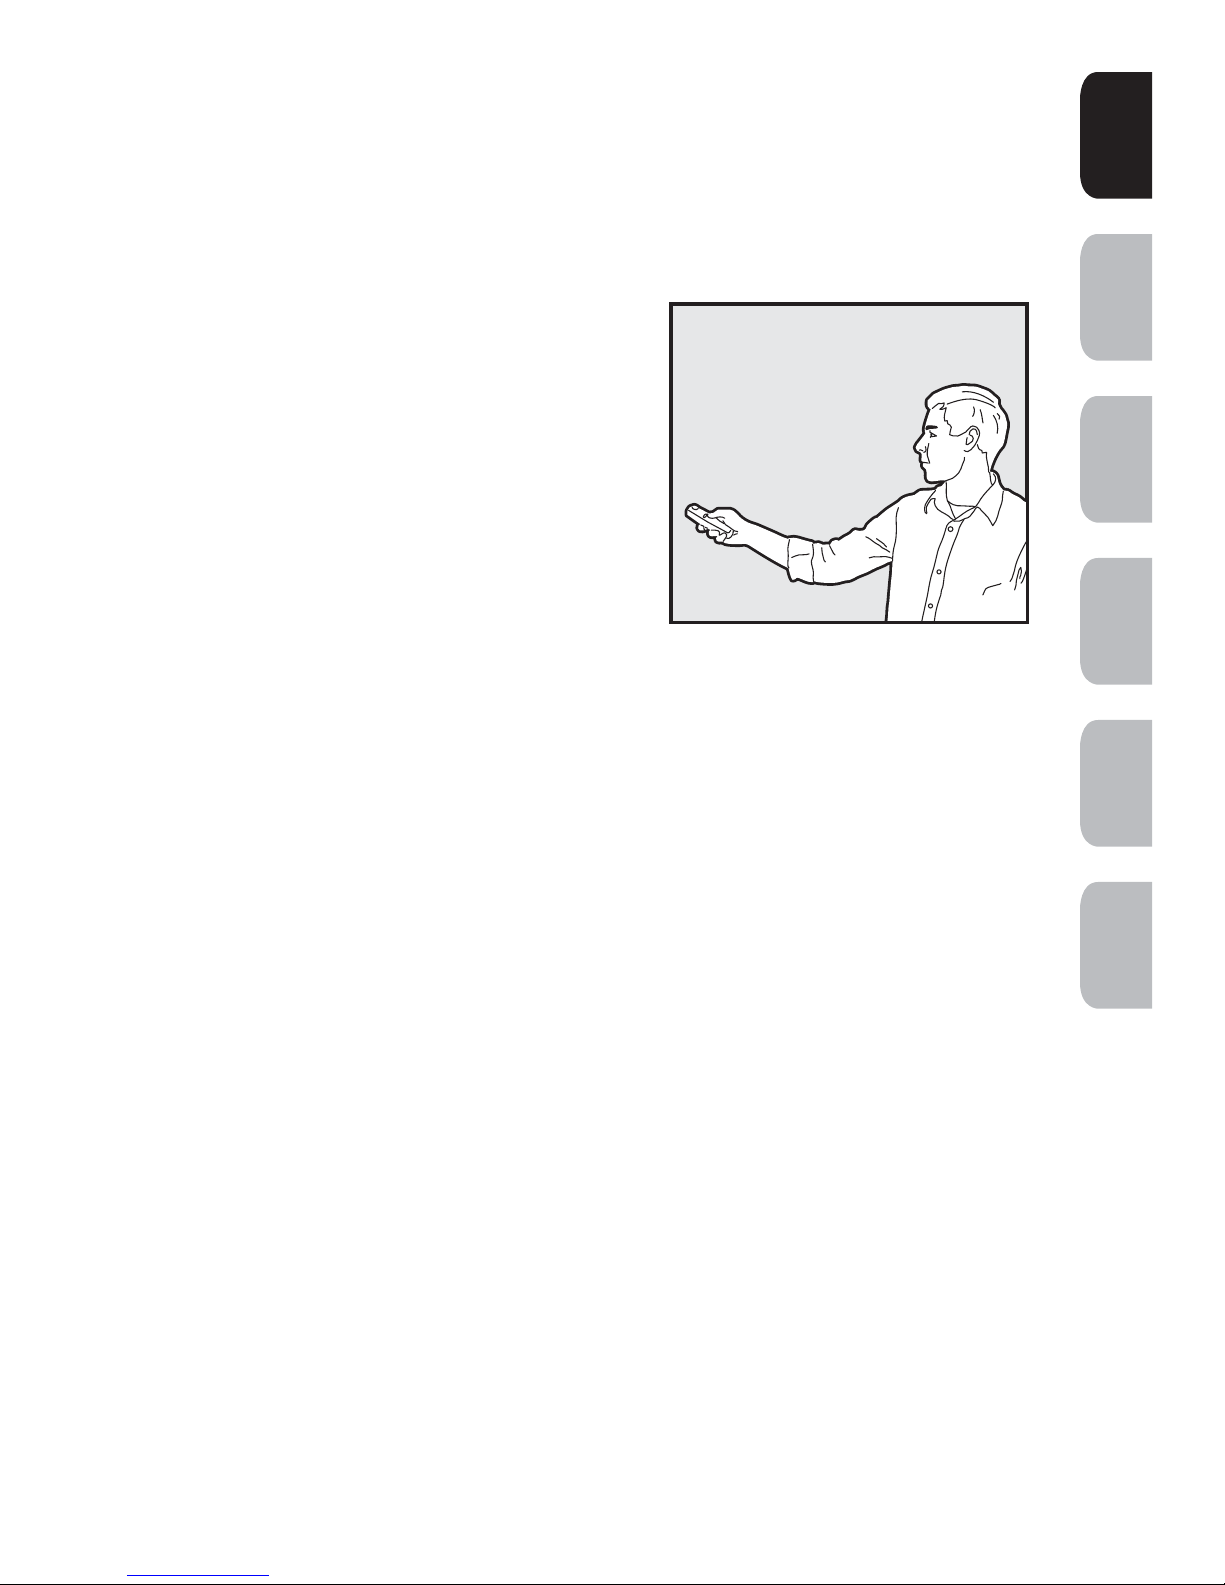
Important: The Remote Trainer has
a range up to 100 metres. Hold the
Remote Transmitter in a horizontal
position away from your body to
achieve optimum range. Terrain,
weather, vegetation, transmission from
other radio devices, and other factors
will affect the maximum range.
Features
• Up to 100 metre range
• 16 levels of Static Stimulation plus Tone only
• +2 Boost for distractions
• Easy to use Digital Remote Transmitter
• Waterproof Receiver Collar
Page 8
8 www.petsafe.net
FR ENES
NL
IT
DE
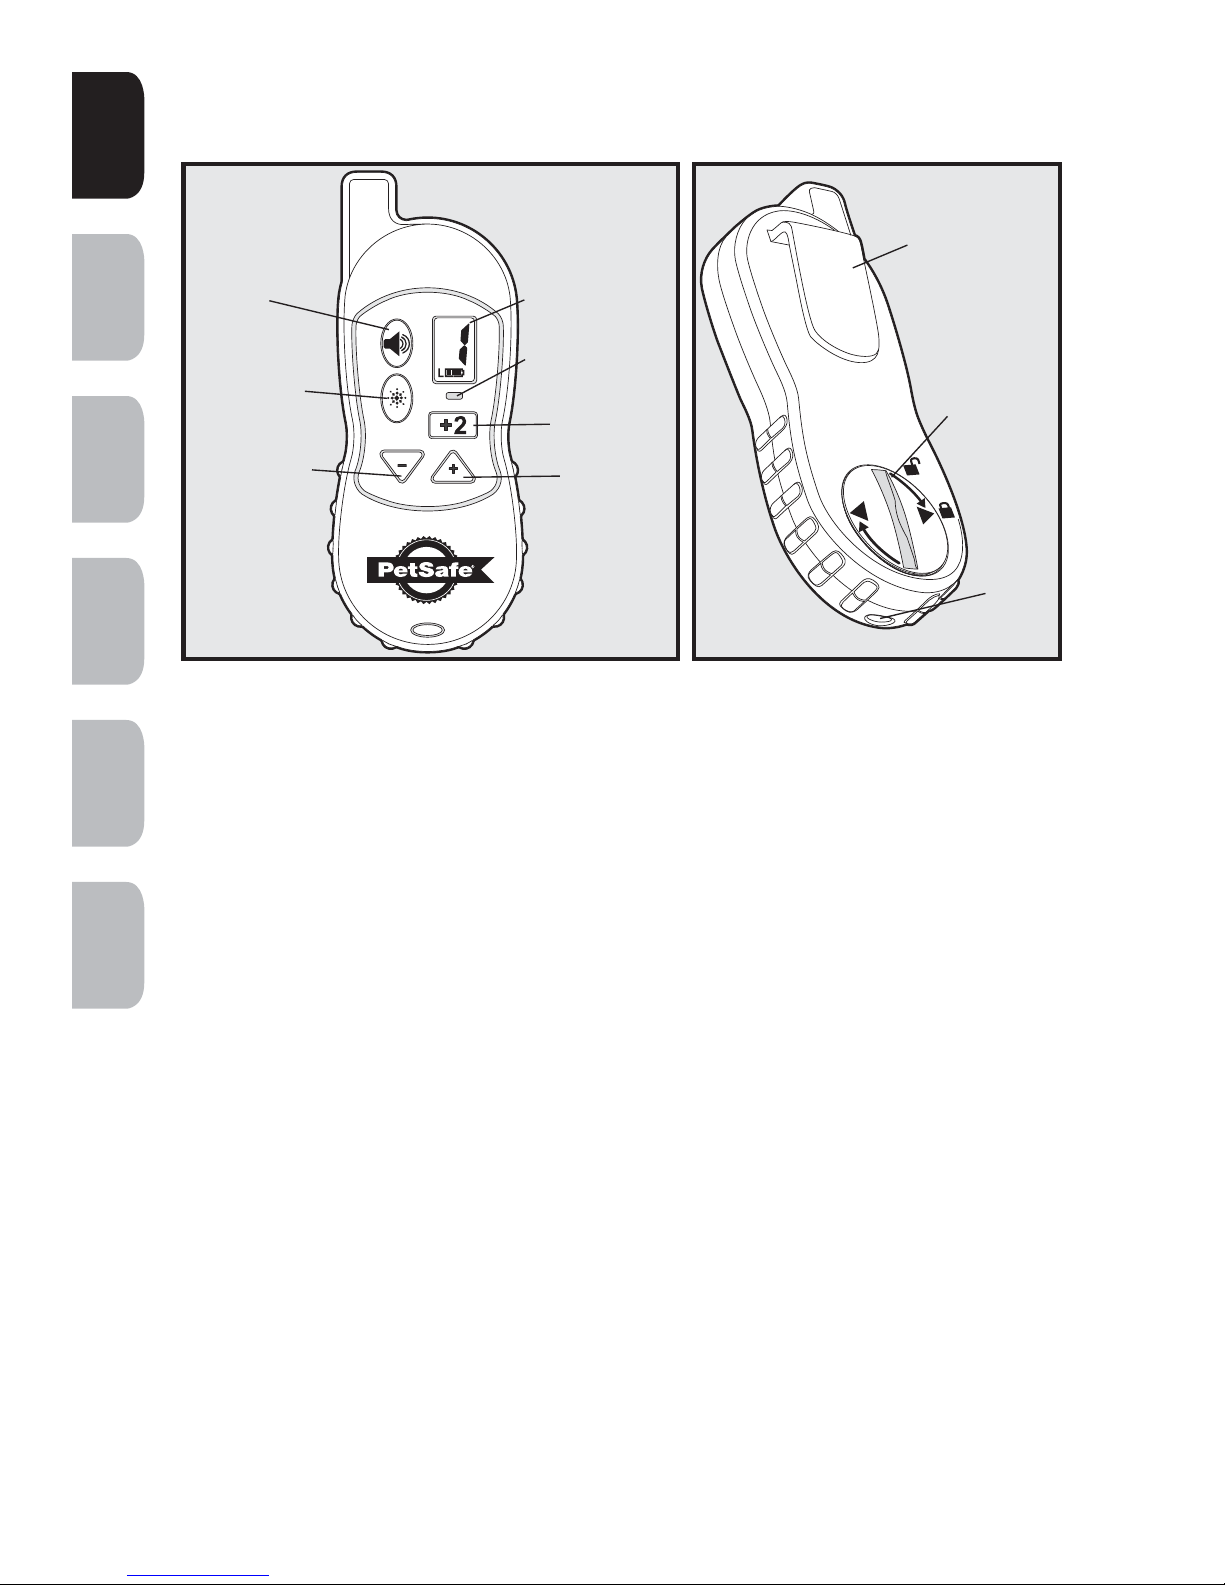
Key De nitions
Remote Transmitter: Transmits the signal to the Receiver Collar.
Tone Button (Green): Sends an audible tone to the Receiver
Collar. No Static Stimulation is delivered.
Stimulation Button (Yellow): Delivers Static Stimulation through
the Contact Points on the Receiver Collar at the level shown on
the Digital Display. When held down for 12 consecutive seconds,
the Remote Transmitter will “time-out”, and you must release and
press the button again before additional Static Stimulation can
bedelivered.
+2 Boost Button (Red): When pressed, instantly adds a boost of
2 levels above current Stimulation Level. Cannot exceed the 8 High
Stimulation Level.
Stimulation Down Button (-): Decreases Stimulation Level by 1.
Stimulation Up Button (+): Increases Stimulation Level by 1.
Digital Display: Indicates Stimulation Level, pairing mode and
battery status. See “Prepare the Remote Transmitter” section for
moredetails.
LED Indicator
Light
Tone Button
(green)
Digital Display
Stimulation
Button (yellow)
Stim Up
Button
+2 Boost
Button (red)
Stim Down
Button
Belt Clip
Battery
Cover
Wrist
Strap
Loop
Page 9
www.petsafe.net 9
FREN
ES
NL
IT
DE
Transmitter LED Indicator Light: 3 colors indicate which
function the Remote Transmitter is currently performing.
Green LED: Indicates Tone is being transmitted.
Red LED: Indicates Static Stimulation is being transmitted. Also
indicates low battery.
Orange LED: Indicates pairing command is being transmitted.
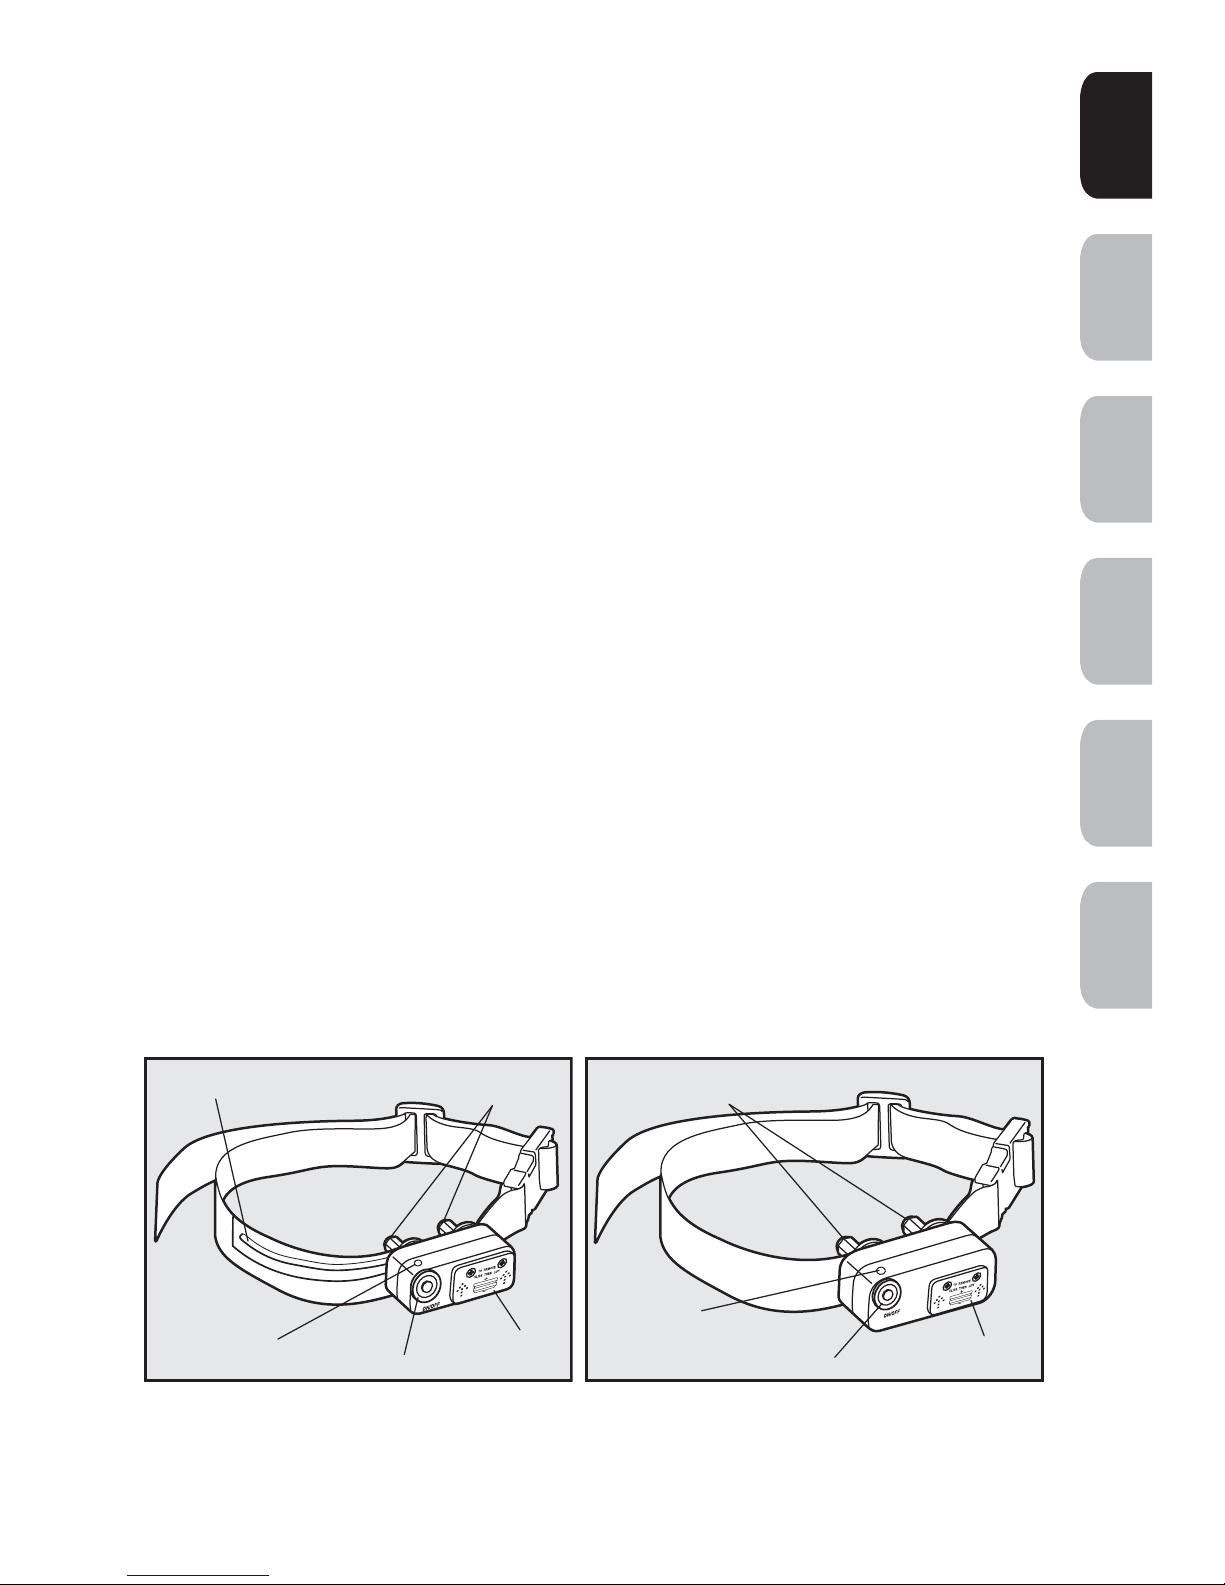
Receiver Collar: Delivers Static Stimulation or Tone only signal
from the Remote Transmitter. It is waterproof.
Antenna: Receives the signal that is emitted from the Remote
Transmitter. The antenna on the Little Dog Receiver Collar is inside
the nylon collar. The Big Dog Receiver Collar antenna is internal.
On/Off Button: Momentarily pressing and holding this button
turns the Receiver Collar on and off.
Contact Points: Deliver Static Stimulation to your pet from the
Remote Transmitter.
Receiver Indicator Light: Indicates that a button is pressed and
also serves as a low-battery indicator.
Red LED: Indicates low battery and when Stimulation Button is
pressed.
Green LED: Indicates good battery and when Tone Button is
pressed. Also indicates when pairing mode is complete.
Receiver
Indicator
Light
Battery
Lid
ON/OFF
Button
Contact
Points
Antenna
Little Dog Receiver Collar
Receiver
Indicator
Light
Battery
Lid
ON/OFF
Button
Contact
Points
Big Dog Receiver Collar
Page 10
10 www.petsafe.net
FR ENES
NL
IT
DE
OPERATING GUIDE
STEP 1
Prepare the Remote Transmitter
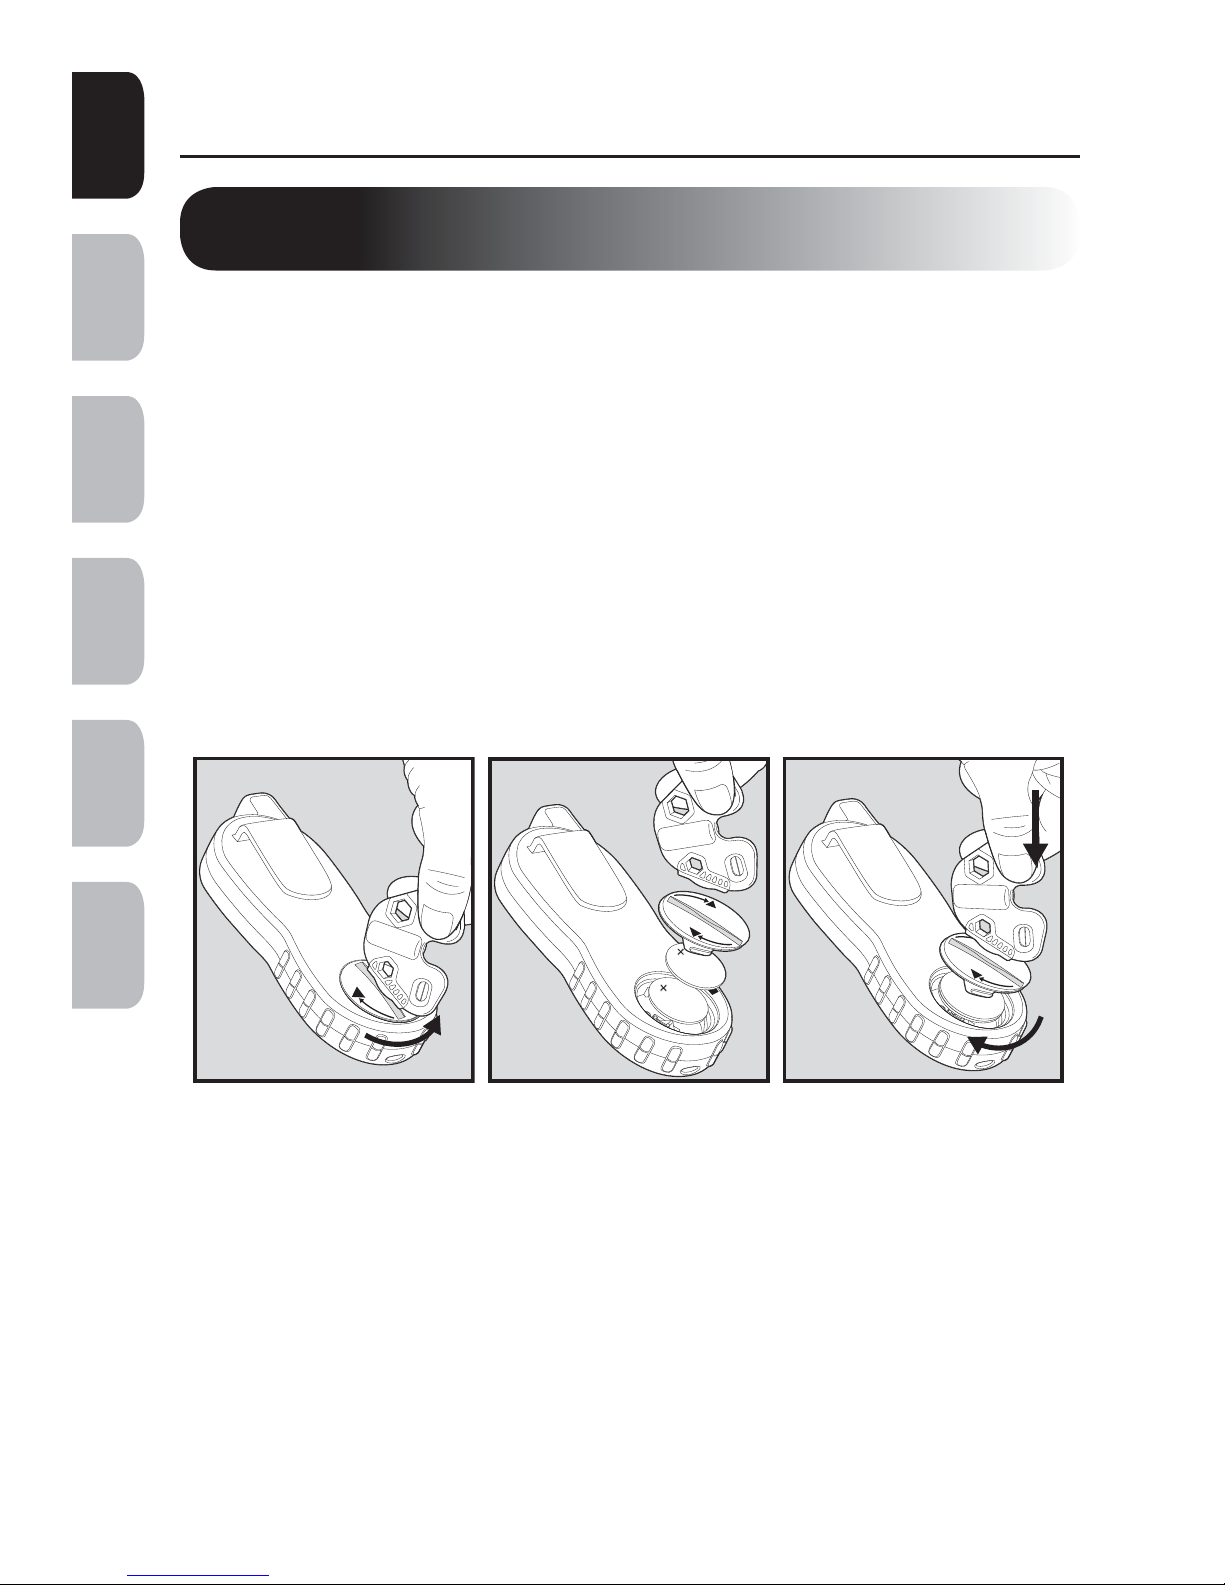
To Insert and Remove the Battery
1. To remove, use the Test Light Tool or a coin and turn the battery
cover counter-clockwise until the right triangle aligns with the
unlock symbol on the Remote Transmitter housing (1A).
2. Install two (2), 3-volt (CR2032) batteries positive (+) side up (1B).
3. To replace the battery cover, align the right triangle with the
unlock symbol, press down and turn clockwise (1C) so that
the right triangle aligns with the lock symbol on the Remote
Transmitter housing.
To verify the batteries are inserted correctly
1. Press any button on the Remote Transmitter. The Digital Display
should activate showing the current Static Stimulation level.
2. If the Digital Display doesn’t activate, you may have inserted the
batteries backwards. Check to ensure that the (+) side is up.
3. If the Digital Display still does not activate, contact the Customer
Care Centre.
1A 1B 1C
Page 11

www.petsafe.net 11
FREN
ES
NL
IT
DE
Risk of explosion if battery is replaced by
an incorrect type. Do not short circuit, mix
old and new batteries, dispose of in re, or
expose to water. When batteries are stored
or disposed, they must be protected from
shorting. Dispose of used batteries properly.
Remote Transmitter Digital Display
The display stays on for approximately 30 seconds after a button
press. After 30 seconds with no button press, the display shuts off
and the Remote Transmitter goes into battery conservation mode.
Pressing any button will turn the display back on. The symbols on the
display are explained below.
L indicates low stimulation levels ranging
from 1-8, and appears in the lower left corner
before the battery indicator.
H indicates high stimulation levels ranging
from 1-8, and appears in the lower right
corner after the battery indicator.
The battery indicator provides constant
awareness of your battery’s power level.
Divided into segments, 3 indicates high
battery power, 2 indicates medium, 1
indicates low (replace soon) and no bars
indicate critically low (replace immediately).
Note: Red LED will ash 3 times every 5
seconds to indicate low battery.
P indicates Remote Transmitter is ready to
pair with Receiver Collar. Press the Stimulation
Down (-) Button through the stimulation
levels to display and beginpairing.
Page 12

12 www.petsafe.net
FR ENES
NL
IT
DE
Transmitter LED Indicator Light –
Function and Response
Button Button Function
Transmitter
Indicator
Light
Response
Tone (green) Delivers audible tone to
ReceiverCollar
Green LED on
for length of
button press
Stimulation
(yellow)
Delivers Static Stimulation to
Receiver Collar based on current
level shown on Digital Display
(Static Stimulation will time-out
if pressed continuously for 12
seconds or longer and will reset
after release)
Red LED on
for length of
buttonpress
Note: Red LED
will also ash
3 times every
5 seconds
to indicate
lowbattery.
+2 Boost
(red)
Delivers Static Stimulation at 2
levels higher than the current
setting (can not exceed level
8 High and will also timeout after button is held for 12
continuousseconds)
Red LED on
for length of
buttonpress
Tone and
Stimulation
Buttons held
simultaneously
Transmits Pairing command to
Receiver Collar when P is visible on
Digital Display
Orange LED
on for length of
button press
Page 13

www.petsafe.net 13
FREN
ES
NL
IT
DE
STEP 2
Prepare the Receiver Collar
To Insert and Remove the Batteries
1. Remove the screws with a small Phillips screwdriver, applying
adequate pressure for the screwdriver head to t snugly into
thescrew (2A).
2. Push the Battery Lid up according to the arrows stamped on the
Battery Lid (2A).
3. Slide the Battery Lid out.
4. Install two (2), 3-volt batteries positive (+) side up (2B). Slide the
Battery Lid into the Receiver Collar.
5. Reinstall the screws (2B). Do not over-tighten the screws.
The Receiver Collar is waterproof. When changing the batteries, be
sure to keep the area free of dirt and debris. Also, ensure the screws
are ush with the Battery Lid. Replacement batteries (3-volt, CR2032)
can be found at many retailers. Contact the Customer Care Centre or
visit our website at www.petsafe.net for a list of common retailers.
TO REMOVE
SLIDE THEN LIFT
TO REMOVE
SLIDE THEN LIFT
2A
Batteries
(CR2032)
2B
Page 14

14 www.petsafe.net
FR ENES
NL
IT
DE
Risk of explosion if battery is replaced by
an incorrect type. Do not short circuit, mix
old and new batteries, dispose of in re, or
expose to water. When batteries are stored
or disposed, they must be protected from
shorting. Dispose of used batteries properly.
To Turn the Receiver Collar On
1. Press and hold the On/Off Button until the unit beeps and
the Green LED light comes on. (This takes approximately
onesecond.)
2. Release the On/Off Button.
In normal mode, the Green LED will ash once every 5 seconds,
indicating the Receiver Collar is on and ready to receive a signal
from the Remote Transmitter.
To Turn the Receiver Collar Off
1. Press and hold the On/Off Button until the unit beeps and the LED
light shuts off. (This takes approximately 3 seconds.)
2. Release the On/Off Button. Note: To extend the life of the batter-
ies, turn the Receiver Collar off when it is not in use.
Important: If the Receiver Collar is left on continuously, the
maximum battery life will be two weeks.
Receiver Indicator Light – Function
andResponse
Receiver Collar Function Green LED Response
Power on Flashes once
Normal operation -
Goodbattery
1 ash every 5 seconds
Training Tone On length of button press
Pairing complete Flashes 5 times
Page 15

www.petsafe.net 15
FREN
ES
NL
IT
DE
Receiver Collar Function Red LED Response
Power off On for 3 seconds
Normal operation - Low battery 3 ashes every 5 seconds
Static Stimulation On length of button press
STEP 3
Fit the Receiver Collar
Important: The proper t and placement of your Receiver Collar is
important for effective operation. The Contact Points must have direct
contact with your dog’s skin on the underside of his neck.
Please refer to page 2 for Important
SafetyInformation.
To assure a proper t, please follow these steps:
1. Make sure that the Receiver Collar is
turned off.
2. Start with your dog
standingcomfortably(3A).
3. Place the Receiver Collar
on your dog’s neck close
to the ears. Center the
Contact Points underneath
your dog’s neck, touching
the skin (3B).
Note: It is sometimes
necessary to trim the hair
around the Contact Points
to make sure that contact
is consistent.
3A
3B
3C
Page 16

16 www.petsafe.net
FR ENES
NL
IT
DE
Do not shave the pet’s neck as this may increase
the risk of skin irritation.
4. Check the tightness of the Receiver Collar by inserting one
nger between the collar and your dog’s neck (3C). The t
should be snug but not constricting.
You should not make the collar any more tight
than is required for good contact. A collar that
is too tight will increase the risk of pressure
necrosis in the contact area.
5. Allow your dog to wear the Receiver Collar for several minutes
then recheck the t. Check the t again as your dog becomes
more comfortable with the Receiver Collar.
6. Trim the collar as
follows(3D):
a. Mark the desired length
of the collar with a pen.
Allow for growth if your
pet is young or grows a
thick winter coat.
b. Remove the Receiver
Collar from your pet
and cut off the excess.
Important: Do not cut the part of the collar containing the
Antenna on the Little Dog Remote Trainer.
c. Before placing the Receiver Collar back onto your pet, seal
the edge of the cut collar by applying a ame along the
frayededge.
Care and Cleaning
• Your dog’s neck and the Contact Points must be washed weekly
with a damp cloth.
• Be sure that your pet’s neck is thoroughly dry before placing the
Receiver Collar back on his neck.
3D
Page 17

www.petsafe.net 17
FREN
ES
NL
IT
DE
Risk of skin damage.
• For comfort, safety and effectiveness of
this product, please ensure that you check
the t of your pet’s collar frequently. If any
skin irritation is observed, discontinue the
use of the collar for a few days. If the
condition persists beyond 48 hours, see
your veterinarian.
• Do not attach a lead to the collar. This can
result in pulling the Contact Points too tightly
against your pet’s neck. Attach a lead to
a separate, non-metallic collar or harness,
making sure the extra collar does not put
pressure on the Contact Points.
• Please refer to page 2 for
additionalinformation.
To Re-Thread the Collar
The slide buckle
prevents the collar from
becoming loose around
your pet’s neck.
The ridges must be
facing up; the collar
will slip if it is not
properlythreaded.
Slide Buckle
Ridges
Page 18

18 www.petsafe.net
FR ENES
NL
IT
DE
STEP 4
Pair the Remote Transmitter
and Receiver Collar
If your Receiver Collar does not beep when
the Tone Button of the Remote Transmitter is
pressed, or if you feel the Receiver Collar
is not responding to the Remote Transmitter,
follow these steps to pair:
1. Start with the Receiver Collar off your pet
and powered off.
2. Press and hold the On/Off Button until
the Green LED light shuts off. When the
Green LED shuts off, release the On/Off
Button and the Receiver Collar LED will
ash green.
3. Place the Remote Transmitter into pairing mode by pressing the
Stimulation Down (-) Button until the Digital Display shows P.
4. Press the Tone and Stimulation Buttons simultaneously (the Orange
LED should be lit) until the Receiver Collar ashes the Green LED 5
times, indicating it has learned the Remote Transmitter ID.
5. Change the level to 1 Low by pressing the Stimulation Up (+)
Button on the Remote Transmitter and then press the Tone Button.
The Receiver Collar should emit a tone, verifying that it is paired
with the Remote Transmitter.
6. If the Receiver Collar does not respond, please contact the
Customer Care Centre.
Page 19

www.petsafe.net 19
FREN
ES
NL
IT
DE
TRAINING GUIDE
Test the Remote Trainer
We recommend you experience rst-hand how the PetSafe® ST-100
Remote Trainer functions. Always begin at the lowest level and
increase the intensity up to your personal comfort level.
1. Place your ngers on both Contact Points of the Receiver Collar.
2. Hold the Remote Transmitter approximately 0.6 m from the
Receiver Collar and press the Stimulation Up Button to show Level
1 on the Digital Display. Press the Stimulation Button (yellow).
At this level you may not feel the quick on/off Static Stimulation
followed by the controlled Static Stimulation while holding the
button down.
Note: An automatic safety time-out will be triggered if any
Stimulation Button is held for more than 12 seconds. Once
released, the Stimulation Button resets to normal functionality.
3. Increase the intensity until the sensation begins to
feeluncomfortable.
General Tips
Introducing the Remote Trainer: Introduce your PetSafe®
Receiver Collar when your dog graduates from puppy stage and
understands basic obedience commands. PetSafe® Receiver Collars
should only be used with pets who are over 6 months of age.
Note: Other pets in hearing range will be affected by the training
tones. Therefore, training sessions should be conducted out of hearing range of other pets.
Avoiding a “Collar Wise” dog: Try to avoid letting your dog
become “collar wise”, obeying only when wearing the PetSafe®
Receiver Collar. Similarly, avoid letting the dog learn to obey only
when seeing the Remote Transmitter in your hand. This is easy to
prevent (see “Remain the Leader” in the following “Dog Training
Recommendations” section).
Page 20

20 www.petsafe.net
FR ENES
NL
IT
DE
Training Sessions & Determining Stimulation Levels: Keep
your training sessions short and watch your dog’s reaction - your pet
will tell you what level of Static Stimulation is appropriate to use and
when to release the button. Please refer to “Find the Best Stimulation
Level for Your Pet” for additional information.
Stopping Unwanted Behaviour: When stopping unwanted
behaviour, it is suggested to use higher levels of Static Stimulation the pet should be convinced that his unacceptable actions (not you)
caused the annoying sensation to happen.
Dogs First Learn One Command: Focus on learning one command before moving on to another. When teaching a command like
“heel”, “come”, “sit”, or “down”, many trainers recommend using
low levels of Static Stimulation. The dog quickly learns to turn off or
completely avoid the unpleasant sensation.
Reinforcing Known Commands: To reinforce commands the
dog already knows, it is suggested to use medium Static Stimulation
levels. This teaches the dog to respect instructions by always listening
and obeying.
Note: Using praise or treats to reward the correct response is great
for encouraging the dog, but it is suggested you and your family
members always remain the dog’s leader.
Never use the Remote Trainer to correct or
eliminate any form of aggressive behaviour.
We recommend you contact your local
veterinarian or professional trainer to
determine if your pet might be aggressive.
Teaching the Positive Tone
Before using the Remote Trainer to correct your pet, spend 10 to 15
minutes per day for 2 or 3 days helping him create the association
of the Tone with reward and praise. To accomplish this:
1. Push the Tone Button (green) for 2 consecutive seconds.
2. Release the button and immediately reward your pet with verbal
Page 21

www.petsafe.net 21
FREN
ES
NL
IT
DE
praise, petting, or a small food reward. Spend 3 to 5 seconds on
your rewarding.
3. Wait a few minutes and repeat holding the Tone Button for 2
seconds following with praise.
Vary the reward to prevent your pet from anticipating a speci c
type. This stage of training is complete when your pet obviously
anticipates a reward when he hears the positive Tone.
Find the Best Stimulation Level
for Your Pet
Important: Always start at the lowest level and work your way up.
The Remote Trainer has 8 Low and 8 High Stimulation Levels. This
allows you to choose the Static Stimulation that is best for your pet.
Once you have placed the Receiver Collar on your pet, it is time
to nd the Stimulation Level that is best for him. This is called the
Recognition Level.
A slight change in your pet’s behaviour, such as looking around in
curiosity, scratching at his collar, or icking his ears, indicates the
Recognition Level that is best for him.
Follow the steps below to nd your pet’s Recognition Level:
1. Starting at Level 1 Low on the Digital Display, press the
Stimulation Button (yellow) continuously for 1 to 2 seconds. Note:
When the Stimulation Button is held down for 12 consecutive
seconds, the Remote Transmitter will “time-out”. You must release
and press the button again before additional Static Stimulation
can be delivered.
2. If your pet shows no reaction, repeat the Stimulation Level several
times before moving up to the next level.
3. YOUR PET SHOULD NOT VOCALISE OR PANIC WHEN
RECEIVING STIMULATION. IF THIS HAPPENS, THE STIMULATION
LEVEL IS TOO HIGH AND YOU NEED TO GO BACK TO THE
PREVIOUS LEVEL AND REPEAT THE PROCESS.
Page 22

22 www.petsafe.net
FR ENES
NL
IT
DE
4. Move up through the Stimulation Levels until your pet reliably
responds to the Static Stimulation.
5. If your pet continues to show no response at Level 8 High, check
the t of the Receiver Collar. If your pet has long or thick hair,
contact our Customer Care Centre to obtain a longer set of
Contact Points. Then go back to step number 1 and repeat the
process. If this still does not yield any results, your pet’s hair will
need to be trimmed around the Contact Points.
Do not shave the pet’s neck as this may
increase the risk of skin irritation.
If, after completing all of these steps, your dog still does not indicate
he is feeling the Static Stimulation, please contact our Customer Care
Centre or visit our website at www.petsafe.net.
+2 Boost
A press of this button (red) sends a signal to the Receiver Collar to
issue a Static Stimulation that is 2 levels higher than the currently
selected level. For example, if the Stimulation Level is set at Level
2 Low, a touch of the +2 Boost button will stimulate at Level 4 Low.
Note: The system can not exceed the 8 High Stimulation Level.
Dog Training Recommendations
When Training Begins: Training starts the moment you bring
your puppy home. While your dog will not be ready for the PetSafe®
products until he has matured, you should begin basic
training immediately.
Remain the Leader: Stop your dog from becoming “collar wise”.
An easy solution known as “Collar Conditioning” will help prevent
the dog from listening only when wearing the Receiver Collar and
disobeying when he is not wearing it. First, t the Receiver Collar
on your dog. Second, immediately take your dog outside or do
something he enjoys; don’t activate the Receiver Collar. Let the
dog wear it during non-training sessions. Your dog should believe
wearing the Receiver Collar can also result in having fun. It should
Page 23

www.petsafe.net 23
FREN
ES
NL
IT
DE
not be perceived as punishment. Place the Receiver Collar on and
off the dog at various times for short or longer periods to make
wearing it a normal routine. Similarly, don’t let the dog learn to obey
only when he sees the Remote Transmitter. Also carry the Remote
Transmitter, but don’t use it all the time. How long should this process
take? Professional trainers’ opinions vary from a few days to a
couple of weeks.
Focus on the Dog: Professional trainers’ opinions vary on some
issues, but all users of remote training systems strongly recommend
watching your dog, not the Remote Transmitter, when training.
PetSafe
®
products are speci cally designed to make this task
simple. It is easy and you should nd the point where your dog rst
perceives the Static Stimulation. See “Find the Best Stimulation Level
for Your Pet”.
“Good Dog” in the Home or Outside: Stopping unwanted
behaviour is easy using the PetSafe® ST-100 Remote Trainers. Your
dog can be good in and out of the house. Remember to be fair to the
dog and remove temptation whenever possible.
Be Consistent and Responsible: Correct your dog every time
he misbehaves. Only let responsible family members use the Remote
Trainer. It is not a toy!
Please visit our website at www.petsafe.net to download a detailed
Training Guide for this unit that teaches basic obedience commands
and how to eliminate unwanted behaviour.
Learn how to use the PetSafe® ST-100 Remote Trainer to teach your
dog the following basic commands:
• Sit
• Come
• Stay
And eliminate the following unwanted behaviour:
• Jumping up
• Digging
• Chasing
• Excessive Barking
Page 24

24 www.petsafe.net
FR ENES
NL
IT
DE
Accessories
To purchase additional accessories for your PetSafe® ST-100 Remote
Trainer, visit our website at www.petsafe.net to locate a retailer near
you and for a listing of Customer Care Centre telephone numbers in
your area.
Frequently Asked Questions
Is the Static
Stimulation safe for
my pet?
While the Static Stimulation is
unpleasant, it is harmless to your pet.
Electronic training devices require
interaction and training from the owner
to achieve desired results.
How old does a
pet have to be
before using the
PetSafe
®
ST-100
RemoteTrainer?
Your pet should be able to recognize
basic obedience commands such as
“Sit” or “Stay”. The system should
only be used with pets who are over
6 months of age. The Receiver Collar
may be too large for dogs under 3.6
kg. If your pet is injured or its mobility
is otherwise impaired, contact your
veterinarian or professional trainer
before use.
Once my pet is
trained and has
been obeying my
commands, will he
have to continue
to wear the
ReceiverCollar?
Probably not. He may need to wear
the Receiver Collar from time to time
forreinforcement.
Is the Receiver
Collar waterproof?
Yes. When changing the batteries, be
sure to keep the area free of dirt and
debris. Also, make sure the screws are
ush with the Battery Lid.
Page 25

www.petsafe.net 25
FREN
ES
NL
IT
DE
Will I get exactly
100 m of range
with the
PetSafe®
ST-100 Remote
Trainer?
The range you get with your PetSafe®
ST-100 Remote Trainer will vary
according to terrain, weather, vegetation,
as well as transmission from other radio
devices. To get the maximum amount of
range, hold the Remote Transmitter in a
horizontal position away from your body.
See “How the System Works” for tips on
maximizing your range.
How long can I
continuously deliver
Static Stimulation to
my pet?
The maximum amount of time you can
press the Stimulation Button and deliver
Static Stimulation to your pet continuously
is 12 seconds. After this, the Remote
Transmitter will time-out and the
Stimulation Button must be released and
pressed again.
Can I use the
PetSafe® ST-100
Remote Trainers on
aggressive pets?
We do not recommend any of our
products be used on aggressive pets.
We recommend you contact your
local veterinarian or professional
trainer to determine if your pet might
beaggressive.
What do I do if my
pet’s neck becomes
red and irritated?
This condition is due to the Contact Points
irritating the skin. Discontinue use of the
Receiver Collar for a few days. If the
condition persists beyond 48 hours, see
your veterinarian. Once the skin returns
to normal, replace the Receiver Collar
and monitor the skin condition closely.
Can I attach a
lead to the
Receiver Collar?
Do not attach a lead to the Receiver
Collar. This can result in pulling the
Contact Points too tightly against your
pet’s neck. Attach a lead to a separate,
non-metallic collar or harness, making
sure the extra collar does not put
pressure on the Contact Points.
Page 26

26 www.petsafe.net
FR ENES
NL
IT
DE
Troubleshooting
The answers to these questions should help you solve any problem
you have with this system. If they do not, please contact the
Customer Care Centre or visit our website at www.petsafe.net.
My pet is not
responding
when I press
abutton.
• Make sure the Receiver Collar has been
turned on.
• If your range has reduced from the rst time
you used the Remote Trainer, the batteries
may be low in either the Remote Transmitter
or Receiver Collar.
• Many factors can impact the amount of
range you have with the Remote Trainer.
For a list of these factors, see “How the
System Works”.
• Test the Receiver Collar. See “Test Light Tool
Instructions” for details.
• Increase the Stimulation Level. Refer to
“Find the Best Stimulation Level For Your
Pet” for more information.
• Make sure the Receiver Collar’s Contact
Points are placed snugly against your pet’s
skin. Refer to “Fit the Receiver Collar” for
more information.
The Receiver
Collar will not
turn on.
• Check that two (2) CR2032 batteries have
been installed properly. See “To Insert and
Remove the Batteries.”
The Receiver
Collar is not
responding
to the Remote
Transmitter.
• Verify the Receiver Collar is on.
• If the Indicator Light does not come on
when a button is pressed on the Remote
Transmitter, ensure that the batteries are
inserted properly.
• If the rst two solutions did not resolve your
problem, see “Pair the Remote Transmitter
and the Receiver Collar.”
Page 27

www.petsafe.net 27
FREN
ES
NL
IT
DE
Test Light Tool Instructions
1. Turn the Receiver Collar on.
2. Hold the Test Light
Tool Contacts to
the Contact Points.
3. Press the Stimulation
Button on the
RemoteTransmitter.
4. The Test Light will
ash. Note: At higher
Stimulation Levels,
the Test Light will
ashbrighter.
5. Turn the Receiver
Collar off.
Save the Test Light Tool for future testing. Note: If the Test Light Tool
does not ash, replace the Receiver Collar batteries and then re-test.
If Test Light Tool still does not ash, contact the Customer Care Centre
or visit our website at www.petsafe.net.
Page 28

28 www.petsafe.net
FR ENES
NL
IT
DE
Battery Disposal
Separate collection of spent batteries is required in many regions;
check the regulations in your area.
Lithium Manganese Dioxide Coin Cell contains ammable materials,
such as organic solvents. Improper battery handling may cause
leakage, heating, explosion or ignition of the battery, which may
lead to injury. Excessive heating may cause deformation of the
gasket, leakage or performance deterioration of the battery.
Important Recycling Advice
Please respect the Waste Electrical and Electronic Equipment
regulations in your country. This equipment must be recycled. If
you no longer require this equipment, do not place it in the normal
municipal waste system. Please return it to where it was purchased
in order that it can be placed in our recycling system. If this is
not possible, please contact the Customer Care Centre for further
information. For a listing of Customer Care Centre telephone
numbers, visit our website at www.petsafe.net.
Compliance
This equipment has been tested and found to comply with relevant
EU Electromagnetic Compatibility, Low Voltage and R&TTE
Directives. Before using this equipment outside the EU countries,
check with the relevant local R&TTE authority. Unauthorized changes
or modi cations to the equipment that are not approved by Radio
Systems Corporation are in violation of EU R&TTE regulations,
could void the user’s authority to operate the equipment, and void
thewarranty.
The Declaration of Conformity can be found at:
http://www.petsafe.net/customercare/eu_docs.php.
Page 29

www.petsafe.net 29
FREN
ES
NL
IT
DE
IC - Canada
This device complies with Industry Canada licence-exempt RSS
standard(s). Operation is subject to the following two conditions: (1) this
device may not cause interference, and (2) this device must accept any
interference, including interference that may cause undesired operation
of the device.
Australia
This device complies with the applicable EMC requirements speci ed by
the ACMA (Australian Communications and Media Authority).
Page 30

30 www.petsafe.net
FR ENES
NL
IT
DE
Terms of Use and
Limitation of Liability
1. Terms of Use
Use of this Product is subject to your acceptance without
modi cation of the terms, conditions and notices contained
herein. Use of this Product implies acceptance of all such terms,
conditions and notices. If you do not wish to accept these terms,
conditions and notices, please return the Product, unused, in its
original packaging and at your own cost and risk to the
relevant customer care centre together with proof of purchase
for a full refund.
2. Proper Use
This Product is designed for use with pets where training is
desired. The speci c temperament or size/weight of your pet
may not be suitable for this Product (please refer to “How
the System Works” in this Operating Guide). Radio Systems
Corporation recommends that this Product is not used if your pet
is aggressive and accepts no liability for determining suitability
in individual cases. If you are unsure whether this Product
is appropriate for your pet, please consult your veterinarian
or certi ed trainer prior to use. Proper use includes, without
limitation, reviewing the entire Operating Guide and any
speci c Caution statements.
3. No Unlawful or Prohibited Use
This Product is designed for use with pets only. This pet training
device is not intended to harm, injure or provoke. Using this
Product in a way that is not intended could result in violation of
Federal, State or local laws.
Page 31

www.petsafe.net 31
FREN
ES
NL
IT
DE
4. Limitation of Liability
In no event shall Radio Systems Corporation or any of its
associated companies be liable for (i) any indirect, punitive,
incidental, special or consequential damage and/or (ii) any
loss or damages whatsoever arising out of or connected with
the misuse of this Product. The Purchaser assumes all risks
and liability from the use of this Product to the fullest extent
permissible by law. For the avoidance of doubt, nothing in
this clause 4 shall limit Radio Systems Corporation’s liability
for human death or personal injury or fraud or fraudulent
misrepresentation.
5. Modi cation of Terms and Conditions
Radio Systems
Corporation reserves the right to change the
terms, conditions and notices governing this Product from time
to time. If such changes have been noti ed to you prior to your
use of this Product, they shall be binding on you as if
incorporated herein.
Protected by U.S. patent 7,111,586. Other patents pending.
Page 32

©2012 Radio Systems Corporation
Radio Systems Corporation
10427 PetSafe Way
Knoxville, TN 37932 USA
(865) 777-5404
www.petsafe.net
400-1595-19
PDT17-13471
PDT17-13473
PDT45-13472
PDT45-13474
PetSafe® products are designed to enhance the relationship between you
and your pet. To learn more about our extensive product range which
includes Containment Systems, Training Systems, Bark Control, Pet Doors,
Health & Wellness and Play & Challenge products,
please visit www.petsafe.net.
Les produits PetSafe
®
sont conçus pour améliorer la relation entre vous et
votre animal de compagnie. Pour en savoir plus sur notre vaste gamme
de produits, comprenant des systèmes de con nement, de dressage, de
contrôle de l’aboiement, des chatières, des produits consacrés à la santé et
au bien-être ainsi qu’au jeu et aux dé s, rendez-vous sur notre site
www.petsafe.net
PetSafe
®
-producten zijn ontworpen om de relatie tussen u en uw huisdier te
verbeteren. Bezoek onze website op www.petsafe.net voor meer informatie
over onze uitgebreide productreeks die onder meer africhtsystemen,
trainingssystemen, antiblafcontrole, kattenluiken, gezondheid en welzijn,
en producten voor spel en uitdaging omvat.
Los productos PetSafe
®
están diseñados para mejorar la relación entre
usted y su mascota. Para saber más acerca de nuestra amplia gama de
productos, que incluyen limitadores de zona, sistemas de adiestramiento,
control de ladridos, puertas para mascotas, salud y bienestar y productos de
juego y reto, visite www.petsafe.net
I prodotti PetSafe
®
sono progettati per migliorare la qualità della
relazione tra voi e il vostro cane. Per ulteriori informazioni sulla nostra
estesa gamma di prodotti comprendente sistemi antifuga, soluzioni per
l’addestramento, controllo dell’abbaio, porte per animali domestici, i
prodotti della linea Salute e benessere e Gioco e prova, visitare:
www.petsafe.net.
PetSafe
®
Produkte sind darauf ausgelegt, die Beziehung zwischen
Ihnen und Ihrem Haustier zu verbessern. Um mehr über unsere breite
Produktpalette zu erfahren, die Rückhaltesysteme, Trainingssysteme,
Bellkontrolle, Haustiertüren, Gesundheit & Wellness und Sport und Spiel
umfasst, besuchen Sie bitte uns auf www.petsafe.net.
 Loading...