

Page 1
Please read this entire guide before beginning.
For additional t roubleshooting, to receive a
training guide w ith details on how to train your
dog using your PetSafe t raining collar, or to
download a comp lete product manual visit
petsafe.net/smartdogtrainer.
The SMART DOG Train er App requires a
Bluetooth® 4.0 compatible phone with one
of the following operations systems:
iOS 5 or later
Android™ 4.3 or later
PD T0 0-15 748
SMART DOG®
Trainer
Startup Guide
Important Safety Information
Explanation of Attention Words and Symbols used in this guide
This is the sa fety alert symb ol. It is used to alert yo u to potential perso nal injury hazards .
Obey all safe ty messages th at follow this symbol t o avoid possible inju ry or death.
WARNI NG indicates a ha zardous situation wh ich, if not avoided,
could result i n death or serious inju ry.
CAUTION , used with the safet y alert symbol , indicates a hazardous
situatio n which, if not avoided , could result in minor or m oderate injury.
CAUTION , used without the sa fety alert sym bol, indicates a hazard ous
situatio n which, if not avoided , could result in harm to you r pet.
• Risk of explos ion if battery is re placed by an incorrec t type. Do not shor t circuit, mix old and
new batter ies, dispose of in fi re, or expose to water. When b atteries are stored or d isposed,
they must be prot ected from short ing. Dispose of used b atteries proper ly.
• Not for use wit h aggressive dogs . Do not use this product if y our dog is prone to aggress ive
behavior. Ag gressive dogs can caus e severe injury or dea th to their owners and ot hers. If
you are not sure tha t this product is right fo r your dog, please talk t o your veterinarian or a
certified trainer.
• Safety du ring on-leash trai ning. It is vitally im portant that you an d your dog remain safe whi le
learning du ring on-leash trai ning. Your dog should be on a st rong leash, long enoug h for him
to attempt t o chase an object, but s hort enough for him no t to reach a road or other unsa fe
area. You must also be p hysically strong eno ugh to restrain your dog wh en he tries to chase.
• This pet train ing device is not a toy, keep away f rom children.
• Risk of skin da mage. Please read and fo llow the instruct ions in this guide. Prope r fit of the
collar is imp ortant. A collar worn f or too long or made too ti ght on the pet’s neck may ca use
skin damag e. Ranging from redness to p ressure ulcers; this co ndition is commonly k nown as
bed sores.
• Avoid leavi ng the collar on the dog fo r more than 12 hours per day.
• When possi ble reposition the co llar on the pet’s neck eve ry 1 to 2 hours.
• Check the fi t to prevent excessive pres sure; follow the instr uctions in this manu al.
• Never connec t a lead to the electro nic collar; it will cau se excessive pressu re on the contacts.
• When usin g a separate collar for a l ead, don’t put pressure on t he electronic colla r.
• Wash the dog’s neck area a nd the contacts of th e collar weekly with a d amp cloth.
• Examine th e contact area daily for s igns of a rash or a sore.
• If a rash or sore is fo und, discontinue us e of the collar until th e skin has healed.
• If the condition persists beyond 48 hours, see your veterinarian.
• For additional information on bed sores and pressure necrosis, please visit our website.
These step s will help keep your pet se cure and comfortabl e. Millions of pets are com fortable
while they we ar stainless steel c ontacts. Some pe ts are sensitive to cont act pressure. You may
find afte r some time that your p et is very tolerant of th e collar. If so, you may relax s ome of these
precaution s. It is important to c ontinue daily chec ks of the contact area. I f redness or sores are
found, disco ntinue use until the s kin has fully heale d.
The PetSafe
®
SMART DOG® Trainer must be use d only on healthy pet s. We recommend that you
take your pet to a vet erinarian before usi ng the product if he is not i n good health.
Radio Systems Corporation
10427 PetSafe Way •Knoxvi lle, TN 37932
1-800-732-2677 • www.petsafe.net
40 0-2016/ 1
©2016 Radio Systems Corporation
The Bluetooth
®
word mark and l ogos are registere d trademarks own ed by Bluetooth S IG, Inc.
and any use of su ch marks by Radio Sys tems Corporat ion is under licen se. Other trade marks
and trade names are those of their respective owners.
Android, Google Play and the Google Play logo are trademarks of Google Inc.
Apple, the A pple logo, iPho ne, iPad, and iPod touc h are trademarks of A pple Inc., regi stered in
the U.S. an d other countri es. App Store is a se rvice mark of A pple Inc.
Page 2
Fit the Receiver Collar
Important: The proper fit and placement of your receiver collar is important for effective
operation. The contact points must have direct contact with your dog’s skin on the
underside of his neck.
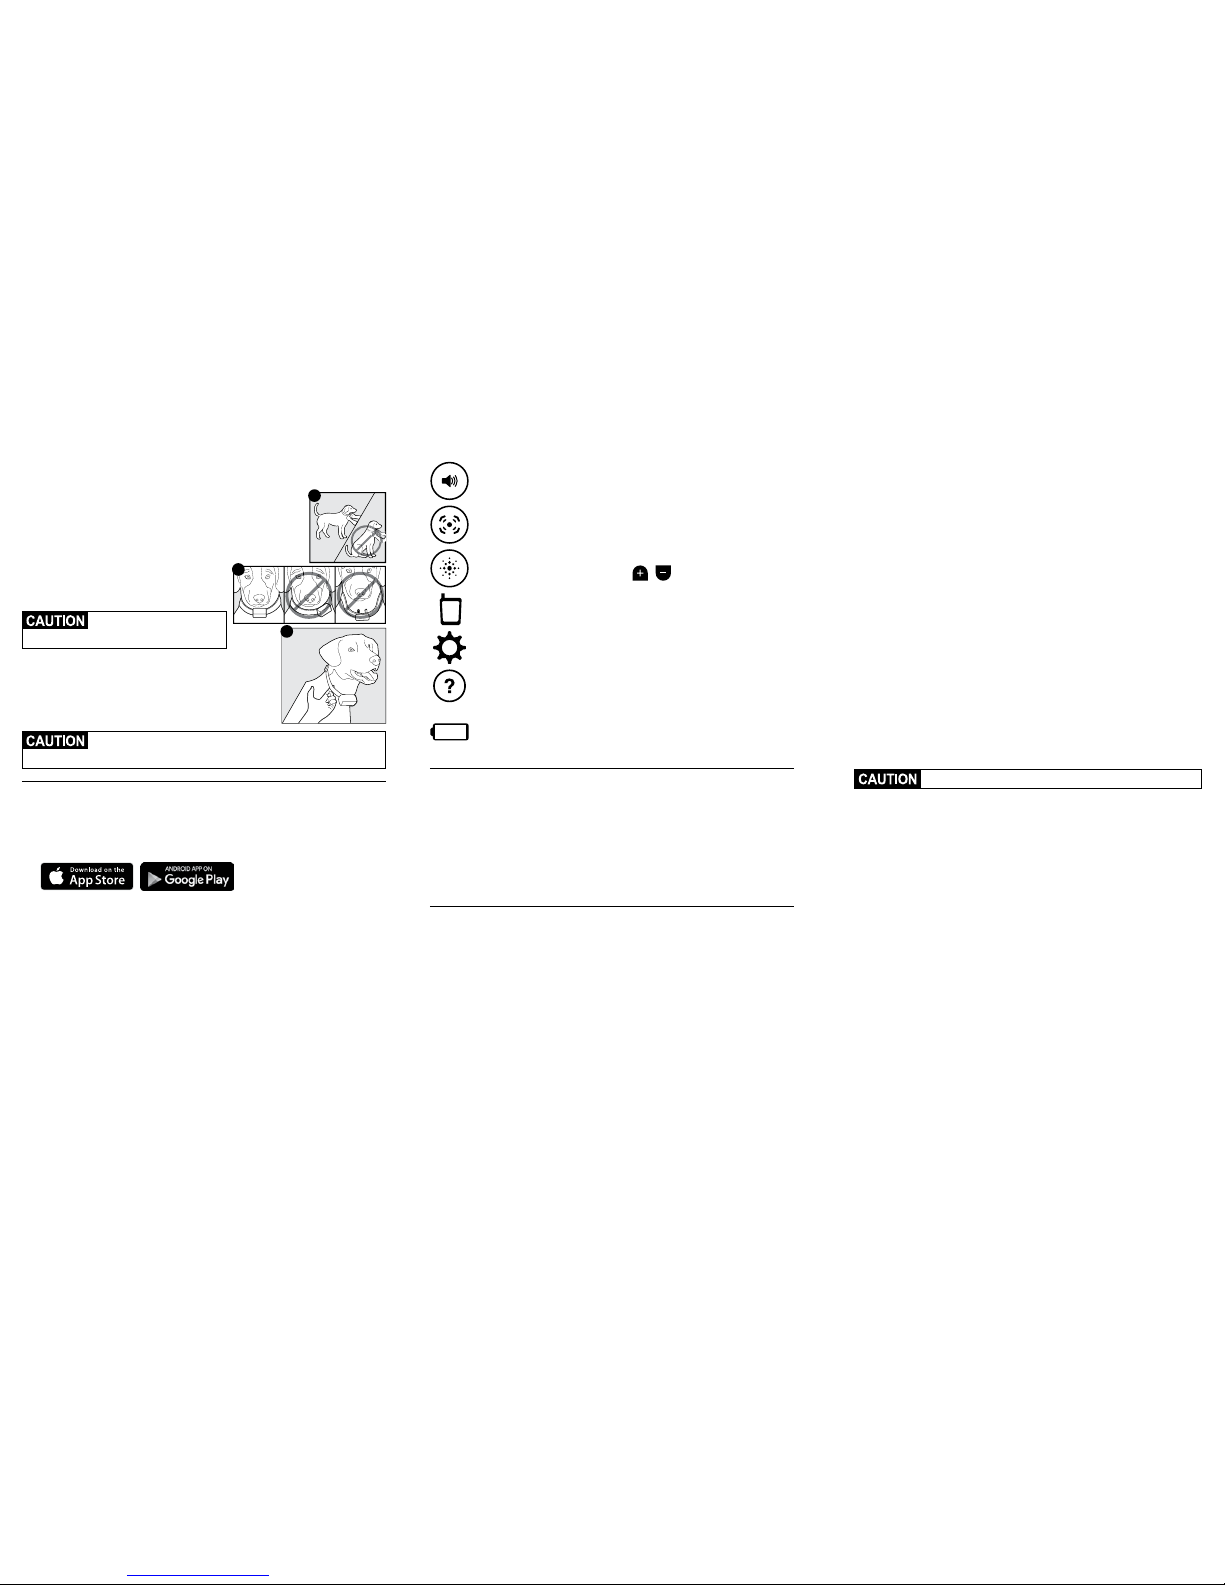
To assure a proper fi t, please follow thes e steps:
1. Make sure that th e receiver collar is tur ned off.
2. Start with your dog standing comfortably (A).
3. Place the receiver coll ar on your dog’s neck close to th e ears. Center
the contact points underneath your dog’s neck, touching the skin (B).
NOTE: It is somet imes necessary to t rim the hair
around the contact points to make sure that
contact is consistent. Longer Contact Points are
also included.
Do not shave th e pet’s neck as
this may incre ase the risk of skin
irritation.
4. Check the tightne ss of the receiver coll ar by inserting one f inger
between t he collar and your dog’s neck (C ). The fit should be
snug but not constricting.
5. Allow your dog to wear th e receiver collar for se veral minutes
then recheck the fit. Check the fit again as your dog becomes
more comfortable with the receiver collar.
The receiver c ollar should not be wor n for more than 12 hours out of every
24-hour pe riod. Leaving the co llar on too long could le ad to skin irritati on.
Connect the Collar with the App
1. Your receiver colla r will be partiall y charged. Press and hol d the ON/OFF button to turn on .
You will hear a beep a nd the green LED will beg in blinking. Your collar is n ow on.
2. Ensure your Bluetooth® setting o n your phone or tablet is t urned on.
3. Download the free SMART DOG® Trainer App.
4. Locate and open the a pp on your smartpho ne. Next, choose “Conn ect to a Collar” and the
SMART DOG Trainer A pp will locate your col lar. Press Connect.
5. Next you will assi gn a PIN. This is a securi ty feature to ensure th at other smartph ones will not
connect to you r receiver collar.
6. The SMART DOG Trainer coll ar and app are now ready to use . For easiest access to y our
app, place it on t he home screen of your sm artphone.
To Turn the Receiver C ollar Off
1. Press and hold t he On/Off button unti l the receiver collar be eps.
2. Release the On/Off but ton.
NOTE: To extend the li fe between charging c ycles, turn the recei ver collar off when i t is not
in use.
A
B
C
Using the App
Tone Button: Delivers a tone wi th non-adjustab le volume to the collar.
Vibration Button: Sends 1 non -adjustable lev el of vibration stim ulation to the coll ar.
Static Button: Delivers 1–15 levels of static s timulation to the co llar that can be
adjusted wi th the Static Level Adjuster.
Remote Icon: When prominent, t he training button s are displayed and read y to
use. Also ind icates the app is conn ected to the receiver co llar.
Settings Icon: Allows you to ch ange settings inc luding button ori entation and
primary/preferred correction method.
Help Icon: Provides detail ed SMART DOG Trainer App ins tructions, tips f or training
your dog, and li nks to the complete use r manual and training v ideos.
Receiver Co llar Batter y Indicator: I ndicates the amount of battery remaining
in the receive r collar.
NOTE: To extend the li fe between charging c ycles, turn the recei ver collar off when
it is not in use.
Test the Remote Trainer
We recommend you ex perience first-h and how the static st imulation funct ions. Always begi n at
the lowest lev el and increase the inte nsity up to your pers onal comfort level .
1. Place one fi nger over both contac t points of the receiver c ollar.
2. Hold your cell phone a pproximately 2 feet f rom the receiver collar. Sta rting at level 1 on the
static leve l adjuster, press the sta tic button contin uously for 1 to 2 seconds . At this level you
may not feel th e stimulation. N OTE: Continuous st imulation will trans mit for no more than eight
continuous se conds. To reactivate, rel ease and repress the but ton.
3. Increase the level on t he static level adjus ter until the sensa tion begins to feel unc omfortable.
Teaching Your Pet Using Tone
Before using t he PetSafe® SMART DOG® Trainer to correct y our pet, spend 10 to 15 minutes per
day for 2 or 3 day s helping him create the a ssociation of the t one with reward and praise . To
accomplish this:
1. Push the tone button for 2 consecutive seconds.
2. Release the but ton and immediatel y reward your pet with verb al praise, pettin g, or a small food
reward. Spend 3 to 5 s econds on your rewardin g.
3. Wait a few minutes and repea t holding the tone but ton for 2 seconds foll owing with praise.
4. Vary the reward to prevent you r pet from anticipat ing a specific ty pe. This stage of train ing is
complete wh en your pet obviously a nticipates a reward whe n he hears the tone.
Find the Best Stimulation Level for Your Pet
Importa nt: Always start a t the lowest level and work you r way up.
The SMART DOG Train er has 1 tone, 1 vibration , and 15 static stimulatio n levels. This allows yo u
to choose the s timulation level t hat is best for your pet. We reco mmend training with t one and
vibration, o r the lower levels of stat ic correction when n eeded. In most cases s tatic levels 1–7 will
be adequat e for your training needs . Levels 8–15 are red as a reminder that you are mov ing to
higher stimulation levels.
Once you have p laced the receiver col lar on your pet, it is time to f ind the stimulati on level that is
best for him. T his is called the “recognit ion level”. Your pet should NOT vocali ze.
A slight chan ge in your pet’s behavio r, such as looking around in cu riosity, scratchin g at his collar,
or flickin g his ears, indicates t he recognition level th at is best for him.
Follow the ste ps below to find your pet ’s recognition level:
1. Choose the v ibration button an d press continuousl y for 1 to 2 seconds.
2. If your pet shows no reac tion, repeat this seve ral times before moving t o static stimulat ion.
3. Starting at Level 1 o n the static level adj uster, press the stimul ation button cont inuously for 1 to
2 seconds.
4. If your pet shows no reac tion, repeat this sti mulation level severa l times before moving up t o
the next level.
5. YOUR PET SHOULD NOT VOCA LIZE OR PANIC WHEN RECEIV ING STIMULATION . IF
THIS HAPPENS , THE STIMULATION LE VEL IS TOO HIGH AND YOU NEED TO GO BACK
TO THE PREVIOU S LEVEL AND REPEAT THE PRO CESS.
6. Move up through the stat ic stimulation le vels until your pet reliab ly responds to the sti mulation.
7. If your pet con tinues to show no respon se at Level 15, check the fit of th e receiver collar. If
your pet has lon g or thick hair, your pet’s hai r may need to be trimmed a round the contact
points.
Do not shave th e pet’s neck as this may inc rease the risk of skin i rritation.
If all of thes e steps have been done a nd your pet continues to s how no reaction to the s timulation,
please contact our customer care center.
For additional t roubleshooting, to receive a tra ining guide with details on how to t rain
your dog using your PetSa fe training collar, or to download a com plete product manual
visit petsafe.net/smartdogtrainer.
 Loading...