

Page 1

Little Dog Model Number
PDLDT-305
Big Dog Model Number
PDBDT-305
1
2
3
4
5
6
7
8
9
0
1
Remote Trainer
operating and training guide
Please read this entire guide before beginning
Page 2
2 US Customer Care Center 1-800-732-2677
www.petsafe.net 3
Thank you for choosing PetSafe®, the best selling brand of electronic training solutions in the
world. Our mission is to be the most trusted brand in the pet ownership experience. We want
to ensure your pet’s safety by providing you with the tools and techniques to successfully
train your pet. If you have any questions, please contact the Customer Care Center at
1-800-732-2677 or visit our website at www.petsafe.net.
To get the most protection out of your warranty, please register your product within 30 days
at www.petsafe.net. By registering and keeping your receipt, you will enjoy the product’s
full warranty and should you ever need to call the Customer Care Center, we will be able to
help you faster. Most importantly, PetSafe
®
will never give or sell your valuable information to
anyone. Complete warranty information is available online at www.petsafe.net.
Important Safety Information
Explanation of Attention Words and Symbols used in this guide
This is the safety alert symbol. It is used to alert you to potential personal injury hazards.
Obey all safety messages that follow this symbol to avoid possible injury or death.
WARNING indicates a hazardous situation which, if not avoided, could
result in death or serious injury.
CAUTION, used with the safety alert symbol, indicates a hazardous
situation which, if not avoided, could result in minor or moderate injury.
CAUTION, used without the safety alert symbol, indicates a hazardous
situation which, if not avoided, could result in harm to your pet.
Not for use with aggressive dogs. Do not use this Product if your dog is
aggressive, or if your dog is prone to aggressive behavior. Aggressive dogs
can cause severe injury and even death to their owner and others. If you are unsure whether
this product is appropriate for your dog, please consult your veterinarian or certified trainer.
Risk of explosion if battery is replaced by an incorrect type. Do not
short circuit, mix old and new batteries, dispose of in fire, or expose to water.
When batteries are stored or disposed, they must be protected from shorting. Dispose of used
batteries properly.
Safety during on-leash training. It is vitally important that you and your dog
remain safe while learning during on-leash training. Your dog should be on a
strong leash, long enough for him to attempt to chase an object, but short enough for him not to
reach a road or other unsafe area. You must also be physically strong enough to restrain your dog
when he tries to chase.
Risk of skin damage. Please read and follow the instructions in this manual.
Proper fit of the collar is important. A collar worn for too long or made too tight
on the pet’s neck may cause skin damage. Ranging from redness to pressure ulcers; this
condition is commonly known as bed sores.
• Avoid leaving the collar on the dog for more than 12 hours per day.
• When possible reposition the collar on the pet’s neck every 1 to 2 hours.
• Check the fit to prevent excessive pressure; follow the instructions in this manual.
• Never connect a lead to the electronic collar; it will cause excessive pressure on the contacts.
• When using a separate collar for a lead, don’t put pressure on the electronic collar.
• Wash the dog’s neck area and the contacts of the collar weekly with a damp cloth.
• Examine the contact area daily for signs of a rash or a sore.
• If a rash or sore is found, discontinue use of the collar until the skin has healed.
• If the condition persists beyond 48 hours, see your veterinarian.
• For additional information on bed sores and pressure necrosis, please visit our website.
These steps will help keep your pet safe and comfortable. Millions of pets are comfortable while they wear
stainless steel contacts. Some pets are sensitive to contact pressure. You may find after some time that your
pet is very tolerant of the collar. If so, you may relax some of these precautions. It is important to continue
daily checks of the contact area. If redness or sores are found, discontinue use until the skin has fully healed.
The PetSafe® Remote Trainer must be used only on healthy dogs. We recommend that you take your dog
to a veterinarian before using the collar if he is not in good health.
Table of Contents
Components ................................................................................................................. 4
Other Items You May Need .......................................................................................... 4
How the System Works ................................................................................................ 4
Key Definitions ............................................................................................................. 5
Operating Guide ......................................................................................................... 6
Prepare the Remote Transmitter ............................................................................... 6
Prepare the Receiver Collar ...................................................................................... 7
Fit the Receiver Collar............................................................................................... 8
Find the Best Intensity Level for Your Pet ................................................................. 9
Understanding the Remote Transmitter ................................................................. 10
Training Guide ........................................................................................................... 11
General Tips ............................................................................................................ 11
Teaching Basic Obedience ..................................................................................... 11
The “Sit” Command ............................................................................................ 11
The “Come” Command ....................................................................................... 12
The “Stay” Command ......................................................................................... 12
Eliminating Unwanted Behavior .............................................................................. 13
Jumping Up ......................................................................................................... 13
Digging ................................................................................................................ 13
Chasing .............................................................................................................. 14
Trash Raiding ...................................................................................................... 15
Frequently Asked Questions ................................................................................... 16
Troubleshooting ........................................................................................................ 17
To Pair the Remote Transmitter and Receiver Collar.................................................. 18
Test Light Instructions ................................................................................................ 18
Terms of Use and Limitation of Liability ..................................................................... 19
FCC ............................................................................................................................ 19
Customer Care International ...................................................................................... 20
Perchlorate Battery ..................................................................................................... 20
Page 3

4 US Customer Care Center 1-800-732-2677
www.petsafe.net 5
Components
Other Items You May Need
•Small Phillips screwdriver
•Pliers
•Scissors
•Lighter
•Non-metallic collar and 10-foot leash
How the System Works
The Remote Trainer assists you in controlling your pet without a leash in a range of up to 100
yards. At the push of a button, your remote sends a signal activating your dog’s Receiver Collar. He
receives a safe but annoying stimulation. He’ll quickly learn the association between his behavior
and your correction; in no time, you’ll have a better-behaved pet. The PetSafe
®
Remote Trainers have
been proven safe, comfortable, and effective for both small and large dog breeds.
Using the Remote Trainer consistently and correctly, any basic
obedience commands can be taught and many misbehaviors that your
pet exhibits can be corrected.
Important: The Remote Trainer has a range up to 100 yards.
Depending on the way you hold the Remote Transmitter, the range
may vary. Hold the Remote Transmitter in a horizontal position
away from your body to achieve optimum range. Terrain, weather,
vegetation, transmission from other radio devices, and other
factors will affect the range of your Remote Trainer.
3-volt
Lithium
Batteries
(CR2032)
9-Volt Battery
Remote
Transmitter
Operating and
Training Guide
1
2
3
4
5
6
7
8
9
0
1
PDLDT-305 Receiver Collar
PDBDT-305 Receiver
Test Light
Key Definitions
Remote Transmitter: Transmits the signal to the
Receiver Collar.
Arrow: Indicates the level of stimulation that will be
delivered to your pet.
Intensity Level Dial: Provides a choice of 10 different
levels of stimulation to enable you to match the level to
your pet’s temperament.
Transmitter Indicator Light: Indicates when any button
on the Remote Transmitter is pressed.
Tone Only Button: Sends an audible tone to your pet.
There is no stimulation associated with this button.
Stimulation Only Button: Delivers stimulation to your
pet through the Contact Points. When this button is
held down continuously for 8 seconds, the Remote
Transmitter will “time-out”, and you must release and
press the button again before any additional stimulation
can be delivered to your pet.
Receiver Collar: Receives the signal from the Remote
Transmitter.
Contact Points: Deliver stimulation to your pet.
Receiver Indicator Light: Indicates when the Receiver
Collar has been turned on or off.
Antenna: Receives the signal that is emitted from the
Remote Transmitter.
Remote Transmitter
Intensity
Level Dial
Arrow
Transmitter
Indicator Light
Tone Only Button
Stimulation
Only Button
1
2
3
4
5
6
7
8
9
0
1
Receiver Collar PDLDT-305
Receiver
Indicator
Light
Battery
Lid
ON/OFF
Button
Contact
Points
Antenna
Receiver Collar PDBDT-305
Receiver
Indicator
Light
Battery
Lid
ON/OFF
Button
Contact
Points
Antenna
Page 4
6 US Customer Care Center 1-800-732-2677
www.petsafe.net 7
Operating Guide
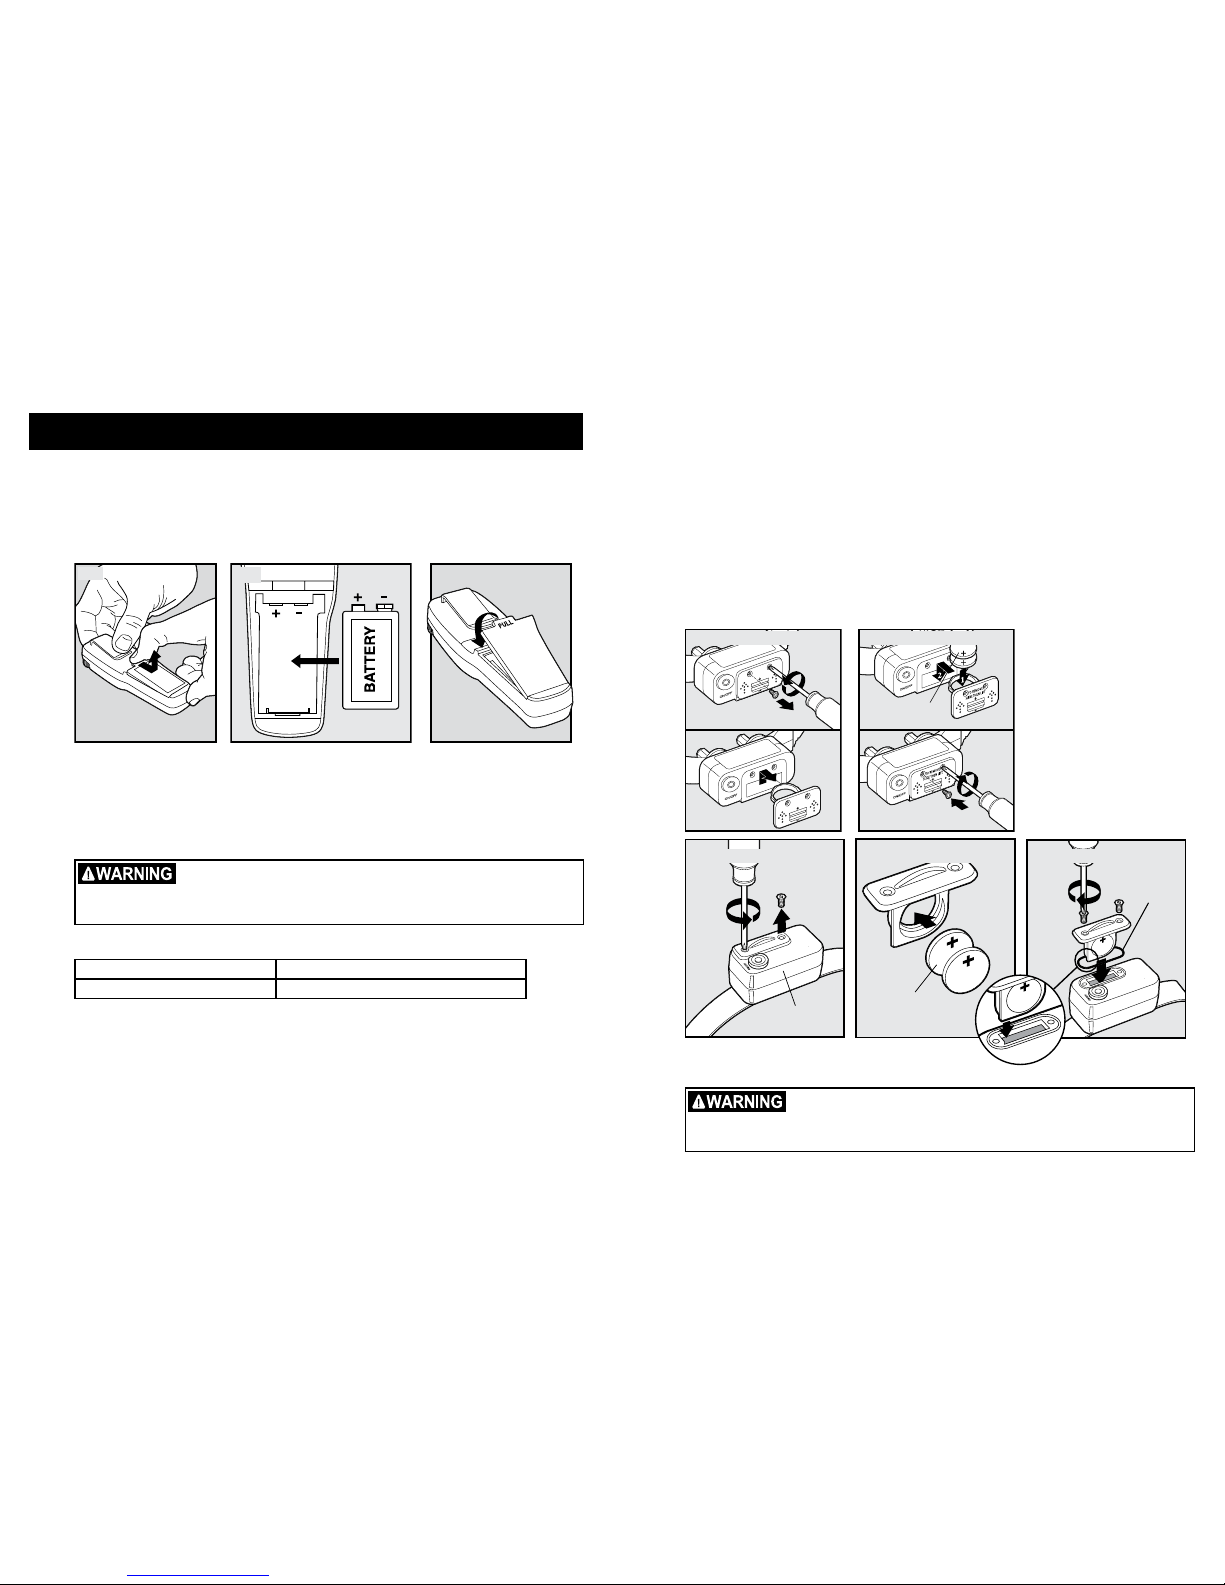
Prepare the Remote Transmitter
To Insert and Remove the Battery
1. Hold the Remote Transmitter face down and pull the battery door open (1A).
2. Insert the 9-volt battery with the positive side oriented as shown (1B).
3. Replace the battery door by positioning the bottom edge (1C), and snap the battery door
into place.
To verify the battery has been inserted correctly
1. Press either button on the Remote Transmitter.
2. The Transmitter Indicator Light should appear.
3. If the Transmitter Indicator Light does not appear, you may have inserted the battery
backwards. Try taking it out and turning it around.
4. If the Transmitter Indicator Light still does not come on, contact the Customer Care Center.
Risk of explosion if battery is replaced by an incorrect type. Do not
short circuit, mix old and new batteries, dispose of in fire, or expose to
water. When batteries are stored or disposed, they must be protected
from shorting. Dispose of used batteries properly.
Transmitter Indicator Light – Function and Response
Remote Transmitter Function Transmitter Indicator Light Response
Any button is pressed Solid in color
Step
1
1C
1A
1B
Prepare the Receiver Collar
To Insert and Remove the Batteries
1. Remove the screws with a small Phillips screwdriver, applying adequate pressure for
the screwdriver head to fit snugly into the screw (2A, 2C).
2. For the PDLDT-305 only, push the Battery Lid up according to the arrows stamped on
the Battery Lid (2A).
3. Slide the Battery Lid out.
4. Install two (2), 3-volt batteries positive (+) side up (2B, 2D).
5. Slide the Battery Lid into the Receiver Collar.
6. Reinstall the screws (2B, 2E). Do not over-tighten the screws.
Replacement batteries (3-volt, CR2032) can be found at many retailers. Contact the
Customer Care Center or visit our website at www.petsafe.net for a list of common retailers.
Risk of explosion if battery is replaced by an incorrect type. Do not
short circuit, mix old and new batteries, dispose of in fire, or expose to
water. When batteries are stored or disposed, they must be protected
from shorting. Dispose of used batteries properly.
Step
2
TO REMOVE
SLIDE THEN LIFT
TO REMOVE
SLIDE THEN LIFT
2A (PDLDT-305)
Batteries
(CR2032)
2B
(PDLDT-305)
Receiver Collar
Batteries
(CR2032)
Waterproof
Seal
2C (PDBDT-305)
2D (PDBDT-305) 2E (PDBDT-305)
Page 5

8 US Customer Care Center 1-800-732-2677
www.petsafe.net 9
Turning the Receiver Collar On and Off
To turn the Receiver Collar on, press and release the On/Off Button. The Receiver
Indicator Light will flash once after the button is released, indicating the Receiver Collar is
ready to receive signals from the Remote Transmitter.
Once the Receiver Collar has been turned on, press the top button of the Remote Transmitter.
Upon pressing, the Receiver Collar should beep for as long as the top button is pressed. If it does
not, see “To Pair the Remote Transmitter and the Receiver Collar” in the Troubleshooting section.
To turn the Receiver Collar off, press and release the On/Off Button. The Receiver Indicator
Light will flash two times after the button is released, indicating the unit has been turned off.
Note: To extend the life of the batteries, turn the Receiver Collar off when it is not in use.
Important: If the Receiver Collar is left on continuously, the maximum battery life
will be two weeks.
Receiver Indicator Light – Function and Response
Receiver Collar Function Receiver Indicator Light Response
Turning on Flashes one time
Turning off Flashes two times
Fit the Receiver Collar
Important: The proper fit and placement of your Receiver Collar
is important for effective training. The Contact Points must have
direct contact with your pet’s skin on the underside of his neck.
To assure a proper fit, please follow these steps:
1. Have your pet standing comfortably (3A).
3A
2. Center the Contact Points underneath your pet’s
neck, touching the skin (3B). If your pet has a long or
thick coat, longer Contact Points are available from
the Customer Care Center. Note: It is sometimes
necessary to trim the hair around the Contact Points
to make sure that contact is consistent.
Do not shave the pet’s neck as
this may increase the risk of
skin irritation.
3. The Receiver Collar should fit snugly, yet loose
enough to allow one finger to fit between the
strap and your pet’s neck (3C).
4. Allow your pet to wear the collar for several
minutes then recheck the fit. Check the fit again
as your pet becomes more comfortable with the
Receiver Collar. If your pet’s neck is less than
12” around, you will need to thread the part of
the collar which includes the antenna through
the buckle. It will be a tight fit.
3B
3C
Step
3
5. Trim the collar as follows (3D):
a. Mark the desired length of the collar with a
pen. Allow for growth if your pet is young or
grows a thick winter coat.
b. Remove the Receiver Collar from your pet and
cut off the excess. Important: Do not cut the
part of the collar containing the Antenna.
c. Before placing the Receiver Collar back onto
your pet, seal the edge of the cut collar by
applying a flame along the frayed edge.
3D
Risk of skin damage. For comfort, safety and effectiveness of this product,
please ensure that you check the fit of your pet’s collar frequently. If any skin
irritation is observed, discontinue the use of the collar for a few days. If the
condition persists beyond 48 hours, see your veterinarian.
Do not attach a leash to the Remote Trainer. This can result in pulling the Contact
Points too tightly against your pets neck. You may put a separate non-metallic
collar on your dog’s neck and attach a leash. Do use a harness for attaching a
leash and/or tags while using the Remote Trainer.
Please refer to page 2 for additional information.
To Re-Thread the Collar
Slide Buckle
Ridges
The slide buckle prevents the collar from
becoming loose around your pet’s neck.
The ridges must be facing up; the collar will
slip if it is not properly threaded.
Find the Best Intensity Level for Your Pet
The Remote Trainer has ten (10) different Intensity Levels. This allows you to choose the
stimulation that is best for your pet.
Important: Always start at the lowest level and work your way up.
Once you have placed the Receiver Collar on your pet, it is time to find the Intensity
Level that is best for your him. This is called the Recognition Level.
A slight change in your pet’s behavior, such as looking around in curiosity, scratching at
his collar, or flicking his ears, indicates the Recognition Level that is best for him.
Step
4
Page 6

10 US Customer Care Center 1-800-732-2677
www.petsafe.net 11
Follow the steps below to find your pet’s Recognition Level:
1. Press the Tone Only Button for 2 to 3 seconds. If your pet reacts to this, you may use
this button for training. If your pet shows no reaction, go to the next step.
2. Starting at Level 1, press the Stimulation Only Button continuously for 2 to 3 seconds.
3. If your pet shows no reaction, go to the next Intensity Level and repeat the process.
4. Repeat each Intensity Level several times before moving to the next level.
5. YOUR PET SHOULD NOT VOCALIZE OR PANIC. IF THIS HAPPENS, GO BACK TO
THE PREVIOUS LEVEL AND REPEAT THE PROCESS.
6. If your pet continues to show no response at Level 10, check the fit of the Receiver
Collar. If your pet has long or thick hair, replace the Contact Points with the longer
set (available from the Customer Care Center). Then go back to # 2 and repeat the
process. If this still does not yield any results, your pet’s hair will need to be trimmed
around the Contact Points.
If all of these steps have been done and your pet continues to show no reaction to the
stimulation, contact the Customer Care Center.
Understanding the Remote Transmitter
To train using the Tone Only Button:
The audible sound emitted by the Receiver Collar can be just as effective as the
stimulation for some dogs. The Transmitter Indicator Light will glow for as long as this
button is pressed. To use this button for training, simply substitute “Tone Only Button”
whenever “Stimulation Only Button” is used in the Training Guide section.
To train using the Stimulation Only Button:
You control the timing of the stimulation being applied to your pet. The stimulation stays
on as long as the Stimulation Only Button is pressed. If this button is pressed longer
than 8 seconds, the Remote Transmitter will “time-out,” the Transmitter Indicator Light
will turn off, and stimulation will no longer be delivered to your pet. This is a safety
feature in the Remote Transmitter. If the Remote Transmitter times out, release the
Stimulation Only Button and press it again to deliver stimulation.
Note: For either one or both of these training methods to be effective, they must be
used consistently along with the command you are trying to teach your pet.
Training Guide
General Tips
•Eliminate one misbehavior or teach one obedience command at a time. If you move too fast
with training, your pet may become confused.
•Be consistent. Correct your pet every time he misbehaves.
•Unless you can supervise him, it is recommended that you restrict your pet from situations in
which he has a history of misbehaving. However, setting up a situation as a training session
can dramatically improve your chances of success.
•If your pet reacts to the tones by hiding or acting fearful, redirect his attention to a simple and
appropriate behavior, such as the “sit” command.
•Pets should be at least 6 months old before using the Trainer.
•Only let responsible family members use the Trainer. It is not a toy!
•Other pets in hearing range will be affected by the training tones. Therefore, training sessions
should be conducted out of hearing range of other pets.
Never use the Remote Trainer to correct or eliminate any form of aggressive
behavior. We recommend you contact your local veterinarian or professional trainer
to determine if your pet might be aggressive. See page 2 for more information.
Teaching Basic Obedience
The “Sit” Command
1. Put a separate, non-metallic collar on your pet’s neck ABOVE the Receiver Collar, and attach
a 10-foot leash.
Note: Be sure the extra collar does not put pressure on the Contact Points.
2. Hold the leash and the Remote Transmitter in one hand. Keep your other hand free to guide
your pet into a “Sit” position.
3. Press and hold the Stimulation Only Button.
4. Immediately give the “Sit” command while continuing to hold the Stimulation Only Button.
5. Release the Stimulation Only Button as soon as your pet is in position, and praise him.
6. Release your pet from the “Sit” command and play.
7. Repeat Steps 2 through 6.
Note: If your pet breaks the “Sit” command, repeat steps 3 through 6. Keep your pet close to
you while teaching the “Sit” command.
Page 7

12 US Customer Care Center 1-800-732-2677
www.petsafe.net 13
The “Come” Command
1. Put a separate, non-metallic collar on your
pet’s neck ABOVE the Receiver Collar,
and attach a 10-foot leash.
Note: Be sure
the extra collar does not put pressure on the
Contact Points.
2. Hold your leash in one hand and the
Remote Transmitter in the other.
3. Wait for your pet to walk away from you.
Using the Recognition Level for your pet,
press and hold the Stimulation Only Button
on your Remote Transmitter.
4. Immediately give the command “Come”
while continuing to hold the Stimulation
Only Button.
5. Using the leash, gently guide your pet toward
you until he begins to come in your direction.
6. Immediately release the Stimulation Only
Button as soon as your pet steps towards
you, and praise him enthusiastically.
7. Quickly move backwards as your pet begins to
come back to you, praising him the entire time.
8. Praise your pet when he returns to you.
9. Repeat Steps 3 through 8.
10. Once your pet responds readily to the
“Come” command several times, back
away from him without giving a command.
When your pet turns toward you, give
the command “Come” (WITHOUT
STIMULATION) and praise him while you
continue to back up. Praise your pet when
he returns to you.
11. Use your leash to prevent your pet from
running past you. If your pet manages to
run past you, repeat Steps 3 through 8.
The “Stay” Command
1. Put a separate, non-metallic collar on your pet’s neck ABOVE the Receiver Collar, and attach
a 10-foot leash.
Note: Be sure the extra collar does not put pressure on the Contact Points.
2. Put your pet on his bed. Hold your leash in one hand and the Remote Transmitter in the other.
3. Staying within 3 feet, walk the perimeter of the bed. Do not say anything to your pet.
4. If your pet tries to leave the bed, press and hold the Stimulation Only Button and give the
“Stay” command. Continue to hold the button until your pet is back on his bed. If necessary,
use the leash to guide your pet onto his place.
5. Praise your pet when he is back on his bed.
6. Once your pet has settled for a few seconds, release him and play calmly.
7. Repeat steps 1 through 5.
Eliminating Unwanted Behavior
Jumping Up
Pets typically jump up to get attention. If you do not want your pet to jump on you, then friends
or members of the family should not encourage this behavior. That means every time your pet
jumps on someone, he should be reprimanded or redirected to an alternate and acceptable
behavior, for which he can receive praise.
Note: It is best if your pet first understands the “Sit” command.
1. Choose your pet’s Recognition Level.
2. As soon as your pet lifts his paws off the
ground to jump on you, press the Stimulation
Only Button and give the command “Sit.”
3. Release the Stimulation Only Button
immediately once your pet is sitting, and
verbally praise him.
4. If your pet ignores the stimulation, increase
the Intensity Level by 1.
5. Practice this exercise in several different areas
and use different people for distractions.
Digging
It is important to first understand why your pet is digging. Many dogs, such as terriers, were
bred to flush out prey, and digging is very innate to them. Other dogs may be digging to find a
cool spot to lie down, or simply out of boredom. Your pet may no longer have the desire to dig
if he is provided with the following:
•A cool, shaded area in which to lie down, and plenty of water.
•An alternate activity, such as a favorite toy.
•Plenty of play, exercise, and attention.
•A yard free from rodents or prey that he may be trying to flush out.
1. Choose the Intensity Level 1 higher than your pet’s Recognition Level.
2. Place the Receiver Collar on your pet and wait at least 10 minutes before placing him in the yard.
No
other people or pets should be in the yard, as you do not want your pet to associate the
stimulation
with anything other than his digging. Your pet must be securely fenced in or contained
during training.
3. From a window or area where your pet cannot see you, wait until your pet begins to dig.
4. While your pet digs, press the Stimulation Only Button and release it when he stops digging.
Only press the button while your pet is in the act of digging, and do not say anything to him.
Page 8

14 US Customer Care Center 1-800-732-2677
www.petsafe.net 15
5. If your pet ignores the stimulation, increase the Intensity Level by 1.
6. Continue to watch your pet, as he may choose another area to dig.
7. Do not allow your pet in the yard unsupervised until he has completely stopped digging.
Chasing
Chasing is an instinctive behavior stimulated by moving objects. Some dogs have a particularly
strong desire to chase that can put them in harm’s way and leave you helpless. Never allow your
dog off the leash or out of a contained area until he has learned the “Come” command, regardless
of the distraction. Be consistent and correct your dog every time he chases something.
It is vitally important that you and your dog remain safe while learning during
on-leash training. Your dog should be on a strong leash, long enough for him
to attempt to chase an object, but short enough for him not to reach a road or
other unsafe area. You must also be physically strong enough to restrain your
dog when he tries to chase.
1. If your dog has not learned the “Come” command, keep a leash on him so you can physically
stop him before he reaches the object he is chasing.
2. Choose the Intensity Level 1 higher than your dog’s Recognition Level.
3. Set up a scenario where your dog is enticed to chase an object. Common items could be
cars, motorcycles, bicycles, etc. (do not use toys).
4. When the object passes in front of your dog, make sure to hold the leash with a firm grip. As
soon as your dog begins to chase the object, press and hold the Stimulation Only Button
until he stops
5. When your dog stops chasing the object, immediately release the button, walk backwards
and give the command “Come.” Praise your dog as he comes to you.
6. Repeat the process until your dog stops chasing the object.
Trash Raiding
The easiest way to prevent trash raiding is to remove garbage and tempting food from your
pet’s environment. You can use the Remote Trainer to teach your pet to stay away from these
items; however, you must be prepared to correct your pet every time he approaches them.
1. Choose the Intensity Level 1 higher than your
pet’s Recognition Level.
2. Pick a temptation for your pet and position
yourself where he cannot see you.
3. While your pet’s mouth is touching the
temptation, press and hold the Stimulation Only
Button. Immediately release the button when
your pet leaves the temptation.
4. Do not say anything, as you want your pet to associate the stimulation with his behavior, not you.
5. If your pet does not respond to the stimulation, increase the Intensity Level by 1 and repeat
the process.
6. Repeat this process in several different locations with different temptations.
Page 9

16 US Customer Care Center 1-800-732-2677
www.petsafe.net 17
Frequently Asked Questions
How old does my pet have to
be before using the PetSafe
®
Remote Trainer?
•Your pet should be able to recognize basic obedience
commands such as “Sit” or “Stay”. Pets should be at
least 6 months old before using the Trainer.
Once my pet is trained and has
been obeying my commands,
will he have to continue to
wear the Receiver Collar?
•Probably not. You may need to reinforce training with the
Receiver Collar from time to time.
Is the Receiver Collar
waterproof?
•Yes. When changing the batteries, be sure to keep the
area free of dirt and debris. Also, make sure the screws
are flush with the Battery Lid.
Will I get exactly 100 yards of
range with the Remote Trainer?
•The range of the Remote Trainer will vary according to
terrain, weather, vegetation, as well as transmission from
other radio devices. See “How the System Works” for
tips on maximizing your range.
How long can I continuously
deliver stimulation to my pet?
•The maximum amount of time you can press the
Stimulation Only Button and deliver stimulation to your
pet continuously is 8 seconds. After this, the Remote
Transmitter will time-out, and the Stimulation Only Button
must be released and pressed again.
Can I place the Receiver Collar
on another collar?
•No. The collar used for this unit has a sleeve to hold
the Antenna.
How often do I need to replace
the batteries?
•If the Receiver Collar is left on continuously, the batteries
will last about 2 weeks. We recommend you turn the
Receiver Collar off when it is not in use. The 9-volt
battery in the Remote Transmitter will last about 2-3
months, depending on the frequency of use.
How will I know when to
replace the batteries?
•The Indicator Lights on both the Remote Transmitter and
the Receiver Collar will not flash when turned on or off.
Troubleshooting
My pet does not respond when
I press the Tone or Stimulation
Only Button.
•Make sure the Receiver Collar has been turned on.
•If your range has reduced from the first time you used the
Remote Trainer, the battery(s) may be low in either the
Remote Transmitter or Receiver Collar.
•Many factors can impact the amount of range you have
with the Remote Trainer. For a list of these factors, see
“How the System Works”.
•Test the Receiver Collar. See “Test Light Instructions”
for details.
•Make sure the Receiver Collar’s Contact Points are placed
snugly against your pet’s skin. Refer to “Fit the Receiver
Collar” for more information.
•Increase the Stimulation Level. Refer to “Find the Best
Stimulation Level For Your Pet” for more information.
The Receiver Collar will not
turn on.
•Check that two (2) CR2032 batteries have been installed
properly. See “To Insert and Remove the Batteries.”
The Receiver Collar is not
responding to the Remote
Transmitter.
•Verify the Receiver Collar is on.
•If the Indicator Light does not come on when any button
is pressed on the Transmitter, ensure that the batteries
are inserted properly.
•If the first two solutions did not resolve your problem, see
“To Pair the Remote Transmitter and the Receiver Collar.”
Page 10

18 US Customer Care Center 1-800-732-2677
www.petsafe.net 19
To Pair the Remote Transmitter and Receiver Collar
If your Receiver Collar does not beep when the Tone Only Button
of the Remote Transmitter is pressed, or if you feel the Receiver
Collar is not responding to the Remote Transmitter, follow these
steps to pair:
1. With the Receiver Collar off your pet, turn the Receiver Collar on.
2. Turn the Intensity Level Dial on the Remote Transmitter to “1”.
3. Separate the Remote Transmitter and the Receiver Collar by 2 feet.
4. Press both the top and bottom buttons on the Remote
Transmitter at the same time and hold for ten seconds.
5. The Receiver Collar should emit two beeps.
6. If the Receiver Collar does not beep twice, please contact the
Customer Care Center.
1
2
3
4
5
6
7
8
9
0
1
Test Light Instructions
A-67
1. Turn the Receiver Collar off.
2. Loosen the Contact Points with pliers.
3. Bend the leads around the base of Contact Point.
4. Hand tighten the Contact Points, making sure that the leads stay
in contact with the base of each Contact Point.
5. Turn the Receiver Collar on.
6. Press the Stimulation Only Button on the Remote Transmitter.
7. The Test Light will flash.
Note: At higher Intensity Levels, the Test
Light will flash brighter.
8. Remove the Test Light and tighten the Contact Points with pliers
one-half turn beyond finger tight.
9. Save the test light for future testing.
Note: If the Test Light does not flash, install new batteries and re-test. If Test Light still does not
flash, contact the Customer Care Center or visit our website at www.petsafe.net.
Terms of Use and Limitation of Liability
1. Terms of Use
This Product is offered to you conditioned upon your acceptance without modification of the terms,
conditions and notices contained herein. Usage of this product implies acceptance of all such
terms, conditions, and notices.
2. Proper Use
This Product is designed for use with pets where training is desired. The specific temperament of
your pet may not work with this product. We recommend that you not use this product if your pet
is less than 8 lb or under 6 months old, or if your pet is aggressive. If you are unsure whether this is
appropriate for your pet, please consult your veterinarian, certified trainer or contact our Customer
Care Center or visit our website at www.petsafe.net.
Proper use includes reviewing the entire Operating and Training Guide provided with your
product and any specific Caution statements.
3. No Unlawful or Prohibited Use
This Product is designed for use with pets only. This pet training device is not intended to harm,
injure, or provoke. Using this product in a way that is not intended could result in violation of
Federal, State or local laws.
4. Limitation of Liability
In no event shall Radio Systems
®
Corporation be liable for any direct, indirect, punitive, incidental,
special or consequential damages, or any damages whatsoever arising out of or connected with the
use or misuse of this Product. Buyer assumes all risks and liability from the use of this Product.
5. Modification of Terms and Conditions
Radio Systems Corporation reserves the right to change the terms, conditions and notices under
which this Product is offered.
FCC
USA
This device complies with part 15 of the FCC Rules. Operation is subject to the following two
conditions: (1) This device may not cause harmful interference, and (2) this device must accept
any interference received, including interference that may cause undesired operation.
CAUTION: Modification or changes to this equipment not expressly approved by Radio
Systems
®
Corporation may void the user’s authority to operate the equipment.
NOTE:
This equipment has been tested and found to comply with the limits for a Class B digital
device, pursuant to part 15 of the FCC Rules. These limits are designed to provide reasonable
protection against harmful interference in a residential installation. This equipment generates,
uses, and can radiate radio frequency energy and, if not installed and used in accordance with
the instructions, may cause harmful interference to radio communications. However, there is no
guarantee that interference will not occur in a specific installation. If interference does occur to
radio or television reception, which can be determined by turning the equipment off and on, the
user is encouraged to try to correct the interference by one or more of the following measures:
•Reorient or relocate the receiving antenna.
•Increase the separation between the equipment and the receiver.
•Connect the equipment to an outlet on a circuit different from that to which the receiver is connected.
•Consult customer care, the dealer, or an experienced radio/TV technician for help.
Page 11

IC - Canada
This device complies with Industry Canada licence-exempt RSS standard(s). This device complies with
Part 15 of the FCC Rules. Operation is subject to the following two conditions: (1) this device may not
cause interference, and (2) this device must accept any interference, including interference that may cause
undesired operation of the device.
Le présent appareil est conforme aux CNR d’Industrie Canada applicables aux appareils radio exempts
de licence. Cet appareil est conforme à la partie 15 des régles FCC. L’exploitation est autorisée aux deux
conditions suivantes : (1) l’appareil ne doit pas produire de brouillage, et (2) l’utilisateur de l’appareil doit
accepter tout brouillage radioélectrique subi, même si le brouillage est susceptible d’en compromettre le
fonctionnement.
Customer Care International
USA & Canada - Tel: 800-732-2677
Monday - Friday 8 AM - 8 PM / Saturday 9 AM – 5 PM
Australia - Tel: 1800 786 608
Monday - Friday 7:30 AM - 5 PM
New Zealand - Tel: 0800 543 054
Monday - Friday 10:30 AM - 7 PM
This product has the benefit of a limited manufacturer’s warranty. Details of the warranty applicable to
this product and its terms can be found at www.petsafe.net and/or are available by sending a stamped
addressed envelope to PetSafe
®
Ltd. Redthorn House, Unit 9, Chorley West Business Park, Ackhurst Road,
Chorley, Lancashire PR7 1NL, United Kingdom.
Perchlorate Battery
Perchlorate Material – special handling may apply. See www.dtsc.ca.gov/hazardouswaste/
perchlorate.
Radio Systems® Corporation
10427 PetSafe Way
Knoxville, TN 37932
1-800-732-2677
www.petsafe.net
400-1064/2
©2008 Radio Systems Corporation
 Loading...