

Petsafe SmartDoor, PPA19-15791, PPA19-15792 Operating Manual
Operating Guide
Manuel d’utilisation
Gebruiksaanwijzing
Manual de adiestramiento
Guida all’uso
Betriebsanleitung
SmartDoor™ Electronic Pet Door
Porte électronique pour animaux SmartDoor
™
SmartDoor™-elektronisch huisdierluik
SmartDoor
™
Puerta para mascotas electrónica
Porta elettronica per animali domestici SmartDoor
™
SmartDoor™ elektronische Haustiertür
PPA19-15791
PPA19-15792
Please read this entire guide after the
Installation Guide
Veuillez lire l’intégralité de ce manuel après le
guide d’installation
Lees deze handleiding helemaal door nadat u de
montagehandleiding hebt gelezen
Lea esta guía en su totalidad después del
Manual de instalación
Leggere attentamente la presente guida dopo il
manuale di installazione
Lesen Sie die Gebrauchsanleitung vollständig nach
der Montageanleitung
www.petsafe.net 3 2 www.petsafe.net
ENES FRIT NLDE
.
IMPORTANT SAFETY INFORMATION
Explanation of Attention Words and Symbols used in this guide
This is the safety alert symbol. It is used to alert you to potential
personal injury hazards. Obey all safety messages that follow this
symbol to avoid possible injury or death.
WARNING indicates a hazardous situation which, if not avoided,
could result in death or serious injury.
CAUTION, used with the safety alert symbol, indicates a
hazardous situation which, if not avoided, could result in minor or
moderate injury.
CAUTION, used without the safety alert symbol, indicates a
hazardous situation which, if not avoided, could result in harm to
your pet.
NOTICE is used to address safe use practices not related to
personal injury.
• When children are present in the home, it is important to
consider the pet door during child proofing activities. The pet
door may be misused by a child resulting in the child accessing
potential hazards that may be on the other side of the pet door.
Purchasers/Homeowners with swimming pools should ensure that
the pet door is monitored at all times and that the swimming pool
has adequate barriers to entry. If a new hazard is created inside
or outside of your home, which may be accessed through the pet
door, Radio Systems® Corporation recommends that you properly
guard access to the hazard or remove the pet door. The closing
panel or lock, if applicable, is provided for aesthetic and energy
efficiency purposes and is not intended as a security device.
Radio Systems® Corporation will not be liable for unintended use
and the purchaser of this product accepts full responsibility for
oversight of the opening it creates.
• Power Tools. Risk of severe injury; follow all safety instructions for
your power tools. Be sure to always wear your safety goggles.
Hereinafter Radio Systems Corporation, Radio Systems PetSafe Europe Ltd.,
Radio Systems Australia Pty Ltd. and any other affiliate or Brand of Radio Systems
Corporation may be referred to collectively as “We” or “Us”.
www.petsafe.net 3
FR ITNL DEEN ES
.
The user, prior to installation, must become familiar with all building
codes that may affect the installation of the pet door and determine,
along with a licensed contractor, its suitability in a given installation.
This pet door is not a fire door. It is important for the owner and
contractor to consider any risks that may be present inside or outside
of the pet door, and any risks that may be created by subsequent
changes to your property and how they may relate to the existence
and use, including misuse of the pet door.
During pet training, while pet door is in UNLOCKED Mode, make
sure to GENTLY lower flap onto pet's back. Also avoid possible
injury by making sure your pet is entirely through the pet door
opening, including paws and tails, before completely releasing flap.
• Keep these instructions with important papers; be sure to transfer
these instructions to the new owner of the property.
• Unauthorised changes or modifications may void the user’s
authority to operate this equipment, and void the warranty.
SAVE THESE INSTRUCTIONS

www.petsafe.net 5 4 www.petsafe.net
ENES FRIT NLDE
.
Thank you for choosing the PetSafe® Brand. You and your pet deserve a companionship
that includes memorable moments and a shared understanding together. Our products
and training tools enhance the relationship between pets and their owners. If you
have any questions about our products or training your pet, please
visit our website at www.petsafe.net or contact our Customer Care
Centre. For a listing of Customer Care Centre telephone numbers, visit
our website atwww.petsafe.net.
To get the most protection out of your warranty, please register your product within 30
days at www.petsafe.net. By registering and keeping your receipt, you will enjoy the
product’s full warranty and should you ever need to call the Customer Care Centre,
we will be able to help you faster. Most importantly, your valuable information will
never be given or sold to anyone. Complete warranty information is available online
at www.petsafe.net.
Table of Contents
Components . . . . . . . . . . . . . . . . . . . . . . . . . . . . . . . . . . . . . . . 5
Tools Needed . . . . . . . . . . . . . . . . . . . . . . . . . . . . . . . . . . . . . . 5
How the Pet Door Works . . . . . . . . . . . . . . . . . . . . . . . . . . . . . . . . 5
Install the Pet Door Through a Wall with the SmartDoor™ Conversion Kit. . . . . . . 6
Key Definitions. . . . . . . . . . . . . . . . . . . . . . . . . . . . . . . . . . . . . . 6
PREPARE . . . . . . . . . . . . . . . . . . . . . . . . . . . . . . . . . . . . . . . . 8
Place Batteries in the Pet Door . . . . . . . . . . . . . . . . . . . . . . . . . . . . 8
Place Battery in the SmartKey™ Electronic Key . . . . . . . . . . . . . . . . . . . 8
Check Operational Modes Before Installation . . . . . . . . . . . . . . . . . . . 9
Check The Pet Door Location Before Installation . . . . . . . . . . . . . . . . . .10
INSTALL . . . . . . . . . . . . . . . . . . . . . . . . . . . . . . . . . . . . . . . . 11
Installing Your Pet Door. . . . . . . . . . . . . . . . . . . . . . . . . . . . . . . .11
SET. . . . . . . . . . . . . . . . . . . . . . . . . . . . . . . . . . . . . . . . . . . .15
Setting The Pet Door Sensitivity Level . . . . . . . . . . . . . . . . . . . . . . . . 15
Understanding Sensitivity and the Active Area . . . . . . . . . . . . . . . . . . .16
Programming a New SmartKey™ Electronic Key. . . . . . . . . . . . . . . . . . .16
Attach the SmartKey™ Electronic Key to the Pet’s Collar . . . . . . . . . . . . . . 16
OPERATE . . . . . . . . . . . . . . . . . . . . . . . . . . . . . . . . . . . . . . . .17
Operating Your Pet Door . . . . . . . . . . . . . . . . . . . . . . . . . . . . . . .17
Troubleshooting . . . . . . . . . . . . . . . . . . . . . . . . . . . . . . . . . . . . . 18
Revert SmartKey™ Electronic Key to Default Factory Setting. . . . . . . . . . . . . .19
Clear SmartKey™ Electronic Key Memory . . . . . . . . . . . . . . . . . . . . . . . 19
Replacement Parts and Accessories . . . . . . . . . . . . . . . . . . . . . . . . . . 19
Terms of Use and Limitation of Liability . . . . . . . . . . . . . . . . . . . . . . . . .20
Important Recycling Advice. . . . . . . . . . . . . . . . . . . . . . . . . . . . . . .20
Battery Disposal . . . . . . . . . . . . . . . . . . . . . . . . . . . . . . . . . . . . .21
Compliance . . . . . . . . . . . . . . . . . . . . . . . . . . . . . . . . . . . . . . . 21
Warranty. . . . . . . . . . . . . . . . . . . . . . . . . . . . . . . . . . . . . . . . .22
www.petsafe.net 5
FR ITNL DEEN ES
.
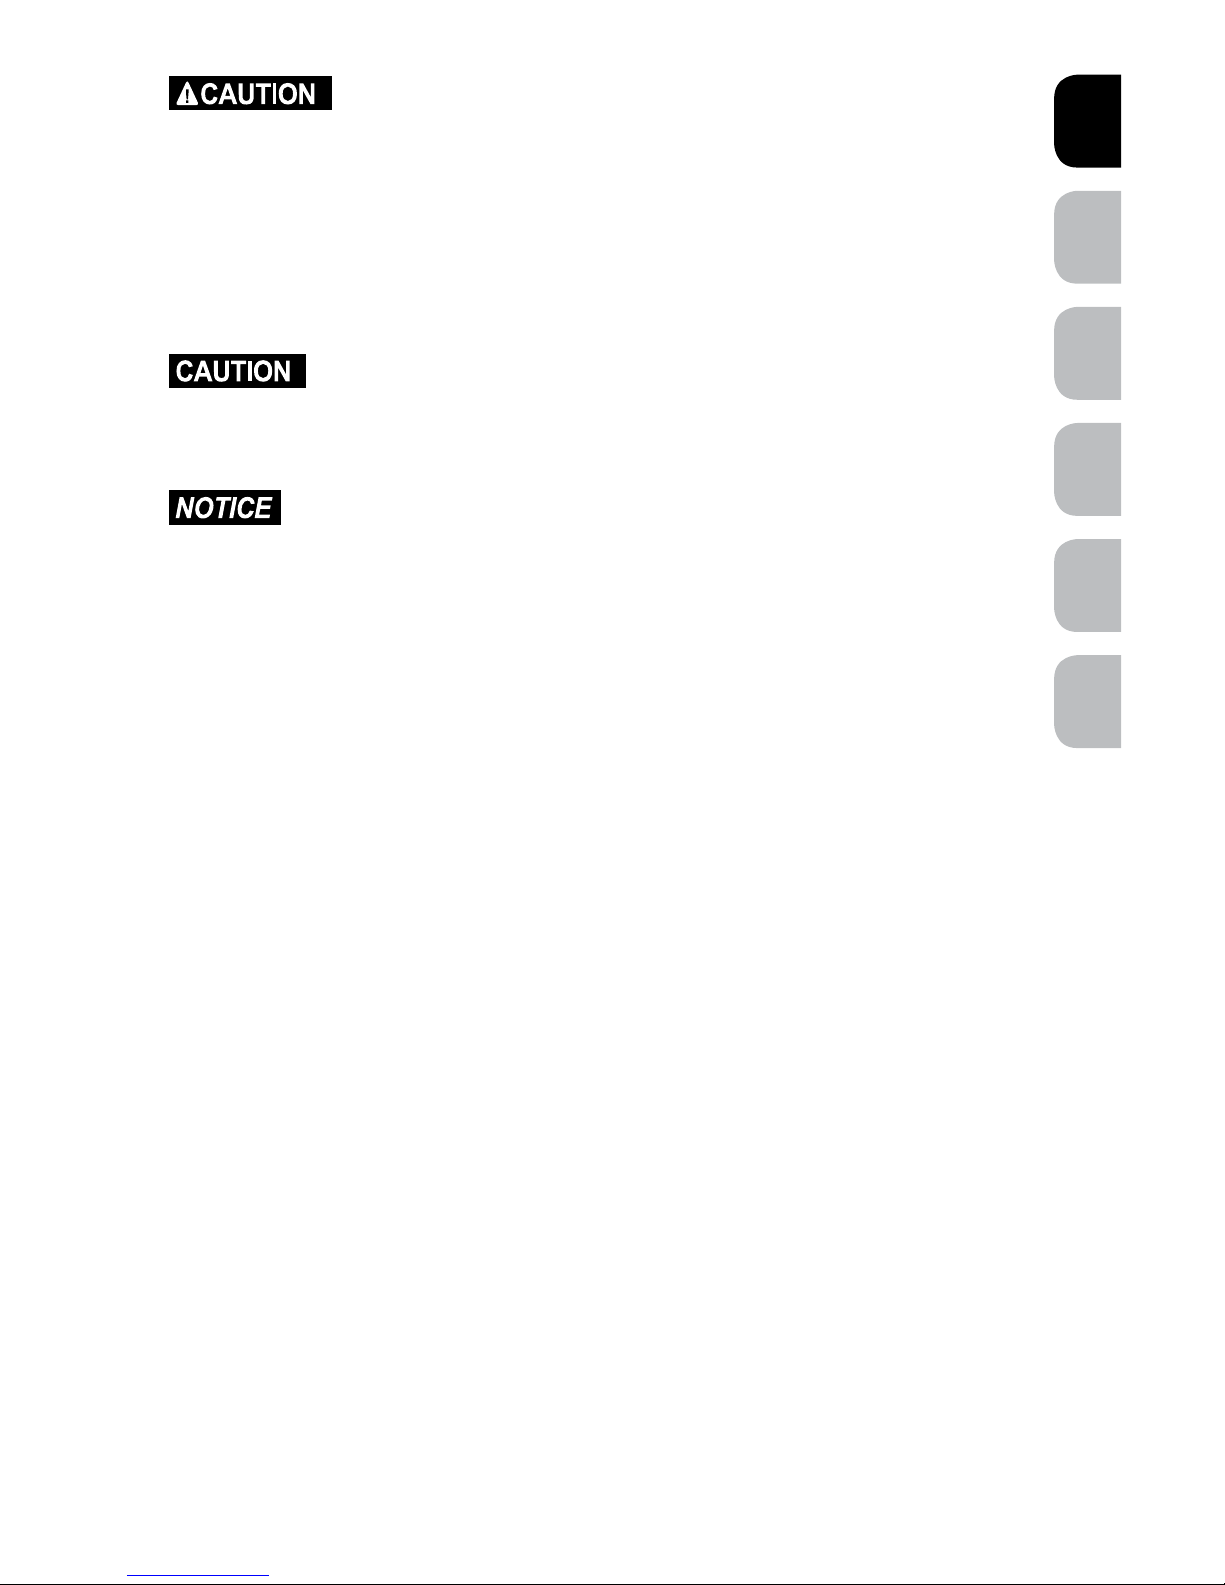
Components
Fits wooden doors < 51 mm thick
S’adapte aux portes en bois < 51 mm d’épaisseur
Se ajusta a puertas de madera < 51 mm de grosor
Adatta per porte di legno spessore < 51 mm
Holztüren < 51 mm stark
Fits PVC/uPVC & Metal < 51 mm thick
S’adapte aux supports en PVC, uPVC et métal< 51 mm d’épaisseur
Puede colocarse en puertas de PVC, uPVC y metal < 51 mm de grosor
Può essere montata su PVC, uPVC e metallo < 51 mm
Für PVC, UPVC und Metall < 51 mm stark
Fits brick walls up to 203 mm (requires Wall Entry Kit – sold separately)
Compatible avec les murs en brique jusqu’à 203 mm (requiert un kit pour mo ntage mura l – vendu sépa rément)
Past in stenen muren van maximaal 203 mm (vereist installatiekit voor muren – apart verko cht)
Puede colocarse en paredes de ladrillos de hasta 203 mm (requiere los túneles para inst alación en pared – ve ndido por separ ado)
Può essere montata su pareti di mattone fino a 203 mm di spessore (richiede un tunnel pe r montaggio su p arete– venduto se paratamente)
F
ür Ziegelwände bis zu 203 mm geeignet (Installationskit Wand erforderlich – Separat er hältlich)
NOTICE/AVIS/AANWIJZING/AVISO/AVVISO/HINWEIS
When applying cutting template there should be a minimum of 7.6 cm between the
bottom and sides of the door and the outer edge of the template to maintain the
structural integrity of the door.
Lorsque vous fixez le gabarit de découpe, un espace d’au moins 7,6 cm doit être présent
entre le bas et les côtés de la porte et le coin supérieur extérieur du gabarit; cela permet de
maintenir l’intégrité structurelle de la porte.
Bij het gebruik van een snijsjabloon moet minimaal 7,6 cm ruimte worden gelaten tussen de
onderkant en zijkanten van de deur en de buitenrand van de sjabloon, zodat de structurele
integriteit van de deur niet wordt aangetast.
Cuando utilice la plantilla de corte, deje un espacio mínimo de 7,6 cm entre la
parte inferior, los laterales de la puerta y el borde externo
de la plantilla para conservar
la integridad estructural de la puerta.
Quando si applica la sagoma lasciare almeno 7,6 cm tra la base e i lati della porta e il bordo
esterno della sagoma per mantenere l’integrità strutturale della porta.
Bei Anwendung der Schnittvorlage sollte zwischen der Unterseite und den Seiten der Tür und
der Außenkante der Schablone mindestens ein Abstand von 7,6 cm vorhanden sein, damit die
physikalische Stabilität der Tür bestehen bleibt.
Operating Guide
Manuel d’utilisation
Gebruiksaanwijzing
Manual de funcionamiento
Guida all'uso
Gebrauchsanweisung
Exterior Frame
Cadre extérieur
Buitenframe
Marco exterior
Struttura esterna
Außenrahmen
Cutting Template
Gabarit de coupe
Sjabloon voor uitsnijden
Plantilla para el corte
Sagoma per il taglio
Schneideschablone
Battery
(PetSafe
®
RFA-67)
Batterie
(PetSafe
®
RFA-67)
Batterij
(PetSafe
®
RFA-67)
Batería
(PetSafe
®
RFA-67)
Batteria
(PetSafe
®
RFA-67)
Batterie
(PetSafe
®
RFA-67)
SmartKey
™
Electronic Key
Clé électronique
SmartKey
™
SmartKey
™
-elektronische sleutel
Llave electrónica
SmartKey
™
Chiave elettronica
SmartKey
™
SmartKey
™
Elektronischer
Schlüssel
Key Ring
Porte-clés
Sleutelring
Anilla para llaves
Anello portachiavi
Schlüsselring
Interior Frame with Flap
Cadre intérieur avec rabat
Binnenframe met klep
Marco interno con batiente
Struttura interna con flap
Innenrahmen mit Klappe
Mounting Screws
(8 pcs. large door)
Vis de montage
(8 pour grande porte)
Bevestigingsschroeven
(8 stuks large luik)
Tornillos de montaje
(8 ud. puerta grande)
Viti di montaggio
(8 pz. porta grande)
Befestigungsschrauben
(8 Stck. große Tür)
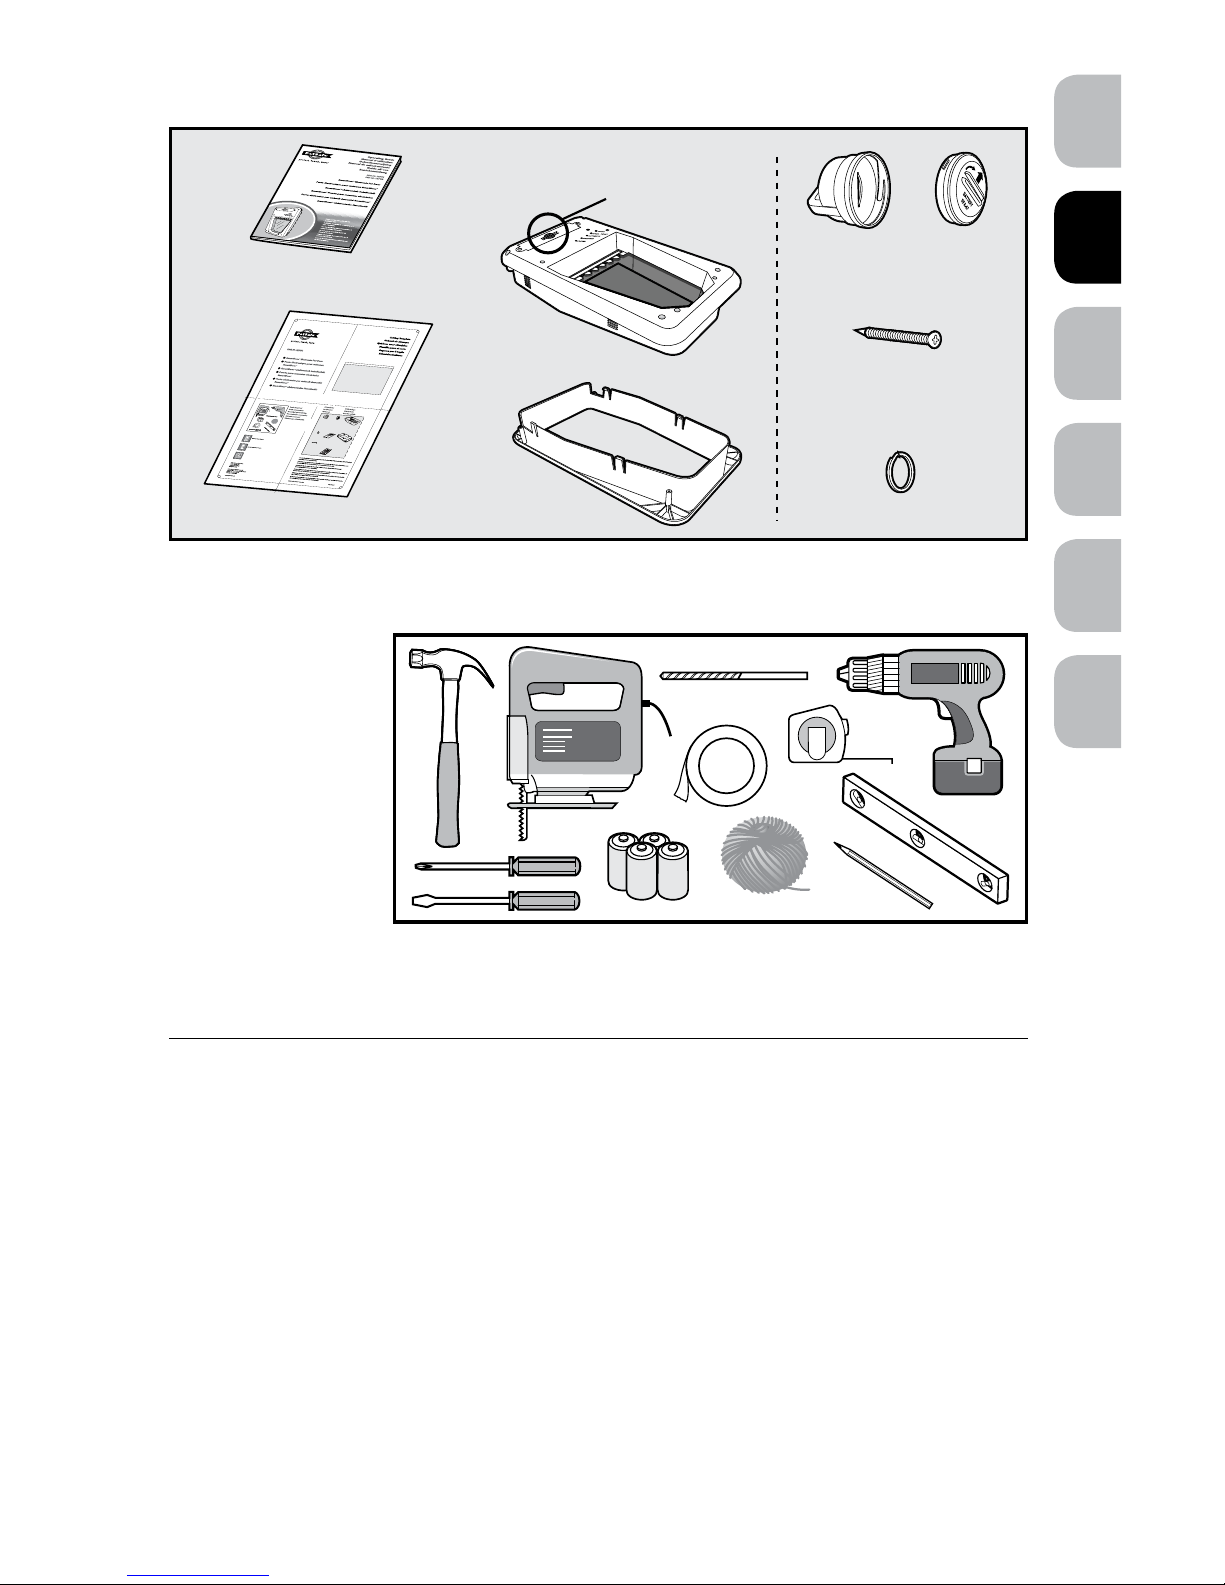
Operating Guide
Interior Frame
with Flap
Located inside the battery compartment
is the SmartKey
™
Electronic Key, RFA-67 battery,
mounting screws and key ring.
Exterior Frame
Cutting Template
Mounting Screws
(4 pcs. small door)
(8 pcs. large door)
Key Ring
SmartKey
™
Electronic
Key
Battery
(PetSafe
®
RFA-67)
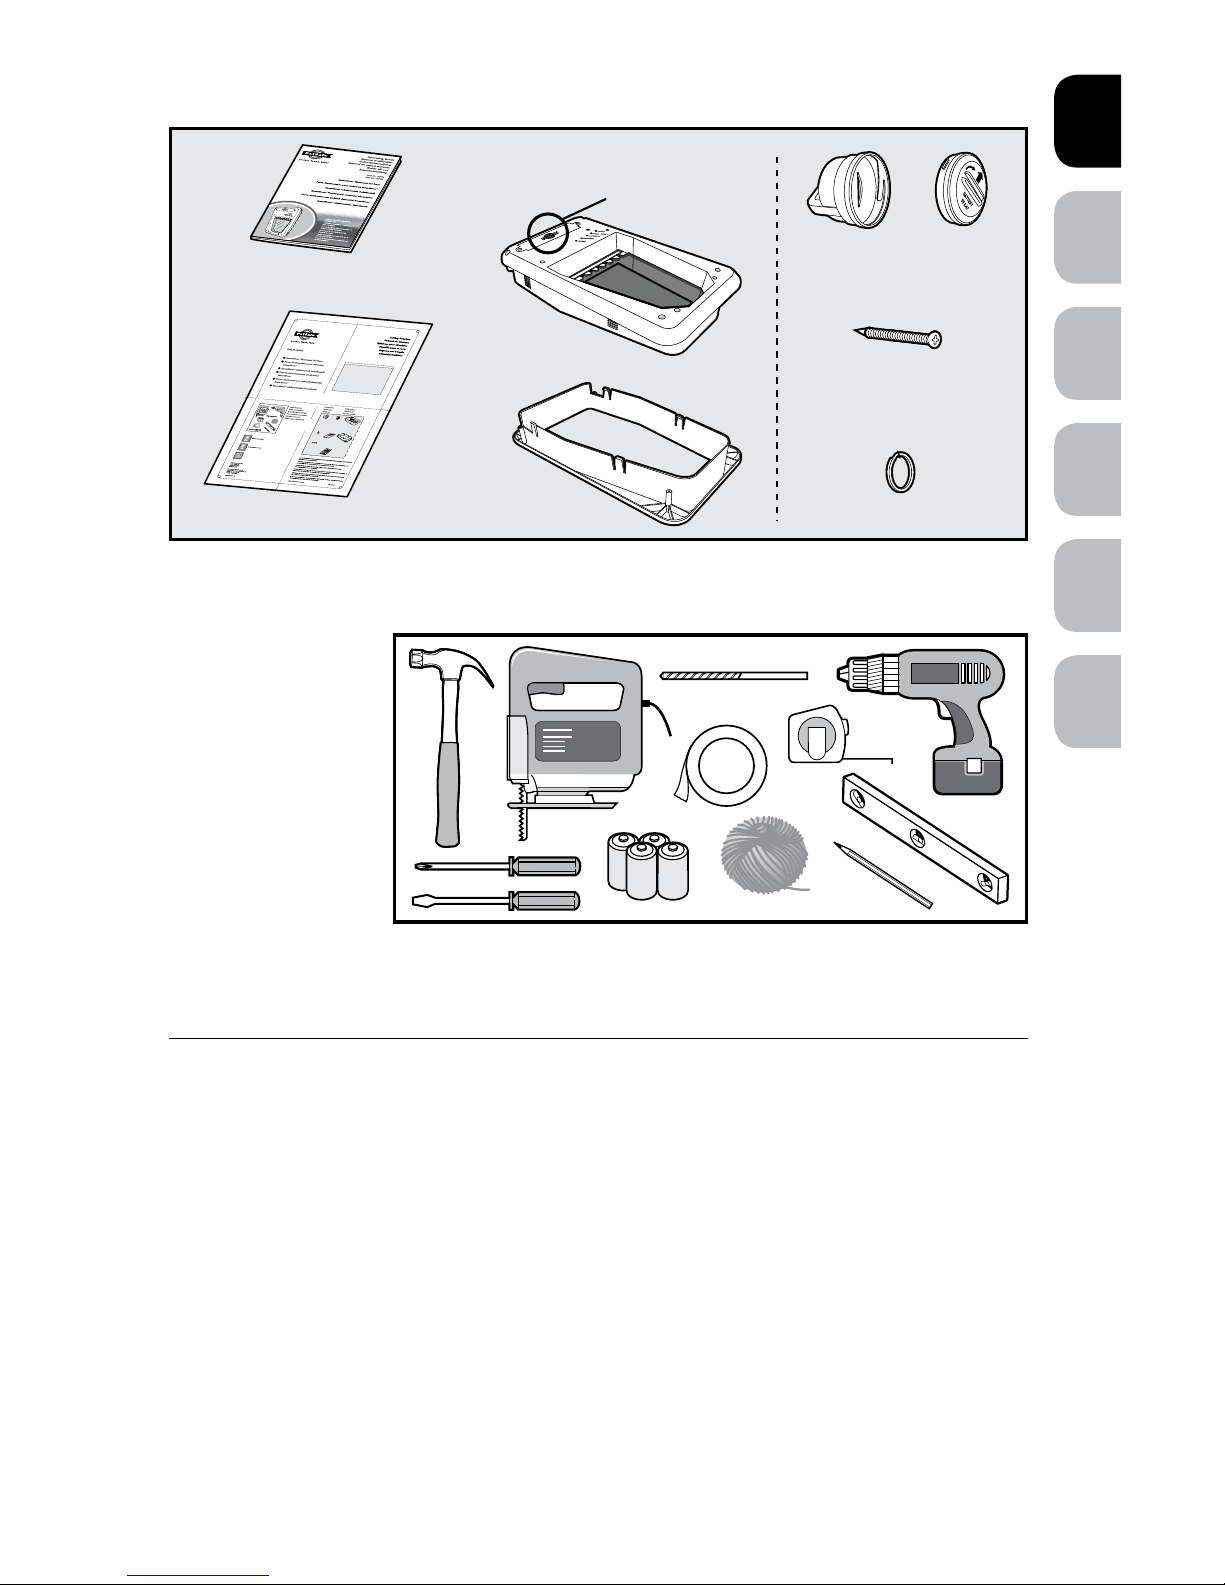
Tools Needed
How the Pet Door Works
Using radio-frequency technology, the SmartDoor™ Electronic Pet Door reads a unique
signal from the SmartKey™ Electronic Key and triggers a battery power-driven flap to
unlock so your pets can come and go as they please. When the SmartDoor™ Electronic
Pet Door no longer senses your pet's SmartKey™ Electronic Key, the flap automatically
locks back into place. The SmartDoor™ Electronic Pet Door can detect up to five
programmed SmartKey™ Electronic Keys and also operates in two other modes: fully
locked mode and unlocked mode.
• Jigsaw or
Keyhole Saw
• Electric Drill
• 10 mm (3/8”)
Drill Bit
• Phillips Screwdriver
• 4 D-Cell (LR20)
Batteries (required)
• Level
• Tape
• Pencil
• String

www.petsafe.net 7 6 www.petsafe.net
ENES FRIT NLDE
.
Install the Pet Door Through a Wall
with the SmartDoor™ Conversion Kit
SmartDoor™ Conversion Kits are available for wall installation applications. The wall
extension conversion kit frames out exposed areas, giving your door installation a clean,
smooth, finished look. For brick, concrete or block wall construction an additional
extension is available for the Large Conversion Kit. Note: The SmartDoor™ Conversion
Kit is designed to be recessed into the brick and does not require additional tunnel
extensions. You may purchase a SmartDoor™ Conversion Kit or large extensions through
selected online websites, www.petsafe.net or by calling our Customer Care Centre. See
“Replacement Parts” section for more information.
Key Definitions
Radio-Frequency Technology – The use of a radio-frequency signal that can be
transmitted without wires.
SmartKey
™
Electronic Key – A SmartKey™ Electronic Key is a battery-operated
transmitter that sends a unique code to the SmartDoor™.
SmartDoor
™
Electronic Pet Door – The SmartDoor™ Electronic Pet Door is an
intelligent receiver using an internal antenna to pick up a unique SmartKey™ code for
selective pet entry and exit.
SmartDoor
™
Flap – The SmartDoor™ flap is a weather resistant, plastic flap with UV
sun protection.
Antenna - The antenna is located inside the Pet Door and receives radio signals from
the SmartKey
™
Electronic Key. The SmartKey™ Electronic Key must be located within a
certain proximity of the antenna in order for the unique code to be read.
Radio-frequency Interference – Radio-frequency interference is due to radio-
frequency signals from other household appliances or common electronic products
that negatively affect the ability of the Pet Door to receive a signal from a SmartKey
™
Electronic Key. Radio-frequency interference or “noise” can come from a variety of
sources. Interference can be minimal, constant or ever changing based on usage and
closeness of other electronic household items during the Pet Door’s operation. It is
recommended that household appliances and common electronic products be placed
at least 60 cm away from the location of the Pet Door.
Sensitivity Knob – Conveniently placed on the interior frame of the Pet Door is the
sensitivity knob. You can easily adjust the sensitivity of the Pet Door, taking into account
common interferences and environmental factors to optimise Pet Door operation.
Sensitivity Level – The level of sensitivity can be adjusted by turning the sensitivity
knob from minimum to maximum, depending on radio-frequency interference and the
application and/or location of the Pet Door. Pre-set from the factory, the sensitivity level
should not be adjusted until after installation. For example, the sensitivity level may need
www.petsafe.net 7
FR ITNL DEEN ES
.
to be increased if the SmartDoor™ is installed in a metal door. See "Setting The Pet Door
Sensitivity Level" section for more information on how to adjust sensitivity.
MODE-RESET Button – Easily select an Operational Mode on your Pet Door by
holding the MODE-RESET button to cycle through selections of operation: LOCKED,
UNLOCKED or AUTOMATIC.
LEARN Button – The LEARN button programs a unique code to the SmartKey
™
Electronic Key to be read by the Pet Door. One SmartKey™ Electronic Key comes
programmed and ready to use. You may program up to five SmartKey™ Electronic Keys
(each sold separately) to one SmartDoor™ Electronic Pet Door.
Operational Modes
LOCKED Mode – The SmartDoor
™
flap is locked and does not allow entry or exit
for any pet.
UNLOCKED Mode – The SmartDoor™ flap is unlocked and allows entry and exit
for all pets.
AUTOMATIC Mode – The SmartDoor™ flap is electronically locked and allows
entry and exit for the pet wearing a programmed SmartKey™ Electronic Key.
Battery Compartment – The battery compartment is located on the Interior
Frame and requires four D-cell (LR20) batteries. Installation mounting screws, key ring,
SmartKey
™
Electronic Key and the one RFA-67 battery are all located inside the battery
box during shipping for your convenience.
RFA-67 Battery – The RFA-67 battery powers the SmartKey
™
Electronic Key and is
replaceable. Additional RFA-67 batteries are available at retailers, or by calling
PetSafe® Customer Care Centre or visiting www.petsafe.net. Typical life of the RFA-67 is
approximately six months.
Overall Size – Pet Door dimensions including outer frame
Cut-out Size – Opening cut in homeowner’s door for proper fit and pet
door installation
Maximum Pet Shoulder Width – Distance between pet's shoulders
across chest
Replacement Flap Size – Overall flap size when removed from pet door
Flap Opening Size – Usable flap space for pet to enter and exit through the
pet door
Interior Frame – Pet door frame on the inside of home
Exterior Frame – Pet door frame on the outside of home
www.petsafe.net 9 8 www.petsafe.net
ENES FRIT NLDE
.
PREPARE
Preparing Your Pet Door
• Read this entire guide prior to cutting or modifying an opening in
your door or wall.
• Do not proceed with cut-out or installation until all steps in this
section have been completed. Do not remove sensitivity sticker until
after installation.
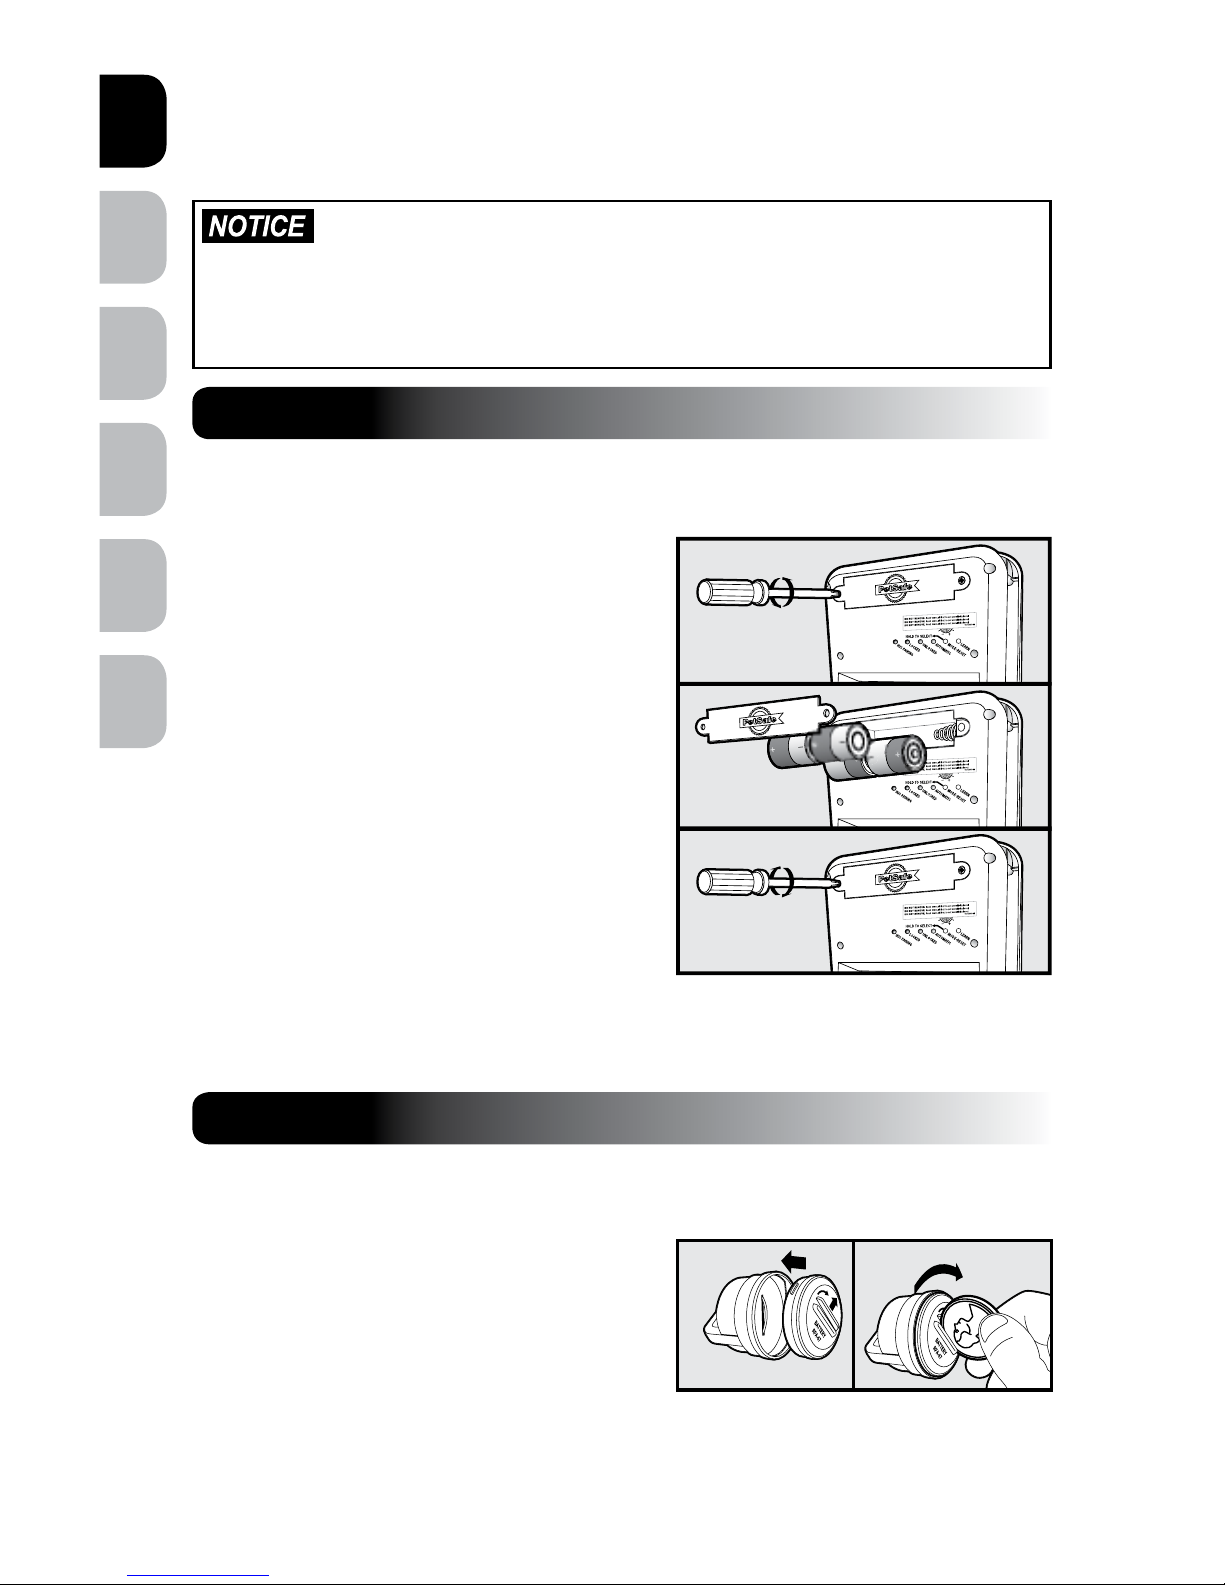
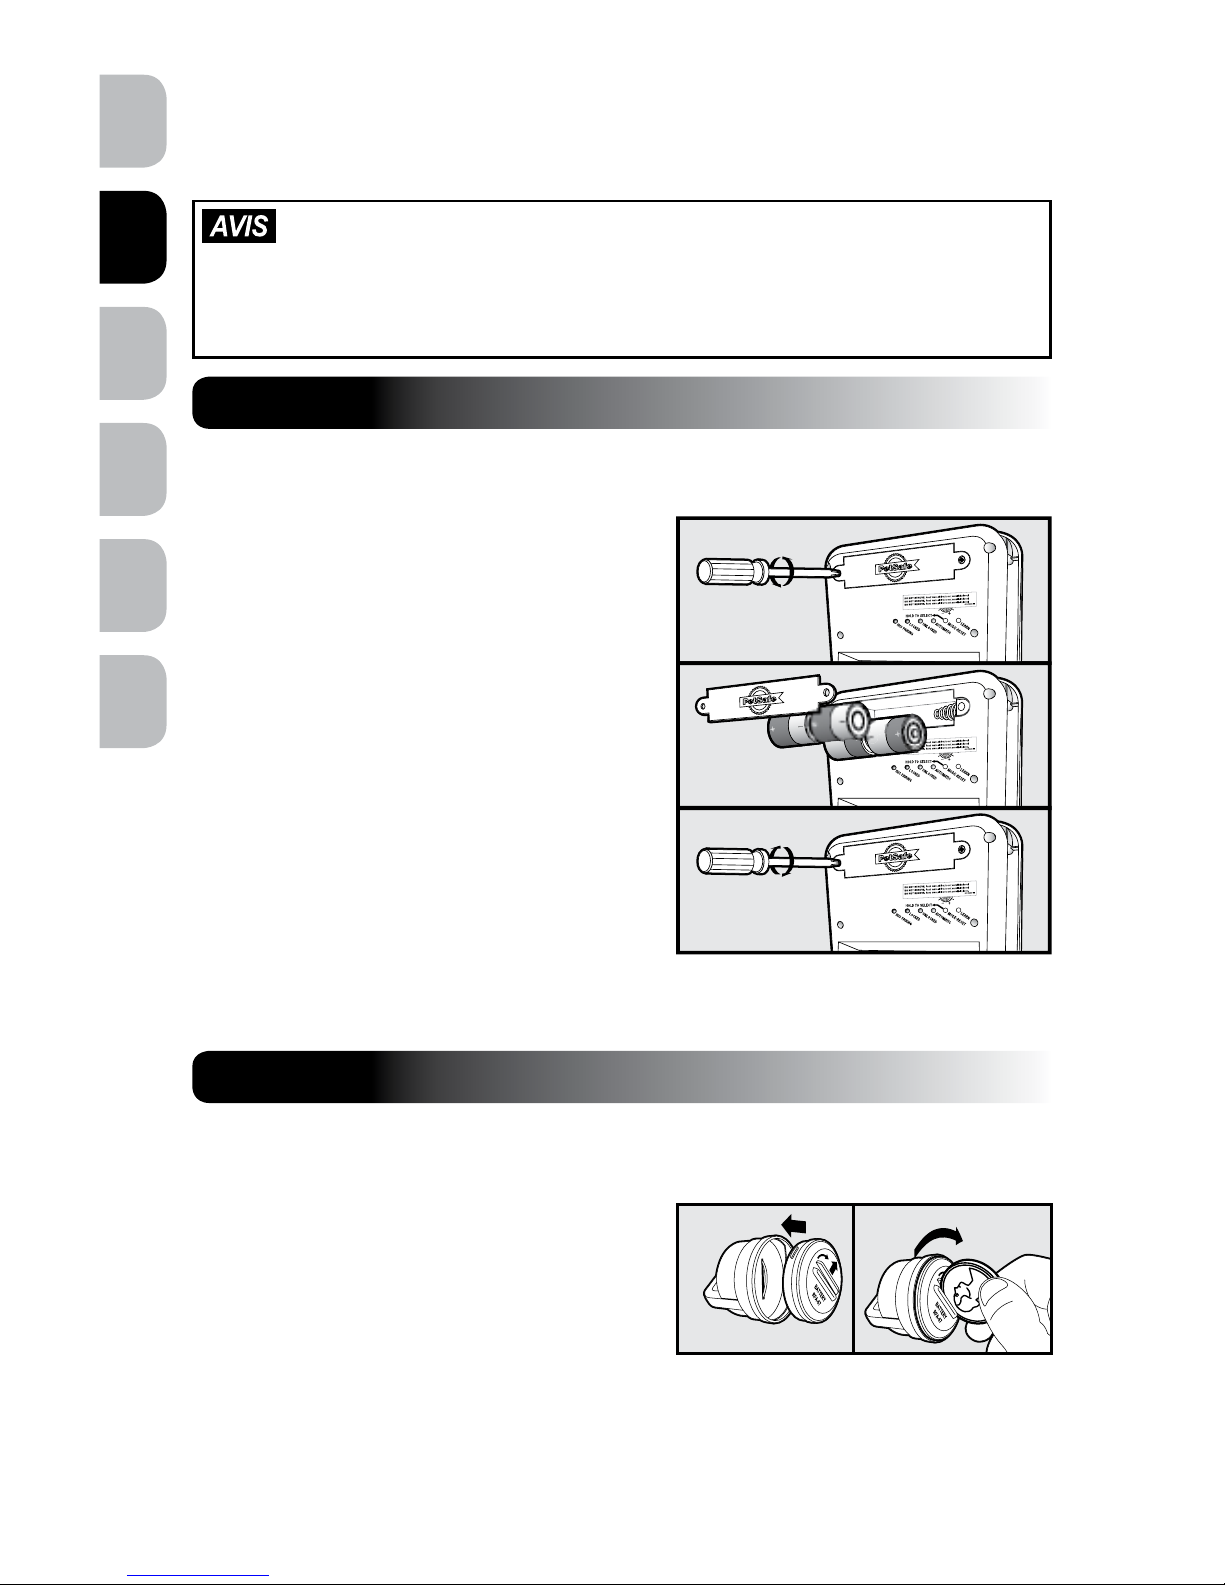
Place Batteries in the Pet Door
1. With a Phillips screwdriver, remove the two
Battery Compartment Cover screws.
2. Remove the Battery Compartment Cover.
3. Refer to the inside of the Battery
Compartment Cover for the proper
orientation of the four D-Cell
(LR20) batteries.
4. Replace the Battery Compartment Cover
and re-install the two screws.
5. When the batteries are placed in the Pet
Door the red light will illuminate for two
seconds and the flap will move into the
locked position, unless the flap is already in
the locked position.
NOTE: The door must be in the upright position for the flap to centre properly and
operate correctly.
Place Battery in the SmartKey™
Electronic Key
1. Place the PetSafe® RFA-67 battery into the
bottom of the SmartKey™ Electronic Key.
2. Using a coin, rotate one-quarter turn
clockwise to secure the PetSafe
®
RFA-67 battery.
NOTE: The SmartKey
™
Electronic Key has a red light that will flash when the PetSafe®
RFA-67 battery is low; the battery should be replaced as soon as possible.
STEP 1
STEP 2
www.petsafe.net 9
FR ITNL DEEN ES
.
Check Operational Modes Before
Installation
Operational Indicators
• To check if operational settings are working properly, hold down the MODE-RESET
button until each operational mode has cycled through once to allow red, green and
yellow lights to illuminate one at a time.
Operational Modes
LOCKED Mode – Does not allow entry or exit for any pet. The Pet Door ships from the
factory in LOCKED Mode and when batteries are placed in the Pet Door, it will enter
LOCKED Mode. To set: hold the MODE-RESET button until red light illuminates and
release when selected.
UNLOCKED Mode – Allows entry and exit for all pets. To set: hold the MODE-RESET
button until the green light illuminates and release when selected.
AUTOMATIC Mode – Allows entry and exit for a pet wearing a programmed
SmartKey
™
Electronic Key. To set: hold the MODE-RESET button until the yellow
light illuminates and release when selected. Five SmartKey™ Electronic Keys can be
programmed to one SmartDoor™ Electronic Pet Door for selective entry and exit during
AUTOMATIC Mode.
NOTE: If at any time the red light remains illuminated, replace with a set of fresh
batteries. If that does not reset the red light, please call our Customer Care Centre for
additional help. If any part of step 3 was unsuccessful, please call our Customer Care
Centre for additional help.
STEP 3
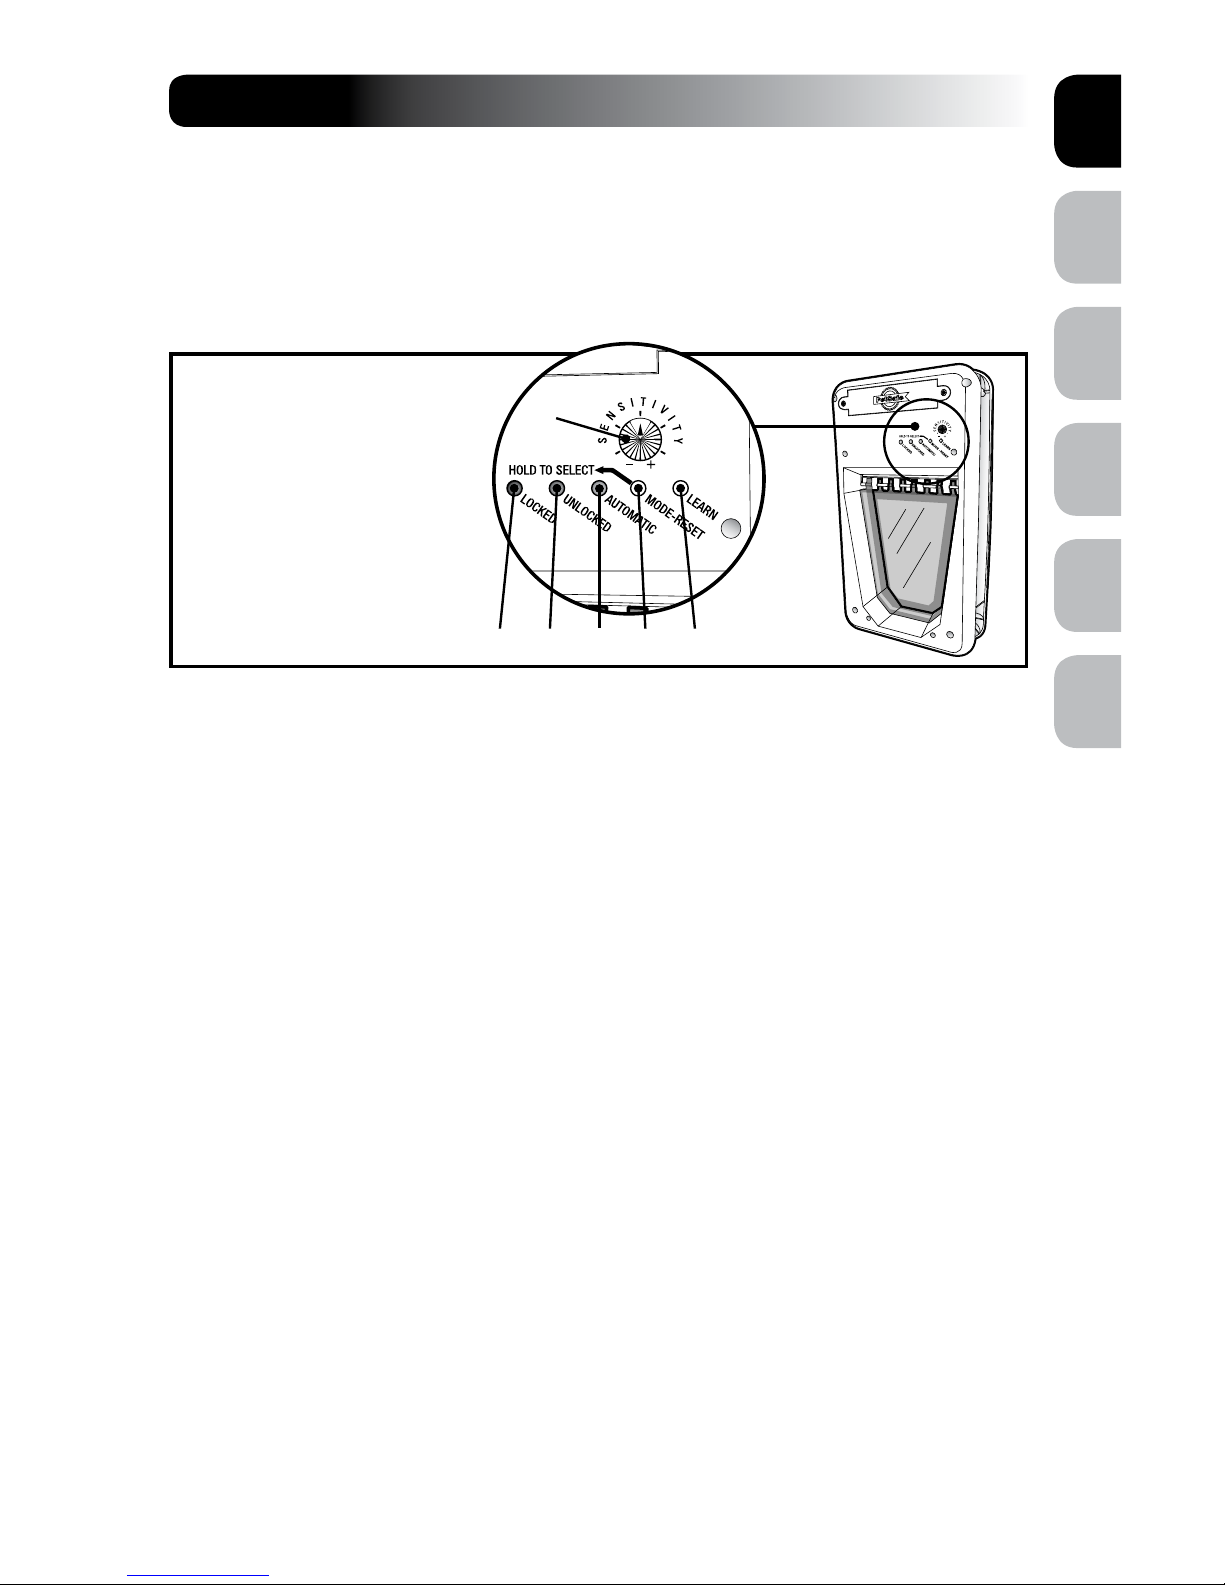
B C D E F
A
SmartDoor™ Electronic Pet Door
A. Sensitivity Knob
B. Locked or Low Battery Red
Indicator
C. Unlocked or Learn Mode Green
Indicator
D. Automatic or Error Mode Yellow
Indicator
E. Mode-Reset Selection Button
F. Learn Mode Button

www.petsafe.net 11 10 www.petsafe.net
ENES FRIT NLDE
.
Check The Pet Door Location Before
Installation
DO NOT REMOVE SENSITIVITY STICKER BEFORE INSTALLING THE
PET DOOR.
Prior to installation, it is recommended to check that the SmartDoor
™
Electronic Pet Door
will operate properly in the intended location or application to guard against possible
severe radio-frequency interference. Household appliances and common electronic
products should be located at least 60 cm away from the Pet Door’s location. Radiofrequency interference detected from other household appliances or common electronic
products will negatively affect the ability of the Pet Door to receive a SmartKey™
Electronic Key signal. Typical appliances and products to consider are laptop
computers, wireless telephones, microwaves, televisions, garage door openers, handheld electronic devices (such as cell phones, game stations and remote controls).
The sticker placed over the sensitivity knob should not be removed until after
installation, as the factory default sensitivity setting is positioned at the optimal level for
most installations.
It is recommended to install the Pet Door in a location where direct wind is not a factor.
Operating Temperature Range: -20.5˚ C to 82˚ C (-5˚ F to 180˚ F). Operating
Humidity Range: 0 to 99.9%.
To check if the Pet Door’s radio-frequency technology will operate properly in desired
location and application, place the Pet Door directly in front of and against the door
or application in the upright position. After performing the steps above, set the Pet
Door in AUTOMATIC Mode and hold the SmartKey
™
Electronic Key directly in front of
the Pet Door. The Pet Door flap should unlock in about three seconds. Remember, the
SmartKey™ Electronic Key included in the kit is already programmed to the Pet Door.
NOTE: If there are existing SmartKey
™
Electronic Keys in the household, remove all
(RFA-67) batteries while performing step 4 except the SmartKey™ Electronic Key
included with the SmartDoor™ Electronic Pet Door.
If the Pet Door does not unlock, move the Pet Door to another location and repeat the
steps once more. If the Pet Door’s location test above was unsuccessful, please call our
Customer Care Centre for additional help.
When the steps above are completed and all are successful, your Pet Door is ready
for installation.
STEP 4
www.petsafe.net 11
FR ITNL DEEN ES
.
INSTALL
STEP 1
Installing Your Pet Door
Determine Pet Door Location
Measure and mark your pet’s shoulder height on the door
(Fig. 1A).
Determine location for the pet door. Draw a vertical
centre line through the shoulder height line using a level
(Fig. 1B).
If homeowner’s door or other application
is not level, the pet door must be marked
level to swing properly.
Helpful Tip: Mark shoulder height and vertical centre
line lightly with a pencil or on a piece of tape so marks
can easily be erased or removed.
STEP 2
Preparing Door
Match the marked lines on the door with the shoulder
and centre lines on the template. Tape the template in
place and carefully trace cutting template. Make sure to
trace underneath tape and connect the corners. Remove
the cutting template and any excess tape from the door
(Fig. 2A).
When applying the template there should
be a minimum of 7.6 cm between the
bottom and sides of the door and the
outer edge of the template to maintain the
structural integrity of the door.
Fig. 1A
Fig. 1B
Fig. 2A
www.petsafe.net 13 12 www.petsafe.net
ENES FRIT NLDE
.
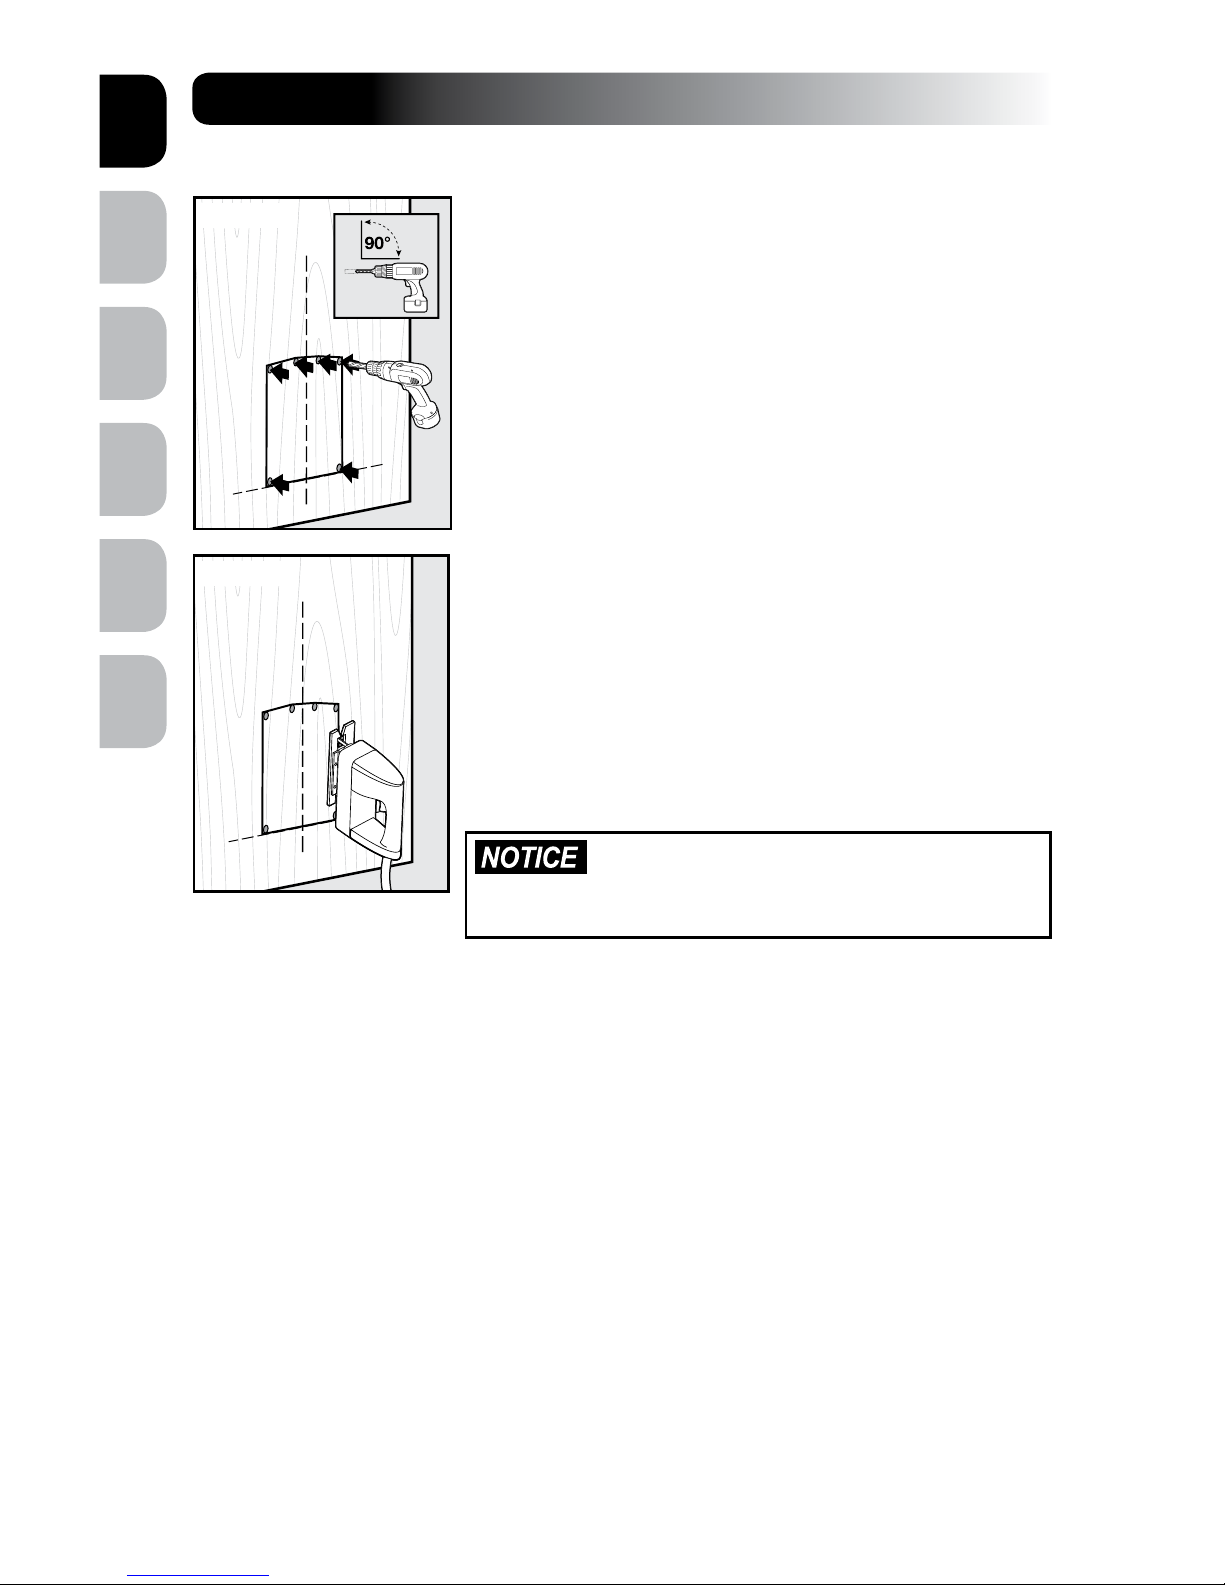
STEP 3
Cut Pet Door Opening
Leave template on and drill 10 mm (3/8") holes in the inside
corners of template. These will be the pilot holes for the saw
blade (Fig. 3A).
Helpful Tip: Use both hands to hold drill steady and
straight at a 90° angle.
Helpful Tip: Before cutting flap opening, apply painter’s
or masking tape on jigsaw blade guide and along outer
edges of drawn template to help protect door surface from
marks and scratches during cutting.
Beginning in one of the holes you just drilled, cut along the
template lines. After cutting out the opening, remove excess
template. You may need to recut to square the opening. This
is necessary for the pet door frame to fit correctly (Fig. 3B).
Helpful Tip: Use a proper saw blade according to door
material (for example a wood blade for wood door and
metal blade for a metal door). When cutting use both hands
to hold the saw slow, steady and straight at a 90° angle.
This will prevent the blade from cutting unevenly between
interior and exterior areas of door.
Make sure there is nothing on the other side
of the door where you will be drilling the
holes or cutting out opening.
Fig. 3A
Fig. 3B
www.petsafe.net 13
FR ITNL DEEN ES
.
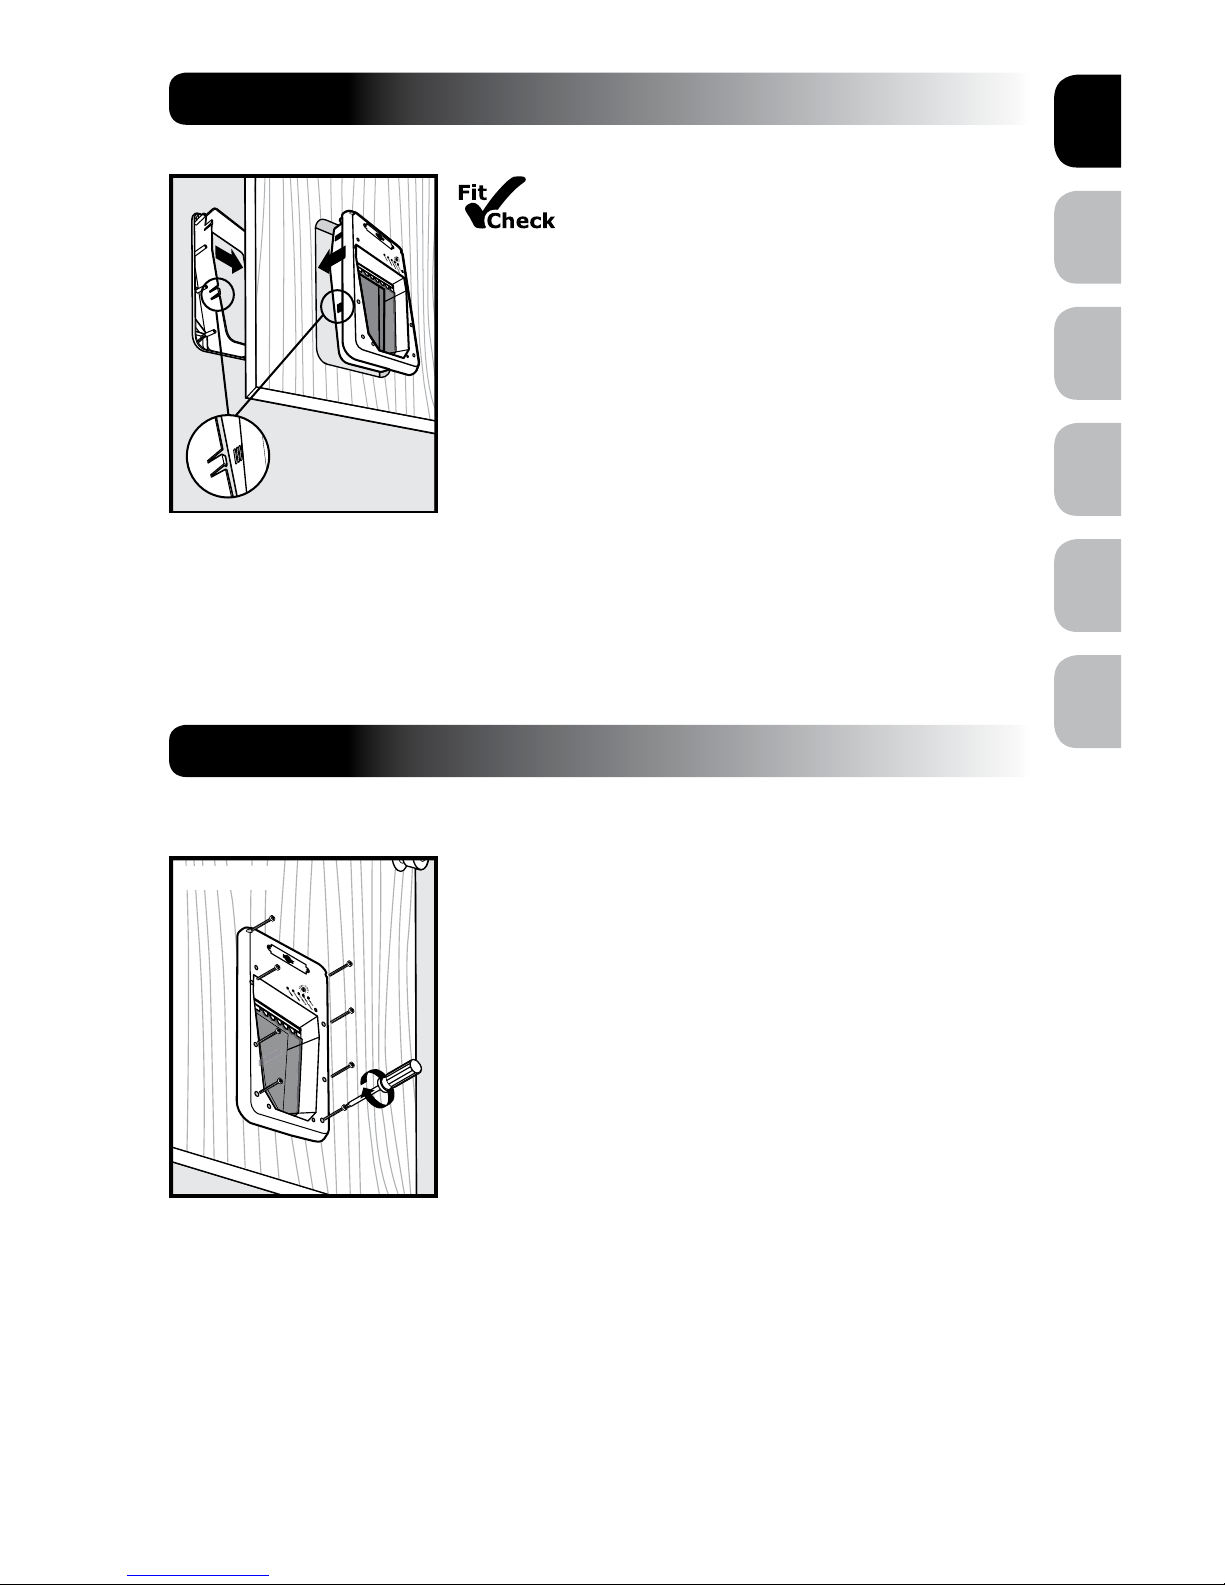
STEP 4
Install Pet Door
Before putting away the jigsaw, place the
interior frame (frame with the flap) inside the cut
out and check the fit. Then, place the exterior frame onto
the other side of the door to check the fit. If frames do not
fit inside the opening, you may need to recut to square
opening before proceeding with installation.
Place interior frame with flap inside cut-out of interior door.
Place exterior frame on exterior of door and press firmly
against interior frame and exterior frame with both hands.
Continue to press while moving hands from bottom to top
of frames until alignment tabs connect and both frames are
firmly in place (Fig. 4A).
Helpful Tip: Use painters’ tape across the Pet Door’s interior frame and door to keep
in place while positioning the exterior frame.
Helpful Tip: You should be able to see clearly through all screw holes when your
door is aligned properly.
STEP 5
Insert Screws
Thread mounting screws through interior frame and align
with exterior frame. Tighten with screwdriver. DO NOT
OVERTIGHTEN (Fig. 5A).
Helpful Tip: If using an electric screwdriver, set on
low torque.
NOTE: Small SmartDoor
™
Electronic Pet Door has four
screw placement holes and Large SmartDoor™ Electronic
Pet Door has eight screw placement holes.
Fig. 4A
Fig. 5A
www.petsafe.net 15 14 www.petsafe.net
ENES FRIT NLDE
.
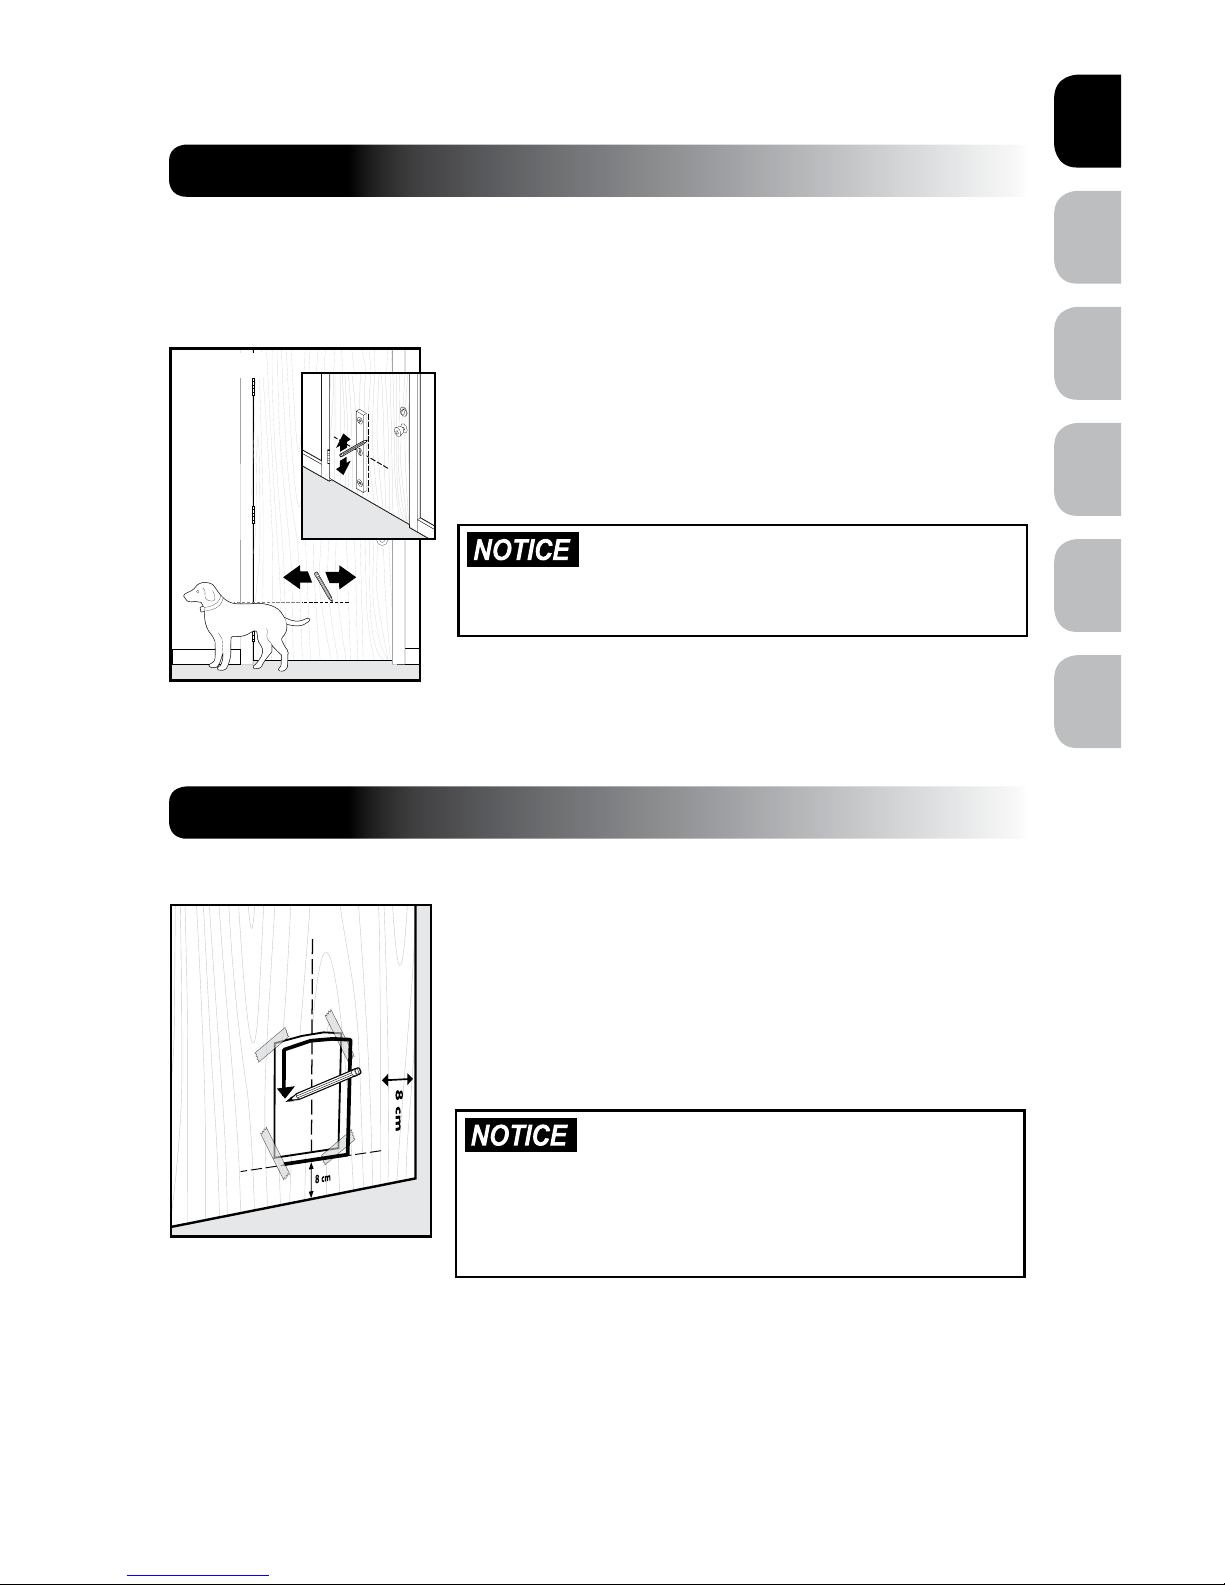
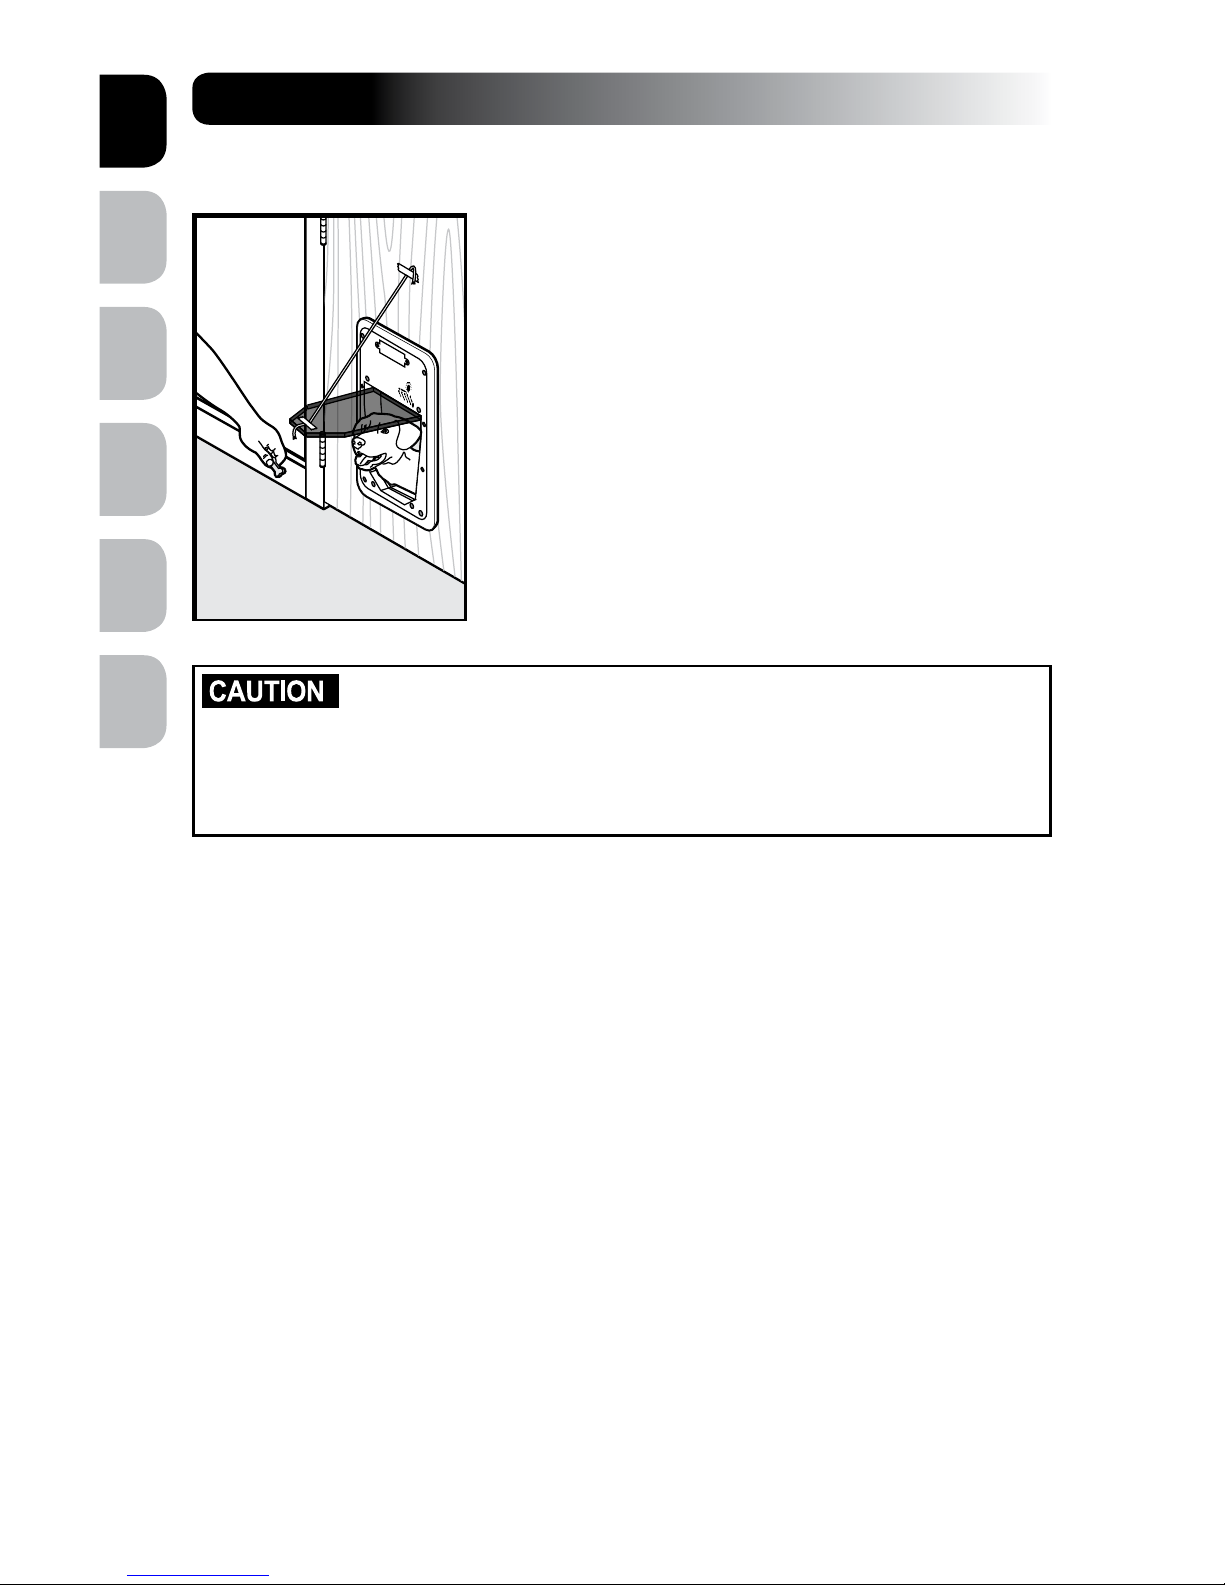
STEP 6
Train Your Pet
Tape the flap open to help your pet become familiar
with the pet door opening. MAKE SURE TAPED FLAP IS
SECURE AND WILL NOT FALL DURING TRAINING.
When your pet is more comfortable let the flap down and
operate the Pet Door in UNLOCKED Mode encouraging
your pet to push through the flap. Once your pet is
comfortable entering and exiting through the closed flap,
set the Pet Door to AUTOMATIC Mode and operate with
your pet’s programmed SmartKey™ Electronic Key. Walk
your pet up to the Pet Door until the SmartKey™ Electronic
Key is detected and flap unlocks. Repeat training your
pet to walk up to the Pet Door and push open flap to the
other side (Fig. 6A).
During pet training, while pet door is in UNLOCKED Mode, make
sure to GENTLY lower flap onto pet's back. Also avoid possible injury
by making sure your pet is entirely through the pet door opening,
including paws and tails, before completely releasing flap.
Helpful Tip: Try treats to encourage your pet to push through the Pet Door flap.
NOTE: The Pet Door is designed with an electric motor to release and unlock flap
when a SmartKey
™
Electronic Key is detected. Do not allow your pet to run or charge
through the Pet Door. Due to variable radio-frequency interferences it could take several
seconds for the unique code of the SmartKey™ Electronic Key to read properly and pet
door flap to unlock.
Fig. 6A
www.petsafe.net 15
FR ITNL DEEN ES
.
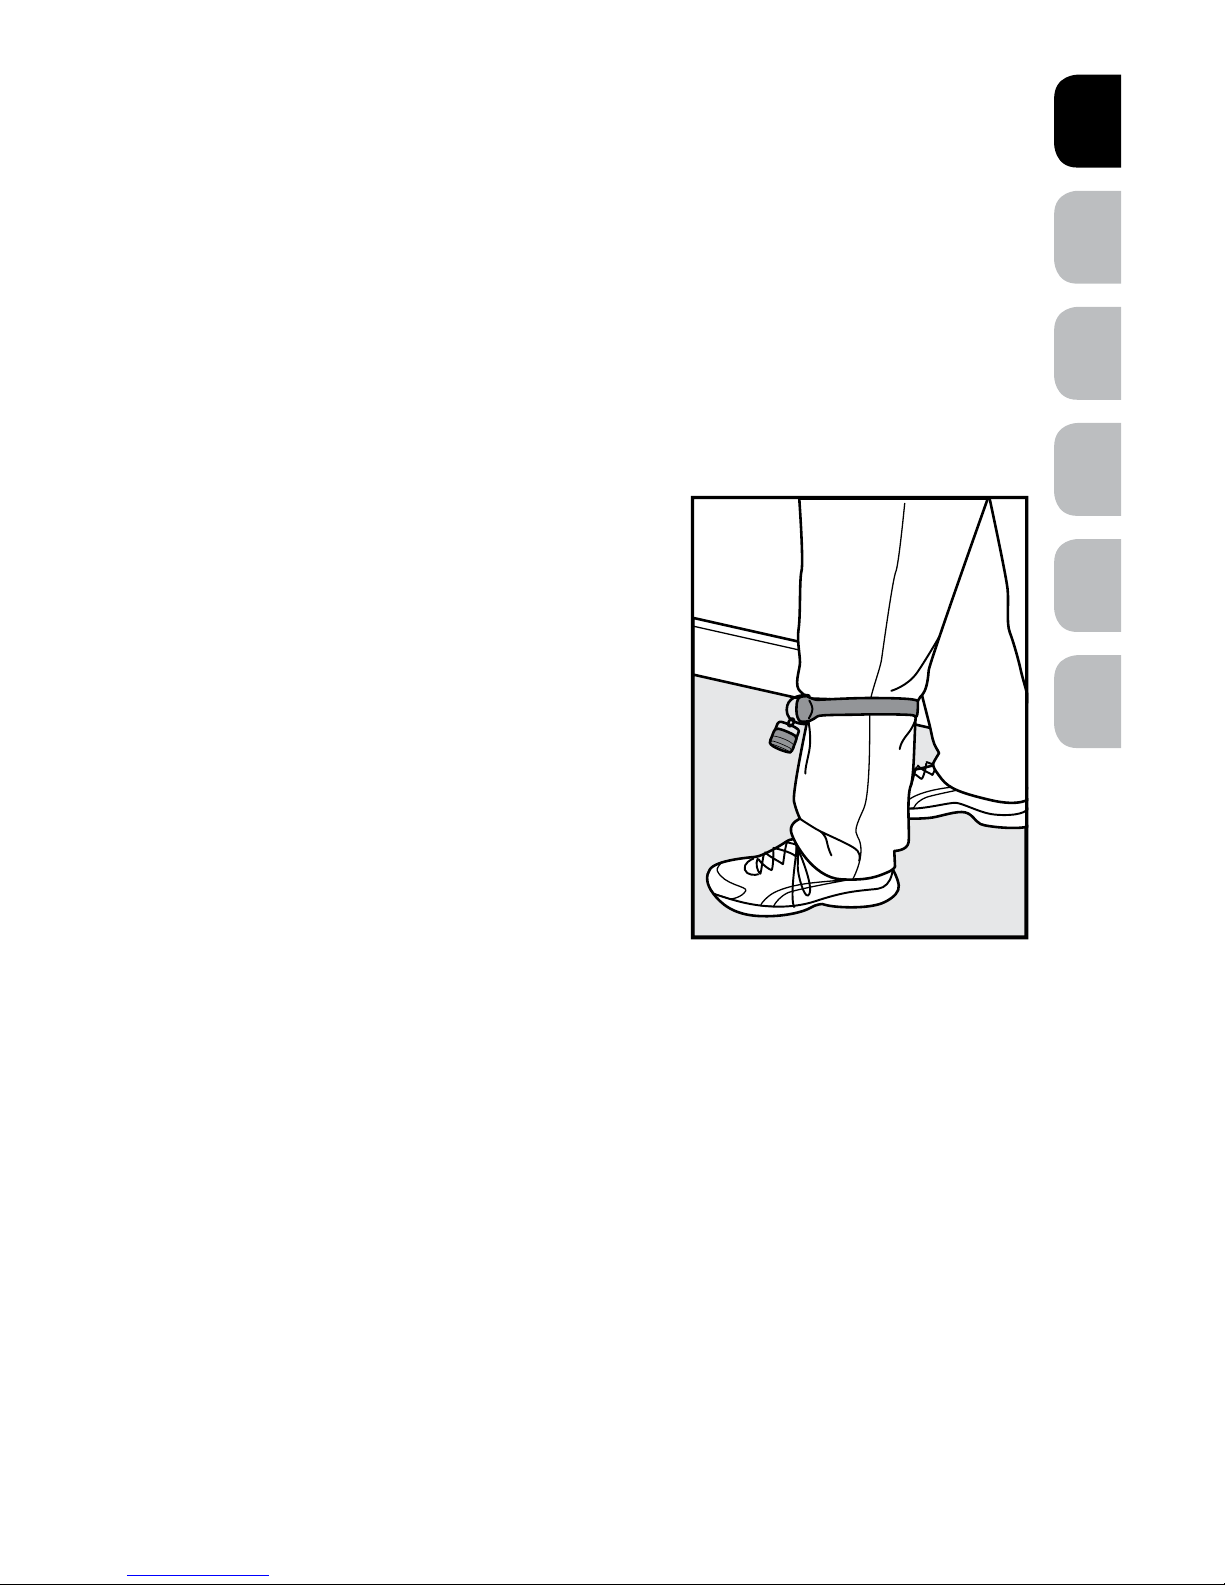
SET
Setting The Pet Door Sensitivity
Level
It is necessary to set the sensitivity level of the Pet Door so your pet’s SmartKey™
Electronic Key works properly due to location or application material, such as radiofrequency interferences, wood or metal door installations.
To begin, it is recommended to use the split ring (included) to attach the SmartKey
™
Electronic Key to the D-ring on your pet’s collar. Also, do not use metal tags as the
additional metal can cause radio-frequency interference and hinder the detection of
your pet’s SmartKey™ Electronic Key.
1. Put the pet's collar on your leg just below your
knee. Tape may be used to secure the collar, if
necessary (A).
2. Stand directly in front of the Pet Door so the
SmartKey
™
Electronic Key is approximately 76
cm from the Pet Door.
3. Put the Pet Door in the UNLOCKED Mode. (See
"Operational Modes" section).
4. Put the Pet Door in the Sensitivity Test Mode by
holding down the MODE-RESET and LEARN
buttons at the same time until all three lights
flash once.
5. Turn the Sensitivity Knob anti-clockwise to the
minimum position, then turn the Sensitivity Knob clockwise until all lights begin to
flash again.
6. Slowly continue to adjust the Sensitivity Knob clockwise until you see a minimum of
six consecutive flashes and stop adjusting. Do not adjust higher than necessary.
7. Put the Pet Door in AUTOMATIC Mode and step away at least 3 metres, allowing
the door to automatically lock. This may take up to fifteen seconds after the
SmartKey
™
Electronic Key no longer is detected.
8. Now confirm the sensitivity level by approaching the Pet Door again. The door
should unlock when you step within approximately 60 cm in front of the Pet Door.
A
www.petsafe.net 17 16 www.petsafe.net
ENES FRIT NLDE
.
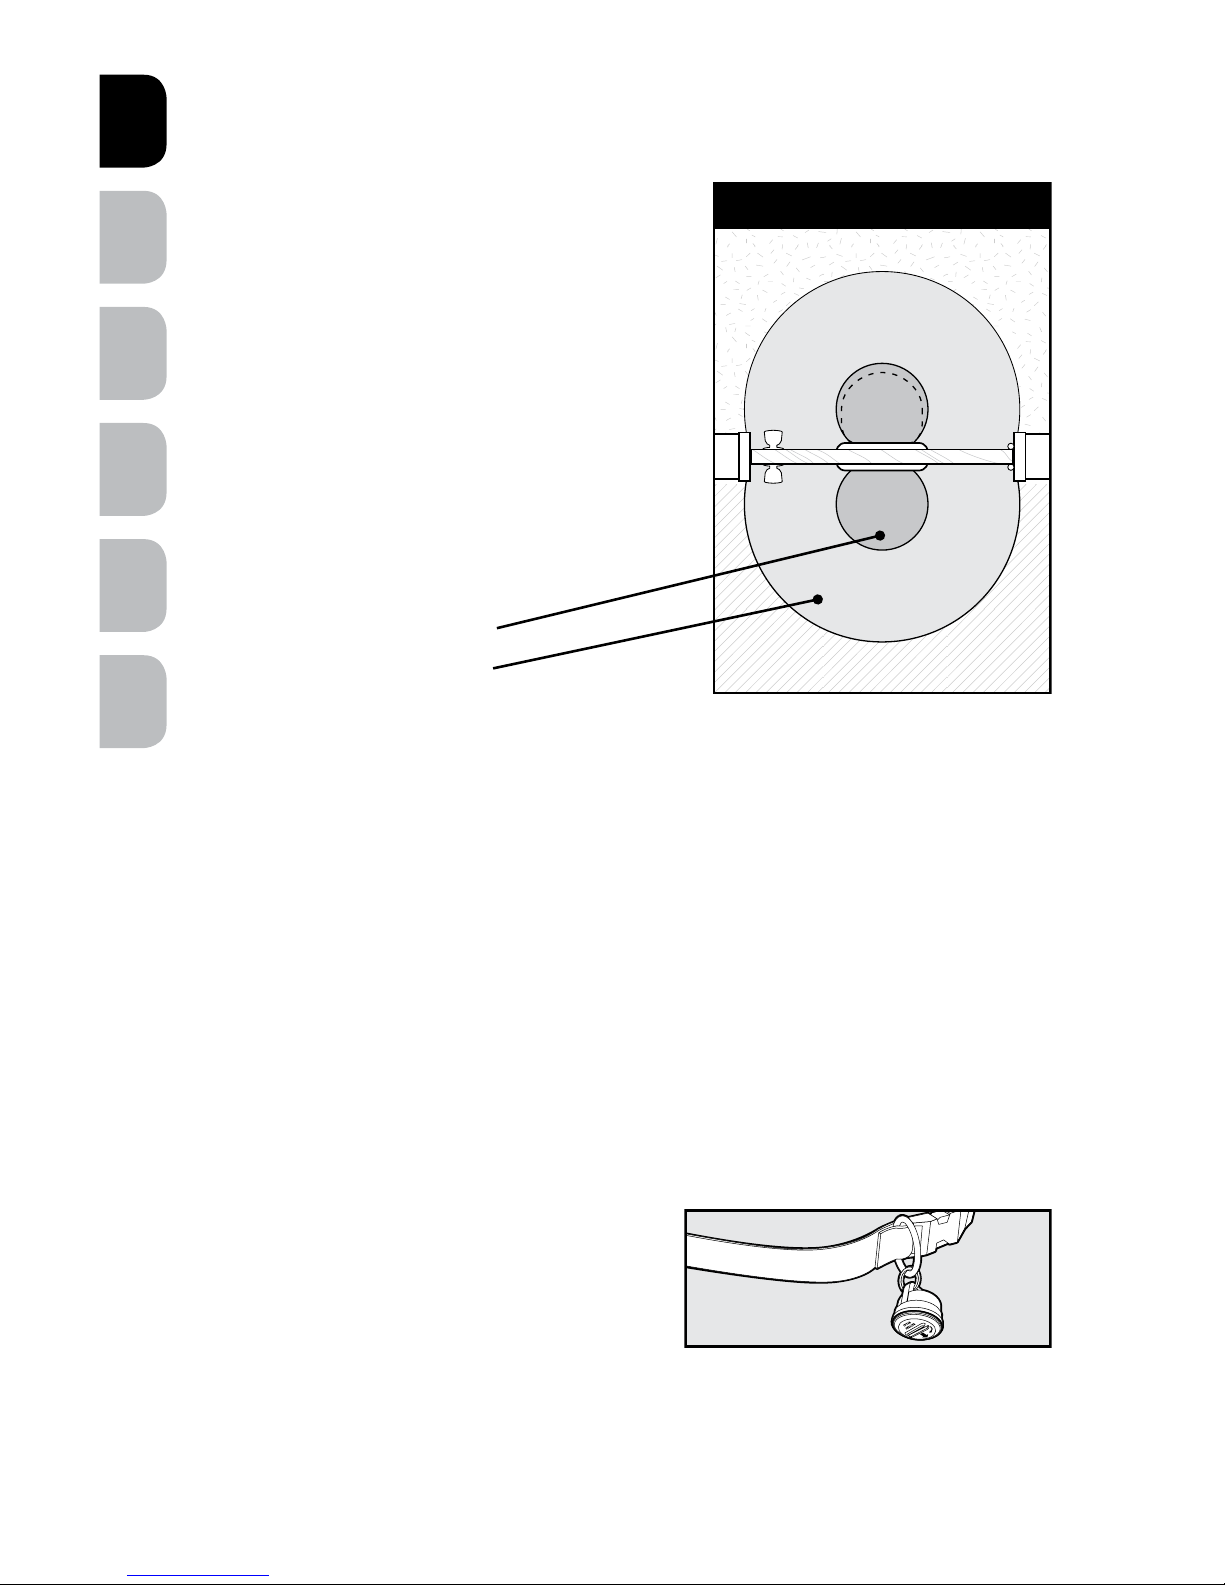
Understanding Sensitivity and the
Active Area
The Active Area is the area where the Pet Door
will consistently open based on your adjustment
of the sensitivity level. In the Fringe Area the Pet
Door may open inconsistently due to variables of
radio-frequency interferences or reflections. In the
Inactive Area the door will generally not unlock
automatically (B).
You may see slight differences between
Outside and Inside Active Areas due to
radio-frequency interferences.
Programming a New SmartKey™
Electronic Key
To reduce error while programming, remove the RFA-67 battery from all programmed
SmartKey™ Electronic Keys except the one you are programming. Press and hold the
LEARN button until the green light illuminates and begins to flash, now release the
button. Bring the SmartKey™ Electronic Key directly below the green light and the light
will stop flashing and illuminate for two seconds. Now your new SmartKey™ Electronic
Key has been programmed and added to memory. Up to five different SmartKey™
Electronic Keys can be added, one at a time.
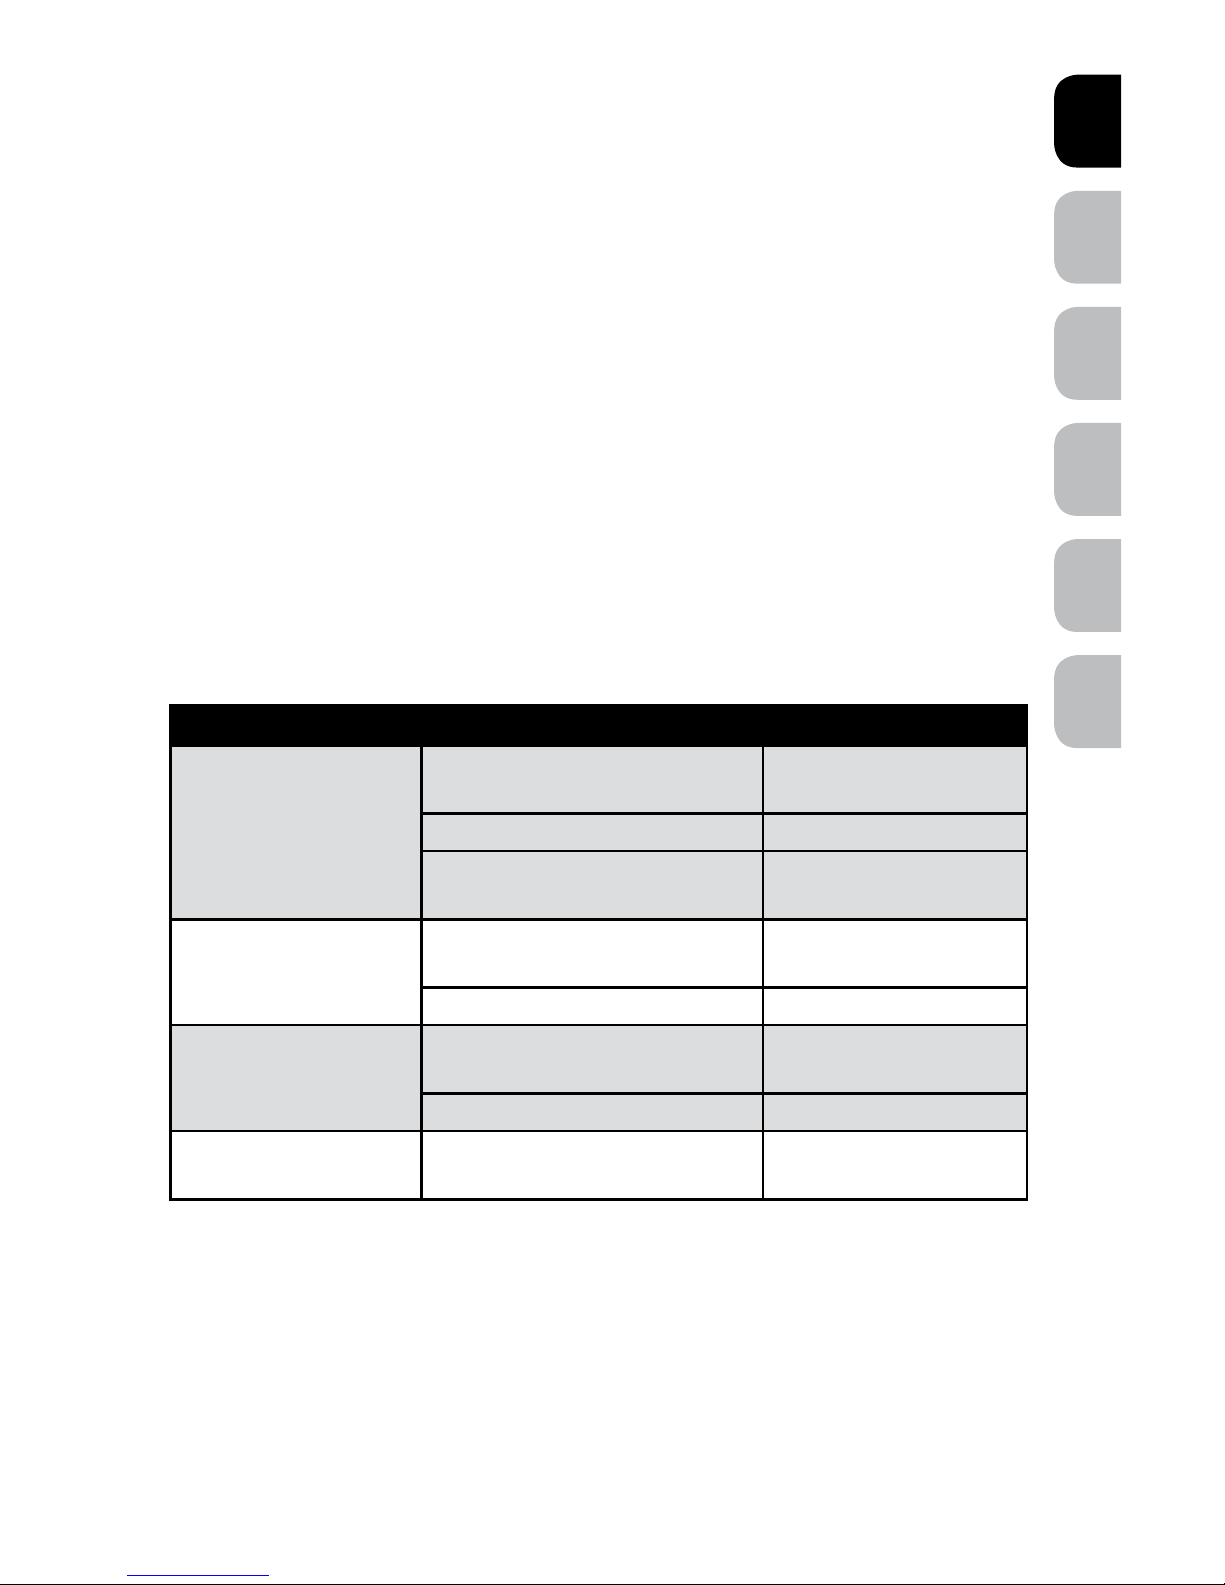
Attach the SmartKey™ Electronic
Key to the Pet’s Collar
A split key ring has been provided to attach to
your pet’s collar and should hang under the
pet’s neck.
The Pet Door includes one SmartKey
™
Electronic
Key which comes pre-programmed and ready
to use.
Door - Top View
Fringe
Active
Active
Fringe
Inside
Outside
Inactive
Inactive
B
Depending on location
and application
~ 76 cm
~ 183 cm
www.petsafe.net 17
FR ITNL DEEN ES
.
OPERATE
Operating Your Pet Door
LOCKED Mode – Does not allow entry or exit for any pet. The Pet Door ships from the
factory in LOCKED Mode and when batteries are placed in the Pet Door, it will enter
LOCKED Mode. To set: hold the MODE-RESET button until the red light illuminates and
release when selected.
UNLOCKED Mode – Allows entry and exit for all pets. To set: hold the MODE-RESET
button until the green light illuminates and release when selected.
AUTOMATIC Mode – Allows entry and exit for a pet wearing a programmed
SmartKey
™
Electronic Key; up to five SmartKey™ Electronic Keys can be programmed
into one SmartDoor™ Electronic Pet Door for selective entry and exit during automatic
mode. To set: hold the MODE-RESET button until the yellow light illuminates and release
when selected.
NOTE: If at any time the red light remains illuminated, replace with a set of fresh
batteries. If that does not reset the red light, please call our Customer Care Centre for
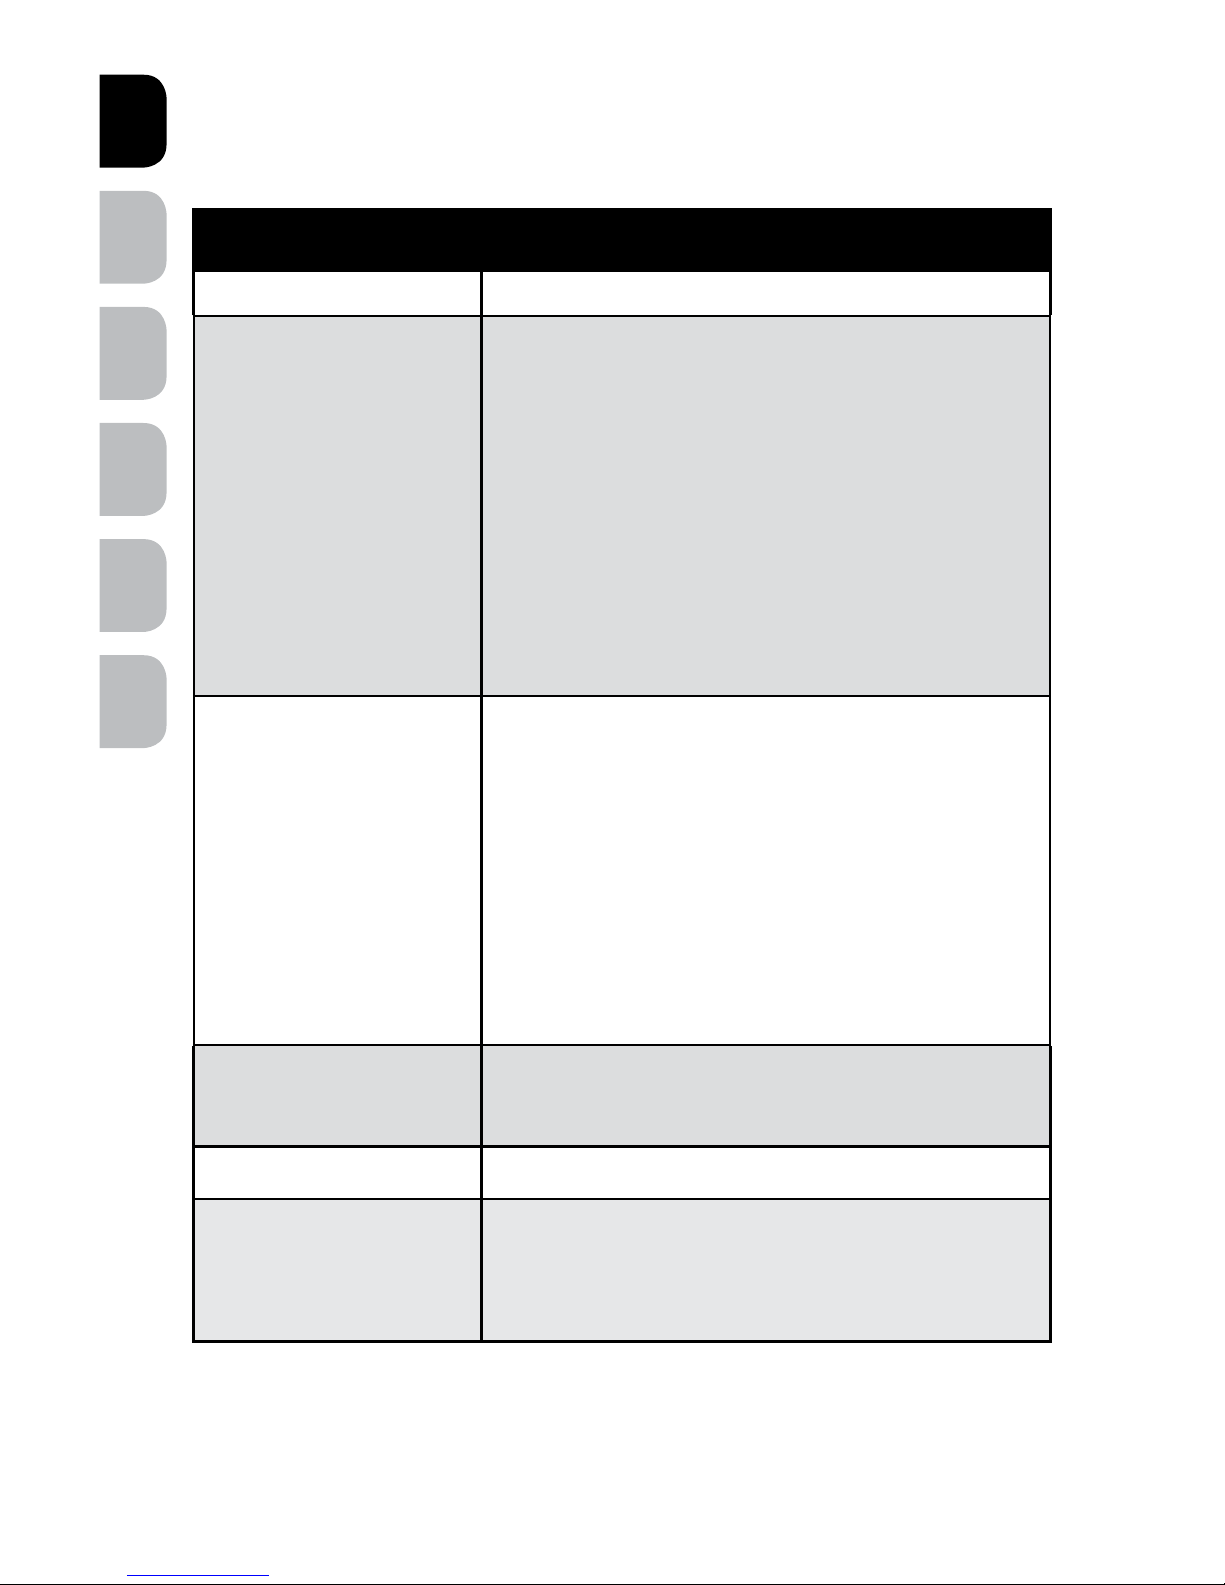
additional help.
Illuminating Color Condition Pet Door Status
RED
Solid only for two seconds after
selecting LOCKED Mode
LOCKED Mode
Flashing Low battery alert
Constant solid Internal failure has
occurred
GREEN
Solid only for two seconds after
selecting UNLOCKED Mode
UNLOCKED Mode
Flashing Learn Mode
YELLOW
Solid only for two seconds after
selecting AUTOMATIC Mode
AUTOMATIC Mode
Flashing Error alert
RED, GREEN AND
YELLOW
Flashing at the same time Sensitivity Test Mode
www.petsafe.net 19 18 www.petsafe.net
ENES FRIT NLDE
.
Troubleshooting
The answers to these questions should help you solve most problems you may have with
the Pet Door. If they do not, please contact our Customer Care Centre.
TROUBLESHOOTING
PROBLEM SOLUTION
The Pet Door does not
respond to the presence of
the SmartKey™ Electronic
Key when my pet is directly
in front of the Pet Door
within three seconds
• Check that the Pet Door is in AUTOMATIC Mode.
• Check that the SmartKey™ Electronic Key has been
programmed to the Pet Door.
• Check sensitivity level has been properly set, see
"Setting the Pet Door Sensitivity Level" section.
• Check that the RFA-67 battery in the SmartKey™
Electronic Key is screwed in tightly.
• Check that the batteries in the Pet Door are fresh.
• If the condition persists, check that there are no
radio-frequency transmitting devices or electronic
devices that radiate electrical energy, which may
interfere with the operation of the Pet Door.
Yellow light is flashing • Obstruction to the flap has been detected.
• Press the MODE-RESET button to cause the Pet Door
to attempt to lock the flap. Clear any obstructions
that keep the flap from locking. When the flap
successfully locks, normal operation is resumed.
• If your large SmartDoor
™
Electronic Pet Door does
not close properly, you can purchase an additional
magnet kit to help centre flap due to constant
wind or a variance between indoor and outdoor
pressure. Please call the Customer Care Centre for
further assistance.
Red light remains
illuminated (internal failure
has occurred)
• Remove batteries and replace them with a fresh set
of batteries. If that does not reset the red light, please
call the Customer Care Centre for additional help.
Red light is flashing • Low battery indicator, replace batteries.
Red, green and yellow
lights are flashing
• Sensitivity set mode has been activated. It will
automatically de-activate in thirty minutes, or can be
immediately de-activated by pressing the MODERESET button once.

www.petsafe.net 19
FR ITNL DEEN ES
.
Revert SmartKey™ Electronic Key to
Default Factory Setting
The Pet Door can be cleared of all additional programmed SmartKey™ Electronic Keys
EXCEPT the one included from the factory. To do this, first take out batteries from battery
compartment. Then, as you place batteries back into the battery compartment, hold
down the LEARN button. When LEARN button is held and the last battery is in place,
the red and green lights will illuminate three times. Now, all SmartKey™ Electronic Keys
programmed to the Pet Door have been cleared except the one SmartKey™ Electronic
Key included with your Pet Door.
Clear SmartKey™ Electronic Key
Memory
The Pet Door can be cleared of all programmed SmartKey™ Electronic Keys, even
the one included from the factory. To do this, first remove batteries from battery
compartment. Then, as you place batteries back into the battery compartment, hold
down the MODE-RESET button. When MODE-RESET button is held and the last battery
is in place, the red and yellow lights will illuminate three times. Now all SmartKey
™
Electronic Keys have been cleared.
Replacement Parts and Accessories
To purchase replacement parts for your PetSafe® SmartDoor™ Electronic Pet Door,
contact the Customer Care Centre or visit our website at www.petsafe.net to locate a
retailer near you.
www.petsafe.net 21 20 www.petsafe.net
ENES FRIT NLDE
.
Terms of Use and Limitation
of Liability
1. Terms of Use
Use of this Product is subject to your acceptance without modification of the terms,
conditions and notices contained herein. Use of this Product implies acceptance
of all such terms, conditions and notices. If you do not wish to accept these terms,
conditions, and notices, please return the Product, unused, in its original packaging
and at your own cost and risk to the relevant Customer Care Centre together with
proof of purchase for a full refund.
2. Proper Use
If you are unsure whether this Product is appropriate for your pet, please consult your
veterinarian or certified trainer prior to use. Proper use includes, without limitation,
reviewing the entire Operating Guide and any specific safety information statements.
3. No Unlawful or Prohibited Use
This Product is designed for use with pets only. Using this Product in a way that is not
intended could result in violation of Federal, State or local laws.
4. Limitation of Liability
In no event shall Radio Systems Corporation or any of its associated companies be
liable for (i) any indirect, punitive, incidental, special or consequential damage and/
or (ii) any loss or damages whatsoever arising out of or connected with the misuse of
this Product. The Purchaser assumes all risks and liability from the use of this Product
to the fullest extent permissible by law.
5. Modification of Terms and Conditions
Radio Systems Corporation reserves the right to change the terms, conditions
and notices governing this Product from time to time. If such changes have been
notified to you prior to your use of this Product, they shall be binding on you as if
incorporatedherein
Important Recycling Advice
Please respect the Waste Electrical and Electronic Equipment regulations in your
country. This equipment must be recycled. If you no longer require this equipment, do not
place it in the normal municipal waste system. Please return it to where it was purchased
in order that it can be placed in our recycling system. If this is not possible, please
contact the Customer Care Centre for further information.
www.petsafe.net 21
FR ITNL DEEN ES
.
Battery Disposal
Separate collection of spent batteries is required in many regions; check the regulations
in your area before discarding spent batteries.
SmartDoor
™
Electronic Pet Door:
This device operates on four Alkaline batteries of the type LR20/D-cell with a 1.5 Volt,
18,000 mAH capacity. Replace only with the equivalent batteries.
SmartKey
™
Electronic Key:
This device operates on two Lithium batteries of the type CR2032 with a 3 Volt, 220
mAH capacity. Replace only with equivalent battery available from the Customer
Care Centre.
Please see page 6 for instructions on how to remove the batteries from these products
for separate disposal.
Compliance
This equipment has been tested and found to comply with the requirements of the
relevant European directives. Before using this equipment outside the EU countries,
check with the relevant local authority. Unauthorised changes or modifications to
the equipment that are not approved by Radio Systems Corporation may violate EU
regulations, could void the user’s authority to operate the equipment, and will void
the warranty.
IC
This device complies with Industry Canada licence-exempt RSS standard(s). Operation
is subject to the following two conditions: (1) this device may not cause interference,
and (2) this device must accept any interference, including interference that may cause
undesired operation of the device.
ACMA
This device complies with the applicable EMC requirements specified by the ACMA
(Australian Communications and Media Authority).

www.petsafe.net 23 22 www.petsafe.net
ENES FRIT NLDE
.
Warranty
Three Year Non-Transferrable Limited Warranty
This Product has the benefit of a limited manufacturer’s warranty. Complete details of the
warranty applicable to this Product and its terms can be found at www.petsafe.net and/
or are available by contacting your local Customer Care Centre.
Europe – Radio Systems PetSafe Europe Ltd., 2nd Floor, Elgee Building, Market
Square, Dundalk, Co. Louth, A91 YR9X Ireland
Canada – Radio Systems Corporation, 10427 PetSafe Way, Knoxville, TN
37932 USA
Australia/New Zealand – In compliance with the Australian Consumer Law,
Warranties Against Defects, effective January 1, 2012, warranty details of this Product
are as follows: Radio Systems Australia Pty Ltd. (hereinafter referred to as “Radio
Systems”) warrants to the original retail purchaser, and not any other purchaser or
subsequent owner, that its Product, when subject to normal and proper residential use,
will be free from defects in material or workmanship for a period of three (3) years from
the purchase date. An “original retail consumer purchaser” is a person or entity who
originally purchases the Product, or a gift recipient of a new Product that is unopened
and in its original packaging. When serviced by Radio Systems Customer Service,
Radio Systems covers labour and parts for the first three years of ownership; after the
first three years, a service or upgrade charge will apply relative to replacement of the
Product with new or refurbished items at Radio Systems’ sole discretion.
The limited warranty is non-transferable and shall automatically terminate if the original
retail consumer purchaser resells the Radio Systems Product or transfers the property on
which the Radio Systems Product is installed. This Limited Warranty excludes accidental
damage due to dog chews; lightning damage; or neglect, alteration, and misuse.
Consumers who purchase products outside of Australia, New Zealand, or from an
unauthorised dealer will need to return the Product to the original place of purchase for
any warranty issues.
Please note that Radio Systems does not provide refunds, replacements, or upgrades for
change of mind, or for any other reason outside of these Warranty terms.
Claims Procedure: Any claim made under this Warranty should be made directly to
Radio Systems Australia Pty Ltd. Customer Care Centre at:
Radio Systems Australia Pty Ltd.
PO Box 7266, Gold Coast Mail Centre QLD 9726, Australia
Australia Residents: 1800 786 608
New Zealand Residents: 0800 543 054
Email: info@petsafeaustralia.com.au
To file a claim, a proof of purchase must be provided. Without a proof of purchase,
Radio Systems will not repair or replace faulty components. Radio Systems requests the
Consumer to contact the Radio Systems Customer Care Centre to obtain a Warranty

www.petsafe.net 23
FR ITNL DEEN ES
.
Return number, prior to sending the Product. Failure to do so may delay in the repair or
replacement of the Product.
If the Product is deemed to be faulty within 30 days from date of original purchase,
Radio Systems will organise for a replacement to be sent in advance of returning
the faulty Product. A Post Bag will be included with the replacement Product for the
return of the faulty Product. The Product must be returned within 7 days of receiving
the replacement. If the Product is deemed to be faulty after 30 days from the date of
original purchase, the consumer will be required to return the Product to Radio Systems
at the consumer’s own expense. Radio Systems will test and replace the faulty unit or its
components and return to the consumer free of charge, provided the Product is within its
said warranty period. This warranty is in addition to other rights and remedies available
to you under the law. Radio Systems goods come with guarantees that cannot be
excluded under the Australia Consumer Law. You are entitled to a replacement or refund
for a major failure and for compensation for any other reasonably foreseeable loss or
damage. You are also entitled to have the goods repaired or replaced if the goods fail
to be of acceptable quality and the failure does not amount to a major failure.
Should you have any queries or require any further information, please contact
our Customer Care Centre on 1800 786 608 (Australia) or 0800 543 054
(New Zealand).

www.petsafe.net 25 24 www.petsafe.net
ENES FRIT NLDE
.
CONSIGNES DE SÉCURITÉ IMPORTANTES
Description des termes et symboles utilisés dans ce manuel
Ce symbole est une alerte de sécurité. Sa présence vous
avertit d’un risque de blessure. Respecteztous les messages de sécurité qui suivent ce symbole afin d’éviter tout
risque de blessure ou de mort.
AVERTISSEMENT indique une situation dangereuse qui,
si elle n’est pas évitée, risque d’entraîner la mort ou des
blessures graves.
ATTENTION, utilisé avec le symbole d’alerte de sécurité,
indique une situation dangereuse qui, si elle n’est pas évitée, peut provoquer une blessure légère ou modérée.
ATTENTION, utilisé sans le symbole d’alerte de sécurité,
indique une situation dangereuse qui, si elle n’est pas
évitée, peut blesser votre animal.
AVIS indique les pratiques d’utilisation sûres qui ne risquent pas d’entraîner de blessures corporelles.
• Si vous avez des enfants à la maison, il est important de
tenir compte de la porte pour animaux pour la sécurité
des enfants. Laporte pour animaux pourrait être mal
employée par un enfant et l’exposer à des dangers
éventuellement présents de l’autre côté de la porte
pour animaux. Lesacheteurs/propriétaires qui ont une
piscine doivent s’assurer que la porte pour animaux est
surveillée en permanence et que la piscine est entourée
de barrières adéquates. Si vous effectuez une installation
qui pourrait créer un nouveau danger à l’extérieur ou à
l’intérieur de votre maison et que la porte pour animaux
y donne accès, Radio Systems® Corporation vous
recommande de protéger correctement l’accès à ce
danger potentiel ou de retirer la porte pour animaux. Le
panneau de fermeture ou le verrou, le cas échéant, est
fourni à des fins esthétiques et d’économie d’énergie; il
ne s’agit pas d’un dispositif de sécurité. Radio Systems®
Corporation décline toute responsabilité en cas
d’utilisation incorrecte du produit et la responsabilité
de surveiller l’ouverture créée par ce dispositif revient
entièrement à l’acheteur.
• Outils électriques. Risque de blessures graves, suivez
toutes les consignes de sécurité fournies avec vos
outils électriques. Veillez à toujours porter des lunettes
de protection.
Ci-après, «Nous» peut renvoyer collectivement à Radio Systems Corporation, Radio
Systems PetSafe Europe Ltd., Radio Systems Australia Pty Ltd., ainsi qu’à toute autre
filiale ou marque de Radio Systems Corporation.
www.petsafe.net 25
FR ITNL DEEN ES
.
Avantl’installation, l’utilisateur doit se familiariser avec les
réglementations de construction susceptibles d’affecter
l’installation de la porte pour animaux et déterminer, avec
l’aide d’un entrepreneur agréé, son caractère approprié
dans une installation donnée. Cette porte pour animaux
n’est pas une porte coupe-feu. Ilest important pour le
propriétaire et l’entrepreneur de prendre en compte tous
les risques éventuels à l’intérieur ou à l’extérieur de la porte
pour animaux, ainsi que tous les risques consécutifs aux
modifications ultérieures de votre propriété, et l’impact que
celles-ci peuvent avoir sur l’existence, l’utilisation, et même le
mauvais usage, de la porte pour animaux.
Pendant le dressage de votre animal, alors que la porte
pour animaux est en mode UNLOCKED (ouvert) assurezvous d’abaisser DÉLICATEMENT le rabat sur le dos de
votre animal. Pour éviter de le blesser, veillez à ce que votre
animal soit complètement passé à travers l’ouverture de la
porte pour animaux, pattes et queue comprises, avant de
relâcher complètement le rabat.
• Gardez ces instructions avec les documents importants;
veillez à les transférer au nouveau propriétaire de votre
maison, le cas échéant.
• Les modifications ou les changements non approuvés
peuvent annuler le droit de l’utilisateur à utiliser l’appareil
et invalider sa garantie.
CONSERVEZ CES INSTRUCTIONS

www.petsafe.net 27 26 www.petsafe.net
ENES FRIT NLDE
.
Mercid’avoir choisi la marque PetSafe®. Votre relation avec votre animal doit être
faite de moments mémorables et de complicité mutuelle. Nos produits et nos outils de
dressage permettent aux animaux et à leurs propriétaires d’avoir de meilleures relations.
Pour toute question concernant nos produits ou le dressage de votre
animal, veuillez consulter notre site internet, www.petsafe.net, ou
contacter notre service clientèle. Pour obtenir la liste des numéros
de téléphone de notre service clientèle, consultez notre site internet,
www.petsafe.net.
Pour bénéficier pleinement de votre garantie, veuillez enregistrer votre article sous
30jours sur le site www.petsafe.net. En enregistrant votre produit et en conservant votre
reçu, vous bénéficierez d’une garantie complète et d’une réponse plus rapide de la
part du service clientèle. Plus important encore, nous ne transmettrons ni ne vendrons
de renseignements importants à votre sujet à personne. Unedescription complète de la
garantie est disponible sur le site www.petsafe.net.
Table des matières
Contenu du kit . . . . . . . . . . . . . . . . . . . . . . . . . . . . . . . . . . . . . .27
Outils nécessaires . . . . . . . . . . . . . . . . . . . . . . . . . . . . . . . . . . . .27
Fonctionnement de la porte pour animaux. . . . . . . . . . . . . . . . . . . . . . .27
Installer la porte pour animaux sur un mur avec le kit de conversion SmartDoor™. .28
Définitions . . . . . . . . . . . . . . . . . . . . . . . . . . . . . . . . . . . . . . . . 28
PRÉPARER . . . . . . . . . . . . . . . . . . . . . . . . . . . . . . . . . . . . . . .30
Placer les piles dans la porte pour animaux. . . . . . . . . . . . . . . . . . . . .30
Placer la batterie dans la clé électronique SmartKey™ . . . . . . . . . . . . . . .30
Vérifier les modes de fonctionnement avant installation . . . . . . . . . . . . . . 31
Vérifier l’emplacement de la porte pour animaux avant installation . . . . . . . .32
INSTALLER . . . . . . . . . . . . . . . . . . . . . . . . . . . . . . . . . . . . . . .33
Installer votre porte pour animaux . . . . . . . . . . . . . . . . . . . . . . . . . .33
PARAMÉTRER . . . . . . . . . . . . . . . . . . . . . . . . . . . . . . . . . . . . .37
Paramétrer le niveau de sensibilité de la porte pour animaux . . . . . . . . . . .37
Comprendre la sensibilité et la zone active . . . . . . . . . . . . . . . . . . . . .38
Enregistrer une nouvelle clé électronique SmartKey™ . . . . . . . . . . . . . . . .38
Attacher la clé électronique SmartKey™ au collier de l’animal . . . . . . . . . . .38
UTILISER . . . . . . . . . . . . . . . . . . . . . . . . . . . . . . . . . . . . . . . .39
Utiliser votre porte pour animaux . . . . . . . . . . . . . . . . . . . . . . . . . .39
Dépannage . . . . . . . . . . . . . . . . . . . . . . . . . . . . . . . . . . . . . . .40
Remettre la clé électronique SmartKey™ aux réglages d’usine par défaut . . . . . .41
Effacer la mémoire de la clé électronique SmartKey™. . . . . . . . . . . . . . . . .41
Pièces de rechange et accessoires . . . . . . . . . . . . . . . . . . . . . . . . . . . 41
Conditions d’utilisation et limitation de responsabilité. . . . . . . . . . . . . . . . .42
Remarque importante concernant le recyclage . . . . . . . . . . . . . . . . . . . . 42
Élimination des batteries usagées . . . . . . . . . . . . . . . . . . . . . . . . . . .43
Conformité. . . . . . . . . . . . . . . . . . . . . . . . . . . . . . . . . . . . . . . .43
Garantie . . . . . . . . . . . . . . . . . . . . . . . . . . . . . . . . . . . . . . . . .43
www.petsafe.net 27
FR ITNL DEEN ES
.
Contenu du kit
Fits wooden doors < 51 mm thick
S’adapte aux portes en bois < 51 mm d’épaisseur
Se ajusta a puertas de madera < 51 mm de grosor
Adatta per porte di legno spessore < 51 mm
Holztüren < 51 mm stark
Fits PVC/uPVC & Metal < 51 mm thick
S’adapte aux supports en PVC, uPVC et métal< 51 mm d’épaisseur
Puede colocarse en puertas de PVC, uPVC y metal < 51 mm de grosor
Può essere montata su PVC, uPVC e metallo < 51 mm
Für PVC, UPVC und Metall < 51 mm stark
Fits brick walls up to 203 mm (requires Wall Entry Kit – sold separately)
Compatible avec les murs en brique jusqu’à 203 mm (requiert un kit pour mo ntage mura l – vendu sépa rément)
Past in stenen muren van maximaal 203 mm (vereist installatiekit voor muren – apart verko cht)
Puede colocarse en paredes de ladrillos de hasta 203 mm (requiere los túneles para inst alación en pared – ve ndido por separ ado)
Può essere montata su pareti di mattone fino a 203 mm di spessore (richiede un tunnel pe r montaggio su p arete– venduto se paratamente)
F
ür Ziegelwände bis zu 203 mm geeignet (Installationskit Wand erforderlich – Separat er hältlich)
NOTICE/AVIS/AANWIJZING/AVISO/AVVISO/HINWEIS
When applying cutting template there should be a minimum of 7.6 cm between the
bottom and sides of the door and the outer edge of the template to maintain the
structural integrity of the door.
Lorsque vous fixez le gabarit de découpe, un espace d’au moins 7,6 cm doit être présent
entre le bas et les côtés de la porte et le coin supérieur extérieur du gabarit; cela permet de
maintenir l’intégrité structurelle de la porte.
Bij het gebruik van een snijsjabloon moet minimaal 7,6 cm ruimte worden gelaten tussen de
onderkant en zijkanten van de deur en de buitenrand van de sjabloon, zodat de structurele
integriteit van de deur niet wordt aangetast.
Cuando utilice la plantilla de corte, deje un espacio mínimo de 7,6 cm entre la
parte inferior, los laterales de la puerta y el borde externo
de la plantilla para conservar
la integridad estructural de la puerta.
Quando si applica la sagoma lasciare almeno 7,6 cm tra la base e i lati della porta e il bordo
esterno della sagoma per mantenere l’integrità strutturale della porta.
Bei Anwendung der Schnittvorlage sollte zwischen der Unterseite und den Seiten der Tür und
der Außenkante der Schablone mindestens ein Abstand von 7,6 cm vorhanden sein, damit die
physikalische Stabilität der Tür bestehen bleibt.
Operating Guide
Manuel d’utilisation
Gebruiksaanwijzing
Manual de funcionamiento
Guida all'uso
Gebrauchsanweisung
Exterior Frame
Cadre extérieur
Buitenframe
Marco exterior
Struttura esterna
Außenrahmen
Cutting Template
Gabarit de coupe
Sjabloon voor uitsnijden
Plantilla para el corte
Sagoma per il taglio
Schneideschablone
Battery
(PetSafe
®
RFA-67)
Batterie
(PetSafe
®
RFA-67)
Batterij
(PetSafe
®
RFA-67)
Batería
(PetSafe
®
RFA-67)
Batteria
(PetSafe
®
RFA-67)
Batterie
(PetSafe
®
RFA-67)
SmartKey
™
Electronic Key
Clé électronique
SmartKey
™
SmartKey
™
-elektronische sleutel
Llave electrónica
SmartKey
™
Chiave elettronica
SmartKey
™
SmartKey
™
Elektronischer
Schlüssel
Key Ring
Porte-clés
Sleutelring
Anilla para llaves
Anello portachiavi
Schlüsselring
Interior Frame with Flap
Cadre intérieur avec rabat
Binnenframe met klep
Marco interno con batiente
Struttura interna con flap
Innenrahmen mit Klappe
Mounting Screws
(8 pcs. large door)
Vis de montage
(8 pour grande porte)
Bevestigingsschroeven
(8 stuks large luik)
Tornillos de montaje
(8 ud. puerta grande)
Viti di montaggio
(8 pz. porta grande)
Befestigungsschrauben
(8 Stck. große Tür)
Manuel d’utilisation
Cadre intérieur
avec rabat
À l’intérieur du compartiment des piles se trouvent la clé
SmartKey
™
, une batterie RFA-67, les vis de montage et
un anneau de porte-clés.
Cadre extérieur
Gabarit de coupe
Vis de montage
(4 pour petite porte)
(8 pour grande porte)
Porte-clés
Clé électronique
SmartKey
™
Batterie
(PetSafe
®
RFA-67)
Outils nécessaires
Fonctionnement de la porte
pour animaux
Avec sa technologie radio-fréquence, la porte électronique pour animaux SmartDoor™
détecte le signal unique émis par la clé électronique SmartKey™ et déclenche l’ouverture
du rabat, alimenté par des piles, pour que vos animaux puissent entrer et sortir à
leur guise. Lorsque la porte électronique pour animaux SmartDoor™ ne détecte plus
la clé électronique SmartKey™ de votre animal, le battant se referme et se verrouille
automatiquement. La porte électronique pour animaux SmartDoor™ détecte jusqu’à cinq
clés électroniques SmartKey™ enregistrées et peut également fonctionner selon deux
autres modes: mode fermé et mode ouvert.
• Scie sauteuse ou
scie à guichet
• Perceuse électrique
• Foret de
10mm (3/8”)
• Tournevis à pointe
cruciforme
• 4 piles D (LR20)
(nécessaires)
• Niveau
• Ruban adhésif
• Crayon
• Ficelle

www.petsafe.net 29 28 www.petsafe.net
ENES FRIT NLDE
.
Installer la porte pour animaux sur
un mur avec le kit de conversion
SmartDoor
™
Les kits de conversion SmartDoor™ sont disponibles pour installer la porte pour animaux
sur un mur. Le kit de conversion pour montage mural encadre les zones exposées,
donnant à l’installation de votre porte un aspect propre, lisse et bien fini. Pour les murs
en brique, en béton ou en blocs, une extension supplémentaire est disponible pour
le grand kit de conversion. Remarque: le kit de conversion SmartDoor™ est conçu
pour être encastré dans le mur en brique et ne nécessite pas d’extensions de tunnel
supplémentaires. Vous pouvez acheter un kit de conversion SmartDoor™ ou de grandes
extensions sur certains sites en ligne, sur www.petsafe.net ou en appelant notre service
clientèle. Voir la section «Pièces de rechange» pour plus d’informations.
Définitions
Technologie radio-fréquence– Utilisation d’un signal de radio-fréquence
pouvant être transmis sans fil.
Clé électronique SmartKey
™
– La clé électronique SmartKey™ est un
émetteur fonctionnant sur batterie et émettant un code unique en direction de la
porte SmartDoor™.
Porte électronique pour animaux SmartDoor
™
– La porte électronique pour
animaux SmartDoor™ est un récepteur intelligent qui utilise une antenne interne pour
détecter un code SmartKey™ unique permettant l’entrée et la sortie de certains animaux.
Rabat SmartDoor
™
– Le rabat SmartDoor™ est un rabat en plastique, résistant aux
intempéries et doté d’une protection contre les rayons UV.
Antenne - L’antenne est située à l’intérieur de la porte pour animaux. Elle reçoit le
signal radio émis par la clé électronique SmartKey
™
. La clé électronique SmartKey™ doit
être située à proximité relative de l’antenne pour que cette dernière puisse détecter le
code unique.
Interférences radio-fréquence - Les interférences radio-fréquence sont dues
aux signaux de radio-fréquence émis par d’autres appareils domestiques ou produits
électroniques d’usage courant qui altèrent la capacité de la porte pour animaux à
recevoir les signaux émis par la clé électronique SmartKey
™
. Les interférences radiofréquence ou «bruits parasites» peuvent provenir de sources diverses. Les interférences
peuvent être minimes, constantes ou sans cesse variables, selon l’utilisation et la
proximité d’autres appareils domestiques et électroniques pendant le fonctionnement de
la porte pour animaux. Il est recommandé de placer les appareils domestiques et les
produits électroniques d’usage courant à au moins 60cm de l’endroit où est installée la
porte pour animaux.
Bouton de sensibilité – Le bouton de sensibilité est bien placé, sur le cadre intérieur
de la porte pour animaux. Vous pouvez facilement ajuster la sensibilité de la porte pour
animaux, pour prendre en compte les interférences et les facteurs environnementaux
courants et ainsi optimiser le fonctionnement de la porte pour animaux.

www.petsafe.net 29
FR ITNL DEEN ES
.
Niveau de sensibilité – Le niveau de sensibilité peut s’ajuster en tournant le bouton
de sensibilité pour passer du minimum au maximum, en fonction des interférences radiofréquence, du support et/ou de l’emplacement de la porte pour animaux. Le niveau de
sensibilité est paramétré en usine et ne doit pas être ajusté avant la fin de l’installation.
Par exemple, il peut être nécessaire d’augmenter le niveau de sensibilité si la porte
SmartDoor™ est installée sur une porte en métal. Voir la section «Paramétrer le niveau
de sensibilité de la porte pour animaux» pour plus d’informations sur le réglage de
la sensibilité.
Bouton MODE-RESET (Réinitialisation du mode) – Sélectionnez facilement
un mode de fonctionnement sur votre porte pour animaux en gardant le bouton de
réinitialisation du mode enfoncé pour faire défiler les différents modes: LOCKED
(Fermé), UNLOCKED (Ouvert) ou AUTOMATIC (Automatique).
Bouton LEARN (Apprentissage) – Le bouton LEARN (Apprentissage) permet
d’enregistrer un code de clé électronique SmartKey
™
unique, que la porte pour animaux
doit détecter. Une clé électronique SmartKey™ vous est fournie, enregistrée et prête à
l’emploi. Vous pouvez enregistrer jusqu’à cinq clés électroniques SmartKey™ (chacune
vendue séparément) sur une porte électronique pour animaux SmartDoor™.
Modes de fonctionnement
Mode LOCKED (Fermé) – Le rabat SmartDoor
™
est verrouillé et ne permet à
aucun animal d’entrer ou de sortir.
Mode UNLOCKED (Ouvert) – Le rabat SmartDoor™ est déverrouillé et permet à
tous les animaux d’entrer ou de sortir.
Mode AUTOMATIC (Automatique) – Le rabat SmartDoor™ est
verrouillé électroniquement et permet à un animal portant une clé électronique
SmartKey™ enregistrée d’entrer et de sortir.
Compartiment des piles – Le compartiment des piles se situe sur le cadre
intérieur et requiert quatre piles D (LR20). Pour plus de commodité, les vis de montage
nécessaires à l’installation, l’anneau de porte-clés, la clé électronique SmartKey
™
et la
batterie RFA-67 se trouvent tous à l’intérieur du logement des piles pendant l’expédition.
Batterie RFA-67 – La batterie RFA-67 alimente la clé électronique SmartKey
™
et
peut être remplacée. D’autres batteries RFA-67 sont disponibles en magasin, auprès
du service clientèle PetSafe® ou sur le site www.petsafe.net. La durée de vie habituelle
d’une batterie RFA-67 est d’environ six mois.
Dimensions complètes– Dimensions de la porte pour animaux, cadre
extérieur inclus
Dimensions de la découpe– Taille de l’ouverture découpée dans la porte du
propriétaire pour pouvoir installer correctement la porte pour animaux
Largeur d’épaule maximale de l’animal – Distance entre les épaules de
l’animal au niveau du torse
Taille du battant de rechange – Taille du rabat lorsqu’il est retiré de la porte
pour animaux
Dimensions de l’ouverture du rabat – Espace de rabat utilisable permettant
à votre animal d’entrer et de sortir par la porte pour animaux
Cadre intérieur – Cadre de la porte pour animaux à l’intérieur de la maison
Cadre extérieur – Cadre de la porte pour animaux à l’extérieur de la maison
www.petsafe.net 31 30 www.petsafe.net
ENES FRIT NLDE
.
PRÉPARER
Préparer la porte pour animaux
• Lisez l’intégralité de ce manuel avant de découper ou de modifier
une ouverture dans la porte ou le mur.
• Ne procédez pas à la découpe ou à l’installation avant d’avoir
complété toutes les étapes de cette section. Ne retirez pas
l’autocollant de sensibilité avant la fin de l’installation.
Placer les piles dans la porte pour animaux
1. A l’aide d’un tournevis à pointe cruciforme,
retirez les deux vis situées sur le couvercle
du compartiment des piles.
2. Retirez le couvercle du compartiment des piles.
3. Consultez le côté intérieur du couvercle du
compartiment pour orienter correctement les
quatre piles D (LR20).
4. Replacez le couvercle du compartiment des
piles et revissez les deux vis.
5. Lorsque vous insérez les piles dans la porte
pour animaux, le voyant rouge s’allume
pendant deux secondes et le rabat se règle
en mode fermé, à moins qu’il ne se trouve
déjà en mode fermé.
REMARQUE: la porte doit se trouver en position verticale pour que le rabat se centre
convenablement et fonctionne correctement.
Placer la batterie dans la clé électronique
SmartKey
™
1. Placez la batterie PetSafe® RFA-67 sur le
fond de la clé électronique SmartKey™.
2. À l’aide d’une pièce, faites tourner la
batterie PetSafe
®
RFA-67 d’un quart de tour
dans le sens des aiguilles d’une montre pour la sécuriser.
REMARQUE: la clé électronique SmartKey™ est dotée d’un voyant rouge qui clignotera
lorsque la batterie PetSafe® RFA-67 est faible; celle-ci doit alors être remplacée dès
que possible.
ETAPE 1
ETAPE 2
 Loading...