

Page 1

PBC19-10765
Bark Control Collar
Collier anti-aboiements
Antiblafhalsband
Collar antiladridos
Collare antiabbaio
Anti-Bellhalsband
Operating Guide
Manuel d’utilisation
Gebruiksaanwijzing
Manual de funcionamiento
Guida all’uso
Gebrauchsanweisung
Please read this entire guide before beginning
Veuillez lire ce manuel en entier avant de commencer
Gelieve deze gids volledig door te lezey voordat u begint
Por favor, este manual lea completo antes de empazar
Si prega di leggere attentamente la guida al uso prima di utilizzare il collare
Bitte lesen Sie die gesamte Betriebsanleitung vor dem Trainingsbeginn
Page 2

IMPORTANT SAFETY INFORMATION
Explanation of Attention Words and Symbols used in this guide
This is the safety alert symbol. It is used to alert you to potential personal
injury hazards. Obey all safety messages that follow this symbol to avoid
possible injury or death.
WARNING
CAUTION
CAUTION
______________________________________________________________________________________________
WARNING
CAUTION
WARNING indicates a hazardous situation which, if not avoided, could
result in death or serious injury.
CAUTION, used with the safety alert symbol, indicates a hazardous
situation which, if not avoided, could result in minor or moderate injury.
CAUTION, used without the safety alert symbol, indicates a hazardous
situation which, if not avoided, could result in harm to your pet.
Not for use with aggressive dogs. Do not use this product if your dog is
aggressive, or if your dog is prone to aggressive behaviour. Aggressive
dogs can cause severe injury and even death to their owner and others.
If you are unsure whether this product is appropriate for your dog, please
consult your veterinarian or a certifi ed trainer.
Please read and follow the instructions in this manual. Proper fi t of the collar
is important. A collar worn for too long, or made too tight on the pet’s neck
may cause skin damage. This is called bed sores; it is also called decubitus
ulcers or pressure necrosis.
• Avoid leaving the collar on the dog for more than 12 hours per day.
• When possible reposition the collar on the pet’s neck every 1 to 2 hours.
• Check the fi t to prevent excessive pressure; follow the instructions in
this manual.
• Never connect a lead to the electronic collar; it will cause excessive
pressure on the contacts.
• When using a separate collar for a lead, don’t put pressure on the
electronic collar.
• Wash the dog’s neck area and the contacts of the collar weekly with a
damp cloth.
• Examine the contact area daily for signs of a rash or a sore.
• If a rash or sore is found, discontinue use of the collar until the skin has
healed.
• If the condition persists beyond 48 hours, see your veterinarian.
For additional information on bed sores and pressure necrosis, please visit
our website.
These steps will help keep your pet safe and comfortable. Millions of pets
are comfortable while they wear stainless steel contacts. Some pets are
sensitive to contact pressure. You may fi nd after some time that your pet is
very tolerant of the collar. If so, you may relax some of these precautions. It
is important to continue daily checks of the contact area. If redness or sores
are found, discontinue use until the skin has fully healed.
2 www.petsafe.net
Page 3

Thank you for choosing PetSafe®, the best selling brand of electronic training solutions in
the world. Our mission is to be the most trusted brand in the pet ownership experience.
We want to ensure your pet’s safety by providing you with the tools and techniques to
successfully train your pet. If you have any questions, please contact the Customer
Care Centre. For a listing of Customer Care Centre telephone numbers in your
area, visit our website at www.petsafe.net.
To get the most protection out of your warranty, please register your product within
30 days at www.petsafe.net. By registering and keeping your receipt, you will enjoy the
product’s full warranty and, should you ever need to call the Customer Care Centre,
we will be able to help you faster. Most importantly, PetSafe® will never give or sell your
valuable information to anyone. Complete warranty information is available online at
www.petsafe.net.
_____________________________________________________________________________
Table of Contents
Components ................................................................................................................ 4
Features .......................................................................................................................4
How the PetSafe® Bark Control Collar Works ................................................................ 5
Key Defi nitions ............................................................................................................ 5
Fit the Bark Control Collar .......................................................................................... 6
To Insert and Remove the Battery ................................................................................ 8
What to Expect During Use of the Bark Control Collar ................................................ 9
Regular Maintenance ................................................................................................... 9
To Test the Bark Control Collar .................................................................................. 10
Accessories ................................................................................................................ 10
Frequently Asked Questions ....................................................................................... 11
Troubleshooting ......................................................................................................... 12
To Discharge the Bark Control Collar ........................................................................ 12
Battery Disposal ........................................................................................................ 13
Compliance ............................................................................................................... 13
Terms of Use and Limitation of Liability .................................................................... 14
Français ................................................................................................................... 15
Nederlands .............................................................................................................. 27
Español .................................................................................................................... 40
Italiano ..................................................................................................................... 53
Deutsch .................................................................................................................... 66
www.petsafe.net 3
Page 4
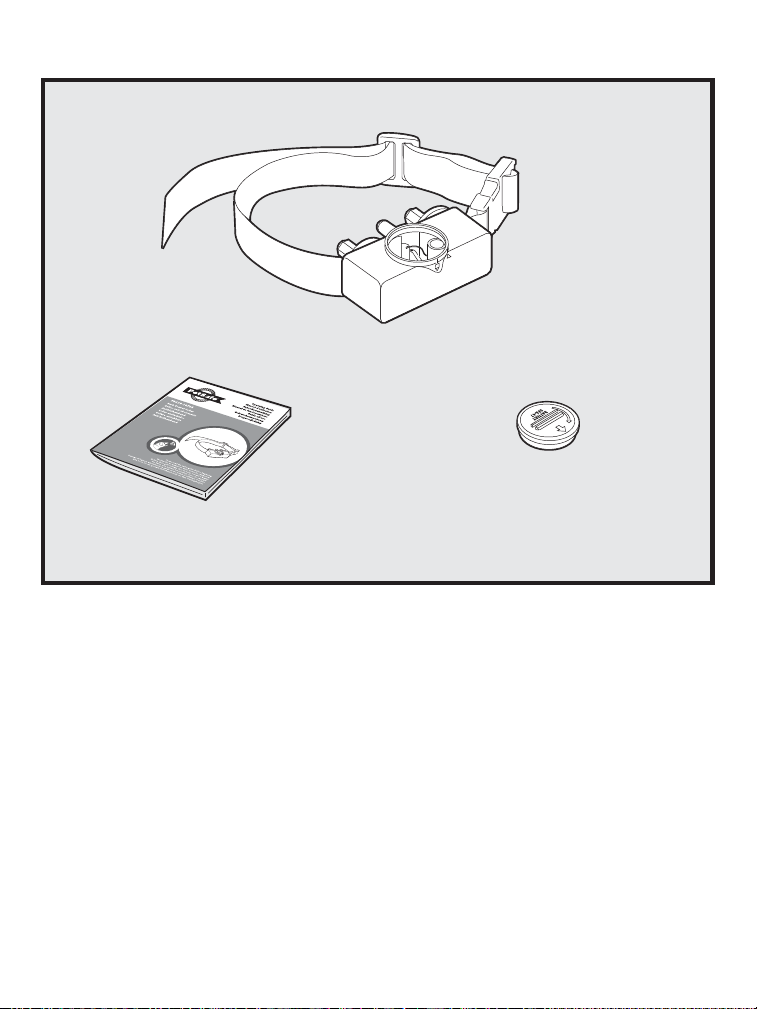
Components
PetSafe
Bark Control Collar
Operating Guide
®
(PetSafe
Battery
®
RFA-67D-11)
Features
• 6 levels of static correction, automatically adjusts to your dog’s temperament
starting at the lowest level
• Waterproof
• Low Battery Indicator Light
4 www.petsafe.net
Page 5

How the PetSafe® Bark Control Collar Works
Effective pet training requires consistency. The PetSafe® Bark Control Collar
automatically and consistently corrects excessive barking in dogs. When the
vibration of your dog’s bark triggers the sensor probe, a static correction is
administered through the contact points. The Bark Control Collar starts with
the lowest level of correction and then increases through 6 levels each time
your dog barks within 30 seconds of the previous bark. If your dog does not
bark again within 30 seconds, the Bark Control Collar resets itself to the
lowest level of correction. Along with each static correction, there will be an
audible beep. For safety, the Bark Control Collar shuts off for 3 minutes if
your dog barks 15 times or more within 50 seconds.
Important: Before playing with your dog, remove the Bark Control Collar.
The activity may cause your dog to bark, which could lead to him associating
the play with the static correction.
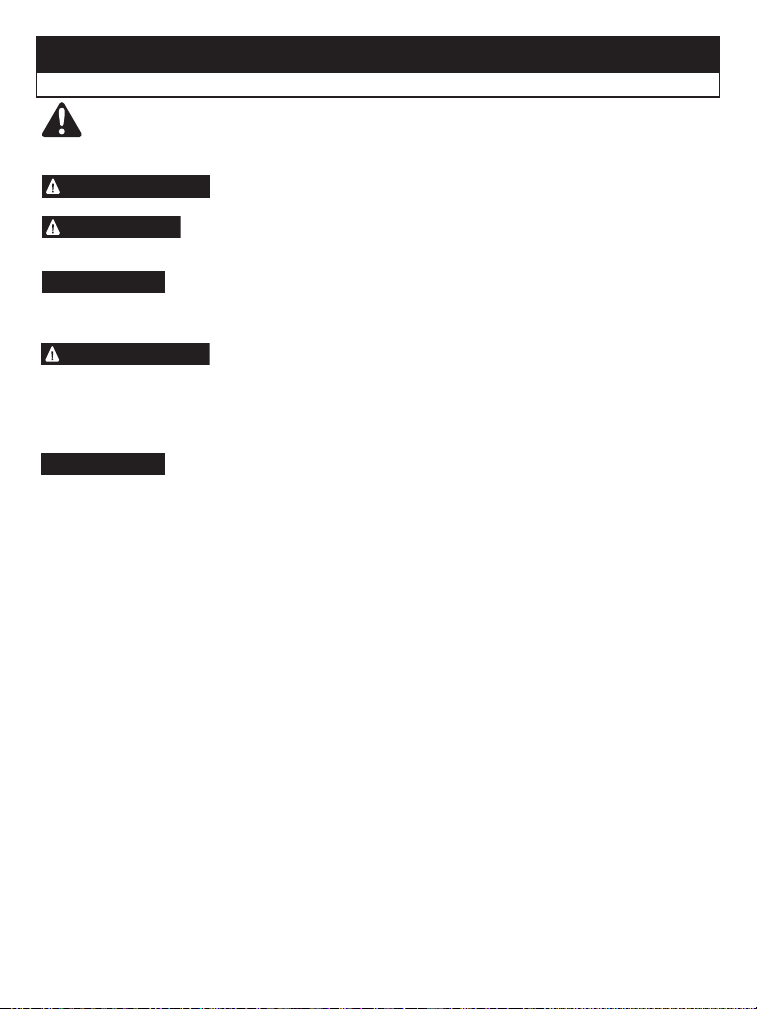
Key Defi nitions
Contact Points: Deliver the safe
static correction.
Sensor Probe: Detects the
vibrations of your dog’s barking.
Note: The Sensor Probe is not
adjustable.
Low Battery Indicator: The
Indicator Light will begin fl ashing
when battery is low.
www.petsafe.net 5
Contact Points
Sensor Probe
Washers
Battery
(Underside)
Low Battery
Indicator Light
RFA-67
BATTERY 6V
Page 6

Fit the Bark Control Collar
Important: The proper fi t and placement of your Bark Control Collar is
important for effective operation. The Contact Points must have direct contact
with your dog’s skin on the underside of his neck.
To assure a proper fi t, please follow these steps:
1. Make sure that the battery is not installed in the Bark Control Collar.
2. Start with your dog standing comfortably.
3. Place the Bark Control Collar on your dog’s neck close to the ears. Centre
the Contact Points underneath your dog’s neck, touching the skin.
YES
CAUTION
Never shave the dog’s neck; this may lead to a rash or infection..
You may need to trim the hair in the area of the Contact Probes.
NO
4. Check the tightness of the Bark Control Collar by inserting one fi nger
between the end of a Contact Point and your dog’s neck. The fi t should be
snug but not constricting.
5. Allow your dog to wear the Bark
Control Collar for several minutes
then recheck the fi t. Check the fi t
again as your dog becomes more
comfortable with the Bark Control
Collar.
CAUTION
You should not make the collar any more tight than is required
for good contact. A collar that is too tight will increase the risk of pressure
necrosis in the contact area.
6 www.petsafe.net
Page 7
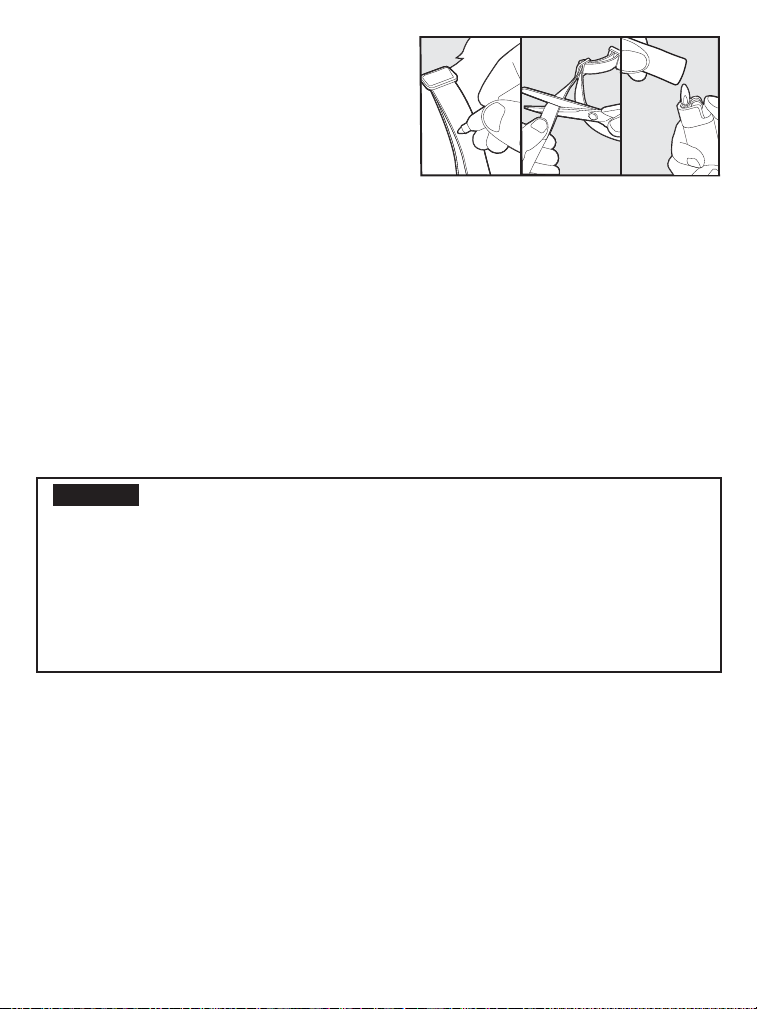
6. Trim the collar as follows:
a. Mark the desired length of the Bark
Control Collar with a pen. Allow for
growth if your dog is young or grows a
thick winter coat.
b. Remove the Bark Control Collar from
your dog and cut off the excess.
c. Before placing the Bark Control Collar back onto your dog, seal the edge
of the cut collar by applying a fl ame along the frayed edge.
Care and Cleaning
• Your dog’s neck and the Contact Points must be washed weekly with a
damp cloth.
• Be sure that your pet’s neck is thoroughly dry before placing the Receiver
Collar back on his neck.
CAUTION
• For comfort, safety and effectiveness of this product, please ensure that you check
the fi t of your pet’s collar frequently. If any skin irritation is observed, discontinue
the use of the collar for a few days. If the condition persists beyond 48 hours, see
your veterinarian.
• Do not attach a lead to the collar. This can result in pulling the Contact Points too
tightly against your pet’s neck. Attach a lead to a separate, non-metallic collar or
harness, making sure the extra collar does not put pressure on the Contact Points.
Risk of skin damage.
www.petsafe.net 7
.
Page 8

To Insert and Remove the Battery
Note: Do not install the battery while the Bark Control Collar is on your dog.
This Bark Control Collar
utilizes a replaceable PetSafe®
battery (RFA-67D-11). This
unique battery is designed
to make battery replacement
easier and increase water
protection.
T
o insert the battery, align the
symbols on the battery (arrow)
and Bark Control Collar
(triangle). Use a large coin
to turn the battery clockwise
until the arrow lines up
with the lock symbol on the
housing.
To remove the battery, turn
the battery counter-clockwise
using a large coin.
WARNING
discard the used battery properly.
A replacement PetSafe® battery (RFA-67D-11) can be found through our
Customer Care Centre and at many retailers. For a listing of Customer Care Centre
telephone numbers or a retailer near you, visit our website at www.petsafe.net.
DO NOT attempt to cut into or pry open the battery. Be sure to
Battery Life
Average battery life is 3 to 6 months, depending on how often your dog barks.
However, due to your dog’s learning process, your fi rst battery may not last as
long as replacement batteries.
Low Battery Indicator
During normal operation the Indicator Light remains off. As the product is
used, the battery will be drained to a weakened state. At this point, the Indicator
Light will begin to fl ash to show that it is time to change the battery.
8 www.petsafe.net
Page 9

What to Expect During Use of the
Bark Control Collar
Important: Do not leave your dog alone the fi rst few times he receives a
static correction.
Place the Bark Control Collar properly on your dog and wait nearby until he barks.
Most dogs will understand very quickly that the Bark Control Collar is disrupting
their urge to bark and will relax and stop barking. Some dogs will bark more,
and as the static correction from the Bark Control Collar may be surprising or
startling, some dogs may vocalize in response to the initial correction.
Rarely, a dog may get into a bark-correction-bark-correction cycle that could be
quite overwhelming. If this happens, reassure your dog with calm, soothing tones.
As your dog relaxes, he will understand that if he becomes quiet, he will not receive
any more static corrections. The small minority of dogs that have this reaction will
only have it the fi rst time they wear the Bark Control Collar.
You should notice a reduction in your dog’s barking within the fi rst couple of days
that he wears the Bark Control Collar. At this point, some dog owners feel that
the problem has been solved, but in most cases the learning process is still not
complete. Most dogs will “test” this new learning experience and will increase
their attempts to bark. This usually occurs during the second week a dog wears
the Bark Control Collar. If this does occur, remain consistent and do not alter
your use of the Bark Control Collar. You must place the Bark Control Collar on
your dog in every situation when you expect him to be quiet. If your dog is not
wearing the Bark Control Collar, he may resume barking and his learning would
suffer a setback.
Regular Maintenance
• Check Contact Points for tightness weekly.
Note: Do not adjust the factory preset Sensor Probe.
• Clean Contact Points weekly.
• Check your dog’s neck for irritation and wash
neck weekly.
www.petsafe.net 9
R
F
A
-
6
7
B
ATTER
Y 6V
Page 10

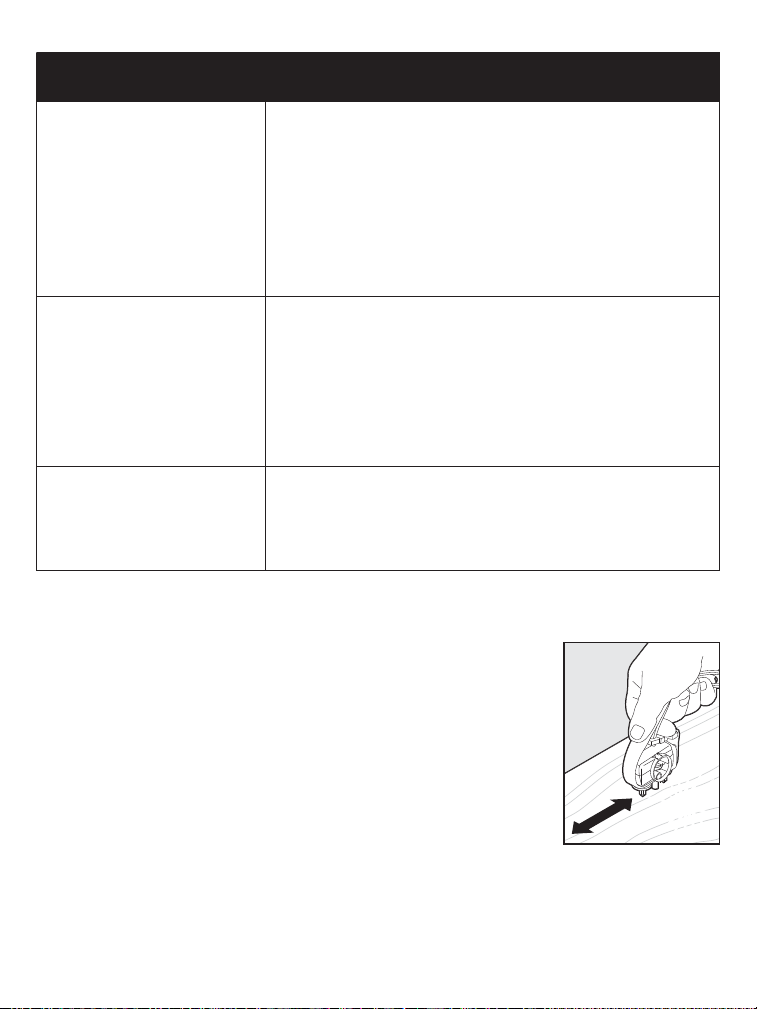
To Test the Bark Control Collar
Slide the Sensor Probe across a rough surface for at least
25 cm (10 in). The Bark Control Collar should beep. If
your Bark Control Collar doesn’t beep during this test,
see “The Bark Control Collar does not beep” in the
“Troubleshooting” section, and continue with the
second step.
Accessories
To purchase additional accessories for your PetSafe® Bark Control Collar, visit
our website at www.petsafe.net to locate a retailer near you and for a listing of
Customer Care Centre telephone numbers in your area.
Component Part Number
Battery - two pack RFA-67D-11
Replacement Collar RFA-68
Accessory Pack (Extra Contact Points,
washers, and battery)
RFA-118
10 www.petsafe.net
Page 11

Frequently Asked Questions
Will my dog stop
barking completely?
Will another dog’s
bark set off the Bark
Control Collar?
Will it hurt my pet?
Will the Bark Control
Collar work for my
dog?
Can I attach a lead
to the Bark Control
Collar?
• The Bark Control Collar effectively and humanely
stops most barking when it is worn. It should only
be worn during periods of unwanted barking.
• No.
• No. The static stimulation is designed to get your
pet’s attention, but not punish him. The initial
static correction may startle your dog; most pets
will only receive a few static corrections during
normal usage.
• The Bark Control Collar is safe and effective for
all breeds and sizes of dogs, though it may be
too large for dogs under 3.6 kg (8 lbs) to wear
comfortably.
• The system should only be used with pets who
are over 6 months of age. If your pet is injured or
its mobility is otherwise impaired, contact your
veterinarian or professional trainer before use.
• No. This can result in pulling the Contact Points
too tightly against your pet’s neck. Attach a lead to a
separate, non-metallic collar, making sure the extra
collar does not put pressure on the Contact Points.
www.petsafe.net 11
Page 12
Troubleshooting
The Bark Control
Collar does not beep.
My dog keeps barking
(does not respond to
the static correction).
The Indicator Light
keeps fl ashing.
• Test the Bark Control Collar (see “To Test the
Bark Control Collar” section).
• If your Bark Control Collar does not beep during
this test, try the same test on a rougher surface.
• Ensure that the battery is properly installed.
• Replace the battery.
• If the Bark Control Collar still does not beep,
contact the Customer Care Centre.
• Tighten the Bark Control Collar and/or trim your
dog’s hair where the Contact Points touch his
neck to ensure good skin contact.
• Test the Bark Control Collar (see “To Test the
Bark Control Collar” section).
• Replace the battery.
• Contact the Customer Care Centre.
• Replace the battery.
• If the light continues to fl ash with a new battery,
contact the Customer Care Centre.
To Discharge the Bark Control Collar
Important: Avoid touching the Contact Points and
Sensor Probe unless the Bark Control Collar is completely
discharged.
After battery removal, the Bark Control Collar retains
some stored energy and may activate 2 or 3 additional
times. To completely discharge the Bark Control Collar,
slide the Sensor Probe across a table or hard surface
several times, until the Bark Control Collar stops beeping.
12 www.petsafe.net
Page 13

Battery Disposal
Separate collection of spent batteries is required in many regions; check the regulations in your
area before discarding spent batteries. Please see page 8 for instructions on how to remove the
battery pack from the product for separate disposal. This device operates on 1 lithium manganese
battery of the 6 Volt, 220mAH capacity; replace only with equivalent battery.
Important Recycling Advice
Please respect the Waste Electrical and Electronic Equipment regulations in your country. This
equipment must be recycled. If you no longer require this equipment, do not place it in the
normal municipal waste system. Please return it to where it was purchased in order that it can be
placed in our recycling system. If this is not possible, please contact the Customer Care Centre for
further information. For a listing of Customer Care Centre telephone numbers, visit our website
at www.petsafe.net
Compliance
This equipment has been tested and found to comply with the EU Electromagnetic Compatibility
and Low Voltage Directive. Unauthorized changes or modifi cations to the equipment that are
not approved by Radio Systems® Corporation could void the user’s authority to operate the
equipment, and void the warranty.
This product is in compliance with the provisions of the EMC and LV directives. The Declaration
of Conformity can be found at: www.petsafe.net/customercare/eu_docs.php
Canada
Canadian Compliance Operation is subject to the following two conditions: (1) This device may not
cause interference and (2) This device must accept any interference, including interference that may
cause undesired operation of the device.
Modifi cations or changes could void the user’s authority to operate this equipment.
This Class B digital apparatus complies with Canadian ICES-003.
Australia
This device complies with the applicable EMC requirements specifi ed by the ACMA (Australian
Communications and Media Authority).
www.petsafe.net 13
Page 14

Terms of Use and Limitation of Liability
1. Terms of Use
Use of this Product is subject to your acceptance without modifi cation of the terms,
conditions and notices contained herein. Use of this Product implies acceptance of
all such terms, conditions and notices. If you do not wish to accept these terms,
conditions and notices, please return the Product, unused, in its original packaging
and at your own cost and risk to the relevant customer care centre together with
proof of purchase for a full refund.
2. Proper Use
This Product is designed for use with pets where training is desired. The specifi c
temperament or size/weight of your pet may not be suitable for this Product
(please refer to “How the System Works” in this Operating Guide). Radio Systems
Corporation recommends that this Product is not used if your pet is aggressive and
accepts no liability for determining suitability in individual cases. If you are unsure
whether this Product is appropriate for your pet, please consult your veterinarian or
certifi ed trainer prior to use. Proper use includes, without limitation, reviewing the
entire Operating Guide and any specifi c Caution statements.
3. No Unlawful or Prohibited Use
This Product is designed for use with pets only. This pet training device is not
intended to harm, injure or provoke. Using this Product in a way that is not intended
could result in violation of Federal, State or local laws.
4. Limitation of Liability
In no event shall Radio Systems® Corporation or any of its associated companies be
liable for (i) any indirect, punitive, incidental, special or consequential damage and/
or (ii) any loss or damages whatsoever arising out of or connected with the misuse
of this Product. The Purchaser assumes all risks and liability from the use of this
Product to the fullest extent permissible by law. For the avoidance of doubt, nothing
in this clause 4 shall limit Radio Systems® Corporation’s liability for human death or
personal injury or fraud or fraudulent misrepresentation.
5. Modifi cation of Terms and Conditions
Radio Systems® Corporation reserves the right to change the terms, conditions
and notices governing this Product from time to time. If such changes have been
notifi ed to you prior to your use of this Product, they shall be binding on you as if
incorporated herein.
®
14 www.petsafe.net
Page 15

Informations importantes sur la sécurité
Explication des mots et des symboles d’avertissement utilisés dans ce guide
Ce symbole est une alerte de sécurité. Il est utilisé pour vous alerter des risques
de blessures. Veuillez respecter tous les messages de sécurité qui suivent ce
symbole pour éviter tout risque de blessure ou de décès.
AVERTISSEMENT
ATTENTION
ATTENTION
______________________________________________________________________________________________
AVERTISSEMENT
ATTENTION
AVERTISSEMENT indique une situation dangereuse qui, si elle n’est pas
évitée, pourrait entraîner la mort ou des blessures graves.
ATTENTION, utilisé avec un symbole d’alerte de sécurité, indique une situation
dangereuse qui, si elle n’est pas évitée, pourrait entraîner des blessures légères
à modérées.
ATTENTION, utilisé sans le symbole d’alerte de sécurité, indique une situation
dangereuse qui, si elle n’est pas évitée, pourrait blesser votre animal.
Ne peut être utilisé avec des chiens dangereux. N’utilisez pas ce produit si
votre chien est agressif ou si votre chien a tendance à être agressif. Les chiens
agressifs peuvent provoquer chez leur maîtres ou autrui des blessures graves
ou la mort. Si vous doutez de l’opportunité d’utiliser ce produit avec votre chien,
veuillez consulter votre vétérinaire ou un dresseur agréé.
Veuillez lire et respecter les consignes décrites dans ce manuel. Il est important
que le collier soit bien ajusté. Un collier porté de façon excessive ou trop serré
peut irriter la peau de l’animal. Ce type de blessure s’appelle une escarre de
décubitus ou une nécrose cutanée
• Évitez de laisser le collier sur le chien pendant plus de 12 heures
consécutives.
• Si possible, réajustez le collier toutes les 1 à 2 heures.
• Vérifi ez que le collier est bien ajusté pour éviter toute pression excessive ;
suivez les consignes décrites
dans ce manuel.
• N’attachez jamais de laisse au collier électronique car cela exercerait une
pression excessive sur les contacteurs.
• Lorsque vous utilisez un autre collier avec une laisse, veillez à ce qu’il
n’exerce pas de pression sur le
collier électronique.
• Lavez le cou du chien et les contacteurs du collier une fois par semaine,
avec un tissu humide.
• Examinez quotidiennement la zone de contact pour détecter toute rougeur
ou plaie.
• En cas de rougeur ou de plaie, arrêtez d’utiliser le collier jusqu’à la guérison.
• Si l’irritation persiste au-delà de 48 heures, consultez un vétérinaire.
Pour tout complément d’informations sur les escarres et les nécroses cutanées,
veuillez consulter notre site internet.
Ces précautions vous permettront de garantir la sécurité et le confort de votre
animal. Des millions d’animaux n’ont aucun problème à porter les contacteurs
en acier inoxydable. Certains sont sensibles à la pression des contacteurs.
Après un certain temps, il se peut que votre chien tolère très bien le collier.
Si c’est le cas, certaines précautions peuvent être assouplies. Il est important
de continuer à contrôler les zones de contact. En cas de rougeur ou de plaie,
arrêtez d’utiliser le collier jusqu’à la guérison complète de la peau.
www.petsafe.net 15
Page 16

Merci d’avoir choisi PetSafe®, la marque de systèmes de dressage électronique la
plus vendue dans le monde. Notre objectif est d’être reconnus comme la marque
la plus fi able par les propriétaires d’animaux. Nous voulons garantir la sécurité de
votre animal en vous donnant les outils et les techniques nécessaires à un dressage
réussi. Pour toute question, contactez le service clientèle. Pour connaître les
numéros de téléphone du service clientèle, visitez notre site Internet www.
petsafe.net.
Pour bénéfi cier pleinement de votre garantie, veuillez enregistrer votre article dans
les 30 jours sur le site www.petsafe.net. Grâce à cet enregistrement et en conservant
le reçu, votre produit sera totalement couvert par notre garantie et si vous deviez
contacter notre service clientèle, nous pourrions vous aider plus rapidement. Enfi n,
vous pouvez voir la certitude que PetSafe
personnelles de ses clients à des tiers. Informations complètes sur la garantie
disponibles sur www.petsafe.net.
_____________________________________________________________________________
®
ne communique jamais les informations
Table des matières
Contenu du kit .........................................................................................17
Caractéristiques ........................................................................................ 17
Fonctionnement du collier anti-aboiements de PetSafe® .............................18
Défi nitions ...............................................................................................18
Ajustement du collier anti-aboiements .......................................................19
Insertion et retrait de la pile .......................................................................21
À quoi faut-il s’attendre lors de l’utilisation du collier anti-aboiements .......22
Entretien régulier ......................................................................................22
Pour tester le collier anti-aboiements .........................................................22
Accessoires ...............................................................................................23
Questions fréquemment posées .................................................................23
Dépannage ...............................................................................................24
Pour decharger le collier anti-aboiements elimination des batteries usagées ....24
Élimination des batteries usagées ...............................................................25
Conformité ............................................................................................... 25
Conditions d’utilisation et limite de responsabilité .....................................26
16 www.petsafe.net
Page 17
Contenu du kit
Collier anti-aboiements
de PetSafe
Manuel d’utilisation
®
(PetSafe
Pile
®
RFA-67D-11)
Caractéristiques
• 6 degrés de correction statique se réglant automatiquement selon le
tempérament du chien en commençant par le niveau le plus faible
• Étanche
• Voyant de pile faible
www.petsafe.net 17
Page 18

Fonctionnement du collier anti-aboiements
de PetSafe
Un dressage effi cace requiert de la cohérence. Le collier anti-aboiements PetSafe®
corrige de manière automatique et cohérente les aboiements excessifs de votre chien.
Lorsque les vibrations des aboiements déclenchent le palpeur, une correction statique est
administrée par les contacteurs. Le collier anti-aboiements commence au niveau le plus
bas de correction et augmente progressivement jusqu’au sixième niveau de stimulation à
chaque fois que votre chien aboie dans les 30 secondes suivant l’aboiement précédent. Si
votre chien n’aboie pas dans les 30 secondes qui suivent le premier aboiement, le collier
anti-aboiements se remet automatiquement au niveau de correction le plus bas. Un signal
sonore est émis à chaque fois qu’une correction statique est envoyée. Comme mesure de
sécurité, si votre chien aboie 15 fois ou plus dans une période de 50 secondes, le collier
anti-aboiements s’éteint pendant 3 minutes.
Important :
Votre chien peut aboyer pendant le jeu, ce qui pourrait l’amener à associer le
jeu à la stimulation électrostatique.
®
Avant de jouer avec votre chien, enlevez le collier anti-aboiements.
Défi nitions
Contacteurs
Contacteurs : Administrent la
correction statique sans danger.
Palpeur : Organe qui détecte les
vibrations des aboiements du chien.
Remarque: Le palpeur ne se règle pas.
Voyant de pile faible : la lampe
témoin commence à clignoter lorsque
la batterie est faible.
18 www.petsafe.net
Palpeur
Rondelles
Pile
RFA-67
(Dessous)
Voyant de
pile faible
BATTERY 6V
Page 19

Ajustement du collier anti-aboiements
Important : Il est important que le collier anti-aboiements soit bien ajusté pour garantir son
bon fonctionnement. Les contacteurs doivent être en contact direct avec la peau de l’animal,
sur la partie inférieure de son cou.
Pour que le collier soit bien ajusté, veuillez suivre les étapes ci-dessous :
1. Vérifi ez que la pile n’est pas installée dans le collier anti-aboiements.
2. Votre chien doit être en position debout.
3. Placez le collier anti-aboiements sur le cou, à proximité des oreilles de votre chien.
Centrez les contacteurs sous son cou, de manière à ce qu’il touchent la peau.
YES
ATTENTION
zone située autour des contacteurs. Ne rasez jamais le cou de votre chien, car cela
risquerait de provoquer des irritations ou une infection.
Il peut s’avérer nécessaire de couper les poils de votre chien dans
NO
4. Vérifi ez que le collier anti-aboiements est bien ajusté et que vous pouvez passer un
doigt entre le contacteur et le cou du chien. Le collier doit être bien serré, mais
sans excès.
5. Laissez votre chien porter le collier anti-
aboiements pendant quelques minutes, puis
contrôlez à nouveau l’ajustement. Vérifi ez
ensuite l’ajustement du collier au fur et à
mesure que votre chien s’habitue à le porter.
ATTENTION
trop serré accroît le risque de nécrose cutanée dans la zone de contact du collier.
Assurez-vous de ne pas serrer le collier de manière excessive. Un collier
www.petsafe.net 19
Page 20

6. Coupez le collier à la taille voulue :
a. Faites une marque avec un stylo à la
longueur voulue. Laissez une longueur
suffi sante si votre chien n’a pas encore
atteint sa taille adulte ou si son poil
s’épaissit en hiver.
b. Enlevez le collier anti-aboiements et coupez
la section en trop.
c. Avant de remettre le collier anti-aboiements sur votre chien, passez une fl amme sur
le bord coupé du collier.
Entretien
• Assurez-vous de bien nettoyer le cou de votre chien et les contacteurs toutes les
semaines à l’aide d’un tissu humide.
• Assurez-vous que le cou de l’animal est bien sec avant de remettre le
collier-récepteur à son cou.
ATTENTION
• Pour garantir le confort, la sécurité et l’effi cacité de ce produit, vérifi ez
l’ajustement du collier de votre chien régulièrement. Si une irritation de la peau
devait être constatée, retirez le collier pendant quelques jours. Si l’irritation
persiste au-delà de 48 heures, consultez votre vétérinaire.
• N’attachez pas de laisse au collier. Les contacteurs risqueraient alors d’exercer
une pression trop forte sur le cou de votre animal. Attachez une laisse à un collier
ou un harnais non métallique distinct en vérifi ant que le collier supplémentaire
n’exerce aucune pression sur les contacteurs.
Risque d’irritation de la peau.
20 www.petsafe.net
Page 21

Insertion et retrait de la pile
Remarque : N’installez pas la pile alors que le collier anti-aboiements est sur votre chien.
Ce collier anti-aboiements
est alimenté par une pile
remplaçable PetSafe® (RFA67D-11), spécialement conçue
pour pouvoir être remplacée
facilement et pour offrir une
protection accrue contre l’eau.
Pour insérer la pile, alignez
les symboles sur la pile (fl èche)
et le collier anti-aboiements
(triangle). Utilisez une grande
pièce pour tourner la pile dans le
sens des aiguilles d’une montre
jusqu’à ce que les fl èches
s’alignent avec le symbole de
verrouillage sur le boîtier.
Pour retirer la pile, tournez la
pile dans le sens inverse des aiguilles d’une montre avec une grande pièce.
AVERTISSEMENT
la réglementation sur la mise au rebut des piles usagées.
Vous trouverez une pile de rechange PetSafe® (RFA-67D-11) auprès de notre
Service clientèle et de nombreux revendeurs. Pour connaître les numéros de
téléphone du Service clientèle ou d’un revendeur près de chez vous, visitez notre site
www.petsafe.net.
N'essayez P AS de couper ni d'ouvrir la pile. Veillez à respecter
Autonomie de la pile
L’autonomie moyenne de la pile est de 3 à 6 mois, en fonction de l’utilisation.
Toutefois, en raison du processus de dressage de votre chien, la première pile
risque de ne pas durer aussi longtemps que les suivantes.
Voyant de pile faible
En mode opératoire normal, la voyant lumineux reste éteinte. La pile va s’affaiblir au
fur et à mesure de l’utilisation du produit. Une fois que la pile atteint un niveau
faible, la voyant lumineux commence à clignoter pour indiquer qu’il est temps de changer
de pile.
www.petsafe.net 21
Page 22

À quoi faut-il s’attendre lors de l’utilisation
du collier anti-aboiements ?
Important : Ne laissez pas votre chien seul les premières fois qu’il reçoit une stimulation
électrostatique.
Mettez le collier anti-aboiements sur votre chien et attendez à proximité jusqu’à ce qu’il
aboie. La plupart des chiens comprennent très rapidement que le collier anti-aboiements
diminue leur envie d’aboyer et se calment. Certains chiens aboient plus, et comme la
stimulation électrostatique du collier anti-aboiements peut surprendre le chien, il peut
réagir en aboyant lors de la première stimulation.
Le chien entre rarement dans un cycle d’aboiement-stimulation-aboiement-stimulation
pouvant s’avérer assez éprouvant. Le cas échéant, calmez votre chien en lui parlant
doucement. A mesure qu’il se tranquilise, il comprend qu’en restant sage, la stimulation
électrostatique ne se déclenche plus. Cette réaction, qui ne concerne qu’une petite
minorité de chiens, ne se produit qu’à la première utilisation du collier anti-aboiements.
Vous devriez constater une réduction des aboiements de votre chien dès les premiers
jours d’utilisation du collier anti-aboiements. A ce stade, certains maîtres pensent que le
problème est résolu, mais dans la plupart des cas le dressage n’est toujours pas terminé.
La plupart des chiens « testent » la nouvelle méthode de dressage et essaient d’aboyer
plus souvent. Ceci se produit généralement durant la deuxième semaine d’utilisation
du collier anti-aboiements. Vous devez alors rester ferme et ne pas modifi er l’utilisation
du collier anti-aboiements. Vous devez mettre le collier anti-aboiements sur votre chien
à chaque fois que vous souhaitez qu’il reste calme. S’il ne porte pas le collier anti-
aboiements, il risque de recommencer à aboyer, ce qui ralentira le processus de dressage.
Entretien régulier
• Contrôlez une fois par semaine que les contacteurs sont
bien serrés.
Remarque : N’ajustez pas le préréglage d’usine du palpeur.
• Nettoyez les contacteurs une fois par semaine.
• Surveillez le cou de votre chien pour vérifi er qu’il n’est pas irrité et
lavez-le lui une fois par semaine.
R
F
A
-
6
7
B
A
T
T
ER
Y
6V
Pour tester le collier anti-aboiements
Faites glisser le palpeur sur une surface rugueuse sur
au moins 25 cm. Le collier anti-aboiements devrait émettre
un bip. Dans le cas contraire, voyez le paragraphe «Le collier
antiaboiements n’émet pas de bip» dans la section
Dépannage et passez à la deuxième étape.
22 www.petsafe.net
Page 23

Accessoires
Pour commander des accessoires supplémentaires pour votre collier anti-aboiements de
PetSafe®, visitez notre site www.petsafe.net pour trouver un revendeur près de chez vous
et pour consulter la liste des numéros de téléphone de notre Service clientèle.
Composant Référence
Pile - deux pièces RFA-67D-11
Collier de rechange RFA-68
Kit d'accessoires (contacteurs supplémentaires,
rondelles et pile)
RFA-118
Questions fréquemment posées
Mon chien va-t-il
arrêter complètement
d'aboyer ?
L'aboiement d'un autre
chien déclenchera t-il le
collier anti-aboiements ?
• Le collier anti-aboiements arrête effi cacement et sans
douleur les aboiements. Il doit être utilisé que dans les
situations où l'aboiement est indésirable.
• Non.
Ce système est-il
douloureux pour mon
animal ?
Le collier antiaboiements marchera
t-il pour mon chien ?
Puis-je attacher une
laisse au collier antiaboiements ?
www.petsafe.net 23
• NON. La stimulation statique est conçue pour capter
l’attention de votre animal, pas pour le punir. La correction
statique initiale peut surprendre votre chien. La plupart
des animaux reçoivent uniquement quelques corrections
statiques dans le cadre d’une utilisation normale.
• Le collier anti-aboiements est sûr et effi cace pour toutes
les races et toutes les tailles de chien, mais il peut être
trop grand pour les chiens pesant moins de 3,6 kg.
• Ce système ne doit être utilisé qu’avec des animaux âgés
de plus de 6 mois. Si votre animal est blessé ou éprouve
des diffi cultés à se déplacer, veuillez contacter votre
vétérinaire ou un dresseur professionnel avant toute
utilisation.
• Non. Une laisse pourrait tirer sur les contacteurs et les
presser trop fortement contre le cou du chien. Attachez
une laisse à un autre collier non métallique, en veillant à
ce que cet autre collier n'exerce pas de pression sur
les contacteurs.
Page 24

Le collier anti-aboiements
n’émet pas de bip.
• Testez-le (voyez la section « Pour tester le collier
• Si le collier n’émet aucun bip au cours de ce test, répétez
• Vérifi ez l’installation des piles.
• Remplacez la pile.
• Si le collier n’émet toujours pas de bip, contactez le
Dépannage
anti-aboiements »).
l’opération sur une surface encore plus rugueuse.
Service clientèle.
Mon chien continue
à aboyer (il ne réagit
pas à la stimulation
électrostatique)
Le voyant continue
de clignoter.
• Serrez le collier anti-aboiements et/ou coupez les poils de
votre chien à l’endroit où les contacteurs touchent son
cou pour garantir un contact adéquat.
• Testez le collier anti-aboiements (se référer à la section
« Pour tester le collier anti-aboiements »).
• Remplacez la pile.
• Veuillez contacter le Service clientèle.
• Remplacez la pile.
• Si le voyant continue de clignoter avec une pile neuve,
contactez le Service clientèle.
Pour décharger le collier anti-aboiements
Important: Évitez de toucher aux contacteurs et au palpeur
avant de décharger complètement le collier anti-aboiements.
Après le retrait de la pile, le collier anti-aboiements contient
de l’énergie accumulée et peut s’activer 2 ou 3 fois. Pour le
décharger complètement, faites glisser le palpeur sur une
table ou une surface rugueuse plusieurs fois jusqu’à ce qu’il
n’émette plus de bips.
24 www.petsafe.net
Page 25

Élimination des batteries usagées
Le tri sélectif des piles usagées est obligatoire dans de nombreuses régions ; vérifi ez les règlements
en vigueur dans votre localité. Veuillez consulter les instructions en page 21 pour retirer la pile
de l'appareil. Ce dispositif fonctionne avec une pile au manganèse de lithium de 6 Volt, avec une
capacité de 220mAH ; remplacez uniquement par une pile équivalente.
Remarque importante concernant le recyclage
Veuillez respecter les règlements applicables aux déchets d’équipements électriques et
électroniques dans votre pays. Ce dispositif doit être recyclé. Si vous n'avez plus l'utilité de ce
matériel, ne le jetez pas avec vos déchets normaux. Veuillez le rapporter chez votre revendeur pour
que ce dispositif soit placé dans notre programme de recyclage. Si cela n'est pas possible, veuillez
contacter le Service clientèle pour plus d'informations. Pour connaître les numéros de téléphone
du Service clientèle, visitez notre site Internet www.petsafe.net.
Conformité
Cet équipement a été testé et il est conforme à la directive européenne applicable à la
compatibilité électromagnétique et la basse tension. Toute modifi cation du dispositif non autorisée
par Radio Systems® Corporation peut annuler la capacité de l'acheteur à utiliser le dispositif et
annuler la garantie.
Ce produit est conforme aux dispositions des directives sur la conformité électromagnétique
et sur la basse tension. Vous pouvez trouver la déclaration de conformité sur le lien suivant :
www.petsafe.net/customercare/eu_docs.php
Canada
Son fonctionnement est soumis aux deux conditions suivantes : (1) cet appareil ne peut pas provoquer
d’interférences et (2) il doit accepter toute interférence reçue, y compris celles qui peuvent être à
l’origine d’un fonctionnement non souhaité.
Toute modifi cation du dispositif peut annuler la capacité de l’acheteur à utiliser edit dispositif.
Cet appareil numérique de la classe B est conforme à la norme ICES-003 du Canada.
Australie
Cet instrument satisfait à la norme de compatibilité électromagnétique spécifi ée par l’ACMA
(Australian Communications and Media Authority).
www.petsafe.net 25
Page 26

Conditions d'utilisation et limite de responsabilité
1. Conditions d'utilisation
En achetant ce produit, vous acceptez les termes, conditions et consignes d'utilisation
tels qu'ils sont stipulés dans ce manuel. L'utilisation de ce produit revient à en
accepter les termes, conditions et consignes d'utilisation. Si vous n'acceptez pas ces
termes, conditions et consignes d'utilisation, veuillez renvoyer ce produit, inutilisé,
dans son emballage d'origine et à vos frais et risques, au Service clientèle approprié
avec une preuve d'achat afi n d'obtenir un remboursement complet.
2. Utilisation adéquate
Ce produit est conçu pour être utilisé avec des animaux pour lesquels un dressage
est nécessaire. Le tempérament spécifi que ou la taille/le poids de votre chien peuvent
ne pas convenir pour ce produit (veuillez consulter la section « Fonctionnement du
système » dans ce Manuel d’utilisation). Radio Systems
l'utilisation de ce produit si votre chien est agressif et rejette toute responsabilité
quant au caractère approprié du produit à un animal spécifi que. Si vous n'êtes pas
sûr que ce dispositif soit approprié à votre animal, veuillez consulter votre vétérinaire
ou un dresseur agréé avant de l'utiliser. Une utilisation appropriée comprend, entre
autres, la consultation de la totalité de ce manuel ainsi que de l'ensemble
des avertissements.
3. Utilisation illégale ou interdite
Ce produit est conçu pour être utilisé exclusivement avec des animaux de compagnie.
Ce dispositif de dressage n'est pas destiné à blesser ni à provoquer un animal.
L'utilisation inappropriée de ce produit peut représenter une violation des lois
fédérales, nationales ou locales.
4. Limitation de responsabilité
Radio Systems® Corporation et ses sociétés affi liées ne peuvent en aucun cas être
tenus responsables pour (i) des dommages directs, indirects, punitifs, accidentels,
spéciaux ou secondaires, (ii) ni pour des pertes ou dommages occasionnés ou
associés à l'utilisation inappropriée de ce produit. L'acheteur prend à sa charge les
risques et les responsabilités en rapport avec l'utilisation de ce produit et dans la
pleine mesure prévue par la loi. Dans le but d'éviter toute ambiguïté, aucune partie
de la clause 4 ne peut engager la responsabilité de Radio Systems
cas de décès, de blessures corporelles, de fraude ou de fausse déclaration.
5. Modifi cation des termes et des conditions
Radio Systems® Corporation se réserve le droit de modifi er les termes, les conditions
et les consignes d'utilisation applicables à ce produit. Si de telles modifi cations vous
ont été communiquées avant que vous n'utilisiez ce produit, elles ont une valeur
contractuelle et s'appliquent comme si elles faisaient partie du présent document.
®
Corporation déconseille
®
Corporation en
26 www.petsafe.net
Page 27
BELANGRIJKE VEILIGHEIDSINFORMATIE
Uitleg van in deze handleiding gebruikte belangrijke woorden en symbolen
Dit is het symbool voor een veiligheidswaarschuwing. Het wordt gebruikt
om u te wijzen op mogelijke risico’s van persoonlijk letsel. Volg alle
veiligheidsberichten op die volgen op dit symbool om mogelijk letsel of
overlijden te voorkomen.
WAARSCHUWING
VOORZICHTIG
VOORZICHTIG
______________________________________________________________________________________________
WAARSCHUWING
VOORZICHTIG
www.petsafe.net 27
WAARSCHUWING geeft een risicovolle situatie aan die, wanneer deze niet
vermeden wordt, kan leiden tot overlijden of ernstig letsel.
VOORZICHTIG in combinatie met het symbool voor veiligheidsalarm, geeft een
risicovolle situatie aan die, wanneer deze niet vermeden wordt, kan leiden tot
licht of matig letsel.
VOORZICHTIG zonder de combinatie met het symbool voor veiligheidsalarm,
geeft een risicovolle situatie aan die, wanneer deze niet vermeden wordt, kan
leiden tot letsel bij uw huisdier.
Niet voor gebruik bij agressieve honden. Gebruik dit product niet wanneer
uw hond agressief is, of wanneer uw hond een neiging heeft tot agressief
gedrag. Agressieve honden kunnen ernstig letsel en zelfs het overlijden van
hun eigenaren en anderen veroorzaken. Als u er niet zeker van bent of dit een
goed idee is voor uw huisdier, neem dan contact op met uw dierenarts of een
gediplomeerd trainer..
Lees de instructies in deze handleiding door en volg deze op. Een juiste
pasvorm van de halsband is belangrijk. Wanneer een halsband te lang
gedragen wordt, of wanneer deze te strak om de nek van het huisdier zit, kan dit
beschadiging van de huid veroorzaken. Dit wordt bedzeer genoemd; een andere
naam is decubitus of druknecrose.
• Laat de hond de halsband niet langer dan 12 uur per dag dragen.
• Positioneer de halsband, indien mogelijk, elke 1 tot 2 uur anders om de nek.
• Controleer de pasvorm om overmatige druk te voorkomen; volg de
instructies in deze handleiding.
• Sluit nooit een lijn aan op de elektronische halsband; dit zal overmatige druk
op de contactpunten veroorzaken.
• Bij gebruik van een tweede halsband voor een lijn mag geen druk op de
elektronische halsband ontstaan.
• Was de nek van de hond en de contactpunten van de halsband wekelijks
met een vochtige doek.
• Onderzoek het contactgebied dagelijks op tekenen van uitslag of wondjes.
• Als uitslag of wondjes worden gevonden, staak dan het gebruik van de
halsband tot de huid genezen is.
• Als de conditie langer dan 48 uur aanhoudt, ga dan naar de dierenarts.
Voor aanvullende informatie over bedzeer en druknecrose kunt u terecht
op onze website.
Deze stappen zullen helpen uw huisdier zich veilig en comfortabel te laten
voelen. Miljoenen huisdieren ondervinden geen problemen bij het dragen
van roestvrijstalen contactpunten. Sommige dieren zijn gevoelig voor de druk
van de contactpunten. Het kan zijn dat uw huisdier de halsband na enige tijd
goed verdraagt. Als dit het geval is, kunt u deze voorzorgen wat minder streng
toepassen. Het is belangrijk dat het contactgebied dagelijks gecontroleerd blijft
worden. Als roodheid of wondjes gevonden worden, staak dan het gebruik tot de
huid volledig genezen is.
Page 28

Wij danken u voor uw keuze voor PetSafe®, wereldwijd het meest verkochte merkvoor
elektronische trainingsoplossingen. Onze missie is het meest vertrouwde merk te zijn
voor eigenaren van huisdieren. Wij willen de veiligheid van uw huisdier waarborgen door
u hulpmiddelen en technieken aan te reiken om uw huisdier met succes te trainen. Bij
vragen verzoeken wij u contact op te nemen met de klantenservice. Voor een lijst
van telefoonnummers van de klantenservice bezoekt u onze website op
www.petsafe.net.
Om optimaal van uw garantie te kunnen genieten, verzoeken wij u uw product binnen 30
dagen te registreren via www.petsafe.net. Door deze registratie, samen met het bewaren
van uw aankoopbewijs, zult u kunnen genieten van de volledige garantie en zullen wij
u, wanneer u het nodig acht contact op te nemen met de klantenservice sneller kunnen
helpen. Belangrijk: PetSafe® zal uw waardevolle informatie nooit aan derden geven of
verkopen. Volledige garantie-informatie is online beschikbaar via www.petsafe.net.
_____________________________________________________________________________
Inhoudsopgave
Onderdelen ...............................................................................................29
Kenmerken ............................................................................................... 29
Hoe werkt de PetSafe® antiblafhalsband ..................................................... 30
Belangrijke defi nities .................................................................................30
Pasklaar maken van de antiblafhalsband ....................................................31
Batterij plaatsen en verwijderen .................................................................33
Wat kunt u verwachten tijdens gebruik van de antiblafhalsband ..................34
Regulier onderhoud ..................................................................................35
Testen van de antiblafhalsband .................................................................. 35
Accessoires ...............................................................................................35
Veel gestelde vragen ..................................................................................36
Probleemoplossing .................................................................................... 37
De antiblafhalsbund ontladen ....................................................................37
Afvoer van batterijen .................................................................................38
Conformiteit ............................................................................................. 38
Gebruiksvoorwaarden en beperking van aansprakelijkheid ..........................39
28 www.petsafe.net
Page 29

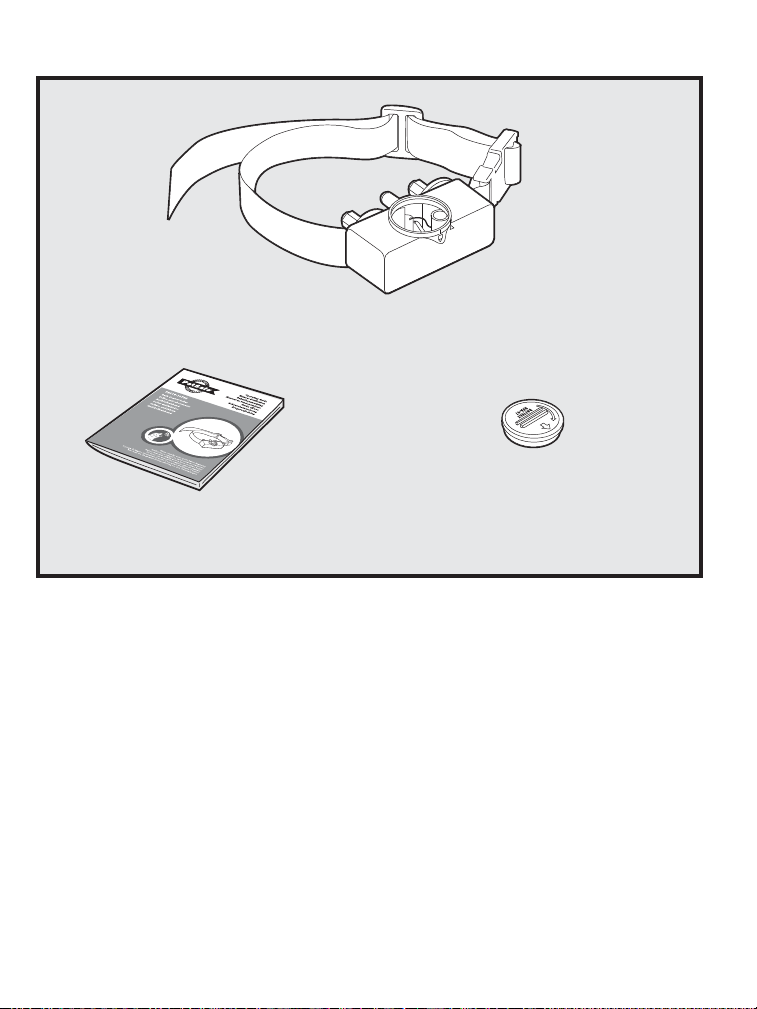
Onderdelen
PetSafe
®
antiblafhalsband
Batterij
(PetSafe® RFA-67D-11)
Gebruiksaanwijzing
Kenmerken
•
6 niveaus van statische correctie die automatisch worden aangepast aan het
temperament van uw hond, beginnend bij het laagste niveau
• Waterdicht
• Indicatorlampje voor lege batterij
www.petsafe.net 29
Page 30

Hoe werkt de PetSafe® antiblafhalsband
Effectieve training van huisdieren vereist consistentie. De PetSafe®
antiblafhalsband corrigeert automatisch en consistent overmatig blaffen bij
honden. Wanneer de vibratie van het blaffen van uw hond de sensorsonde
triggert, wordt een statische correctie toegediend door de contactpunten. De
antiblafhalsband begint op het laagste niveau van correctie en verhoogt dit
elke keer dat uw hond binnen 30 seconden na een eerdere blaf nogmaals blaft,
tot maximaal niveau 6. Als uw hond binnen 30 seconden niet nogmaals blaft,
zal de antiblafhalsband zichzelf resetten naar het laagste niveau van statische
correctie. Naast de statische correctie zal er een pieptoon te horen zijn. Om
veiligheidsredenen schakelt de antiblafhalsband zichzelf 3 minuten uit als uw
hond 15 keer of meer blaft binnen 50 seconden.
Belangrijk
spelen. Door de activiteit kan uw hond gaan blaffen, wat ertoe kan leiden dat
spelen met de statische correctie geassocieerd gaat worden.
:
Verwijder de antiblafhalsband voordat u met uw hond gaat
Belangrijke defi nities
Contactpunten: dienen de veilige
statische correctie toe.
Sensor: detecteert de trillingen van
het geblaf van uw hond. Opmerking: De
sensor is niet regelbaar.
Indicatorlamje voor lege batterij:
het indicatorlamje zal beginnen te
knipperen, als de batterij bijna leeg is.
30 www.petsafe.net
Contactpunten
Sensor
Plaatjes
(onderzijde)
Indicatorlamje
voor lege batterij
RFA-67
BATTERY 6V
Batterij
Page 31

Pasklaar maken van de antiblafhalsband
Belangrijk: Een correcte pasvorm en plaatsing van de antiblafhalsband zijn van
belang voor een effectieve training.
De contactpunten moeten direct in contact staan met de huid van uw hond, aan
de onderzijde van de nek
Om zeker te zijn van de correcte pasvorm volgt u de onderstaande stappen:
1. Zorg ervoor dat er nog geen batterijen in de antiblafhalsband zitten.
2. Begin met uw hond rustig voor u te laten staan.
3. Plaats de antiblafhalsband om de nek van uw hond, dichtbij de oren. Centreer
de contactpunten onder de nek van uw hond, waarbij ze de huid raken.
YES
VOORZICHTIG
te knippen. Scheer de nek van de hond nooit; dit kan leiden tot uitslag of een infectie
Het kan nodig zijn de vacht in het gebied van de contactpunten bij
NO
4. Controleer hoe strak de antiblafhalsband zit door een vinger tussen het eind
van een contactpunt en de nek van uw hond te steken. De pasvorm moet goed
aansluitend zijn, maar niet te strak aangespannen
5. Laat uw hond de antiblafhalsband gedurende een aantal minuten dragen en
controleer dan de pasvorm opnieuw. Controleer de pasvorm na een tijdje
nogmaals, als uw hond gewend raakt aan de antiblafhalsband
VOORZICHTIG
een goed contact. Bij een halsband die te strak zit wordt het risico op druknecrose
in het contactgebied groter.
De halsband mag niet strakker dan nodig gemaakt worden voor
www.petsafe.net 31
Page 32

6. Snij de halsband als volgt op maat:
a. Markeer de gewenste lengte van de
antiblafhalsband met een pen. Laat
voldoende ruimte voor groei wanneer
uw hond nog jong is of een dikke
wintervacht heeft.
b. Verwijder de antiblafhalsband van uw
hond en knip of snijd het overtollige deel eraf.
c. Voordat de antiblafhalsband wordt teruggeplaatst bij uw hond, wordt de hoek
van het afgesneden deel afgedicht door een vlam bij de gerafelde rand te
houden.
Onderhoud en Schoonmaak
• De nek van de hond en de contactpunten dienen elke week met een vochtige doek te
worden gewassen.
• Zorg ervoor dat de nek van uw huisdier grondig droog is voordat u de
halsbandontvanger rond zijn nek plaatst.
VOORZICHTIG
• Gelieve voor het draagcomfort, de veiligheid en werking van dit product regelmatig
te controleren of de halsband goed aansluit. Als u huidirritatie vaststelt, mag u
de halsband enkele dagen niet gebruiken. Als de aandoening langer dan 48 uur
aanhoudt, moet u uw dierenarts raadplegen.
• Bevestig geen lijn aan de halsband. Hierdoor zouden de contactpunten te strak
tegen de hals aan kunnen komen. Bevestig de lijn aan een aparte, niet-metalen
halsband of tuigje, en zorg ervoor dat deze halsband geen extra druk op de
contactpunten geeft.
Risico op huidbeschadiging.
32 www.petsafe.net
Page 33

Batterij plaatsen en verwijderen
Opmerking: De batterij mag niet worden verwisseld als de antiblafhalsband nog om de
nek van uw hond zit.
Voor de antiblafhalsband
wordt een vervangbare
PetSafe® batterij (RFA67D-11) gebruikt. Deze
unieke batterij is ontworpen
om het vervangen van
de batterij makkelijker te
maken en waterdichtheid te
bevorderen.
Voor het plaatsen van de
batterij worden de symbolen
op de batterij (pijl) en de
antiblafhalsband (driehoek)
met elkaar in lijn gebracht.
Gebruik een grote munt
om de batterij rechtsom te
draaien tot de pijl in lijn staat
met het vergrendelsymbool
op de behuizing.
Voor verwijderen van de
batterij draait u deze linksom met een grote munt.
WAARSCHUWING
Zorg ervoor dat u de lege batterij op de juiste wijze verwerkt..
Een vervangende PetSafe
veel verkooppunten worden aangeschaft. Voor een lijst van telefoonnummers van
de klantenservice of een verkooppunt bij u in de buurt, bezoekt u onze website:
www.petsafe.net.
Probeer NIET in de batterij te snijden of deze te openen.
®
batterij (RFA-67D-11) kan via de klantenservice en bij
Gebruiksduur batterij
Gemiddelde gebruiksduur van de batterij is 3 tot 6 maanden, afhankelijk van het
blafgedrag van uw hond. Door het leerproces van de hond kan de eerste batterij
echter minder lang meegaan dan vervangende exemplaren.
www.petsafe.net 33
Page 34

Indicatorlamje voor lege batterji
Tijdens normale werking blijft het indicatorlampje gedoofd. Naarmate het
product wordt gebruikt, zal de batterij opgebruikt raken. In dat stadium zal
het indicatorlampje beginnen te knipperen om aan te geven dat het tijd is om
de batterij te vervangen.
Wat kunt u verwachten tijdens gebruik van
de antiblafhalsband
Belangrijk: Laat uw hond de eerste paar keer dat deze een statische correctie ontvangt, niet alleen.
Plaats de antiblafhalsband juist bij uw hond en wacht in de buurt tot hij blaft.
De meeste honden zullen heel snel begrijpen dat de antiblafhalsband hun drang tot
blaffen verstoort en zullen ontspannen en stoppen met blaffen. Sommige honden zullen
meer blaffen, omdat de statische correctie van de antiblafhalsband verrassend kan zijn,
sommige honden kunnen in reactie op de eerste correctie vocaliseren.
In uitzonderlijke gevallen kan een hond in een correctiecyclus blaf-correctie-blaf
terechtkomen, die overweldigend kan zijn. Als dit zich voordoet, stel de hond dan
gerust met kalme, rustige tonen. Als uw hond zich ontspant, zal hij begrijpen dat er
geen statische correcties meer volgen wanneer hij rustig wordt. Een kleine minderheid
van de honden met deze reactie zal deze alleen de eerste maal dat de antiblafhalsband
wordt gedragen, vertonen.
U zou in de eerste dagen dat de antiblafhalsband wordt gedragen, een vermindering
in het blaffen van uw hond waar moeten nemen. Op dit punt lijkt het voor sommige
eigenaren of het probleem is opgelost, maar in de meeste gevallen is het leerproces niet
afgerond. De meeste honden zullen deze nieuwe leerervaring gaan “testen” en hun
pogingen om te blaffen zullen toenemen. Dit doet zich meestal in de tweede week dat
de antiblafhalsband wordt gedragen, voor. Als dit zich voordoet, wees dan consistent
en breng geen wijzigingen aan in het gebruik van de antiblafhalsband. U dient in elke
situatie waarin u verwacht dat de hond rustig zal zijn, de antiblafhalsband om te doen
bij uw hond. Als uw hond de antiblafhalsband niet draagt, kan hij opnieuw beginnen
met blaffen en maakt het leerproces een stap achteruit.
34 www.petsafe.net
Page 35

Regulier onderhoud
• Controleer wekelijks of de contactpunten niet te
strak zitten.
Opmerking: Stel de vooringestelde sensor niet anders in.
• Maak de contactpunten wekelijks schoon.
• Controleer de nek van uw hond wekelijks op irritatie en
6
7
A
-
R
F
BATTERY 6V
was dan de nek.
Testen van de antiblafhalsband
Schuif de sensor over een afstand van minstens 25 cm
over een ruw oppervlak. De antiblafhalsband moet dan
piepen. Als de antiblafhalsband tijdens deze test niet
piept, raadpleeg dan “De antiblafhalsband piept niet” in
het hoofdstuk “Probleemoplossing” en ga verder met de
tweede stap.
Accessoires
Om extra accessoires te kopen voor uw PetSafe® antiblafhalsband, bezoekt u onze
website: www.petsafe.net om een verkooppunt in de buurt te vinden of voor een
lijst van telefoonnummers van de klantenservice in uw regio.
Onderdeel Bestelnummer
Verpakking met 2 batterijen RFA-67D-11
Vervangende halsband RFA-68
Accessoirepakket (extra contactpunten, sluitringen
RFA-118
en batterij)
www.petsafe.net 35
Page 36

Veel gestelde vragen
Zal mijn hond helemaal
stoppen met blaffen?
Zal het blaffen van
een andere hond de
antiblafhalsband
activeren?
Doet het zeer bij mijn
huisdier?
Zal de antiblafhalsband
werken bij mijn hond?
Kan er een riem aan
de antiblafhalsband
worden bevestigd?
• De antiblafhalsband stopt effectief en humaan het
meeste blaffen wanneer deze wordt gedragen.
De halsband hoort alleen gedragen te worden tijdens
perioden van ongewenst blaffen.
• Nee.
• NEE. De statische stimulatie is ontworpen om de
aandacht te krijgen, niet om te straffen. De initiële
statische correctie kan uw hond laten schrikken; de
meeste huisdieren zullen slechts enkele statische
correcties ontvangen bij normaal gebruik
• De antiblafhalsband is veilig en effectief voor
honden van alle rassen en groottes, hoewel deze te
groot kan zijn voor honden met een gewicht van
minder dan 3,6 kg voor comfortabel dragen.
• Het systeem mag alleen gebruikt worden met
huisdieren ouder dan 6 maanden. Indien uw
huisdier gewond is of een beprkte mobiliteit heeft,
raadpleeg uw dierenarts of een professionele trainer
voor gebruik.
• Nee. Dit kan ertoe leiden dat de contactpunten
te strak tegen de nek van uw huisdier worden
getrokken. Bevestig een riem aan een aparte, nietmetalen halsband of tuig, waarbij de extra halsband
geen druk mag uitoefenen op de contactpunten.
36 www.petsafe.net
Page 37

Probleemoplossing
De antiblafhalsband
piept niet.
Mijn hond blijft blaffen
(reageert niet op de
statische correctie).
Het indicatorlampje blijft
knipperen.
• Test de antilblafhalsband (zie hoofdstuk “Testen van
de antiblafhalsband”).
• Als de antiblafhalsband niet piept tijdens deze test,
probeer de test dan op een ruwer oppervlak uit te
voeren.
• Controleer of de batterij juist geplaatst is.
• Vervang de batterij.
• Als de antiblafhalsband nog steeds niet piept, neem
dan contact op met de klantenservice.
• Maak de antiblafhalsband strakker en/of knip
het haar van de hond bij op de plek waar de
contactpunten de nek raken om een goed
huidcontact te waarborgen.
• Test de antiblafhalsband (raadpleeg sectie “Testen
van de antiblafhalsband”).
• Vervang de batterij.
• Neem contact op met de klantenservice.
• Vervang de batterij.
• Als het lampje blijft knipperen na vervanging van de
batterij, neem dan contact op met de klantenservice.
De antiblafhalsband ontladen
Belangrijk: Raak de contactpunten en de sensor niet aan
voordat de antiblafhalsband volledig ontladen is.
Na het verwijderen van de batterij bevat de antiblafhalsband
nog een kleine hoeveelheid opgeslagen energie die nog 2 of 3
keer geactiveerd kan worden. Om de antiblafhalsband volledig
te ontladen, moet u de sensor meerdere keren over een tafel of hard oppervlak
schuiven, totdat antiblafhalsband stopt met piepen
www.petsafe.net 37
Page 38

Afvoer van batterijen
In veel gebieden is het apart inzamelen van gebruikte batterijen verplicht; controleer de
regelgeving in uw regio voordat gebruikte batterijen worden weggegooid. Raadpleeg pagina
33 voor aanwijzingen over het verwijderen van de batterij, voor aparte afvoer. Dit apparaat
werkt op 1 lithium-mangaanbatterij met capaciteit 6 volt, 220 mAH; alleen vervangen door
gelijkwaardige batterij.
Belangrijk advies aangaande hergebruik
De richtlijnen voor Afgedankte Elektrische en Elektronische Apparatuur in uw land dienen te
worden opgevolgd. Deze apparatuur dient hergebruikt te worden. Indien u deze apparatuur niet
langer nodig heeft, werp deze dan niet bij het gewone huisvuil weg. Breng de apparatuur terug
naar de plaats van aankoop, zodat deze kan worden opgenomen in ons systeem van hergebruik.
Als dit niet mogelijk is, neem dan contact op met de klantenservice voor verdere informatie. Voor
een lijst van telefoonnummers van de klantenservice bezoekt u onze website op www.petsafe.net
Conformiteit
Deze apparatuur is getest en voldoet aan relevante EU-richtlijn voor Elektromagnetische
compatibiliteit en lage spanning. Ongeoorloofde wijzigingen of aanpassingen aan de
apparatuur, die niet zijn goedgekeurd door Radio Systems® Corporation, kunnen leiden tot
een verbod op het gebruik van dit systeem en het nietig verklaren van de garantie.
Dit product is in overeenstemming met de voorzieningen van EMC en LV-richtlijnen.
De conformiteitsverklaring is te vinden op: www.petsafe.net/customercare/eu_docs.php
Australië
Dit apparaat is in overeenstemming met de van toepassing zijnde EMCvereisten zoals vastgelegd
door de ACMA, Australian Communications and Media Authority.
38 www.petsafe.net
Page 39

Gebruiksvoorwaarden en beperking van
aansprakelijkheid
1. Gebruiksvoorwaarden
Dit product wordt u aangeboden onder voorwaarde van uw toezegging, zonder
wijziging, van de voorwaarden, condities en opmerkingen die hierin staan. Gebruik
van dit product impliceert aanvaarding van alle dergelijke voorwaarden, condities
en opmerkingen. Wanneer u deze voorwaarden, condities en opmerkingen
niet accepteert, kan het product, samen met het aankoopbewijs en ongebruikt,
geretourneerd worden in de originele verpakking en op uw risico en kosten naar de
relevante klantenservice, voor een volledige teruggave van het aankoopbedrag.
2. Correct gebruik
Dit product is ontworpen voor gebruik met huisdieren wanneer training gewenst is.
Het kan voorkomen dat het specifi eke temperament of de grootte/het gewicht van
uw huisdier niet geschikt zijn voor dit product (raadpleeg "Werking van het systeem"
in deze bedieningshandleiding). Radio Systems
product niet gebruikt wordt wanneer uw huisdier agressief is en aanvaardt geen
aansprakelijkheid voor het vaststellen van geschiktheid in dergelijke gevallen. Als u
er niet zeker van bent of dit product geschikt is voor uw huisdier, neem dan contact
op met uw dierenarts of een gediplomeerd trainer. Juist gebruik omvat, zonder
beperking, het doornemen van de gehele Handleiding voor gebruik en alle
specifi eke waarschuwingen.
3. Geen onwettig of verboden gebruik
Dit product is alleen ontworpen voor gebruik met huisdieren. Dit systeem voor
training van huisdieren is niet bedoeld om te schaden, verwonden of te provoceren.
Gebruik van dit product op een wijze waarvoor niet bedoeld is kan leiden tot het
schenden van nationale of plaatselijke wetten.
4. Beperking van aansprakelijkheid
Radio Systems® Corporation zal in geen geval aansprakelijk zijn voor (i) enige directe,
indirecte, fi nanciële, incidentele, speciale of gevolgschade, of (ii) enige andere schade
die voortvloeit uit of in verband staat met het gebruik of misbruik van dit Product.
De koper aanvaardt, in de breedste zin zoals toegestaan door de wet, alle risico's
en aansprakelijkheden die voortvloeien uit het gebruik van dit product. Om twijfel
uit te sluiten: niets in deze clausule 4 zal de aansprakelijkheid van Radio Systems
Corporation beperken in geval van overlijden of persoonlijk letsel van personen of
fraude of frauduleuze misrepresentatie.
5. Aanpassing van voorwaarden
Radio Systems® Corporation behoudt zich het recht voor om de voorwaarden,
condities en opmerkingen waaronder dit Product wordt aangeboden, te wijzigen.
Indien dergelijke wijzigingen aan u zijn gecommuniceerd voor gebruik van het
product, zijn deze bindend als hierin opgenomen.
®
Corporation beveelt aan dat dit
®
www.petsafe.net 39
Page 40

INFORMACIÓN DE SEGURIDAD IMPORTANTE
Explicación de las palabras de atención y símbolos utilizados en este guía
Este es el símbolo de alerta de seguridad. Se utiliza para alertarle sobre riesgos
de lesiones personales potenciales. Siga todos los mensajes de seguridad que a
aparecen a continuación de este símbolo para evitar posibles daños o la muerte.
ADVERTENCIA
ATENCIÓN
ATENCIÓN
______________________________________________________________________________________________
ADVERTENCIA
ATENCIÓN
ADVERTENCIA indica una situación peligrosa que, si no se evita, podría
provocar la muerte o daños serios.
ATENCIÓN, utilizada con el símbolo de alerta de seguridad, indica una situación
peligrosa que, si no se evita podría provocar lesiones menores o moderadas.
ATENCIÓN, utilizada sin el símbolo de alerta de seguridad, indica una situación
peligrosa que, si no se evita podría provocar daños a su mascota.
No se debe utilizar con perros agresivos. No use este producto si su perro
es agresivo o si es propenso a mostrar una conducta agresiva. Los perros
agresivos pueden causar lesiones graves e incluso la muerte a su propietario
y a otras personas. Si no está seguro de si este producto es apropiado para su
perro, por favor consulte con su veterinario o un entrenador certifi cado.
Lea y observe las instrucciones recogidas en este manual. Es importante
conseguir un ajuste correcto del collar. Un collar demasiado apretado, o
utilizado durante mucho tiempo, puede causar daños en la piel del cuello de
la mascota. Estas lesiones se demoniman escaras de la cama; también se
denominan úlceras de decúbito o necrosis por presión.
• Evite dejar el collar en el perro durante más de 12 horas al día.
• Si es posible, recoloque el collar en el cuello del animal cada 1 ó 2 horas.
• Verifi que el ajuste para prevenir una presión excesiva; siga las instrucciones
recogidas en este manual.
• No conecte nunca una correa al collar electrónico, dado que provocaría una
presión excesiva sobre los puntos de contacto.
• Cuando se utilice un collar independiente para fi jar un correa, verifi que que
esto no causa presión sobre el collar electrónico.
• Lave semanalmente la zona del cuello del perro y los puntos de contacto del
collar con un trapo húmedo.
• Examine diariamente el área de contacto en busca de signos de erupciones
o úlceras.
• Si se observa una herida o una úlcera, deje de usar el collar hasta que se
haya curado la piel.
• Si el problema persiste durante más de 48 horas, acuda al veterinario.
Para obtener información adicional sobre las úlceras por presión y la necrosis
por presión, por favor visite nuestro sitio web.
Estas medidas ayudarán a proteger a su mascota y a mejorar su comodidad.
Millones de mascotas se sienten cómodas al utilizar puntos de contacto
de acero inoxidable, pero algunos animales son sensibles a la presión por
contacto. Es posible que, tras cierto tiempo, su mascota tolere bien su collar,
en cuyo caso, podría no seguir estrictamente algunas de estas precauciones.
Es importante que continúe controlando diariamente la zona de contacto. Si
observa enrojecimiento o irritación, deje de utilizar el collar hasta que la piel
haya sanado completamente.
40 www.petsafe.net
Page 41

Gracias por elegir PetSafe®, la mejor marca mundial de soluciones de
adiestramiento electrónico. Nuestra misión es ser la marca más fi able respecto
a la experiencia de poseer una mascota. Queremos asegurar la seguridad de
su mascota ofreciéndole las herramientas y técnicas para adiestrarla con éxito.
Si tiene alguna pregunta, por favor contacte con el Centro de atención
al cliente. Para obtener un listado de los números de teléfono de los
Centros de atención al cliente de su zona visite nuestro sitio web en
www.petsafe.net.
Para obtener la mayor protección de su garantía, por favor registre su producto
dentro de los 30 días posteriores a la compra en www.petsafe.net.
Al registrarse, disfrutará de la garantía plena del producto y si tuviera necesidad
de contactar con el Centro de atención al cliente, podremos ayudarle con mayor
rapidez. Y esto es aún más importante, PetSafe
valiosa información a nadie. La información completa sobre la garantía está
disponible en línea en www.petsafe.net.
_____________________________________________________________________________
®
nunca le dará ni venderá su
Índice
Componentes ...........................................................................................42
Características ..........................................................................................42
Cómo funciona el collar antiladridos de PetSafe
Defi niciones ..............................................................................................43
Ajuste del collar antiladridos .....................................................................44
Para insertar y retirar la batería ..................................................................46
Qué se puede esperar durante el uso del collar antiladridos ........................47
Mantenimiento periódico ..........................................................................48
Prueba del collar antiladridos ....................................................................48
Accesorios ................................................................................................48
Preguntas frecuentes .................................................................................49
Resolución de problemas ...........................................................................50
Para descargar el collar antiladridos ...........................................................50
Eliminación de las baterías ........................................................................51
Conformidad ............................................................................................ 51
Condiciones de uso y limitación de responsabilidad ...................................52
®
.......................................43
www.petsafe.net 41
Page 42

Componentes
Manual de funcionamiento
Collar antiladridos
de PetSafe®
Batería
(PetSafe® RFA-67D-11)
Características
• 6 niveles de corrección estática, se ajusta al temperamento de su perro
automáticamente, comenzando en el nivel más bajo
• Hermético
• Luz indicadora de batería con poca carga
42 www.petsafe.net
Page 43
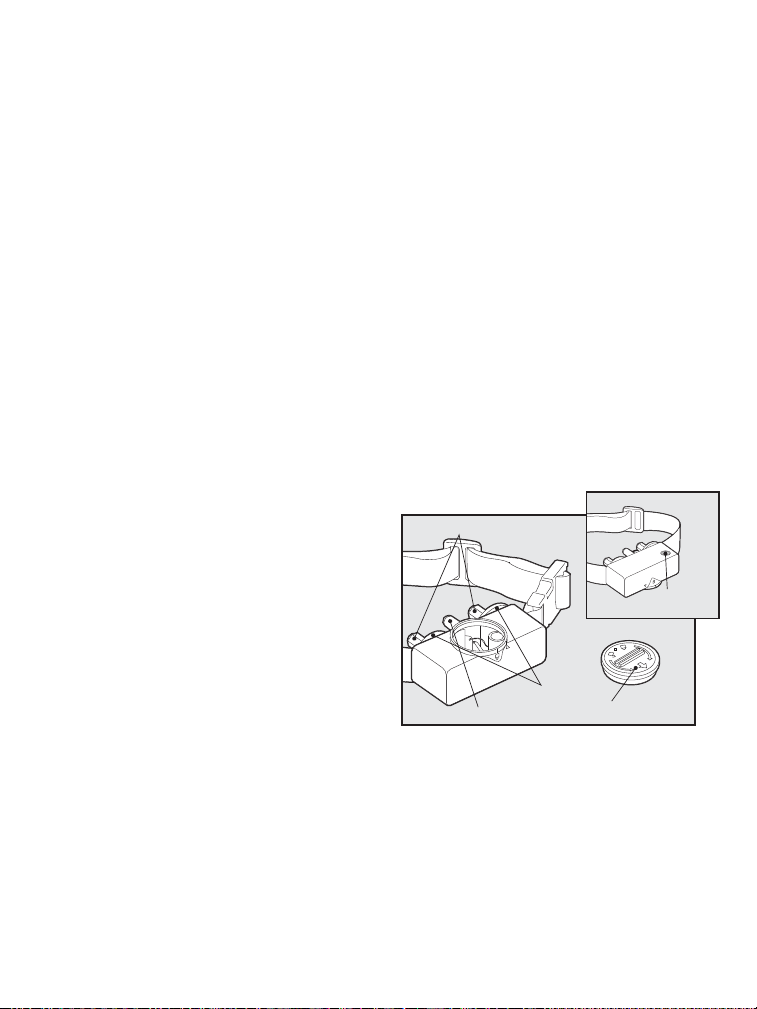
Cómo funciona el collar antiladridos
de PetSafe
El adiestramiento efectivo de las mascotas requiere consistencia. El collar
antiladridos PetSafe® corrige de forma automática y consistente los ladridos
excesivos de los perros. Cuando la vibración de los ladridos del perro activa
la sonda del sensor, se administra una estimulación estática a través de los
puntos de contacto. El collar antiladridos empieza en el nivel más bajo de la
estimulación y después va aumentando, pasando por los 6 niveles, cada vez
que el perro ladre antes de que transcurran 30 segundos después del ladrido
anterior. Si el perro no ladra de nuevo en los 30 segundos siguientes al
ladrido anterior, el collar antiladridos se restaurará en el nivel más bajo de la
estimulación. Junto con cada estimulación estática, se escuchará un bip. Por
motivos de seguridad, el collar antiladridos se apaga durante 3 minutos si el
perro ladra 15 veces o más en 50 segundos.
Importante: Retire el collar antiladridos antes de ponerse a jugar con su
perro. La actividad puede hacer que su perro ladre, lo que podría llevarle a
asociar el juego con la estimulación estática.
®
Defi niciones
Puntos de contacto:
corrección estática segura.
Sonda sensora: La sonda que detecta
las vibraciones del ladrido de su perro.
Nota: La sonda sensora no es ajustable
Indicador de batería con poca carga:
La luz del indicador comenzará a
parpadear cuando la batería esté baja.
www.petsafe.net 43
Proporcionan la
Puntos de contacto
Arandelas
Sonda sensora
(Debajo)
Indicador de
batería con poca carga
RFA-67
BATTERY 6V
Batería
Page 44

Ajuste del collar antiladridos
Importante: El ajuste correcto y la colocación del collar antiladridos son
importantes para que el funcionamiento sea efectivo. Los puntos de contacto
deben estar en contacto directo con la piel de su perro en la parte inferior de
su cuello
Para asegurar un ajuste correcto, siga los siguientes pasos:
1. Asegúrese de que la batería no está instalada en el collar antiladridos.
2. Empiece haciendo que su perro se ponga de pie de forma cómoda.
3. Coloque el collar antiladridos en el cuello del perro cerca de las orejas. Centre
los puntos de contacto por debajo del cuello del perro, tocando la piel.
YES
ATENCIÓN
No afeite nunca el cuello del perro, eso podría ocasionar una erupción o una infección.
Quizás tenga que recortar el pelo de la zona de los puntos de contacto.
NO
4. Compruebe la tirantez del collar antiladridos insertando un dedo entre el
extremo de un punto de contacto y el cuello de su perro. El ajuste debe ser
cómodo, no debe estar demasiado apretado.
5. Deje que su perro lleve el collar
antiladridos durante varios minutos,
luego vuelva a comprobar el ajuste.
Compruebe el ajuste de nuevo cuando
el perro se sienta más cómodo con el
collar antiladridos
ATENCIÓN
contacto. Un collar demasiado apretado puede aumentar el riesgo de necrosis por
presión en la zona de contacto.
No debe ajustar el collar más de lo necesario para que haga buen
44 www.petsafe.net
Page 45

6. Recorte el collar como se indica a continuación:
a. Marque la longitud deseada del collar
antiladridos con un bolígrafo.
Deje espacio para cuando crezca, si la
mascota es joven, o si le crece un pelo
largo para el invierno.
b. Retire el collar antiladridos de su
mascota y corte lo que sobre.
c. Antes de volver a colocar el collar
antiladridos a su perro, selle el borde del corte del collar aplicando una
llama a lo largo del borde cortado.
Cuidado y Limpieza
• El cuello de su perro y los puntos de contacto deben lavarse semanalmente
con un paño húmedo.
• Asegúrese de que el cuello de la mascota esté totalmente seco antes de
colocarle otra vez el collar receptor.
ATENCIÓN
• Para la comodidad, seguridad y efi cacia de este producto, asegúrese de que
comprueba el ajuste del collar de su mascota frecuentemente. Si la piel se irritara,
interrumpa la utilización del collar durante unos días. Si esta situación persiste
durante más de 48 horas, consulte a su veterinario.
• No enganche una correa al collar. De lo contrario, podría hacer que los puntos de
contacto ejercieran demasiada presión contra el cuello de su perro. Enganche la
correa a otro collar no metálico o a un arnés, asegurándose de que ese otro collar
no ejerza presión sobre los puntos de contacto
Riesgo de daños para la piel.
www.petsafe.net 45
Page 46
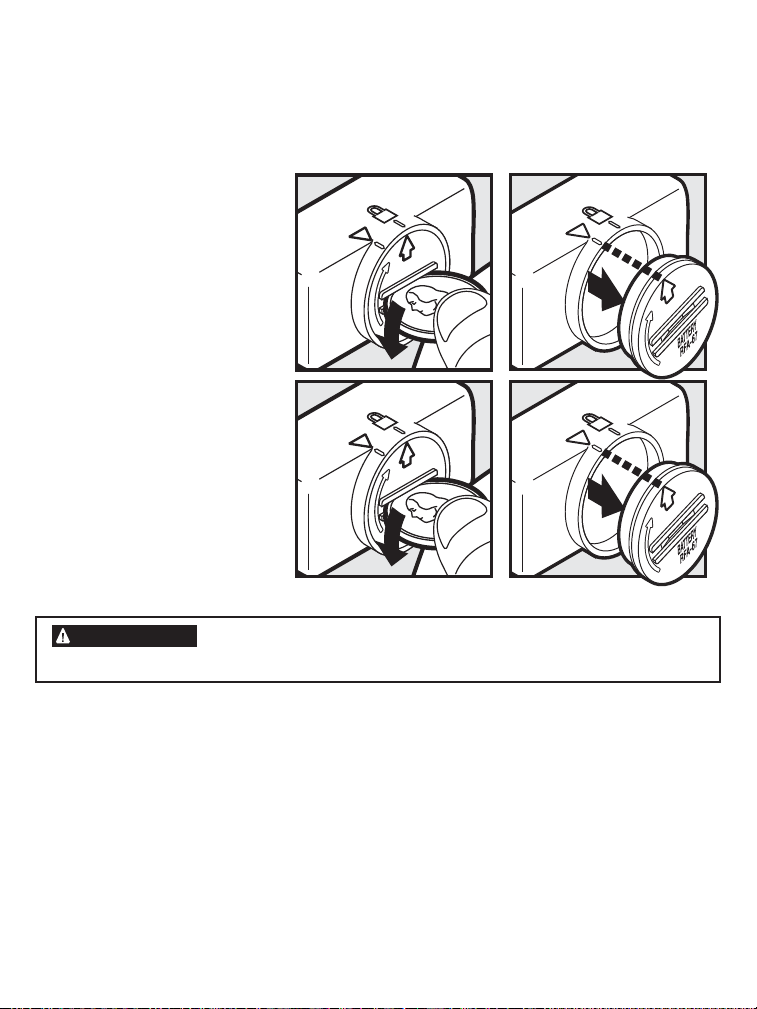
Para insertar y retirar la batería
Nota: No instale la batería mientras que su mascota tenga puesto el collar antiladridos.
Este collar antiladridos utiliza una batería sustituible (RFA-67D-11) de PetSafe®.
Esta batería está diseñada para facilitar su sustitución y aumentar la protección
contra el agua.
Para insertar la batería, alinee
los símbolos de la batería
(fl echa) y el collar antiladridos
(triángulo). Utilice una
moneda grande para girar la
batería en el sentido de las
agujas del reloj hasta que
la fl echa se alinee con el
símbolo del candado de
la carcasa.
Para retirar la batería, gire
ésta en la dirección contraria
a las agujas del reloj
utilizando una
moneda grande.
ADVERTENCIA
Asegúrese de desechar la batería utilizada correctamente.
Se puede conseguir una batería de repuesto (RFA-67D-11) de PetSafe
al Centro de atención al cliente y a través de muchos distribuidores. Para obtener
un listado de los números de teléfono de los Centros de atención al cliente o de un
distribuidor próximo a su domicilio, visite nuestro sitio web www.petsafe.net.
NO intente cortar ni abrir la batería para curiosear dentro.
®
llamando
Vida útil de la batería
La vida útil de la batería promedio es de 3 a 6 meses, dependiendo de la frecuencia
de los ladridos del perro. No obstante, debido a que se usará más durante el
adiestramiento del perro, puede que la primera batería no dure tanto como las
baterías de repuesto.
46 www.petsafe.net
Page 47

Indicador de batería con poca carga
Durante el funcionamiento normal la luz del indicador permanece apagada.
Conforme se utilice el producto, la batería se irá agotando hasta gastarse. En
este punto, la luz del indicador comenzará a parpadear para mostrar que es el
momento de cambiar la batería.
Qué se puede esperar durante el uso del
collar antiladridos
Importante: No deje a su perro sólo las primeras veces que reciba una
estimulación estática.
Ponga el collar antiladridos correctamente a su perro y espere cerca hasta
que ladre. La mayoría de los perros comprenderán muy rápidamente que el
collar antiladridos está interrumpiendo sus ladridos, se relajarán y dejarán de
ladrar. Algunos perros pueden ladrar más, la estimulación estática del collar
antiladridos puede resultarles sorprendente o alarmante, por ello algunos perros
pueden ladrar en respuesta a las correcciones iniciales.
En raras ocasiones un perro puede entrar en un ciclo de ladrido-estimulaciónladrido-estimulación que podría resultar bastante molesto. Si esto ocurre,
tranquilice a su perro con tono calmado y suave. Cuando el perro se relaje,
comprenderá que si se calla no recibirá más estimulaciones estáticas. La
pequeña minoría de perros que tienen esta reacción sólo deberían tenerla la
primera vez que lleven el collar antiladridos.
Notará una reducción de los ladridos de su perro en los dos primeros días en
que lleve el collar antiladridos. En ese momento, algunos propietarios de perros
creen que el problema se ha solucionado, pero en la mayoría de los casos el
proceso de aprendizaje todavía no se ha completado. La mayoría de los perros
“probarán” esta nueva experiencia de adiestramiento y aumentarán sus intentos
de ladrar. Esto generalmente ocurre durante la segunda semana que un perro
lleva puesto el collar antiladridos. Si esto ocurre, sea constante y no altere el uso
del collar antiladridos. Debe colocar el collar antiladridos a su perro en cada
situación en que espere que esté callado. Si su perro no lleva puesto el collar
antiladridos, puede volver a ponerse a ladrar y su adiestramiento sufrirá
un retroceso.
www.petsafe.net 47
Page 48

Mantenimiento periódico
• Compruebe el ajuste de los puntos de contacto
semanalmente.
Nota: No regule la sonda del sensor programada previamente
en la fábrica.
• Limpie los puntos de contacto semanalmente.
7
F
A
-6
R
BATTERY 6V
• Compruebe si el cuello de su perro presenta alguna
irritación y lave el cuello semanalmente.
Prueba del collar antiladridos
Deslice la sonda sensora por encima de una superfi cie
áspera de por lo menos 25 cm. El collar antiladridos deberá
emitir pitidos. Si su collar antiladridos no emite pitidos
durante esta prueba, vea el punto “El collar antiladridos no
emite pitidos” en la sección de “Resolución de problemas”
y continúe con el segundo punto.
Accesorios
Para comprar accesorios adicionales para su collar antiladridos de PetSafe®,
visite nuestro sitio web en www.petsafe.net para encontrar una tienda
minorista próxima y un listado de los números de teléfono del Centro de
atención al cliente en su zona.
Componentes Número de pieza
Batería - dos paquetes RFA-67D-11
Collar de recambio RFA-68
Paquete de accesorios (puntos de contacto adicionales,
RFA-118
arandelas y batería)
48 www.petsafe.net
Page 49

Preguntas frecuentes
¿Dejará mi perro de
ladrar completamente?
¿Accionará el collar
antiladridos el ladrido
de otro perro?
¿Hará daño a mi
mascota?
¿Funcionará el collar
antiladridos para mi
perro?
¿Puedo fi jar una
correa al collar
antiladridos?
• El collar antiladridos detiene de forma efectiva y
respetuosa con el animal los ladridos cuando se
lleva puesto. Sólo lo debe llevar puesto durante
periodos en los que no se quiera que ladre.
• No.
NO. La estimulación estática está diseñada
•
para captar la atención de la mascota, no para
castigarla. La estimulación estática inicial puede
asustar al perro, la mayoría de las mascotas sólo
reciben unas pocas estimulaciones estáticas
durante el uso normal.
• El collar antiladridos es seguro y efectivo para
todas las razas y tamaños de perros, no obstante
puede ser demasiado grande para perros que
pesen menos de 3,6 kg zy puede resultarles
incómodo llevarlo.
• Este dispositivo está diseñado para ser utilizado
con mascotas mayores de 6 meses de edad. Si su
mascota padece alguna herida o limitación física,
consulte con su veterinario o un adiestrador
certifi cado antes de usarlo.
• No. Esto puede dar como resultado que se tire de
los puntos de contacto apretando demasiado el
cuello de su mascota. Fije una correa a un collar o
arnés separado, no metálico, y asegúrese de que el
collar adicional no ejerza presión sobre los puntos
de contacto.
www.petsafe.net 49
Page 50

Resolución de problemas
El collar antiladridos
no emite pitidos.
Mi perro sigue
ladrando (no responde
a la estimulación
estática).
La luz indicadora
sigue emitiendo
destellos.
• Pruebe el collar antiladridos (vea la sección de
“Prueba del collar antiladridos”).
• Si su collar antiladridos no emite pitidos durante
esta prueba, realice la misma prueba sobre una
superfi cie aún más áspera.
• Asegúrese de que la batería esté correctamente
instalada.
• Sustituya la batería.
• Si el collar antiladridos todavía no emite pitidos,
contacte al Centro de atención al cliente.
• Apriete el collar antiladridos y/o recorte el pelo
del perro donde los puntos de contacto hagan
contacto con el cuello para asegurar un buen
contacto con la piel.
• Compruebe el collar antiladridos (consulte la
sección "Prueba del collar antiladridos").
• Sustituya la batería.
• Contacte con el Centro de atención al cliente.
• Sustituya la batería.
• Si la luz continúa emitiendo destellos con una
nueva batería contacte con el Centro de atención
al cliente.
Para descargar el collar antiladridos
Importante: Evite tocar los puntos de contacto y la
sonda sensora, a menos que el collar antiladridos esté
completamente descargado.
Después de quitar la batería, el collar antiladridos retiene
alguna energía almacenada y se puede activar 2 ó 3 veces
adicionales. Para descargar completamente el collar
antiladridos, deslice la sonda sensora por encima de una
mesa o una superfi cie áspera, varias veces, hasta que el collar
antiladridos detenga sus pitidos.
50 www.petsafe.net
Page 51

Eliminación de las baterías
En muchas regiones se requiere que las baterías gastadas se recojan por separado, compruebe las
normas de su zona antes de deshacerse de las baterías gastadas. Consulte la página 46 para ver
instrucciones sobre cómo retirar las baterías del producto para eliminarlas por separado.
Este dispositivo funciona con una batería de litio manganeso, que tiene una capacidad de
6 voltios, 220 mAH; sústituyala sólo por una batería equivalente.
Aviso importante sobre reciclado
Respete las normas de su país relativas a desechos eléctricos y de equipos electrónicos.
Este equipo debe ser reciclado. Si no necesita más este equipo, no lo eche al sistema de basuras
municipal normal. Devuélvalo a donde lo compró para que pueda ser incluido en nuestro
sistema de reciclado. Si esto no es posible, contacte con el Centro de atención al cliente para más
información. Para obtener un listado de los números de teléfono de los Centros de atención al
cliente visite nuestro sitio web en www.petsafe.net.
Conformidad
Este equipo ha sido sometido a pruebas y ha demostrado cumplir con las principales normas de
compatibilidad electromagnética y de bajo voltaje de la UE. Los cambios o modifi caciones sin
autorización realizados en el equipo que no estén aprobados por Radio Systems® Corporation
podrían anular la autoridad del usuario para usar el equipo y anularán la garantía.
Este producto cumple las normas de las directivas EMC y LV. La declaración
de conformidad se puede encontrar en: www.petsafe.net/customercare/eu_docs.php
Australia
Este aparato cumple los requisitos EMC aplicables especifi cados por la ACMA (Australian
Communications and Media Authority).
www.petsafe.net 51
Page 52

Condiciones de uso y limitación de
responsabilidad
1. Condiciones de uso
El uso de este Producto está sujeto a su aceptación sin modifi cación de los términos,
las condiciones y las notifi caciones aquí incluidas. El uso de este Producto implica
la aceptación de dichas condiciones generales y notifi caciones. Si no desea aceptar
estos términos, condiciones y notifi caciones, devuelva el Producto, sin utilizar en
su paquete original, con portes pagados y asumiendo el riesgo del envío al Centro
de atención al cliente pertinente, junto con la prueba de compra para obtener una
devolución total.
2. Uso correcto
Este Producto está diseñado para ser utilizado con mascotas cuando se quiere
adiestrarlas. El temperamento específi co o tamaño/peso de su mascota puede que
no sea adecuado para este Producto (consulte "Cómo funciona el sistema" en este
manual de funcionamiento). Radio Systems
Producto no se use si su mascota es agresiva y no acepta ninguna responsabilidad
para determinar la idoneidad en casos individuales. Si no está seguro de si este
Producto es apropiado para su mascota consulte con su veterinario o un entrenador
certifi cado antes de usarlo. El uso correcto incluye, sin limitación, la revisión de todo
el manual de funcionamiento y cualquier declaración de precaución específi ca.
3. Uso ilegal o prohibido
Este Producto está diseñado para ser utilizado sólo con mascotas. Este dispositivo de
adiestramiento de mascotas no tiene como propósito herir, dañar ni provocar.
La utilización de este Producto de una forma que no sea la prevista para este
producto podría ocasionar una infracción de las leyes federales, estatales o locales.
4. Limitación de responsabilidad
En ningún caso Radio Systems
será responsable por (i) ningún daño indirecto, punitivo, accidental, especial o
consiguiente, o (ii) cualquier daño que resulte de o esté relacionado con el mal uso
de este Producto. El Comprador asume todos los riesgos y responsabilidades del uso
de este Producto hasta el límite máximo permitido por la ley. Para evitar cualquier
duda, nada de lo estipulado en esta cláusula 4 limitará la responsabilidad de Radio
Systems® Corporation respecto a muerte humana, daños personales, fraude o
tergiversación fraudulenta.
5. Modifi cación de las condiciones generales
Radio Systems
condiciones generales y notifi caciones bajo las que este Producto se ofrece. Si dichos
cambios le han sido notifi cados antes de usar este Producto, serán vinculantes para
usted del mismo modo que si estuvieran incluidos en este documento.
®
Corporation se reserva el derecho a cambiar periódicamente las
®
Corporation o cualquiera de sus empresas asociadas
®
Corporation recomienda que este
52 www.petsafe.net
Page 53

INFORMAZIONI IMPORTANTI SULLA SICUREZZA
Spiegazione dei termini e dei simboli di Attenzione utilizzati in questa guida
È il simbolo di allerta sicurezza. Si usa per avvisare di ogni possibile rischio
di infortunio alle persone. Osservare tutti i messaggi di sicurezza segnalati da
questo simbolo per evitare possibili infortuni o la morte.
AVVERTENZA
ATTENZIONE
ATTENZIONE
______________________________________________________________________________________________
AVVERTENZA
ATTENZIONE
AVVERTENZA indica una situazione pericolosa che, se non evitata, potrebbe
causare morte o gravi lesioni.una situación peligrosa que, si no se evita, podría
provocar la muerte o daños serios.
ATTENZIONE, utilizzato con il simbolo di allerta sicurezza, indica una situazione
di pericolo che, se non evitata, potrebbe causare infortuni di lieve o moderata
entità
ATTENZIONE, utilizzato senza il simbolo di allerta sicurezza, indica una
situazione di pericolo che, se non evitata, potrebbe provocare del male all’animale.
Da non utilizzare con cani aggressivi. Non utilizzare questo prodotto se il cane è
aggressivo o se tende ad avere un comportamento aggressivo. I cani aggressivi
possono causare gravi ferite e persino il decesso del loro padrone e di altri. In
caso di dubbi sull’idoneità del prodotto per il proprio cane, rivolgersi al proprio
veterinario o un addestratore certifi cato.
Leggere e seguire le istruzioni di questo manuale. Una corretta applicazione del
collare è importante. Un collare portato troppo a lungo, o troppo stretto, sul collo
dell’animale può causare danni alla cute. Queste lesioni vengono dette piaghe o
anche ulcere da decubito oppure necrosi da pressione.
• Evitare di lasciare il collare sul cane per più di 12 ore al giorno.
• Se possibile, riposizionare il collare sul collo dell’animale ogni 1-2 ore.
• Controllare l’aderenza, per evitare eccessiva pressione; seguire le istruzioni
di questo manuale.
• Non collegare mai un guinzaglio al collare elettronico, per non causare una
pressione eccessiva dei contatti.
• Utilizzando un collare separato per il guinzaglio, non creare troppa pressione
sul collare elettronico.
• Lavare l’area del collo del cane e i contatti del collare ogni settimana con un
panno umido.
• Esaminare quotidianamente l’area per rilevare eventuali arrossamenti
o escoriazioni.
• Se si rilevano arrossamenti o escoriazioni, interrompere l’uso del collare
fi nché la cute non è guarita.
• Se il problema si protrae oltre 48 ore, rivolgersi a un veterinario.
Per ulteriori informazioni su piaghe e necrosi da pressione, si prega di visitare il
nostro sito web.
Questi accorgimenti contribuiranno a garantire la sicurezza e il comfort del
proprio animale. Per milioni di animali indossare i contatti in acciaio inossidabile
non crea alcun disagio. Alcuni sono sensibili alla pressione da contatto. Se dopo
un po’ di tempo si vede che il proprio animale tollera bene il collare, è possibile
ignorare alcune di queste norme precauzionali. È comunque importante
continuare a controllare quotidianamente la zona di contatto. Se si notano
arrossamenti o escoriazioni, interrompere l’uso fi no a completa guarigione
della cute.
www.petsafe.net 53
Page 54

Grazie per aver scelto PetSafe®, uno dei migliori marchi di soluzioni per
l'addestramento elettronico al mondo. La nostra missione è di proporci ai
proprietari di animali domestici come il marchio più affi dabile e di garantire la
sicurezza degli animali, fornendo ai loro proprietari strumenti e tecniche per
riuscire nell'addestramento del proprio animale. Per eventuali domande, è
possibile rivolgersi direttamente al Centro assistenza clienti. Per un
elenco dei numeri di telefono del Centro di assistenza clienti più vicino,
visitare il nostro sito web all'indirizzo www.petsafe.net.
Per usufruire della copertura integrale della nostra garanzia, è necessario
registrare il prodotto entro 30 giorni sul sito Web www.petsafe.net.
La registrazione e la conservazione della ricevuta consentono di usufruire della
completa garanzia sul prodotto e di ottenere un'assistenza più rapida dal Centro
®
di assistenza clienti in caso di necessità. Quello che più conta è che PetSafe
si
impegna a non divulgare né a vendere a nessuno i preziosi dati personali dei
propri clienti. Informazioni complete sulla garanzia sono disponibili on line, sul
sito www.petsafe.net.
_____________________________________________________________________________
Indice
Componenti .............................................................................................55
Caratteristiche ..........................................................................................55
Come funziona il collare antiabbaio di PetSafe
Defi nizioni chiave .....................................................................................56
Come mettere il collare antiabbaio ............................................................57
Per inserire e rimuovere la batteria .............................................................59
Che cosa aspettarsi dall'uso del collare antiabbaio ......................................60
Manutenzione periodica ............................................................................61
Per provare il collare antiabbaio .................................................................61
Accessori ..................................................................................................61
Domande frequenti ...................................................................................62
Individuazione e risoluzione dei guasti .......................................................63
Come scaricare il collare antiabbaio ...........................................................63
Smaltimento delle batterie .........................................................................64
Conformità ............................................................................................... 64
Limitazione di responsabilità e condizioni di utilizzo ..................................65
®
. .........................................56
54 www.petsafe.net
Page 55

Componenti
Collare antiabbaio
di PetSafe
Guida all’uso
®
Batteria
(PetSafe® RFA-67D-11)
Caratteristiche
• 6 livelli di correzione statica, si adatta automaticamente al temperamento del
vostro cane, partendo dal livello più basso
• Impermeabile
• Indicatore di batteria scanica
www.petsafe.net 55
Page 56

Come funziona il collare antiabbaio
deluxe di PetSafe
Perché l’addestramento sugli animali sia effi cace è necessaria la costanza.
Il collare antiabbaio PetSafe® corregge automaticamente e costantemente
l’eccessivo abbaio dei cani. Quando la vibrazione dell’abbaiare del cane attiva
la sonda del sensore, viene erogata una correzione statica attraverso i punti
di contatto. Il collare di controllo dell’abbaio inizia con il livello più basso di
correzione statica e quindi aumenta gradatamente per 6 livelli, ogni volta che
il cane abbaia entro 30 secondi dall’abbaio precedente. Se il cane non abbaia
per 30 secondi, il collare antiabbaio si ripristina da solo al livello più basso di
correzione. Un segnale acustico accompagna ciascuna correzione statica. Per
sicurezza, il collare antiabbaio si spegne per 3 minuti se il cane abbaia 15 o più
volte in 50 secondi.
®
Importante:
Prima di giocare con il cane, rimuovere il collare di controllo
dell’abbaio. L’attività potrebbe fare abbaiare il vostro cane, facendogli
associare il gioco alla correzione statica.
Defi nizioni chiave
Punti di contatto: Impartiscono la
Punti di contatto
(Lato inferiore)
correzione statica sicura.
Sonda sensore: Rileva le vibrazioni
prodotte dall’abbaiare del cane. Nota:
La sonda sensore non è regolabile.
Indicatore di batteria scarica:
batteria scarica
RFA-67
L’Indicatore comincia a lampeggiare
quando la batteria è scarica.
Sonda sensore
Rondelle
Batteria
56 www.petsafe.net
Indicatore di
BATTERY 6V
Page 57

Come mettere il collare antiabbaio
Importante: per un funzionamento ottimale, è indispensabile applicare e
regolare correttamente il collare antiabbaio. I punti di contatto devono essere a
contatto diretto con la pelle sul lato inferiore del collo del cane.
Per verifi care se il collare è stato applicato correttamente, attenersi alla seguente
procedura:
1. Ve r ifi care che la batteria non sia installata nel collare ricevitore.
2. Iniziare mettendo il cane comodo sulle quattro zampe.
3. Collocare il collare antiabbaio sul collo del cane, vicino alle orecchie. Centrare i
punti di contatto sotto il collo del cane, a contatto con la pelle
YES
ATTENZIONE
Non rasare mai il collo del cane per non provocare arrossamenti o infezioni.
Può essere necessario accorciare il pelo nell’area dei punti di contatto.
NO
4. Controllare l’aderenza del collare antiabbaio inserendo un dito tra il punto di
contatto e il collo del cane. Il collare deve essere aderente, ma non stretto.
5. Lasciare il collare antiabbaio applicato
per qualche minuto, quindi controllare
nuovamente l’aderenza.Quando il cane
si abitua al collare antiabbaio controllare
nuovamente l’aderenza.
ATTENZIONE
contatto. Un collare troppo stretto aumenta il rischio di necrosi da pressione
nell’area di contatto.
Non tenere il collare più stretto del necessario per avere un buon
www.petsafe.net 57
Page 58
6. Per tagliare il collare:
a. Contrassegnare la lunghezza desiderata
del collare antiabbaio con una penna,
lasciando uno spazio aggiuntivo per
l’eventuale crescita del collo, se il cane è
giovane, o del pelo invernale;
b. Rimuovere il collare antiabbaio dal cane e
tagliare la parte eccedente.
c. Prima di ricollocare il collare al cane, sigillarne la parte tagliata applicando una
fi amma al bordo sfi lacciato.
Puliza e Manutenzione
• Il collo del cane e i punti di contatto devono essere lavati ogni settimana con
un panno umido.
• Prima di riposizionare il collare ricevitore, assicuratevi che il collo del cane
sia asciutto.
ATTENZIONE
• Per garantire la praticità, sicurezza ed effi cacia di questo prodotto è importante
verifi care frequentemente il collare sul collo dell’animale. In caso di irritazione
della pelle, sospendere per alcuni giorni l’uso del collare. Se la condizione persiste
dopo 48 ore, consultare il veterinario.
• Non agganciare un guinzaglio al collare per evitare di premere troppo i punti di
contatto contro il collo. Agganciarlo a un collare o fi nimento separato non metallico
facendo in modo che non prema sui punti di contatto.
Rischio di danni cutanei.
58 www.petsafe.net
Page 59

Per inserire e rimuovere la batteria
Nota: non installare la batteria quando il collare antiabbaio è applicato al cane.
Il collare antiabbaio è dotato
di una batteria PetSafe® (RFA-
67D-11), appositamente
progettata per semplifi care la
sostituzione e garantire una
maggiore impermeabilità.
Per inserire la batteria,
allineare i simboli su di
essa (freccia) e sul collare
antiabbaio (triangolo).
Utilizzare una moneta
grande per ruotare la
batteria in senso orario,
fi nché la freccia non si
allinea al simbolo di blocco
sull’alloggiamento.
Per rimuovere la batteria,
ruotarla in senso antiorario
servendosi di una moneta grande.
AVVERTENZA
Smaltire sempre la batteria in modo corretto.
Presso in nostro Centro di assistenza e presso numerosi rivenditori è possibile
trovare una batteria PetSafe® (RFA-67D-11) di ricambio. Per un elenco di
numeri di telefono dei Centri di assistenza clienti o del rivenditore più vicino,
visitare il nostro sito web all’indirizzo www.petsafe.net.
NON tentare di tagliare o forzare l’apertura della batteria.
Autonomia della batteria
La durata media di una batteria va dai 3 ai 6 mesi, a seconda della frequenza
dei latrati del cane. Tuttavia, dato il maggior utilizzo durante il periodo di
apprendimento del cane, la prima batteria potrebbe non durare quanto una batteria
di ricambio.
www.petsafe.net 59
Page 60

Indicatore di batteria scarica
Durante il normale funzionamento, la indicatore resta spenta. Quando il prodotto è
in uso, la batteria subisce un progressivo scaricamento. A questo punto la indicatore
comincerà a lampeggiare per segnalare che è giunto il momento di sostituire la batteria.
Che cosa aspettarsi dall’uso del collare
antiabbaio
Importante: le prime volte che riceve la correzione statica, non lasciare il cane da solo.
Collocare correttamente il collare sul cane e aspettare nelle vicinanze fi nché non
abbaia. La maggior parte dei cani capisce molto velocemente che il collare antiabbaio
ostacola il suo impulso ad abbaiare e si rilassa, smettendo di latrare. Alcuni cani
continuano ad abbaiare e, poiché la correzione statica del collare antiabbaio potrebbe
sorprenderli o spaventarli, reagendo alla correzione iniziale alcuni cani potrebbero
emettere guaiti.
In casi rari, il cane potrebbe fi nire in un circolo vizioso abbaio-correzione-abbaiocorrezione che potrebbe sconvolgerlo. Se questo avviene, rassicurarlo con toni calmi e
rilassanti. Mentre il cane si rilassa, capisce che se si calma non riceve altre correzioni
statiche. Nella esigua minoranza di cani che reagisce in questo modo, questa reazione
si verifi ca normalmente solo la prima volta che indossano il collare antiabbaio.
Nei primi due giorni in cui il cane indossa il collare si dovrebbe notare una riduzione
dei latrati. A quel punto alcuni proprietari pensano che il problema sia risolto, ma
nella maggior parte dei casi il processo di apprendimento non è ancora completo.
La maggior parte dei cani “prova” questa nuova esperienza di apprendimento e
aumenta i tentativi di abbaiare. Questo avviene di solito durante la seconda settimana
in cui il cane indossa il collare. In questo caso, restare coerenti e non modifi care l’uso
del collare antiabbaio. È necessario collocare il collare antiabbaio al cane ogni volta
che si vuole che resti calmo. Se il cane non indossa il collare antiabbaio, è possibile
che riprenda ad abbaiare, facendo un passo indietro nell’apprendimento.
60 www.petsafe.net
Page 61

Manutenzione periodica
• Controllare ogni settimana l’aderenza dei punti di contatto.
Nota: non regolare la sonda del sensore regolata in fabbrica.
• Pulire ogni settimana i punti di contatto.
R
F
A
-6
• Controllare ogni settimana che il collo del cane non
presenti irritazioni e lavarlo.
7
BATTERY 6V
Per provare il collare antiabbaio
Fate scorrere la sonda sensore su una superfi cie ruvida per
almeno 25 cm. Il collare antiabbaio dovrebbe emettere un
segnale acustico. In caso contrario si rimanda al paragrafo
“Il collare antiabbaio non emette alcun segnale acustico”
nella sezione “Individuazione e resoluzione dei guasti” e
proseguite con la seconda fase.
Accessori
Per acquistare accessori aggiuntivi per il collare antiabbaio di PetSafe®, visitare
il nostro sito Web all’indirizzo www.petsafe.net, per trovare informazioni sul
rivenditore più vicino o sui numeri del Centro di assistenza clienti della propria area.
Componente Codice
Batteria - doppio modulo RFA-67D-11
Collare di ricambio RFA-68
Pacchetto di accessori (punti di contatto extra, rondelle e
RFA-118
batteria)
www.petsafe.net 61
Page 62

Domande frequenti
Il mio cane smetterà
completamente di
abbaiare?
Il latrato di un altro
cane può attivare il
collare antiabbaio?
• Quando viene applicato, il collare antiabbaio arresta
in modo ragionevole ed effi cace l'abbaio. Deve essere
indossato solo durante i periodi in cui non si vuole
che il cane abbai.
• No.
Fa male al mio
animale?
Il collare antiabbaio
funzionerà con mio
cane?
Posso attaccare un
guinzaglio al collare
antiabbaio?
• NO. La stimolazione statica è studiata per avere
l’attenzione dell’animale, non per punirlo. La
correzione statica iniziale può sorprendere il cane;
la maggior parte degli animali ricevono solo alcune
correzioni statiche durante l’uso normale.
• Il collare antiabbaio è sicuro ed effi cace per tutte
le razze e le taglie di cani, anche se potrebbe essere
troppo grande da portare per cani al di sotto dei
3,6 kg.
• Questo prodotto è stato progettato per essere
utilizzato con animali di almeno 6 mesi. Se il
suo animale è ferito o si muove con diffi coltà,
consigliamo di contattare il proprio veterinario o
un addestratore professionale prima dell’utilizzo.
• No. Per evitare che possa comprimere eccessivamente i
punti di contatto sul collo del cane. Fissare il guinzaglio
ad un collare separato, non metallico, verifi cando che
non eserciti pressione sui punti di contatto.
62 www.petsafe.net
Page 63

Individuazione e risoluzione dei guasti
Il collare antiabbio
non emette alcun
segnale acustico.
Il mio cane continua ad
abbaiare (non risponde
alla correzione statica).
L'indicatore luminoso
continua a lampeggiare.
• Provare il collare antiabbaio (vedi la sezione “Per
provare il collare antiabbaio”).
• Se il vostro collare antiabbaio non emette un segnale
acustico durante questa prova, ripetere la prova su una
superfi cie più ruvida.
• Assicurarsi che la batteria sia correttamente installata.
• Sostituire la batteria.
• Se il collare antiabbaio non emette ancora alcun
segnale acustico, contattare il Centro assistenza clienti.
• Stringere il collare antiabbaio e/o tagliare il pelo del
cane dove i punti di contatto toccano il collo, per
garantire un buon contatto con la pelle.
• Testare il collare antiabbaio (fare riferimento alla
sezione “Per provare il collare antiabbaio”).
• Sostituire la batteria.
• Per informazioni, rivolgersi al Centro assistenza
clienti.
• Sostituire la batteria.
• Se indicatore continua a lampeggiare con una nuova
batteria, contattare il Centro assistenza clienti.
Come scaricare il collare antiabbio
Importante: Evitate di toccare i punti di contatto e la
sonda sensore, tranne nel caso in cui il collare antiabbio sia
completamente scarico.
Dopo la rimozione della batteria, il collare antiabbio
trattiene una certa quantità di energia e può attivarsi per
altre 2 o 3 volte. Per scaricare completamente il collare
antiabbio, far scorrere più volte la sonda sensore su una
tavola o altra superfi cie dura fi no a quando il collare
antiabbio smetterà di suonare.
www.petsafe.net 63
Page 64

Smaltimento delle batterie
In alcune zone le batterie usate devono essere smaltite a parte; consultare sempre i regolamenti
locali prima di gettare batterie esauste. Per istruzioni su come rimuovere le batterie dal prodotto
in modo da poterle smaltire a parte, vedere a pagina 59. Il dispositivo funziona con 1 batteria del
tipo al litio manganese da 6 volt, 220 mAH di capacità. Sostituire solo con una equivalente.
Avviso importante sul riciclaggio
Rispettare sempre le normative relative allo smaltimento di apparecchiature elettriche ed
elettroniche usate in vigore nel proprio Paese. Questa apparecchiatura deve essere riciclata e
non smaltita come normale rifi uto urbano. Se si prevede di non utilizzare più il prodotto, è
necessario restituirlo al rivenditore in modo che possa essere opportunamente riciclato. Se ciò
non è possibile, rivolgersi al Centro assistenza clienti per ulteriori informazioni. Per un elenco dei
numeri di telefono dei nostri Centri di assistenza clienti, visitare il sito web all'indirizzo
www.petsafe.net.
Conformità
Questo dispositivo è stato testato e risulta conforme alla direttiva europea su Compatibilità
Elettromagnetica e Bassa Tensione. Variazioni o modifi che non autorizzate all'apparecchiatura, non
direttamente approvate da Radio Systems
usare il prodotto e rendere nulla la garanzia.
Il prodotto è conforme a quanto previsto dalle direttive EMC e LV. La dichiarazione di
conformità è pubblicata sulla pagina Web www.petsafe.net/customercare/eu_docs.php
Australia
Il dispositivo è conforme ai requisiti EMC in vigore specifi cati dalla ACMA (Australian
Communications and Media Authority).
®
Corporation possono annullare il diritto dell'utente a
64 www.petsafe.net
Page 65

Limitazione di responsabilità e condizioni
di utilizzo
1. Termini di utilizzo
L'utilizzo del prodotto è soggetto all'accettazione senza modifi che dei termini,
delle condizioni e degli avvisi qui contenuti. L'uso di questo Prodotto implica
l'accettazione della totalità di tali termini, condizioni e avvisi. Se non si desidera
accettare tali termini, condizioni e avvisi, per un totale rimborso si prega di restituire
il Prodotto, inutilizzato, nella sua confezione originale, a spese e rischio del cliente,
all'appropriato Centro di assistenza clienti, insieme alla prova di acquisto.
2. Uso corretto
Questo prodotto è indicato per addestrare animali domestici. Nel caso specifi co,
il temperamento o la taglia / il peso dell'animale possono non essere adatti al
Prodotto (fare riferimento alla sezione "Funzionamento del sistema” in questa
Guida all'uso Radio Systems
l'animale è aggressivo e declina ogni responsabilità nello stabilire l'idoneità nei
singoli casi. In caso di dubbi sull'idoneità del Prodotto per il proprio animale,
prima dell'utilizzo rivolgersi al proprio veterinario o un addestratore certifi cato.
L'utilizzo proprio comprende, senza limite alcuno, la lettura dell'intera Guida
all'uso e di qualsiasi Avvertenza specifi ca.
3. Vietato l'uso illegale o non consentito
Il prodotto è stato progettato per essere utilizzato unicamente per animali
domestici. Questo dispositivo per l'addestramento non deve essere usato con
l'intento di fare del male, ferire o provocare. L'uso del Prodotto in un modo a cui
non è destinato, potrebbe violare le leggi statali o locali.
4. Limitazione di responsabilità
Radio Systems® Corporation o qualunque azienda associata declinano ogni
responsabilità per (i) qualunque danno indiretto, punitivo, incidentale, speciale
o conseguente, o per (ii) qualsiasi perdita o danno derivanti da o collegati al
semplice uso o all'uso improprio di questo prodotto. L'acquirente si assume tutti
i rischi e le responsabilità per l'uso di questo Prodotto nella misura totale in cui
la legge dà facoltà. Per evitare qualunque dubbio, nulla di questa clausola 4 può
limitare la responsabilità di Radio Systems® Corporation riguardo a decesso o
infortunio o frode oppure dichiarazioni false.
5. Modifi ca di termini e condizioni
Radio Systems® Corporation si riserva il diritto di modifi care nel tempo i
termini, le condizioni e gli avvisi che regolano il prodotto. Se tali modifi che sono
state notifi cate all'utente prima dell'utilizzo del prodotto, sono da considerarsi
vincolanti come se fossero incorporate al presente documento.
®
Corporation sconsiglia l'uso del Prodotto se
www.petsafe.net 65
Page 66

WICHTIGE SICHERHEITSINFORMATIONEN
Erklärung der in diesem Führer verwendeten Warnhinweise und Symbole
Das ist das Sicherheitswarnsymbol. Es wird verwendet, um Sie auf mögliche
persönliche Verletzungsgefahren hinzuweisen. Befolgen Sie alle Sicherheitsmeldungen
nach diesem Symbol, um mögliche Verletzungen oder den Tod zu vermeiden.
WARNUNG
VORSICHT
VORSICHT
______________________________________________________________________________________________
WARNUNG
VORSICHT
WARNUNG weist auf eine gefährliche Situation hin, die zum Tod oder einer
ernsthaften Verletzung führen kann, wenn sie nicht vermieden wird
VORSICHT zusammen mit dem Sicherheitswarnsymbol weist es auf eine gefährliche
Situation hin, die zu geringfügiger oder moderater Verletzung führen kann, wenn sie
nicht vermieden wird.
VORSICHT ohne die Sicherheitswarnsymbol weist es auf eine gefährliche Situation hin,
die Ihrem Haustier Schaden zufügen kann, wenn sie nicht vermieden wird.
Nicht zur Verwendung bei aggressiven Hunden. Dieses Produkt nicht verwenden,
wenn Ihr Hund aggressiv ist oder wenn Ihr Hund zu aggressivem Verhalten
tendiert. Aggressive Hunde können ihren Besitzern und anderen Personen schwere
Verletzungen und sogar den Tod zufügen. Wenn Sie nicht sicher sind, ob dieses
Produkt für Ihr Haustier angemessen ist, konsultieren Sie bitte Ihren Tierarzt oder einen
zertifi zierten Trainer.
Bitte lesen Sie die Anleitungen im Handbuch durch und befolgen Sie diese. Es ist
wichtig, dass das Halsband richtig passt. Wird ein Halsband zu lange oder zu eng am
Hals des Haustiers anliegend getragen, kann das Hautschäden nach sich ziehen. Das
wird als Druckgeschwür oder auch Dekubitalgeschwür oder Drucknekrose bezeichnet.
• Das Haustier sollte das Halsband nicht länger als 12 Stunden am Tag tragen.
• Nach Möglichkeit das Halsband am Nacken des Haustiers alle 1 bis 2 Stunden
umpositionieren.
• Prüfen Sie die Passung, um übermäßigen Druck zu verhindern; befolgen Sie die
Anleitungen in diesem Handbuch.
• Legen Sie am elektronischen Halsband nie eine Leine an; das übt zu viel Druck auf
die Kontakte aus.
• Wenn Sie für eine Leine ein separates Halsband verwenden, keinen Druck auf das
elektronische Halsband ausüben.
• Waschen Sie den Nackenbereich des Hundes und die Kontakte am Halsband
wöchentlich mit einem feuchten Tuch.
• Untersuchen Sie den Kontaktbereich täglich auf Anzeichen von Ausschlag und
Wundstellen.
• Wird Hautausschlag oder eine Wundstelle vorgefunden, das Empfängerhalsband
nicht verwenden, bis die Haut geheilt ist.
• Wenn der Zustand länger als 48 Stunden lang anhält, Ihren Tierarzt zurate ziehen.
Für weitere Informationen über Druckgeschwüre und Drucknekrose, besuchen Sie bitte
unsere Website.
Diese Schritte helfen, Ihr Haustier sicher und komfortabel zu halten. Für Millionen von
Haustieren ist das Tragen von Edelstahlkontakten bequem. Einige Haustiere reagieren
sensibel auf Druckkontakt. Sie stellen vielleicht fest, dass Ihr Haustier das Halsband
sehr gut toleriert. Ist das der Fall, können Sie einige dieser Vorsichtsmaßnahmen
etwas weniger strikt einhalten. Es ist wichtig, den Kontaktbereich weiterhin täglich zu
prüfen. Wenn Sie Röte oder Wundstellen vorfi nden, die Verwendung absetzen, bis die
Haut vollständig geheilt is
66 www.petsafe.net
Page 67

Vielen Dank, dass Sie sich für Petsafe®entschieden haben, die führende Marke für
elektronische Trainingslösungen weltweit. Als Unternehmensvision verfolgen wir das Ziel,
die zuverlässigste Marke für Haustierhalter zu werden. Wir wollen die Sicherheit Ihres
Haustiers gewährleisten, indem wir Ihnen die Werkzeuge und Methoden bereitstellen,
um Ihr Haustier erfolgreich zu trainieren. Wenn Sie Fragen haben, wenden Sie
sich bitte an die Kundenbetreuung. Eine Liste mit den Telefonnummern der
Kundenbetreuung in Ihrer Gegend fi nden Sie auf unserer Website
www.petsafe.net.
Um den größten Schutz für Ihre Garantie zu erhalten, registrieren Sie bitte Ihr Produkt
innerhalb von 30 Tagen auf www.petsafe.net. Wenn Sie registrieren und Ihre Quittung
behalten, können Sie die volle Garantieleistung für das Produkt in Anspruch nehmen
und sollten Sie die Kundenbetreuung je kontaktieren müssen, können wir Ihnen viel
schneller helfen. Sehr wichtig! Von PetSafe® wird Ihre wertvolle Information nie an Dritte
weitergegeben oder verkauft. Die vollständige Garantieinformation steht Online unter
www.petsafe.net zur Verfügung.
_____________________________________________________________________________
Inhaltsverzeichnis
Bauteile ..................................................................................................................... 68
Funktionen ................................................................................................................ 68
So funktioniert das PetSafe® Anti-Bell-Halsbands ....................................................... 69
Schlüsseldefi nitionen .................................................................................................. 69
Anpassen des Anti-Bell-Halsbands ............................................................................. 70
Einsetzen und Herausnehmen der Batterie ................................................................. 72
Verwendung des Anti-Bell-Halsbands ......................................................................... 73
Regelmäßige Wartung................................................................................................. 73
Testen des Anti-Bell-Halsbands .................................................................................. 74
Zubehör .................................................................................................................... 74
Häufi g gestellte Fragen............................................................................................... 75
Fehlerbehebung ......................................................................................................... 76
Des Anti-Bell-Halsbands entladen .............................................................................. 76
Batterieentsorgung ..................................................................................................... 77
Konformität ............................................................................................................... 77
Verwendungsbedingungen und Haftungsbeschränkung ............................................... 78
www.petsafe.net 67
Page 68

Bauteile
PetSafe
Anti-Bell-Halsband
Gebrauchsanweisung
®
Batterie
(PetSafe® RFA-67D-11)
Funktionen
• Statischer Stromreiz in 6 Stufen, passt sich automatisch dem Temperament Ihres
Hundes an und beginnt auf der niedrigsten Stufe
• Wasserdicht
• Batterieladeanzeige
68 www.petsafe.net
Page 69

So funktioniert das PetSafe®
Anti-Bell-Halsband
Für effektives Training von Haustieren ist Konsistenz notwendig. Das AntiBell-Halsband von PetSafe® korrigiert übermäßiges Bellen bei Hunden
automatisch und konsistent. Wenn die Vibration des Bellens von Ihrem Hund
die Fühlersonde auslöst, wird eine statische Korrektur über die Kontaktpunkte
abgegeben. Das Anti-Bell-Halsband startet auf der niedrigsten statischen
Korrekturstufe und erhöht dann jedesmal, wenn Ihr Hund bellt, innerhalb von
30 Sekunden des vorherigen Bellens über 6 Stufen. Wenn Ihr Hund innerhalb
von 30 Sekunden nicht wieder bellt, stellt sich das Anti-Bell-Halsband zurück
auf die niedrigste statische Korrekturstufe im aktuellen Modus. Gleichzeitig mit
jeder statischen Korrektur ertönt ein Piepton. Zur Sicherheit schaltet das AntiBell-Halsband 3 Minuten ab, wenn Ihr Hund innerhalb von 50 Sekunden 15
Mal oder mehr bellt.
Wichtig: Bevor Sie mit Ihrem Hund spielen, sollten Sie das Anti-BellHalsband abnehmen. Die Aktivität kann Ihren Hund zum Bellen veranlassen.
Das könnte dazu führen, dass er Spielen mit der statischen Korrektur in
Zusammenhang bringt
Schlüsseldefi nitionen
Kontaktpunkte: Die Kontaktpunkte
geben den sicheren statischen
Korrekturstufe ab.
Sensor: Der Sensor entdeckt die
Vibrationen des Bellens Ihres Hundes.
Anmerkung: Der Sensor kann nicht
verstellt werden.
Batterieladeanzeige: Die
Batterieanzeige beginnt zu blinken,
wenn die Batterie schwach ist.
Kontaktpunkte
Unterlegscheiben
Sensor
(Unterseite)
Batterieladeanzeige
RFA-67
BATTERY 6V
Batterie
www.petsafe.net 69
Page 70

Anpassen des Anti-Bell-Halsbands
Wichtig: Für den wirksamen Einsatz ist es wichtig, dass das Anti-Bell-Halsband richtig
sitzt und platziert ist. Die Kontaktpunkte müssen direkten Kontakt mit der Haut Ihres
Hundes auf der Halsunterseite haben.
Um die richtige Passung zu gewährleisten, bitte die folgenden Schritte befolgen:
1. Stellen Sie sicher, dass die Batterie im Anti-Bell-Halsband nicht installiert ist.
2. Lassen Sie Ihren Hund am Anfang bequem stehen.
3. Legen Sie das Anti-Bell-Halsband am Nacken Ihres Hunds
nahe bei den Ohren an. Zentrieren Sie die Kontaktpunkte unterhalb des Nackens
Ihres Hunds, wobei diese Kontakt mit der Haut haben.
YES
VORSICHT
schneiden. Rasieren Sie niemals den Nacken des Hundes; das könnte einen Ausschlag
oder eine Infektion zur Folge haben.
Sie müssen die Haare im Bereich der Kontaktpunkte vielleicht kurz
NO
4. Prüfen Sie, wie eng das Anti-Bell-Halsband sitzt, indem Sie einen Finger zwischen das
Ende eines Kontaktpunkts und den Hals Ihres Hunds einführen. Es sollte eng
anliegen, doch nicht einengend sein.
5. Lassen Sie Ihren Hund das Anti-Bell-
Halsband ein paar Minuten lang tragen,
prüfen Sie dann die Passform nochmal.
Prüfen Sie die Passform nochmal, wenn sich
Ihr Hund an das Anti-Bell-Halsband
gewöhnt hat.
VORSICHT
erforderlich ist. Ein Halsband, das zu fest ist, erhöht das Risiko einer Drucknekrose
im Kontaktbereich.
Sie sollten das Halsband nie enger ziehen, als für den guten Kontakt
70 www.petsafe.net
Page 71

6. Kürzen Sie das Halsband wie folgt:
a. Markieren Sie die gewünschte Länge des
Anti-Bell-Halsbands mit einem Stift. Lassen
Sie genug Platz, falls Ihr Hund noch jung ist
oder ihm im Winter ein dickes Fell wächst.
b. Nehmen Sie das Anti-Bell-Halsband von
Ihrem Hund ab und schneiden Sie die
überschüssige Länge ab.
c. Bevor Sie das Anti-Bell-Halsband wieder an Ihrem Hund anbringen, versiegeln
Sie das geschnittene Halsband, indem Sie mit einer Flamme die ausgefranste
Kante entlang fahren c. Bevor Sie das Anti-Bell-Halsband wieder an Ihrem Hund
anbringen, versiegeln Sie das geschnittene Halsband, indem Sie mit einer Flamme
die ausgefranste Kante entlang fahren.
Pfl ege und Reinigung
• Der Nackenbereich Ihres Hundes und die Kontaktpunkte am Halsband müssen
wöchentlich mit einem feuchten Tuch gewaschen werden.
• Vergewissern Sie sich, dass der Hals Ihres Tieres komplett trocken ist, bevor Sie
das Empfängerhalsband wieder anlegen.
VORSICHT
• Um Komfort, Sicherheit und korrekte Funktion dieses Produkts sicherzustellen,
überprüfen Sie bitte häufi g den richtigen Sitz des Halsbandes. Wenn Sie
irgendwelche Hautreizungen feststellen, sollten Sie die Benutzung des Halsbandes
für einige Tage absetzen. Wenn die Reizung länger als 48 Stunden anhält, sollten
Sie Ihren Tierarzt aufsuchen.
• Befestigen Sie keine Leine an dem Halsband. Dies kann dazu führen, dass die
Kontaktstifte zu fest an den Hals Ihres Hundes gedrückt werden. Befestigen
Sie eine Leine an einem separaten, nicht metallischen Halsband oder Geschirr
und achten Sie darauf, dass das zusätzliche Halsband keinen Druck auf die
Kontaktstifte ausübt.
Risiko eines Hautschadens.
www.petsafe.net 71
Page 72

Einsetzen und Herausnehmen der Batterie
Hinweis: Installieren Sie die Batterie nicht, während Ihr Hund das Anti-Bell-Halsband anhat.
In diesem Anti-Bell-Halsband
wird eine austauschbare
PetSafe®-Batterie (RFA-67D-11)
verwendet. Diese einzigartige
Batterie ist so ausgelegt, dass
der Batteriewechsel einfach ist
und der Wasserschutz verbessert
wird.
Zum Einsetzen der Batterie,
die Symbole auf der Batterie
(Pfeil) und Anti-Bell-Halsband
(Dreieck) ausrichten. Drehen
Sie die Batterie mit einer großen
Münze nach rechts, bis der Pfeil
mit dem Verschlusssymbol auf
der Gehäuse fl uchtet.
Zum Herausnehmen der
Batterie drehen Sie die Batterie mit einer großen Münze nach links.
WARNUNG
Die verbrauchte Batterie unbedingt ordnungsgemäß entsorgen
Eine PetSafe
und vielen Einzelhändlern erhältlich. Für eine Liste der Telefonnummern von
Kundenbetreuungszentren und Einzelhändlern besuchen Sie bitte unsere Website auf
www.petsafe.net.
NICHT versuchen die Batterie aufzuschneiden oder aufzubrechen.
®
-Ersatzbatterie (RFA-67D-11) ist bei unserem Kundendienst
Lebensdauer der Batterie
Die durchschnittliche Lebensdauer der Batterie ist 3 bis 6 Monate, je nachdem wie oft
Ihr Hund bellt. Infolge des Trainings für Ihren Hund, hält die erste Batterie eventuell
nicht so lange wie Ersatzbatterien.
Batteneladeanzeige
Bei normalem Betrieb bleibt die Anzeigeleuchte ausgeschaltet. Bei der Benutzung des
Produkts leert sich die Batterie, bis sie schwach wird. Zu diesem Zeitpunkt beginnt die
Anzeigeleuchte zu blinken, um anzuzeigen, dass es Zeit für einen Batteriewechsel ist.
72 www.petsafe.net
Page 73

Verwendung des Anti-Bell-Halsbands
Wichtig: Lassen Sie Ihren Hund die ersten paar Male, wenn er eine statische Korrektur
erhält, nicht allein.
Legen Sie das Anti-Bell-Halsband richtig an Ihrem Hund an und warten Sie in der
Nähe darauf, bis er bellt. Die meisten Hunde verstehen sehr schnell, dass das Anti-BellHalsband ihren Drang zu Bellen unterbricht, und sie entspannen sich und hören zu
bellen auf. Einige Hunde bellen mehr und da die statische Korrektur vom Anti-BellHalsband überraschend oder alarmierend sein kann, geben manche Hunde als Reaktion
Töne auf die anfängliche Korrektur ab.
Ein Hund gerät selten in einen Bellen-Korrektur-Bellen-Korrektur-Kreislauf, der sehr
überwältigend sein kann. Tritt dieser Fall ein, beruhigen Sie Ihren Hund mit ruhigen,
besänftigenden Tönen. Wenn sich Ihr Hund entspannt, wird er verstehen, dass er keine
statische Korrektur mehr erhält, wenn er ruhig wird. Eine kleine Minderheit von Hunden
mit dieser Reaktion werden das nur beim ersten Tragen des Anti-Bell-Halsbands tun.
Sie sollten innerhalb der ersten paar Tage, die das Anti-Bell-Halsband getragen wird,
eine Reduktion des Bellens des Hundes bemerken. An dieser Stelle denken einige
Hundebesitzer, dass das Problem gelöst ist, doch ist das Training in den meisten Fällen
noch nicht abgeschlossen. Die meisten Hunde werden diese neue Lernerfahrung „testen“
und ihre Bellversuche vermehren. Das tritt normalerweise in der zweiten Woche ein, die
ein Hund das Anti-Bell-Halsband trägt. Tritt dieser Fall ein, bleiben Sie konsistent und
ändern die Verwendung des Anti-Bell-Halsbands nicht. Sie müssen Ihrem Hund das
Anti-Bell-Halsband in jeder Situation anlegen, wenn Sie wollen, dass er ruhig ist.
Wenn Ihr Hund das Anti-Bell-Halsband nicht trägt, fängt er vielleicht wieder zu Bellen
an und das wäre ein Rückfall in seinem Training.
Regelmäßige Wartung
• Prüfen Sie die Kontaktpunkte wöchentlich auf enges Anliegen.
Hinweis: Stellen Sie die werkseitig voreingestellte Sensor
nicht ein.
• Reinigen sie die Kontaktpunkte wöchentlich.
• Prüfen Sie den Hals Ihres Hunds auf Reizungen und waschen
Sie den Nacken wöchentlich.
www.petsafe.net 73
7
F
A
-6
R
BATTERY 6V
Page 74

Testen des Anti-Bell-Halsbands
Ziehen Sie den Sensor mindestens 25 cm weit über eine
raue Oberfl äche. Das Anti-Bell-Halsband sollte dabei
piepen. Wenn es bei diesem Test nicht piept, lesen Sie
bitte „Das Anti-Bell-Halsband piept nicht“ im Abschnitt
„Fehlerbehebung“ und machen Sie mit dem zweiten
Schritt weiter.
Zubehör
Um weiteres Zubehör für Ihren PetSafe® Anti-Bell-Halsband zu kaufen, um einen
Einzelhandel in Ihrer Nähe zu fi nden sowie für eine Liste der Telefonnummern von
Kundendienstzentren in Ihrer Gegend besuchen Sie unsere Website auf www.petsafe.net
Bauteile Artikelnummer
Batterie - Zweierpackung RFA-67D-11
Ersatzhalsband RFA-68
Zubehörpaket (Extra Kontaktpunkte,
Unterlegscheiben und Batterie)
RFA-118
74 www.petsafe.net
Page 75

Wird mein Hund
vollständig mit dem
Bellen aufhören?
Häufi g gestellte Fragen
• Das Anti-Bell-Halsband stoppt das Bellen wirksam und
human, wenn es getragen wird. Es sollte nur in Zeiten
getragen werden, wenn kein Bellen erwünscht ist.
Löst das Bellen eines
anderen Hunds das
Anti-Bell-Halsband aus?
Wird das meinem
Haustier weh tun?
Wird das Anti-BellHalsband bei Ihrem Hund
funktionieren?
Kann ich eine Leine am
Anti-Bell-Halsband
befestigen?
• Nein.
NEIN. Die statische Stimulation ist so ausgelegt, dass
•
sie den Hund aufmerksam macht, aber ihn nicht straft.
Die anfängliche statische Korrektur kann Ihren Hund
erschrecken. Die meisten Hunde erhalten nur ein paar
statische Korrekturen bei der normalen Verwendung.
• Das Anti-Bell-Halsband ist bei allen Hunderassen und
Größen von Hunden sicher und wirksam, auch wenn es
für Hunde von unter 3,6 kg zu groß für das bequeme
Tragen sein kann.
•
Dieses System ist nur geeignet für Haustiere die
mindestens 6 Monate alt sein. Bitte kontaktieren Sie
vor Gebrauch und einen Tierartzt oder professionellen
Trainer wenn Ihr Haustier verletzt oder gehbehindert ist.
• Nein. Das könnte zurfolge haben, dass die
Kontaktpunkte zu fest gegen den Hals Ihres Haustiers
gezogen werden. Befestigen Sie eine Leine an einem
separaten, nicht-metallischen Halsband oder Gurt und
achten Sie darauf, dass das extra Halsband keinen Druck
auf die Kontaktpunkte ausübt.
www.petsafe.net 75
Page 76

Fehlerbehebung
Das Anti-Bell-Halsband
piept nicht.
Mein Hund bellt weiter
(reagiert nicht auf die
statische Korrektur).
Die Anzeigeleuchte
blinkt weiter.
• Testen Sie das Anti-Bell-Halsband (siehe den Abschnitt
„Testen des Anti-Bell-Halsbands“).
• Wenn Ihr Anti-Bell-Halsband bei diesem Test nicht
piept, wiederholen Sie diesen Test auf einer raueren
Oberfl äche.
• Achten Sie darauf, dass die Batterie korrekt eingelegt ist.
• Ersetzen Sie die Batterie.
• Wenn das Anti-Bell-Jalsband immer noch nicht
funktioniert, dann nehmen Sie bitte mit dem
Kundendiensetzentrum.
• Ziehen Sie das Anti-Bell-Halsband fest und/oder kürzen
Sie die Haare Ihres Hundes, wo die Kontaktpunkte
seinen Nacken berühren, damit ein guter Hautkontakt
gewährleistet ist.
• Testen Sie das Anti-Bell-Halsband (siehe das Kapitel
“Testen des Anti-Bell-Halsbands”).
• Ersetzen Sie die Batterie.
• Setzen Sie sich bitte mit dem Kundendienstzentrum in
Verbindung.
• Ersetzen Sie die Batterie.
• Wenn die Leuchte mit einer neuen Batterie weiter rot
blinkt, kontaktieren Sie das Kundendienstzentrum.
Des Anti-Bell-Halsbands entladen
Wichtig: Vermeiden Sie, die Kontaktpunkte und den
Sensor zu berühren, so lange das Anti-Bell-Halsband nicht
vollständig entladen ist.
Nach dem Entnehmen der Batterie bleibt im
Anti-Bell-Halsband etwas Strom gespeichert und kann
zwei oder drei zusätzliche Stromreize auslösen. Um das
Anti-Bell-Halsband vollständig zu entladen, ziehen Sie den
Sensor mehrfach über einen Tisch oder eine raue Oberfl äche, bis das
Anti-Bell-Halsband nicht mehr piept.
76 www.petsafe.net
Page 77

Batterieentsorgung
In vielen Regionen ist die separate Sammlung von verbrauchten Batterien erforderlich; prüfen
Sie die Bestimmungen in Ihrer Gegend, bevor Sie verbrauchte Batterien wegwerfen. Siehe bitte
Seite 72 für Anleitungen zum Herausnehmen des Batteriepacks aus dem Produkt für die separate
Entsorgung. Dieses Gerät wird mit einer 6-V-Lithium-Mangan-Batterie mit 220mAH-Kapazität
betrieben; diese nur mit einer gleichwertigen Batterie austauschen.
Wichtiger Recycling-Hinweis
Bitte respektieren Sie die Bestimmungen Ihres Landes in Bezug auf die Entsorgung für elektrische
und elektronische Geräte. Die Ausrüstung muss recycled werden. Wenn Sie diese Ausrüstung
nicht mehr benötigen, diese nicht in die normale örtliche Müllentsorgung geben. Bitte bringen Sie
es dahin zurück, wo es gekauft wurde, damit es in unser Recycling-System gegeben werden kann.
Ist das nicht möglich, kontaktieren Sie bitte die Kundenbetreuung für weitere Information. Ein
Liste mit den Telefonnummern der Kundenbetreuung fi nden Sie auf unserer Website
www.petsafe.net.
Konformität
Dieses Gerät wurde getestet und stimmt nachweislich mit den entsprechenden
EU-Richtlinien für elektromagnetische Kompatibilität und Niederspannung überein. Nicht
autorisierte Änderungen oder Modifi kationen der Ausrüstung, die nicht von Radio Systems®
Corporation genehmigt wurden, könnten die Autorisierung des Benutzers die Ausrüstung zu
betreiben annullieren und die Garantie ungültig machen.
Dieses Produkt ist mit den Vorkehrungen der EMC- und LV-Direktiven konform. Die
Konformitätserklärung fi nden Sie unter: www.petsafe.net/customercare/eu_docs.php
Australien
Dieses Gerät entspricht den EMC Bedingungen, spezifi ziert durch ACMA (Australian
Communications und Media Authority).
www.petsafe.net 77
Page 78

Verwendungsbedingungen und
Haftungsbeschränkung
1. Verwendungsbedingungen
Dieses Produkt wird Ihnen unter der Bedingung angeboten, dass Sie es ohne
eine Modifi zierung der darin enthaltenen Bedingungen und Hinweise annehmen.
Die Verwendung dieses Produkts stellt die stillschweigende Annahme all dieser
Bedingungen und Hinweise dar. Wenn Sie diese Bedingungen und Hinweise
nicht akzeptieren wollen, geben Sie das Produkt bitte unverwendet in seiner
Originalverpackung und auf Ihre Kosten und Ihr Risiko an die entsprechende
Kundenbetreuung zusammen mit dem Kaufnachweis für eine vollständige
Kostenrückerstattung zurück.
2. Richtige Verwendung
Dieses Produkt ist für die Verwendung mit Haustieren konstruiert, wo ein
Training gewünscht wird. Das spezifi sche Temperament oder die Größe/das
Gewicht Ihres Haustiers ist eventuell nicht passend für dieses Produkt (siehe bitte
“So funktioniert das System” in dieser Gebrauchsanweisung). Radio Systems
Corporation empfi ehlt, dass dieses Produkt nicht verwendet wird, wenn Ihr Haustier
aggressiv ist und übernimmt keine Haftung für die Bestimmung der Eignung in
einzelnen Fällen. Wenn Sie nicht sicher sind, ob dieses Produkt für Ihr Haustier
angemessen ist, konsultieren Sie bitte Ihren Tierarzt oder zertifi zierten Trainer.
Die richtige Verwendung umfasst unbeschränkt das Durchlesen der gesamten
Gebrauchsanweisung und spezifi schen Warnhinweise.
3. Keine widerrechtliche oder verbotene Verwendung
Dieses Produkt ist ausschließlich zur Verwendung mit Haustieren konstruiert.
Diese Trainingsvorrichtung für Haustiere soll weder Schaden zufügen, verletzen
noch provozieren. Eine Verwendung dieses Produkts auf eine nicht vorgesehene Art
und Weise, könnte eine Verletzung von Bundes-, staatlichen oder lokalen Gesetzen
zurfolge haben.
4. Haftungsbeschränkung
Radio Systems
in keinem Fall für (i) etwaige direkte, indirekte, Straf-, Zufalls-, Sonder- oder
Folgeschäden und/oder (ii) jedwede Verluste oder Schäden haftbar, die sich aus
der Verwendung bzw. dem Missbrauch dieses Produkts ergeben oder damit in
Zusammenhang stehen. Der Käufer übernimmt alle Risiken und Haftung aus der
Verwendung dieses Produkts im vollsten vom Gesetz zulässigen Umfang. Um alle
Zweifel auszuschließen, beschränkt nichts in diesem Artikel 4 die Haftung von
Radio Systems
Verletzung oder Betrug oder betrügerisch falsche Darstellung.
5. Modifi kation der Bedingungen
Radio Systems
Hinweise unter denen dieses Produkt angeboten wird, zu ändern. Wenn Sie über
solche Änderungen vor der Verwendung dieses Produkt informiert wurden, sind diese
für Sie bindend als wären sie hierin eingeschlossen.
®
Corporation oder eines ihrer verbundenen Unternehmen ist
®
Corporation für den Tod eines Menschen oder persönliche
®
Corporation behält sich das Recht vor, die Bedingungen und
®
78 www.petsafe.net
Page 79

Page 80

Radio Systems® Corporation
10427 Electric Avenue
Knoxville, TN 37932 USA
(865) 777-5404
www.petsafe.net
400-1169-19
©2010 Radio Systems Corporation
 Loading...