

Page 1
Please read this entire guide before beginning
Lea por completo esta guía antes de comenzar.
Antes de começar, leia todo o manual
Operating Guide
Manual de funcionamiento
Guia de Operação
PBC13-13208
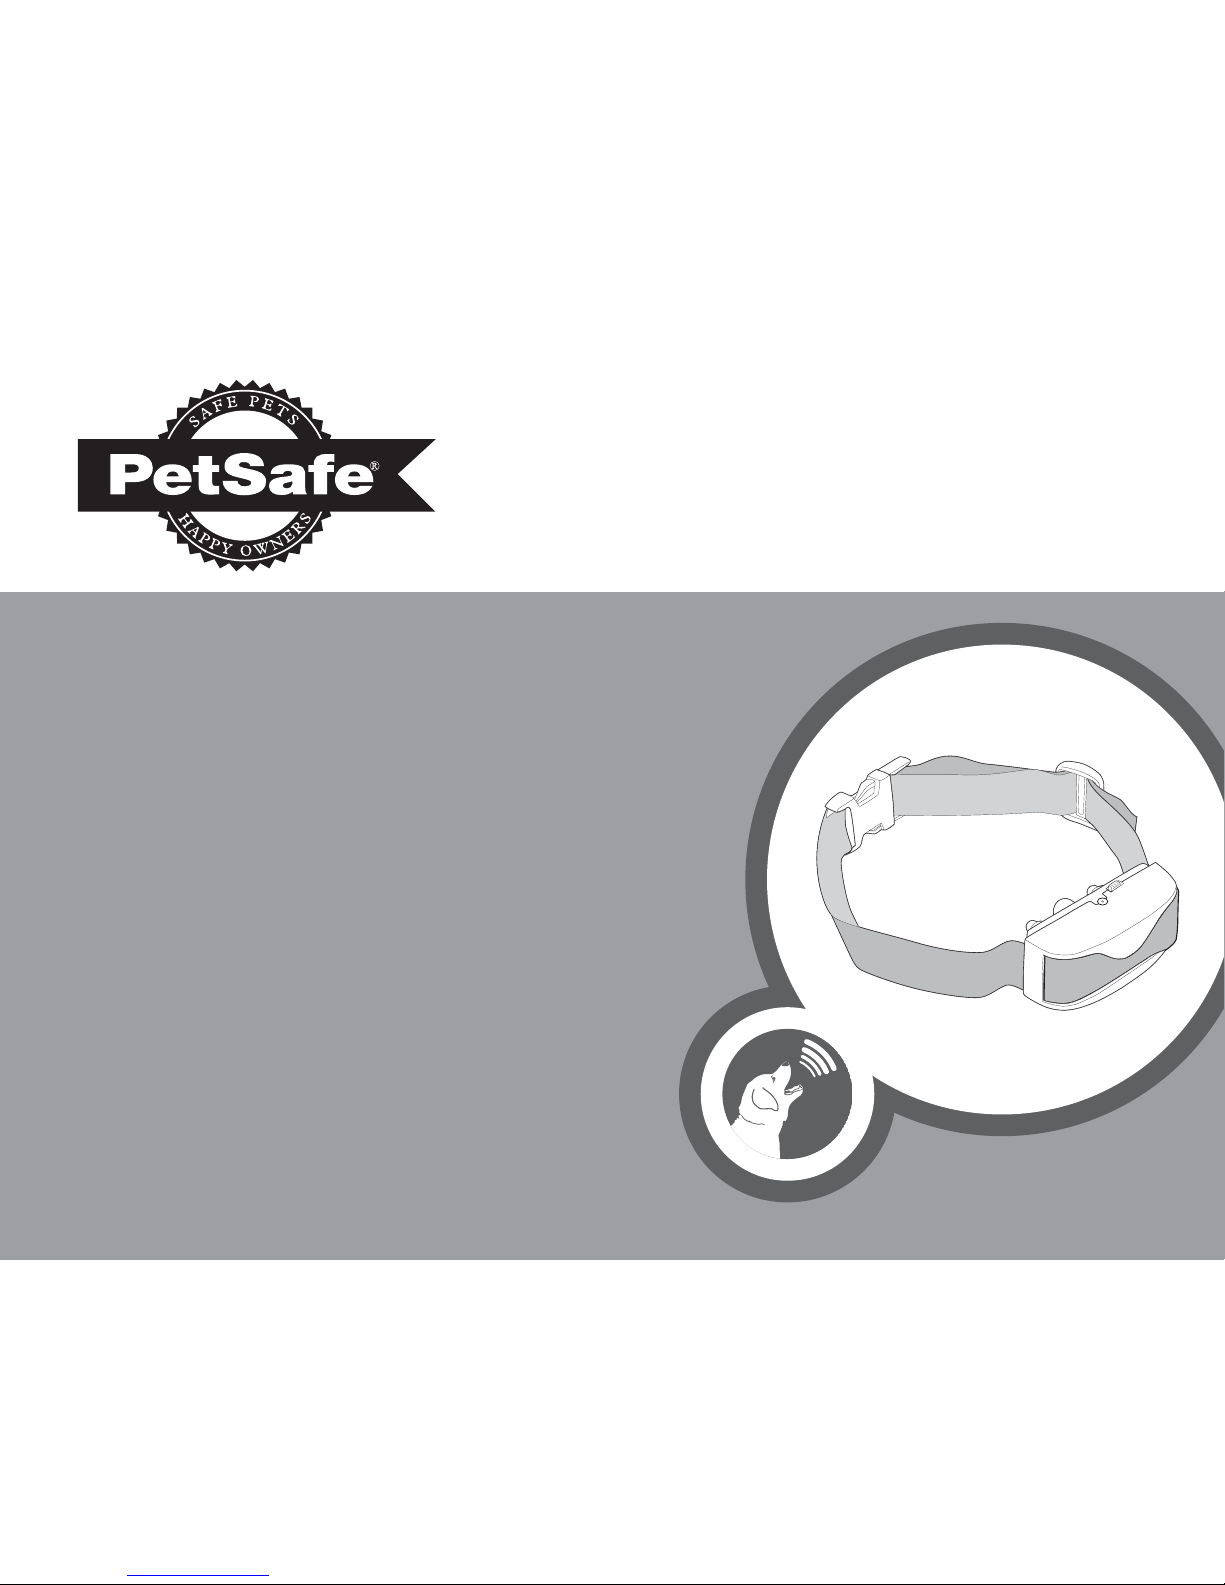
Barkender™ Bark Control Collar
Barkender™ Collar antiladridos
Barkender™ Coleira para
controle de latidos
Page 2
2
www.petsafe.net
ENES
PT
IMPORTANT SAFETY
INFORMATION
Explanation of Attention Words
and Symbols used in this guide
This is the safety alert symbol. It is used to alert you to potential personal injury hazards. Obey all safety messages
that follow this symbol to avoid possible injury or death.
WARNING indicates a hazardous situation which, if not
avoided, could result in death or serious injury.
CAUTION, used with the safety alert symbol, indicates a
hazardous situation which, if not avoided, could result in
minor or moderate injury.
CAUTION, used without the safety alert symbol, indicates
a hazardous situation which, if not avoided, could result in
harm to your pet.
Page 3
3
www.petsafe.net
EN
ES
PT
Not for use with aggressive dogs. Do not use this Product if
your dog is aggressive, or if your dog is prone to aggressive
behavior. Aggressive dogs can cause severe injury and even
death to their owner and others. If you are unsure whether
this product is appropriate for your dog, please consult your
veterinarian or certied trainer.
The Bark Control Collar is not a toy. Keep it away from the
reach of children. Use it only for its bark stopping purpose.
Page 4
4
www.petsafe.net
ENES
PT
Risk of skin damage. Please read and follow the instructions
in this manual. Proper t of the collar is important. A collar
worn for too long or made too tight on the pet’s neck may
cause skin damage. This is called bed sores; it is also called
decubitus ulcers or pressure necrosis.
• Avoid leaving the collar on the dog for more than 12 hours
per day.
• When possible reposition the collar on the pet’s neck every
1 to 2 hours.
• Check the t to prevent excessive pressure; follow the
instructions in this manual.
• Never connect a leash to the electronic collar; it will cause
excessive pressure on the contacts.
• When using a separate collar for a leash, don’t put pressure
on the electronic collar.
• Wash the dog’s neck area and the contacts of the collar
weekly with a damp cloth.
• Examine the contact area daily for signs of a rash or a sore.
• If a rash or sore is found, discontinue use of the collar until
the skin has healed.
• If the condition persists beyond 48 hours, see your
veterinarian.
For additional information on bed sores and pressure
necrosis, please visit our website.
Page 5

5
www.petsafe.net
EN
ES
PT
These steps will help keep your pet safe and comfortable.
Millions of pets are comfortable while they wear stainless
steel contacts. Some pets are sensitive to contact pressure.
You may nd after some time that your pet is very tolerant
of the collar. If so, you may relax some of these precautions.
It is important to continue daily checks of the contact area.
If redness or sores are found, discontinue use until the skin
has fully healed.
• The Bark Control Collar must be used only on healthy dogs.
We recommend that you take your dog to a veterinarian
before using the collar if he is not in good health.
• Do not shave the pet’s neck as this may increase the risk of
skin irritation.
• You should not make the collar any tighter than is required
for good contact. A collar that is too tight will increase the
risk of pressure necrosis in the contact area.
Page 6

6
www.petsafe.net
ENES
PT
Thank you for choosing PetSafe®. We want to ensure your pet’s safety by providing you
with the tools and techniques to successfully train your pet. If you have any questions,
please contact the Customer Care Center. For a listing of Customer Care Center
telephone numbers visit our website at www.petsafe.net.
To get the most protection out of your warranty, please register your product within 30
days at www.petsafe.net. By registering and keeping your receipt, you will enjoy the
product’s full warranty and should you ever need to call the Customer Care Center, we
will be able to help you faster. Most importantly, PetSafe
®
will never give or sell your
valuable information to anyone. Complete warranty information is available online at
www.petsafe.net.
Page 7

7
www.petsafe.net
EN
ES
PT
Table of Contents
Components ..................................................................................................8
Features ........................................................................................................ 8
How the System
Works ....................................................................................9
Key Denitions .............................................................................................10
Fit the Bark Control Collar ............................................................................. 11
To Re-Thread the Collar ................................................................................. 14
To Insert and Remove the Batteries ..................................................................15
What to Expect During Use of the Bark Control Collar ......................................17
Regular Maintenance....................................................................................18
To Test the Bark Control Collar .......................................................................19
To Discharge the Bark Control Collar .............................................................. 19
Frequently Asked Questions ...........................................................................20
Troubleshooting ...........................................................................................21
Battery Disposal ........................................................................................... 22
Terms of Use and Limitation of Liability ............................................................ 23
Español ....................................................................................................25
Português ................................................................................................48
Page 8
8
www.petsafe.net
ENES
PT
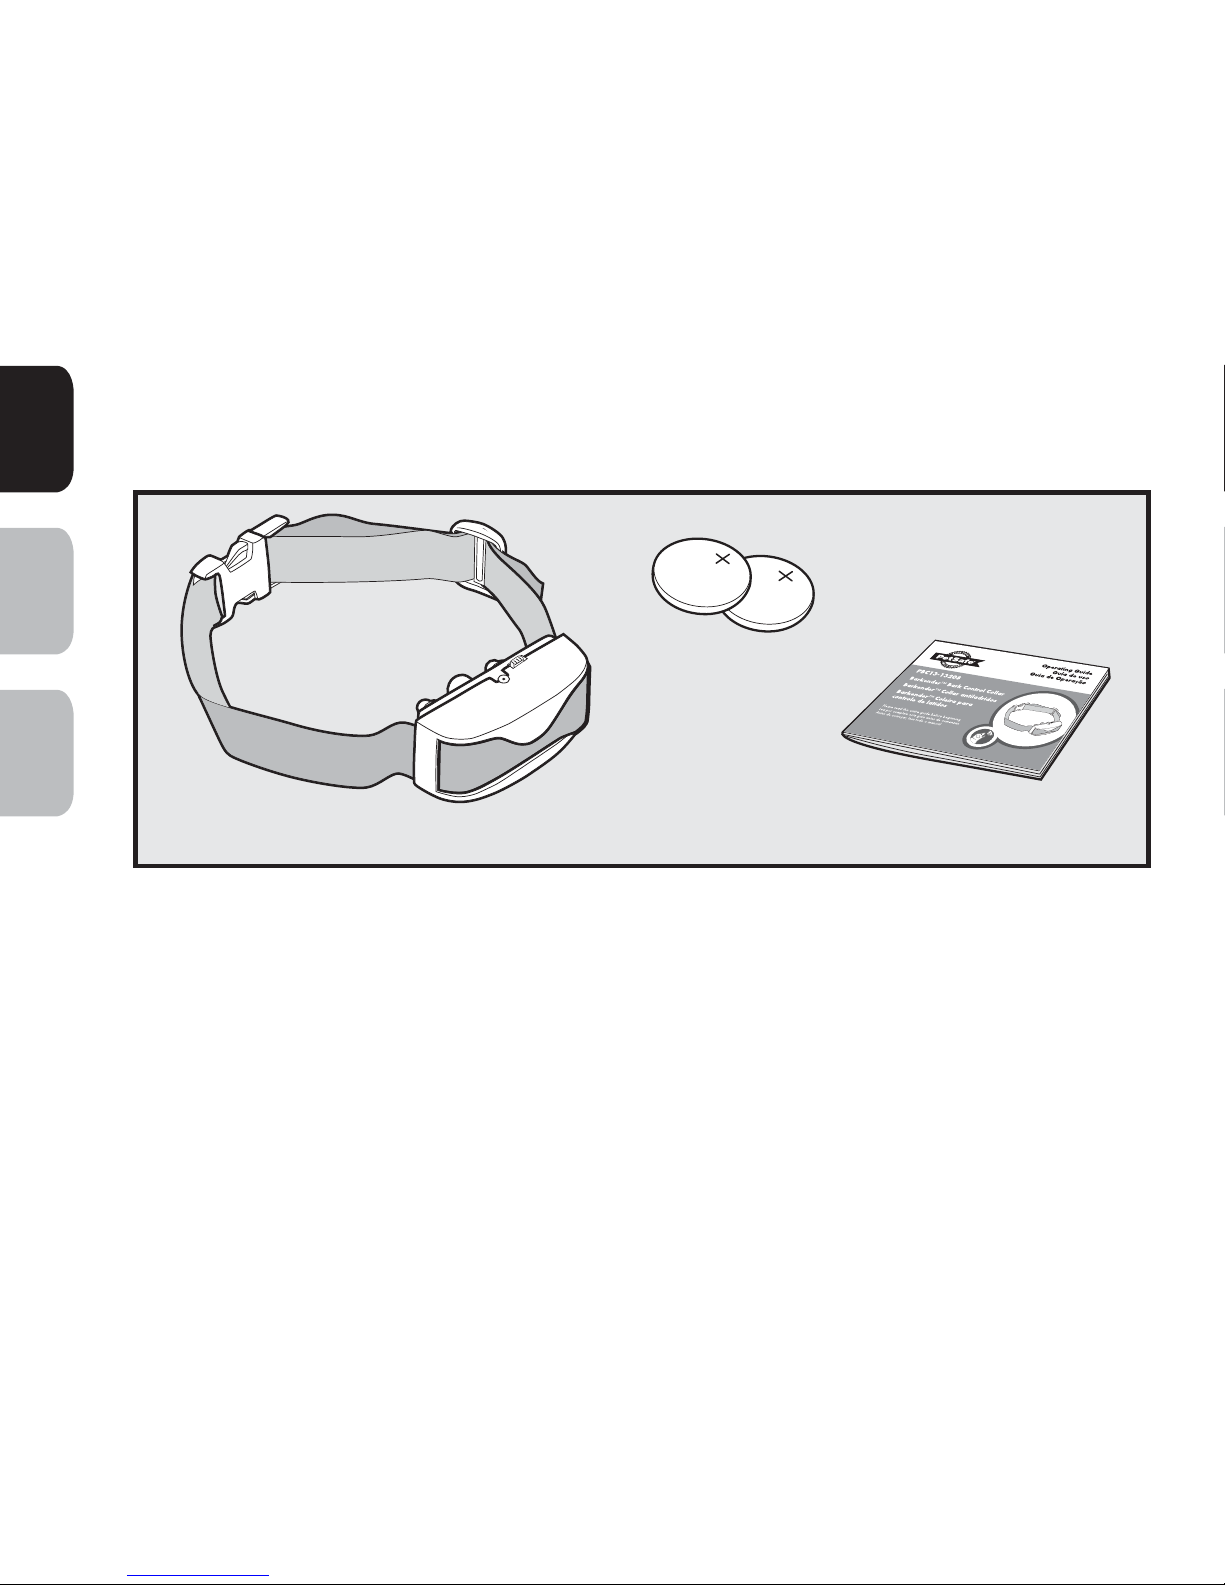
Components
Features
• 6 levels of Static Stimulation, automatically adjusts to your dog’s temperament
starting at the lowest level
• Low Battery Indicator Light
• Stimulation Status Indicator
• ON/OFF position for longer battery life
Operating Guide
(2) 3V Batteries
PAC13-13224
PetSafe
®
Barkender™ Bark Control Collar
Page 9

9
www.petsafe.net
EN
ES
PT
How the System Works
The PetSafe® Barkender™ Bark Control Collar effectively and humanely stops
barking when it is worn. When the vibration of your dog’s bark triggers the Sensor
Probe, a Static Stimulation is administered through the Contact Points. The Bark
Control Collar starts with the lowest level of Static Stimulation and then increases
through 6 levels each time your dog barks within 30 seconds of the previous bark.
If your dog does not bark again within 30 seconds, the Bark Control Collar will
reset itself to the lowest level of Static Stimulation. As an added safety feature, the
Bark Collar will automatically shut off for 3 minutes if your dog barks 15 times or
more within a 50-second period.
Important:
Before playing with your dog, remove the Bark Control Collar. The
activity may cause your dog to bark, which could lead to him associating the play
with the Static Stimulation.
Page 10
10
www.petsafe.net
ENES
PT
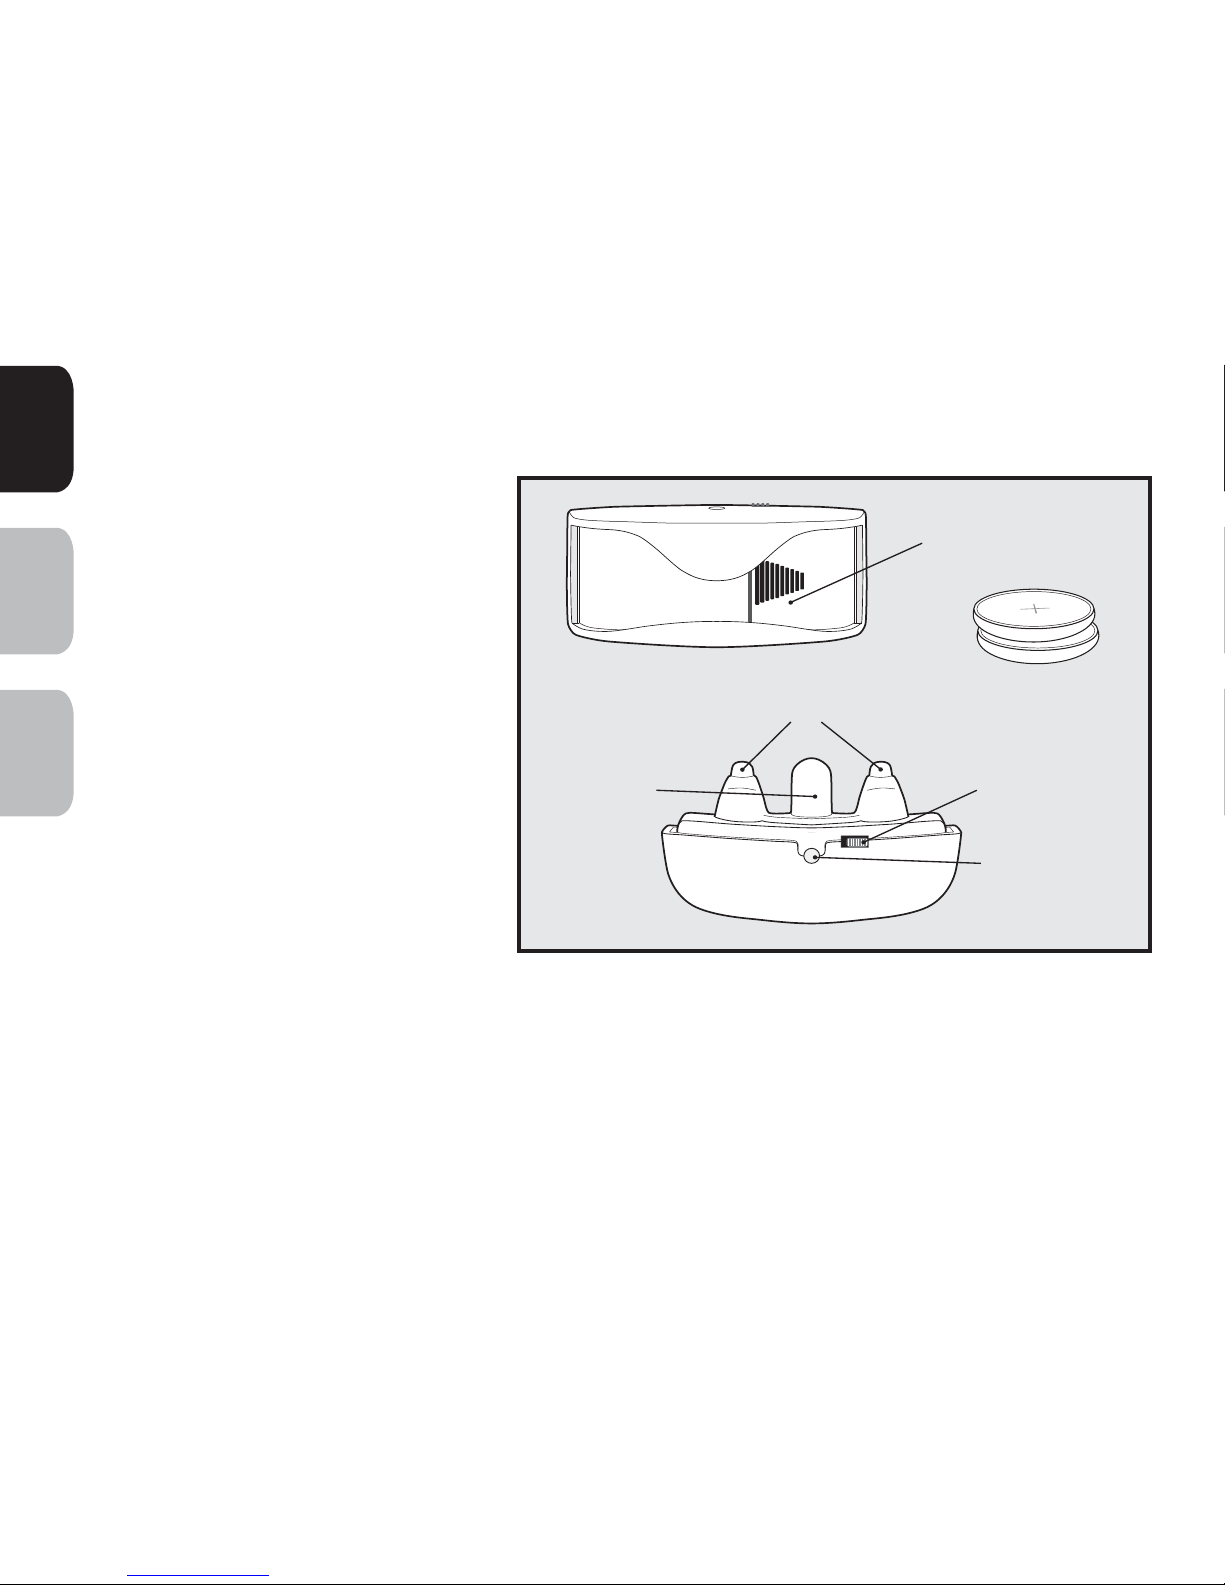
Key Denitions
Contact Points:
Deliver the
safe Static Stimulation.
Sensor Probe:
Detects
the vibrations of your dog’s
barking. Note: The Sensor
Probe is not adjustable.
Low Battery Indicator:
The Indicator light will begin
ashing when batteries are low.
Stimulation Status
Indicator:
The Indicator Light
will ash three times when the
dog receives a stimulation.
ON/OFF switch:
Turns the
collar on and off.
Battery Door
Contact Points
Sensor Probe
Batteries
ON/OFF Switch
Low Battery/
Correction Status
Indicator Light
Page 11

11
www.petsafe.net
EN
ES
PT
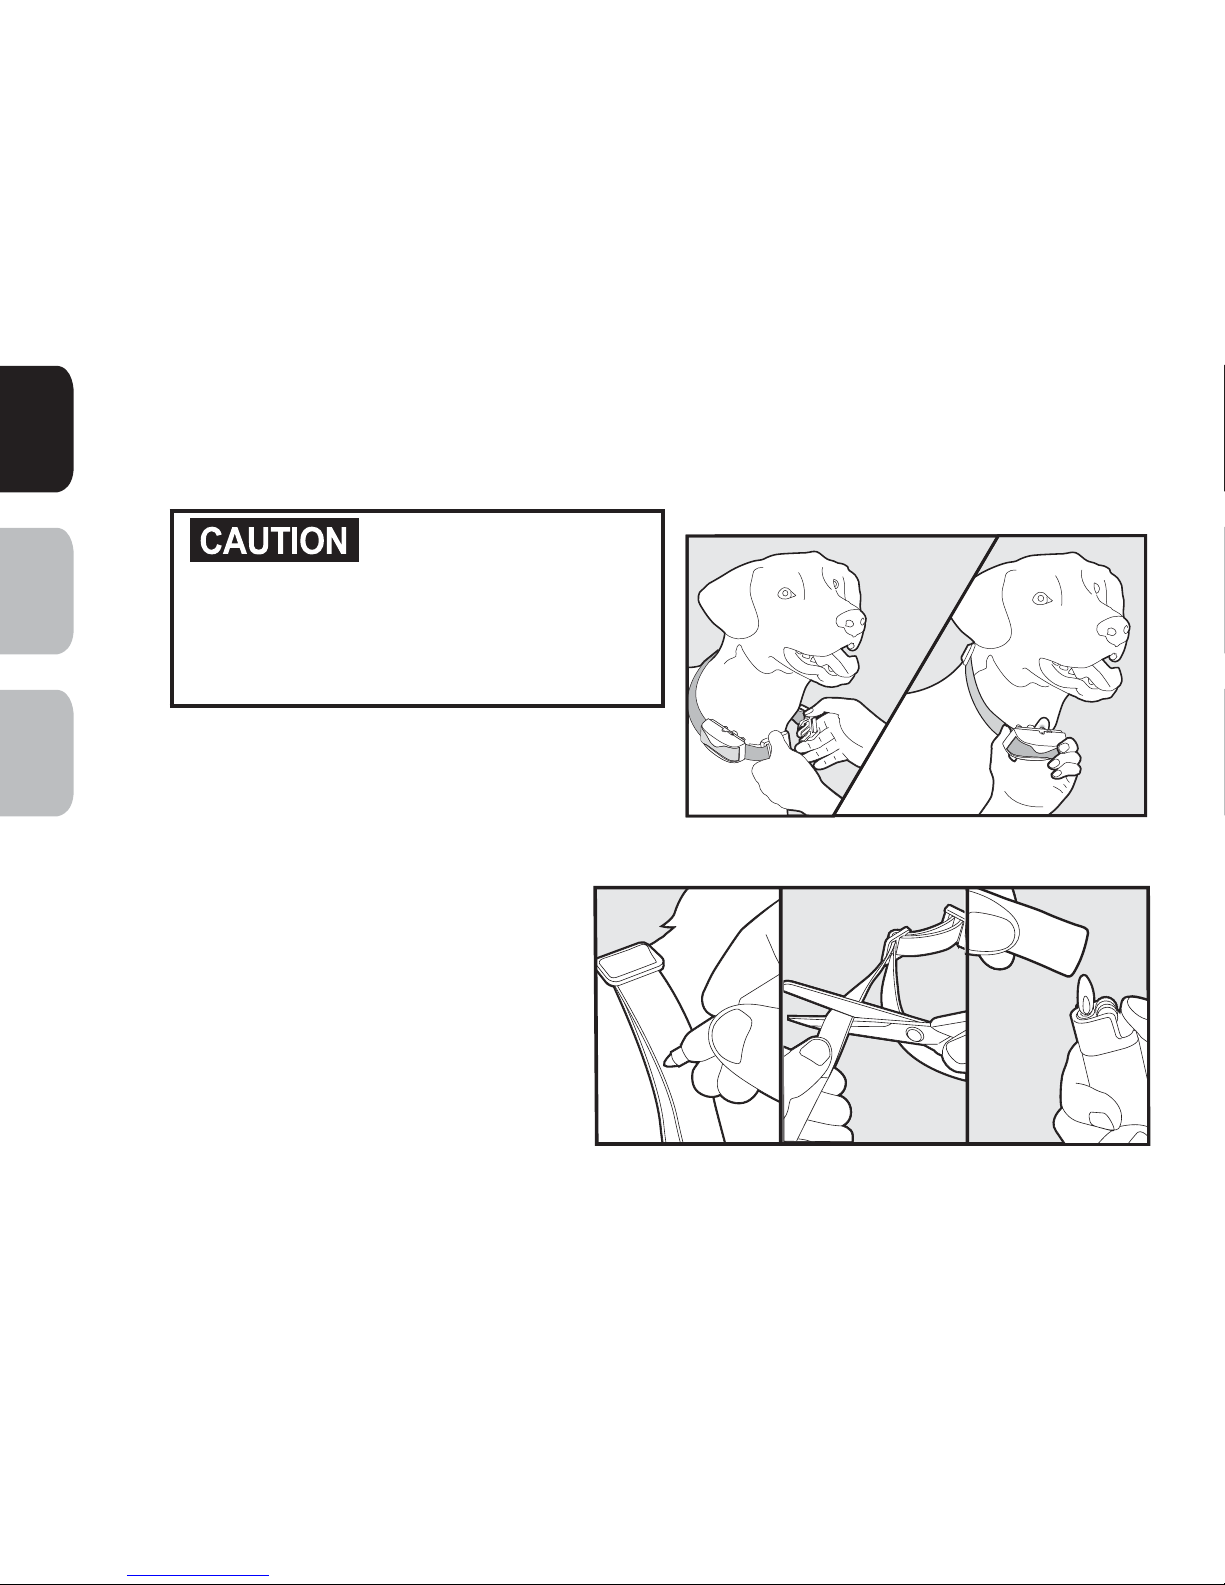
Fit the Bark Control Collar
Important:
The proper t and placement of your Bark Control Collar is important
for effective operation. The Contact Points must have direct contact with your dog’s
skin on the underside of his neck.
To assure a proper t, please follow these steps:
1. Make sure the ON/OFF switch is in the “OFF”
position. Install batteries prior to tting the collar on
your dog. See page 16 for instructions on inserting
the batteries.
2. Start with your dog standing comfortably (A).
3. Place the Bark Control Collar high on your dog’s
neck close to the ears. Center the
Contact Points underneath your dog’s
neck, touching the skin (B). Note: It is
sometimes necessary to trim the hair
around the Contact Points to make
sure that contact is consistent.
Do not shave the pet’s neck as this
may increase the risk of skin irritation.
YES
NO
A
B
Page 12
12
www.petsafe.net
ENES
PT
4. Check the tightness of the Bark Control Collar by inserting one nger between
the end of a Contact Point and your dog’s neck (
C
). The t should be snug but
not constricting.
You should not make
the collar any tighter than is required
for good contact. A collar that is too
tight will increase the risk of pressure
necrosis in the contact area.
5. Allow your dog to wear the Bark
Control Collar for several minutes then
recheck the t. Check the t again as
your dog becomes more comfortable
with the Bark Control Collar.
6. Trim the collar as follows (
D
):
a. Mark the desired length of the
Bark Control Collar with a
pen. Allow for growth if your
dog is young or grows a thick
winter coat.
b. Remove the Bark Control
Collar from your dog and cut
off the excess.
C
D
Page 13
13
www.petsafe.net
EN
ES
PT
c. Before placing the Bark Control Collar back onto your dog, seal the edge of
the cut collar by applying a ame along the frayed edge.
The Bark Control Collar should not be worn for more than 12
hours out of every 24-hour period. Leaving the collar on too long could lead to
skin irritation. Please refer to page 4 for additional information.
ON/OFF Switch
To activate the collar, push the switch left into the “ON” position. If the PetSafe®
Barkender™ Bark Control Collar is not going to be used on the dog immediately
leave it in the “OFF” position.
Page 14

14
www.petsafe.net
ENES
PT
To Re-Thread the Collar
Thread the collar up through the side
of the bark control unit and feed collar
underneath the lip on the front of the bark
control unit.
The slide buckle prevents the collar from
becoming loose around your pet’s neck.
The ridges must be facing up; the collar
will slip if it is not properly threaded.
Ridges
Slide Buckle
Page 15
15
www.petsafe.net
EN
ES
PT
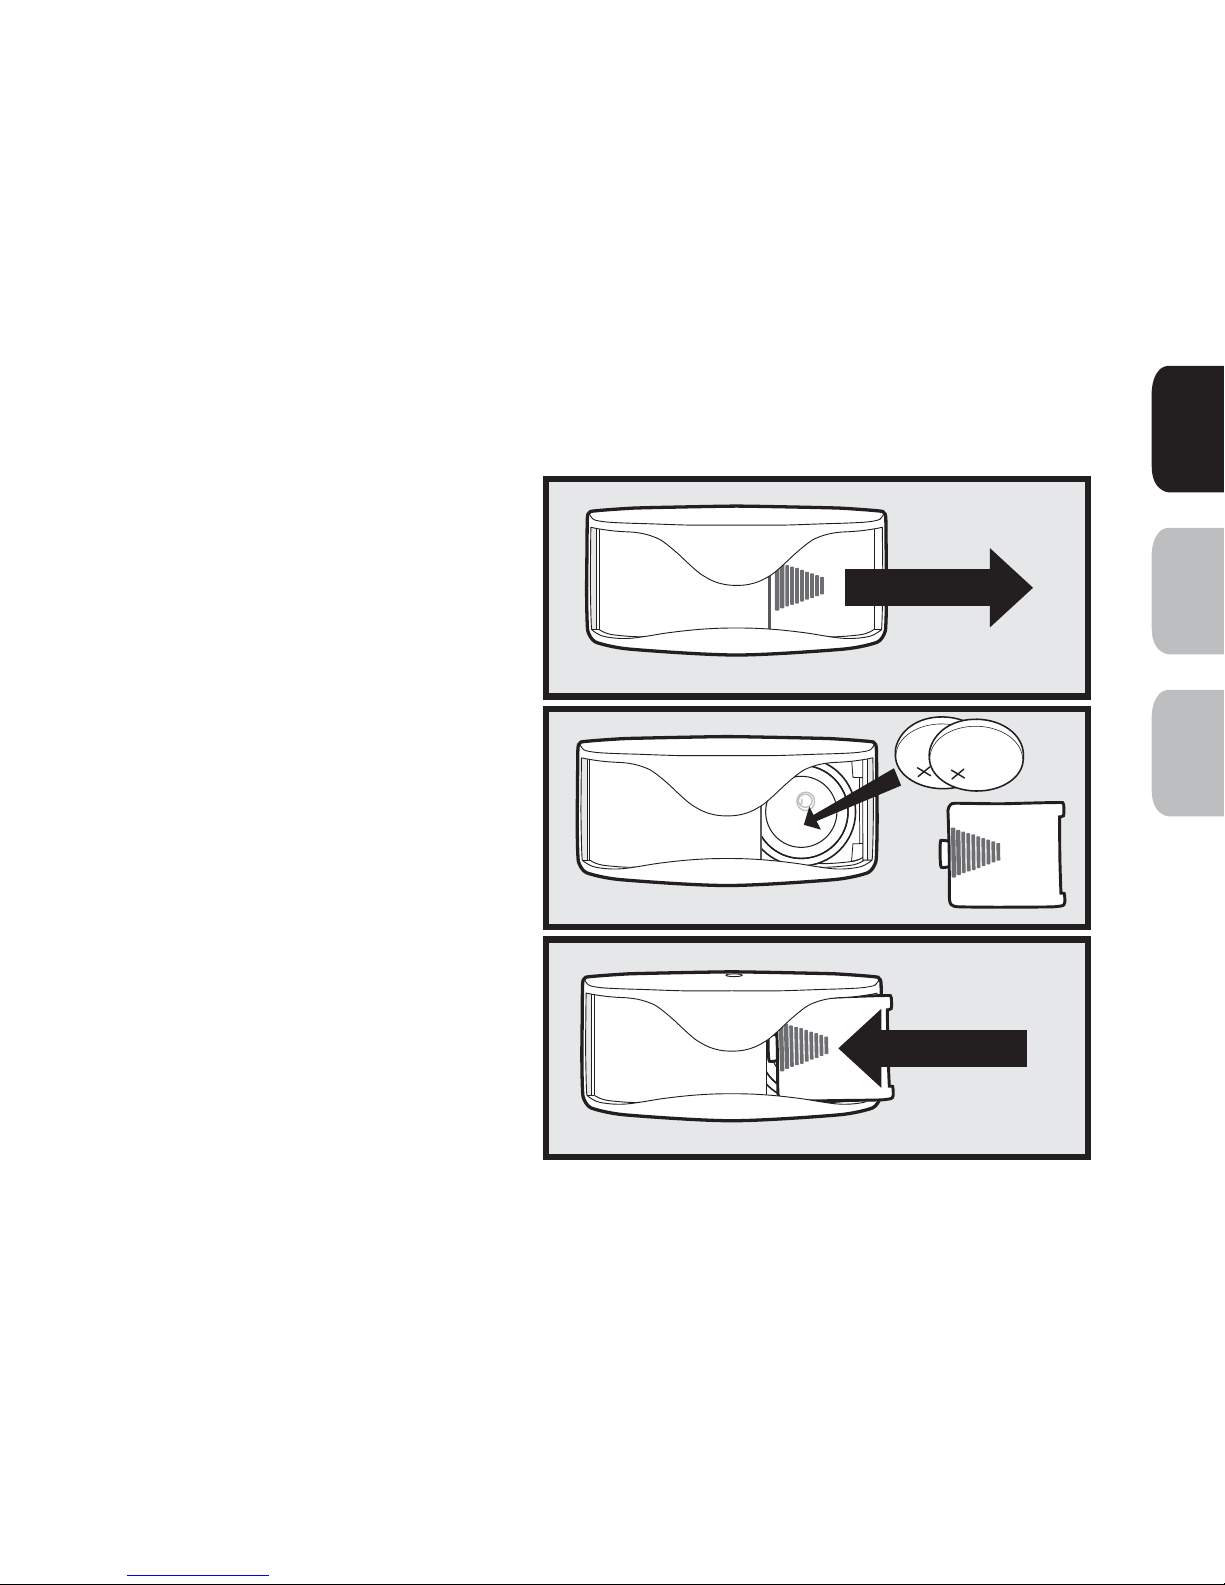
To Insert and Remove the Batteries
1. Slide the battery door open.
2. Install two (2), 3-volt batteries positive
(+) side out, negative (-) side pointed
toward inside of battery unit.
3. Replace the battery door using.
Replacement batteries (3-volt,
PAC13-13224) can be found at many
retailers. Contact the Customer Care Center
or visit our website at www.petsafe.net to
locate a retailer near you
Page 16
16
www.petsafe.net
ENES
PT
Battery Life
Average battery life is 3 to 6 months, depending on how often your dog barks.
However, due to greater use during your dog’s training, your rst batteries may not last
as long as replacement batteries.
Indicator Light Functions
Indicator Light
Color
Number of
Flashes
How
Often?
Indication
None None - Unit is OFF
Red 1 Once Unit is ON
Red 1 Once Every
1 Second
Batteries are low
and need to be
replaced
Red 3 Flashes
3 times/
stimulation
Static stimulation
is administered
Page 17

17
www.petsafe.net
EN
ES
PT
What to Expect During Use of the
Bark Control Collar
Important: Do not leave your dog alone the rst few times he receives a Static
Stimulation.
Place the Bark Control Collar properly on your dog and wait nearby until he barks.
Most dogs will understand very quickly that the Bark Control Collar is disrupting
their urge to bark and will relax and stop barking. Because the Static Stimulation
from the Control Bark Collar may be surprising or startling at rst, some dogs may
bark more at the initial stimulation.
On rare occasions, a dog may get into a bark-stimulation-bark-stimulation cycle. If
this happens, reassure your dog with calm, soothing tones. As your dog relaxes,
he will understand that if he becomes quiet, he will not receive any more Static
Stimulations. The small minority of dogs that have this reaction will only have it the
rst time they wear the Bark Control Collar.
You should notice a reduction in your dog’s barking within the rst couple of days
that he wears the Bark Control Collar. At this point, it is important to remember the
learning process is still not complete. Dogs will “test” this new learning experience
and will increase their attempts to bark. This usually occurs during the second week
a dog wears the Bark Control Collar. If this does occur, remain consistent and do
not alter your use of the Bark Control Collar. You must place the Bark Control Collar
Page 18

18
www.petsafe.net
ENES
PT
on your dog in every situation when you expect him to be quiet. If your dog is not
wearing the Bark Control Collar, he may resume barking and his learning would
suffer a setback.
Regular Maintenance
• Check Contact Points for tightness weekly. Note: Do not adjust
the factory preset Sensor Probe.
• Clean Contact Points with alcohol weekly. Note: Remove
the batteries and discharge the Bark Control Collar before
touching the Contact Points.
• Check your dog’s neck for irritation and wash neck weekly.
Risk of skin damage.
• For comfort, safety and effectiveness of this product, please ensure that you check
the t of your pet’s collar frequently. If any skin irritation is observed, discontinue
the use of the collar for a few days. If the condition persists beyond 48 hours, see
your veterinarian.
• Do not attach a leash to the collar. This can result in pulling the Contact Points too
tightly against your pet’s neck. Attach a lead to a separate, non-metallic collar or
harness, making sure the extra collar does not put pressure on the Contact Points.
Page 19
19
www.petsafe.net
EN
ES
PT
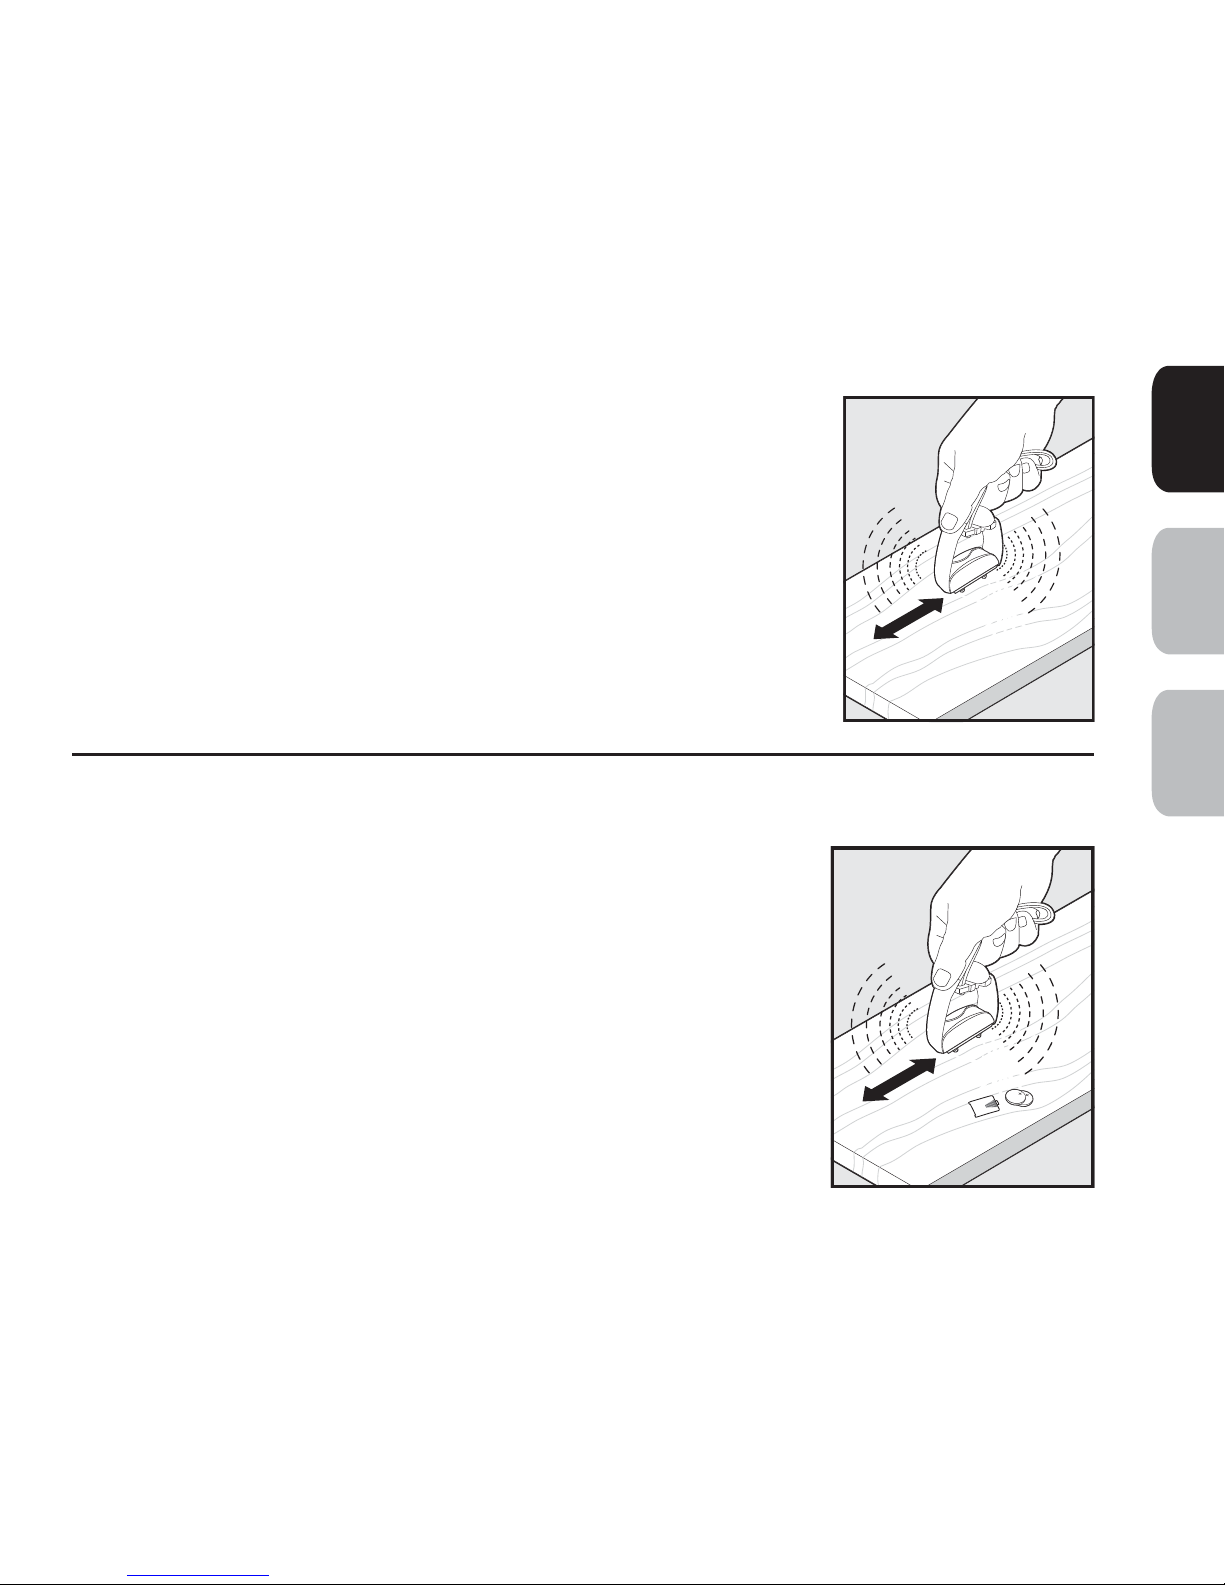
To Test the Bark
Control Collar
Slide the Sensor Probe across a rough surface for at least
254 mm. The Indicator of the Bark Control Collar should ash
several times. If your Bark Control Collar does not ash during
this test, see “The Bark Control Collar does not ash” in the
“Troubleshooting” section, and continue with the second step.
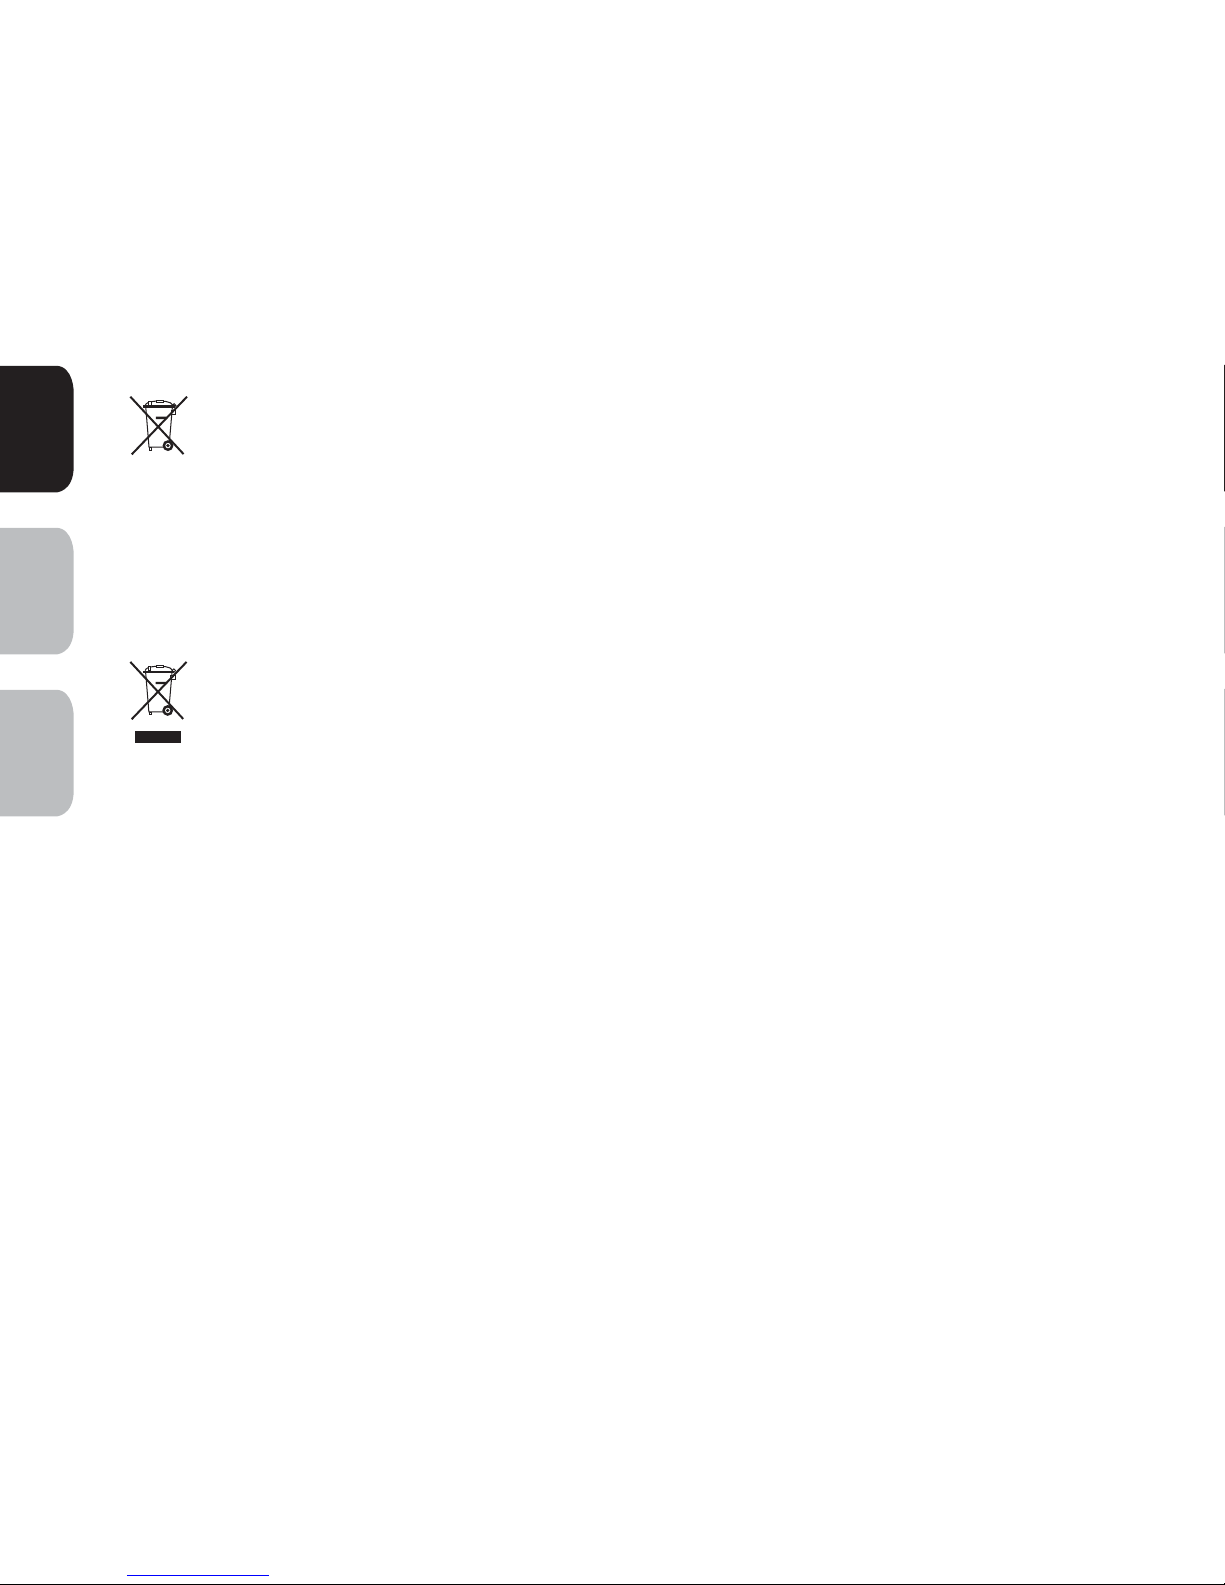
To Discharge the
Bark Control Collar
Important:
Avoid touching the Contact Points and Sensor
Probe unless the Bark Control Collar is completely discharged.
After battery removal, the Bark Control Collar retains some
stored energy and may activate 2 or 3 additional times. To
completely discharge the Bark Control Collar, slide the Sensor
Probe across a table or hard surface several times, until the
Bark Control Collar stops ashing.
Page 20

20
www.petsafe.net
ENES
PT
Frequently Asked Questions
Will my dog stop barking
completely?
• The
Bark Control Collar
effectively and
humanely stops all barking when it is worn. It
should only be worn during periods of unwanted
barking.
Will another dog’s bark set
off the Bark Control Collar?
• No.
Is the Bark Control Collar
safe and humane?
• Yes. The Bark Control Collar is designed to get
your dog’s attention, not to punish him. However,
the initial Static Stimulation may startle your dog.
Will the Bark Control Collar
work for my dog?
• The Bark Control Collar is safe and effective
for all breeds and sizes of dogs, though it may
be too large for dogs under 3.6 kg to wear
comfortably.
Page 21

21
www.petsafe.net
EN
ES
PT
Troubleshooting
The Bark Control
Collar does not
ash.
• Test the Bark Control Collar (see “To Test the Bark Control
Collar” section).
• If your Bark Control Collar does not ash during this test, try
the same test on a rougher surface.
• Ensure that the batteries are properly installed.
• Replace the batteries.
• If the Bark Control Collar still does not ash, contact the
Customer Care Center.
My Bark Control
Collar ashes, but
my dog keeps
barking (does not
respond to the
Static Stimulation).
• Tighten the Bark Control Collar and/or trim your dog’s hair
where the Contact Points touch his neck to ensure good
skin contact.
• Replace the batteries.
• If your dog still does not respond, contact the Customer
Care Center.
The Bark Control
Collar Indicator
Light is ashing.
• Replace the batteries.
Page 22
22
www.petsafe.net
ENES
PT
Battery Disposal
Separate collection of spent batteries is required in many regions; check the
regulations in your area before discarding spent batteries. Please see page 15
for instructions on how to remove the battery pack from the product for separate
disposal. This device operates on 2 lithium manganese batteries of the 3 Volt,
220mAH capacity; replace only with equivalent battery.
Important Recycling Advice
Please respect the Waste Electrical and Electronic Equipment regulations in your
country. This equipment must be recycled. If you no longer require this equipment,
do not place it in the normal municipal waste system. Please return it to where it was
purchased in order that it can be placed in our recycling system. If this is not possible, please contact the Customer Care Center for further information. For a listing
of Customer Care Center telephone numbers, visit our website at www.petsafe.net.
Page 23

23
www.petsafe.net
EN
ES
PT
Terms of Use and Limitation
of Liability
1. Terms of Use
Use of this Product is subject to your acceptance without modication of the terms,
conditions and notices contained herein. Use of this Product implies acceptance
of all such terms, conditions and notices. If you do not wish to accept these
terms, conditions and notices, please return the Product, unused, in its original
packaging and at your own cost and risk to the relevant customer care centre
together with proof of purchase for a full refund.
2. Proper Use
This Product is designed for use with pets where training is desired. The specic
temperament or size/weight of your pet may not be suitable for this Product
(please refer to “How the System Works” in this Operating Guide). Radio Systems
®
Corporation recommends that this Product is not used if your pet is aggressive and
accepts no liability for determining suitability in individual cases. If you are unsure
whether this Product is appropriate for your pet, please consult your veterinarian
or certied trainer prior to use. Proper use includes, without limitation, reviewing
the entire Operating Guide and any specic Caution statements.
Page 24

24
www.petsafe.net
ENES
PT
3. No Unlawful or Prohibited Use
This Product is designed for use with pets only. This pet training device is not
intended to harm, injure or provoke. Using this Product in a way that is not
intended could result in violation of Federal, State or local laws.
4. Limitation of Liability
In no event shall Radio Systems
®
Corporation or any of its associated companies
be liable for (i) any indirect, punitive, incidental, special or consequential damage
and/or (ii) any loss or damages whatsoever arising out of or connected with the
misuse of this Product. The Purchaser assumes all risks and liability from the use of
this Product to the fullest extent permissible by law. For the avoidance of doubt,
nothing in this clause 4 shall limit Radio Systems® Corporation’s liability for human
death or personal injury or fraud or fraudulent misrepresentation.
5. Modication of Terms and Conditions
Radio Systems
®
Corporation reserves the right to change the terms, conditions
and notices governing this Product from time to time. If such changes have been
notied to you prior to your use of this Product, they shall be binding on you as if
incorporated herein.
Page 25

25
www.petsafe.net
EN
ES
PT
INFORMACIÓN DE
SEGURIDAD IMPORTANTE
Explicación de las palabras de atención
y símbolos utilizados en este guía
Este es el símbolo de alerta de seguridad. Se utiliza
para alertarle sobre riesgos de lesiones personales
potenciales. Siga todos los mensajes de seguridad
que a aparecen a continuación de este símbolo
para evitar posibles daños o la muerte.
ADVERTENCIA indica una situación peligrosa
que, si no se evita, podría provocar la muerte o
daños serios.
ATENCIÓN, utilizada con el símbolo de alerta
de seguridad, indica una situación peligrosa que,
si no se evita podría provocar lesiones menores
o moderadas.
ATENCIÓN, utilizada sin el símbolo de alerta de
seguridad, indica una situación peligrosa que, si no
se evita podría provocar daños a su mascota.
Page 26

26
www.petsafe.net
ENES
PT
No apto para perros agresivos. No use este
producto si su perro es agresivo o si es propenso a
mostrar una conducta agresiva. Los perros agresivos
pueden causar lesiones graves e incluso la muerte a
su propietario y a otras personas. Si no está seguro
de si este producto es apropiado para su perro, por
favor consulte a su veterinario o a un adiestrador
profesional.
El collar antiladridos no es un juguete. Manténgalo fuera del alcance de los niños. Utilícelo sólo
para reducir los ladridos.
Page 27

27
www.petsafe.net
EN
ES
PT
Riesgo de lesiones en la piel. Lea y siga las instrucciones
que guran en esta guía. Es importante ajustar el collar
correctamente. Un collar usado durante demasiado tiempo o
muy ajustado en el cuello de la mascota puede lesionarle la
piel. Se llaman úlceras, también conocidas como úlcera por
decúbito o necrosis por presión.
• Evite dejarle puesto el collar al perro durante más de 12
horas por día.
• Cuando sea posible, cambie de lugar el collar en el cuello
del perro cada 1 a 2 horas.
• Verique el ajuste para prevenir la presión excesiva. Siga
las instrucciones de esta guía.
• No conecte una correa al collar electrónico; ocasionará
presión excesiva en los contactos.
• Cuando se use un collar separado para una correa, no le
aplique presión al collar electrónico.
• Lave el área del cuello del perro y los contactos del collar
semanalmente con un paño húmedo.
• Examine diariamente el área de contacto para detectar si
existen signos de sarpullido o úlceras.
• Si se encuentra un sarpullido o una úlcera, suspenda el
uso del collar hasta que la piel haya sanado.
• Si la condición persiste después de pasadas 48 horas,
consulte con el veterinario.
Para obtener más información sobre úlceras y necrosis por
presión, diríjase a nuestro sitio web.
Page 28

28
www.petsafe.net
ENES
PT
Estos pasos lo ayudarán a mantener a su mascota segura
y cómoda. Millones de mascotas están cómodas al usar
contactos de acero inoxidable. Algunas mascotas son
sensibles a la presión de contacto. Con el tiempo, puede
descubrir que su mascota es muy tolerante al collar. De
ser así, puede disminuir algunas de estas precauciones.
Es importante continuar con los controles diarios del
área de contacto. Si se detectan algún enrojecimiento o
úlceras, suspenda el uso hasta que la piel haya sanado
completamente.
• El collar antiladridos sólo debe utilizarse en perros
saludables. Le recomendamos que lleve a su perro al
veterinario antes de usar el collar si su estado de salud no
es bueno.
• No rasure el cuello de su mascota, ya que, de hacerlo,
quedará más expuesto a sufrir irritación cutánea.
• No debe ajustar el collar más de lo requerido para lograr
un buen contacto. Un collar muy ajustado aumentará el
riesgo de necrosis por presión en el área de contacto.
Page 29

29
www.petsafe.net
EN
ES
PT
Gracias por elegir la marca PetSafe®. Queremos garantizar la seguridad de su mascota
mediante las herramientas y técnicas para adiestrar exitosamente a su mascota. Si tiene
alguna pregunta, por favor comuníquese con el Centro de Atención al Cliente. Para
obtener un listado de los números de teléfono de los Centros de Atención al Cliente,
visite nuestro sitio web en www.petsafe.net.
Para aprovechar al máximo la protección de su garantía, registre su producto dentro
de los 30 días posteriores a la compra en www.petsafe.net. Con el registro y con el
recibo de compra, disfrutará de la garantía total del producto y, si tuviera necesidad
de comunicarse con el Centro de Atención al Cliente, podremos ayudarle con
mayor rapidez. Y lo que es más importante, PetSafe
®
no dará ni venderá su valiosa
información a nadie. La información completa sobre la garantía está disponible en línea
en www.petsafe.net.
Page 30

30
www.petsafe.net
ENES
PT
Índice
Componentes ..............................................................................................31
Características ............................................................................................. 31
Cómo funciona el sistema .............................................................................32
Deniciones ................................................................................................33
Ajuste del collar antiladridos .........................................................................34
Interruptor de encendido/apagado ................................................................ 36
Cómo volver a enhebrar el collar ................................................................... 37
Colocación y extracción de la batería ............................................................38
Qué se puede esperar durante el uso del collar antiladridos .............................40
Mantenimiento periódico ..............................................................................41
Prueba del collar antiladridos ........................................................................42
Descarga del collar antiladridos ....................................................................42
Preguntas frecuentes ..................................................................................... 43
Resolución de problemas ..............................................................................44
Eliminacion de las baterías ............................................................................45
Condiciones de uso y limitación de responsabilidad ........................................46
Page 31

31
www.petsafe.net
EN
ES
PT
Componentes
Características
• Seis niveles de estimulación por estática: ajusta automáticamente el nivel de
estimulación por estática al temperamento del perro, a partir del nivel más bajo.
• Luz indicadora de batería baja.
• Luz indicadora de estado de estimulación.
• Posición de encendido y apagado que brinda mayor vida útil de la batería.
Manual de funcionamiento
(2) baterías de 3 voltios
PAC13-13224
Barkender™ Collar antiladridos PetSafe
®
Page 32

32
www.petsafe.net
ENES
PT
Cómo funciona el sistema
El Barkender™ collar antiladridos PetSafe® disuade ecaz y humanamente de
ladrar al perro cuando éste lo está usando. Cuando la vibración del ladrido
del perro activa el sensor, se administra una estimulación por estática mediante
los puntos de contacto. El collar antiladridos comienza con el nivel más bajo
de estimulación por estática y luego incrementa los seis niveles cada vez que
su pero ladra dentro de los 30 segundos del ladrido anterior. Si su perro no
ladra nuevamente dentro de los 30 segundos, el collar antiladridos se reiniciará
automáticamente al nivel más bajo de estimulación por estática. Como una
característica adicional de seguridad, el collar antiladridos se apagará
automáticamente por 3 minutos si su perro ladra 15 veces o más dentro de un
período de 50 segundos.
Importante:
apague la unidad y retire el collar antiladridos antes de ponerse a
jugar con el perro. La actividad puede hacer que el perro ladre, lo que podría llevarlo
a asociar el juego con la estimulación por estática.
Page 33

33
www.petsafe.net
EN
ES
PT
Deniciones
Puntos de contacto:
proporcionan una
estimulación por estática
segura.
Sensor:
detecta las
vibraciones de los ladridos
del perro. Nota: el sensor no
es ajustable.
Luz indicadora de
batería baja:
comenzará a
destellar cuando las baterías
estén bajas.
Indicador del estado
de estimulación:
la luz
indicadora destellará tres veces cuando el perro reciba una estimulación.
Interruptor de ON/OFF (encendido/apagado):
enciende y apaga el collar.
Tapa de la batería
Puntos de contacto
Sensor
Baterías
Interruptor de ON/OFF
(encendido/apagado)
Luz indicadora
de batería
baja/estado de
corrección
Page 34

34
www.petsafe.net
ENES
PT
Ajuste del collar antiladridos
Importante:
el ajuste y la colocación correctos del collar antiladridos son
importantes para un funcionamiento ecaz. Los puntos de contacto deben tener
contacto directo con la piel del perro en la parte inferior del cuello.
Para asegurar un ajuste correcto, siga los siguientes pasos:
1. Asegúrese de que el interruptor de encendido/
apagado esté en la posición “OFF” (apagado).
Instale las baterías antes de ajustarle el collar
al perro. Diríjase a la página 38 para obtener
instrucciones sobre cómo colocar las baterías.
2. Empiece haciendo que el perro se ponga de pie de
forma cómoda (A).
3. Póngale el collar antiladridos al perro
en el cuello, cerca de las orejas.
Coloque los puntos de contacto
debajo del cuello del perro, de forma
que esté en contacto con la piel (B).
Nota: a veces hay que recortar el
pelo del perro en la zona que rodea
los puntos de contacto para que estén
siempre en contacto con la piel.
YES
NO
A
B
Page 35

35
www.petsafe.net
EN
ES
PT
No rasure el cuello de la mascota ya que, de
hacerlo quedará, más expuesta a sufrir irritación cutánea.
4. Compruebe la tirantez del collar antiladridos con un dedo entre el extremo de
un punto de contacto y el cuello del perro (
C
). El ajuste debe ser cómodo. No
debe estar demasiado apretado.
No debe ajustar
el collar más de lo requerido para
lograr un buen contacto. Un collar
muy ajustado aumentará el riesgo
de necrosis por presión en el área
de contacto.
5. Deje que el perro lleve el collar
antiladridos durante varios minutos
y después vuelva a comprobar
el ajuste. Compruebe el ajuste
nuevamente cuando el perro se
sienta más cómodo con el collar
antiladridos.
6. Recorte el collar como se indica a
continuación (D):
C
D
Page 36

36
www.petsafe.net
ENES
PT
a. Marque la longitud deseada del collar antiladridos con un bolígrafo.
Deje espacio para cuando crezca, si la mascota es joven, o para el invierno,
si tiene el pelo largo.
b. Retire el collar antiladridos del perro y corte el exceso.
c. Antes de volver a colocarle el collar antiladridos al perro, selle el borde del
corte del collar con una llama a lo largo del borde cortado.
El collar antiladridos no se debe utilizar durante más de
12 horas en un período de 24 horas. Si se le deja puesto el collar al perro
durante demasiado tiempo, éste podría sufrir irritación cutánea. Consulte la
página 27 para obtener más información.
Interruptor de encendido/apagado
Para activar el collar, coloque el interruptor de encendido/apagado en la posición
“ON” (encendido). Si no se va a utilizar el Barkender™ collar antiladridos de
PetSafe
®
inmediatamente en el perro, déjelo en la posición “OFF” (apagado).
Page 37

37
www.petsafe.net
EN
ES
PT
Cómo volver a enhebrar el collar
Enhebre el collar por el lateral de
la unidad de control de ladridos e
introduzca el collar por debajo del borde
en la parte frontal de la unidad de control
de ladridos.
La hebilla deslizante evita que el collar se
aoje del cuello de la mascota.
Los rebordes deben estar hacia
arriba. El collar se deslizará si no está
adecuadamente enhebrado.
Rebordes
Hebilla deslizante
Page 38

38
www.petsafe.net
ENES
PT
Colocación y extracción de la batería
1. Deslice la tapa de la batería para
abrirla.
2. Instale dos (2) baterías de 3
voltios con el lado positivo (+)
hacia afuera y el lado negativo (-)
apuntando hacia el interior de la
unidad de la batería.
3. Sustituya la tapa de la batería.
Las baterías de reemplazo (de 3
voltios, PAC13-13224) pueden
encontrarse en muchas tiendas
minoristas. Póngase en contacto con el
Centro de Atención al Cliente o visite
nuestro sitio web en www.petsafe.net
para encontrar una tienda minorista en
su localidad.
Page 39

39
www.petsafe.net
EN
ES
PT
Vida útil de la batería
La vida útil de la batería promedio es de tres a seis meses, según de cuán
a menudo ladre el perro. Sin embargo, debido a un mayor uso durante el
adiestramiento del perro, es posible que las primeras baterías no duren tanto
como las baterías de reemplazo.
Funciones de la luz indicadora de batería baja
Colores de la luz
indicadora
Cantidad de
destellos
¿Cuán a
menudo?
Indicación
Ninguno Ninguna - La unidad está OFF
(apagada).
Rojo 1 Una vez La unidad está ON
(encendida).
Rojo 1 Una vez cada
un segundo
Las baterías
tienen poca carga
y se las debe
reemplazar.
Rojo 3 Destella
tres veces/
estimulación
Se administra la
estimulación por
estática.
Page 40

40
www.petsafe.net
ENES
PT
Qué se puede esperar durante el
uso del collar antiladridos
Importante: no deje solo al perro las primeras veces que reciba una estimulación
por estática.
Colóquele el collar antiladridos correctamente al perro y espere cerca hasta
que ladre. La mayoría de los perros comprenderán muy rápidamente que el
collar antiladridos está interrumpiendo sus ladridos, se relajarán y dejarán de
ladrar. Debido a que la estimulación por estática del collar antiladridos puede
sorprenderlos o asustarlos al principio, algunos perros pueden ladrar más en la
estimulación inicial.
En raras ocasiones un perro puede entrar en un ciclo de ladrido-estimulación-
ladrido-estimulación. Si esto ocurre, tranquilice al perro con tono calmado y
suave. Cuando el perro se relaje, comprenderá que si se calla no recibirá más
estimulaciónes por estática. Una pequeña minoría de perros que tienen esta
reacción sólo la tendrán la primera vez que usen el collar antiladridos.
Notará una reducción de los ladridos del perro en los dos primeros días que use
el collar antiladridos. En este punto, es importante recordar que el proceso de
adiestramiento aún no ha nalizado. La mayoría de los perros "probarán" esta
nueva experiencia de adiestramiento y aumentarán sus intentos de ladrar. Esto
generalmente ocurre durante la segunda semana que un perro lleva puesto el collar
antiladridos. Si esto ocurre, sea constante y no altere el uso del collar antiladridos.
Page 41

41
www.petsafe.net
EN
ES
PT
Debe colocarle el collar antiladridos al perro en cada situación en que desee
que esté callado. Si el perro no lleva puesto el collar antiladridos, puede volver a
ponerse a ladrar y su adiestramiento sufrirá un retroceso.
Mantenimiento periódico
• Compruebe el ajuste de los puntos de contacto semanalmente.
Nota: no ajuste el sensor precalibrado en fábrica.
• Limpie los puntos de contacto con alcohol una vez por
semana. Nota: retire las baterías y descargue el collar
antiladridos antes de tocar los puntos de contacto.
• Verique que el perro no tenga irritaciones en el cuello y
lávelo una vez por semana.
Riesgo de lesiones en la piel
• Para la comodidad, seguridad y efectividad de este producto, asegúrese
de vericar el ajuste del collar de su mascota a menudo. Si observa alguna
irritación cutánea, suspenda el uso del collar por unos días. Si la condición
persiste después de pasadas 48 horas, consulte con su veterinario.
• No ate una correa al collar. Si lo hace, es posible que los puntos de contacto
queden muy pegados al cuello del perro. Ate la correa a otro arnés o collar no
metálico y asegúrese de que el collar extra no ejerza presión sobre los puntos
de contacto.
Page 42

42
www.petsafe.net
ENES
PT
Prueba del collar antiladridos
Deslice el sensor a través de una supercie áspera por al
menos 254 mm. El indicador del collar antiladridos debe
destellar varias veces. Si el collar antiladridos no destella
durante esta prueba, consulte "El collar antiladridos no
destella" en el apartado “Resolución de problemas” y
continúe con el segundo paso.
Descarga del collar antiladridos
Importante:
evite tocar los puntos de contacto y
el sensor a menos que el collar antiladridos esté
completamente descargado.
Después de retirar la batería, el collar antiladridos retiene
cierta energía almacenada y se puede activar dos ó
tres veces más. Para descargar completamente el collar
antiladridos, deslice el sensor por una mesa o supercie
dura varias veces hasta que el collar antiladridos deje
de destellar.
Page 43

43
www.petsafe.net
EN
ES
PT
Preguntas frecuentes
¿Por qué dejó de ladrar
por completo mi perro?
• El
collar antiladridos
disuade ecaz y huma-
namente de ladrar al perro cuando éste lo está
usando. Sólo lo deberá utilizar en momentos en
que no se desea que el perro ladre.
¿Activará el collar el ladrido de otro perro?
• No.
¿Es seguro y humano el
collar antiladridos?
• Sí. El collar antiladridos está diseñado para capturar la atención del perro, no para castigarlo.
Sin embargo, es posible que la estimulación por
estática inicial lo asuste.
¿Funcionará bien el collar
el ladrido para mi perro?
• El collar antiladridos es seguro y ecaz para
todas las razas y tamaños de perros, aunque es
posible que sea demasiado grande para perros
con menos de 3,6kg y les resulte incómodo.
Page 44

44
www.petsafe.net
ENES
PT
Resolución de problemas
El collar antiladridos no hace
ningún destello.
• Pruebe el collar antiladridos (consulte el apartado “Prueba
del collar antiladridos").
• Si el collar antiladridos no destella durante la prueba, intente
realizar la misma prueba sobre una supercie más dura.
• Asegúrese de que las baterías estén bien colocadas.
• Reemplace las baterías.
• Si aun así no destella, comuníquese con el Centro de
Atención al Cliente.
El collar
antiladridos
destella, pero
el perro sigue
ladrando (no
responde a la
estimulación por
estática).
• Ajuste el collar y recorte el cabello del perro donde se
encuentran los puntos de contacto para que éstos le toquen
la piel y se asegure así un buen contacto.
• Reemplace las baterías.
• Si el perro sigue sin responder, póngase en contacto con el
Centro de Atención al Cliente.
La luz del collar
antiladridos
destella.
• Reemplace las baterías.
Page 45

45
www.petsafe.net
EN
ES
PT
Eliminación de las baterías
En muchas regiones se requiere que las baterías gastadas se recojan por separado;
compruebe las normas de su zona antes de deshacerse de las baterías gastadas.
Consulte la página 38 para ver instrucciones sobre cómo retirar la batería del
producto para eliminarla por separado. Este dispositivo funciona con dos baterías
de litio CR2032 de 3 voltios y 220 mAH de capacidad. Cambiéla sólo por una
batería equivalente.
Aviso importante sobre el reciclaje
Respete las normativas sobre Residuos de aparatos eléctricos y electrónicos en su
país. Este aparato debe ser reciclado. Si ya no necesita este dispositivo, no lo deje
en el sistema municipal de residuos normales. Entréguelo en el lugar de adquisición
para que procedan a enviarlo a nuestro sistema de reciclado. Si no fuera posible,
póngase en contacto con el Centro de atención al cliente para obtener más
información.
Page 46

46
www.petsafe.net
ENES
PT
Condiciones de uso y limitación
de responsabilidad
1. Condiciones de uso
El uso de este producto está sujeto a su aceptación sin modicación de los
términos, condiciones y avisos incluidos en este documento. El uso de este
producto implica la aceptación de dichos términos, condiciones y avisos. Si no
desea aceptar estos términos, condiciones y avisos, devuelva el producto, sin
utilizar, en su paquete original, con portes pagados y asumiendo el riesgo del
envío al Centro de Atención al Cliente pertinente, junto con la prueba de compra
para obtener una devolución total.
2. Uso correcto
Este producto está diseñado para su uso con mascotas a las que se desee
adiestrar. El temperamento especíco o tamaño/peso de su mascota puede que
no sea adecuado para este producto (consulte el apartado "Cómo funciona el
sistema" de esta guía). Radio Systems
®
Corporation recomienda que este Producto
no se use si su mascota es agresiva y no acepta ninguna responsabilidad para
determinar la idoneidad en casos individuales. Si no está seguro de si este
producto es apropiado para su mascota, consulte con su veterinario o con un
adiestrador profesional antes de usarlo. Uso correcto incluye, entre otros, la
revisión de este manual y de cualquier declaración de precaución especíca.
Page 47

47
www.petsafe.net
EN
ES
PT
3. Uso ilegal o prohibido
Este Producto está diseñado para uso únicamente con mascotas. Este aparato de
adiestramiento para mascotas no tiene como propósito herir, lesionar ni provocar.
El uso de este producto de una forma para la que no esté indicado podría dar
como resultado una infracción de las leyes federales, estatales o locales.
4. Limitación de responsabilidad
En ningún caso Radio Systems
®
Corporation o cualquiera de sus empresas
asociadas será responsable por i) daño indirecto, punitivo, accidental, especial
o consecuente alguno, o ii) toda pérdida o daño que resulte o esté relacionado
con el uso indebido del producto. El comprador asume todos los riesgos y
responsabilidades del uso del producto en la medida en que esté permitido por
la ley. Para evitar cualquier duda, nada de lo estipulado en la cláusula 4 limitará
la responsabilidad de Radio Systems® Corporation respecto de muerte humana,
lesiones personales, fraude o tergiversación fraudulenta.
5. Modicación de las condiciones generales
Modicación de las condiciones generales Radio Systems
®
Corporation se reserva
el derecho a cambiar periódicamente las condiciones generales y noticaciones
bajo se ofrece el producto. Si dichos cambios le han sido noticados antes de
usar el producto, serán vinculantes para usted del mismo modo que si estuvieran
incluidos en este documento.
Page 48

48
www.petsafe.net
ENES
PT
INFORMAÇÕES IMPORTANTES
SOBRE SEGURANÇA
Explicação sobre as palavras de atenção e símbolos
usados neste guia
Este é o símbolo de alerta de segurança. Ele é usado para
alertá-lo sobre a possibilidade de ferimentos. Observe
todas as mensagens de segurança ao lado deste símbolo
para evitar possíveis ferimentos ou morte.
ATENÇÃO
ATENÇÃO indica uma situação perigosa que, se não for
evitada, poderá resultar em morte ou ferimentos graves.
CUIDADO
CUIDADO, usado com o símbolo de alerta de segurança,
indica uma situação perigosa que, se não for evitada,
poderá resultar em ferimentos leves ou moderados.
CUIDADO
CUIDADO, usado sem o símbolo, indica uma situação perigosa que, se não for evitada, poderá resultar em ferimentos
ao animal.
Page 49

49
www.petsafe.net
EN
ES
PT
ATENÇÃO
Não indicado para uso em cães agressivos. Não use este
produto se o seu cão for agressivo ou tiver tendência a
comportamento agressivo. Esses animais podem causar
ferimentos graves e até morte aos seus donos e a outras
pessoas. Se estiver em dúvida quanto à adequação deste
produto ao seu cão, consulte um veterinário ou treinador
certicado.
CUIDADO
A coleira para controle de latidos não é um brinquedo.
Mantenha-a fora do alcance de crianças. Use-a somente
para interrupção de latidos.
Page 50

50
www.petsafe.net
ENES
PT
CUIDADO
Risco de ferimentos à pele. Leia e siga as instruções contidas
neste manual. O ajuste adequado da coleira é importante. O
uso prolongado do produto ou sua colocação muito justa no
pescoço do animal pode causar ferimentos à pele, que são
chamados de escaras; também são conhecidos como úlceras
de decúbito ou necrose de pressão.
• Evite deixar a coleira no cão por mais de 12 horas por dia.
• Quando possível, reposicione a coleira no pescoço do
animal a cada uma ou duas horas.
• Verique o ajuste para evitar pressão excessiva; siga as
instruções contidas neste manual.
• Nunca prenda uma correia à coleira eletrônica; isso causará pressão excessiva nos contatos.
• Ao usar outra coleira com uma correia, não coloque pressão sobre a coleira eletrônica.
• Lave a área do pescoço do animal e os contatos da coleira
semanalmente com um pano umedecido.
• Examine a área de contato diariamente para vericar a existência de sinais de irritação ou ferimento.
• Se encontrar ferimentos ou irritação, interrompa o uso da
coleira até que a pele se recupere.
• Se o problema persistir além de 48 horas, consulte
o veterinário.
Page 51

51
www.petsafe.net
EN
ES
PT
Para obter informações adicionais sobre escaras e necrose
de pressão, visite nosso site.
Estas etapas ajudarão a manter o animal seguro e
confortável. O uso de contatos de aço inoxidável se
mostrou confortável em milhões de animais de estimação.
Alguns são sensíveis à pressão de contato. Pode ser que
você perceba, depois de algum tempo, que o seu animal
é bastante tolerante à coleira. Nesse caso, você poderá
suspender algumas dessas precauções. É importante
continuar com as vericações diárias da área de contato.
Se encontrar vermelhidão ou ferimentos, suspenda o uso
até que a pele se recupere completamente.
• A coleira para controle de latidos deve ser usada somente
em cães saudáveis. Se o seu cão não estiver saudável,
recomendamos que você o leve a um veterinário antes de
usar o produto.
• Não depile o pescoço do animal, pois isso poderá
aumentar a irritação da pele.
• Não ajuste a coleira além do que é necessário para um
bom contato. Se a coleira estiver muito apertada, isso
aumentará o risco de necrose de pressão na área de
contato.
Page 52

52
www.petsafe.net
ENES
PT
Obrigado por escolher a PetSafe®. Queremos garantir a segurança do seu animal
fornecendo-lhe as ferramentas e técnicas para treiná-lo com êxito. Se você tiver dúvidas,
entre em contato com o Centro de Atendimento ao Cliente. Para obter uma lista de
telefones do Centro, visite nosso site www.petsafe.net.
Para obter o máximo de benefícios da sua garantia, registre o produto em até 30 dias
no site www.petsafe.net. Ao efetuar o registro e guardar a nota scal, você aproveitará
a garantia total do produto e, se precisar ligar para o Centro de Atendimento ao
Cliente, poderemos ajudá-lo com mais rapidez. O que é mais importante: a PetSafe
®
nunca fornecerá nem venderá suas valiosas informações a ninguém. No site
www.petsafe.net, você encontrará informações completas sobre a garantia.
Page 53

53
www.petsafe.net
EN
ES
PT
Índice
Componentes ..............................................................................................54
Recursos .....................................................................................................54
Como o sistema funciona .............................................................................. 55
Principais denições ..................................................................................... 56
Ajustar a coleira antilatidos ........................................................................... 57
Chave liga/desliga ......................................................................................59
Para reencaixar a coleira ..............................................................................60
Para inserir e retirar as baterias ..................................................................... 61
O que esperar durante o uso da coleira antilatidos .......................................... 63
Manutenção regular ..................................................................................... 64
Para testar a coleira antilatidos ......................................................................65
Para descarregar a coleira antilatidos ............................................................65
Perguntas frequentes .....................................................................................66
Solução de problemas .................................................................................. 67
Descarte de Bateria ...................................................................................... 68
Termos de uso e limitação de responsabilidade ...............................................69
Page 54

54
www.petsafe.net
ENES
PT
Componentes
Recursos
• 6 níveis de correção estática, ajusta-se automaticamente ao temperamento do seu
cão, começando pelo menor nível
• Luz indicadora de bateria fraca
• Indicador de status de correção
• Posição Liga/Desliga para maior duração da bateria
Guia de Operação
2 baterias de 3 V
PAC13-13224
Barkender™ Coleira para controle de latidos PetSafe
®
Page 55

55
www.petsafe.net
EN
ES
PT
Como o sistema funciona
A Barkender™ coleira para controle de latidos PetSafe®, quando usada, interrompe
o latido de forma ecaz e humana. Quando a vibração do latido do seu cão
aciona o sensor, uma correção estática é administrada por meio dos pontos de
contato. A coleira para controle de latidos começa com o menor nível de correção
estática e, em seguida, vai intensicando a correção, até o nível seis, sempre que
o cão late em menos de 30 segundos após o latido anterior. Se o seu cão não
latir novamente em 30 segundos, a coleira será reajustada para o menor nível de
correção estática.
Importante:
antes de brincar com o seu cão, retire a coleira para controle de
latidos. A atividade poderá fazer com que ele lata, o que poderá levá-lo a associar
a brincadeira com a correção estática.
Page 56

56
www.petsafe.net
ENES
PT
Principais denições
Pontos de contato:
aplicam
a correção estática segura.
Sensor:
detecta as vibrações
dos latidos do seu cão.
Observação: o sensor não é
ajustável.
Indicador de bateria
fraca:
a luz indicadora
começará a piscar quando as
baterias estiverem fracas.
Indicador de status de
correção:
a luz indicadora
piscará três vezes quando o
cão receber uma correção.
Chave ON/OFF (liga/desliga):
liga e desliga a coleira.
Tampa do compartimento
das baterias
Pontos de contato
Sensor
Baterias
Chave ON/OFF
(liga/desliga)
Luz indicadora
de bateria
fraca/status de
correção
Page 57

57
www.petsafe.net
EN
ES
PT
Ajustar a coleira antilatidos
Importante:
o ajuste e a colocação adequados da coleira antilatidos é
importante para se obter um funcionamento ecaz. Os pontos de contato deverão
ter contato direto com a pele do cão, no lado de baixo do pescoço.
Para garantir um ajuste adequado, siga estas etapas:
1. Verique se a chave liga/desliga está na posição
“OFF” (desliga). Instale as baterias antes de colocar
a coleira no cão. Consulte a página 62 para obter
instruções sobre a colocação das baterias.
2. Comece com o seu cão em uma posição
confortável (A).
3. Coloque a coleira antilatidos no
pescoço do cão, próximo às orelhas.
Centralize os pontos de contato
abaixo do pescoço, tocando a
pele (B). Observação: às vezes, é
necessário cortar o pelo em volta dos
pontos para uniformizar o contato.
CUIDADO
Não depile o pescoço do animal, pois isso pode aumentar
o risco de irritação da pele.
YES
NO
A
B
Page 58

58
www.petsafe.net
ENES
PT
4. Verique o ajuste da coleira inserindo um dedo entre a extremidade da ponta
de contato e o pescoço do cão (
C
). A coleira deverá estar justa, mas não a
ponto de pressionar.
CUIDADO
Não ajuste a coleira
além do que é necessário para se
obter um bom contato. Se a coleira
car muito justa, isso aumentará o
risco de necrose de pressão na área
de contato.
5. Deixe a coleira no cão por alguns
minutos e, em seguida, verique
novamente o ajuste. Verique novamente o ajuste conforme o seu cão for se
sentindo mais confortável com a coleira antilatidos.
6. Corte a coleira da seguinte maneira (
D
):
a. Marque o comprimento
desejado da coleira com
uma caneta. Considere
o crescimento do animal
caso ele seja lhote ou a
abundância de pelos.
C
D
Page 59

59
www.petsafe.net
EN
ES
PT
b. Remova a coleira do cão e corte o excesso.
c. Antes de recolocar a coleira no cão, sele com fogo a ponta cortada da
coleira.
CUIDADO
A coleira para controle de latidos não deve ser usada por mais
de 12 horas a cada período de 24 horas. O uso prolongado do produto
poderá causar irritação da pele. Consulte a página 50 para obter informações
adicionais.
Chave liga/desliga
Para ativar a coleira, empurre a chave para a esquerda, para a posição “ON”
(liga). Se não for usar a Barkender™ coleira para controle de latidos PetSafe
®
imediatamente em no seu cachorro, deixe-a na posição “OFF” (desliga).
Page 60

60
www.petsafe.net
ENES
PT
Para reencaixar a coleira
Encaixe a coleira pelo lado da unidade
de controle de latidos e insira-a abaixo
da lingueta na frente dessa unidade.
A vela deslizante evita que a coleira
que frouxa ao redor do pescoço do
animal.
Os sulcos devem estar voltados para
cima; a coleira deslizará se não estiver
encaixada corretamente.
Sulcos
Fivela deslizante
Page 61

61
www.petsafe.net
EN
ES
PT
Para inserir e retirar as baterias
1. Abra a tampa do compartimento
das baterias.
2. Instale duas (2) baterias de 3
volts com o lado positivo (+)
para fora, e o lado negativo
(-) apontado para dentro da
unidade de baterias.
3. Recoloque a tampa do
compartimento.
Baterias para de reposição (3
volts, PAC13-13224) podem ser
encontradas em muitas lojas.
Entre em contato com o Centro de
Atendimento ao Cliente ou visite
nosso site www.petsafe.net para
localizar uma loja próxima.
Page 62

62
www.petsafe.net
ENES
PT
Duração da bateria
A duração média da bateria é de três a seis meses, dependendo da frequência em
que seu cão late. No entanto, devido ao uso maior durante o treinamento do cão, as
suas primeiras baterias poderão não durar tanto quanto as de reposição.
Funções da luz indicadora
Cor da luz
indicadora
Número
de vezes
em que ela
pisca
Qual a
frequência?
Indicação
Nenhuma Nenhuma - A unidade está
OFF (desligada)
Vermelha 1 Uma vez A unidade está
ON (ligada)
Vermelha 1 Uma vez por
segundo
As baterias estão
fracas e precisam
ser substituídas
Vermelha 3 Pisca três
vezes/
correção
A correção
estática é
administrada
Page 63

63
www.petsafe.net
EN
ES
PT
O que esperar durante o uso da
coleira antilatidos
Importante: não deixe o cão sozinho nas primeiras vezes em que ele receber
uma correção estática.
Coloque a coleira corretamente no cão e aguarde, sem se distanciar, até que ele
lata. A maioria dos cães entenderá, com muita rapidez, que a coleira interrompe
seu impulso, o que faz com que ele relaxe e pare de latir. Como a correção
estática da coleira antilatidos pode surpreender e assustar no início, alguns cães
poderão latir ainda mais na correção inicial.
Em raras ocasiões, um cão poderá entrar em um ciclo de latido-correção-latidocorreção. Se isso acontecer, conforte-o com sons calmos e relaxantes. À medida
que o seu cão relaxar, ele entenderá que, se car quieto, não receberá mais
correções estáticas. Uma pequena minoria de cães que têm essa reação terá esse
comportamento somente na primeira vez em que usar a coleira.
Você deverá observar uma redução nos latidos do seu cão nos primeiros dias de
uso da coleira. Nesse ponto, é importante lembrar que o processo de aprendizado
ainda não está completo. Alguns cães "testarão" essa nova experiência de
aprendizado e aumentarão suas tentativas de latir. Em geral, isso ocorre durante
a segunda semana em que o cão usa a coleira. Nesse caso, seja persistente e
Page 64

64
www.petsafe.net
ENES
PT
não altere o uso da coleira. É necessário colocá-la no cão sempre que desejar que
ele que quieto. Se o seu cão não estiver usando a coleira, ele poderá retomar o
latido e, com isso, atrasar seu aprendizado.
Manutenção regular
• Verique o ajuste dos pontos de contato semanalmente.
Observação: não ajuste o sensor predenido de fábrica.
• Limpe os pontos de contato com álcool semanalmente.
Observação: retire as baterias e descarregue a coleira antes
de tocar nos pontos de contato.
• Verique a existência de irritação no pescoço do cão e lave a
área semanalmente.
CUIDADO
Risco de ferimentos à pele.
• Para assegurar o conforto, a segurança e a ecácia deste produto, verique,
com frequência, o ajuste da coleira do animal. Se observar qualquer irritação na
pele, suspenda o uso do produto por alguns dias. Se o problema persistir além
de 48 horas, consulte o veterinário.
• Não prenda uma correia na coleira. Isso pode causar uma pressão excessiva
dos pontos de contato no pescoço do animal. Prenda a correia em um peitoral
ou coleira separada, não metálica, garantindo que ela não pressione os pontos
de contato.
Page 65

65
www.petsafe.net
EN
ES
PT
Para testar a coleira antilatidos
Deslize o sensor por uma superfície áspera por, pelo menos,
254 mm. O indicador da coleira para controle de latidos
deverá piscar algumas vezes. Se não piscar durante esse
teste, consulte, na seção "Solução de problemas", o tópico “A
coleira para controle de latidos não pisca”, e prossiga para a
segunda etapa.
Para descarregar a
coleira antilatidos
Importante:
evite tocar nos pontos de contato e no sensor,
a menos que a coleira esteja completamente descarregada.
Após a retirada das baterias, a coleira manterá um pouco de
energia armazenada e poderá ser ativada mais duas ou três
vezes. Para descarregar completamente a coleira, deslize o
sensor por uma mesa ou superfície dura algumas vezes, até
que ela pare de piscar.
Page 66

66
www.petsafe.net
ENES
PT
Perguntas frequentes
Meu cão parará de latir
completamente?
• A
coleira para controle de latidos
, quando
usada, interrompe todo o latido de forma ecaz
e humana. Ela deve ser usada somente durante
os períodos em que os latidos são indesejáveis.
O latido de outro cão
acionará a coleira para
controle de latidos?
• Não.
O uso da coleira para controle de latidos é seguro e
humano?
• Sim. A coleira foi projetada para obter a
atenção do cão, não para puni-lo. No entanto, a
correção estática inicial poderá assustá-lo.
A coleira para controle de
latidos funcionará para o
meu cão?
• A coleira para controle de latidos é segura e ecaz para todas as raças de cães, embora talvez
seja muito grande para que animais com menos
de 3,6 kg a usem de forma confortável.
Page 67

67
www.petsafe.net
EN
ES
PT
Solução de problemas
A coleira para
controle de latidos
não pisca.
• Teste a coleira (consulte a seção “Para testar a coleira
antilatidos”).
• Se a sua coleira não piscar durante esse teste, refaça-o em
uma superfície mais áspera.
• Verique se as baterias estão instaladas corretamente.
• Substitua as baterias.
• Se, ainda assim, a coleira não piscar, entre em contato com
o Centro de Atendimento ao Cliente.
Minha coleira
antilatidos pisca,
mas meu cão
continua latindo
(não responde à
correção estática).
• Aperte a coleira e/ou corte o pelo do cão onde os pontos
de contato tocam o pescoço, para garantir um bom contato
com a pele.
• Substitua as baterias.
• Se, ainda assim, o seu cão não responder, entre em contato
com o Centro de Atendimento ao Cliente.
A luz indicadora
da coleira antilatidos está piscando.
• Substitua as baterias.
Page 68

68
www.petsafe.net
ENES
PT
Descarte de Bateria
A coleta seletiva de pilhas é mandatória em muitas regiões. Consulte as normas na sua
área antes de descartar pilhas usadas. Por favor consulte a página 61 para instruções
sobre como remover a bateria do produto e descartá-la separadamente. Este dispositivo
funciona com 2 pilhas de manganês de lítio de capacidade de 3 Volts e 220mAh.
Recoloque apenas baterias equivalentes.
Importantes Conselhos de Reciclagem
Por favor respeite as normas de Resíduos de Equipamentos Elétro-Electrônicos do seu país.
Este equipamento deve ser reciclado. Se você não necessita mais deste equipamento,
não descarte-o pelo sistema habitual de coleta de resíduos do seu município. Por favor,
devolva-o para onde foi comprado para que seja processado pelo nosso sistema de
reciclagem. Caso não seja possível, entre em contato com o Atendimento ao Cliente
para maiores informações. Para obter uma lista de números de telefone dos Centros de
Atendimento ao Cliente, visite o nosso website: www.petsafe.net.
Page 69

69
www.petsafe.net
EN
ES
PT
Termos de uso e limitação
de responsabilidade
1. Termos de uso
O uso deste Produto está sujeito à sua aceitação incondicional dos termos,
condições e avisos aqui contidos. O uso deste Produto implica a aceitação de
todos esses termos, condições e avisos. Caso não os aceite, devolva o Produto,
sem uso, em sua embalagem original, e à sua custa e risco, para o centro de
atendimento ao cliente correspondente, juntamente com o comprovante de
compra, para obter um reembolso integral.
2. Uso adequado
Este Produto foi projetado para uso com animais de estimação que se queira
treinar. O temperamento ou tamanho/peso especícos do seu animal poderão
não ser adequados a este Produto (consulte “Como o sistema funciona” neste
Guia de Operação). A Radio Systems
®
Corporation recomenda que este Produto
não seja usado se o seu animal for agressivo e não se responsabiliza pela
determinação da adequação do produto em casos individuais. Se você não tiver
certeza quanto à adequação deste Produto ao seu animal, consulte o veterinário
ou um treinador certicado antes do uso. O uso adequado inclui, sem limitação,
analisar todo o Guia de Operação e quaisquer declarações de cuidado
especícas.
Page 70

70
www.petsafe.net
ENES
PT
3. Inexistência de uso proibido ou ilegal
Este Produto foi projetado para uso exclusivo em animais de estimação. Este
dispositivo de treinamento não se destina a prejudicar, ferir ou provocar. O uso
deste Produto de forma não prevista poderá resultar na infração de leis federais,
estaduais ou locais.
4. Limitação de responsabilidade
Em nenhum caso, a Radio Systems
®
Corporation ou suas empresas associadas
se responsabilizarão por (i) qualquer dano indireto, punitivo, incidental, especial
ou consequencial e/ou (ii) qualquer perda ou dano resultante ou relativo ao mau
uso deste Produto. O Comprador assume todos os riscos e a responsabilidade
em relação ao uso deste Produto na máxima medida prevista em lei. Para dirimir
dúvidas, ca estabelecido que nada nesta cláusula 4 limitará a responsabilidade
da Radio Systems® Corporation pela morte ou ferimentos de pessoas, fraude ou
adulterações fraudulentas.
5. Modicação dos termos e condições
A Radio Systems
®
Corporation se reserva o direito de alterar, ocasionalmente, os
termos, condições e avisos que regem este Produto. Se tais alterações lhe forem
noticadas antes do uso deste Produto, elas terão valor de obrigação legal como
se zessem parte da redação original.
Page 71

Page 72

Radio Systems® Corporation
10427 Electric Avenue
Knoxville, TN 37932 USA
865-777-5404
www.petsafe.net
400-1290-13/1
Patents pending.
Patentes en trámite.
Patentes pendentes.
©2011 Radio Systems Corporation
 Loading...