

Page 1
STACKING KIT INSTALLATION
IMPORTANT
For built-in applications only! Ensure
the anti-tip brackets are installed per
the installation manual that came
with the cabinet. Never install if used
with caster kits or extended leg kits.
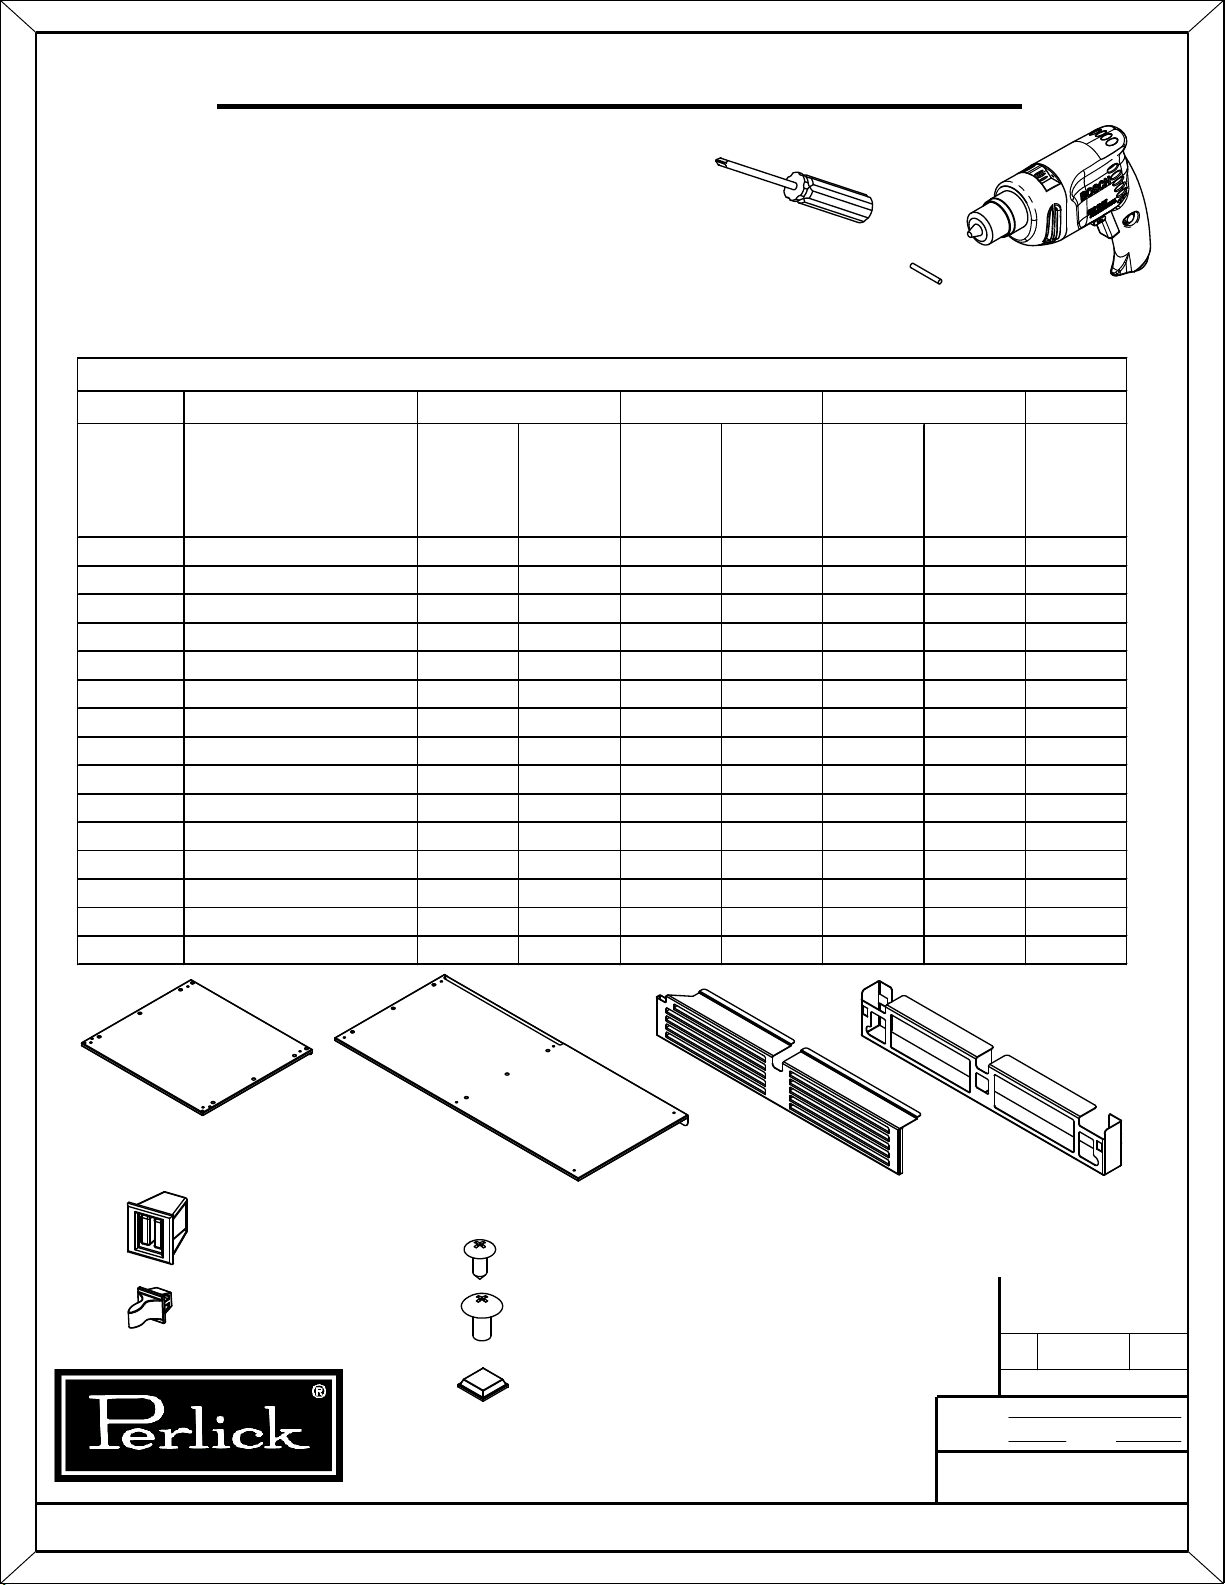
Parts Required
HP15 HP24, HC24, & HA24 HH24
Tools Required
Phillips
Screwdriver
DRILL
5/32" DRILL BIT
HP48
Part Number Description
69608-1 15" Grill, Left Hinged Door 1 - - - - - 69609-1 15" Grill, Right Hinged Door - 1 - - - - -
68837 15" Grill Mounting Bracket 1 1 - - - - 69603-1 24" Grill, Left Hinged Door - - 1 - 1 - 1
69604-1 24" Grill, Right Hinged Door - - - 1 - 1 1
68836 24" Grill Mounting Bracket - - 1 1 1 1 2
68094-15 15" Mounting Plate 1 1 - - - - 68094-24 24" Mounting Plate - - 1 1 - - -
68094-24x18 24" x 18" Mounting Plate - - - - 1 1 -
68094-48 48" Mounting Plate - - - - - - 1
63965 Latch Strike 2 2 2 2 2 2 4
63966 Latch 2 2 2 2 2 2 4
C31323 Bumper, Adjesive Poly 4 4 4 4 4 4 8
M00885-189 1/4-20 x 1/2" Machine Screw 4 4 4 4 4 4 6
M50050-466 #10 x 1/2" Sheet Metal Screw 4 4 4 4 4 4 11
Left Hinged
Door
Right
Hinged Door
Left Hinged
Door
Right
Hinged Door
Left Hinged
Door
Right
Hinged Door
Left & Right
Hinged Door
15" & 24" Mounting Plate
Grill
48" Mounting Plate
Grill Mounting Bracket
Latch
#10 x 1/2" Sheet Metal Screw
Latch Strike
1/4-20 x 1/2" Machine Screw
Bumper, Adhesive Poly
SCALE
Perlick Corporation
Milwaukee, WI 53223
THIS DOCUMENT/PUBLICATION/SOFTWARE/DRAWING CONTAINS PROPRIETARY INFORMATION WHICH IS THE PROPERTY OF THE PERLICK CORPORATION. IT MAY NOT BE REPRODUCED OR TRANSMITTED IN ANY FORM, ELECTRONIC
OR MECHANICAL, INCLUDING PHOTOCOPYING, RECORDING, OR USED IN ANYINFORMATION STORAGE, TRANSMISSION, OR RETRIEVAL SYSTEM, WITHOUT WRITTEN PERMISSION FROM THE PERLICK CORPORATION
COPYRIGHT 2001 PERLICK CORPORATION. ALL RIGHTS RESERVED.
DRAWN
RELEASE FOR PRODUCTION
A
3/12/2014 JMP
REVISIONS
1:5
DATE
JMP 3/12/2014
95220
SW
Page 2
STACKING KIT INSTALLATION
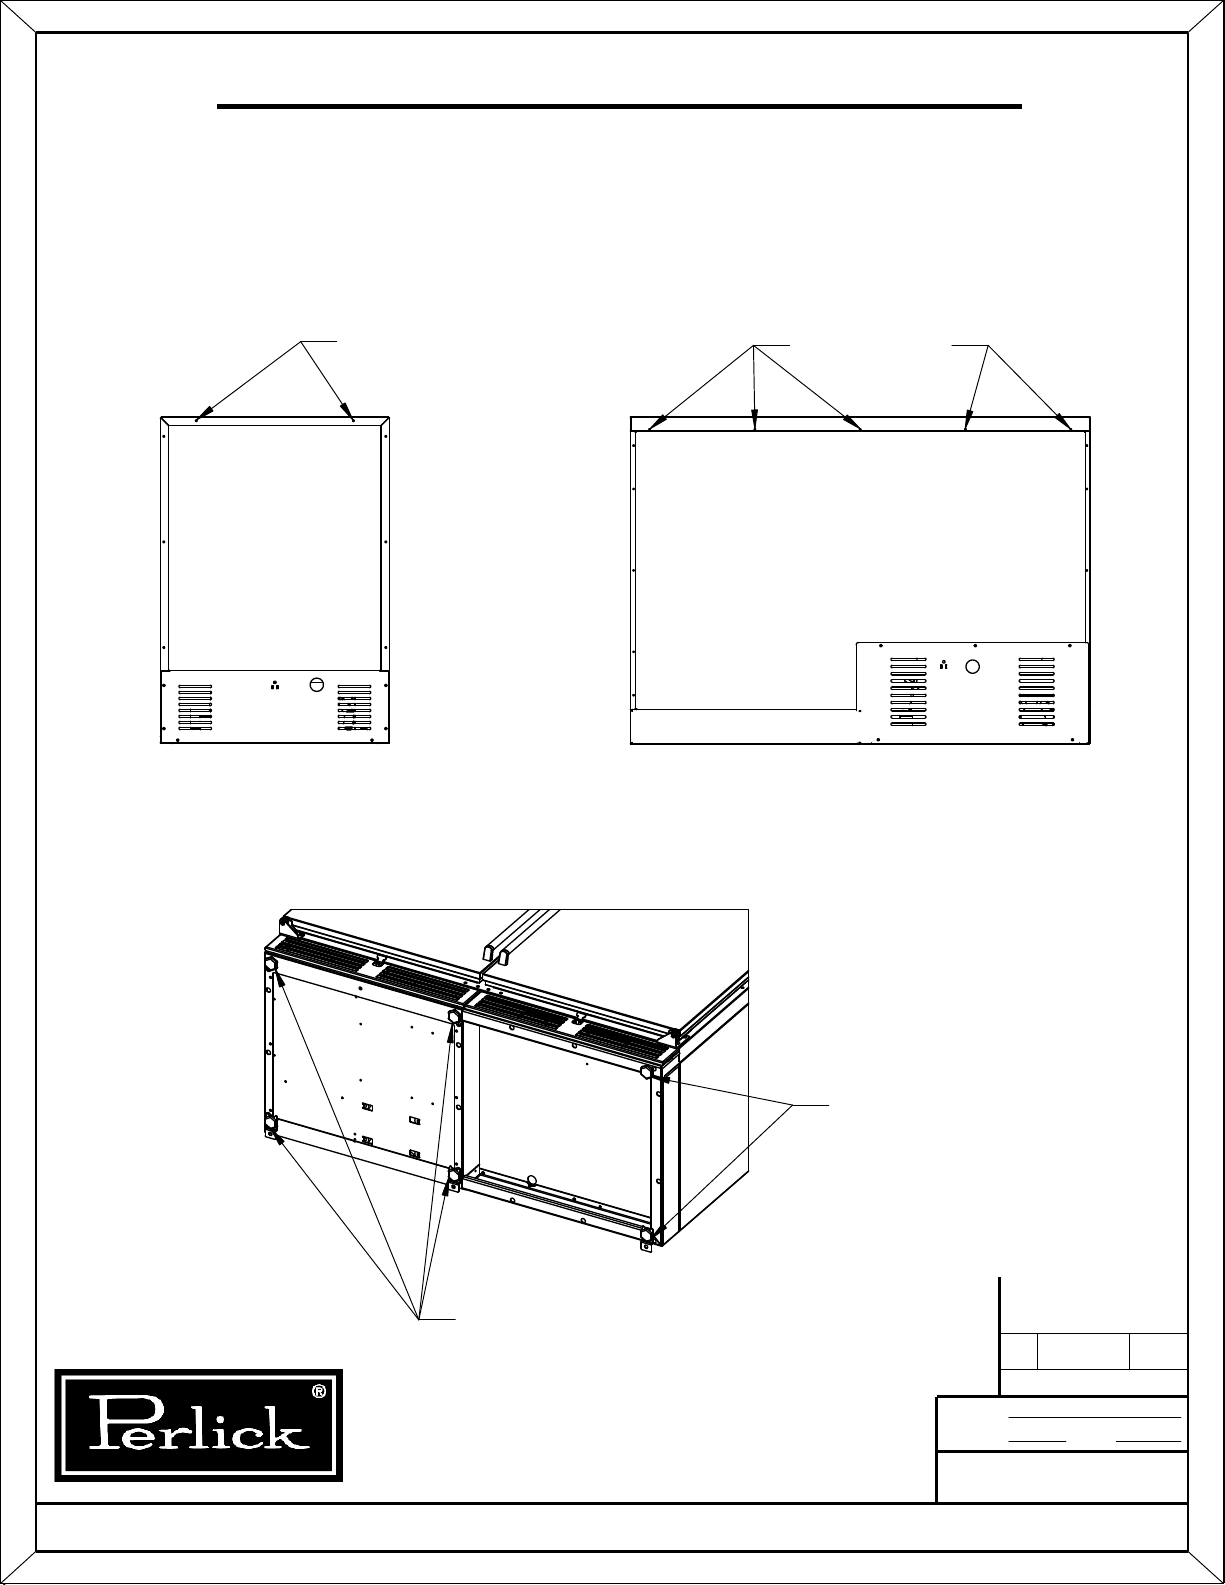
These cabinets are extremely heavy. Ensure that you have enough
CAUTION:
Step 1: Drill out top row of rivets along back of the bottom cabinet using a 5/32" drill bit.
people on hand to help in repositioning the units so that it can be
done safely and without damage.
2 rivets on 24" & 15"
wide cabinets
5 rivets on 48"
wide cabinet
Step 2: Lay upper cabinet on its back and remove leg levelers and grill(s) from unit.
Remove 2 additional
leg levelers from
48" upper units.
Remove 4 leg levelers
from all sizes
of upper units.
RELEASE FOR PRODUCTION
A
3/12/2014
REVISIONS
SCALE
Perlick Corporation
Milwaukee, WI 53223
THIS DOCUMENT/PUBLICATION/SOFTWARE/DRAWING CONTAINS PROPRIETARY INFORMATION WHICH IS THE PROPERTY OF THE PERLICK CORPORATION. IT MAY NOT BE REPRODUCED OR TRANSMITTED IN ANY FORM, ELECTRONIC
OR MECHANICAL, INCLUDING PHOTOCOPYING, RECORDING, OR USED IN ANYINFORMATION STORAGE, TRANSMISSION, OR RETRIEVAL SYSTEM, WITHOUT WRITTEN PERMISSION FROM THE PERLICK CORPORATION
COPYRIGHT 2001 PERLICK CORPORATION. ALL RIGHTS RESERVED.
DRAWN
1:15
DATE
JMP 3/12/2014
95220
SW
JMP
Page 3

STACKING KIT INSTALLATION
Step 3: Attach mounting plate(where the leg levelers were removed in step 2)
by using 1/4-20 machine screws. Flange should be pointing away from
the bottom of the unit.
Bottom of
cabinet
Flange
Back of cabinet
Step 4: Place upper unit on top of lower unit and attach using #10 sheet metal
screws (where the rivets were drilled out in step 1).
Note: To prevent damage to the
compressor, wait 24 hours
before powering on unit
after turning the cabinet
back to its upright position.
15
68
16
"
NOTE: Extension of leg levelers
will increase assembly height.
RELEASE FOR PRODUCTION
A
3/12/2014
REVISIONS
SCALE
Perlick Corporation
Milwaukee, WI 53223
THIS DOCUMENT/PUBLICATION/SOFTWARE/DRAWING CONTAINS PROPRIETARY INFORMATION WHICH IS THE PROPERTY OF THE PERLICK CORPORATION. IT MAY NOT BE REPRODUCED OR TRANSMITTED IN ANY FORM, ELECTRONIC
OR MECHANICAL, INCLUDING PHOTOCOPYING, RECORDING, OR USED IN ANYINFORMATION STORAGE, TRANSMISSION, OR RETRIEVAL SYSTEM, WITHOUT WRITTEN PERMISSION FROM THE PERLICK CORPORATION
COPYRIGHT 2001 PERLICK CORPORATION. ALL RIGHTS RESERVED.
DRAWN
1:20
DATE
JMP 3/12/2014
95220
SW
JMP
Page 4

STACKING KIT INSTALLATION
Step 5: Remove (2) #10 sheet metal screws from the front of the top cabinet (These screws
will be used to attach the mounting bracket) Attach mounting bracket(s) to the front
of the cabinet using #10 sheet metal screws. Install latches into the grill bracket(s).
Remove (2) screws from front of cabinet.
Attach grill mounting brackets
using #10 sheet metal screws.
Install latches to grill mounting bracket.
RELEASE FOR PRODUCTION
A
3/12/2014
REVISIONS
SCALE
Perlick Corporation
Milwaukee, WI 53223
THIS DOCUMENT/PUBLICATION/SOFTWARE/DRAWING CONTAINS PROPRIETARY INFORMATION WHICH IS THE PROPERTY OF THE PERLICK CORPORATION. IT MAY NOT BE REPRODUCED OR TRANSMITTED IN ANY FORM, ELECTRONIC
OR MECHANICAL, INCLUDING PHOTOCOPYING, RECORDING, OR USED IN ANYINFORMATION STORAGE, TRANSMISSION, OR RETRIEVAL SYSTEM, WITHOUT WRITTEN PERMISSION FROM THE PERLICK CORPORATION
COPYRIGHT 2001 PERLICK CORPORATION. ALL RIGHTS RESERVED.
DRAWN
1:20
DATE
JMP 3/12/2014
95220
SW
JMP
Page 5

STACKING KIT INSTALLATION
Step 6: Attach (4) bumpers and (2) latch strikes to each new grill. Orient the tabs
on the latch strike vertically. Attach grill assembly to upper unit. Move
stacked assembly into final position by pushing lower unit.
This edge
vertical.
Bumper
Note: When using stacking kit to join (2)
HH24 or HA24 units, a wall mount anti-tip
kit must be installed. See cabinet installation
manual for instructions.
RELEASE FOR PRODUCTION
A
3/12/2014
REVISIONS
SCALE
Perlick Corporation
Milwaukee, WI 53223
THIS DOCUMENT/PUBLICATION/SOFTWARE/DRAWING CONTAINS PROPRIETARY INFORMATION WHICH IS THE PROPERTY OF THE PERLICK CORPORATION. IT MAY NOT BE REPRODUCED OR TRANSMITTED IN ANY FORM, ELECTRONIC
OR MECHANICAL, INCLUDING PHOTOCOPYING, RECORDING, OR USED IN ANYINFORMATION STORAGE, TRANSMISSION, OR RETRIEVAL SYSTEM, WITHOUT WRITTEN PERMISSION FROM THE PERLICK CORPORATION
COPYRIGHT 2001 PERLICK CORPORATION. ALL RIGHTS RESERVED.
DRAWN
1:20
DATE
JMP 3/12/2014
95220
SW
JMP
 Loading...