

Perfect Aire NP10000 User Manual

CONTENTS
SAFETY PRECAUTIONS ..................................................................................... 2
IDENTIFICATION OF PARTS................................................................................3
AIR CONDITIONER FEATURES.......................................................................... 5
OPERATING INSTRUCTIONS .............................................................................6
INSTALLATION INSTRUCTIONS
........................................................................ 8
CARE AND MAINTENANCE ...............................................................................13
TROUBLESHOOTING TIPS ............................................................................... 14
This manual provides the information needed for proper use and maintenance of this air
conditioner. Basic preventative care can help extend the life of this unit. The “Troubleshooting
Tips” section in this manual contains a chart with solutions to the most common problems.
Referring to this section may save time and prevent the need for a service call in the event of
a problem.
NOTE: The rating data indicated on the energy label is based on the testing condition of installing the
un-extended air exhaust duct without flat mouth, round mouth, and wall exhaust adaptors.
(The duct and the adaptors are listed in the accessories chart of this Instruction Manual.)
!
CAUTION
● Contact an authorized service technician for repair or maintenance of this unit.
● Contact an installer for installation of this unit if necessary.
● The air conditioner is not intended for use by young children without supervision.
Young children should be supervised to ensure that they do not play with the air conditioner.
● Disabled persons may require assistance with set up.
● If the power cord is to be replaced, replacement work should be performed by authorized
personnel only.
● Installation and repair work must be performed in accordance with the national wiring
standards by authorized personnel only.
● Do not operate your air conditioner in a wet room such as a bathroom or laundry room.
NOTE: All the illustrations in this manual are for explanation purposes only. Unit purchased
may be slightly different.
The design and specifications are subject to change without prior notice for product
improvement. Contact customer service for details.
1
SAFETY PRECAUTIONS
!
Always do this
Your air conditioner should be used in such a way
that it is protected from moisture (i.e. condensation,
splashed water, etc.). Do not place your air
conditioner where it can fall or be pulled into water
or any other liquid. If the unit does ever fall into
water, unplug immediately.
Always transport your air conditioner in a vertical
position and stand on a stable, level surface
during use.
Turn off the product when not in use.
Always contact a qualified person to carry out repairs.
If the supply cord is damaged it must be replaced by
an authorized service technician.
Keep an air path of at least 11.8 in (30 cm) all around
the unit from walls, furniture and curtains.
If the air conditioner is knocked over during use, turn
off the unit and unplug from the main power supply
immediately.
Energy Saving Tips
● Use the unit in the recommended room size.
● Locate the unit where furniture cannot obstruct the air flow.
● Keep blinds/curtains closed during the sunniest part of the day.
● Keep the filters clean.
● Keep doors and windows closed to keep cool air in and warm air out.
Never do this
Do not operate your air conditioner in a wet room such as a
bathroom or laundry room.
Do not touch the unit with wet or damp hands or when
barefoot.
Do not press the buttons on the control panel with anything
other than your fingers.
Do not remove any fixed covers. Never use this appliance
if it is not working properly or if it has been dropped
or damaged.
Never use the plug to start and stop the unit. (Always use
the switch on the control panel to power the unit on and off.)
Do not cover or obstruct the inlet or outlet grilles.
Do not use hazardous chemicals to clean or come into
contact with the unit. Do not use the unit in the presence of
flammable substances or vapor such as alcohol,
insecticides, petrol, etc.
Do not allow children to operate the unit unsupervised.
Do not use this product for functions other than those
described in this instruction manual.
Operation of Current Device
Plug in &
press RESET
TEST
RESET
NOTE: Some plugs have buttons on the top.
NOTES:
The air conditioner must be operated within the temperature range indicated below:
MODE ROOM TEMPERATURE
COOL 62°F (17°C) – 95°F (35°C)
DRY 55°F (13°C) – 95°F (35°C)
Do not use this device to turn the unit on or off.
Always make sure the RESET button is pushed in for correct operation.
The power supply must be replaced if it fails to reset when either the TEST button is pushed or it cannot be reset.
If power supply cord is damaged, it cannot be repaired. Please call customer service to assist with replacement.
The power supply cord contains a current device that senses damage to the power
cord. To test your power supply cord do the following:
1. Plug in the air conditioner.
2. The power supply cord will have TWO buttons on the plug head. Press the TEST
button. The RESET button will click as it pops out.
3. Press the RESET button; again you will notice a click as the button engages.
4. The power supply cord is now supplying electricity to the unit.
(On some products this is also indicated by a light on the plug head.)
2
IDENTIFICATION OF PARTS
Vent
Joint
Exhaust
Hose
Flat Mouth
Adaptor
Bolt Window
Slider Kit
• Exhaust hose 1 Set
• Flat mouth adaptor
• Window slider kit with bolt
• Vent joint
• Foam Seal 1 Piece
• Wall exhaust adaptor A*
• Round mouth adaptor B*
Not
Available
• Expansion Plugs & Wooden Screws*
(*Not included. Set sold separately.)
• Remote Control and Battery 1 Set
• Drain hose 1 Piece
NOTE:
All of the illustrations in this manual are for explanation purposes only. Your air conditioner may be slightly different.
3
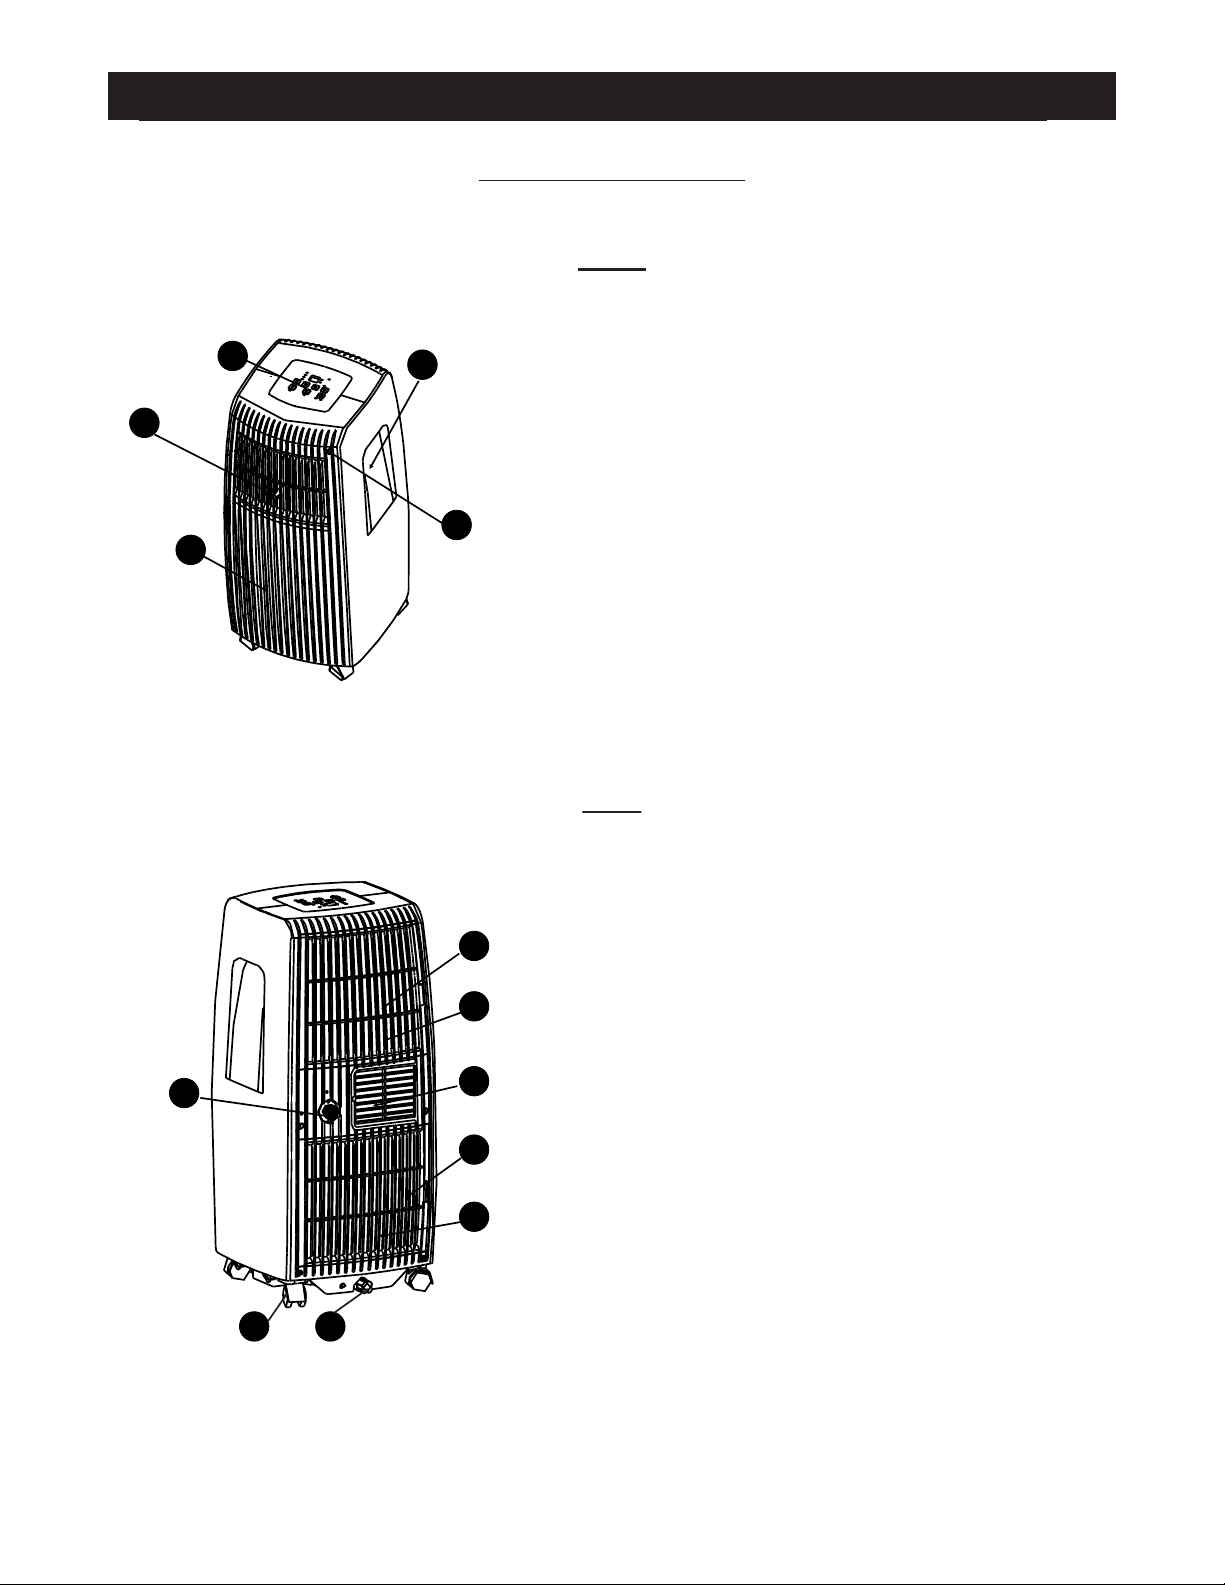
IDENTIFICATION OF PARTS (CONTINUED)
NAMES OF PARTS
Front
Operation Panel
1
3
2
4
5
Fig.1
1.
Horizontal Louver Control Lever
2.
(adjust manually)
Carrying Handle
3.
(both sides)
Remote signal receptor
4.
Panel
5.
10
Rear
Upper Air Filter
6.
6
9
7
12
11
8
13
Fig. 2
(Behind the grille)
Air Outlet
7.
Wheel
8.
Air intake
9.
Drain Outlet
10.
Air intake
11.
Lower Air Filter
12.
(Behind the grille)
Bottom tray drain outlet
13.
4
 Loading...