


DEHUMIDIFIER DÉSHUMIDIFICATEUR
OWNER’S MANUAL
(PAGE 1)
F O R T H E F O L LO W I N G M O D E L S:
MANUEL DE L’UTILISATEUR
(PAGE 12)
P O U R L E S M O D È L E S S U I VA N T S:
4 PA D3 0
4 PA D 4 5
4 PA D5 0
4 PA D7 0
Before using your dehumidifier, please read this manual and keep it for future reference along with your receipt.
Avant d’utiliser votre déshumidificateur, lisez ce manuel et gardez le pour y réferer en temps futur avec votre reçu en tant que preuve d’achat.

CONSUMER PRODUCT INFORMATION
For your own records, please attach a copy of your sales receipt to this manual and complete the following:
Model Number:_____________________________________ |
Serial Number: ________________________________________ |
Purchase Date: _____________________________________ |
Store Purchased: ______________________________________ |
Installation Date: ____________________________________ |
Installation Co.: _______________________________________ |
Installer Name: _____________________________________ |
Installer Phone No.: ____________________________________ |

QUICK START TIPS
IT IS HIGHLY SUGGESTED THAT THE MANUAL BE READ IN FULL BEFORE OPERATING THE UNIT. However, the notes below are especially important in helping you to properly set up and begin to use your dehumidifier.
1.The dehumidifier should be kept upright. If for any reason it has not been stored upright while in your possession, put the unit in an upright position for a minimum of 24 hours before running it.
2.When first using the dehumidifier, operate the unit on CONTINUOUS mode for 24 hours.
First 24 hours on Continuous Mode.
Cont.
3.After the first 24 hours, should you wish to set a desired humidity, you will need to take the unit off of
“Continuous.” You will not be able to select a desired humidity while the unit is set on “Continuous” mode. (NOTE:
You do not need to be in CONTINUOUS mode to do continuous draining.)
4.When unpacking the dehumidifier, note that the foam inside the float piece in the bucket should NOT be removed. Without this foam piece, the dehumidifier will not operate properly. NOTE: Removing the float and/or foam will cause the unit not to shut off and the bucket to overflow.
Foam piece inside float mechanism.
DO NOT REMOVE this foam piece.
5. The accessories are located with the unit as follows.
Find the garden hose adapter and short tube inside the bucket.
Find the screws inside the water tank.
Before using your dehumidifier, it is recommended that you read this manual carefully and keep it together with your proof of purchase (receipt) for warranty purposes.

CONTENTS |
|
SAFETY PRECAUTIONS.................................................................... |
1 |
ELECTRICAL INFORMATION........................................................... |
2 |
CONTROL PADS ON THE DEHUMIDIFIER.................................... |
3 |
IDENTIFICATION OF PARTS............................................................ |
5 |
OPERATING THE UNIT..................................................................... |
6 |
CARE AND MAINTENANCE............................................................ |
8 |
TROUBLESHOOTING....................................................................... |
9 |
This manual provides the information needed for proper use and maintenance of this dehumidifier. Basic preventative care can help extend the life of this unit. The
“Troubleshooting” section in this manual contains a chart with possible solutions to the most common problems. Referring to this section may save time and prevent the need for a service call in the event of a problem.
!CAUTION
•Contact an authorized service technician for repair or maintenance of this unit.
•If necessary, contact an installer for installation of this unit.
•The dehumidifier is not intended for use by young children without supervision. Young children should be supervised to ensure that they do not play with the dehumidifier.
•Disabled persons may require assistance with set up and usage.
•If the power cord is to be replaced, replacement work should be performed by authorized personnel only.
•Installation and repair work must be performed in accordance with the national wiring standards by authorized personnel only.
NOTE: All the illustrations in this manual are for explanation purposes only. Unit purchased may be slightly different.
NOTE: The design and specifications of the dehumidifier are subject to change without prior notice for product improvement. Contact Consumer Services at 844-472-2473 for details.

SAFETY PRECAUTIONS
READ SAFETY PRECAUTIONS BEFORE INSTALLATION
To prevent injury to the user or other people and property damage, the following instructions must be followed. Incorrect operation due to ignoring of instructions may cause harm or damage. The seriousness is classified by the following indications.
THIS SYMBOL INDICATES THAT IGNORING INSTRUCTIONS MAY CAUSE DEATH OR SERIOUS INJURY.
THIS SYMBOL INDICATES THAT IGNORING INSTRUCTIONS MAY CAUSE MODERATE INJURY TO YOUR PERSON, OR DAMAGE TO YOUR UNIT OR
OTHER PROPERTY.
OTHER SYMBOLS:  NEVER DO THIS.
  ALWAYS DO THIS.
 WARNINGS
|
DO NOT exceed the rating of the power outlet or |
Doing so may cause electric shock or fire due to excess |
connection device. |
heat generation. |
|
|
DO NOT operate or stop the unit by inserting or |
This may cause electric shock or fire due to heat |
|
pulling out the power plug directly from the wall. |
generation. |
|
DO NOT damage or use an unspecified power cord. |
This may cause electric shock or fire. (If power |
|
cord is damaged, it must be replaced by a qualified |
|
|
|
professional.) |
|
DO NOT modify the power cord length or share the |
This may cause electric shock or fire due to heat |
|
outlet with other appliances. |
generation. |
DO NOT insert or pull out plug with wet hands. |
This may cause electric shock. |
|
DO NOT place the unit near a heat source. |
Plastic parts may melt and cause a fire. |
|
|
Disconnect the power if strange sounds, smells, or |
Failing to do so may cause fire and electric shock. |
|
smoke comes from unit. |
|
|
You should never try to take apart or repair the unit |
This may cause failure of machine or electric shock and/ |
|
by yourself. |
or may void warranty. |
|
Before cleaning, turn off the power and unplug the |
Failing to do so may cause electrical shock or injury. |
|
unit. |
|
|
DO NOT use the unit near flammable gas/ |
This may cause an explosion or fire. |
combustiblesetc. such as gasoline benzene, thinner,
DO NOT drink or use the water drained from the unit. It contains contaminants and could make you sick
1

 CAUTIONS
|
DO NOT use the unit in small spaces. |
Lack of ventilation can cause overheating and fire. |
|
DO NOT put in places where water may splash onto the |
Water entering unit can degrade the insulation and |
|
unit. |
cause electric shock or fire. |
Place the unit on a level, sturdy section of the floor. |
If unit falls over, it may spill water and damage |
|
|
|
belongings, or cause electric shock or fire. |
|
DO NOT cover the intake or exhaust openings with |
A lack of air flow can lead to overheating and fire. |
|
cloths or towels. |
|
|
Care should be taken when using the unit in a room |
Infants, children, elderly people, and people |
|
with the following persons: |
insensitive to humidity |
DO NOT use in areas where chemicals are handled. |
This will cause unit deterioration due to chemicals and |
|
|
|
solvents dissolved in the air. |
|
Never insert fingers or other foreign objects into grille |
This may cause electric shock or failure of |
|
openings. Be sure to warn children of dangers. |
dehumidifier. |
|
DO NOT place heavy objects on the power cord; make |
There is danger of fire or electric shock. |
|
sure the cord is not compressed. |
|
DO NOT climb up on or sit on the unit. |
You may be injured if you fall or if the unit falls over. |
|
|
Always insert the filters securely. Clean filter at least |
Operation without a filter or with a dirty filter may |
|
once every two weeks. |
cause failure. |
|
If water enters the unit, turn unit off, disconnect power |
This may cause failure of dehumidifier and there is |
|
and contact a qualified service technician. |
danger of electric shock. |
|
DO NOT place flower vases or other water containers |
Water may spill into the inside of the unit, causing |
|
on top of the unit. |
insulation failure and electrical shock or fire. |
ELECTRICAL INFORMATION
•The manufacturer’s nameplate is located on the rear panel of the unit and contains electrical and other technical data specific to this unit.
•Be sure the unit is properly grounded. To minimize shock and fire hazards, proper grounding is important. The power cord is equipped with a three-prong grounding plug for protection against shock hazards. DO NOT remove 3rd prong.
•Your unit must be used with a properly grounded wall receptacle. If the wall receptacle you intend to use is not adequately grounded or protected by a time delay fuse or circuit breaker, have a qualified electrician install the proper receptacle.
•Ensure the receptacle is accessible after the unit is installed.
•DO NOT use extension cords or an adapter plug with this unit. If it is necessary to use an extension cord, use an approved “Dehumidifier” heavy duty extension cord of the proper gauge only (available at most local hardware stores).
•To avoid the possibility of personal injury, always disconnect the power supply to the unit before installing and/ or servicing.
2
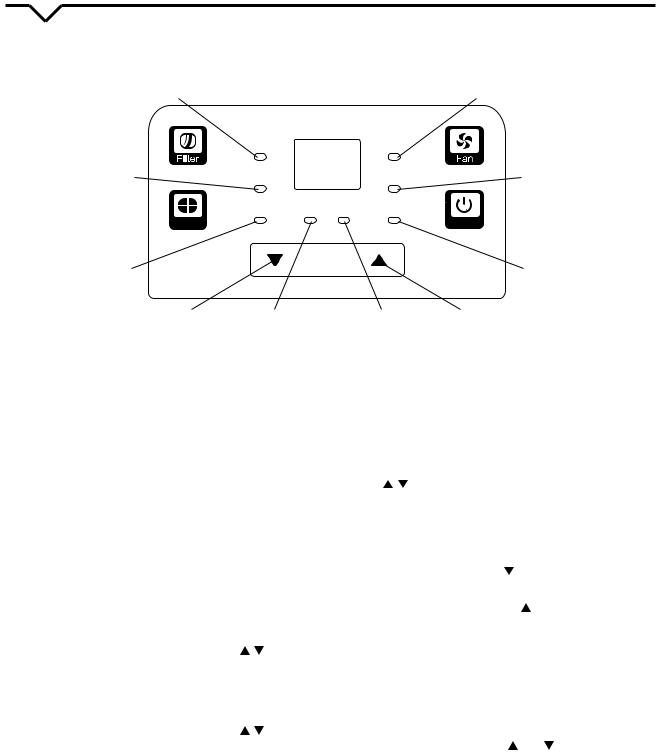
CONTROL PADS ON THE DEHUMIDIFIER
NOTE: The control panel of the unit you purchased may be slightly different according to the models.
|
Clean Filter |
|
|
8 |
|
High Fan |
|
|||
|
Indicator Light |
|
|
|
Indicator Light |
|
||||
3 |
|
|
Filter |
|
|
|
Turbo |
|
|
4 |
|
|
|
|
|
|
|
||||
Comfort |
Comfort |
|
|
|
Full |
|
|
Bucket Full |
||
Dehumidifying |
|
|
|
|
|
|||||
|
|
|
|
|
Indicator Light |
|||||
Indicator Light |
|
|
|
|
|
|
|
|||
|
|
|
|
|
|
|
|
|||
2 |
|
|
Cont. |
On |
|
Off Auto defrost |
|
|
1 |
|
Mode |
|
Power |
||||||||
|
|
|
|
|
|
|
||||
Continuous |
|
Timer |
|
|
|
Auto Defrost |
||||
Operation on |
|
|
|
|
|
|
|
Operation |
||
|
|
|
|
|
|
|
||||
Indicator Light |
|
|
|
|
|
|
|
Indicator Light |
||
5 |
Timer “On” |
|
|
Timer “Off” |
7 |
|
FIG. 1 |
|||
6 |
|
|||||||||
|
|
|
Indicator Light |
|
|
Indicator Light |
|
|
|
|
CONTROL PADS: When you push the button to change operation modes, the unit will make a single “beep” sound to indicate that it is changing modes.
1.POWER
Press to turn the dehumidifier on and off.
2.MODE
Toggle between the following features:
NORMAL – Utilize this mode if you would like the unit to cycle on and off based on the relative humidity setting you have manually selected. (See numbers 5, 7 and 8 in the column to the right for further instruction.) In NORMAL mode, both the “Comfort” and “Cont.” indicator lights will not be illuminated.
COMFORT – Utilize this dehumidification feature
to automatically keep humidity in the 45%- 55% range based on room temperature. When operating in this mode the UP/DOWN / pads
will be deactivated and you will NOT be able to set a desired humidity.
CONTINUOUS (CONT.) – Press to activate the continuous dehumidifying operation. When operating in this mode the UP/DOWN / pads will be deactivated and you will NOT be able to set a desired humidity. The unit will run non-stop unless using the bucket to collect water. At which point, the unit will shut off when the bucket is full.
3.FILTER
The check filter feature is a reminder to clean the Air Filter for more efficient operation. The “Filter” light (Clean Filter Indicator Light) will illuminate after 250 hours of operation. To reset after cleaning the filter, press and hold the Filter button and the light will go off, resetting the timer.
4.FAN
Control the fan speed. Press to select either Turbo or Normal fan speed. Set the fan control to Turbo
(“High”) for maximum moisture removal. When the humidity has been reduced and quiet operation is preferred, set the fan control to Normal by pressing the FAN pad to turn off Turbo fan/light.
5/7. / : UP/DOWN PADS HUMIDITY SET CONTROL PADS
•The humidity level can be set within a range of 35%RH to 85%RH (Relative Humidity) in 5% increments.
• |
For drier air, press the pad and set to a lower |
|
percent value (%). |
• |
For damper air, press the pad and set a higher |
|
percent value (%). |
•The recommended standard setting is 45-50%.
You must be on Normal mode to set the humidity
•Cannot be used in COMFORT or CONTINUOUS mode.
6.TIMER
Press to initiate the Auto on and Auto off feature,
in conjunction with the and key pads. The timer range is 0.0 to 24 hrs. Timer does not cycle.
8.DISPLAY
Shows the set % humidity level from 35% to 85% or auto on/off time (0-24) while setting, then shows the actual ( +/- 5% accuracy) room % humidity level in a range of 30%RH to 90%RH
(Relative Humidity).
3

 ERROR AND PROTECTION CODES
AS – HUMIDITY SENSOR ERROR
Unplug the unit for at least 5 minutes and plug it back in. Make sure the filter is clean. If error repeats, call Perfect Aire Consumer Services at 844.472.2473.
ES – TEMPERATURE SENSOR ERROR
Unplug the unit for at least 5 minutes and plug it back in. Make sure the filter is clean. If error repeats, call Perfect Aire Consumer Services at 844.472.2473.
P2 – BUCKET IS FULL OR NOT IN THE CORRECT POSITION
Empty the bucket and replace it in the proper position. Ensure float switch and foam are properly secured in bucket.
E1 – UNIT MALFUNCTION
Unplug the unit for at least 5 minutes and plug it back in. If error repeats, call Perfect Aire
Consumer Services at 844.472.2473.
EC – HUMIDITY SENSOR ERROR
Make sure the temperature of the working environment is between 41°F (5°C) and 95°F
(35°C). If not, please operate the unit under the correct stated temperature. If on a concrete floor, unplug and elevate unit a few inches off the floor; plug back into outlet and power on. If you have made these adjustments and still see the EC error code, please call Perfect Aire
Consumer Services at 844.472.2473.
 OTHER FEATURES
BUCKET FULL INDICATOR LIGHT
Illuminates when the bucket needs to be emptied, is removed, or is not placed in the proper position.
AUTO SHUT OFF
The dehumidifier shuts off after 30 seconds when the bucket is full or when the bucket is removed or not replaced in the proper position. When the humidity setting is reached, the unit will cycle off automatically. (The compressor cycles off first. Then, three minutes later, the fan turns off as well.)
AUTO DEFROST
When frost builds up on the evaporator coils, the compressor will cycle off and the fan will continue to run (on “Turbo”) until the frost disappears. The AUTO DEFROST Indicator light will illuminate. The unit will restart on its own once the auto defrost process has completed.
SAFETY FEATURE
After the unit has stopped, it cannot resume operation within three minutes. This is to protect the unit. Operation will automatically restart after three minutes.
CHECK FILTER FEATURE
The system starts to log the time once the fan motor operates. The check filter light will illuminate only when the accumulated operation time achieves 250 hours or more. The CLEAN FILTER indicator light flashes once per second. After cleaning the air filter, press and hold the FILTER button to reset the filter timer and turn off the CLEAN FILTER indicator light .
AUTO-RESTART
If the unit breaks off unexpectedly due to a loss of power, it will automatically restart with the previous function setting when the power resumes.
SETTING THE TIMER
•When the unit is on, press the TIMER button. The
TIMER OFF indicator light illuminates, indicating that the Auto Stop program is initiated. Press it again and the TIMER ON indicator light illuminates indicating that the Auto Start program is initiated.
•If you prefer, you can set the timer while the unit is powered off and follow the instructions above to set the unit to go on and then off.
•Press or hold the UP or DOWN pad to change the
Auto time in 0.5 hour increments, up to 10 hours, then at 1 hour increments up to 24 hours. The display on the control pad will count down the time remaining until start/stop.
•The selected time will register for 5 seconds and the system will automatically revert back to display the humidity setting.
•When the Auto start and Auto stop times are set within the same program sequence, TIMER ON and
OFF indicator lights illuminate identifying both ON and OFF times are now programmed. You can set the
Timer for just ON or just OFF in which case the single corresponding ON or OFF light will be illuminated.
•Turning the unit ON or OFF at any time or adjusting the timer setting to 0.0 will cancel the Auto Start/Stop.
•When LED display window displays the code of P2, the Auto Start/Stop function will also be canceled.
A NOTE ABOUT THE TIMER:
When you set the timer, the unit will only go on once and off once. If you want the dehumidifier to cycle on and off repeatedly, you do not need to set the timer.
Instead, set your desired humidity and the unit will cycle on and off based on the selected humidity setting.
4
 Loading...