

Page 1
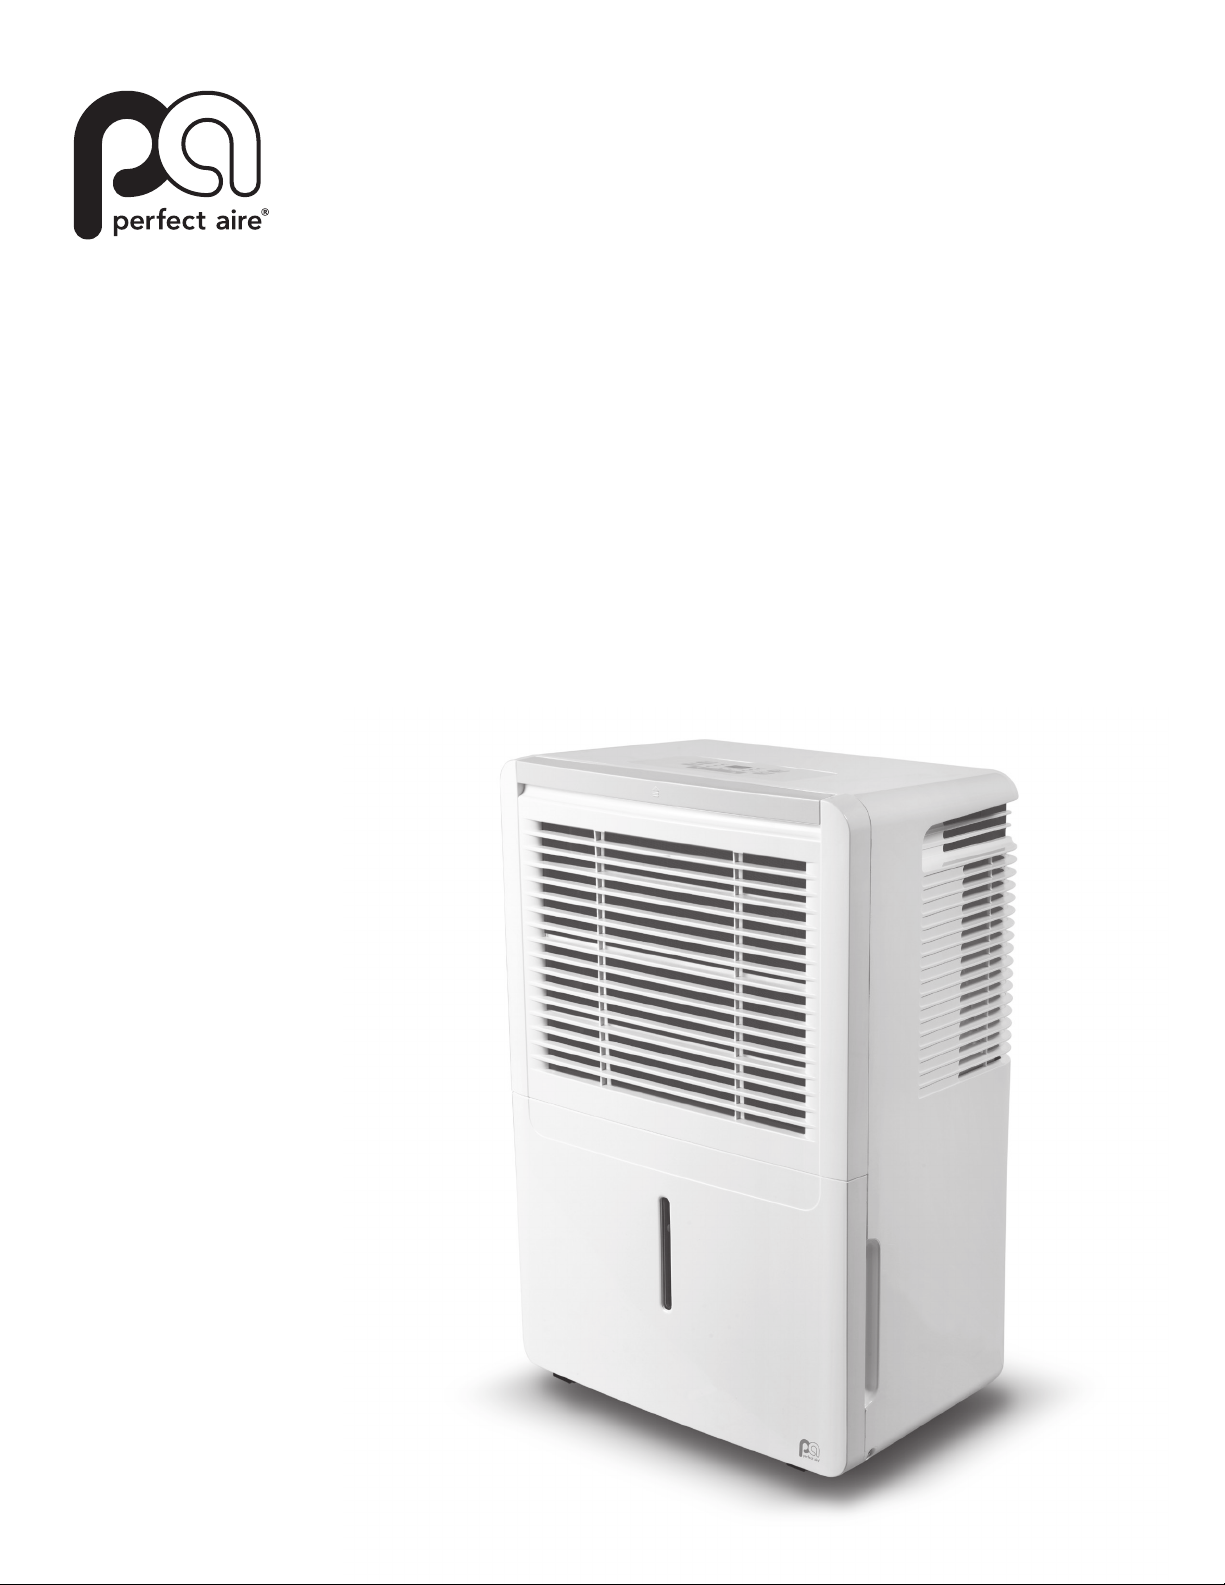
DEHUMIDIFIER
DÉSHUMIDIFICATEUR
OWNER’S MANUAL
(PAGE 1)
FOR THE FOLLOWING MODELS:
MANUEL DE L’UTILISATEUR
(PAGE 12)
POUR LES MODÈLES SUIVANTS:
4PAD30
4PAD45
4PAD50
4PAD70
Before using your dehumidifier, please read
this manual and keep it for future reference
along with your receipt.
Avant d’utiliser votre déshumidificateur, lisez ce manuel
et gardez le pour y réferer en temps futur avec votre
reçu en tant que preuve d’achat.
Page 2

CONSUMER PRODUCT INFORMATION
For your own records, please attach a copy of your sales receipt to this manual and complete the following:
Model Number: _____________________________________ Serial Number: _______________________________________
Purchase Date: ____________________________________ Store Purchased: _____________________________________
Installation Date: ___________________________________ Installation Co.: _______________________________________
Installer Name: _____________________________________ Installer Phone No.: ___________________________________
Page 3
QUICK START TIPS
IT IS HIGHLY SUGGESTED THAT THE MANUAL BE READ IN FULL BEFORE OPERATING THE UNIT. However, the notes below
are especially important in helping you to properly set up and begin to use your dehumidier.
1. The dehumidier should be kept upright. If for any reason it has not been stored upright while in your
possession, put the unit in an upright position for a minimum of 24 hours before running it.
2. When rst using the dehumidier, operate the unit on CONTINUOUS mode for 24 hours.
First 24 hours on Continuous Mode.
Cont.
3. After the rst 24 hours, should you wish to set a desired humidity, you will need to take the unit o of
“Continuous.” You will not be able to select a desired humidity while the unit is set on “Continuous” mode. (NOTE:
You do not need to be in CONTINUOUS mode to do continuous draining.)
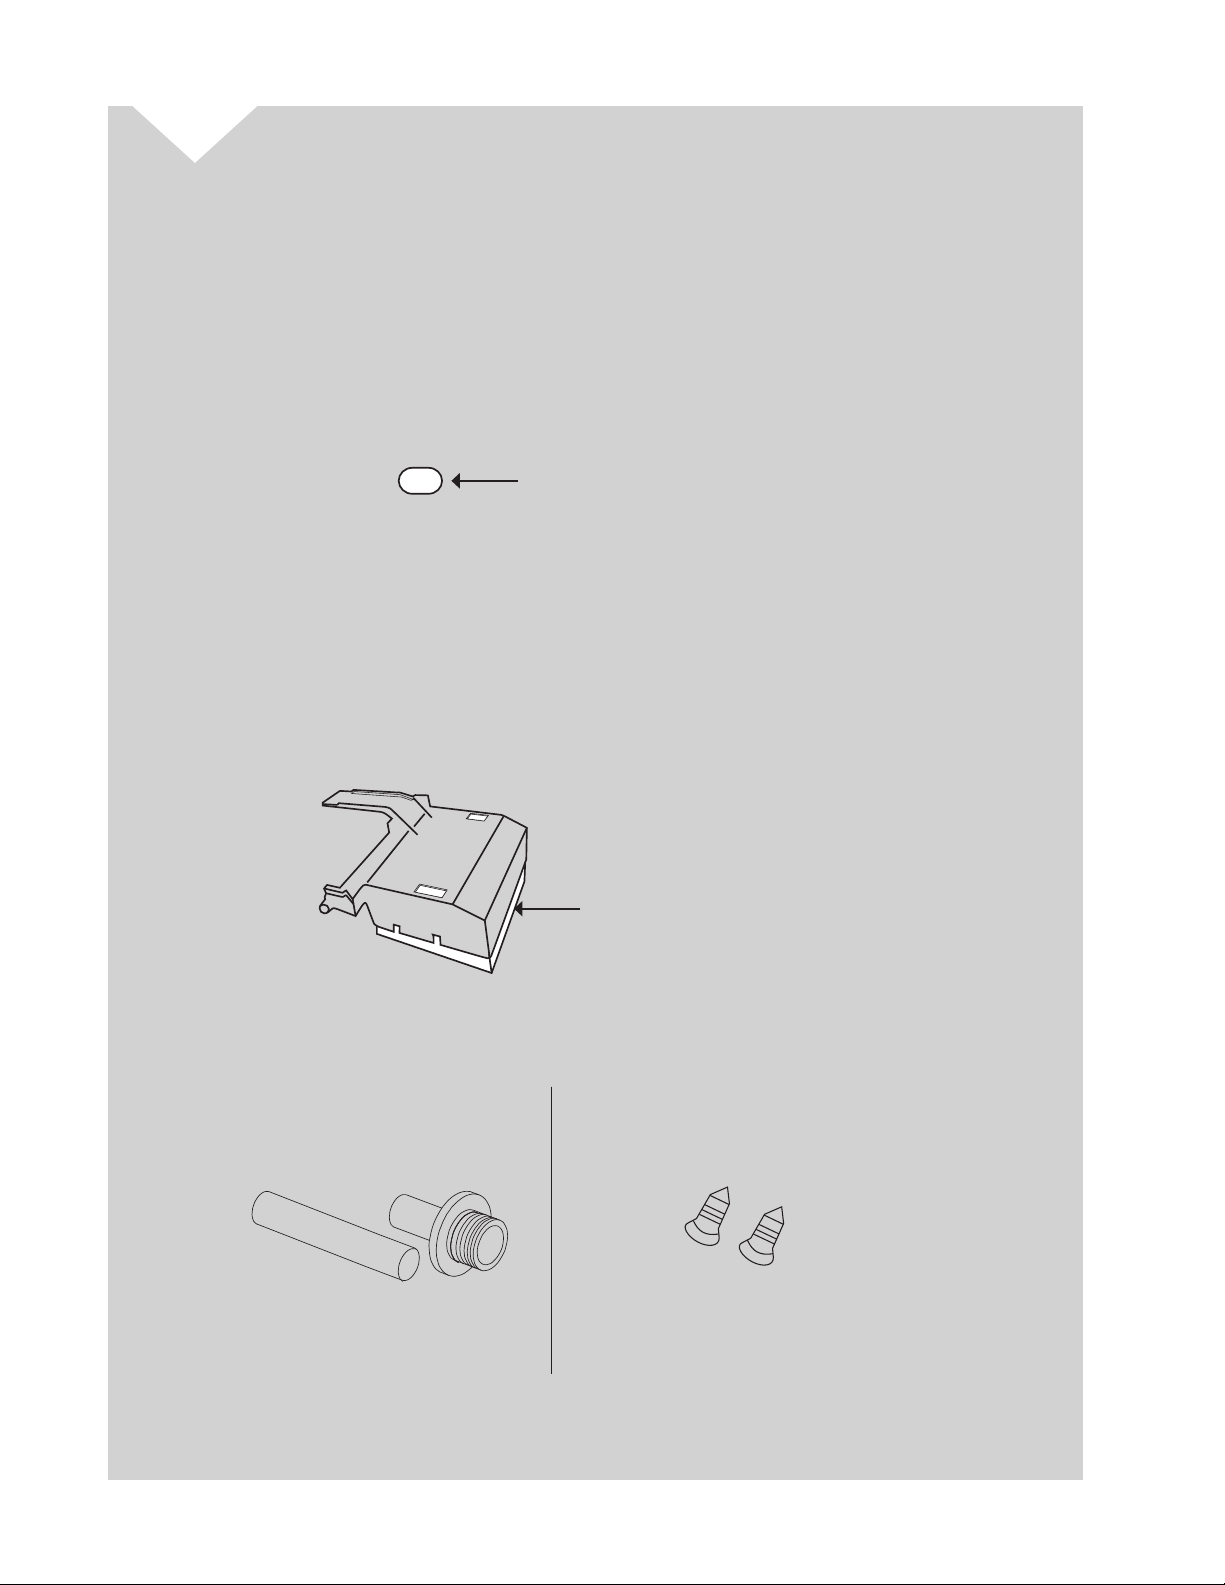
4. When unpacking the dehumidier, note that the foam inside the oat piece in the bucket should NOT be
removed. Without this foam piece, the dehumidier will not operate properly. NOTE: Removing the float and/or
foam will cause the unit not to shut off and the bucket to overflow.
Foam piece inside float mechanism.
DO NOT REMOVE this foam piece.
5. The accessories are located with the unit as follows.
Find the garden hose adapter and
short tube inside the bucket.
Before using your dehumidifier, it is recommended that you read this manual carefully and keep it together with your
proof of purchase (receipt) for warranty purposes.
Find the screws inside the water tank.
Page 4

Page 5
CONTENTS
SAFETY PRECAUTIONS ...................................................................1
ELECTRICAL INFORMATION ..........................................................2
CONTROL PADS ON THE DEHUMIDIFIER ....................................3
IDENTIFICATION OF PARTS ...........................................................5
OPERATING THE UNIT .....................................................................6
CARE AND MAINTENANCE ............................................................8
TROUBLESHOOTING .......................................................................9
This manual provides the information needed for proper use and maintenance of
this dehumidier. Basic preventative care can help extend the life of this unit. The
“Troubleshooting” section in this manual contains a chart with possible solutions to the
most common problems. Referring to this section may save time and prevent the need
for a service call in the event of a problem.
CAUTION
!
• Contact an authorized service technician for repair or maintenance of this unit.
• If necessary, contact an installer for installation of this unit.
• The dehumidier is not intended for use by young children without supervision. Young children should be
supervised to ensure that they do not play with the dehumidier.
• Disabled persons may require assistance with set up and usage.
• If the power cord is to be replaced, replacement work should be performed by authorized personnel only.
• Installation and repair work must be performed in accordance with the national wiring standards by authorized
personnel only.
NOTE: All the illustrations in this manual are for explanation purposes only. Unit purchased may be slightly dierent.
NOTE: The design and specications of the dehumidier are subject to change without prior notice for product
improvement. Contact Consumer Services at 844-472-2473 for details.
Page 6
SAFETY PRECAUTIONS
READ SAFETY PRECAUTIONS BEFORE INSTALLATION
To prevent injury to the user or other people and property damage, the following instructions must be followed.
Incorrect operation due to ignoring of instructions may cause harm or damage. The seriousness is classied by the
following indications.
THIS SYMBOL INDICATES THAT IGNORING INSTRUCTIONS MAY CAUSE
DEATH OR SERIOUS INJURY.
THIS SYMBOL INDICATES THAT IGNORING INSTRUCTIONS MAY CAUSE
MODERATE INJURY TO YOUR PERSON, OR DAMAGE TO YOUR UNIT OR
OTHER PROPERTY.
NEVER DO THIS.OTHER SYMBOLS: ALWAYS DO THIS.
WARNINGS
DO NOT exceed the rating of the power outlet or
connection device.
DO NOT operate or stop the unit by inserting or
pulling out the power plug directly from the wall.
DO NOT damage or use an unspecied power cord.
DO NOT modify the power cord length or share the
outlet with other appliances.
DO NOT insert or pull out plug with wet hands.
DO NOT place the unit near a heat source.
Disconnect the power if strange sounds, smells, or
smoke comes from unit.
You should never try to take apart or repair the unit
by yourself.
Before cleaning, turn o the power and unplug the
unit.
DO NOT use the unit near ammable gas/
combustibles such as gasoline benzene, thinner,
etc.
DO NOT drink or use the water drained from the unit.
Doing so may cause electric shock or re due to excess
heat generation.
This may cause electric shock or re due to heat
generation.
This may cause electric shock or re. (If power
cord is damaged, it must be replaced by a qualied
professional.)
This may cause electric shock or re due to heat
generation.
This may cause electric shock.
Plastic parts may melt and cause a re.
Failing to do so may cause re and electric shock.
This may cause failure of machine or electric shock and/
or may void warranty.
Failing to do so may cause electrical shock or injury.
This may cause an explosion or re.
It contains contaminants and could make you sick
1
Page 7
CAUTIONS
DO NOT use the unit in small spaces.
DO NOT put in places where water may splash onto the
unit.
Place the unit on a level, sturdy section of the oor. If unit falls over, it may spill water and damage
DO NOT cover the intake or exhaust openings with
cloths or towels.
Care should be taken when using the unit in a room
with the following persons:
DO NOT use in areas where chemicals are handled.
Never insert ngers or other foreign objects into grille
openings. Be sure to warn children of dangers.
DO NOT place heavy objects on the power cord; make
sure the cord is not compressed.
DO NOT climb up on or sit on the unit.
Always insert the lters securely. Clean lter at least
once every two weeks.
If water enters the unit, turn unit o, disconnect power
and contact a qualied service technician.
DO NOT place ower vases or other water containers
on top of the unit.
Lack of ventilation can cause overheating and re.
Water entering unit can degrade the insulation and
cause electric shock or re.
belongings, or cause electric shock or re.
A lack of air ow can lead to overheating and re.
Infants, children, elderly people, and people
insensitive to humidity
This will cause unit deterioration due to chemicals and
solvents dissolved in the air.
This may cause electric shock or failure of
dehumidier.
There is danger of re or electric shock.
You may be injured if you fall or if the unit falls over.
Operation without a lter or with a dirty lter may
cause failure.
This may cause failure of dehumidier and there is
danger of electric shock.
Water may spill into the inside of the unit, causing
insulation failure and electrical shock or re.
ELECTRICAL INFORMATION
• The manufacturer’s nameplate is located on the rear panel of the unit and contains electrical and other technical data
specic to this unit.
• Be sure the unit is properly grounded. To minimize shock and re hazards, proper grounding is important. The power
cord is equipped with a three-prong grounding plug for protection against shock hazards. DO NOT remove 3rd prong.
• Your unit must be used with a properly grounded wall receptacle. If the wall receptacle you intend to use is not
adequately grounded or protected by a time delay fuse or circuit breaker, have a qualied electrician install the
proper receptacle.
• Ensure the receptacle is accessible after the unit is installed.
• DO NOT use extension cords or an adapter plug with this unit. If it is necessary to use an extension cord, use an
approved “Dehumidier” heavy duty extension cord of the proper gauge only (available at most local hardware stores).
• To avoid the possibility of personal injury, always disconnect the power supply to the unit before installing and/
or servicing.
2
Page 8
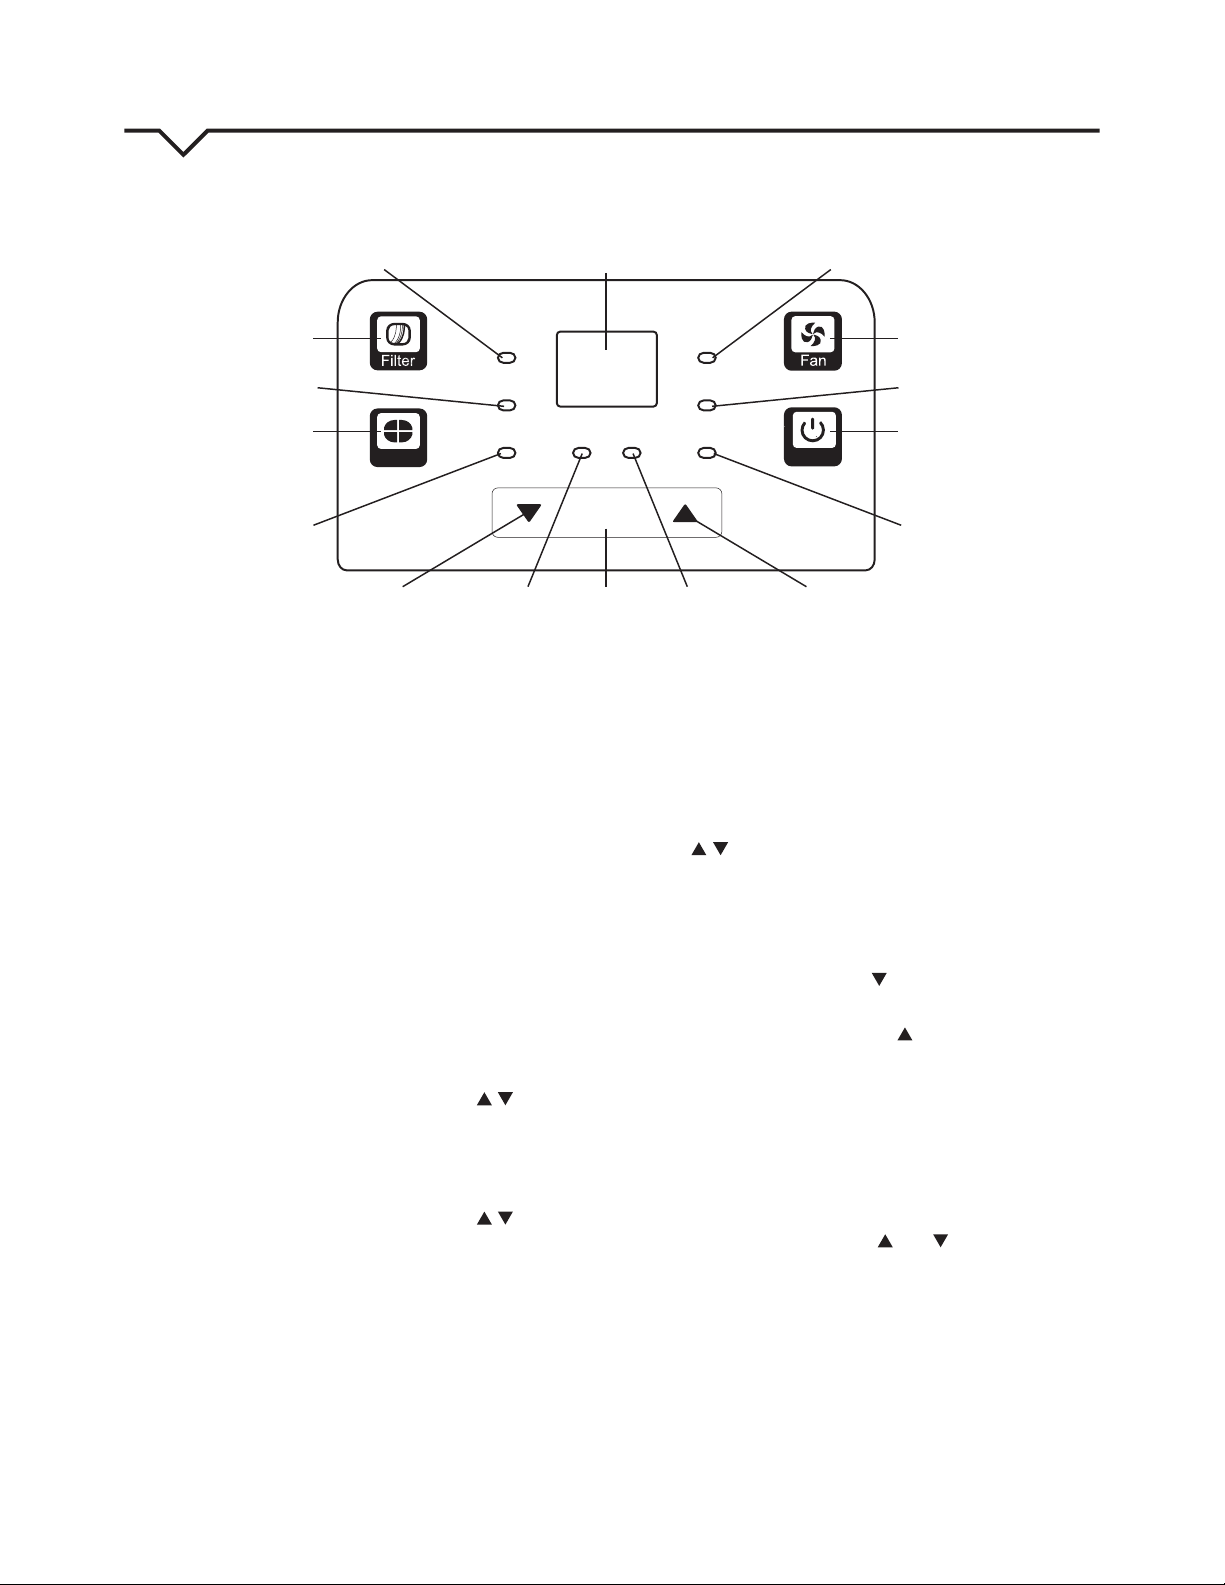
CONTROL PADS ON THE DEHUMIDIFIER
High Fan
Clean Filter
Continuous
Operation on
Indicator Light
Indicator Light
Indicator Light
Comfort
Dehumidifying
Indicator Light
NOTE: The control panel of the unit you purchased may be slightly dierent according to the models.
Indicator Light
3
Mode
Filter
Comfort
Cont. On Off
Timer “On”
Indicator Light
CONTROL PADS: When you push the button to change
operation modes, the unit will make a single “beep”
sound to indicate that it is changing modes.
1. POWER
Press to turn the dehumidier on and o.
2. MODE
Toggle between the following features:
NORMAL – Utilize this mode if you would like the
unit to cycle on and o based on the relative
humidity setting you have manually selected. (See
numbers 5, 7 and 8 in the column to the right for
further instruction.) In NORMAL mode, both the
“Comfort” and “Cont.” indicator lights will not be
illuminated.
COMFORT – Utilize this dehumidication feature
to automatically keep humidity in the 45%55% range based on room temperature. When
operating in this mode the UP/DOWN / pads
will be deactivated and you will NOT be able to set
a desired humidity.
CONTINUOUS (CONT.) – Press to activate the
continuous dehumidifying operation. When
operating in this mode the UP/DOWN / pads
will be deactivated and you will NOT be able to
set a desired humidity. The unit will run non-stop
unless using the bucket to collect water. At which
point, the unit will shut o when the bucket is full.
3. FILTER
The check lter feature is a reminder to clean the
Air Filter for more ecient operation. The “Filter”
light (Clean Filter Indicator Light) will illuminate
after 250 hours of operation. To reset after
cleaning the lter, press and hold the Filter button
and the light will go o, resetting the timer.
Timer
8
Turbo
Full
Auto defrost
Timer “Of f”
Indicator Light
Indicator Light
Power
765
4
Bucket Full
12
Auto Defrost
Operation
FIG. 1
4. FAN
Control the fan speed. Press to select either Turbo
or Normal fan speed. Set the fan control to Turbo
(“High”) for maximum moisture removal. When the
humidity has been reduced and quiet operation
is preferred, set the fan control to Normal by
pressing the FAN pad to turn o Turbo fan/light.
5/7. / : UP/DOWN PADS
HUMIDITY SET CONTROL PADS
• The humidity level can be set within a range
of 35%RH to 85%RH (Relative Humidity) in
5% increments.
• For drier air, press the pad and set to a lower
percent value (%).
• For damper air, press the pad and set a higher
percent value (%).
• The recommended standard setting is 45-50%.
You must be on Normal mode to set the humidity
• Cannot be used in COMFORT or
CONTINUOUS mode.
6. TIMER
Press to initiate the Auto on and Auto o feature,
in conjunction with the and key pads. The
timer range is 0.0 to 24 hrs. Timer does not cycle.
8. DISPLAY
Shows the set % humidity level from 35% to 85%
or auto on/o time (0-24) while setting, then
shows the actual ( +/- 5% accuracy) room %
humidity level in a range of 30%RH to 90%RH
(Relative Humidity).
3
Page 9

ERROR AND PROTECTION CODES
AS – HUMIDITY SENSOR ERROR
Unplug the unit for at least 5 minutes and plug
it back in. Make sure the lter is clean. If error
repeats, call Perfect Aire Consumer Services at
844.472.2473.
ES – TEMPERATURE SENSOR ERROR
Unplug the unit for at least 5 minutes and plug
it back in. Make sure the lter is clean. If error
repeats, call Perfect Aire Consumer Services at
844.472.2473.
P2 – BUCKET IS FULL OR NOT IN THE CORRECT POSITION
Empty the bucket and replace it in the proper
position. Ensure oat switch and foam are
properly secured in bucket.
OTHER FEATURES
BUCKET FULL INDICATOR LIGHT
Illuminates when the bucket needs to be emptied, is
removed, or is not placed in the proper position.
AUTO SHUT OFF
The dehumidier shuts o after 30 seconds when the
bucket is full or when the bucket is removed or not
replaced in the proper position. When the humidity
setting is reached, the unit will cycle o automatically.
(The compressor cycles o rst. Then, three minutes
later, the fan turns o as well.)
AUTO DEFROST
When frost builds up on the evaporator coils, the
compressor will cycle o and the fan will continue to
run (on “Turbo”) until the frost disappears. The AUTO
DEFROST Indicator light will illuminate. The unit will
restart on its own once the auto defrost process has
completed.
SAFETY FEATURE
After the unit has stopped, it cannot resume operation
within three minutes. This is to protect the unit.
Operation will automatically restart after three minutes.
CHECK FILTER FEATURE
The system starts to log the time once the fan motor
operates. The check lter light will illuminate only when
the accumulated operation time achieves 250 hours or
more. The CLEAN FILTER indicator light ashes once
per second. After cleaning the air lter, press and hold
the FILTER button to reset the lter timer and turn o
the CLEAN FILTER indicator light .
AUTO-RESTART
If the unit breaks o unexpectedly due to a loss of
power, it will automatically restart with the previous
function setting when the power resumes.
E1 – UNIT MALFUNCT ION
Unplug the unit for at least 5 minutes and plug
it back in. If error repeats, call Perfect Aire
Consumer Services at 844.472.2473.
EC – HUMIDITY SENSOR ERROR
Make sure the temperature of the working
environment is between 41°F (5°C) and 95°F
(35°C). If not, please operate the unit under the
correct stated temperature. If on a concrete
oor, unplug and elevate unit a few inches o
the oor; plug back into outlet and power on.
If you have made these adjustments and still
see the EC error code, please call Perfect Aire
Consumer Services at 844.472.2473.
SETTING THE TIMER
• When the unit is on, press the TIMER button. The
TIMER OFF indicator light illuminates, indicating that
the Auto Stop program is initiated. Press it again and
the TIMER ON indicator light illuminates indicating
that the Auto Start program is initiated.
• If you prefer, you can set the timer while the unit is
powered o and follow the instructions above to set
the unit to go on and then o.
• Press or hold the UP or DOWN pad to change the
Auto time in 0.5 hour increments, up to 10 hours,
then at 1 hour increments up to 24 hours. The
display on the control pad will count down the time
remaining until start/stop.
• The selected time will register for 5 seconds and the
system will automatically revert back to display the
humidity setting.
• When the Auto start and Auto stop times are set
within the same program sequence, TIMER ON and
OFF indicator lights illuminate identifying both ON
and OFF times are now programmed. You can set the
Timer for just ON or just OFF in which case the single
corresponding ON or OFF light will be illuminated.
• Turning the unit ON or OFF at any time or
adjusting the timer setting to 0.0 will cancel the
Auto Start/Stop.
• When LED display window displays the code of P2,
the Auto Start/Stop function will also be canceled.
A NOTE ABOUT THE TIMER:
When you set the timer, the unit will only go on once
and o once. If you want the dehumidier to cycle on
and o repeatedly, you do not need to set the timer.
Instead, set your desired humidity and the unit will cycle
on and o based on the selected humidity setting.
4
Page 10

IDENTIFICATION OF PARTS
2
FRONT
1. Control Panel
2. Air Filter (pull
up to remove)
3. Air Outlet Grill
4. Air Intake Grill
5. Water Bucket
6. Handle (both sides)
REAR
1
2
4
5
FIG. 2 FIG. 3
6
3
1. Drain Hose Outlet
2. Casters
3. Power Cord & Plug
4. Band (used only
when storing unit)
4
1
2
3
CASTERS (#2 in diagram above)
• The casters are located at four points on the
bottom of the unit.
• Casters can move freely.
• Never force casters to move over carpet or
move the unit with water in the bucket. (The unit
may tip over and spill water.)
WHAT IS THE “FLOAT”? DOES IT NEED THE FOAM PIECE INSIDE OF IT?
Inside the bucket, on the right side, is an
“arm” mechanism that wobbles. This piece
is called the “oat.” DO NOT remove the foam
piece that is found in the plastic holder part
of the oat. (See Fig. 4.) If the piece is
removed, the bucket will overow.
NOTE: All the illustrations in this manual are for explanation purposes only. Unit purchased may be slightly dierent,
but the operations and functions are the same.
Foam piece inside oat mechanism.
DO NOT REMOVE the foam.
FIG. 4
ACCESSORIES
Drain Tube (1 pc.) Garden Hose Adapter (1 pc.) Screws (2 pc.)
FIG. 5
NOTE: Drain tube and adapter are located inside of the water bucket. Screws are located in a pouch inside the
packaging for this user manual.
5
Page 11

OPERATING THE UNIT
more
POSITIONING THE UNIT
A dehumidier operating in one room will have little or no eect in
drying an adjacent enclosed area, such as a closet, or other room
unless there is adequate circulation of air around the area.
• Do not use outdoors.
• This dehumidier is intended for indoor residential applications
only. This dehumidier should not be used for commercial or
industrial applications.
• Place the dehumidier on a smooth, level oor, strong enough
to support the unit with a full bucket of water.
• Allow at least 8 in. (20 cm) of air space all around the unit for
proper air circulation 16” or more from the top of the unit.
• Place the unit in an area where the temperature will not fall
below 41°F (5°C). The coils can become covered with frost at
temperatures below 41°F (5°C), which may reduce performance
and cause an error code.
• Place the unit away from the clothes dryer, heater
or radiator.
• Use the dehumidier to prevent moisture damage anywhere books
or valuables are stored.
• Use the dehumidier in a basement to help prevent
moisture damage.
• The dehumidier must be operated in an enclosed area to be
most eective.
• Close all doors, windows and other outside openings in the space
that you wish to dehumidify.
16ʺ or more
Air intake
grille
8ʺ or
more
FIG. 6
Air outlet
grille
8ʺ or more
8ʺ or
8ʺ or
more
WHEN USING THE UNIT
A dehumidier operating in one room will have little or no eect in drying an adjacent enclosed area, such as a closet, or
other room unless there is adequate circulation of air entering and exiting the area.
• WHEN FIRST USING THE DEHUMIDIFIER, OPERATE THE UNIT ON “CONTINUOUS” MODE FOR 24 HOURS.
NOTE: After the rst 24 hours, should you wish to set a desired humidity, you will need to take the unit o of
CONTINUOUS. You will not be able to select a desired humidity while the unit is set on CONTINUOUS mode.
• This unit is designed to operate in a working environment between 41°F/5°C and 95°F/35°C.
• If the unit has been switched o and needs to be switched on again quickly, allow approximately 3 minutes for the
correct operation to resume.
• DO NOT connect the dehumidier to a multiple socket outlet that is being used for other electrical appliances.
• Select a suitable location, making sure you have easy access to an electrical outlet.
• Plug the unit into an electrical outlet with a grounding connection.
• Make sure the water bucket is correctly tted or the unit will not operate properly.
• NOTE: DO NOT attempt to move the dehumidier when there is water in the bucket. The unit may tip over and spill water
or damage unit.
6
Page 12

REMOVING THE COLLECTED WATER: 2 OPTIONS
OPTION 1: USE THE BUCKET
A dehumidier operating in one room will have little or no eect in
drying an adjacent enclosed area, such as a closet, or other room
unless there is adequate circulation in the area.
• If the bucket is full when the unit is OFF, the unit will beep 8 times,
the Full indicator light will ash and the display will show P2.
• If the bucket is full when the unit is ON, the compressor will turn
o followed by the fan 30 seconds later. The unit will then beep 8
times, the full indicator light will ash and the display will show P2.
• Unplug the unit before removing the bucket. Slowly pull out the
bucket. Grip the left and right sides securely, and carefully pull
out straight so water does not spill. Use the handle to carry the
bucket. DO NOT put the tank on the oor because the bottom of the
bucket is uneven. The bucket will fall and cause the water to spill.
• Throw away the water and replace the bucket. The bucket must be
in place securely for the dehumidier to operate. (DO NOT drink the water.)
• The unit will re-start 3 minutes after the bucket is placed in its correct position.
NOTES:
• When you remove the bucket, do not touch any parts inside of the unit. Doing so may damage the unit.
• Be sure to push the bucket gently all the way into the unit. Improper installation or failing to push it in securely may
cause the unit not to operate.
• When you remove the bucket, be sure to wipe away any excess moisture found inside the unit.
OPTION 2: CONTINUOUS DRAINING
Water can be automatically emptied into a oor drain by attaching
a water hose, garden hose, or dehumidier drain hose to the
dehumidier. (Garden hose must have a female threaded end. Hose
not included.)
• If not already assembled, put together the “Drain Tube
Subassembly” by securely connecting the drain tube (included) to
the garden hose adapter (included). (See Fig. 9.) Drain tube and
adapter can be found inside the bucket.
• Remove the rubber plug from the drain outlet on the back of the
unit and set aside or in the bucket for safe keeping. Remove
bucket to access connector. Insert the drain hose through the
unit’s drain outlet (from the back of the unit going forward) and
securely press into the connector on the inside of the unit. (Fig. 10
& 11)
• Tighten the garden hose adapter to the unit by using the two
4x5/8” screws provided, which can be found inside a pouch in the
packaging with this user manual.
• Install the female threaded end of the water hose, garden hose,
or dehumidier drain hose into the garden hose adapter (Fig. 12);
Then lead the water hose to the oor drain or a suitable
drainage facility.
• A hose length of no more than 6 ft. is recommended as the hose
must allow the water to continuously travel downward into the drain.
• Make sure the hose is secure to avoid leakage.
• Direct the hose down toward the drain, making sure that there are
no kinks that will stop the water ow.
• Place the end of the hose into the drain and make sure the end of
the hose is level or down to let the water ow smoothly. NEVER LET
DRAIN HOSE GO UPWARD AGAINST GRAVITY.
• Place the bucket back in the unit in the proper position. The unit
will not run if the bucket is not in the proper place.
• Select the desired humidity setting and fan speed on the unit for
continuous draining to start.
NOTES:
• CONTINUOUS mode and continuous draining are dierent. You
do not need to be on CONTINUOUS mode to do continuous draining. See pg. 3 for details about
• To eliminate the use of the drain tube adapter assembly and still drain to the oor you may use tubing (5/8” O.D. 1/2”
I.D.) in the length required (up to 6 ft.) to go directly from the unit to oor drain.
OPTION 1: USE THE BUCKET
FIG. 7 FIG. 8
1. Pull the bucket
out slightly.
3. Dispose of water; replace bucket into proper position.
2. Hold both sides of the bucket
with even strength and pull it
out from the unit.
OPTION 2: CONTINUOUS DRAINING
FIG. 9: Drain Tube Subassembly
Garden Hose
Adapter
Drain tube
FIG. 10
Rubber plug
Drain tube
subassembly
FIG. 11
Connector
Drain tube
FIG. 12
Female threaded end of water
hose connected to the
garden hose adapter
Water hose
NOTE: When the continuous drain feature is not being used,
remove the garden hose adapter and drain tube from the
outlet and insert drain plug. Failure to re-insert the drain
plug will result in unit malfunction and possible error codes.
Rubber plug
CONTINUOUS
7
mode.
Page 13

CARE AND MAINTENANCE
CARE AND CLEANING OF THE DEHUMIDIFIER
TURN THE DEHUMIDIFIER OFF AND REMOVE THE PLUG FROM THE WALL
OUTLET BEFORE CLEANING.
1. CLEAN THE GRILLE AND CASE
• Use a damp cloth with water and a mild detergent. Do not use
bleach or abrasives.
• Do not splash water directly onto the main unit. Doing so may
cause electrical shock, cause the insulation to deteriorate, or
cause the unit to rust.
• The air intake and outlet grilles get soiled easily; use a vacuum
attachment or brush to clean.
2. CLEAN THE BUCKET
Every few weeks, clean the bucket to prevent growth of mold, mildew
and bacteria.
• Remove the bucket and clean it in an area away from the
dehumidier to avoid splashing water onto/in the unit.
• Partially ll the bucket with clean water and add a small amount of
mild detergent. Swish it around in the bucket,empty and rinse.
NOTE: DO NOT use a dishwasher to clean the bucket. After cleaning the
bucket, it must be securely in place for the dehumidier to operate.
3. CLEAN THE AIR FILTER
• Remove and clean the lter when the lter light illuminates. For
more frequent use, clean the lter more often (i.e. every 2 weeks).
• Remove the lter from the top of the unit (See Fig. 13.)
• Wash the lter with clean water, then dry thoroughly before reinserting the lter.
CAUTION: DO NOT operate the dehumidier without a lter because dirt
and lint will clog the unit and reduce performance.
3. PROLONGED PERIODS OF NON-USE
• After turning o the unit, wait one day before emptying the bucket.
• Clean the main unit, water bucket and air lter and let
dry completely.
• Wrap the cord and bundle it with the band on the unit.
(See Fig. 14).
• Cover the unit with a plastic bag.
• Store the unit upright in a dry, well-ventilated place.
FIG. 13: Removing the Filter
FIG. 14: Cord Storage
8
Page 14

TROUBLESHOOTING
BEFORE CALLING FOR SERVICE, PLEASE REVIEW THE CHART BELOW
ISSUE POSSIBLE CAUSES
• Turn o unit and unplug 4-6 hours.
• Plug unit back in. Run in Normal mode (no Turbo fan, not on Continuous operation) and set
AUTO DEFROST
DISPLAYS
REPEATEDLY
humidity level to no more than 5% lower humidity than what the display reads for the room humidity.
• Allow time for the unit to run until it successfully reaches initial humidity setting.
• Lower humidity another 5% and repeat until desired humidity is reached. (Average setting should be
45-50%.)
• Be sure unit humidity is not set too low, unit is not sitting on too cold of a oor and unit is not being
used in too cold of a room. (Room should be 41º F or above.)
• Be sure there is sucient air circulation between the unit and the oor.
FROST APPEARS
ON THE COILS
DEHUMIDIFIER
P2 OR
‘BUCKET FULL’
DISPLAYS
DEHUMIDIFIER
NOT
DRAWING
WATER
DEHUMIDIFIER
CONSTANTLY
CYCLES ON/OFF
• This is normal. The dehumidier has an auto defrost feature. See page 4 for more information.
• Verify rubber drain plug is not removed from back of unit if using bucket to collect water.
• Check oat switch (inch length silver tab in top of unit behind bucket) to ensure it is not cracked,
bent, broken, dirty, or obstructed. If bent, re-adjust by re-bending back in place. The switch is
located on the left side behind the bucket when you are facing the unit.
• Check that unit is level and the lter, vents and bucket are thoroughly clean.
• Ensure oat is snapped into place inside the bucket and that foam piece is inserted in oat. See
page 5, Fig. 4.
• Unplug unit for at least 5 minutes. Plug unit back in. Remove bucket, then re-insert. Turn unit on.
• Be sure unit is not too large or too small for the area of the room.
• When rst installed, run unit on Continuous Mode for 24 hours.
• Allow enough time for unit to remove moisture.
• Set humidity low enough to ensure moisture removal. Setting the unit below 45% is not
recommended.
• Setting may be the same as actual humidity in room, thus no moisture to remove.
• Be sure all doors, windows and other openings are securely closed.
• Be sure unit is level and that there is sucient air circulation around the unit, as well as between unit
and oor.
• Make sure unit is level and that there are no curtains, blinds, or furniture blocking the unit.
• Check that room temperature is 41º F or above.
• If unit is near a heat source, such as a clothes dryer, etc., relocate unit.
• Be sure unit is not too large or too small for the area of the room.
• Using unit in much less than its stated coverage will likely cause it to go on and o more frequently.
Using too small of a unit will cause it to run constantly.
• If the humidity setting and actual humidity in room are cycling right around the same, the unit would
go o and on accordingly.
• The fan will run for a few minutes after the compressor shuts o. If you have turned the Continuous
mode on, the fan and compressor will not turn o; they will run continuously in this mode.
• Check that unit is level and the lter, vents and bucket are thoroughly clean and nothing is
obstructing them.
• Be sure all doors, windows and other openings are securely closed.
• Ensure there is sucient air circulation around the unit, as well as between unit and oor.
• Unplug unit for at least 5 minutes. Plug unit back in, remove and return bucket to dehumidier and
turn on.
ES, AS, P2, EC
or E1 APPEARS
ON THE DISPLAY
9
• These are error and protection codes. See page 4 of this manual for more information.
Page 15

BEFORE CALLING FOR SERVICE, PLEASE REVIEW THE CHART BELOW
ISSUE POSSIBLE CAUSES
DEHUMIDIFIER ALWAYS
RUNNING
CONTINUOUS DRAIN NOT
WORKING PROPERLY
• Be sure unit is not too large or too small for the area of the room.
• Allow enough time for unit to remove moisture.
• If set on CONTINUOUS mode, de-select button and set unit to an appropriate humidity
setting.
• If humidity in room is above the set humidity, then unit will be running.
• Be sure all doors, windows and other openings are securely closed.
• Be sure unit is level and that there is sucient air circulation around the unit, as well as
between unit and oor.
• Make sure there are no curtains, blinds, or furniture blocking the unit.
• Lower room temperature.
• If unit is near a source of moisture, such as a sink, shower, washing machine, etc.,
relocate unit.
• Check that lter, vents and bucket are thoroughly clean.
• Be sure hose is CLEAN, pliable and no longer than 6 feet in length (recommended).
Clear tubing with sizing of 5/8 inch for the outer diameter and 1/2 inch for inner diameter
is recommended.
• Hose should be secure on both ends, being especially mindful that it is pushed all the way
onto connector piece inside unit.
• Hose should exit through the back of unit and always be positioned at a DOWNWARD
slope to the desired drain location.
• If using garden hose attached to adapter piece, be sure connection is secure throughout.
• Be sure nothing is obstructing hose connection and there are no kinks or tears in any of
the hosing.
• Ensure unit is level and not tilted forward and that bucket is pushed in all the way. Though
the unit may appear level, if the surface it sits on is even slightly uneven and the front of
the unit is tilted downward, continuous draining may not work. If necessary, slightly prop
up the front two wheels of the unit, taking care that the unit does not fall backward.
• Check that lter, vents and bucket are thoroughly clean.
• If water is going into bucket instead of hose, the unit is working properly. Please double
check all of the above and/or unhook hosing set-up and start again.
• Make sure the dehumidier’s plug is pushed completely into the outlet.
• Check the fuse/circuit breaker box in your home.
UNIT DOES NOT START
UNIT MAKES A LOUD NOISE
WHEN OPERATING
WATER ON FLOOR
UP AND DOWN PADS ON
CONTROL PANEL DO NOT
ALLOW USER TO ADJUST
HUMIDITY SETTING
• The bucket is full and needs to be emptied OR the water bucket is not in the
proper position.
• If on NORMAL mode, check that the humidity setting is lower than Relative Humidity (RH).
• Make sure the air lter is clean and not clogged.
• Make sure the unit is upright (not tilted) and on a at, level surface.
• If you are using the pump operation, the unit may be noisy for the rst 3-5 minutes after
the pump begins operating. This is normal.
• Check the hose connection points to make sure they are not loose.
• If collecting water in the bucket, make sure continuous drain outlet plug has not been
removed from back of unit and that the unit is level.
• Make sure the foam piece has not been removed from the oat. Without this piece, the
oat mechanism will not work properly and the bucket will overow. See page 5, Fig. 4.
• Unit must be powered on.
• Unit cannot be in Continuous mode.
• Unit cannot be in Comfort mode.
NOTE
A highly recommended troubleshoot for any issue in general consists of turning o unit and unplugging for 5 minutes. It is
also recommended to try another wall outlet. For further assistance, contact Consumer Services at 844-472-2473.
10
Page 16

11
Page 17

I'appareil
...........................................................18
tilisation deUUU
I'appareil
........
Conseils en matière de dépannage.................................................21
12
Page 18

MESURES DE SECURITE
Pour éviter les blessures et les dommages matériels, les instructions suivantes doivent être suivies. Faire
fonctionner l’unité sans tenir compte des instructions peut causer des blessures corporelles ou des dommages.
La
AVERTISSEMENT
ATTENTION Ce symbole indique un risque de blessure ou de dommage matériel.
Signification des symboles utilisés dans ce manuel:
Ne pas excéder la puissance
nominale de la prise de courant
ou du dispositif de branchement.
Un choc électrique ou un
incendie peut survenir en
raison d’une trop grande
production de chaleur.
Ne pas modifier la longueur
du cordon d’alimentation ou
partager la prise de courant
avec d’autres appareils.
Un choc
un incendie peut survenir en
raison d’une trop grande production de chaleur.
Couper l’électricité si un
son,une odeur ou de la
fumée s’échappe
anormalement de l’unité
Un choc
un incendie peut survenir.
Ne pas utiliser l’unité près
d’un gaz inflammable ou de
combus-tibles comme de
l’essence, du benzène, des
solvants, etc.
Une explosion ou un incendie peut survenir.
électrique ou
électrique ou
Ce symbole indique un risque de mort ou de blessure grave.
AVERTISSEMENT
Ne pas faire fonctionner ou
arrêter l'appareil à partir du
panneau électrique principal.
Un choc électrique ou un
incendie peut survenir en
raison d’une trop grande
production de chaleur.
Ne pas insérer ou débrancher la fiche si vous avez
les mains mouillées.
Un choc
peut survenir.
Vous ne devriez jamais tenter de désassembler ou de
réparer l’unité vous-même
L’unité peut ne plus fonctionner
ou un choc
peut survenir.
Ne pas boire ou utiliser
l’eau provenant du déshumidificateur.
Elle contient des contaminants et pourrait vous
rendre malade.
électrique
électrique
Un choc électrique ou
un incendie peut survenir.
Ne pas placer l’unité près
d’une source de chaleur.
Les pièces en plastique peuvent fondre et causer un
incendie.
Un choc électrique
une blessure peut survenir.
Ne pas ouvrir l’unité pendant qu’elle fonctionne.
Un choc
survenir.
électrique
ou
peut
13
N'utilisez pas l'appareil
dans des endroits
restreints.
Un manque d’aération peut
entraîner une surchauffe ou
un incendie.
ATTENTION
Ne pas placer l’unité où
L’eau peut pénétrer à l’intérieur de l’unité et endommager l’isolation. Un choc
électrique ou un incendie
peut survenir.
Placer l’unité sur une section robuste et droite du
plancher.
Si l’unité bascule, l’eau peut
se renverser et endommager
des biens, de même que causer un choc électrique ou un
incendie.
Page 19

MESURES DE SECURITE
ATTENTION
Ne pas couvrir les ouvertures et les sorties avec des
linges ou des serviettes.
Un manque de débit d’air
peut entraîner une surchauffe ou un incendie.
Ne jamais insérer les doigts ou
autres objets dans les
ouvertures. Porter une attention
particulière aux enfants.
Un choc électrique ou des
dommages pourraient
survenir.
Toujours insérer les filtres de
manière sécuritaire. Nettoyer
les filtres toutes les deux
semaines.
Faire fonctionner l’unité sans
filtre peut l’endommager.
Informations electriques
La prudence est de mise si
l'unité est utilisée dans une
pièce où se trouvent les
personnes suivantes:
Ne pas placer d’objets lourds
sur le cordon d’alimentation
et s’assurer qu’il n’est pas
compressé.
Il existe un risque de
choc
électrique ou d’in-
cendie.
L’unité peut ne pas fonctionner ou un accident peut
survenir.
Ne pas utiliser l’unité dans
des endroits où des produits
chimiques sont manipulés.
L’unité se détériorerait en
raison des produits chimiques et des solvants
présents dans l’air.
Ne pas monter ou s’asseoir
sur l’unité.
Vous pouvez vous blesser si
vous tombez de l’unité ou
si elle vous tombe dessus.
Ne pas placer de vase, de
fleurs ou d’autres récipients
contenant de l’eau sur
l’unité.
L’eau peut pénétrer dans
l’unité, endommager l’isolation et causer un choc
électrique ou un incendie.
La plaque signalétique est située sur le panneau arrière
de l'unité et contient les données électriques et techniques
de l’appareil.
Assurez-vous que l’appareil est correctement branché à la terre.
Afin de minimiser les risques de chocs électriques et d'incendie,
une mise à la terre correcte est importante. Le cordon d'alimentation
est équipé d'une fiche à trois broches pour la protection contre les
risques d'électrocution.
Votre appareil doit être utilisé avec une prise à la terre murale.
Si la prise murale que vous avez l’intention d’utiliser n’est pas
mise à la terre correctement ou protégée par un dispositif de
surcharge ou un disjoncteur, demandez à un électricien qualifié
d’installer la prise appropriée.
Assurez-vous que la prise est accessible après l'installation de
l'appareil.
N’utilisez pas de rallonge ou d’adaptateur.
Cependant, si c'est
nécessaire, utilisez une rallonge spécifique spécialement conçue
pour les déshumidificateurs (disponible dans la plupart des
quincailleries).
Pour éviter les risques de blessures, débranchez toujours
l'appareil de la prise murale avant l'installation, la réparation ou
l'entretien.
14
Page 20

PANNEAU DE COMMANDES DE L’APPAREIL
REMARQUE: Le panneau de commande de l'appareil que vous avez acheté peut être légèrement différent
selon les modèles. Certains modèles peuvent être contrôlés par la télécommande. Certains modèles
n'ont aucune fonction de contrôle à distance. Voir la figure 1 ci-dessous. Référez-vous aux
INSTRUCTIONS DE TELECOMMANDE pour le fonctionnement à distance, si votre appareil est muni d'une
télécommande.
Voyant de nettoyage de filtre
Affichage
8
Voyant de ventilation forte
Voyant de bac plein
Voyant de mode de
déshumidification continue
Voyant de minuterie
activée/désactivée
Touches de commandes
Quand vous appuyez sur une touche pour changer
le mode de fonctionnement, l'appareil émettra un
bip sonore pour indiquer que le change ment de
mode sera effectué.
1. Touche de mode continu
Appuyez sur cette touche pour activer le
fonctionnement continu de déshumidification.
2. Touche de filtre
La fonction de vérification de filtre est un rappel
pour nettoyer le filtre à air pour un fonctionnement
plus efficace. Le voyant de filtre s'allume après
250 heures de fonctionnement. Pour réinitialiser
après le nettoyage du filtre, appuyez sur la touche
de filtre et le voyant s'éteint.
3. Touche de ventilation
Pour régler la vitesse de ventilation. Appuyez
pour choisir la vitesse HAUTE ou NORMALE.
Réglez la vitesse HAUTE pour maximiser la
déshumidification. Quand l'humidité a été
réduite et le fonctionnement silencieux est
préférable, réglez le ventilateur à la vitesse
NORMALE.
Voyant de ventilation faible
Voyant de dégivrage
automatique
Fig.1
4. Touche Marche-Arrêt
Appuyez pour mettre l’appareil en marche ou
l'arrêter.
5 / 7 Touches (plus/moins)
Touchesde réglage d’humidité
Le taux d'humidité peut être réglé dans une plage
de 35% HR (humidité relative) à 85% HR
(humidité relative) en échelons de 5%.
Pour de l'air plus sec,appuyez sur la touche pour
diminuer le réglage d’humidité.
Pour de l'air plus humide, appuyez sur la touche
pour augmenter le réglage d’humidité.
Touchesde réglage de minuterie
Utilisez les touches + / - pour
régler l’heure de démarrage et d'arrêt
automatique de 0.0 à 24.
6. Touche de minuterie
Appuyez pour activer la fonction de démarrage et
d'arrêt automatique, en association avec les
touches et .
+-
-
+
15
Page 21

PANNEAU DE COMMANDES DE L’APPAREIL
8. Affichage
L'écran indique le taux d’humidité(%) préréglé dans une plage de 35% à 85% ou l’heure de
démarrage / d'arrêt automatique (0~24) lors du réglage, ensuite l'écran indique le taux d’humidité
ambiante (
relative) .
Codes d’erreur et de protection :
AS-Erreur de capteur d’humidité-Débranchez l’appareil et puis rebranchez-le. Si l’erreur se
répète,appelez le centre de service.
ES-Erreur de capteur de température-Débranchez l’appareil et puis rebranchez-le. Si l’erreur se
répète,appelez le centre de service.
P2-Le bac est plein ou n’est pas en bonne position-Videz le bac et remettez-le en bonne
position.
Autres caractéristiques
5% tolérance ) dans une plage de 30% HR (humidité relative) à 90% HR (humidité
Voyant de bac plein
Il s’allume lorsque le bac est plein,ou lorsque le bac a été
retiré ou mal remis en place.
Arrêt automatique
Le déshumidificateur s’arrête automatiquement 30
secondes après lorsque le bac soit plein, ou lorsque le bac
a été retiré ou mal remis en place. Lorsque l’humidité
préréglée est atteinte, l’appareil s’arrête tout seul. Pour
certains modèles, le moteur du ventilateur va continuer à
fonctionner.
Dégivrage automatique
Lorsque le givre s'accumule sur les serpentins de
l'évaporateur, le compresseur s’arrête et le ventilateur
continuera de fonctionner jusqu'à ce que le givre fonde.
Attendre 3 minutes avant de remettre l'appareil
en marche
Après que l’appareil ait été arrêté,le compresseur ne
redémarrera pas dans les 3 premières minutes. Ceci vise à
protéger l'appareil. en marche
automatiquement après 3 minutes.
Fonction de vérification de filtre
Le système commence à compter le temps une fois que le
moteur du ventilateur fonctionne. La fonction de vérification
de filtre ne peut être activée que lorsque le temps de
fonctionnement accumulé atteint 250 heures ou plus. Le
une fois
appuyez sur la touche de filtre et le voyant de réinitialisation
(Voyant de nettoyage filtre) s'éteint.
par seconde. Après avoir nettoyé le filtre à air,
Il se remettra
e t ong i l c ) e r t l i f egayo t t en ed t na yoV( no i t as i l a i t i n i é r ed t nayov
Redémarrage automatique (sur certains modèles)
En cas d'une panne de courant ou d'une interruption,
l'unité
paramètres
Réglage de la minuterie
Lorsque l'appareil est allumé, appuyez d'abord sur la
touche de minuterie, le voyant de la minuterie d'arrêt
s’allume. Il indique que l'arrêt automatique est activé.
Appuyez de nouveau, le voyant de la minuterie de
démarrage s’allume. Il indique que le démarrage
automatique est lancé.
Lorsque l'appareil est éteint, appuyez d'abord sur la
touche de minuterie, le voyant de la minuterie de
automatique est activé. Appuyez de nouveau, le
voyant de la minuterie d’arrêt s’allume. Il indique que
l’arrêt automatique est lancé.
Appuyez ou maintenez enfoncée la touche
heures, jusqu'à 10 heures, puis par échelons
heure jusqu'à 24 heures. Le système
temps restant jusqu'au départ.
Le temps sélectionné va être enregistré en 5
secondes et le système reviendra automatiquement
pour afficher le réglage de l'humidité précédente.
Lorsque les heures de démarrage et d'arrêt
automatiques sont préréglé ed s t nayov se l , se
démarrage et d’arrêt automatique s'allument dans la
même séquence pour indiquer que les heures de
démarrage et d'arrêt sont maintenant programmées.
Mettre l'appareil en marche ou en arrêt à tout moment
ou ajuster le réglage de la minuterie à 0,0 annulera la
fonction de démarrage/d’arrêt automatique.
la fonction de démarrage/d’arrêt automatique sera
également annulée.
s e l c e v a t n eme u q i t amo t u a e r r amé d e r
. i l ba t é r t se t na r uoc e l euq s i o f enu s t nedécé r p
de 1
décompte le
ega r r améd e l euq euq i dn i l I . emu l l a ’ s ega r r améd
5 , 0 ed sno l ehcé r ap e r ueh ' l r egnahc r uop uo - +
, P 2edoc e l eh c i f f a DEL egahc i f f a ' d e r t êne f a l euqs r oL
16
Page 22

IDENTIFICATION DES COMPOSANTES
Identification des composantes
Avant
1. Panneau de commande
2. Grille d'aspiration d'air
3. Grille de sortie d’air
4. Filtre à air (derrière la grille)
5. Bac d’eau
6. Poignée (deux côtés)
Arrière
1. Sortie du tuyau de vidange
2. Roulettes
3. Cordon d’alimentation avec fiche
4. Crochet (utilisé seulement pour ranger
l’appareil)
1
2
4
5
Fig.2
1
6
3
REMARQUE Toutes les figures dans le manuel
sont données à titre explicatif seulement. La forme
réelle de l'unité que vous avez achetée peut être
légèrement différente, mais les opérations et les
fonctions sont les mêmes.
Accessoire
vidange
2
3
Fig.3
vis(2ens)
17
Page 23

p
UTILISATION DE L’APPAREIL
Positionnement de l'appareil
Le fonctionnement d’un déshumidificateur dans
un sous-sol aura peu ou pas d'effet sur le séchage
d’une zone de stockage fermée adjacente, telle
qu'un placard, à moins qu'il y ait une circulation
adéquate d'air dans et hors de la zone.
N’utilisez pas cet appareil à l’extérieur.
Ce déshumidificateur est destiné à un
usage domestique intérieur, et non pour des
applications commerciales ou industrielles.
Le déshumidificateur doit être installé sur un
sol nivelé qui le supportera avec un bac plein
d'eau.
Prévoyez au moins 8 po (20 cm) d'espace tout
autour de l’appareil pour avoir une bonne
circulation d’air.
Placez l'appareil dans une zone où la
température ne descend pas sous
Les serpentins seront couverts par
sous 5
(41 ), ce qui peut
CF
réduire les
CF
5 (41 ).
le givre
performances.
Placez l’appareil loin des sèche-linges, appareils
de chauffage ou radiateurs.
Utilisez l'appareil pour éviter que
n'endommage
des livres ou des objets de valeur.
l'humidité
Utilisez le déshumidificateur dans un sous-sol pour
aider à prévenir les dommages de l'humidité.
Le déshumidificateur doit être utilisé dans une zone
fermée pour être le plus efficace.
Fermez toutes les portes, fenêtres, et autres ouvertures
extérieures à la pièce.
15 po (40cm)
Grille
d’as
iration d’air
8 po (20cm) ou plus
8 po (20cm)
Roulett
ou plus
Grille de sortie d’air
8 po (20cm)
ou plus
Fig.4a
es (aux 4 coins, sous la base
de l'appareil)
Les roulettes peuvent se déplacer
librement.
Ne forcez pas les roulettes à rouler sur
du tapis et ne déplacez pas l'appareil
quand le réservoir est plein (il risquerait
de basculer et l’eau se renverserait.)
8 po (20cm)
ou plus
ou plus
Utilisation de l’appareil
Lorsque vous utilisez le déshumidificateur pour la première fois, faites fonctionner l'appareil
en continu pendant
Cet appareil est conçu pour fonctionner dans un environnement entre 5 (41 )
et 35
(95 ).
CF
Si, après avoir été l’appareil doit être rapidement remis en marche, prévoyez un laps
24 heures.
CF
arrêté,
d’environ 3 minutes pour que le fonctionnement correct reprenne.
Ne branchez pas le déshumidificateur sur une prise multiple,qui est aussi utilisée pour
d’autres appareils électriques.
Choisissez l’emplacement avec soin, à proximité d’une prise électrique.
Branchez l’appareil sur une prise électrique correctement mise à la terre.
Positionnez parfaitement le réservoir sans quoi l’appareil ne fonctionnera pas.
REMARQUE : Lorsque l'eau dans le bac atteint un certain niveau,
pour éviter de le faire tomber.
déplacez
l’appareil avec pr
écaution
18
Page 24

UTILISATION DE L’APPAREIL
Evacuation de l’eau
. e i l l i euce r uae ’ l r eucavé ' d snoça f xued e t s i xe l I
1. En utilisant le bac d'eau
Lorsque l’appareil est hors tension, l’appareil émet 8 bips sonores,
le voyant de bac plein clignote et l’appareil affiche «P2 ».
Lorsque l’appareil est sous tension, si le réservoir est plein, le
compresseur s'arrête et le ventilateur s'éteint au bout de 30
secondes pour sécher l'eau du condensateur, ensuite l’appareil émet
8 bips sonores, le voyant de bac plein clignote et l’appareil affiche
«P2 ».
Sortez lentement le réservoir. Saisissez les poignées droite et
gauche pour tirer le réservoir tout droit afin que l’eau
pas. Ne posez pas le réservoir par terre – son fond n’étant pas
plat,il risquerait de tomber et l’eau se renverserait.
Videz le bac et replacez-le. Le réservoir doit être fermement en
place pour que le déshumidificateur fonctionne.
Le fonctionnement reprendra une fois le réservoir correctement
replacé.
REMARQUES :
Quand vous retirez le bac, ne touchez à aucune pièce
intérieure, sinon vous endommageriez l’appareil.
Repoussez le réservoir doucement mais à fond dans l’appareil.Le
fait que le bac se heurte contre quelque chose ou qu’il n’est pas bien
repoussé peut causer le non fonctionnement de l’appareil.
devez la sécher.
2. Vidange continue
L’eau peut automatiquement couler dans un trou à cet effet du
sol, en équipant l’appareil d’un tuyau (diam. int. 5/16 po non inclus)
avec une extrémité filetée femelle (diam.ext. 26mm,non inclus).
Installez le tuyau de vidange sur l'adaptateur A. (Voir Fig.7, placé
dans le bac).
Retirez le couvercle en plastique de la sortie de vidange à l’arrière
de l'unité et mettez-le de côté et retirez le bac, puis insérez le tuyau
de vidange à travers la sortie de vidange de l'unité et enfoncez-le
solidement dans le connecteur situé sur le devant de l’unité.
(voir.Fig.9)
Reserrez l'adaptateur A et l'unité en utilisant deux vis (situées dans
le bac).
nstallez l'extrémité filetée femelle du tuyau d'eau dans l’adaptateur
I
A (Voir.Fig.10), puis dirigez le tuyau d'eau vers le drain de plancher
ou une installation de drainage approprié.
pas de fuites.
Assurez-vous que le tuyau est sécurisé afin qu'il n'y ait
Dirigez le tuyau vers le drain, en vous assurant qu'il n'y a pas de
blocages pour l’écoulement d’eau.
Placez l'extrémité du tuyau dans le drain et assurez-vous que
l'extrémité du tuyau est à niveau égal ou inférieur pour laisser
l'eau couler sans problèmes. Le tuyau ne doit pas tre dirig
vers le .tuah
Remettez le bac en place dans l'unité et assurez-vous qu'il est
correctement positionné.
Sélectionnez le réglage d'humidité désiré et la vitesse du
ventilateur sur l'unité pour commencer le drainage continu .
REMARQUE : L orsque la fonction de vidange en continu n'est pas utilisée,
retirez le tuyau de vidange de la prise.
n'éclabousse
ê
suo v , é t i nu ' l snad uae ' l ed a y l i ' s , c ab e l ze r i t e r suo v euqs r oL
é
1. Retirez un peu le bac.
Fig.5
2. Maintenez les deux côtés du bac
à
égalité
, et tirez-le
hors de
l'appareil.
Fig.6
3. Videz l’eau.
Tuyau de vidange
Adaptateur A
Fig.7
Couvercle en
plastique
Sous-ensemble
du tuyau de
vidange
Connecteur
Tuyau de vidange
Fig.8
Fig.9
Tuyau d’eau
d
Bout femelle fileté
Fig.10
19
Page 25

ENTRETIEN ET NETTOYAGE
Entretien et nettoyage du déshumidificateur
Éteignez l’appareil et débranchez-le avant d’entreprendre
son nettoyage.
1. Nettoyage de la grille et du boîtier
Utilisez de l'eau et un détergent doux. N’utilisez pas d'eau
de Javel ou de produits abrasifs.
N’éclaboussez pas d'eau directement sur l'appareil.Cela
peut causer un choc électrique,la détérioration de l’isolation ou
la production de rouille sur l’appareil.
Les grilles d’aspiration et de sortie deviennent sales facilement,
utilisez un aspirateur à vide ou une brosse pour les nettoyer.
2. Nettoyage du bac à eau
Nettoyez le réservoir toutes les 2 ou 3 semaines pour éviter la
prolifération des moisissures et bactéries. Remplissez partiellement
le réservoir d’eau propre à laquelle vous ajouterez un peu de
détergent doux. Agitez la solution dans le bac, videz-le puis rincez-le.
Ne lavez pas le bac au lave-vaisselle.Replacez le
REMARQUE:
bac comme il se doit pour que l’appareil fonctionne.
3. Nettoyage du filtre à air
Dans les conditions d'utilisations normales, retirez le filtre
toutes les deux semaines pour le nettoyer.
Pour retirer le filtre, enlevez d’abord le bac puis tirez le
filtre vers le bas.
Lavez le filtre avec de l'eau propre puis
séchez-le à fond.
Réinstallez le filtre, remettez le bac en place.
ATTENTION :
NE FAITES PAS fonctionner le déshumidificateur sans le filtre,
la saleté et la peluche pourraient boucher l’appareil et
réduire son rendement.
Fi g. 11
4. Si l’appareil ne sert pas pendant de longues périodes:
Après avoir débranché l’appareil, attendez un jour avant de vider le bac.
Nettoyez l’unité principale, le bac et le filtre à air.
Enroulez l’excédent de cordon sur le crochet à cet effet. (Fig.12)
Recouvrez l’appareil d’un sac en plastique.
Rangez l’appareil droit, dans un endroit sec et bien ventilé.
Fig. 12
20
Page 26

Problème
L’unité ne
fonctionne pas.
Le déshumidificateur
n’assèche pas I’air
comme il le devrait.
Quoi vérifier
S’assurer que la fiche du déshumidificateur est
bien branchée dans la prise murale.
Vérifier les fusibles ou le boîtier de disjoncteurs.
Le déshumidificateur a atteint son niveau préréglé
ou le seau est plein.
Le seau n'est pas en place adéquatement.
L’appareil fait beaucoup de bruit quand
il fonctionne.
Du givre s’accumule
sur les serpentins.
ıl y a de l’eau sur
le plancher.
ES,AS, EC et P2
apparaît à l’écran.
Le filtre à air est bloqué.
L’unité est inclinée alors qu’elle devrait se trouver
en position verticale.
Le plancher n'est pas droit.
C’est normal. Le déshumidificateur comporte une
fonction de dégivrage automatique.
Le raccord du tuyau peut être dévissé.
Le seau devait être utilisé pour recueillir l’eau,
mais le bouchon de vidange est enlevé.
Ce sont des codes d’erreur.Voir la section
«BOUTONS DU DÉSHUMIDIFICATEUR ».
21
Page 27

22
Page 28

PERFECT AIRE LLC | 5401 Dansher Road, Countryside, IL 60525 | p. 866.996.9255 | f. 630.323.2301 | www.perfectaire.us | support@perfectaire.us
 Loading...