

Page 1
RCWL330A (51459SL)
69-2148EFS-03
P4 Premium Portable Plus Wireless Chime and Push
Installation
Instructions
Page 2

Installation Instructions
Contents
Checking pack contents .........................................................................................................................1
Safety .......................................................................................................................................................2
Quick start ................................................................................................................................................2
Open the bell push ..................................................................................................................................3
Install the push battery ...........................................................................................................................4
Install the chime battery ..........................................................................................................................4
Switch positions ......................................................................................................................................5
Sliding window.........................................................................................................................................6
Volume control .........................................................................................................................................7
Use of icons .............................................................................................................................................8
Programming procedures .....................................................................................................................10
Recall function .......................................................................................................................................11
Chime sounds ........................................................................................................................................ 11
Mount bell push .....................................................................................................................................12
Chime position .......................................................................................................................................13
Troubleshooting .....................................................................................................................................14
Specifications ........................................................................................................................................16
Disposal and recycling ..........................................................................................................................17
Declaration .............................................................................................................................................17
Guarantee ..............................................................................................................................................17
69-2148EFS—03 ii
Page 3

RCWL330A
Premium Portable Plus Wirefree Chime with Push
Thank you for choosing this Honeywell product. Please use the following instructions to ensure correct installation and use. Keep these notes in a safe place for
future reference.
Checking Pack Contents
Unpack your chime kit and identify the
following parts:
• Chime
• Chime bracket
• Bell push
You will need:
• A Phillips-head screwdriver
• A small flat-bladed screwdriver
• A 1/4-in. (6 mm) masonry drill
• 4 LR14 “C” alkaline batteries
• CR2032 battery for bell push
• 4 self-adhesive icons strips (2 prefitted on chime)
• 2 screws for push
• 2 screws for chime wall bracket
• 2 wall plugs
• Adhesive pad
1 69-2148EFS—03
Page 4

Installation Instructions
Safety
Before proceeding with the installation, please note the following safety warnings:
• Always follow the manufacturer’s advice when using power tools and wear
suitable protective equipment (e.g. safety goggles) when drilling holes, etc.
• Before drilling holes in walls, check for hidden electricity cables and water pipes.
The use of a cable/pipe locator is advisable if in doubt.
Quick Start
The bell push supplied with this kit is pre-programmed to operate with the chime. You
need to do the following to get started:
• Open the bell push
• Install the push battery
• Install the chime batteries
• Check the chime switch setting
• Check the volume setting
69-2148EFS—03 2
When you operate the bell push, the
chime will sound and the first icon will
flash. If you have additional pushes or
you want to assign a different icon to
your push, you will need to follow the
programming procedure.
Page 5
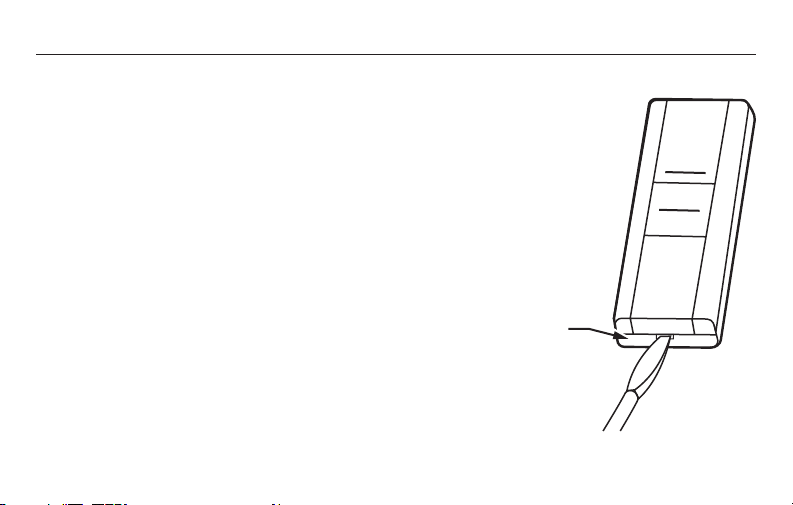
Open the Bell Push
M27269
A
Insert a flat-bladed screwdriver into the slot A, at the base of the push.
Carefully lever the cover and base apart (Fig. 1).
RCWL330A
Fig. 1
3 69-2148EFS—03
Page 6
Installation Instructions
M27270
C
M27153
CR2032
+
CR2
0
32
+
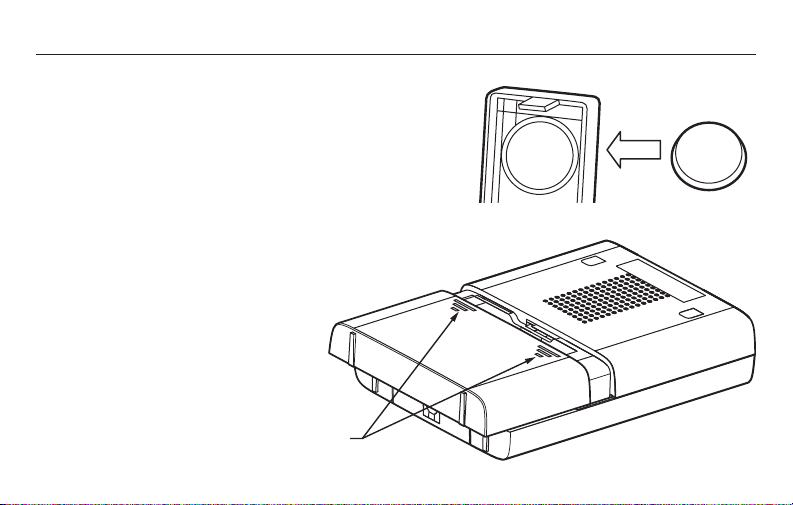
Install the Bell Push Battery
Insert the CR2032 coin cell. Ensure the face
marked “+” is facing up (Fig. 2).
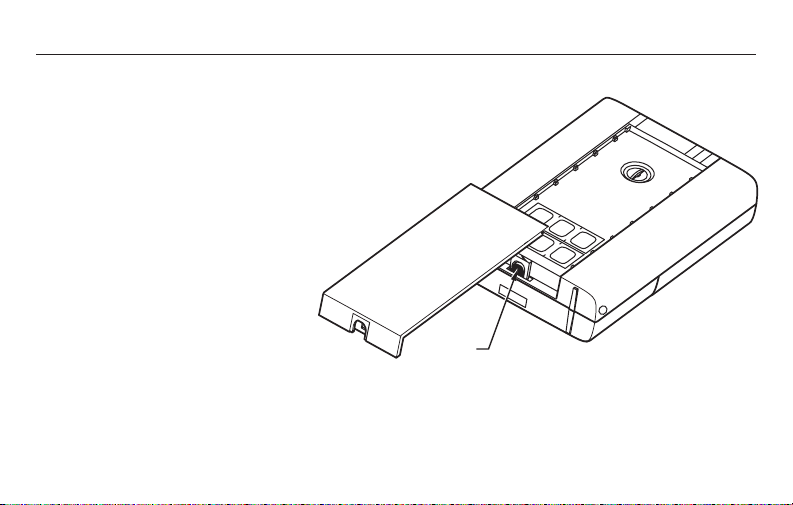
Install the Chime Batteries
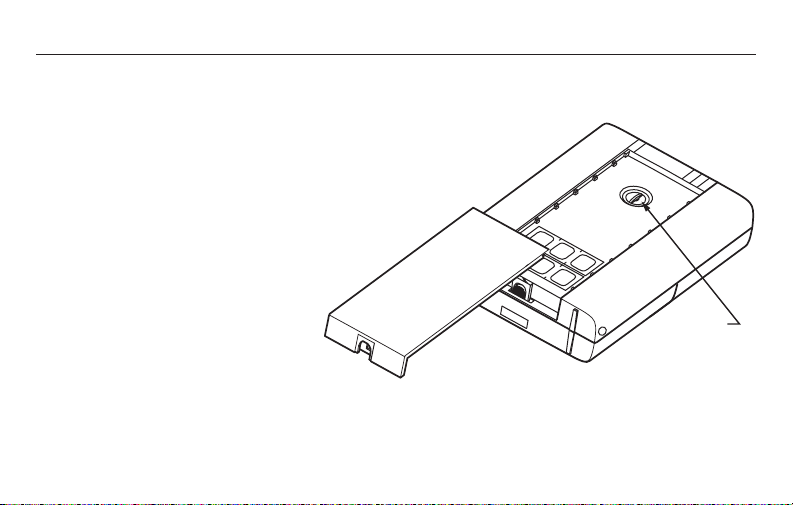
To remove the chime battery cover, press at point C
and slide the cover back, then lift off. Insert
4 LR14 “C” alkaline batteries (not
supplied). Observe polarity as
marked inside the battery compartment (Fig. 3).
Fig. 2
69-2148EFS—03 4
Fig. 3
Page 7
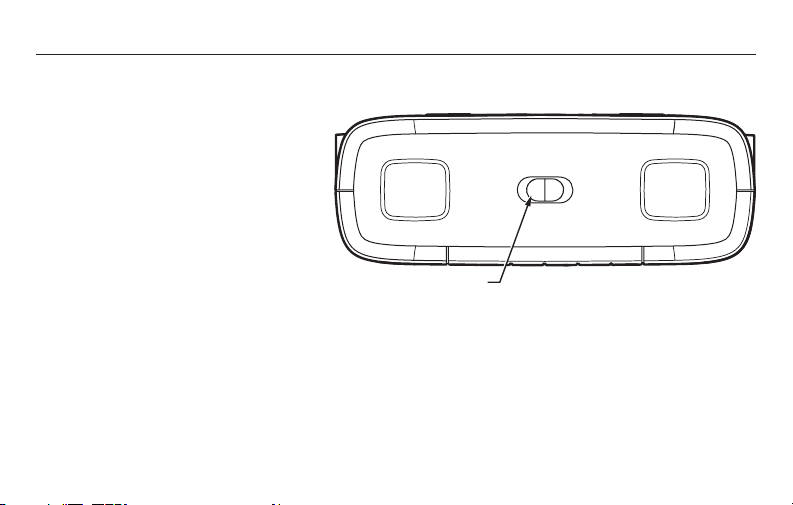
Switch Positions
1 2 3
M27286
D
Mute with flash on
To keep the flash on and turn the
sound off, set switch (D) to position 1.
Flash off with sound on
To turn the blue flashing light off,
set switch (D) to position 3.
Normal operation
For normal operation (sound and
flashing light on), set switch (D) to
position 2.
RCWL330A
Fig. 4
5 69-2148EFS—03
Page 8
Installation Instructions
M27271
E
2
3
1
5
6
Sliding Window
Release the catch (E) and slide open the window.
Shown with number
icon strips.
69-2148EFS—03 6
Fig. 5
Page 9
Volume Control
M27272
VOLUME
CONTROL
2
3
1
5
6
The volume control is behind the sliding window on the front
of the chime. Initially, set the control to mid-point. After you
have tested your system, adjust to the desired volume.
RCWL330A
7 69-2148EFS—03
Fig. 6
Page 10
Installation Instructions
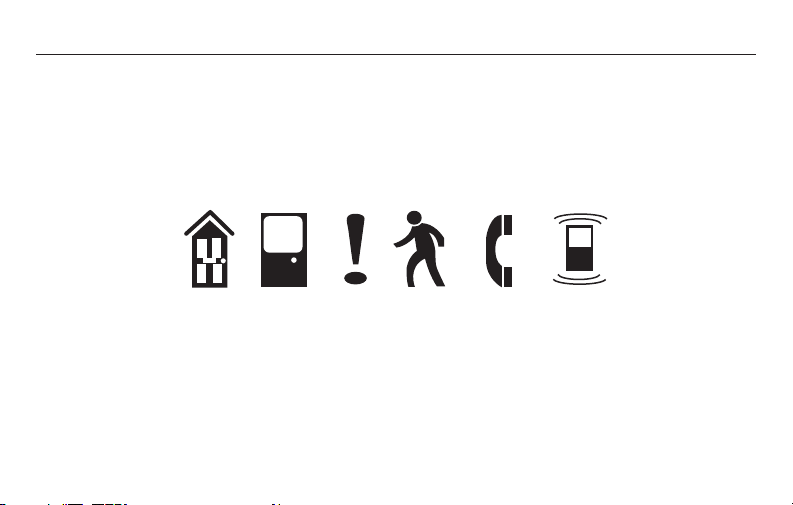
MAIN
DOOR
BACK
DOOR
ALERT
SYMBOL
INTRUDER TELEPHONE PAGER/
KEY FOB
M27289
Use of Icons
In addition to the chime sounds, your chime has a visual indication to show which
device has activated it. An icon will illuminate when the chime is activated by a bell
push or another compatible device. The chime supports six icons:
69-2148EFS—03 8
Page 11
RCWL330A
M27290
Use of Icons
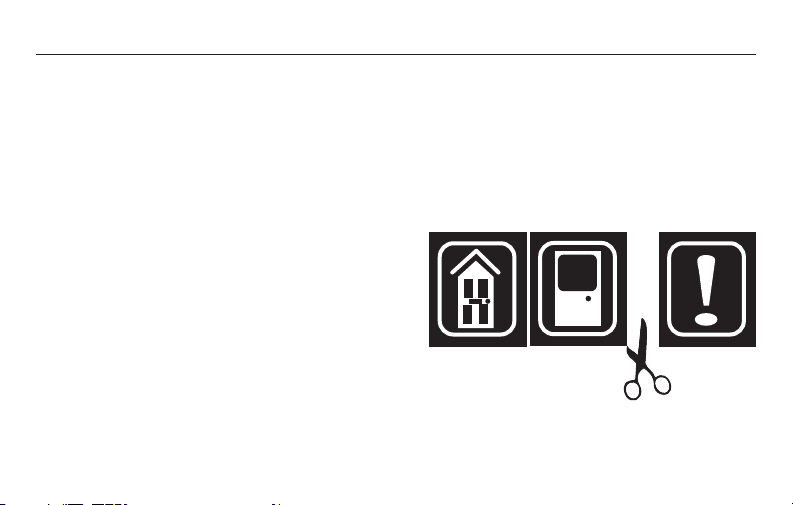
The “Main door” and “Back door” icons are usually used for bell pushes. The other
icons are intended for use with other compatible devices, such as wireless motion
detectors and telephone ring detectors (check availability). Icons numbered 1 to 6
are also included. The icons are self-adhesive, supplied in strips of 3. They can be
changed, if required, by opening the sliding window of the chime and gently peeling
off the strips.
If desired, the strips can be cut into individual
icons and fixed to the chime in a different
order.
Use the Programming procedure to change
the Icon associated with a push.
9 69-2148EFS—03
Page 12

Installation Instructions
Programming Procedure
Learn procedure
To enable your chime to learn the identity
of your bell push:
• Press the l button and keep it
pressed. Each Icon will light in
turn. When the Icon you want is lit,
release the button.
• While the Icon you have selected is
lit, operate your push. The chime will
sound. The Icon will flash.
69-2148EFS—03 10
Unlearn procedure
If you want to remove a push from the
chime’s memory:
• Press the l button and keep it
pressed. Each Icon will light in turn.
When the Icon associated with the
push to be unlearned is lit, release
the button.
• Press and hold both l & buttons
until a “beep” sound is heard.
Page 13
RCWL330A
Changing the Tune
Operate the push. While the Icon is flashing, press the button. Press the button
again and the tune will change. Repeat until the tune you want plays.
Recall Function
A short push of the l button will flash the Icon that was last in use.
Chime Sounds
To hear the chime sounds without operating the bell push, press the button. Press
the button again and the tune will change.
11 69-2148EFS—03
Page 14
Installation Instructions
M27155
TOP
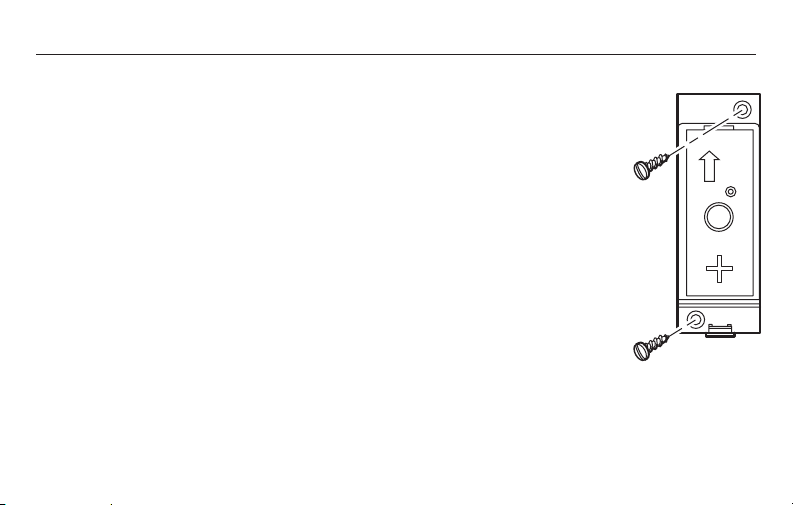
Mount the Bell Push
Mount using either the double-sided adhesive pad, or the screws provided (see Fig 7).
Test your push before mounting. Avoid mounting to metal structures.
69-2148EFS—03 12
Fig. 7
Page 15
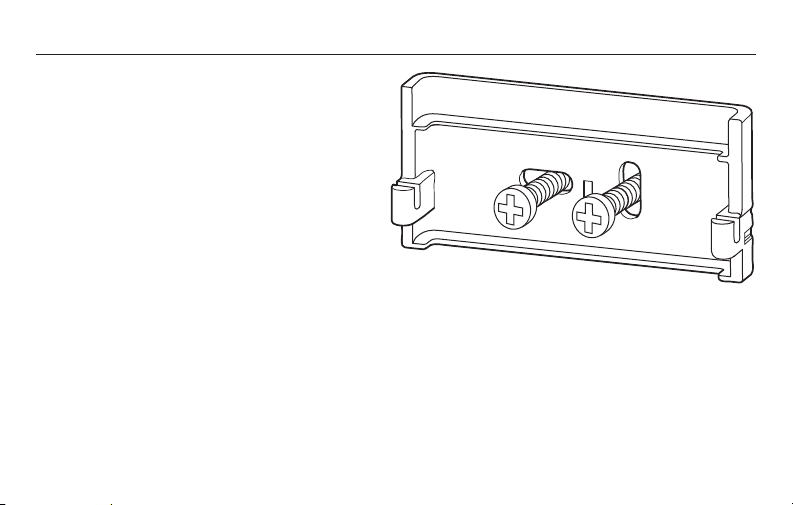
Chime Position
M27318
The chime can be free-standing or
wall-mounted using the wall bracket
provided. If wall mounting is preferred,
screw the bracket to the wall (see Fig 8).
The chime hooks onto the wall bracket
as shown.
RCWL330A
Fig. 8
13 69-2148EFS—03
Page 16

Installation Instructions
Troubleshooting
A “beep” sound is heard in learn mode…
• The push you are programming has already been learned by the chime.
• If you want to change the icon associated with the push, use the un-learn procedure, then
program the push again.
Two “beep” sounds are heard after the normal chime sound…
• This indicates a low battery in the bell push that activated the chime. Install a new battery,
type CR2032.
When the bell push is operated, the amber confidence light does not turn on, or is only
on for a short time…
• In normal operation, the amber light will turn on for 1 second. When the battery is weak, the
light will only turn on for a short time. Install a new battery, type CR2032.
The chime does not work…
• Check that the chime batteries are the correct type, LR14 “C” cells. Only use alkaline batteries.
• Check that the batteries are fitted correctly.
• The chime could be out of range of the bell push. Try the chime in a different location.
• The chime might not have learned the identity of the bell push. Follow the programming
procedure.
69-2148EFS—03 14
Page 17

RCWL330A
Troubleshooting
The chime does not sound…
• Check the chime switch position.
• Check that the volume control is not at the minimum setting.
The flashing light does not work…
• Check the chime switch position.
Range is reduced…
• Metal structures, including door frames, can reduce the range of the product. Avoid mounting
the push or chime on or near metal structures.
• Other equipment can cause radio interference that affects your chime.
• Walls and ceilings will reduce the range.
• Weak batteries will reduce range. Replace every 12–18 months. In cold conditions (below
40ºF), batteries may need to be replaced more often.
Amber light flashes…
• When the chime battery is low, an amber light will flash every 5 seconds. Fit new batteries in
the chime, type LR14 “C” cells. Only use alkaline batteries.
15 69-2148EFS—03
Page 18

Installation Instructions
Specifications
Specification Chime Bell Push
Operating Temperature 32°F to 104°F
Range (open field) 450 ft (140 m)
RF Frequency 916.8MHz 916.8MHz
Sound Level (typical) 90dBA @ 3 ft (1m)
RF Power <1mW
Battery Type LR14 “C” size CR2032
Battery Life
(5 activations/day)
Rain Proof Pass UL rain test
Power Adaptor 6V DC (Not included)
69-2148EFS—03 16
0°C to +40°C
12 months 18 months
14°F to 104°F
-10°C to +40°C
Page 19

RCWL330A
Disposal & Recycling
Batteries and waste electrical products should not be disposed of with household waste. Please
recycle where these facilities exist. Check with your local authority or retailer for recycling advice.
Declaration
Honeywell hereby declares that this product complies with Part 15 of the FCC rules and
Industrial Canada standards. This device operation is subject to the following two conditions:
(1) This device may not cause harmful interference, and
(2) This device must accept any interference received, including interference that may cause
undesired operation.
Caution:
Changes or modification not expressly approved by the party responsible for regulatory compli-
ance could void the user’s authority to operate the equipment.
Guarantee
Honeywell guarantees this product for 1 year from the date of purchase. Proof of purchase is
required; this does not affect your statutory rights. If you require further information about your
product, call the Honeywell helpline at 1-800-468-1502.
17 69-2148EFS—03
Page 20

Honeywell International Inc.
ACS, Environmental and Combustion Controls
1985 Douglas Drive, Golden Valley, MN 55422
www.honeywell.com
Printed in U.S.A. on recycled
paper containing at least 10%
post-consumer paper fibers.
® U.S. Registered Trademark.
© 2008 Honeywell International Inc.
69-2148EFS—03 M.S. Rev. 04-08
Page 21

RCWL330A (51459SL)
Sonnette et carillon portatifs sans fil supérieurs Plus P4
Directives
d’installation
Page 22

Directives d’installation
Table des matières
Vérification du contenu de la boîte ......................................................................................................21
Sécurité ..................................................................................................................................................22
Mise en service rapide ..........................................................................................................................22
Ouverture de la sonnette.......................................................................................................................23
Installation de la pile de la sonnette ....................................................................................................24
Installation de la pile du carillon ...........................................................................................................24
Positions des interrupteurs ...................................................................................................................25
Fenêtre coulissante ...............................................................................................................................26
Réglage du volume ................................................................................................................................27
Utilisation des icônes ............................................................................................................................28
Programmation ......................................................................................................................................30
Fonction de rappel ................................................................................................................................31
Sonneries du carillon .............................................................................................................................31
Installation de la sonnette .....................................................................................................................32
Position du carillon ................................................................................................................................ 33
Dépannage .............................................................................................................................................34
Caractéristiques techniques .................................................................................................................34
Élimination et recyclage ........................................................................................................................37
Déclaration .............................................................................................................................................37
Garantie ..................................................................................................................................................37
69-2148EFS—03 20
Page 23

RCWL330A
Sonnette et carillon portatifs sans fil supérieurs Plus
Nous vous remercions d’avoir choisi un produit Honeywell. Veuillez suivre les
instructions suivantes pour installer et utiliser correctement ce produit. Conservez
ces instructions dans un endroit sûr de façon à pouvoir vous y référer plus tard.
Vérification du contenu de la boîte
Emballage comprend les pièces suivantes :
• Carillon
• Support pour carillon
• Sonnette
• Pile CR2032 pour la sonnette
• 4 bandes adhésives pour icônes
Vous aurez besoin de :
• Un tournevis cruciforme
• Un petit tournevis à lame plate
• Un foret de maçonnerie de 6 mm
(1/4 po)
• 4 piles alcalines LR14, taille C
(2 déjà installées sur le carillon)
• 2 vis pour la sonnette
• 2 vis pour suspendre le carillon au
mur
• 2 chevilles d’ancrage
• Tampon adhésif
21 69-2148EFS—03
Page 24

Directives d’installation
Sécurité
Avant de procéder à l’installation, veuillez prendre note des précautions suivantes :
• Toujours suivre les directives du fabricant lors de la manipulation d’outils
électriques et porter le matériel de protection qui convient (p. ex., lunettes de
protection) avant de percer des ouvertures.
• Avant de percer des trous dans les murs, vérifiez s’il y a des conduites d’eau ou
des câbles électriques dissimulés. En cas de doute, utilisez un localisateur de
câbles ou de canalisations.
Mise en service rapide
La sonnette qui accompagne le carillon a été préprogrammée pour fonctionner avec
ce carillon. Pour l’installer :
• Ouvrez la sonnette
• Installez la pile de la sonnette
• Installez les piles du carillon
• Vérifiez la position de l’interrupteur
du carillon
• Vérifiez le réglage du volume
69-2148EFS—03 22
Lorsqu’on appuie sur la sonnette, le
carillon se fait entendre et la première
icône clignote. Si vous utilisez d’autres
sonnettes ou si vous voulez affecter une
autre icône à votre sonnette, vous devrez
suivre la procédure de programmation
Page 25

Ouvrir la sonnette
M27269
A
Insérez un tournevis à lame plate dans la fente A, à la base de la
sonnette. Soulevez doucement le couvercle et séparez-le de la base.
RCWL330A
Fig. 1
23 69-2148EFS—03
Page 26

Directives d’installation
M27270
C
M27153
CR2032
+
CR2
0
32
+
Installation de la pile de la sonnette
Insérez une pile bouton de type CR2032. Vérifiez
que la face marquée «+» est sur le dessus (Fig. 2).
Installation du carillon
Pour enlever le couvercle du compartiment à piles
du carillon, appuyez sur le point C et faites
glisser le couvercle, puis retirez-le
en le relevant. Insérez 4 piles
alcalines de type LR14, taille
C (non fournies). Respectez la
polarité indiquée à l’intérieur du
compartiment à piles (Fig. 3).
Fig. 2
69-2148EFS—03 24
Fig. 3
Page 27

Positions des interrupteurs
1 2 3
M27286
D
Voyant clignotant, sans son
Pour que le voyant reste allumé
sans faire entendre de son, placez
l’interrupteur (D) à la position 1.
Voyant éteint, avec son
Pour que le voyant clignotant bleu
soit éteint, placez l’interrupteur (D)
à la position 3.
Fonctionnement normal
Pour un fonctionnement normal
(son et clignotant en service),
réglez l’interrupteur (D) à la
position 2.
RCWL330A
Fig. 4
25 69-2148EFS—03
Page 28

Directives d’installation
M27271
E
2
3
1
5
6
Fenêtre coulissante
Libérez le loquet (E) et faites glisser la fenêtre.
Illustré avec bandes
d’icônes numérotées.
69-2148EFS—03 26
Fig. 5
Page 29

Réglage du volume
MF27272
RÉGLAGE
DU VOLUME
2
3
1
5
6
Le bouton de réglage du volume est situé sous la fenêtre
coulissante sur le devant du carillon.
Pour commencer, réglez le volume au centre. Après
avoir vérifié le système, ajustez le volume à
l’intensité désirée.
RCWL330A
27 69-2148EFS—03
Fig. 6
Page 30

Directives d’installation
PORTE
PRINCIPALE
PORTE
ARRIÈRE
ALERTE
INTRUS TÉLÉPHONE TÉLÉAVERTISSEUR
/
PORTE-CLÉS
MF27289
Utilisation des icônes
En plus de déclencher une sonnerie, votre carillon identifie visuellement l’appareil qui
a activé la sonnerie. Une icône s’affiche lorsque le carillon est activé par une sonnette
ou par un autre appareil compatible. Le carillon comporte six icônes :
69-2148EFS—03 28
Page 31

RCWL330A
M27290
Utilisation des icônes
Les icônes de porte d’entrée et de porte arrière sont généralement utilisées avec
les sonnettes. Les autres icônes sont utilisées avec d’autres appareils compatibles,
comme les détecteurs de mouvements passifs à infrarouge passifs (PIR) ou les
détecteurs de sonnerie téléphonique. Des icônes numérotées de 1 à 6 sont également incluses. Ces icônes auto-adhésives sont fournies en bandes de 3. Vous pouvez
les changer au besoin en ouvrant la fenêtre
coulissante du carillon et en décollant avec
précaution les bandes correspondantes.
Vous pouvez, si vous le désirez, découper les
bandes en icônes individuelles et les coller
sur le carillon dans un ordre différent.
Utilisez la Procédure de programmation pour
changer l’icône associée à une sonnette.
29 69-2148EFS—03
Page 32

Directives d’installation
Programmation
Pour programmer les icônes
Pour permettre à votre carillon
d’apprendre à identifier votre sonnette :
• Appuyez sur le bouton l et le
maintenir enfoncé. Chaque icône
s’allume à tour de rôle. Lorsque
l’icône voulue s’allume, relâchez la
sonnette.
• Lorsque l’icône que vous avez
sélectionnée est allumée, actionnez
la sonnette. Le carillon se fait
entendre. L’icône clignote.
69-2148EFS—03 30
Procédure de déprogrammation
Pour retirer une sonnette de la mémoire :
• Appuyez sur le bouton l et le
maintenir enfoncé. Chaque icône
s’allume à tour de rôle. Lorsque
l’icône associée à la sonnette à
déprogrammer est allumée, relâchez
le bouton.
• Appuyez en même temps sur les
boutons l et maintenez-les
enfoncés, jusqu’à ce que vous
entendiez un bip sonore.
Page 33

RCWL330A
Changer la sonnerie
Appuyez sur la sonnette. Lorsque l’icône clignote, appuyez sur le bouton . Appuyez
à nouveau sur ce bouton pour changer de sonnerie. Recommencez jusqu’à ce que
vous ayez la sonnerie voulue.
Rappel
En appuyant rapidement sur le bouton l, la dernière icône utilisée se mettra à
clignoter.
Mélodies du carillon
Pour entendre les mélodies du carillon sans appuyer sur la sonnette, appuyez sur le
bouton . Appuyez à nouveau sur ce bouton pour changer de sonnerie.
31 69-2148EFS—03
Page 34

Directives d’installation
M27155
TOP
Installation de la sonnette
Installez la sonnette en utilisant le tampon adhésif ou les vis fournis
(Voir Fig. 7).
Vérifiez la sonnette avant de l’installer. Évitez de l’installer sur des
structures de métal.
69-2148EFS—03 32
Fig. 7
Page 35

Position du carillon
M27318
Le carillon peut être fixé de façon
autonome ou monté sur un mur en
utilisant le support mural fourni. Si
vous voulez le fixer à un mur, vissez le
support au mur (voir Fig. 8). Le carillon
s’accroche au support mural de la façon
illustrée ci-dessous.
RCWL330A
Fig. 8
33 69-2148EFS—03
Page 36

Directives d’installation
Dépannage
J’entends un bip sonore en mode de programmation…
• La sonnette que l’on tente de programmer a déjà été configurée avec ce carillon.
• Pour modifier l’icône associée à la sonnette, suivez la procédure de déprogrammation, puis
programmez à nouveau la sonnette.
Deux bips retentissent après le carillon normal…
• Cela signifie que la pile de la sonnette qui a déclenché le carillon sera bientôt déchargée.
Installez une nouvelle pile de type CR2032.
Quand j’appuie sur la sonnette, la lampe témoin jaune ne s’allume pas ou ne s’allume
qu’un court moment…
• En mode normal, la lampe témoin jaune s’allume pendant 1 seconde. Lorsque la pile est
presque déchargée, elle s’allume pendant un court moment. Installez une nouvelle pile de type
CR2032.
Le carillon ne fonctionne pas...
• Vérifiez que les quatre piles du carillon sont bien des piles de taille C de type LR14. N’utilisez
que des piles alcalines.
• Vérifiez que les piles sont correctement installées.
• Il est possible que le carillon soit hors de portée de la sonnette. Essayez le carillon à un autre
emplacement.
• Le carillon n’a peut-être pas enregistré l’identité de la sonnette. Suivez la procédure de
programmation.
69-2148EFS—03 34
Page 37

RCWL330A
Dépannage
Le carillon ne sonne pas...
• Vérifiez la position de l’interrupteur du carillon.
• Vérifiez que le volume n’est pas réglé au minimum.
Le clignotant ne fonctionne pas...
• Vérifiez la position de l’interrupteur du carillon.
La portée est réduite...
• Les structures métalliques, notamment les cadres de fenêtres et de porte en PVC-U, peuvent
réduire la portée du produit. Évitez de monter la sonnette ou le carillon sur des structures
métalliques ou à proximité.
• D’autres appareils engendrent des interférences radio qui affectent le carillon.
• Les murs et les plafonds réduisent la portée de l’appareil.
• Des piles faibles réduisent également la portée. Remplacez les piles tous les 12 à 18 mois.
Dans les régions froides (en dessous 40 ºF/5 ºC), les piles auront besoin d’être remplacées
plus souvent.
La lampe témoin jaune clignote...
• Lorsque la pile du carillon est bientôt déchargée, une lampe témoin jaune clignote toutes les 5
secondes. Installez de nouvelles piles C de type LR14 dans le carillon. N’utilisez que des piles
alcalines.
35 69-2148EFS—03
Page 38

Directives d’installation
Caractéristiques techniques
Caractéristiques
techniques
Température de service 32 °F à 104 °F 0 °C à +40 °C 14 °F à 104 °F
Portée (à ciel ouvert) 140 m (450 pi)
Fréquence RF 916,8 MHz 916,8 MHz
Niveau sonore (type) 90 dBA @ 1 m (3 pi)
Puissance émise <1 mW
Type de pile LR14, taille C CR2032
Durée de vie des piles
(5 activations/jour)
À l’épreuve de la pluie Conforme à l’épreuve de pluie
Adaptateur électrique 6 V c.c. (non compris)
69-2148EFS—03 36
Carillon Sonnette
-10 °C à +40 °C
12 mois 18 mois
UL
Page 39

RCWL330A
Mise au rebut et recyclage
Les piles et les produits électriques ne doivent pas être mis au rebut avec les ordures
ménagères. Prière de recycler partout où les services adéquats sont à disposition. Communiquer
avec la municipalité ou le détaillant pour obtenir des conseils en matière de recyclage.
Déclaration
Honeywell déclare aux présentes que ce produit est conforme à la partie 15 des règles de la
FCC et aux normes d’Industrie Canada. Le fonctionnement de ce système est assorti aux deux
conditions suivantes :
(1) L’appareil ne peut causer d’interférences nuisibles, et
(2) L’appareil doit accepter les interférences reçues, y compris celles qui pourraient nuire à son
fonctionnement.
Mise en garde :
Toute modification qui n’est pas autorisée expressément par la partie responsable de la conformité de L’appareil aux règles en vigueur pourrait rendre l’utilisateur inapte à faire fonctionner le
matériel.
Garantie
Honeywell garantit ce produit pendant une année à partir de la date d’achat. La preuve d’achat
sera exigée sans que cela n’affecte les droits qui vous sont accordés par la loi. Pour obtenir de
plus amples informations concernant notre produit, prière de communiquer avec les Services à
la clientèle de Honeywell en composant le 1-800-468-1502.
37 69-2148EFS—03
Page 40

Honeywell International Inc.
SRA, Régulateurs d’ambiance et de combustion
1985 Douglas Drive, Golden Valley, MN 55422
www.honeywell.com
Imprimé aux É.-U. sur du papier recyclé
contenant au moins 10 % de fibres de
papier recyclées après consommation.
® Marque enregistrée des É.-U.
Copyright © 2008 Honeywell International Inc.
69-2148EFS—03 M.S. Rev. 04-08
Page 41

Instrucciones de
Instalación
RCWL330A (51459SL)
Campanilla y pulsador inalámbricos y portátiles Plus de primera P4
Page 42

Instrucciones de Instalación
Índice
Verificación del contenido del paquete ................................................................................................ 41
Seguridad ...............................................................................................................................................42
Arranque rápido .....................................................................................................................................42
Abra el pulsador del timbre ..................................................................................................................43
Instale la batería del pulsador ..............................................................................................................44
Instale la batería de la campanilla ........................................................................................................44
Posiciones del interruptor .....................................................................................................................45
Ventanilla deslizante ..............................................................................................................................46
Control de volumen ...............................................................................................................................47
Uso de los íconos ..................................................................................................................................48
Procedimientos de programación ........................................................................................................50
Función de memoria..............................................................................................................................51
Sonidos de la campanilla ......................................................................................................................51
Coloque el pulsador del timbre ............................................................................................................52
Posición de la campanilla .....................................................................................................................53
Solución de problemas .........................................................................................................................54
Especificaciones ....................................................................................................................................56
Desecho y reciclado .............................................................................................................................. 57
Declaración ............................................................................................................................................57
Garantía ..................................................................................................................................................57
69-2148EFS—03 40
Page 43

RCWL330A
Campanilla sin cables portátil Plus de primera con pulsador
Gracias por elegir este producto Honeywell. Utilice las siguientes instrucciones para
lograr la instalación y el uso adecuados del producto. Conserve estas notas en un
lugar seguro para referencia futura.
Verificación del contenido del paquete
Desempaque el kit de la campanilla e
identifique las siguientes piezas:
• Campanilla
• Soporte de la campanilla
• Pulsador del timbre
• Batería CR2032 para el pulsador del
timbre
• 4 bandas de íconos autoadhesivas
Necesitará:
• Un destornillador de cabeza Phillips
• Un destornillador pequeño de hoja
plana
• Un taladro de mampostería de ¼
pulgadas (6 mm)
• 4 baterías alcalinas LR14 “C”
(2 previamente colocadas en la
campanilla)
• 2 tornillos para el pulsador
• 2 tornillos para el soporte de pared
de la campanilla
• 2 enchufes de pared
• Almohadilla adhesiva
41 69-2148EFS—03
Page 44

Instrucciones de Instalación
Seguridad
Antes de proceder con la instalación, observe las siguientes advertencias de seguridad:
• Siempre siga las recomendaciones del fabricante cuando utilice herramientas
eléctricas y utilice equipo protector adecuado (por ej.: gafas de seguridad)
cuando taladre agujeros, etc.
• Antes de taladrar agujeros en las paredes, revise si hay cables eléctricos
o tuberías de agua ocultos. El uso de un localizador de cables/tuberías es
aconsejable si tiene dudas.
Arranque rápido
El pulsador del timbre que se suministra con este kit está preprogramado para que
funcione con la campanilla. Para comenzar, debe hacer lo siguiente:
• Abra el pulsador del timbre
• Instale la batería del pulsador
• Instale las baterías de la campanilla
• Verifique la posición del interruptor
de la campanilla
• Verifique la configuración del
Cuando accione el pulsador del timbre,
la campanilla sonará y el primer ícono
destellará. Si tiene pulsadores adicionales
o desea asignar un ícono diferente a su
pulsador, deberá seguir el procedimiento
de programación.
volumen
69-2148EFS—03 42
Page 45

Abra el pulsador del timbre
M27269
A
Inserte un destornillador de hoja plana en la ranura A, en la base
del pulsador.
Cuidadosamente apalanque la cubierta y la base para separarlas
(Fig. 1).
RCWL330A
Fig. 1
43 69-2148EFS—03
Page 46

Instrucciones de Instalación
M27270
C
M27153
CR2032
+
CR2
0
32
+
Instale la batería del pulsador del timbre
Inserte la pila tipo botón CR2032. Asegúrese de
que la parte marcada “+” esté boca arriba (Fig. 2).
Instale las baterías de la campanilla.
Para retirar la cubierta de la batería de la campanilla,
presione en el punto C y deslice la cubierta
hacia atrás. Luego levántela. Inserte
4 baterías alcalinas LR14 “C”
(no se incluyen). Observe la
polaridad según está marcada
dentro del compartimiento de
las baterías (Fig. 3).
Fig. 2
69-2148EFS—03 44
Fig. 3
Page 47

RCWL330A
1 2 3
M27286
D
Posiciones del interruptor
Modo silencioso con destello
on “encendido”
Para que el destello permanezca
encendido y el sonido se apague,
coloque el interruptor (D) en la
posición 1.
Destello off “apagado” con
sonido on “encendido”
Para apagar la luz azul intermi-
Fig. 4
tente, coloque el interruptor (D) en
la posición 3.
Funcionamiento normal
Para configurar el funcionamiento
normal (sonido y luz intermitente
on “encendidos”), coloque el interruptor (D) en la posición 2.
45 69-2148EFS—03
Page 48

Instrucciones de Instalación
M27271
E
2
3
1
5
6
Ventanilla deslizante
Libere el enganche (E) y deslice la ventanilla para abrirla.
Se indica con bandas de
íconos numerados.
69-2148EFS—03 46
Fig. 5
Page 49

Control de volumen
MS27272
CONTROL
DE VOLUMEN
2
3
1
5
6
El control de volumen está detrás de la ventanilla deslizante
al frente de la campanilla. Inicialmente, coloque el control
a la mitad. Después de probar su sistema, regúlelo al
volumen deseado.
RCWL330A
47 69-2148EFS—03
Fig. 6
Page 50

Instrucciones de Instalación
PUERTA
PRINCIPAL
PUERTA
TRASERA
SÍMBOLO
DE ALERTA
INTRUSO TELÉFONO LOCALIZADOR/
DISPOSITIVO
DE SEGURIDAD KEY FOB
M27289
Uso de los íconos
Además de los sonidos, la campanilla tiene una indicación visual para mostrar el dispositivo que la activó. Un ícono se iluminará cuando la campanilla se haya activado
por medio de un pulsador del timbre u otro dispositivo compatible. La campanilla
admite seis íconos:
69-2148EFS—03 48
Page 51

RCWL330A
M27290
Uso de los íconos
Los íconos de “Puerta principal” y “Puerta trasera” se utilizan generalmente para
pulsadores de timbre. Los otros íconos se utilizan con otros dispositivos compatibles,
tales como detectores de movimiento inalámbricos y de timbre de teléfono (verifique
la disponibilidad). También se incluyen los íconos numerados del 1 al 6. Los íconos
son autoadhesivos y se suministran en bandas de 3. Se pueden cambiar, si fuese
necesario, abriendo la ventanilla deslizante
de la campanilla y despegando suavemente
las bandas.
Si lo desea, las bandas pueden cortarse
en íconos individuales y adherirse a la
campanilla en un orden diferente.
Utilice el procedimiento de programación
para cambiar el ícono asociado con un
pulsador.
49 69-2148EFS—03
Page 52

Instrucciones de Instalación
Procedimiento de programación
Procedimiento de memorización
Para permitir que la campanilla memorice
la identidad del pulsador del timbre:
• Presione el botón l y manténgalo
presionado. Cada ícono se iluminará
uno por uno. Cuando el ícono que
desea se ilumine, suelte el botón.
• Mientras esté iluminado el ícono
que seleccionó, accione el pulsador.
La campanilla sonará. El ícono
destellará.
69-2148EFS—03 50
Procedimiento de desprogramación
Si desea retirar un pulsador de la memoria de la campanilla:
• Presione el botón l y manténgalo
presionado. Cada ícono se iluminará
uno por uno. Cuando el ícono
asociado con el pulsador que desea
desprogramar se ilumine, suelte el
botón.
• Presione y mantenga presionados
los botones l y hasta que
escuche un “tono”.
Page 53

RCWL330A
Cómo cambiar la melodía
Accione el pulsador. Mientras el ícono esté destellando, presione el botón .
Presione el botón nuevamente y la melodía cambiará. Repita hasta que suene la
melodía que desea escuchar.
Función de memoria
Si presiona el botón l en forma breve, el último ícono que se utilizó destellará.
Sonidos de la campanilla
Para escuchar los sonidos de la campanilla sin accionar el pulsador del timbre, presione el botón . Presione el botón nuevamente y la melodía cambiará.
51 69-2148EFS—03
Page 54

Instrucciones de Instalación
M27155
TOP
Instalación del pulsador del timbre
Instálelo con la almohadilla adhesiva de doble lado o los tornillos que
se incluyen (ver Fig. 7).
Pruebe el pulsador antes de instalarlo. Evite instalarlo en estructuras
metálicas.
69-2148EFS—03 52
Fig. 7
Page 55

Posición de la campanilla
M27318
La campanilla puede instalarse sin
empotrar o montarse en la pared
utilizando el soporte de pared que se
incluye. Si se elige el montaje en pared,
atornille el soporte a la pared (ver Fig. 8).
La campanilla se engancha al soporte de
pared como se muestra.
RCWL330A
Fig. 8
53 69-2148EFS—03
Page 56

Instrucciones de Instalación
Solución de problemas
Se escucha un “tono” en la modalidad de memorización...
• El pulsador que está programando ya ha sido memorizado por la campanilla.
• Si desea cambiar el ícono relacionado con el pulsador, utilice el procedimiento de
desprogramación, luego programe el pulsador nuevamente.
Se escuchan dos “tonos” después del sonido normal de la campanilla...
• Esto indica que la batería del pulsador del timbre que activa la campanilla está baja. Instale
una batería nueva tipo CR2032.
Cuando se acciona el pulsador del timbre, la luz ámbar de confirmación no se enciende,
o se enciende únicamente por poco tiempo...
• En condiciones normales de funcionamiento, la luz ámbar se encenderá durante un segundo.
Cuando la batería tenga poca carga, la luz se encenderá únicamente por poco tiempo. Instale
una batería nueva tipo CR2032.
La campanilla no funciona...
• Verifique que las baterías de la campanilla sean del tipo adecuado, LR14 “C”. Use baterías
alcalinas únicamente.
• Verifique que las baterías estén instaladas correctamente.
• La campanilla podría estar fuera del alcance del pulsador del timbre. Pruebe la campanilla en
un lugar diferente.
• La campanilla podría no haber memorizado la identidad del pulsador del timbre. Siga el
procedimiento de programación.
69-2148EFS—03 54
Page 57

RCWL330A
Solución de problemas
La campanilla no suena...
• Verifique la posición del interruptor de la campanilla.
• Verifique que el control de volumen no esté en la posición mínima.
La luz intermitente no funciona...
• Verifique la posición del interruptor de la campanilla.
Se ha reducido el alcance...
• Las estructuras metálicas, incluyendo los marcos de puertas, pueden disminuir el alcance del
producto. Evite instalar el pulsador o la campanilla en estructuras metálicas o cerca de ellas.
• Otros equipos pueden ocasionar interferencia de radio que afecte la campanilla.
• Las paredes y los techos disminuyen el alcance.
• Las baterías con poca carga disminuyen el alcance. Cámbielas cada 12 – 18 meses.
En temperaturas frías (inferiores a 40 °F [4,4 °C]), es posible que las baterías deban ser
reemplazadas con mayor frecuencia.
La luz ámbar destella...
• Cuando la batería de la campanilla está baja, una luz ámbar destellará cada cinco segundos.
Coloque baterías nuevas del tipo LR14 “C” en la campanilla. Use baterías alcalinas
únicamente.
55 69-2148EFS—03
Page 58

Instrucciones de Instalación
Especificaciones
Especificación Campanilla Pulsador del timbre
Temperatura de funcionamiento
Alcance
(campo abierto)
Frecuencia RF 916,8MHz 916,8MHz
Nivel de sonido
(promedio)
Potencia RF <1mW
Tipo de batería LR14 tamaño “C” CR2032
Vida de la batería
(5 activaciones por día)
A prueba de lluvia Pasa la prueba de lluvia UL
Adaptador de energía 6V CC (No se incluye)
69-2148EFS—03 56
de 32 °F a 104 °F
de 0 °C a +40 °C
450 pies (140 m)
90 dBA a 3 pies (1 m)
12 meses 18 meses
de 14° F a 104° F
de -10 °C a +40 °C
Page 59

RCWL330A
Desecho y reciclaje
Las baterías y los desechos procedentes de productos eléctricos no deben colocarse con los
residuos domésticos. Recicle donde haya tales instalaciones. Verifique con las autoridades locales
o el distribuidor la disponibilidad del servicio de reciclaje.
Declaración
Honeywell por la presente declara que este producto cumple con la Parte 15 de las regulaciones
FCC y las normas industriales de Canadá. El funcionamiento de este dispositivo está sujeto a
las siguientes dos condiciones:
(1) Este dispositivo no debe causar interferencia perjudicial y
(2) Este dispositivo deberá aceptar cualquier interferencia que se reciba, incluyendo la interferencia que pudiese causar el funcionamiento no deseado.
Precaución:
los cambios o modificaciones que no hayan sido expresamente aprobados por la parte responsable del acatamiento a las regulaciones podrían anular la autoridad del usuario para operar el
equipo.
Garantía
Honeywell garantiza este producto por el lapso de 1 año a partir de la fecha de compra. La
prueba de compra es necesaria; esto no afecta sus derechos legales. Si necesita mayor información sobre su producto, llame a la línea de ayuda de Honeywell al 1 (800) 468-1502.
57 69-2148EFS—03
Page 60

Honeywell International Inc.
ACS, Environmental and Combustion Controls
1985 Douglas Drive, Golden Valley, MN 55422
www.honeywell.com
Impreso en los EE. UU., en papel
reciclado que contiene por lo menos
un 10% de fibras de papel reciclable.
® Marca registrada de los EE. UU.
© 2008 Honeywell International Inc.
69-2148EFS—03 M.S. Rev. 04-08
 Loading...