

Page 1
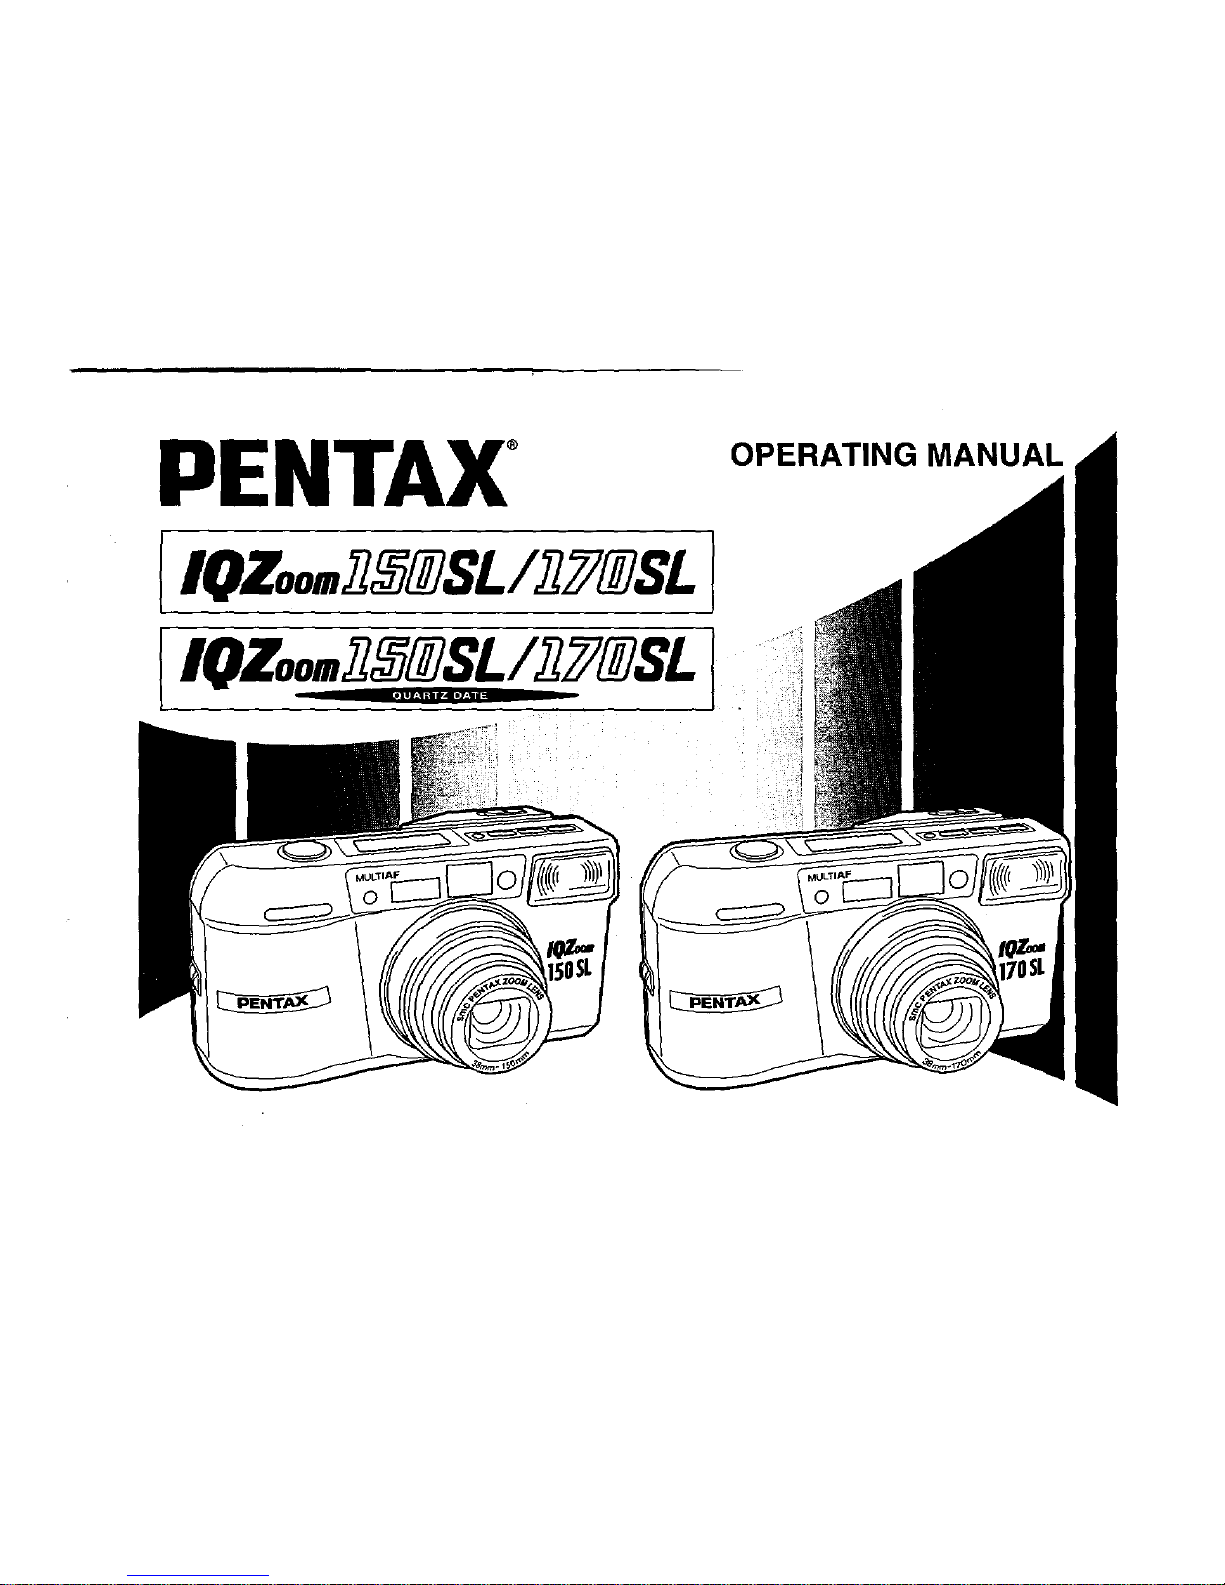
PENTAX®
OPERATING MANUAL
llOZOOIIIJl!JJ/JJSL/ll'!l/JJSL
1
IIOZOOIIIJl!Jlf!l§J.Ill'!l/JJSL
1
..
Page 2
Thank you for buying the Pentax product.
Please read this manual before using the
camera
in
order to get the most out of ail
the features and functions.
Keep this manual
sale, as it can be a valu-
able tool
in
helping you to understand ali
the camera's capabilities.
• This operating manual
is
for IQZoom
150SL
1 Quartz Date and IQZoom 170SL
1 Quartz Date.
• Illustrations shown herein may differ from
the camera's actual appearance.
• Illustrations
in
this operating manual are
the
DATA
MODEL.
leon indications used
in
this manual
Operation direction
r-----
-------
--
------c-----
Automatic operation 1
+•••••
,-,
Attention L ' '
'
......
'
-------------·-
------
Lamp lighted .
_':_,:~-
,,,
-------------
-r-
~
~--
Lamp blinking .:···:.
------
------~-
_·_:;_~~-
Correct Q
------------------
Incorrect l X
Page 3
FOR SAFE USE OF YOUR CAMERA
Although we have carefully designed this camera for safe operation, please be sure to follow
the following precautions.
& WARNING This mark indicates precautions that if not followed, could result
in
serious injury to the operator.
&CAUTION This mark indicates precautions that, if not followed, could result
in
minor or medium injury to the operator or damage to the equipment.
& WARNING &CAUTION
• The electric circuits inside the camera
contain high
voltage working parts. Never
attempt to
disassemble the camera your-
self.
•
Never touch internai parts of the camera
if they become exposed, as there is danger of
electric shock.
• Wrapping the strap around your neck is
dangerous.Make sure that
small children
do not the strap caught their neck.
• Be sure to store batteries out of the reach
of
children. Seek medical assistance
immediately if accidentally swallowed.
• Do not use the flash near anyone's eyes,
as it may hurt them.
Be
particularly care-
ful with the flash around infants.
• Never try to disassemble, short or
recharge the battery.
Also, do not dispose
of the battery
in
fire, as it may explode.
•
Remove the battery from the camera
immediately if it becomes hot or begins to
smoke. Be
careful not to burn yourself
during removal.
Page 4
PRECAUTIONS FOR YOUR CAMERA
Precautions when taking pictures
• Do not allow the camera to get wet. Should the
camera get wet wipe it off immediately with a
dry soft cloth.
• Do not drop the camera or allow it to hit a solid
object.
If the camera suffers a severe shock
or
impact, take it to a Pentax service center for
inspection.
•
Be
careful not to subject the camera to strong
vibrations, shock or pressure.
Cushion the
camera during transportation.
• Condensation on the interior or the exterior of
the camera may be harmful to the camera
mechanism. When taking the camera from a
warm temperature to a subfreezing one
or
vice
versa,
put the camera into a case or plastic
bag so thal any changes
in
temperature differ-
ence is minimized. Do not
remove it from the
bag until the temperature has stabilized.
• Regular size color prints may eut off what
appears
on
the extreme edges of the film
frame.
Compose your picture with a margin
of
safety at the edges.
2
Precautions for storage
• A void leaving the camera for extended periods
in places where temperature and humidity are
high, such as in a
car.
• Store the camera in a cool, dry place with good
air circulation th
at
is
free of dirt, dust, or chem-
icals.
Precautions for proper care
• Use a blower and lens brush to remove dust
accumulated on the lens or the viewfinder window.
•
To
clean the external camera surfaces - but not
glass surfaces - use a dry or silicone-treated
cloth.
• Never use solvents such as paint thinner, alco-
hol or benzene to clean the camera.
Page 5
Other precautions
• The temperature range at which this camera
functions properly
is
sooc
to -10°C (122°F to
14°F).
• The PENTAX warranty provided
is
only for the
repair of defects
in
materials or workmanship.
Damage of any kind cannot
be
repaired at
no
charge under the term of the warranty. If the
difficulty
is
caused
as
a direct result of the
product being used
in
conditions contrary to
the instructions
outlined in this manual,
charges will
be
assessed or a repair quotation
will
be
provided.
LCD (Liquid-crystal display)
• When the LCD
is
exposed to high tempera-
tures over about
60°C, it may blacken, but
when the temperature
normalizes, it will return
to normal.
• The LCD may also slow down
in
response to
lower temperatures, but this
is
a normal char-
acteristic of
an
LCD.
• ln low light situations, the illuminator of the
LCD
panel lights up for 4sec when the camera
operates.
PRECAUTIONS FOR BATTERY USAGE
• Use one 3V lithium battery, type CR-2 or the
equivalent.
• Misuse of a battery can cause hazards such as
leakage, overheating, explosions, etc. The battery should
be
inserted with the "+" and "-"
sides facing correctly.
• Never try to disassemble, short or recharge the
battery.
Do
not dispose of the battery
in
lire.
• Battery performance may
be
temporarily hin-
dered
in
low temperatures, but will recover
in
normal temperatures.
•
Be
sure to store batteries out of the reach of
children. Seek medical assistance immediately
if accidentally swallowed.
• Keep a spare battery
on
hand for replacement
convenience when shooting outdoors or while
traveling.
3
Page 6
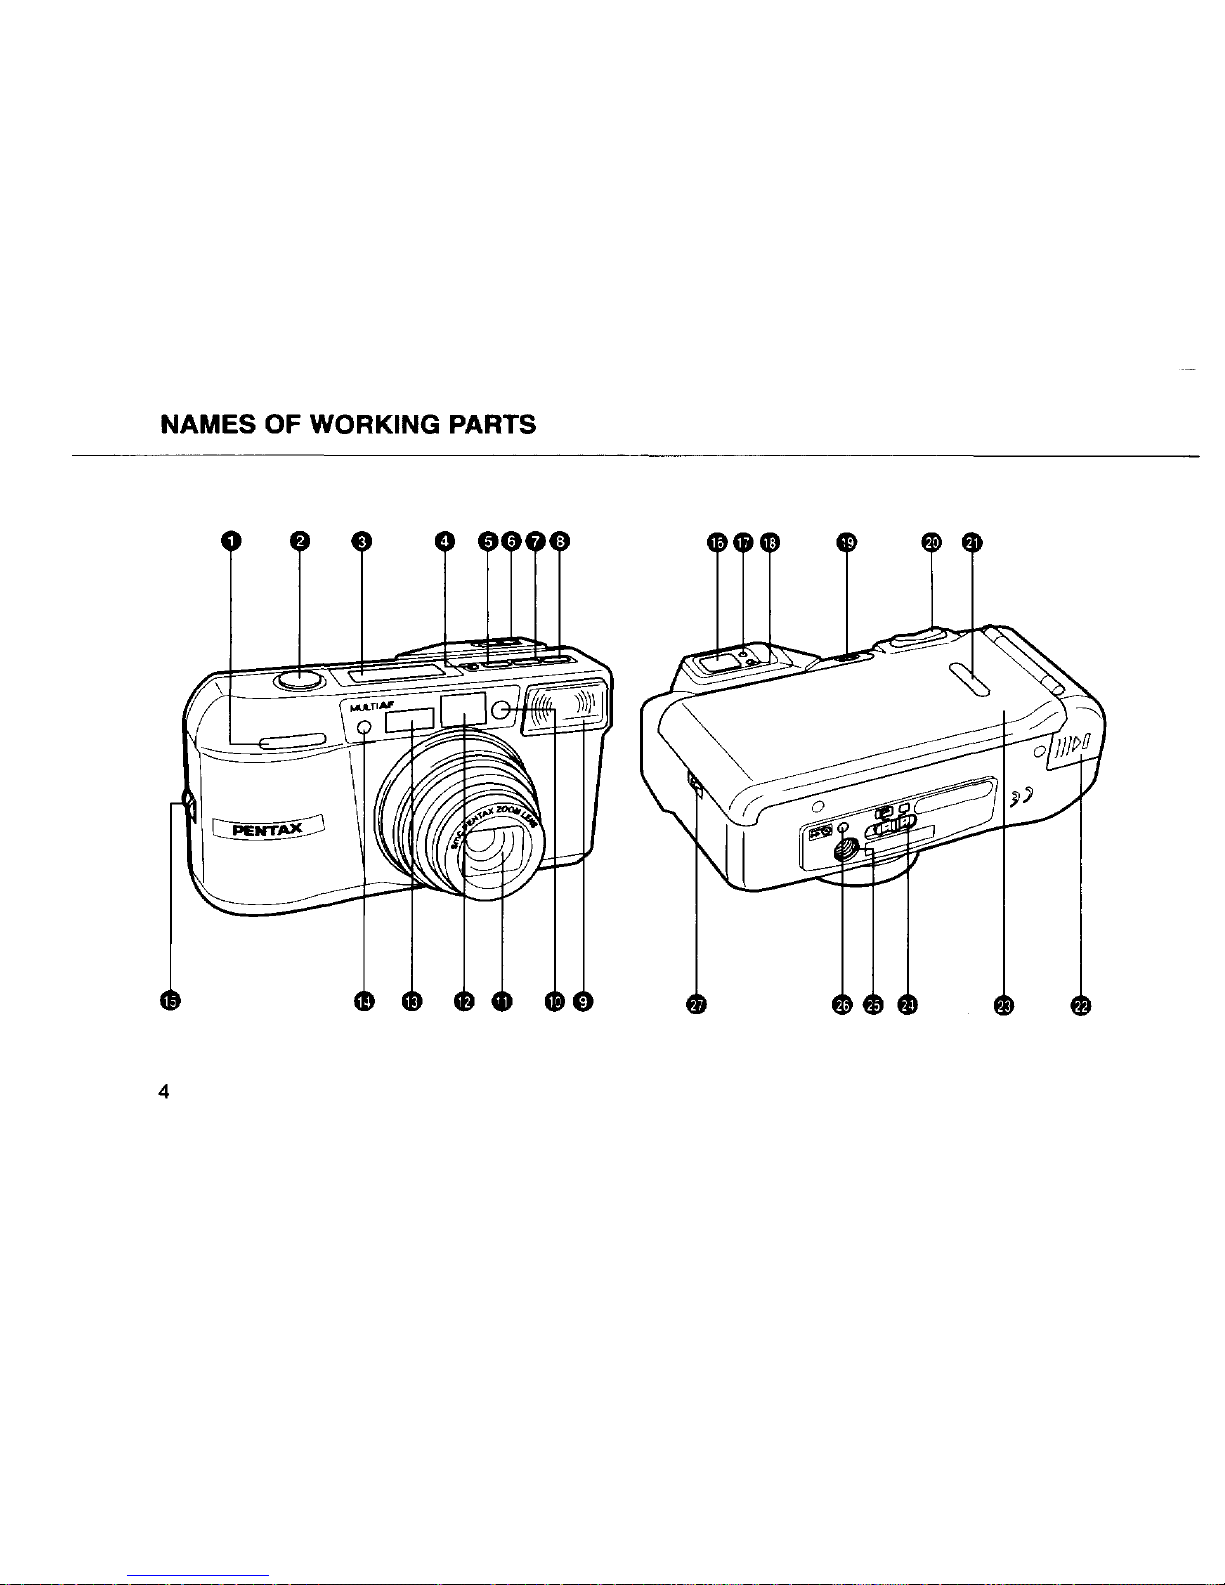
NAMES OF WORKING PARTS
4
Page 7
NAMES
OF
WORKING PARTS
0 Self-timer lamp (p.33)
8 Shutter release button
0 LCD panel
8 Date button (p.37, 38)
8 Drive button (p.32)
ft
Diopter adjustment lever (p.12)
8 AF/Infinity-Landscape button
(p.22, 23, 32)
0 Mode button (p.27)
0 Built-in flash
48)
Light senser window
4DLens
4B
Viewfinder window
œ Autofocus window
œ Remote control receiver (p.34 - 36)
œ Strap lug (p.8)
419
Viewfinder eyepiece
4fl
Green lamp (p.12)
48)
Red lamp (p.12)
G1
Main switch
(p.1
0)
8 Zoom button (p.18, 19, 38)
~
Film information window
~
Battery chamber caver (p.9)
@)
Back caver (p.13 - 15)
e Panorama switch (p.26)
~
Tripod socket
~
Mid-roll rewind button (p.16)
~
Back caver release lever (p.13, 15)
5
Page 8
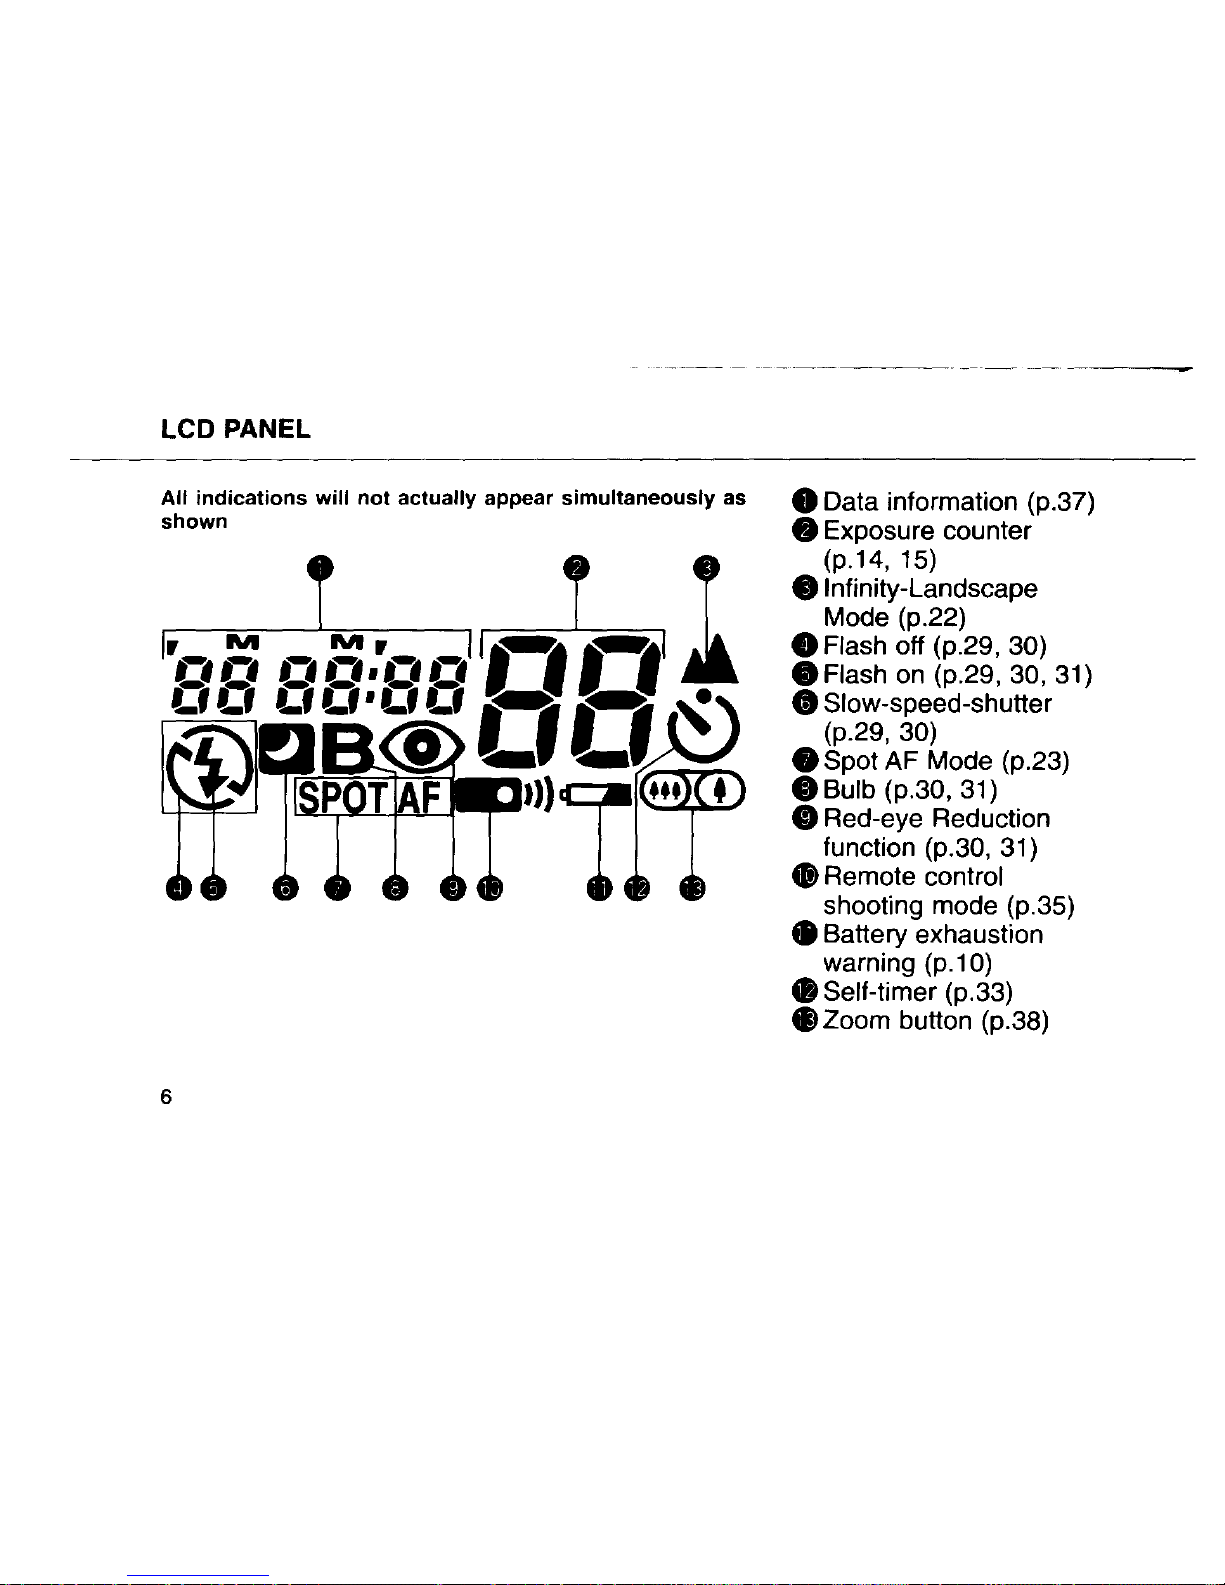
LCD PANEL
Ali
indications
will
not
actually
appear
simultaneously
as
shown
6
---·
--·~-
··--
0 Data information (p.37)
8 Exposure counter
(p.14, 15)
•lnfinity-Landscape
Mode (p.22)
8 Flash off (p.29, 30)
• Flash
on
(p.29, 30, 31)
e Slow-speed-shutter
(p.29,
30)
• Spot
AF Mode (p.23)
0 Bulb (p.30, 31)
8 Red-eye Reduction
function (p.30, 31)
e Remote control
shooting mode (p.35)
• Battery exhaustion
warning
(p.1
0)
8 Self-timer (p.33)
41
Zoom button (p.38)
Page 9
TABLE OF CONTENTS ·
• For sa fe use of your camera
............
1
Composing and Focusing
...............
20
•
Precautions for your camera ...... 2 - 3 Hard-Tc-Autofocus Subjects
............
21
• Precautions for battery usage
............
3 lnfinity-Landscape Mode
..................
22
• Names of working parts
............
4 - 5 Spot Focus . . . . . . . . . . . . . . . . . . . . . . . . . . . . . . . . . . . . 23
• LCD panel
....................................
6 Focus-Lock Shooting
...............
24 - 25
• Table of contents
...........................
7
Panorama Mode
...........................
26
Auto exposure mode
.....................
27
ABOUT THE CAMERA Flash effective range . . . . . . . . . . . . . .
..
. . .
..
28
Strap attachment
..............................
8 Daylight-Sync Shooting
..................
29
lnstalling 1 Replacing Battery
............
9 Slow Shutter Speeds Modes ...... 29 - 30
Battery exhaustion warning
...............
10
Bulb Modes
...........................
30-
31
Main switch
....................................
10
Shooting
Modes
...........................
32
Viewfinder Displays
........................
11
Self-timer photography
.....................
33
Lamp
Indications
...........................
12
Using wireless remote control (option)
Di
opter adjustment
........................
12
.............................................
34-36
Loading 1 Unloading the film ......
13-
15 Date Model
...........................
37 - 38
Rewinding Film in
mid-roll
...............
16
Holding the camera
........................
17
Trouble shooting
.....................
39 - 40
Specifications
........................
41
- 43
TAKING PHOTOGRAPHS
Warranty po licy . . . . . . . . . . . . . . . . . . . . . . . . 44 - 45
Operating the zoom
lens
............
18 - 19
7
Page 10
ABOUT
THE
CAMERA
8
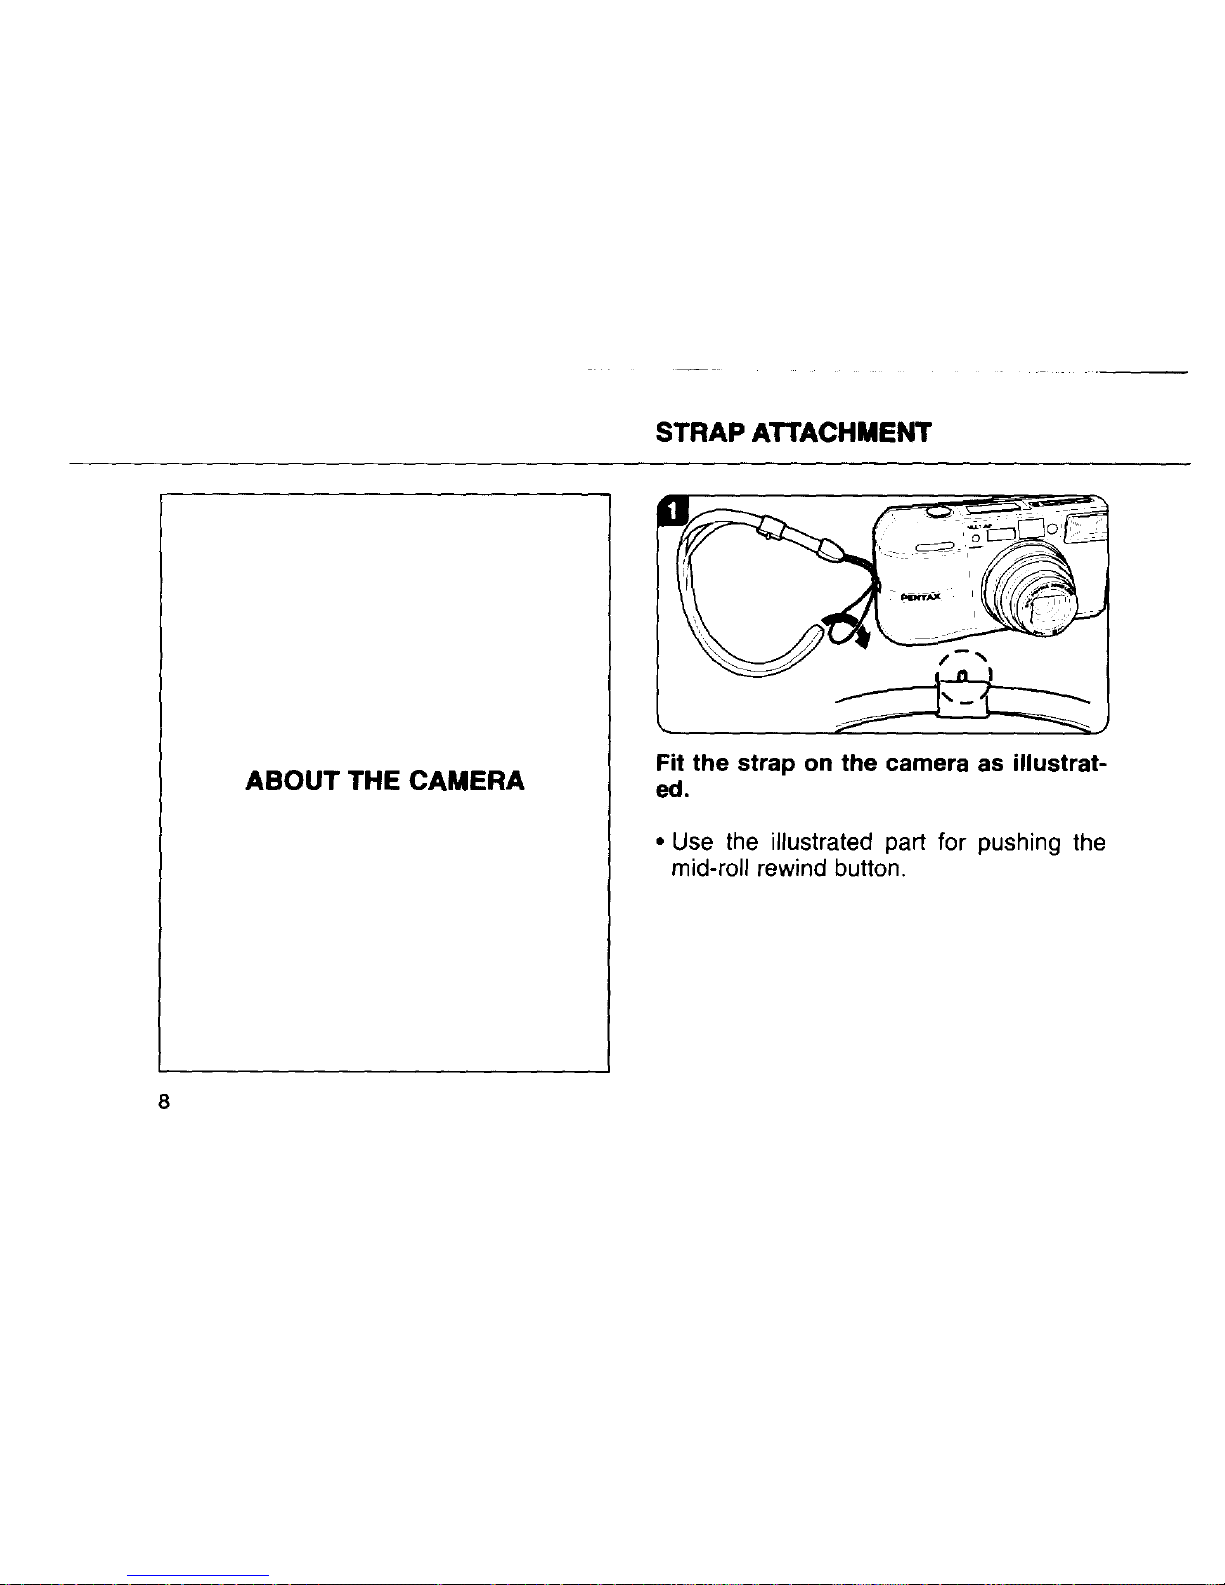
STRAP ATTACHMENT
Fit
the
strap
on
the
camera as illustrat-
ed.
•
Use
the
illustrated part for pushing the
mid-roll rewind butten.
Page 11
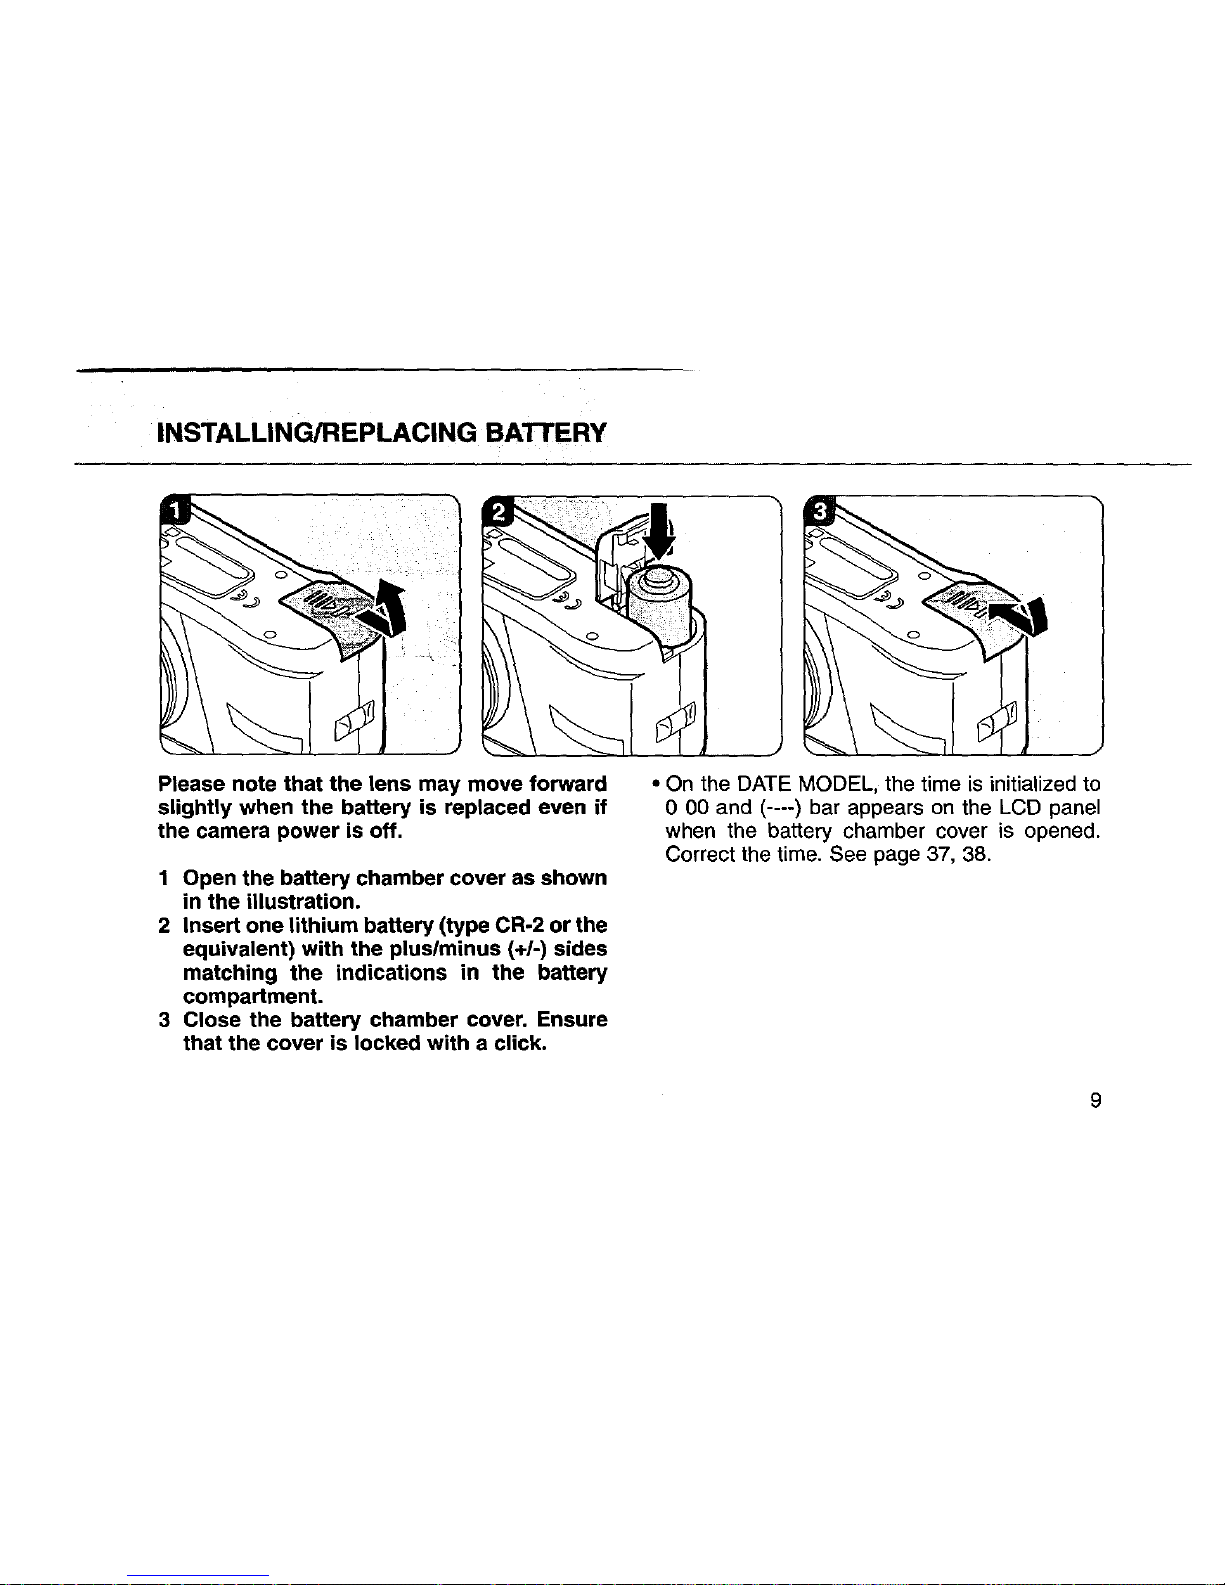
INSTALLINGIREPLACING BATTERY
Please
note
that
the
lens
may
move
forward
slightly
when
the
battery
is
replaced even
if
the
camera
power
is
off.
1 Open
the
battery
chamber
cover
as
shown
in
the
illustration.
2
lnsert
one
lithium
battery
(type CR-2
or
the
equivalent)
with
the
plus/minus
(+/·)
sides
matching
the
indications
in
the
battery
compartment.
3 Close
the
battery
chamber
cover. Ensure
that
the
cover
is
locked
with a click.
•
On
the DATE MODEL, the time
is
initialized to
0 00 and (----) bar appears
on
the LCD panel
when the battery chamber cover is opened.
Correct the time.
See page 37, 38.
9
Page 12

BATTERY EXHAUSTION WARNING
l
b
['"'
6
'
'
J
~
u•
'
,-f
·~,
/~1
1\
...
When the battery is nearly exhausted, the batlery
symbol (
c=-)
appears
on
the LCD panel to
warn you.
Replace the battery as soon as possi-
ble. When (
c=-)
starts blin king,
no
operations
can be performed.
BaHery life (using 24-exposure film rolls):
Approx. 8 rolls using flash 50% of the lime
(using the
CR-2 battery and under Pentax test-
ing conditions).
Actual battery !ife/performance
may vary
drastically depending
on
usage of
Power Zoom, Flash and external conditions
such as temperature and freshness of the batlery.
10
MAIN SWITCH
When the main switch buHon ls depressed,
the power tu
ms
ON.
When the power turns ON, the lens extends
slightly for opening the lens cover.
• If the camera
is
ON and left unused for over 3
minutes, the
lens automatically retracts to the
shortest
focal length.
Page 13
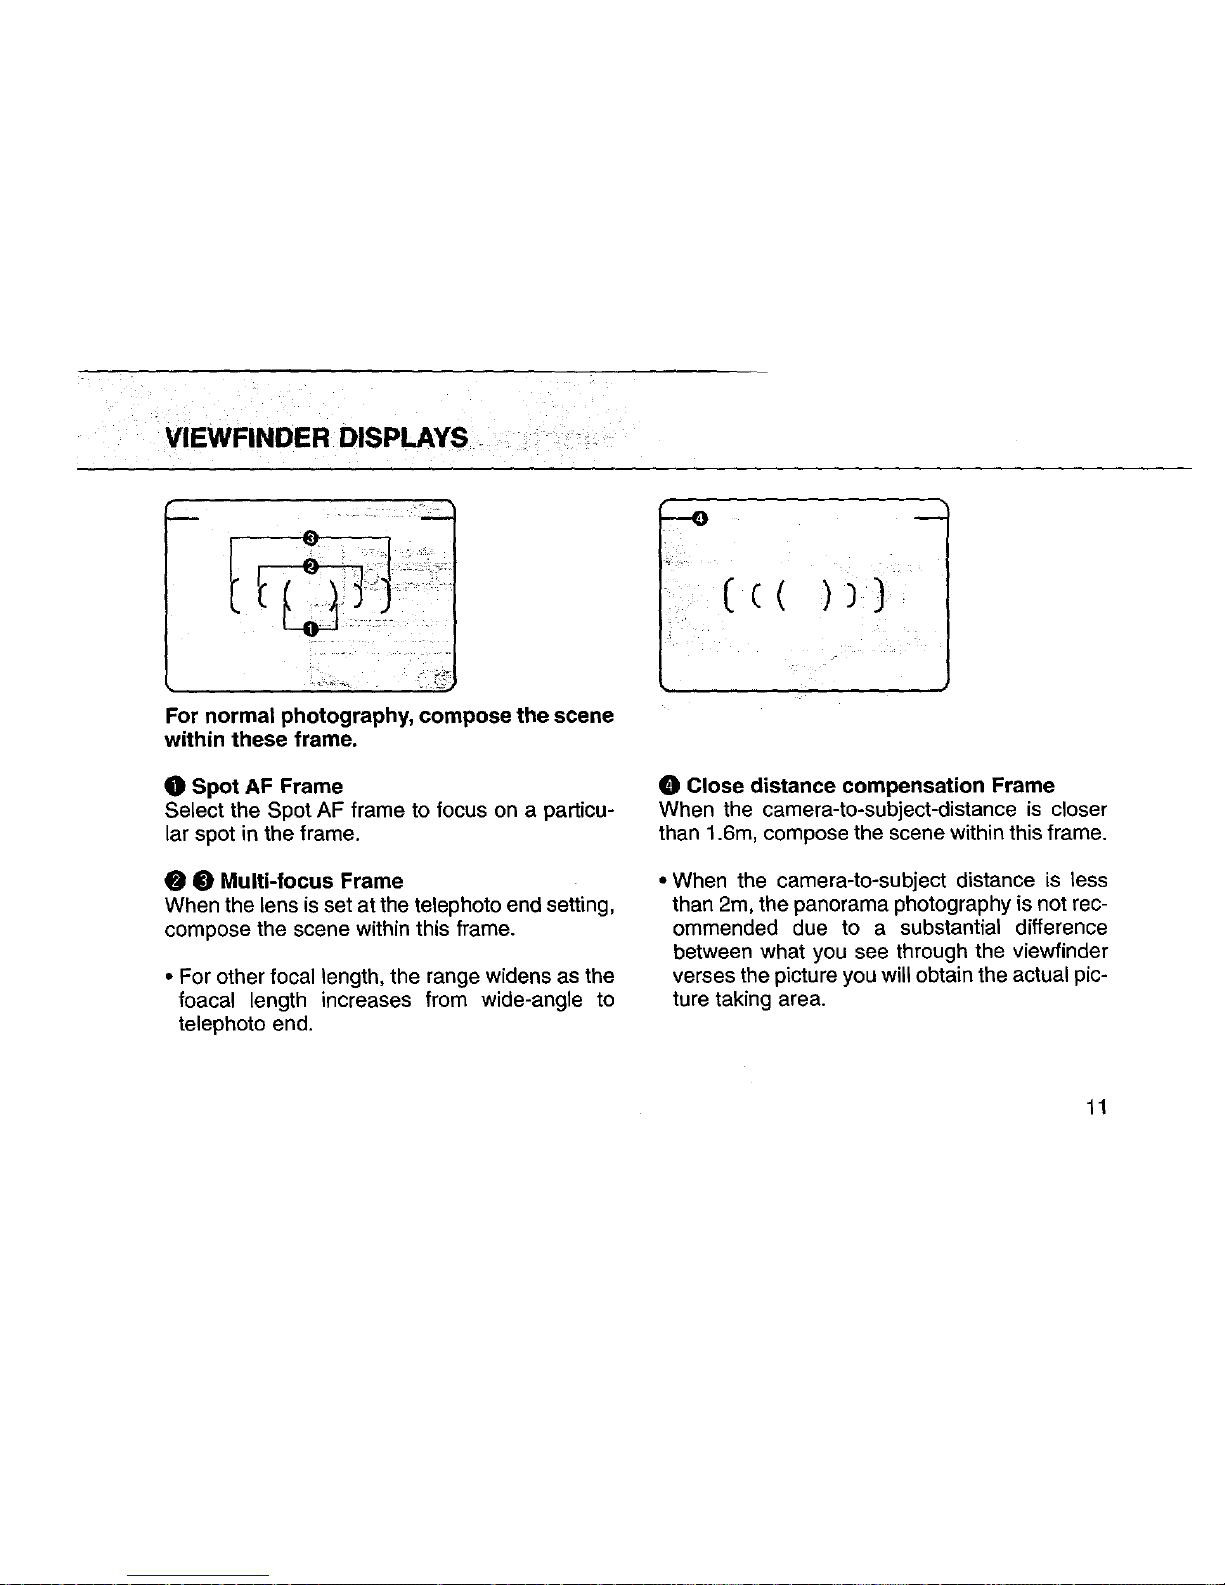
VIEWFINDER DISPLAYS
For normal photography, compose the scene
within these trame.
0 Spot AF Frame
Select the Spot AF frame to focus on a particu-
lar spot in the frame.
8 8 Multi-tocus Frame
When the lens
is
set at the telephoto end setting,
compose the scene within this frame.
• For other focallength, the range widens as the
foacal length increases from wide-angle to
telephoto end.
8 Close distance compensation Frame
When the camera-to-subject-distance
is
closer
than 1.6m, compose the scene within this frame.
• When the camera-to-subject distance
is
less
than 2m, the panorama photography is not rec-
ommended due to a
substantial difference
between what you see through the viewfinder
verses the picture you
will obtain the actual pic-
ture taking area.
11
Page 14
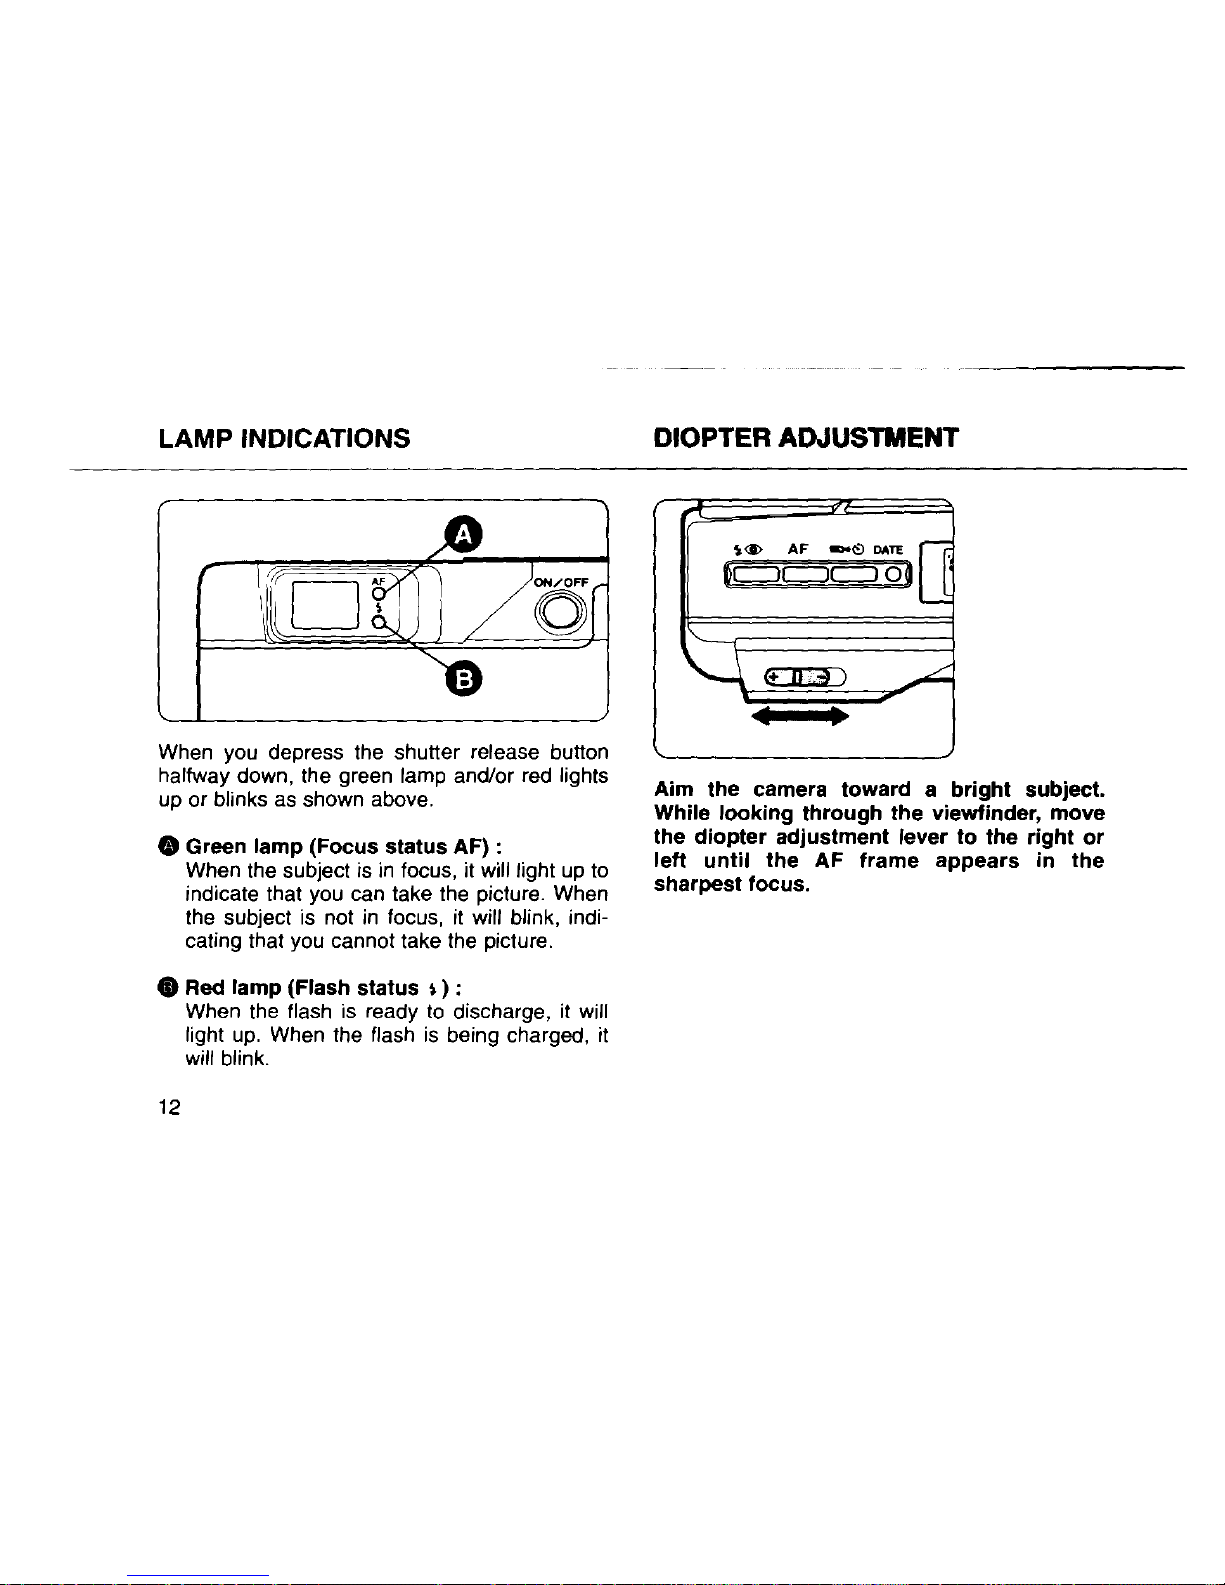
LAMP INDICATIONS
When you depress the shutter release button
halfway down, the green lamp and/or red lights
up or blinks as shown above.
8 Green lamp (Focus status AF) :
When the subject is
in
locus, it will light up to
indicate that you can take the picture. When
the subject is not
in
locus, it will blink, indi-
cating thal you cannot take the picture.
4D
Red lamp (Flash status
~)
:
12
When the flash is ready
to
discharge, il will
light
up.
When the flash
is
being charged, il
will blink.
DIOPTER ADJUSTMENT
~._,
AF
-c;:.
DATE
~c:=JCJCJ
OG
• •
Aim the camera toward a bright subject.
While looking through the viewflnder, move
the diopter adjustment lever to the right or
left until the AF frame appears
in
the
sharpest focus.
Page 15
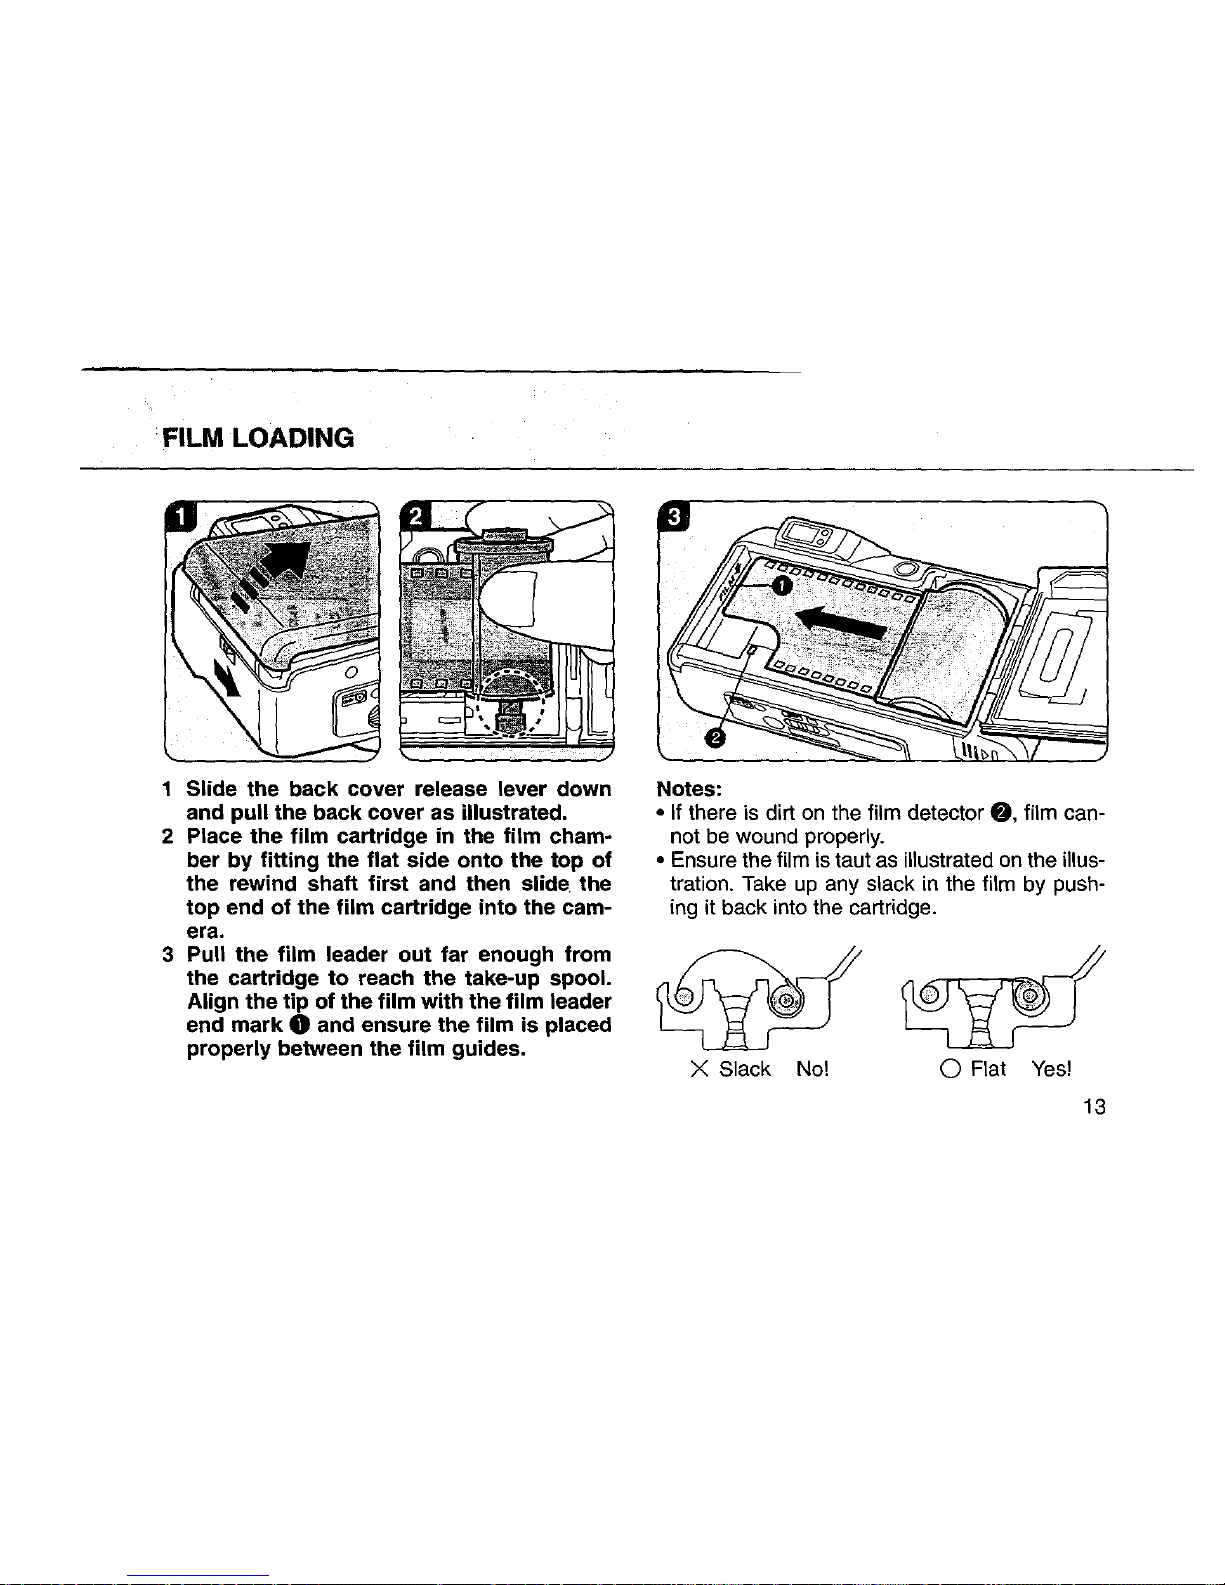
FILM
LOADING
1 Slide the
back
cover release lever
down
and
pull
the back cover as illustrated.
2 Place
the
film
cartridge
in
the film cham-
ber
by
fitting
the flat side
onto
the
top
of
the rewind shaft
first
and then slide. the
top
end
of
the
film
cartridge into the cam-
era.
3 Pull
the
film
leader
out
far
enough from
the cartridge
to
reach
the
take-up spool.
Align
the
tip
of
the
film
with
the
film
leader
end
mark
0 and ensure the
film
is
placed
properly between the film guides.
Notes:
•
If
there is dirt
on
the film detector
8,
film can-
not
be
wound properly.
• Ensure the film is taut as illustrated
on
the illus-
tration. Take
up
any slack
in
the film by push-
ing it back into the cartridge.
X
Slack No! 0 Flat
Yes!
13
Page 16

4 Atter the back cover
ls
closed, the film
automatically
advances to the first frame.
5 When
":"
appears
in
the exposure counter
on
the LCD panel, the film automatically
stops winding.
6
If (
f)
blinks
on
the LCD panel, the film is
not properly loaded.
Reload the film.
• The exposure counter indication will remain on
even if the main switch
is
turned
OFF.
14
'
,
Automatic film speed setting
This camera
is
designed to use DX-coded films
with
ISO rating from 25
to
3200. When any of
these films are loaded, the proper
film speed
is
automaticaliy set.
Note:
• Non-DX coded films should not be used. If
Non-DX coded film is used, the film speed is
automaticaliy set to the
ISO 25.
Page 17

UNLOADING FILM
Rewinding the
film
After
you
have exposed the last frame
of
the
roll, the lens retracts
to
the shortest
focal length and the film rewinds
automat-
ically, the
motor
stops, and
(a)
blinks
as
shown
to
indicate that
the
film
has been
rewound.
• A 24-exposure roll of film takes about 25 seconds to be rewound.
• During rewinding, the exposure counter counts
frame numbers
in
reverse.
2 Unloading
film
To
unload the film, open the back cover,
and remove the cartridge
from
the cham-
ber by pulling the
top
of
the
film
cartridge
out
first
with
your
finger.
• Never open the back cover until the whole film
roll
is
rewound.
15
Page 18

REWINDING A FILM
IN
MID-ROLL
If you wish to unload a film before exposing
ali the frames, push the mid-roll rewind button with the protrusion part of the strap
clamp; the lens retracts to the shortest
focal length and then film rewinding starts.
16
When rewind is completed, the motor
stops, and
(a)
blinks, indicating that the
back
cover may
be
opened safely.
Page 19

HOLDING THE CAMERA
Keep
the
camera
as
still
as
possible,
and gently depress
the
shutter release
button.
If
too
much
force
is
applied, the
camera
is
likely
to
shake, and
the
pic-
ture
will
be blurred. When
using
the
flash with the camera
positioned
verti-
cally,
hold
the
camera
so
that
the flash
is
above
the
lens.
Notes:
•
Do
not hold the zoom lens because it
moves back
and
forth while
in
operation.
• Make sure not
to
obstruct the autofocus
window,
lens, light sensor window or the
built-in
flash with your fingers, hair or
other object.
17
Page 20

TAKING PHOTOGRAPHS
18
OPERATING
THE
ZOOM LENS
lc=::4'1
0
IJ
lu
IQZoom 150SL
38
- 150mm
IQZoom 170SL
38
- 170mm
Pushing the zoom button on the right ( • ) maves
the lens towards the telephoto setting.
Pushing
the zoom button on the left (
•••
) maves the lens
towards the wide - angle setting. When the lens
zooms
to
the desired setting, release the zoom
button and depress the shutter release button
lully
to
take pictures.
Page 21

t
• Do not apply force
to
the zoom lens as doing
so causes damage to the camera.
• The shutter cannot
be
released
wh
ile the lens
is zooming.
• Although a sound like the shutter closing may
be heard accompanied by vibration
while
zooming, this is an operating sound that occurs
due to switching of the internai mechanism of
the
lens and
is
not a malfunction.
19
Page 22

COMPOSING AND FOCUSING
After zooming the lens, compose the
scene, and
place the autofocus frame
on
the subject. Release the shutter.
AF
illumlnator
When shutter release button half way down
where it
is
hard for autofocus to work, such as
in
a dark place, the built-in flash discharges continuously
to
provide illumination, making it easy for
the autofocus
to
work.
20
fl
Il
•
-
IJ~.D
tq-
,,
'f
[30·~
~·.J
2 Check the lamp indication:
When
the subject
is
in
focus, the green
lamp will light up.
• The green lamp blinks if the subject is too
close or if the subject
is
difficult to autofocus.
• If the autofocus window
is
dirty, the autofocus
may not function
properly.
Page 23

HARD-TO-AUTOFOCUS SUBJECTS
a)
Extremely low-contrast subjects such as
a white
wall or blue sky in the autofocus
frame.
b) Subjects which don't
reflect much light
in
the autofocus frame.
c) Fast moving subjects.
d} Subjects with horizontal lines or com-
plex or
detailed patterns in the autofo-
cus frame.
e)
Multiple subjects in foreground
of
the
autofocus frame.
f}
Subjects positioned against reflected or
strong
backlight or with extremely bright
background.
21
Page 24

INFINITY-LANDSCAPE MODE
J l
0c::::J
..
c::::J o œ
~$
AF
.,.~
DATE 1
l'a:
6
:
T~j
1
~
(+
!l
D
/~1
f>r!!!.
Use the lnfinity-Landscape Mode to
Jock
the
focus at infinity
or
to lake a picture of a distant
scene through a window.
Depress the AFnnfinity-Landscape button
repeatedly until (
.oiiA)
appears
on
the LCD
panel.
• After the picture
is
laken, this mode is can-
celed.
• The flash will not discharge in the auto exposure mode even
in
dark light situations.
22
Page 25

SPOTFOCUS
~@>
AF
.,.(i)
DATE r:==:::::;::==:::::;-ï
mc=>c=>c=>oiD
L..::;~~=::::......J
(+
()
-)
)
Select the Spot AF Mode to focus on a par-
ticular spot in the frame.
1 Depress
the
AF/Infinity-Landscape
button
so
that
the
(SPOT AF) appears
on
the
LCD panel.
2 Focus on the
subject
with the Spot
AF frame ( c ) ) in the center
of
the
viewfinder.
23
Page 26

FOCUS-LOCK SHOOTING
1 When taking a photograph like the
one shown above,
if
the photograph
is
taken with the camera
in
this
set-
ting, the
focus
will be placed
on
the
subject
in
the very
front
of
the
(C
J)
and
will
not
focus
on
the main
sub-
ject
in
the
back.
ln
this
case, use the
Spot
AF
Mode and
focus-lock
tech-
nique.
24
2 Focus
on
the
subject
with the
Spot
AF frame
(C
J).
Page 27

3 Depress
the
shutter
release
button
halfway down. The green lamp in
the
viewfinder
lights
up
and
the
expo-
sure
and
focus
are
temporarily
locked.
Note:
• The focus will not change as long as the
green lamp is lit (Focus lock).
4 While
holding
the
shutter release but-
ton
halfway down, re-aim the camera
or
recompose
the
picture, then
press
the
release
button
ali the
way
to
release the shutter.
•
You
can release focus
Jock
simply by lift-
ing your finger from the shutter release
butten.
25
Page 28

PANORAMA MODE
Vou
can switch between the panorama format
and standard format picture taking mode at any
time by moving the panorama switch. The
panorama format picture
allows horizontally
positioned dynamic pictures to be laken (approx.
13x36mm
on
film).
1 Move the panorama switch to ( P ) to
select the panorama format mode.
• When the picture frame is switched to panorama, the viewfinder switches to the
horizontal
panorama format frame.
26
2 Compose the scene as you would normal-
ly
and release the shutter.
• When the camera-to-subject distance
is
less
than
2m
(6.6ft), use of the panorama format is
not recommended.
• Panorama format processing facilities differ
depending
on
the area and requirements. Your
local film processor of camera dealers will
advise you
on
ali the options to you.
Page 29

AUTO EXPOSURE MODES
Automatic Flash Emission
The flash
automatically discharges in low light or
in
a backlit conditions. When the shutter release
button is pressed halfway down, the red lamp
lights
up indicating that the flash is
ready.
If the
red
lamp blinks, the built-in flash is being
charged and the shutter cannat be released.
SELECT OTHER EXPOSURE MODES
1
~<§>
AF
11:10.:5}
DATE
1
la:
6
:
•
1
,
~'""''~''IC:::Jc=J
0~).
\
/-~~~
• For normal use, set the auto exposure mode.
• The camera is automatically re-set to the Auto
Exposure Mode when the power
is
turned off.
To
select the various exposure modes,
de press the mode button (
~
®
).
Auto
Auto (Red eye
reduction
flash-
ON)
Daylight-Sync
(Flash-ON)
Slow-Shutter
Speed (Flash·
OFF)
Bulb-Sync
@ (Flash and red
eye reduction
L----.---'
flash-ON)
Bulb (Flash·
OFF)
27
Page 30

FLASH EFFECTIVE RANGE (Color negative film)
IQZoom 150SL
38mm-
150mm
IQZoom 170SL
38mm - 170mm
Lens
=···
150mm •
1170mm
•
ISO
meters meters
25
0.75-
1.8m
-----
-----
(2.5 - 5.9ft)
1
50
0.75-
2.5m 1
1.2-
1.4m T 1.2
-1.4m
(2.5 - 8.2ft) (3.9 - 4.6ft) (3.9 - 4.6ft)
100
0.75-
3.5m 1
1.2-
1.9m l
1.2-
1.9m
(2.5-
11ft)
(3.9-
6.2ft)
(3.9-
6.2ft)
200
0.75-
5.0m
1.2 - 2.8m 1 1.2 - 2.8m
(2.5-
16ft)
(3.9-
9.1ft)
(3.9-
9.1ft) i
400
0.75-
7.1m
1.2-
3.9m
1.2-
3.9m 1
(2.5-
23ft)
(3.9-
13ft) 1
(3.9-
13ft)
800
0.90-
10.0m
1.2-
5.5m 1
1.2-
5.5m i
(3.0-
33ft)
(3.9-
18ft)
(3.9-
18ft)
1600
1.3·
-14.1m
i
(4.3.-
46ft)
1.2-
7.8m 1
(3.9-
26ft)
1.2-
7.8m l
(3.9-
26ft) '
3200
1.8• - 20.0m 1 1.2
-11.0m
1.2-
11.0m Î
(5.9.-
66ft)
(3.9-
36ft)
1
(3.9-
36ft)
* With high speed film, overexposure may occur
at
close range due to the film's high sensitivity.
28
Red-Eye Reduction Flash Functlon
To
reduce the red-eye phenomenon
in
the picture, use this function. With this function used,
the
flash discharges two consecutive times to
reduce the appearance of the red-eye effect.
Page 31

DAYLIGHT-SYNC SHOOTING
il
Daylight-Sync (Flash-ON)
De press the mode button (
~
<~>)
until ( ~ )
appears
on
the LCD panel.
ln this mode, the flash will always discharge
in
both dark and bright conditions. When a portrait
is taken with the subject in a backlight situation,
the front of the subject may
be
cast
in
shadow.
ln such a case, use the Daylight-Sync Shooting
Mode (Flash-ON Mode) within the flash effective
range to take a picture. This will ensure that a
picture is
weil exposed without any shadow.
When you wish to discharge the
flash, use this
mode.
Note:
• Make sure you're within the flash-effective
range even when you use the
built-
in
flash as
a
till-in flash in daylight.
SLOW SHUTTER SPEEDS MODES
>®
AF
-c;,
DA"
1
mc::JC:::=Jc::J
om
il
Slow Shutter Speed (Flash-OFF)
Depress the mode button (
$.<~>)
until (@El)
appears
on
the LCD panel.
ln this mode, the flash does not discharge, and
a picture
is
taken at a slow shutter speed up to
approx. 2 seconds. Use this mode in places
where flash photography
is
prohibited or for a
natural existing light effect
in
low ambient pho-
tography.
29
Page 32

Il
Slow-Speed-Sync Shootlng (Flash and red
eye reduction
flash-ON)
De press the mode button (
~
*)
until (
H'.l
*)
appears
on
the LCD panel.
1t
is possible to photograph subjects and back-
ground
in
a balanced way by using the built-in
flash
to properly expose the foreground subject
and a
slow-speed to expose the low light back-
ground.
Notes:
• When shooting in low light, the shutter speed
gets
slower, and camera shake
is
likely to blur
your picture. Use of a tripod
is
recommended.
• ln ali flash modes make sure you are within the
flash-effective range.
30
BULB
SHOOnNG,
BULB-SYNC
SHOOnNG
''"'
..
_.,
..
,.,
tc::::Jc:::JC::::::J
o œ
Il
Bulb Mode (Flash-OFF)
Depress the mode button (
~
*)
until (
@B)
appears on the LCD panel.
• This mode
is
useful for long exposures
required for shooting fireworks and night
scenes. Use of a tripod
is
recommended.
• The shutter remains open as long as the shutter release button held down. (Max. 1minute)
Page 33

0G:Jc:::Jc:::J
o œ
''"'
AF
-0
DA><I
Il
Bulb-Sync Mode (Flash and red eye reduc-
tion flash-ON)
Depress the mode button (
~
<~>)
until (
~ B <~>)
appears on the
LCD
panel.
This lets you use the flash in addition to the Bulb
Mode, so you can take a portrait photograph
with a night scene in the background.
• ln ali flash modes make sure you are within the
flash-effective range.
• The shutter remains open as long as the shutter release button held down. (Max. 1minute)
• Use of a tripod is recommended.
31
Page 34

SHOOTING MODES
To
set various shooting modes, depress the
drive button.
Power OFF S•ngle-Frame Self-
Ti
mer Remote Control
Shoot1ng
Shooting Shooting
• For normal use, set the Single-Frame Shooting
Mode.
32
To
set various focusing modes, depress the
AF/Infinity-Landscape button (AF).
F1ve-point
AF
lnf•nity-Landscape Spot AF
Shooting Shooting Shooting
• For normal use, set the Five-point AF Shooting
Mode.
Page 35

SELF-TIMEA PHOTOGRAPHY
~@
AF .,,,ci) DATE
l~c:::Jc:::Jc:::J
o m
(+
()
-)
)
Self-Timer
Use
the self-timer if
you
wish to get in the pic-
ture. Use of a tripod
is
recommended.
1 Depress the drive butten
(~•110)
repeat-
edly until (
0)
symbol appears
on
the LCD
panel.
2 Assure that the subject
is
within the
AF
frame in the viewfinder. Depress the shutter release butten fully.
The shutter will
be
released
in
about 10 sec-
onds. When the self-timer
is
working, the SelfTimer lamp blinks 3 seconds before the shutter
is released.
To
cancel
To
stop the self-timer operation at any
ti
me
after
its been activated, set the main switch to the
other position.
•
Do
not stand directly
in
front of the camera
when starting the Self-Timer,
as
the camera
will locus
on
you, not the main subject.
Be
sure
that you are behind, or next to the camera
when starting the Self-Timer.
• When you want to
use
the flash with the self-
timer, ensure that the
red
flash-ready lamp is lit
before starting the self-timer.
33
Page 36

USING WJRELESS REMOTE CONTROL (OPTIONAL)
If you have purchased the optional wireless
remote control, read this section.
The wireless remote control allows you to
trip the shutter at a distance. The shutter
will
be
released 3 seconds after the shutter
release button
on
the remote control is
depressed.
• Use a tripod when shooting with the wireless
remote control.
•
Use the remote control to take pictures
in
the Bulb mode to avoid camera shake.
While the remote control's shutter release
button is held down, the shutter remains
open up to a max. of 1 minutes.
34
Name of parts
Shutter
release
button
Remote
control
transmitter
Page 37

~@
AF
.,.~DATE
IDCJC:ll:~~
oro
~=~===--'
(+
(]
-)
)
Remote Control Shooting Mode
1 Depress the drive button (
.::~·n~)
repeatedly until (
~,,,)
symbol
appears
on
the
LCD
panel.
• If the shutter is released by the camera's
release butten, picture will be taken
in
the
ordinary shooting mode.
• When the camera is set
in
the Remote
Control Shooting Mode and left unused
for 5 minutes, the
lens automatically
retracts and the power is switched
OFF.
4m
2 Compose the scene and frame the
subject with the
AF
frame.
Aim the remote control transmitter towards
the remote
control receiver
on
the camera,
and then depress the shutter
release but-
ton
on
the remote control.
35
Page 38

o The self-limer lamp blinks rapidly for 3
seconds and then the shutter is released.
• Focus cannot be locked when the remote
control is
in
use. The subject framed in
the AF frame
will
be
in
focus when the
remote control's shutter release button
is
depressed.
Operating Distance of the
Wireless
Remote Control from the camera's
front: within approx.
4m
(13ft) straight
in front of the camera
o The remote control may not work
in
a
backlight situation.
ln this case, use the
camera's shutter release button
in
the
Self-
Ti
mer Mode to take pictures.
o The remote control does not work while
the flash is being charged.
36
Battery life on the Remote Control
About 30,000 commands can
be
issued
using the Remote
Control with a battery
installed.
If the battery is exhausted,
please have it replaced at your
local
Pentax Service center (there is a charge
for this service).
Page 39

DATE MODEL
If you purchased the DATE model, read this
section.
The dating unit automatically switches the
DATE
position between the standard and panorama
according
to
the format mode selected.
• The
DATE
model records dates
up
to the year
2100 on pictures.
• Year
2001
will be imprinted ('01)
on
pictures.
Switching the Mode
Press the
DATE
button with
your finger, the mode
on
the
LCD panel switches as
shown.
Notes:
• The data
on
the LCD panel
will
be
imprinted
on
the film.
• "----" indicates no data will
be imprinted.
• "M"
on
the
LCD
panel indicates "Month".
•
The date
in
the picture above
is
simulated.
37
Page 40

Correcting
the
date
Switch the power
on.
1.
Pressing the DATE
button
for 3 seconds:
the
"Year"
digits
and (
@XD)
will
blin k.
2.
Each
time
the
DATE
button
is
depressed,
the
blinking
digits
changes in
the
follow-
ing
manner:
Year -
Month
- Day -
Hours
- Minutes
Release
the
button
when
the
desired
digits
appear.
3.
Push
the
zoom
button
on
the
right
or
left
side
when
you
wish
to
change
the
blin
king
digits.
The
digits
increase
by
one
each
time
the
right
zoom
button
is
pushed and
the
digits
decrease
by
one
each
time
the
left
zoom
button
ls
pushed.
Pushing
the
zoom
button
for
about
one
second
will
change
the
digits
continuously.
4. After
the
data
has
been adjusted,
depress
the
DATE
button
repeatedly
until
blinking
stops.
38
• The blinking "minutes" allows precise fine-tuning
of the internai clock
to
the beginning of a
specified minute. When
"minutes digits" are
blinking, depress the DATE button
in
sync with
a time
signal.
• If you release the shutter while the blinking
data
is
being corrected, the data will not be
imprinted.
• If there
is
a white or yellow object
in
the corner
of the picture where the data
is
imprinted. the
data may
be
difficult
to
read. When composing
your photographs, try to avoid brightly-colored
subjects
in
that corner.
Page 41

TROUBLESHOOTING
What appears troublesome may
be
easily remedied. Here are sorne problems that may
occur and their remedies.
Symptoms
dt:
"'"'c;;;
.tr<;,,·.~
é'··•;
Gauses
and
Remedies
.,.
:··
.-..
.
-·
,;•J,• .Hl:
1.
The shutter cannot be released. • ls the main switch turned OFF? If so,
tu
rn
itON. See page 1
O.
• ls the battery exhausted? lnsert new battery. See page
9.
• ls (G) blinking
on
the LCD panel? The film has been used
up.
lnsert a new roll. See page 13, 14.
• ls (
E)
blin king
on
the LCD panel? The film has not been
loaded properly. Reload the film. See page 14.
2.
My printed pictures don't look • Did you position the autofocus frame on your subject? See
very
clear. page 20.
•
Did you obstruct the autofocus window with your fingers, hair
or other object. See page 17.
• ls the autofocus window dirty? Wipe it off. See page 20.
3.
Zoom lens retracted automati-
• The lens automatically retracts
to
the shortest focal length if
cally (the power
is
turned off
the camera is
left unused for over 3 minutes. See page 1
O.
automatically)
• When the camera
is
set
in
the Remote Control shooting mode
and
left unused for 5 minutes, the lens automatically retracts
and the power
is
switched
OFF.
See page 35.
39
Page 42

Symptoms
4.
The Remote Control does
ope rate.
_ j Causes and Remedies 1
not • The operable distance of the Remote Control
is
approx. 4m :
from the front. See page 36. '
• The Remote Control may not operate
in
a backlit situation.
j'
See page
36.
1
• The flash
is
being charged. Wail until it lully charges. See
page
36.
'•
ls the battery for the remote control exhausted? See page 36.
5.
The flash discharges, though it • The flash discharges automatically in a backlit situation. See
is
not dark. page
27.
1
•
Daylight sync mode has been set. See page 29.
~------------------------~--------------------------------------------
,6.
There
is
a vibration and a sound i • The internai mechanism of the lens
is
switched du ring zoom- ,
1
like the shutter clicking
is
heard 1 ing in arder to obtain a zoom lens that is compact and has a '
40
when the power
is
switched
on
· high magnification factor. The vibration and sound are gener-
and off or white zooming. ated each lime this switching operation occurs and are not a
1
malfunction.
Page 43

SPECIFICATIONS
Type:--------35mm
lully automatic lens-shutter with built-in zoom lens and auto flash
Film: Auto film speed setting with 35mni perforated
DX
- coded film with
ISO
rating from 25 - 3200
(1
EV
step).
Non -DX
coded films are automatically set
to
18025
Format:
-------24x36mm
(Approx. 13 x
36
in
panorama format)
Film loading: Auto film loading. Closing the back caver will automatically wind the film to first exposure.
Film
winding:
Auto film winding (single - frame)
Film rewinding: Auto film rewinding at the end of
roll. Auto stop upon completion of rewinding. Rewinding time:
approx. 25sec. with 24
- exposure film. Rewinding
in
mid - roll provided.
Frame number:
----Automatic
readout of successive frame numbers
in
ascending arder when shooting, and
descending order when rewinding.
Lens:
IQZoom
150SL----Pentax
power zoom
38-
150mmf/5.6-
12
8 elements
in
6 groups, Angle
of
view: 75° - 16.5°
IQZoom
170SL----Pentax
power zoom 38
-170mmff5.6
-12.8
8 elements
in
6 groups, Angle of view:
75°-
14.5°
Focusing system:
IQZoom
150SL.----Pentax
phase-matching passive live-point autofocus system. Autofocusing range: 0.75m (2.45
ft) - infinity (at wide), 1.2m
(3.911)-
infinity (at telephoto), Maximum magnification: approx.0.14X.
Focus lock is provided. lnfinity-landscape mode (locus is fixed to infinity), AF illuminator is automatically
emitted
in
low lighf/ or hard-to-autofocus subject.
IQZoom
170SL----Pentax
phase-matching passive live-point autofocus system. Autofocusing range: 0.75m
(2.4511)
- infinity (at wide), 1.2m
(3.911)
- infinity (at telephoto), Maximum magnification:
approx.0.15X. Focus lock is provided. lnfinity-landscape mode (locus is fixed
to
infinity), AF illu-
minator is automatically emitted
in
low lighf/ or hard-to-autofocus subject.
Zooming:-------Eiectronic
zoom
Shutter: Programmed
AE
electronic shutter with speed approx.1f360 - 2 sec. Bulb:
112
sec.- 1 min,
Electromagnetic release.
41
Page 44

Self-limer:
------Eiectrontc
lamp indication. Approx.10 sec. Cancellation alter activation
is
possible.
Viewfinder:
IQZoom
150SL----Siandard/panorama
switchable, Actual image zoom viewfinder, Viewfinder area: 80%,
Magnification: 0.44X (38mm
WIDE)-
1.50X (150mm TELE), Diopter adjustment range:
-3
to
+ 1 m ', Five-point
AF
frames for Wide-angle and Telephoto settings, Spot
AF
frame, Picture
frame,
Close distance compensation frame, Panorama format picture area, Green lamp lighting:
in-locus signal Green lamp blinking: When subject
is
too close and/or hard-ta-autofocus subject,
Red
lamp lighting: Flash-ready status,
Red
lamp blinking: Flash being charged
IQZoom
170SL----Standard/panorama
switchable, Actual image zoom viewfinder, Viewfinder area: 80%,
Magnification: 0.44X (38mm
WIDE)-
1.68X (170mm TELE), Diopter adjustment range:
-3
to
+ 1 m
·•.
Five-point
AF
frames for Wide-angle and Telephoto settings, Spot
AF
frame, Picture
frame,
Close distance compensation frame, Panorama formai picture area, Green lamp lighting:
in-locus
signal Green lamp blinking: When subject is loo close and/or hard-ta-autofocus subject,
Red
lamp lighting: Flash-ready status,
Red
lamp blinking: Flash being charged
Exposure
control:
IQZoom
150SL----Programmed
auto-exposure control with mufti segment (2) metering system, Range:
EV10-
EV17at 38mm WIDE,
EV14-
EV19 at 150mm TELE in Auto or Daylight-Sync Mode (ISO 400),
EV4-
EV17 at 38mm WIDE
EV6-
EV19at 150mm
in
Slow-Shutter-Speed Mode (ISO 400),
Automatic exposure compensation
in
a backlit situation.
IQZoom
170SL----Programmed
auto-exposure control with
mu~i
segment (2) metering system, Range:
EV10-
EV17at38mm WIDE,
EV14-
EV19
at170mm
TELE
in
Auto or Daylight-Sync Mode (ISO 400),
EV4-
EV17 at 38mm WIDE EV6
-EV19
at 170mm
in
Slow-Shutter-Speed Mode (ISO 400).
Automatic exposure compensation
in
a backlit situation.
Flash:
--------Built-in
flash with red-eye reduction mode, Automatic discharge in low lighling and backlighting
situations
in
auto mode, Flash ON;Day-light Sync/Siow-Shut1er-Speed Sync (up
to
2 sec.),
Flash-
OFF Mode, Bulb-Sync 1/2
sec.-
1min.
Flash
affectlva range:
IQZoom
150SL----0.75
(2.45ft)-
7.1
(23ft) m (38mm WIDE), 1.2 (3.911)- 3.9m (13ft) (150mm TELE) (ISO 400 film
used).
IQZoom
170SL.----0.75
(2.45ft)
-7.1
(23ft) m (38mm WIDE), 1.2
(3.911)
-3.9m
(13ft) (170mm TELE)
(IS0400
film
used).
42
Page 45

Flash recycling
time:--Approx.
5 sec. under Pentax testing conditions.
Power source:
One 3V lithium battery (CR - 2 or the equivalent)
Battery
life:-----Approx.
BroUs
of 24exposure film when 50% of shooting uses flash (under Pentax testing con-
ditions)
Battery
exhaustion:--
(
c=-)
appears
on
the LCD panel, Shutter is locked when (
c=-)
is
blinking.
warning:
Size & Weight:
IQZoom
tSOSL.----111.5
(W) x 60 (H) x 47.5 (D}
mm
(4.4" x 2.4" x 1.9") 200g (7.1oz) without battery
IQZoom 170SL
111.5
(W} x 60 (H) x 47.5 (D)
mm
(4.4" x 2.4" x 1.9") 200g (7.1oz} without battery
DATE
MODEL
Date mechanism:
---Crystal
quartz controlled; LCD with digital clock, auto calendar
up
to 2100. Possible
to
imprint
both standard and panoramic format frames.
lmprinting
mode:
---"Year,
Month and Day",
"Day,
Hour and Minutes,"----" blank, Month, Day and Year" or "Day,
Month and
Year".
Size
& Weight:
IQZoom
150SL.----111.5
(W) x
60
(H)
x 47.5
(D)
mm
(4.4" x 2.4" x 1.9") 200g (7.1oz) without battery
IQZoom
170SL
111.5
(W)
x 60 (H} x 47.5
(D)
mm
(4.4" x 2.4" x 1.9") 200g (7.1oz) without battery
REMOTE
CONTROL
Remote
control:
---lnfrared
wireless remote control, 3-seconds delay shutter release, Effective range: Gloser than
4m
when projected from the camera's front.
Power source
for
---One
lithium battery CR1620 (replaced by Pentax Service facility}
Remote
Control:
Size
&
weight
for---22.0
(W) x 53.0 (L) x 6.5
(D)
mm
(0.9" x 2.1" X0.3"),
7g
(0.2oz) including battery
Remote Control:
SPECIFICATIONS ARE SUBJECT TO CHANGE AT ANY TIME WITHOUT NOTIFICATION OR ANY OBLIGATION ON THE
PART
OF THE MANUFACTURER.
43
Page 46

WARRANTY POLICY
Ail Pentax cameras purchased through authorized bona fide photographie distribution channels are guaranteed against defects of material
or workmanship for a period of twelve months
from date of purchase.
Service will be rendered,
and defective parts
will be replaced without cost
to you within that period, provided the
equip-
ment does not show evidence of impact, sand
or
liquid damage, mishandling, tampering, battery
or chemical corrosion, operation contrary to
operating instructions, or modification by an
unauthorized repair shop. The manufacturer or
its authorized representatives
shall not be liable
for any repair or alterations except those made
with its written consent and
shall not be liable for
damages from delay or loss of use or from other
indirect or consequential damages of any kind,
whether caused by defective material or
work-
manship or otherwise; and it is expressly agreed
that the liability of the manufacturer or its
repre-
sentatives under ail guarantees or warranties,
whether expressed or implied,
is
strictly limited
to the replacement of parts as he rein before
provided. No refunds will be made on repairs performed by non-authorized Pentax service facilities.
44
Procedure During 12-month Warranty Period
Any
Pentax which proves defective during the
12
month warranty period should be returned to
the dealer from whom you purchased the
equip-
ment
orto
the manufacturer.
If
the
re
is
no repre-
sentative of the manufacturer in your country,
send the equipment to the manufacturer with
postage prepaid. ln this case, it will take a
considerable length of time before the equipment
can be returned to you owing to the complicated
customs procedures required.
If
the equipment
is
covered by warranty, repairs will be made and
parts replaced free of charge, and the
equipment will be returned to you upon completion of
servicing.
If
the equipment
is
not covered by
warranty, regular charges of the manufacturer or
of its representatives
will apply. Shipping
charges are to be borne by the owner.
If your
Pentax was purchased outside of the country
where you wish to have it serviced during the
warranty period, regular handling and servicing
fees may be charged by the manufacturer's
rep-
resentatives in that country. Notwithstanding
this, your
Pentax returned to the manufacturer
will be serviced free of charge according to this
procedure and warranty policy.
Page 47

ln
any case, however, shipping charges and
customs clearance fees are to be borne by the
sender.
To
prove the date of your purchase
when required,
please keep the receipts or bills
covering the purchase of your equipment for at
!east a year. Before sending your equipment for
servicing, please make sure that
you
are
send-
ing
it
to the manufacture's authorized representatives or their approved repair shops, unless
you are sending
it
directly
to
the manufacturer.
Always obtain a quotation for the service
charge,
and
only after
you
accept the quoted
service charge, instruct the service station
to
proceed with the servicing.
This warranty does not apply to Pentax prod-
ucts purchased in the United States.
Therefore, for warranty information
regarding Pentax products purchased in the United
States, please read the warranty card supplied with your product.
CE
The CE mark is Directive conformity mark
of the European Community (EC).
STATEMENT
OF
FCC COMPLIANCE
This deviee complies with Part
15
of the FCC Rules.
Operation is subject to the following two conditions:
(1) This deviee may not cause harmful interference,
and
(2)
this deviee must accept any interference
received, including interference that may cause
undesired operation.
Changes or modifications not approved by the party
responsible for compliance could void the user's
authority to operate the equipment.
This equipment
has
been tested and found to cornply with the limits for a Glass B digital deviee, pursuant to part 15 of the FCC Rules. These limits are
designed to provide reasonable protection against
harmful interference
in
a residential installation. This
equipment generales, uses and can radiale
fre-
quency energy and, if not installed and used
in
accordance with the instructions, may cause harmful interference to radio communications. However,
there is no guarantee thal interference
will not occur
in
a particular installation. If this equipment does
cause harmful interference to radio or television
reception, which can
be
determined
by
turning the
equipment off
and
on, the user is encourage to try to
correct the interference by one or more of the
fol-
lowing measures:
• Recrient
or
relocate the receiving antenna.
•lncrease the separation between the equipment
and receiver.
• Consul! the dealer or
an
experience radio!TV tech-
nician for help.
Page 48

Asahi
Optical
Co.,
Ltd.
2-36-9. Maeno-cho, ltaba,hi-ku. Tokyo 174-8639, JAPAN (http://www.pentax.co.jpl
Pentax
GmbH
(European
Headquarters)
Juliu,-Vo"elcr-Stra"e.
104, 22527 Hamburg. GERM ANY
!HQ-
http://www.pentaxeurope.com
Gennany-
http://Y.wY..pentax.de)
Pentax
U.K.
Limited
Pentax House. Heron drive, Langley. Slough, Berks SL3 8PN. U.K. (http://www.pemax.co.uk)
Pentax
France
S.A. 12/14. rue Jean Poulmarch. 95106 Argenteuil Cedex. FRANCE
Pentax
Benelux
B.
V.
tfor Netherlands) Spinveld 25,4815 HR Breda. NETHERLANDS thttp:!/wy,w.pentax.nl)
tfor Belgium & Luxembourg) Weiveldlaan 3-5. 1930 Zaventem, BELGIUM fhttp://wwY..pentax.be)
Pentax
(Schweiz) AG lndustriestrasse
2.
8305 Dietlikon. SWlTZERLAND thttp://wY.w.pentax.ch)
Pentax
Scandinavia
AB
P.O.
Box 650. 75127 Uppsala. SWEDEN lhttp://www.pentax.seJ
Pentax
Europe
n.v.
(European
Distribution
Center)
Weiveldlaan 3-5. 1930 Zaventem. BELGIUM
Pentax
Corporation
35
In
vernes; Drive East. Englewood. Colorado 80112. L'.S.A. thttp://www.pentax.comJ
Pentax
Canada
lnc.
3131
Universal Drive,
Mi~sis!-.auga.
Ontario L4X 2E5. CANADA (http://www.pentaxcanada.ca)
57200
ENG
Th•s
operating manual is pnnted
on
recycled paper.
Copyright©
Asahr Opticat Co.Lid. 2001
01-200105 Printed in Japan
 Loading...