

Page 1
69-1110EF-02
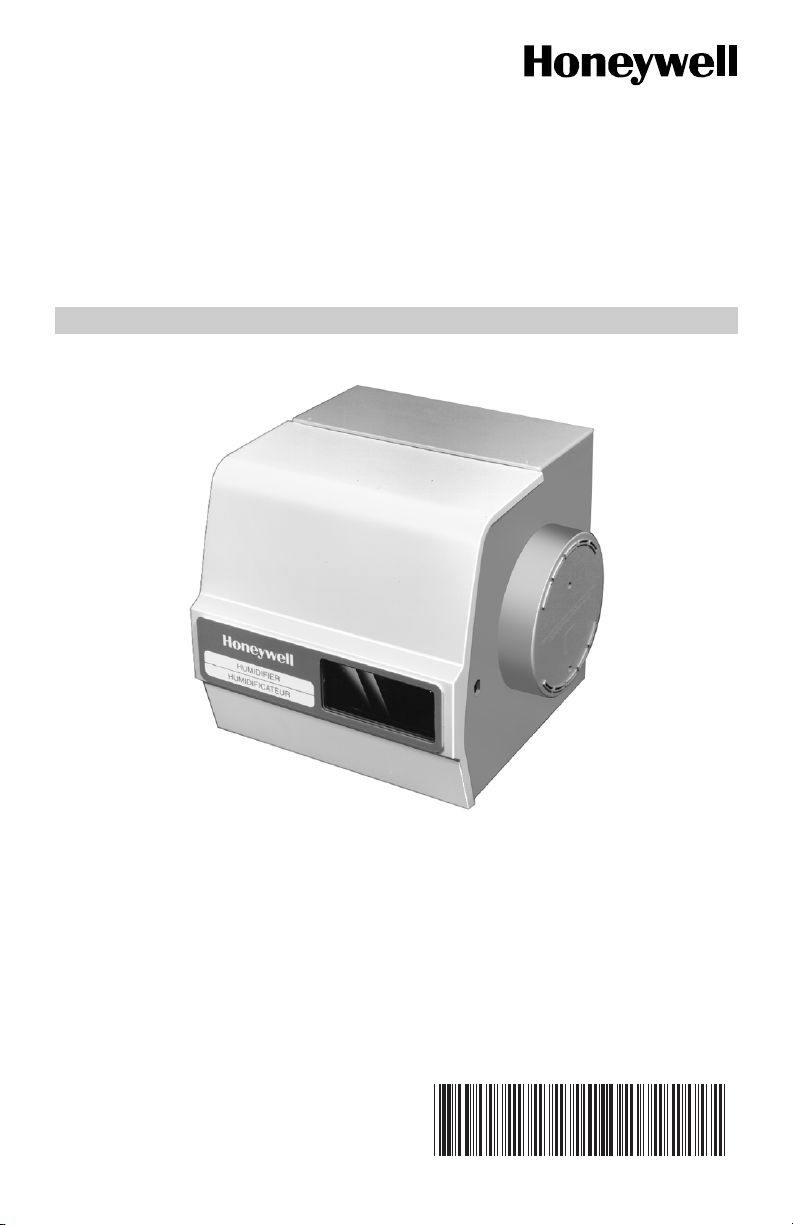
HE120 By-Pass
Drum Humidifier
OWNER’S MANUAL
Contents
How Your Humidifier Works .................................................................................... 2
Operating Your Humidifier ...................................................................................... 2
Maintaining Your Humidifier .................................................................................... 3
Checking Your Humidifier Operation ...................................................................... 6
Troubleshooting Your Humidifier ............................................................................. 6
Page 2
HE120 BY-PASS DRUM HUMIDIFIER
HOW YOUR HUMIDIFIER WORKS
Your Honeywell humidifier uses the principle that vapor (evaporated water) is created
when warm air blows over a water soaked area. As the vapor circulates, the relative
humidity rises.
Your humidity control monitors the relative humidity and activates the humidifier
accordingly. The humidifier has a water supply that disburses water evenly over a
humidifier pad. The warm dry air from the furnace passes over the humidifier pad and
picks up the moist air to circulate it through your home.
Humidified air feels warmer and more comfortable so you may be able to lower your
thermostat heating setpoint and save money on your heating fuel bills. The end result
is that your humidifier gives you a comfortable environment that is also energy
efficient.
OPERATING YOUR HUMIDIFIER
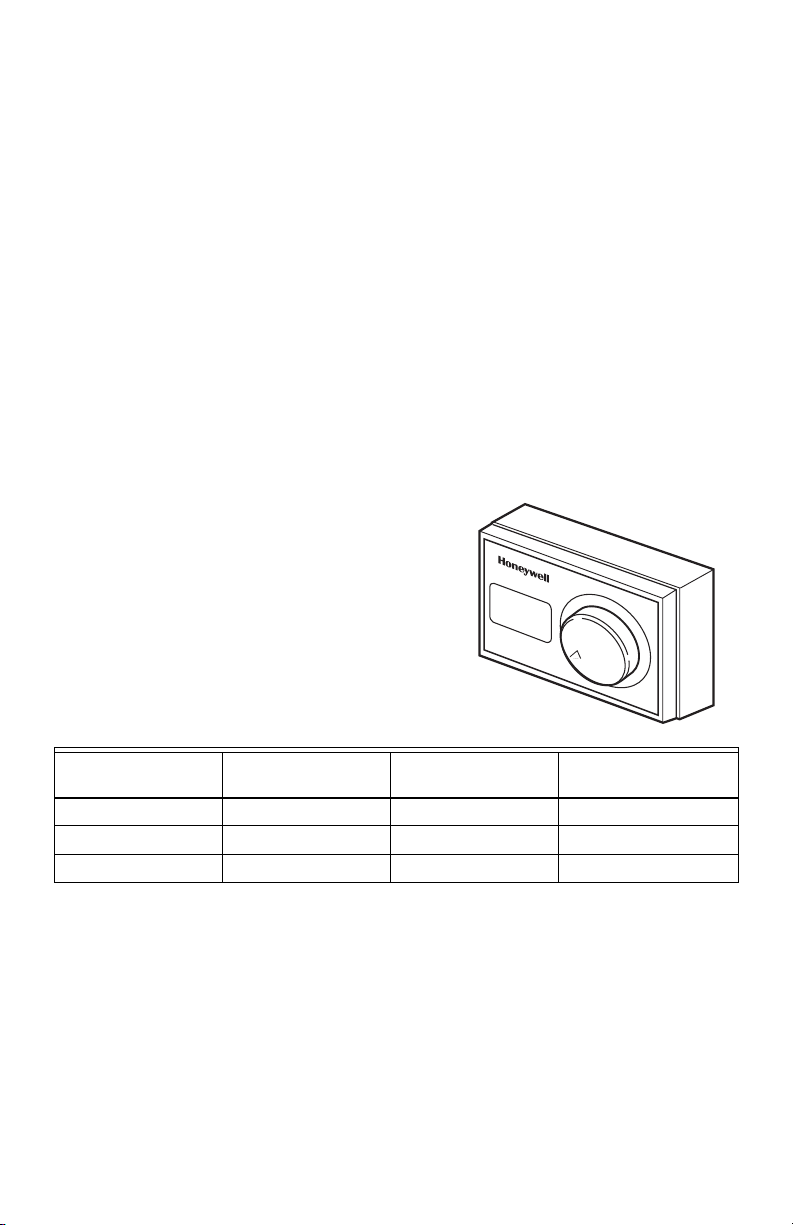
Your HE120 Honeywell humidifier is controlled by
the Humidity Control that is installed either on the
return air duct or on an interior wall in your living
area. Choose the humidity control setting using the
combination relative humidity/outdoor temperature
setting scale on your humidity control. Match the
dial setting to the outdoor temperature for
optimizing the humidity level while reducing the
moisture condensation on your windows. The table
below can also be used to adjust the humidity
control to the recommended setting.
M13608
At Outside
Tem per atu re
-20°F (-29°C) Low +10°F (-12°C) Med
-10°F (-23°C) Low +20°F (-7°C) High
0°F (-18°C) Med Above 20° (-7°C) High
NOTE: As the outside temperature drops, the recommended humidity control setting
is lowered to accommodate for the effects of dewpoint. These settings should
reduce the accumulation of moisture and ice on your windows and in other
areas of your home.
Some indoor activities such as cooking, showering and clothes drying can cause
excessive levels of humidity and start the accumulation of moisture on your windows.
NOTE: If this condition persists for more than a few hours, set the humidity control to
the lowest setting to turn off the humidifier. If the condition does not improve,
ventilate your home to remove the moisture.
69-1110EF—02 2
Recommended
Setting
At Outside
Temperature
Recommended
Setting
Page 3

HE120 BY-PASS DRUM HUMIDIFIER
CAUTION
MAINTAINING YOUR HUMIDIFIER
A regular maintenance program prolongs the life of your humidifier and provides a
more comfortable home. The frequency of cleaning will depend on the condition of
your water.
You can use either hard or soft water in your humidifier, but hard water mineral
deposits are more difficult to clean than soft water deposits.
Cleaning Humidifier (Every 1 to 3 Months Depending on Water Quality)
Voltage Hazard.
Can cause electrical shock
and equipment damage.
Disconnect power and shut off water supply before installing or servicing.
IMPORTANT
Use the following steps to clean your Honeywell humidifier:
NOTE: You will encounter some resistance when removing the drum shaft until you
Never oil any part of the humidifier.
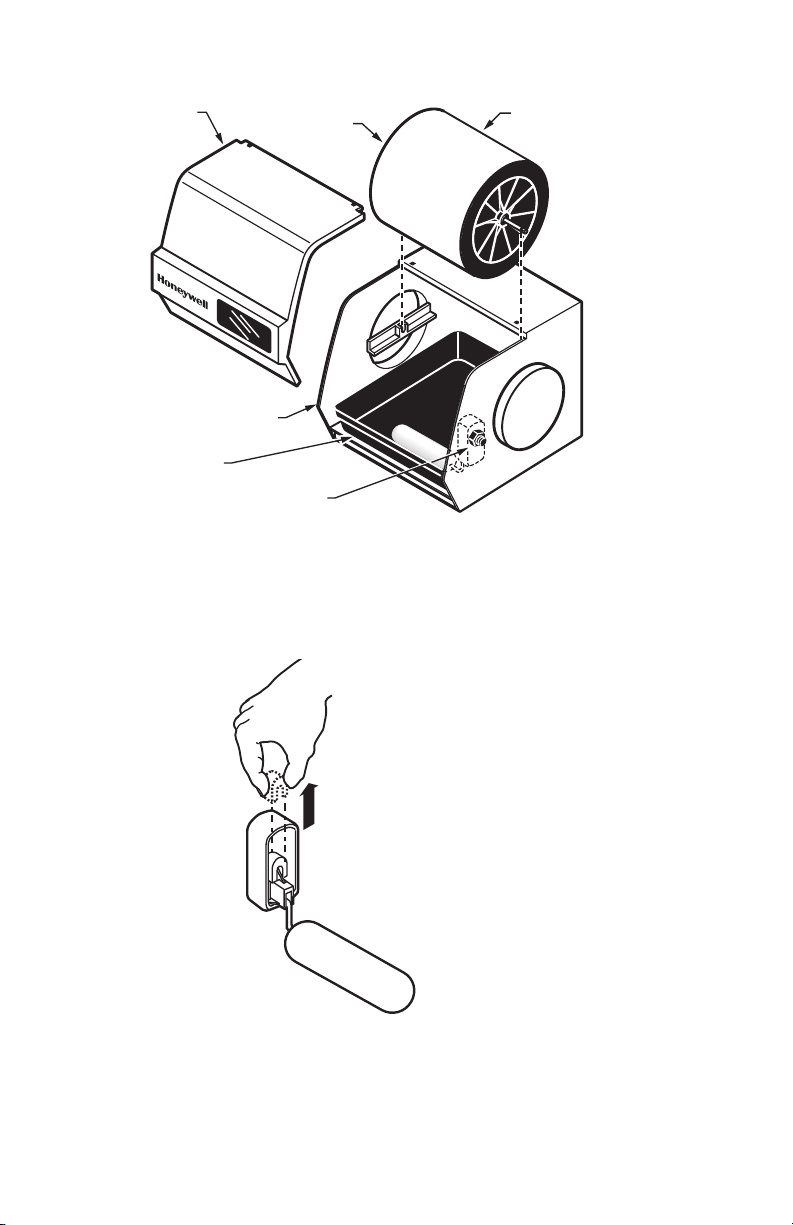
1. Disconnect the power and turn off the humidifier water supply.
2. Remove the humidifier cover by lifting the bottom of the cover upward.
3. Lift up the drum shaft from the bearing end and slide it out of the motor coupling
to remove the drum assembly. See Fig. 1.
hear an audible click.
4. Remove the drum from the assembly.
3 69-1110EF—02
Page 4
HE120 BY-PASS DRUM HUMIDIFIER
M13617
LIFT THE RUBBER VALVE SEAT UPWARD
TO REMOVE IT FROM THE VALVE
COVER
WATER PAN
BEARING END OF
DRUM SHAFT
HUMIDIFIER
HOUSING
WATER VALVE
OPENING
DRUM ASSEMBLY
M12252
Fig. 1. Removing Drive Assembly
5. Grasp the rubber valve seat between your thumb and forefinger and lift it upward
to remove the valve seat from the valve. The seat is located inside the humidifier
housing at the water valve opening. See Fig. 2.
Fig. 2. Float Valve Assembly
6. Raise up the float and remove the water pan.
69-1110EF—02 4
Page 5

HE120 BY-PASS DRUM HUMIDIFIER
7. Refer to the drawing to disassemble the drum. See Fig. 3.
SQUEEZE
SLIGHTLY
TO INSTALL
OPEN
DRUM END
PAD
TINNERMAN
DRUM SHAFT
CLOSED DRUM END
M13609
METAL TABS
Fig. 3. Drum Assembly
8. Clean all humidifier parts in a 50% solution of vinegar (or a humidifier cleaner)
and water. Soak overnight to remove stubborn deposits.
NOTE: Replace humidifier pad yearly with the new Honeywell Drum Humidifier Pad
(Part no. HC12A1015). The actual frequency depends on the quality of the
water used.
9. After the humidifier components are clean, reassemble the humidifier by
reversing the order of steps 1 through 7.
NOTE: Be sure that the drum shaft is completely seated-listen for the click.
10. Verify the humidifier operation by following the steps in the Checking Your
Humidifier Operation section.
Start of Humidification Season
Replace the humidifier pad with a new Honeywell Drum Humidifier Pad (Part no.
HC12A1015) at the beginning of the heating season. Follow the cleaning instructions
to replace the pad and check for proper operation.
End of Humidification Season
Clean the humidifier and shut it off at the end of the heating season. Follow the
cleaning instructions, steps 1 through 9, to shut down the device for the season.
5 69-1110EF—02
Page 6

HE120 BY-PASS DRUM HUMIDIFIER
IMPORTANT
Be sure the humidifier power is off and the humidifier water pan is empty.
Vacation
When leaving on vacation, turn off the humidifier water supply and your humidity
control. Turn on the humidifier water supply and reset your humidity control when you
return.
CHECKING YOUR HUMIDIFIER OPERATION
After winter startup or maintenance, use the following steps to check the humidifier
operation:
1. Turn on the humidifier power and water supply.
2. Open By-Pass Damper (if installed).
3. Check the water level in the humidifier water pan; water level setting should be
1-3/8 in.
NOTE: Turn the valve adjustment screw, located on the water valve inside the
humidifier, clockwise to lower the water level and counter clockwise to raise it.
4. Turn the Humidity Control to the highest setting.
5. Check that the humidifier pad is rotating.
6. Reset the thermostat and Humidity Control to a comfortable setting.
TROUBLESHOOTING YOUR HUMIDIFIER
Problem What To Look For What To Do
Low humidity Furnace blower not
operating.
Rapid air changes.
Drafts (cold air is dry
and is an added load
to the humidifier).
High humidity Condensation on
walls.
Heavy condensation
on windows.
• Reset circuit breaker or check for blown fuse.
• Check that the furnace power is on.
• Check all external wiring connections.
• Check the humidity control setting.
• Call a professional heating contractor.
• Keep doors and windows closed.
• Close fireplace damper when not in use.
• Keep exhaust fan running time to a
minimum.
• Seal around doors and windows.
• Turn off the humidity control and water until
condensation is completely evaporated.
• Turn humidity control down low enough to
eliminate condensation caused by moisture
from bathing, mopping, cooking, etc. If
moisture persists, more ventilation is
needed.
69-1110EF—02 6
Page 7

HE120 BY-PASS DRUM HUMIDIFIER
LIMITED WARRANTY
Honeywell warrants this product to be free from defects in the workmanship or materials, under
normal use and service, for a period of one (1) year from the date of purchase by the consumer.
If, at any time during the warranty period, the product is defective or malfunctions, Honeywell
shall repair or replace it (at Honeywell’s option) within a reasonable period of time.
If the product is defective, return it, with a bill of sale or other dated proof of purchase, to the
retailer from which you purchased it.
This warranty does not cover removal or reinstallation costs. This warranty shall not apply if it is
shown by Honeywell that the defect or malfunction was caused by damage which occurred while
the product was in the possession of a consumer.
Honeywell’s sole responsibility shall be to repair or replace the product within the terms stated
above. HONEYWELL SHALL NOT BE LIABLE FOR ANY LOSS OR DAMAGE OF ANY KIND,
INCLUDING ANY INCIDENTAL OR CONSEQUENTIAL DAMAGES RESULTING, DIRECTLY OR
INDIRECTLY, FROM ANY BREACH OF ANY WARRANTY, EXPRESS OR IMPLIED, OR ANY
OTHER FAILURE OF THIS PRODUCT. Some states do not allow the exclusion or limitation of
incidental or consequential damages, so this limitation may not apply to you.
THIS WARRANTY IS THE ONLY EXPRESS WARRANTY HONEYWELL MAKES ON THIS
PRODUCT. THE DURATION OF ANY IMPLIED WARRANTIES, INCLUDING THE
WARRANTIES OF MERCHANTABILITY AND FITNESS FOR A PARTICULAR PURPOSE, IS
HEREBY LIMITED TO THE ONE YEAR DURATION OF THIS WARRANTY. Some states do not
allow limitations on how long an implied warranty lasts, so the above limitation may not apply to
you.
This warranty gives you specific legal rights, and you may have other rights which vary from state
to state.
If you have any questions concerning this warranty, please write Honeywell Customer Relations,
1985 Douglas Dr. N MN10-1461, Golden Valley, MN 55422 or call 1-800-468-1502, MondayFriday, 7:00 a.m. to 5:30 p.m., Central time. In Canada, write Honeywell Limited/Honeywell
Limitée, 35 Dynamic Dr., ON15, Scarborough, Ontario M1V4Z.
7 69-1110EF—02
Page 8

Automation and Control Solutions
Honeywell International Inc. Honeywell Limited-Honeywell Limitée
1985 Douglas Drive North 35 Dynamic Drive
Golden Valley, MN 55422 Toronto, Ontario M1V 4Z9
yourhome.honeywell.com
® U.S. Registered Trademark
© 2009 Honeywell International Inc.
69-1110EF—02 E.K. 05-09
Page 9

69-1110EF-02
Humidificateur à dérivation
à tambour HE120
GUIDE DU PROPRIÉTAIRE
Contents
Fonctionnement de L'humidificateur ....................................................................... 10
Utilisation de L'humidificateur ................................................................................. 10
Entretien de L'humidificateur .................................................................................. 11
Vérification de L'humidificateur ............................................................................... 14
Dépannage de L'humidificateur .............................................................................. 15
Page 10

HUMIDIFICATEUR À DÉRIVATION À TAMBOUR HE120
FONCTIONNEMENT DE L'HUMIDIFICATEUR
L'humidificateur Honeywell fonctionne selon le principe suivant : de la vapeur (eau
évaporée) se forme lorsque l'air chaud passe sur une surface imbibée d'eau; en
circulant, la vapeur fait augmenter l'humidité relative.
Le régulateur d'humidité surveille l'humidité relative et fait fonctionner l'humidificateur
selon les besoins. L'humidificateur est muni d'un système d'alimentation qui distribue
uniformément de l'eau sur un tampon. L'air sec et chaud de l'appareil de chauffage
circule au-dessus du tampon et capte l'air humide pour le faire circuler dans la maison.
L'air humidifié semble plus chaud et il assure un meilleur confort; il est donc possible
d'abaisser le point de consigne du thermostat et, ainsi, de diminuer les coûts de
chauffage. Non seulement l'humidificateur assure plus grand confort, il permet de
réaliser des économies d'énergie.
UTILISATION DE L'HUMIDIFICATEUR
L'humidificateur Honeywell HE120 est commandé
par un régulateur d'humidité qui est installé soit sur
une gaine de retour d'air, soit sur un mur à l'intérieur
d'une pièce utilisée. Pour régler le régulateur
d'humidité, consulter l'échelle combinée de l'humidité
relative et de la température à l'extérieur apposée sur
le régulateur. Il faut tenir compte de la température à
l'extérieur pour optimiser le degré d'humidité et
réduire la condensation dans les fenêtres. Le tableau
ci-dessous peut également servir à choisir le réglage
recommandé.
M13608
Température à
l'extérieur
-29 °C (-20 °F) Bas -12 °C (+10 °F) Moyen
-23 °C (-10 °F) Bas -7 °C (+20 °F) Élevé
-18 °C (0 °F) Moyen Supérieure à -7 °C (20 °F) Élevé
REMARQUE : Lorsque la température à l'extérieur diminue, le point de consigne du
Certaines activités comme la cuisson, les douches et le séchage des vêtements
peuvent produire une humidité excessive dans les fenêtres.
69-1110EF—02 10
Réglage
recommandé Température à l'extérieur
régulateur d'humidité doit être abaissé pour tenir compte des effets du
point de rosée. Ces réglages permettent de réduire l'accumulation de
condensation et de glace dans les fenêtres et ailleurs dans la maison.
Réglage
recommandé
Page 11

HUMIDIFICATEUR À DÉRIVATION À TAMBOUR HE120
MISE EN GARDE
REMARQUE : Si cette condition persiste plus de quelques heures, régler le régulateur
d'humidité à la valeur la plus basse de façon à arrêter l'humidificateur.
S'il n'y a aucun changement, il faudrait aérer la maison pour en chasser
l'humidité.
ENTRETIEN DE L'HUMIDIFICATEUR
L'entretien régulier de l'humidificateur en prolonge la durée de vie tout en rendant la
maison plus confortable. La fréquence de nettoyage varie selon la qualité de l'eau.
L'humidificateur peut fonctionner avec de l'eau dure ou de l'eau douce. Cependant,
l'eau dure laisse des dépôts minéraux plus difficiles à nettoyer que ceux que laisse
l'eau douce.
Nettoyage de l'humidificateur (Intervalle de un à trois mois, selon la qualité de l'eau)
Risques liés au courant électrique
Peut causer des chocs électriques et des dommages à l'équipement
Couper l'alimentation électrique et l'alimentation en eau avant d'installer
l'appareil ou d'en faire l'entretien.
IMPORTANT
Pour nettoyer l'humidificateur, suivre les étapes ci-dessous :
REMARQUE : Il y a une certaine résistance sur l'arbre du tambour jusqu'au moment
Ne jamais lubrifier l'une ou l'autre des parties de l'humidificateur
1. Couper l'alimentation électrique et l'alimentation en eau.
2. Enlever le couvercle de l'humidificateur en soulevant le bas du couvercle vers le
haut.
3. Soulever l'arbre par l'extrémité du roulement de l'arbre du tambour et le dégager
en le faisant glisser à l'extérieur de l'accouplement moteur pour retirer le
tambour. Voir la figure 1.
du déclic.
4. Retirer le tambour de l'appareil.
11 69-1110EF—02
Page 12

HUMIDIFICATEUR À DÉRIVATION À TAMBOUR HE120
MF13617
SOULEVER LE SIÈGE EN CAOUTCHOUC
DU ROBINET ET LE RETIRER DU ROBINET
EXTRÉMITÉ DU
ROULEMENT
COUVERCLE
BOÎTIER DE L’HUMIDIFICATEUR
BAC D’EAU
DE L’ARBRE
DU TAMBOUR
TAMBOUR
OUVERTURE DU ROBINET D’EAU
MF12252
Fig. 1. Enlèvement de l'ensemble entraînement.
5. Prendre le siège en caoutchouc du robinet entre le pouce et l'index et le
soulever pour l'enlever. Le siège de robinet est monté à l'intérieur de
l'humidificateur, à l'ouverture du robinet. Voir la figure 2.
Fig. 2. Ensemble flotteur du robinet.
69-1110EF—02 12
Page 13

HUMIDIFICATEUR À DÉRIVATION À TAMBOUR HE120
L
6. Soulever le flotteur et enlever le bac d'eau.
7. Pour désassembler le tambour, consulter l'illustration de la figure 3.
PRESSER
LÉGÈREMENT
POUR INSTALLER
EXTRÉMITÉ
OUVERTE
DU TAMBOUR
TAMPON
FIXATION
ARBRE DU TAMBOUR
PATTES EN MÉTA
EXTRÉMITÉ FERMÉE DU TAMBOUR
MF13609
Fig. 3. Ensemble tambour.
8. Nettoyer toutes les parties de l'humidificateur avec une solution à part égale de
vinaigre (ou de nettoyant pour humidificateur) et d'eau. Faire tremper toute la
nuit pour éliminer les dépôts tenaces.
REMARQUE : Remplacer le tampon par un nouveau tampon d'humidificateur Honey-
well (pièce HC12A1015) une fois par année. La fréquence réelle de
remplacement dépend de la qualité de l'eau.
9. Une fois les pièces de l'humidificateur nettoyées, les remonter dans l'ordre
inverse suivi aux étapes 1 à 7.
REMARQUE : S'assurer que l'arbre du tambour est bien engagé. Un clic doit se faire
entendre.
10. Vérifier le bon fonctionnement de l'humidificateur en suivant les étapes décrites
à la section Vérification de l'humidificateur.
Début de la saison d'humidifcation
Remplacer le tampon de l'humidificateur par un nouveau tampon Honeywell (pièce
HC12A1015) au début de la saison de chauffage. Pour remplacer le tampon et vérifier
le fonctionnement de l'humidificateur, se reporter aux instructions de nettoyage.
Fin de la saison d'humidification
Nettoyer l'humidificateur à la fin de la saison de chauffage et l'arrêter. Suivre les
instructions de nettoyage (étapes 1 à 9) pour arrêter l'appareil à la fin de la saison.
13 69-1110EF—02
Page 14

HUMIDIFICATEUR À DÉRIVATION À TAMBOUR HE120
IMPORTANT
S'assurer que l'appareil est hors tension et que le réservoir d'eau est vide.
Absence prolongée
Au moment de s'absenter pour une longue période, fermer l'alimentation en eau et
mettre le régulateur d'humidité en position arrêt. Au retour, ouvrir l'alimentation en eau
et régler le régulateur d'humidité.
VÉRIFICATION DE L'HUMIDIFICATEUR
Lors du démarrage pour l'hiver ou lors d'un entretien, vérifier le fonctionnement de
l'humidificateur en suivant les étapes ci-dessous :
1. Ouvrir l'alimentation électrique et l'alimentation en eau.
2. Ouvrir la dérivation, s'il y en a une.
3.
Vérifier le niveau de l'eau dans le bac. Le niveau devrait être de 3,5 cm (1 3/8 po).
REMARQUE : Tourner la vis de réglage du robinet, à l'intérieur de l'humidificateur
4. Mettre le régulateur d'humidité au réglage le plus élevé.
5. Vérifier si le tampon de l'humidificateur tourne.
6. Remettre le thermostat et le régulateur d'humidité au réglage de confort.
dans le sens horaire pour réduire le nouveau de l'eau et dans le sens
antihoraire pour augmenter le niveau de l'eau.
69-1110EF—02 14
Page 15

HUMIDIFICATEUR À DÉRIVATION À TAMBOUR HE120
DÉPANNAGE DE L'HUMIDIFICATEUR
Problème À vérifier À faire
Humidité
faible
Humidité
élevée
Le ventilateur de
l'appareil de
chauffage ne
fonctionne pas.
Renouvellement
rapide de l'air.
Courants d'air (l'air
froid est sec et
accroît la charge de
l'humidificateur).
Condensation sur les
murs.
Condensation élevée
dans les fenêtres.
• Réenclencher le disjoncteur ou vérifier si le
fusible est grillé.
• Vérifier si l'appareil de chauffage est alimenté
en électricité.
• Vérifier toutes les connexions électriques
externes.
• Vérifier le réglage du régulateur d'humidité.
• Appeler un entrepreneur en chauffage.
• Garder les portes et les fenêtres fermées.
• Fermer le registre du foyer quand il n'est pas
utilisé.
• Faire fonctionner le moins possible les
ventilateurs de reprise.
• Sceller le contour des portes et des fenêtres.
• Arrêter le régulateur d'humidité et couper
l'alimentation en eau jusqu'à ce que la
condensation soit complètement évaporée.
• Régler le régulateur d'humidité suffisamment
bas pour éliminer la condensation causée par
les bains, le lavage des planchers, la cuisson,
etc. Si l'humidité persiste, augmenter la
ventilation.
15 69-1110EF—02
Page 16

GARANTIE LIMITÉE
Honeywell garantit que ce produit est exempt de tout vice de fabrication ou de matière
dans la mesure où il en est fait une utilisation et un entretien convenables et ce, pour
une période de un an à partir de la première date d'achat par le consommateur. En
cas de défectuosité ou de mauvais fonctionnement pendant la période de garantie,
Honeywell réparera ou remplacera ledit produit (au choix de Honeywell) dans un délai
raisonnable.
Si le produit est défectueux, le consommateur doit le retourner au magasin où il a été
acheté, en y joignant la facture ou une preuve d'achat.
La présente garantie ne couvre pas les frais d'installation et de retrait de ce produit.
La présente garantie ne s'appliquera pas s'il est démontré par Honeywell que la
défectuosité ou le mauvais fonctionnement du produit est attribuable à un
endommagement du produit alors que le consommateur l'avait en sa possession.
La responsabilité de Honeywell se limite à réparer ou à remplacer le produit
conformément aux modalités susmentionnées. HONEYWELL N'ASSUME AUCUNE
RESPONSABILITÉ POUR QUELQUE DOMMAGE INDIRECT QUE CE SOIT
RÉSULTANT D'UNE VIOLATION QUELCONQUE D'UNE GARANTIE, EXPRESSE
OU TACITE, APPLICABLE AU PRÉSENT PRODUIT. Certains territoires et provinces
ne permettent pas l'exclusion ou la restriction des dommages indirects et, par
conséquent, la présente restriction peut ne pas s'appliquer.
LA PRÉSENTE GARANTIE TIENT LIEU DE TOUTES LES AUTRES GARANTIES,
EXPRESSES OU TACITES, ET LES GARANTIES DE VALEUR MARCHANDE ET DE
CONFORMITÉ À UNE FIN PARTICULIÈRE SONT PAR LES PRÉSENTES EXCLUES
APRÈS LA PÉRIODE DE UN AN DE LA PRÉSENTE GARANTIE. Certains territoires
et provinces ne permettent pas l'exclusion ou la restriction des dommages indirects et,
par conséquent, la présente restriction peut ne pas s'appliquer.
La présente garantie donne au consommateur des droits légaux spécifiques et peutêtre certains autres droits qui peuvent varier selon la province ou le territoire.
Pour tout renseignement concernant cette garantie, veuillez écrire à Honeywell
Customer Relations, 1985 Douglas Dr. N MN10-1461, Golden Valley, MN 55422 ou
téléphonez au 1 800 468-1502, du lundi au vendredi entre 7 h et 17 h 30, heure du
Centre. Au Canada, veuillez écrire à Honeywell Limitée-Honeywell Limited, 35
Dynamic Dr., ON15, Toronto (Ontario) M1V 4Z9.
Solutions de régulation et d'automatisation
Honeywell International Inc. Honeywell Limited-Honeywell Limitée
1985 Douglas Drive North 35, Dynamic Drive
Golden Valley, MN 55422 Toronto (Ontario) M1V 4Z9
yourhome.honeywell.com
® Marque de commerce déposée aux É.-U.
© 2009 Honeywell International Inc. Tous droits réservés
69-1110EF—02 E.K. 05-09
 Loading...