

Page 1
EN-1
Page 2

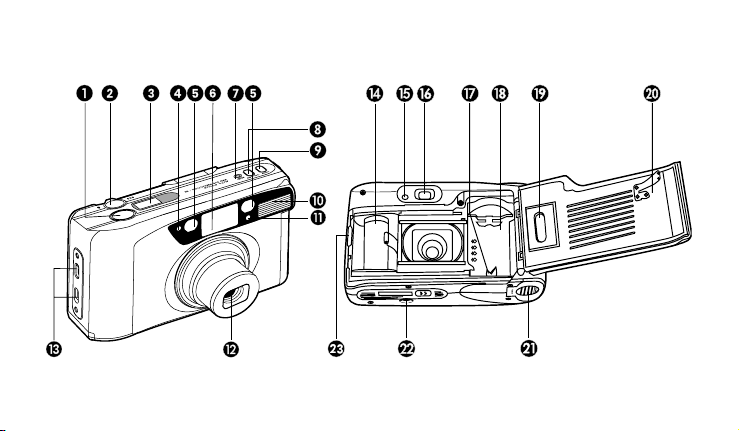
Names of Parts
1. Shutter button
2. Zoom lever
3. LCD panel
4. Red-eye reduction/Self-timer lamp
5. Auto focus sensor
6. Viewfinder window
7. Manual rewind button
8. Power (ON/OFF) button
9. Mode button
10.Built-in flash
11.AE metering sensor
12.Lens/lens cover
EN-2
13.Strap eyelet
14.Film take-up spool
15.Ready LED
16.Viewfinder eyepiece
17.Film rewind shaft
18.Film chamber
19.Film check window
20.Back cover
21.Battery cover
22.Tripod socket
23.Back cover latch
Page 3
EN-3
Page 4
EN-4
Page 5

CONTENTS
NAMES OF PARTS........................................2
WARRANTY POLICY.....................................6
FOR SAFE USE OF YOUR CAMERA...............9
PRECAUTIONS FOR YOUR CAMERA............10
ATTACHING THE STRAP ..............................15
INSERTING THE BATTERY...........................15
CHECKING THE BATTERY............................16
LOADING THE FILM......................................16
AUTO POWER OFF SYSTEM........................17
HOLDING THE CAMERA...............................17
TAKING A PICTURE......................................18
AUTOMATIC FLASH PHOTOGRAPHY.............19
MODE SELECTION & LCD PANEL .................20
AUTO FLASH MODE.....................................21
RED-EYE REDUCTION MODE...................... 21
FLASH-OFF MODE ......................................22
FILL-IN FLASH MODE .................................22
SELF-TIMER MODE .....................................23
AUTO FILM REWIND................................... 23
MID-ROLL REWIND......................................24
AUTO-DATE.................................................24
DATE IMPRINTING.......................................24
DATE AND TIME ADJUSTMENT.....................25
SPECIFICATIONS.......
...................................27
EN-5
Page 6

WARRANTY POLICY
All Pentax cameras purchased through
authorized bona fide photographic
distribution channels are guaranteed against
defects of material or workmanship for a
period of twelve months from date of
purchase. Service will be rendered, and
defective parts will be replaced without cost
to you within that period, provided the
equipment does not show evidence of
impact, sand or liquid damage, mishandling,
tampering, battery or chemical corrosion,
operation contrary to operating instructions,
or modification by an unauthorized repair
shop. The manufacturer or its authorized
EN-6
representatives shall not be liable for any repair
or alterations except those made with its
written consent and shall not be liable for
damages from delay or loss of use or from
other indirect or consequential damages of
any kind, whether caused by defective
material or workmanship or otherwise; and
it is expressly agreed that the liability of the
manufacturer or its representatives under all
guarantees or warranties, whether expressed
or implied, is strictly limited to the replacement
of parts as hereinbefore provided. No refunds
will be made on repairs by non-authorized
Pentax service facilities.
Page 7

PROCEDURE DURING
12-MONTH WARRANTY PERIOD
Any Pentax which proves defective during the
12-month warranty period should be returned
to the dealer from whom you purchased the
equipment or to the manufacturer. If there is
no representatives of the manufacturer in your
country, send the equipment to the
manufacturer, with postage prepaid. In this
case, it will take a considerable length of time
before the equipment can be returned to you
owing to the complicated customs procedures
required. If the equipment is covered by
warranty, repairs will be made and parts
replaced free of charge, and the equipment
will be returned to you upon completion of
servicing. If the equipment is not covered
by warranty, regular charges of the
manufacturer or of its representatives will
apply. Shipping charges are to be borne by
the owner.If your Pentax was purchased
outside of the country where you wish to
have it serviced during the warranty period,
regular handling and servicing fees
may be charged by the manufacturer's
representatives in that country.
Notwithstanding this, your Pentax returned
to the manufacturer will be serviced free of
EN-7
Page 8

charge according to this procedure and
warranty policy. In any case, however,
shipping charges and customs clearance
fees to be borne by the sender. To prove
the date of your purchase when required,
please keep the receipt or bills covering the
purchase of your equipment for at least a
year. Before sending your equipment for
servicing, please make sure that you are
sending it to the manufacturer's authorized
representatives or their approved repair
shops, unless you are sending it directly to
the manufacturer. Always obtain a quotation
for the service charge, and only after you
EN-8
accept the quoted service charge, instruct the
service station to proceed with the servicing:
This warranty policy does not affect the
customer's statutory rights.
The local warranty policies available from
Pentax distributors in some countries can
supersede this warranty policy.
Therefore, we recommend that you
review the warranty card supplied with
your product at the time of purchase, or
contact the PENTAX distributor in your
country for more information and to
receive a copy of the warranty policy.
Page 9

FOR SAFE USE OF YOUR
CAMERA
Although we have carefully designed this
camera for safe operation, please be sure
to follow precautions given in this manual.
WARNING
This mark indicates precautions that if not
followed, could result in serious injury to
the user.
CAUTION
This mark indicates precautions that, if not
followed, could result in minor or medium injury
to the user or damage to the equipment.
WARNING
The electric circuits inside the camera
contain high voltage working parts. Never
attempt to disassemble the camera
yourself.
Never touch internal parts of the camera
if they become exposed from dropping
the camera or for some other reason, as
there is danger of electric shock.
EN-9
Page 10

Wrapping the strap around your neck is
dangerous. Make sure that small children
do not get the strap caught around their
neck.
CAUTION
Do not use the flash near anyone's eyes,
as it may hurt them. Be particularly
careful with the flash around the infants
Never try to disassemble, short or
recharge the battery. Also, do not dispose
of the battery in fire, as it may explode.
Remove the battery from the camera
immediately if it becomes hot or begin to
smoke.Be careful not to burn yourself
during removal.
EN-10
PRECAUTIONS FOR YOUR
CAMERA
Precautions when taking pictures
Do not use the camera where it may come
in contact with rain, water or any other
liquid, because the camera is not
weather, water, or liquid resistant.
Should the camera get wet from rain,
splashing water, or any other liquid, wipe
it off immediately with a dry soft cloth.
Do not drop the camera or allow it to hit a
solid object. If the camera suffers a
severe shock or impact, take it to a
PENTAX service center for inspection.
Page 11

Be careful not to subject the camera to
strong vibrations, shock or pressure. Use
a cushion to protect the camera when
carrying it in a motorcycle, car, boat, etc.
Condensation on the interior or the
exterior of the camera may be extremely
harmful to the camera mechanism as it
may cause rust and / or corrosion.
Furthermore, if the camera is taken from
warm temperature to a subfreezing one
or vice versa, the formation of ice may
cause damage. In such a case, put the
camera into a case or plastic bag so that
any changes in temperature difference
is minimized. Do not remove it from the
bag until temperature has stabilized.
Precautions for storage
Avoid leaving the camera for extended
periods in places where temperature and
humidity are high such as in a car.
Do not store the camera in a closet with
mothballs or in a case where chemicals
are handled. Store it in a place with good
air circulation to prevent fungus growth.
EN-11
Page 12

Precautions for proper care
Use a blower and lens brush to remove
dust accumulated on the lens or the
viewfinder window.
Never use solvents such as paint thinner,
alcohol or benzene to clean the camera.
To clean the external camera surfaces,
but not glass surfaces; use of a dry or
silicone-treated cloth is recommended.
EN-12
Other precautions
The temperature range at which this camera
functions properly is 50°C to –10°C
(122°F to 14°F).
To maintain optimum performance, it is
recommended that the camera be
inspected every one or two years. If the
camera has not been used for an
extended period, or is being prepared
for an important photographic session, it
is recommended that you have the
camera inspected or test shoot with it.
The PENTAX warranty provided only for
the repair of defects in materials or
Page 13

workmanship. Damage of any kind cannot
be repaired at free of charge under the
term of warranty. If the difficulty is caused
as a direct result of the product being
used in conditions as outlined in the other
operation contrary to the instructions
outlined in this manual, charges will be
assessed or a repair will be provided.
PRECAUTIONS FOR
BATTERY USAGE
Misuse of a battery can cause hazards
such as leakage, overheating,
explosions, etc.
The battery should be inserted with the
"+" and "–" sides facing correctly.
Never try to disassemble, short or
recharge the battery. Also do not dispose
of the battery in a fire as it may explode.
Battery performance may be temporarily
hindered in low temperatures, but will
recover in normal temperatures.
EN-13
Page 14

When the camera is in a bag, make sure
the main switch is on OFF position.
Otherwise, battery power may be wasted
if the shutter release button is accidentally
pressed.
Keep a spare battery on hand for replacement
convenience when shooting outdoors or
while traveling.
Be sure to store battery out of reach of
children.
EN-14
LCD Panel Indicator
(Fig.13)
Film counter
Battery life
Film status
Auto-flash mode
Red-eye reduction mode
Flash-off mode
Fill-in flash mode
Self-timer mode
Film loading or rewinding
Page 15

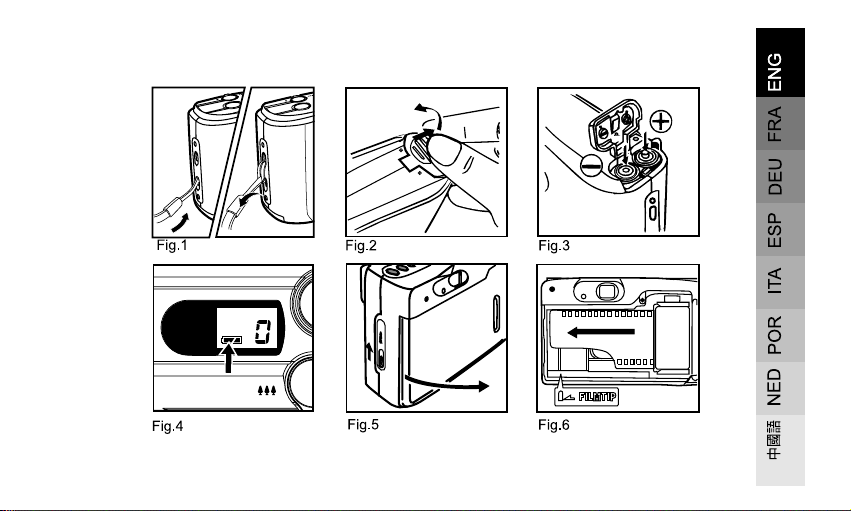
ATTACHING THE STRAP (Fig. 1)
Pass the narrow end of the strap through
the strap eyelet and pass the other end
through the loop.
The protruding part of the strap
adjustment clip can be used to press the
small buttons on the camera.
INSERTING THE BATTERY
1. Push the battery cover toward the open
direction and open the cover. (Fig.2)
2. Insert the two AA batteries according to
the polarity information of the battery
cover.
3. Close the cover by pushing it back till it
locks firmly.
Remove the batteries from the camera
when you do not expect to use it for a
long period time.
FOR THE DATE MODEL
Set the date and time. Refer to the DATE
IMPRINTING.
EN-15
Page 16

CHECKING THE BATTERY
The battery condition in camera can be
checked when you turn the power on. It is
displayed on the LCD panel. (Fig.4)
1. The full battery mark ( ) is displayed
when the battery is in good condition.
2. The half battery mark ( ) is displayed
when the battery is nearly exhausted.
3. The blank battery mark ( ) is displayed
when the battery is too low. All functions
are locked and the battery mark and film
counter blink. Replace the battery
immediately.
EN-16
LOADING THE FILM
This camera is designed to use DX-coded
films of ISO 100-400. Your camera
automatically sets the correct film speed.
1. Slide the back cover latch upward to
open. (Fig.5)
2. Load the film cartridge into the film
chamber and pull out the film enough to
reach the FILMTIP mark inside the camera.
(Fig.6)
3. Make sure the film lies flat. Close the back
cover. The film advances to the first frame
and "1" is displayed on the LCD panel.
(Fig.7)
Page 17

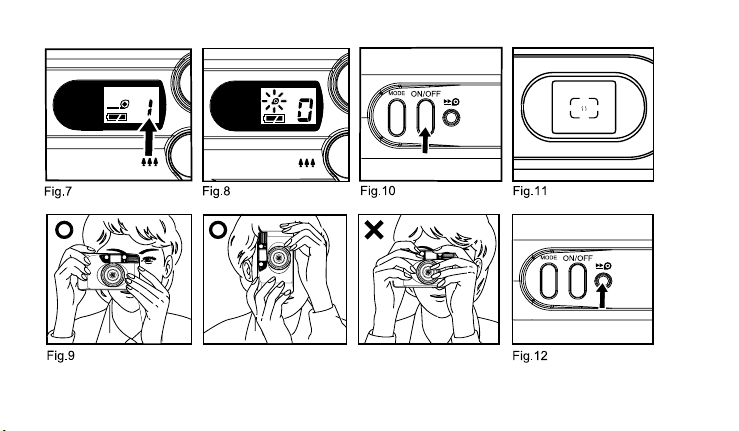
If " " blinks on LCD panel, it indicates
film loading failure. Please re-load the film.
(Fig.8)
Whether the film is in camera or not can
be confirmed by either the film check
window or the film counter on the LCD
panel.
Automatic film loading can be done no
matter if power is on or off.
AUTO POWER OFF SYSTEM
The camera is turned on and left unused for
five minutes, the lens automatically retracts
and the power is turned off to save the
battery energy.
HOLDING THE CAMERA (Fig. 9)
1. Keep your elbows close to your body to
hold the camera steady.
2. Whether for vertical or horizontal
photography, hold the camera with both
hands.
3. If the flash is used with the camera held
EN-17
Page 18

vertically, the flash unit should be
positioned above the lens.
4. If the flash is used while holding the camera
with the flash positioned below the lens the
result will look unnatural.
5. Be careful that fingers, hair or the camera
strap are not in the way of the lens, the
auto-exposure windows, autofocus
windows or the flash.
6. Hold the camera firmly with both hands
in a stable posture and press the shutter
button with your fingertip.
EN-18
TAKING A PICTURE
1. Press power button. The lens extends
to the 35mm wide-angle setting.
2. Set the subject you wish to take within
the autofocus frame located in the center
of the viewfinder. (Fig.11)
3. Compose the subject by moving the zoom
lever to right or left.
4. Press the shutter button halfway.
5. Gently press the shutter button fully to
take a picture. The film advances
automatically to the next frame.
Page 19

Make sure that the subject is at least
0.9m at 35mm to 1.2m at 60mm away
from the camera.
Be careful not to accidentally cover the
autofocus sensor windows on the front
of your camera because this will cause
incorrect focusing.
Keep the autofocus sensor windows
clean to ensure the accurate focusing. If
they are dirty, they should be cleaned
with a soft cloth.
AUTOMATIC FLASH
PHOTOGRAPHY
If additional light is required, the built-in flash
will activate automatically.
1. When the flash is fully charged, the
ready, green, LED lights up by pressing
the shutter button halfway.
After the flash is discharged, it will take
approx. eight seconds to recharge fully.
The " " mark of the LCD panel and green
LED will blink.
EN-19
Page 20

Flash effective range:
(When a negative color film is used.)
Wide: 0.9m-2.2m (3.0ft-7.2ft) (ISO 100),
0.9m-4.2m (3.0ft-13.8ft) (ISO 400)
Tele: 1.2m-1.3m (3.9ft-4.3ft) (ISO 100),
1.2m-2.5m (3.9ft-8.2ft) (ISO 400)
EN-20
MODE SELECTION & LCD
PANEL (Fig.10)
Turn the power on by pressing the Power
button. Press the Mode button to set various
exposure modes . The mode selection will
change each time the Mode button is
pressed. When the power is turned on, the
mode is always preset in the auto flash mode.
The sequence of the selected modes and
displays are as follows.
Page 21

Auto Mode (Automatic self
activating flash)(Camera controls
exposures automatically.)
Red-eye Reduction Mode
(Flash as Auto mode)
AUTO FLASH MODE
In this mode, the flash fires automatically
depending on the light conditions.
RED-EYE REDUCTION MODE
Flash-Off Mode
(The Flash will not fire.)
Fill-in Flash Mode (Flash on)
(The Flash will always fire.)
Self-timer Mode (Auto Flash mode)
Selecting this mode makes it possible to
minimize the red-eye effect that sometimes
occurred when taking portrait photographs
with flash.
1. Press the mode button until the
appears on the LCD panel.
2. Press the shutter button halfway so that
symbol
EN-21
Page 22

the Ready LED (Green lamp) lights up.
3. Press the shutter button fully down to
take a picture.
FLASH-OFF MODE
This mode will forcibly prevent the flash
activating, thus allowing available light
photography where flash photography is
prohibited.
1. Press the mode button until the symbol
appears on the LCD panel.
2. Press the shutter button to take a picture
without flash.
EN-22
In the flash-off mode, slow shutter speeds
are used for available light. The use of a
tripod is recommended to prevent the
camera from shaking.
FILL-IN FLASH MODE
This mode will activate flash forcibly when
you want to photograph subjects with
sunlight to their side or back. It lets you take
more natural looking pictures by softening
harsh shadows.
1. Press the mode button until the symbol
appears on the LCD panel.
Page 23

2. Press the shutter button. There will be
every time when shutter button is pressed.
flash
SELF-TIMER MODE
1. Compose your picture with the camera
on a steady support like a tripod.
2. Press Mode button until the symbol
appears on the LCD panel. Press shutter
button, the self-timer lamp blinks relatively
slow in the first seven seconds and then
blinks rapidly for two seconds and then
lights on for the last one second. After
approx. total ten seconds have passed,
the shutter will be released.
Press the shutter button once again or
turn off the power to cancel the self-
timer.
AUTO FILM REWIND
1. The film will be automatically rewound at
the end of the roll, and the lens will retract
into the camera.
2. Rewinding will automatically stop after
the film is completely rewound, and " 0"
and a blinking " " will appear on the
film counter LCD. Make sure that the
EN-23
Page 24

blinking " " appears before opening the
back cover. Open the back cover and
remove the film. When the "0" is not
displayed on the LCD counter after
rewinding, press the Manual rewind
button.
AUTO-DATE(Fig.A)
(FOR AUTO-DATE MODEL ONLY)
The Auto-date model of this camera has a
quartz-controlled auto-date mechanism
(clock/calendar) that is programmed through
December 31, 2049.
MID-ROLL REWIND (Fig.12)
The film may be rewound before the roll is
finished. Use the protruding part of the strap
clip to press the manual rewind button to
rewind the film.
EN-24
DATE IMPRINTING
(DATE MODEL ONLY)
DATE PRINT SETTING (Fig.A)
Press the Back cover MODE button to select
the date, time or no imprint on the film.
The date unit must be reset when you
changed the batteries.
Page 25

DATE AND TIME ADJUSTMENT
(Fig.B)
1. Press the Back cover MODE button until
the year, month and day appear on the
display as in Fig B.
2. Press the SELECT button to choose the
number blinking.
3. Press the SET button to change the
number blinking.
Press the SET button repeatedly until the
desired number is set.
1. Repeat the above steps 2. and 3. until
the year, month and day are all correct.
2. Press the SELECT button again after all
EN-25
Page 26

of the numbers have been changed. The
numbers will stop blinking and the "Imprint
Mark" (-) will appear above the number
by pressing the SELECT button again.
The camera is now ready for use.
If you want to change the time, press
the MODE button to display the day,
hour and minute.
Using the same method as was used to
change the date, repeat the above step 2.
and 3. to change the time.
Press the SELECT button after changing
the time. After the ":" mark begins to blink,
press the SELECT button again to put the
camera in the "Imprint" state.
EN-26
To change the seconds, first make the ":
" mark blink and then use the SET button
to adjust the seconds. You can obtain
the exact time by the time signal.
Afterwards press the SELECT button to
put the camera in the "Imprint" state.
Page 27

Specifications
Type 35mm lens shutter camera with zoom lens and built-in flash
Film format 24 x 36mm
Film speed With DX film, Auto setting, ISO-100/200, 400
Lens 4 elements 4 groups
35mm/F6.3~60mm/F10.3
Shutter Electrically programmed shutter
Shutter speed Approx. 1/250 sec.-1/3 sec.
Focusing system Infrared active autofocus with focus lock
Focusing range 35mm: 0.9m (3.0ft)-infinity, 60mm: 1.2m (3.9ft)-infinity
Viewfinder
Flash Built-in flash, Recharging time: approx. 8sec. with fresh alkaline batteries
Field of view: 80%(at 3m)
Magnification: 0.57X/TELE, 0.36X/WIDE
EN-27
Page 28

Flash effective TELE: 1.2m - 1.3m (3.9ft - 4.3ft) (ISO 100),
range 1.2m - 2.5m (3.9ft - 8.2ft) (ISO 400)
WIDE: 0.9m - 2.2m (3.0ft - 7.2ft) (ISO 100),
0.9m - 4.2m (3.0ft - 13.8ft) (ISO 400)
Photograph mode Auto flash, Red-eye reduction, Flash-off, Fill-in, Self-timer
Self-timer 10sec.delay electronic self-timer
LCD panel Film counter, Film indicator, Photograph mode, Battery symbol
Film transport Auto loading, Auto advance, Auto rewind, Mid-roll rewind
Power source 1.5V AA alkaline battery x 2
Battery life 12 rolls of 24-exp. film with 50% flash
Dimension 115.0 x 67.0 x 39.0mm [4.5 x 2.6 x 1.5 in] (without databack)
115.0 x 67.0 x 44.0mm [4.5 x 2.6 x 1.7 in] (with databack)
Weight 190g [6.7 oz] (with databack)
(without battery) 185g [6.5 oz] (without databack)
Date imprinting 5 modes (Date model only)
Note: Specifications and design are subject to change without notice.
The CE Mark is a Directive conformity mark of the European Community.
EN-28
Page 29

For Customers in USA
STATEMENT OF FCC COMPLIANCE
This device complies with Part 15 of the
FCC rules.
Operation is subject to the following two
conditions:(1)This device may not cause
harmful interference,and (2) this device
must accept any interference received,
including interference that may cause
undersired operation.
Changes or modifications not approved by
the party responsible for compliance could
void the use’s authority to operate the
equipment.
This equipment has been tested and found
to comply with the limits for a Class B digital
device,pursuant to part 15 of the FCC Rules.
These limits are designed to provide
reasonable protection against harmful
interference in a residential installation. This
equipment generates,uses and can radiate
radio frequency energy and, if not installed
and used in accordance with the instructions,
may cause harmful interference to radio
communications. However, there is no
guarantee that interference will not occur in
a particular installation.
If this equipment does cause harmful
EN-29
Page 30

interference to radio or television reception,
which can be determined by turning the
equipment off and on, the user is encouraged
to try to correct the interference by one or
more of the following measures:
Reorient or relocate the receiving antenna.
Increase the separation between the
equipment and receiver.
Consult the dealer or an experienced radio/
TV technician for help.
EN-30
For Customers in Canada
This Class B digital apparatus meets all
requirements of the Canadian Interference-
Causing Equipment Regulations.
 Loading...