

Page 1

Digital Camera
PENTAX Efina
Operating Manual
To ensure the best performance from your camera, please
read the Operating Manual before using the camera.
Page 2

Table of Contents
Chapter 1. Names of parts ...................................................................3
Chapter 2. Setting up your camera .....................................................4
Loading the battery...........................................................................4
Charging the battery.........................................................................4
Charging the battery with a computer USB port...............................5
Inserting an SD/SDHC Card.............................................................5
Turning on the camera .....................................................................6
Setting the language, date/time........................................................7
Chapter 3. Taking pictures and videos ...............................................8
Taking pictures in Smart Capture mode ...........................................8
Adjusting camera settings ................................................................9
Monitoring the battery level ............................................................10
Taking a video................................................................................10
Using other picture-taking modes...................................................10
Using Scene modes .......................................................................11
Using the Self-Portrait mirror ..........................................................12
Chapter 4. Reviewing pictures...........................................................13
Chapter 5. Transferring pictures to your computer.........................14
Chapter 6. Using an EYE-FI Card (optional accessory) ..................15
Chapter 7. Viewing images on a computer....................................... 17
Provided Software ..........................................................................17
System Requirements ....................................................................17
Installing the Software ....................................................................18
Chapter 8. Solving camera problems................................................20
Main Specifications ............................................................................21
Appendix..............................................................................................23
Using Your Camera Safely.............................................................24
Care to be Taken During Handling .................................................27
Page 3
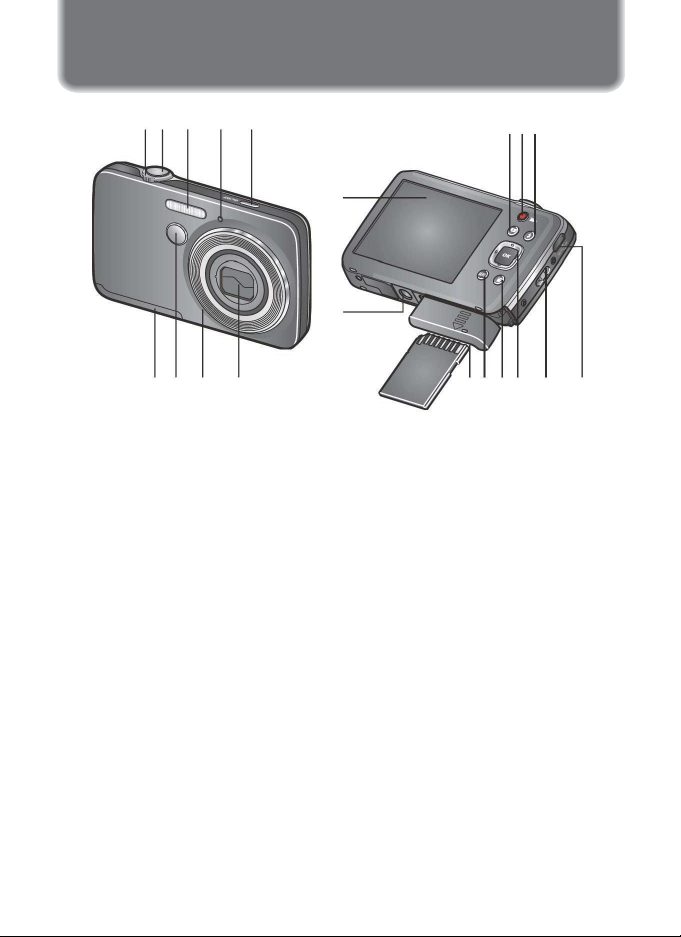
Chapter 1. Names of parts
12 3 4 5
20
19
18
9
678
17 16 15 14 13
1 Wide Angle/ Telephoto 12 Flash Mode button
2 Shutter button 13 USB port, A/V Out
3 Flash 14 Strap post
4 Self-timer/Video light 15 4, 4523
5 Power button 16 Delete button
6 Lens 17 3 button
7 Microphone 18
8 Self-Portrait mirror
Battery compartment, SD/SDHC
or EYE-FI Card slot
9 Battery/card cover 19 Tripod socket
10 Review button 20 Display
11 Video Record button
121110
3
Page 4

Chapter 2. Setting up your camera
Loading the battery
All batteries lose power over time-even if they’re not being used. For
longer life, charge the battery prior to use.
Use the battery
to push aside
the battery lock.
Charging the battery
Charge the Li-Ion battery anytime-don’t wait until it’s exhausted. Charge
until the Battery Charging light stops blinking. (Charging time varies by
battery level. You can use the camera while it’s plugged in.)
1
Turn off the camera.
4
Page 5

2
Connect the camera, USB cable, and power adapter.
Yours may
differ.
Battery Charging light:
• Blinking: still charging
• Steady On: finished charging
Charging the battery with a computer USB port
Use the USB cable to connect the camera to a computer USB port.
Charge until the Battery Charging light stops blinking. (USB charging is
typically slower than the previous method.)
Inserting an SD/SDHC Card
Your camera has enough internal memory for a couple practice pictures.
We highly recommend purchasing a Class 4 or higher SD/SDHC Card
(up to 32 GB) to conveniently store more pictures/videos. (Card class is
typically shown on the card and/or packaging.)
Your camera also accepts type X2 EYE-FI Cards. Learn more at
www.eye.fi.
1
Turn off the camera, then open the battery/card cover.
5
Page 6
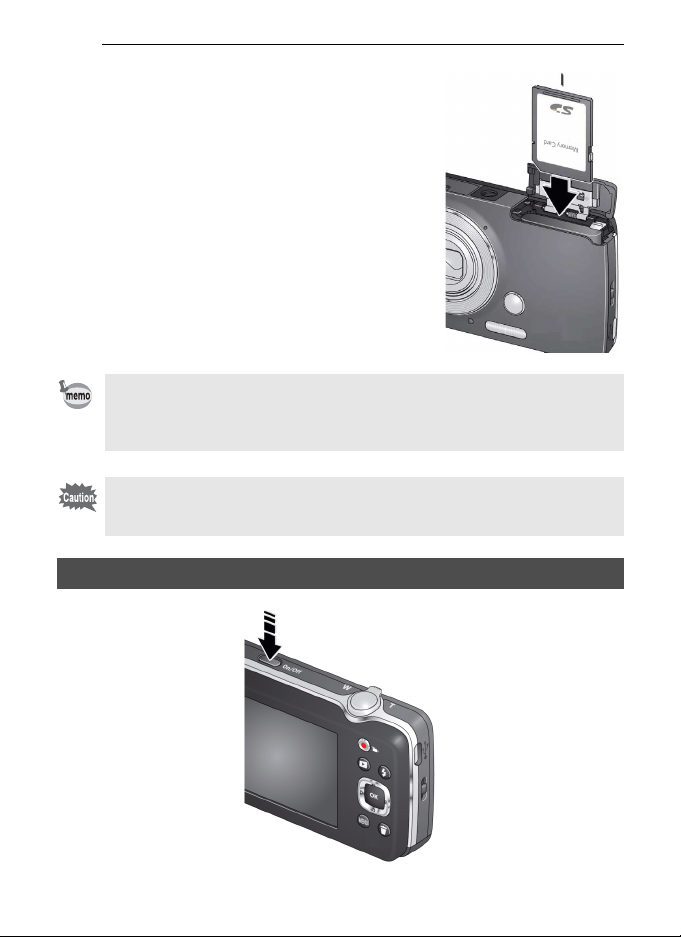
2
Insert a card until it clicks into
place. (To remove a card, press
and release it.)
When you turn on the camera, it checks to see if a card is inserted. If
pictures/videos are detected in internal memory, the camera prompts
you to move them to the card. New pictures/videos are stored on the
card.
A card can only be inserted one way; forcing it may cause damage.
Inserting or removing a card while the camera is on may damage the
pictures, the card, or the camera.
Turning on the camera
Accessory
6
Page 7
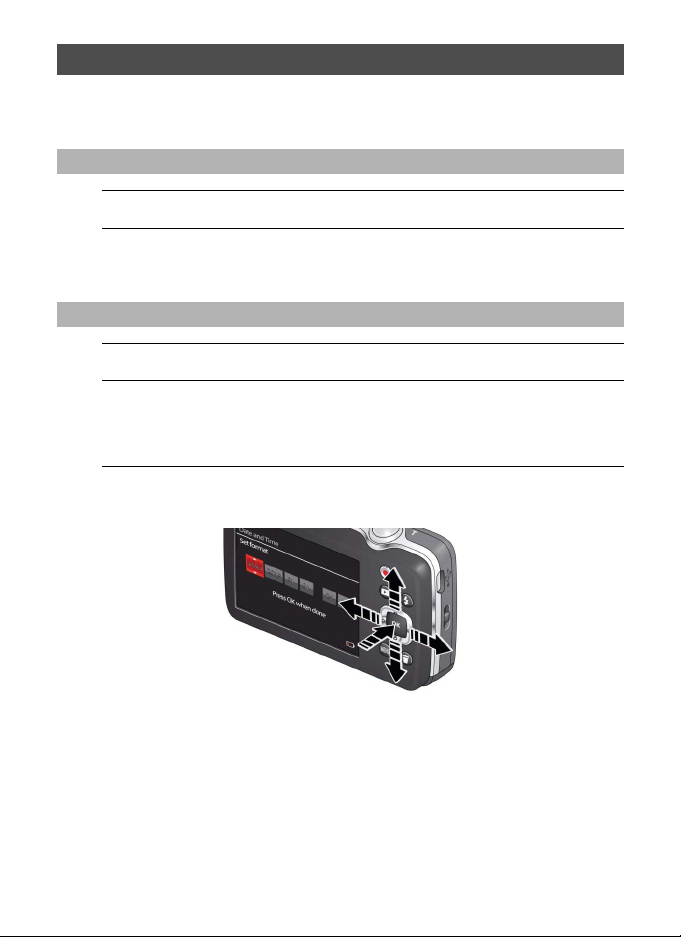
Setting the language, date/time
The first time you turn on the camera, you’re prompted to choose your
language and set the date/time.
Setting the language
1
Press 23 to find your language.
2
When your language is highlighted, press the 4
button.
Setting the date and time
1
Press 23 to change the date format, if desired.
2
Press 45 to highlight the year, month, date, hours,
and minutes. Press 23 to change the highlighted
value.
3
When finished setting the date and time, press the 4
button.
7
Page 8
Chapter 3. Taking pictures and videos
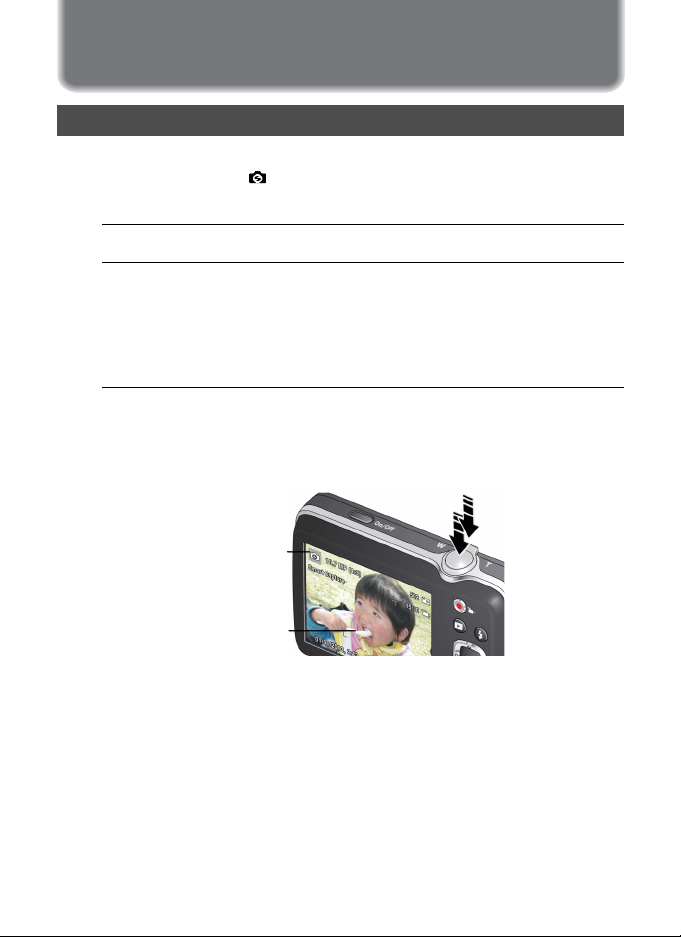
Taking pictures in Smart Capture mode
When you turn on the camera for the first time, it’s ready to take pictures
in Smart Capture mode . (After that, it remembers the last mode you
used.)
1
Use the display to compose the picture.
2
Press the Shutter button halfway down to focus and
set exposure.
Focus brackets indicate the camera focus area. If the camera is not
focusing on the desired subject, release the Shutter button and
recompose the scene.
3
Press the Shutter button completely down.
The new picture is briefly displayed and is saved unless you press the
Delete button i. (To dismiss the picture quickly and get back to taking
pictures right away, press the Shutter button halfway down.)
Smart Capture
mode
Focus brackets
8
Page 9
+
1.0
502
15:30
0.0
+
1.0
502
15:30
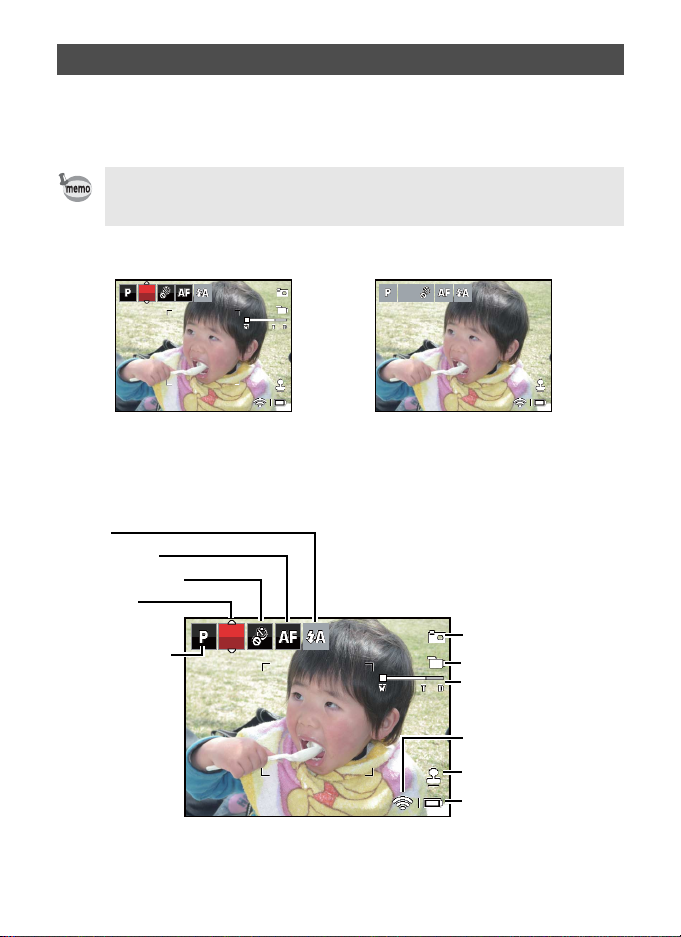
Adjusting camera settings
To adjust camera settings, you can either use:
• 3 button - for access to all settings
• Shortcuts-icons of the most popular settings, at the top of the display
By default, shortcuts are displayed and active. To change the default
setting, press the 3 button. Under Settings, change Shortcut Icons
to Hide.
Flash
Focus mode
Self-timer/Burst
Exposure
compensation
Capture mode
Available shortcuts
+
1.0
502
15:30
Press 45 to choose a
shortcut, then press 4.
+
1.0
Shortcuts as status indicators
Press the 3 button
to choose a setting. (Or
press 4 to activate
shortcuts.)
Icon definitions
0.0
502
15:30
Pictures remaining
Video time remaining
Zoom slider
EYE-FI status
Date stamp
Battery level
9
Page 10

Monitoring the battery level
Don’t miss out on great pictures and videos-keep your battery fully
charged.
Full
Three quarters
Half
One Quarter/Critical /
Plugged into AC Power
Taking a video
1
Use the display to compose the video.
2
To start recording, press and release
the Video Record button .
To stop recording, press and release the button
again. The first frame of the new video and the
play button are displayed for a few seconds.
• To play the video, press the 4 button.
• If you don’t like the video, press the Delete
button i, then follow the prompts.
Using other picture-taking modes
Capture mode For
Smart Capture
Program Mode More creative control than Smart Capture.
Scene Modes
General picture taking - it offers excellent image quality and
ease of use.
Point-and-shoot simplicity when taking pictures under
special conditions.
10
Page 11

Press 23 to choose a picture-taking mode
(Smart Capture, Program, or a Scene mode).
Current picture-taking
mode
Using Scene modes
Choose a Scene mode before taking a picture.
1
Press 23 to change the picture-taking mode to Scene
modes (SCN), then press the 4 button.
2
Press 2345 to highlight a Scene mode, then press
the 4 button.
Scene mode For
Portrait Full-frame portraits of people.
Sport Subjects that are in motion. Shutter speed is fast.
Landscape Distant scenes.
Close Up Close range. Use available light instead of flash.
Sunset Subjects at dusk.
Backlight Subjects that are in shadow or “backlit.”
Candle Light Subjects illuminated by candlelight.
Children Action pictures of children in bright light.
Bright Bright beach or snow scenes.
Fireworks Fireworks. Place the camera on a tripod.
Self Portrait Close-ups of yourself.
Night Portrait Red-eye reduction of people in low-light.
High ISO People indoors, in low-light scenes.
Panorama “Stitching” 2 or 3 pictures into 1 panoramic scene.
Blur Reduction Reducing blur of camera shake or subject motion.
11
Page 12

Using the Self-Portrait mirror
Use the mirror when taking self-portrait pictures and videos. The mirror
helps you stay in-frame.
12
Page 13

Chapter 4. Reviewing pictures
00000
00:47
Selec t Ph ot o
Birthday, Children, New. ..
1
Press the Review button Q.
The most recent picture/video is displayed.
2
Press 45 to view previous or next picture/video.
Understanding the review icons
Protected
Duration
(videos)
Select
Tag
Multi-up
Play (videos)
00:47
Select Photo
00000
Image number
Birthday, Children, New...
Favorite
Keyword tags
Battery level
EYE-FI status
13
Page 14

Chapter 5. Transferring pictures to your computer
1
Turn off the camera.
2
Using the USB cable, connect the camera to a computer
USB port. (Use only the cable included with this
camera.)
The camera turns on.
3
Follow the computer prompts to transfer pictures/
videos to your computer.
14
Page 15

Chapter 6. Using an EYE-FI Card (optional accessory)
This chapter pertains only if you’re using an EYE-FI Card.
An EYE-FI Card stores pictures just like an SD/SDHC Card does. It also
has a built-in Wi-Fi antenna that uses your Wi-Fi network to transfer
pictures from your camera to your computer or mobile device. Choose
an EYE-FI X2 Card or higher.
To set up and use the EYE-FI Card and EYE-FI Center Software, follow
the EYE-FI documentation that accompanied the card.
If using an EYE-FI Card in this camera, it’s critical that you disable (do
not turn on) Endless Memory Mode in EYE-FI Center Software.
1
Turn off the camera, then open the battery/card cover.
2
Insert a card until it clicks into
place. To remove a card, press and
release it.
When you turn on the camera, it checks to see if a card is inserted. If
pictures/videos are detected in internal memory, the camera prompts
you to move them to the card. New pictures/videos are stored on the
card.
15
Accessory
Page 16

EYE-FI status icons
• The camera must be turned on to transfer and share pictures.
• Do not turn off the camera while the EYE-FI Card is transferring
pictures.
Icon Meaning
EYE-FI is idle, set to On, and not currently transferring.
EYE-FI is on the network and transferring pictures.
Error
EYE-FI is off.
Changing EYE-Fi Settings
1
In picture-taking mode, press the 3 button. Press
23 to scroll through the list.
2
Highlight EYE-FI, then press the 4 button.
3
Choose Selective Share (recommended).
4
When you’re in range of your known Wi-Fi network, turn
on the camera to transfer pictures to your computer or
mobile device.
Other EYE-FI Information
• It’s critical that you disable (do not turn on) Endless Memory
Mode in EYE-FI Center Software.
• EYE-FI Cards are certified for use in the countries and regions in
which they were purchased.
• The EYE-FI Card has a wireless LAN function. Do not insert the EYEFI Card where Wi-Fi is prohibited, such as while aboard an airplane or
in a hospital.
• Even when you set EYE-FI to off, the card may transmit radio waves.
• The card may become warm during use. This is normal.
• Battery life is reduced when using an EYE-FI Card.
• For the best reception when transferring pictures to a computer or
mobile device, the rear (display side) of the camera should face the
Wi-Fi access point.
16
Page 17

Chapter 7. Viewing images on a computer
Provided Software
The following software is included in the CD-ROM.
Image viewing/managing/editing software
Windows
• “MediaImpression 3.6.1 LE”
Macintosh
• “MediaImpression 2.2 LE”
System Requirements
The following system requirements must be met for you to fully enjoy the
images and movies captured with the camera on your computer.
®
• Supported OS should be pre-installed in PC and updated to the latest
version.
• Working status is not guaranteed for all PCs.
• System requirements mentioned here are the minimum for playing or
editing movies.
Windows
OS Windows® XP (SP3), Windows Vista®, Windows® 7, Windows® 8
CPU Intel
Memory 512 MB (2GB or higher recommended)
HDD volume 300 MB available hard disk space (1GB or higher recommended)
Graphics Intel
Monitor 1024 × 768 pixels, 16-bit color or higher
®
®
Pentium® IV 1.6 GHz, AMD Athlon™ XP 1800+, or equivalent
®
Core™ 2 Duo E6300, AMD Athlon™ 64 X2 5000+, or higher)
(Intel
®
GMA X3100/NVIDIA GeForce® MX440/ATI Radeon™ 9200,
with 128M video memory, or equivalent
®
GMA 4500HD/NVIDIA GeForce® 8600GT/ATI Radeon™ HD
(Intel
3800, with 256M video memory, or higher recommended)
17
Page 18

Macintosh
OS Mac OS X 10.4, 10.5, 10.6, 10.7, 10.8
CPU Power PC G4 800 MHz, or equivalent
Memory 512 MB (1GB or higher recommended)
HDD volume 300 MB available hard disk space (1GB or higher recommended)
Graphics NVIDIA GeForce
Monitor 1024 × 768 pixels, 16-bit color or higher
®
Core™ 2 Duo, or higher)
(Intel
®
equivalent
®
GMA 950/NVIDIA GeForce® 7300GT/ATI Radeon™ X1600,
(Intel
with 128MB video memory, or higher recommended)
FX 5200 Ultra with 64MB video memory, or
Installing the Software
Install the image viewing/managing/editing software “MediaImpression”.
• Make sure your computer meets the system requirements before
installing the software.
• When multiple accounts have been set up in your computer, log on
with an account that has administrative rights before installing the
software.
Windows
1
2
3
4
®
Turn your PC on.
Insert the CD-ROM into the CD-ROM/DVD drive.
If the top screen (illustration below) appears, go to Step 5.
Click [Computer] in the Start menu.
Double-click the CD-ROM/DVD drive icon.
The top screen appears.
18
Page 19

5
Click [Software Install],
choose a language in the
“Choose Setup Language”
screen and click [OK].
The setup screen appears. Follow the
on-screen guidance and install the
software.
Macintosh
1
Turn your Macintosh on.
2
Insert the CD-ROM into the CD-ROM/DVD drive.
3
Double-click the CD-ROM icon.
4
Double-click the [Software Installer] icon.
The installation screen appears.
5
Click [MediaImpression 2.2
LE].
The setup screen appears. Follow the
on-screen guidance and install the
software.
Top screen
19
Page 20

Chapter 8. Solving camera problems
Status Solution
Camera does not turn on, off;
buttons do not function.
Camera freezes when a card is
inserted or removed.
SD/SDHC Card is not
recognized.
Get support for EYE-FI Cards
and Software.
• Remove then reinsert or replace the battery.
• Charge the battery.
• Turn the camera off, then back on. Make sure
the camera is turned off before inserting or
removing a card.
• Card may be corrupted. Format the card in the
camera. (Find the Format feature in the Settings
menu.)
• Caution: Formatting a card deletes all
pictures and videos, including protected
files.
• Use another SD/SDHC Card.
support.eye.fi
20
Page 21

Main Specifications
Lens 6 elements in 5 groups (3 aspherical elements)
Focal Length 4.7 - 23.3mm
35mm equivalent
focal length
Aperture F3.5(W)-15.0(T)
Zoom Optical Zoom 5X
Digital Zoom Approx. 5X
Motion Blur
Reduction
Focus Type Face Priority, Center, Multi-Zone
Face Detection Face Detection AF&AE is available for all modes up to
Number of Effective pixels Approx. 14 megapixels
Image Sensor 1/2.3" CCD
Number of
Recorded
pixels
Sensitivity (Standard Output
Sensitivity)
White Balance Auto, Daylight, Tungsten, Fluorescent, Open shade
Display 2.5" LCD, approx. 230K dots
Exposure
Control
Scene modes Portrait, Sport, Landscape, Close Up, Sunset,
Shutter Speed 1/8 – 1/1400 sec.
Still High-sensitivity anti-shake mode
Movie Movie Shake Reduction mode
Focus Range
(From lens face)
Still 14 MP (4:3),12 MP (3x2), 10 MP (16x9), 6 MP (4:3),
Movie 1280, 640
Metering System Multi-segment; center-weighted; center spot
Exposure
Compensation
Approx. 26 mm - 130 mm
Standard
0.5 [m] – Infinity (at wide setting)
0.9 [m] – Infinity (at tele setting)
Macro
0.2–0.8 [m] (at wide setting)
0.8–1.3 [m] (at tele setting)
5 faces.
3 MP (4:3)
Auto, Manual (ISO 80 - 1600)
±2EV(1/3EV steps)
Backlight, Candle Light, Children, Bright, Fireworks,
Self Portrait, Night Portrait, High ISO, Panorama LeftRight, Panorama Right-Left, Blur Reduction
21
Page 22

Built-in flash Modes Auto, Flash Off, Red Eye Preflash, Flash On
Flash Range Wide: Approx. 0.3 - 4.1m (ISO Auto)
Tele: Approx. 0.8 - 2.3m (ISO Auto)
Drive Modes Single shot, Burst(3 shots), Self timer (10s), Delay
Storage Media Built-in Memory (approx. 32 MB), SD/SDHC Memory
Power Source Rechargeable lithium-ion battery D-LI108
Battery life Still*: Approx. 200 shots (Rechargeable Lithium-ion
Interfaces USB2.0(Hi-Speed): PC/AV terminal
Video Output NTSC/PAL
Dimensions Approx. 87.0 (W) × 54.0 (H) × 20.5 (D)mm
Weight With battery &
* Recording capacity shows approximate number of shots recorded during CIPA-compliant
testing. Actual performance may vary depending on operating conditions.
** According to the result of PENTAX in-house testing.
SD card
Body Approx. 91 g (without battery and SD memory card)
shutter (2s), 2-shots self-timer
Card
battery)
Playback**: Approx. 250 min. (Rechargeable Lithiumion battery)
Approx. 108 g (loaded and ready)
22
Page 23

Appendix
Thank you for purchasing this PENTAX Digital Camera.
Please read this manual before using the camera in order to get the most
out of all the features and functions. Keep this manual safe, as it can be
a valuable tool in helping you to understand all the camera’s capabilities.
Regarding copyrights
Images taken with this PENTAX Digital Camera that are for anything other than
personal enjoyment cannot be used without permission according to the rights as
specified in the Copyright Act. Please take care, as there are cases where
limitations are placed on taking pictures even for personal enjoyment during
demonstrations, performances or of items on display. Images taken with the
purpose of obtaining copyrights also cannot be used outside the scope of use of
the copyright as laid out in the Copyright Act, and care should be taken here also.
Regarding trademarks
• Eye-Fi, the Eye-Fi logo and Eye-Fi connected are trademarks of Eye-Fi, Inc.
•ArcSoft
• Microsoft, Windows and Windows Vista are registered trademarks of Microsoft
• Macintosh and Mac OS are trademarks of Apple Inc., registered in the U.S. and
• Intel, Intel Core and Pentium are trademarks of Intel Corporation in the U.S.
• AMD and AMD Athlon, ATI Radeon are trademarks or registered trademarks of
• NVIDI and GeForce are trademarks and/or registered trademarks of NVIDIA
• All other trademarks are the property of their respective owners.
To users of this camera
• Do not use or store this camera in the vicinity of equipment that generates
• The liquid crystal panel used for the display is manufactured using extremely
• There is a possibility that the illustrations and the screen display in this manual
®
ArcSoft Inc. in the United States and/or other countries.
Corporation in the United States of America and other countries.
other countries.
and/or other countries.
Advanced Micro Devices, Inc.
Corporation in the U.S. and/or other countries.
strong electromagnetic radiation or magnetic fields. Strong static charges or the
magnetic fields produced by equipment such as radio transmitters could
interfere with the display, damage the stored data, or affect the camera’s
internal circuitry and cause camera misoperation.
high precision technology. Although the level of functioning pixels is 99.99% or
better, you should be aware that 0.01% or fewer of the pixels may not illuminate
or may illuminate when they should not. However, this has no effect on the
recorded image.
are different from the actual ones.
, and its logo are either the registered trademark or trademark of
23
Page 24

• In this manual, the generic term “computer(s)” refers to either a Windows PC or
a Macintosh.
• In this manual, the term “battery(ies)” refers to any type of batteries used for this
camera and its accessories.
Using Your Camera Safely
We have paid close attention to the safety of this camera. When using
this camera, we request your special attention regarding items marked
with the following symbols.
Warning
Caution
This symbol indicates that ignoring this item could
cause serious personal injuries.
This symbol indicates that ignoring this item could
cause minor or medium personal injuries, or loss of
property.
About the Camera
Warning
• Do not disassemble or modify the camera. High voltage areas are present
inside the camera, with a risk of electric shock.
• If the camera interior is exposed due to dropping or otherwise damaging
the camera, never touch the exposed portion. There is a risk of electric
shock.
• Wrapping the strap around a neck is dangerous. Take care that small
children do not hang the strap around their necks.
• If any irregularities occur during use, such as smoke or a strange odor, stop
use immediately, remove the battery, and contact your nearest PENTAX
Service Center. Continuing to use the camera can cause a fire or electric
shock.
Caution
• Do not place your finger over the flash when discharging the flash. You
may burn yourself.
• Do not cover the flash with clothing when discharging the flash.
Discoloration may occur.
24
Page 25

• Some portions of the camera heat up during use. There is a risk of low
temperature burns when holding such portions for long periods.
• Should the display be damaged, be careful of glass fragments. Also, be
careful not to allow the liquid crystal to get on your skin, in your eyes or
mouth.
• Depending on your individual factors or physical condition, the use of the
camera may cause itching, rashes or blisters. In case of any abnormality,
stop using the camera and get medical attention immediately.
About the Power Adapter
Warning
• Always use the power adapter provided with this camera, with the specified
power and voltage. Using a power adapter not provided with this camera,
or using the provided power adapter with an unspecified power or voltage
can cause a fire, electric shock, or camera breakdown. The specified
voltage is 100 - 240V AC.
• Do not disassemble or modify the power adapter. This can cause a fire or
electric shock.
• If the generation of smoke or strange odor from the power adapter or other
abnormality occurs, immediately discontinue use and consult a PENTAX
Service Center. Continuing to use the adapter can cause a fire or electric
shock.
• If water should happen to get inside the power adapter, consult a PENTAX
Service Center. Continuing to use the adapter can cause a fire or electric
shock.
• If a thunder storm should occur while using the power adapter, unplug the
adapter and discontinue use. Continuing to use the adapter can cause
damage to the equipment, fire, or electric shock.
• Wipe off the plug of the power adapter if it becomes covered with dust.
Accumulated dust on the plug may cause a fire.
Caution
• Do not place or drop heavy objects on the power adapter. Doing so may
damage the adapter. Should the power adapter be damaged, consult a
PENTAX Service Center.
• Do not touch or short-circuit the terminal area of the power adapter while
the cord is plugged in.
25
Page 26

• Do not handle the power adapter with wet hands. This can cause an
electric shock.
• Do not drop the power adapter, or subject it to violent impact. This can
cause equipment breakdown.
• Do not use the power adapter to charge a battery other than a
rechargeable lithium-ion battery D-LI108. This can cause an explosion, or
heating, or may damage the power adapter.
About the Battery
Warning
• Be sure to store the battery out of the reach of small children. Placing the
battery in their mouths may cause an electric shock.
• If any leakage from the battery should come in contact with your eyes, do
not rub them. Flush your eyes with clean water and get medical attention
immediately.
Caution
• Only use the specified battery with this camera. Use of other batteries may
cause an explosion or fire.
• Do not disassemble the battery. This may cause an explosion or leakage.
• Remove the battery from the camera immediately if it becomes hot or
begins to smoke. Be careful not to burn yourself during removal.
• Keep wires, hairpins, and other metal objects away from the (+) and (-)
contacts of the battery.
• Do not short the battery or dispose of the battery in fire. This can cause an
explosion or fire.
• If any leakage from the battery should come in contact with skin or clothing,
it may cause irritation to the skin. Wash the affected areas thoroughly with
water.
• Precautions for D-LI 108 Battery Usage:
BATTERY MAY EXPLODE OR FIRE IF MISTREATED.
- DO NOT DISASSEMBLE OR DISPOSE OF IN FIRE.
- DO NOT CHARGE EXCEPT SPECIFIED CHARGING CONDITION.
- DO NOT HEAT ABOVE 140°F / 60°C, OR SHORT CIRCUIT.
- DO NOT CRUSH OR MODIFY.
26
Page 27

Keep the Camera and its Accessories out of the Reach of Small
Children
Warning
• Do not place the camera and its accessories within the reach of small
children.
1. If the product falls or is operated accidentally, it may cause serious
personal injuries.
2. Wrapping the strap around a neck may cause suffocation.
3. To avoid the risk of a small accessory such as the battery or SD Memory
Cards from being swallowed by mistake, keep them out of the reach of
small children. Seek medical attention immediately if an accessory is
accidentally swallowed.
Care to be Taken During Handling
Before Using Your Camera
• When traveling, take the Worldwide Service Network listing that is included
in the package. This will be useful if you experience problems abroad.
• When the camera has not been used for a long time, confirm that it is still
working properly, particularly prior to taking important pictures (such as at
a wedding or when traveling). Contents of the recording cannot be
guaranteed if recording, playback or transferring your data to a computer,
etc. is not possible due to a malfunction of your camera or recording media
(SD Memory Card), etc.
• The lens on this camera is not interchangeable. The lens is not removable.
About the Battery
• Storing the battery fully charged may decrease the battery performance.
Avoid storing in high temperatures.
• If the battery is left inserted and the camera is not used for a long time, the
battery will over-discharge and shorten the battery’s life.
• Charging the battery a day before use or on the day of use is
recommended.
27
Page 28

Precautions on Carrying and Using Your Camera
• Do not subject the camera to high temperatures or high humidity. Do not
leave the camera in a vehicle, as the temperature can get very high.
• Do not subject the camera to strong vibrations, shocks, or pressure. Use a
cushion to protect the camera from vibrations of motorcycles, automobiles,
or ships.
• The display may appear black at high temperatures, but will return to
normal at normal temperatures.
• The display may respond more slowly at low temperatures. This is due to
liquid crystal properties, and is not a malfunction.
• Sudden temperature changes will cause condensation on the inside and
outside of the camera. Place the camera in your bag or a plastic bag, and
remove it after the temperatures of the camera and surroundings are
equalized.
• Avoid contact with garbage, mud, sand, dust, water, toxic gases, or salt.
These could cause the camera to breakdown. Wipe the camera to dry off
any rain or water drops.
• Do not press the display with excessive force. This could cause it to break
or malfunction.
• Be careful not to sit down with the camera in your back pocket as this may
damage the exterior of the camera or the display.
• Be careful not to overtighten the tripod screw when using a tripod.
Cleaning Your Camera
• Do not clean the camera with organic solvents such as thinner, alcohol or
benzine.
• Use a lens brush to remove dust accumulated on the lens. Never use a
spray blower for cleaning as it may damage the lens.
Storing Your Camera
• Do not store the camera with preservatives or chemicals. Storage in high
temperatures and high humidity can cause mold to grow on the camera.
Remove the camera from its case and store it in a dry and well-ventilated
location.
• Avoid using or storing the camera where it may be exposed to static
electricity or electrical interference.
28
Page 29

• Avoid using or storing the camera in direct sunlight or where it may be
exposed to rapid changes in temperature or to condensation.
• Periodic inspections are recommended every one to two years to maintain
high performance.
Other Precautions
• The SD Memory Card is equipped with a write-protect switch. Setting the
switch to LOCK prevents new data from being recorded on the card, the
stored data from being deleted, and the card from being formatted by the
camera or computer. The message appears on the display when the card
is write-protected.
• Care should be taken when removing the SD Memory Card immediately
after using the camera, as the card may be hot.
• Keep the battery/card cover closed and do not remove the SD Memory
Card or turn the camera off while the data is being played back or saved to
the card, or the camera is connected to a computer with the USB cable, as
this may cause the data to be lost or the card to be damaged.
• Do not remove the SD Memory Card during formatting as this may damage
the card and render it unusable.
• The data on the SD Memory Card may be lost in the following
circumstances. We do not accept any liability for data that is deleted
(1) when the SD Memory Card is mishandled by the user.
(2) when the SD Memory Card is exposed to static electricity or electrical
interference.
(3) when the SD Memory Card has not been used for a long time.
(4) when the SD Memory Card is ejected or the battery is removed while
the card is being accessed.
• If it is not used for a long time, the data on the card may become
unreadable. Be sure to regularly make a backup of important data on a
computer.
• Be sure to format SD Memory Cards that are unused or have been
previously used on another camera.
• Please note that deleting data, or formatting the SD Memory Cards or the
built-in memory does not completely erase the original data. Deleted files
can sometimes be recovered using commercially available software. It is
user’s responsibility to ensure the privacy of such data.
29
Page 30

PENTAX RICOH IMAGING CO., LTD.
2-35-7, Maeno-cho, Itabashi-ku, Tokyo 174-8639,
JAPAN
http://www.pentax.jp/english
• Specifications and external dimensions are subject to change without notice.
38623EN Copyright © PENTAX RICOH IMAGING CO., LTD. 2012
R01DTK12
 Loading...