

Page 1
e_kb487.book Page i Wednesday, December 8, 2010 9:49 AM
Medium Format Digital SLR Camera
Operating Manual
To ensure the best performance from your camera,
please read the operating manual before using the camera.
Page 2
e_kb487.book Page ii Wednesday, December 8, 2010 9:49 AM
Thank you for purchasing this PENTAX medium format digital SLR
camera h. Please read this manual before using the camera in
order to get the most out of all the features and functions. Keep this
manual safe, as it can be a valuable tool in helping you to understand
all the camera’s capabilities.
Lenses you can use
In general, lenses that can be used with this camera are D FA645 and
FA645 lenses, and 645 lenses that have an Aperture s (Auto) position.
To use any other lens or accessory, see p.26 of this manual.
Regarding copyrights
Images taken with this camera that are for anything other than personal
enjoyment cannot be used without permission according to the rights as
specified in the Copyright Act. Please take care, as there are cases
where limitations are placed on taking pictures even for personal
enjoyment during demonstrations, performances or of items on display.
Images taken with the purpose of obtaining copyrights also cannot be
used outside the scope of use of the copyright as laid out in the
Copyright Act, and care should be taken here also.
Regarding trademarks
PENTAX, h and smc PENTAX are trademarks of HOYA
CORPORATION.
PENTAX Digital Camera Utility and SDM are trademarks of HOYA
CORPORATION.
Microsoft and Windows are registered trademarks of Microsoft
Corporation in the United States and other countries. Windows Vista is
either a registered trademark or trademark of Microsoft Corporation in
the United States and/or other countries.
Macintosh and Mac OS are trademarks of Apple Inc., registered in the
U.S. and other countries.
SDHC Logo is a trademark of SD-3C, LLC.
This product includes DNG technology under license by Adobe
Systems Incorporated.
The DNG logo is either registered trademarks or trademarks of
Adobe Systems Incorporated in the United States and/or other
countries.
Interface are trademarks or registered trademarks of HDMI Licensing
HDMI, the HDMI logo and High-Definition Multimedia
LLC.
All other brands or product names are trademarks or registered
trademarks of their respective companies.
This product supports PRINT Image Matching III. PRINT Image
Matching enabled digital still cameras, printers and software help
photographers to produce images more faithful to their intentions.
Some functions are not available on printers that are not PRINT Image
Matching III compliant.
Copyright 2001 Seiko Epson Corporation. All Rights Reserved.
PRINT Image Matching is a trademark of Seiko Epson Corporation.
The PRINT Image Matching logo is a trademark of Seiko Epson
Corporation.
To users of this camera
• Do not use or store this device in the vicinity of equipment that
generates strong electromagnetic radiation or magnetic fields.
Strong static charges or the magnetic fields produced by equipment
such as radio transmitters could interfere with the monitor, damage
the stored data, or affect the product’s internal circuitry and cause
camera misoperation.
• The liquid crystal panel used for the monitor is manufactured using
extremely high precision technology. Although the level of functioning
pixels is 99.99% or better, you should be aware that 0.01% or fewer
of the pixels may not illuminate or may illuminate when they should
not. However, this has no effect on the recorded image.
• In this manual, both an SD Memory Card and an SDHC Memory Card
are referred to as SD Memory Cards hereafter.
• In this manual, the generic term “computer(s)” refers to either a
Windows PC or a Macintosh hereafter.
• In this manual, the term “battery(ies)” refers to any type of batteries
used for this camera and accessories.
There is a possibility that the illustrations and the display screen in this
manual are different from the actual product.
Page 3
e_kb487.book Page 1 Wednesday, December 8, 2010 9:49 AM
FOR USING YOUR CAMERA
SAFELY
We have paid close attention to the safety of this product. When using
this product, we request your special attention regarding items marked
with the following symbols.
Warning
Caution
ABOUT THE CAMERA
Warning
• Do not disassemble or modify the camera. High voltage areas
are present inside the camera, with the risk of electric shock.
• If the camera interior is exposed due to dropping or otherwise
damaging the camera, never touch the exposed portion. There is
a risk of electric shock.
• Wrapping the strap around your neck is dangerous. Take care
that small children do not hang the strap around their necks.
• Do not look directly at the sun through the camera with a
telephoto lens attached, as viewing the sun may damage your
eyes. Viewing the sun directly with a telephoto lens may lead to
a loss of eyesight.
• If any irregularities occur during use, such as smoke or a strange
odor, stop use immediately, remove the battery or the AC
adapter, and contact your nearest PENTAX Service Center.
Continuing to use the product can cause a fire or electric shock.
This symbol indicates that violating this item could
cause serious personal injuries.
This symbol indicates that violating this item could
cause minor or medium personal injuries, or loss of
property.
• Some portions of the camera heat up during use. There is a risk
of low temperature burns when holding such portions for long
periods.
• Should the monitor be damaged, be careful of glass fragments.
Also, be careful not to allow the liquid crystal to get on your skin
or in your eyes or mouth.
• Depending on your individual factors or physical condition, the
use of the camera may cause itching, rashes or blisters. In case
of any abnormality, stop using the camera and get medical
attention immediately.
About the Battery Charger and AC Adapter
Warning
•
Always use the battery charger and AC adapter exclusively
developed for this product, with the specified power and voltage.
Using a battery charger or AC adapter not exclusive to this
product, or using the exclusive battery charger or AC adapter with
an unspecified power or voltage can cause a fire, electric shock, or
camera breakdown. The specified voltage is 100 - 240V AC.
• Do not disassemble or modify the product. This can cause a fire
or electric shock.
• If the generation of smoke or strange odor from the product or
other abnormality occurs, immediately discontinue use and
consult a PENTAX Service Center. Continuing to use the product
can cause a fire or electric shock.
• If water should happen to get inside the product, consult a
PENTAX Service Center. Continuing to use the product can
cause a fire or electric shock.
• If a thunder storm should occur while using the battery charger
and AC plug cord, unplug the AC plug cord and discontinue use.
Continuing to use the product can cause damage to the
equipment, fire or electric shock.
1
Page 4
e_kb487.book Page 2 Wednesday, December 8, 2010 9:49 AM
• Wipe off the plug of the AC plug cord if it becomes covered with
dust. Dust on the plug may cause a fire.
Caution
• Do not place or drop heavy objects on or forcefully bend the AC
plug cord. Doing so may damage the cord. Should the AC plug
cord be damaged, consult a PENTAX Service Center.
• Do not touch or short-circuit the terminal area of the AC plug cord
while the cord is plugged in.
• Do not plug or unplug the power cord with wet hands. This can
cause an electric shock.
• Do not drop the product, or subject it to violent impact. This can
cause equipment breakdown.
• Do not use the battery charger to charge a battery other than a
rechargeable lithium-ion battery D-LI90. Attempting to charge
other types of batteries may cause an explosion, or heating, or
may damage the battery charger.
• To reduce the risk of hazards, use only a CSA/UL certified power
supply cord set, cord is Type SPT-2 or heavier, minimum NO.18
AWG copper, one end with a molded-on male attachment plug
cap (with a specified NEMA configuration), and the other is
provided with a molded-on female connector body (with a
specified IEC nonindustrial type configuration) or the equivalent.
About the Battery
Warning
• Be sure to store the battery out of the reach of small children.
Placing it in their mouths may cause an electric shock.
• If any leakage from the battery should come in contact with your
eyes, do not rub them. Flush your eyes with clean water and get
medical attention immediately.
Caution
• Only use the specified battery with this camera. Use of other
batteries may cause an explosion or fire.
• Do not disassemble the battery. Disassembling the battery may
cause an explosion or leakage.
• Remove the battery from the camera immediately if it becomes
hot or begins to smoke. Be careful not to burn yourself during
removal.
• Keep wires, hairpins, and other metal objects away from the +
and - contacts of the battery.
• Do not short the battery or dispose of the battery in fire. This can
cause an explosion or fire.
• If any leakage from the battery should come in contact with skin
or clothes, wash the affected areas thoroughly with water.
• Precautions for D-LI90 Battery Usage:
USE SPECIFIED CHARGER ONLY.
DO NOT INCINERATE.
DO NOT DISASSEMBLE.
DO NOT SHORT CIRCUIT.
DO NOT EXPOSE TO HIGH TEMP. (140°F/60°C)
About the SD Memory Card
Warning
• Be sure to store the SD Memory Card out of the reach of small
children. The SD Memory Card may be swallowed by mistake.
Seek medical attention immediately if a memory card is
accidentally swallowed.
2
Page 5
e_kb487.book Page 3 Wednesday, December 8, 2010 9:49 AM
Care to be Taken During Handling
Before Using Your Camera
• When the camera has not been used for a long time, confirm that
it is still working properly, particularly prior to taking important
pictures (such as at a wedding or when traveling). Recorded data
cannot be guaranteed if recording, playback or transferring your
data to a computer, etc. is not possible due to a malfunction of
your camera or recording media (SD Memory Card), etc.
About the Battery and Charger
• Storing the battery fully charged may decrease the battery
performance. Avoid storing in high temperatures.
• If the battery is left inserted and the camera is not used for a long
time, the battery will over-discharge and shorten the battery’s
usage span.
• Charging the battery a day before use or on the day of use is
recommended.
• The AC plug cord provided with this camera is developed
exclusively for the battery charger D-BC90. Do not use it with
other devices.
Precautions on Carrying and Using Your
Camera
• Do not subject the camera to high temperatures or high humidity.
Do not leave the camera in a vehicle, as the temperature can get
very high.
• Do not subject the camera to strong vibrations, shocks, or
pressure. Use a cushion to protect the camera from vibrations of
motorcycles, automobiles, or ships.
• The temperature range for camera use is –10°C to 40°C (14°F to
104°F).
• The monitor may appear black at high temperatures, but will
return to normal at normal temperatures.
• The monitor may respond more slowly at low temperatures. This
is due to liquid crystal properties, and is not a malfunction.
• Sudden temperature changes will cause condensation on the
inside and outside of the camera. Place the camera in your bag
or a plastic bag, and remove it after temperature of the camera
and surroundings are equalized.
• Avoid contact with garbage, mud, sand, dust, water, toxic gases,
or salts. These could cause the camera to breakdown. Wipe the
camera to dry off any rain or water drops.
• Please do not press forcefully on the monitor. This could cause it
to break or malfunction.
• Be careful not to overtighten the tripod screw when using a tripod.
3
Page 6
e_kb487.book Page 4 Wednesday, December 8, 2010 9:49 AM
Cleaning Your Camera
• Do not clean the product with organic solvents such as thinner,
alcohol or benzine.
• Use a lens brush to remove dust accumulated on the lens or
viewfinder. Never use a spray blower for cleaning as it may
damage the lens.
• Please contact PENTAX Service Center for professional
cleaning of CCD Sensor. (This service will involve a fee.)
Storing Your Camera
• Do not store the camera with preservatives or chemicals. Storage
in high temperatures and high humidity can cause mold to grow
on the camera. Remove the camera from its case and store it in
a dry and well-ventilated location.
Other Precautions
• Periodic inspections are recommended every one to two years to
maintain high performance.
• Refer to “Precautions When Using the SD Memory Card” (p.32)
regarding the SD Memory Card.
• Please note that deleting images or formatting the SD Memory
Cards does not completely erase the original data. Deleted files
can sometimes be recovered using commercially available
software. It is user’s responsibility to ensure the privacy.
Regarding Product Registration
In order to better serve you, we request that you complete the product
registration, which can be found on the CD-ROM supplied with the camera
or the PENTAX website. Thank you for your cooperation.
Refer to “Using a Computer” (p.81) for more information.
4
Page 7

e_kb487.book Page 5 Wednesday, December 8, 2010 9:49 AM
Provided Manuals
This camera comes with two manuals: “Operating Manual” (this
book) and “Menu Reference”. Use these as needed.
Operating Manual
Describes the necessary preparations before use
and the basic operations of your camera. The
“Operating Manual” contains pages 1 to 103.
Menu Reference
Describes the functions that can be set when the
3 button is pressed and the product
specifications. After you read the “Operating
Manual” and become familiar with the basic
operations of your camera, you can carry the “Menu
Reference” with you as a handy reference guide.
The “Menu Reference” contains pages R1 to R48.
The following symbols indicate reference page numbers with
related information.
1 Refer to another location within the same
document.
z Refer to a location in the other document.
5
Page 8
e_kb487.book Page 6 Wednesday, December 8, 2010 9:49 AM
Operating Manual Contents
FOR USING YOUR CAMERA SAFELY ........................... 1
Care to be Taken During Handling ................................... 3
Provided Manuals ............................................................5
1 Before Using Your Camera 9
Checking the Contents of the Package........................10
Names and Functions of Working Parts...................... 11
Buttons, Dials, and Levers .............................................. 12
Display Indicators.......................................................... 14
Monitor............................................................................ 14
Viewfinder and LCD Panel.............................................. 20
2 Getting Started 23
Attaching the Strap........................................................24
Attaching the Lens.........................................................24
Lens Compatibility Chart................................................. 26
Using the Battery ........................................................... 28
Charging the Battery....................................................... 28
Inserting/Removing the Battery ...................................... 28
Using the AC Adapter (Optional) .................................... 30
Inserting/Removing the SD Memory Card ................... 31
Power ..............................................................................33
Initial Settings ................................................................ 34
Language Setting............................................................ 34
Date Adjustment ............................................................. 35
Formatting an SD Memory Card..................................... 36
Diopter Adjustment........................................................ 37
Attaching the Large Eyecup............................................ 37
Testing Your Camera.....................................................37
Shooting ..........................................................................37
Playing Back Captured Images.......................................38
How to Change Function Settings................................38
Using the Direct Keys......................................................38
Using the Control Panel ..................................................39
Using the Menus .............................................................40
3 Shooting Functions 41
Setting the File Format and Data Saving Method ....... 42
File Format ......................................................................42
JPEG Recorded Pixels/Quality Level ..............................43
Focusing .........................................................................44
Selecting the Focus Mode ...............................................44
AF Point Switching ..........................................................44
Exposure Setting............................................................ 45
Selecting the Metering Mode........................................... 45
Setting the Sensitivity......................................................46
Changing the Exposure Mode.........................................47
AE Lock...........................................................................49
White Balance................................................................. 50
Setting the Manual White Balance ..................................51
Setting the Color Temperature........................................52
Saving the White Balance Setting of a Captured
Image....................................................................52
Drive Mode......................................................................53
Continuous Shooting .......................................................53
Self-timer Shooting..........................................................54
Remote Control Shooting ................................................54
Interval Shooting .............................................................54
Multi-exposure.................................................................55
Mirror Lock-up .................................................................55
Auto Bracketing .............................................................56
Exposure Bracketing .......................................................56
Extended Bracketing .......................................................57
6
Page 9
e_kb487.book Page 7 Wednesday, December 8, 2010 9:49 AM
Flash Mode .....................................................................58
Attaching a Flash............................................................ 58
Setting the Flash Mode................................................... 58
Flash Compatibility Chart................................................ 60
Preview ...........................................................................61
Optical Preview............................................................... 61
Digital Preview................................................................ 61
Custom Image ................................................................ 62
4 Playback and Processing
Functions 65
Setting the Playback Functions.................................... 66
Playback Mode Palette ................................................... 66
Displaying a Single Image.............................................67
Deleting Images One by One ......................................... 67
Zoom Display.................................................................. 67
Displaying Multiple Images........................................... 68
Multi-image Display ........................................................ 68
Folder Display................................................................. 69
Calendar Display ............................................................ 69
Slideshow ....................................................................... 70
Image Comparison ......................................................... 70
Index ............................................................................... 71
Developing RAW Images............................................... 72
Protecting Images..........................................................73
Rotating Images ............................................................. 74
Changing the Image Size............................................... 75
Resizing Images ............................................................. 75
Cropping Images ............................................................ 75
Digital Filters ..................................................................76
Applying the Digital Filter................................................ 76
Recreating Filter Effects ................................................. 77
Searching for the Original Image.................................... 77
DPOF Settings................................................................78
Connecting the Camera to AV Equipment................... 79
5 Using a Computer 81
Connecting to a Computer............................................82
System Requirements .....................................................82
Connecting Your Camera to a Computer ........................83
Using the Provided Software ........................................84
Installing the Software.....................................................84
The PENTAX Digital Camera Utility 4 Screen.................85
Viewing the Help Menu ...................................................87
6 Appendix 89
Optional Accessories ....................................................90
Error Messages .............................................................. 93
Troubleshooting.............................................................94
Index................................................................................95
WARRANTY POLICY....................................................100
7
Page 10

e_kb487.book Page 8 Wednesday, December 8, 2010 9:49 AM
MEMO
8
Page 11

e_kb487.book Page 9 Wednesday, December 8, 2010 9:49 AM
1 Before Using Your Camera
Checking the Contents of the Package ..................... 10
Names and Functions of Working Parts ................... 11
Display Indicators ....................................................... 14
Page 12
e_kb487.book Page 10 Wednesday, December 8, 2010 9:49 AM
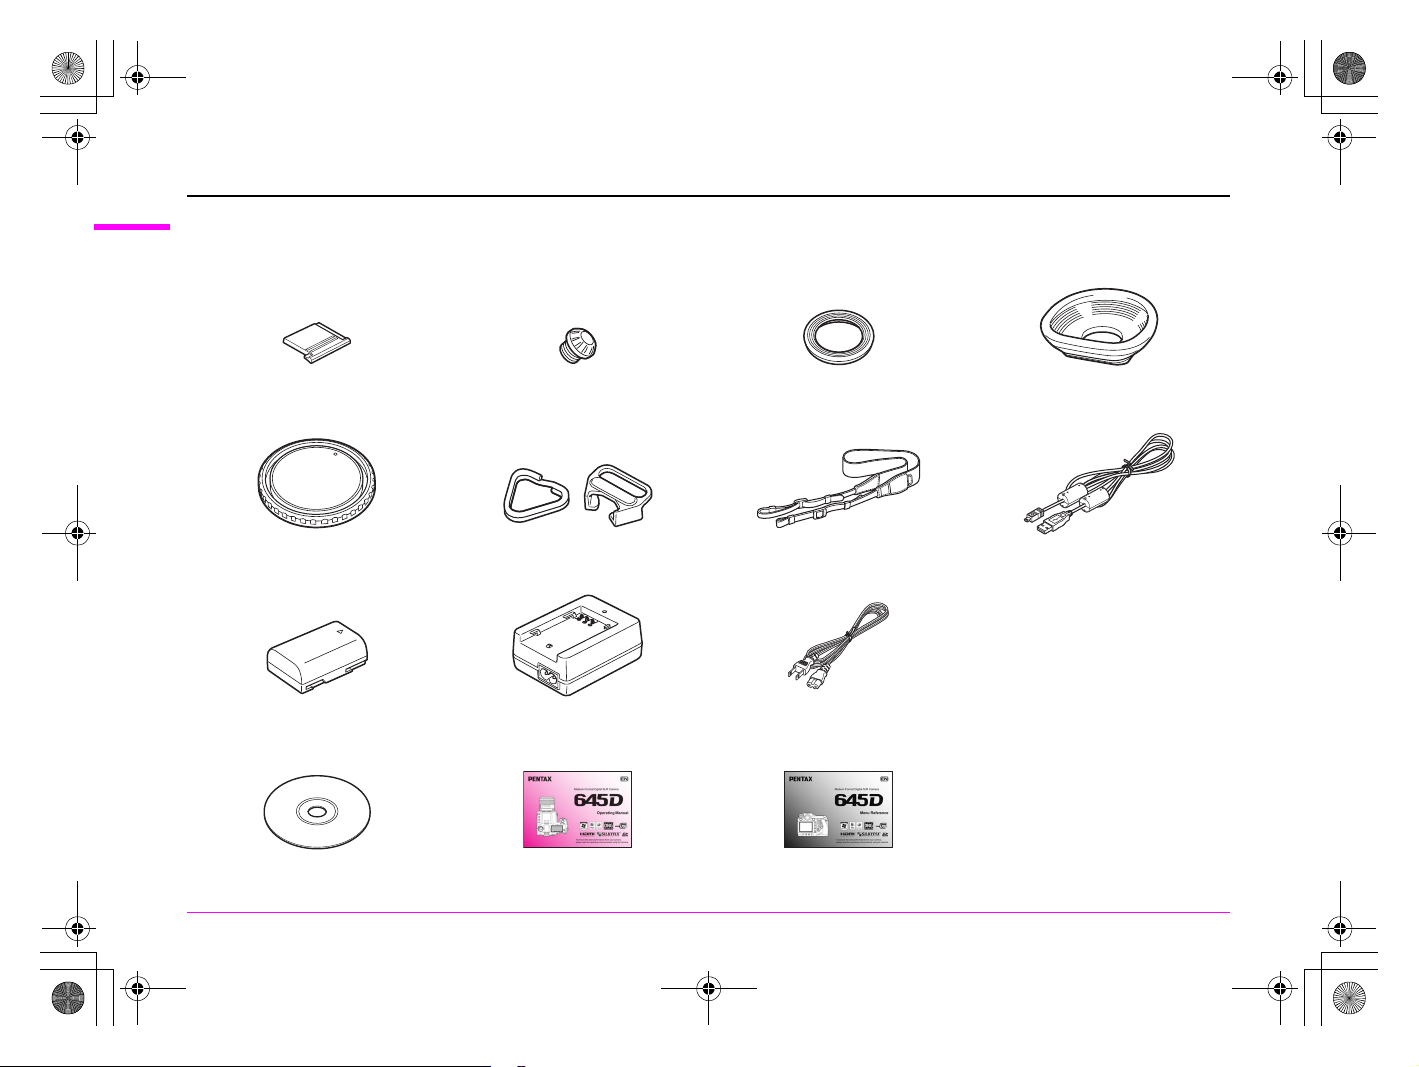
Checking the Contents of the Package
1
The following accessories are packaged with the h.
Before Using Your Camera
Check that all accessories are included before using your camera.
10
Hot shoe cover FK
(Installed on camera)
Body mount cap 645
(Installed on camera)
Rechargeable lithium-ion battery
D-LI90
Software (CD-ROM)
S-SW107
Sync socket 2P cap
(Installed on camera)
Triangular ring and protective cover
(Installed on camera)
Battery charger
D-BC90
Operating Manual (this book) Menu Reference
Standard eyecup
(Installed on camera)
Strap
O-ST107
AC plug cord
Large eyecup 645
O-EC107
USB cable
I-USB107
Page 13
e_kb487.book Page 11 Wednesday, December 8, 2010 9:49 AM
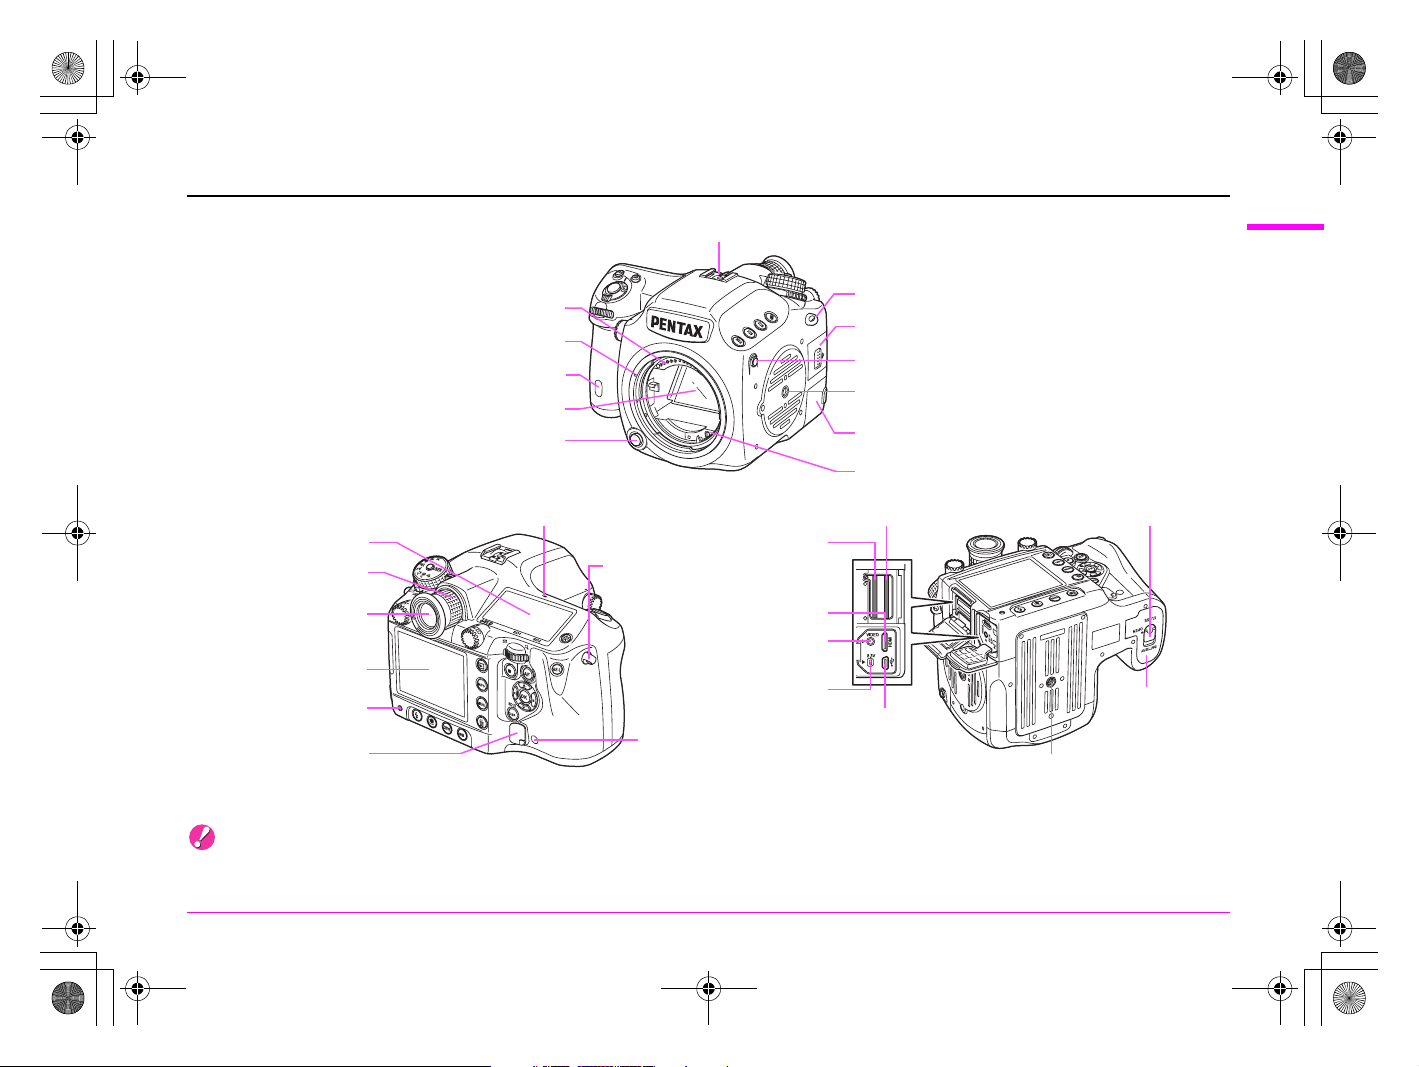
Names and Functions of Working Parts
Hot shoe
1
Before Using Your Camera
Lens information contacts
Lens mount index
Self-timer lamp/ Remote control receiver
Mirror
Lens unlock button
Image plane (CCD plane) indicator
LCD panel
Diopter adjustment ring
Viewfinder
Monitor
Card access lamp
Cable switch terminal
C
Strap lug
mini HDMI terminal
DC input terminal
Remote control receiver
* The front and rear views show the camera with the Hot shoe cover FK removed.
Caution
• Be sure to close the terminal cover correctly to keep out dust and moisture.
SD1 slot
(Type C)
Video terminal
(Mini jack)
Strap lug
Card cover
X-sync socket
Tripod socket
Terminal cover
AF coupler
SD2 slot
DC IN
USB terminal
Battery cover unlock knob
Battery cover
Tripod socket
11
Page 14
e_kb487.book Page 12 Wednesday, December 8, 2010 9:49 AM
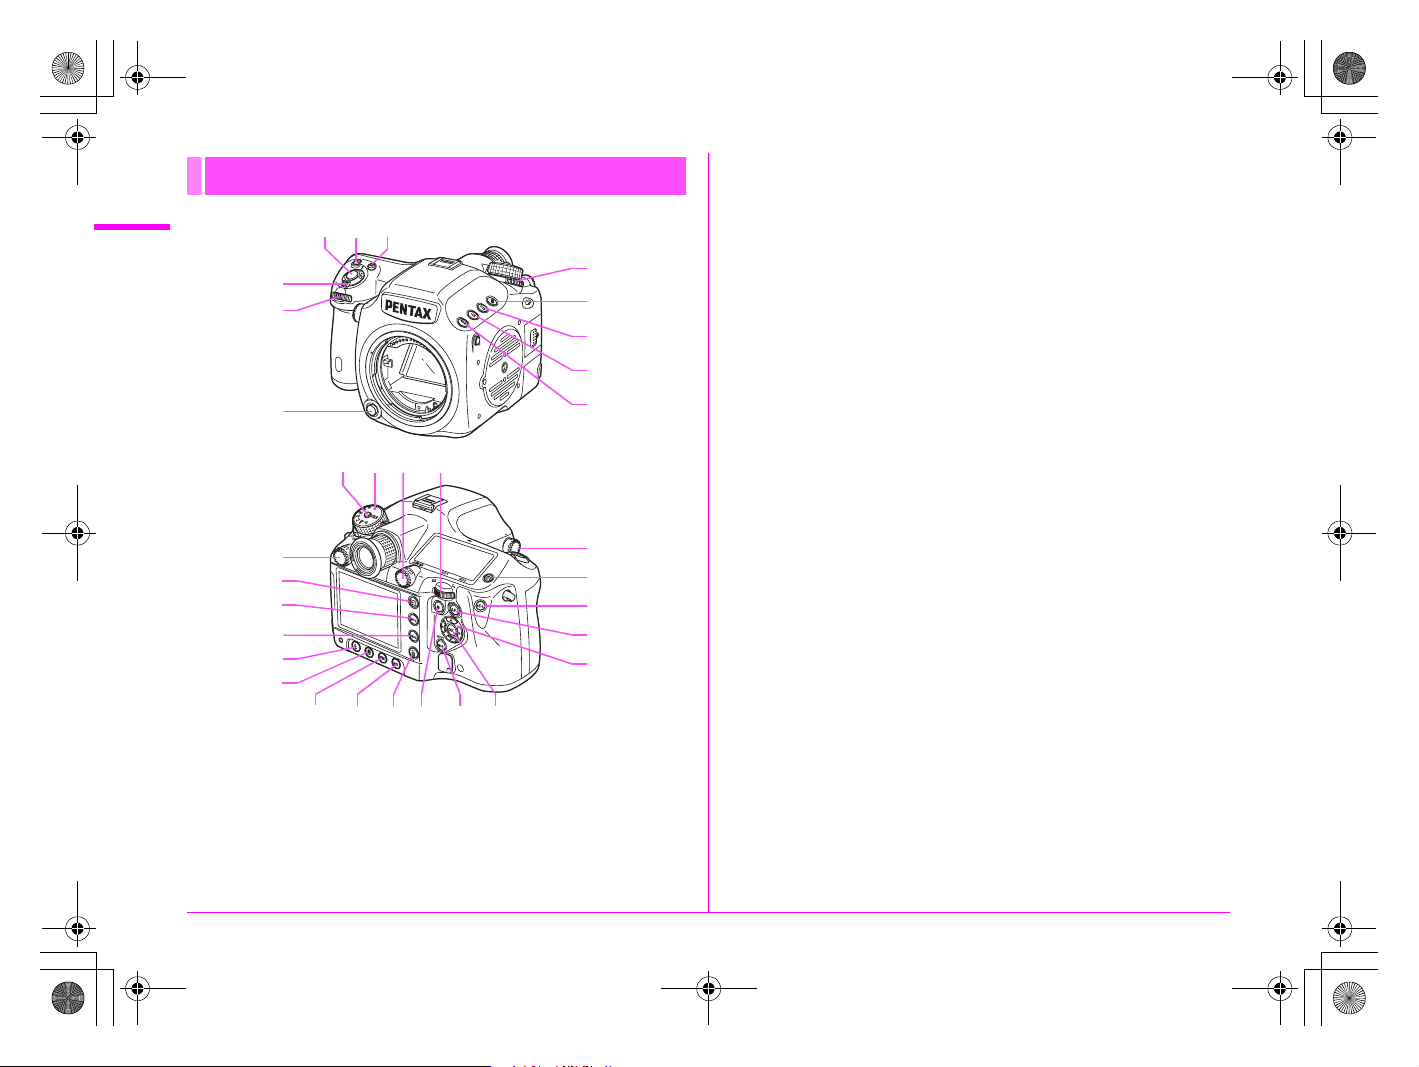
Buttons, Dials, and Levers
1
Before Using Your Camera
4
5
6
f
g
h
i
j
k
1 Shutter release button
Press to capture images. (p.37)
Press halfway during playback to switch to Capture mode.
2 o button
Turn the S dial while pressing this button to set the ISO
sensitivity. (p.46)
3 m (EV Compensation) button
Turn the S dial while pressing this button to set the EV
compensation value. (p.48)
3
21
7
8
Press to increase the magnification in enlarged view during
playback. (p.67)
4 Main switch
Move to turn the power on/off (p.33) or to preview (p.61).
5 R (Front) e-dial
9
0
a
Changes setting values.
Displays the next or previous image during playback.
Switches between the menu categories when a menu is displayed.
(p.40)
6 Lens unlock button
cdb
e
Press to detach a lens.
7 Metering mode switching lever
Switches between the metering modes. (p.45)
l
m
n
o
p
t
srq
uv
8 ] (Exposure Bracketing) button
Sets exposure bracketing. (p.56)
9 x (SD2 quality level) button
Sets the file format for saving images to the SD Memory Card in
the SD2 slot. (p.42)
0 w (SD1 quality level) button
Sets the file format for saving images to the SD Memory Card in
the SD1 slot. (p.42)
a | button
Temporarily changes the file format. Set the file format in the [A 4]
menu. (z p.R19)
b Mode dial lock button
Press to allow the mode dial to be turned. (p.48)
c Mode dial
Switches between the exposure modes. (p.48)
12
Page 15
e_kb487.book Page 13 Wednesday, December 8, 2010 9:49 AM
d AF point switching dial
Sets the AF point. (p.44)
e S (Rear) e-dial
Changes setting values.
Changes the magnification in enlarged view and displays multiple
images during playback. (p.67, p.68)
Switches between the menu tabs when a menu is displayed. (p.40)
f AF mode switching dial
Switches between the autofocus modes (l/A). (p.44)
g Q (Playback) button
Switches to the Playback mode. (p.38) Press again to switch to
Capture mode.
h M button
Displays the control panel. (p.16)
Displays shooting information during playback. (p.17)
i 3 button
Displays the [A1] menu. (p.40) Next, press the 5 key to display
other menus. Displays the [Q1] menu first during playback.
When a menu is displayed, press this button to cancel a selection
or return to the previous screen.
j E (Flash mode) button
Sets the flash mode. (p.58)
k y (Custom Image) button
Sets the Custom Image settings. (p.62)
l d (Mirror Up) dial
Enables the mirror lock-up shooting. (p.55)
m I (Illumination) button
Illuminates the LCD panel. (p.22)
n L button
Locks the exposure. (p.49)
Saves the preview image when setting White Balance or Custom
Image. (p.50, p.62)
o = button
Operates in the same way as when pressing the shutter release
button halfway and temporarily provides manual focus. (p.44,
z p.R31)
p 2345 (Four-way controller) keys
When the control panel or menu is displayed, use these keys to
move the cursor or change items.
When the AF point switching dial is set to j (Select), use these
keys to change the AF point. (p.45)
Press the 3 key to display the playback mode palette during
playback. (p.66)
q Y button
Sets the drive mode. (p.53)
r n (White Balance) button
Sets the white balance. (p.50)
s i (Delete) button
Press to delete an image during playback. (p.67)
t | (Green) button
Sets the exposure mode to Automatic Exposure and resets the
setting values.
u u button
Turns the status screen display on/off. (p.15)
Switches between the SD Memory Cards to play back during
playback. (p.66)
v 4 button
When the control panel or menu is displayed, press this button to
confirm the selected item.
When the AF point switching dial is set to j (Select), use this
button to return the AF point to the center. (p.45)
1
Before Using Your Camera
13
Page 16
e_kb487.book Page 14 Wednesday, December 8, 2010 9:49 AM
1
Button and Dial Operations
You can operate both a button and e-dial, such as m and S or
Before Using Your Camera
] and R, to change the settings using either of the following
methods.
Operation Confirming the Setting
Turn the dial while pressing the
button.
Press the button, take you finger
off the button, and then turn the
dial.
Hereafter, this Operating Manual explains by using the “Turn the
dial while pressing the button” operation.
Take your finger off the button.
Press the button again or wait
until the meter operating timer
goes off.
Display Indicators
Monitor
The following indicators appear on the monitor depending on
the status of the camera.
Memo
• You can adjust the brightness and color of the monitor with
[Brightness Level] and [LCD Color Tuning] in the [R2] menu.
(z p.R24 - p.R25)
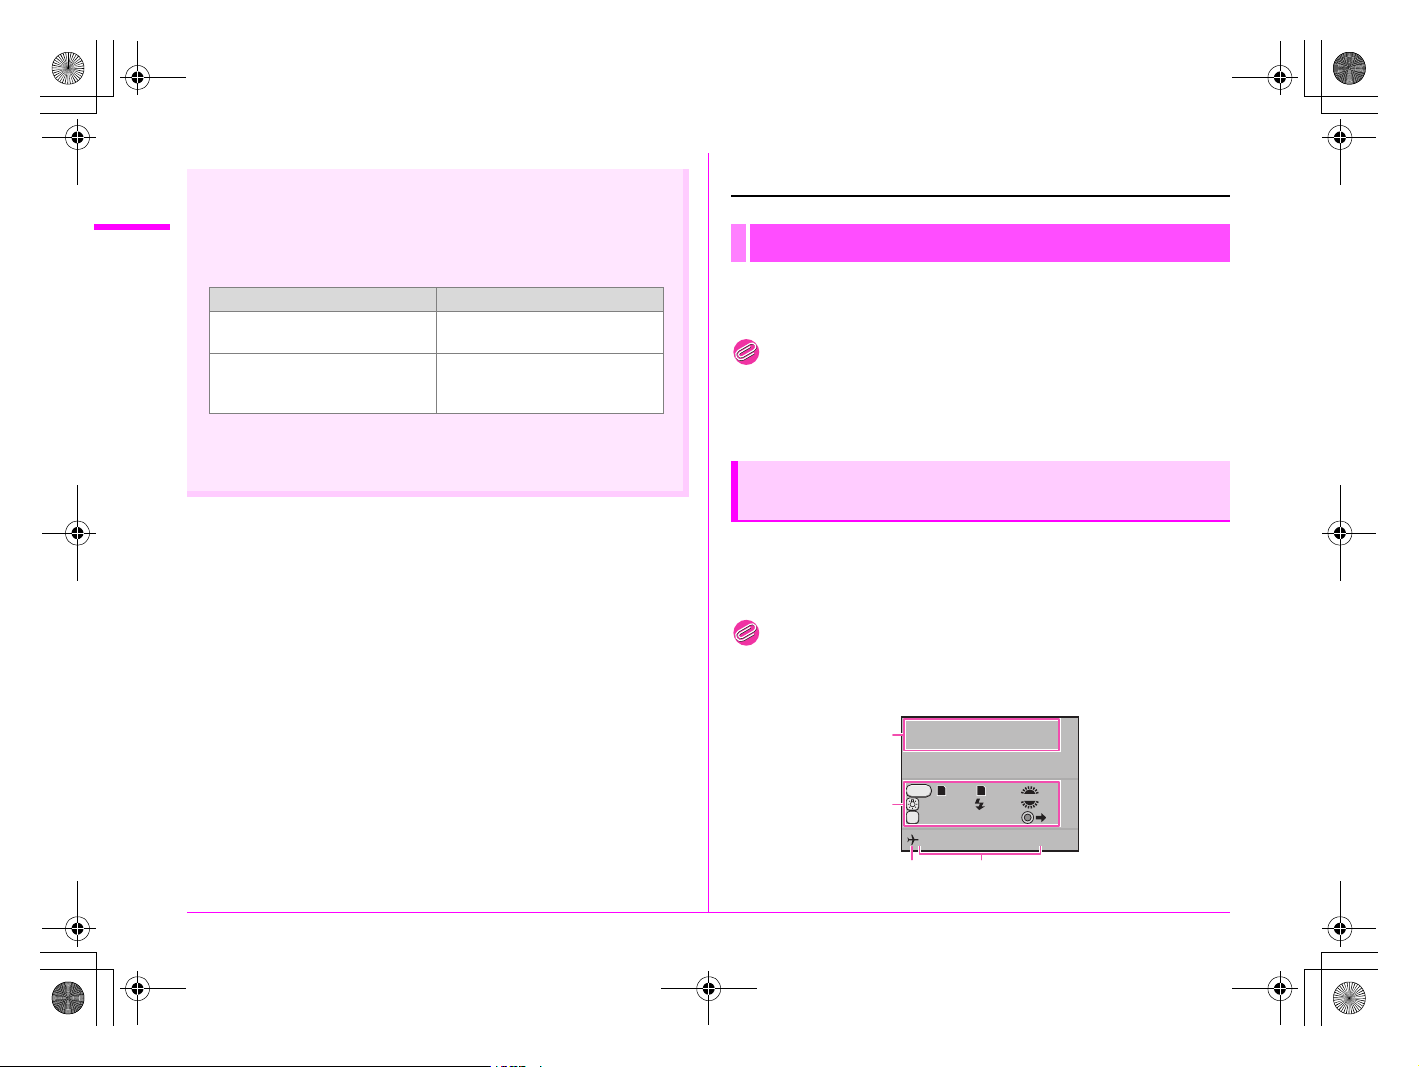
At Start-up or when Operating the Mode
Dial
Guide indicators appear on the monitor for 3 seconds (default
setting) when the camera is switched on or the mode dial is
turned.
Memo
• To turn off the guide indicators, set [Guide Display] to [Off] in the
[R1] menu. (z p.R24)
14
Program
P
1
Automatic Exposure
1 2
RAW
JPEG RAW
MODELING
2
AF
Cancel AF
05/05/2010
34
10:30AM
Tv
Av
P
Page 17
e_kb487.book Page 15 Wednesday, December 8, 2010 9:49 AM
1 Exposure Mode (p.47)
2 Operation guide
3 World Time setting
4 Current date and time (p.35)
* Indicator 3 appears only when [World Time] is set to [Destination] in
the [R1] menu. (z p.R23)
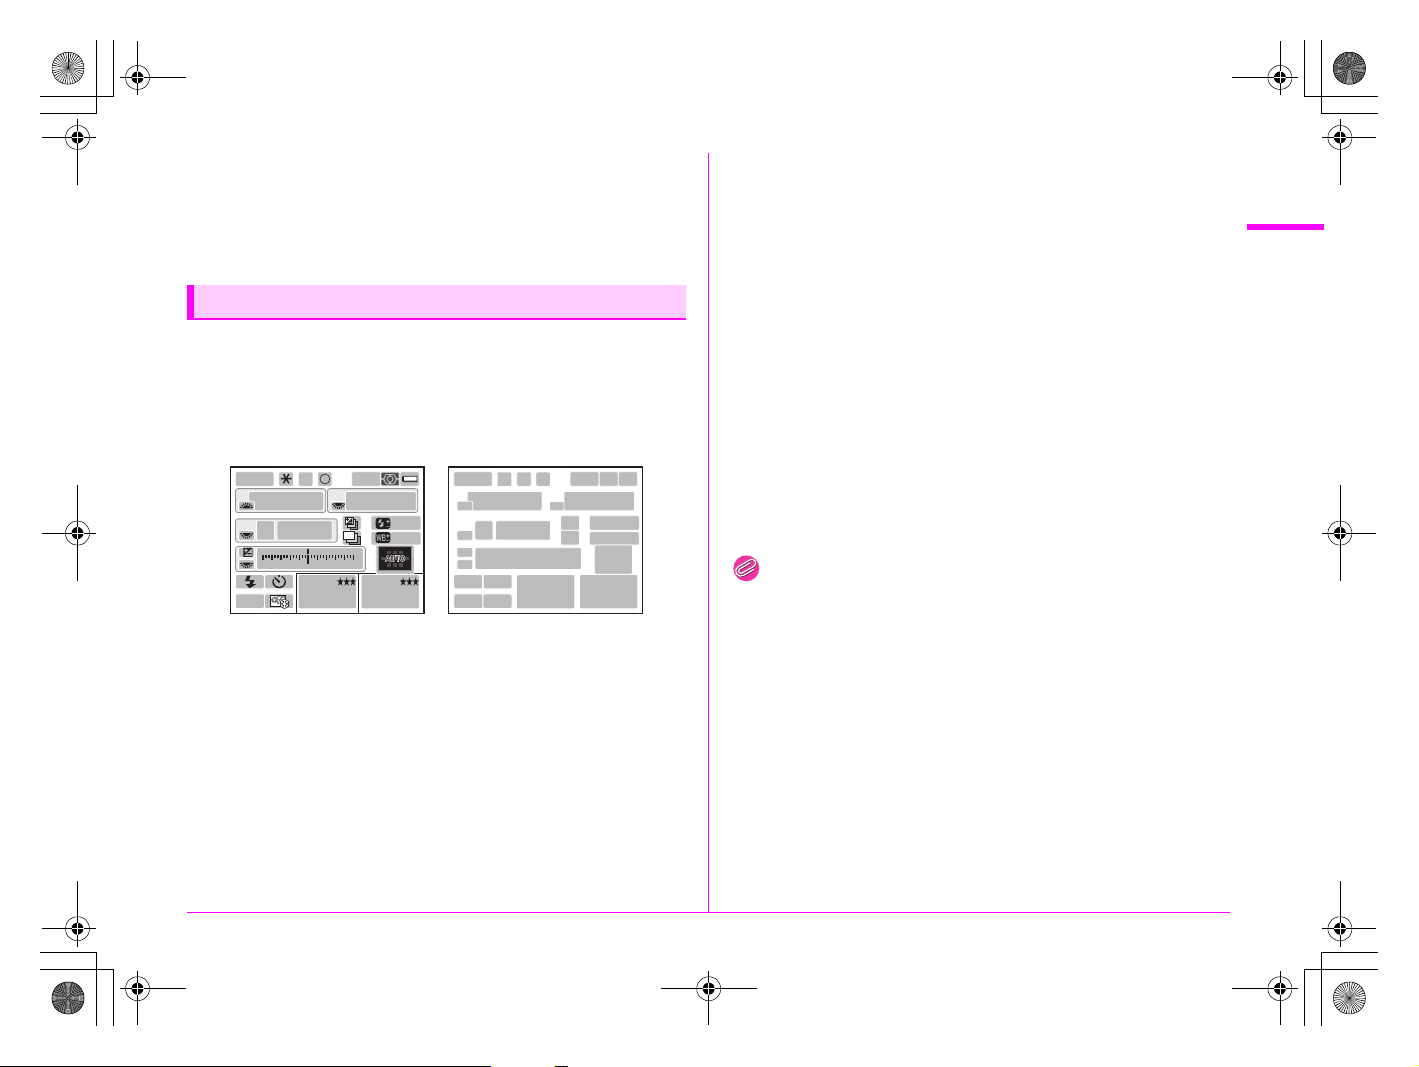
Capture Mode
Status screen
Press the u button to display the settings of the shooting
functions.
(All of the indications are displayed here for explanatory
purposes. The actual display may differ.)
P
AWB
1/
USER
SHIFT
ISO
AUTO
-
5
M.UP
2000
1600
11223344+5
RAW+
C
AF.S
F
WB
L JPEG
]
123
2.8
2 [
456
+1.0
G1A1
L
]1 [
12
8
11
8
17
8
2120
2322
34 5 67
9
8
13
12
14
18
10
15
16
19
2524
1 Exposure Mode (p.47)
2 AE lock (p.49)
3 Mirror Up (p.55)
4 Copyright Information
embedded (z p.R27)
5 AF mode (p.44)
6 Metering mode (p.45)
7 Battery level (p.29)
8 e-dial guide
9 Shutter speed
10 Aperture value
11 ISO/ISO AUTO
12 Sensitivity (p.46)
13 Exposure Bracketing (p.56)/
Multi-exposure (p.55)/HDR
Capture (z p.R16)
14 Extended Bracketing (p.57)
16 White Balance fine tuning
(p.51)
17 EV Compensation (p.48)
18 EV bar
19 AF point (p.44)
20 Flash Mode (p.58)
21 Drive Mode (p.53)
22 White Balance (p.50)
23 Custom Image (p.62)
24 SD1 Image File Format/JPEG
Recorded Pixels/JPEG
Quality/Remaining image
storage capacity (p.42)
25 SD2 Image File Format/JPEG
Recorded Pixels/JPEG
Quality/Remaining image
storage capacity (p.42)
15 Flash Exposure
Compensation (p.59)
Memo
• The status screen will disappear if no operations are made within
30 seconds after pressing the u button.
• You can change the color of the status screen by setting [Status
Screen] in the [A3] menu. (z p.R18)
1
Before Using Your Camera
15
Page 18
HDR
OFF
DR
200
HDR
OFF
DR
200
e_kb487.book Page 16 Wednesday, December 8, 2010 9:49 AM
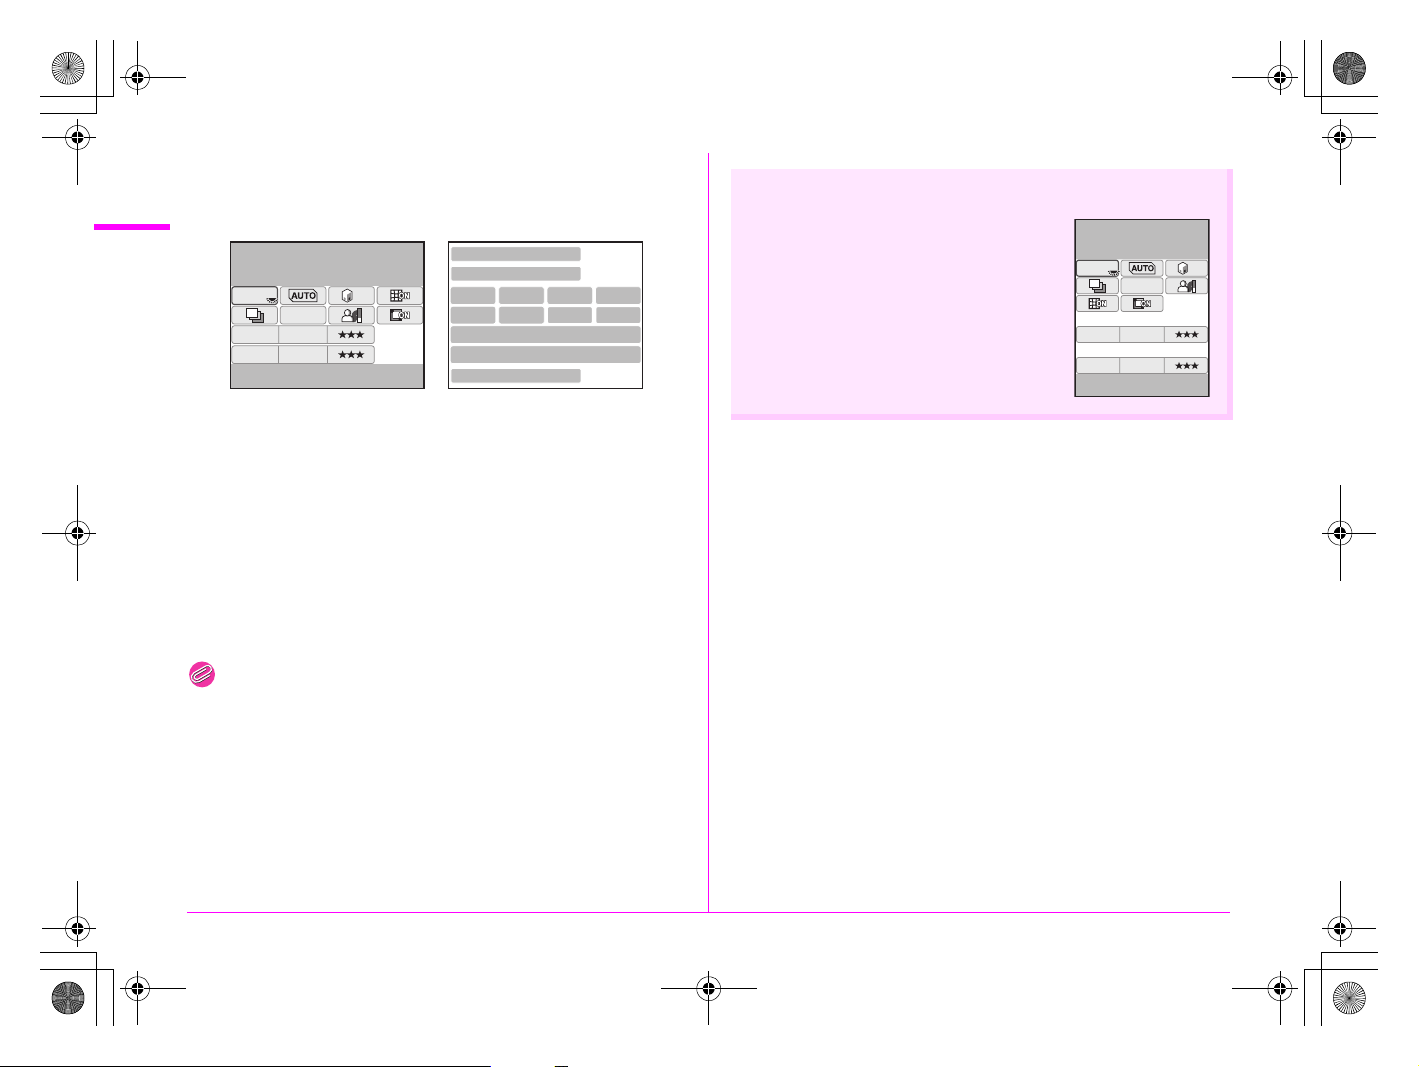
Control panel
Press the M button to display the control panel and change
settings.
1
Before Using Your Camera
ISO AUTO Adjustment
On
HDR
OFF
10:30AM
DR
200
ISO
AUTO
WB
1
RAW+ L
2
JPEG L
05/05/’10
[
123
[
456
]
]
1
2
34 56
78 910
11
12
13
Vertical Display
When the camera is rotated to the vertical
position with the meter operating timer
turned on, the status screen and control
panel are displayed in a vertical position,
and the directions of the 2345 keys
also change.
ISO AUTO Adjustment
On
ISO
AUTO
WB
1
RAW+
2
JPEG L
05/05/’10 10:30AM
HDR
OFF
DR
200
[
123
L
[
456
]
]
1 Function name
2 Setting
3 ISO AUTO Adjustment
4 Program Line
5 Highlight Correction
6 Distortion Correction
7 Extended Bracketing
8 HDR Capture
9 Shadow Correction
11 SD1 Image File Format/JPEG
Recorded Pixels/JPEG
Quality/Remaining image
storage capacity
12 SD2 Image File Format/JPEG
Recorded Pixels/JPEG
Quality/Remaining image
storage capacity
13 Current date and time
10 Lateral Chromatic Aberration
Adjustment
Memo
• Items that cannot be changed due to the current camera setting
status cannot be selected.
16
Page 19
100- 0001
100- 0001
DR
200
RAW+
JPEG
RAW+
JPEG
e_kb487.book Page 17 Wednesday, December 8, 2010 9:49 AM
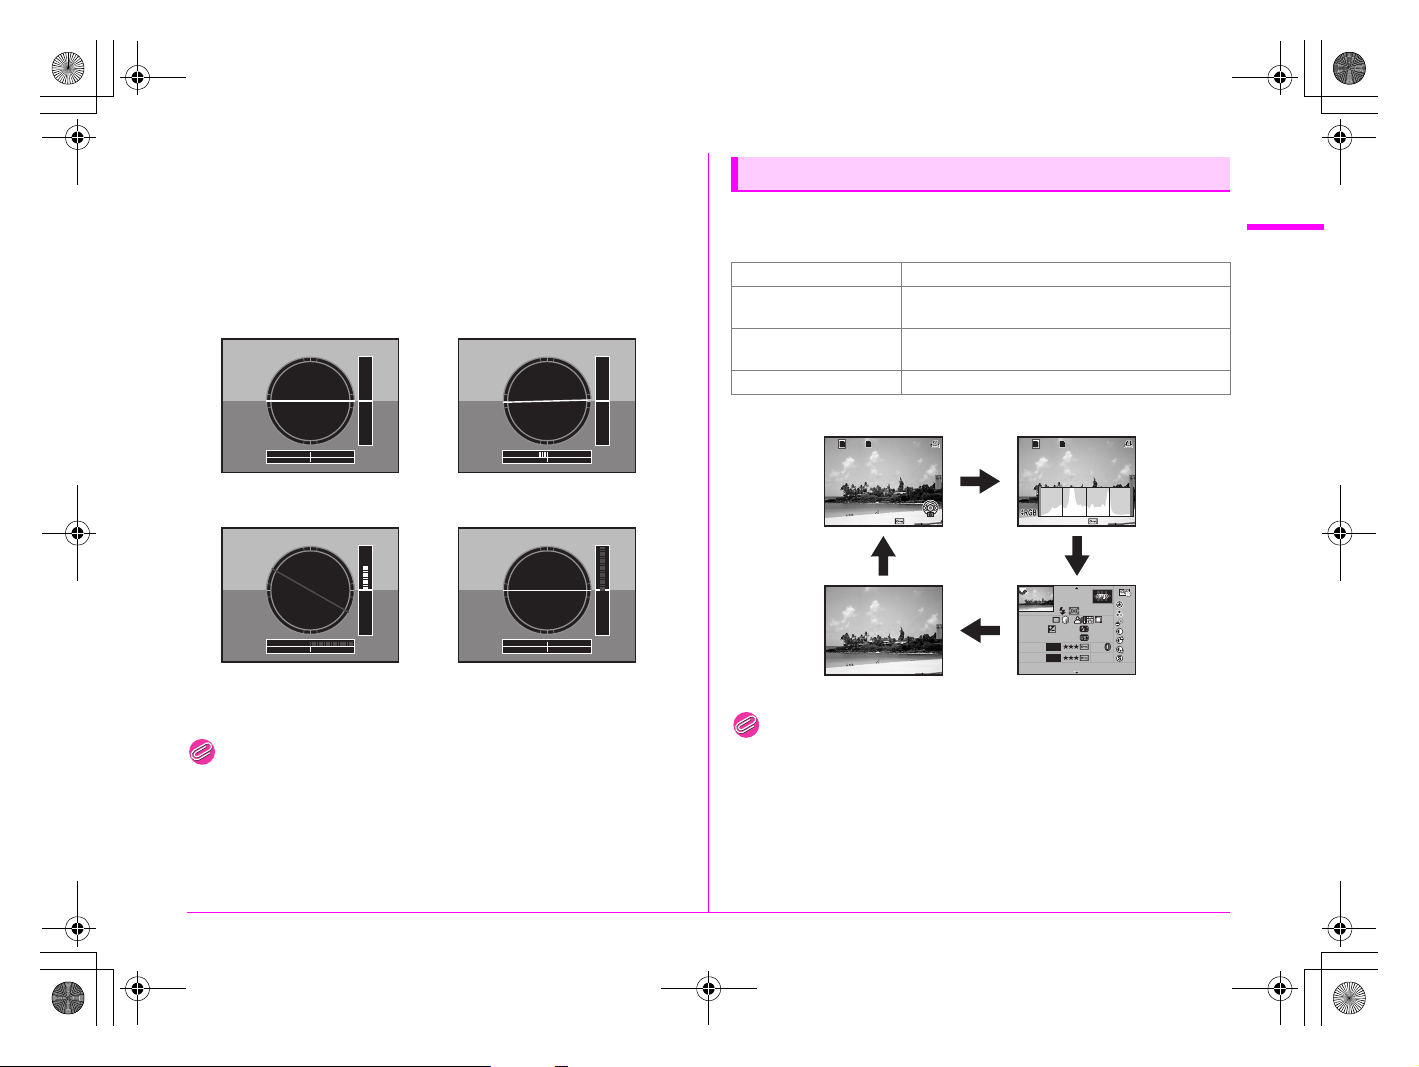
Electronic Level Display
Press the u button while the status screen is displayed to
display the electronic level. A bar graph indicating the horizontal
camera angle appears at the bottom of the screen, and a bar
graph indicating the vertical camera angle appears on the right
side.
Example:
Horizontally and
vertically level (green)
Outside horizontal level display (red)
Tilted 5° up (yellow)
Tilted 1.5° to the left (yellow)
Vertically level (green)
Horizontally level (green)
Outside vertical level display (red)
Memo
• The electronic level display will disappear if no operations are
made within 1 minute.
• If the camera angle cannot be detected, both ends and the center
of the bar graphs flash red.
• You can select the display setting with [Electronic Level Display] in
the [A3] menu. (z p.R19)
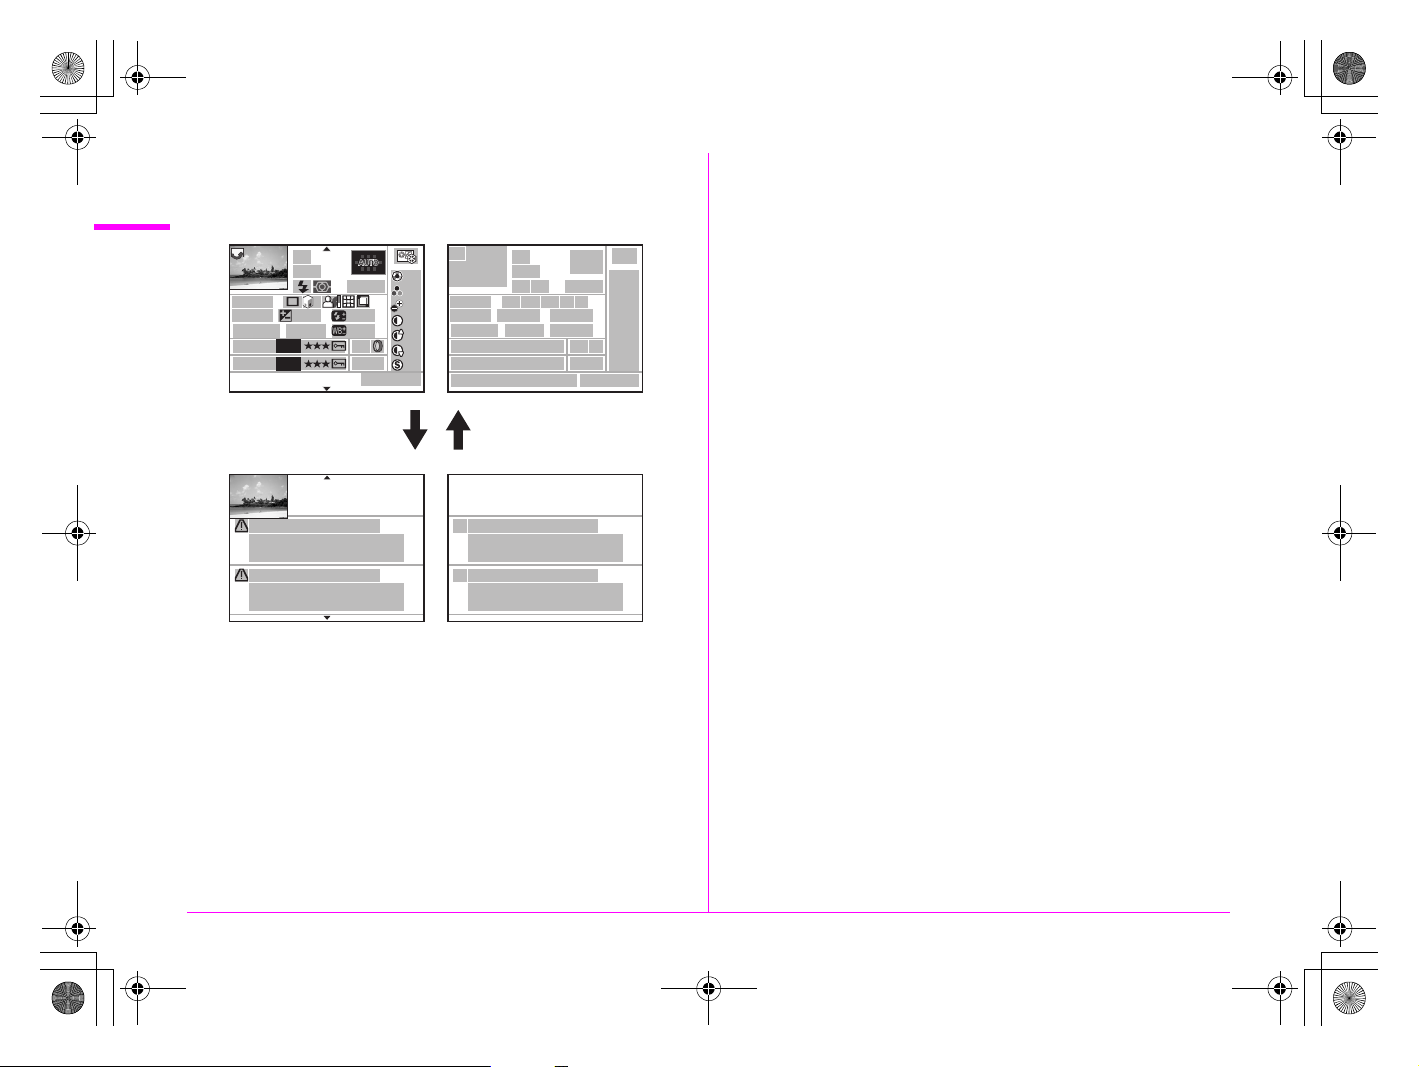
Playback Mode
The camera changes the type of information display when you
press the M button during image playback.
Standard display An image and guide indicators are displayed.
Histogram display
Detailed information
display
No info. display Only an image is displayed.
Standard display Histogram display
1 2
RAW+
1/
2000 F5.6
No info. display Detailed information display
Memo
• Press the u button, w button, or x button to switch
between the SD Memory Cards to play back.
• The information display that is shown first during playback is the
same as that of the last playback in the previous session. The
information display type differs depending on the setting of
[Memory] in the [A4] menu. (z p.R20)
• You can set whether to display the Bright/Dark Area warning with
[Playback Display Method] in the [Q1] menu. (z p.R22)
An image and its histogram (Brightness/RGB)
are displayed.
Detailed showing of how and when the image
was taken is displayed.
JPEG
M
100-0001
1 2
1/
2000 F5.6
RAW+
JPEG
100-0001
MM
P
M
1/
2000
F5.6
200
ISO
1
RAW+
2
JPEG
05/05/’10
10000K
40M
40M
AF.S
+1.0
10:00AM
DR
200
mm
800
+1.0
G2
A1
HDR
1
AdobeRGB
100-0001
±0
±0
±0
±0
±0
±0
±0
1
Before Using Your Camera
17
Page 20
DR
200
e_kb487.book Page 18 Wednesday, December 8, 2010 9:49 AM
Detailed information display
Use the 23 keys to switch between pages.
1
Before Using Your Camera
Page 1
1/
2000
F5.6
200
ISO
1
RAW+
2
JPEG
05/05/’10
Page 2
P
AF.S
+1.0
10000K
40M
40M
800
DR
200
+1.0
G2
HDR
AdobeRGB
10:00AM
mm
A1
1
100-0001
±0
±0
±0
±0
±0
±0
±0
1
3
2
4
78
6
91011121314
18
21 23 24
171615
19 20
28 29
232
26
5
27
2522
1 Rotation Information
2 Captured image
3 Exposure Mode
4 Focus Mode
5 AF point
6 Flash Mode
7 Metering mode
8 Focal length
9 Shutter speed
10 Drive Mode
11 Highlight Correction
12 Shadow Correction
13 Distortion Correction
14 Lateral Chromatic Aberration
Adjustment
15 Aperture value
16 EV Compensation
Photographer
ABCDEFGHIJKLMNOP
QRSTUVWXYZ
Copyright Holder
ABCDEFGHIJKLMNOP
QRSTUVWXYZ
30
30
31
31
32
32
17 Flash Exposure
Compensation
18 Sensitivity
19 White Balance
20 White Balance fine tuning
21 SD1 Image File Format/JPEG
Recorded Pixels/JPEG
Quality/Protect
22 SD2 Image File Format/JPEG
Recorded Pixels/JPEG
Quality/Protect
23 HDR Capture/Multi-exposure
24 Digital Filter
25 Color Space
26 Image Tone
27 Custom Image parameters
28 Shooting date and time
29 Folder number-File number
30 Information tampering
warning
31 Photographer
32 Copyright Holder
18
Page 21
RAW+
JPEG
e_kb487.book Page 19 Wednesday, December 8, 2010 9:49 AM
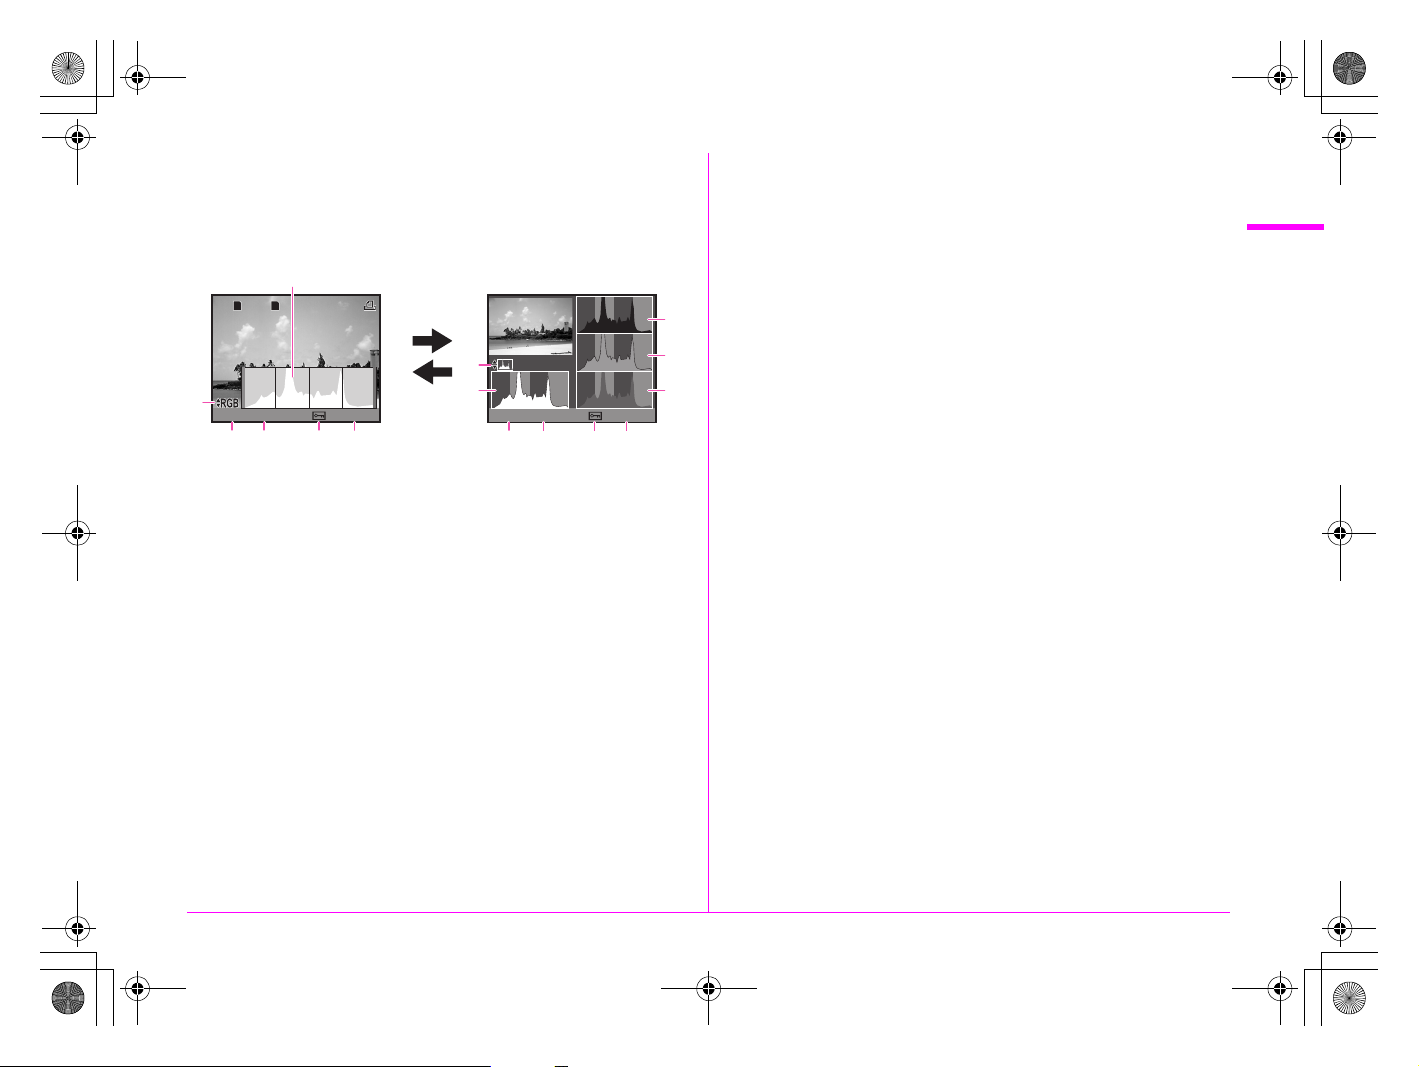
Histogram display
A brightness histogram and RGB histogram can be displayed
during image playback. Use the 23 keys to switch between
the histogram displays.
1
1 2
RAW+
JPEG
2 3
1
Before Using Your Camera
8
7
2
1/
2000 F5.6 100-0001
546 34563
Brightness histogram RGB histogram
1 Brightness histogram
2 Color Space
3 Shutter speed
4 Aperture value
5 Protect setting
6 Folder number-File number
1
2 3
1/
2000 F5.6 100-0001
7 Switch Brightness histogram/
RGB histogram
8 R histogram
9 G histogram
10 B histogram
9
10
19
Page 22
e_kb487.book Page 20 Wednesday, December 8, 2010 9:49 AM
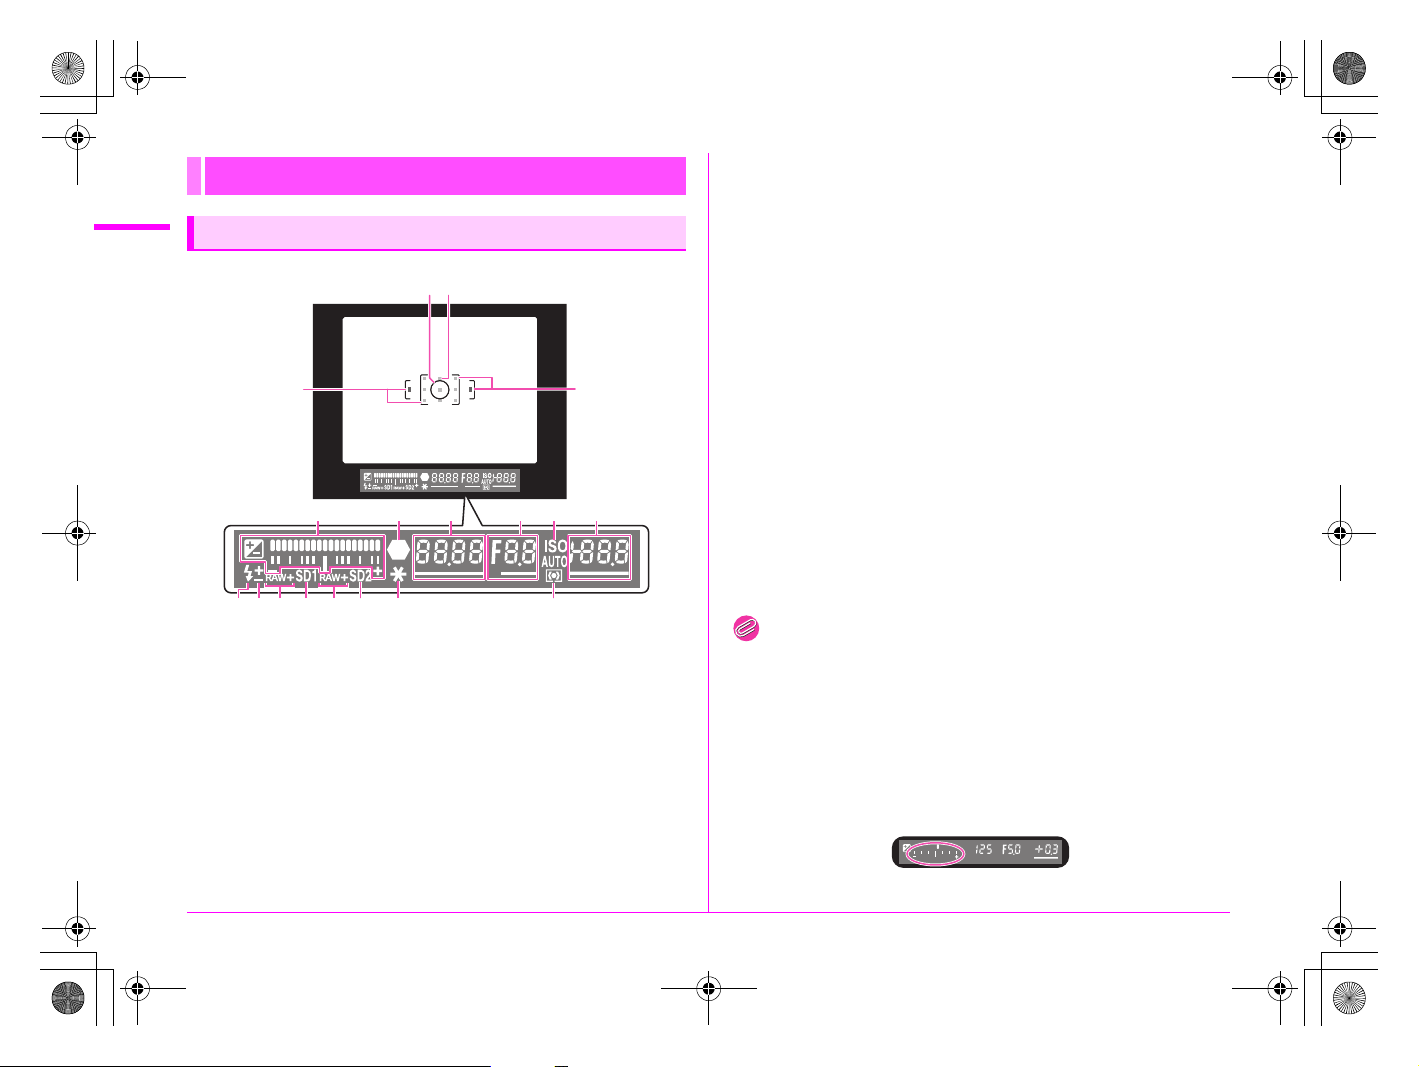
Viewfinder and LCD Panel
1
Before Using Your Camera
Viewfinder
11 12 13 12 13 14 1510
1 AF frame
2 Spot metering frame (p.45)
3 AF point (p.44)
4 EV bar
Shows the EV compensation
values or the difference
between the appropriate and
current exposure values
when the exposure mode is
set to a or M.
Displays the camera angle
when [Electronic Level Disp.]
is set to O.
8 ISO/ISO AUTO
Appears when the sensitivity
is displayed.
9 Sensitivity
Underlined when the value
3
2
11
1
4
5 6 7 8 9
1
can be adjusted.
Displays the number of
recordable images
immediately after shooting.
(Max. display is [999].)
When [Electronic Level Disp.]
is set to O: Displays the
difference between the
appropriate and current
exposure values when the
exposure mode is set to a.
10 Flash status
Appears when the flash is
available.
Blinks when the flash is
recommended or is being
charged.
11 Flash Exposure
Compensation (p.59)
12 File Format (p.42)
Appears when the file format is
RAW or RAW+.
Not displayed when the file
format is JPEG.
13 SD1/SD2 slot status (p.42)
Appears when recording is
available.
Not displayed when set to OFF
or RESERVE.
14 AE lock (p.49)
15 Metering mode (p.45)
Memo
5 Focus indicator
Appears when the subject is
in focus.
Blinks when the subject is not
in focus.
6 Shutter speed
Underlined when the value
can be adjusted.
7 Aperture value
Underlined when the value
can be adjusted.
• The AF points appear in red (superimposed) when the shutter
release button is pressed halfway.
EV bar
Shows the difference between the appropriate and current
exposure values when the exposure mode is set to a or M. If
the value exceeds the range of the EV bar, the “+” or “–” blinks.
20
Page 23
e_kb487.book Page 21 Wednesday, December 8, 2010 9:49 AM
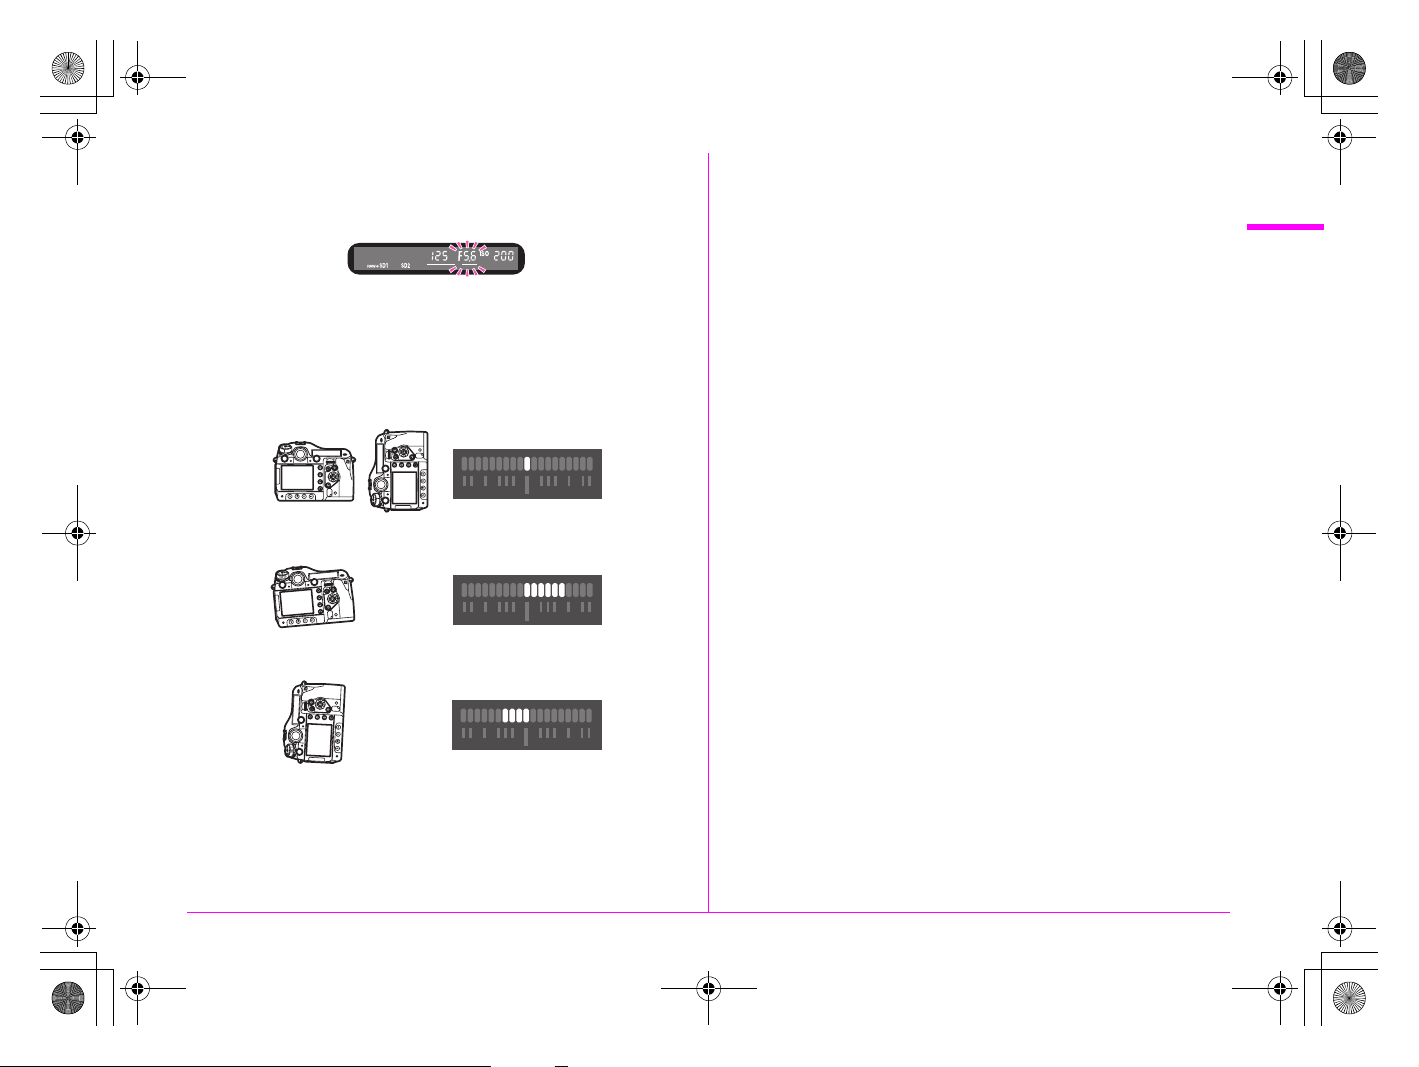
Exposure Warning
When a value that is not the proper exposure is set, that value
blinks.
Electronic Level Display
Displays the camera angle when [Electronic Level Disp.] in the
[A3] menu is set to O. (z p.R19)
When level (at 0°)
When tilted 5° to the left
1
Before Using Your Camera
When held vertically and tilted 3° to the right
21
Page 24
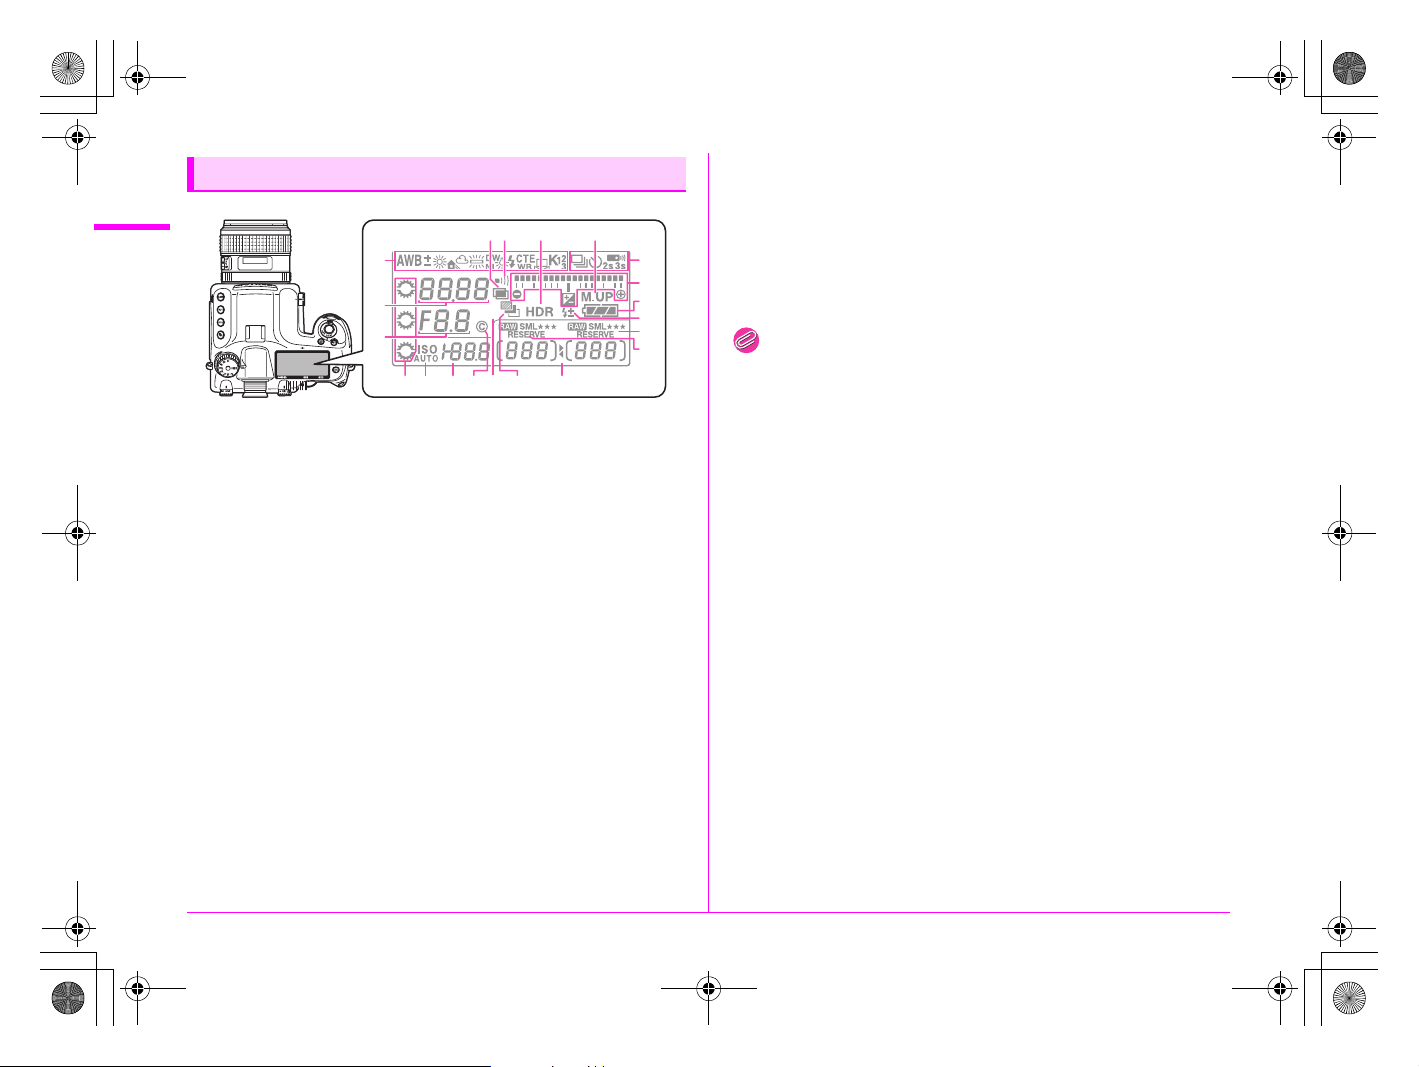
e_kb487.book Page 22 Wednesday, December 8, 2010 9:49 AM
LCD Panel
1
Before Using Your Camera
1 Multi-exposure
2 Beep
Appears when Beep is on.
(z p.R24)
3 HDR Capture (z p.R16)
4 Mirror Up
5 White Balance (p.50)
6 Shutter speed
7 Aperture value
8 Drive Mode (p.53)
9: Single Frame Shooting
j: Continuous Shooting
g: Self-timer shooting
W: Remote Control
shooting
9 EV bar/Electronic Level
Display/EV Compensation
(p.48)
10 Battery level (p.29)
11 Flash Exposure
Compensation (p.59)
20 Remaining image storage
capacity/USB connection
mode (z p.R25)/Sensor
12 3 4
5
8
9
6
INT.
7
161514
12 SD2 Image File Format/JPEG
Recorded Pixels/JPEG Quality
(p.42)
1: RAW capture
1P: RAW+JPEG capture
13 SD1 Image File Format/JPEG
Recorded Pixels/JPEG Quality
(p.42)
14 e-dials
Appears when the adjustment
is available.
15 ISO/ISO AUTO
Appears when the sensitivity is
displayed.
16 Sensitivity/EV compensation
value
17 Copyright Information
embedded (z p.R27)
18 Interval Shooting (p.54)
19 Auto Bracketing
Blinks when used together
with Extended Bracketing.
2017 18 19
10
11
12
13
Cleaning (z p.R29)
Pc-S: MSC mode
Pc-P: PTP mode
Cln: During sensor cleaning
Memo
• Press the I button to illuminate the LCD panel.
22
Page 25

e_kb487.book Page 23 Wednesday, December 8, 2010 9:49 AM
2 Getting Started
Attaching the Strap ..................................................... 24
Attaching the Lens ...................................................... 24
Using the Battery ......................................................... 28
Inserting/Removing the SD Memory Card ................ 31
Power ............................................................................ 33
Initial Settings .............................................................. 34
Diopter Adjustment ..................................................... 37
Testing Your Camera .................................................. 37
How to Change Function Settings ............................. 38
Page 26
e_kb487.book Page 24 Wednesday, December 8, 2010 9:49 AM
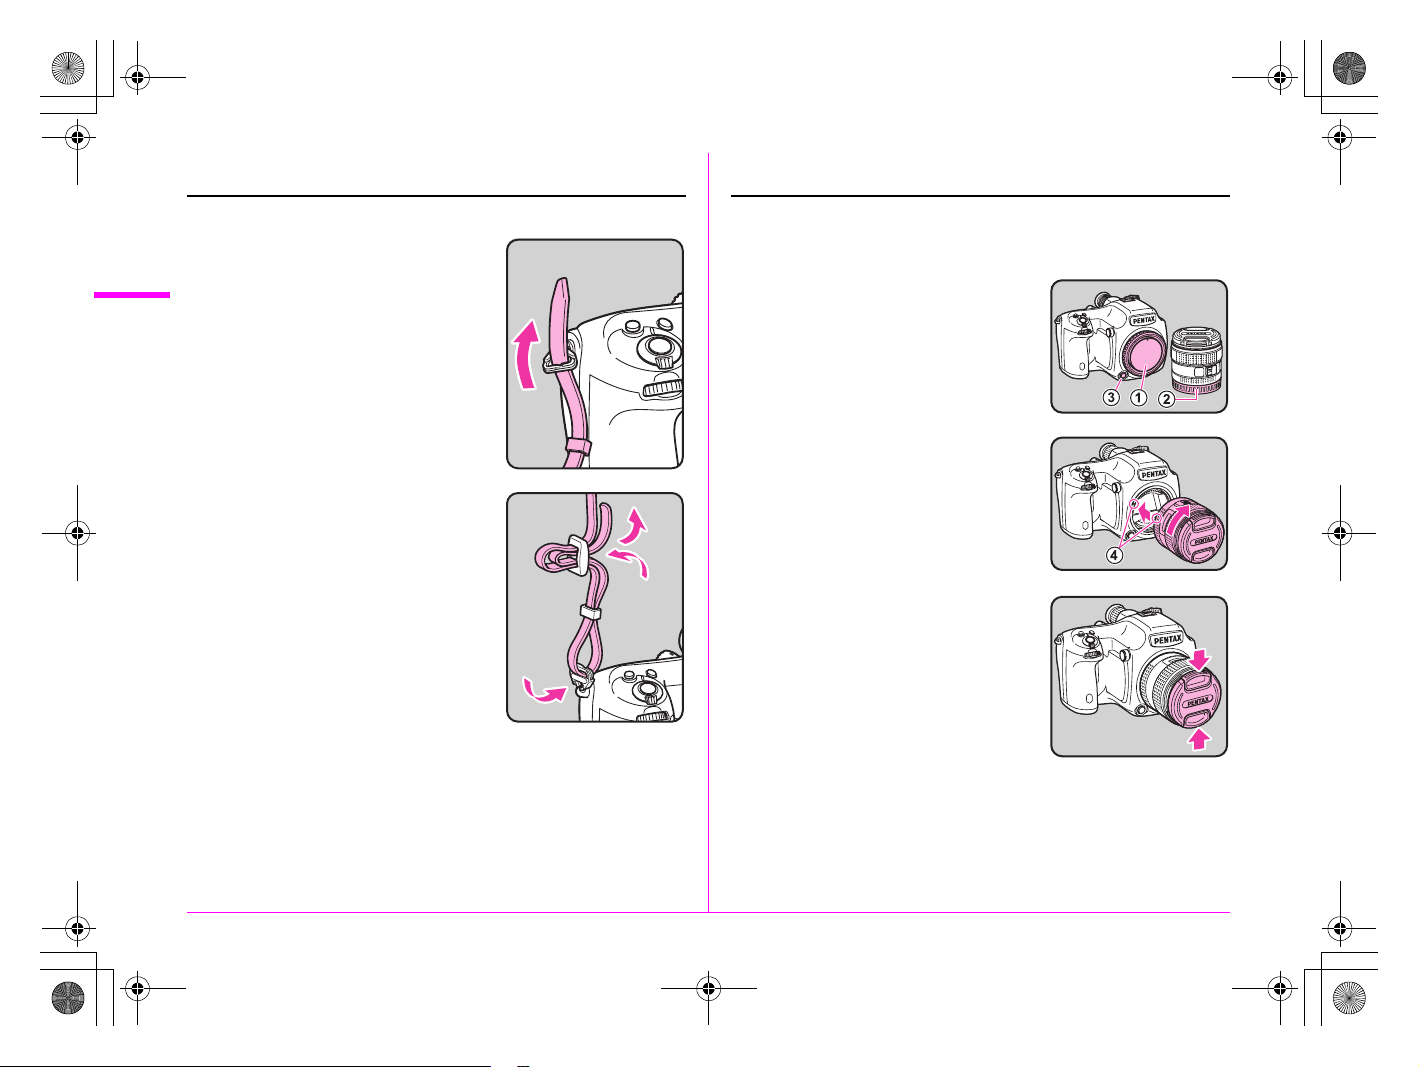
Attaching the Strap
1 Pass the end of the strap
2
Getting Started
through the triangular ring.
2 Secure the end of the strap
on the inside of the clasp.
Attaching the Lens
1 Make sure that the camera is turned off.
2 Remove the body mount cap
(1) and lens mount cap (2).
Hold down the lens unlock button (3)
and remove the body mount cap.
3 Align the Lens mount index
(red dots; 4) on the camera
and the lens, and turn the
lens clockwise.
Do not press the lens unlock button at
this time.
4 Remove the front lens cap
by pushing the indicated
portions.
24
Page 27
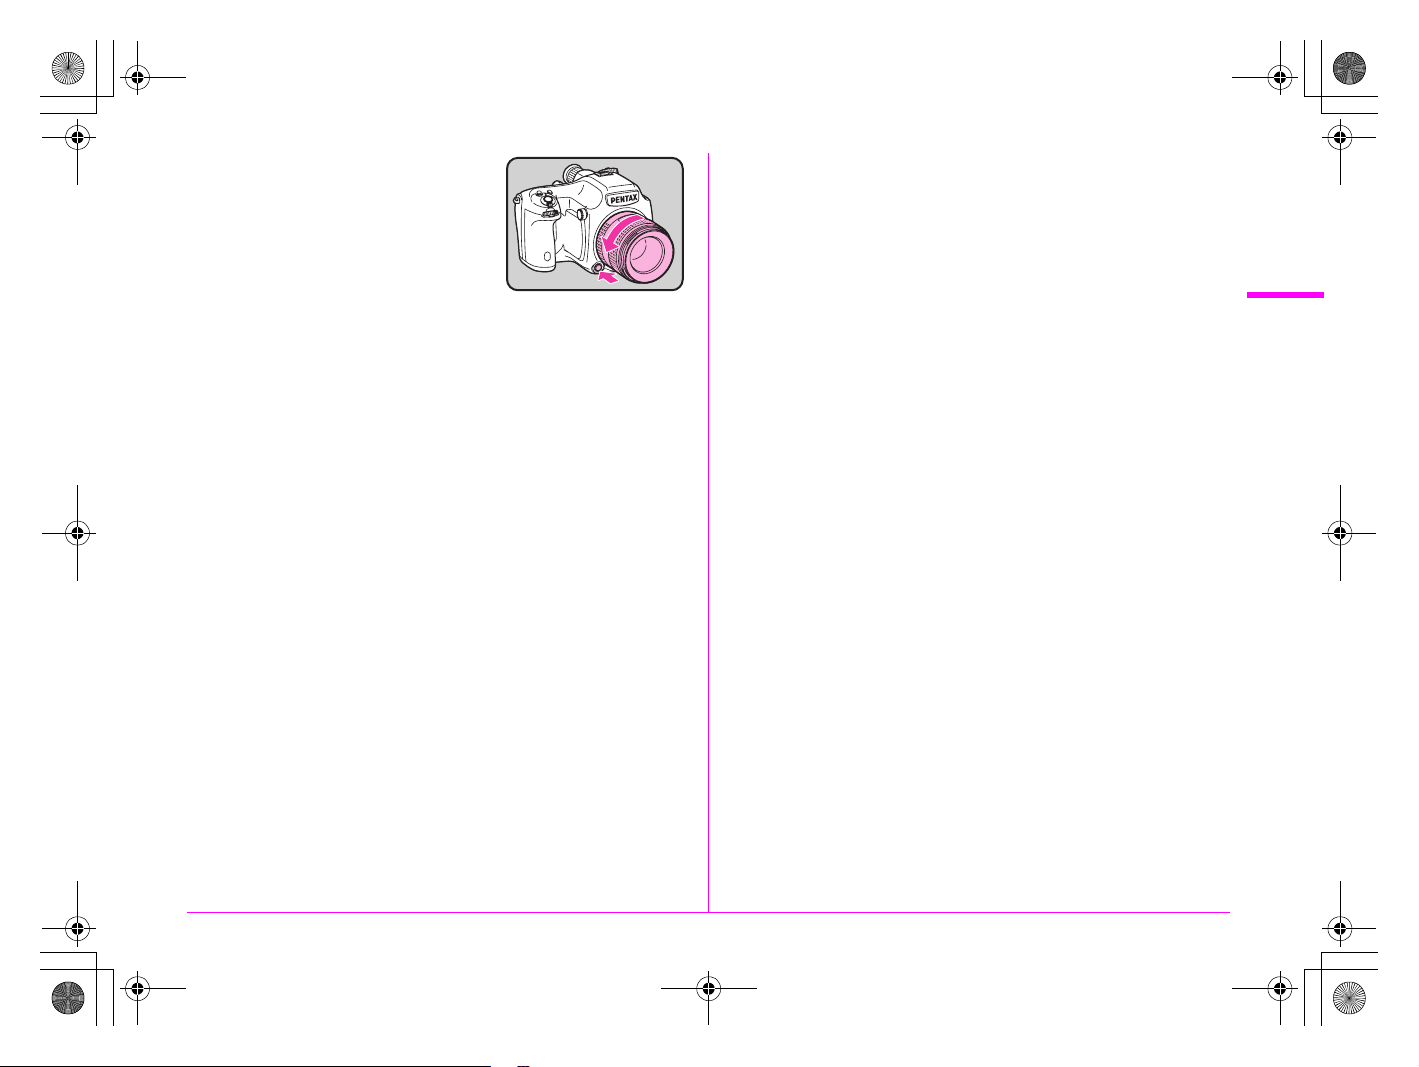
e_kb487.book Page 25 Wednesday, December 8, 2010 9:49 AM
To detach the lens, hold down the lens
unlock button and turn the lens
counterclockwise.
2
Getting Started
25
Page 28
e_kb487.book Page 26 Wednesday, December 8, 2010 9:49 AM
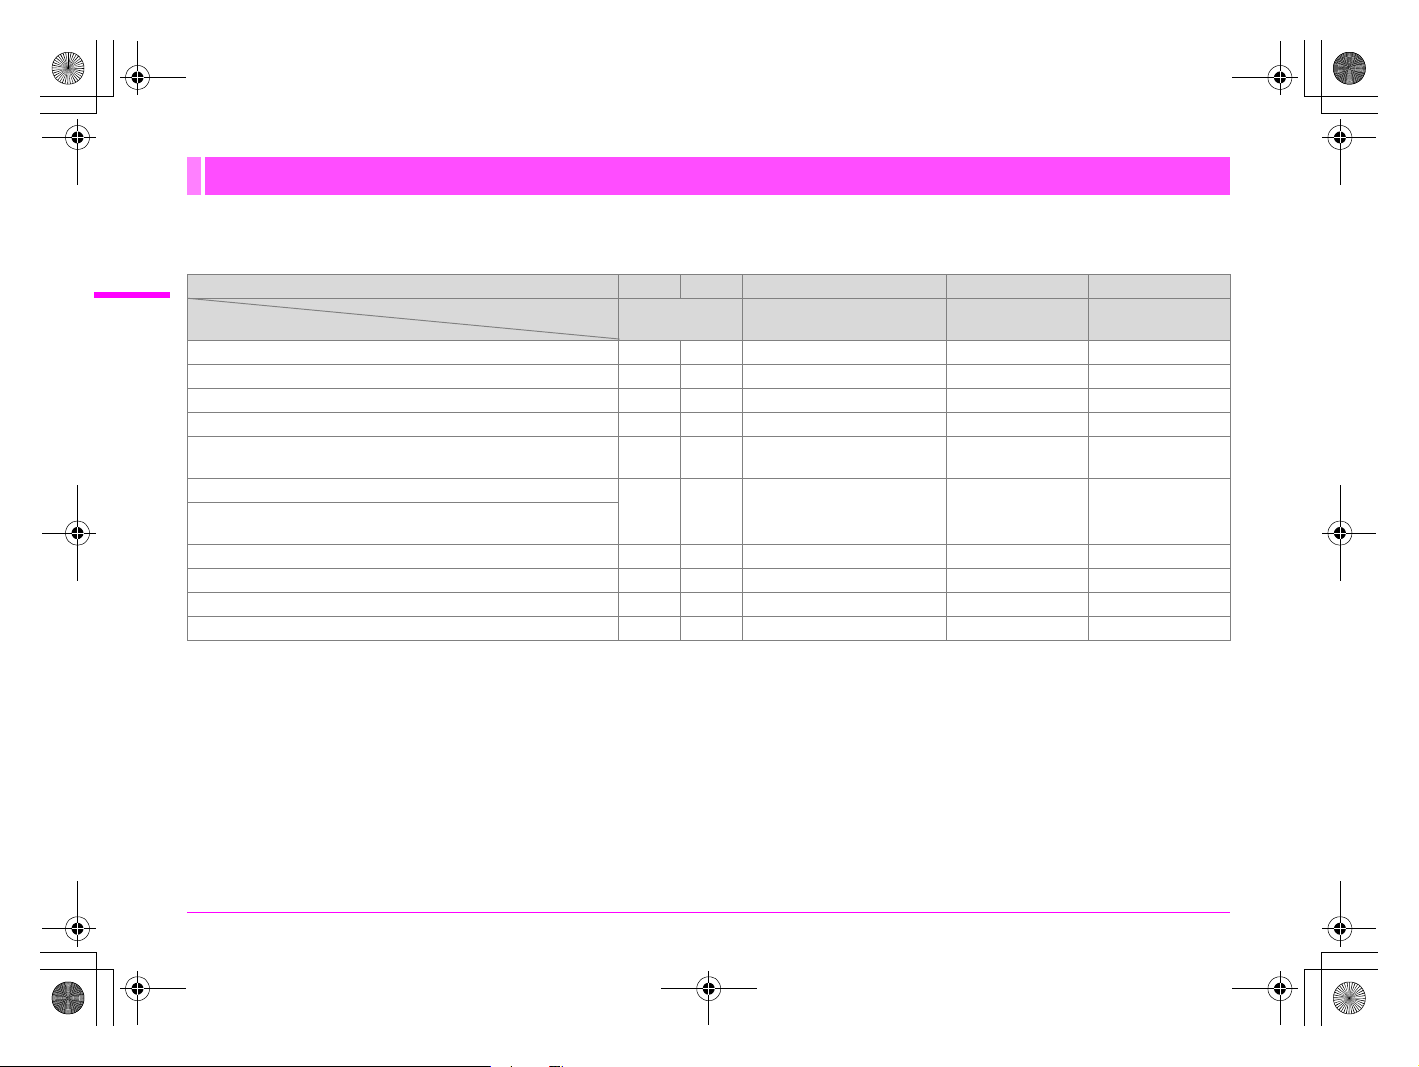
Lens Compatibility Chart
When using the D FA645 lens (for digital cameras), all of the functions of the h are available. Other PENTAX film camera
lenses can also be used with this camera; however, the following restrictions apply.
2
Getting Started
Function
e/K/b/L mode zz z ××
c/a mode zz z z
Program P-TTL auto flash zz z ××
P-TTL auto flash zz z z z
Automatic changing of lighting angle when using AF540FGZ/
Display of aperture value in viewfinder at aperture position s
Display of focus indicator in viewfinder in manual focus mode
*1 This includes all types of helicoid extension tubes and accessories without
information contacts.
*2 Stop down metering
*3 The lens aperture value is displayed when using Auto extension tube A or Rear
converter A645 2X.
The display will differ when using Rear converter A645 1.4× with a lens other
than A*645 300mm F4 or FA*645 300mm F4.
[Displaying the lens aperture value as is indicated on the lens]
[Displaying the maximum effective aperture value when combined with a lens]
[Displaying the aperture value with the aperture stopped down by two stops]
AF500FTZ/AF360FGZ/AF330FTZ
Display of aperture guide in viewfinder at a position
other than s
Metering mode switching zz z #
Lens Correction function × z ×××
FA645 300mm F5.6, FA645 400mm F5.6, A*645 600mm F5.6
A645 200mm F4, FA645 200mm F4, A*645 300mm F4, FA*645
300mm F4, A645 macro 120mm F4, FA645 macro 120mm F4
FA645 150mm F2.8
*8
AF × z ×××
Lens A645 FA645 A/FA645 A/FA645 67
Accessories
Lens only
× z ×××
zz #
*4
z *5z
*6
*4 Available only when the lens aperture value without accessories is F5.6 or
*5 When u sing A645 macro 120mm F4, its fun ction may become unreliable whe n
*6 The focus indicator appears in the viewfinder with the camera focused on the
*7 The camera operates with center-weighted metering even when multi-
*8 Depending on the lens, the aperture ring value and the value displayed in the
26
and Rear converter A
and Auto extension tube A
*3
zz
wider, or when the maximum effective aperture value combined with
accessories is F5.6 or wider.
the magnification ratio on the lens is set to between “1” (1:1) and “2” (1:2).
The focus indicator appears in the viewfinder with the focus area switched to
U (Center), even if S (Auto) or j (Select) is selected as the focus area.
subject by using three AF points, even if you selected S or j as the focus
area.
segment metering is selected.
viewfinder may not match.
(z: Available #: Restricted ×: Not available)
and Helicoid
extension tube
*1
*2
××
*5
*7
and Adapter 645
for 67 lens
z
*5
z
*7
#
Page 29

e_kb487.book Page 27 Wednesday, December 8, 2010 9:49 AM
Caution
• We assume no responsibility nor liability for accidents, damages
and malfunctions resulting from the use of lenses made by other
manufacturers.
Using the Lens Shutter of the LS Lens
The PENTAX 645LS lens is equipped with a shutter that enables
high-speed sync shooting.
To use the lens shutter, switch the shutter speed ring on the lens
to LS. Note the following restrictions when using this function.
• The exposure mode switches to a regardless of the exposure
mode setting on the camera.
• The difference from the appropriate exposure is not displayed.
• [LS] is displayed for the shutter speed of the camera.
• The appropriate exposure is not selected even when the |
button is pressed.
• EV Compensation is not available.
• Setting the shutter speed ring to LS when EV Compensation
is set cancels EV Compensation.
• AE lock is not available.
• Setting the shutter speed ring to LS when AE lock is set
cancels AE lock.
• Continuous Shooting of the drive mode, Self-timer (2s delay),
Remote Control (3s delay), and Remote Continuous Shooting
are not available.
• Setting the shutter speed ring to LS when Continuous
Shooting or Self-timer (2s delay) is set switches the shooting
mode to Single Frame Shooting.
• Setting the shutter speed ring to LS when Remote Control (3s
delay) or Remote Continuous Shooting is set switches the
shooting mode to Remote Control.
• Mirror lock-up shooting is not available.
• Setting the shutter speed ring to LS when the mirror is raised
lowers the mirror.
• The shutter cannot be released when the shutter speed ring is
set to LS and the d dial is set to the “UP” position.
• Optical Preview is not available.
• If the lens shutter is charged in advance, Digital Preview can
be used. (The same applies when using the Digital Preview to
preview the image with White Balance or Custom Image.)
• Interval Shooting, Exposure Bracketing, and HDR Capture are
not available.
• Setting the shutter speed ring to LS when Exposure
Bracketing or HDR Capture is set cancels the setting.
• Setting the shutter speed ring to LS when Interval Shooting is
set exits Interval Shooting.
• In Multi-exposure mode, the lens shutter must be charged
manually for each shot.
• An external flash cannot be used even when connected to the
hot shoe. Be sure to use the sync terminal on the lens.
• An external flash cannot be synchronized even when connected
to the X-sync socket on the camera.
• The flash mode setting is not applied to LS shooting.
2
Getting Started
27
Page 30
e_kb487.book Page 28 Wednesday, December 8, 2010 9:49 AM
Using the Battery
Use only a rechargeable lithium-ion D-LI90 battery.
Note: AC plug cord “Listed, Type SPT-2 or NISPT-2, 18/2
2
Getting Started
flexible cord, rated 125V, 7A, minimum 6ft (1.8m)”
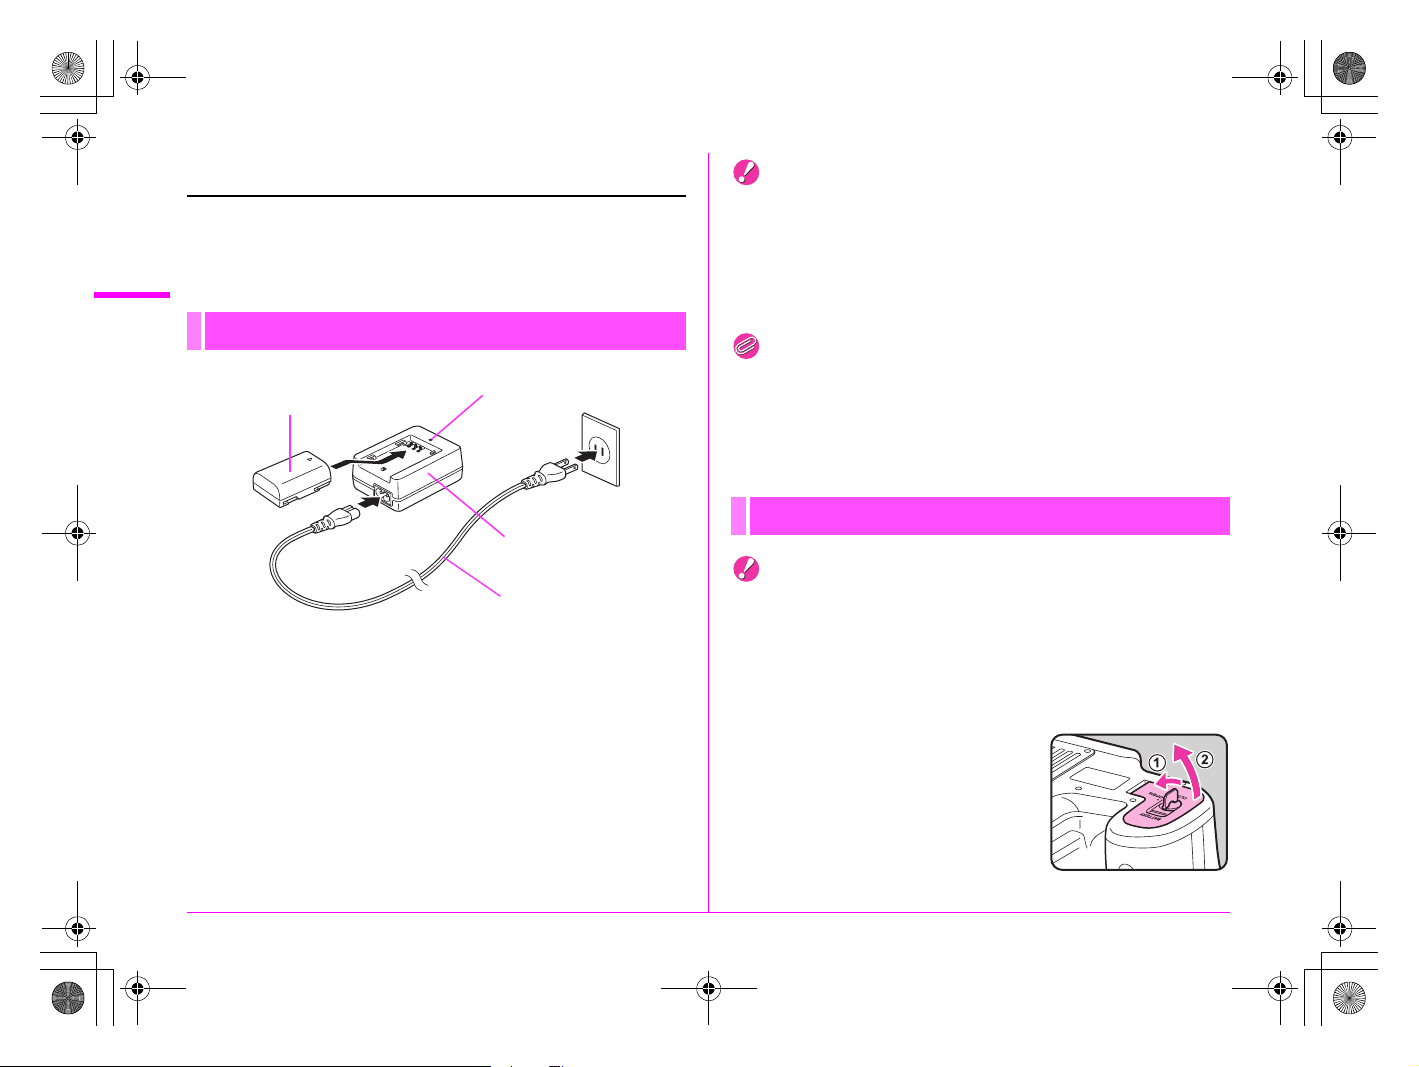
Charging the Battery
Indicator lamp
Lithium-ion battery
Battery charger
AC plug cord
1 Connect the AC plug cord to the charger.
2 Plug the AC plug cord into the power outlet.
3 Face the 2 mark on the battery up and insert it
into the battery charger.
The indicator lamp turns on during charging and turns off when the
battery is fully charged.
4 Remove the battery from the battery charger.
Caution
• Do not use the provided battery charger to charge batteries other
than battery D-LI90. Charging other batteries may cause damage
or overheating.
• If the battery is correctly oriented and inserted into the battery
charger but the indicator lamp is not lit, the battery is faulty. Use a
new battery in the camera.
Memo
• The maximum charging time is approximately 390 minutes.
Charge in a location where the temperature is between 0°C and
40°C.
• If usage time is reduced, the battery has reached the end of its
usage span. Use a new battery in the camera.
Inserting/Removing the Battery
Caution
• Do not open the battery cover or remove the battery while the
power is on.
• Remove the battery when you will not use the camera for a long
while. Otherwise, the battery may leak.
• If the battery is removed for a long while, the date and time settings
may be reset.
1 Open the battery cover.
Lift the battery cover unlock knob, turn
towards OPEN (1) to unlock, and
then pull the cover open (2).
28
Page 31

e_kb487.book Page 29 Wednesday, December 8, 2010 9:49 AM
2 Face the 2 mark on the
battery towards the outside
of the camera, push the
battery lock lever in the
direction of the arrow (3)
and insert the battery.
To remove the battery, push the
battery lock lever in the direction of the
arrow (3) with your finger.
Battery lock lever
3 Close the battery cover (4)
and turn the battery cover
unlock knob towards CLOSE
(5) to lock.
Stow the battery cover unlock knob.
Memo
• Use the AC adapter kit K-AC50 (optional) when using the camera
for a prolonged period. (p.30)
Battery Level Indicator
You can confirm the remaining battery level by checking the
battery level indicator on the status screen or LCD panel.
Status Screen LCD Panel Battery Level
w (Green) A Battery is full.
x (Green) B Battery is one-third empty.
y (Yellow) C Battery is two-thirds empty.
z (Red) D lit Battery is almost empty.
[Battery depleted] D blinks
Memo
• The displayed battery level may not be correct when the camera is
used at low temperatures or when performing continuous shooting
for long periods of time.
• Battery performance decreases at low temperatures. When using
the camera in cold climates, keep the battery warm in your pocket.
Battery performance will return to normal when returned to room
temperature.
• The battery level is not displayed when using the AC adapter.
The camera turns off after displaying
the message. (The LCD panel
indicator continues to blink.)
2
Getting Started
29
Page 32

e_kb487.book Page 30 Wednesday, December 8, 2010 9:49 AM
Using the AC Adapter (Optional)
We recommend using the AC adapter kit K-AC50 (optional)
when using the monitor for a long time or when connecting to
your PC or AV equipment.
2
Getting Started
1 Make sure that the camera is turned off.
2 Open the terminal cover.
3 Face the 2 mark on the DC
terminal of the AC adapter
towards the 2 mark on the
camera, and connect the DC
terminal to the DC input
terminal of the camera.
4 Connect the AC plug cord to the AC adapter, and
then plug the AC plug cord into the power outlet.
Memo
• Make sure the camera is turned off before connecting or
disconnecting the AC adapter.
• Make sure that all the terminals are securely connected. The SD
Memory Card and data may become corrupted if the connection is
dropped while the camera is accessing the SD Memory Card.
• The battery in your camera will not charge when connected to the
AC adapter.
• Be sure to read the AC adapter kit K-AC50 Operating Manual when
using the AC adapter.
30
Page 33

e_kb487.book Page 31 Wednesday, December 8, 2010 9:49 AM
Inserting/Removing the SD
Memory Card
This camera can use up to two commercially available SD
Memory Cards or SDHC Memory Cards (collectively referred to
as “SD Memory Cards” in this manual). Ideally you should use
a high-speed, large-capacity SD Memory Card.
Caution
• An SD Memory Card must be formatted with this camera before
use. (1 “Formatting an SD Memory Card” p.36)
1 Make sure that the camera is turned off.
2 Slide the card cover in the
direction of the arrow (1)
and then lift it to open (2).
2
1
3 Insert the card all the way
into the SD1 or SD2 slot with
the SD Memory Card label
facing toward the monitor.
Insert an SD Memory Card into one or
both of the SD1 and SD2 slots.
To remove the SD Memory Card, push
the card in again.
4 Close the card cover and then slide it in the
opposite direction of the arrow (1).
Caution
• Be sure to fully close the card cover. The camera will not turn on if
the card cover is open.
• Do not turn off the power or remove the SD Memory Card while the
card access lamp is lit.
Memo
• Refer to “Setting the File Format and Data Saving Method” (p.42)
for details on how to save data to the SD Memory Cards in the SD1
and SD2 slots.
2
Getting Started
31
Page 34

e_kb487.book Page 32 Wednesday, December 8, 2010 9:49 AM
2
Getting Started
Precautions When Using the SD Memory Card
• The SD Memory Card is equipped with a
write-protect switch. Setting the switch to
LOCK prevents new data from being
recorded on the card, the stored data from
being deleted, and the card from being
formatted by the camera or computer.
• The SD Memory Card may be hot when
removing the card immediately after using
the camera.
• Do not remove the SD Memory Card or turn off the power while
the card access lamp is lit. This may cause the data to be lost or
the card to be damaged.
• Do not bend the SD Memory Card or subject it to violent impact.
Keep it away from water and store away from high
temperatures.
• Do not remove the SD Memory Card while formatting. The card
may be damaged and become unusable.
• Data on the SD Memory Card may be deleted in the following
circumstances. We do not accept any liability for data that are
deleted if
(1) the SD Memory Card is mishandled by the user.
(2) the SD Memory Card is exposed to static electricity or
electrical interference.
(3) the SD Memory Card has not been used for a long time.
(4) the SD Memory Card or the battery is removed while the
card is being accessed.
• If it is not used for a long time, the data on the card may become
unreadable. Be sure to regularly make a backup of important
data on a computer.
• Avoid using or storing the card where it may be exposed to static
electricity or electrical interference.
• Avoid using or storing the card in direct sunlight or where it may
be exposed to rapid changes in temperature or to condensation.
Write-protect
switch
• Format new SD Memory Cards. Also format SD Memory Cards
used with other cameras. (1 ”Formatting an SD Memory Card”
p.36)
• The data on your SD Memory Card should be managed at your
own risk.
32
Page 35

e_kb487.book Page 33 Wednesday, December 8, 2010 9:49 AM
Power
1 Turn the main switch to
[ON].
The camera will turn on.
Set the main switch to the position
[OFF] to turn off the camera.
Memo
• Always turn the camera off when not in use.
• The power will automatically turn off when you do not perform any
operations within a set period of time (Auto Power Off). To
reactivate the camera after it turns off automatically, turn it on
again or perform any of the following.
• Press the shutter release button halfway.
• Press the Q button, 3 button or M button.
• By default, the camera is set to power off automatically after 1
minute of inactivity. You can change the setting in [Auto Power Off]
in the [R3] menu. (z p.R27)
2
Getting Started
33
Page 36

e_kb487.book Page 34 Wednesday, December 8, 2010 9:49 AM
Initial Settings
Language Setting
2
The first time the camera is turned on after purchase, the
Getting Started
[Language/u] screen appears on the monitor. Follow the
procedure below to set the display language and the current
date and time.
1 Use the2345 keys to
select a desired language
and press the 4 button.
The [Initial Setting] screen in the
selected language appears.
MENU
Cancel OK
2 Press the 3 key.
The cursor moves to W (Hometown).
If the hometown is set as you desire,
proceed to Step 7 on p.34.
3 Press the 5 key.
The [W Hometown] screen appears.
4 Use the 45 keys to choose
the hometown.
Initial Setting
New York
Text Size
Settings complete
MENU
Cancel
Hometown
OK
English
Standard
5 Press the 3 key.
The cursor moves to [DST] (daylight saving time).
6 Use the 45 keys to select O or P, and press the
4 button.
The camera returns to the [Initial Setting] screen.
7 Press the 3 key.
The cursor moves to [Text Size].
8 Press the 5 key, use the
23 keys to select
[Standard] or [Large], and
press the 4 button.
Selecting [Large] increases the text
size of the selected menu item.
Initial Setting
New York
Text Size
Settings complete
MENU
Cancel OK
English
Standard
Large
MSC
OK
9 Press the 3 key to select [Settings complete] and
press the 4 button.
The [Date Adjustment] screen appears.
Memo
• You can select from 75 cities for the hometown and destination.
(z p.R23)
• In this manual, the menu screens hereafter are described with
[Text Size] set to [Standard].
• To change the Language, Hometown or Text Size settings, use the
[R1] menu. (z p.R23)
34
New York
DST
MENU
Cancel OK
OK
Page 37

e_kb487.book Page 35 Wednesday, December 8, 2010 9:49 AM
Date Adjustment
1 On the [Date Adjustment]
screen, press the 5 key and
use the 23 keys to choose
the date format.
Choose [mm/dd/yy], [dd/mm/yy] or [yy/
mm/dd].
Date Adjustment
Date Format
Date
Time
MENU
Cancel OK
mm
00 00
Settings complete
dd yy
/
/
//
/ 2010
/01 01
:
24h
OK
2 Press the 5 key and use the 23 keys to select
[24h] (24-hour display) or [12h] (12-hour display).
3 Press the 5 key.
The frame returns to [Date Format].
4 Press the 3 key and then the 5 key.
The frame moves to the month.
5 Use the 23 keys to set the month, day and year.
6 Set the time in the same manner.
If you select [12h] in Step 2, the camera switches between am and
pm depending on the time.
7 Select [Settings complete] and press the 4
button.
The status screen is displayed and the camera switches to Capture
mode.
The seconds value is set to 0 seconds when the 4 button is
pressed.
Memo
• Pressing the 3 button while setting the date and time cancels
the settings and switches the camera to Capture mode. The [Initial
Setting] screen or the [Date Adjustment] screen will appear again
the next time the power is turned on.
• To change the date and time, use the [R1] menu. (z p.R23)
2
Getting Started
35
Page 38

e_kb487.book Page 36 Wednesday, December 8, 2010 9:49 AM
Formatting an SD Memory Card
An SD Memory Card must be formatted with this camera before
use.
2
Getting Started
Caution
• Do not remove the SD Memory Card while formatting. The card
may be damaged and become unusable.
• Formatting an SD Memory Card deletes all images on the card
even protected images.
1 Press the 3 button.
The [A1] menu appears.
1 234
SD1 Image File Format
SD2 Image File Format
JPEG Recorded Pixels
JPEG Quality
ISO AUTO Adjustment
D-Range Setting
MENU
Exit
2 Turn the S dial to select the [R4] menu.
3 Use the 23 keys to select
[Format] and press the 5
key.
The [Format] screen appears.
Pixel Mapping
Dust Alert
Dust Removal
Sensor Cleaning
Format
MENU
1234
Exit
JPEG
JPEG
L
4 Use the 23 keys to select the card to format and
press the 4 button.
You cannot select a card when either one of the cards is locked or
not inserted.
5 Press the 2 key to select
[Format] and press the 4
button.
Formatting starts.
When formatting is completed, the
camera returns to Capture mode.
Format
All data saved
on SD1 card
will be deleted
Format
Cancel
OK
OK
36
Page 39

Del et eDelete
e_kb487.book Page 37 Wednesday, December 8, 2010 9:49 AM
Diopter Adjustment
You can adjust the diopter from approximately –3.5 to +2.0 m–1.
1 Turn the diopter adjustment
ring while looking through
the viewfinder.
Turn the diopter adjustment ring
clockwise for a negative value and
counterclockwise for a positive value.
Attaching the Large Eyecup
Attach the Large Eyecup 645 O-EC107 as needed.
1 Slightly stretch the rim of the
large eyecup and attach it on
the camera, covering over
the standard eyecup.
Testing Your Camera
Shooting
Take some test pictures to familiarize yourself with the camera.
1 View the subject through the viewfinder and
press the shutter release button.
The picture is taken.
The image appears for 1 second
(default setting) on the monitor shortly
after capturing (Instant Review).
Available operations during Instant Review
S dial Enlarges Instant Review (p.67)
i button Deletes an image (p.67)
2
Getting Started
Memo
• You can set the Instant Review display with the [A3] menu.
(z p.R18)
37
Page 40

e_kb487.book Page 38 Wednesday, December 8, 2010 9:49 AM
Playing Back Captured Images
You can play back captured images.
1 Press the Q button.
2
Getting Started
The camera enters Playback mode
and the most recently captured image
(image with the highest file number) is
displayed on the monitor.
Press the M button to switch the
information display for the image.
(p.17)
2 View the images.
Available operations
4 key or R dial to the left Shows the previous image.
5 key or R dial to the right Shows the next image.
u button/w button/
x button
Memo
• Refer to “Playback and Processing Functions” (p.65) for details on
playback functions.
• Use the provided “PENTAX Digital Camera Utility 4” software to
play back pictures using a computer. (1 “Using a Computer” p.81)
How to Change Function
Settings
Function settings can be changed using the direct keys, control
panel or menus. Some functions can be changed using both the
control panel and menus.
This section explains the basic ways to change function
settings.
Using the Direct Keys
You can use the direct keys in Capture mode to directly set
functions.
The following explains how to set the flash mode as an
example.
1 Press the E button in
Capture mode.
The [Flash Mode] screen appears.
Switches between the SD
Memory Cards.
38
Page 41

HDR
OFF
DR
200
HDR
OFF
DR
200
e_kb487.book Page 39 Wednesday, December 8, 2010 9:49 AM
2 Use the 45 keys to select a
flash mode.
Flash Mode
Flash On
MENU
Cancel OK
0.0
3 Press the 4 button.
The camera switches to Capture mode.
Using the Control Panel
The following explains how to set the Program Line as an
example.
1 Press the M button in
Capture mode.
The control panel appears.
2 Use the 2345 keys to
select the item you want to
change the setting for.
You cannot select an item that cannot
be changed with current camera
OK
settings.
3 Use the R/S dials to
change the setting.
Press the 4 button to display the
detailed setting screen for the selected
item. For some items such as
Extended Bracketing, you can make
more detailed settings from the
ISO AUTO Adjustment
On
ISO
AUTO
HDR
WB
OFF
1
RAW+ L
2
JPEG L
05/05/’10
Program Line
Auto
1
RAW+ L
2
JPEG L
05/05/’10
ISO
AUTO
WB
10:30AM
HDR
OFF
10:30AM
DR
200
]
[
123
[
]
456
2
Getting Started
DR
200
]
[
123
[
]
456
detailed setting screen.
4 Press the M button.
The camera switches to Capture mode.
39
Page 42

OFF
OFF
e_kb487.book Page 40 Wednesday, December 8, 2010 9:49 AM
Using the Menus
This section explains how to use the menus: [A Rec. Mode],
[Q Playback], [R Set-up] and [A Custom Setting].
The following explains how to set [Program Line] in the [A2]
2
menu as an example.
Getting Started
1 Press the 3 button in
Capture mode.
The [A1] menu appears on the
monitor.
Press the 3 button in Playback
mode to display the [Q1] menu first.
2 Press the 5 key or turn the
S dial to the right (y).
Each time the 5 key is pressed, the
menu will change in the following
sequence: [A2], [A3], [A4], [Q1]
...[A1].
When the R dial is turned to the
right, the category will change in the following sequence: [A1],
[Q1], [R1], [A1].
1 234
SD1 Image File Format
SD2 Image File Format
JPEG Recorded Pixels
JPEG Quality
ISO AUTO Adjustment
D-Range Setting
MENU
Exit
JPEG
JPEG
L
3 Use the 23 keys to select
an item and press the 5 key.
Available settings are displayed.
The frame moves to the pop-up menu
if there is one.
4 Use the 23 keys to select
an item and press the 4
button.
The camera returns to the menu
screen. Next, set other items.
Press the 3 button to exit the
menu and return to the screen that
1 234
Lens Correction
Program Line
Extended Bracketing
HDR Capture
Multi-exposure
Interval Shooting
MENU
Exit
1 234
Lens Correction
Program Line
Extended Bracketing
HDR Capture
Multi-exposure
Interval Shooting
MENU
Cancel OK
was displayed before the menu was selected.
Caution
• Your settings may not be saved if the camera is turned off
improperly (such as by removing the battery while the camera is
on).
Memo
• Refer to “Menu Reference” for details on each menu.
• A Rec. Mode Menu z p.R13
• Q Playback Menu z p.R22
• R Set-up Menu z p.R23
• A Custom Setting Menu z p.R30
OFF
Off
OFF
OK
40
Page 43

e_kb487.book Page 41 Wednesday, December 8, 2010 9:49 AM
3 Shooting Functions
Setting the File Format and Data Saving Method ..... 42
Focusing ...................................................................... 44
Exposure Setting ......................................................... 45
White Balance .............................................................. 50
Drive Mode ................................................................... 53
Auto Bracketing ........................................................... 56
Flash Mode ................................................................... 58
Preview ......................................................................... 61
Custom Image .............................................................. 62
Page 44

e_kb487.book Page 42 Wednesday, December 8, 2010 9:49 AM
Setting the File Format
and Data Saving Method
Before shooting, you can set the file format, recorded pixels and
quality level of captured images and how they are saved to the
SD Memory Card.
3
Shooting Functions
File Format
You can set the data saving method and file format for images
saved to the SD Memory Cards in the SD1 and SD2 slots.
Regardless of the number of inserted cards, you can configure the
setting for each card slot individually. For example, JPEG images
can be saved to one card slot while RAW images are saved to the
other slot, or you can have images captured in the same format to
both card slots at the same time as a data backup.
JPEG
RAW
RAW+
RESERVE
OFF
Captures images in JPEG format. (default setting)
If [JPEG] is selected, next set the [JPEG Recorded Pixels]
and [JPEG Quality] settings.
Captures images in RAW format.
After shooting, use RAW Development (p.72) or the provided
“PENTAX Digital Camera Utility 4” software for RAW image
development (p.84).
Captures images in both RAW and JPEG formats and saves
them to one card.
When either of SD Memory Cards becomes full, images are
saved to the other one in the same file format.
If an SD Memory Card which is not set to [RESERVE]
becomes full or is removed, images are saved to the other
one which is set to [RESERVE].
The card slot is not used.
When using only one SD Memory Card, use this setting for
the unused slot.
Setting examples
SD1 Slot
JPEG JPEG
JPEG RAW
JPEG RAW+
JPEG RESERVE
JPEG OFF The SD2 slot is unused.
SD2 Slot Operation
Saves images in the same file format (JPEG) to the
cards in the SD1 and SD2 slots. (Data backup)
Saves JPEG images to the card in the SD1 slot and
RAW images to the card in the SD2 slot.
Saves JPEG images to the card in the SD1 slot and
RAW and JPEG images to the card in the SD2 slot.
JPEG images saved to the cards in the SD1 and
SD2 slots have the same [JPEG Recorded Pixels]
and [JPEG Quality] settings.
When the card in the SD1 slot is full, images are
saved in the same format to the card in the SD2 slot.
If the SD1 slot has a new card, when the card in the
SD2 slot is full, images are saved to the card in the
SD1 slot.
Memo
• Only one slot can be set to [RESERVE] or [OFF].
• Set the RAW file format in the [A4] menu. (z p.R19)
• You can temporarily change the file format by simply pressing the
| button. Set this with [RAW Button] in the [A4] menu.
(z p.R19)
1 Turn the S dial while
pressing the w button.
The setting changes in the following
sequence: JPEG, RAW, RAW+,
RESERVE, OFF.
42
Page 45

e_kb487.book Page 43 Wednesday, December 8, 2010 9:49 AM
2 Turn the S dial while pressing the x button.
Configure the setting for the SD Memory Card in the SD2 slot in the
same manner.
Caution
•
Depending on the setting and condition for storing the data, when one
or both of the SD Memory Cards become full and no more images can
be saved, an error message appears and the shutter locks.
• When [JPEG] or [RAW+] is set for both cards, the JPEG images
saved to both cards have the same [JPEG Recorded Pixels] and
[JPEG Quality] settings.
Memo
• You can check the data saving status for each slot on the status
screen (p.15), LCD panel (p.22) and in the viewfinder (p.20).
JPEG Recorded Pixels/Quality
Level
When [JPEG] is selected as the file format, set the recorded pixels
C
and quality level (
does not have to be set when [RAW] is selected as the file format.
Setting Recorded Pixels Pixels
L i 7264×5440
M
S
Set the recorded pixels for M and S with [35. M and S Pixel
Resolution] in the [A5] menu. (z p.R35)
Best, D Better, and E Good). This
k 6528×4896
n 5376×4032
q 4224×3168
a 3072×2304
1 Turn the R dial while
pressing the w/x
button.
The setting changes in the following
sequence: LC (default setting),
LD, LE, MC, MD, ME,
SC, SD, SE.
3
Shooting Functions
Memo
• If you set [JPEG] or [RAW+] for both cards, when either the w or
x button is used to set the recorded pixels and quality level, both
cards will have the same settings.
43
Page 46

e_kb487.book Page 44 Wednesday, December 8, 2010 9:49 AM
Focusing
Selecting the Focus Mode
1 Select [AF] or [MF] on the
lens.
3
Shooting Functions
2 Use the AF mode switching
dial on the camera to select
the AF mode.
Memo
• You can use the = button to focus on the subject in the same
manner as when pressing the shutter release button halfway. You
can also use [13. AF Button Function] in the [A2] menu to set the
= button function to [AF Cancel]. (z p.R31)
• You can adjust the AF focus position with [33. AF Fine Adjustment]
in the [A5] menu. (z p.R35)
AF Point Switching
Auto
S
j Select
U Center Sets the focus position to the center of the viewfinder.
The camera selects an optimum AF point in the
viewfinder.
You can select the desired focus position from the set
number of AF points in the AF area.
1 Turn the AF point switching
dial.
The selected AF point lights red in the
viewfinder (Superimpose AF Area).
44
l
Autofocus/Single mode
A(k)
Autofocus/Continuous
mode
Locks the focus at the position where the
subject is in focus.
Continuously adjusts the focus to keep the
subject in focus. The shutter can be released
even if autofocus does not work.
The camera automatically tracks the subject
if the subject is determined to be a moving
object during focusing.
Page 47

e_kb487.book Page 45 Wednesday, December 8, 2010 9:49 AM
2 When [j] is selected, use the 2345 keys to
select the desired focus position.
Pressing the 4 button returns the focus position to the center.
Memo
• To turn off the red light of the superimposed AF point, set [15.
Superimpose AF Area] to [Off] in the [A3] menu. (z p.R32)
• You can select the number of AF points from 11 (default setting), 5
or 3. The selected AF points are used as the focus position when
the AF point switching dial is set to j. Set this with [16. Number
of AF Points] in the [A3] menu. (z p.R32)
• The focus position selected when set to j is saved even if the
camera is turned off or the focus area is switched to U or S.
• When any of the following operations are performed, changing of
the AF point (in Step 2) is canceled.
• The main switch is turned off
• The AF point switching dial is turned
• The mode dial is turned
• The Q or 3 button is pressed
• When the camera is used with the A645 mount lens, an
intermediate ring, or other accessory, the focus area is always set
to U.
Exposure Setting
Selecting the Metering Mode
1 Turn the metering mode
switching lever.
The set metering mode is displayed in
the viewfinder and on the status
screen.
L Multi-segment metering
The image in the viewfinder is metered
in 77 different zones.
M Center-weighted metering
Metering is weighted at the center of
the viewfinder image.
The sensitivity at the center of the
image is high and is not automatically
compensated even for backlit scenes.
N Spot metering
Metering is performed only for a
limited area at the center of the
viewfinder image.
3
Shooting Functions
45
Page 48

e_kb487.book Page 46 Wednesday, December 8, 2010 9:49 AM
3
Shooting Functions
Memo
• You can set whether to link the exposure and AF point in the focus
area during multi-segment metering. Set this with [6. Link AE to AF
Point] in the [A1] menu. (z p.R30)
Meter operating timer
Set the meter operating time with [4. Meter Operating Time]
in the [A1] menu. (z p.R30)
Setting the Sensitivity
You can set the sensitivity to [AUTO] (default setting) or a value
in the range equivalent to ISO 200 to 1000.
1 Turn the S dial while
pressing the o button.
Press the | button while pressing the
o button to return to [AUTO].
Memo
• Set the range of automatic sensitivity adjustment with [ISO AUTO
Adjustment] in the [A1] menu or on the control panel. (z p.R14)
• You can set the sensitivity in increments of 1 EV or in accordance
with the EV step setting for exposure. It can be set with
[2. Sensitivity Steps] in the [A1] menu. (z p.R30)
• You can expand the sensitivity range to ISO 100 to 1600 with
[3. Expanded Sensitivity] in the [A1] menu. (z p.R30)
• You can reduce noise at high sensitivity with [20. High-ISO Noise
Reduction] in the [A3] menu. (z p.R32)
46
Page 49

e_kb487.book Page 47 Wednesday, December 8, 2010 9:49 AM
Changing the Exposure Mode
The following are the available exposure modes.
Exposure Mode Function
e
Hyper-program
K
Sensitivity Priority
b
Shutter Priority
c
Aperture Priority
L
Shutter & Aperture Priority
a
Hyper-manual
p
Bulb
M
Flash X-sync Speed
A
User setting
Automatically sets the shutter speed and aperture value
according to Program Line.
You can use the front and rear e-dials to switch between
shutter priority and aperture priority.
You can set the desired sensitivity. z ××
You can set the desired shutter speed. zz × z
You can set the desired aperture value. z × zz
Automatically sets the sensitivity according to the set
shutter speed and aperture value.
You can set all settings. zzz
Bulb shooting × × z
The shutter speed is locked at 1/125 seconds. Use this
when using a flash that does not automatically set the
sync speed.
Lets you capture images with the previously-saved
exposure mode and settings.
(z: Available ×: Not available)
EV
Compensation
zzzz
zzzAUTO only
z × z
––––
Change Shutter
Speed
Change
Aperture Value
Change
Sensitivity
Other than
AUTO
Other than
AUTO
Other than
AUTO
Other than
AUTO
3
Shooting Functions
Memo
• Set Program Line on the control panel or in the [A2] menu. (z p.R15)
•Set A in the [A4] menu. (z p.R20)
47
Page 50

e_kb487.book Page 48 Wednesday, December 8, 2010 9:49 AM
1 Turn the mode dial while
pressing the mode dial lock
button.
3
Shooting Functions
2 Use the R/S dials to
change the setting.
R/S appears on the monitor next
to the setting that is being changed.
Memo
• Set the functions of the e-dials for each mode in the [A4] menu.
(z p.R33 - p.R34)
Mode dial lock button
M
1/
AWB
125
ISO
-
5
200
F
11223344+5
RAW+ L JPEG
]
123
AF.S
5.6
EV Compensation
You can adjust the EV compensation from –5 to +5 (EV).
1 Turn the S dial while
pressing the m button.
m is displayed during compensation.
Press the | button while pressing the
m button to return to “0.0”.
L
2 [
]1 [
456
Memo
• Set the EV steps with [1. EV Steps] in the [A1] menu. (z p.R30)
EV Compensation for a and M modes
If you set the EV compensation to a
positive (+) value for a and M modes,
underexposure is displayed on the EV
bar. If you set the exposure so that the
V is displayed at the center of the EV
bar, the image will be captured with
the compensated value.
48
Page 51

e_kb487.book Page 49 Wednesday, December 8, 2010 9:49 AM
AE Lock
AE lock is a function that locks the exposure prior to taking the
picture.
1 Press the L button.
The camera locks the exposure. @ is
displayed on the status screen and in
the viewfinder while the AE lock is
engaged.
Press it again to cancel the AE lock.
Memo
• The exposure remains in memory for between half and twice the
amount of the meter operating time, even after you take your finger
off the L button.
• You will hear a beep when the L button is pressed. You can
change the setting with [Beep] in the [R1] menu. (z p.R24)
• When the AE lock is set in a mode, you can change the shutter
speed and aperture value while maintaining the exposure value.
• AE lock is not available in p or M mode.
• When any of the following operations are performed, AE lock is
canceled.
• The L button is pressed again
• The Q button, 3 button or M button is pressed
• The mode dial is turned
• The metering mode switching lever is turned
• The lens is changed
• The lens with an aperture s position is set to the s position or
is switched to another position
• When using a zoom lens whose maximum aperture value varies
depending on the focal length, the shutter speed and aperture
value change depending on the zooming position while the AE lock
is engaged. However, the exposure value does not change and a
picture is taken at the brightness level set by the AE lock.
• Exposure can be locked when the focus is locked. Set this with [5.
AE-L with AF Locked] in the [A1] menu. (z p.R30)
3
Shooting Functions
49
Page 52

e_kb487.book Page 50 Wednesday, December 8, 2010 9:49 AM
White Balance
The following settings are available.
Setting Color Temperature
F Auto (default setting)
3
G Daylight Approx. 5,200K
H Shade Approx. 8,000K
Shooting Functions
^ Cloudy Approx. 6,000K
Fluorescent Light
D Fluorescent Light Daylight Color
J
N Fluorescent Light Daylight White
W Fluorescent Light Cool White
L Fluorescent Light Warm White
I Tungsten Light Approx. 2,850K
L Flash Approx. 5,400K
f Color Temperature Enhancement –
K Manual 1-3
K Color Temperature 1-3 –
Approx. 4,000
to 8,000K
Approx. 6,500K
Approx. 5,000K
Approx. 4,200K
Approx. 3,000K
Approx. 2,500
to 10,000K
1 Press the n button.
The [White Balance] screen appears.
2 Use the 23 keys to select
the white balance.
CTE
5000K
MENU
Cancel
Available operations
Main switch (|) Displays the background image with Digital
L button Saves the background image as a new file.
Preview.
White Balance
Auto
AE.L
OK
Check
OK
50
Page 53

A
e_kb487.book Page 51 Wednesday, December 8, 2010 9:49 AM
3 To fine-tune the white
Shade
balance, press the 5 key.
Seven levels (225 patterns) are
available on the G-M and B-A axes.
Available operations
23 keys Adjusts the tone of the colors between green
(G) and magenta (M).
45 keys Adjusts the tone of the colors between blue
(B) and amber (A).
| button Resets the adjustment value.
G1 ±0
±0
MENU
Cancel Check
BBA
4 Press the 4 button.
The camera switches to Capture mode.
Memo
• The white balance of a JPEG image can also be adjusted after
shooting. Immediately after shooting, press the n button and
change the setting, and then press the L button and select
[Save as].
• The camera automatically performs fine-tuning even when the light
source is specified. To fix the color temperature of the light source,
use [11. WB Adjustable Range] in the [A 2] menu. (z p.R31)
• To set the white balance setting when using the flash, use [10. WB
When Using Flash] in the [A2] menu. (z p.R31)
Setting the Manual White Balance
GG
A
MM
OK
OK
You can save up to three manual white balance settings.
1 Select K in the [White Balance] screen and press
the 5 key.
2 Use the 23 keys to select
K1, K2 or K3 and press
the 5 key.
CTE
5000K
MENU
Cancel
White Balance
Manual 1
OK
Check
OK
3
Shooting Functions
3 Aim the camera at the subject to measure the
white balance and press the shutter release
button fully.
4 Use the S dial to select
the entire screen or spot
area for the measuring
range.
When a spot area is selected, use the
2345 keys to move the frame to
the position you want to measure.
MENU
Cancel OK
OK
5 Press the 4 button.
When measuring is completed, the camera returns to the white
balance fine-tuning screen.
51
Page 54

A
100 -0 105
Man ua l W hit e Bal an ce is
now s et acc or din g to the
cur re nt ima ge's col or ba la nce
e_kb487.book Page 52 Wednesday, December 8, 2010 9:49 AM
Setting the Color Temperature
You can save up to three color temperature settings. (The
default setting is [5000K].)
1 Select K in the [White Balance] screen and press
the 5 key.
3
2 Use the 23 keys to select K1, K2 or K3 and press
Shooting Functions
the 5 key.
The [Color Temperature] screen appears.
3 Use the R/S dials to
adjust the color
temperature.
Color temperature steps differ
depending on the e-dial.
e-dial Kelvin Mired
R 1 Step (100K) 1 Step (20M)
S 10 Steps (1,000K) 5 Steps (100M)
Color
Temperature
5000K
±0 ±0
±0
MENU
Cancel Check
4 Press the 4 button.
The settings are saved and the camera returns to the [White
Balance] screen.
Memo
• By default, the unit of Color Temperature is [Kelvin]. You can
change the unit to [Mired] in [22. Color Temperature Steps] in the
[A4] menu. (Figures are converted to Kelvin and displayed.)
(z p.R33)
K1
GG
BBA
A
MM
OK
OK
Saving the White Balance Setting of
a Captured Image
You can copy the white balance setting of an image captured
with this camera and save it as Manual White Balance.
1 In Playback mode, display the image with the
white balance setting you want to copy.
2 Select K (Save as Manual WB) in the playback
mode palette.
The save confirmation screen appears.
3 Select K1, K2 or K3, and
press the 4 button.
The white balance setting of the
selected image is saved to Manual
White Balance and the camera
switches to Capture mode.
Caution
• The fine-tuned white balance value used when shooting is reset.
Memo
• Refer to “Setting the Playback Functions” (p.66) for operations of
the playback mode palette.
Manual White Balance is
now set according to the
current image's color balance
Cancel
1
100-0105
OK
OK
52
Page 55

e_kb487.book Page 53 Wednesday, December 8, 2010 9:49 AM
Drive Mode
There are four drive modes: Single Frame Shooting,
Continuous Shooting, Self-timer, and Remote Control.
1 Press the Y button.
The [Drive Mode] screen appears.
2 Use the 45 keys to select a drive mode.
Continuous Shooting
With Continuous Shooting, you can shoot at a maximum speed
of 1.1 frames per second. The number of frames that can be
shot continuously varies depending on the number of recorded
pixels, quality level, and other settings.
1 Select j in the [Drive Mode]
screen and press the 4
button.
Drive Mode
Continuous Shooting
MENU
Cancel OK
OK
3
Shooting Functions
53
Page 56

2
s
e_kb487.book Page 54 Wednesday, December 8, 2010 9:49 AM
Self-timer Shooting
This camera has the following two types of self-timer modes.
g Shutter is released after about 12 seconds.
Z Mirror is raised and shutter is released after about 2 seconds.
1 Select g in the [Drive Mode] screen.
3
2 Press the 3 key, use the
Shooting Functions
45 key to select g or Z,
and press the 4 button.
3 Press the shutter release button fully.
When g is selected, the self-timer lamp on the front of the camera
starts blinking slowly and blinks rapidly 2 seconds before the
shutter is released. A beep is heard and the rate increases.
Remote Control Shooting
This camera has the following three types of remote control
shooting modes for use with the optional Remote Control F or
Remote Control Waterproof O-RC1.
Drive Mode
Self-timer (12 sec.)
MENU
Cancel OK
1 Select h in the [Drive Mode] screen.
2 Press the 3 key, use the
45 key to select h, i or
i, and press the 4
button.
The self-timer lamp blinks.
Memo
2
s
OK
• When using the Remote Control Waterproof O-RC1, you can use
the S button on the remote control to enable autofocus.
Interval Shooting
By specifying the shooting time and interval, you can capture up
to 999 images with Interval Shooting.
Set this in the [A2] menu. (z p.R17)
Caution
• Interval Shooting is not available when the exposure mode is set to
p or when Extended Bracketing or HDR Capture is set.
Drive Mode
Remote Control
MENU
Cancel OK
OK
h Releases shutter immediately.
i Mirror is raised and shutter is released after 3 seconds.
Continuous shooting starts when the shutter release button on
i
the remote control unit is pressed. Press it again to stop
shooting.
54
Page 57

e_kb487.book Page 55 Wednesday, December 8, 2010 9:49 AM
Multi-exposure
You can create a composite picture by taking multiple frames.
Set this in the [A2] menu. (z p.R17)
Caution
• When Multi-exposure is set, Interval Shooting and Extended
Bracketing are not available.
• Multi-exposure cannot be used with Extended Bracketing or HDR
Capture at the same time. The mode set last is used.
• [Lens Correction] in the [A2] menu is disabled when Multiexposure is set.
Mirror Lock-up
This raises the mirror. You can use this function with another
drive mode.
1 Turn the d dial.
The camera is ready to raise the
mirror.
2 Press the shutter release button fully.
The mirror is raised.
3 Press the shutter release button fully again.
The picture is taken and the mirror is lowered.
To exit mirror lock-up shooting, return the d dial to its original
position.
Memo
• The mirror will be lowered automatically about one minute after
being raised.
Caution
• Turning the mode dial or adjusting the lens aperture ring when the
mirror is raised lowers the mirror.
• Preview is not available when the mirror is raised.
• The mirror will not be raised during Interval Shooting even when
the d dial is set to the “UP” position.
3
Shooting Functions
M.UP
55
Page 58

e_kb487.book Page 56 Wednesday, December 8, 2010 9:49 AM
Auto Bracketing
Exposure Bracketing
You can use Exposure Bracketing to take 2 (standard exposure
and underexposure, or standard exposure and overexposure),
3 or 5 pictures with different exposure.
3
Shooting Functions
Memo
• Set the auto bracketing order with [8. Auto Bracketing Order] in the
[A2] menu. (z p.R31)
• Set the EV step interval with [1. EV Steps] in the [A1] menu.
(z p.R30)
1 Turn the R dial while
pressing the ] button and
set the number of frames.
Check the setting on the LCD panel.
Right (clockwise) OFF → 3 frames → 5 frames
Left (counterclockwise) OFF → 2 frames (underexposed) → 2
frames (overexposed)
2 Turn the S dial while pressing the ] button
and set the compensation value.
Press the | button while pressing the ] button to return to [OFF]
and [--].
EV Steps Compensation Value
1/3 EV ±0.3/±0.7/±1.0/±1.3/±1.7/±2.0
1/2 EV ±0.5/±1.0/±1.5/±2.0
2 images (underexposed) at 0.3 EV
5 images at 1.0 EV
3 Press the shutter release button fully.
Pictures can be taken continuously while the shutter release button
is held down.
If you take your finger off the shutter release button before the set
number of frames is taken, the next bracket setting will remain
effective for twice the amount of the meter operating time.
Select [OFF] in Step 1 to finish shooting with Exposure Bracketing.
Memo
• To take all frames with one press of the shutter release button, set
[7. One-Push Bracketing] in the [A1] menu. (z p.R30)
• You can combine Exposure Bracketing with the P-TTL auto flash
to change the flash output continuously. Confirm that the flash unit
is fully charged before shooting each frame.
• You can use Exposure Bracketing together with Extended
Bracketing. When Extended Bracketing is set to 3 frames, a total
of 9 images are saved.
56
Page 59

e_kb487.book Page 57 Wednesday, December 8, 2010 9:49 AM
Caution
• This function is not available when the exposure mode is set to p.
• This function cannot be used with Multi-exposure. The mode set
last is used.
Extended Bracketing
You can take pictures with three different levels of the following
items: White Balance, Saturation, High/Low Key Adjustment,
Contrast and Sharpness. Unlike Exposure Bracketing, three
pictures are saved each time the shutter is released.
Set this on the control panel or in the [A2] menu. (z p.R16)
Caution
• The file format is always set to [JPEG] and cannot be changed.
You cannot use Extended Bracketing when the file format is set to
[RAW] or [RAW+].
• When Extended Bracketing is set, Interval Shooting and Multiexposure are not available.
• Extended Bracketing and HDR Capture cannot be used at the
same time. The mode set last is used.
3
Shooting Functions
57
Page 60

e_kb487.book Page 58 Wednesday, December 8, 2010 9:49 AM
Flash Mode
Attaching a Flash
1 Remove the hot shoe cover
of the camera.
3
Shooting Functions
2 Attach the flash and turn on the camera.
Memo
• Press the I button to discharge the flash in Modeling Flash or
Test Flash mode. Set this with [34. External Flash Discharge] in the
[A5] menu. (z p.R35)
Using a Sync Cord
You can connect a sync cord to the
X-sync socket on the camera.
Caution
• Do not use high-voltage or high-current external flashes. They may
cause the camera to malfunction.
• A flash with reversed polarity (the center of the hot shoe or sync
plug has a negative symbol) cannot be used, as this may damage
the camera or flash.
• Linked functions will not work.
• To prevent vignetting caused by Trailing Curtain Sync from
occurring, it is recommended to take a test shot using a shutter
speed one stop slower than the flash sync speed.
• The contact of the X-sync socket is not dust-proof or waterresistant. Attach the provided Sync socket 2P cap when not in use.
Setting the Flash Mode
The following flash modes are available. The flash modes that
are available differ depending on the exposure mode.
Flash Mode Available Exposure Modes
E Flash On
F Flash On+Red-eye Reduction
G Slow-speed Sync
H Slow-speed Sync+Red-eye
e/K/b/c/L/a/p/M
e/K/c
58
Page 61

e_kb487.book Page 59 Wednesday, December 8, 2010 9:49 AM
1 Press the E button.
The [Flash Mode] screen appears.
2 Use the 45 keys to select a
flash mode.
Flash Mode
Flash On
MENU
Cancel OK
0.0
3 Use the S dial to adjust the flash
compensation value.
The compensation value differs depending on the setting of [1. EV
Steps] (z p.R30) in the [A1] menu.
EV Steps Compensation Value
1/3 EV –2.0/–1.7/–1.3/–1.0/–0.7/–0.3/0.0/+0.3/+0.7/+1.0
1/2 EV –2.0/–1.5/–1.0/–0.5/0.0/+0.5/+1.0
Press the | button to return to “0.0”.
4 Press the 4 button.
The camera switches to Capture mode.
3
Shooting Functions
OK
59
Page 62

e_kb487.book Page 60 Wednesday, December 8, 2010 9:49 AM
Flash Compatibility Chart
The following functions are available when using h with PENTAX flashes.
(z: Available ×: Not available)
Flash
Function
P-TTL auto flash z
3
TTL auto flash × × × × × × × × ×
Shooting Functions
External auto flash z ×× × ×z × zz
Red-eye reduction zzz ЧЧЧЧЧЧ
Automatic switching of shutter
speed to Flash X-sync Speed
after flash charging
Aperture set in e and b modes z ×× × ×z
Slow-speed Sync zzzz zz
Auto check in the viewfinder × × × × × × × × ×
Trailing Curtain Sync
Contrast-Control-Sync Flash z ×× × × ××××
Slave flash z ××z
Flash compensation zzz ЧЧЧЧЧЧ
AF Assist Light z ×× zz××× ×
Multiple flash × × × z
High-speed flash sync
Wireless flash
*1
*2
AF540FGZ
AF360FGZ
zzzz zzzzz
z ××z
z ×× × × ××××
AF200FG AF160FC
*3
z
*3
z
*3
AF500FTZ
AF330FTZ
ЧЧЧЧЧЧ
AF400FTZ
AF240FT
*7
*8
*8
z
ЧЧЧЧЧ
ЧЧЧЧЧ
AF400T
AF280T
AF200T
*7
××××
AF140C
AF080C
*4
*6
z
z
*4
*6
AF200SA
× z
zz
AF200S
AF160
AF140
*5
*5
*1 There is a limit to the available shutter speed.
*2 Two or more compatible flash units are required.
*3 Available only when using A645, AE645, FA645, FAE645, or D FA645 lenses.
*4 When the flash setting is MS or M, the aperture value changes automatically.
60
*5 When the flash setting is MS or M, the aperture value changes
automatically in b mode.
*6 The aperture value changes automatically.
*7 The flash fully discharges.
*8 Unavailable for AF330FTZ.
Page 63

e_kb487.book Page 61 Wednesday, December 8, 2010 9:49 AM
Preview
There are two preview methods: Optical Preview (default
setting) using the viewfinder and Digital Preview using the
monitor.
Optical Preview
1 Turn the main switch to |
while viewing the subject
through the viewfinder.
You can preview the depth of field in
the viewfinder while the main switch is
set to |.
During this time, no shooting
information is displayed in the viewfinder, and the shutter cannot
be released.
2 Take your finger off the main switch.
Optical Preview ends and the camera is ready to take a picture.
Digital Preview
1 Set [Digital Preview] in the [A3] menu.
Refer to “Menu Reference”. (z p.R18)
Available operations
S dial Enlarge Instant Review (p.67)
L button Saves the preview image as a new file.
3 Press the shutter release button halfway.
Digital Preview ends and the autofocus system operates.
Memo
• The maximum display time for Digital Preview is 60 seconds.
3
Shooting Functions
2 Turn the main switch to | while viewing the
subject on the monitor.
A preview appears on the monitor.
61
Page 64

Por tr ait
Can ce l
Che ck
F
e_kb487.book Page 62 Wednesday, December 8, 2010 9:49 AM
Custom Image
You can set the image finishing tone before shooting. Select
from the following eight modes for Image Tone: Bright, Natural
(default setting), Portrait, Landscape, Vibrant, Muted, Reversal
Film and Monochrome. You can adjust the following parameters
for each mode.
3
Shooting Functions
Parameter Setting
Saturation
Hue
Filter Effect
Toning
High/Low Key Adj
Contrast
*1
*1
*2
*2
*3
–4 to +4
–4 to +4
None/Green/Yellow/Orange/Red/Magenta/Blue/
Cyan/Infrared Filter
–4 to +4
*3
–4 to +4
–4 to +4
• [Contrast Highlight] and [Contrast Shadow] can be
added to make more advanced settings.
Sharpness
*1 Not available when [Reversal Film] or [Monochrome] is selected.
*2 Available only when [Monochrome] is selected.
*3 Not available when [Reversal Film] is selected.
–4 to +4
• You can change [Sharpness] to [Fine Sharpness].
1 Press the y button.
The [Custom Image] setting screen
appears.
2 Use the 45 keys to choose the image tone
mode.
3 Use the 23 keys to select
the parameter you want to
M
change and use the 45
keys to change the setting.
MENU
Cancel
Available operations
R dial Switches between enabling and disabling the
S dial Switches between [Sharpness] and [Fine
Main switch (|) Displays the background image with Digital
L button Saves the background image as a new file.
more advanced setting for contrast.
Sharpness].
Preview.
M
AE.L
CheckOKOK
Portrait
R
R
B
B
C
C
OK
Y
Y
G
G
F
62
Page 65

e_kb487.book Page 63 Wednesday, December 8, 2010 9:49 AM
4 Press the 4 button.
The camera switches to Capture mode.
Memo
• The Custom Image settings of a JPEG image can also be adjusted
after shooting. Immediately after shooting, press the y button and
change the setting, and then press the L button and select
[Save as].
• When [Reversal Film] is selected and [White Balance] is set to
F, images are captured with an effect similar to using a
daylight film.
3
Shooting Functions
63
Page 66

e_kb487.book Page 64 Wednesday, December 8, 2010 9:49 AM
MEMO
64
Page 67

e_kb487.book Page 65 Wednesday, December 8, 2010 9:49 AM
4
Playback and Processing Functions
Setting the Playback Functions ................................. 66
Displaying a Single Image .......................................... 67
Displaying Multiple Images ........................................ 68
Developing RAW Images ............................................ 72
Protecting Images ....................................................... 73
Rotating Images .......................................................... 74
Changing the Image Size ............................................ 75
Digital Filters ................................................................ 76
DPOF Settings ............................................................. 78
Connecting the Camera to AV Equipment ................ 79
Page 68

e_kb487.book Page 66 Wednesday, December 8, 2010 9:49 AM
Setting the Playback
Functions
Perform settings related to playing back images in the playback
mode palette or Q menu.
1 In Playback mode, display
the image to play back and
press the 3 key.
4
Playback and Processing Functions
The playback mode palette appears.
Memo
• If captured images are saved on both SD Memory Cards in the
SD1 or SD2 slots, you can use the u button, w button, or
x button to select the card containing the images to be played
back.
• Refer to “Menu Reference” for details on the Q menus.
z p.R22)
(
Slideshow
Plays a slideshow with
all captured images
MENU
Exit
Playback Mode Palette
Item Function Page
s Image Rotation Rotates images. p.74
D Digital Filter
n Resize
o Cropping Crops images. p.75
u Slideshow Plays back images one after another. p.70
Save as Manual WBCopies the white balance setting of an image
K
RAW
h
Development
p Index
Image
g
Comparison
Z Protect Protects images. p.73
OK
OK
r DPOF Sets the DPOF settings. p.78
* This cannot be performed for JPEG images.
Saving edited images
When saving images that have been
edited with Digital Filter, Resize,
Cropping, RAW Development, or
Index, you can choose whether to
save the images to the SD Memory
Card in the SD1 or SD2 slot if both
cards are available for recording.
Changes the color tone of images, processes
the image or adjusts the brightness.
Changes the number of recorded pixels and
quality level of images.
and saves it as Manual White Balance.
Converts RAW images to JPEG format. p.72
*
Joins a number of images together and
creates a new index image with them.
Displays two images side-by-side. p.70
Select Memory Card
SD1 Card
SD2 Card
MENU
p.76
p.75
p.52
p.71
OK
OK
66
Page 69

100 -0 001
x2
e_kb487.book Page 67 Wednesday, December 8, 2010 9:49 AM
Displaying a Single Image
Deleting Images One by One
Caution
• Deleted images cannot be restored.
• Protected images cannot be deleted. (p.73)
1 Select the image you want to
delete and press the i
button.
The delete screen appears.
2 Use the 23 keys to select [Delete] and press the
4 button.
Memo
• Select the file format to delete for the images saved in RAW+
format.
• When deleting multiple images at once, refer to “Multi-image
Display” (p.68) and “Folder Display” (p.69).
• To delete all images, use [Delete All Images] in the [Q1] menu.
(z p.R22)
Zoom Display
Images can be magnified up to 3200% in Playback mode.
1 Select the image to enlarge and turn the S dial
to the right (y).
The image enlarges at each click
([×1.2] (120%) to [×32] (3200%)).
Available operations
2345 keys Moves the area to enlarge.
S dial to the right
(y)/m button
S dial to the left
(f)/| button
4 button Returns to the original size.
R dial
M button Changes the information display.
u button/w
button/x button
Enlarges the image (up to 3200%).
Reduces the image (down to 120%).
Displays the previous or next image without changing the
magnification and the position of the enlarged image.
Switches between the SD Memory Cards without changing
the magnification and the position of the enlarged image.
Memo
• You can enlarge the image by following the same procedure during
Instant Review (p.37) or Digital Preview (p.61).
• The default setting for the initial magnification is [×1.2] (120%). You
can set the initial magnification with [Playback Display Method] in
the [Q1] menu. (z p.R22)
• The full display of vertical images is displayed at three-quarters the
size of horizontal images; therefore, the initial enlarged
magnification of vertical images is 100%.
100-0001
x2
4
Playback and Processing Functions
67
Page 70

e_kb487.book Page 68 Wednesday, December 8, 2010 9:49 AM
Displaying Multiple
Images
Multi-image Display
You can display 4, 9 (default setting), 16, 36 or 81 images on
the monitor at the same time.
1 Turn the S dial to the left
4
Playback and Processing Functions
(f) in Playback mode.
Nine thumbnail images are
displayed at once.
Available operations
2345 keys Moves the selection frame.
4 button Displays a full screen display of the selected image.
M button
Displays the [Multi-img Display Setting] screen. Select
the number of images to display at the same time.
Multi-img Display Setting
Display Type
Selection frame
INFO
1
100-0001
Scroll bar
u button/
w button/
x button
i button Selects the images and deletes them.
Switches between the SD Memory Cards.
Memo
• Icons such as ? are not displayed on the thumbnail images during
81-image display.
Select & Delete
You can delete up to 100 images at once.
1 In the multi-image display
1
screen, press the i button.
During 81-image display, the screen
temporarily changes to 36-image
display.
MENU
Delete
OK
2 Select the images to delete.
Available operations
2345 keys Moves the selection frame.
4 button Selects (z) or deselects an image.
S dial Displays the selected image at full screen.
(45 keys: Displays the next or previous
image.)
3 Press the i button and select [Select & Delete].
68
MENU
(This is not available when developing multiple RAW
images (p.72).)
INFO
Cancel OK
OK
Page 71

SUN
e_kb487.book Page 69 Wednesday, December 8, 2010 9:49 AM
Folder Display
Images will be grouped and displayed by folder in which they
are saved.
1 In the multi-image display screen, turn the S
dial again to the left (f).
Six folders are displayed at once.
2 Select the folder to display.
Available operations
2345 keys Moves the selection frame.
4 button Displays the images in the folder on the
u button/w button/
x button
i button Deletes the folder and all the images in
Memo
• If the folder to be deleted contains protected images, select
whether to delete or leave all images on the confirmation screen.
When [Delete All] is selected, protected images are also deleted.
• Refer to “Menu Reference” for details on folder names. (z p.R26)
multi-image display screen.
Switches between the SD Memory
Cards.
it.
Number of images
in the folder
100 101 102
103 104 105
12345
1
100_0105
Calendar Display
You can display images by shooting date.
1 In the multi-image display
screen, press the M
button twice.
Only the dates when pictures were
taken are displayed.
Available operations
23 keys Selects the shooting date.
45 keys Selects an image captured on the
4 button or S dial
to the right (y)
M button Switches to Multi-image display.
u button/w button/
x button
i button Deletes selected images.
selected shooting date.
Displays all images.
(S dial to the left (f): Returns to
calendar display.)
Switches between the SD Memory
Cards.
Number of images shot
2010.5
WED
12
FRI
14
MON
24
2010.6
THU
3
SUN
6
WED
16
SAT
19
date
1
Delete
ThumbnailShooting
in this date
2/5
INFO
4
Playback and Processing Functions
69
Page 72

100 -0 001
100 -0 001
x2
x2
e_kb487.book Page 70 Wednesday, December 8, 2010 9:49 AM
Slideshow
You can play back all images saved on an SD Memory Card
successively.
1 Select u (Slideshow) in the playback mode
palette.
The start screen is displayed and
slideshow begins.
4
Playback and Processing Functions
Available operations
4 button Pause/Resume
45 keys Displays the next or previous image.
3 key/Q button/
3 button
Shutter release button/
= button/Mode dial
switching/Main switch
(|)
Memo
• If captured images are saved on both SD Memory Cards in the
SD1 and SD2 slots, the slideshow displays the images of the card
containing the image last played back. You cannot switch to the
other SD Memory Card.
• You can set the slideshow display method with [Slideshow] in the
[Q1] menu. (z p.R22)
Stops playback and the camera returns to
Playback mode.
Stops playback and the camera switches to
Capture mode.
Start
OK
Image Comparison
You can display two images side-by-side.
1 Select g (Image Comparison) in the playback
mode palette.
The last image played back will be
displayed twice side-by-side.
Available operations
4 button Moves the selection frame (right image
2345 keys Moves the area to enlarge.
| button Returns the enlarged area to the center.
R dial Displays the previous or next image
S dial Enlarges or reduces the image.
M button Changes the information display.
u button/w button/
x button
i button Deletes the image (when the selection
3 button Returns to single image display.
→ both images → left image).
(when the selection frame is on the left
or right image).
Switches between the SD Memory
Cards (when the selection frame is on
the left or right image).
frame is on the left or right image).
100-0001
x2
MENU
11
100-0001
x2
OK
70
Page 73

e_kb487.book Page 71 Wednesday, December 8, 2010 9:49 AM
Index
You can join multiple images together, display them as an index
print, and save the index print as a new image.
1 Select p (Index) in the playback mode palette.
The [Index] screen appears.
2 Press the 5 key and select a
layout.
o Thumbnail r Random2
p Square s Random3
q Random1 p Bubble
When you select o, images are positioned in order starting from
the smallest file number.
Index
MENU
Layout
Images
Backgrnd.
Selection
Create an index image
Cancel
OK
OK
3 Select [Images], press the 5 key, and select the
number of images.
You can select 12, 24 or 36 images.
4 Select [Backgrnd.], press the 5 key, and select
the background color.
You can select a white or black background.
5 Select [Selection], press the 5 key, and select the
type of image selection.
u All Images
w Manual
x Folder
Automatically selects all images from the SD
Memory Card containing the image last displayed.
Lets you select the images individually.
Continue by selecting [Select image(s)] and select
the individual images.
Automatically selects images from the selected
folder.
Continue by selecting [Select a folder] and select
the folder.
6 Select [Create an index image].
After the message [Data being processed] appears, the index
image is displayed.
7 Select [Save] or [Reshuffle].
Save
Reshuffle
After the index image is saved, the camera returns to Playback
mode and the index image is displayed.
Memo
• Processing may take a while when creating an index image.
• When the number of saved images is smaller than the number set
for [Images], empty spaces will appear in [Thumbnail] layout and
some images may be duplicated in other layouts.
The index image is saved with [Recorded Pixels] set to
a and [Quality Level] set to C.
Reselects the images and displays a new index image.
(If [Thumbnail] is selected for [Layout], this is not
displayed.)
4
Playback and Processing Functions
71
Page 74

100 -0 001
Fil e For mat
sRGB
RAW
JPEG
e_kb487.book Page 72 Wednesday, December 8, 2010 9:49 AM
Developing RAW Images
You can convert RAW images into JPEG or TIFF format.
Caution
• Only RAW images captured with this camera can be edited.
Images captured with other cameras cannot be edited on this
camera.
1 Select a RAW image and select h (RAW
4
Playback and Processing Functions
72
Development) in the playback mode palette.
2 Select [Developing a Single Image] or
[Developing Multiple Images].
If [Developing a Single Image] is selected, the parameters
recorded in the image file are displayed. You can turn the R dial
to select a different image. Proceed to Step 5.
If [Developing Multiple Images] is selected, the display is switched
to Multi-image Display (p.68).
3 Select the RAW images to
1
develop.
MENU
4 Press the L button and
select [Develop images as
shot] or [Develop images
with modified settings].
Develop images as shot
Develop images with
modified settings
MENU
AE.L
RAW JPEG
5 Use the 23 keys to select
the parameter and use the
RAW
JPEG
File Format
40
M
45 keys to adjust the
value.
If you select [Develop images as shot]
in Step 4, you can set only File Format,
Recorded Pixels and Quality Level.
Press the 5 key to display the setting screen for White Balance
and Custom Image.
Parameter Value Page
File Format JPEG/TIFF –
i (7264×5440)/k (6528×4896)/
Recorded Pixels
Quality Level
Custom Image
White Balance
OK
Sensitivity –2.0 to +2.0 –
High-ISO Noise
Reduction
Shadow Correction Off/Low/Medium/High z p.R14
Distortion
OK
OK
Correction
*1
n (5376×4032)/q (4224×3168)/
a (3072×2304)
*1
C/D/E p.43
Bright/Natural/Portrait/Landscape/
Vibrant/Muted/Reversal Film/
Monochrome
F (Auto)/G (Daylight)/H
(Shade)/^ (Cloudy)/JD
(Fluorescent Light Daylight Color)/
JN (Fluorescent Light Daylight
*2
White)/JW (Fluorescent Light Cool
White)/JL (Fluorescent Light Warm
White)/I (Tungsten Light)/L
(Flash)/f/K (Manual 1 to 3)/K
(Color Temperature 1 to 3)
Off/Low/Medium/High z p.R32
*3
Off/On z p.R15
1
MENU
100-0001
100-0001
OK
sRGB
p.43
p.62
p.50
Page 75

e_kb487.book Page 73 Wednesday, December 8, 2010 9:49 AM
Parameter Value Page
Lat-Chromatic-Ab
*3
Adj
Color Space sRGB/AdobeRGB z p.R19
*1 This cannot be set when [File Format] is set to [TIFF]. (The setting is
fixed to i.)
*2 This cannot be set for RAW images taken in Multi-exposure mode.
*3 This can be selected only when a compatible lens is attached.
Off/On z p.R15
6 Press the 4 button.
7 Select [Save as].
If you selected [Developing a Single Image] in Step 2, the message
[Image developed and stored. Continue developing?] appears.
Select [Continue] to develop other RAW images.
Memo
• You cannot save the background image or use Digital Preview with
Custom Image or White Balance.
• When [White Balance] is set to K (Manual), press the M
button to display the measuring screen.
Protecting Images
You can protect images from being accidentally deleted.
1 Select Z (Protect) in the playback mode palette.
2 Select [Single Image] or [All Images].
If [Single Image] is selected, use the 45 keys to select an image
to protect.
3 Select [Protect] or [Unprotect].
If [Protect] is selected, the image is protected and the Y icon
appears at the top right of the screen. If [Unprotect] is selected, the
protection is removed.
Caution
• When an SD Memory Card is formatted, all images including
protected images are deleted.
4
Playback and Processing Functions
73
Page 76

e_kb487.book Page 74 Wednesday, December 8, 2010 9:49 AM
Rotating Images
When shooting vertically, rotation information is added to an
image so that it can be played back with the appropriate
orientation. You can change the rotation information and save
the image using the following procedure.
Memo
• Images with rotation information are rotated and displayed
according to the orientation of the camera. To cancel image
4
Playback and Processing Functions
rotation, set [32. Auto Image Rotation] in the [A5] menu to [Off].
(z p.R35)
• To not add rotation information, set [31. Saving Rotation Info] in the
[A5] menu to [Off]. (z p.R35)
Caution
• Rotation information cannot be changed in the following situations.
• For protected images
• For images without rotation information
• When [32. Auto Image Rotation] in the [A5] menu is set to [Off]
(z p.R35)
1 Select the image to rotate and select s (Image
Rotation) in the playback mode palette.
Four thumbnail images are displayed with the image rotated in 90°
increments.
2 Use the 2345 keys to
select the desired rotation
direction and press the 4
button.
The image rotation information is
changed.
MENU
Cancel OK
OK
74
Page 77

e_kb487.book Page 75 Wednesday, December 8, 2010 9:49 AM
Changing the Image Size
Resizing Images
You can change the number of recorded pixels and quality level
of an image and save it as a new file.
Caution
• Only JPEG images captured with this camera can be resized.
• Images once resized to s cannot be resized again.
1 Select the image to resize and then select n
(Resize) in the playback mode palette.
2 Select the image size.
Select from j, k, l, m, n,
o, p, q, r, a and s. (The
available sizes differ depending on the
original image size.)
3 Select the quality level and press the 4 button.
4 Select [Save as].
MENU
40M 36M
OK
Cropping Images
You can crop an image and save it as a new file.
Caution
• Only JPEG and RAW images captured with this camera can be
cropped.
• Images resized to a or s with this camera cannot be cropped.
1 Select the image to crop and then select o
(Cropping) in the playback mode palette.
2 Specify the size and position
of the area to crop by using
the cropping frame that
appears on the screen.
MENU
INFO
Available operations
S dial Changes the size of the cropping frame.
2345 keys Moves the cropping frame.
M button Rotates the image from –45° to +45° in
| button Rotates the cropping frame in 90° increments
increments of 1°.
(only when the cropping frame can be rotated).
4
Playback and Processing Functions
OK
3 Press the 4 button.
4 Select [Save as].
75
Page 78

Mon oc hro me
OK
100 -0 001
Exi t
Red
100 -0 001
e_kb487.book Page 76 Wednesday, December 8, 2010 9:49 AM
Digital Filters
You can process images with digital filters.
The following filters are available.
Filter name Effect Parameter
Filter Effect: OFF/Red/Green/Blue/
IR (Infrared Filter)
Toning (B-A): 7 levels
Color: Red/Magenta/Blue/Cyan/
Green/Yellow
Color Freq. Range: –2 to +2
Color: Red/Magenta/Blue/Cyan/
Green/Yellow
Color Density: Light/Standard/Dark
Brightness: ±8 levels
Saturation: ±3 levels
Hue: ±3 levels
Contrast: ±3 levels
Sharpness: ±3 levels
Soft Focus: +1/+2/+3
Shadow Blur: OFF/ON
4
Playback and Processing Functions
Monochrome
Extract Color
Color
Base
Parameter
Adj
Soft
Creates a
monochrome image.
Extracts a specific
color and makes the
rest of the image
black and white.
Adds a color filter to
the image.
Adjusts the
parameters to create
the desired image.
Creates an image
with a soft focus
throughout the
image.
Caution
• Only JPEG and RAW images captured with this camera can be
edited using the digital filters.
Applying the Digital Filter
1 Select an image for applying the digital filter and
then select D (Digital Filter) in the playback mode
palette.
2 Use the 23 keys to select a
filter and press the 4
Monochrome
1
100-0001
button.
You can check the filter effect on the
screen.
You can also use the R dial to
select a different image.
3 Use the 23 keys to select
the parameter, use the 45
MENU
Red
Exit
1
OK
OK
100-0001
keys to adjust the value, and
press the 4 button.
MENU
Example: Color Filter
OK
4 Select [Use filters in combination] or [Save as].
The image is saved.
To apply additional filters to the same image, select [Use filters in
combination] and repeat Steps 2 to 4.
Memo
• You can apply up to 10 filters to the same image.
76
Page 79

Rea pp lie s f ollow ing d igi tal f ilt er
eff ec ts fro m pre vio us im ag e
100 -0 001
e_kb487.book Page 77 Wednesday, December 8, 2010 9:49 AM
Recreating Filter Effects
You can retrieve the filter effects already applied to an image,
and reapply them to other images.
1 Select an image for retrieving the digital filter
effects and then select D (Digital Filter) in the
playback mode palette.
2 Select [Recreating filter effects] and press the
4 button.
The filter effects applied to the image
appears.
Press the M button to check the
filter parameters.
Reapplies following digital filter
effects from previous image
1.2.3.4.5.
MENU
INFO
100-0001
7.
- -
9.
- -
6.
- -
8.
- -
10.- -
OK
OKDetails
3 Use the 45 keys to select an image for applying
the same filter effects and press the 4 button.
You can only select an image that has not been processed with a
filter.
4 Select [Save as].
Searching for the Original Image
You can search for and display the original image prior to digital
filter application.
1 Select [Searching for the original image] in Step 2
in “Recreating Filter Effects”.
Memo
• If the original image is no longer stored on the SD Memory Card,
the message [Original image, prior to digital filter application, is not
found] appears.
4
Playback and Processing Functions
77
Page 80

OK
Dat e
00
Cop ie s
Dat e
100 -0 105
e_kb487.book Page 78 Wednesday, December 8, 2010 9:49 AM
DPOF Settings
DPOF (Digital Print Order Format) settings allow you to specify
the number of copies and whether to imprint the date.
Memo
• DPOF settings cannot be applied to RAW images.
• You can make DPOF settings for up to 999 images on each SD
Memory Card.
1 Select r (DPOF) in the playback mode palette.
4
Playback and Processing Functions
2 Select [Single Image] or [All Images].
If [All Images] is selected, proceed to Step 4.
3 Use the 45 keys to select an image to set DPOF
settings.
4 Use the 23 keys to select
the number of copies.
You can set up to 99 copies.
To cancel the DPOF setting, set the
number of copies to [00].
5 Turn the S dial to select O or P for printing the
date.
O: The date will be printed.
P : The date will not be printed.
Repeat Steps 3 to 6 to set other images.
Copies
MENU
Date
00
1
100-0105
Date
OK
Caution
• You cannot switch between the SD Memory Cards while making
the DPOF settings.
• Depending on the printer, the date may not be printed even if you
select O in Step 5.
• The number of copies specified for the All Images setting applies
to all the images, and the Single Image setting is canceled.
OK
6 Press the 4 button.
The DPOF settings are saved.
78
Page 81

e_kb487.book Page 79 Wednesday, December 8, 2010 9:49 AM
Connecting the Camera to
AV Equipment
You can play back images on AV equipment by connecting the
camera with a commercially-available video cable (mini plug to
RCA cable) or HDMI cable (Type C).
Memo
• If you intend to play back continuously for a long period, use of the
AC adapter kit K-AC50 (optional) is recommended. (p.30)
• Nothing is displayed on the monitor during HDMI output.
• You cannot output both composite and HDMI video signals at the
same time.
• The video output format differs depending on the region. When you
set the hometown with Initial Settings (p.34) or change [Setting the
Time] to X (Destination) with [World Time] (z p.R23) in the [R1]
menu, the video output format is set to match that region. If images
fail to be played back, change the video output format with [Video
Out] in the [R2] menu. (z p.R25)
• The maximum size of the HDMI output format corresponding to the
AV equipment and camera is automatically selected. If images fail
to be played back, change the video output format with [HDMI Out]
in the [R2] menu. (z p.R25)
About the Video Cable
The video terminal for this camera is a two-conductor socket. If
using a three- or four-conductor mini plug cable, insert the colored
cord corresponding to the signal from the mini plug end into the
video input terminal on the AV equipment being used.
[3-conductor mini plug]
Video signal
from the
h
Earth (GND)
1 Turn the AV equipment and camera off.
2 Open the terminal cover on the camera and
connect the video cable to the video terminal or
the HDMI cable to the mini HDMI terminal.
4
Playback and Processing Functions
3 Connect the other end of the video cable or HDMI
cable to the video IN jack or HDMI IN jack on the
AV equipment, and then turn on the camera and
AV equipment.
The camera turns on in video or HDMI mode, and the camera
information is displayed on the screen of the connected AV
equipment.
Caution
• For video output, images are played back in normal resolution
regardless of the compatible resolution of the AV equipment. To
play back images in high definition, use the HDMI terminal or first
transfer the data to a computer.
[4-conductor mini plug]
79
Page 82

e_kb487.book Page 80 Wednesday, December 8, 2010 9:49 AM
MEMO
80
Page 83

e_kb487.book Page 81 Wednesday, December 8, 2010 9:49 AM
5 Using a Computer
Connecting to a Computer ......................................... 82
Using the Provided Software ..................................... 84
Page 84

e_kb487.book Page 82 Wednesday, December 8, 2010 9:49 AM
Connecting to a Computer
The captured images can be transferred to a computer by
connecting the camera using a USB cable and can be managed
using the provided software.
System Requirements
We recommend the following system requirements to connect
your camera to a computer or to use the software “PENTAX
Digital Camera Utility 4” included on the CD-ROM (S-SW107).
Windows
5
Using a Computer
OS
CPU
Memory 2.0 GB minimum (3.0 GB or more recommended)
Free disk space 1 GB minimum (8 GB or more recommended)
Monitor
Others USB 2.0 port as standard equipment
Windows XP (SP3 or later), Windows Vista, or
Windows 7 (can be run as a 32-bit application on any
x64 Edition of Windows.)
Pentium D 3.0 GHz equivalent or higher (Intel Core 2
Duo processor 2.0 GHz equivalent or higher
recommended)
1280×800 pixels or more (1920×1200 or more
recommended) with 24-bit full color (approximately
16.77 million colors)
Macintosh
OS Mac OS X 10.4.11, 10.5, or 10.6
CPU
Memory 2.0 GB minimum (4.0 GB or more recommended)
Free disk space 1 GB minimum (8 GB or more recommended)
Monitor
Others
PowerPC G5 Dual-core 2.0 GHz or higher (Intel Core
2 Duo processor 2.0 GHz or higher recommended.
Universal Binary format.)
1280×800 pixels or more (1920×1200 or more
recommended) with 24-bit full color (approximately
16.77 million colors)
USB 2.0 port as standard equipment, QuickTime 7.0
or later
82
Page 85

e_kb487.book Page 83 Wednesday, December 8, 2010 9:49 AM
Connecting Your Camera to a
Computer
1 Set [USB Connection] in the [R2] menu.
Refer to “Menu Reference”. (z p.R25)
2 Turn your computer on.
3 Turn your camera off.
4 Open the terminal cover of the camera, and
connect the USB terminal and a USB port of your
computer using the provided USB cable.
5 Turn your camera on.
For Windows, the camera is recognized as a [Removable Disk] in
[My Computer].
For Macintosh, an icon for the SD Memory Card appears on the
desktop.
Memo
• If the [Removable Disk Drive] dialog appears when the camera is
turned on, select [Open folder to view files using Windows
Explorer] and click the OK button.
• When using Windows XP, if the SD Memory Card has a volume
label, the volume label name appears instead of [Removable Disk].
A new unformatted SD Memory Card may show the
manufacturer’s name or model number.
6 Save the captured images to your computer.
Copy the image file(s) or the folder containing the image files in
your camera to the hard disk of your computer.
7 Disconnect your camera from your computer.
5
Using a Computer
83
Page 86

e_kb487.book Page 84 Wednesday, December 8, 2010 9:49 AM
Using the Provided
Software
“PENTAX Digital Camera Utility 4” is included on the provided
CD-ROM (S-SW107). Using the PENTAX Digital Camera Utility
4, you can manage images saved on your computer, develop
RAW images taken with this camera and adjust the color of
them.
Compatible file formats:
.bmp (BMP)/.jpg (JPEG)/.pef (RAW files in PENTAX original
format)/.png (PNG)/.tif (TIFF)/.dng (RAW files in DNG format)
5
Using a Computer
Installing the Software
You can install the software from the provided CD-ROM.
Memo
•
When multiple accounts have been setup on your computer, log on with
an account that has administrative rights before installing the software.
1 Turn your computer on.
Shut down other software running.
If the [PENTAX Software Installer] screen does not appear
[For Windows]
1 Click [My Computer] from the Start menu.
2 Double-click the [CD-ROM drive (S-SW107)] icon.
3 Double-click the [Setup.exe] icon.
[For Macintosh]
1 Double-click the CD-ROM (S-SW107) icon on the
desktop.
2 Double-click the [PENTAX Installer] icon.
3 Click [PENTAX Digital
Camera Utility 4].
For Windows, proceed to Step 4.
For Macintosh, follow the instructions
on the screen to perform subsequent
steps.
4 Select the desired language in the [Choose Setup
Language] screen and click [OK].
5 When the [InstallShield Wizard] screen appears in
the selected language, click [Next].
Follow the instructions on the screen to perform subsequent steps.
2 Place the CD-ROM (S-SW107) into the CD-ROM/
DVD drive on your computer.
The [PENTAX Software Installer] screen appears.
84
Page 87

e_kb487.book Page 85 Wednesday, December 8, 2010 9:49 AM
The PENTAX Digital Camera Utility
4 Screen
When PENTAX Digital Camera Utility 4 is launched, the
following screen (browser) appears.
Memo
• The screenshots used in this explanation are for Windows.
The Browser tab set (default setting)
You can perform the file management functions such as
viewing and managing the images.
1 2
4 33
1 Menu Bar
This executes functions or sets various settings.
For Macintosh, the Menu bar appears at the top of the desktop.
2 Tool Bar
Frequently used functions are provided as Tool bar buttons.
3 Control Panel
The shooting information and settings for the selected image
appear in this panel. You can switch the panel tab sets by pressing
the Browser, Laboratory and Custom buttons on the Tool bar.
4 File Display Pane
The file list or the images in the selected folder appear here.
5 Status Bar
Information on the selected item appears.
5
Using a Computer
5
85
Page 88

e_kb487.book Page 86 Wednesday, December 8, 2010 9:49 AM
The Laboratory tab set (default setting)
The control panel for adjusting the image appears here.
5
Using a Computer
The Custom tab set (default setting)
The screen display can be customized here.
The Custom tab set enables you to customize whether to
show/hide the various tab pages in accordance with your
needs. By default, all control panels are displayed.
86
Page 89

e_kb487.book Page 87 Wednesday, December 8, 2010 9:49 AM
Viewing the Help Menu
Refer to the Help menu for details on using the software
program.
1 Click the button on the Tool bar.
Or, select [PENTAX Digital Camera Utility Help] from the [Help]
menu.
Regarding Product Registration
To better serve you, please take a moment to register your
software.
1 Click [Product Registration] on the screen in Step 3 on
p.84.
A world map for Internet Product
Registration is displayed.
5
Using a Computer
2 If your computer is connected to the Internet, click the
displayed country or region and then follow the
instructions to register your software.
Note that you can only register online if your country or area is
shown.
87
Page 90

e_kb487.book Page 88 Wednesday, December 8, 2010 9:49 AM
MEMO
88
Page 91

e_kb487.book Page 89 Wednesday, December 8, 2010 9:49 AM
6 Appendix
Optional Accessories .................................................. 90
Error Messages ........................................................... 93
Troubleshooting .......................................................... 94
Index ............................................................................. 95
WARRANTY POLICY ................................................. 100
Page 92

e_kb487.book Page 90 Wednesday, December 8, 2010 9:49 AM
Optional Accessories
Several accessories are provided for use with the h.
Please contact a PENTAX Service Center for details regarding
accessories.
Products marked with an asterisk (*) are the same as those
supplied with the camera.
Power Supply Accessories
Battery Charger kit K-BC90 (*)
(Kit includes Battery charger D-BC90 and AC plug cord.)
Rechargeable Lithium-ion Battery D-LI90 (*)
AC Adapter Kit K-AC50
6
(Kit includes AC Adapter D-AC50 and AC plug cord.)
Appendix
Lets you power your camera from an AC outlet.
Flash Accessories
Auto Flash AF540FGZ
Auto Flash AF360FGZ
The AF540FGZ and AF360FGZ
are P-TTL auto flash units with a
maximum guide number of
approximately 54 and 36 (ISO
100/m), respectively. Their
features include slave-sync
flash, contrast-control-sync
flash, auto flash, high-speed
sync flash, wireless flash, slowspeed sync and trailing curtain
sync flash.
Auto Flash AF200FG
The AF200FG is a P-TTL auto
flash unit with a maximum guide
number of approximately 20 (ISO
100/m).
It features contrast-control-sync
flash and slow-speed sync flash
when combined with the
AF540FGZ or AF360FGZ unit.
AF540FGZ
AF360FGZ
AF200FG
90
Page 93

e_kb487.book Page 91 Wednesday, December 8, 2010 9:49 AM
Auto Macro Flash AF160FC
The AF160FC is a flash system
especially designed for macro
photography to take close,
shadowless pictures of small
objects. It is compatible with
existing TTL auto flash functions
and it can be used with a wide
range of PENTAX cameras by
using the provided adapter rings.
Hot Shoe Adapter FG
Extension Cord F5P
Off-camera Shoe Adapter F
Use the adapters and cords to
use the external flash away from
the camera.
Off-camera Shoe Clip CL-10
When using the AF540FGZ or
AF360FGZ as a wireless flash,
this large clip is used for setting
the external flash on a desk or
table.
AF160FC
Hot Shoe Adapter FG
Off-camera Shoe Adapter F
For Viewfinder
Large Eyecup 645 O-EC107 (*)
Interchangeable Focusing Screen
AF Framed Matte DF-80 (*)
AF Cross-Lined Matte DG-80
AF Golden Section Matte DK-80
6
Appendix
Off-camera Shoe Clip CL-10
91
Page 94

e_kb487.book Page 92 Wednesday, December 8, 2010 9:49 AM
Cable Switch CS-205
Connect to the cable switch
terminal and operate the camera
shutter release button. The cord
length is 0.5 m.
Remote Control
Used for remote control shooting.
Operating distance for remote control
From the front of camera: approx. 4 m
From the back of camera: approx. 2 m
6
Remote Control F
Appendix
Remote Control Waterproof O-RC1
Strap
Camera Strap O-ST107 (*)
Other Accessories
Body Mount Cap 645 (*)
Hot Shoe Cover F
USB Cable I-USB107 (*)
Sync Socket 2P Cap (*)
Imagesensor Cleaning Kit O-ICK1
K (*)
92
Page 95

e_kb487.book Page 93 Wednesday, December 8, 2010 9:49 AM
Error Messages
Error Message Description
Memory card full
No image
This image cannot be
displayed
No card in the camera
Cannot use this card
Memory card error
Card is not formatted
Card is locked
The card is
electronically locked
This image cannot be
enlarged
This image is protected
Battery depleted
The SD Memory Card is full and no more
images can be saved. Insert a new SD Memory
Card or delete unwanted images.
There are no images for playback on the SD
Memory Card.
You are trying to play back an image in a format
not supported by this camera.
The SD Memory Card is not inserted in the
camera.
The inserted SD Memory Card is not compatible
with this camera.
The SD Memory Card has a problem, and image
capture and playback are impossible.
The SD Memory Card you have inserted is
unformatted or has been formatted on other
device and is not compatible with this camera.
Use the card after formatting it with this camera.
The write-protect switch on the SD Memory
Card you have inserted is locked. Unlock the SD
Memory Card.
Data are protected by the SD Memory Card
security feature.
You are trying to enlarge an image that cannot
be enlarged.
The image is protected. Remove the protection
from the image.
The battery is exhausted. Install a charged
battery in the camera.
Error Message Description
Not enough battery
power remaining to
clean sensor
Not enough battery
power remaining to
activate Pixel Mapping
Image folder cannot be
created
Unable to store image
Settings not stored
The operation could not
be completed correctly
No more images can be
selected
This image cannot be
processed
The camera failed to
create an image
Appears if the battery level is insufficient.
Replace the battery with a fully charged one or
use an AC adaptor kit K-AC50 (optional).
The maximum folder number (999) and file
number (9999) are being used, and no more
images can be saved. Insert a new SD Memory
Card or format the card.
The image could not be saved because of an SD
Memory Card error.
The DPOF settings could not be saved because
the SD Memory Card is full. Delete unwanted
images and perform DPOF settings again.
The camera was unable to measure the manual
white balance or detect dust on the sensor. Try
the operation again.
You cannot select 100 or more images at a time
for Index, Select & Delete or Developing Multiple
RAW Images.
Appears when Digital Filter, Resize, Cropping,
Save as Manual WB, or RAW Development is
started for images captured with other cameras,
or when Resize or Cropping is started for
minimum size images.
The creation of an index print image failed.
Caution
• Error messages related to an SD Memory Card appear for each
card slot being used. If an error message appears, take the
appropriate action for the respective card slot.
6
Appendix
93
Page 96

e_kb487.book Page 94 Wednesday, December 8, 2010 9:49 AM
Troubleshooting
In rare cases, the camera may not operate correctly due to
static electricity. This can be remedied by taking the battery out
and putting it back in again. When the mirror remains in the up
position, take the battery out and put it back in again. Then, the
mirror will retract when the camera is turned on again. If, after
performing these procedures, the camera operates correctly, it
does not require any repairs.
We recommend checking the following items before contacting
a service center.
Problem Cause Remedy
The camera does
6
Appendix
connection with a
computer does not
not turn on
The shutter will
not release
The USB
work properly
The battery is not
installed
The battery power is
low
There is no
available space on
the SD Memory
Card
Recording Wait until recording is finished.
The USB
connection mode is
set to [PTP]
Check if the battery is installed.
Replace with a charged battery
or use the AC adapter kit KAC50 (optional).
Insert an SD Memory Card with
available space or delete
unwanted images. Also check
the file format settings for the
SD1 and SD2 slots.
Set [USB Connection] in the
[R2] menu to [MSC].
(z p.R25)
94
Page 97

e_kb487.book Page 95 Wednesday, December 8, 2010 9:49 AM
Index
Symbols
E button............................................ 59
y button........................................... 62
] button........................................... 56
m button ........................................... 48
I button............................ 22, 58, R35
| button .................................. 13, R34
| (Preview)...................................... 61
L (Metering Mode).......................... 45
M (Metering Mode).......................... 45
N (Metering Mode).......................... 45
S (AF point)..................................... 44
U (AF point)..................................... 44
A menu .................................. R4, R13
Q menu.................................. R6, R22
R menu ................................... R7, R23
A menu ................................... R9, R30
A
AC adapter........................................ 30
Accessories .......................... 10, 26, 90
AdobeRGB..................................... R19
AE lock..................................... 49, R30
L button..................................... 49
= button................................ 44, R31
AF Fine Adjustment ....................... R35
AF point ................................... 44, R30
AF with Remote Control................. R32
k ................................................ 44
l ................................................ 44
Aperture Priority mode..................... 47
Auto (White Balance) ....................... 50
Auto Bracketing................................ 56
Auto Bracketing Order.................... R31
Auto EV Compensation.................. R31
AUTO ISO Parameters .................. R14
Auto Power Off............................... R27
Auto Rotation ........................ R18, R35
F (White Balance)..................... 50
AV equipment................................... 79
c mode................................... 47, R34
B
p mode.................................... 47, R34
Base Parameter Adj (Digital Filter)
...................................................... 76
Battery.............................................. 28
Battery level ..................................... 29
Beep............................................... R24
Best (Quality level)................... 43, R14
Better (Quality level)................. 43, R14
Bright/Dark Area............................. R22
Brightness Level............................. R24
Bulb mode........................................ 47
C
A (AF mode).................................... 44
Cable switch terminal....................... 11
Calendar display .............................. 69
Card access lamp............................. 11
CCD plane indicator ......................... 11
Center-weighted metering ................ 45
Charging........................................... 28
City ................................................ R23
Cloudy (White Balance).................... 50
Color (Digital Filter)........................... 76
Color Space................................... R19
Color Temperature ........................... 52
Color Temperature Steps .............. R33
Compression ratio ......................... R14
Connecting to a computer ................ 82
Continuous mode ............................. 44
Continuous Shooting ........................ 53
Contrast (Custom Image) ................. 62
Contrast (Extended Bracketing) .... R16
Control panel .............................. 16, 39
Copyright Holder............................ R27
Copyright Information .................... R27
Cropping........................................... 75
f (White Balance)....................... 50
Custom Image .................................. 62
Custom setting menu............... R9, R30
D
Data Saving Method................ 42, R13
Date Adjustment...................... 35, R23
Date imprint ...................................... 78
Daylight (White Balance) .................. 50
Default Settings ............................... R4
Delete all images........................... R22
6
Appendix
95
Page 98

e_kb487.book Page 96 Wednesday, December 8, 2010 9:49 AM
Delete an single image ..................... 67
Destination..................................... R23
Detailed information display.............. 18
Development..................................... 72
Digital Camera Utility ........................ 82
Digital Filter....................................... 76
Digital Preview......................... 61, R18
Diopter adjustment............................ 37
Direct keys............................... 38, R11
u button ................................ 15, 66
Display Color ................................. R18
Display Language.................... 34, R23
Distortion........................................ R15
DNG............................................... R19
DPOF................................................ 78
D-Range Setting ............................ R14
Y button .................................... 53
6
Drive Mode ....................................... 53
Appendix
Dust Alert....................................... R28
Dust Removal ................................ R29
Dynamic Range ............................. R14
E
e-dial.............................................. R33
Electronic Level Display..... 17, 21, R19
Error message .................................. 93
EV bar............................................... 20
EV Compensation............................. 48
EV Steps........................................ R30
Expanded Sensitivity ..................... R30
Exposure Bracketing......................... 56
96
Exposure Mode........................ 47, R13
Exposure warning ............................ 21
Extended Bracketing................ 57, R16
External flash ................................. R35
Extract Color (Digital Filter) .............. 76
Eyecup ............................................. 37
F
File Format............................... 42, R13
File Name....................................... R26
Filter (Digital Filter)........................... 76
Filter Effect (Custom Image) ............ 62
Fine Sharpness (Custom Image) ..... 62
Flash ................................................ 60
Flash (White Balance)...................... 50
E button ........................................... 59
Flash compatibility............................ 60
Flash compensation......................... 59
Flash Mode ...................................... 58
Flash On........................................... 58
Flash X-sync Speed mode............... 47
Fluorescent Light (White Balance)... 50
Fluorescent Light Cool White
(White Balance)............................ 50
Fluorescent Light Daylight Color
(White Balance)............................ 50
Fluorescent Light Daylight White
(White Balance)............................ 50
Fluorescent Light Warm White
(White Balance)............................ 50
Focus Mode ..................................... 44
Folder display ................................... 69
Folder Name.................................. R26
Format ..................................... 36, R29
Function settings .............................. 38
G
Good (Quality level)................. 43, R14
Green button.................................. R34
Guide Display .......................... 14, R24
H
HDMI cable....................................... 79
HDMI Out....................................... R25
HDR Capture................................. R16
Help .................................................. 87
High definition................................... 79
High dynamic range capture.......... R16
High/Low Key Adjustment (Custom
Image)........................................... 62
High/Low Key Adjustment (Extended
Bracketing)................................. R16
High-ISO Noise Reduction ............ R32
Highlight Correction....................... R14
Histogram display............................. 19
Hometown ............................... 34, R23
Hue (Custom Image) ........................ 62
Hue (Extended Bracketing) ........... R16
Hyper-manual mode......................... 47
Hyper-program mode ....................... 47
I
Image Comparison ........................... 70
Page 99

e_kb487.book Page 97 Wednesday, December 8, 2010 9:49 AM
Image plane indicator ....................... 11
Image Rotation ................................. 74
Image Tone....................................... 62
Index................................................. 71
Index display..................................... 68
M button............................... 16, 17
Initial Setting ..................................... 34
Initialize.......................................... R29
Installing software............................. 84
Instant Review ......................... 37, R18
Interval........................................... R22
Interval Shooting...................... 54, R17
ISO AUTO Adjustment................... R14
o button......................................... 46
J
JPEG ................................................ 42
JPEG Quality ................................. R14
JPEG Recorded Pixels .................. R13
K
Kelvin....................................... 52, R33
L
Language/u ........................ 34, R23
Language setting ..................... 34, R23
Lateral chromatic aberration.......... R15
LCD Color Tuning.......................... R25
LCD panel......................................... 22
Lens.................................................. 24
Lens compatibility............................. 26
Lens Correction ............................. R15
Locking exposure value ................... 49
M
a mode.................................... 47, R34
d dial .......................................... 55
Macintosh......................................... 82
Manual mode ................................... 47
Manual White Balance ..................... 51
Memory .......................................... R20
Menu .......................................... 40, R4
Menu operation .............................. R12
Metering mode ................................. 45
Meter operating timer............... 46, R30
Mired ........................................ 52, R33
Mirror Up .......................................... 55
Mode dial.......................................... 48
Modeling Flash............................... R35
Monitor ............................................. 14
Monochrome (Digital Filter).............. 76
MSC ............................................... R25
Multi-exposure.......................... 55, R17
Multi-image display .......................... 68
Multi-segment metering.................... 45
N
Names of parts................................. 11
Noise Reduction............................. R32
NTSC ............................................. R25
Number of AF Points...................... R32
Number of shots............................. R36
O
One-Push Bracketing .................... R30
Optical Preview........................ 61, R18
P
e mode................................... 47, R33
PAL................................................ R25
PEF................................................ R19
Photographer................................. R27
Pixel Mapping................................ R28
Pixels............................... 43, R13, R35
Playback..................................... 38, 66
Playback Display Method .............. R22
Playback Menu........................ R6, R22
Playback Mode Palette............ 66, R11
Power ............................................... 33
Press halfway ................................ R32
Preview.................................... 61, R18
Print Setting...................................... 78
Product registration .......................... 87
Program Line........................... 47, R15
Program mode.................................. 47
Protect .............................................. 73
Provided software............................. 84
PTP................................................ R25
Q
Quality Level............................ 43, R14
R
RAW ................................................. 42
| button ................................... R19
6
Appendix
97
Page 100

e_kb487.book Page 98 Wednesday, December 8, 2010 9:49 AM
RAW Development ........................... 72
RAW File Format ........................... R19
Rec. Mode menu ..................... R4, R13
Recorded Pixels............... 43, R13, R35
Red-eye reduction ............................ 58
Remote Control................................. 54
Remote Control in p ..................... R32
Repeat Playback............................ R22
RESERVE......................................... 42
Reset ..................................... R28, R35
Resize............................................... 75
Rotate ............................................... 74
Rotation information....................... R35
S
Saturation (Custom Image)............... 62
Saturation (Extended Bracketing)
6
................................................... R16
Appendix
Save as Manual WB......................... 52
Save Setting (White Balance)........... 52
Screen Effect ................................. R22
SD Memory Card........................ 31, 36
w/x button ................................ 42
SD1/SD2 Image File Format.......... R13
j .................................................. 44
Select & Delete................................. 68
Self-timer .......................................... 54
Sensitivity................................. 46, R14
Sensitivity Priority mode ................... 47
Sensitivity Start Level .................... R32
Sensitivity steps............................. R30
Sensor Cleaning............................. R29
Setting the Time............................. R23
Set-up menu............................ R7, R23
Shade (White Balance).................... 50
Shadow Correction......................... R14
Sharpness (Extended Bracketing)
.................................................... R16
Sharpness (Custom Image) ............. 62
Shooting........................................... 37
Shooting information........................ 14
Shutter & Aperture Priority mode ..... 47
Shutter Priority mode ....................... 47
Single Image Display ....................... 67
Single mode ..................................... 44
Slideshow................................. 70, R22
Slot................................................... 42
Slow Shutter Speed NR ................. R32
Slow-speed Sync ............................. 58
Soft (Digital Filter) ............................ 76
Specifications................................. R36
Spot metering................................... 45
sRGB.............................................. R19
Start Interval................................... R17
Status Screen........................... 15, R18
Strap................................................. 24
Superimpose AF Area.............. 44, R32
K mode.................................. 47, R33
Sync cord ......................................... 58
System requirements....................... 82
T
L mode ............................... 47, R34
Test Flash...................................... R35
Text Size.................................. 34, R24
TIFF .................................................. 72
Toning (Custom Image).................... 62
Tungsten Light............................... R31
Tungsten Light (White Balance) ....... 50
b mode .................................. 47, R33
U
USB Connection...................... 83, R25
USB terminal .................................... 83
A............................................... R20
A mode........................................ 47
User setting mode ................... 47, R20
V
Vertical position ................................ 16
Video cable....................................... 79
Video Out....................................... R25
Video terminal................................... 79
Viewfinder......................................... 20
Viewing a captured image ................ 37
W
WARRANTY POLICY............ 100, R45
WB Adjustable Range ................... R31
n button ........................................ 50
WB When Using Flash .................. R31
White Balance .................................. 50
98
 Loading...