

Page 1
Amerlite® Underwater Light Owner’s Manual
IMPORTANT SAFETY INSTRUCTIONS
READ AND FOLLOW ALL INSTRUCTIONS
SAVE THESE INSTRUCTIONS
Listed
Table of Contents
SECTION I. Installing light fixture during new pool construction ..........................................................................3
SECTION II. Replacing light fixture in existing pool ..............................................................................................4
SECTION III. Replacing a lamp only .......................................................................................................................5
SECTION IV. Amerlite Parts Breakdown ...............................................................................................................7
SECCIÓN I. Instalación del accesorio para lámpara durante la construcción de una piscina nueva .................. 11
SECTION I. Installation de l’appareil d’éclairage lors de la construction d’une nouvelle piscine ....................... 19
DANGER
Risk of Electrical Shock or Electrocution
This underwater light must be installed by a licensed or certified electrician in accordance with the
National Electrical Code and all applicable local codes and ordinances. Improper installation will
create an electrical hazard which could result in death or serious injury to pool users, installer, or
others due to electrical shock, and may also cause damage to property. Read and follow the specific
instructions below.
WARNING
Before installing this product, read and follow all warning notices and instructions which are included. Failure to
follow safety warnings and instructions can result in severe injury, death, or property damage.
Call (800) 831-7133 for additional free copies of this manual.
Important Notice
Attention Installer.
This manual contains important information about the installation, operation and safe use of this
product. This information should be given to the owner/operator of this equipment.
Product Labeling
Certain product labeling has been provided in French and Spanish!
Install these labels over the corresponding English text label if the personnel operating or servicing the product is fluent in either of these languages.
If more than one language is spoken by personnel operating or servicing this equipment, then install the additional labels of the required language adjacent to
the English text label. If insufficient space is available on the product to install multiple labels, then these labels should be placed on a placard or sign and
posted near the equipment where it is visible to all who operate or service this equipment.
Before installing the label, remove all dirt or grease from the surface that the labels will be installed upon using a mild detergent solution.
Pentair Water Pool and Spa, Inc.
1620 Hawkins Ave., Sanford, NC 27330 • (800) 831-7133 • (919) 566-8000
10951 West Los Angeles Ave., Moorpark, CA 93021 • (800) 831-7133 • (805) 553-5000
Visit www.pentairpool.com or www.staritepool.com
Rev. G • Rev. G • Rév. G 10-29-07 1 P/N • Núm/Pte. • Réf. 99360000
Page 2

DANGER! Risk of Electrical Shock or Electrocution!
This product must be installed by a licensed or certified electrician or a qualified pool serviceman
in accordance with the National Electrical Code and all applicable local codes and ordinances.
Improper installation will create an electrical hazard which could result in death --- or serious
injury to pool users, installers or others due to electrical shock, and may also cause damage to
property. Always disconnect the power to the pool light at the circuit breaker before servicing the
light. Failure to do so could result in death or serious injury to serviceman, pool users or others
due to electrical shock. READ AND FOLLOW ALL INSTRUCTIONS IN THIS MANUAL.
WARNING — Important Safety Information for Pentair Niche and Light Installation
•
All Niche and Light installations must conform with all codes. If local codes mandate a
cord seal, use Pentair plastic niches (P/N 79206600 and P/N 79206700).
• Under no circumstances replace lights by splicing wire under water or behind niche.
WARNING — RISK OF ELECTRIC SHOCK AND INJURY.
USE ONLY THE INSTALLATION METHOD SPECIFIED BELOW.
Important Safety Information for Fountain Fixture Installations
Location of Pentair Fountain Fixture* Required Installation Method
Luminaire (Light) Use (P/N 560000 – P/N 560001)
(P/N 560002 – P/N 560003)
Swimming Pool or Spa Wet-Niche Swimming Pool Fixture Housing (Forming Shell) ONLY.
(or Spa) Luminaire (Light) DO NOT USE Fountain Fixture Stand.
Fountain Wet-Niche Submersible Fixture Housing (Forming Shell) or
Swimming Pool (or Spa) Fountain Fixture Stand.
Luminaire (Light)
(*) Note: Wet-niche luminaires complying with requirements for both uses may bear both the Listed Wet-Niche
Swimming Pool (or Spa) Luminaire UL Mark and the Listed Wet-Niche Submersible Luminaire UL Mark. A luminaire
not bearing the corresponding UL Listing Mark is not considered by UL to have been produced under UL’s Listing
and Follow-Up Service for the associated usage location.
© 2007 Pentair Water Pool and Spa, Inc. All rights reserved.
This document is subject to change without notice.
Trademarks and Disclaimers: The Pentair Pool Products logo, Because reliability matters most and Amerlite are registered trademarks
of Pentair Water Pool and Spa, Inc. Other trademarks and trade names may be used in this document to refer to either the entities claiming
the marks and names or their products. Pentair Water Pool and Spa, Inc. disclaims any proprietary interest in trademarks and trade names
other than its own.
P/N • Núm/Pte. • Réf. 99360000 2 Rev. G • Rev. G • Rév. G 10-29-07
Page 3

SECTION I. Installing light fixture
during new pool construction
A. Preparatory steps which must be completed
by the electrician before light fixture is
installed; see Figure 1.
1. Verify that the pool meets the
requirements of the current National
Electrical Code and all local codes and
ordinances. A licensed or certified
electrician must install the electrical
system to meet or exceed those
requirements before the underwater
light is installed. Some of the
requirements of the National Electrical Code which the pool’s electrical system must meet are listed below.
a. The lighting circuit must have a Ground Fault Circuit Interrupter (GFCI), and an appropriately rated circuit
breaker.
b. The Junction Box (or, for 12 volt models, the low voltage transformer) must be located at least 8 inches above
water level, 4 inches above ground level, and at least 48 inches from the edge of the pool; see Figure 1.
c. The light fixture and all metal items within 5 feet of the pool must be properly electrically bonded.
d. The wet niche must be properly installed so the pilot screw hole is at the 12 o’clock position and that the top
edge of the underwater light’s lens is at least 18 inches below the surface of the water in the pool; see Figure 1.
To GFCI, Circuit
Breaker and
Power Source.
Rigid
Conduit
Figure 1.
4" min.
#8 AWG Ground
Connector bonding
is located at rear
of Niche.
48"
min.
16"
8" min. Junction Box or
low Voltage Transformer.
18" min. to top of Lens.
Pilot screw @12 o'clock position
Concrete must be cut
back around Niche to
allow for a compacted
plaster seal.
11.50"
Coil 4 ft. of light
cable around fixture.
NOTE
The required orientation of all Pentair lights is with the pilot screw at the 12 o’clock position. This is guaranteed by proper niche installation.
e. The wet niche must be properly electrically bonded and grounded via the No. 8 AWG ground connector located
at the rear of the niche; see Figure 1.
NOTE
The pool or spa electrical system can be verified with a Pool and Spa Electrical Qualification Test Kit. The test kit is available from Pentair
Water Pool and Spa. The electrical system inspection using this kit must be performed by trained and certified personnel.
2. To be certain that the pool’s electrical system meets all applicable requirements, the electrician should also consult
the local building department.
3. Use only Pentair Water Pool and Spa wet niches to insure proper bonding and grounding connections.
B. Steps to perform after the electrical system requirements are met.
1. Feed cord through conduit to Junction Box, leaving at least 4 feet of cord at the light fixture to coil around the light;
see Figure 1. This 4 feet of cord around the light allows the light to be serviced after the pool is filled with water.
2. Cut the cord at the Junction Box, leaving at least 6 inches of cord to make connections.
3. Strip 6 inches of the outer cord jacket to expose the three insulated wires. Be careful not to damage the insulation
on the three inner wires.
4. Connect all three wires to the corresponding circuit wires in the Junction Box (black wire to power, white wire to
common, and green wire to ground) and secure the Junction Box cover in place.
WARNING
Never operate this underwater light for more than 10 seconds unless it is totally submerged in water. Without total submersion,
the light assembly will get extremely hot, which may result in serious burns or in breakage of the lamp or lens. This may result
in serious injury to pool users, installers, or bystanders, or in damage to property.
5. Replace the light assembly into niche and tighten special pilot screw.
Rev. G • Rev. G • Rév. G 10-29-07 3 P/N • Núm/Pte. • Réf. 99360000
Page 4
WARNING
Use only the special pilot screw provided with this underwater light. This screw mounts and electrically grounds the
housing securely to the mounting ring and wet niche. Failure to use the screw provided could create an electrical hazard
which could result in death or serious injury to pool users, installers or others due to electrical shock.
6. Fill the pool until the underwater light is completely submerged in water before operating the light for more than
10 seconds. Turn on main switch or circuit breaker, as well as the switch which operates the underwater light
itself, to check for proper operation.
SECTION II. Replacing light fixture in existing pool
DANGER
Risk of Electrical Shock or Electrocution
This underwater light must be installed by a licensed or certified electrician or a qualified pool serviceman in
accordance with the National Electrical Code and all applicable local codes and ordinances. Improper
installation will create an electrical hazard which could result in death or serious injury to pool users,
installers or others due to electrical shock, and may also cause damage to property.
Always disconnect the power to the pool light at the circuit breaker before servicing the light. Failure to do
so could result in death or serious injury to serviceman, pool users or others due to electrical shock.
A. Before replacing the light fixture.
1. Verify that the pool meets the requirements of the current National Electrical Code and all local codes and
ordinances. A licensed or certified electrician must install the electrical system to meet or exceed those
requirements before the underwater light is installed. Some of the requirements of the National Electrical Code
which the pool’s electrical system must meet are as follows:
a. The lighting circuit has a Ground Fault Circuit Interrupter (GFCI), and has an appropriately rated circuit
breaker.
b. The Junction Box (or, for 12 volt models, the low voltage transformer) is located at least 8 inches above
water level and at least 4 inches above ground level and at least 48 inches from the edge of the pool; see
Figure 1.
c. The light fixture and all metal items within 5 feet of the pool are properly electrically bonded.
d. The wet niche is properly installed so that the top edge of the underwater light’s lens is at least 18 inches
below the surface of the water in the pool; see Figure 1.
e. The wet niche is properly electrically bonded and grounded via the No. 8 AWG ground connector located
at the rear of the niche; see Figure 1.
NOTE:
The pool or spa electrical system can be verified with a Pool and Spa Electrical Qualification Test Kit. The test kit is available from Pentair
Water Pool and Spa. The electrical system inspection using this kit must be performed by trained and certified personnel.
2. To be certain that the pool’s electrical system meets all applicable requirements, the electrician should also
consult the local building department.
3. Use only Pentair Water Pool and Spa wet niches to insure proper bonding and grounding connections.
B. Replacing light fixture after electrical system requirements are met.
WARNING
Failure to bring the pool’s electrical system up to code requirements before installing the underwater light will create an
electrical hazard which could result in death or serious injury to pool users, installers, or others due to electrical shock,
and may also cause damage to property.
1. Turn off main electrical switch or circuit breaker, as well as the switch which operates the underwater light.
P/N • Núm/Pte. • Réf. 99360000 4 Rev. G • Rev. G • Rév. G 10-29-07
Page 5

2. To remove light assembly, remove the special pilot screw at top of face ring, remove light assembly from niche,
and place assembly on deck.
WARNING
Be sure to keep the special pilot screw from this underwater light. This screw mounts and electrically grounds the
housing securely to the mounting ring and wet niche. Failure to use the screw provided could create an electrical hazard
which could result in death or serious injury to pool users, installers or others due to electrical shock.
3. Remove Junction Box cover, disconnect the light fixture wires, and pull the cord through the conduit.
4. Feed the new light fixture cord through the conduit from the niche to the Junction Box.
NOTE:
Depending on the length of the conduit, special tools may be required to pull the cord through the conduit.
5. Leave at least 4 feet of cord to coil around the light fixture; see Figure 1. This 4 feet of cord coiled around the
light allows the light to be serviced after the pool is filled with water.
6. Cut the cord at the Junction Box, leaving at least 6 inches of cord to make connections.
7. Strip 6 inches of the outer cord jacket from the cord to expose the three insulated wires. Be careful not to
damage the insulation on the three inner wires.
8. Connect all three wires to the corresponding circuit wires in the Junction Box (black wire to power, white wire
to common, and green wire to ground) and secure the Junction Box cover in place.
WARNING
Never operate this underwater light for more than 10 seconds unless it is totally submerged in water. Without total
submersion, the light assembly will get extremely hot, which may result in serious burns or in breakage of the lamp or
lens. This may result in serious injury to pool users, installers, or bystanders, or in damage to property.
9. Replace light assembly into niche and tighten special pilot screw.
WARNING
Use only the special pilot screw provided with this underwater light. This screw mounts and electrically grounds the
housing securely to the mounting ring and wet niche. Failure to use the screw provided could create an electrical hazard
which could result in death or serious injury to pool users, installers or others due to electrical shock.
10. Fill the pool until the underwater light is completely submerged in water before operating the light for more than
10 seconds. Turn on main switch or circuit breaker, and the switch that operates the underwater light itself, to
check for proper operation.
SECTION III. Replacing a lamp only
DANGER
Always disconnect power to the pool light at the circuit breaker before servicing the light. Failure to do so could
result in death or serious injury to installer, serviceman, pool users or others due to electrical shock.
1. Turn off main electrical switch or circuit
breaker, as well as the switch which operates
the underwater light itself.
2. You will need the following items.
a. A new lens gasket (p/n 79101600).
b. A lamp, for proper type and wattage;
see Table 1.
Lamp Specifications: 12* volt Models 120 volt Models
120 volt - 300 watt - R-40 lamp 100 watt 300 watt
120 volt - 400 watt - R-40 lamp 300 watt 400 watt
120 volt - 500 watt - R-40 lamp 500 watt
12 volt - 300 watt - R-40 lamp *Trnsfmr. req.
12 volt - 100 watt - R-40 lamp
Table 1.
Rev. G • Rev. G • Rév. G 10-29-07 5 P/N • Núm/Pte. • Réf. 99360000
Page 6
WARNING
Replace lamp with a similar type and wattage. Failure to replace lamp with the same type of lamp will damage the light
assembly and may cause an electrical hazard resulting in death or serious injury to pool users, installers, or others due
to electrical shock, and may also cause damage to property.
WARNING
Always install a new lens gasket (part number 79101600) whenever disassembling the light. Failure to do so may permit
water to leak into the assembly which could cause:
(a) an electrical hazard resulting in death or serious injury to pool users, installers or others due to electrical shock; or,
(b) breakage of the lamp or lens, which could result in serious injury to pool users, installers, bystanders, or in
property damage.
3. To remove light assembly, remove the special pilot screw at top of face ring, remove light assembly from niche,
and place assembly on deck.
WARNING
Be sure to keep the special pilot screw from this underwater light. This screw mounts and electrically grounds the
housing securely to the mounting ring and wet niche. Failure to use the screw provided could create an electrical hazard
which could result in death or serious injury to pool users, installers or others due to electrical shock.
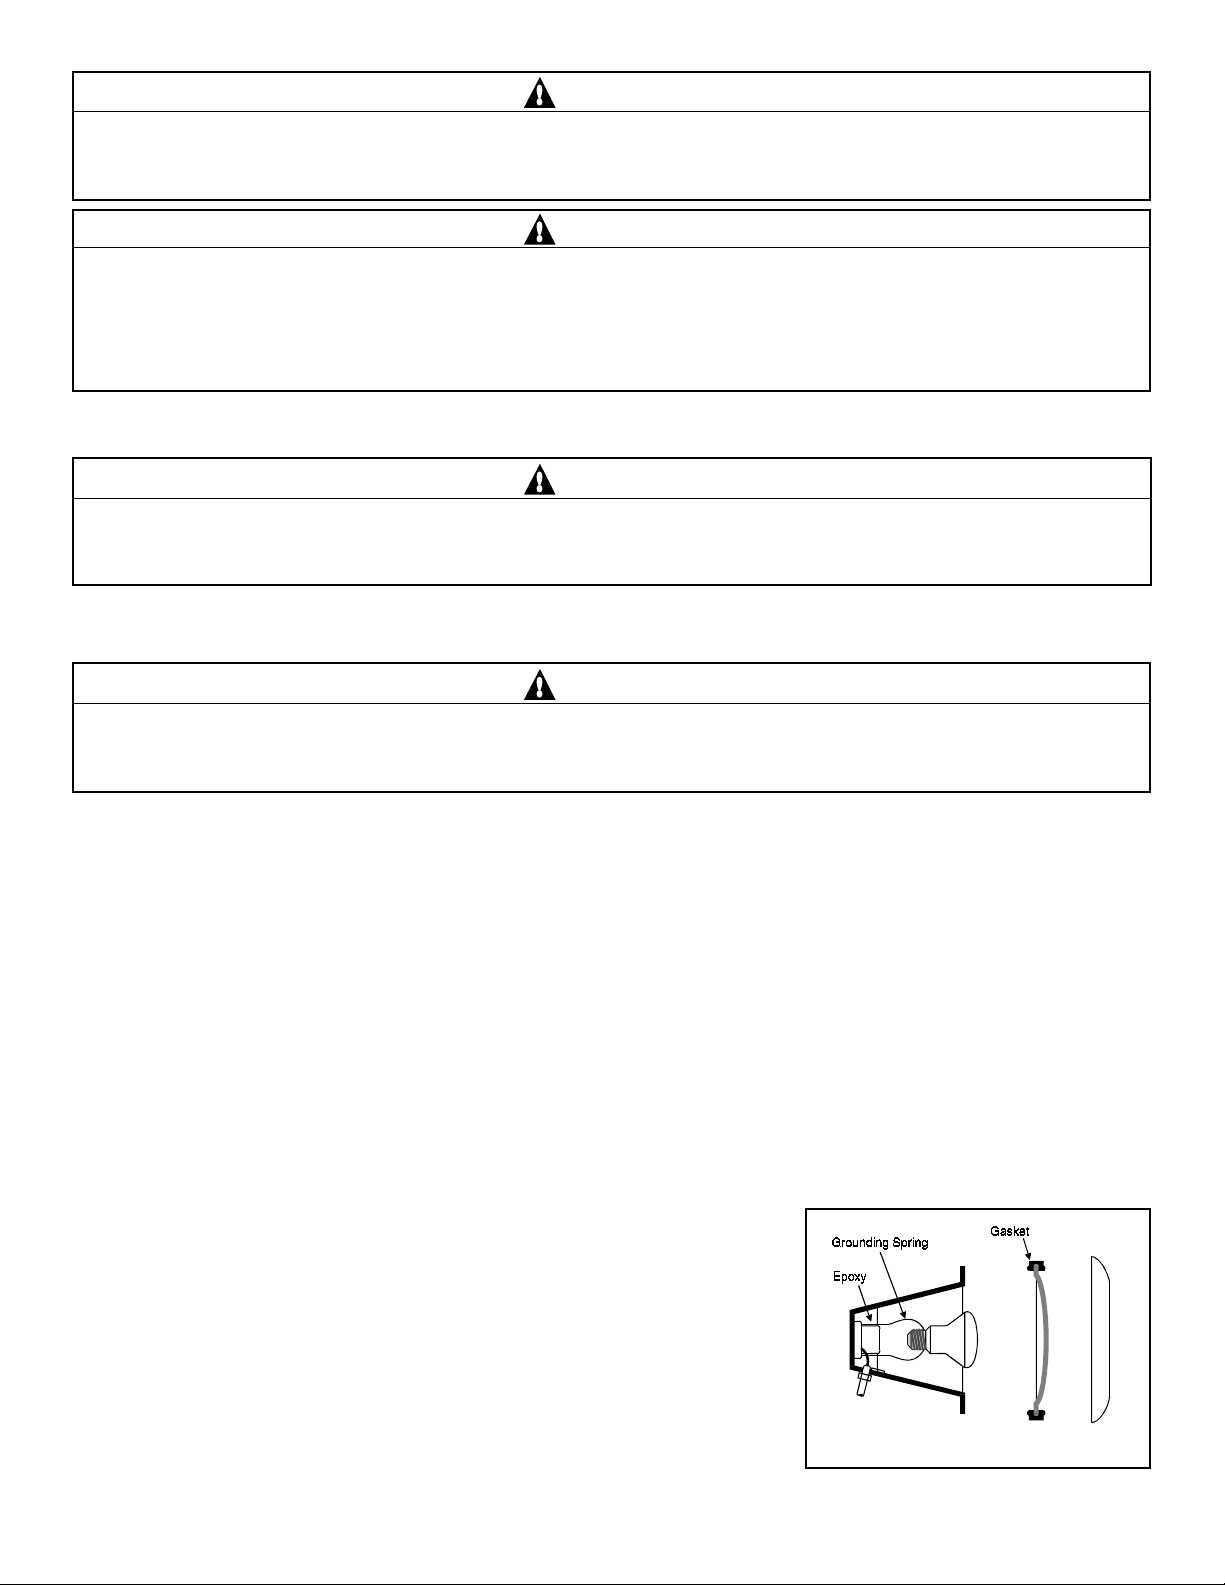
4. Disassemble light fixture and remove bulb. Remove and discard old gasket; see Figure 2.
5. Install new gasket during reassembly of light, Pentair Water Pool and Spa part number 79101600.
WARNING
Never operate the underwater light for more than 10 seconds unless it is totally submerged in water. Without total
submersion, the light assembly will get extremely hot and may result in serious burns or in breakage of the lamp or
lens. This may result in serious injury to pool users, installers, bystanders, or in damage to property.
6. Align the pilot screw on the face ring with the first “E” in the word “BEFORE” on the lens face. Then align the lens/
face ring assembly to the housing by lining up the pilot screw with the arrow on the warning label.
7. Secure ring to light fixture. Sealing screws must be tightened in the following manner to assure a proper seal;
a. For lights with chrome or brass face ring:
(1) Partly tighten the screw at the 12 o’clock position, and then partly tighten the screw at the 6 o’clock position.
Partly tighten the screw at another ‘opposite’ position, and then partly tighten the screw directly across
from it.
(2) Continue partly tightening all screws in the above sequence until all screws are evenly and securely tightened.
Recommended 20 inch pounds torque.
b.
For lights with stainless steel face ring:
(1) With the light resting on its base, align the face ring, and lens/gasket on top of the light shell as described in
Step 6. A NEW LENS GASKET MUST BE USED EACH TIME THE LIGHT IS REASSEMBLED.
The locking levers should all be hanging freely down to install over the lens and gasket. Before installing the
Unitension Clamp be sure that the gap at the ends of the clamp is
approximately 1 in. apart. Pull the ends of the Unitension Clamp
past one another to accomplish this.
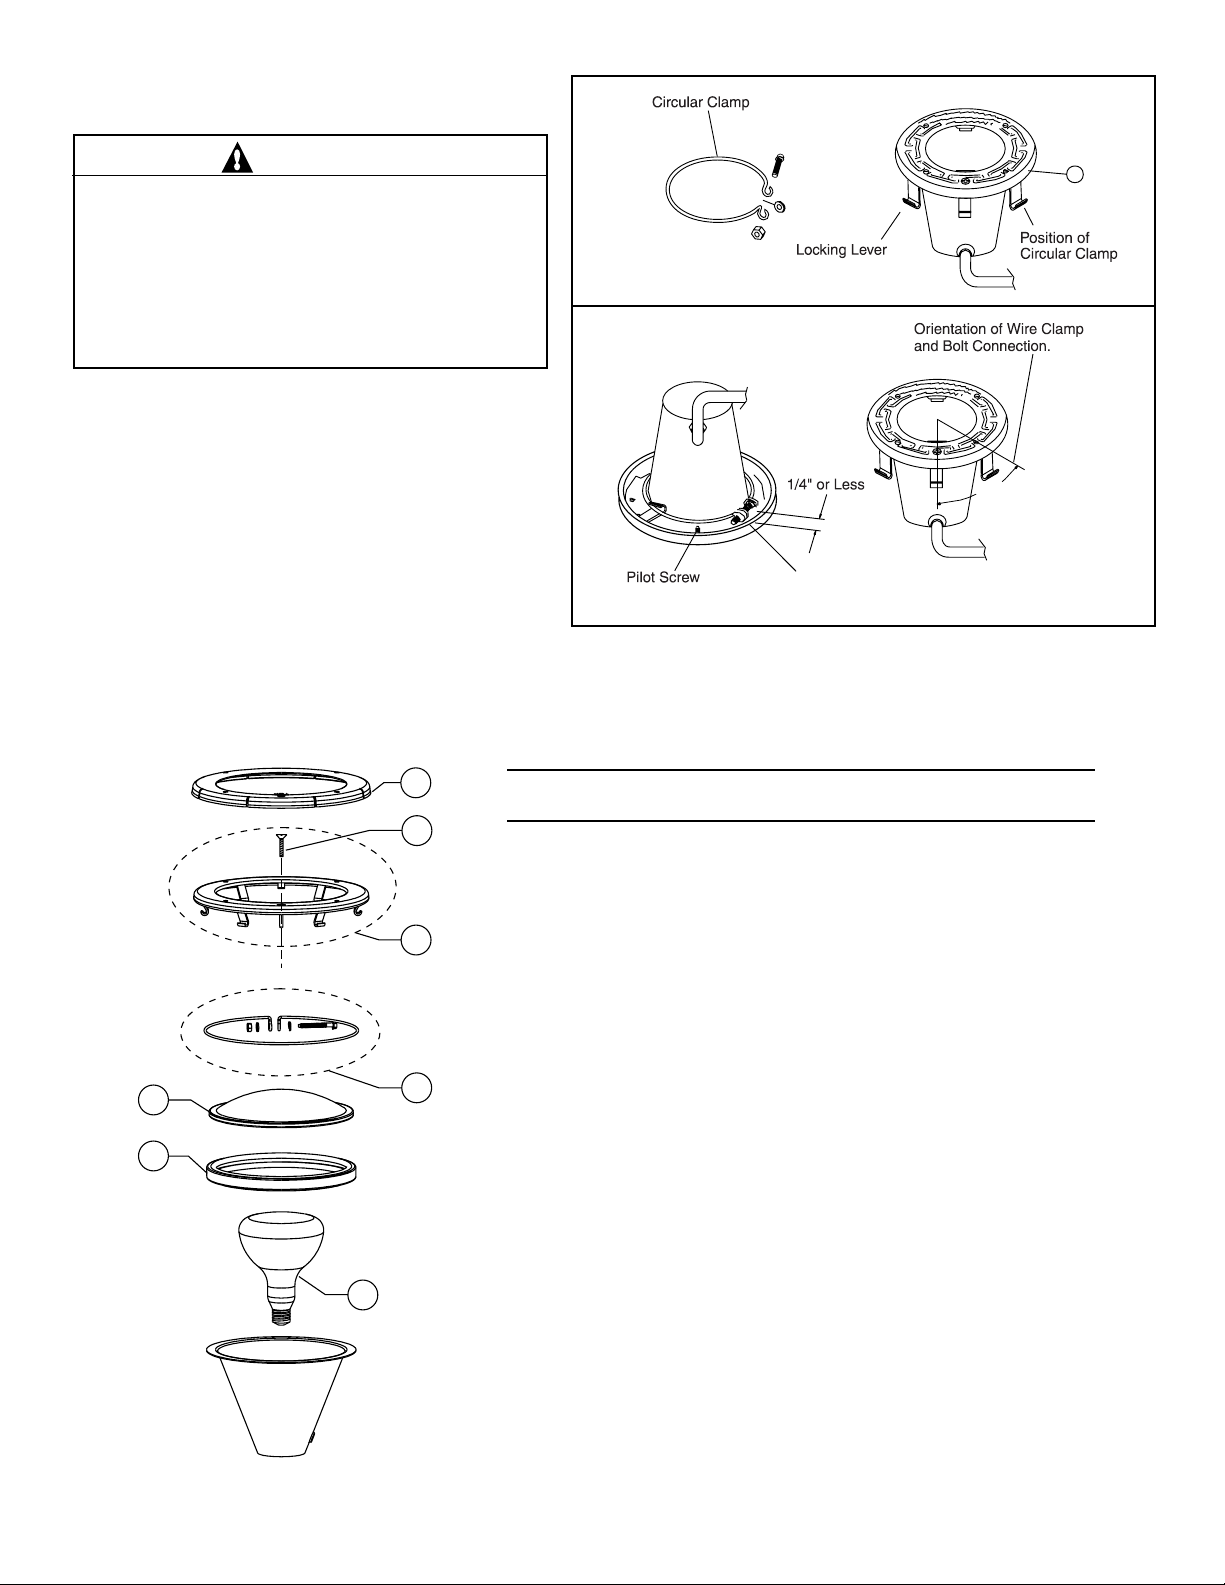
(2) With the bent ends of the circular unitension clamp pointing
down spread the clamp and place it in the “U” recesses of the
locking levers. Be sure the bent ends of the clamp are located
between the pair of locking levers as shown in Figure 3,
location A. Check to see that the clamp is properly engaged
with all of the levers.
(3) Turn the light so that it is now resting on its lens. Tighten the bolt
and nut until the distance between the ends of the clamp equals 1/4 inch or less; see Figure 4.
P/N • Núm/Pte. • Réf. 99360000 6 Rev. G • Rev. G • Rév. G 10-29-07
Figure 2.
Page 7
8. Replace light assembly into niche and tighten
special pilot screw.
WARNING
Use only the special pilot screw provided with this
underwater light. This screw mounts and electrically
grounds the housing securely to the mounting ring
and wet niche. Failure to use the screw provided
could create an electrical hazard which could result
in death or serious injury to pool users, installers or
others due to electrical shock.
9. Fill pool until the underwater light is
completely submerged in water before
operating the light for more than 10 seconds.
Turn on main switch or circuit breaker, as
well as the switch which operates the
underwater light itself, to check for proper
operation.
SECTION IV. Amerlite Replacement Parts
Figure 3.
Figure 4.
A
45 degrees
Bolt and nut are to be tightened at approx. 45 degrees
from the pilot screw between the tabs on the face ring
as shown above.
1
2
3
5
4
6
7
Item Part Description
No. No.
1 79212100 Face ring, large plastic, for S/S only, white
1 79212165 Face ring, large plastic, for S/S only, gray
1 79212111 Face ring, large plastic, for S/S only, black
2 79104800 Pilot Screw, with captive gum washer, brass
2 619355 Pilot Screw, with captive gum washer, S/S
3 79110600 Face ring assembly, S/S
4 79111000 Uni-tension wire clamp assy.
5 79100100 Lens, clear, 8-3/8 in. dia., tempered
5 79100200 Lens, med. blue, 8-3/8 in. dia., heat resistant
6 79101600 Gasket, 8-3/8 in. lens
7 79101800 Floodlamp, med. base, 100 watt, 12 volt
7 79101900 Floodlamp, med. base, 300 watt, 12 volt
7 79102100 Floodlamp, med. base, 500 watt, 120 volt
7 79107600 Floodlamp, med. base, 300 watt, 120 volt
7 79102200 Floodlamp, med. base, 400 watt, 120 volt
78900700 Kwik-change lens cover, green
78900800 Kwik-change lens cover, blue
78900900 Kwik-change lens cover, red
78901000 Kwik-change lens cover, amber
Rev. G • Rev. G • Rév. G 10-29-07 7 P/N • Núm/Pte. • Réf. 99360000
Page 8

SAVE THESE INSTRUCTIONS
© 2007 Pentair Water Pool and Spa, Inc. All rights reserved.
This document is subject to change without notice.
1620 Hawkins Ave., Sanford, NC 27330 • (800) 831-7133 • (919) 566-8000
10951 West Los Angeles Ave., Moorpark, CA 93021 • (800) 831-7133 • (805) 553-5000
P/N • Núm/Pte. • Réf. 99360000 8 Rev. G • Rev. G • Rév. G 10-29-07
Page 9

Manual del Propietario – Lámpara subacuática Amerlite
IMPORTANTES INSTRUCTIVOS DE SEGURIDAD
LEA Y SIGA TODOS LOS INSTRUCTIVOS
™
PROTEJA ESTOS INSTRUCTIVOS
Listed
Índice
SECCIÓN I. Instalación del accesorio para lámpara durante la construcción de una piscina nueva .................. 11
SECCIÓN II. Cambio del accesorio para lámpara en una piscina ........................................................................12
SECCIÓN III. Cambio de la bombilla (foco) únicamente ...................................................................................... 14
SECCIÓN IV. Desglose de las partes ....................................................................................................................16
PELIGRO
Riesgo de choque eléctrico o electrocución
Esta lámpara subacuática tiene que instalarse por un electricista con licencia o certificación y de acuerdo
con el Código Eléctrico Nacional (EE. UU.) y todos los códigos y reglamentos locales respectivos. La
instalación inadecuada creará un riesgo eléctrico que podría resultar en la muerte o en lesiones graves
a los usuarios de la piscina, a los instaladores o a otras personas debido a un choque eléctrico, y también
podría causar daños a la propiedad. Lea y siga los instructivos específicos abajo.
ADVERTENCIA
Antes de instalar esta lámpara subacuática de Pentair Water Pool and Spa, lea y siga todos los avisos de
advertencia y los instructivos que acompañan a la lámpara subacuática. El no apegarse a los avisos de seguridad
y a los instructivos podría dar por resultado una lesión grave, la muerte o daños a la propiedad. Comuníquese con
su proveedor local para obtener ejemplares gratuitos o llame a Pentair Water Pool and Spa al (805) 553-5000.
Aviso importante
A la atención del instalador(a):
Este manual contiene información importante sobre la instalación, operación y uso en forma
segura de este producto. Esta información debe dársele al dueño(a)/operador(a) de este equipo.
Etiquetado del Producto
En ciertos productos, hemos provisto el etiquetado en francés y en español.
Ponga estas etiquetas sobre la etiqueta del texto inglés correspondiente si el personal que opera o que da servicio al producto sabe bien cualquiera de estos idiomas.
Si el personal que opera o que da servicio al equipo consiste de personas que hablan diferentes idiomas, entonces puede colocar las etiquetas adicionales del idioma
requerido junto a la etiqueta en inglés. Si no hay suficiente espacio en el producto para instalar varias etiquetas, entonces dichas etiquetas deberán ponerse en una
placa o letrero y colocarse cerca del equipo donde puedan ser vistas por quienes operan o dan servicio a este equipo.
Antes de poner la(s) etiqueta(s), quite toda la mugre o grasa que haya en la superficie sobre la que se va(n) a poner usando una solución de detergente blando.
Pentair Water Pool and Spa, Inc.
1620 Hawkins Ave., Sanford, NC 27330 • (800) 831-7133 • (919) 566-8000
10951 West Los Angeles Ave., Moorpark, CA 93021 • (800) 831-7133 • (805) 553-5000
Visite www.pentairpool.com o www.staritepool.com
Rev. G • Rev. G • Rév. G 10-29-07 9 P/N • Núm/Pte. • Réf. 99360000
Page 10

¡PELIGRO! ¡Riesgo de Golpe Eléctrico o Electrocución!
Este producto debe ser instalado por un electricista certificado o licenciado o por un representante
de servicio de manutención de piscinas calificado de acuerdo con el Código Nacional de Electricidad
y todas las regulaciones y códigos locales aplicables. Una instalación inapropiada creará un
peligro eléctrico que podría resultar en muerte — o lesiones graves a los usuarios de la piscina,
instaladores u otras personas debido a un golpe eléctrico y puede causar daño a la propiedad.
Siempre desconecte la fuente de poder de las luces de la piscina en la caja de fusibles antes de
realizar un servicio de manutención de las luces. El no hacerlo de esta forma puede resultar en
la muerte o lesiones serias al representante de servicios de manutención, usuarios de la piscina
u otros debido a un golpe eléctrico. LEA Y SIGA TODAS LAS INTRUCCIONES DE ESTE MANUAL.
ADVERTENCIA — Importante información de seguridad para la instalación de luces y
nichos Pentair
•
Todas las instalaciones de nichos y luces deben estar en conformidad con todos
los códigos. Si un código local exige un sello para cable, utilice nichos plásticos
Pentair (P/N 79206600 y P/N 79206700).
• Por ningun motivo reemplace luces empalmando cables bajo el agua o detrás del
nicho.
ADVERTENCIA — RIESGO DE GOLPE ELÉCTRICO Y LESIONES.
UTILICE SOLO EL MÉTODO DE INSTALACIÓN ESPECIFICADO MÁS ABAJO.
Importante información de seguridad para instalaciones de reflectores de fuentes
Lugar de uso de Reflector de Fuente Pentair* Método de Instalación Requerido
Lámpara (Luz) (P/N 560000 – P/N 560001)
(P/N 560002 – P/N 560003)
Piscina o Spa Lámpara (Luz) para Piscina (o Spa) SÓLO carcasa de reflector (Casco de molde).
con nicho impermeables NO UTILIZAR Soporte para reflector de
fuente.
Fuente Lámpara (Luz) para Piscina (o Spa) Carcasa para reflector (Casco de molde) o
con nicho impermeable sumergible soporte para reflector de fuente.
(*) Nota: Las lámparas de nicho impermeable que cumplen con los requisitos para ambos usos, pueden llevar ya
sea la marca de certificación UL para Lámparas listadas para piscinas (Spa) de nicho impermeable, como la marca
de certificación UL para Lámparas listadas de nicho impermeable sumergible. Una Lámpara que no lleva la marca
de Listado UL correspondiente, no es considerada por UL como fabricada bajo el Listado y Servicio de Seguimiento
UL para el lugar de uso asociado.
© 2007 Pentair Water Pool and Spa, Inc. Todos los derechos reservados.
Este documento está sujeto a cambios sin previo aviso.
Marcas registradas y exenciones de responsabilidad: El logo de Pentair Pool Products, Because reliability matters most y Amerlite son
marcas registradas de Pentair Water Pool and Spa Inc. Otras marcas registradas y nombres registrados pueden ser utilizados en este
documento para hacer referencia a ya sea las entidades que poseen las marcas y nombres de sus productos. Pentair Water Pool and
Spa Inc. renuncia a cualquier interés de propiedad en marcas registradas que sean distintas a las que posee.
P/N • Núm/Pte. • Réf. 99360000 10 Rev. G • Rev. G • Rév. G 10-29-07
Page 11

SECCIÓN I. Instalación del
accesorio para lámpara durante la
construcción de una piscina nueva
A. Los siguientes pasos de preparación
tienen que haberse completado por el
electricista antes de instalar el accesorio
para lámpara. (Vea la figura 1 abajo.)
1. Verifique que la piscina cumpla con
todos los requisitos del Código
Eléctrico Nacional vigente y con
todos los códigos y reglamentos
locales. Un electricista con licencia
o certificación tiene que ser la
persona que instale el sistema
eléctrico el cual deberá cumplir o exceder dichos requisitos antes de instalar la lámpara subacuática. Algunos de los
requisitos del Código Eléctrico Nacional que el sistema eléctrico de la piscina tiene que cumplir aparecen en seguida.
Verifique que:
a. El circuito de luz tenga un interruptor por corriente de pérdida a tierra (GFCI), y un disyuntor clasificado
correctamente.
b. La caja de empalmes (o, para los modelos de 12 voltios, el transformador de baja tensión) esté
colocada por lo menos a 20.3 centímetros (8 pulgadas) arriba del nivel de tierra y por lo menos
a 1.22 m (48 pulgadas) de distancia del borde de la piscina. (Vea la figura 1 abajo.)
c. El accesorio para lámparas y todos los artículos metálicos que estén a menos de 1.5 metros (5 pies) de distancia tienen
que estar unidos eléctricamente en la forma correcta.
d. El nicho en húmedo debe estar correctamente instalado de manera que el tornillo piloto se encuentre en la posición de
las 12 del reloj y que el borde superior del lente de la lámpara subacuática se encuentre a un mínimo de 45.72 cm
(18 pulg.) por debajo de la superficie del agua de la piscina. (Vea la figura 1 abajo.)
Al interruptor por
To GFCI, Circuit
corriente de pérdida a
Breaker and
tierra (GFCI),
Power Source.
disyuntor y fuente
de alimentación
Conducto
Rigid
rígido
Conduit
Figura 1.
10 cm (4") mínimo
4" min.
La unión del conector a
#8 AWG Ground
tierra #8 AWG (3.3 mm)
Connector bonding
está ubicada en la parte
is located at rear
trasera del nicho.
of Niche.
48"
1.22 m
min.
40.6 cm
16"
20.3 cm (8”) mínimo a la caja de
8" min. Junction Box or
empalmes o transformador de baja
low Voltage Transformer.
tensión (voltaje).
45.7 cm (18”) mínimo hasta la
18" min. to top of Lens.
parte de arriba de la lente.
El tornillo piloto en la posición
Pilot screw @12 o'clock position
de las 12 del reloj.
Concrete must be cut
El hormigón armado (concreto)
back around Niche to
debe estar recortado un poco más
allow for a compacted
alrededor del nicho para permitir
plaster seal.
un sello compacto de yeso.
29.2 cm
11.50"
Coil 4 ft. of light
Enrolle 1.22 metros (4 pies) de
cable de luz alrededor del
cable around fixture.
accesorio.
NOTA
La orientación requerida para todas las lámparas Pentair es con el tornillo piloto en la posición de las 12 del reloj. Esto es garantizado por la
instalación correcta del nicho.
e. El nicho mojado está unido eléctricamente en la forma correcta y conectado a tierra a través del conector a tierra
Núm. 8 AWG (3.3 mm) ubicado en la parte trasera del nicho. (Vea la figura 1.)
NOTA:
El sistema eléctrico de la piscina o bañera de hidromasaje (spa) se puede verificar con un Pool and Spa Electrical Qualification Test Kit (Juego
de Prueba para Calificar Piscinas y Bañeras de Hidromasaje). Este juego de prueba está disponible con Pentair Water Pool and Spa. La inspección
del sistema eléctrico utilizando el juego arriba indicado tiene que realizarse por personal certificado y capacitado para ello.
2. Para estar seguro de que el sistema eléctrico de la piscina satisface todos los requisitos aplicables, el electricista también
deberá consultar al departamento de construcciones de la localidad.
3. Sólo use los nichos mojados de Pentair Water Pool and Spa para cerciorarse de una unión eléctrica y de una conexión a
tierra correctas.
B. Pasos que deben realizarse después de que se haya cumplido con los requisitos del sistema eléctrico.
1. Pase el cordón a través del conducto hasta la caja de empalmes, dejando por lo menos 1.22 metros (4 pies) de cordón o
cable en el accesorio para lámpara para enrollarlo en la misma lámpara. (Vea la figura 1.) Este metro veintidós centímetros
(4 pies) de cordón alrededor del accesorio de la lámpara le permitirá darle servicio a dicha lámpara después de que se llene
de agua la piscina.
2. Corte el cordón en la caja de empalmes, dejando por lo menos 15 cm (6 pulgadas) de cordón para hacer las conexiones.
3. Pele 15 cm (6 pulgadas) de la punta de la envoltura externa del cordón para poner al descubierto los tres alambres aislados
— tenga cuidado de no dañar el aislante de los tres alambres internos.
4. Conecte los tres alambres a los alambres correspondientes en el circuito en la caja de empalmes y fije la tapa de la caja de
empalmes en su lugar.
Rev. G • Rev. G • Rév. G 10-29-07 11 P/N • Núm/Pte. • Réf. 99360000
Page 12

ADVERTENCIA
Riesgo de choque eléctrico. Conéctese sólo a un receptáculo del tipo que tiene conexión a tierra protegido mediante un
interruptor por corriente de pérdida a tierra (GFCI). No use cables o cordones de extensión para la conexión. El no hacer esto
en la forma indicada podría resultar en la muerte o en lesiones personales graves.
¿¿¿QUÉ ES UN GFCI???
Un interruptor por corriente de pérdida a tierra (GFCI), es un dispositivo eléctrico de seguridad diseñado con el fin de medir
fugas eléctricas en un circuito. Es mucho más sensible que un disyuntor estándar. Las combinaciones de interruptores
equipados con un GFCI y tomacorrientes reaccionan ante las fugas inseguras y apagan la corriente antes de que pueda ocurrir
una lesión por choque eléctrico. Cualquier dispositivo eléctrico que se use a menos de 3 metros (10 pies) de una piscina
tiene que estar protegido por un tomacorrientes equipado con un GFCI o por un disyuntor equipado con un GFCI hecho para
usarse precisamente con ese fin.
ADVERTENCIA
Nunca encienda esta lámpara subacuática durante más de 10 segundos a no ser que ésta esté completamente sumergida
en el agua. Si no está totalmente sumergida, el conjunto de la lámpara se pondrá sumamente caliente, lo cual podría causar
quemaduras graves o la rotura de la lámpara o lente. Esto a su vez podría causar lesiones graves a los usuarios de la piscina,
a los instaladores, a las personas que se encuentren cerca o daños a la propiedad.
5. Vuelva a colocar el conjunto de la lámpara en el nicho y apriete el tornillo piloto especial de acero inoxidable.
ADVERTENCIA
Use solamente el tornillo piloto especial de acero inoxidable suministrado con esta lámpara subacuática. Este tornillo monta
y conecta el bastidor a tierra en forma segura conectándolo al aro de montaje y al nicho mojado. El no usar el tornillo provisto
podría causar un peligro eléctrico que a su vez podría resultar en la muerte o lesión grave de los usuarios de la piscina,
instaladores u otros debido a un choque eléctrico.
6. Llene la piscina hasta que la lámpara subacuática quede completamente sumergida en el agua antes de encender la
luz durante más de 10 segundos. Encienda el interruptor principal o el disyuntor, así como también el interruptor que
hace funcionar la lámpara subacuática en sí, para verificar que esté funcionando adecuadamente.
SECCIÓN II. Cambio del accesorio para lámpara en una piscina
PELIGRO
Riesgo de choque eléctrico o electrocución
Esta lámpara subacuática tiene que instalarse por un electricista con licencia o certificación y de acuerdo con el Código
Eléctrico Nacional (EE. UU.) y todos los códigos y reglamentos locales respectivos. La instalación inadecuada creará un
riesgo eléctrico que podría resultar en la muerte o en lesiones graves a los usuarios de la piscina, a los instaladores o a otras
personas debido a un choque eléctrico, y también podría causar daños a la propiedad.
Siempre desconecte la alimentación eléctrica de la luz de la piscina en el disyuntor antes de darle servicio a la
lámpara. El no hacerlo podría resultar en la muerte o en lesiones graves a la persona que esté dando servicio,
a los usuarios de la piscina o a otras personas debido a un choque eléctrico.
A. Antes de cambiar el accesorio para lámpara.
1. Verifique que la piscina satisfaga los requisitos del Código Eléctrico Nacional vigente y todos los códigos y reglamentos
de la localidad. Un electricista con licencia o certificación es quien tiene que instalar el sistema eléctrico con el fin de
cumplir o exceder dichos requisitos antes de que se instale la lámpara subacuática. Algunos de los requisitos del Código
Eléctrico Nacional que el sistema eléctrico de la piscina tiene que cumplir son los siguientes. Verifique que:
a. El circuito de luz tiene que tener un interruptor por corriente de pérdida a tierra (GFCI), y tener un disyuntor
clasificado correctamente.
b. La caja de empalmes (o, para los modelos de 12 voltios, el transformador de baja tensión) debe
estar por lo menos a 20.3 centímetros (8 pulgadas) arriba del nivel de tierra y por lo menos a
1.22 m (48 pulgadas) de distancia del borde de la piscina. (Vea la figura 1 abajo.)
P/N • Núm/Pte. • Réf. 99360000 12 Rev. G • Rev. G • Rév. G 10-29-07
Page 13

c. El accesorio para lámpara y todos los artículos metálicos que estén a menos de 1.5 metros (5 pies) de distancia
tienen que estar unidos eléctricamente en la forma correcta.
d. El nicho mojado está instalado correctamente de tal manera que el borde superior de la lente de la lámpara
subacuática está por lo menos a 45.72 cm (18 pulgadas) por debajo de la superficie del agua en la piscina.
(Vea la figura 1 abajo.)
e. El nicho mojado está unido eléctricamente en la forma correcta y conectado a tierra a través del conector a tierra
Núm. 8 AWG ubicado en la parte trasera del nicho. (Vea la figura 1.)
NOTA
El sistema eléctrico de la piscina o bañera de hidromasaje (spa) se puede verificar con un Pool and Spa Electrical Qualification Test
Kit (Juego de Prueba para Calificar Piscinas y Bañeras de Hidromasaje). Este juego de prueba está disponible con Pentair Water
Pool and Spa. La inspección del sistema eléctrico utilizando el juego arriba indicado tiene que realizarse por personal certificado
y capacitado para ello.
2. Para estar seguro de que el sistema eléctrico de la piscina satisface todos los requisitos aplicables, el electricista también
deberá consultar al departamento de construcciones de la localidad.
3. Sólo use los nichos mojados de Pentair Water Pool and Spa para cerciorarse de una unión eléctrica y de una conexión
a tierra correctas.
B. Cambio del accesorio para lámpara después de cumplir con los requisitos del sistema eléctrico.
ADVERTENCIA
El no asegurarse de que el sistema eléctrico de la piscina cumpla con los requisitos vigentes del código antes de instalar la lámpara
subacuática creará un peligro eléctrico que podría resultar en la muerte o en una lesión grave de los usuarios de la piscina,
instaladores, u otras personas debido a un choque eléctrico, y también podría causar daños a la propiedad.
1. Apague el interruptor eléctrico principal o el disyuntor, así como también el interruptor que opera la lámpara
subacuática en sí.
2. Para quitar el conjunto de la lámpara, saque el tornillo piloto especial de acero inoxidable que está en la parte de arriba
del aro de la carátula, saque del nicho al conjunto de la lámpara y póngalo en el piso junto a la piscina.
ADVERTENCIA
Cerciórese de guardar el tornillo piloto especial de acero inoxidable de esta lámpara subacuática. Este tornillo monta y
conecta el bastidor a tierra en forma segura conectándolo al aro de montaje y al nicho mojado. El no usar el tornillo provisto
podría causar un peligro eléctrico que a su vez podría resultar en la muerte o lesión grave de los usuarios de la piscina,
instaladores u otros debido a un choque eléctrico.
3. Quite la cubierta de la caja de empalmes, desconecte los alambres del accesorio para lámpara, y tire del cordón a través
del conducto.
4. Pase el nuevo cordón del accesorio para lámpara a través del conducto desde el nicho hasta la caja de empalmes.
NOTA:
Dependiendo de la longitud del conducto, podrían necesitarse herramientas especiales para tirar del cordón a través del conducto.
5. Deje por lo menos 1.22 metros (4 pies) de cordón o cable alrededor del accesorio de la lámpara. (Vea la figura 1.)
Este metro veintidós centímetros (4 pies) de cordón enrollado alrededor del accesorio de la lámpara permitirá que se
le dé servicio a la lámpara después de que se llene de agua la piscina.
6. Corte el cordón en la caja de empalmes, dejando por lo menos 15 cm (6 pulgadas) de cordón para hacer las conexiones.
7. Pele 15 cm (6 pulgadas) de la punta de la envoltura externa del cordón para poner al descubierto los tres alambres
aislados — tenga cuidado de no dañar el aislante de los tres alambres internos.
8. Conecte los tres alambres a los alambres correspondientes en el circuito en la caja de empalmes (el alambre negro a
la fuente de alimentación, el blanco al común de masa y el verde a tierra) y fije la tapa de la caja de empalmes en su
lugar.
Rev. G • Rev. G • Rév. G 10-29-07 13 P/N • Núm/Pte. • Réf. 99360000
Page 14

ADVERTENCIA
Nunca encienda esta lámpara subacuática durante más de 10 segundos a no ser que ésta esté completamente sumergida en el
agua. Si no está totalmente sumergida, el conjunto de la lámpara se pondrá sumamente caliente, lo cual podría causar quemaduras
graves o la rotura de la lámpara o lente. Esto a su vez podría causar lesiones graves a los usuarios de la piscina, a los instaladores,
a las personas que se encuentren cerca o daños a la propiedad.
9. Vuelva a colocar el conjunto de la lámpara en el nicho y apriete el tornillo piloto especial de acero inoxidable.
ADVERTENCIA
Use solamente el tornillo piloto especial de acero inoxidable suministrado con esta lámpara subacuática. Este tornillo monta
y conecta el bastidor a tierra en forma segura conectándolo al aro de montaje y al nicho mojado. El no usar el tornillo provisto
podría causar un peligro eléctrico que a su vez podría resultar en la muerte o lesión grave de los usuarios de la piscina,
instaladores u otros debido a un choque eléctrico.
10. Llene la piscina hasta que la lámpara subacuática quede completamente sumergida en el agua antes de encender la
luz durante más de 10 segundos. Encienda el interruptor principal o el disyuntor, así como también el interruptor que
hace funcionar la lámpara subacuática en sí, para verificar que esté funcionando adecuadamente.
SECCIÓN III. Cambio de la bombilla (foco) únicamente
PELIGRO
Siempre desconecte la alimentación eléctrica de la luz de la piscina en el disyuntor antes de darle servicio a la
lámpara. El no hacerlo podría resultar en la muerte o en lesiones graves al instalador, a la persona que esté dando
servicio, a los usuarios de la piscina o a otras personas debido a un choque eléctrico.
1. Apague el interruptor eléctrico principal o el disyuntor, así como también el interruptor que opera la lámpara subacuática
en sí.
2. Necesitará conseguir lo siguiente:
a. Un empaque nuevo de lente (número de parte 79101600).
b. El tipo correcto de lámpara y el vataje adecuado (vea la tabla 1).
ADVERTENCIA
Reemplace la lámpara por otra que sea de tipo y vataje similares. El no reemplazar la lámpara con el mismo tipo de lámpara dañará
el conjunto de la misma y podría causar un peligro eléctrico que dé por resultado la muerte o lesiones graves a los usuarios de la piscina,
instaladores, u otras personas debido a un choque eléctrico, y también podría causar daños a la propiedad.
ADVERTENCIA
Siempre instale un empaque nuevo para la lente (número de parte 79101600) cada vez que desarme la luz. El no hacer
esto podría permitir que el agua entrase al conjunto, lo cual podría causar:
(a) un peligro eléctrico que podría resultar en la muerte o en una lesión seria a los usuarios de la piscina,
instaladores u otras personas debido a un choque eléctrico, o
(b) la ruptura de la lámpara o lente que, en forma similar, podría resultar en una lesión seria a los usuarios de la
piscina, instaladores o personas cercanas, o daños a la propiedad.
3. Para quitar el conjunto de la lámpara, saque el tornillo piloto especial de acero inoxidable que está en la parte de arriba
del aro de la carátula, saque del nicho al conjunto de la lámpara y póngalo en el piso junto a la piscina.
ADVERTENCIA
Cerciórese de guardar el tornillo piloto especial de acero inoxidable de esta lámpara subacuática. Este tornillo monta y
conecta el bastidor a tierra en forma segura conectándolo al aro de montaje y al nicho mojado. El no usar el tornillo provisto
podría causar un peligro eléctrico que a su vez podría resultar en la muerte o lesión grave de los usuarios de la piscina,
instaladores u otros debido a un choque eléctrico.
4. Desarme el accesorio para lámpara y quite la bombilla (foco). Quite y deseche el viejo empaque (junta). (Vea la
figura 2.)
P/N • Núm/Pte. • Réf. 99360000 14 Rev. G • Rev. G • Rév. G 10-29-07
Page 15

5. Instale el nuevo empaque al armar de nuevo la luz, el número de parte de Pentair Water Pool and Spa es el
79101600.
ADVERTENCIA
Nunca encienda esta lámpara subacuática durante más de 10 segundos a no ser que ésta esté completamente sumergida
en el agua. Si no está totalmente sumergida, el conjunto de la lámpara se pondrá sumamente caliente, lo cual podría causar
quemaduras graves o la rotura de la lámpara o lente. Esto a su vez podría causar lesiones graves a los usuarios de la piscina,
a los instaladores, a las personas que se encuentren cerca o daños a la propiedad.
6. Alinee el tornillo piloto del aro de la carátula con la primera letra «E» de la palabra «BEFORE» que está en el frente
de la lente. Después alinee este conjunto de aro de lente/carátula con el bastidor, alineando para ello el tornillo piloto
con la flecha en la etiqueta de advertencia.
7. Asegure el aro al accesorio de iluminación. Los tornillos de sellado tienen que apretarse de la siguiente forma para
asegurar un sellado adecuado:
a. Para los faros con un aro de carátula de cromo o de latón:
(1) Apriete parcialmente el tornillo en la posición de las 12 horas, y después apriete parcialmente el tornillo en la
posición de las 6 horas. Apriete parcialmente el tornillo en alguna otra posición «opuesta», y después apriete
parcialmente el tornillo que esté directamente opuesto a ese tornillo.
(2) Continúe apretando parcialmente todos los tornillos en la secuencia arriba indicada hasta que todos los tornillos
estén apretados en forma pareja y segura. (Se recomienda una torsión de 20 pulgadas libra.)
b. Para los faros con un aro de carátula de acero inoxidable: Coloque el tornillo y la tuerca aproximadamente a
45 grados a la derecha del tornillo piloto especial y apriete la tuerca en la abrazadera de unitensión hasta que la
distancia entre los extremos de la abrazadera sea igual a 1/4 de pulgada.
(1) Con el faro descansando sobre su base, coloque la junta en la parte superior de la armazón del faro como se
describió en el paso 7. SE TIENE QUE USAR UNA JUNTA NUEVA DE LENTE CADA VEZ QUE SE
VUELVA A ARMAR EL FARO. Centre el aro de carátula de acero inoxidable y colóquelo encima del grupo
formado por la lente y la junta. Todas las palancas de bloqueo deben estar colgando libremente y hacia abajo
con el fin de instalar encima la lente y la junta. Antes de instalar la abrazadera de unitensión cerciórese de que
la separación entre las puntas de la abrazadera sea de aproximadamente 1 pulgada (2.5 cm). (Tire de las puntas
de la abrazadera de unitensión para lograr esto.)
(2) Con las puntas dobladas de la abrazadera circular de unitensión apuntando hacia abajo abra la abrazadera y
colóquela en las muescas en «U» de las palancas de bloqueo. Cerciórese de que las puntas dobladas de la
abrazadera estén colocadas entre el par de palancas de
bloqueo como se muestra en la figura 3, indicación A.
Verifique que la abrazadera esté bien enganchada con todas
las palancas.
(3) Déle vuelta al faro de manera que éste repose sobre la lente.
Apriete el perno y la tuerca hasta que la distancia entre las
puntas de la abrazadera sea igual a 1/4 de pulgada o menos;
vea la figura 4.
8. Vuelva a colocar el conjunto del faro en el nicho y apriete el tornillo
piloto especial.
ADVERTENCIA
Use solamente el tornillo piloto especial de acero inoxidable suministrado
con esta lámpara subacuática. Este tornillo monta y conecta el bastidor a
tierra en forma segura conectándolo al aro de montaje y al nicho mojado. El
no usar el tornillo provisto podría causar un peligro eléctrico que a su vez
podría resultar en la muerte o lesión grave de los usuarios de la piscina,
instaladores u otros debido a un choque eléctrico.
TABLA 1.
Especificaciones de la lámpara: Modelos de 12* voltios
120 voltios - 300 vatios - R-40 lámp. 100 vatios
120 voltios - 400 vatios - R-40 lámp. 300 vatios
120 voltios - 500 vatios - R-40 lámp. * Se requiere transformador
12 voltios - 300 vatios - R-40 lámp. Modelos de 120 voltios
12 voltios - 100 vatios - R-40 lámp. 300 vatios
Ressort de terre
Resorte de conexión a tierra
Epoxia
400 vatios
500 vatios
Empaque
Joint
Figura 2.
Rev. G • Rev. G • Rév. G 10-29-07 15 P/N • Núm/Pte. • Réf. 99360000
Page 16

A
9. Llene la piscina hasta que la lámpara
subacuática quede completamente sumergida
en el agua antes de encender la luz
segundos. Encienda el interruptor principal
de 10
durante más
o el disyuntor, así como también el interruptor
que hace funcionar la lámpara subacuática en
sí, para verificar que esté funcionando
adecuadamente.
Abrazadera circular
Figura 3.
Palanca de bloqueo
Posición de la
Abrazadera circular
SECCIÓN IV. Desglose de las partes
1
2
3
5
4
6
7
Figura 4.
Tornillo piloto
6 mm
(1/4 de pulg.)
o menos
Bolt and nut are to be tightened at approx. 45 degrees
El tornillo y la tuerca tienen que estar apretados a
from the pilot screw between the tabs on the face ring
aproximadamente 45 grados del tornillo piloto en el aro
as shown above.
de carátula, como se muestra arriba.
Orientación de la abrazadera de
alambre y conexión del perno.
45 degrees
45 grados
Artículo No. del Descripción
No. Repuesto
1 79212100 Aro frontal, grande de plástico, sólo para acero inoxido, blanco
1 79212165 Aro frontal, grande de plástico, sólo para acero inoxido, gris
1 79212111 Aro frontal, grande de plástico, sólo para acero inoxido, negro
2 79104800 Tornillo piloto, con arandela de caucho cautiva, latón
2 619355 Tornillo piloto, con arandela de caucho cautiva, acero inoxidable
3 79110600 Conjunto del aro de carátula, acero inoxidable
4 79111000 Conjunto de abrazadera del alambre de unitensión
5 79100100 Lente, transparente, 21.27 cm (8 3/8 pulgadas) de diámetro,
templada
5 79100200 Lente, azul medio, 21.27 cm (8 3/8 pulgadas) de diámetro, resistente
al calor
6 79101600 Empaque, 21.27 cm (8-3/8 pulgadas), lente
7 79101800 Reflector, base med., 100 vatios, 12 voltios
7 79101900 Reflector, base med., 300 vatios, 12 voltios
7 79102100 Reflector, base med., 500 vatios, 120 voltios
7 79107600 Reflector, base med., 300 vatios, 120 voltios
7 79102200 Reflector, base med., 400 vatios, 120 voltios
78900700 Cubierta de lente Kwik-change, verde
78900800 Cubierta de lente Kwik-change, azul
78900900 Cubierta de lente Kwik-change, roja
78901000 Cubierta de lente Kwik-change, ámbar
P/N • Núm/Pte. • Réf. 99360000 16 Rev. G • Rev. G • Rév. G 10-29-07
¡LEA Y PROTEJA ESTOS INSTRUCTIVOS!
Page 17

Notice d’emploi des lampes immergées Amerlite
CONSIGNES DE SÉCURITÉ IMPORTANTES
PRIÈRE DE LIRE ET D’OBSERVER TOUTES LES CONSIGNES
®
CONSERVER CETTE NOTICE
Liste
Table des matières
SECTION I. Installation de l’appareil d’éclairage lors de la construction d’une nouvelle piscine ....................... 19
SECTION II. Remplacement de l’appareil d’éclairage d’une piscine existante ...................................................20
SECTION III. Remplacement d’une ampoule uniquement .................................................................................... 22
SECTION IV. Nomenclature des pièces ................................................................................................................24
DANGER
Risque de choc électrique ou d’électrocution
Cette lampe immergée doit obligatoirement être installée par un électricien agréé ou breveté conformément au
Code national de l’électricité et à tous les codes et ordonnances locaux applicables. Une installation incorrecte
risque de créer un danger électrique pouvant provoquer le décès ou des dommages corporels graves pour les
utilisateurs de la piscine, les installateurs ou d’autres personnes par suite d’un choc électrique et pouvant
également entraîner des dégâts matériels. Prière de lire et d’observer les directives spécifiques ci-dessous.
AVERTISSEMENT
Avant d’installer cette lampe immergée d’Pentair Water Pool and Spa, prière de lire et de suivre tous les avertissements
et instructions qui l’accompagnent. Toute infraction aux consignes de sécurité et d’emploi risque de provoquer
blessures graves, décès ou dégâts matériels. Pour obtenir des exemplaires gratuits, prière de s’adresser au fournisseur
local ou d’appeler Pentair Water Pool and Spa au 805-553-5000.
Avis important
À l’attention de l’installateur.
La présente notice contient des renseignements importants sur l’installation, le fonctionnement et l’utilisation de
ce produit en toute sécurité. Prière de fournir ces informations au propriétaire et (ou) à l’opérateur de ce matériel.
Étiquetage des Produits
Les étiquettes de certains produits sont fournies en français et en espagnol.
Si le personnel opérateur ou de maintenance du produit parle couramment l’une de ces deux langues mieux que l’anglais, installer ces étiquettes par-dessus
l’étiquette en anglais correspondante.
Si le personnel consiste de personnes qui parles plusieurs langues, installer les étiquettes supplémentaires de la langue voulue à côté de l’étiquette en anglais. S’il
n’y a pas assez de place sur le produit pour installer plusieurs étiquettes à la fois, apposer ces étiquettes sur un panneau ou une pancarte installée à proximité de
l’équipement de maniére à ce qu’elles soient visibles par tous les opérateurs ou personnel de maintenance de ce matériel.
Avant d’installer les étiquettes, nettoyer toute la poussiére ou graisse de la surface qui devra les recevoir avec une solution de détergent doux.
Pentair Water Pool and Spa, Inc.
1620 Hawkins Ave., Sanford, NC 27330 • (800) 831-7133 • (919) 566-8000
10951 West Los Angeles Ave., Moorpark, CA 93021 • (800) 831-7133 • (805) 553-5000
Visitez le site www.pentairpool.com ou www.staritepool.com
Rev. G • Rev. G • Rév. G 10-29-07 17 P/N • Núm/Pte. • Réf. 99360000
Page 18

DANGER! Risque de décharge électrique ou d’électrocution!
Ce produit doit être installé par un électricien agréé ou qualifié ou un technicien spécialisé,
conformément au Code National d’Electricité et à tous les codes et règlements locaux en vigueur.
Toute mauvaise installation crée un danger électrique pouvant causer la mort ou des blessures
graves - par décharge électrique - aux utilisateurs, aux installateurs ou à des tiers, et pouvant
également provoquer des dégâts matériels. Avant de commencer l’entretien du luminaire, veuillez
toujours couper le courant électrique du luminaire au niveau du disjoncteur. Le non-respect de
cette consigne peut entraîner la mort ou des blessures graves par décharge électrique pour le
technicien, les utilisateurs ou des tiers. VEUILLEZ LIRE ET OBSERVER TOUTES LES CONSIGNES
DE CE GUIDE.
AVERTISSEMENT — Importantes consignes de sécurité pour l’installation du
luminaire et de la niche Pentair
•
Toutes les installations de niche et dE luminaire doivent être faites
conformément à tous les codes. Si les codes locaux exigent un joint
d’étanchéité à cordon, veuillez utiliser les niches en plastique Pentair
(P/N 79206600 et P/N 79206700).
• Ne tenter en aucun cas de remplacer les luminaires en épissant les câbles
sous l’eau ou derrière la niche.
AVERTISSEMENT — RISQUE DE DÉCHARGE ÉLECTRIQUE OU DE BLESSURE.
UTILISEZ UNIQUEMENT LA MÉTHODE D’INSTALLATION SPÉCIFIÉE CI-DESSOUS.
Importantes consignes de sécurité pour l’installation d’un appareil d’éclairage pour fontaine
Emplacement/Utilisation Luminaire pour Fontaine Pentair* Méthode d’Installation Requise
du Luminaire (lumière) (P/N 560000 – P/N 560001)
(P/N 560002 – P/N 560003)
Piscine ou spa Luminaire (lumière) pour niche Bâti de luminaire (coque) SEULEMENT.
étanche pour piscine (ou spa) NE PAS UTILISER le support pour
fontaine.
Fontaine Luminaire (lumière) pour niche Bâti de luminaire (coque) ou support
submersible de pour piscine (ou spa) luminaire pour fontaine.
(*) Remarque : Les luminaires pour niches étanches se conformant aux règlements pour les deux applications peuvent porter la marque UL
listée pour les luminaires pour niches étanches pour piscine (ou spa) ainsi que pour les luminaires pour niches submersibles. Un luminaire
ne portant pas la marque UL listée correspondante n’est pas considéré comme ayant été produit conformément aux normes de la marque
UL listé et au service de suivi de la production UL pour cet emplacement.
© 2007 Pentair Water Pool and Spa, Inc. Tous droits réservés.
Ce document est sujet à tous changements sans préavis.
Marques de commerce et avis de non-responsabilité : Le logo de Pentair Pool Products, Because reliability matters most et Amerlite
sont des marques de commerce de Pentair Water Pool and Spa, Inc. Les autres marques ou dénominations commerciales utilisées dans
ce document pour faire référence aux entités se réclamant de ces marques ou dénominations ou à leurs produits sont la propriété de leurs
détenteurs respectifs. Pentair Water Pool and Spa, Inc. déclare n'avoir aucun intérêt dans les marques et noms de produits autres que
les siens.
P/N • Núm/Pte. • Réf. 99360000 18 Rev. G • Rev. G • Rév. G 10-29-07
Page 19

SECTION I. Installation de l’appareil
d’éclairage lors de la construction
d’une nouvelle piscine
A. Avant que l’appareil d’éclairage ne puisse
être installé, l’électricien devra procéder
aux préparatifs suivants (cf. figure 1 cidessous).
1. S’assurer d’abord que la piscine est
conforme aux spécifications
courantes du Code national de
l’électricité et de tous les codes et
ordonnances locaux. Avant que la
lampe immergée ne puisse être
installée, il faut qu’un électricien agréé
ou breveté installe un circuit électrique qui soit conforme à ces spécifications ou qui les dépasse. Certaines des spécifications
du Code national de l’électricité applicables aux circuits électriques des piscines sont indiquées ci-dessous. Vérifier ainsi que :
a. Le circuit d’éclairage comporte un interrupteur à détection de courant de terre (GFCI) et un disjoncteur du calibre
approprié.
b. La boîte de dérivation (ou, pour les modèles de 12 volts, le transformateur basse tension) est située à au moins
20,3 cm (8 pouces) au-dessus du niveau du sol et à au moins 1,22 m (48 pouces) du bord de la piscine (cf. figure
1 ci-dessous).
Vers l’interrupteur
GFCI, le disjonc-
To GFCI, Circuit
teur et la source
Breaker and
d’alimentation
Power Source.
Conduit
rigide
Rigid
Conduit
Figure 1.
1,22 m
4" min.
10 cm (4") min.
Connecteur de mise
à la terre n° 8 AWG
#8 AWG Ground
(3,3 mm) : joint électrique
Connector bonding
à l’arrière de la niche
is located at rear
of Niche.
48"
min.
40,6 cm
16"
20,3 cm (8”) min. à partir de la boîte de
8" min. Junction Box or
dérivation ou du transformateur basse
low Voltage Transformer.
tension
45,7 cm (18”) min. jusqu’au
18" min. to top of Lens.
haut de la lentille
Vis pilote à 12 heures.
Pilot screw @12 o'clock position
Concrete must be cut
Creuser le béton autour
back around Niche to
de la niche afin de
allow for a compacted
permettre un joint de
plaster seal.
plâtre compacté.
11.50"
29,2 cm
Enrouler 1,22 m (4 pieds) de
Coil 4 ft. of light
câble de lampe autour de
cable around fixture.
l’appareil
c. L’appareil d’éclairage et tous les éléments métalliques situés à moins de 1,5 m (5 pieds) de la piscine comportent des
joints électriques appropriés.
d. La niche submersible doit être installée convenablement, de telle manière que le trou de la vis soit à 12 heures et que
le rebord supérieur de la lentille du luminaire soit à une profondeur d’au moins 45,7 cm (18 pouces) au-dessous de la
surface de l’eau dans la piscine (cf. figure 1 ci-dessous).
REMARQUE
La position requise de tous les luminaires Pentair est d’avoir la vis pilote à 12 heures. Ceci est garanti par l’installation correcte de la niche.
e. La niche immergée comporte des joints électriques appropriés et est convenablement reliée à la terre au moyen du
connecteur de terre n° 8 AWG (3,3 mm) situé à l’arrière de la niche (cf. figure 1).
REMARQUE
Le circuit électrique peut être verifié au moyen d’un kit d’essai de qualification électrique pour piscines et bains tourbillon, kit disponible auprès
d’Pentair Water Pool and Spa. L’inspection du circuit au moyen du kit en question doit être réalisée par un personnel breveté et bien formé.
2. Pour s’assurer que le circuit électrique de la piscine est conforme à toutes les spécifications applicables, l’électricien devra
aussi consulter le service de construction local.
3. Pour réaliser une connexion à la terre et des joints électriques satisfaisants, n’utiliser que des niches immergées d’Pentair
Water Pool and Spa.
B. Une fois le circuit électrique installé conformément aux spécifications, procéder comme suit :
1. Acheminer le cordon à travers le conduit jusqu’à la boîte de dérivation en laissant au moins 1,22 m (4 pieds) à enrouler autour
de la lampe au niveau de l’appareil d’éclairage (cf. figure 1). Ce mètre vingt-deux permet de procéder au remplacement
de la lampe une fois la piscine remplie d’eau.
2. Couper le cordon au niveau de la boîte de dérivation en laissant au moins 15 cm (6 pouces) pour les raccordements.
3. Couper la gaine extérieure du cordon sur 15 cm (6 pouces) afin de mettre à nu les trois conducteurs internes isolés en veillant
à ne pas endommager leur isolement.
4. Raccorder les trois conducteurs aux fils correspondants du circuit électrique dans la boîte de dérivation et refermer
solidement le couvercle de cette dernière.
Rev. G • Rev. G • Rév. G 10-29-07 19 P/N • Núm/Pte. • Réf. 99360000
Page 20

AVERTISSEMENT
À moins qu’elle ne soit totalement immergée dans l’eau, ne jamais utiliser cette lampe pendant plus de 10 secondes, car
elle atteindrait alors des températures excessives susceptibles de provoquer des brûlures graves ou de casser l’ampoule
ou la lentille et d’entraîner par là des blessures graves pour les utilisateurs de la piscine, les installateurs ou d’autres
personnes, ou encore des dégâts matériels.
5. Remettre l’ensemble lampe dans la niche et serrer la vis sans tête spéciale en acier inoxydable.
AVERTISSEMENT
N’utiliser que la vis sans tête spéciale en acier inoxydable livrée avec cette lampe immergée. Cette vis fixe solidement le
logement à la bague de montage et à la niche immergée et assure la mise à la terre. L’emploi de toute autre vis risque de
créer un danger électrique pouvant provoquer le décès ou des dommages corporels graves pour les utilisateurs de la piscine,
les installateurs ou d’autres personnes par suite d’un choc électrique.
6. Ne pas utiliser la lampe pendant plus de 10 secondes avant que la piscine ne soit suffisamment remplie pour que la
lampe soit totalement immergée dans l’eau. Mettre alors en marche l’interrupteur ou le disjoncteur principal ainsi
que l’interrupteur de commande de la lampe afin d’en vérifier le bon fonctionnement.
SECTION II. Remplacement de l’appareil d’éclairage d’une piscine existante
DANGER
Risque de choc électrique ou d’électrocution
Cette lampe immergée doit obligatoirement être installée par un électricien agréé ou breveté ou par un technicien qualifié
dans la maintenance des piscines conformément au Code national de l’électricité et à tous les codes et ordonnances
locaux applicables. Une installation incorrecte risque de créer un danger électrique pouvant provoquer le décès ou des
dommages corporels graves pour les utilisateurs de la piscine, les installateurs ou d’autres personnes par suite d’un choc
électrique et pouvant également entraîner des dégâts matériels.
Sous peine de provoquer le décès ou des blessures graves pour le technicien de maintenance, les utilisateurs
de la piscine ou d’autres personnes par suite d’un choc électrique, veiller à toujours déconnecter la lampe de la
piscine du secteur au niveau du disjoncteur avant de procéder au remplacement de la lampe.
A. Avant de remplacer l’appareil d’éclairage.
1. S’assurer d’abord que la piscine est conforme aux spécifications courantes du Code national de l’électricité et de tous
les codes et ordonnances locaux. Avant que la lampe immergée ne puisse être installée, il faut qu’un électricien agréé
ou breveté installe un circuit électrique qui soit conforme à ces spécifications ou qui les dépasse. Certaines des
spécifications du Code national de l’électricité applicables aux circuits électriques des piscines sont indiquées
ci-dessous. Vérifier ainsi que:
a. Le circuit d’éclairage comporte un interrupteur à détection de courant de terre (GFCI) et un disjoncteur du calibre
approprié.
b. La boîte de dérivation (ou, pour les modèles de 12 volts, le transformateur basse tension) est située à au
moins 20,3 cm (8 pouces) au-dessus du niveau du sol et à au moins 1,22 m (48 pouces) du bord de la piscine
(cf. figure 1 ci-dessous).
c. L’appareil d’éclairage et tous les éléments métalliques situés à moins de 1,5 m (5 pieds) de la piscine comportent
des joints électriques appropriés.
d. La niche immergée est correctement installée de manière à ce que le bord supérieur de la lentille de la lampe soit
à au moins 45,7 cm (18 pouces) au-dessous de la surface de l’eau dans la piscine (cf. figure 1 ci-dessous).
e. La niche immergée comporte des joints électriques appropriés et est convenablement reliée à la terre au moyen
du connecteur de terre n° 8 AWG (3,3 mm) situé à l’arrière de la niche (cf. figure 1).
REMARQUE
Le circuit électrique peut être vérifié au moyen d’un kit d’essai de qualification électrique pour piscines et bains tourbillon, kit disponible
auprès d’Pentair Water Pool and Spa. L’inspection du circuit au moyen du kit en question doit être réalisée par un personnel breveté
et bien formé.
P/N • Núm/Pte. • Réf. 99360000 20 Rev. G • Rev. G • Rév. G 10-29-07
Page 21

2. Pour s’assurer que le circuit électrique de la piscine est conforme à toutes les spécifications applicables, l’électricien
devra aussi consulter le service de construction local.
3. Pour réaliser une connexion à la terre et des joints électriques satisfaisants, n’utiliser que des niches immergées
d’Pentair Water Pool and Spa.
B. Pour remplacer l’appareil d’éclairage une fois le circuit électrique installé conformément aux spécifications, procéder
comme suit.
AVERTISSEMENT
Avant d’installer la lampe immergée, veiller à rendre le circuit électrique de la piscine conforme aux spécifications du code, car on risquerait
autrement de créer un danger électrique pouvant provoquer le décès ou des dommages corporels graves pour les utilisateurs de la piscine, les
installateurs ou d’autres personnes par suite d’un choc électrique, et entraîner également des dommages matériels.
1. Mettre à l’arrêt l’interrupteur ou le disjoncteur principal ainsi que l’interrupteur de commande de la lampe immergée.
2. Pour retirer l’ensemble lampe, ôter la vis de guide spéciale en acier inoxydable située au sommet de la bague avant,
retirer l’ensemble de la niche et le placer sur la plate-forme.
AVERTISSEMENT
Veiller à conserver la vis de guide spéciale en acier inoxydable de cette lampe immergée. Cette vis fixe solidement le
logement à la bague de montage et à la niche immergée et assure la mise à la terre. L’emploi de toute autre vis risque de
créer un danger électrique pouvant provoquer le décès ou des dommages corporels graves pour les utilisateurs de la piscine,
les installateurs ou d’autres personnes par suite d’un choc électrique.
3. Enlever le couvercle de la boîte de dérivation, débrancher les fils électriques de l’appareil d’éclairage et tirer le cordon
à travers le conduit.
4. Acheminer le cordon du nouvel appareil à travers le conduit depuis la niche jusqu’à la boîte de dérivation.
REMARQUE :
Selon la longueur du conduit, il se pourrait que l’on ait besoin d’outils spéciaux pour tirer le cordon à travers le conduit.
5. Laisser au moins 1,22 m (4 pieds) de cordon à enrouler autour de la lampe (cf. figure 1). Ce mètre vingt-deux permet
de procéder au remplacement de la lampe une fois la piscine remplie d’eau.
6. Couper le cordon au niveau de la boîte de dérivation en laissant au moins 15 cm (6 pouces) pour les raccordements.
7. Couper la gaine extérieure du cordon sur 15 cm (6 pouces) afin de mettre à nu les trois conducteurs internes isolés en
veillant à ne pas endommager leur isolement.
8. Raccorder les trois conducteurs aux fils correspondants du circuit électrique dans la boîte de dérivation (conducteur
noir raccordé au fil de tension, conducteur blanc au fil de retour et conducteur vert au fil de terre) et refermer solidement
le couvercle de la boîte.
AVERTISSEMENT
À moins qu’elle ne soit totalement immergée dans l’eau, ne jamais utiliser cette lampe pendant plus de 10 secondes, car
elle atteindrait alors des températures excessives susceptibles de provoquer des brûlures graves ou de casser l’ampoule
ou la lentille et d’entraîner par là des blessures graves pour les utilisateurs de la piscine, les installateurs ou d’autres
personnes, ou encore des dégâts matériels.
9. Remettre l’ensemble lampe dans la niche et serrer la vis de guide spéciale en acier inoxydable.
AVERTISSEMENT
N’utiliser que la vis de guide spéciale en acier inoxydable livrée avec cette lampe immergée. Cette vis fixe solidement le
logement à la bague de montage et à la niche immergée et assure la mise à la terre. L’emploi de toute autre vis risque de
créer un danger électrique pouvant provoquer le décès ou des dommages corporels graves pour les utilisateurs de la piscine,
les installateurs ou d’autres personnes par suite d’un choc électrique.
10. Ne pas utiliser la lampe pendant plus de 10 secondes avant que la piscine ne soit suffisamment remplie pour que la lampe
soit totalement immergée dans l’eau. Mettre alors en marche l’interrupteur ou le disjoncteur principal ainsi que
l’interrupteur de commande de la lampe afin d’en vérifier le bon fonctionnement.
Rev. G • Rev. G • Rév. G 10-29-07 21 P/N • Núm/Pte. • Réf. 99360000
Page 22

SECTION III. Remplacement d’une ampoule uniquement
DANGER
Sous peine de provoquer le décès ou des dommages corporels graves pour l’installateur, le technicien de maintenance,
les utilisateurs de la piscine ou d’autres personnes par suite d’un choc électrique, veiller à toujours déconnecter la lampe
de la piscine du secteur au niveau du disjoncteur avant de procéder à son entretien.
1. Mettre à l’arrêt l’interrupteur ou le disjoncteur principal ainsi que
l’interrupteur de commande de la lampe immergée.
2. Se procurer les éléments suivants :
a. Un nouveau joint de lentille (référence 79101600).
b. Une ampoule du type correct et de la puissance qui convient
(cf. tableau 1).
Spécifications de l'ampoule: Modèles 12* volts
120 volts - 300 watts - ampoule R-40 100 watts
120 volts - 400 watts - ampoule R-40 300 watts
120 volts - 500 watts - ampoule R-40 * Transformateur nécessaire
12 volts - 300 watts - ampoule R-40 Modèles 120 volts
12 volts - 100 watts - ampoule R-40 300 watts
TABLEAU 1.
400 watts
500 watts
AVERTISSEMENT
Ne remplacer l’ampoule que par un modèle de type et de puissance semblables, faute de quoi on risque d’endommager l’ensemble
lampe et de créer un danger électrique pouvant provoquer le décès ou des dommages corporels graves pour les utilisateurs de la
piscine, les installateurs ou d’autres personnes par suite d’un choc électrique et pouvant également entraîner des dégâts matériels.
AVERTISSEMENT
Installer toujours un nouveau joint de lentille (référence 79101600) lorsque l’on démonte la lampe, faute de quoi de l’eau
pourrait pénétrer dans l’ensemble et :
(a) créer un danger électrique pouvant provoquer le décès ou des dommages corporels graves pour les utilisateurs
de la piscine, les installateurs ou d’autres personnes par suite d’un choc électrique, ou
(b) briser la lampe ou la lentille, ce qui pourrait de même provoquer des blessures graves pour les utilisateurs de la
piscine, les installateurs ou d’autres personnes, ou entraîner des dégâts matériels.
3. Pour retirer l’ensemble lampe, ôter la vis de guide spéciale en acier inoxydable située au sommet de la bague
avant, retirer l’ensemble de la niche et le placer sur la plate-forme.
AVERTISSEMENT
Veiller à conserver la vis de guide spéciale en acier inoxydable de cette lampe immergée. Cette vis fixe solidement le
logement à la bague de montage et à la niche immergée et assure la mise à la terre. L’emploi de toute autre vis risque de
créer un danger électrique pouvant provoquer le décès ou des dommages corporels graves pour les utilisateurs de la piscine,
les installateurs ou d’autres personnes par suite d’un choc électrique.
4. Démonter l’appareil d’éclairage et retirer l’ampoule. Ôter le vieux joint et s’en débarrasser, cf. Figure 2.
5. Lors de la repose de la lampe, installer un nouveau joint Pentair Water Pool and Spa référence 79101600.
Joint
AVERTISSEMENT
À moins qu’elle ne soit totalement immergée dans l’eau, ne jamais utiliser
cette lampe pendant plus de 10 secondes, car elle atteindrait alors des
températures excessives susceptibles de provoquer des brûlures graves
ou de casser l’ampoule ou la lentille, et d’entraîner par là des blessures
graves pour les utilisateurs de la piscine, les installateurs ou d’autres
personnes, ou encore des dégâts matériels.
Ressort de terre
Époxy
Figure 2.
P/N • Núm/Pte. • Réf. 99360000 22 Rev. G • Rev. G • Rév. G 10-29-07
Page 23

6. Alignez la vis sans tête de la couronne sur le
A
premier « E » du mot « BEFORE » inscrit sur la
lentille. Alignez ensuite l’ensemble lentille/
couronne sur le boîtier, en plaçant la vis sans tête
en face de la flèche sur l’étiquette
d’avertissement.
7. Fixez la couronne sur l’appareil d’éclairage. Les
vis d’étanchéité doivent être serrées comme
indiqué ci-dessous afin d’assurer l’étanchéité du
joint :
a. Pour les lampes munies d’une couronne en
chrome ou en laiton :
Collier circulaire
Figure 3.
Figure 4.
Levier de blocage
Collier circulaire
Orientation du collier en fil
métallique et du boulon d’attache
(1) Serrez partiellement la vis située à midi,
puis serrez partiellement la vis située à
6 heures. Continuez en serrant
6 mm (1/4”)
ou moins
45 degrees
45 degrés
partiellement une autre vis située dans
une position « opposée », puis celle située
directement en face.
(2) Continuez à serrer partiellement toutes
Vis sans tête
La vis et l’écrou doivent être serrés à environ 45 degrés de
Bolt and nut are to be tightened at approx. 45 degrees
from the pilot screw between the tabs on the face ring
la vis sans tête de la bague avant comme indiqué ci-dessus.
as shown above.
les vis selon la séquence décrite
ci-dessus jusqu’à ce qu’elles soient toutes serrées de façon uniforme et à fond. (La force de torsion
recommandée est de 20 pouces livre.)
b. Pour les lampes munies d’une couronne en acier inoxydable : placez la vis et son écrou à 45 degrés environ à droite
de la vis sans tête spéciale et serrez l’écrou sur le collier de serrage Unitension jusqu’à ce que la distance entre
les extrémités de la bride soit égale à ¼ de pouce.
(1) La lampe reposant sur son socle, placez l’ensemble d’étanchéité sur le dessus du boîtier de la lampe,
conformément à l’étape 7. LE JOINT DE LENTILLE DOIT ETRE CHANGE CHAQUE FOIS QUE LA
LAMPE EST REINSTALLEE. Centrez la couronne en acier inoxydable et placez-la par-dessus l’ensemble
lentille et joint d’étanchéité. Les leviers de verrouillage doivent tous pendre librement pour pouvoir être installés
sur la lentille et son joint. Avant d’installer le collier de serrage Unitension, vérifiez que l’écartement aux
extrémités du collier soit d’un pouce environ. (Pour cela, tirez sur les extrémités du collier de serrage
Unitension.)
(2) Les extrémités courbées du collier Unitension circulaire étant dirigées vers le bas, ouvrez le collier et placez-
le dans le logement en « U » des leviers de verrouillage. Vérifiez que les extrémités courbées du collier soient
situées entre les deux leviers de verrouillage illustrés à la figure 3, emplacement A. Vérifiez que le collier soit
bien engagé avec tous les leviers.
(3) Retournez la lampe de manière à ce qu’elle repose sur la lentille. Serrez le boulon et son écrou jusqu’à ce que
la distance entre les extrémités de la bride soit égale à ¼ de pouce maximum ; voir la figure 4.
8. Remettez l’appareil d’éclairage en place dans son logement et resserrez la vis spéciale sans tête.
AVERTISSEMENT
N’utiliser que la vis de guide spéciale en acier inoxydable livrée avec cette lampe immergée. Cette vis fixe solidement le
logement à la bague de montage et à la niche immergée et assure la mise à la terre. L’emploi de toute autre vis risque de
créer un danger électrique pouvant provoquer le décès ou des dommages corporels graves pour les utilisateurs de la piscine,
les installateurs ou d’autres personnes par suite d’un choc électrique.
9. Ne pas utiliser la lampe pendant plus de 10 secondes avant que la piscine ne soit suffisamment remplie pour que la
lampe soit complètement immergée dans l’eau. Mettre alors en marche l’interrupteur ou le disjoncteur principal
ainsi que l’interrupteur de commande de la lampe afin d’en vérifier le bon fonctionnement.
Rev. G • Rev. G • Rév. G 10-29-07 23 P/N • Núm/Pte. • Réf. 99360000
Page 24

SECTION IV. Nomenclature des pièces
1
2
3
5
4
6
7
Article Pièce Description
No. No.
1 79212100 Bague avant grande en plastique, pour inox seulement, blanche
1 79212165 Bague avant grande en plastique, pour inox seulement, grise
1 79212111 Bague avant grande en plastique, pour inox seulement, noire
2 79104800 Vis pilote avec rondelle captive en caoutchouc, laiton
2 619355 Vis pilote avec rondelle captive en caoutchouc, inox
3 79110600 Ensemble bague avant, inox
4 79111000 Ensemble collier en fil métallique unitension
5 79100100 Lentille transparente en verre trempé, 21,3 cm (8-3/8”) de diamètre
5 79100200 Lentille bleu moyen résistant à la chaleur, 21,3 cm (8-3/8”) de diamètre
6 79101600 Joint pour lentille 21,3 cm (8-3/8”)
7 79101800 Ampoule, base moyenne, 100 watts, 12 volts
7 79101900 Ampoule, base moyenne, 300 watts, 12 volts
7 79102100 Ampoule, base moyenne, 500 watts, 120 volts
7 79107600 Ampoule, base moyenne, 300 watts, 120 volts
7 79102200 Ampoule, base moyenne, 400 watts, 120 volts
78900700 Couvercle de lentille vert à changement rapide
78900800 Couvercle de lentille bleu à changement rapide
78900900 Couvercle de lentille rouge à changement rapide
78901000 Couvercle de lentille jaune à changement rapide
PRIÈRE DE LIRE ET DE CONSERVER CETTE NOTICE !
© 2007 Pentair Water Pool and Spa, Inc. Tous droits réservés.
1620 Hawkins Ave., Sanford, NC 27330 • (800) 831-7133 • (919) 566-8000
10951 West Los Angeles Ave., Moorpark, CA 93021 • (800) 831-7133 • (805) 553-5000
Ce document est sujet à tous changements sans préavis.
P/N • Núm/Pte. • Réf. 99360000 24 Rev. G • Rev. G • Rév. G 10-29-07
 Loading...