

Pentair UltraTemp, ThermalFLo HP, UltraTemp Series, UltraTemp 110, UltraTemp 120 User Manual
...Page 1

UltraTemp
Heat Pump
®
AHRI Performance Certified
IMPORTANT SAFETY INSTRUCTIONS
READ AND FOLLOW ALL INSTRUCTIONS
SAVE THESE INSTRUCTIONS
Installation
and
User's Guide
Page 2

Customer Service
If you have questions about ordering Pentair Water Pool and Spa® replacement parts, and pool
products, please use the following contact information:
Customer Service (8 A.M. to 4:30 P.M. — Eastern and Pacific Times)
Phone: (800) 831-7133
Fax: (800) 284-4151
Technical Support
Sanford, North Carolina (8 A.M. to 4:30 P.M. — Eastern Time)
Phone: (919) 566-8000
Fax: (919) 566-8920
Moorpark, California (8 A.M. to 4:30 P.M. — Pacific Time)
Phone: (805) 553-5000
Fax: (805) 553-5515
Web site
visit www.pentairpool.com or www.staritepool.com to find information about Pentair products
© 2010 Pentair Water Pool and Spa, Inc. All rights reserved.
This document is subject to change without notice.
1620 Hawkins Ave., Sanford, NC 27330 • (800) 831-7133 • (919) 566-8000
10951 West Los Angeles Ave., Moorpark, CA 93021 • (800) 831-7133 • (805) 553-5000
Trademarks and Disclaimers: UltraTemp®, IntelliTouch®, EasyTouch®, Eco Select™ and Pentair Water Pool and Spa® are trademarks and/or
registered trademarks of Pentair Water Pool and Spa, Inc. in the United States and/or counties. Unless noted, names and brands of others that may
be used in this document are not used to indicate an affiliation or endorsement between the proprietors of these names and brands and Pentair Water
Pool and Spa, Inc. Those names and brands may be the trademarks or registered trademarks of those parties or others.
P/N 474099 Rev. C 08/02/10
Page 3

Contents
Important Safety Precautions .............................................................................................. iii
Section 1: Introduction ..................................................................................................... 1
Heat Pump Overview ..............................................................................................1
General Features..................................................................................................... 2
Section 2: Installation ....................................................................................................... 3
Installation ................................................................................................................ 3
Materials Needed for Installation .............................................................................3
®
UltraTemp
Location ...................................................................................................................4
Clearances ..............................................................................................................5
Roof Run-off ............................................................................................................5
Equipment Pad ........................................................................................................ 5
Drainage and Condensation .................................................................................... 6
Heat Pump Dimensions ........................................................................ 4
i
Lawn Sprinklers ....................................................................................................... 6
Anchor Clamp Installation ........................................................................................ 6
Water Connections .................................................................................................. 7
Standard Plumbing ..................................................................................................7
Water Connections (Quick Connect)....................................................................... 8
Automatic Flow Control Valve .................................................................................. 8
Multiple Unit Installation ........................................................................................... 9
Heat Pump, Heater and/or Solar Combination ......................................................... 9
Multiple Heat Pump Connections ............................................................................10
Electrical Connections ............................................................................................. 11
General Information ................................................................................................. 11
Main Power ..............................................................................................................11
Bonding.................................................................................................................... 11
Remote Operation ................................................................................................... 12
Relay Remote Controls ...........................................................................................12
®
Connecting the Heat Pump to IntelliTouch
or EasyTouch® Load Center
via the Heat Pump Spade Terminals ........................................................................ 13
®
Connecting the Heat Pump to IntelliTouch
or EasyTouch® Load Center
via RS-485 Connector .............................................................................................14
Connecting the Heat Pump Control Board to IntelliTouch
®
or EasyTouch
®
via RS-485 Connector .............................................................................................14
®
Pin Configuration for the Heat Pump Control Board to IntelliTouch
®
Connecting the IntelliTouch
or EasyTouch® to the Heat Pump ............................... 15
........................ 15
Water Pressure Switch Adjustment......................................................................... 16
Installation and User’s Guide
Page 4

ii
Contents,
continued
Section 3: Operating the Heat Pump ...............................................................................17
Initial Start-up Precautions ...................................................................................... 17
Heat Pump Control Panel Overview ........................................................................ 18
Control Panel Layout ............................................................................................... 18
Control Panel Operation .......................................................................................... 19
Timers and Delays .................................................................................................. 23
Control Panel Menu Tree Screens ........................................................................... 24
Control Panel Menu Screens ................................................................................... 25
Operator Setup Menu Tree Screens ........................................................................27
Operator Setup Menu Screens ................................................................................ 28
Locking the Control Panel........................................................................................ 29
Defrost Cycle ..........................................................................................................29
AutoSet .................................................................................................................... 30
Control Panel Alarm Messages ............................................................................... 31
Heat Pump Wiring Diagram – (Single Phase – 50/60 Hz) ....................................... 32
Heat Pump Wiring Diagram – (Three Phase – 60 Hz) .............................................33
Heat Pump Wiring Diagram – (Three Phase – 50 Hz) .............................................34
AutoSet Contactor to Mechanical Timer Wiring Example ........................................ 35
Section 4: General Maintenance ...................................................................................... 36
Water Chemistry ...................................................................................................... 36
Winterizing ...............................................................................................................36
Spring Start-Up ....................................................................................................... 37
Inspection and Service ............................................................................................ 37
Owner Inspection ....................................................................................................37
Professional Maintenance and Service ...................................................................38
Section 5: Troubleshooting .............................................................................................. 39
Temperature Resistance Chart Table ...................................................................... 42
Ambient/Water Flow Table for Professional Maintenance and Service .................... 43
Section 6: Replacement Parts ..........................................................................................44
Illustrated Parts (UltraTemp
Replacement Parts List (UltraTemp
®
) ..................................................................................44
®
) ...................................................................... 45
Installation and User’s Guide
Page 5

IMPORTANT SAFETY PRECAUTIONS
Important Notice:
This guide provides installation and operation instructions for the UltraTemp® Heat Pump.
Consult Pentair Water with any questions regarding this equipment.
iii
Attention Installer:
this product. This information should be given to the owner and/or operator of this equipment after installation or left on
or near the heat pump.
Attention User:
heat pump. Please retain it for future reference.
WARNING —
This guide contains important information about the installation, operation and safe use of
This manual contains important information that will help you in operating and maintaining this
Before installing this product, read and follow all warning notices and instructions which are
included. Failure to follow safety warnings and instructions can result in severe injury, death,
or property damage. Call (800) 831-7133 for additional free copies of these instructions.
Codes and Standards
UltraTemp® heat pumps are listed by ETL as complying with the latest edition of the “UL Standard for Safety for Heating
and Cooling Equipment”, UL 1995 and CSA C22.2 No. 236.
All Pentair Water heat pumps must be installed in accordance with the local building and installation codes as per the
utility or authority having jurisdiction. All local codes take precedence over national codes. In the absence of local
codes, refer to the latest edition of the National Electric Code (NEC) in the United States and the Canadian Electric
Code (CEC) in Canada for installation.
DANGER — Risk of electrical shock or electrocution.
The electrical supply to this product must be installed by a licensed or certified electrician in
accordance with the National Electrical Code and all applicable local codes and ordinances.
Improper installation will create an electrical hazard which could result in death or serious
injury to pool or spa users, installers, or others due to electrical shock, and may also cause
damage to property. Read and follow the specific instructions inside this guide.
WARNING —
WARNING —
To reduce the risk of injury, do not permit children to use this product unless they are closely
supervised at all times.
For units intended for use in other than single-family dwellings, a clearly labeled emergency
switch shall be provided as part of the installation. The switch shall be readily accessible to
the occupants and shall be installed at least 5 feet [1.52 m] away, adjacent to, and within sight
of the unit.
Installation and User’s Guide
Page 6

iv
IMPORTANT SAFETY PRECAUTIONS (continued)
Consumer Information and Safety
The UltraTemp® series of heat pumps are designed and manufactured to provide safe and reliable service when installed,
operated and maintained according to the information in this manual and the installation codes referred to in later sections.
Throughout the manual, safety warnings and cautions are identified by the “ “ symbol. Be sure to read and comply with
all of the warnings and cautions.
WARNING —
WARNING —
1. Spa or hot tub water temperatures should never exceed 104° F. [40° C.]. A temperature of 100° F. [38° C.] is considered
safe for a healthy adult. Special caution is suggested for young children. Prolonged immersion in hot water can induce
hyperthermia.
2. Drinking of alcoholic beverages before or during spa or hot tub use can cause drowsiness which could lead to
unconsciousness and subsequently result in drowning.
3. Pregnant women beware! Soaking in water above 100° F. [38° C.] can cause fetal damage during the first three
months of pregnancy (which may result in the birth of a brain-damaged or deformed child). Pregnant women should
stick to the 100° F. [38° C.] maximum rule.
4. Before entering the spa or hot tub, the user should check the water temperature with an accurate thermometer. Spa
or hot tub thermostats may err in regulating water temperatures.
5. Persons with a medical history of heart disease, circulatory problems, diabetes or blood pressure problems should
obtain their physician's advice before using spas or hot tubs.
6. Persons taking medication which induce drowsiness, such as tranquilizers, antihistamines or anticoagulants should
not use spas or hot tubs.
Hyperthermia occurs when the internal temperature of the body reaches a level several degrees above normal body
temperature of 98.6° F. [37° C.]. The symptoms of hyperthermia include: drowsiness, lethargy, dizziness, fainting, and an
increase in the internal temperature of the body.
The U.S. Consumer Product Safety Commission warns that elevated water temperature can be
hazardous. See below for water temperature guidelines before setting temperature.
The following “Safety Rules for Hot Tubs” recommended by the U.S. Consumer Product Safety
Commission should be observed when using the spa.
The effects of hyperthermia include:
1. Unawareness of impending danger.
2. Failure to perceive heat.
3. Failure to recognize the need to leave the spa.
4. Physical inability to exit the spa.
5. Fetal damage in pregnant women.
6. Unconsciousness resulting in danger of drowning.
Warranty Information
Heat pumps are sold with a limited factory warranty. Details are specified on the warranty card. Make all warranty claims to
an authorized Pentair Water dealer or directly to the factory. Claims must include the heat pump serial number and model
(this information can be found on the rating plate), installation date, and name of the installer. Shipping costs are not
included in the warranty coverage. This warranty does not cover damage caused by improper assembly, installation,
operation, improper water chemistry balancing or other chemical abuse, or improper sanitation application, winterizing,
field modification, or failure to earth bond and properly ground the unit. Any changes to the heat pump, evaporator, heat
exchanger, wiring, or improper installation may void the warranty.
Installation and User’s Guide
Page 7

v
IMPORTANT SAFETY PRECAUTIONS (continued)
Swimming Pool Energy Saving Tips
It is important to note that a heat pump will not heat a pool as fast as a large gas or electric pool heater. If the pool water is
allowed to cool significantly, it may take several days to return to the desired swimming temperature. For weekend use, it
is
more economical
to use your pool for a prolonged period, then you might choose to turn the heat pump completely off
temperature setting of the control several degrees to minimize energy consumption.
Pentair offers the following recommendations to help conserve energy and minimize the cost of operating your heat pump
without sacrificing comfort.
1. The American Red Cross recommends a maximum water temperature of 78° F. [25° C.]. Use an accurate pool
thermometer. A difference of 4° F. [2° C.] , between 78° F. and 82° F. [26° C. and 28° C.], will significantly increase energy
consumption.
2. Carefully monitor the water temperature of your pool in the summertime. You can reduce heat pump usage due to warmer
air temperatures.
3. During the winter or when on vacation for longer than a week, turn off the heat pump.
4. Find the proper setting on the heat pump temperature control and use the Keypad Lock function to discourage further
adjustments.
5. Where possible, shelter the pool from prevailing winds with well-trimmed hedges or other landscaping, cabanas, or
fencing.
6. Pentair recommends the use of a pool cover. Besides providing a valuable safety feature, a pool cover will reduce heat
loss, conserve chemicals, and reduce the load on filter systems.
to maintain the pool water temperature at or near your desired swimming temperature. If you do
or
not
plan
decrease the
Technical Information
10
9
8
7
6
5
4
Pressure Drop (psi)
3
2
1
0
0 10 20 30 40 50 60 70 80 90 100 110 120
HEAT PUMP PRESSURE DROP
UltraTemp 110
UltraTemp 120
UltraTemp 120C
UltraTemp 120H/C
UltraTemp 100I
UltraTemp 90I
Water Flow (gpm)
Installation and User’s Guide
Page 8
vi
IMPORTANT SAFETY PRECAUTIONS (continued)
General Installation Information
1. Installation and service must be performed by a qualified installer or service agency, and must conform to all
national, state, and local codes.
®
2. UltraTemp
control system for pool/spa combinations or preheat convenience.
3. This heat pump is specifically designed for heating fresh water swimming pools and spas. Do not use it as a
general service heater. Consult your dealer for the appropriate Pentair Water products for these applications.
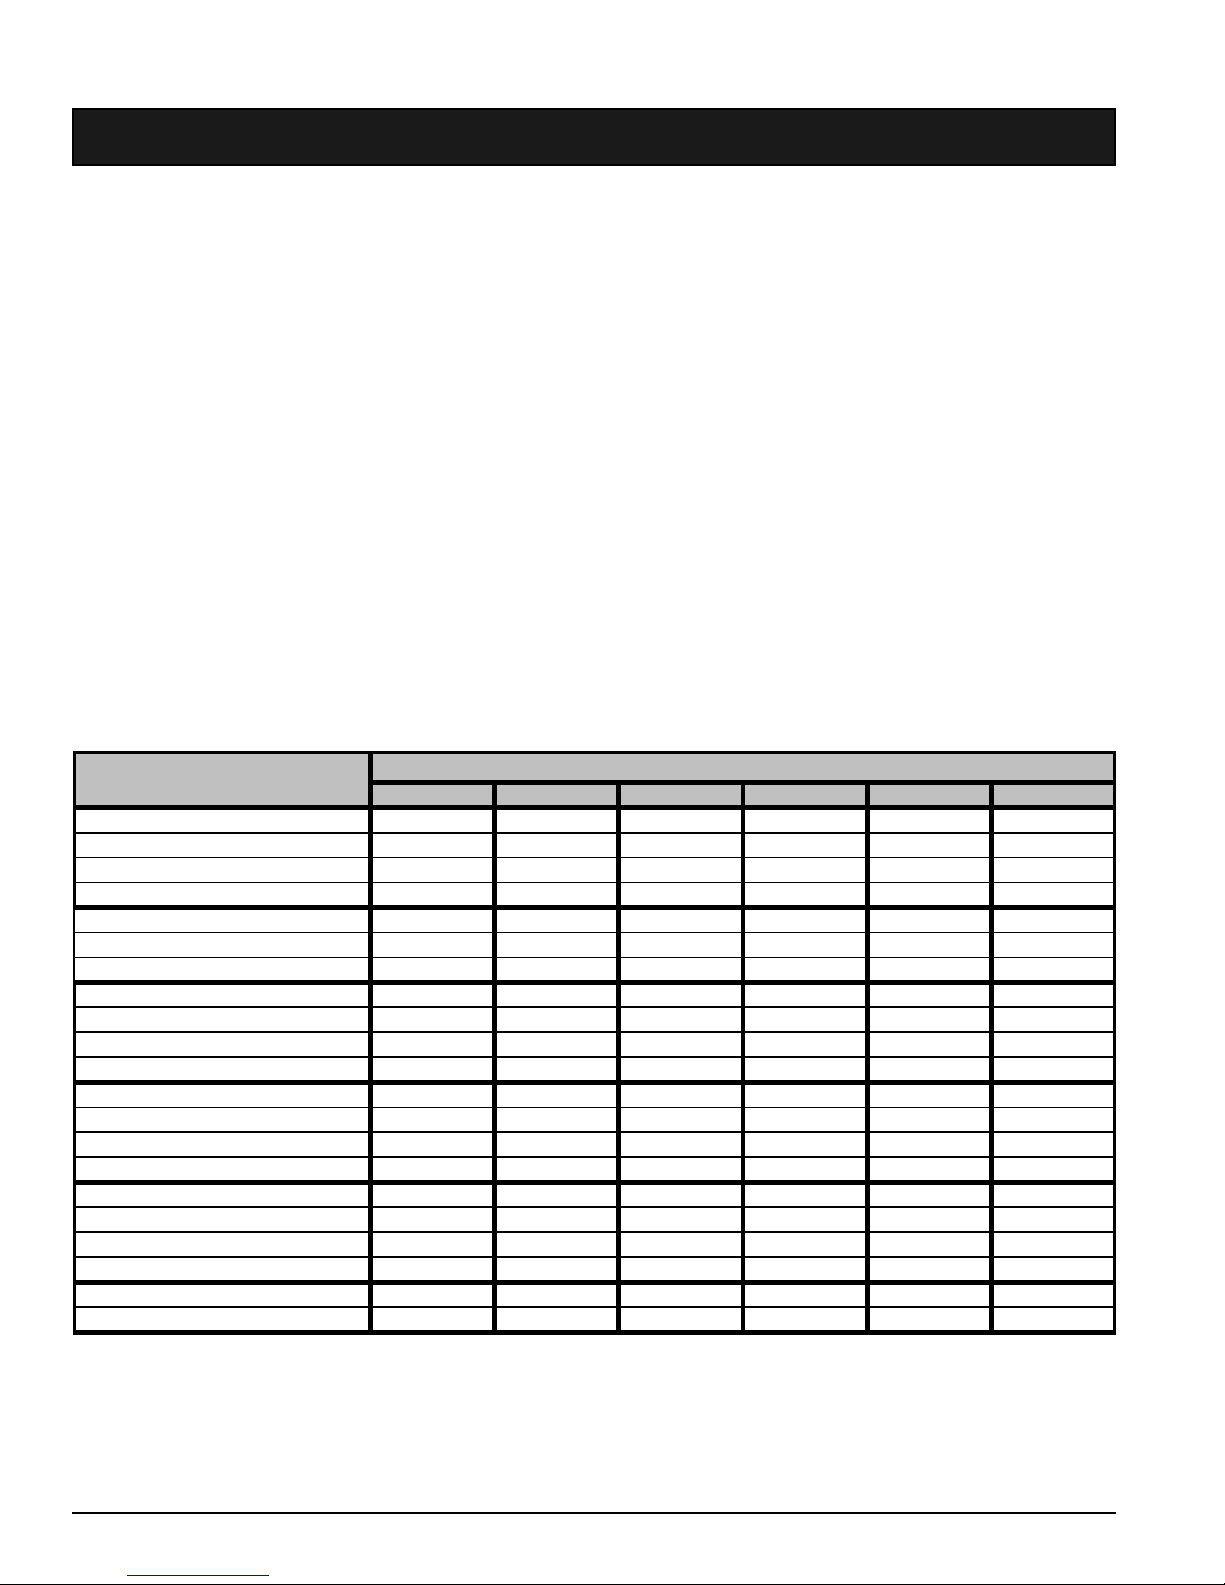
General Specifications
Installation Location Certified for use:
heat pumps get electrical power from an external source and provide a dual electronic thermostat
OUTDOOR USE ONLY.
Failure to provide the proper clearances outlined on page 5 will lower the
performance of the heat pump and void the warranty.
Water Pipe/Heater Connection — Plastic 2” PVC (Unions included)
Flow Rate
Maximum 100 gpm [380 lpm]
Minimum 30 gpm [110 lpm]
Maximum Working Water Pressure 50 psi
Electrical Supply – Voltage Requirements:
Models
Voltage/Phase/Hz
Min. Circuit Ampacity
Recommended Fuse Size
Max. Fuse Breaker Size
Compressor/Fan Motor/System RLA
Compressor/Fan Motor/System LRA
Compressor/Fan Motor/System MCC
Capacity (Btu/h) 80A-80RH-80W * 108,000 125,000 125,000 125,000 102,000 85,000
COP 80A-80RH-80W * 5.8 5.5 5.4 6.1 5.9 5.7
Power Input, KW (80A-80RH-80W) * 5.5 6.7 6.8 6.0 5.1 4.4
Current, Amp (80A-80RH-80W) * 25 30 31 19 25 9
Capacity (Btu/h) 80A-63RH-80W ** 101,000 117,000 117,000 115,000 96,000 81,000
COP 80A-63RH-80W ** 5.5 5.3 5.2 5.8 5.6 5.4
Power Input, KW (80A-63RH-80W) * 5.4 6.5 6.6 5.8 5.0 4.4
Current, Amp (80A-63RH-80W) * 25 29 30 18 24 9
Capacity (Btu/h) 50A-63RH-80W *** 72,000 82,000 82,000 81,000 67,000 56,000
COP 50A-63RH-80W *** 4.0 4.0 4.0 4.3 4.0 4.0
Power Input, KW (50A-63RH-80W) * 5.3 6.0 6.0 5.5 4.9 4.1
Current, Amp (50A-63RH-80W) * 24 27 27 17 24 9
Shipping Weight (lbs) 270 270 278 280 280 250
Shipping Size (LxWxH) 38.7"x33.3"x45.5" 38.7"x33.3"x45.5" 38.7"x33.3"x45.5" 38.7"x33.3"x45.5" 38.7"x33.3"x41.5" 38.7"x33.3"x33.5"
110 120 120 H/C 120C 100I 90I
208-230/1/60 208-230/1/60 208-230/1/60 208-230/3/60 230/3/60 380-400/3/50
42 42 42 35 42 18
50 50 50 50 50 30
70 70 70 60 60 40
32/2/34 32/2/34 32/2/34 26/2/28 32/2/34 12/1/13
148/4/152 185/4/189 185/4/189 190/4/194 130/4/134 87/3/90
50/NA/NA 50/NA/NA 50/NA/NA 39/NA/NA 50/NA/NA 19/NA/NA
UltraTemp
®
* 80A-80RH-80W: 80° F. Air Temp., 80% Relative Humidity [RH], 80° F. Water Inlet Temp.
** 80A-63RH-80W: 80° F. Air Temp., 63% Relative Humidity [RH], 80° F. Water Inlet Temp.
*** 50A-63RH-80W: 50° F. Air Temp., 63% Relative Humidity [RH], 80° F. Water Inlet Temp.
COP = Coefficient of Performance
Installation and User’s Guide
Page 9

Section 1
Introduction
Overview
Your Pentair heat pump will provide you with years of heated pool enjoyment. Heat pumps operate by taking heat
from the surrounding air and transfering it into the water. The warmer the air and the more humid the air, the more
latent heat is available for heating your pool. With a properly sized heat pump for your pool, the heat pump should
raise your pool on average 1° F. per hour depending on air temperature, humidity, and water temperature. The
ideal or rated condition for the heat pump is 80° F. air temperature, 80% relative humidity, and 80° F. water
temperature. As conditions decrease from 80/80/80, the heat pump performance will decrease slightly.
Heat Pumps are best utilized to maintain a set water temperature; they are not intended to provide instant or fast
heating. It is not reasonable to expect a heat pump to perform like a gas heater which has a much higher BTU
output and faster response. Additionally, gas heaters are not dependent on environmental conditions. Swimming
pool heat pumps are very similar to home heating and air conditioning heat pumps and therefore should be treated
similarly.
Proper operation and use of the heat pump is to set it at your desired temperature and leave it. Your heat pump
will turn on and off automatically to maintain your desired temperature much like your home HVAC unit. To take
advantage of the suns energy operate your heat pump during the heat of the day. Your heat pump will still operate
when the temperature dips at night, but the output will be decreased.
1
It is acceptable to shut the heat pump off and not use it for extended periods of time. When you have a need to
heat your pool, please plan accordingly because it may take the heat pump days to heat your pool back up to your
desired temperature depending on your pool temperature and environmental conditions.
Installation and User’s Guide
Page 10

2
General Features
• Dual digital thermostats offer precise temperature control to maintain the desired separate water
temperatures in pool/spa combinations without overheating or wasting energy.
• Long-life corrosion resistant composite plastic cabinet stands up to severe climates and pool chemicals.
• 100% pure titanium heat exchanger assures corrosion-free performance for extra long life.
• Self-diagnostic control panel monitors and troubleshoots heat pump operations to ensure safe, dependable
operation.
• LCD control board displays an intuitive menu-driven read out with easy to follow full word messages...
no more codes.
• Autoset (time clock over-ride) feature monitors water temperature and turns the water circulation pump
on and off as needed to maintain desired pool temperatures.
• Automatic defrost feature senses refrigerant temperature and prevents the heat pump from freezing,
allowing the heat pump to operate at even lower temperatures.
• Compatible with all automated control packages.
• Thermostatic expansion valve (TXV) controls refrigerant flow for optimum efficiency and BTU output
over a wider operating range.
• Each unit undergoes a finishing process to ensure corrosion resistance and long life.
• Elevated base pan for positive drainage of condensation.
• 2-inch plumbing connections for easy installation.
• Separate isolated electrical compartment prevents internal corrosion, extends heater life.
®
• RS485 communication compatible with IntelliTouch
and EasyTouch® control systems.
• Highest efficiency available, meets or exceeds existing codes and standards.
• Adjustable timer allows to set the heat pump to run for a predetermined time. Incremental by 10 minutes
to a maximum of 99 hours.
• Ability to display text in Spanish.
• ETL listed for safe operation.
• AHRI Performance Certified.
Installation and User’s Guide
Page 11

Section 2
Installation
The following general information describes how to install the UltraTemp® heat pumps.
Note: Before installing this product, read and follow all warning notices and instructions starting
on page iii.
Installation
Only a qualified service person should install the heat pump.
Materials needed for Installation
The following items are needed and are to be supplied by the installer for all heat pump installations:
1. Plumbing connections (2 inch).
3
2. Level surface for proper drainage.
3. Suitable electrical supply line. See rating plate on unit for electrical specifications. A junction box is not
needed at the heat pump; connections are made inside of the heat pump electrical compartment. Conduit
may be attached directly to the heat pump jacket.
4. Electric cutout switch that will interrupt all power to the unit. This switch must be within line of sight of the
heat pump.
5. Watertight conduit to run the electrical supply line.
Note: We recommend installing isolation valves on the inlet and outlet water connections for ease
of serviceability.
Installation and User’s Guide
Page 12
4
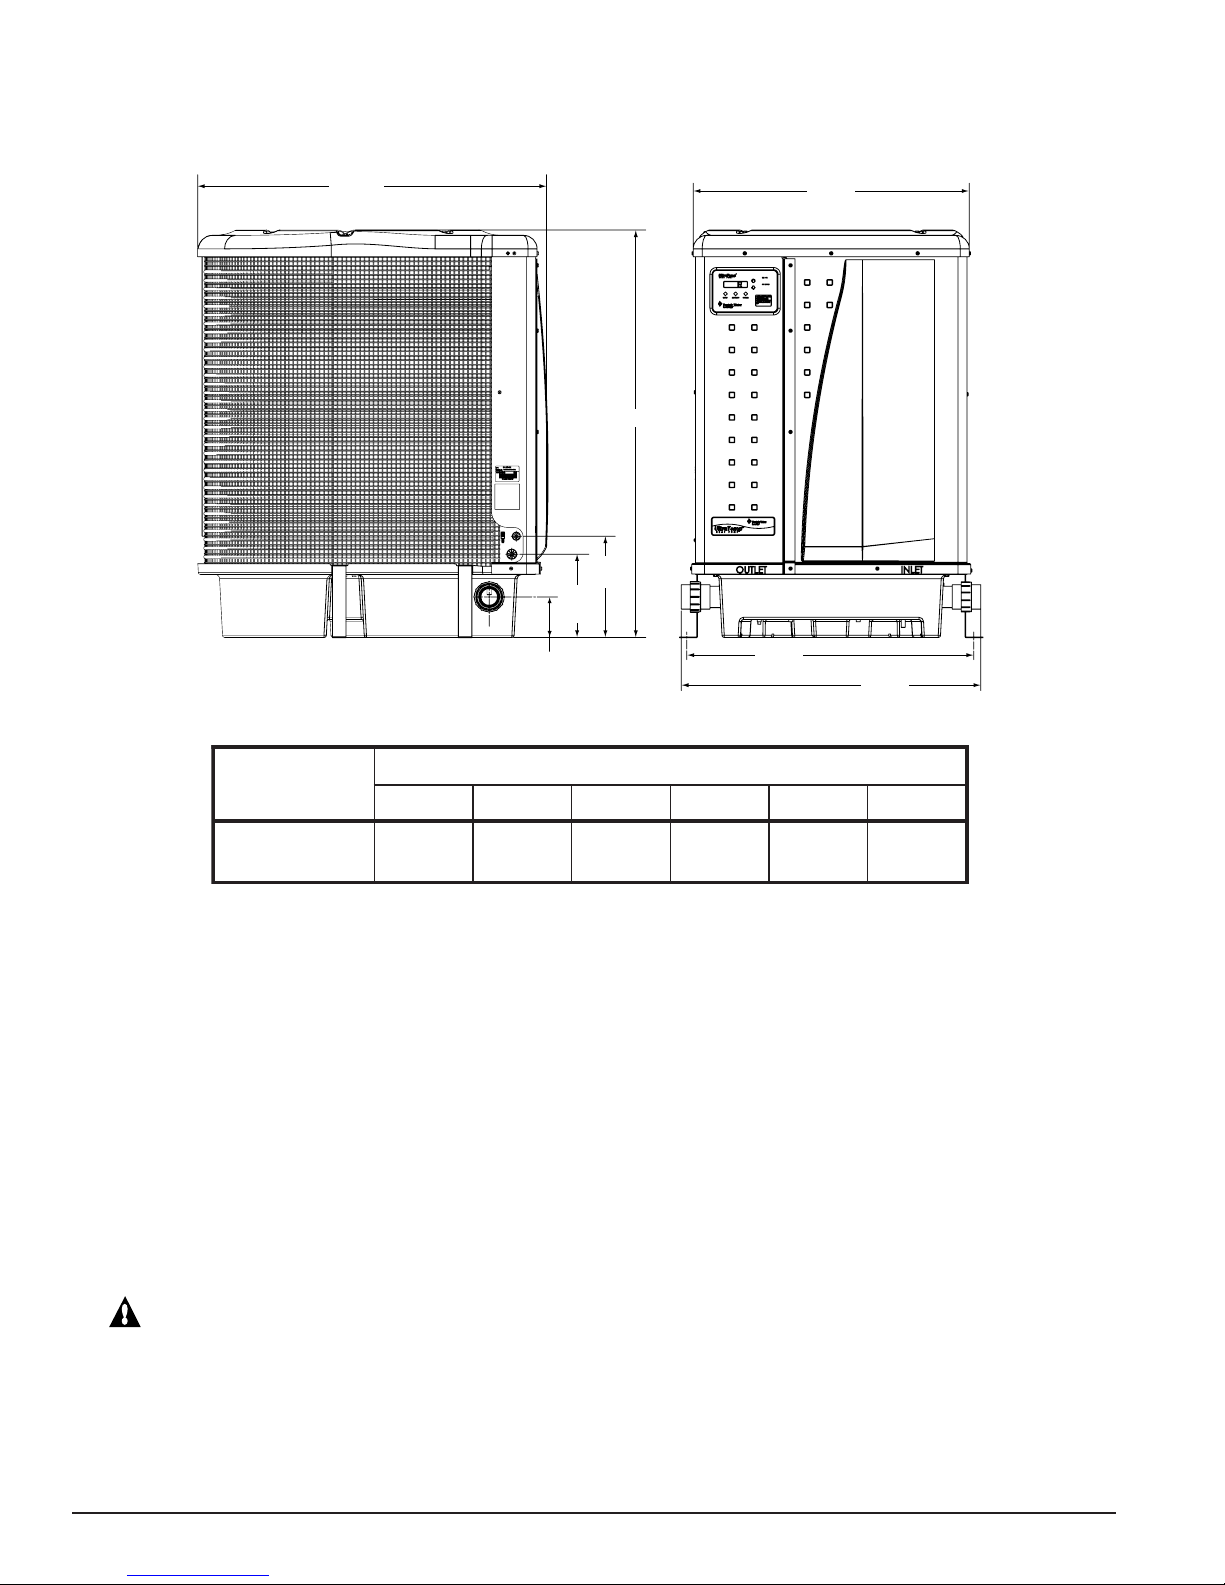
UltraTemp® Heat Pump Dimensions
Figure 1.
38.7"
(983 mm)
9.25"
(235 mm)
4.5"
(114 mm)
11.25"
(286 mm)
30.7"
(780 mm)
A
32.0"
(813 mm)
®
PMETARTLU/#LEDOM
33.3"
(846 mm)
011021C/H021C021I001I09
"A"noisnemiD
”5.54
)mm6511(
”5.54
)mm6511(
”5.54
)mm6511(
”5.54
)mm6511(
”5.14
)mm4501(
”5.33
)
mm158(
Correct installation is required to assure safe operation. The requirements for Pentair Water heat pumps
include the following:
• Dimensions for critical connections.
• Field assembly (if required).
• Appropriate site location and clearances. (See pages 4-5.)
• Proper electrical wiring. (See pages vi and 11, 32-34.)
• Adequate water flow. (See page vi.)
This manual provides the information needed to meet these requirements. Review all application and installation
procedures completely before continuing the installation.
Location
CAUTION —
When pool equipment is located below the pool surface, a leak from any component can cause
large scale water loss or flooding. Pentair Water Pool and Spa, Inc. cannot be responsible for such
water loss or flooding which may cause damage to the product.
Avoid placing the heat pump in locations where it can cause damage by water or condensate
leakage. If this is not possible, provide a suitable drain pan to catch and divert any leakage.
Installation and User’s Guide
Page 13
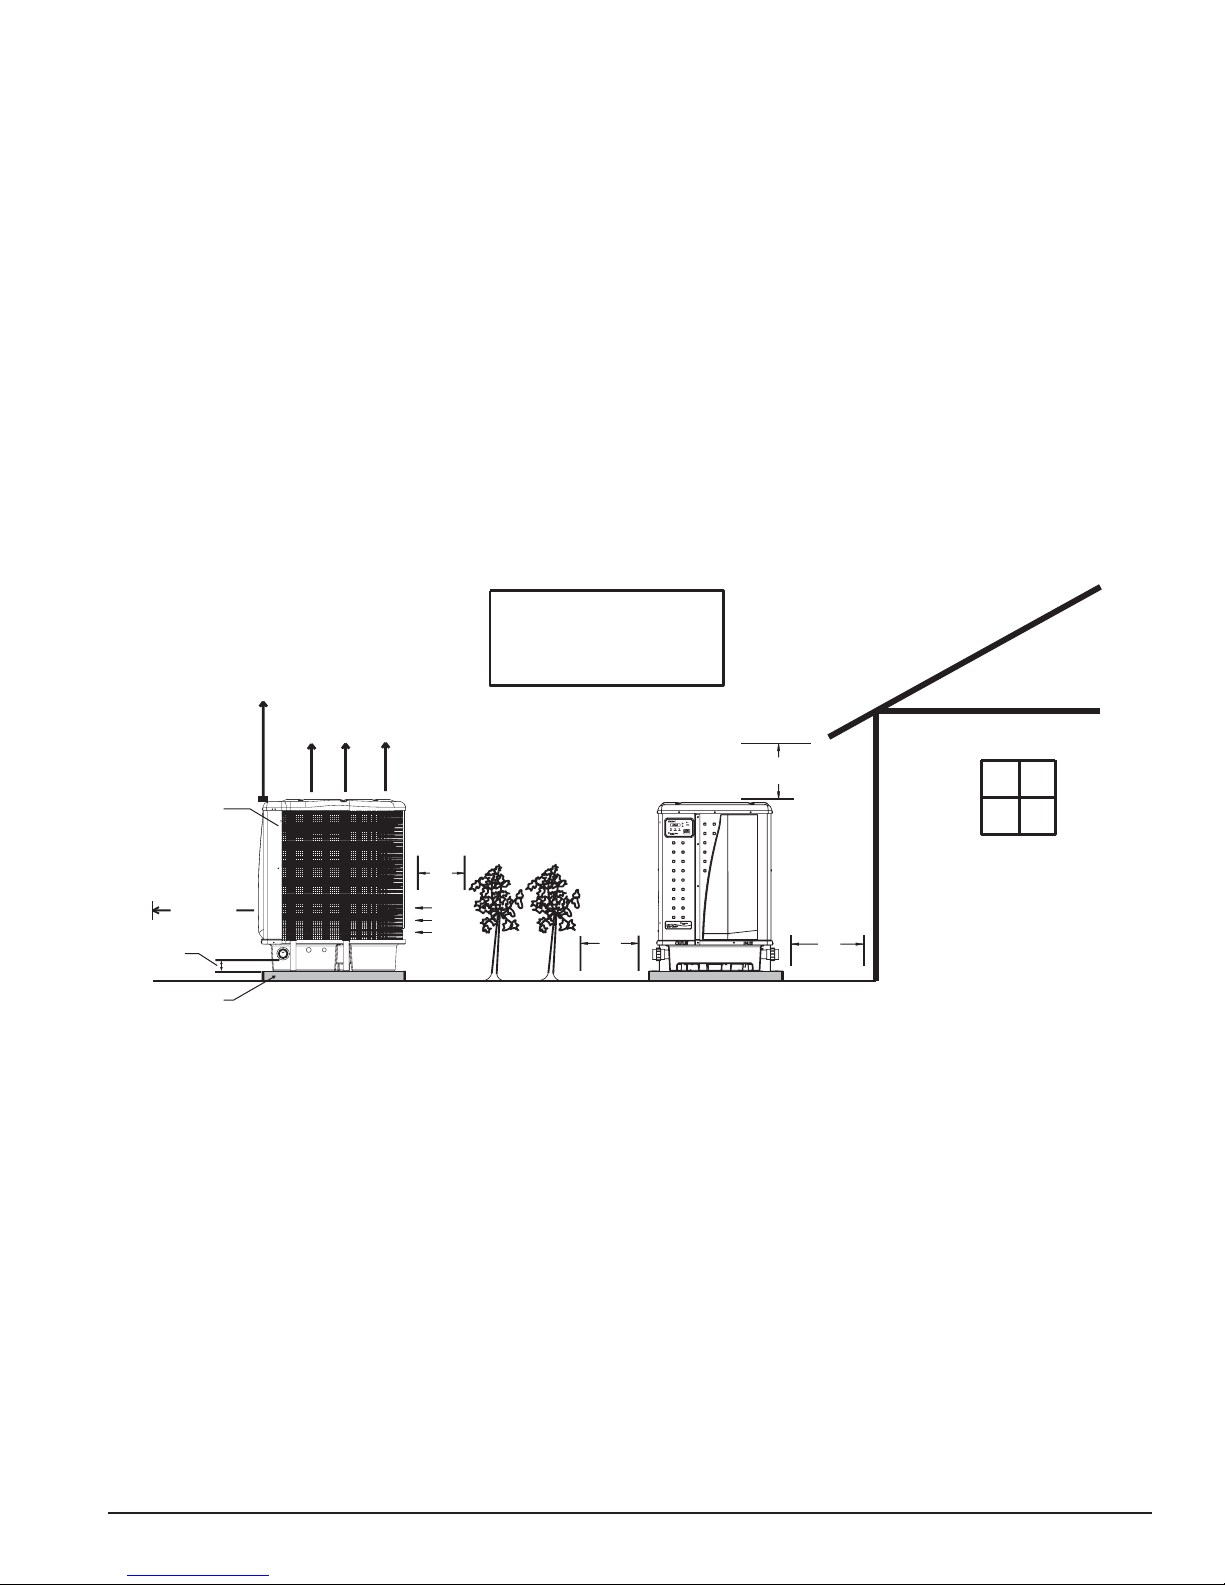
Clearances
All criteria given in the following sections reflect minimum clearances. However, each installation must also be
evaluated, taking into account the prevailing local conditions such as proximity and height of walls, and proximity
to public access areas.
The heat pump must be placed to provide clearances on all sides for maintenance and inspection.
1. At least 24 in. [61cm] access must be available in the front and 24 in. [61 cm] on all the other sides of
the heat pump for service and proper air flow, see Figure 2.
2. If the heat pump is to be installed under a cover or under a vertical overhang, the unit must have a minimum
of six (6) feet [1.83 m] clearance from the top of the heat pump.
3. Install a minimum of five (5) feet [1.52 m] from the inside wall of the pool or spa unless the heat pump
is separated from the pool or spa by a five (5) foot high solid fence or other permanent barrier.
Canadian installations require a minimum of three (3) meters from pool water.
DO NOT ALLOW ROOF
RUN-OFF TO FLOW INTO
THE UNIT.
OPEN
5
EVAPORATOR
COILS
SERVICE
ACCESS
24" to 36"
(610 - 914 mm)
3"
(76 mm)
SLAB
AIR FLOW OUT
24"
(610 mm)
AIR
FLOW
IN
24"
(610 mm)
OVER HANG
72"
(1829 mm)
24"
(610 mm)
Figure 2.
Roof Run-off
Make sure the heat pump is not located where large amounts of water may run-off from a roof into the unit.
Sharp sloping roofs without gutters will allow massive amounts of rain water, mixed with debris from the
roof to be forced through the unit, see Figure 2. A gutter or down spout may be needed to protect the
heat pump.
Equipment Pad
Place the heat pump on a flat slightly pitched surface, such as a concrete or fabricated slab (pad). This allows
proper drainage of condensation and rain water from the base of the unit. If possible, the pad should be placed
at the same level or slightly higher than the filter system equipment pad.
NOTE: Ensure that the pad is pitched not more than 1/4 in. per foot toward the compressor end (front)
of the heat pump. Pitch slab from back to front 1/4 in. per foot maximum and level from side to side.
Installation and User’s Guide
Page 14
6
NO SPRINKLERS
Drainage and Condensation
Condensation will occur from the evaporator coil while the unit is running and drain at a steady rate, usually three
to five gallons per hour, depending upon ambient air temperature and humidity. The more humid the ambient
conditions, the more condensation will be produced. The bottom of the unit acts as a tray to catch rainwater and
condensation. Keep the drain holes, located on the bottom pan of the base of the unit, clear of debris.
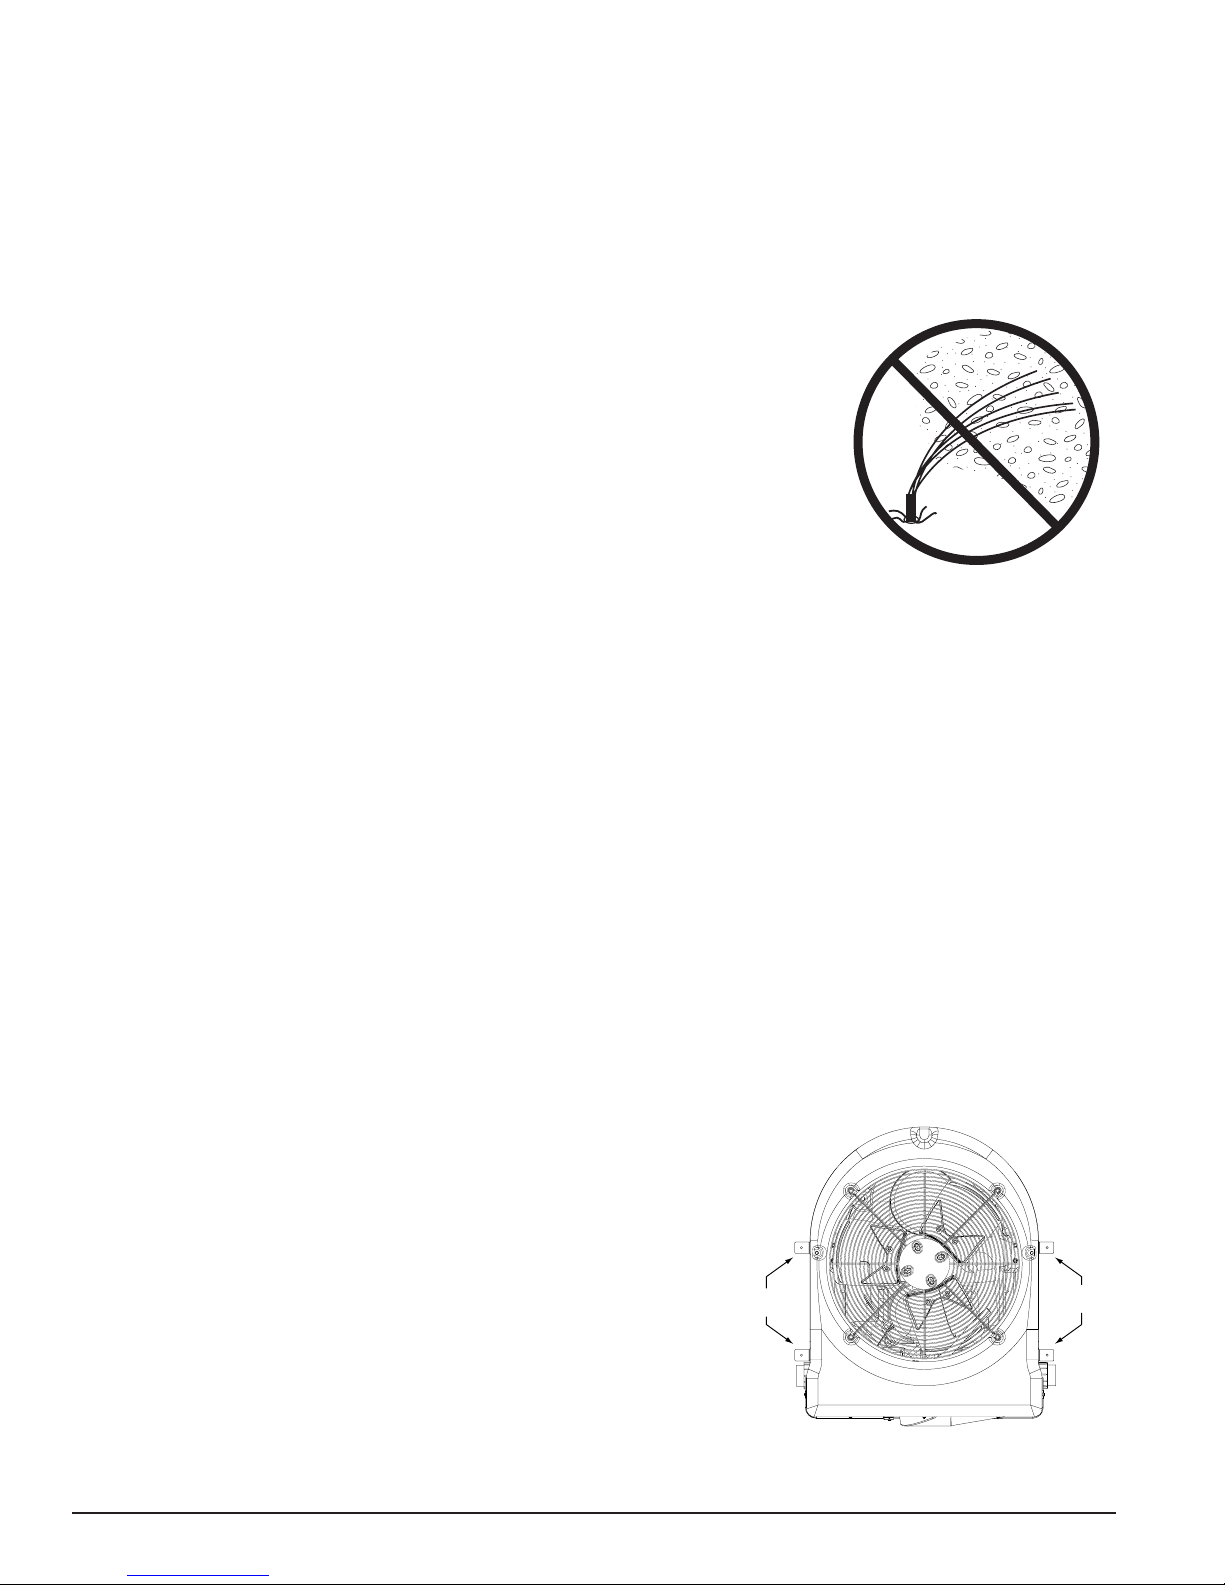
Lawn Sprinklers
NO SPRINKLERS
Make sure there are absolutely no sprinkler heads near the heater that will in
any way spray on or into the heater. Sprinkler damage is not covered under
the warranty agreement.
Make sure that they’re a sufficient distance away so that normal winds will not
carry the mist to the heater. If your filtering system area has plants that need water,
use a trickle type irrigation sprinkler instead of the broadcast type.
NO SPRINKLERS
WITHIN A
6 FT. RANGE
The heater is designed to handle the wettest weather conditions that are typical of
Figure 3.
rain and humidity, etc. Sprinkler heads force high pressure water into the unit from
the side at an odd angle. Most sprinkler systems are connected to a well system. Most well water is high in
minerals, sulphur and other aggressive contaminates. These contaminates will leave a build up on the evaporator
coils and electronics causing corrosion and hamper the efficiency. If you are located within 15 miles of the
coast, salt may also be in the well water.
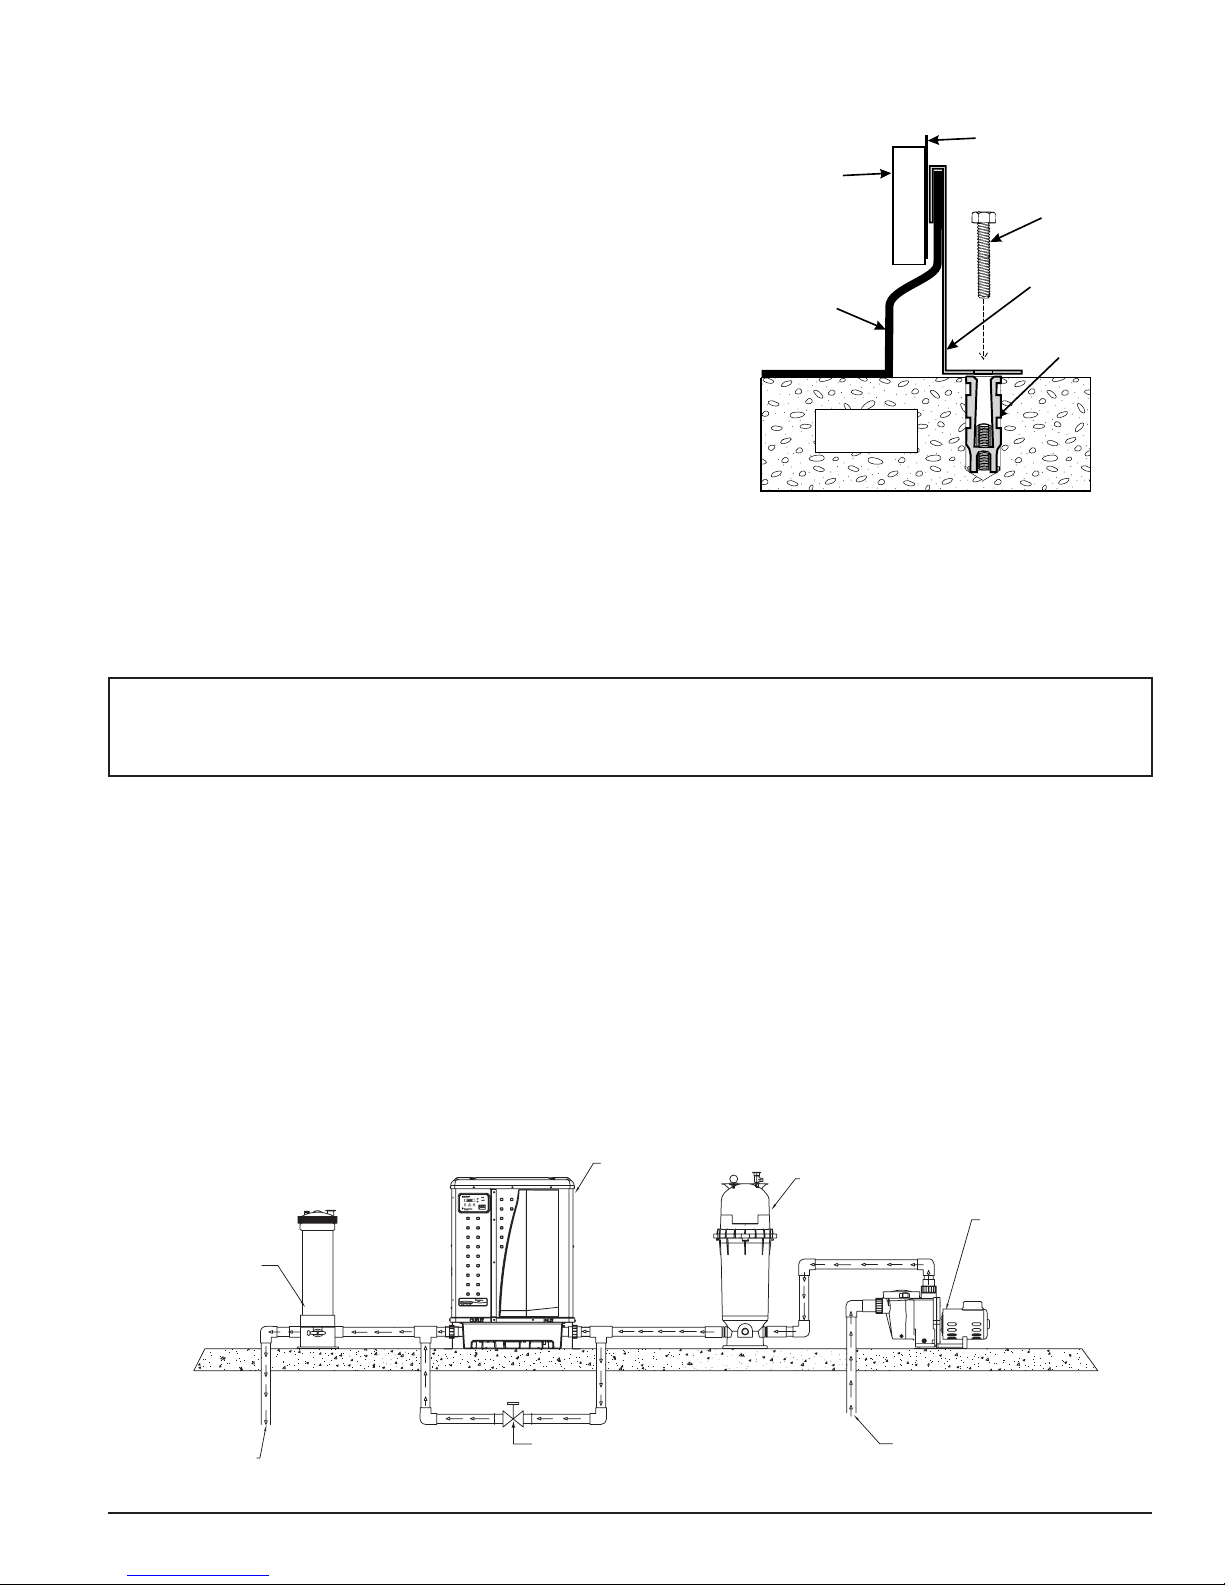
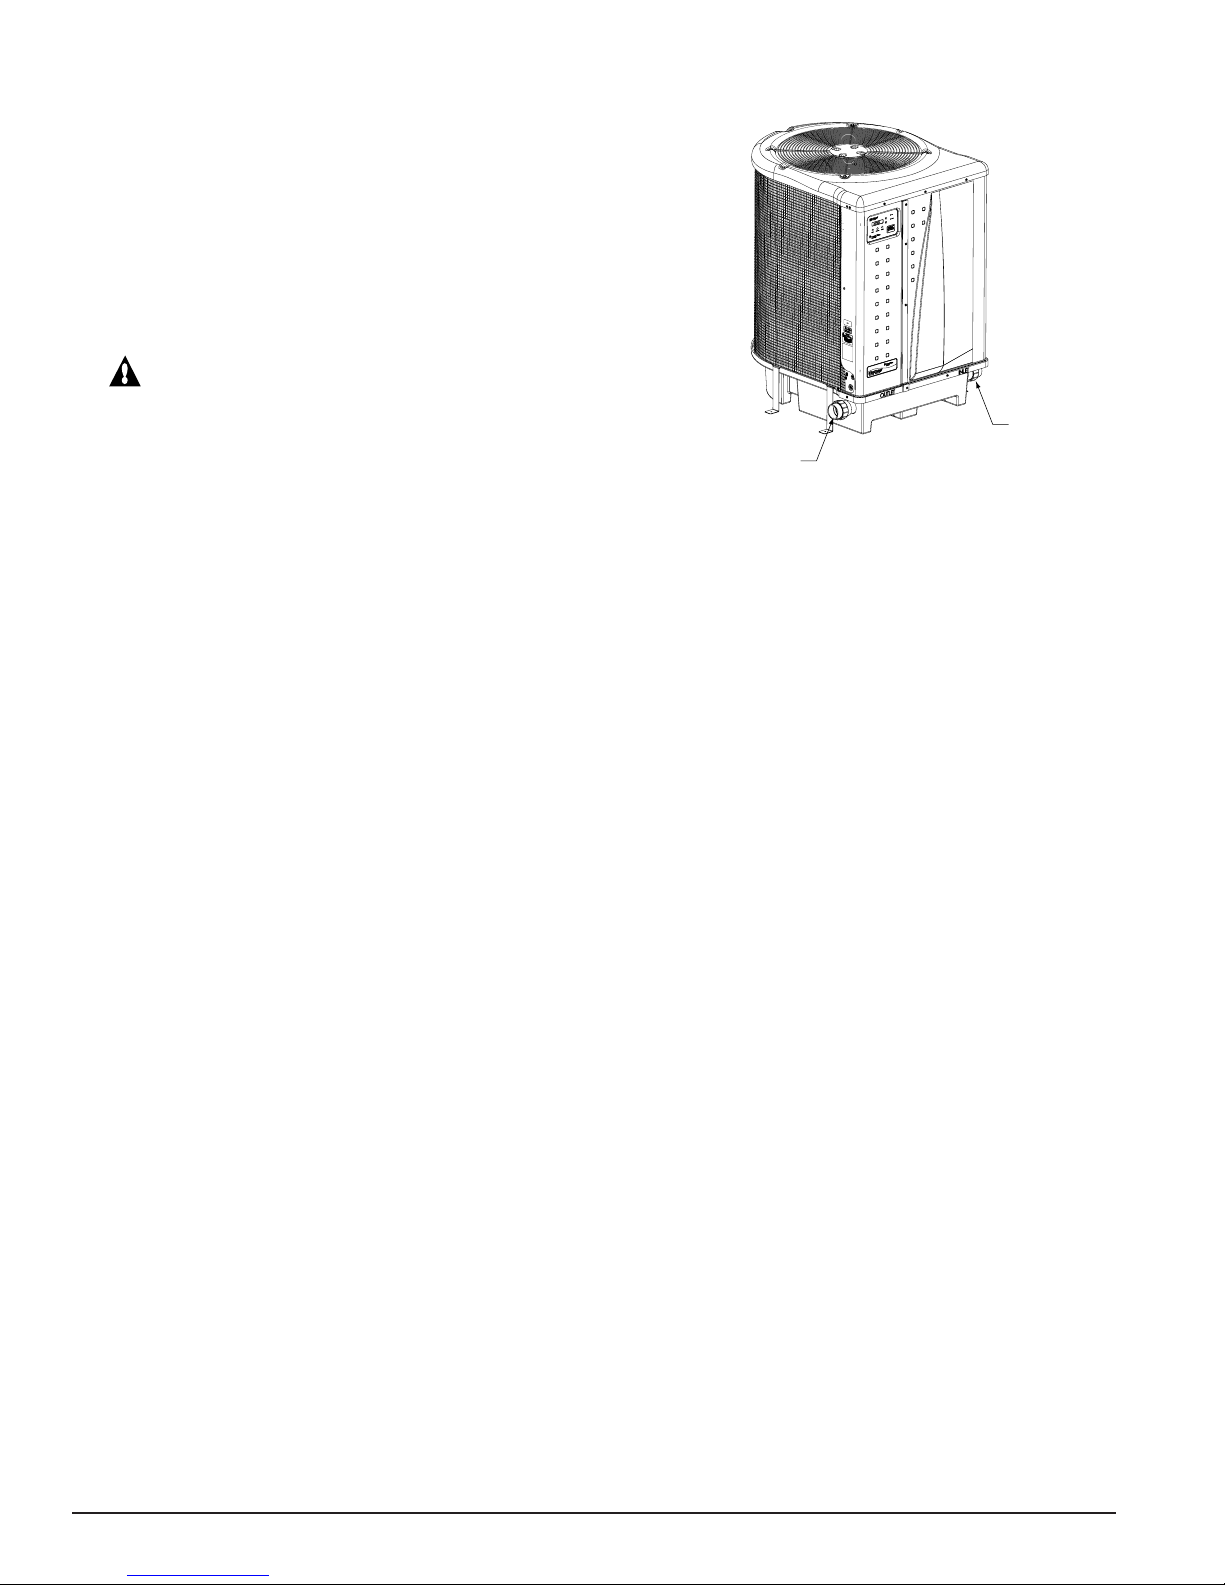
Anchor Clamp(s) Installation
In Florida, building codes require that the heat pump be anchored to the equipment pad or platform to
withstand high wind pressures created during hurricanes.
This heat pump is provided with anchor clamps designed to hold the unit to the equipment pad in high wind
conditions. Installation of the anchor clamps is recommended in all installations. Installation of the anchor
clamps is required in Florida (See Florida Building Code 301.13).
To install the anchor clamps:
1. Be sure that the heat pump is in its permanent location on the equipment pad.
2. Remove the anchor clamps from the installation and instruction package.
Note: Bolts and bolt anchors are not included with the heat pump.
The installer must provide 1/4” x 1-3/8” stainless steel anchor bolts
and the appropriate size concrete anchor to mount the clamp to the
equipment pad.
3. Place the clamps at the base of the heat pump in the 4 locations
indicated in Figure 4, (2 in. undercut [notched area] on either
side).
4. Fit the hook of each clamp over the lip on the base panel of the
heat pump. The hook should fit between the lip of the base panel
and the evaporator coil guard, see Figure 5.
5. Mark the position of the hole in each clamp on the equipment pad.
Installation and User’s Guide
HEAT PUMP
CLAMPS
Figure 4.
HEAT PUMP
CLAMPS
Page 15
7
Anchor Clamp(s) Installation, continued
6. Drill a hole in the cement using a masonry drill bit, with a
AIR
COIL
AIR COIL GUARD
diameter as determined by the concrete anchor, at each of the
marks on the equipment pad. The hole should be approximately
1½ in. deep.
7. Insert a bolt anchor into each of the holes. Be sure the anchors
HEAT PUMP
BASE
are set completely into the holes
8. Position the anchor clamps so that the holes in the clamps are
over the bolt anchors. Be sure that the clamp hooks are over the
lip of the heat pump base, see
Figure 5.
CONCRETE
EQUIPMENT PAD
9. Insert an anchor bolt through each clamp into the anchor and
tighten to secure the clamp and heat pump to the equipment pad.
Figure 5.
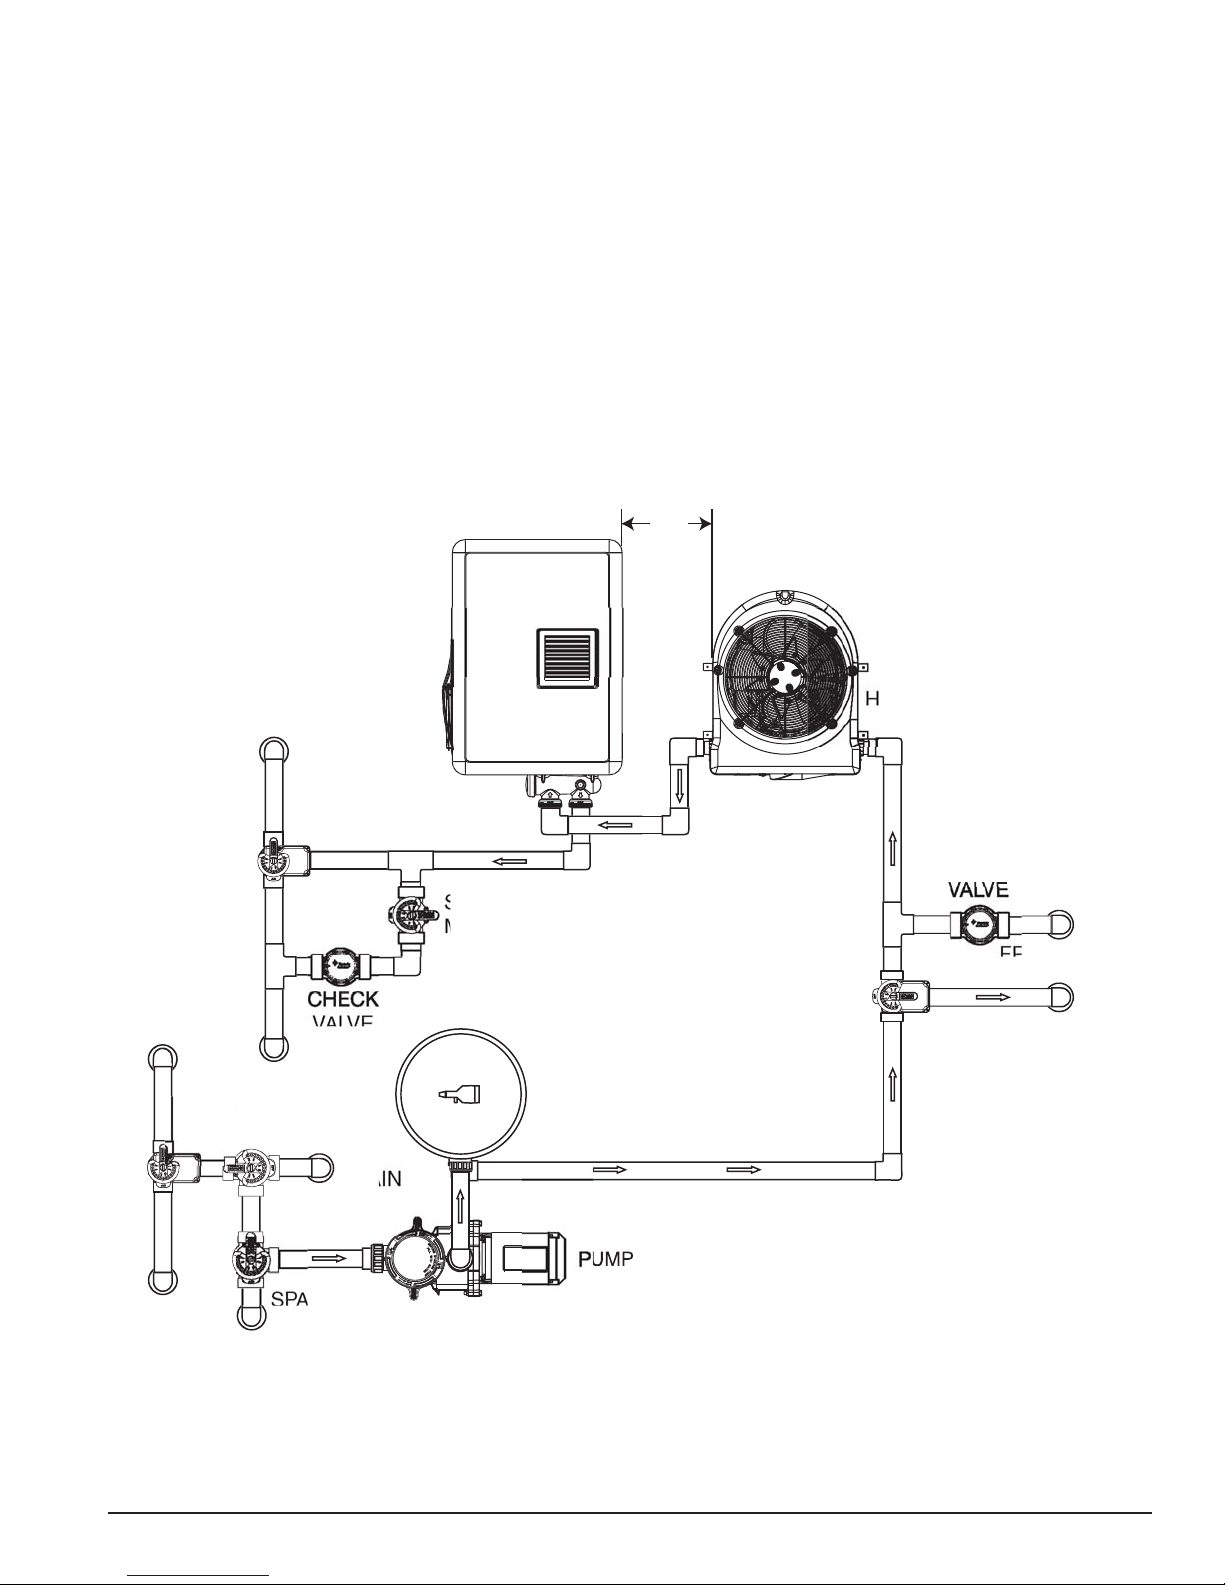
Water Connections
Plumbing layout
See Figure 6, illustrating the standard plumbing layout with a single heat pump unit. Following the diagram
from right to left, the plumbing sequence is as follows:
Pool > Skimmer and Main Drain > Pool Pump > Filter > Heat Pump > Chlorinator > Pool
1-3/8" HEX BOLT
(installer provided)
HEAT PUMP
ANCHOR CLAMP
BOLT ANCHOR
(installer provided)
NOTE: For normal installations, do not install a shut-off valve or any kind of variable restriction in
the water piping between the heat pump outlet and the pool/spa.
The heat pump must be protected from back-siphoning of water. If there is any chance of back-siphoning,
provide an optional manual bypass valve between the pool and the heat pump outlet. Arrangement of pool
system components other than as illustrated in Figure 6 and the following diagrams can affect the operation
of the heat pump’s water pressure switch. Location of the heat pump above or below the pool water surface
can also affect operation of the switch. In general, the pressure switch can be adjusted to accommodate
this effect if the heat pump water connections are no more than six (6) feet below the pool water surface or
no more than fifteen (15) feet above it. See instructions for pressure switch adjustment (page 16) in the heat
pump start-up section of this manual for more information. If the heat pump is installed outside of this range,
an external pressure switch may need to be installed in the plumbing upstream of the heat pump. Call the
Pentair Water Heat Pump Technical Service department at (800) 831-7133 for details.
Be advised that when pool equipment is located below the pool surface a leak can result in large-scale water
loss or flooding. Pentair cannot be responsible for such water loss or flooding or the damage caused by
either occurrence.
CHEMICAL FEEDER
HEAT PUMP
FILTER
POOL PUMP
TO POOL OR SPA
Figure 6. Standard Plumbing Layout
MANUAL BYPASS VALVE
(Optional)
FROM POOL OR SPA
Installation and User’s Guide
Page 16
8
Water Connections at the Heat Pump
Two inch Quick Connect fittings have been installed on the water inlet
and outlet connections, see
Figure 7. Filtered cool water is plumbed
to the inlet, located on the right side of the heat pump. Heated water
flows through the outlet, located on the left side of the heat pump.
Plastic piping (PVC Schedule 40) should be connected to the heat
pump. The unions, provided with the unit, accept 2 in. PVC pipe.
CAUTION —
Make sure that flow requirements and pool water
turnover rates can be maintained with the installation of
additional heat pumps and plumbing restrictions.
Water
Automatic Flow Control Valve
Outlet Union
The inlet/outlet header of the heat pump comes equipped with an internal automatic flow control valve. The
automatic flow control valve maintains the proper flow through the heat pump at rates up to 100 gpm
(380 lpm). If the filter system flow rate is higher than 100 gpm (380 lpm), install a manual bypass valve, see
Figure 6 on page 7.
Water
Inlet Union
Figure 7.
NOTE: Be advised that if your circulation pump is over 2 HP or if the total flow exceeds 100 gpm
(380 lpm), you will have to add an external bypass valve. Excess water flow will damage the heat
exchanger.
Installation and User’s Guide
Page 17
Multiple Unit Installation
P
R
R
OOL
A
A
OOL
A
OOL
N
A
P
CK
Heat Pump, Heater and/or Solar Combination
In certain regions of the country it may be more economical to run a heat pump during the warmer months and
a gas heater during the cooler months. In some situations it may be desirable to run the heat pump in the
“Chiller” mode, if so equipped, during the hottest portion of the year and a heater during the cooler months.
The Pentair Water heat pump may be used in conjunction with a gas or electric heater or any combination of
heat sources including solar. All heat sources must be plumbed in series to work correctly and efficiently.
A recommended plumbing layout for a heat pump / heater / solar combination heating system for a pool / spa
combination is shown in
will apply by eliminating the component in the illustration that is not a part of your system.
Figure 8. Your system may not contain all of these components, but the basic plumbing
24"
(610 mm)
9
P
RETUR
P
AKE-U
P
SP
P
DR
FILTE
EAT PUM
HE
TO SOLA
P
Figure 8.
Installation and User’s Guide
Page 18

10
Multiple Heat Pump Connections
All plumbing on multiple heat pump installations must be done in parallel see
Figures 9 and 10. An equal flow
of water to each heat pump is important for optimum operation.
NOTE: It may be necessary to adjust the water pressure switch if a unit is installed below the water
level. See
page 16 for details on when and how to adjust the pressure switch.
Each heat pump allows a maximum flow rate of 100 gpm (380 lpm) and requires a minimum of
30 gpm (110 lpm).
24 inches (610 mm) min. clearance around evap.
24"
(610 mm)
Check Valves are
optional on heater inlets
but will help system
balancing
Extend 12" (305 mm)
past end heater
inlet for hydraulic
balancing
60 GPM (220 lpm)
Minimum
Extend 12" (305 mm)
past end heater
inlet for hydraulic
balancing
Flow Meter
OPTIONAL
2" Check Valve Bypass
2" PVC Pipe
Flow Meter
To Pool
Figure 9. Two Heat Pump Plumbing Layout
24 inches (610 mm) min. clearance around evap.
2" PVC Pipe
Extend 12"
(305 mm) past
end heater
inlet for hydraulic
balancing
To Pool
Figure 10. Four Heat Pump Plumbing Layout
Flow Meter
2" PVC Pipe
24"
(610 mm)
3" Ball Valve Bypass
3" PVC Pipe3" PVC Pipe
Minimum
3" PVC Pipe
Minimum
2" PVC Pipe
2" PVC Pipe2" PVC Pipe
Flow Meter
Pool Pump
Check Valves are
optional on heater inlets
but will help for system
balancing
Extend 12" (305 mm)
past end heater
inlet for hydraulic
balancing
120 GPM (440 lpm)
Minimum
Pool Pump
Installation and User’s Guide
Page 19

Electrical Connections
WARNING —Risk of electrical shock or electrocution.
This heat pump contains wiring that carries high voltage. Contact with these wires could result in death
or serious injury to pool or spa users, installers, or others due to electrical shock, and may also cause
damage to property. Always disconnect power circuit before connecting the heat pump.
CAUTION —
General Information
Wiring connections must be made exactly as shown in the wiring diagram found on the inside of the heat pump
access panel, see Figures 18-20 on pages 32-34. The heat pump must include a definite means of grounding
and bonding. There is a ground lug inside the heat pump electrical compartment and a bonding lug on the left
side of the heat pump.
Main Power
Electrical wiring to the heat pump must be in accordance with the latest edition of the National Electric Code
(NEC), ANSI/National Fire Protection Association (NFPA) 70 in the United States, and in Canada, the
Canadian Electrical Code (CEC) C22.1, unless local code requirements indicate otherwise. All wiring must be
done by a certified electrician.
Label all wires prior to disconnection when servicing controls. Wiring errors can cause improper and
dangerous operation. Verify proper operation after servicing.
11
The following is the procedure to wire the heat pump to the electrical source:
Be sure the power to the circuit for the heat pump is turned off.
1. Remove the front left panel of the heat pump cabinet, (you do not need to remove the torque head
screw at the top left corner).
2. Remove the service panel to the heat pump electrical compartment. (front left corner of unit)
3. Electrical supply lines must be run through watertight conduit. Run the wires and conduit from the power
source and connect them to the conduit connection on the left side of the heat pump.
4. Connect the power leads to the bottom terminals on the main compressor contactor as shown in the wiring
diagram.
5. Verify that all other contactor wires are secure, they may have loosened during shipment.
6. Connect the ground wire to the ground lug provided on the bottom of the electrical compartment.
7. Replace the service panel and reinstall screws to hold it in place.
8. Replace the front left panel.
9. Connect a copper bonding wire (8 AWG) to the bonding lug on the left side of the heat pump.
Bonding
CAUTION —
This heater must be connected to a bonding grid with a solid copper wire not smaller in diameter
than 8 ga.
The National Electrical Code and most other codes require that all metallic components of a pool structure,
including reinforcing steel, metal fittings, and above ground equipment be bonded together with a solid copper
conductor not smaller than 8 AWG. The heat pump, along with pumps and other pool equipment must be
connected to this bonding grid. A bonding lug is provided on the left side of the heat pump to ensure this
requirement is met.
Installation and User’s Guide
Page 20

12
Remote Operation
The heat pump may be connected to an automation system via the remote spade terminals on the back of the
control board or via the RS-485 communication connector on the back of the control board.
NOTE: Remote connection via the RS-485 connector is only available on IntelliTouch® and EasyTouch
software version 1.11 or higher. All other automation packages must connect via the
¼ in. “Spade” terminals.
Relay Remote Controls
Electrical wiring must be in accordance with the latest edition of the NEC (NFPA 70) in the United States and
CEC (CSA 22.1) in Canada, unless local code requirements indicate otherwise. To connect remote control
equipment to the heat pump, perform the following steps:
1. Turn off the power to both the remote pool/spa control system and the heat pump.
2. Remove the front left panel of the heat pump cabinet, (you do not need to remove the torque head
screw at the top left corner).
3. Remove the electrical service panel to the heat pump. Remove the 4 bezel retaining screws from above the
electrical compartment and rotate the bezel downward. This will allow you to access the Remote terminals
on the back of the heat pump control board for the remote control installation.
®
4. Run the wires from the pool/spa remote control system into the upper electrical compartment.
5. Connect the wiring from the pool/spa remote control system to the heat pump remote control terminals using
¼ in. “Spade” connectors as shown in the figure below.
6. Rotate the bezel back upwards into position and reinstall the 4 retaining screws.
7. Replace the electrical service panel.
8. Replace the front left panel.
9. Restore power to the heat pump and the pool/spa remote control system.
10. Press the Menu Select button to scroll to the Relay Remote screen. Toggle the selection by pressing one of
the arrows until the screen displays “Relay Remote On”.
RS-485
J8
INTELLITOUCH
CONNECTION
INPUT
SWIT CHES
J9
W
O
L
F
H
WTR
TEMP
S
J4
S
E
R
P
I
E
R
P
W
THERM1 THERM2
O
L
DEF
TEMP
J5
3 - WIRE
REMOTE
.
TERM
SPA POOL
COM
Heat Pump Control Board
OUTPUTS
3
PWR
7
J
24 VAC
J
P
M
N
U
A
P
F
C
O
S
S
E
R
P
M
O
R
R
G
N
I
S
E
R
V
E
L
V
A
E
V
Figure 11.
Installation and User’s Guide
¼ in. “Spade”
connectors
Page 21

Connecting the Heat Pump to the IntelliTouch® or EasyTouch® Load Center via the
Heat Pump Spade Terminals
13
To connect the heat pump cable to the Personality Board in the IntelliTouch
®
or EasyTouch® Load Center:
1. Turn off the main system power before making any connections.
2. Unlatch the front door spring latche(s), and open the front door of the IntelliTouch® or EasyTouch® Load
Center.
3. Loosen the two retaining screws from the top of the control panel and lower the control panel down to access
the Personality Board.
4. Run a UL approved conductor cable from the UltraTemp® to the Load Center.
5. Route the cable up through the low voltage raceway located on the left of the Load Center to the Personality
Board, see
6. Insert the UltraTemp
Figure 12.
®
cable plug onto the gas heater terminal connector, located on the left side of
the Personality Board.
7. If the heat pump is used in conjunction with a gas heater, use a 520403 Dual Heater Relay Kit. Plug the
heat pump relay connector onto the SOLAR Terminal on the top center of the Personality Board. Follow
the Dual Heater Relay Kit instructions for further set-up details. Be sure to install solar temperature
sensor as per instructions.
8. Lift the control panel up into position and secure with the two screws.
9. Connect the cable from the IntelliTouch® or EasyTouch® Load Center to the heat pump remote control
terminals using ¼ in. “Spade” connectors, see Figure 11 on the previous page. Follow instructions for
wiring on page 12.
NOTE: Solar temperature sensor could be left loose in load center. The automation system does not
use the temperature reading but just looks for resistance.
A disconnecting
means must be
located within
sight from the
equipment and
at least 5 feet
(1.52 m) from
the inside walls
of the pool, spa
or hot tub.
TEMP. SENSORS HAVE NO POLARITY.
RED/BLK WIRES ARE INTERCHANGEABLE.
IntelliTouch Screw Terminal
COM PORT (J7 / J8)
BLK
GRN
YEL
RED
COMMUNICATION PORT
Pin Configuration for connecting IntelliFlo to IntelliTouch:
1
Strip back the cable conductors 1/4”. Insert the two wires into either of the
2
COM PORTS
(J7
and
J8)
Note: Multiple wires may be inserted into a single screw terminal.
3
A communication expansion module with 3 extra COM ports and 4 IntelliFlo
4
pump ports is available (P/N 520818).
• IntelliFlo:
• IntelliFlo:
screw terminals. Secure the wires with the screws.
Connect pin 6 (green) to IntelliTouch screw terminal pin 2 (green)
Connect pin 7 (yellow) to IntelliTouch screw terminal pin 3 (yellow)
INDOOR CONTROL
(AND/OR)
(AND/OR)
RF TRANSCEIVER
iS10
SPA-SIDE REMOTE.
IntelliFlo® Cable Pin Configuration
Pin 6
(Green)
Pin 7
(Yellow)
Figure 12.
Installation and User’s Guide
Page 22

14
Connecting the Heat Pump to the IntelliTouch® or EasyTouch® Load Center via the
RS-485 Connector
The heat pump can be controlled by an IntelliTouch® or EasyTouch® system via the RS-485 communication
cable. In this configuration, IntelliTouch
®
or EasyTouch® overrides present Temperature Set points on the heat
pump and will start or stop the heat pump. The transfer of this data takes several seconds and causes a delay
from when the command is given from the IntelliTouch® or EasyTouch® indoor control panel until the heat pump
physically responds. This happens automatically but may take 1-2 minutes to complete.
NOTE: Heat pump control board set points will be shown but functionality disabled. For more
information, refer to the IntelliTouch
®
User’s Guide (P/N 520102) or the EasyTouch® User’s Guide
(P/N 520584) or the EasyTouch® Wireless System User’s Guide (P/N 520688).
Connecting the Heat Pump Control Board to IntelliTouch® or EasyTouch® via RS-485
Connection from heat pump board to the IntelliTouch® or EasyTouch® system is via the optional four-wire cable
(P/N 520199).
®
To connect the heat pump board cable to the IntelliTouch
CAUTION —
Switch the main power off to the IntelliTouch® or EasyTouch® load center.
1. Unlatch the IntelliTouch® or EasyTouch® load center front door spring latches, and open the front door.
2. Remove the cover-panel screws securing the high voltage cover-panel, and remove it from the enclosure.
3. Loosen the two control panel access screws and fold down the outdoor control panel, see
4. Insert the four-wire cable into plastic grommet on the bottom of the enclosure and route the wire up through
the low voltage raceway to the Personality board.
5. Strip back the cable conductors ¼ in. Insert the wires into either of the COM PORTS (J7 and J8) screw
terminals located on the left side of the Personality board. Secure the wires with the screws. For wiring details,
refer to the pin configuration as shown on
page 15, Figure 14.
or EasyTouch® load center:
Figure 13.
NOTE: Multiple wires may be inserted into single screw terminal.
Personality Board
Access
Screw
Low Voltage
Raceway
Plastic
Grommet
IntelliTouch® Load Center
Figure 13.
Cover
Pane l
Screw
(Cover Panel
not shown)
Installation and User’s Guide
Page 23

15
ON
elliTouch
)
al
al
or
)
)
)
)
)
Connecting the Heat Pump Control Board to IntelliTouch® or EasyTouch® (
Pin Configuration for the Heat Pump Control Board to IntelliTouch®:
• Heat Pump Control Board: Connect pin 2 (green) to IntelliTouch
• Heat Pump Control Board: Connect pin 3 (yellow) to IntelliTouch® screw terminal pin 3 (yellow)
IMPORTANT
IntelliTouch Personality
Board COM PORT
IntelliTouch Screw Terminal
COM PORT (J7 / J8)
1
BLK
2
GRN
YEL
3
RED
4
Figure 14.
— Do NOT use pin 1 (black) or pin 4 (red) on the AutoSet board or the IntelliTouch® mother board.
(J7/J8)
COMMUNICATION PORT
Pin Configuration for connecting IntelliFlo® to IntelliTouch®:
Strip back the cable conductors 1/4”. Insert the two wires into either of the
COM PORTS
(J7
and
J8)
Note: Multiple wires may be inserted into a single screw terminal.
A communication expansion module with 3 extra COM ports and 4 IntelliFlo
pump ports is available (P/N 520818).
• IntelliFlo:
• IntelliFlo:
INDOOR CONTROL
screw terminals. Secure the wires with the screws.
Connect pin 6 (green) to IntelliTouch screw terminal pin 2 (green)
Connect pin 7 (yellow) to IntelliTouch screw terminal pin 3 (yellow)
(AND/OR)
(AND/OR)
RF TRANSCEIVER
iS10
SPA-SIDE REMOTE.
PIN 2
(Green)
L
F
SWITC HES
W
O
INPUT
J9
PIN 3
(Yellow)
S
E
R
P
I
H
®
screw terminal pin 2 (green)
J8 RS-485
INTELLITOUCH
CONNECTION
WTR
TEMP
S
J4
E
R
P
W
THERM1 THERM2
O
L
Figure 15.
DEF
TEMP
J5
nt
COM PORT (J7/J8
rew termin
3 - WIRE
REMOTE
TERM
.
SPA POOL
COM
24 VAC
Continued
)
IntelliTouch
rew termin
nnect
2 (GRN
3 (YEL
AutoSet Board
4-wire cable
GREEN (PIN 2
YELLOW (PIN 3
PIN CONFIGURATI
Heat Pump Control Board
PWR
OUTPUTS
3
J7
J
N
U
A
P
F
R
O
S
S
E
R
P
P
M
M
V
E
O
R
C
G
N
I
S
E
R
V
E
L
A
V
6. Close the IntelliTouch® control panel and secure it with the two access screws.
7. Install the high voltage panel cover and secure it with the two retaining screws.
8. Close the load center front door and secure with the two latches.
9. Switch power on to the IntelliTouch
®
load center.
Connecting the IntelliTouch® or EasyTouch® to Heat Pump
1. Turn off the power to both the remote pool/spa control system and the heat pump.
2. Remove the front left panel of the heat pump cabinet, (you do not need to remove the torque head screw
at the top left corner).
3. Remove the electrical service panel to the heat pump. Remove the 4 bezel retaining screws from above the
electrical compartment and rotate the bezel downward. This will allow you to access the Remote terminals on
the back of the Heat Pump control board for the remote control installation.
4. Run the wires from the pool/spa remote control system into the upper electrical compartment.
®
5. Connect the wiring from the IntelliTouch
connection (J8) on the Heat Pump control Board. Connect the Green wire to J8 pin 2 and yellow wire to J8
pin 3. Do NOT use pin 1 (red) or pin 4 (black) wires. The connections are shown in the Figure 15.
6. Rotate the bezel back upwards into position and reinstall the 4 retaining screws
7. Replace the electrical service panel.
8. Replace the front left panel.
9. Restore power to the heat pump and the pool/spa remote control system.
10. Press the Menu Select button to scroll to the Serial Remote screen. Toggle the selection
by pressing one of the arrows until the screen displays “Serial Remote On”.
Personality Board COM PORT to the RS-485 IntelliTouch
®
Installation and User’s Guide
Page 24

16
Water Pressure Switch Adjustment
CAUTION —
The pressure switch is preset at the factory for activation at 1.5 psi [10 kPa]. This factory setting works for most basic
installations as shown previously on pages 7, 9-10 in this manual. Only adjust the water pressure switch if the heat pump
does not operate when the proper flow is applied to unit or if the heat pump does not shut off when the filter pump is off.
Occasionally, unusual plumbing configurations or necessary restrictions in the plumbing may cause pressure sensing
problems. In these rare situations, the plumbing system configuration may require adjustment of the water pressure switch.
Adjustment of the pressure switch may be necessary if any part of the filter system piping is 3 feet [0.91 m] or more above the
top of the heat pump.
In general, if the heat pump is installed more than 6 feet [1.83 m] below the pool surface, an external water flow switch must be
added to the plumbing system.
On some installations, the piping from the heat pump to the pool is very short. The back pressure could be too low to trigger the
pressure switch. If this happens, it may be necessary to install a directional fitting or elbows where the return line enters the pool.
This will increase back pressure enough for the heat pump to operate properly. If this configuration is necessary, be sure to check
that the system flow is above the minimum requirement of 30 gpm (110 lpm) after the direction fitting or elbow has been installed.
Make sure the pool filter is clean before making any pressure switch adjustment: A dirty filter will restrict the water flow and
the pressure switch cannot be adjusted properly.
To adjust the pressure switch:
The water pressure switch should be adjusted to turn the heater off when the pump is off. Setting the switch
to close at too low of a flow can damage the appliance. Adjust the switch to turn the heater off, not on.
The following adjustment is for installations where the heat pump is below pool water level.
1. Be sure that all valves in the system are set to allow water flow through the heat pump. Start the filter pump.
2. Set the heat pump temperature above the actual temperature to call for heat. Turn the heat Pump ON.
3. Once the heat pump is running, turn off the filter pump. The heat pump should turn off immediately.
4. If the heat pump continues to operate when the filter pump is off, then the water pressure switch needs to be adjusted.
5. Remove the heat pump’s left front panel and remove remaining right front panel. The water pressure switch is located in
the water plumbing in the lower right corner of the heat pump.
6. Slowly rotate the adjustment wheel on the water pressure switch in a clockwise direction until the the “LOW WATER
FLOW” Alarm shows on the LCD, the Red Service LED turns ON, and the heat pump stops.
7. Check the setting of the water pressure switch by starting and stopping the filter pump and checking the control panel
and operation of the heater between each flow change.
8. If the water pressure switch cannot be adjusted to accommodate the conditions listed above, an external flow switch must
be added to the plumbing system to ensure that the heat pump will not operate without the proper flow through the heat
exchanger.
The following adjustment is for installations where the heat pump is above pool water level.
1. Be sure that all valves in the system are set to allow water flow through the heat pump. Start the filter pump.
2. Set the heat pump temperature above the actual temperature to call for heat. Turn the heat Pump ON.
3. If the LCD shows a “LOW WATER FLOW” Alarm and Red Service LED is present then the water pressure switch needs
to be adjusted.
4. Remove the heat pump’s left front panel and remove remaining right front panel. The water pressure switch is located in
the water plumbing in the lower right corner of the heat pump.
5. Slowly rotate the adjustment wheel on the water pressure switch in a counterclockwise direction until the “LOW WATER
FLOW” Alarm and Red Service LED vanish, time delay countdown will start.
6. Once the heat pump is running, turn off the filter pump. The heat pump should turn off immediately.
7. If the heat pump continues to operate when the filter pump is off, turn the adjustment wheel on the water pressure switch
in a clockwise direction until the “LOW WATER FLOW” Alarm shows on the LCD, the Red Service LED turns ON, and
the heat pump stops.
8. Check the setting of the water pressure switch by starting and stopping the filter pump and checking the control panel
and operation of the heater between each flow change.
9. If the water pressure switch cannot be adjusted to accommodate the conditions listed above, an external flow switch must
be added to the plumbing system to ensure that the heat pump will not operate without the proper flow through the heat
exchanger.
Installation and User’s Guide
Page 25

Section 3
Operating the Heat Pump
This section describes how to operate the heat pump.
Initial Start-up Precautions
CAUTION —
CAUTION —
After starting the heat pump, please note that there is a 5 minute delay before the compressor begins operation. The heat
pump display will show the remaining delay time in minutes and seconds.
Do not use this heat pump if any part has been under water. Immediately call a qualified service
technician to inspect the heater and replace any part of the control system which has been under
water.
Keep all objects off the top of the heat pump. Blocking air flow could damage the unit and may void
the warranty.
ATTENTION
17
Be sure that there is water in the pool and that the surface level is above the skimmer or other inlets of the pool’s filter system.
The pool pump must be on and water flowing through the heat pump for it to operate.
With any new pool or spa installation, operate the filter pump with the heat pump off long enough to completely clean the
water. This will remove any installation residue from the water. Clean the filter at the end of this operation before starting the
heat pump. When raising the temperature of a cold pool, program the time clock to run the pump continuously. This lets the
filter system and heat pump operate continuously until the water reaches the temperature setting on the temperature control.
When that happens, the heat pump will automatically shut off, but the filter pump will keep running.
Figure 16.
Installation and User’s Guide
Page 26

18
HEAT PUMP CONTROL PANEL OVERVIEW
CONTROL PANEL LAYOUT
1. ON/OFF button – Turns the heat pump On and Off.
2. MENU SELECT button – If pressed from the Run Screen it will bring up the Menu Select Menu Tree
Screens. It is also used to scroll through the Operator Setup Menu Tree.
3. POOL/SPA button – On the first press the current heat, cool or auto mode will be displayed along with the
active set point, pool or spa. On subsequent presses, the use of the pool or spa set points will be toggled.
The operator can also toggle between the pool and spa set point by using the UP and DOWN arrows.
4. UP and DOWN Arrow buttons – The UP and DOWN arrows will raise or lower the temperature set point
if pressed while the run screen is displayed. They are also used to scroll through the various parameter values
on the Menu Select and Operator Setup screens.
5. Liquid Crystal Display (LCD) – Displays water temperature, set point temperature and heat pump
parameters.
6. ON Light – Illuminated green when the heat pump is on.
7. SERVICE Light – Illuminated red when an alarm condition exists.
Figure 17. Heat Pump Main Control Panel
Installation and User’s Guide
Page 27

CONTROL PANEL OPERATION
1. Starting and Stopping the Heat Pump – The heat pump is started and stopped with the ON/OFF button.
a. Starting - If power is supplied to the heat pump and the ON light is not illuminated, pressing the
ON/OFF button will start the heat pump which causes the ON light to illuminate.
b. Stopping - If the ON light is illuminated, pressing the ON/OFF button will stop the heat pump causing
the ON light to be extinguished. The screen shown below will be displayed temporarily.
PENTAIR WATER
HEAT PUMP OFF
2. Changing the Set Point – The control board has 2 independently adjustable temperature set points. One
set point is for the pool temperature control and the other for temperature control of the spa. The active mode
of operation (pool or spa) is defined as the "active" set point.
a. The value of the pool or spa temperature set point is adjusted by pressing the UP or DOWN arrow
buttons when the associated pool or spa run screen is displayed. The temperature set point is displayed
after the letters SET in the lower left corner of the display. The number after ACT= on the bottom row
is the actual measured water temperature.
19
POOL
IDLE/HEAT/COOL
SET=__ ACT=__
SPA
IDLE/HEAT/COOL
SET=__ ACT=__
b. The set point need not be active to be adjusted. Press the MENU SELECT button repeatedly until
the associated run screen is displayed. With that screen displayed, adjust the set point with the UP
and DOWN arrows. The screen will automatically return to the active run screen after 15 seconds of
keypad inactivity.
c. The active set point can be changed in one of the following two ways:
i. On the first press of the POOL/SPA button the current heat, cool or auto mode will be displayed
along with whether the pool or spa set point is active. On subsequent presses, the use of the pool
or spa set points will be toggled. The operator can also toggle between the pool and spa set point
by using the UP and DOWN arrows when this screen is displayed.
ii. The Auto Mode screen can also be made active by repeatedly pressing the MENU SELECT
button. Once the Auto Mode screen is displayed the active set point can be toggled between
pool and spa by pressing the UP or DOWN arrows.
AUTO MODE
POOL/SPA
Installation and User’s Guide
Page 28

20
3. Heat, Cool and Auto Modes Operation – Certain models have the ability to both heat and cool.
a. These heat pumps can be setup to operate in any one of three modes:
i. Heat only mode
ii. Cool only mode
iii. Automatic Heat and Cool - The heat pump automatically switches between heat and cool based
on whether the water temperature is below or above the active set point.
b. If the cooling option is available, the operating modes can be changed as described here. Press the
MENU SELECT button repeatedly until the Heat or Cool screen is displayed. Once displayed, press
the UP or DOWN arrows to scroll through the heat, cool and auto options. The last option shown on
the display will become active.
HEAT / COOL / AUTO
SET TO - H/C/A
4. Heat Pump Timer – This feature is an adjustable timer to allow the heat pump to run (Green LED ON)
and then turn OFF (Green LED OFF) for a predetermined amount of time. During the selected time frame
the Green LED Indicator is ON and the heat pump will function in the normal mode of operation and/or the
operator can change set points, functions, etc. The heat pump's Green LED Indicator will turn OFF and
the heat pump will stay OFF when time expires. Countdown time is in hours and minutes.
HEATPUMP RUNTIME
REMAINING = NONE
a. To activate the heat pump timer, press the MENU SELECT button repeatedly until the heat pump
timer screen is displayed. With that screen displayed, press the UP arrow to increase the amount of time.
The DOWN arrow will decrease the amount of time.
i. An adjustable time from 10 minutes to 99 hours in 10 minute increments by use of the UP or
DOWN arrows.
ii. Time is shown in Hours and Minutes.
iii. Enabled by the first press of the UP arrow (going from NONE to the first 10 minutes) or DOWN
arrow (going from NONE to 99 hours).
iv. The first press will also turn the heat pump on if it is not already on. Green LED illuminates and
fan turns on.
v. When the timer is active (in countdown), the operator can increase or decrease the time
remaining within the current screen using the arrow buttons.
vi. This feature will not be active in Relay Remote or Serial Remote modes. The above screen will
still be displayed, but operator will not be able to adjust the time. Turning Relay ON will
automatically disable the Heat Pump timer.
vii. Any RS-485 valid communication received will reset the timer to zero. The RS-485 overrides
the heat pump timer operation.
viii. The timer can be disabled by pressing DOWN and POOL/SPA Buttons simultaneously or just
pressing the ON/OFF button.
Installation and User’s Guide
Page 29

5. Relay Remote – In relay remote operation, the heat pump is started and stopped by remote relays which are
connected to the remote POOL, COMMON and SPA quick connect connectors on the back of the control
board. When conductivity is provided between the pool and common connections or the spa and common
connections, the heat pump will start as long as the water temperature is not over the local set point (under for
chiller operation). The local set points are active in relay remote operation.
a. To activate the relay Remote Mode, press the MENU SELECT button repeatedly until the Relay Remote
screen is displayed. Once displayed, press the UP or DOWN arrows to toggle between ON and OFF. The
last option shown on the display will become active.
RELAY REMOTE
REMOTE IS ON/OFF
6. Serial Remote – In serial remote operation, the heat pump is made to start and stop via a serial RS-485
communications link with a Pentair automation controller. When operating in this mode, the heat pump's
local set point is disregarded. The heat pump will heat or cool as told by the automation controller without regard
to the local set point. However, the high and low temperature faults are still active so the heat pump will not
heat above 104° F. or cool below 45° F. To use the Serial Remote mode, the Serial Remote should be turned
ON (default setting) and, the Intell Address screen from the Operator Setup Menu Tree must be assigned to
the proper address. One (1) is the most commonly used address.
21
a. To activate the Serial Remote Mode, press the MENU SELECT button repeatedly until the Serial Remote
screen is displayed. Once displayed, press the UP or DOWN arrows to toggle between ON and OFF. The
last option shown on the display will become active.
SERIAL REMOTE
ON/OFF
®
b. The Address on the IntelliTouch
Address screen must match the address being used on the IntelliTouch®.
The IntelliTouch® address can be changed from the Operator Setup Menu as described below:
i. Press the UP and DOWN arrows simultaneously. The Language Selection screen should be
displayed.
LANGUAGE / IDIOMA
SELECTED - ENGLI SH
ii. Then press the MENU SELECT button repeatedly until the Intell Address screen is displayed.
Once displayed, press the UP or DOWN arrows to select the address being used in the automation
controller. The last address shown on the display will become active.
INTELL ADDRESS
ADDRESS = 1 - 16
7. Temperature Scales – The control board can display temperatures in either degrees Fahrenheit or Celsius.
The temperature scale in use can be changed from the Operator Setup Menu Tree as described below:
a. Press the UP and DOWN arrows simultaneously. The Language Selection screen should be displayed.
LANGUAGE / IDIOMA
SELECTED - ENGLISH
Installation and User’s Guide
Page 30

22
b. Then press the MENU SELECT button repeatedly until the Temperature Scale screen is displayed.
Once displayed, press the UP or DOWN arrows to toggle between the Fahrenheit and Celsius options.
The last option shown on the display will become active.
TEM PERAT URE SCALE
FAHRENHEIT / CELSIUS
8. Temperature Offset – The control board provides the ability to increase or decrease the measured water
temperature by 2 degrees. This is setup in the Operator Setup Menu Tree as described below:
a. Press the UP and DOWN arrows simultaneously. The Language Selection screen should be displayed.
LANGUAGE / IDIOMA
SELECTED - ENGLI SH
b. Then press the MENU SELECT button repeatedly until the Temperature Offset screen is displayed.
Once displayed, press the UP or DOWN arrows to select the desired offset. The last number shown
on the display will become active.
TEMP OFFSET
OFFSET = -2 TO +2
9. AutoSet Operation – The AutoSet feature periodically energizes a contactor which can be connected to
the pump to move water though the heat pump. This allows the heat pump to sense the temperature of the
body of water whose temperature is being maintained. After a temperature stabilization delay, the heat pump
will determine if it needs to start or not. If the temperature is at the desired level, the heat pump does not start
and the filter pump contactor is de-energized. If the water temperature is not at the desired level, the heat
pump starts and will run, along with the filter pump, until the water reaches the desired temperature. At that
point the filter pump and the heat pump will stop. (See AutoSet on
page 8 for further details/example.)
a. The AutoSet feature is enabled in the Main Menu Tree as follows. Press the MENU SELECT button
repeatedly until the AutoSet screen is displayed. Once displayed, press the UP or DOWN arrows to
toggle between the on and off options. The last option shown on the display will become active.
AUTOSET
OVERRIDE IS ON/OFF
Installation and User’s Guide
Page 31

TIMERS AND DELAYS
1. Water Sensing Timer – One minute timer to allow water from the pool to reach the Heat Pump before
acquiring temperature. This timer initiates when water first begins to run from stopped or low water flow
conditions or when the heat pump is turned ON. Countdown time is in Minutes and Seconds.
SENSING WATER TEMP
REMAINING= 1:00
2. Restart Delay Timer – Five minute timer is a protection feature for the heat pump's compressor.
This extends the life of the compressor's by not allowing it to cycle on and off, (i.e. adjusting set point up
and down around actual temperature). Countdown time is in minutes and seconds.
RESTART DELAY
REMAINING= 5:00
3. Defrost Delay Timer – Fifteen minute timer where the Heat pump is in Defrost operation. Countdown
time is in minutes and seconds. See Defrost section on
page 29 for more details.
23
DEFROST DELAY
REMAINING= 15:00
4. Pump Start Delay – One to Four Hour timer used in conjunction with the AutoSet feature. Counts down
the time until the control board will energize the internal contactor in the heat pump to turn on. Countdown
time is in hours and minutes. See AutoSet section for more details.
PUMP START DELAY
REMAINING=4:00
5. Heat Pump Runtime Timer – This feature is an adjustable timer to allow the heat pump to run (Green
LED ON) and then turn OFF (Green LED OFF) for a predetermined amount of time. During the selected
time frame the Green LED Indicator is ON and the heat pump will function in the normal mode of
operation and/or the operator can change set points, functions, etc. The heat pump's Green LED Indicator
will turn OFF and the heat pump will stay OFF when time expires.
HEATPUMP RUNTIME
REMAINING = NONE
Installation and User’s Guide
Page 32

24
CONTROL PANEL MENU TREE SCREENS
(Press MENU SELECT Button)
MENU SELECT
MENU TREE
IDLE/HEAT/COOL
SET=__ ACT=__
IDLE/HEAT/COOL
SET=__ ACT=__
HEAT / COOL / AUTO
POOL
SPA
SET TO - H/C/A
HEAT PUMP RUNTIME
REMAINING = NONE
RELAY REMOTE
ON/OFF
SERIAL REMOTE
ON/OFF
AUTOSET
OVERRIDE IS ON/OFF
RESTART / PUMP START /
SENSING WATER TEMP
DELAYS
SUCTION TEMP
ACTUAL = ___
Installation and User’s Guide
ALARM STATUS
AUTO MODE
POOL/SPA
Page 33

CONTROL PANEL MENU SCREENS
To scroll through the menu screens press the MENU SELECT button to view each screen. While in the menu
screens, if no activity is detected after 15 seconds, the main screen is displayed.
1. Pool Run Screen – Displays whether the heat pump is idle, heating or cooling if the Pool set point is active.
This screen also displays the water temperature set point and the actual measured water temperature.
The Pool set point can be raised or lowered using the UP and DOWN arrows while this screen is displayed.
The display will automatically return to this screen after 15 seconds of push button inactivity when the
Pool set point is active.
POOL
IDLE/HEAT/COOL
SET=__ ACT=__
2. Spa Run Screen – Displays whether the heat pump is idle, heating or cooling if the Spa set point is active.
This screen also displays the water temperature set point and the actual measured water temperature.
The Spa set point can be raised or lowered using the UP and DOWN arrows while this screen is displayed.
The display will automatically return to this screen after 15 seconds of push button inactivity when the
Spa set point is active.
25
SPA
IDLE/HEAT/COOL
SET=__ ACT=__
3. Heat or Cool Mode Selection Screen – This screen is only shown on Auto Heat and Cool Heat
pumps, not on heat only units. On these units this screen allows the operator to switch the heat pump
between heat-only, cool-only and auto heat/cool modes.
HEAT / COOL / AUTO
SET TO - H/C/A
4. Heat Pump Timer Screen – This feature is an adjustable timer to allow the heat pump to run (Green
LED ON) and then turn OFF (Green LED OFF) for a predetermined amount of time.
HEATPUMP RUNTIME
REMAINING = NONE
5. Relay Remote On/Off Screen – Allows the operator to turn the Relay Remote mode On and Off. In Relay
Remote mode, the heat pump is started and stopped by remote relays in an automation controller. The local
Pool and Spa set points are still active in this Relay Remote mode.
RELAY REMOTE
ON/OFF
Installation and User’s Guide
Page 34

26
6. Serial Remote On/Off Screen – Allows the operator to turn the Serial Remote mode On and Off. In
Serial Remote mode, the heat pump is started and stopped with serial communication commands from
the automation controller via the RS-485 link. The local Pool and Spa temperature set points are not
active when operation is in this Serial Remote mode.
SERIAL REMOTE
ON/OFF
7. AutoSet On/Off Screen – This screen is only shown if the AutoSet mode is enabled during factory
setup. Allows the operator to turn the AutoSet mode On and Off. AutoSet mode periodically energizes a
filter pump contactor to start a remote filter pump which allows the heat pump to heat or cool the water as
necessary.
AUTOSET
OVERRIDE IS ON/OFF
8. Time Delay Screen – If the heat pump is waiting on any of the restart, pump start or sensing water
temperature delays this screen shows how much delay time is left.
RESTART / PUMP START /
SENSING WATER T EMP
DELAYS
9. Alarm Screen – If an alarm condition is present it will be displayed on this screen. If no alarms are present
the screen will display ALARM STATUS NONE. The control board has the ability to store a 30 Alarm
history of previous alarms that have occurred. At the alarm status screen, press the DOWN arrow. The
first alarm will be the most recent alarm that has occurred. Successive presses (up to 30) of the DOWN
arrow will display the alarm history in the order of occurrence. The operator can scroll back up using the UP
button. There is an option to erase the history.
ALARM STATUS
NONE
First and second press sequence of the DOWN arrow.
FIRST PRESS SECOND PRESS
LATEST ALARM
LOW WATER FLOW
ALARM PRIOR #1
HIGH REFRIG
10. Auto Mode Screen – Displays whether the heat pump is in Heat only, Cool only or Auto mode. It
also displays whether the Pool or Spa set point is active. The active set point can be switched between
Pool and Spa by using the UP and DOWN arrows.
Installation and User’s Guide
AUTO MODE
POOL/SPA
Page 35

OPERATOR SETUP MENU TREE SCREENS
(Press UP and DOWN Arrows Simultaneously)
OPERATOR
SETUP MENU TREE
LANGUAGE - IDIOMA
ENGLISH / ESPANOL
SOFTWARE VERSION
REV. ____
PUMP START TIME
TIME = 1 - 4 HRS
27
INTELL ADDRESS
ADDRESS = 1 - 16
TEMPERATURE SCALE
FAHRENHEIT / CELSIUS
WATER TEMP OFFSET
OFFSET = -2 TO +2
DEFROST
ENABLE / DISABLE
WP HP LP PL SP
1 1 1 0 0
FAN COMP PMP REV
1 1 1 0
PRESS POOL/SPA TO
EXIT SETUP
**
**
**
THE NUMBER ONE (1) IS DISPLAYED WHEN THE ASSOCIATED
INPUT/OUTPUT IS ON AND ZERO (0) IS DISPLAYED WHEN THE
ASSOCIATED INPUT/OUTPUT IS OFF.
INPUT STATUS
WP = WATER PUMP SWITCH
HP = HIGH REFRIGERANT PRESSURE SWITCH
LP - LOW REFRIGERANT PRESSURE SWITCH
PL - POOL REMOTE
SP - SPA REMOTE
OUTPUT STATUS
FAN - FAN
COMP - COMPRESSOR
PMP - FILTER PUMP
REV - REVERSING VALVE
Installation and User’s Guide
Page 36

28
OPERATOR SETUP MENU SCREENS
To access this menu, press the Up and Down arrows simultaneously. While in the Operator Setup Menu
screen, if no activity is detected after 15 seconds, the main screen is displayed. To get back into the Setup
menu you must press the Up and Down arrows simultaneously again.
1. Language Selection – Displays the language selected. Select either English or Spanish using the UP and
DOWN arrows.
LANGUAGE / IDIOMA
SELECT ED - ENGLI SH
2. Software Revision – Displays the software revision level loaded on the control board.
SOFTWARE VERSION
REV. __
3. Pump Start Time – This displays the period at which the heat pump will close the AutoSet contactor to
start the filter pump. Adjustable from 1 to 4 hours using the UP and DOWN arrows.
PUMP START TIME
TIME = 1 - 4 HRS
4. Intell Address – IntelliTouch® RS-485 Communications Address which must match the address used in
the IntelliTouch® or EasyTouch® automation controller being communicated with. Adjustable from 1 to 16
using the UP and DOWN arrows.
INTELL ADDRESS
ADDRESS = 1 - 16
5. Temperature Scale – Determines if the water temperature actual reading and set point is displayed in
degrees Fahrenheit or Celsius. Adjusted between Fahrenheit and Celsius using the UP and DOWN arrows.
TEMPERATURE SCALE
FAHRENHEIT / CELSIUS
6. Temp Offset – Adjusts the measured water temperature up or down to allow the operator to match the
heat pump measured temperature to a remote temperature monitoring device. The offset can be varied
from -2 to +2 using the UP and DOWN arrows.
7. Defrost Screen – Allows to Enable/Disable defrost cycle.
Installation and User’s Guide
TEMP OFFSET
OFFSET = -2 TO +2
DEFROST
ENABLE / DISABLE
Page 37

8. Input Screen – The Input screen is a diagnostic display which shows the status of the input sensors. The
number 1 is displayed when the associated input is on and zero is displayed when the associated input is off.
WP HP LP PL SP
1 1 1 0 0
WP = Water Pump Switch HP = High Refrigerant Pressure Switch
LP = Low Refrigerant Pressure Switch PL = Pool Remote
SP = Spa Remote
9. Output Screen – The Output screen is a diagnostic display which shows the status of the Output devices.
The number 1 is displayed when the associated output is on and zero is displayed when the associated output
is off.
FAN COMP PMP REV
1 1 1 0
FAN = Fan COMP = Compressor
PMP = Pump REV = Reversing valve
29
10. Exit – Pressing the POOL/SPA button while this screen is displayed returns the display to the Pool or Spa Run
Screen as appropriate.
PRESS POOL/SPA TO
EXIT SETUP
LOCKING THE CONTROL PANEL
1. Heat pump control panel lock-out – To prevent unwanted adjusting or manipulating of the heat pump
settings, the control panel can be locked. Once locked, if any button is pressed, the display will read:
HEAT PUMP
CONTROLS LOCKED
• To activate the control panel lockout, press the MENU SELECT and POOL/SPA buttons simultaneously.
• To unlock the control panel, press the MENU SELECT and POOL/SPA buttons simultaneously.
DEFROST CYCLE
At air temperatures around 50° F, the heat pump may enter a defrost cycle. The defrost cycle is initiated when a
sensor on the evaporator detects that the refrigerant temperature has fallen below the defrost set point. At this
time, the heat pump compressor will stop. The heat pump evaporator fan will continue to run, and will draw air
over the evaporator fins for about 15 minutes. If, at the end of the 15 minutes, the temperature sensor detects a
temperature above 44° F, the compressor will restart. Otherwise the unit will shut down.
Because a heat pump's efficiency decreases as air temperature decreases, it is preferable to operate the heat
pump during the warmest time of day. As a rule, the unit should not be operated during the coolest time of day, or
when the air temperature falls below 45° F.
Installation and User’s Guide
Page 38

30
AUTOSET
Autoset is a feature that allows the heat pump to automatically turn on your water circulation pump at
predetermined time intervals after the water circulation pump shuts off. To utilize this feature, the water circulation
pump must be wired in parallel with your mechanical time clock using the auxiliary relay supplied in the high
voltage power panel of the heat pump.
For example, if your pool water circulation pump is wired properly with the time clock through the heat pump,
have the heat pump control board programmed with a pump start time interval of 4 hours, have the AutoSet
feature enabled, and you wish to maintain your pool to 80° F., this is the sequence of events that will happen.
1. If your mechanical time clock is set to shut off at 9:00 p.m., once the water circulation pump shuts off,
the heat pump will display a countdown window.
PUMP START DELAY
REMAINING=4:00
2. The heat pump will continue to countdown in hours and minutes.
3. Once the 4 hours has expired, at 1:00 am, the control board will energize the internal contactor in the heat
pump to turn on your water circulation pump.
4. The heat pump will sense water temperature then determine if it needs to continue to circulate water. If
the pool temperature has fallen below your set point, 80 degrees for this example, the heat pump will turn
on and begin heating the pool. Once the pool temperature has reached its set point, 80 degrees, the heat
pump will shut off and will also shut off the water circulation pump.
5. If after the water sensing time, the heat pump detects the pool water is above the set point, 80 degrees for
this example, it will shut off and shut the water circulation pump off also.
6. At the time the water circulation pump shuts off, the heat pump will again reset and begin the countdown
interval again and display the following window.
PUMP START DELAY
REMAINING=4:00
7. The heat pump will continue this cycle every time the water circulation pump is shut off.
8. Once the time clock turns on in the morning, the heat pump will stop the AutoSet feature and resume normal
operation.
Installation and User’s Guide
Page 39

CONTROL PANEL ALARM MESSAGES
PMETRETAWHGIH .°801evobasierutarepmetretaW
PMETRETAWWOL .°04wolebsierutarepmetretaW
31
WOLFRETAWWOL .neposiwo
lfretawgnisneshctiwserusserpehT
APSLOOPETOMER .dezigreneylsuoenatlumiserastupnietomeryalerapSdnalooP
TRO
HSMREHTRETAW .detrohstiucricrotsimrehterutarepmetretaW
NEPOMREHTRETAW .nepotiucricrotsimrehterutarepmetr
etaW
TROHSHTNOITCUS .detrohstiucricrotsimrehttsorfeD
NEPOHTNOITCUS .nepotiucricrotsimrehttsorfeD
TUONWORB .
wolsidraoblortnocehtotegatlovylppusCAV42ehT
GIRFERHGIH .neposihctiwserusserphgihtnaregirfeR
GIRFERWOL .ne
SMRALAEVIF lliwtluafsihT.ruohenoniderruccoevahstluaf5tahtsetacidnI
posihctiwserusserpwoltnaregirfeR
ybte
seryllaunamebnacroruohenoniteseryllacitamotua
.nottubFFO/NOehtgnisserp
Installation and User’s Guide
Page 40

32
Wiring Diagram – (Single Phase – 50Hz/60Hz)
RS-485
J8
INTELLITO UCH
CONNECTION
Heat Pump Control Board
GREEN
INPUT
SWIT CHES
J9
W
O
I
L
H
F
Compressor
S
E
R
P
L
Capacitor
COMPR FAN
PURPLE
R
S
E
R
P
W
THERM1 THERM2
O
Water Pres Sw
PINK
S
C
WTR
TEMP
J4
TEMP
10K ohm
Thermistors
Hi Ref Pres Sw
FANHERM C
BROWN
DEF
J5
3 - WIRE
REMOTE
TERM.
SPA POOL
COM
YELLOW
TBL
1
2
WHITE
3
WHITE
4
BLACK
5
BLACK
6
RED
7
RED
8
Lo Ref Pres Sw
WHITE/RED
BLUE
WHITE
WHITE
BLACK
BLACK
RED
RED
BLUE
PWR
J7
24 VAC
YELLOW
OUTPUTS
J3
P
M
N
U
O
A
P
F
C
WHITE
WHITE
/RED
PURPLE
Reversing Valve
RED BLAC K
R
P
M
BLACK
Optional
BROWN
R
O
G
S
N
S
I
E
S
E
R
V
E
L
V
A
E
V
R
TBR
WHITE
1
BLACK
2
3
4
5
6
BLACK
BLACK
YELLOW
PURPLE
BLUE
Tan
WHITE/RED
24 VAC
Transformer
COM
ORANGE
208V
240V
BLACK
WHITE
Fan
Relay
NC
NO
BROWN
PURPLE
PINK
RED
Compressor
Contactor
BLACK
BLACK
RED
BLUE
BROWN
TAN
ORANGE
Incoming 230 VAC
GREEN
Power Connection
Figure 18.
Installation and User’s Guide
GREEN
Fan
WHITE
/RED
AutoSet Contactor
See Users Guide
for instructions on
connecting to filter
pump
WHITE
/RED
473073 Rev.C
Page 41

Wiring Diagram – (Three Phase – 60Hz)
RS-485
J8
INTELLITOUCH
CONNECTION
Heat Pump Control Board
33
INPUT
SWITCHES
J9
W
O
L
F
YELLOW
BLACK/WHI TE
S
R
E
P
R
P
W
I
O
H
L
Water Pres Sw
Y-Out
Phase P rot ectio n Device
L1
L2 L3
RED/BLA CK
Comp res sor
T2
T1 T3
WTR
TEMP
S
E
TEMP
J4
THERM1 THERM2
10K ohm
Thermistors
Hi Ref Pres Sw
YELLOW/BL UE
GREEN
CY
BLUE/WHITE
DEF
J5
3 - WIRE
REMOTE
TERM.
SPA
COM
YELLOW
TBL
1
2
WHITE
3
WHITE
4
BLACK
5
BLACK
6
RED
7
RED
8
Lo Ref Pre s Sw
POOL
WHITE
WHITE
BLACK
BLACK
RED
RED
BLUE
24 VAC
BLUE
YELLOW
PWR
J7
WHITE
OUTPU TS
N
A
F
PURPLE
RED
J3
O
S
S
E
R
P
M
E
O
R
C
BLACK
Optio nal
Reversing Valve
R
R
E
V
V
BLACK
BLACK
S
A
G
N
I
E
V
L
TBR
1
2
3
4
5
6
BLACK
BLACK
YELLOW/BL UE
WHITE
PURPLE
BLUE
TAN
Transformer
24 VAC
NC
NO
Fan
Relay
COM
208V
240V
BLACK
BROWN
ORANGE
WHITE
RED
BLACK
WHITE
L3
L2
PURPLE
BLACK/WHITE
GREEN
L1
T1
Compres sor
Filter Pump
Contact or
Contactor
T2
RED
PINK
ORANGE
BLUE
BROWN
T3
BLUE/W HITE
TAN
BLACK
Incoming 230 VAC 60 Hz
3 Phase Pow er Connection
Figure 19.
Capacitor
PINK
7.5 mF
GREEN
BROWN
Fan
BROWN
474022 Rev A
Installation and User’s Guide
Page 42

34
l
e
A
r
3
C
m
s
an
or
Sw
E
UE
OW
UE
OW
E
CK
CK
CK
CK
N
APOOL
UT
S
J9
J4
J5
E
E
J7
J8
ON
CK
S
J3
CK
E
CK
CK
er
08V
C
r
r
an
y
CK
CK
UE
UE
E
GE
CK
UE
N
N
E
OW
)
n
N
GE
3
3
1
E
/
C
C
/
3
t
ase
ce
CK
E
OW
UE
N
O
3
OW
)
OW
)
YELLOW (L1)
()
E
Wiring Diagram – (Three Phase – 50Hz)
Heat Pump Control Board
NNECTI
INP
WITCHE
YELL
Water Pres SwHi Ref Pres
YELLOW/BL
Y-Ou
Ph
Protection Devi
THERM1THERM2
10K oh
Thermistor
REE
L
YELL
WHIT
BLA
BLA
REMOT
P
- WIR
YELL
WHIT
BLA
BLA
TPUT
24 VA
BL
BL
PURPL
PURPL
BLA
BLA
Optiona
Reversing Valv
BLA
BLA
YELLOW/BL
Transform
24 VA
2
BL
RAN
BLA
BLACK/WHIT
PURPL
K
WHITE
BLA
K
ED
LA
REE
Figure 20.
RED/BLA
L
Compresso
BLA
L2L
Compresso
ontacto
T
BL
BROW
T
BLUE/WHIT
BLA
RAN
Incoming 380 VAC 50 Hz
3 Phase Power Connectio
YELL
L1
YELL
L3
F
Mot
REE
YELL
L2
RANGE/WHIT
T
NON
F
Rela
BROW
474017 Rev.
Installation and User’s Guide
Page 43

AutoSet Contactor to Mechanical Timer Wiring Example
35
240V
SUPPLY
GROUND
LINE 1
LINE 2
Intermatic
T104
Timer
A
CLOCK
MOTOR
123 4
FILTER
PUMP
GROUND
AutoSet
Contactor
NOTES:
1. Mechanical timer is not provided with the heat pump.
2. Example only, other timers will be similarly wired.
3. Ensure that the electrical power lines are not crossed when making connections.
Figure 21.
Installation and User’s Guide
Page 44

36
Section 4
General Maintenance
Water Chemistry
Proper chemical balances are necessary for sanitary bathing conditions as well as ensuring your heat pump’s
long life. Be sure to keep your chemical and mineral concentration levels within the values indicated in Table 1.
Failure to maintain proper water chemistry may cause damage to the heat pump and may void
the warranty.
tseTleveLdednemmoceR
enirolhCeerF
ro
enimorB)aps0.5ot0.3(mpp0.4ot0.2
Hp6.7ot4.7
)AT(ytinilaklAlatoTmpp021ot08
)aps0.5ot0.3(mpp0.3ot0.1
aHmuiclaCmpp004ot002
dicAcirunayCmpp05ot03
reppoCmpp0
.
Table 1. Optimal Water Chemistry Ranges
)HC(ssendr
)SDT(sdiloSdevlossiDlatoTmpp0002nahtsseL
dnalooPcisaB"morfnekatslevelnoitartnecnoC*
"ygolonhceTapS
.)etutitsnIlooPdnaapSlanoitaN(IPSNybdehsilbup
NOTE: For spas, it is also necessary to perform water changes in addition to chemical treatment. It is
recommended to change the spa water every 60 days for light usage and every 30 days if usage is heavy.
Winterizing
CAUTION —
Failure to winterize could cause damage to the heat pump and will void the warranty.
In areas where freezing temperatures occur, you should
protect your pump, filter, and heat pump from the elements.
Perform the following steps to completely drain the heat
pump, see Figure 22.
1. Turn off the electrical power to the heat pump at the
main breaker panel.
2. Shut off the water supply to the heat pump.
3. Disconnect the water inlet and outlet unions located on
the lower front panel of the heat pump.
4. Blow out the water lines.
5. Cover only the top of the heat pump to prevent debris
from falling into the unit. Do not wrap the sides of the heat
pump with any plastic or other material that will retain
heat or moisture inside the unit.
Installation and User’s Guide
Water
Outlet Union
Water
Inlet Union
Figure 22.
Page 45

Spring Start-Up
If your heat pump has been winterized, perform the following steps when starting the system in the Spring:
1. Uncover the heat pump and inspect the top and sides for any debris or structural problems.
2. Connect the water inlet and outlet unions located on the lower front panel of the heat pump.
3. Turn on the filter pump to supply water to the heat pump. Open the filter air bleeder and circulate water
through the system long enough to bleed all the air out of the pool system. Check for leaks in and around
the heat pump.
4. Turn on the electrical power to the heat pump at the main breaker panel.
Inspection and Service
Pentair Water Heat Pumps are designed and constructed to provide long performance life when installed and
operated properly under normal conditions. Periodic inspections are important to keep your heat pump running
safely and efficiently through the years. Failure to properly maintain your unit may void your warranty.
Owner Inspection
Pentair Water recommends that you inspect your heat pump on a continual basis and especially after abnormal
weather conditions. The following basic guidelines are suggested for your inspection:
37
1. Make sure the front of the unit is accessible for future service.
2. Keep the top and surrounding areas of the heat pump clear of all debris.
3. Keep all plants and shrubs trimmed and away from the heat pump.
4. Keep lawn sprinkler heads from spraying on the heat pump to prevent corrosion and damage. Use a deflector
if needed.
5. If the unit is installed under a very sharp roof pitch or under a roof without a gutter, a gutter or diverter should
be fitted to prevent excessive water from pouring down into the unit.
6. Do not use this heat pump if any part has been under water. Immediately call a qualified professional
technician to inspect the heat pump and replace any part of the control system which has been submerged.
The heat pump will produce condensation (water) while in operation. The heat pump base is designed to allow
the condensation to exit through the bottom drain port when the unit is running. The condensation will increase
as the outdoor air humidity level increases. Check the following at regular intervals to ensure proper condensate
drainage:
1. Visually inspect and clear the bottom drain ports of any debris that could clog the ports.
2. Keep the top air flow discharge and air flow intake area clear of debris so the air flow though the heat pump
is not restricted. The cooler discharge air from the top should not accumulate and be drawn into the side air
intake coils.
3. Ensure that condensate run-off is properly directed away from the equipment pad to keep it from
undermining the pad.
4. Ensure that condensate water does not puddle inside the heat pump.
During normal operation, the heat pump produces three to five gallons of condensate per hour. If condensate
drainage is above this range during operation or if water continues to drain from the base when the heat pump
is not in operation for more than an hour, a leak in the internal plumbing may have occurred. Call a qualified
heat pump technician to investigate the problem.
Installation and User’s Guide
Page 46

38
Professional Maintenance and Service
The Pentair line of Heat Pumps are some of the most efficient ways to heat a pool or spa. The heat pump
transfers heat from the outside air to the pool or spa water by means of an internal heat exchanger.
When the fan is turned on, warm air is drawn through the R410A refrigerant charged air coil, turning the cold
liquid refrigerant to a warm gas. The gas then flows through the compressor, which increases the pressure and
refrigerant temperature. The hot refrigerant gas enters the water-to-gas heat exchanger where the water is
heated and returned to the pool. During this heat exchange process the refrigerant is cooled and returned to the
air coil and the cycle repeats.
NOTE: The maximum heat output and efficiency of a heat pump is dependent upon the quality and performance
of the major components used. Equally important are the environmental conditions (for example, air temperature,
humidity, water temperature, and wind). To maintain maximum performance and efficiency, keep the air coil
clean from dirt and debris. It is recommended to clean your air coil once a year by flushing the coil with
compressed air or hosing off the coil with a garden hose. Care should be taken to not bend the coil fins as this
will restrict the airflow and lower your heat pump performance. DO NOT USE A PRESSURE CLEANER ON
THE UNIT.
COLD
AIR OUT
FAN
WATER
INLET
(Cold)
WARM
AIR IN
Installation and User’s Guide
WATER
OUTLET
(Warm)
Figure 23. Typical Heating Cycle
EVAPORATOR
COIL
Page 47

Section 5
Troubleshooting
Use the following troubleshooting information to resolve possible problems with your heat pump.
WARNING —
RISK OF ELECTRICAL SHOCK OR ELECTROCUTION.
Improperly installation will create an electrical hazard which could result in death or serious injury
to pool users, installers, or others due to electrical shock, and may also cause damage to property.
Do NOT attempt any internal adjustments inside the heater.
1. Keep your hands and hair clear of the fan blades to avoid injury.
2. If you are not familiar with your pool filtering system and heater:
a. Do NOT attempt to adjust or service without consulting your dealer, professional pool or air
conditioning contractor.
b. Read the entire Installation & User’s Guide before attempting to use, service or adjust the
heater or pool filtering system. The water pressure switch should be adjusted to turn the
heater off when the pump is off. Setting the switch to close at too low of a flow can damage the
appliance. Adjust the switch to turn the heater off, not on.
39
Note: T urn off power to unit prior to attempting service or repair .
Problems and Corrective Action
Fault Condition Possible Cause Corrective Action
HIGH WATER TEMP Alarm:
temperature above 108° F.
LOW WATER TEMP Alarm: Water
temperature below 40° F.
LOW WATER FLOW Alarm: The
pressure switch sensing water flow is
open.
REMOTE POOL SPA Alarm:
Spa remote inputs are simultaneously
energized.
WATER THERM SHORT Alarm: Water
temperature sensor circuit is shorted.
WATER THERM OPEN Alarm: Water
temperature sensor circuit is open.
SUCTION TH SHORT Alarm: Defrost
refrigerant temperature sensor circuit is
shorted.
SUCTION TH OPEN Alarm: Defrost
refrigerant temperature sensor circuit is
open.
Refer to 10K Ohm Temperature Resistance Chart on page 42.
*
Water
Pool and
Bad Thermistor or bad control board.
Bad Thermistor or bad control board.
1. Water circulation pump not on. Verify water circulation pump is on.
2. Insufficient water flow.
3. External bypass open.
4. Bad water pressure switch.
Remote pool, spa, and common spade terminals
on the back of the control board are all
energized.
Bad Thermistor or bad control board.
Bad Thermistor, or bad control board.
Bad Thermistor or bad control board.
Bad Thermistor or bad control board.
Test water temp to see if it is correct, if not, use the 10k
ohm resistance test to verify thermistor. If bad, replace
thermistor. If good, replace control board.
Test water temp to see if it is correct, if not, use the 10k
ohm resistance test to verify thermistor. If bad, replace
thermistor. If good, replace control board.
Dirty or worn filters or clogged lint traps. Verify filter is
clean, backwash if necessary to clean entire filter system
or replace filter element if needed. Inspect & clean pump
impeller. Adjust Plumbing valves. Repair suction air
leaks.
Make sure external water bypass around heat pump is
closed.
With water flowing, check resistance of water pressure
switch, if open, replace switch.
Modify automation control output so that only either the
pool and common or spa and common terminals are
energized.
Use the 10k ohm resistance test to verify thermistor.
If shows shorted, replace thermistor. If good, replace
control board.
Use the 10k ohm resistance test to verify thermistor.
If shows open, replace thermistor. If good, replace
control board.
Use the 10k ohm resistance test to verify thermistor.
If shows shorted, replace thermistor. If good, replace
control board.
Use the 10k ohm resistance test to verify thermistor.
If shows an open, replace thermistor. If good, replace
control board.
*
*
*
*
*
*
Installation and User’s Guide
Page 48

40
Fault Condition Possible Cause Corrective Action
BROWNOUT Alarm:
voltage to the control board is low. CAUTION:
High Voltage Checks. Observe extreme
caution or call dealer or factory for advice
before attempting to Troubleshoot Electrical
Box.
HIGH REFRIG Alarm:
pressure switch is open.
The 24 VAC supply
Refrigerant high
1. Bad transformer
2. Insufficient supply voltage to the heat pump.
1. Water circulation pump not on. Verify water pump is on.
2. Insufficient water flow.
3. External bypass open.
4. Bad refrigerant high pressure switch. Check resistance of switch, if open, replace switch.
5. TXV Stuck Closed
Supply voltage to the transformer should be between 208 and 260
volts. Transformer should output between 24 and 28 vol ts. If below this
range, replace transformer.
Check supply voltage to the heat pump. Supply voltage shoul d be
between 208 and 260 volts. Check to see if a phase is out. Should
have 120 volts to ground and 240 volts across power legs.
Verify filter and skimmers are clean, backwash if necessary. Minimum
flow 30 GPM.
Verify external water bypass around heat pump is closed. Also make
sure all other valves are open or in the proper positions to allow proper
water fl ow through heat pump.
1. Disconnect TXV bulb from suction line (SL), have it in your hand, if
pressures go back to normal, then reinstall the bulb on suct ion line (it
may have some debris st uck in the port). For adjustable TXVs open
adjustable valve, it may remove the debris a
LOW REFRIG Alarm: Refri gerant low
pressure switch is open.
Check Water level in pool. This condition may appear if the heat pump
6. Other Possibilities:
7. Other Possibilities. Low or restricted water flow
through heater. Dirty or worn filters or clogged lint
traps. Clogged filter pump impell er. Improper
plumbing valve settings. Sucti on leak allowing air into
the water flow. Low water flow when switched t
8. Unit overcharged. Reclaim charge. Recharge with appropriate nameplate charge
1. Low refrigerant in system. Find source of refrigerant leak and fix. Pull vacuum and recharge.
2. Air and water temperatures too cold to operate the
heat pump.
3. Bad refrigerant low pressure switch. Check resistance of swit ch with a full charge, if open, replace switch.
4. Faulty fan blade.
5. TXV Stuck Closed
has NOT been operated for an extended period. To Clear this
condition, cycle the heat pump on and off up to 3 times. If this does not
correct problem, call for service.
Clean entire filtering system and or replace filter element. Inspect &
clean pump impeller. Adjust all plumbing valves. Repair suction ai r
leaks, grease pump lid o-ring. Repl ace filter. Wrong fi lter pump pipe
size. Automatic pool vacuum causing restrictio
Wait unti l temperatures warm up and see if unit operates.
Check the capacitor and fan motor. Replace either one if it is faulty.
Check the fan blade and make sure it is not slipping or broken. If so,
replace the fan.
1. Disconnect TXV bulb from suction line (SL), have it in your hand, if
pressures go back to normal, then reinstall the bulb on suct ion line (it
may have some debris st uck in the port). For adjustable TXVs open
adjustable valve, it may remove the debris and set it back to original
position.
2. If (1) does not work, recover the charge, remove bulb from SL,
unscrew TXV head, shake it, if rattles, replace head (PN KT-45-ZGA),
if not, replace TXV and filter dryer and charge appropriatel y.
FIVE ALARMS: Indicates that 5 faults have
occurred in one hour. This fault will
automatically reset in one hour or can be
manually reset by pressing the ON/OFF
button.
5 alarms of any kind within one hour.
Installation and User’s Guide
Press the ON/OFF button to clear the alarm. Check Heat Pump over
the next few minutes/hours to see if alarm appears again. This alarm
most likely caused the fi ve alarms in one hour.
Page 49

Problem or Symptoms Possible Cause Corrective Action
Unable to turn Heat Pump ON. Display is
Blank. Unit will NOT start.
Control failure. No power supply to heater. Tri pped
breaker or blown fuse. Faulty Transformer. Incorrect
Wiring.
Reset breaker. Replace fuse. Call dealer or factory for advice before
attempti ng to repl ace part s. Replace Transformer. Check wiring.
41
Unit power is ON and Set Temperature is
above Actual . Unit will NOT start to heat or
cool. No Alarms.
Unit power is ON and Set Temperature is
above Actual . Unit will NOT start to heat. No
Alarms.
Unit power is ON, and Set Temperature is
above Actual . Unit cycles on and off, i.e.
Compressor cuts on briefly and then off after
Five minute delay before set poi nt is reached.
Unit is forming ICE or Frost on the outer air
coil, usually at the bottom.
Remote feature enabled, but no controlling device
hook-up. Control failure.
Heat Pump pool/spa selecti on mode is incorrect. The
thermostat is malfunctioning. Control Board Failure.
Faulty Compressor. Or Compressor internal
protection devices are shutting off because of
excessive debris. Faulty Compressor contactor.
Incorrect wiring. Control Board Failure. Internal
bypass valve damaged or clogged with debris. Heat
exchanger clogged with debris. Suction leak allowing
air int o the water flow. Unit is plumbed backwards.
Discharge air flow is restricted. Discharge air is
accumulating and being drawn back through the outer
air coil. The fan is obstructed, low air flow. Sprinklers
spraying on the outer air coil duri ng cooler
temperatures. Outer ai r coil clogged with debris.
Plants too close to heater, blocki ng discharge air flow.
Low refri gerant pressure caused by a Refrigerant
leak. Possible malf uncti oning of the internal l ow
refrigerant pressure switch. Check Alarm Status on
Control Board for LOW REFRIG Alarm.
Check to see if the Remote feature on the Control Board is enable.
Disable if needed. See Section 3 for more information on Remote
functi on. Call dealer or factory for advice before attempting to replace
parts. Replace Control Board.
Check to see if heat pump is in correct active pool/spa mode by
pressing the pool/spa button. If active mode is spa, but trying to
heat/cool pool press pool/spa butt on again to change the active mode
to pool. If active mode is Pool, but want spa heat change active mode
to spa. Call dealer or factory for advice before attempting to replace
parts. Replace thermostat. Replace Control Board.
Clean entire filtering system and or replace filter el ement. Inspect &
clean pump impeller. Adjust all plumbing valves. Repair suction air
leaks, grease pump li d o-ring. Replace filter. Wrong f ilt er pump pipe
size. Automatic pool vacuum causi ng restriction. Call your dealer or
factory for advice if corrective action does not sol ve the problem.
Possible Compressor's internal relief valve or overload protection
device is faulty. Call dealer or factory for advice before attempting to
replace parts. Replace Compressor.
The outside air temperature too low and Defrost feature is NOT
enable. Malfunctioning Defrost Thermistor. Make sure heater is
installed with the required placement clearances for air flow and roof
clearance. Do NOT install indoors. Make sure that your sprinklers do
NOT spray on the heater in any way what so ever. If ice forms on the
outer coil, shut the heater off and allow ice to thaw. You may use water
at low pressure to thaw ice build up on the outer coil, shut the heater
off when doing so. Call your deal er or factory for advice corrective
action does not sol ve the problem.
Unit power is ON, and Set Temperature is
above Actual . Fan is NOT Turning. No Alarms.
Fan is turning, no cool air discharge out of top
of heater. Unit ON, and Set Temperature i s
above Actual , but Unit is not heating. No
Alarms.
Spa will not heat to maximum
temperature of 104° F.
Thermostat is turned all the way up.
OR
Spa is heating very sl owly.
Pool is heating very slowly.
Pool is not getting up to temperature.
Faulty Fan Relay. Faulty Capacitor. Faulty Fan Motor.
Control Board Failure. Incorrect wiring.
Heat Pump is in the five minute safety delay and
Compressor has not started. Faulty Compressor.
Faulty Capacitor. Compressor contactor is stuck
open. Control Board failure. Incorrect wiring.
Low or restricted water flow through heater. Dirty or
worn filters or clogged lint traps. Clogged filter pump
impeller. Improper plumbing valve settings. Suction
leak allowing air into the water flow. Low water flow
when switched to spa mode or the control is not in
spa mode. Unit is plumbed backwards. Heat
exchanger cl ogged with debris. Internal bypass valve
damaged or clogged with debris. Your spa
thermometer is not reading the correct temperature.
Air blower is runni ng. Venturi air inlet s are open. It is
very cold outside. Spa pump is not running.
Low or restricted water flow through heater.
Dirty or worn filters or clogged lint traps. Clogged filter
pump impeller. Improper plumbing valve settings.
Suction leak allowing air into the water flow. It is cold
outside. Pool pump timer is not set for a long enough
running period. Pool is not covered. High wind speed
over pool. Shaded pool area.
Call dealer or factory for advice before attempting to replace parts.
Replace Fan relay. Replace Capacitor, Replace Fan motor. Replace
Control Board.
Call dealer or factory for advice before attempting to replace parts.
Replace Capacitor. Replace Control board. Replace Contactor.
Replace Compressor.
Clean entire filtering system and or replace filter el ement. Inspect &
clean pump impeller. Adjust all plumbing valves. Repair suction air
leaks, grease pump li d o-ring. Shut off air blower and or Venturi inlets
that allow air turbulence in the spa. Use a cover while heating the spa.
Outside air temp. too cold. Set spa pump timer for longer time. Call
your dealer for advice. Call the factory for advice.
Clean entire filtering system and or replace filter el ement. Inspect &
clean pump impeller. Adjust all plumbing valves. Repair suction air
leaks, grease pump li d o-ring. Use a pool cover. Place a wind break
around pool. Set pool pump timer longer. Call your dealer for advice.
Call the factory for advice.
Installation and User’s Guide
Page 50

42
Problem or Symptoms Possible Cause Corrective Action
1. Disconnect TXV bulb from suction line (SL), have it in your hand, if
pressures go back to normal, then reinstall the bulb on suction l ine (it
Higher than Normal Head Pressure, lower than
normal suction pressure with high superheat
and very cold or frosty distributor tubes,
have no Alarm.
may
TXV stuck closed.
may have some debris stuck in the port). For adj ustabl e TXVs open
adjustable valve, it may remove the debris and set it back to original
position.
2. If (1) does not work, recover the charge, remove bulb from SL,
unscrew TXV head, shake it, if rattles, replace head
(PN KT-45-ZGA), if not, replace TXV and filter dryer and charge
appropriately.
Lower than Normal Head Pressure, higher
than normal suction pressure wit h cold suction
line and compressor and no superheat,
have no Alarm.
Unusually higher than normal current.
Low current with high superheat. Unit undercharged. Find source of refrigerant leak and fix. Pull vacuum and charge.
Unit runs, but trips continously. Wires not connected properly. Fix the miswire as per the Wiring Diagrams.
TXV stuck open.
may
TXV stuck closed/part ially closed, insufficient water
flow, system overcharged.
1. Check to see if TXV bulb is firmly attached to suction line, if loose,
attach firmly by tightening the clamp over the bulb and suction line.
2. If (1) above does not work, reclaim charge and replace TXV and
filter dryer with nameplate charge.
See Possible Cause column for: TXV stuck closed, Insufficient
water flow
, and
Unit overcharged
.
Problems and Corrective Action (3 Phase Units Only)
Problem or Symptoms Possible Cause Corrective Action
Check the Light on Phase Monitor inside the electrical box. If red,
switch two of the Input wires. Any two of the three can be switched.
Call dealer or factory for advice before attempting to replace parts.
Replace Phase Monitor.
Check the Light on Phase Monitor inside the electrical box. If the Light
is Red, fix the supply power loose end. If the Light is Green, fix the
output l oose wire.
Switch any two of the three wires on the compressor side of the
Contactor.
Unable to turn Heat Pump ON. Display is
Blank. Unit will NOT start.
Compressor making a loud or unusual noise or
sounds during operation. Fan is turning, no
cool air discharge out of top of heater. Unit
ON, and Set Temperature is above Actual, but
Unit is not heating.
Incorrect Wiring.
Faulty Phase Monitor.
Loose wire on Phase Monitor, either from the supply
input power or the output side.
Compressor running Backwards. This usually
happens if the compressor wire harness is
disconnected for possibl e repaire or repl acement.
* Temperature Resistance Chart
°F OHMS °F OHMS °F OHMS °F OHMS °F OHMS
0 85,387 51 19,377 66 13,136 81 9,076 96 6,382
10 62,479 52 18,870 67 12,809 82 8,861 97 6,238
20 46,225 53 18,377 68 12,491 83 8,651 98 6,097
30 34,561 54 17,899 69 12,182 84 8,447 99 5,960
40 26,100 55 17,435 70 11,882 85 8,249 100 5,827
41 25,391 56 16,985 71 11,589 86 8,056 101 5,697
42 24,704 57 16,548 72 11,305 87 7,867 102 5,570
43 24,037 58 16,123 73 11,029 88 7,684 103 5,446
44 23,391 59 15,711 74 10,761 89 7,506 104 5,326
45 22,764 60 15,310 75 10,500 90 7,333 105 5,208
46 22,156 61 14,921 76 10,246 91 7,164 106 5,094
47 21,566 62 14,543 77 9,999 92 6,999 107 4,982
48 20,993 63 14,176 78 9,758 93 6,839 108 4,873
49 20,438 64 13,820 79 9,525 94 6,683 110 4,664
50 19,900 65 13,473 80 9,297 95 6,530 120 3,758
NOTE: Any service must be done by an authorized service agency person.
Installation and User’s Guide
Page 51

The table below should be used by trained air-conditioning and refrigeration service people.
(psig)
(psig)
(F)
p
p
p
p
p
p
(psig)
(psig)
(F)
p
p
p
p
p
p
(psig)
(psig)
(F)
p
p
p
p
p
p
(psig)
(psig)
(F)
p
p
p
p
p
p
The table below should not be used for adjusting the charge in the system.
Use of interpolation or extrapolation of the table data may not be appropriate unless it is closely matched by
the ambient and water flow conditions.
Air: 80F, 80%RH Water: 80F, 45-50gpm
Model
HP500
HP700
HP900
HP1200
HP1200R
UltraTem
UltraTem
UltraTem
UltraTem
UltraTem
UltraTem
Model
HP500
HP700
HP900
HP1200
HP1200R
UltraTem
UltraTem
UltraTem
UltraTem
UltraTem
UltraTem
Model
HP500 330 83 5
HP700 320 81 4
HP900
HP1200
HP1200R
UltraTem
UltraTem
UltraTem
UltraTem
UltraTem
UltraTem
Model
HP500
HP700
HP900
HP1200
HP1200R
UltraTem
UltraTem
UltraTem
UltraTem
UltraTem
UltraTem
110
120
120 H/C 378 157 10
120C 354 150 12
100I 340 154 10
90I 354 157 9
Air: 80F, 63%RH Water: 80F, 45-50gpm
110
120
120 H/C
120C
100I
90I
Air: 50F, 63%RH Water: 80F, 45-50gpm
110
120
120 H/C
120C
100I
90I
Air: 80F, 63%RH Water: 104F, 45-50gpm
110
120
120 H/C
120C
100I
90I
Discharge
Pressure
359 134 14
348 132 14
355 142 10
367 141 8
367 141 8
343 164 11
350 157 9
Discharge
Pressure
352 125 11
341 123 11
348 132 8
360 131 6
360 131 6
337 153 9
344 146 7
368 146 8
346 143 10
335 144 8
335 152 8
Discharge
Pressure
325 85 4
322 86 3
322 86 3
324 92 4
330 90 3
336 90 3
318 89 4
329 86 4
327 90 4
Discharge
Pressure
457 137
445 142
450 141
478 135
478 135
453 159 5
450 152 4
474 152 4
450 150 7
452 151 4
473 150 6
Suction
Pressure
Suction
Pressure
Suction
Pressure
Suction
Pressure
Superheat
Superheat
Superheat
Superheat
7
8
5
6
6
43
RH = Relative Humidity
Installation and User’s Guide
Page 52

44
Section 6
Replacement Parts
UltraTemp® Illustrated Parts
20
19
18
21
17
22
16
29
30
12
3
28
31
26
25
32
23
DETAIL B – Single Phase
20
45
22
23
DETAIL B – Three Phase
SEE
DETAIL B
15
14
19
18
17
4
21
25
27
5
42
41
6
B
43
11
44
37
13
10
7
1
33
34
35
40
2
9
8
36
38
39
Installation and User’s Guide
24
25
Page 53

UltraTemp® Replacement Parts List
(
(
)
)
)
(
(
)
)
(
)
)
(
)
(
)
(
)
(
)
)
)
)
)
)
)
)
(
)
)
(
(
(
(
)
)
(
)
)
(
)
)
)
)
)
(
(
ITEM PART NO. DESCRIPTION
1 473665 PROBE THERMISTOR DEFROST SENSOR
2 470284 NUT, J-CLIP
3 473285 NUT, 1/4-20 SS ACORN
4 470281 NUT, U-CLIP
5 473732 W IRE HARNESS, COMPRESSOR
5 474009 W IRE HARNESS, COMPRESSOR
5 474010 W IRE HARNESS, COMPRESSOR (3-PHASE MODELS
6 473734Z COMPRESSOR, SCROLL ZP83 (MODEL 120, 120HC
6 473735Z COMPRESSOR, SCROLL ZP70 (MODEL 110)
6 474011Z COMPRESSOR KIT, SCROLL HLJ83
6 473780Z COMPRESSOR SCROLL HLJ072
6 474081Z COMPRESSOR SCROLL HLJ083 (MODEL 100I
7 473295 FENDER W ASHER
8 473736 COMPRESSOR ISOLATION KIT, GROMMET AND SPACER 1 SET
9 473745 BOLT 5/16-18 x 2" SS
10 98219800 BOLT 5/16-18 x 1" SS
11 473121 DRIER
11 473139 DRIER (MODEL 120HC
12 470441 FAN GUARD FASTENER KIT
13 071406 NUT, 1/4-20 HEX SS
14 473777 BEZEL, CONTROL BOARD WITH LABEL
15 473711 AUTO HEAT CONTRO L BOARD, HIGH
16 473603 PUMP CONTACTOR AUTOHEAT
17 473150 FAN RELAY
17 474016 FAN RELAY
18 473155 TRANSFORMER
18 473790 TRANSFORMER
19 473422 W IRE HARNESS TERMINAL BLOCK- FAN, COMPRESSOR
20 473315 W IRE HARNESS, TERMINAL BLOCK- SENSORS
21 473731 CAPACITOR
21 473154 CAPACITOR (3-PHASE MODEL 120C ONLY
21 470146 CAPACITOR (MODEL 100I
22 473149 CONTACTOR, HEAT PUMP (MODEL 110, 120, 120HC, 100I ONLY
22 473778 CONTACTOR, HEAT PUMP (3-PHASE MODELS
23 473423 W IRE HARNESS, MAIN (MODEL 110, 120, 120HC, 100I ONLY
23 474021 W IRE HARNESS, MAIN (3-PHASE MODEL 120C ONLY
23 474031 W IRE HARNESS, MAIN (3-PHASE MODEL 90I ONLY
24 473742 PANEL, FRONT RIGHT
24 474194 PANEL, FRONT RIGHT, 36" BLACK
24 473431 PANEL, FRONT RIGHT
24 473412 PANEL, FRONT RIGHT (MODEL 90I ONLY
25 470159 SCREW #10 x .75" PAN HEAD PHILLIPS, ALMOND HEA D
25 474198 SCREW #10 x .75" PAN HEAD PHILLIPS, BLACK HEAD
26 470161 SCREW #10 x 1" BUTTON HEAD TORX, ALMOND HEAD
26 474197 SCREW #10 x 1" BUTTON HEAD TORX, BLACK HEAD
27 473755 PANEL, FRONT LEFT, W/ DECAL
27 474196 PANEL, FRONT LEFT, W/ DECAL, 36" BLACK
27 474202 PANEL, FRONT LEFT, W/ DECAL
27 474203 PANEL, FRONT LEFT, W/ DECAL
28 473773 HP TOP
28 474193 HP TOP, BLACK
29 473786 GUARD, FAN
30 470439 NUT, #10-32 SS ACORN
31 473785 FAN MOTOR W / ACORN NUT KIT
31 474030Z FAN MOTOR W / ACORN NUT KIT
32 473783 FAN BLADE
32 474230 FAN BLADE (50 Hz
33 470137 TIE DOWN BRACKET
34 471566 PROBE THERMISTER - WATER TEM PERATURE
35 473606 W ATER PRESSURE SW ITCH BOO T
36 473605 W ATER PRESSURE SW ITCH
37 473992 TITANIUM HEAT EXCHANGER
37 472736 TITANIUM HEAT EXCHANGER
37 472737 TITANIUM HEAT EXCHANGER (MODEL 90I ONLY
38 473774 W ATER BYPASS MANIFOLD W/ 2 STREET ELBOWS
39 R172305 WATER BYPASS CHECK VALVE
40 473381 UNION PVC 2"
41 473656 SW ITCH, LOW PRESSUR E
42 473744 SW ITCH, HIGH PRESSURE
43 473787 THERMOSTATIC EXPANSIOIN VALVE
43 473999 THERMOSTATIC EXPANSIOIN VALVE (MODEL 120HC, 110
44 473657 TITANIUM WATER COIL TIE DOW N STRAP (2 ON MODEL 90I, 1 ON MODEL 100I
44 473772 TITANIUM WATER COIL TIE DOW N STRAP (1 ON ALL MODELS EXCEPT MODEL 90I
44 473789 TITANIUM WATER COIL TIE DOW N STRAP (1 ON ALL MODELS EXCEPT MODEL 90I & 100I
45 474089 PHASE MONITOR
473135 REVERSING VALVE
473432 REVERSING SOLENOID
472734 AUTO SET BOARD BEZE L LBL KIT [not shown]
MODEL 110, 120, 120C, 100I, 90I HEAT ONLY
3PH-50HZ ONLY
3PH-50HZ ONLY
MODEL 110, 120, 120HC ONLY
MODEL 100I ONLY
60 Hz
Model 120HC) [not shown] FOR HEAT COOL ONLY
Model 120HC) [not shown] FOR HEAT COOL ONLY
45
1PH-60HZ)
1PH-50HZ
3-PHASE MODEL 120C ONLY)
MODEL 90I
MODEL 110, 120, 120HC, 100I ONLY
MODEL 100I ONLY)
MODEL 90I ONLY)
MODEL 90I ONLY)
MODEL 100I ONLY
MODEL 120, 120C, 100I, 90I
Installation and User’s Guide
Page 54

46
SAVE THESE INSTRUCTIONS
Installation and User’s Guide
Page 55

NOTES
47
Installation and User’s Guide
Page 56

P/N 474099 Rev. C 08/02/10
*474099*
 Loading...