

Page 1
RAINBOW
™
CHLORINE/BROMINE FEEDER
MODEL #300-29X (FOR COMMERCIAL-SIZE APPLICATIONS)
Features:
• No special venting required.
• Completely enclosed-no escaping gases.
• Positive external no-clog chlorine control valve.
YOUR LIFEGARD®FEEDER IS THE MOST EFFICIENT AND TROUBLE-FREE AUTOMATIC FEEDER YOU CAN BUY,
BUT IT CAN ALSO BE DANGEROUS TO YOU AND YOUR EQUIPMENT. PLEASE FOLLOW INSTRUCTIONS EXACTLY AND
HEED ALL CAUTIONS. YOUR SAFETY AND THE PROTECTION OF YOUR EQUIPMENT IS OUR FIRST CONCERN.
• No equipment damage.
Feeds sanitiz er directly to pool or spa.
• All parts replaceable.
WHERE TO INSTALL YOUR FEEDER
IF YOUR POOL OR SPA HAS COPPER PLUMBING . . . STOP!!
Never install the feeder into copper plumbing as pipe damage could occur. Feeder should
be installed ABOVE POOL WATER LEVEL whenever practical. If installed below water
level these special instructions must be followed for safe and proper operation. When the
feeder is installed below water level, two conditions must be overcome.
1. ISOLATION OF THE FEEDER FROM POOL WATER: The control valve when shut off
to “off” isolates it on the side. A one way check valve such as the Rainbow R172324NS or
other chemically resistant check valve will have to be attached on the discharge line at the
top of the feeder.
NOTE: Never use any type of isolation valve on the discharge or outlet side of the feeder.
Damage to the feeder will occur due to pressure build up. Use only a one-way corrosion
resistance check valve. If isolation valves are used, remember t
possible following recharging. Never leave closed for long periods of time as pressure will
build up. Isolation is necessary to accomplish “DRAINING” in condition #2 which follows.
2. DRAINING: To prevent dangerous splash back of highly chlorinated water during
recharging, the feeder will have to be emptied. There is a ½" MPT plug on side of feeder
(see drawing) that can be removed for draining. To facilitate draining: A drain valve is
available from your dealer. Details on back drawing.
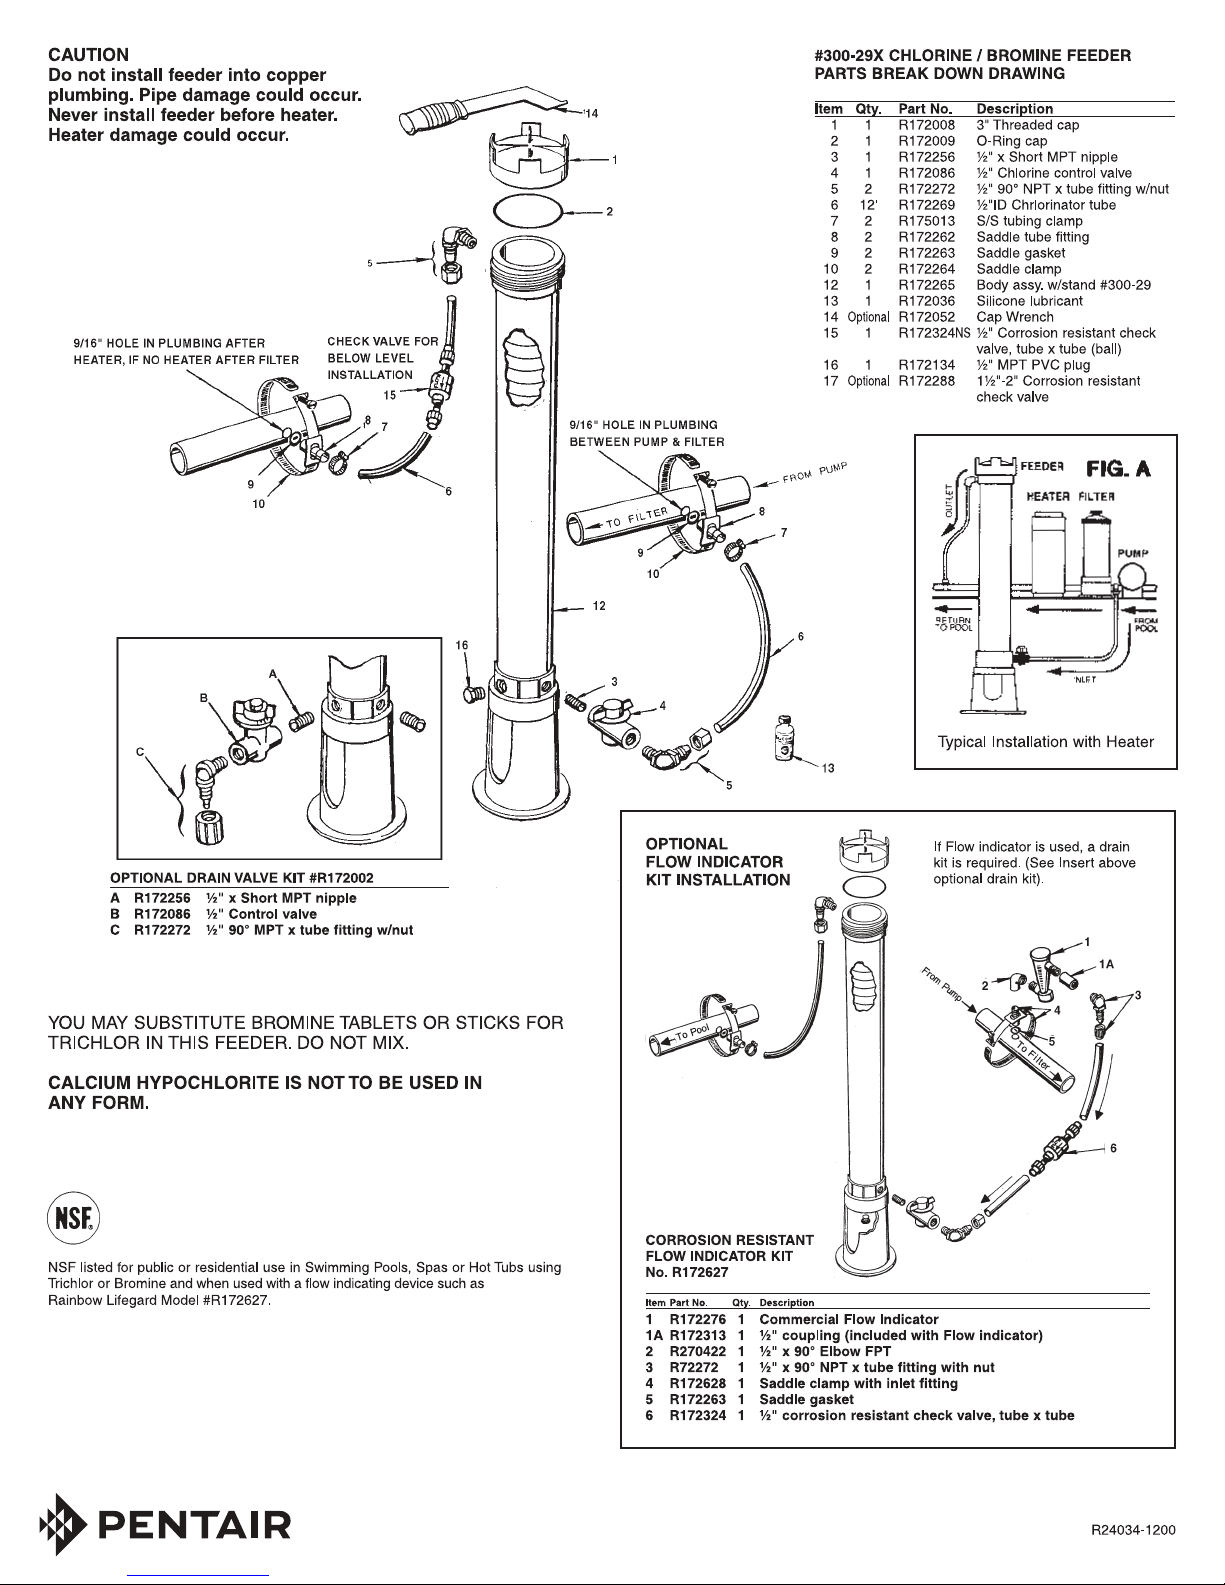
The outlet line must be installed after the heater. If your pool does not have a heater, then
it must be installed after the filter. DAMAGE TO YOUR HEATER COULD RESULT IF
HIGHLY CHLORINATED WATER FLOWS THROUGH IT. REFER TO INSTALLATION
DRAWING FIGURE A
Install the inlet line between the pump and filter. Detailed installation instructions follow in
the next section.
IMPORTANT PLUMBING HINTS
All male pipe fittings must be w
sealant. Always wrap counter-clockwise (opposite of direction to tighten) Never overtighten
fittings, they are plastic and can be broken. Usually 2-3 turns past finger tight will
prevent any leaks. A fitting can always be tightened more if it leaks but not once it is
broken. Additional saddle clamps (Part No. R172264) may be required if plumbing is over
2" in diameter. Clamps can be interlocked. For plumbing 3" to 6" diameter, order saddle
clamps (Part No. R172264XL). It is recommended that the Feeder be bolted down.)
1. Position feeder close to the filter and cut tubing to desired length. Be careful to cut
tubing ends straight.
2. ATTACH INLET LINE TO FEEDER. Wrap ½" x short nipple with seal tape. Screw
nipple into bottom ½" FPT hole in side of feeder. Screw control valve onto other end of
nipple. Be careful not to overtighten. Wrap 90 degree tube fitting with thread tape and screw
into valve. Push compression nut over tubing end of elbow. Push tubing onto tapered end
of elbow. Tighten nut firmly by hand.
SEE DRAWING ON OTHER SIDE OF INSTRUCTION SHEET.
3. ATTACH OUTLET LINE TO FEEDER. Wrap 90 degree fitting with thrad tape and
screw into top ½" FPT hole on side of feeder. Push compression nut over tubing end, then
push tubing onto tapered end of elbow.Tighten nut firmly by hand.
4. INSTALL INLET LINE IN PLUMBING. (Line to bottom side of feeder).Turn off pump and
timer switches. Drill
Secure tubing to saddle clamp fitting by tightening clamp. Make sure clamp is below rib at
end of saddle fitting. SEE DRAWING FIGURE A.
5. INSTALL OUTLET LINE IN PLUMBING. (Line from top of feeder.) Drill
plumbing AFTER the heater and remove burrs. SEE DRAWING FIGURE A. Install saddle
clamp assembly. Attach tubing as in #4 above. Installation is now complete.
9
/16" hole in plumbing, remove burrs and install saddle clamp assembly.
rapped with 3-4 turns of thread tape to act as a thread
o open them as soon as
9
/16" hole in
SEE INSTALLATION DRAWING FIGURE A ON OTHER SIDE.
DIRECTIONS FOR USE
Before start up of feeder, your pool should be properly conditioned and the chlorine residual
should be 1.0 to 1.5 ppm, (Bromine 2.0-4.0 ppm). The sanitizer demand in a pool varies
and is dependent upon many factors; sunlight, bather load, water temperature, etc. As a
result, the valve setting may have to be changed from time to time to conform to conditions.
For example, the winter setting may be 2 and the summer setting may be 3.
Recommended start setting #3. Check residual daily to find ideal valve setting. Note:
Higher numbers dispense more sanitizer.
START UP INSTRUCTIONS
Exercise extreme caution when opening or servicing feeder. Do not inhale fumes. Wear
protective gear. Follow manufacturer's suggestions for handling the chemical.
1. If below water level, close the control valve and drain any water in feeder by removing
¼" NPT plug in bottom, or by opening valve on optional drain kit. After draining,
reinstall plug (use thread seal tape) or close drain valve.
2. Remov
rate use 1" diameter tablets, 3" tablets produce less than 40% of 1" tablets.
3. Making sure O-Ring is clean, lubricated with Lifegard Silicone and is in place, replace
cap. Hand tighten only.
4. Turn on pump and timer switches. Open control valve to #5 for one minute; which will
allow feeder to fill with water. Adjust control valve according to your pool's size. Larger
numbers dispense more sanitizer. The water in a newly filled pool should be properly
conditioned to ensure maximum effectiveness of the Lifegard Automatic Feeder. Consult
your local pool dealer for water conditioning information in your area. Refer to tablet container
for recommended residual. It is recommended that the sanitizer level
the first 5 days. Remember that on hot days higher water temperature or increased pool
activity will cause your pool to use more sanitizer.When possible, increase the feed a day
or two in advance.
HOW TO RECHARGE
1. SHUT OFF PUMP AND TIMER SWIT CHES. OPEN CONTRO L VALVE TO #5
(If below water, level, see special instructions below.)
2. Remove cap; this will allow water and fumes to drain from feeder.
3. Fill with PROPER SIZE TABLETS (SEE START UP INSTRUCTIONS #2)
4. Making sure O-Ring is clean, lubricated with Lifegard Silicone and is in place, replace
cap. Hand tighten onl
5. Turn on pump and timer switches.
6. Leave control valve on #5 for one minute, this will allow feeder to fill with water. Reset
control valve to original setting. Inspect inlet and outlet lines each time feeder is recharged.
Replace lines yearly if necessary. Model 300-29X may require drain kit part #R172268 and
a corrosion resistant check valve part #R172324. (See illustration)
BELOW WATER LEVEL RECHARGING INSTRUCTIONS
1. Shut off pump and timer switches.
2. Shut off control valve.
3. Place a clean containe
4. Exercise extreme caution when opening or servicing feeder. Do not inhale fumes.
Wear protective gear. Remove cap. water will now drain from feeder. Empty container back
into pool or spa.
5. Close drain valve. Follow chemical manufacturer's recommendations for handling
chemical used in your feeder. Fill with proper size tablets or sticks.
6. Making sure O-Ring is clean, lubricated with Lifegard Silicone and is in place, replace
cap. Hand tighten only.
7.
8. Reset control valve to original setting. Inspect inlet and outlet lines each time feeder is
recharged. Replace lines yearly if needed.
e cap of feeder and fill with Trichlor or bromine tablets.For maximum dispensal
be checked daily for
y.
r under drain and open drain valve.
Turn on pump and timer switches.
D A N G E R
READ CAREFULLY
This feeder is designed to use only CLEAN Trichlor-s-trizinetrione OR CLEAN Bromine tables - slow dissolving type. Never use dirty tablets. UNDER NO
CIRCUMSTANCES MIX Trichlor or Bromine with Calcium Hypochlorite, with other forms of c oncentrated chlorine or with other chemicals. Keep inside of
feeder clean of dirt and debris at all times. FIRE AND/OR EXPLOSION MAY RESULT.
NEVER use oils or grease to lubricate o-ring. Oil in contact with Trichlor OR Bromine may result in FIRE. Lubricate o-ring with Lifegard Silicone o-ring Lubricant
ONLY, available at your dealers. If shock treatments or Algaecides containing chemicals other than sanitizers tablets in feeder must be used, turn off Feeder OR
remove tablets until the shock or Algae treatment is complete and all granules have dissolved. Failure to do so may result in granules mixing in feeder causing
FIRE AND/OR EXPLOSION. The shock or algae treatment dissolved in water is safe with tablets. If you are not the original owner of this feeder, not sure which
chemicals was used,
CAP. DO NOT INHALE FUMES.
CALCIUM HYPOCHLORITE IS NOT TO BE USED IN ANY FORM. Use of chemicals other than listed by manufacturer may be hazardous.
© 2013 Pentair Water Pool and Spa, Inc. All rights reserved. Sanford, NC Moorpark, CA Chino, CA www. pentairpool.com P/N R24294.D 12/13
or if dirt and/or debris inside feeder, be SAFE and flush thoroughly with fresh water. CAUTION SHOULD BE USED WHEN REMOVING
• • •
Page 2
Page 3

Page 4

2013
 Loading...