

Pentair QC10-CBR, QC10-EP, QC10-GAC, QC10-TSGAC, QC10-CGAC Installation And Operation Manual
...Page 1
PENTEK® QC10 SERIES QUICK-CHANGE WATER FILTER SYSTEM
INSTALLATION AND OPERATION MANUAL
©2012 Pentair Residential Filtration, LLC www.pentairaqua.com
Page 2
SPECIFICATIONS
WARNING:
CAUTION
CAUTION
CAUTION
PRECAUTIONS
Pressure Range: 30–125 psi (2.1–8.62 bar)
Temperature Range: 40–100°F (4.4–37.8°C)
Rated Service Flow:
QC10-CBR 0.5 gpm (1.9 Lpm)
QC10-EP 0.5 gpm (1.9 Lpm)
QC10-GAC 0.75 gpm (2.8 Lpm)
QC10-TSGAC 0.75 gpm (2.8 Lpm)
QC10-CGAC* 0.6 gpm (2.3 Lpm)
QC10-CB1* 0.6 gpm (2.3 Lpm)
Size: 2.187-inch x 11.625-inch
(55.5 mm x 295.3 mm)
*Not Performance Tested or Certified by NSF.
PARTS INCLUDED
• Filter head with built-in bracket and compression or
push-fit fittings
• Cartridge
• Hardware kit
TOOLS AND MATERIALS REQUIRED
• Phillips screwdriver
• Adjustable wrench (for 1/4-inch male threaded parts)
• Tape measure
• Pencil
• Safety glasses
• Separate drinking water faucet required if supplying
water directly to the kitchen sink
OPTIONAL MATERIALS
• Shut-off valve
• Saddle tap valve with shut-off
• Threaded copper "T"
• 1/4-inch (6.35 mm) plastic or copper tubing or flexible hose
• 3/8-inch (9.53 mm) plastic or copper tubing or flexible hose
Do not use with water that is microbiologically
unsafe or of unknown quality without adequate
disinfection before or after the system.
Protect against freezing to prevent cracking of the
filter and water leakage.
Because of the product’s limited service life and to
prevent costly repairs or possible water damage,
we strongly recommend that the head of the filter
be replaced every ten years. If the head of your
filter has been in use for longer than this period,
it should be replaced immediately. Date the top of
any new head to indicate the next recommended
replacement date.
Turn off water supply to head without cartridge if
it must be left unattended for an extended period
of time.
The QC10-CBR is Tested and Certified by NSF
International to NSF/ANSI Standard 42/53.
The QC10-EP is Tested and Certified by NSF
International to NSF/ANSI Standard 42 for the
aesthetic reduction of Chlorine Taste and Odor.
The QC10-GAC is Tested and Certified by NSF
International to NSF/ANSI Standard 42 for the
aesthetic reduction of Chlorine Taste and Odor.
The QC10-TSGAC is Tested and Certified by NSF
International to NSF/ANSI Standard 42 for the
aesthetic reduction of Chlorine Taste and Odor.
PRODUCT SPECIFICATIONS
Model Claims Filter Capacity
QC10-CBR
QC10-EP chlorine taste & odor
QC10-GAC chlorine taste & odor
QC10-TSGAC
QC10-CGAC*
QC10-CB1
Turbidity = 5 NTU Max.
*Not Performance Tested or Certified by NSF.
2 •PENTEK
®
QC10 SERIES Installation and Operation Manual
chlorine taste & odor,
sediment, lead, atrazine,
lindane, cysts** and turbidity
chlorine taste & odor with
phosphate crystals
chloramine taste & odor and
chlorine taste & odor*
chlorine taste & odor and
sediment*
500 gallons
(1,890 L)
1,500 gallons
(5,670 L)
2,500 gallons
(9,460 L)
1,700 gallons
(6,435 L)
500 gallons
(1,890 L)*
10,000 gallons
(37,850 L)*
Rated
Service
Flow
0.5 gpm
(1.9 L/min)
0.5 gpm
(1.9 L/min)
0.75 gpm
(2.8 L/min)
0.75 gpm
(2.8 L/min)
0.6 gpm
(2.3 L/min)*
0.6 gpm
(2.3 L/min)*
Micron
Rating
1/4-inch
Threaded
0.5 158667 158682 158691
5* 158668 158683 158692
– 158669 158684 158693
– – 158723 158724
– – 158719 158720
- – 158721 158722
1/4-inch
JG
Push fit
3/8-inch
JG
Push fit
QC10-TSGACR
**NSF/ANSI Standard 53 certified to reduce cysts such as
Cryptosporidium and Giardia by mechanical means.
Replacement
Cartridge
QC10-CBRR
155785-43
QC10-EPR
155962-43
QC10-GACR
155901-43
255706-43
QC10-CGACR
255704-43
QC10-CB1R
255705-43
Page 3
INSTALLATION
CAUTION
CAUTION
NOTE: For cold water use only.
NOTE: Make certain that installation complies with all state
and local laws and regulations.
NOTE: The contaminants or other substances removed or
reduced by the selected cartridge are not necessarily
in your water. Filter must be maintained according
to manufacturer’s recommendation including
replacement of filter cartridges. Ask your local water
municipality for a copy of their water analysis, or
have your private well tested by a reputable water
testing lab.
NOTE: After prolonged periods of non-use (such as during
a vacation) it is recommended that the system be
flushed thoroughly. Let water run for 2-3 minutes
before using.
NOTE: The filter cartridge used with this system has a
limited service life. Changes in taste, odor, color,
and/or flow of the water being filtered indicate that
the cartridge should be replaced.
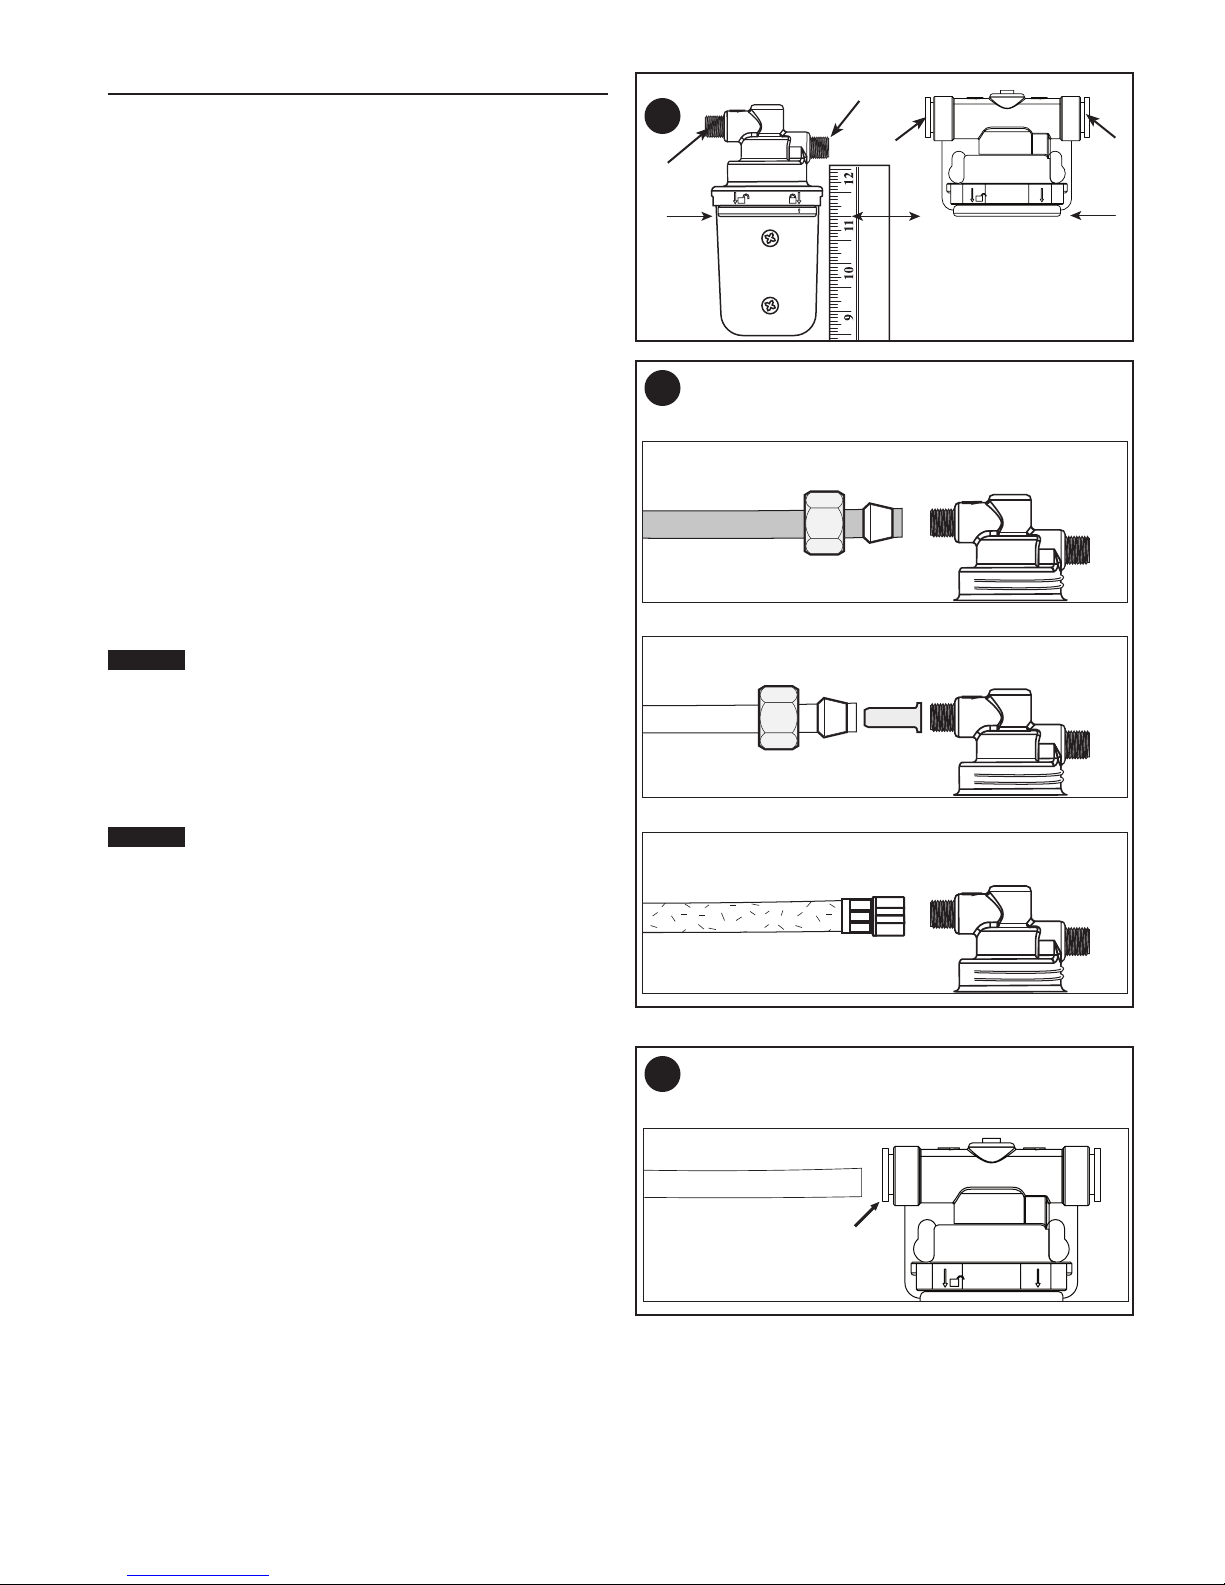
1. Mounting the Filter System
A. Select a location where filter system is to be mounted.
NOTE: Allow 1-1⁄2 inches (38 mm) clearance below housing
or 11-inches (279 mm) below filter head to enable
filter cartridge changes.
Filter head should be mounted securely to a solid
stud or surface. The mounting bracket will support
the weight of the filter and help prevent strain on
the cold water line.
B. Filter head should be mounted in vertical position. Use
mounting bracket as a template to mark screw locations.
Mount filter head in marked location using the screws
provided in the hardware kit.
Cold water supply to the filter should have a
separate shut-off valve. If it does not, a separate
shut-off should be installed.
2. Connecting the Tubing and Fittings
A. Assemble fittings as shown in Figure 2A. Press appropriate
tubing into the inlet and outlet fittings until it stops. Handtighten connections. Then tighten 1 to 1-1⁄2 turn(s) with a
wrench.
B. Cut and deburr 1/4-inch or 3/8-inch tubing. Insert tubing
into push fittings. Push tubing in until you hit a hard stop as
shown in Figure 2B, page 3. To remove tubing from fitting,
depress tube collar around the tube while pulling the tube
out.
Outlet
1A
Inlet
Inlet
11"
1/4-inch THREADED COMPRESSION FITTINGS
2A
COPPER TUBING Hand tighten plus 1 to 1-1/2 turns with a wrench
Ferrule
Nut
PLASTIC TUBING Hand tighten plus 1 to 1-1/2 turns with a wrench
Ferrule
Nut
FLEX TUBING Wrench tighten, do not over tighten
1/4-inch Compression
Flexible Braided Hose
JG PUSH FIT FITTINGS
2B
Push tubing into fitting until you hit a hard stop.
11"
Outlet
3. Installing the Cartridge
See Filter Cartridge Replacement, Step R3, for installation
instructions.
1/4" or 3/8"
Copper or Plastic
Tubing
PENTEK
®
QC10 SERIES Installation and Operation Manual • 3
Tube
Collar
Page 4

FILTER CARTRIDGE REPLACEMENT
(R1) Relieve pressure by turning off water supply to the filter
and dispensing water from the faucet.
(R2) (a) Twist cartridge away from the locked position to the
unlock position , and (b) remove cartridge (R2).
(R3) (c) Line up arrow on replacement cartridge with the
unlocked position on head and firmly push cartridge
into head and (d) turn to locked position (R3).
(R4) Turn on water and check for leaks. If leaks are found, see
Troubleshooting section, page 4.
NOTE: A water cartridge may contain carbon fines (very
fine black powder). This will be released during your
initial flushing.
(R5) Flush water through filter for 5 minutes to remove carbon
fines. Check for leaks again before leaving installation.
R3R2
TROUBLESHOOTING
Leaks:
...Between head and cartridge
1. Turn off the water supply to the filter and dispense water
from faucet.
2. Remove cartridge and inspect o-rings to make sure they
are in place and clean.
3. Install cartridge and turn on water supply, if it still leaks,
contact Technical Support at 800.279.9404. Turn off
icemaker if filtered water goes to icemaker.
...From fittings
1. Relieve pressure by turning off water supply to the filter
opening until water and airflow stops.
2. For copper or plastic tubing, loosen the compression nut
and pull the tubing from the brass fitting.
3. Inspect to see if the ferrule and insert (plastic only) are
properly installed on the tubing.
4. If so, reconnect tubing finger-tight, then tighten nut about
1 to 1-1⁄2 turn(s) with a wrench.
5. Install cartridge and turn on water supply, if it still leaks,
contact Technical Support at 800.279.9404. Turn off
icemaker if filtered water goes to icemaker.
b
Zoomed
View
MAINTENANCE
a
c
d
Contact your local water treatment professional for
replacement cartridge pricing or call Customer Service at
800.279.9404 for a dealer near you.
REPLACEMENT PARTS
Part No. Model No. Description Replacement for
144842 QCH Head Assembly
257438 QCH-1/4PF
257439 QCH-3/8PF
144846
244430 QC-PF Push Fit Hardware Kit John Guest Push Fit
Head & Bracket
Assembly
Head & Bracket
Assembly
1/4-inch MT Hardware
Kit
1/4-inch Male
Threaded Ports
1/4-inch John Guest
Push Fit
3/8-inch John Guest
Push Fit
1/4-inch Male
Threaded Ports
4 •PENTEK
®
QC10 SERIES Installation and Operation Manual
Page 5

PERFORMANCE DATA
WARNING:
WARNING:
Important Notice: Read this performance data and compare
the capabilities of these systems with your actual water
treatment needs. It is recommended that, before installing a
water treatment system, you have your water supply tested to
determine your actual water treatment needs.
This system has been tested according to NSF/ANSI 42 and
53 for the reduction of the substances listed below. The
concentration of the indicated substances in water entering
the system was reduced to a concentration less than or
equal to the permissible limit for water leaving the system as
specified in NSF/ANSI 42 and 53.
Do not use with water that is microbiologically
unsafe or of unknown quality without adequate
disinfection before or after the system.
QC10CBR WITH QC10CBRR CARTRIDGE
Substance
Standard 42—Aesthetic Effects
Chlorine 2.0 mg/L ± 10% ≥ 50% 97.5%
Particulate,
Class I
Particles*
0.5 - 1 µm
Standard 53—Health Effects
Cyst** Minimum 50,000/L 99.95% 99.99%
Turbidity 11 mg/L ± 1 NTU 0.5 NTU 99.1%
Lead (pH
6.5)
Lead (pH
8.5)
Atrazine 0.009 mg/L ± 10% 0.003 mg/L 92.0%
Lindane 0.002 mg/L ± 10% 0.0002 mg/L 99.1%
Flow Rate = 0.5 gpm (1.9 L/min)
Capacity = 500 gallons (1,890 L) or 6 months
* Reduces particles as small as 0.5-1 micron in size by mechanical means.
**NSF/ANSI Standard 53 certified to reduce cysts such as Cryptosporidium and Giardia by
mechanical means.
Influent Challenge
Concentration
at least
10,000
particles/mL
0.15 mg/L ± 10% 0.010 mg/L 99.3%
0.15 mg/L ± 10% 0.010 mg/L 97.9%
Max. Permissible Product
Water Concentration
Reduction
Requirements
Minimum
Reduction
≥ 85% 99.7%
Average
Reduction
QC10TSGAC WITH QC10TSGACR
CARTRIDGE
Substance
Standard 42—Aesthetic Effects
Chlorine 2.0 mg/L ± 10% ≥ 50% 89.5% 96.5%
Flow Rate = 0.75 gpm (2.8 L/min)
Capacity = 1,700 gallons (6,435 L) or 9 months
Testing was performed under standard laboratory conditions; actual performance may vary.
Influent Challenge
Concentration
Test Conditions:
Flow Rate = 0.5 gpm (QC10-CBR & QC10-EP)
Inlet Pressure = 60 psi (4.1 bar)
pH = 7.5 ± 1
Temperature = 68˚F ± 5˚F (20˚C ± 2.5˚C)
Operating Requirements:
Pressure = 30-125 psi (2.1-8.62 bar)
Temperature = 40˚-100˚F (4.4˚-37.8˚C)
Turbidity = 5 NTU Max
California Residents - Proposition 65
This product contains chemicals known to the
Max. Permissible Product
Water Concentration
Reduction
Requirements
Minimum
Reduction
Average
Reduction
= 0.75 gpm (QC-GAC, QC10-TSGAC)
State of California to cause cancer or birth
defects or other reproductive harm.
QC10GAC WITH QC10GACR CARTRIDGE
Substance
Standard 42—Aesthetic Effects
Chlorine 2.0 mg/L ± 10% ≥ 50% 84.2%
Flow Rate = 0.75 gpm (2.8 L/min)
Capacity = 2,500 gallons (9,460 L) or 9 months
Influent Challenge
Concentration
Max. Permissible Product
Water Concentration
Reduction
Requirements
Minimum
Reduction
Average
Reduction
QC10EP WITH QC10EPR CARTRIDGE
Substance
Standard 42—Aesthetic Effects
Chlorine 2.0 mg/L ± 10% ≥ 50% 93.5%
Flow Rate = 0.5 gpm (1.9L/min)
Capacity = 1,500 gallons (5,670 L) or 9 months
Testing was performed under standard laboratory conditions; actual performance may vary.
Influent Challenge
Concentration
Max. Permissible Product
Water Concentration
Reduction
Requirements
Minimum
Reduction
Average
Reduction
EPA Est. #090375-MEX-001 PENTEK
®
QC10 SERIES Installation and Operation Manual • 5
Page 6

6 •PENTEK
®
QC10 SERIES Installation and Operation Manual
Page 7

PENTEK
®
QC10 SERIES Installation and Operation Manual • 7
Page 8

For Pentek® Product Warranties visit:
Pentek® para las gasantías de los productos visite:
Pour Pentek® garanties produit visitez le site:
www.pentairaqua.com/pro
}
FILTRATION & PROCESS
5730 NORTH GLEN PARK ROAD, MILWAUKEE, WI 53209
P: 262.238.4400 | WWW.PENTAIRAQUA.COM | CUSTOMER CARE: 800.279.9404 | tech-support@pentair.com
All Pentair trademarks and logos are owned by Pentair, Inc. or its affiliates. All other registered and unregistered trademarks and logos are the property of their
respective owners. Because we are continuously improving our products and services, Pentair reserves the right to change specifications without prior notice.
Pentair is an equal opportunity employer.
146224 REV F FE14 ©2014 Pentair Residential Filtration, LLC All Rights Reserved.
 Loading...