

Page 1

®
Prowler 720 and 730
Robotic Inground Pool Cleaners
Installation
User's Guide
IMPORTANT SAFETY INSTRUCTIONS
READ AND FOLLOW ALL INSTRUCTIONS
SAVE THESE INSTRUCTIONS
and
Page 2

Customer Service
If you have questions about ordering Pentair Water Pool and Spa (”Pentair”) replacement parts,
and pool products, please use the following contact information:
Customer Service (8 A.M. to 5 P.M. — Eastern and Pacific Times)
Phone: (800) 831-7133
Fax: (800) 284-4151
Technical Support
Sanford, North Carolina (8 A.M. to 5 P.M. — Eastern Time)
Phone: (919) 566-8000
Fax: (919) 566-8920
Moorpark, California (8 A.M. to 5 P.M. — Pacific Time)
Phone: (805) 553-5000 (Ext. 6312)
Fax: (805) 553-5502
Web site
visit www.pentairpool.com or www.staritepool.com to find information about Pentair products
© 2011 Pentair Water Pool and Spa, Inc. All rights reserved.
This document is subject to change without notice.
1620 Hawkins Ave., Sanford, NC 27330 • (919) 566-8000
10951 West Los Angeles Ave., Moorpark, CA 93021 • (805) 553-5000
Trademarks and Disclaimers: Prowler and Pentair Water Pool and Spa are trademarks and/or registered trademarks of Pentair
Water Pool and Spa, Inc. and/or its affiliated companies in the United States and/or other countries. Unless noted, names and brands
of others that may be used in this document are not used to indicate an affiliation or endorsement between the proprietors of these
names and brands and Pentair Water Pool and Spa, Inc. Those names and brands may be the trademarks or registered trademarks of
those parties or others.
P/N P12154 Rev. B 5/11/11
®
®
Page 3

Contents
Important Warning and Safety Instructions .........................................................................ii
Section 1: Introduction ..................................................................................................... 1
Prowler 720 and 730 Overview ...............................................................................1
Prowler 720 and 730 Features ................................................................................2
Section 2: Installation ....................................................................................................... 3
Cleaner Components ...............................................................................................3
Operating the Prowler 720 and 730 Cleaner ........................................................... 4
Technical Data .........................................................................................................4
Cleaner Placement .................................................................................................. 5
Power Supply Set-Up ..............................................................................................6
i
Wireless Remote Control ........................................................................................ 7
Using the Radio Remote Control Feature ................................................................7
Remote Control Cleaning Modes .............................................................................7
Replacing the Remote Control Battery ....................................................................8
Section 3: Maintenance .....................................................................................................9
Changing/Cleaning the Filter Bag ............................................................................9
Changing the Drive Belts ......................................................................................... 10
Changing Brushes ................................................................................................... 10
Cable Care .............................................................................................................. 11
Important Maintenance Tips .................................................................................... 11
In/Off-Season Storage .............................................................................................11
Section 4: Replacement Parts ..........................................................................................12
Prowler 720 Exploded View ..................................................................................... 12
Prowler 720 Replacement Parts List .......................................................................13
Prowler 730 Exploded View ..................................................................................... 14
Prowler 730 Replacement Parts List .......................................................................15
Prowler 720 and 730 Installation and User’s Guide
Page 4

ii
IMPORTANT WARNING AND SAFETY INSTRUCTIONS
Important Notice:
Attention Installer: This guide contains important information about the installation, operation and safe use of
this product. This information should be given to the owner and/or operator of this equipment after installation of the
pool cleaner.
Attention User: This manual contains important information that will help you in operating and maintaining this
pool cleaner. Please retain it for future reference. Consult Pentair with any questions regarding this equipment.
WARNING — Before installing this product, read and follow all warning notices and instructions which are
included. Failure to follow safety warnings and instructions can result in severe injury, death,
or property damage. Call (800) 831-7133 for additional free copies of these instructions.
Consumer Information and Safety
The Prowler 720 and 730 pool cleaners are designed and manufactured to provide many years of safe and reliable
service when installed, operated and maintained according to the information in this manual. Throughout the manual,
safety warnings and cautions are identified by the “ “ symbol. Be sure to read and comply with all of the warnings
and cautions.
®
DANGER — Risk of electrical shock or electrocution.
The electrical supply to this product must be installed in accordance with the National Electrical
Code and all applicable local codes and ordinances. Improper installation will create an electrical
hazard which could result in death or serious injury to pool or spa users, installers, or others due
to electrical shock, and may also cause damage to property.
Always disconnect the power to the cleaner before servicing. Failure to do so could result in death
or serious injury to serviceman, pool users or others due to electrical shock. Read and follow the
specific instructions inside this guide.
WARNING — Hazardous suction. Do not play with cleaner or cable or apply to body. Can trap and tear hair
or body parts. Cable can trip or entangle swimmers which could result in drowning.
WARNING — Do not allow swimmers in the pool while pool cleaner is operating. Cable can trip or entangle
swimmers which could result in drowning.
WARNING — To reduce the risk of injury, do not let children use or play with pool cleaner.
CAUTION — Before installing the cleaner in a gunite pool or a pool that is partially or completely tiled, repair
loose tiles and tighten any loose light rings.
CAUTION — Before installing the cleaner, understand cleaner coverage: The cleaner was not designed to
automatically clean steps or to work under a solar cover. It was also not designed to do initial
cleanup for a new pool installation.
CAUTION — The unit must be supplied through a residual current device (RCD) having a rated operating
current not exceeding 30mA.
• The connection to the branch circuit should be consistent with local and National Electrical Code.
• Mishandling the unit can result in leakage of lubricants.
• If the supply cord is damaged, it must be replaced by a licensed or certified electrician or a
qualified pool serviceman in order to avoid hazards.
Prowler 720 and 730 Installation and User’s Guide
Page 5

GENERAL INSTALLATION INFORMATION
Pre-installation check list
Before installing your cleaner, review and understand all warnings and safety information in this guide. Failure to
follow these instructions or improper installation of the cleaner can result in damage to the pool finish or the vinyl
liner, Pentair Water Pool and Spa, Inc. disclaims any liability for repairs or replacement to any of these structures
or components of the customer’s pool.
Before installing the cleaner in a vinyl liner pool:
Check liner closely for signs of deterioration or damage from age, chemicals, pool wall damage, etc. If any
damage is found, have a qualified pool professional make all the necessary repairs. Also, if there are stones,
roots, etc., under the liner, remove them before installing the cleaner.
Before installing the cleaner in a gunite pool or a pool that is partially or completely tiled:
Repair loose tiles and tighten any loose light rings.
iii
Before installing the cleaner, clean your filter system:
Make sure you have cleaned the filter, including backwashing, rinsing, and emptying all baskets. A clean
system is necessary for proper cleaner operation and coverage.
Before installing the cleaner, fill the hose with water:
Always make sure the cleaner head is submerged and the hose is full of water before connecting the hose to
the filtration system (whether through a skimmer or dedicated wall fitting). Air in the system can damage the
pump through dry running and overheating.
Before installing the cleaner, understand cleaner coverage:
The cleaner is designed to rid your pool of debris in approximately 4-6 hours. Less time could be needed,
depending on the pool size. The cleaner was not designed to automatically clean steps or swimouts or to
work under a solar cover. It was also not designed to do initial cleanup for a new pool or when opening your
pool for the season.
AFTER installing the cleaner, make sure the cleaner is operating correctly :
The cleaner may need some minor adjustments to make sure it is operating properly so there is no damage
to the pool finish. Certain vinyl liner patterns are particularly susceptible to surface wear, pattern removal, ink
rubbing off of, or serious scratches to the pattern caused by objects coming into contact with the vinyl surface,
including automatic pool cleaners. Pentair Water Pool and Spa, Inc. is not responsible for any pattern removal,
abrasions or markings on vinyl liners.
Prowler 720 and 730 Installation and User’s Guide
Page 6

iv
WARRANTY INFORMATION
Limited Warranty Terms & Conditions
Before installing your cleaner, review and understand all warnings, safety and warranty information in this guide. Failure to follow these
instructions or improper installation of the cleaner can result in damage to the pool finish or the vinyl liner, Pentair Water Pool and Spa, Inc.
disclaims any liability for repairs or replacement to any of these structures or components of the customer’s pool.
The Cleaner manufacturer, Pentair Water Pool and Spa, Inc. (“Manufacturer”), hereby provides the following limited warranty to the
purchaser (“Customer”): WHICH IS SUBJECT ONLY TO THE FOLLOWING CONDITIONS AND EXCLUSIONS:
This limited warranty does not include replacement of parts which become discolored due to exposure to sunlight or chemicals, or parts
which, even if worn, do not affect performance of the cleaner. Nicks, scratches, fading, discoloration, etc. are cosmetic conditions that
do not affect mechanical performance. Both Manufacturer and Pentair Water Pool and Spa’s dealer reserve the right to deny
any and all warranty claims made for worn parts if the wear does not negatively affect mechanical performance of the
cleaner.
The Cleaner is designed to function in a properly designed, constructed and maintained pool. This limited warranty does not extend in the
circumstances where the pool’s design, construction or maintenance is defective, substandard or inappropriate for the Cleaner’s
operation.
Deterioration, discoloration or brittleness of any pool finish can be caused over time separately by, or in combination with, age, an
imbalance in water chemistry, improper installation, and other factors. Customer hereby disclaims any and all claims, and releases
Manufacturer from any and all claims for damages to any pool plaster or vinyl liner in Customer’s pool by reason of the use and/or
operation of the Cleaner.
Under no circumstances shall Manufacturer be liable for any loss or damage, whether direct, consequential or incidental, arising out of the
use or inability to use the Cleaner or the Hose in Customer’s pool.
This limited warranty does not apply to any injury, loss, damage, defect, or malfunction of the Cleaner or failure to function resulting from
any failure to operate or maintain the Cleaner in accordance with the directions contained in the Installation and Operation Manual or
operating instructions provided by Pentair Water Pool and Spa or any injury, loss, damage, defect, or malfunction, or failure to function
resulting from any accident, acts of God, alterations in the Cleaner by anyone other than Manufacturer; or misuse, unreasonable use,
tampering, abuse, acts, omissions, failure or negligence by anyone other than Manufacturer including but not limited to such damages
or injuries to parts resulting from improper installation, or damage to pump parts resulting from running the pump dry (e.g., interruption
in or inadequate supply of water to internal pump parts due to loss of prime, or obstruction in lines or otherwise); or damage, defect or
malfunction resulting from defects in, failure or malfunction of, or negligence, abuse, or misuse with respect to equipment other than the
Cleaner; or any damage or loss of any nature whatsoever and personal injury caused due to the presence of a foreign object in or about
the pool.
Disclaimer of Liability
About Your Pool and Prowler 720 and 730
There are a multitude of factors that contribute to the life of your pool. The Prowler 720 and 730 robotic pool cleaners are very passive
products that will have no impact on pool life.
Please be aware that over time, deterioration, discoloration and brittleness of any pool finish can be caused separately by, or in combination
with, age, an imbalance in pool water chemistry, improper installation and other factors. Robotic pool cleaners, such as Prowler 720 and
730, will not remove or cause wear on “good” pool plaster. In fact, the opposite is true–pool plaster will eventually cause wear on the
cleaner.
The same situation holds true for vinyl-lined in-ground swimming pools, because vinyl liners are also affected by the environment and
factors such as pool water chemistry, sunlight and the pool’s surroundings. Therefore over time, vinyl can become brittle and weak. In
addition, vinyl-lined pools are affected by the workmanship, composition and installation of the liner and the workmanship and quality of
construction of the supporting walls and pool base. These are all factors which can contribute to liner failure. The existence of any of
these type of conditions in your pool is not caused by the use or operation of Prowler 720 and 730. The manufacturer disclaims any
liability for repairs or replacement to any of these structures or components of the customer’s pool.
The pool owner must assume all responsibility for the condition and maintenance of the pool’s surface, water and deck.
Prowler 720 and 730 Installation and User’s Guide
Page 7

Section 1
Introduction
The Prowler 720 and 730 Overview
Vacuums what you can see, filters what you can’t...
Prowler 720 and 730 are the computer-controlled, programmed cleaners that scrub and vacuum your pool’s
bottom, walls and steps and provides supplemental filtration of pool water.
Powerful, efficient, and smart!
The Prowler 720 and 730 features the patented Aqua Smart System. This intelligent program enables the cleaner
to fully cover and efficiently clean any standard residential swimming pool in approximately one hour (90
minutes for larger residential pools). The high-speed drive motor propels the unit across pool surfaces while a
high-efficiency pump motor delivers thorough, economical cleaning performance.
Totally independent of your pool circulation system, the Prowler 720 and 730 provide on-demand cleaning without
running pumps. It requires no installation, no booster pump, no hoses. Just plug it in and place it in your pool…it’s
a totally self-contained cleaning and filtration system.
1
Two-way cleaning with remote control convenience
The Prowler 730™ Remote Control provides the ultimate in automatic pool cleaning convenience. The wireless
radio remote control system provides two automatic cleaning options – one for the pool bottom and a second for
the bottom and sides. Remote control functions allow you to override the automatic cleaning modes to perform
quick spot clean-ups. Simply guide the cleaner to any area of the pool with the touch of a button.
No other cleaner is so simple.
No other cleaner provides such a complete cleaning job at such a low operating cost.
Prowler 720
Prowler 720 and 730 Installation and User’s Guide
Page 8

2
General Features
Two-way cleaning performance:
• Powerful vacuum action removes fine particles and larger debris.
• Integrated filtration system captures dirt and debris in handy collection bag.
• Integrated filter reduces run time of your primary filtration system by 25% to save on pump energy use
and normal wear and tear.
• Works fast; thoroughly scrubs and vacuums pools up to 20 x 50 feet in just 60–90 minutes.
• Auto-reverse feature prevents hang-ups in corners and by steps and ladders for uninterrupted service.
• Cleans all pool surfaces: gunite, vinyl, fiberglass and tile.
Additional Features:
Time and energy-saving features:
• Reduces your filtration system’s run time.
• Removes algae and bacteria.
• Vacuums all types of debris.
• Cleans and scrubs most pool steps.
• Built-in filtration system with reusable filter bag.
• Cleans any size, shape and type of standard residential pool in only one hour.
• The intelligent program enables the cleaner to fully cover and efficiently clean any standard residential
swimming pool in approximately one hour (90 minutes for larger residential pools).
Prowler 720 and 730 Installation and User’s Guide
Page 9
Section 2
Installation
The following general information describes how to install the Prowler 720 and 730 robotic pool cleaners. Carefully
read the following so that you are fully aware of all the capabilities and features this Prowler cleaner has to offer.
NOTE: Before installing this product, read and follow all warning notices and instructions starting
on page ii.
Introducing your new Prowler Cleaner
Dear Customer, Congratulations! You have purchased one of the best pool cleaners that technology has to offer!
Thank you for choosing the Prowler cleaner to clean your pool. We hope that you will enjoy using your new
Prowler cleaner to maintain your swimming pool for years to come.
Your Prowler automatic pool cleaner includes the following:
• Cleaning Unit & Cable
3
• Power Supply (Transformer)
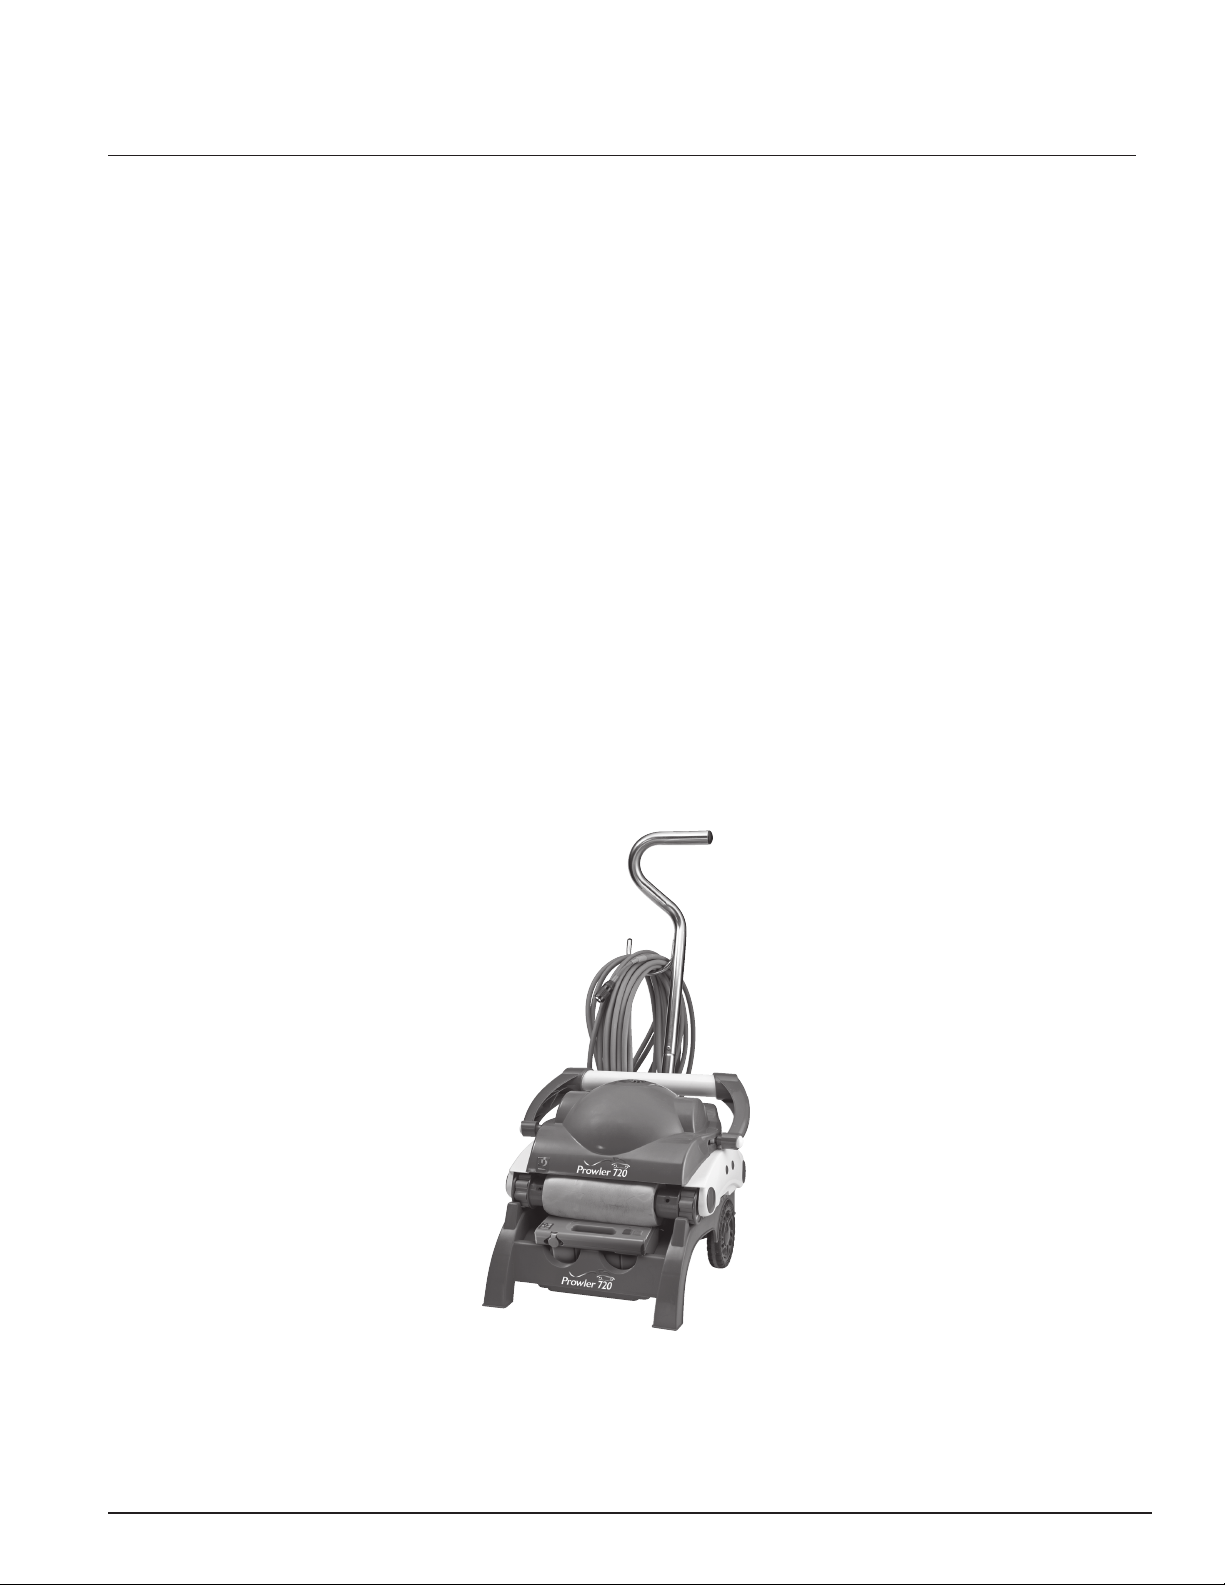
• Caddy — Cart
Photo shows the Prowler 720 in a convenient,
protective cradle for easy storage and transport,
also available for the Prowler 730 model.
Prowler 720 and 730 Installation and User’s Guide
Page 10
4
Operating the Prowler 720 and 730 Cleaners
WARNING —
WARNING — Risk of electrical shock or electrocution.
CAUTION —
Your Cleaner should not be used while people are swimming in the pool. The cable can trip or
entangle swimmers which could result in drowning.
A Ground Fault Current Interrupter (GFCI-USA) or a Residual Current Device (RCD-EUROPE) must
be installed to protect your electric outlet and to prevent any possible electrical shock. Failure to do
so could create an electrical hazard which could result in death or serious injury to pool or spa users,
installers, or others due to electrical shock, and may also cause damage to property.
DO not switch the pool cleaner to “ON” if it is not fully immersed in water. Operating the cleaner out
of water will immediately cause severe damage and will result in loss of warranty.
Allow the cleaner to remain in the pool for 15 to 20 minutes following the end of its cleaning cycle.
This will allow the motors to cool adequately. Do not leave the cleaner in the pool all the time. Always
remember to turn the power supply “OFF” and unplug it from the power outlet before removing the
cleaner from the pool.
027relworP
htgnelelbacgnitaolF
037relworP
htgnelelbacgnitaolF
rotomevirD
rotompmuP
noitacificepsretliFnorcim2elbasueR
noitacificepslacirtcelEzH06/V511
retawniegatloVCDV42
ezisloopdednemmoceRteef05x02sretem2.51x1.6
deretlifretawfoemuloV.rh/.lag522,4m61
teef06sretem81
57
teef
deepshgihCDV42
elbisrembus
ycneiciffehgihCDV42
elbisrembus
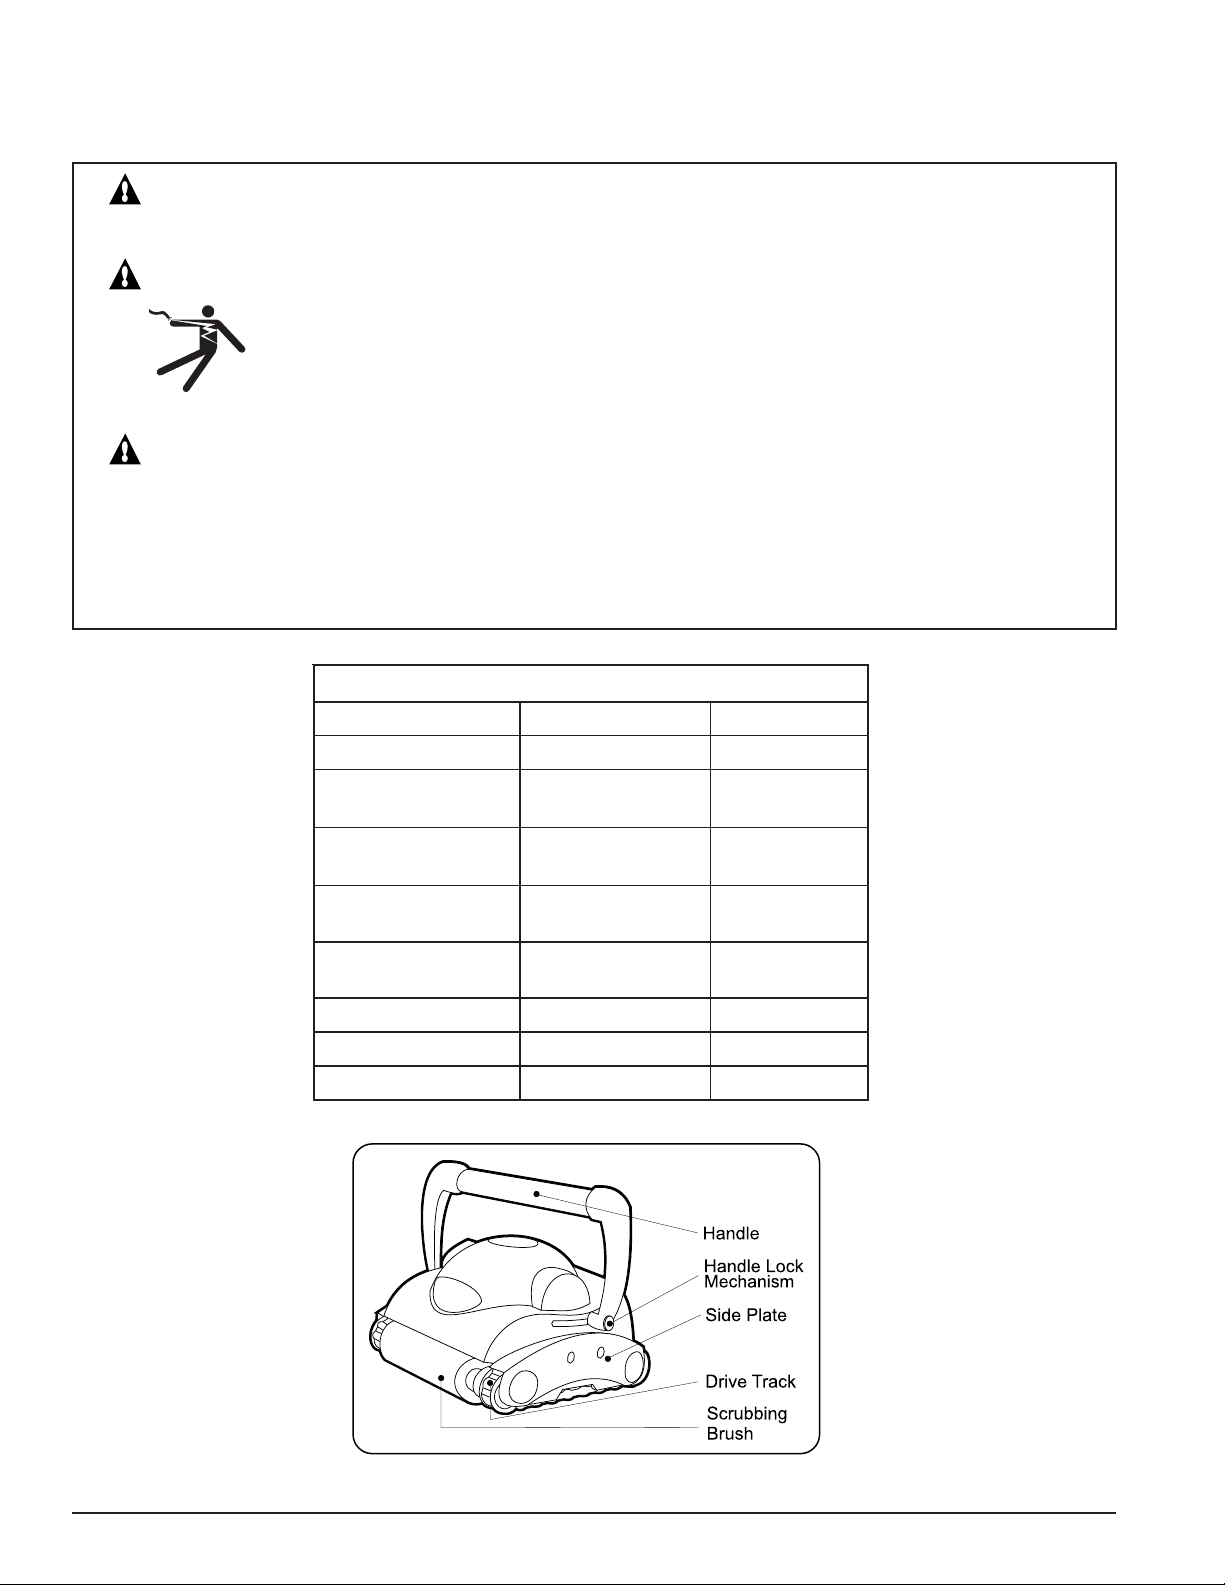
ataDlacinhceT037dna027relworP
3
.rh/
32
sretem
Prowler 720 and 730 Installation and User’s Guide
Figure 1.
Page 11
Operating the Prowler 720 and 730 Cleaners, cont’d.
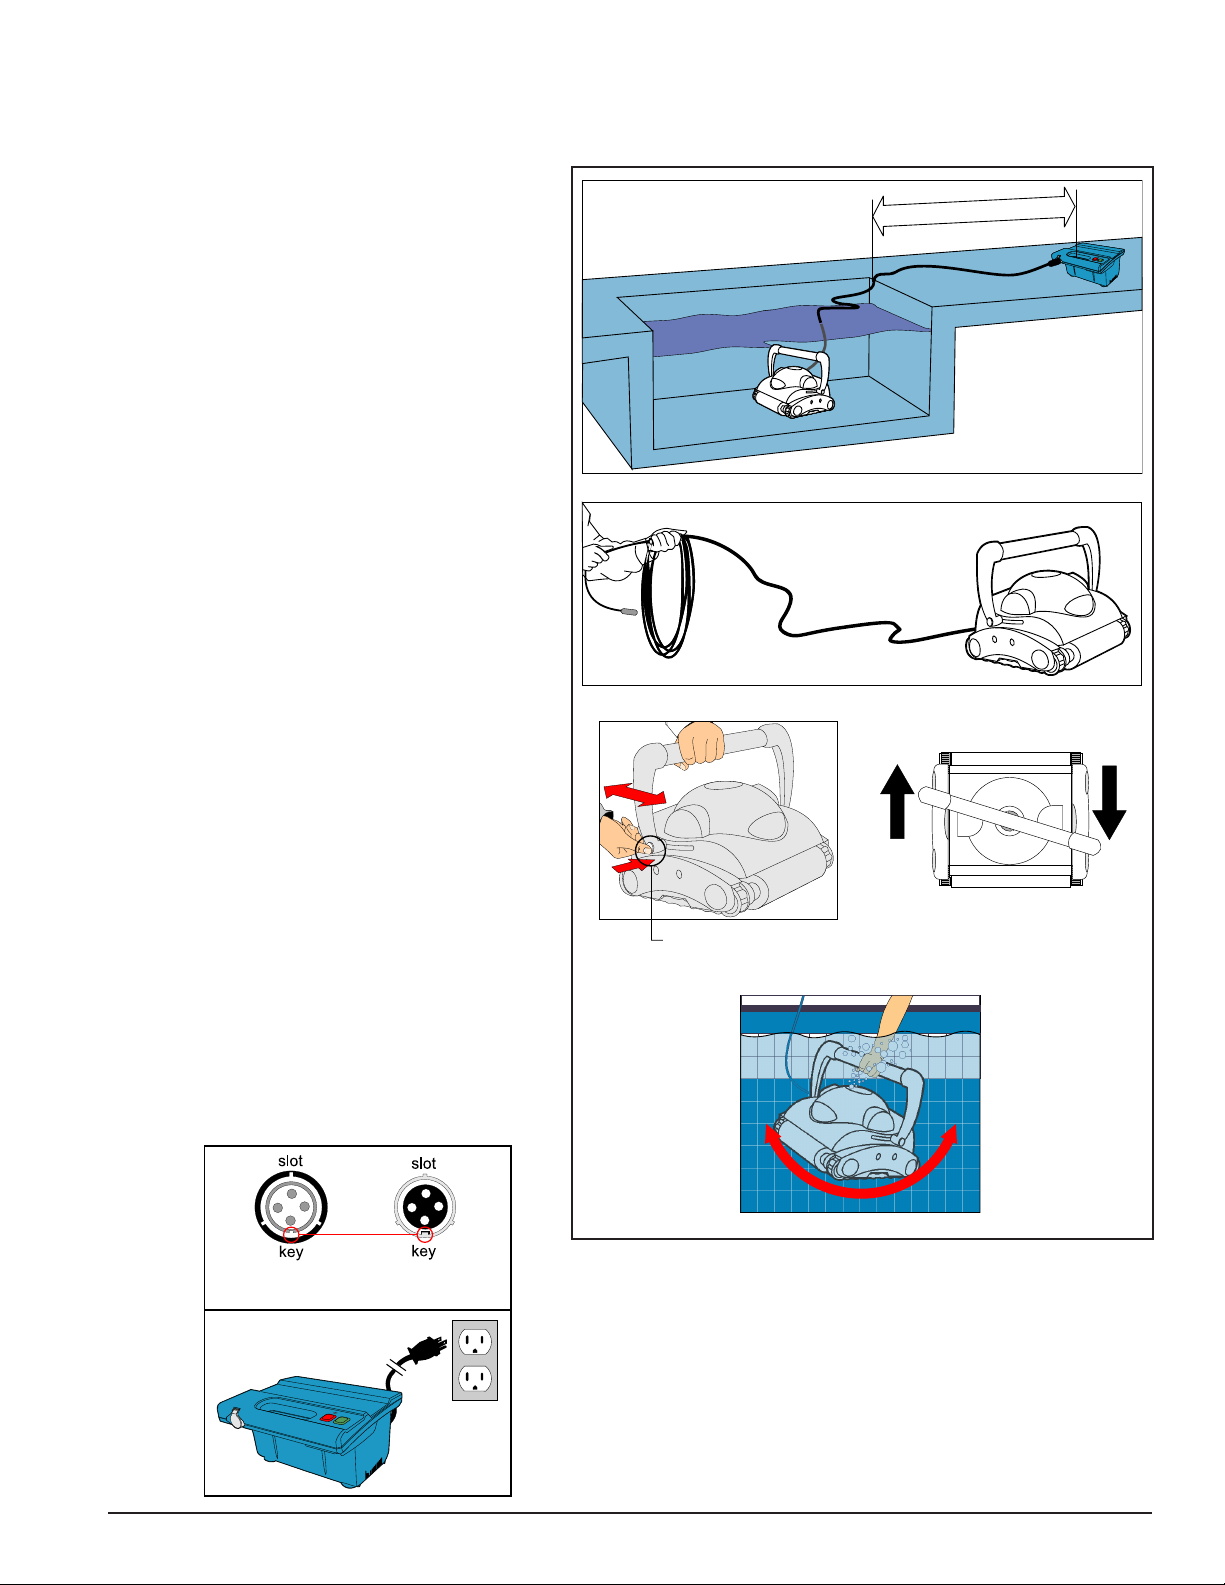
1. Place the power supply, (transformer), at
least ten feet / three meters from the pool as
shown in Figure 2. The transformer will
supply low voltage to the cleaner.
2. Uncoil the cable as shown in Figure 3.
3. For proper operation, lock the moveable
handle diagonally across the top of the
cleaner's body. Push down on the handle
lock mechanism and slide the handle all the
way to the end, (we recommend one slot
before the end), then release the lock. The
handle will remain fixed in this position.
Repeat this process on the other side of the
cleaner. Remember, the handle must be
fixed diagonally, see Figures 4 and 5.
4. Place the unit in the water. Turn the unit
side to side in the water to allow air to
escape from the body and then let the
cleaner sink to the bottom of the pool, see
Figure 6. Then, spread the cable over the
surface of the pool as evenly as possible as
shown in Figure 2.
5
10 ft. / 3m
Figure 2.
Figure 3.
5. Plug the cable into the power supply. Make
sure the key on the plug exactly corresponds
with the key slot on the socket of the power
supply, see Figure 7. Plug the power supply
into a grounded outlet. Make sure that the
electric outlet has been properly grounded,
see Figure 8. The light will glow indicating
that the system is “ON” and the pool cleaner
will start the cleaning cycle. The unit keeps
record of the number of cleaning cycles.
Only an authorized service center can display
the accumulated cleaning cycles. (See
details on the next page.)
Figure 7.
Transformer
Plug
Transformer
Socket
Figure 4.
Handle Lock Mechanism
Figure 5.
Figure 6.
Figure 8.
Prowler 720 and 730 Installation and User’s Guide
Page 12
6
Setting Up the Standard Power Supply (Transformer)
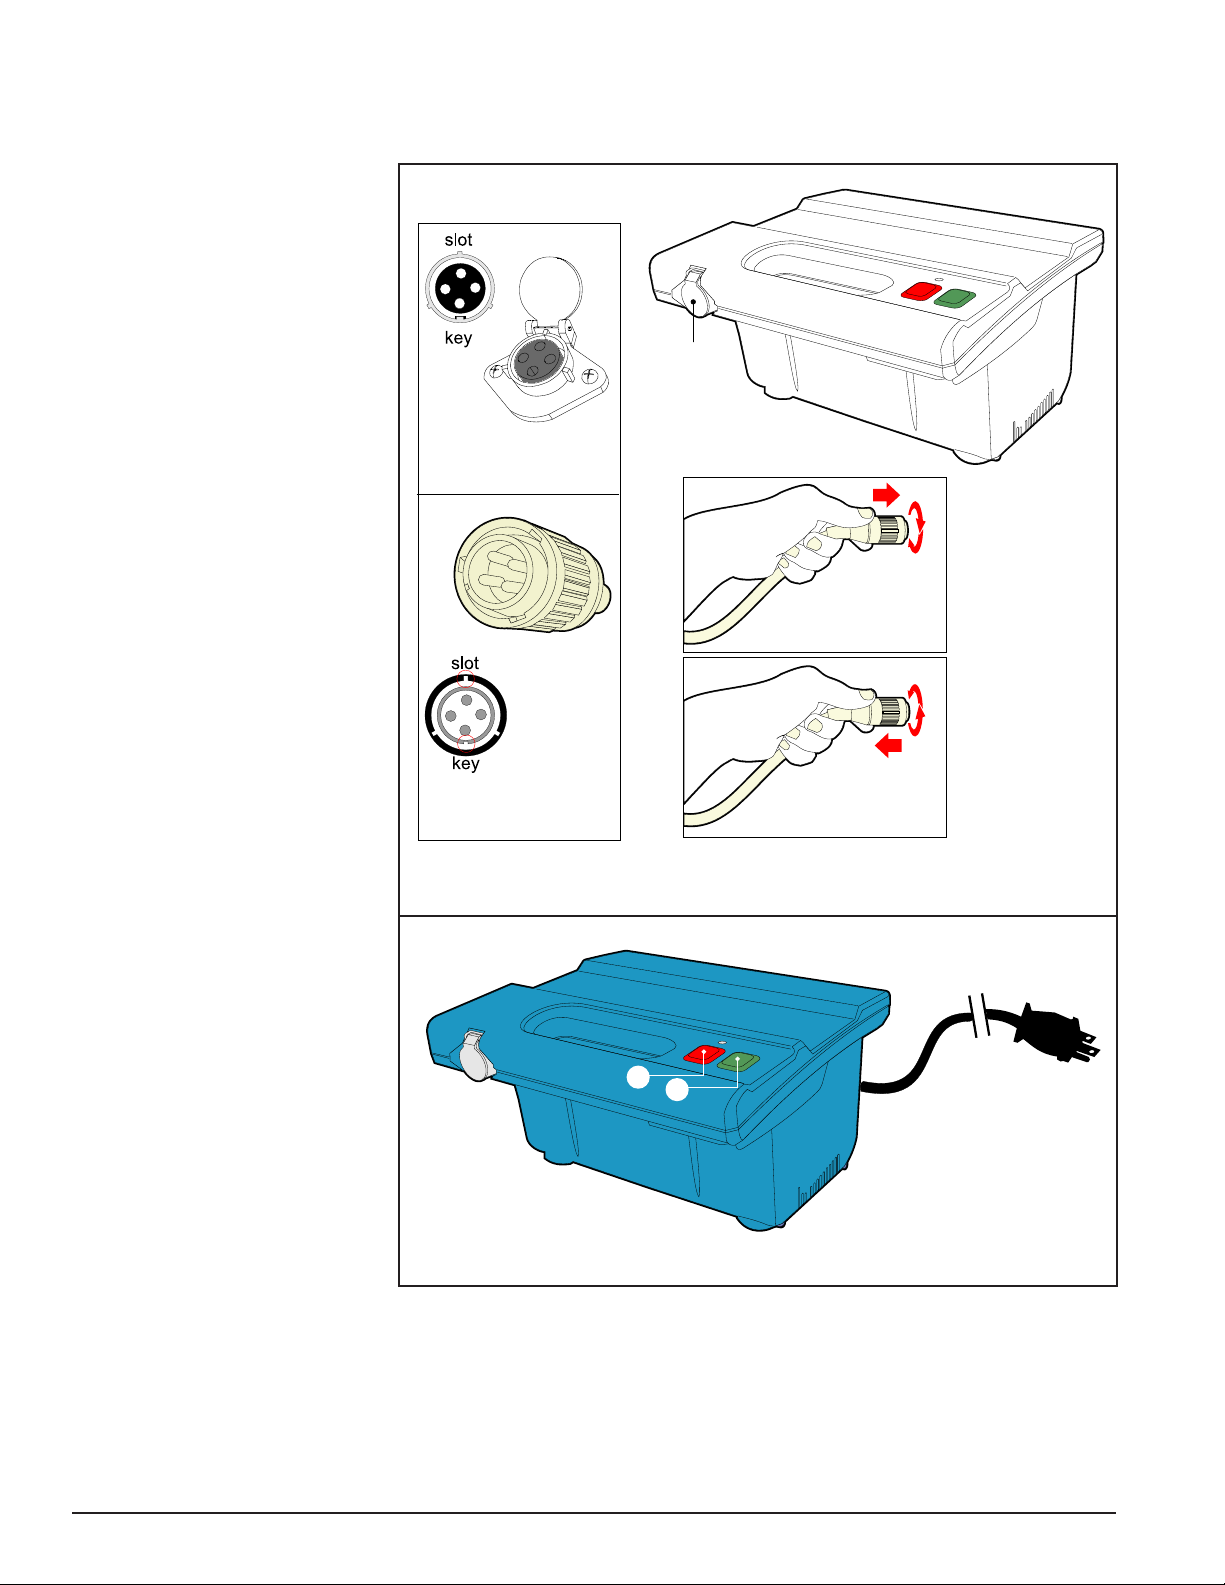
To plug the cable into the
transformer socket on the power
supply, follow these steps:
1. Prepare the plug with the
key and three outside slots
as shown in Figure 9.
2. Fit the key and the slots
from cable plug exactly
with the corresponding
key and slots from the
transformer socket.
3. Push the plug all the way
into the socket of the
transformer.
4. Once the plug is in, rotate
the plug to the right to
lock it into place as
shown in Figure 9.
5. To remove the plug, first
rotate the plug to the left
to unlock it, then pull it
out.
6. The Power Supply
(Transformer) is now
ready for operation.
Listed below are the
Transformer buttons as
shown in Figure 10:
Transformer
Transformer
Cable Plug
Transformer
Socket
Socket
Push and rotate right to lock
Cable Plug
Rotate left and pull to unlock
Figure 9.
a. Green Button: push
button turns the
machine ”ON”.
b. Red Button: push
button turns the
machine “OFF”.
IMPORTANT– After every
cycle, the pool cleaner will turn
off automatically. In case you
want to turn the machine off
during the working cycle, push
the red button once and the
indicator light will turn off
(Remember to keep the Power Supply at least 10 feet away from the pool.)
signaling that the machine has
stopped running.
Prowler 720 and 730 Installation and User’s Guide
b
a
Figure 10.
Page 13
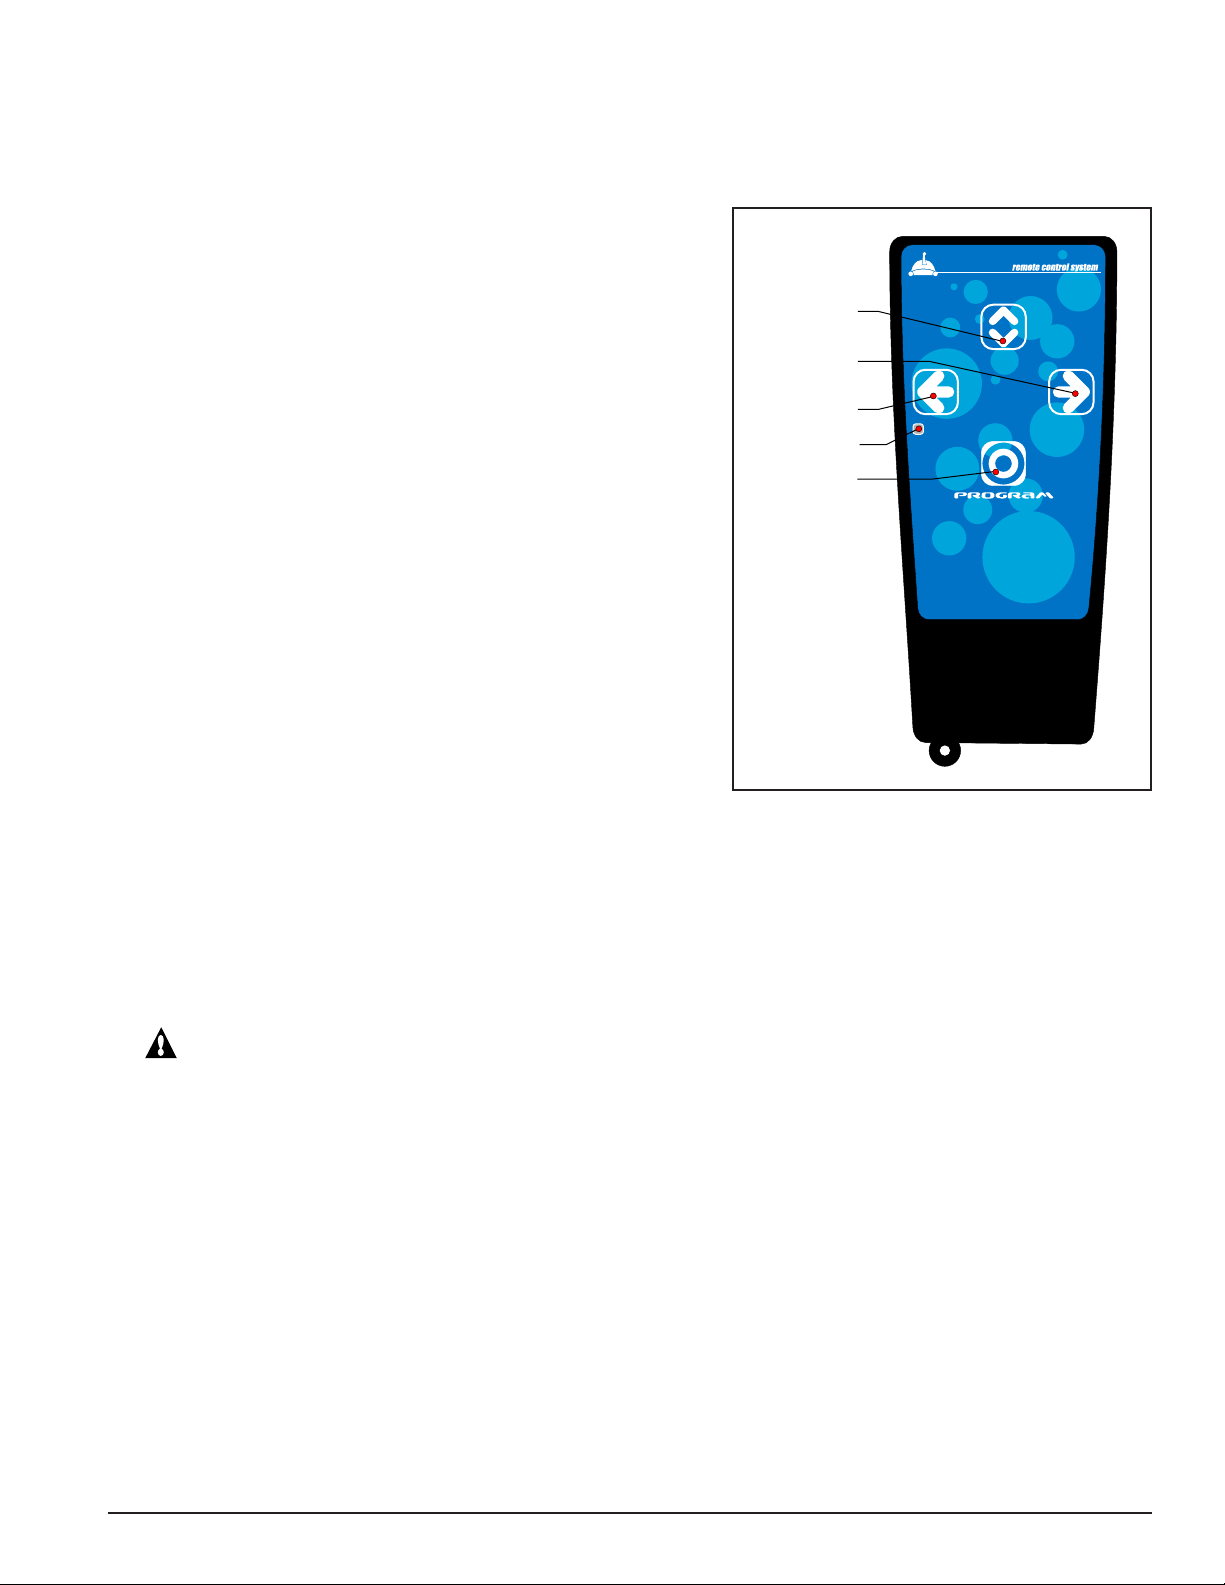
Wireless Remote Control - only for Prowler 730 cleaners equipped with Remote Control
Forward / Reverse
Right
Left
LED
Program
Using Radio Remote Control Feature and Accessing Cleaning Modes
The Remote Control Model is equipped with a multi-directional
radio transmitter, see Figure 12. This feature will enable you to
guide the pool cleaner directly to areas of the pool requiring
additional cleaning attention or for quick clean-ups. When you
press the Right or Left buttons, the cleaner will turn until the
button is released. Then, the cleaner will proceed straight ahead
in the new direction. Pressing the Forward/Reverse button will
cause the cleaner to proceed in the new direction after the button
has been released.
Cleaning Modes
The Remote Control has an advanced cleaning program with two
options:
7
Option 1: STANDARD MODE
— this cycle is 1½ hours long and
cleans the bottom of the pool only.
Option 2: SUPER MODE
— this cycle cleans the bottom and the
walls of the swimming pools. This cleaning program is 3 hours
long and is registered in the cycle counter as two cycles (one for
each 1.5 hours of use). Every time a cleaning cycle is complete
the cleaner will stop automatically. Every remote control unit is
Figure 12.
shipped from the factory with the “Standard Mode” as the primary
program. To switch from the “Standard Mode” to the “Super Mode”, simply press the "Program" button once.
The cleaner will immediately receive the command and will start to clean the bottom and the walls. Your signal
that the cleaner is in the “Special Mode” is that the machine will climb up to the waterline in the first contact with
a wall. To return to the “Standard Mode”, simply press the “Program” button again, ONLY when the machine is
on the pool bottom.
NOTE: When the Power Supply is turned off, the Mode is automatically returned to the "Standard Mode" (floor
cleaning only).
CAUTION —
Be sure to always keep your Pentair pool cleaner properly stored anywhere between 50° to 104°
Fahrenheit, (10° to 40° Celsius). This will keep the motors, plastics and seals protected. Failure to
comply will result in loss of warranty.
Prowler 720 and 730 Installation and User’s Guide
Page 14
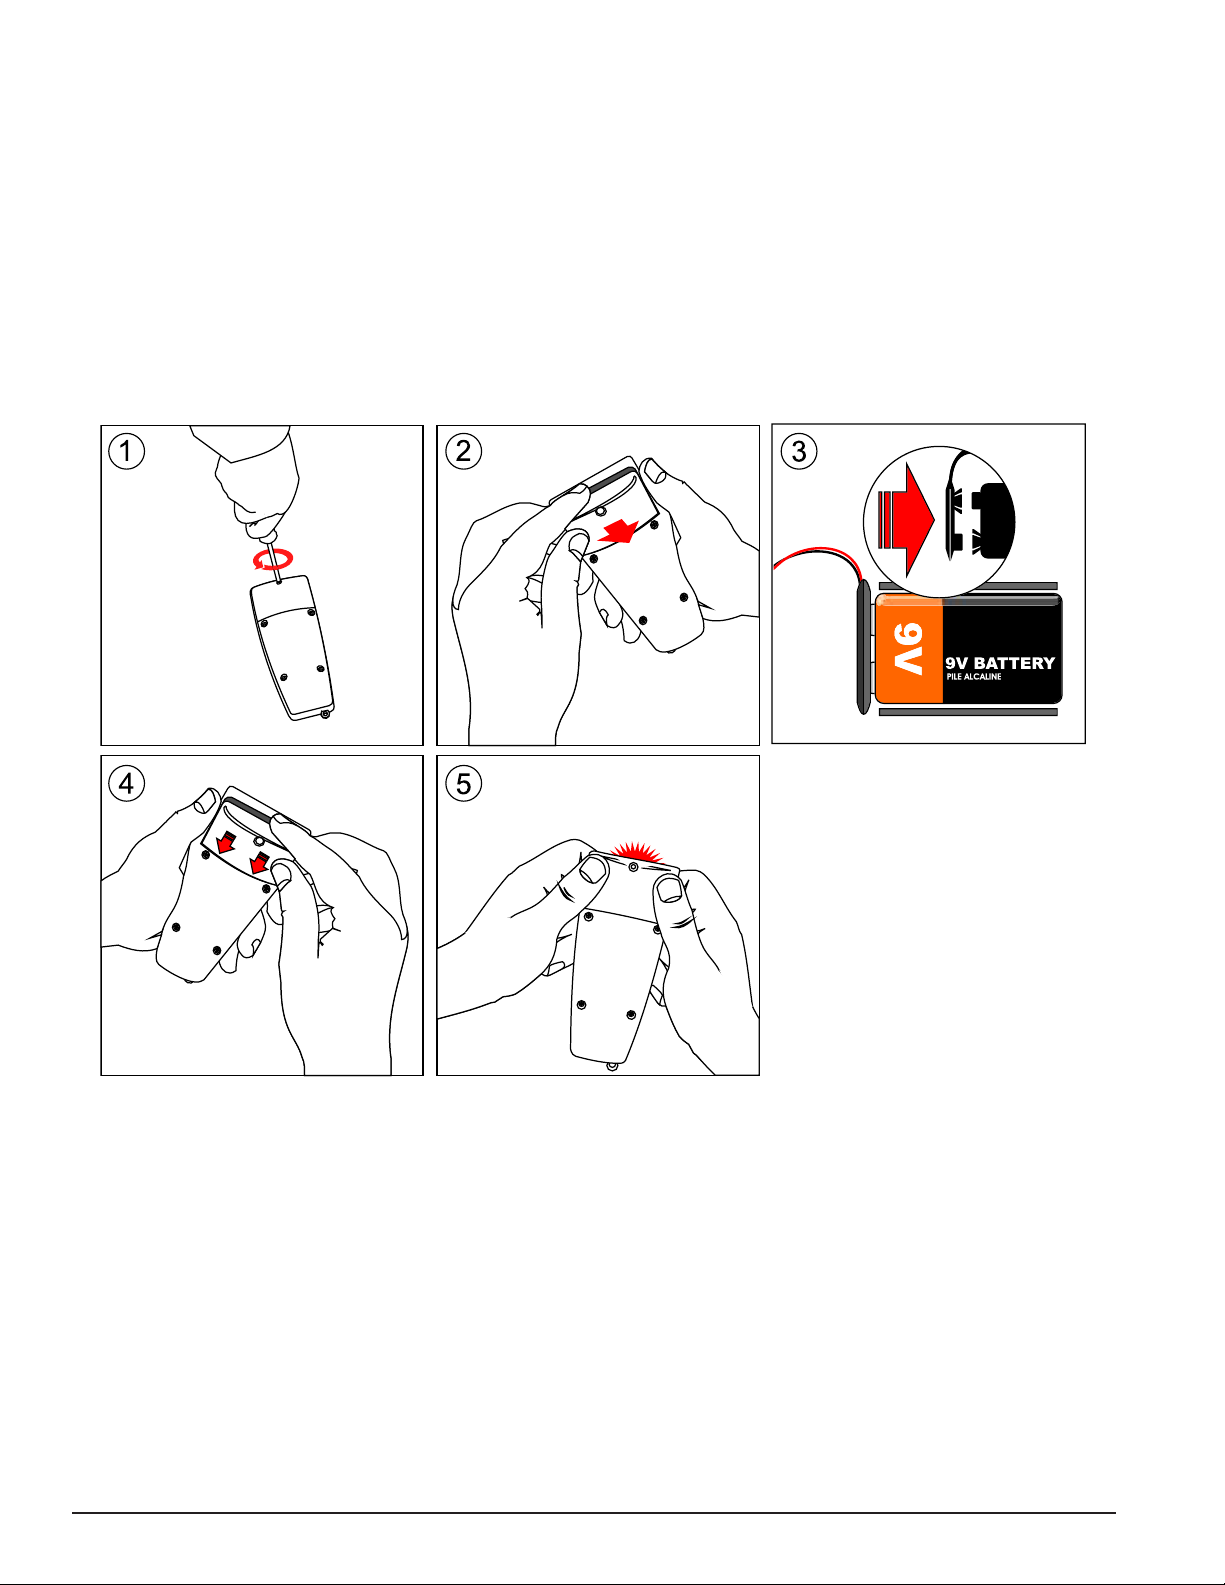
8
Replacing the Remote Control Battery
1. Remove the top screw (see Figure 13, Step 1).
2. Pull the top of the cover away from the transmitter and then pull upwards (Step 2).
3. Replace the battery and make sure the polarity is the same as the existing battery (Step 3).
4. Push the cover downwards into the 2 slots (Step 4).
5. Push the top of the cover towards the battery until it snaps into place (Step 5).
6. Put the screw back into place.
Prowler 720 and 730 Installation and User’s Guide
Figure 13.
Page 15
Section 3
Maintenance
Maintaining the Prowler 720 and 730 Cleaner
Clean the Filter Bag after every Cleaning Cycle
1. Unplug the power supply. (Keep the plug away from contact with water.)
2. If the unit is in the pool, gently pull the cleaner toward you using the cable until the handle is within reach. Use
the handle (not the cable) to pull the cleaner out of the pool after allowing most of the water to drain from the
unit.
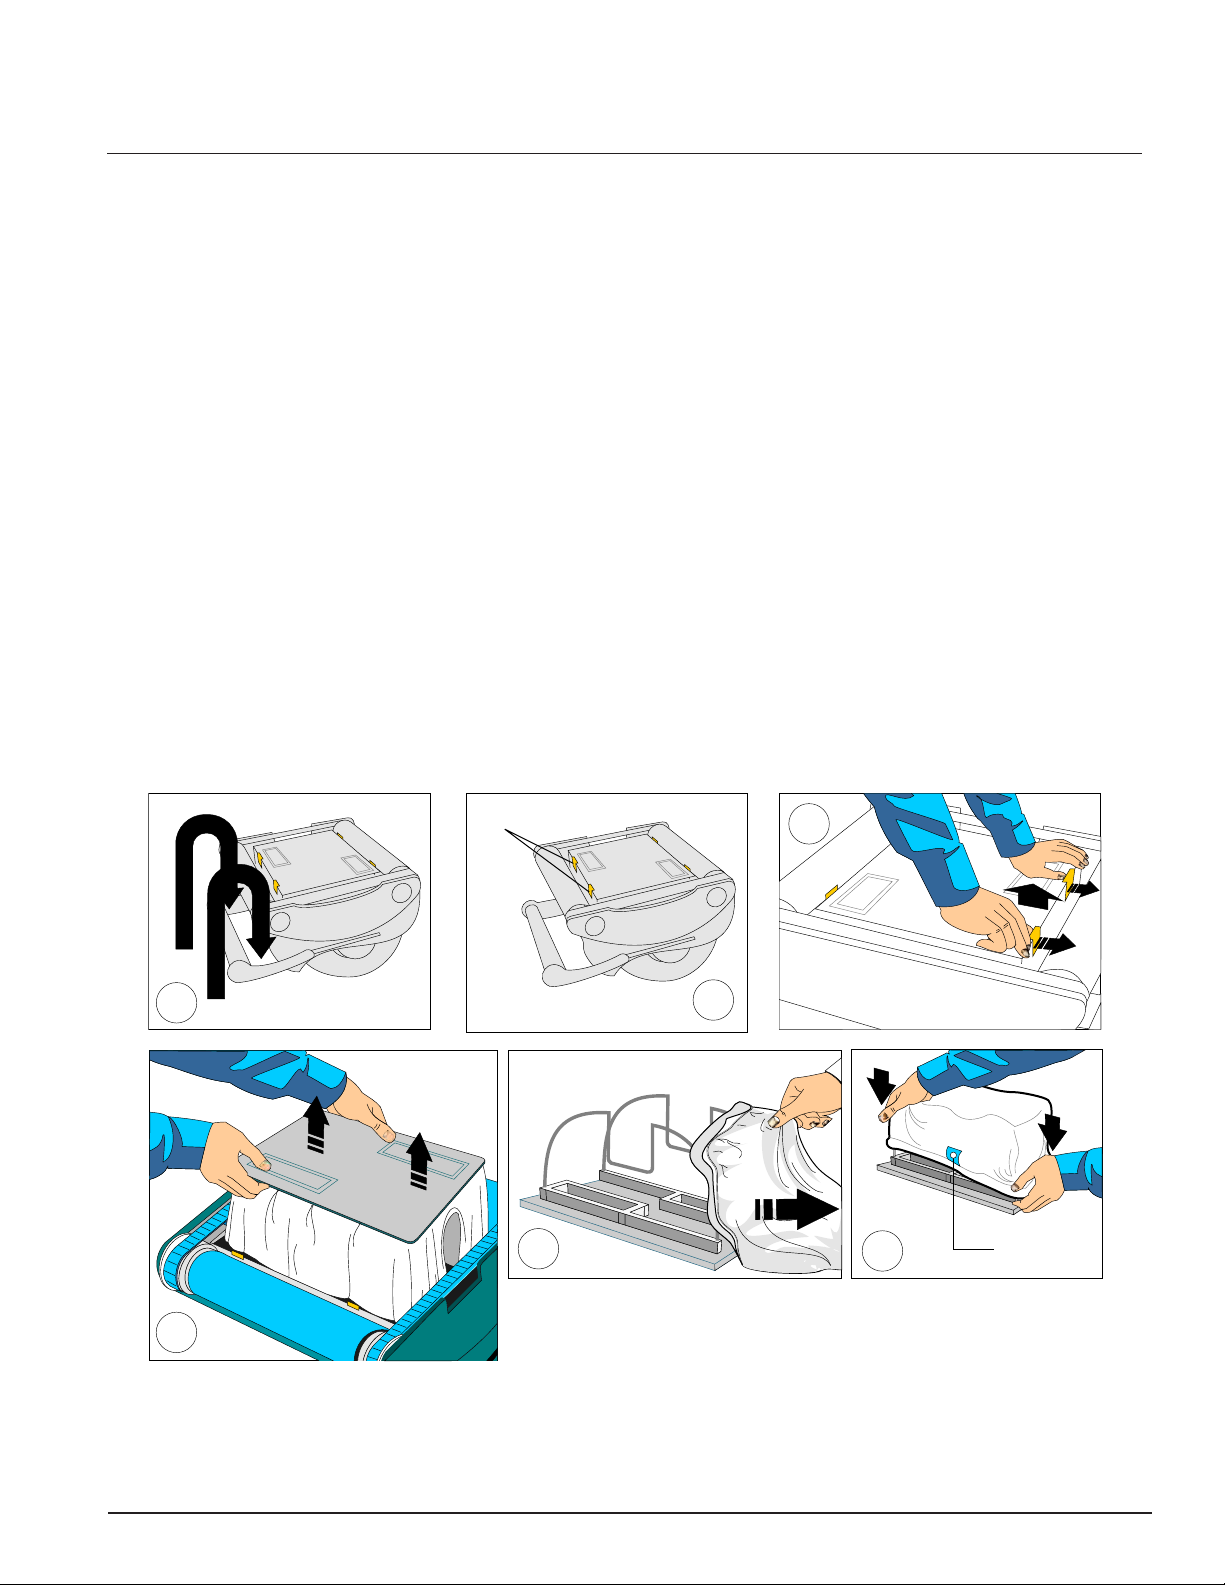
3. Lay the unit on its back on a smooth surface, (in order to prevent scratches on the machine body), unlock and
remove the bottom lid assembly, see Figure 14, Steps 1 - 4.
4. Remove the filter bag from the support bars, see Step 5, turn it inside out and wash off all the dirt with a garden
hose or in a sink. Squeeze the bag gently until the rinse water is clear. If necessary, machine wash the bag using
only cold water with NO DETERGENT!
9
5. Re-install the bag on the support bars with the label in the center of one of the long sides of the bottom lid, see
Step 6.
6. Re-install the bottom lid assembly onto the body. Push down on it until all (4) locking tabs snap properly into
place.
1
Lock Tabs
2
3
4
5
Figure 14.
6
Prowler 720 and 730 Installation and User’s Guide
Label
Page 16
10
S
e
Drive Track
Wheel Tube
End Hub
PVA
Brush
Changing the Drive Belts
Depending on usage, the drive belts, (located behind
the side plate), will stretch. When this happens, in order
to maintain the optimum performance of the unit, these
drive belts have to be changed.
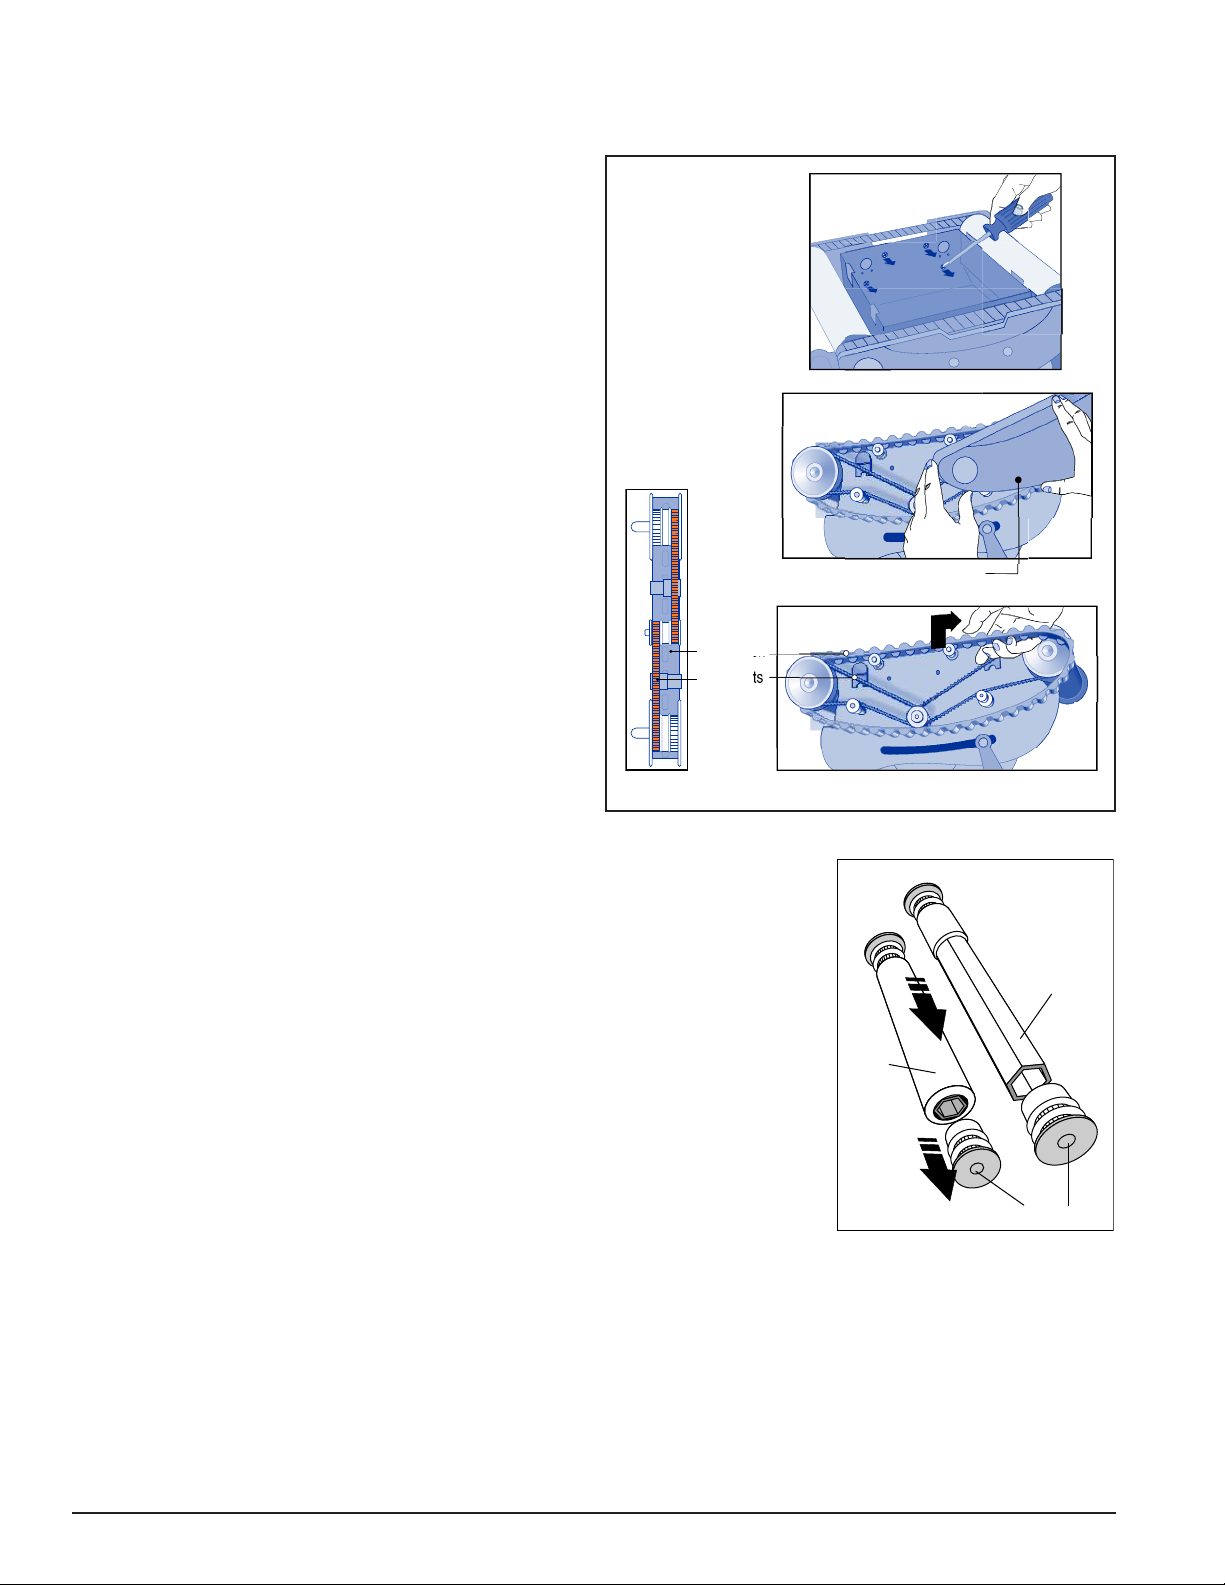
1. Turn the robot upside down and remove the bottom lid
assembly as shown on page 9, Figure 14, Steps 1-4.
2.
Inside, locate four screws on drive motor side which
hold the side plate in place, see Figure 15.
3. Take out these four screws and remove the side
plate, see Figure 16.
4. Remove the drive track. Before removing the drive
track, notice how the drive belts are positioned for
re-assembly, see Figure 17.
Figure 15.
Figure 16.
5. Take out the old drive belts and replace them
with new ones (P/N P12111). To re-assemble,
reverse Steps 4 to 1 above.
Changing Brushes
Drive Bel
It is necessary to replace the brushes when they are
worn out, (when the brushes reach the plastic of the
wheel). Worn out brushes will impede the cleaner’s
scrubbing, climbing the walls and/or general
performance.
1. Detach one of the side plates by unscrewing the four screws, see Figure 15.
2. With side plate detached, take out the wheel tube from the machine.
3. Remove the end hub and pull out the worn PVA brush, see Figure18.
4. Place the new PVA brush onto the hexagonal tube and replace the end hub.
5. Re-install the wheel tube in place and reattach the side plate by screwing
back- in the four screws.
ide Plat
Figure 17.
Figure 18.
Prowler 720 and 730 Installation and User’s Guide
Page 17
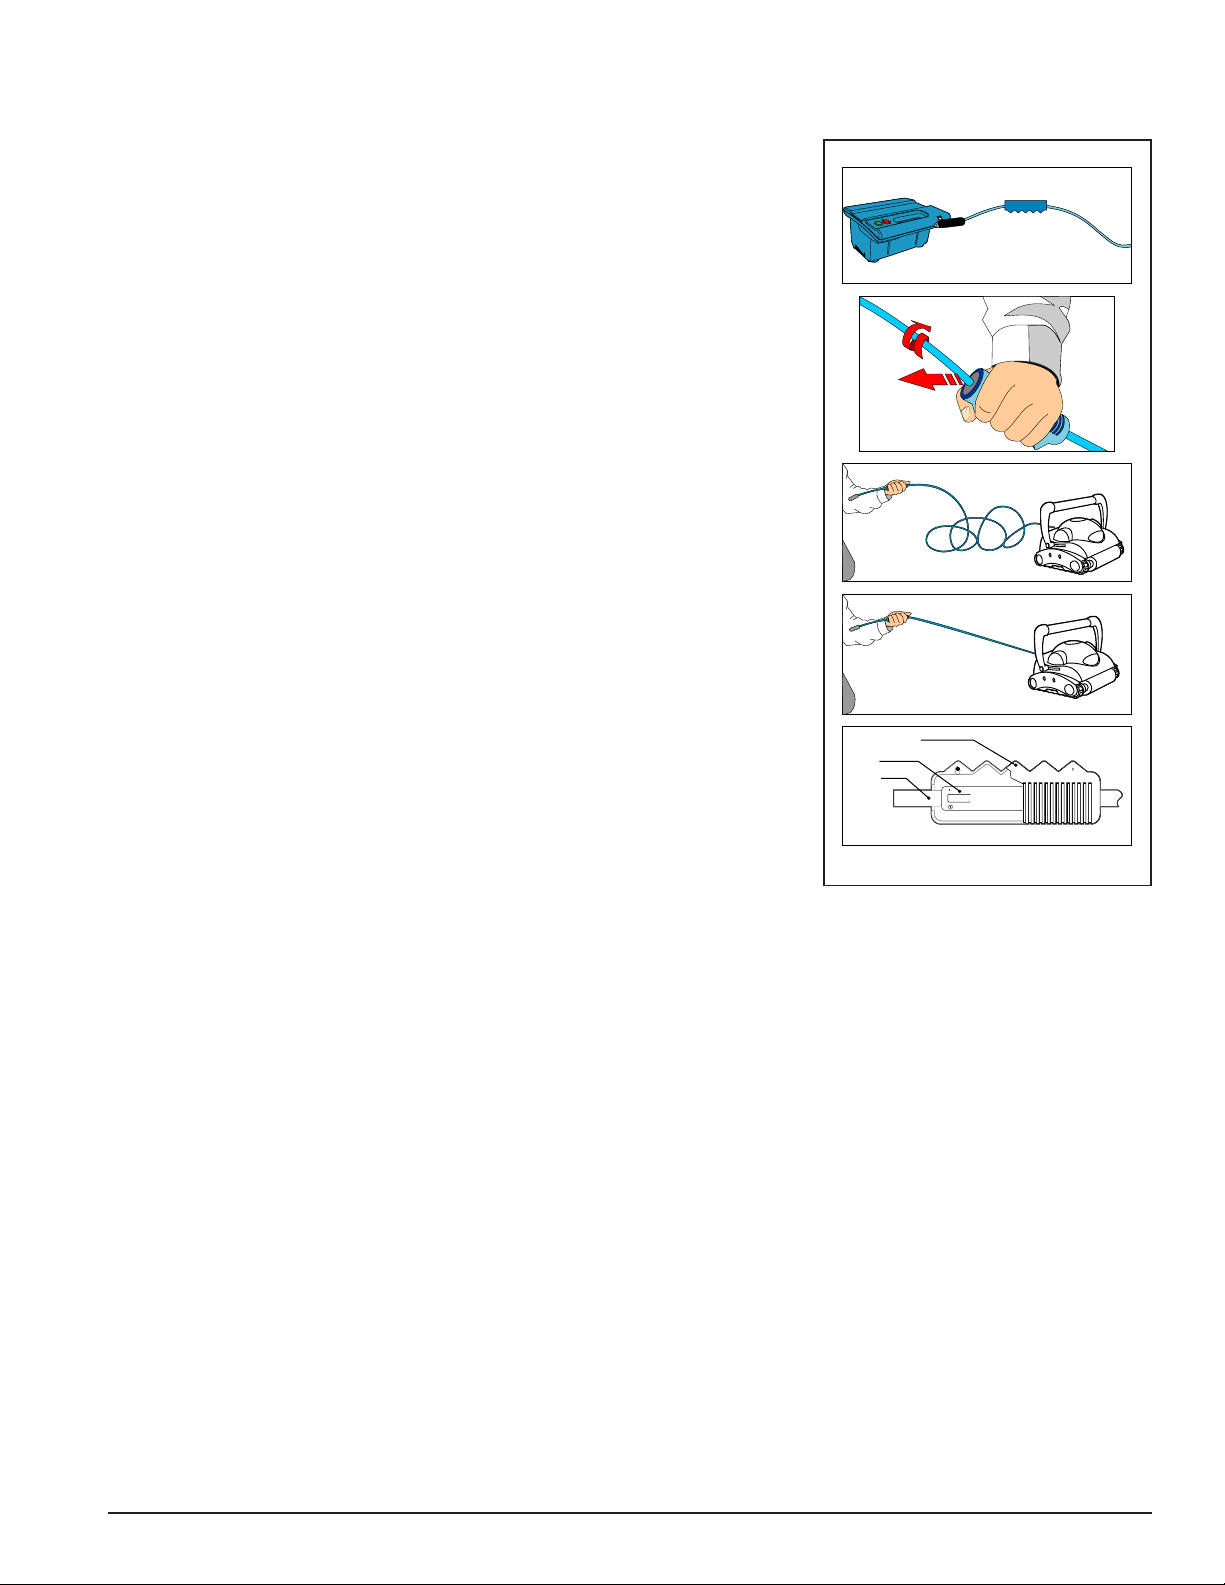
Cable Care
The cable may become twisted after a period of use. To correct this condition,
simply lock the moveable handle on the top of the cleaner in the
opposite diagonal direction. The pool cleaner will now travel in the opposite
direction while cleaning your pool and the cable will uncoil. Check the cable
periodically for external damage. If the problem persists, use the E-Z Swivel
device.
Place the Robot on the ground and unplug the cable from the transformer.
With one hand holding the E-Z Swivel, walk away from the Robot, pulling
the cable to its full length. The core will rotate inside the cover which will
untangle the cable, see Figure 19.
Important Maintenance Tips
1. Shut off and unplug the power supply every time you remove the cleaner
from the water.
2. Clean the filter bag after every cycle.
3. Reverse the handle after every cleaning cycle to avoid tangling the cable.
11
E-Z SWIVEL - Location
4. Periodically straighten out the floating cable.
5. Replace worn brushes to ensure maximum cleaning performance.
6. Make sure that your pool cleaner positions itself properly on the wall. The
machine handle must rest parallel to the water line upon reaching the
surface of the water.
Handle Cover
Core
Cable
Assy.
7. Save your cleaner's packaging for off-season storage or for shipping the
unit to your dealer if service is required.
8. Store the unit and accessories on the caddy.
Figure 19.
9. Leave your pool cleaner in the water for 15 to 20 minutes after every cleaning cycle.
10. Do not leave your cleaner in direct sunlight when not in use.
11. Never leave the power supply in direct sunlight and avoid leaving it in the rain.
12. Occasionally, you should rinse your cleaner in clean, fresh water. This will lengthen the service life of the drive
belts, drive tracks and scrubbing brushes.
In-Season Storage
Do not leave your Prowler cleaner in the pool when not in use. Doing so, will reduce the life of your Filter Bag and
the Prowler cleaner. After removing the Prowler cleaner from the pool, you should clean and re-install the Filter
Bag. Then, rest the Prowler cleaner on its side in a dry shaded area along with its Power Supply and properly
coiled Floating Cable.
Off-Season Storage
When the Pool Season is over, you should thoroughly clean the Filter Bag. Make sure that there is no water in the
Prowler cleaner. Completely untangle and then properly coil the Floating Cable. Your Prowler cleaner and Power
Supply should be stored in a dry, protected area away from freezing temperatures.
Prowler 720 and 730 Installation and User’s Guide
Page 18
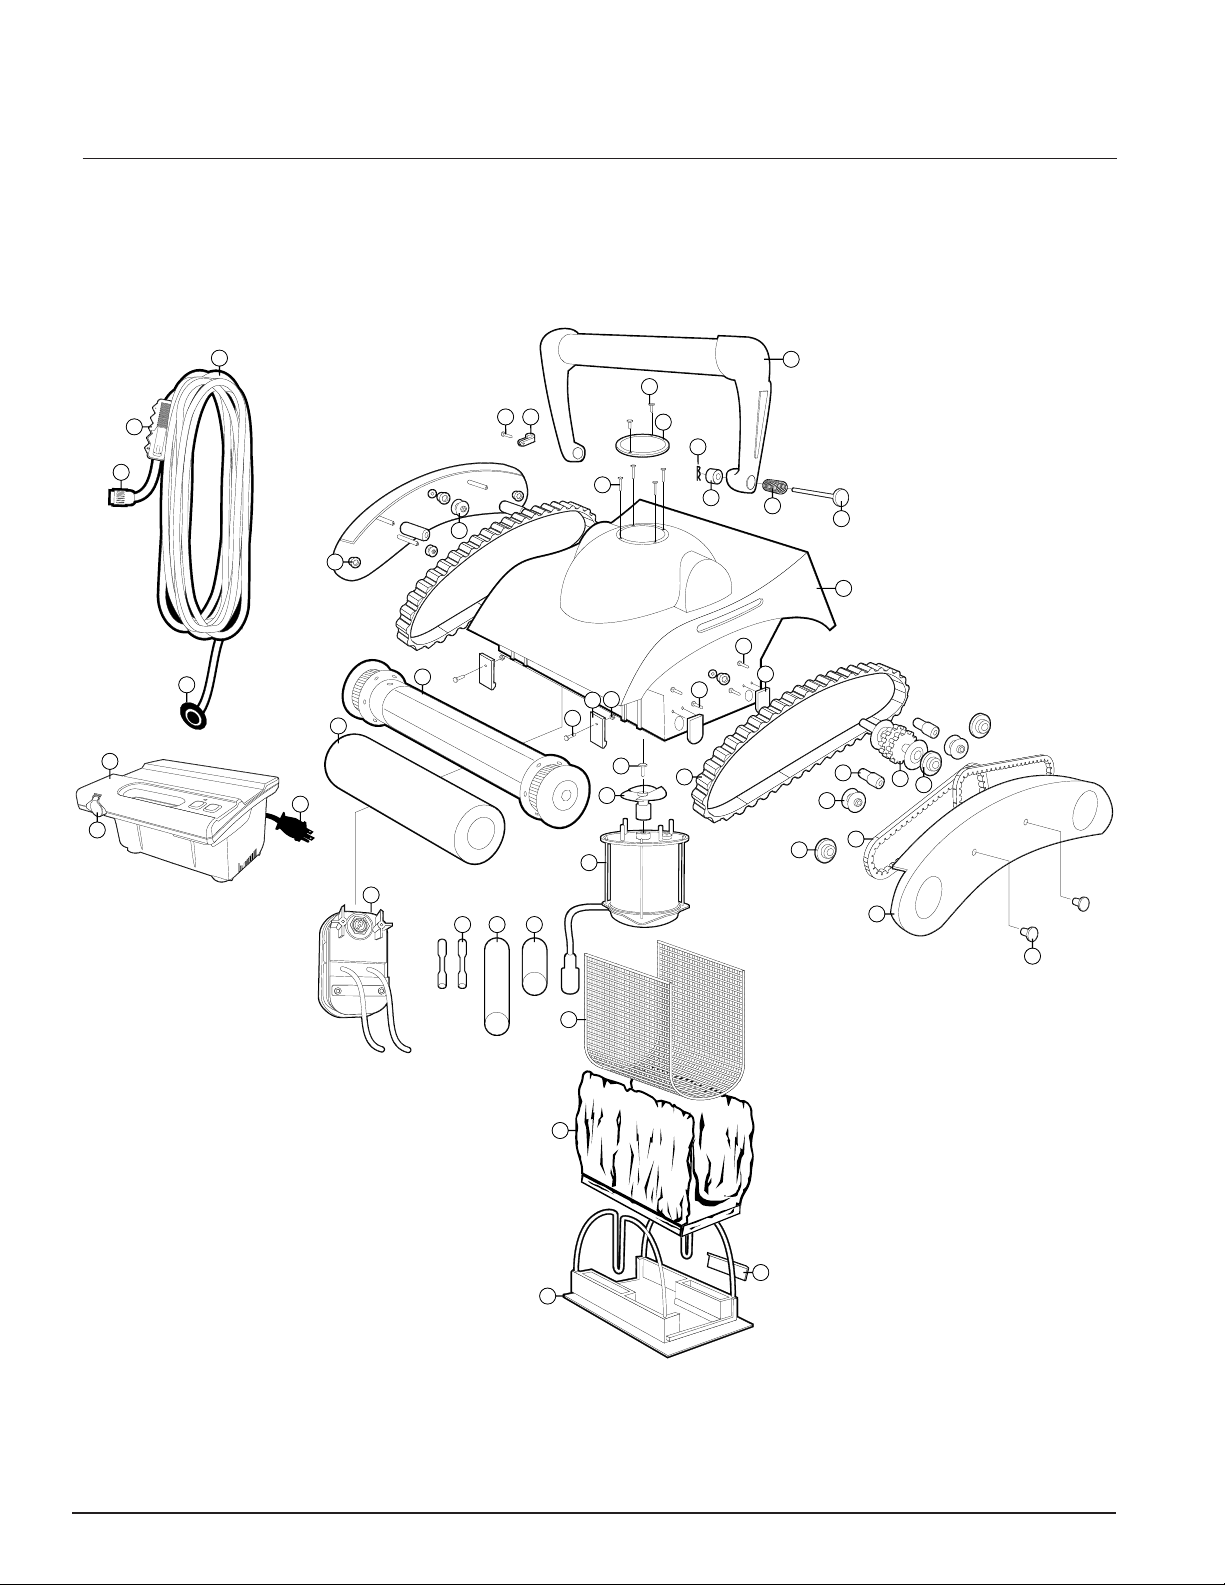
12
Section 4
Replacement Parts
Prowler 720 Model
2
11
34
46
1
20
3
32
40
41
47
31
27
35
33
12
13
28
434445
10
8
9
14
30
29
5
16
26
4
6
15
17
7
42
22
23
21
25
20
24
18
19
Prowler 720 and 730 Installation and User’s Guide
39
36
38
37
Page 19

Replacement Parts List for the Prowler 720 Model
ITEM NO. PART NO. DESCRIPTION
13
1 P12100 4 PIN PLUG
2 P12101 CABLE ASSY. - INCLUDES P/N P12100, P12125
3 SEALING GROMMET
4 P12102 HANDLE ASSY.
5 PUSH BUTTON LOCK
6 P12103 SPRING
7 CLEVIS PIN
8 R PIN FOR HANDLE
9 SCREW FOR PUMP
10 OUTLET TOP
11 SCREW (OUTLET TOP)
12 P12104 LOCK TAB
13 SCREW
14 P12105 NUT
15 P12106 SCREW
16 P12107 SCREW
17 RUBBER VALVE
18 P12108 SIDE PLATE
19 P12122 TRIM PANEL
20 P12109 BUSHING
21 SMALL ROLLER
22 P12133 SLEEVE ROLLER
23 P12110 PULLEY ASSY.
24 NYLON BUSHING
25 P12111 DRIVE BELT
26 P12112 DRIVE TRACK
27 P12113 DRIVE MOTOR (1 HR.) - INCLUDES P/N P12125, P12124
28 P12114 PUMP MOTOR - INCLUDES P/N P12123
29 PROPELLER
30 SCREW FOR PROPELLER
31 P12116 WHEEL TUBE ASSY. - HEX
32 P12117 PVA BRUSH
33 LARGE ROLLER
34 P-CLIP
35 P12106 SCREW (P-CLIP)
36 P12118 FILTER BAG
37 P12119 BOTTOM LID ASSY.
38 BOTTOM LID VALVE
39 P12120 FILTER SCREEN
40 P12121 POWER SUPPLY ASSY. (1 HR.)
41 POWER SUPPLY CORD
42 P12115 BODY ASSY. - INCLUDES P/N P12105
43 P12123 SHRINK TUBE - 1 METER
44 P12124 SHRINK TUBE - 1 METER
45 P12125 BUTT CONNECTOR
46 SWIVEL
47 SOCKET
Used on both of the Prowler
720 & 730 models.
Prowler 720 and 730 Installation and User’s Guide
Page 20
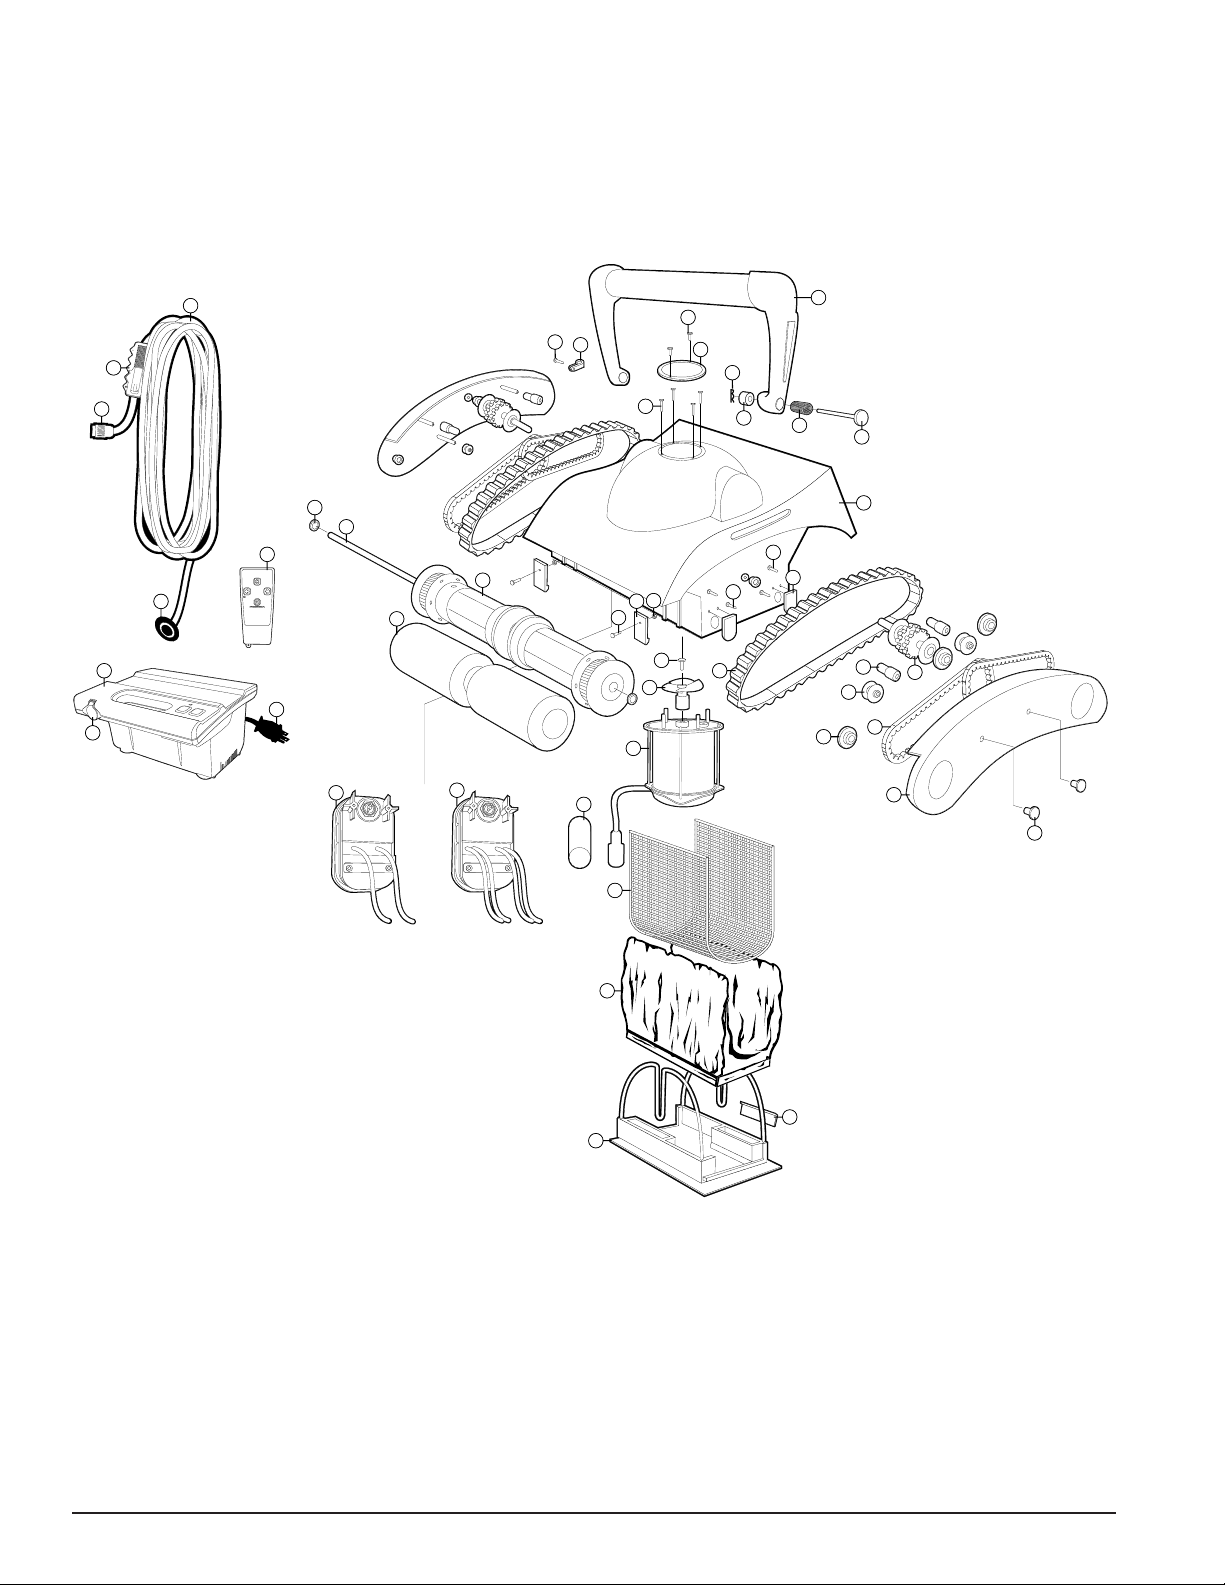
14
Prowler 730 Model
2
15
34
43
1
33
45
44
32
3
39
40
46
27
31
26
13
42
11
10
8
9
14
12
30
29
28
5
16
25
4
6
15
17
7
41
22
21
20
23
24
18
19
38
35
37
36
Prowler 720 and 730 Installation and User’s Guide
Page 21

Replacement Parts List for the Prowler 730 Model
ITEM No. PART No. DESCRIPTION
15
1 P12100 4 PIN PLUG
2 P12126 CABLE ASSY. - INCLUDES P/N’s P12100, P12123
3 SEALING GROMMET
4 P12102 HANDLE ASSY.
5 PUSH BUTTON LOCK
6 P12103 SPRING
7 CLEVIS PIN
8 R PIN FOR HANDLE
9 SCREW FOR PUMP
10 OUTLET TOP
11 SCREW (OUTLET TOP)
12 P12104 LOCK TAB
13 SCREW
14 P12105 NUT
15 P12106 SCREW
16 P12107 SCREW
17 RUBBER VALVE
18 P12108 SIDE PLATE
19 P12122 TRIM PANEL
20 P12109 BUSHING
21 SMALL ROLLER
22 P12133 SLEEVE ROLLER
23 P12110 PULLEY ASSY.
24 P12111 DRIVE BELTS
25 P12112 DRIVE TRACK
26 P12127 DRIVE MOTOR MASTER - INCLUDES P/N P12123
27 P12129 DRIVE MOTOR SLAVE - INCLUDES P/N P12123
28 P12128 PUMP MOTOR - INCLUDES P/N P12123
29 PROPELLER
30 SCREW FOR PROPELLER
31 P12132 PVA BRUSH
32 P12131 WHEEL TUBE ASSY. HEX
33 FLAT NYLON WASHER
34 P-CLIP
35 P12118 FILTER BAG
36 BOTTOM LID ASSY.
37 BOTTOM LID VALVE
38 P12120 FILTER SCREEN
39 P12134 POWER SUPPLY ASSY. 1 HR.
40 POWER SUPPLY CORD
41 P12130 BODY ASSY. - INCLUDES P/N P12115
42 P12123 SHRINK TUBE 1 METER
43 SWIVEL
44 P12137 REMOTE CONTROL
45 P12138 AXLE FOR WHEEL TUBE ASSY.
46 SOCKET
Used on both of the Prowler
SAVE THESE INSTRUCTIONS.
720 & 730 models.
Prowler 720 and 730 Installation and User’s Guide
Page 22

16
Notes
Prowler 720 and 730 Installation and User’s Guide
Page 23

Notes
17
Prowler 720 and 730 Installation and User’s Guide
Page 24

P/N P12154 Rev. B 5/11/11
 Loading...