

Pentair EVERPURE H Series, EVERPURE H-54, EVERPURE H-300, EVERPURE H-104, EVERPURE H-300-HSD Installation Instructions Manual
...Page 1

EVERPURE® H SERIES WATER FILTRATION SYSTEMS
SISTEMA DE FILTRACIÓN DE AGUA DE LA SERIE H
H SÉRIE SYSTÈME DE FILTRAGE D’EAU
Page 2

INSTALLATION INSTRUCTIONS ENGLISH
Product Specifications ........................................... Page 3
Tools Required ....................................................... Page 4
Basic Installations Instructions ............................. Page 4
H-1200 Installations Instructions .....................Pages 6-7
Claims & Notes ...................................................... Page 7
INSTRUCCIONES DE INSTALACIÓN ESPAÑOL
Especificaciones Del Producto ........................... Página 8
Herramientas necesarias ................................... Página 9
Instrucciones básicas de instalación..................Página 9
H 1200 Instrucciones de instalación .......... Páginas 11-12
Declaraciones y notas ....................................... Página 12
INSTRUCTIONS D’INSTALLATION FRANÇAIS
Caractéristiques Techniques Du Produit ............. Page 14
Outils nécessaires ............................................... Page 15
Instructions d’installation de base ...................... Page 15
Consignes d’utilisation pour l’H 1200 ...........Pages 17-18
Revendication & remarques ................................ Page 18
2
Page 3
Thank you for purchasing an Everpure commercial-grade
water filtration system for your home. With your Everpure
system, you get premium quality water direct from your tap
that’s great-tasting, healthful and convenient for you and
your family.
Product Specifications:
•For Cold Water Use Only
•Temperature Range: 35-100°F (2-38°C)
•Min.-Max. Working Pressure:
10-125 psi (0.7-8.6 bar)
•Service Flow Rate: 0.5 gpm (1.9 Lpm)
THE OWNER’S GUIDE IS APPLICABLE FOR THE
FOLLOWING
Model H-54 Rated Capacity: 750 gal (2835 L)*
Model H-300 Rated Capacity: 300 gal (1140 L)*
Model H-104 Rated Capacity: 1,000 gal (3780 L)*
Model H-300-HSD Rated Capacity: 300 gal (1140 L)*
Model H-300-NXT Rated Capacity: 300 gal (1140 L)*
Model H-1200 Rated Capacity: 1,000 gal (3780 L)*
For optimum performance, cartridge replacement
*
is required once a year, or sooner if flow becomes
too slow for convenience, or if the unit’s rated
capacity is reached.
For purchase of replaceable components please contact your local distributor.
H-1200 customers: Instructions for installing the H-1200
begin on page 6 of this Installation and Operation Guide.
EVERPURE FILTER MODELS:
The Universal Plumbing Code adopted by over 20
states, and other specific state and county codes, prohibit the
use of saddle valves and their use is never recommended. You
must adhere to your state/local plumbing codes. Consult your
licensed plumber if you have related questions.
Do NOT use copper tubing with the John Guest®
Fittings provided with your Everpure Filter System. Copper
tubing may appear to fit, but water leaks will develop over time
and use. If copper tubing is required, you must use copper
compression fittings available from any hardware/plumbing
supply.
CALIFORNIA PROPOSITION 65 WARNING
State of California to cause cancer or birth defects or other
reproductive harm.
Multiple Appliance Connections: You can also connect your
Everpure Filter to the refrigerator for ice and water, an instant
hot water dispenser or chiller, or a plumbed-in coffee brewer.
Simply install connection “tees” (available from any hardware/
plumbing supply) in the water line between the filter and the
faucet adaptor, and run new tubing to each appliance.
NOTE:
These appliances require flow and volume beyond the design
limits of your under-sink filter system.
NOTE:
faucet connection under the sink, a flush valve is required.
This product contains chemicals known to the
DO NOT connect this system to a commercial ice maker.
If connecting to a home icemaker and there is no filter
ENGLISH
EVERPURE
®
H-Series Water Filtration Systems • 3
Page 4
BASIC INSTALLATION INSTRUCTIONS
Tools Needed For Installation
• Phillips Screwdriver • Wrench • Pencil
• Utility Knife • Measuring Tape
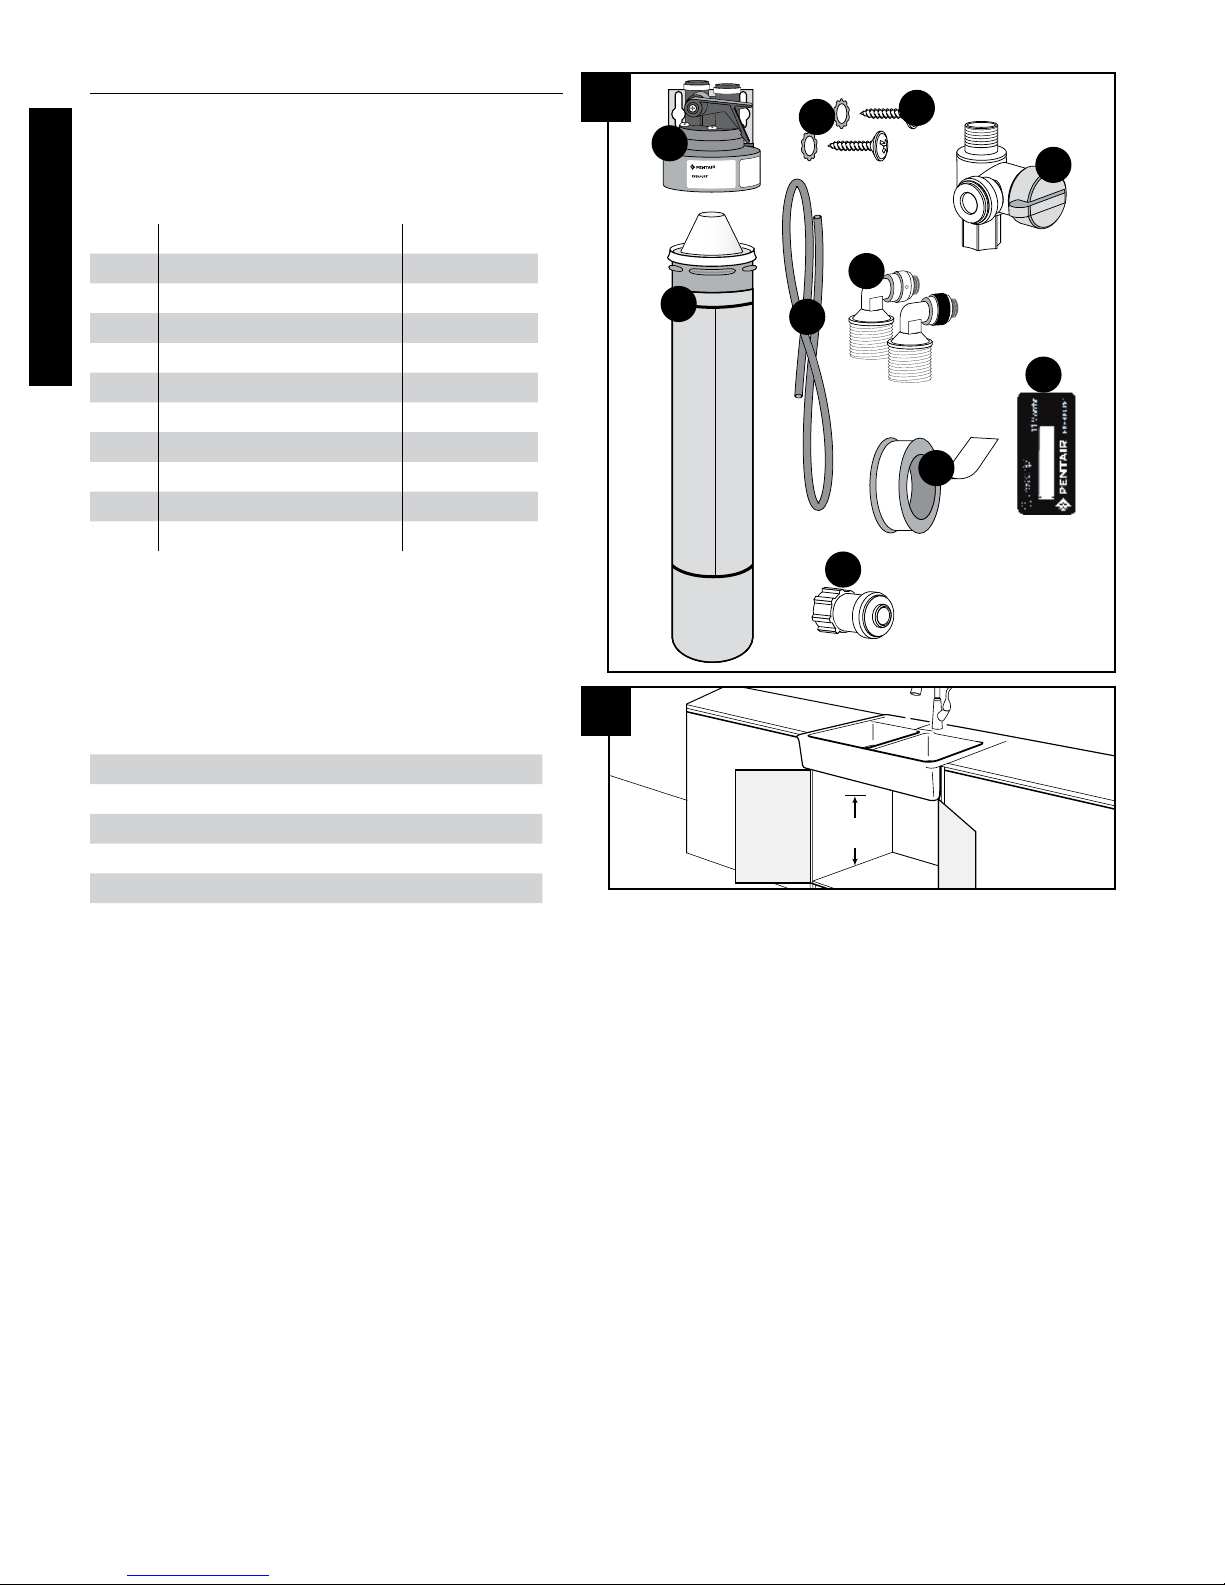
1. OPEN CARTON & INSPECT PARTS
Installation Parts
Key Description Part No.
1 QL3 Filter Head EV925831
ENGLISH
2 Filter Cartridge (varies)
3 2 Locking Washers EV306204
4 2 Screws EV306196
5 Angle Stop Valve Adaptor EV312120
6 Tubing, 1/4" poly A0860119
Elbow Fitting Pack Restrictor
7
8 Plumbers Tape EV312119
9 Faucet Connector EV312135
10 Everpure Filter Timer EV314160
EV308168
1
3
4
1
5
7
2
6
10
8
2. VERIFY UNDERSINK MOUNTING LOCATION
Measure 22” from the base of the cabinet, and mark the
mounting location for the top of the filter head. Make sure
there is adequate space above the head to open and close
the built in shut-off valve and to avoid crimping the water
line tubing. Also, make sure your chosen location offers
easy access for future cartridge changes.
DIMENSION Width Height Depth
H-54 5" 15" 5"
H-104 5" 20" 5"
H-300 5" 22" 5"
H-300-HSD 5" 22" 5"
H-300-NXT 5" 22" 5"
The head and cartridge must be mounted in the
NOTE:
vertical position, with the cartridge hanging down.
9
2
22"
4 • EVERPURE
®
H-Series Water Filtration Systems
Page 5
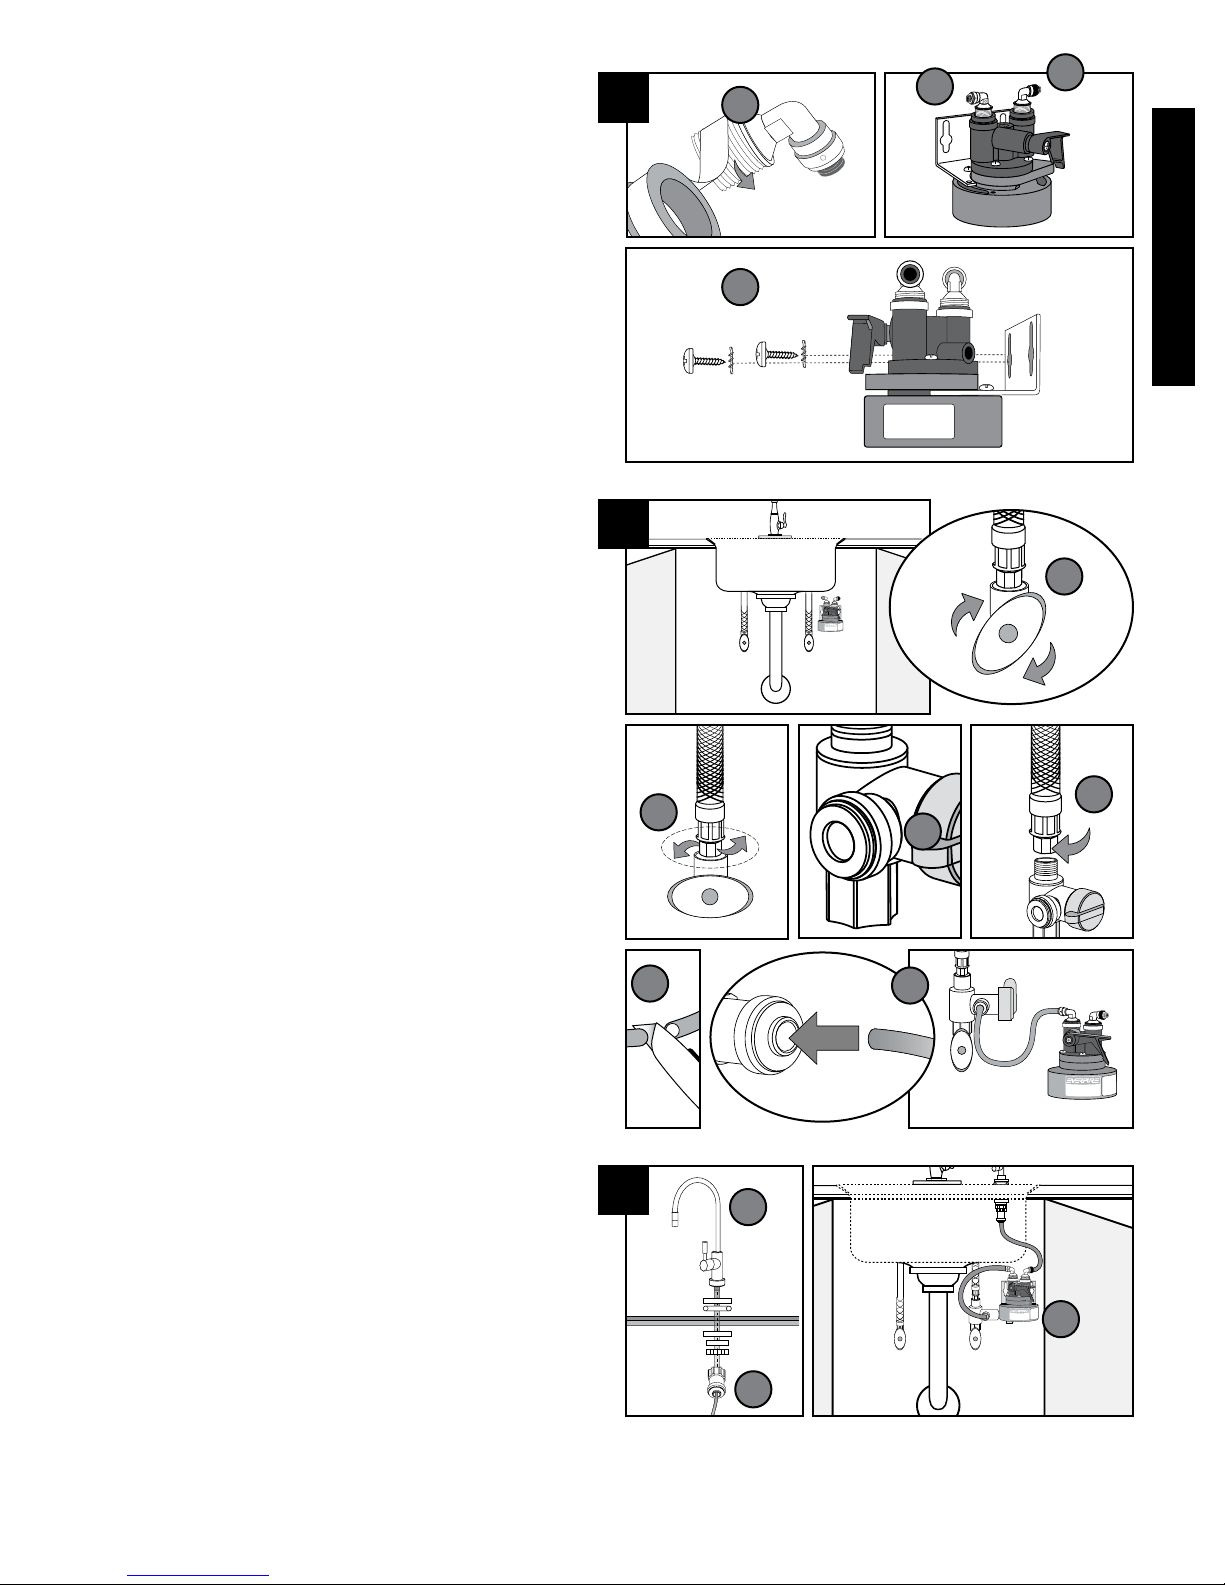
3. MOUNT FILTER HEAD UNDER SINK
A. Identify Filter Head and the two Elbow Fittings, and
note that the Outlet Fitting has a black band. This
fitting includes a small restrictor insert to ensure
maximum flow at 1/2 gallon per minute.
B. Apply Plumbers Tape to the threads of each Elbow
Fitting. Wrap tape in direction of the threads to
assure a tight fit and avoid small leaks.
C. Screw Inlet Elbow Fitting into the left side of the
filter head, and hand tighten only.
D. Screw Outlet Elbow Fitting (black band) into the
right side of the filter head in the same manner.
E. Securely mount the filter head on the cabinet wall
using the enclosed mounting screws and washers.
4. ATTACH INLET WATER SUPPLY
F. Locate and close the cold water Angle Stop Valve
under your kitchen sink. Open cold water line of
faucet to release water pressure.
G. Unscrew and disconnect the braided tubing on top of
the Angle Stop Valve.
H. Attach the bottom of Angle Stop Adaptor to the
existing cold water Angle Stop Valve.
I. Attach the braided tubing to the top of the Angle
Stop Adaptor.
J. Close side valve on Angle Stop Adaptor and open
cold water Angle Stop Valve to return water service
to kitchen sink. Check for leaks.
Plumbers Tape should not be required for
NOTE:
these next steps.
K. Measure length of tubing needed to connect Angle
Stop Adaptor to Inlet Elbow Fitting on Filter Head.
Allow adequate tubing to avoid sharp turns.
L. Cut tubing at a 90° angle using a sharp knife.
M. Insert ends of tubing into quick-connect fittings.
Push tube into fitting and gently pull to confirm a
tight fit.
5. ATTACH FILTERED WATER TO SINK FAUCET
N. Install separate faucet for filtered drinking water.
Follow individual manufacturer’s instructions.
O. Attach Faucet Connector Fitting to bottom end of
threads on new faucet assembly. Plumbers Tape
should not be required for this step.
P. Measure length of tubing needed to connect the
Outlet Elbow Fitting on Filter Head to the new
Faucet Connector Fitting. Allow adequate tubing to
avoid sharp turns. Cut and insert each end of the
tubing into the fittings.
3
B
C
D
ENGLISH
E
4
F
I
G
H
L
M
5
N
P
O
EVERPURE
®
H-Series Water Filtration Systems • 5
Page 6
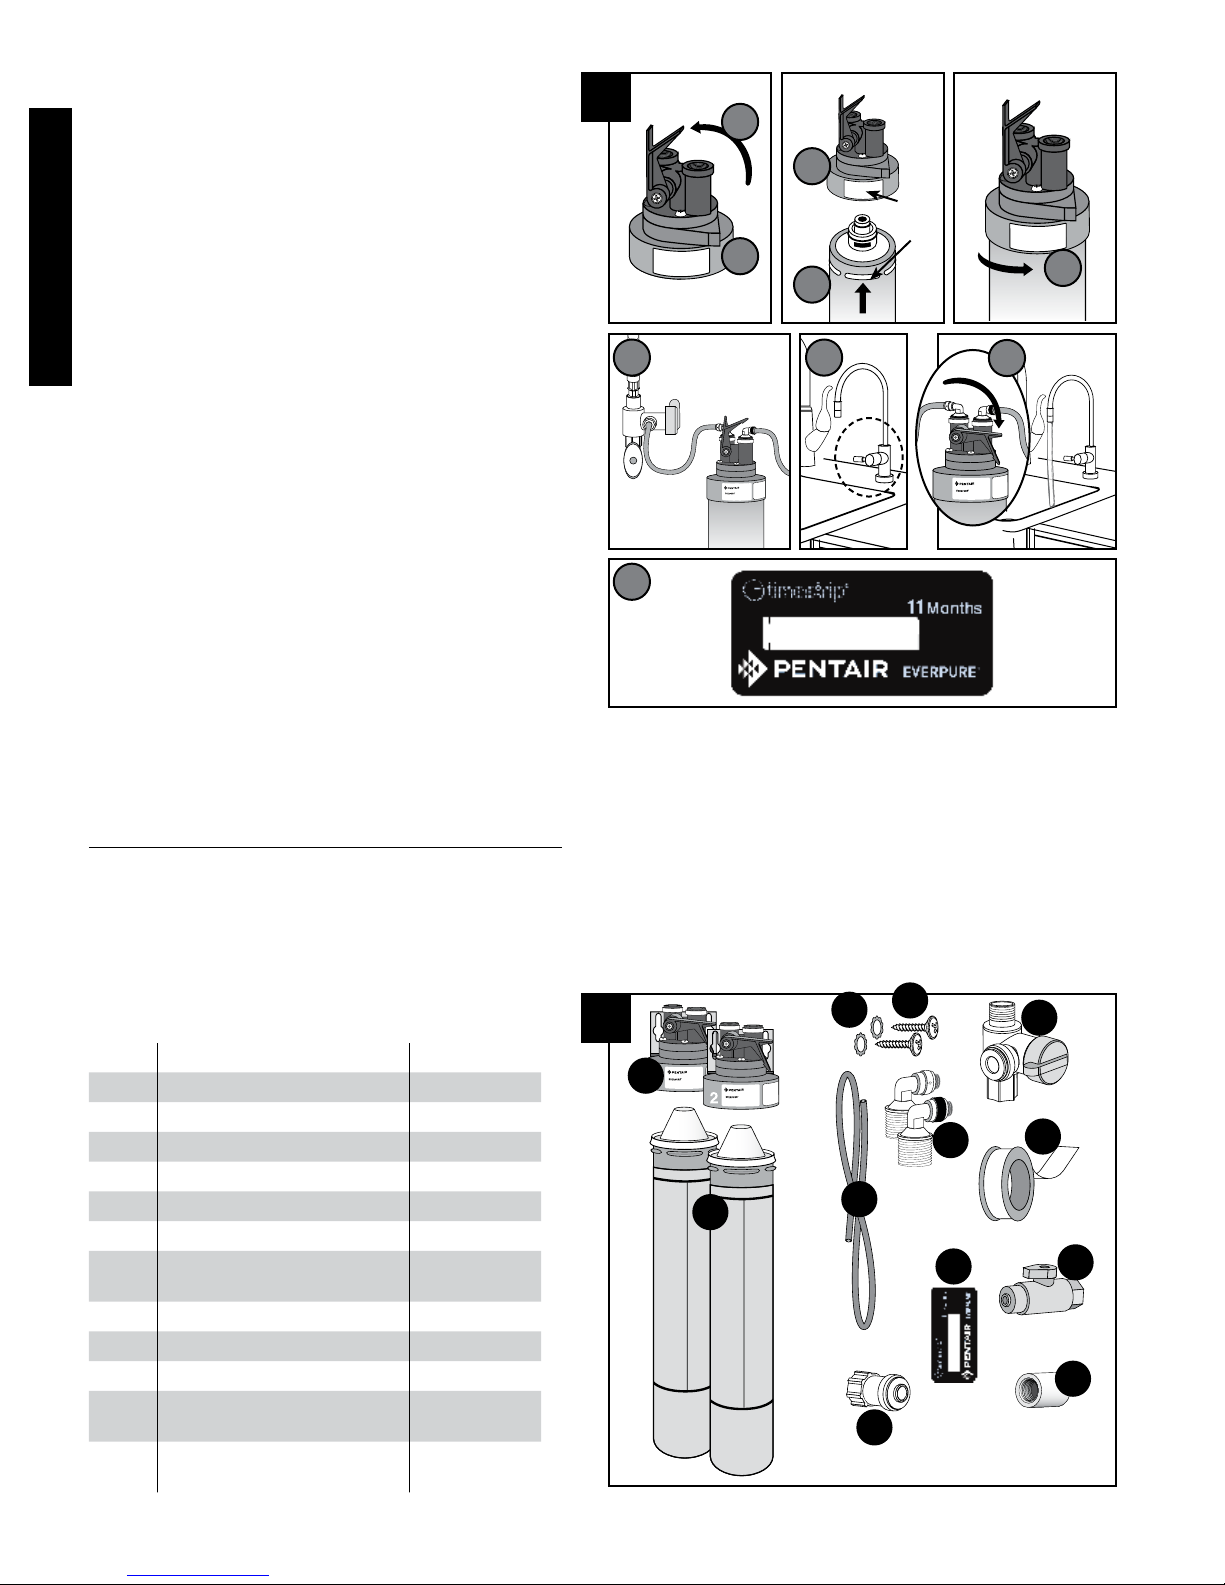
6. INSTALL AND FLUSH FILTER CARTRIDGE
Q. Lift handle of the built-in shut off (QC Valve) on the
Head.
R. Hold Head firmly with one hand.
S. Align cartridge lug with label on filter Head.
T. Insert filter Cartridge – Push upwards.
U. Turn it to the right – About 1⁄4 turn – Until rotation
stops.
V. Open Side Valve of Angle Stop Adaptor and check
for leaks up to Inlet Elbow Fitting.
W. Open Filtered Water Faucet.
ENGLISH
X. Lower the QC Valve Handle to flush water to the
sink.
Flush new filter cartridges for at least
NOTE:
3 minutes (flush H-1200 system for at least 7
minutes) to remove air and any loose carbon. At
first the water may appear cloudy due to trapped
air in the filter and tubing. If water continues to
be cloudy for more than one week, please contact
Everpure Technical Services for assistance.
Y. Activate Filter Timer by pinching bubble until you
feel a change in resistance as the Filter timer
“pops”. Within a few seconds, a thin RED line will
appear in the white window showing the Timestrip®
has been activated. Peel away backing and adhere
to desired location. When the white window is
completely filled with RED, it is time to replace your
product.
6
Q
R
V W
Y
S
Label
Lug
U
T
X
H1200 INSTRUCTIONS
Tools Needed For Installation
• Phillips Screwdriver
• Wrench
• Utility Knife
• Measuring Tape
• Pencil
1. OPEN CARTON & INSPECT PARTS
Installation Parts
Key Description Part No.
1 QL Twin Series Filter Head EV927222
2 Filter Cartridges (Set of 2) EV928201
3 2 Locking Washers EV306204
4 2 Screws EV306196
5 Angle Stop Valve Adaptor EV312120
6 Tubing, 1/4" poly A0860119
7 Elbow Fitting Pack
Restrictor
8 Plumbers Tape EV312119
9 Faucet Connector EV312135
10 Everpure Filter Timer EV314160
11 Shut Off Valve,
3/8" John Guest® x 3/8" FPT
12 Coupler, 3/8" FPT
Stainless
EV308168
EV309860
EV312350
1
3
4
5
1
8
11
12
2
7
6
10
9
6 • EVERPURE
®
H-Series Water Filtration Systems
Page 7

2. VERIFY UNDERSINK MOUNTING LOCATION
Measure 22” from the base of the cabinet, and mark the
mounting location for the top of the filter head. Measure
13” for the width required for the H-1200 System with
dual cartridges. Make sure there is adequate space above
the head to open and close the shut-off valve and to avoid
crimping the water line tubing. Also, make sure your
chosen location offers easy access for future cartridge
changes.
DIMENSION
H-1200 13" 22" 5"
NOTE: The head and cartridge must be mounted in the
vertical position, with the cartridge hanging down.
3. MOUNT FILTER HEAD UNDER SINK
A. Identify Dual Filter Head and Shut Off Valve (EV309860).
B. Apply Plumbers Tape to the threads on the inlet (left)
side of the Head. Screw on the new Shut Off Valve
and hand tighten. Repeat for the Stainless Coupler
(EV312350) for the outlet (right) side of the Head.
C. Apply Plumbers Tape to the threads of the Outlet
Elbow Fitting (black band). Screw into the outlet of
the Stainless Coupler. Wrap tape in direction of the
threads to assure a tight fit and avoid small leaks.
D. Securely mount the filter head on the cabinet wall
using the enclosed mounting screws and washers.
4. Go to page 5 and follow Basic Installation Instructions,
Steps 4, 5, and 6, to complete the H-1200 System
installation.
Width Height Depth
2
ENGLISH
22"
3
Dual Filter Head Shut Off Valve
A
B
C
CLAIMS & NOTES
This installation must comply with all applicable state and
local regulations.
Do no use with water that is microbiologically unsafe or
unknown quality without adequate disinfection before or
after the system. Systems certified for cyst reduction may
be used on waters that may contain filterable cysts.
Testing was performed under standard laboratory
conditions, actual performance may vary.
EPA Est. No. 002623-IL-002
Systems Tested and Certified by NSF International
against NSF/ANSI Standards 42, 53 and NSF 401 of
claims specified on the Performance Data Sheet.
*NSF Standard 401 have been deemed as “incidental
contaminants/emerging compounds”. Incidental
contaminants are those compounds that have been
detected in drinking water supplies at trace levels.
While occurring at only trace levels, these compounds
can affect the public acceptance/perception of drinking
water quality.
EVERPURE
D
®
H-Series Water Filtration Systems • 7
Page 8

Gracias por comprar un sistema de filtración de agua
Everpure de categoría comercial para su hogar. Con el
sistema Everpure usted obtiene directamente de la llave
un agua de primera calidad de buen sabor, saludable
y en forma conveniente para usted y su familia.
Especificaciones Del Producto:
•Para uso únicamente con agua fría
•Gama de temperatura: 2-38°C (35-100°F)
•Presión de servicio mín. - máx.:
0.7-8.6 bar (10-125 psi)
•Caudal de servicio: 1.9 Lpm (0.5 gpm)
EL MANUAL DEL USUARIO SE APLICA A LOS
SIGUIENTES MODELOS DE FILTRO EVERPURE:
Modelo H-54 Capacidad nominal: 750 Gal (2835 L)*
Modelo H-300 Capacidad nominal: 300 Gal (1140 L)*
Modelo H-104 Capacidad nominal: 1,000 Gal (3780L)*
Modelo H-300-HSD Capacidad nominal: 300 Gal(1140L)*
Modelo H-300-NXT Capacidad nominal: 300 Gal(1140L)*
Modelo H-1200 Capacidad nominal:1,000 Gal (3780 L)*
*Para mayor rendimiento, el cartucho debe ser reemplazado una
vez al año o antes si el caudal se vuelve demasiado lento para su
conveniencia o si se alcanza la capacidad nominal de la unidad.
Para la compra de componentes reemplazables por favor
póngase en contacto con su distribuidor local.
Usuarios del H-1200: Las instrucciones para la instalación
del H-1200 comienzan en la página n
Instalación y Funcionamiento.
o
11 de este Manual de
El Código Universal de Plomería (EE.UU.)
adoptado por más de 20 estados y otros códigos estatales y de
condados específicos prohíben el uso de válvulas de montura y su
uso no es nunca recomendado. Usted debe cumplir con los códigos
estatales o locales. Consulte con un plomero licenciado si tiene
preguntas sobre esto.
NO use tubería de cobre con las conexiones
®
John Guest
suministradas con su Sistema de Filtración Everpure.
Podría parecer que la tubería de cobre encaja pero con el tiempo
y el uso se desarrollarán pérdidas de agua. Si es necesario usar
tubos de cobre, debe usar conectores de compresión de cobre
disponibles en cualquier tienda de plomería o ferretería.
ADVERTENCIA SEGÚN PROPUESTA 65 DE CALIFORNIA:
Este producto contiene químicos que el Estado de
California sabe que causan cáncer o defectos de nacimiento u otro
daño reproductivo.
Conexiones para electrodomésticos múltiples: También puede
conectar su Filtro Everpure al refrigerador para el surtidor de
hielo y agua, a un surtidor instantáneo de agua caliente o fría o
a una cafetera instalada. Simplemente instale conectores en T
(disponibles en cualquier tienda de plomería o ferretería) en la
línea de agua entre el filtro y el adaptador del grifo, y extienda
una tubería nueva hacia cada uno de los electrodomésticos.
instale
NOTA:
NO conecte este sistema a una máquina comercial de hacer
hielo. Estas máquinas requieren un caudal y un volumen mayor
que los límites de diseño de su sistema de filtración debajo del
fregadero.
NOTA:
Si lo conecta a una máquina de hacer hielo casera y no
hay una conexión para un filtro de grifo debajo del fregadero: se
necesita una válvula de descarga.
ESPAÑOL
8 • EVERPURE
®
Sistema De Filtración De Agua De La Serie H
Page 9

INSTRUCCIONES BÁSICAS DE INSTALACIÓN
Herramientas necesarias
Destornillador Phillips • Llave • Cuchillo universal
Cinta métrica • Lápiz
1. ABRA EL CARTÓN Y REVISE LAS PIEZAS
Piezas de instalación
Clave Descripción Pieza No
1 QL3 Cabezal de filtro EV925831
2 Cartucho filtrante (varies)
3 2 arandelas de seguridad EV306204
4 2 tornillos EV306196
5 Adaptador para válvula de
cierre en ángulo
6 Tubería de plástico de 1/4" A0860119
7 Codo adaptador y reductor EV308168
8 Cinta de Fontanero EV312119
9 Conector de grifo EV312135
10 Medidor de filtro Everpure EV314160
EV312120
1
1
2
3
6
4
5
7
10
8
2. COMPRUEBE EL SITIO DE MONTAJE DEBAJO DEL FREGADERO
Mida 55.8 cm desde la base del armario y marque el sitio de
montaje de la parte superior del cabezal del filtro. Asegúrese
de que haya suficiente espacio encima del cabezal para abrir
y cerrar la válvula de cierre incorporada y para evitar que
la tubería de agua se doble. También, asegúrese de que el
sitio que escogió sea fácilmente accesible para cambiar los
cartuchos en el futuro.
Dimensiones Ancho Altura Profundidad
H-54 12.7 cm 38.1 cm 12.7 cm
H-104 12.7 cm 50.8 cm 12.7 cm
H-300 12.7 cm 55.8 cm 12.7 cm
H-300-HSD 12.7 cm 55.8 cm 12.7 cm
H-300-NXT 12.7 cm 55.8 cm 12.7 cm
NOTA:
El cabezal y el cartucho deben montarse en posición
vertical, con el cartucho colgando hacia abajo.
9
2
55.8 cm
ESPAÑOL
EVERPURE
®
Sistema De Filtración De Agua De La Serie H • 9
Page 10

3. MONTE EL CABEZAL DEL FILTRO DEBAJO DEL FREGA
DERO
A. Identifique el cabezal de filtro y los dos codos
adaptadores y note que el adaptador de salida tiene
una banda negra. Este adaptador incluye un pequeño
accesorio reductor para asegurar un flujo máximo de
1,9 litros por minuto.
B. Aplique cinta de Teflón a las roscas de cada codo
adaptador. Enrolle la cinta en el sentido de las roscas
para asegurar un ajuste firme y evitar las pérdidas
pequeñas.
C. Enrosque el codo adaptador de entrada al lado
izquierdo del cabezal de filtro y sólo apriete a mano.
D. Enrosque el codo adaptador de salida (banda negra) al
lado derecho del cabezal de filtro de la misma manera.
E. Monte firmemente el cabezal del filtro a la pared
de armarios usando los tornillos de montaje y las
arandelas incluidas.
4. CONECTE EL ABASTECIMIENTO DE AGUA DE ENTRADA
F. Ubique y cierre la válvula de cierre de agua fría en
ángulo debajo del fregadero de la cocina. Abra la llave
de agua fría del grifo para descargar la presión del
agua.
G. Destornille y desconecte el tubo trenzado de la parte
superior de la válvula de cierre en ángulo.
H. Acople la parte inferior del adaptador de cierre en
ángulo a la válvula de cierre en ángulo existente para el
agua fría.
I. Acople el tubo trenzado a la parte superior del
adaptador de cierre en ángulo.
J. Cierre la válvula del costado del adaptador de cierre
en ángulo y abra la válvula de cierre en ángulo para el
agua fría para restituir el servicio de agua al fregadero
de la cocina. Verifique si hay pérdidas.
No se necesitará cinta de Fontanero para los
NOTA:
próximos pasos.
K. Mida el largo del tubo necesario para conectar el
adaptador de cierre en ángulo al codo adaptador de
ESPAÑOL
entrada en el cabezal de filtro. Deje suficiente tubo
para evitar vueltas agudas.
L. Corte el tubo a 90° usando un cuchillo filoso.
M. Introduzca las puntas del tubo en los empalmes de
conexión rápida. Empuje el tubo dentro de la conexión y
tire suavemente para confirmar que el ajuste es firme.
5. CONECTE EL AGUA FILTRADA AL GRIFO DEL FREGADERO
N. Instale un grifo separado para agua potable filtrada.
Siga las instrucciones específicas del fabricante.
O. Acople el conector del grifo a la punta inferior de la
rosca del nuevo conjunto de grifo. No se necesitará
cinta de Fontanero para este paso.
P. Mida el largo del tubo necesario para conectar el codo
adaptador de salida en el cabezal de filtro al conector
del grifo. Deje suficiente tubo para evitar vueltas
agudas. Corte e introduzca cada punta del tubo en los
conectores.
3
B
C
E
D
4
F
I
G
H
L
5
M
N
10 • EVERPURE
®
Sistema De Filtración De Agua De La Serie H
P
O
Page 11

6. INSTALE EL CARTUCHO FILTRANTE Y DEJE CORRER EL
AGUA
Q. Levante la manilla de la válvula de cierre (válvula de
control) en el cabezal.
R. Sujete firmemente el cabezal con una mano.
S. Alinee la lengüeta del cartucho con la etiqueta del
cabezal del filtro.
T. Introduzca el cartucho filtrante—empuje hacia arriba.
U. Gírelo hacia la derecha, aproximadamente un 1/4 de
vuelta hasta que tope.
V. Abra la válvula de agua fría y compruebe que no haya
pérdidas hasta el adaptador del codo de entrada.
W. Abra el grifo de agua.
X. Baje la manilla de la válvula de control para descargar
el agua hacia el fregadero.
Deje correr agua por el cartucho filtrante nuevo
NOTA:
por lo menos durante 3 minutos (enjuague el sistema
H-1200 durante por lo menos 7 minutos) para quitar
el aire y toda partícula suelta de carbono. Al principio,
el agua filtrada pudiera aparecer turbia debido al aire
atrapado en el filtro y la tubería. Si el agua continúa
opaca por más de una semana, póngase en contacto
con el departamento de Servicios Técnicos para que le
ayuden: (800) 942-1153
Y. Active el temporizador del filtro presionando la
burbuja hasta que sienta un cambio en la resistencia
cuando se bote el temporizador. En unos pocos
segundos aparecerá una línea ROJA delgada en la
ventana blanca para mostrar que ya se activó el
Timestrip®. Desprenda el protector y adhiéralo al
sitio donde lo requiera. Cuando la ventana blanca
esté completamente llena de ROJO, será momento de
reemplazar su producto.
6
Q
R
V W
Y
S
Etiqueta
Lengüeta
U
T
X
ESPAÑOL
H1200 INSTRUCCIONES DE INSTALACIÓN
Herramientas necesarias
• Destornillador Phillips
• Llave
• Cuchillo universal
• Cinta métrica
• Lápiz
1. OUVREZ LE CARTON ET INSPECTEZ LES PIÈCES
Pièces à installer
Clave Descripción Pieza No
1 QL3 Cabezal de filtro EV927222
2 Cartucho filtrante EV928201
3 2 arandelas de seguridad EV306204
4 2 tornillos EV306196
5 Adaptador para válvula de
cierre en ángulo
6 Tubería de plástico de 1/4" A0860119
7 Codo adaptador y reductor EV308168
8 Cinta de Fontanero EV312119
9 Conector de grifo EV312135
10 Medidor de filtro Everpure EV314160
11
12 Acoplador, 3/8” hembra
Válvula de cierre, 3/8”
®
x 3/8” hembra
Guest
inoxidable
John
EV312120
EV309860
EV312350
1
1
EVERPURE
4
3 5
7
6
2
10
9
®
Sistema De Filtración De Agua De La Serie H • 11
8
11
12
Page 12

2. COMPRUEBE EL SITIO DE MONTAJE DEBAJO DEL FREGADERO
Mida 55.8 cm desde la base del armario y marque el sitio de
montaje de la parte superior del cabezal del filtro. Asegúrese
de que haya suficiente espacio encima del cabezal para abrir
y cerrar la válvula de cierre incorporada y para evitar que
la tubería de agua se doble. También, asegúrese de que el
sitio que escogió sea fácilmente accesible para cambiar los
cartuchos en el futuro.
Dimensiones Ancho Altura Profundidad
H-1200 33 cm 55.8 cm 12.7 cm
NOTA:
El cabezal y el cartucho deben montarse en posición
vertical, con el cartucho colgando hacia abajo.Monte el cabezal
del filtro debajo del fregadero
3. MONTE EL CABEZAL DEL FILTRO DEBAJO DEL FREGADERO
A. Identifique el cabezal de filtro doble y la válvula de
cierre (EV309860).
B. Aplique cinta de Teflón a la rosca del lado de entrada
(izquierdo) del cabezal. Atornille la nueva válvula
de cierre y ajuste a mano. Repita lo mismo con el
acoplador inoxidable (EV312350) para el lado de salida
(derecho) del cabezal.
C. Aplique cinta de Teflón a la rosca del codo adaptador
de salida (banda negra). Atornille dentro de la salida
del acoplador inoxidable. Enrolle la cinta en el sentido
de las roscas para asegurar un ajuste firme y evitar las
pérdidas pequeñas.
D. Monte firmemente el cabezal del filtro a la pared
de armarios usando los tornillos de montaje y las
arandelas incluidas.
4. Vaya a la página 10 y siga los pasos 4, 5 y 6 de las
Instrucciones Básicas de Instalación para completar la
instalación del Sistema H-1200.
2
55.8 cm
3
Dual Filter Head Shut Off Valve
A
B
C
ESPAÑOL
DECLARACIONES Y NOTAS
Esta instalación debe cumplir con todas las leyes y
reglamentos locales y estatales.
No lo utilice con agua que sea microbiológicamente peligrosa
o de calidad desconocida sin usar una desinfección adecuada,
antes o después del sistema. Los sistemas certificados para
la reducción de quistes pueden usarse en aguas desinfectadas
que pudieran contener quistes filtrables.
Las pruebas se realizaron en condiciones normales de
laboratorio, el rendimiento real pudiera variar.
Sistemas probados y certificados por NSF
International bajo las normas 42, 53 de NSF/ANSI
y 401 de NSF para la reducción de substancias
especificadas en la ficha de datos de rendimiento.
La norma NSF 401 se considera como
“contaminantes incidentales/compuestos
emergentes”. Los contaminantes incidentales son
los compuestos que se han detectado en fuentes
de abastecimiento de agua potable en niveles de
trazas. Aunque estén presentes sólo en niveles
de trazas, estos compuestos pueden afectar la
aceptación y la percepción del público hacia la
calidad del agua potable.
D
12 • EVERPURE
®
Sistema De Filtración De Agua De La Serie H
Page 13

Page 14

Everpure vous remercie de votre achat d’un filtre de qualité
professionnelle pour votre logement. Avec votre système
Everpure, votre famille et vous pourrez facilement tirer
directement à votre robinet, de l’eau de qualité supérieure au
goût excellent et bonne pour la santé.
Caractéristiques Techniques Du Produit:
• Pour usage sur eau froide uniquement
• Gammes de températures : 2 à 38°C
• Pression utile mini. – maxi. : 0.7-8.6 bar
• Débit de service : 1.9 Lpm
LE GUIDE DE L’UTILISATEUR S’APPLIQUE AUX FILTRES
EVERPURE DES MODÈLES SUIVANTS :
Modèle H-54 Capacité nominale : 750
Modèle H-300 Capacité nominale : 300
Modèle H-104 Capacité nominale : 1,000
Modèle H-300-HSD Capacité nominale : 300
Modèle H-300-NXT Capacité nominale : 300
Modèle H-1200 Capacité nominale : 1,000
*Pour maximiser la performance, il convient de
remplacer la cartouche une fois par an ou plus souvent
si le débit ralentit trop ou si la capacité nominale de
l’unité est dépassée
Gal
(2835 L)*
Gal
Gal
Gal
(1140 L)*
(3780 L)*
Gal
(1140 L)*
Gal
(1140 L)*
(3780 L)*
Pour l’achat de composants remplaçables s’il vous plaît contacter
votre distributeur local.
Clients de l’H-1200 : Les consignes d’installation du H-1200
commencent à la page no 16 de ce guide d’installation et
d’utilisation.
(Universal Plumbing Code) adopté par plus de 20 états ainsi que
d’autres règlements spécifiques à certaines villes ou à certains
contés interdit l’usage de robinets à étrier, et en tout état de cause,
leur utilisation n’est jamais recommandée. Vous devez suivre les
règlements de plomberie de votre état ainsi que ceux de votre
localité. Consultez un plombier qualifié si vous avez des questions
à ce sujet.
raccords de type John Guest
filtrage Everpure. Le tube de cuivre pourrait donner l’impression
de convenir, mais des fuites d’eau se développeront à l’usage ou au
bout d’un certain temps. Si vous devez utiliser du tube en cuivre,
il vous faut alors employer des raccords cuivre à compression
disponibles dans toutes les quincailleries ou fournisseurs de
plomberie.
le règlement américain de la plomberie
n’utilisez PAS de tubes de cuivre avec les
®
fournis avec votre système de
AVERTISSEMENT AU SUJET DE LA PROPOSITION 65 DE
CALIFORNIE:
Ce produit contient des produits chimiques que
l’État de Californie considère comme carcinogènes et responsables
d’anomalies congénitales et d’autres pathologies du système
reproductif.
Raccordement à plusieurs appareils : vous pouvez également
raccorder votre filtre Everpure au réfrigérateur pour la distribution
d’eau et de glace, à un distributeur d’eau chaude instantanée, à
un refroidisseur ou à une cafetière raccordée à l’arrivée d’eau. Il
vous suffit d’installer des raccords en Té (disponibles dans toutes
les quincailleries ou fournisseurs de plomberie) dans la ligne
d’alimentation en eau entre le filtre et l’adaptateur du robinet puis
d’amener un tuyau à chaque appareil.
REMARQUE :
glaçons commerciale. Ce type d’appareil nécessite un débit et un
volume d’eau supérieurs aux limites pour lesquelles votre filtre
sous évier a été conçu.
REMARQUE :
domestique et qu’il n’y a pas de raccordement à un robinet de filtre
sous l’évier, il faut prévoir un robinet de purge.
NE raccordez PAS ce système à une machine à
Si vous le raccordez à une machine à glaçons
FRANÇAIS
14 • EVERPURE
®
H Série Système De Filtrage D’eau
Page 15

INSTRUCTIONS D’INSTALLATION DE BASE
Outils nécessaires
Tournevis Phillips • Clé • Couteau • Mètre à ruban • Crayon de bois
1. OUVREZ LE CARTON ET INSPECTEZ LES PIÈCES
Pièces à installer
Repère Description No de pièce
1 QL3 Tête de filtre EV925831
2 Cartouche filtrante (varies)
3 2 rondelles de blocage EV306204
4 2 vis EV306196
5 Adaptateur de robinet
d’arrêt d’équerre
6 Tube plastique 1/4 po A0860119
7 Raccord coudé et
réducteur
8 Sparadrap EV312119
9 Raccord de robinet EV312135
10
2. VÉRIFIEZ L’EMPLACEMENT DE MONTAGE SOUS L’ÉVIER
Mesurez 55.8 cm par rapport au bas du placard et repérez
l’emplacement de montage du dessus de la tête de filtre.
Assurez-vous qu’il y a assez d’espace au-dessus de la tête
pour ouvrir et fermer le robinet d’arrêt intégré et pour éviter
de faire un pli dans le tuyau d’arrivée d’eau. Assurez-vous
également que l’emplacement choisi permet un accès facile
pour changer les cartouches dans le futur.
Dimensions Largeur Hauteur Profondeur
H-54
H-104
H-300
H-300-HSD
H-300-NXT
Compteur du filtre Everpure
12.7 cm 38.1 cm 12.7 cm
12.7 cm 50.8 cm 12.7 cm
12.7 cm 55.8 cm 12.7 cm
12.7 cm 55.8 cm 12.7 cm
12.7 cm 55.8 cm 12.7 cm
EV312120
EV308168
EV314160
1
1
3
4
5
7
2
6
10
8
9
2
55.8 cm
REMARQUE :
position verticale avec la cartouche dirigée vers le bas.
la tête et la cartouche doivent être montées en
FRANÇAIS
EVERPURE
®
H Série Système De Filtrage D’eau • 15
Page 16

3. MONTAGE DE LA TÊTE DE FILTRE SOUS L’ÉVIER
A. Identifiez la tête de filtre et les deux raccords coudés
et remarquez que le raccord de sortie est doté d’une
bague noire. Ce raccord est muni d’un petit réducteur
rapporté pour limiter le débit à un maximum de 1,9
litres (1/2 gallon) par minute.
B. Enrobez les filets des raccords coudés de ruban
Sparadrap. Enroulez le ruban dans le sens des filets
pour assurer un serrage convenable et éviter les
petites fuites.
C. Vissez le coude d’entrée sur le côté gauche de la tête
filtrante et serrez à la main seulement.
D. Vissez le coude de sortie (bague noire) sur le côté droit
de la tête filtrante de la même manière.
E. Montez fermement la tête de filtre sur la paroi du
placard à l’aide des vis et rondelles de montage
fournies.
4. RACCORDEMENT DE L’ARRIVÉE D’EAU
F. Localisez le robinet d’arrêt d’équerre d’eau froide sous
votre évier de cuisine et fermez-le.
G. Dévissez le tube armé du dessus du robinet d’arrêt
d’équerre et débranchez-le.
H. Fixez la partie inférieure de l’adaptateur de robinet
d’arrêt d’équerre sur le robinet d’arrêt d’équerre d’eau
froide existant.
I. Raccordez le tube armé à la partie supérieure de
l’adaptateur de robinet d’arrêt d’équerre.
J. Fermez le robinet latéral de l’adaptateur de robinet
d’arrêt d’équerre et ouvrez le robinet d’arrêt d’équerre
d’eau froide pour rétablir l’arrivée d’eau à l’évier.
Vérifiez qu’il n’y a pas de fuites.
REMARQUE :
Fontanero pour les étapes qui suivent.
K. Mesurez la longueur de tube nécessaire pour raccorder
l’adaptateur de robinet d’arrêt d’équerre au coude
d’entrée de la tête filtrante. Prévoyez suffisamment de
longueur pour éviter les coudes brusques.
L. Coupez le tube d’équerre à l’aide d’un couteau bien
aiguisé.
M. Enfoncez les extrémités du tube dans les raccords
rapides. Poussez le tube dans le raccord et tirez
doucement dessus pour confirmer qu’il est bien
assujetti.
5. RACCORDEMENT DE L’EAU FILTRÉE AU ROBINET DE
L’ÉVIER
N. Installez un robinet séparé pour l’eau potable filtrée.
Suivez les instructions du fabricant.
O. Raccordez le raccord de robinet à la partie inférieure
des filets du robinet qui vient d’être installé. Il
ne devrait pas être nécessaire d’utiliser du ruban
Fontanero pour cette étape.
P. Mesurez la longueur de tube nécessaire pour raccorder
le coude de sortie de la tête filtrante au raccord de
robinet qui vient d’être installé. Prévoyez suffisamment
de longueur pour éviter les coudes brusques. Coupez
le tube et insérez les deux extrémités dans les
raccords.
il n’est pas nécessaire d’utiliser de ruban
3
B
C
E
D
4
F
I
G
H
L
5
M
N
FRANÇAIS
16 • EVERPURE
®
H Série Système De Filtrage D’eau
P
O
Page 17

6. INSTALLATION ET RINÇAGE DE LA CARTOUCHE FIL
TRANTE
Q. Mettez la poignée du robinet d’arrêt intégré (robinet de
contrôle) situé sur la tête en position haute.
R. Tenez fermement la tête d’une main.
S. Mettez la patte de la cartouche en face de l’étiquette
située sur la tête de filtre.
T. Enfoncez la cartouche filtrante en poussant vers le
haut.
U. Faites-la tourner vers la droite d’environ 1/4 tour
jusqu’à ce qu’elle butte.
V. Ouvrez le robinet d’arrêt d’eau froide et vérifiez qu’il n’y
a pas de fuites jusqu’au coude d’entrée.
W. Ouvrez le robinet.
X. Mettez la poignée du robinet d’arrêt en position basse
pour évacuer l’eau dans l’évier.
REMARQUE :
pendant un minimum de 3 minutes (Rincer le système
H-1200 pendant au moins 7 minutes) pour éliminer l’air
et les particules de carbone libres. Au début, il se peut
que l’eau apparaisse laiteuse à cause de la présence
d’air dans le filtre et les tuyaux. Si l’eau reste laiteuse
après une semaine, veuillez contacter le services
d’assistance technique d’Everpure pour assistance
(800) 942-1153.
Y. Activez le compteur du filtre en pinçant la bulle
jusqu’à sentir un changement dans la résistance
et jusqu’à ce que le temporisateur de filtre soit
éjecté. En quelques secondes une ligne ROUGE fine
apparaîtra dans la fenêtre blanche indiquant que
le Timestrip® a été activé. Décollez la pellicule de
protection et faites adhérer à l’emplacement désiré.
Quand la fenêtre blanche est complètement remplie
de ROUGE, il est temps de remplacer le produit.
Rincez les cartouches filtrantes neuves
6
Q
R
V W
Y
S
Étiquette
Patte
U
T
X
CONSIGNES D’UTILISATION POUR L’H1200
Outils nécessaires
• Tournevis Phillips
• Clé
• Couteau
• Mètre à ruban
• Crayon de bois
1. OUVREZ LE CARTON ET INSPECTEZ LES PIÈCES
Pièces à installer
Key Description Part No.
1 QL3 Tête de filtre EV927222
2 Cartouche filtrante EV928201
3 2 rondelles de blocage EV306204
4 2 vis EV306196
5 Adaptateur de robinet
d’arrêt d’équerre
6 Tube plastique 1/4 po A0860119
7 Raccord coudé et réducteur EV308168
8 Ruban Sparadrap EV312119
9 Raccord de robinet EV312135
10 Compteur du filtre Everpure EV314160
11 Robinet d’arrêt, raccord type
John Guest
filetage gaz femelle.
12 Accouplement, 3/8 po
filetage gaz femelle, acier
inoxydable
®
3/8 po x 3/8 po
EV312120
EV309860
EV312350
1
1
3 5
4
7
8
6
2
10
11
FRANÇAIS
12
9
EVERPURE
®
H Série Système De Filtrage D’eau • 17
Page 18

2. VÉRIFIEZ L’EMPLACEMENT DE MONTAGE SOUS L’ÉVIER
Mesurez 55.8 cm par rapport au bas du placard et repérez
l’emplacement de montage du dessus de la tête de filtre.
Assurez-vous qu’il y a assez d’espace au-dessus de la tête pour
ouvrir et fermer le robinet d’arrêt intégré et pour éviter de faire
un pli dans le tuyau d’arrivée d’eau. Assurez-vous également
que l’emplacement choisi permet un accès facile pour changer
les cartouches dans le futur.
Dimensions Largeur Hauteur Profondeur
H-1200 12.7 cm 55.8 cm 12.7 cm
2
55.8 cm
REMARQUE :
position verticale avec la cartouche dirigée vers le bas.
3. MONTAGE DE LA TÊTE DE FILTRE SOUS L’ÉVIER
A. Identifiez la double tête filtrante et le robinet d’arrêt
B. Appliquez du ruban Sparadrap sur les filets du côté
C. Appliquez du ruban Sparadrap sur les filets du coude
D. Montez fermement la tête de filtre sur la paroi du
4. Allez à la page 15 et suivez les instructions d’installation
de base, étapes 4, 5 et 6 pour terminer l’installation du
système H-1200.
la tête et la cartouche doivent être montées en
(EV309860).
entrée (gauche) de la tête. Vissez-y le nouveau robinet
d’arrêt et serrez à la main. Répétez cette étape pour
l’accouplement en inox (EV312350) du côté sortie (droit)
de la tête.
de sortie (bague noire). Vissez-le sur la sortie de
l’accouplement en inox. Enroulez le ruban dans le sens
des filets pour assurer un bon serrage et éviter les
petites fuites.
placard à l’aide des vis et rondelles de montage fournies.
REVENDICATION & REMARQUES
L’installation doit être conforme à tous les règlements
provinciaux et locaux en vigueur.
N’utilisez pas le filtre avec de l’eau qui est micro
biologiquement impropre à la consommation ou de qualité
inconnue sans une désinfection correcte avant ou après le
système.
Essai effectué sous conditions normales de laboratoire, les
performances réelles peuvent être différentes.
3
Dual Filter Head Shut Off Valve
A
B
C
D
Systèmes testés et certifiés par NSF
International selon les normes NSF/ANSI 42,
53 et NSF 401 pour la réduction des produits
revendiqués à la fiche des données techniques.
La norme NSF 401 concerne les «
micropolluants/polluants émergents ». Les
micropolluants sont des composés qui ont été
détectés dans l’eau potable à l’état de trace.
Bien qu’uniquement présents à l’état de trace,
ces composés peuvent influer sur l’opinion et
la perception du public relatives à la qualité de
l’eau potable.
FRANÇAIS
18 • EVERPURE
®
H Série Système De Filtrage D’eau
Page 19

Notes • Notas • Remarques
Page 20

For Everpure® Product Warranties visit:
Everpure® para las gasantías de los productos visite:
Pour Everpure® garanties produit visitez le site:
www.everpure.com
FILTRATION & PROCESS
5730 NORTH GLEN PARK ROAD, MILWAUKEE, WI 53209
P: 262.238.4400 | WWW.PENTAIRAQUA.COM | CUSTOMER CARE: 800.279.9404 | tech-support@pentair.com
All Pentair trademarks and logos are owned by Pentair, Inc. or its affiliates. All other registered and unregistered trademarks and logos are the property of their
respective owners. Because we are continuously improving our products and services, Pentair reserves the right to change specifications without prior notice.
Pentair is an equal opportunity employer.
EV307043 REV AB JL14 © 2014 Pentair Residential Filtration, LLC. All rights reserved.
 Loading...