

Page 1
Client
Operation
Manual
C1554M-A (4/05)
C1553M (5/04)
Page 2

Page 3

Contents
Introduction . . . . . . . . . . . . . . . . . . . . . . . . . . . . . . . . . . . . . . . . . . . . . . . . . . . . . . . . . . . . . . . . . . . . . . . . . . . . . . . . . . . . . . . . . . . . . . . . . . . . . . . . . .9
Configuring Servers . . . . . . . . . . . . . . . . . . . . . . . . . . . . . . . . . . . . . . . . . . . . . . . . . . . . . . . . . . . . . . . . . . . . . . . . . . . . . . . . . . . . . . . . . . . . . . . . . .10
User Groups . . . . . . . . . . . . . . . . . . . . . . . . . . . . . . . . . . . . . . . . . . . . . . . . . . . . . . . . . . . . . . . . . . . . . . . . . . . . . . . . . . . . . . . . . . . . . . . . . . . . . . . .12
Logging In and Out . . . . . . . . . . . . . . . . . . . . . . . . . . . . . . . . . . . . . . . . . . . . . . . . . . . . . . . . . . . . . . . . . . . . . . . . . . . . . . . . . . . . . . . . . . . . . . . . . . .13
Logging In When the Client Is Not Already Running . . . . . . . . . . . . . . . . . . . . . . . . . . . . . . . . . . . . . . . . . . . . . . . . . . . . . . . . . . . . . . . . . . . . .13
Logging In When the Client Is Already Running . . . . . . . . . . . . . . . . . . . . . . . . . . . . . . . . . . . . . . . . . . . . . . . . . . . . . . . . . . . . . . . . . . . . . . . .15
Logging Out . . . . . . . . . . . . . . . . . . . . . . . . . . . . . . . . . . . . . . . . . . . . . . . . . . . . . . . . . . . . . . . . . . . . . . . . . . . . . . . . . . . . . . . . . . . . . . . . . . . .16
Shutting Down the Client . . . . . . . . . . . . . . . . . . . . . . . . . . . . . . . . . . . . . . . . . . . . . . . . . . . . . . . . . . . . . . . . . . . . . . . . . . . . . . . . . . . . . . . . .16
Workspaces . . . . . . . . . . . . . . . . . . . . . . . . . . . . . . . . . . . . . . . . . . . . . . . . . . . . . . . . . . . . . . . . . . . . . . . . . . . . . . . . . . . . . . . . . . . . . . . . . . . . . . . .17
Opening a Workspace . . . . . . . . . . . . . . . . . . . . . . . . . . . . . . . . . . . . . . . . . . . . . . . . . . . . . . . . . . . . . . . . . . . . . . . . . . . . . . . . . . . . . . . . . . . . 17
Autogenerating a Workspace . . . . . . . . . . . . . . . . . . . . . . . . . . . . . . . . . . . . . . . . . . . . . . . . . . . . . . . . . . . . . . . . . . . . . . . . . . . . . . . . . . . . . .18
Editing a Workspace . . . . . . . . . . . . . . . . . . . . . . . . . . . . . . . . . . . . . . . . . . . . . . . . . . . . . . . . . . . . . . . . . . . . . . . . . . . . . . . . . . . . . . . . . . . . .18
Appearance Tab . . . . . . . . . . . . . . . . . . . . . . . . . . . . . . . . . . . . . . . . . . . . . . . . . . . . . . . . . . . . . . . . . . . . . . . . . . . . . . . . . . . . . . . . . . . .19
Size Tab . . . . . . . . . . . . . . . . . . . . . . . . . . . . . . . . . . . . . . . . . . . . . . . . . . . . . . . . . . . . . . . . . . . . . . . . . . . . . . . . . . . . . . . . . . . . . . . . . . . 22
Position Tab . . . . . . . . . . . . . . . . . . . . . . . . . . . . . . . . . . . . . . . . . . . . . . . . . . . . . . . . . . . . . . . . . . . . . . . . . . . . . . . . . . . . . . . . . . . . . . .23
Content Tab . . . . . . . . . . . . . . . . . . . . . . . . . . . . . . . . . . . . . . . . . . . . . . . . . . . . . . . . . . . . . . . . . . . . . . . . . . . . . . . . . . . . . . . . . . . . . . . . 24
Details Tab . . . . . . . . . . . . . . . . . . . . . . . . . . . . . . . . . . . . . . . . . . . . . . . . . . . . . . . . . . . . . . . . . . . . . . . . . . . . . . . . . . . . . . . . . . . . . . . .25
Saving a Workspace . . . . . . . . . . . . . . . . . . . . . . . . . . . . . . . . . . . . . . . . . . . . . . . . . . . . . . . . . . . . . . . . . . . . . . . . . . . . . . . . . . . . . . . . . . . . . 25
Workspace Preferences . . . . . . . . . . . . . . . . . . . . . . . . . . . . . . . . . . . . . . . . . . . . . . . . . . . . . . . . . . . . . . . . . . . . . . . . . . . . . . . . . . . . . . . . . . .26
Setting Your Preferences . . . . . . . . . . . . . . . . . . . . . . . . . . . . . . . . . . . . . . . . . . . . . . . . . . . . . . . . . . . . . . . . . . . . . . . . . . . . . . . . . . . . . . . . . .27
Maps . . . . . . . . . . . . . . . . . . . . . . . . . . . . . . . . . . . . . . . . . . . . . . . . . . . . . . . . . . . . . . . . . . . . . . . . . . . . . . . . . . . . . . . . . . . . . . . . . . . . . . . . . . . . . .28
Loading Maps . . . . . . . . . . . . . . . . . . . . . . . . . . . . . . . . . . . . . . . . . . . . . . . . . . . . . . . . . . . . . . . . . . . . . . . . . . . . . . . . . . . . . . . . . . . . . . . . . .28
Adjusting the Map Display . . . . . . . . . . . . . . . . . . . . . . . . . . . . . . . . . . . . . . . . . . . . . . . . . . . . . . . . . . . . . . . . . . . . . . . . . . . . . . . . . . . . . . . . 29
Zoom Buttons . . . . . . . . . . . . . . . . . . . . . . . . . . . . . . . . . . . . . . . . . . . . . . . . . . . . . . . . . . . . . . . . . . . . . . . . . . . . . . . . . . . . . . . . . . . . . .29
Previous View Button . . . . . . . . . . . . . . . . . . . . . . . . . . . . . . . . . . . . . . . . . . . . . . . . . . . . . . . . . . . . . . . . . . . . . . . . . . . . . . . . . . . . . . . .29
Predefined Views . . . . . . . . . . . . . . . . . . . . . . . . . . . . . . . . . . . . . . . . . . . . . . . . . . . . . . . . . . . . . . . . . . . . . . . . . . . . . . . . . . . . . . . . . . .29
Hotlinks . . . . . . . . . . . . . . . . . . . . . . . . . . . . . . . . . . . . . . . . . . . . . . . . . . . . . . . . . . . . . . . . . . . . . . . . . . . . . . . . . . . . . . . . . . . . . . . . . . . . . . . 30
Labels . . . . . . . . . . . . . . . . . . . . . . . . . . . . . . . . . . . . . . . . . . . . . . . . . . . . . . . . . . . . . . . . . . . . . . . . . . . . . . . . . . . . . . . . . . . . . . . . . . . . . . . . .31
Icons . . . . . . . . . . . . . . . . . . . . . . . . . . . . . . . . . . . . . . . . . . . . . . . . . . . . . . . . . . . . . . . . . . . . . . . . . . . . . . . . . . . . . . . . . . . . . . . . . . . . . . . . . .31
Devices . . . . . . . . . . . . . . . . . . . . . . . . . . . . . . . . . . . . . . . . . . . . . . . . . . . . . . . . . . . . . . . . . . . . . . . . . . . . . . . . . . . . . . . . . . . . . . . . . . . . . . . . . . . . 32
Device Icons . . . . . . . . . . . . . . . . . . . . . . . . . . . . . . . . . . . . . . . . . . . . . . . . . . . . . . . . . . . . . . . . . . . . . . . . . . . . . . . . . . . . . . . . . . . . . . . . . . .32
Device List . . . . . . . . . . . . . . . . . . . . . . . . . . . . . . . . . . . . . . . . . . . . . . . . . . . . . . . . . . . . . . . . . . . . . . . . . . . . . . . . . . . . . . . . . . . . . . . . . . . . . 33
Switching a Device . . . . . . . . . . . . . . . . . . . . . . . . . . . . . . . . . . . . . . . . . . . . . . . . . . . . . . . . . . . . . . . . . . . . . . . . . . . . . . . . . . . . . . . . . . . . . . 33
Controlling VMX300(-E) Devices . . . . . . . . . . . . . . . . . . . . . . . . . . . . . . . . . . . . . . . . . . . . . . . . . . . . . . . . . . . . . . . . . . . . . . . . . . . . . . . . . . . .34
Controlling a Pelco PTZ Camera . . . . . . . . . . . . . . . . . . . . . . . . . . . . . . . . . . . . . . . . . . . . . . . . . . . . . . . . . . . . . . . . . . . . . . . . . . . . . . . . . . . .34
Pelco PTZ Gadget . . . . . . . . . . . . . . . . . . . . . . . . . . . . . . . . . . . . . . . . . . . . . . . . . . . . . . . . . . . . . . . . . . . . . . . . . . . . . . . . . . . . . . . . . . .35
Opening the Device Control Dialog Box . . . . . . . . . . . . . . . . . . . . . . . . . . . . . . . . . . . . . . . . . . . . . . . . . . . . . . . . . . . . . . . . . . . . . . . . . .35
Pan, Tilt, Zoom, Iris, and Focus . . . . . . . . . . . . . . . . . . . . . . . . . . . . . . . . . . . . . . . . . . . . . . . . . . . . . . . . . . . . . . . . . . . . . . . . . . . . . . . . .35
Presets . . . . . . . . . . . . . . . . . . . . . . . . . . . . . . . . . . . . . . . . . . . . . . . . . . . . . . . . . . . . . . . . . . . . . . . . . . . . . . . . . . . . . . . . . . . . . . . . . . .37
Patterns . . . . . . . . . . . . . . . . . . . . . . . . . . . . . . . . . . . . . . . . . . . . . . . . . . . . . . . . . . . . . . . . . . . . . . . . . . . . . . . . . . . . . . . . . . . . . . . . . . .41
Sequences . . . . . . . . . . . . . . . . . . . . . . . . . . . . . . . . . . . . . . . . . . . . . . . . . . . . . . . . . . . . . . . . . . . . . . . . . . . . . . . . . . . . . . . . . . . . . . . . . 45
Auxiliaries . . . . . . . . . . . . . . . . . . . . . . . . . . . . . . . . . . . . . . . . . . . . . . . . . . . . . . . . . . . . . . . . . . . . . . . . . . . . . . . . . . . . . . . . . . . . . . . . . 45
On-Screen Display . . . . . . . . . . . . . . . . . . . . . . . . . . . . . . . . . . . . . . . . . . . . . . . . . . . . . . . . . . . . . . . . . . . . . . . . . . . . . . . . . . . . . . . . . .46
Locking a Camera . . . . . . . . . . . . . . . . . . . . . . . . . . . . . . . . . . . . . . . . . . . . . . . . . . . . . . . . . . . . . . . . . . . . . . . . . . . . . . . . . . . . . . . . . . .47
Capturing Live Video . . . . . . . . . . . . . . . . . . . . . . . . . . . . . . . . . . . . . . . . . . . . . . . . . . . . . . . . . . . . . . . . . . . . . . . . . . . . . . . . . . . . . . . . .49
Controlling a PelcoNet Device . . . . . . . . . . . . . . . . . . . . . . . . . . . . . . . . . . . . . . . . . . . . . . . . . . . . . . . . . . . . . . . . . . . . . . . . . . . . . . . . . . . . . .49
PelcoNet Device Controls . . . . . . . . . . . . . . . . . . . . . . . . . . . . . . . . . . . . . . . . . . . . . . . . . . . . . . . . . . . . . . . . . . . . . . . . . . . . . . . . . . . . . 50
Gadgets Available When Viewing Video From a PelcoNet Device . . . . . . . . . . . . . . . . . . . . . . . . . . . . . . . . . . . . . . . . . . . . . . . . . . . . .50
Controlling a DX8000 Series DVR . . . . . . . . . . . . . . . . . . . . . . . . . . . . . . . . . . . . . . . . . . . . . . . . . . . . . . . . . . . . . . . . . . . . . . . . . . . . . . . . . . .52
Viewing Live Video . . . . . . . . . . . . . . . . . . . . . . . . . . . . . . . . . . . . . . . . . . . . . . . . . . . . . . . . . . . . . . . . . . . . . . . . . . . . . . . . . . . . . . . . . .52
Working With Archived Video . . . . . . . . . . . . . . . . . . . . . . . . . . . . . . . . . . . . . . . . . . . . . . . . . . . . . . . . . . . . . . . . . . . . . . . . . . . . . . . . . 52
Controlling a DX9000 Series DVR . . . . . . . . . . . . . . . . . . . . . . . . . . . . . . . . . . . . . . . . . . . . . . . . . . . . . . . . . . . . . . . . . . . . . . . . . . . . . . . . . . .54
C1554M-A (4/05) 3
Page 4

Viewing Live Video . . . . . . . . . . . . . . . . . . . . . . . . . . . . . . . . . . . . . . . . . . . . . . . . . . . . . . . . . . . . . . . . . . . . . . . . . . . . . . . . . . . . . . . . . .54
Working with Archived Video . . . . . . . . . . . . . . . . . . . . . . . . . . . . . . . . . . . . . . . . . . . . . . . . . . . . . . . . . . . . . . . . . . . . . . . . . . . . . . . . . .55
Controlling an ASCII Switcher . . . . . . . . . . . . . . . . . . . . . . . . . . . . . . . . . . . . . . . . . . . . . . . . . . . . . . . . . . . . . . . . . . . . . . . . . . . . . . . . . . . . . . 62
ASCII Switcher Gadget . . . . . . . . . . . . . . . . . . . . . . . . . . . . . . . . . . . . . . . . . . . . . . . . . . . . . . . . . . . . . . . . . . . . . . . . . . . . . . . . . . . . . . . 62
Opening the Switcher’s Device Control Dialog Box . . . . . . . . . . . . . . . . . . . . . . . . . . . . . . . . . . . . . . . . . . . . . . . . . . . . . . . . . . . . . . . . . 62
Date\Time Tab . . . . . . . . . . . . . . . . . . . . . . . . . . . . . . . . . . . . . . . . . . . . . . . . . . . . . . . . . . . . . . . . . . . . . . . . . . . . . . . . . . . . . . . . . . . . . . 62
On-Screen Display . . . . . . . . . . . . . . . . . . . . . . . . . . . . . . . . . . . . . . . . . . . . . . . . . . . . . . . . . . . . . . . . . . . . . . . . . . . . . . . . . . . . . . . . . .63
Controlling an ASCII Camera . . . . . . . . . . . . . . . . . . . . . . . . . . . . . . . . . . . . . . . . . . . . . . . . . . . . . . . . . . . . . . . . . . . . . . . . . . . . . . . . . . . . . . . 64
ASCII Camera Gadget . . . . . . . . . . . . . . . . . . . . . . . . . . . . . . . . . . . . . . . . . . . . . . . . . . . . . . . . . . . . . . . . . . . . . . . . . . . . . . . . . . . . . . . . 64
Opening the Camera’s Device Control Dialog Box . . . . . . . . . . . . . . . . . . . . . . . . . . . . . . . . . . . . . . . . . . . . . . . . . . . . . . . . . . . . . . . . . . 64
Pan, Tilt, Zoom, Iris, and Focus . . . . . . . . . . . . . . . . . . . . . . . . . . . . . . . . . . . . . . . . . . . . . . . . . . . . . . . . . . . . . . . . . . . . . . . . . . . . . . . . .64
Presets . . . . . . . . . . . . . . . . . . . . . . . . . . . . . . . . . . . . . . . . . . . . . . . . . . . . . . . . . . . . . . . . . . . . . . . . . . . . . . . . . . . . . . . . . . . . . . . . . . .66
Patterns . . . . . . . . . . . . . . . . . . . . . . . . . . . . . . . . . . . . . . . . . . . . . . . . . . . . . . . . . . . . . . . . . . . . . . . . . . . . . . . . . . . . . . . . . . . . . . . . . . .70
Sequences . . . . . . . . . . . . . . . . . . . . . . . . . . . . . . . . . . . . . . . . . . . . . . . . . . . . . . . . . . . . . . . . . . . . . . . . . . . . . . . . . . . . . . . . . . . . . . . . . 74
Auxiliaries . . . . . . . . . . . . . . . . . . . . . . . . . . . . . . . . . . . . . . . . . . . . . . . . . . . . . . . . . . . . . . . . . . . . . . . . . . . . . . . . . . . . . . . . . . . . . . . . . 74
On-Screen Display . . . . . . . . . . . . . . . . . . . . . . . . . . . . . . . . . . . . . . . . . . . . . . . . . . . . . . . . . . . . . . . . . . . . . . . . . . . . . . . . . . . . . . . . . .75
Locking a Camera . . . . . . . . . . . . . . . . . . . . . . . . . . . . . . . . . . . . . . . . . . . . . . . . . . . . . . . . . . . . . . . . . . . . . . . . . . . . . . . . . . . . . . . . . . .75
Controlling a KBD300A Keyboard . . . . . . . . . . . . . . . . . . . . . . . . . . . . . . . . . . . . . . . . . . . . . . . . . . . . . . . . . . . . . . . . . . . . . . . . . . . . . . . . . . .77
Controlling a CM9760-REL Relay Output Unit . . . . . . . . . . . . . . . . . . . . . . . . . . . . . . . . . . . . . . . . . . . . . . . . . . . . . . . . . . . . . . . . . . . . . . . . . .79
Opening a CM9760-REL Relay Unit’s Device Control Dialog Box . . . . . . . . . . . . . . . . . . . . . . . . . . . . . . . . . . . . . . . . . . . . . . . . . . . . . . 79
How to Control a Relay Unit . . . . . . . . . . . . . . . . . . . . . . . . . . . . . . . . . . . . . . . . . . . . . . . . . . . . . . . . . . . . . . . . . . . . . . . . . . . . . . . . . . . 80
Controlling a Serial Output Device . . . . . . . . . . . . . . . . . . . . . . . . . . . . . . . . . . . . . . . . . . . . . . . . . . . . . . . . . . . . . . . . . . . . . . . . . . . . . . . . . . 81
Opening a Serial Output Device’s Device Control Dialog Box . . . . . . . . . . . . . . . . . . . . . . . . . . . . . . . . . . . . . . . . . . . . . . . . . . . . . . . . .81
Controlling an IP Device Status Monitor . . . . . . . . . . . . . . . . . . . . . . . . . . . . . . . . . . . . . . . . . . . . . . . . . . . . . . . . . . . . . . . . . . . . . . . . . . . . . . 83
Accessing IP Device Controls Through an Embedded Web Server . . . . . . . . . . . . . . . . . . . . . . . . . . . . . . . . . . . . . . . . . . . . . . . . . . . . .83
Monitoring an Access Control Device . . . . . . . . . . . . . . . . . . . . . . . . . . . . . . . . . . . . . . . . . . . . . . . . . . . . . . . . . . . . . . . . . . . . . . . . . . . . . . . . 84
Monitoring Access Control Points . . . . . . . . . . . . . . . . . . . . . . . . . . . . . . . . . . . . . . . . . . . . . . . . . . . . . . . . . . . . . . . . . . . . . . . . . . . . . . 84
Port Buffer Tab . . . . . . . . . . . . . . . . . . . . . . . . . . . . . . . . . . . . . . . . . . . . . . . . . . . . . . . . . . . . . . . . . . . . . . . . . . . . . . . . . . . . . . . . . . . . .85
Gadgets . . . . . . . . . . . . . . . . . . . . . . . . . . . . . . . . . . . . . . . . . . . . . . . . . . . . . . . . . . . . . . . . . . . . . . . . . . . . . . . . . . . . . . . . . . . . . . . . . . . . . . . . . . . .86
Video for Windows Gadget . . . . . . . . . . . . . . . . . . . . . . . . . . . . . . . . . . . . . . . . . . . . . . . . . . . . . . . . . . . . . . . . . . . . . . . . . . . . . . . . . . . . . . . .87
Quad Video Display Gadget . . . . . . . . . . . . . . . . . . . . . . . . . . . . . . . . . . . . . . . . . . . . . . . . . . . . . . . . . . . . . . . . . . . . . . . . . . . . . . . . . . . . . . . .88
Configure Quad Video Display Properties . . . . . . . . . . . . . . . . . . . . . . . . . . . . . . . . . . . . . . . . . . . . . . . . . . . . . . . . . . . . . . . . . . . . . . . .88
Custom Windows . . . . . . . . . . . . . . . . . . . . . . . . . . . . . . . . . . . . . . . . . . . . . . . . . . . . . . . . . . . . . . . . . . . . . . . . . . . . . . . . . . . . . . . . . . . . . . . . . . . . 90
Viewing Live Video . . . . . . . . . . . . . . . . . . . . . . . . . . . . . . . . . . . . . . . . . . . . . . . . . . . . . . . . . . . . . . . . . . . . . . . . . . . . . . . . . . . . . . . . . . . . . .92
Capturing Live Video . . . . . . . . . . . . . . . . . . . . . . . . . . . . . . . . . . . . . . . . . . . . . . . . . . . . . . . . . . . . . . . . . . . . . . . . . . . . . . . . . . . . . . . . .93
Controlling a Camera . . . . . . . . . . . . . . . . . . . . . . . . . . . . . . . . . . . . . . . . . . . . . . . . . . . . . . . . . . . . . . . . . . . . . . . . . . . . . . . . . . . . . . . . 93
PTZ Controls . . . . . . . . . . . . . . . . . . . . . . . . . . . . . . . . . . . . . . . . . . . . . . . . . . . . . . . . . . . . . . . . . . . . . . . . . . . . . . . . . . . . . . . . . . . . . . .93
Viewing Archived Video . . . . . . . . . . . . . . . . . . . . . . . . . . . . . . . . . . . . . . . . . . . . . . . . . . . . . . . . . . . . . . . . . . . . . . . . . . . . . . . . . . . . . . . . . . . 95
Locating Archived Video . . . . . . . . . . . . . . . . . . . . . . . . . . . . . . . . . . . . . . . . . . . . . . . . . . . . . . . . . . . . . . . . . . . . . . . . . . . . . . . . . . . . . . 95
Controlling an Archive Device . . . . . . . . . . . . . . . . . . . . . . . . . . . . . . . . . . . . . . . . . . . . . . . . . . . . . . . . . . . . . . . . . . . . . . . . . . . . . . . . .99
Cursor Mode . . . . . . . . . . . . . . . . . . . . . . . . . . . . . . . . . . . . . . . . . . . . . . . . . . . . . . . . . . . . . . . . . . . . . . . . . . . . . . . . . . . . . . . . . . . . . . .99
Viewing Maps . . . . . . . . . . . . . . . . . . . . . . . . . . . . . . . . . . . . . . . . . . . . . . . . . . . . . . . . . . . . . . . . . . . . . . . . . . . . . . . . . . . . . . . . . . . . . . . . .100
Viewing an Internet Browser . . . . . . . . . . . . . . . . . . . . . . . . . . . . . . . . . . . . . . . . . . . . . . . . . . . . . . . . . . . . . . . . . . . . . . . . . . . . . . . . . . . . . .100
Viewing a Remote PC (Workstation) . . . . . . . . . . . . . . . . . . . . . . . . . . . . . . . . . . . . . . . . . . . . . . . . . . . . . . . . . . . . . . . . . . . . . . . . . . . . . . . .101
Scripts . . . . . . . . . . . . . . . . . . . . . . . . . . . . . . . . . . . . . . . . . . . . . . . . . . . . . . . . . . . . . . . . . . . . . . . . . . . . . . . . . . . . . . . . . . . . . . . . . . . . . . . . . . . .103
Running a Script . . . . . . . . . . . . . . . . . . . . . . . . . . . . . . . . . . . . . . . . . . . . . . . . . . . . . . . . . . . . . . . . . . . . . . . . . . . . . . . . . . . . . . . . . . . . . . . . 103
Pausing a Script . . . . . . . . . . . . . . . . . . . . . . . . . . . . . . . . . . . . . . . . . . . . . . . . . . . . . . . . . . . . . . . . . . . . . . . . . . . . . . . . . . . . . . . . . . . . . . . . 103
Stopping a Single Script . . . . . . . . . . . . . . . . . . . . . . . . . . . . . . . . . . . . . . . . . . . . . . . . . . . . . . . . . . . . . . . . . . . . . . . . . . . . . . . . . . . . . . . . . 104
Stopping All Scripts . . . . . . . . . . . . . . . . . . . . . . . . . . . . . . . . . . . . . . . . . . . . . . . . . . . . . . . . . . . . . . . . . . . . . . . . . . . . . . . . . . . . . . . . . . . . . 104
Event Picker . . . . . . . . . . . . . . . . . . . . . . . . . . . . . . . . . . . . . . . . . . . . . . . . . . . . . . . . . . . . . . . . . . . . . . . . . . . . . . . . . . . . . . . . . . . . . . . . . . . . . . . . 105
Building a Date/Time . . . . . . . . . . . . . . . . . . . . . . . . . . . . . . . . . . . . . . . . . . . . . . . . . . . . . . . . . . . . . . . . . . . . . . . . . . . . . . . . . . . . . . . . . . . .106
Zooming to a Time Unit . . . . . . . . . . . . . . . . . . . . . . . . . . . . . . . . . . . . . . . . . . . . . . . . . . . . . . . . . . . . . . . . . . . . . . . . . . . . . . . . . . . . . . . . . .108
Session Manager . . . . . . . . . . . . . . . . . . . . . . . . . . . . . . . . . . . . . . . . . . . . . . . . . . . . . . . . . . . . . . . . . . . . . . . . . . . . . . . . . . . . . . . . . . . . . . . . . . .109
Session View . . . . . . . . . . . . . . . . . . . . . . . . . . . . . . . . . . . . . . . . . . . . . . . . . . . . . . . . . . . . . . . . . . . . . . . . . . . . . . . . . . . . . . . . . . . . . . . . . .110
Current Session Tree . . . . . . . . . . . . . . . . . . . . . . . . . . . . . . . . . . . . . . . . . . . . . . . . . . . . . . . . . . . . . . . . . . . . . . . . . . . . . . . . . . . . . . .111
Activities List . . . . . . . . . . . . . . . . . . . . . . . . . . . . . . . . . . . . . . . . . . . . . . . . . . . . . . . . . . . . . . . . . . . . . . . . . . . . . . . . . . . . . . . . . . . . .111
4 C1554M-A (4/05)
Page 5

Archive View . . . . . . . . . . . . . . . . . . . . . . . . . . . . . . . . . . . . . . . . . . . . . . . . . . . . . . . . . . . . . . . . . . . . . . . . . . . . . . . . . . . . . . . . . . . . . . . . . .112
Browsing Archived Alarms and Events . . . . . . . . . . . . . . . . . . . . . . . . . . . . . . . . . . . . . . . . . . . . . . . . . . . . . . . . . . . . . . . . . . . . . . . . . .113
Filtering Archived Alarms and Events . . . . . . . . . . . . . . . . . . . . . . . . . . . . . . . . . . . . . . . . . . . . . . . . . . . . . . . . . . . . . . . . . . . . . . . . . . .113
Schedules . . . . . . . . . . . . . . . . . . . . . . . . . . . . . . . . . . . . . . . . . . . . . . . . . . . . . . . . . . . . . . . . . . . . . . . . . . . . . . . . . . . . . . . . . . . . . . . . . . . . . . . . . 118
How Schedules Work . . . . . . . . . . . . . . . . . . . . . . . . . . . . . . . . . . . . . . . . . . . . . . . . . . . . . . . . . . . . . . . . . . . . . . . . . . . . . . . . . . . . . . . . . . .118
When a Schedule Executes . . . . . . . . . . . . . . . . . . . . . . . . . . . . . . . . . . . . . . . . . . . . . . . . . . . . . . . . . . . . . . . . . . . . . . . . . . . . . . . . . . 118
Responding to a Schedule . . . . . . . . . . . . . . . . . . . . . . . . . . . . . . . . . . . . . . . . . . . . . . . . . . . . . . . . . . . . . . . . . . . . . . . . . . . . . . . . . . . 118
Alarms and Events . . . . . . . . . . . . . . . . . . . . . . . . . . . . . . . . . . . . . . . . . . . . . . . . . . . . . . . . . . . . . . . . . . . . . . . . . . . . . . . . . . . . . . . . . . . . . . . . . .119
How Alarms and Events Work . . . . . . . . . . . . . . . . . . . . . . . . . . . . . . . . . . . . . . . . . . . . . . . . . . . . . . . . . . . . . . . . . . . . . . . . . . . . . . . . . . . . .119
When an Alarm or Event is Triggered . . . . . . . . . . . . . . . . . . . . . . . . . . . . . . . . . . . . . . . . . . . . . . . . . . . . . . . . . . . . . . . . . . . . . . . . . .119
Replaying an Alarm or Event . . . . . . . . . . . . . . . . . . . . . . . . . . . . . . . . . . . . . . . . . . . . . . . . . . . . . . . . . . . . . . . . . . . . . . . . . . . . . . . . .120
Acknowledging an Alarm or Event . . . . . . . . . . . . . . . . . . . . . . . . . . . . . . . . . . . . . . . . . . . . . . . . . . . . . . . . . . . . . . . . . . . . . . . . . . . . .120
When an Alarm or Event Becomes Complete . . . . . . . . . . . . . . . . . . . . . . . . . . . . . . . . . . . . . . . . . . . . . . . . . . . . . . . . . . . . . . . . . . . .120
Server Status . . . . . . . . . . . . . . . . . . . . . . . . . . . . . . . . . . . . . . . . . . . . . . . . . . . . . . . . . . . . . . . . . . . . . . . . . . . . . . . . . . . . . . . . . . . . . . . . . . . . . .121
Remote Desktop Servers . . . . . . . . . . . . . . . . . . . . . . . . . . . . . . . . . . . . . . . . . . . . . . . . . . . . . . . . . . . . . . . . . . . . . . . . . . . . . . . . . . . . . . . . . . . . .122
Starting a Remote Desktop Server . . . . . . . . . . . . . . . . . . . . . . . . . . . . . . . . . . . . . . . . . . . . . . . . . . . . . . . . . . . . . . . . . . . . . . . . . . . . . . . . . 122
Setting Remote Desktop Server Options . . . . . . . . . . . . . . . . . . . . . . . . . . . . . . . . . . . . . . . . . . . . . . . . . . . . . . . . . . . . . . . . . . . . . . . . . . . . .123
Shutting Down a Remote Desktop Server . . . . . . . . . . . . . . . . . . . . . . . . . . . . . . . . . . . . . . . . . . . . . . . . . . . . . . . . . . . . . . . . . . . . . . . . . . . .123
Appendix: Adjusting the Display . . . . . . . . . . . . . . . . . . . . . . . . . . . . . . . . . . . . . . . . . . . . . . . . . . . . . . . . . . . . . . . . . . . . . . . . . . . . . . . . . . . . . . .124
Adjusting Dockable Windows . . . . . . . . . . . . . . . . . . . . . . . . . . . . . . . . . . . . . . . . . . . . . . . . . . . . . . . . . . . . . . . . . . . . . . . . . . . . . . . . . . . . .124
Adjusting the Size of a Docked Window . . . . . . . . . . . . . . . . . . . . . . . . . . . . . . . . . . . . . . . . . . . . . . . . . . . . . . . . . . . . . . . . . . . . . . . .124
Docking a Window in a Different Position . . . . . . . . . . . . . . . . . . . . . . . . . . . . . . . . . . . . . . . . . . . . . . . . . . . . . . . . . . . . . . . . . . . . . . . 124
Closing a Window . . . . . . . . . . . . . . . . . . . . . . . . . . . . . . . . . . . . . . . . . . . . . . . . . . . . . . . . . . . . . . . . . . . . . . . . . . . . . . . . . . . . . . . . . . . . . . 124
Resizing a Window . . . . . . . . . . . . . . . . . . . . . . . . . . . . . . . . . . . . . . . . . . . . . . . . . . . . . . . . . . . . . . . . . . . . . . . . . . . . . . . . . . . . . . . . . . . . . 124
Repositioning a Window . . . . . . . . . . . . . . . . . . . . . . . . . . . . . . . . . . . . . . . . . . . . . . . . . . . . . . . . . . . . . . . . . . . . . . . . . . . . . . . . . . . . . . . . .124
C1554M-A (4/05) 5
Page 6

List of Illustrations
1 Login Dialog Box. . . . . . . . . . . . . . . . . . . . . . . . . . . . . . . . . . . . . . . . . . . . . . . . . . . . . . . . . . . . . . . . . . . . . . . . . . . . . . . . . . . . . . . . . . . . . . . 10
2 Configure Servers Dialog Box. . . . . . . . . . . . . . . . . . . . . . . . . . . . . . . . . . . . . . . . . . . . . . . . . . . . . . . . . . . . . . . . . . . . . . . . . . . . . . . . . . . . .10
3 Add Server Dialog Box . . . . . . . . . . . . . . . . . . . . . . . . . . . . . . . . . . . . . . . . . . . . . . . . . . . . . . . . . . . . . . . . . . . . . . . . . . . . . . . . . . . . . . . . . .11
4 Edit Server Dialog Box . . . . . . . . . . . . . . . . . . . . . . . . . . . . . . . . . . . . . . . . . . . . . . . . . . . . . . . . . . . . . . . . . . . . . . . . . . . . . . . . . . . . . . . . . .11
5 Client Login Dialog Box . . . . . . . . . . . . . . . . . . . . . . . . . . . . . . . . . . . . . . . . . . . . . . . . . . . . . . . . . . . . . . . . . . . . . . . . . . . . . . . . . . . . . . . . . 13
6 Select Group Dialog Box . . . . . . . . . . . . . . . . . . . . . . . . . . . . . . . . . . . . . . . . . . . . . . . . . . . . . . . . . . . . . . . . . . . . . . . . . . . . . . . . . . . . . . . .14
7 Workspace Not Found Message . . . . . . . . . . . . . . . . . . . . . . . . . . . . . . . . . . . . . . . . . . . . . . . . . . . . . . . . . . . . . . . . . . . . . . . . . . . . . . . . . .14
8 Client Login Dialog Box . . . . . . . . . . . . . . . . . . . . . . . . . . . . . . . . . . . . . . . . . . . . . . . . . . . . . . . . . . . . . . . . . . . . . . . . . . . . . . . . . . . . . . . . . 15
9 Select Group Dialog Box . . . . . . . . . . . . . . . . . . . . . . . . . . . . . . . . . . . . . . . . . . . . . . . . . . . . . . . . . . . . . . . . . . . . . . . . . . . . . . . . . . . . . . . .15
10 Workspace Not Found Message . . . . . . . . . . . . . . . . . . . . . . . . . . . . . . . . . . . . . . . . . . . . . . . . . . . . . . . . . . . . . . . . . . . . . . . . . . . . . . . . . .16
11 Edit Workspace Dialog Box . . . . . . . . . . . . . . . . . . . . . . . . . . . . . . . . . . . . . . . . . . . . . . . . . . . . . . . . . . . . . . . . . . . . . . . . . . . . . . . . . . . . . .19
12 Edit Workspace Dialog Box - Appearance Tab. . . . . . . . . . . . . . . . . . . . . . . . . . . . . . . . . . . . . . . . . . . . . . . . . . . . . . . . . . . . . . . . . . . . . . . .19
13 Custom Window - Windows Caption and Border Setting . . . . . . . . . . . . . . . . . . . . . . . . . . . . . . . . . . . . . . . . . . . . . . . . . . . . . . . . . . . . . . . 20
14 Custom Window - No Caption or Border Setting. . . . . . . . . . . . . . . . . . . . . . . . . . . . . . . . . . . . . . . . . . . . . . . . . . . . . . . . . . . . . . . . . . . . . .20
15 Custom Window - Custom and Border Setting . . . . . . . . . . . . . . . . . . . . . . . . . . . . . . . . . . . . . . . . . . . . . . . . . . . . . . . . . . . . . . . . . . . . . . .21
16 Edit Window Title Dialog Box . . . . . . . . . . . . . . . . . . . . . . . . . . . . . . . . . . . . . . . . . . . . . . . . . . . . . . . . . . . . . . . . . . . . . . . . . . . . . . . . . . . . 21
17 Edit Workspace Dialog Box - Size Tab . . . . . . . . . . . . . . . . . . . . . . . . . . . . . . . . . . . . . . . . . . . . . . . . . . . . . . . . . . . . . . . . . . . . . . . . . . . . . .22
18 Edit Workspace Dialog Box - Position Tab . . . . . . . . . . . . . . . . . . . . . . . . . . . . . . . . . . . . . . . . . . . . . . . . . . . . . . . . . . . . . . . . . . . . . . . . . . .23
19 Edit Workspace Dialog Box - Content Tab . . . . . . . . . . . . . . . . . . . . . . . . . . . . . . . . . . . . . . . . . . . . . . . . . . . . . . . . . . . . . . . . . . . . . . . . . . .24
20 Edit Workspace Dialog Box - Details Tab. . . . . . . . . . . . . . . . . . . . . . . . . . . . . . . . . . . . . . . . . . . . . . . . . . . . . . . . . . . . . . . . . . . . . . . . . . . .25
21 Workspace Decision Process . . . . . . . . . . . . . . . . . . . . . . . . . . . . . . . . . . . . . . . . . . . . . . . . . . . . . . . . . . . . . . . . . . . . . . . . . . . . . . . . . . . . . 26
22 User Preferences Dialog Box . . . . . . . . . . . . . . . . . . . . . . . . . . . . . . . . . . . . . . . . . . . . . . . . . . . . . . . . . . . . . . . . . . . . . . . . . . . . . . . . . . . . .27
23 Loading a Map . . . . . . . . . . . . . . . . . . . . . . . . . . . . . . . . . . . . . . . . . . . . . . . . . . . . . . . . . . . . . . . . . . . . . . . . . . . . . . . . . . . . . . . . . . . . . . . . 28
24 Loading a Predefined View. . . . . . . . . . . . . . . . . . . . . . . . . . . . . . . . . . . . . . . . . . . . . . . . . . . . . . . . . . . . . . . . . . . . . . . . . . . . . . . . . . . . . . . 30
25 Viewing a Hotlink . . . . . . . . . . . . . . . . . . . . . . . . . . . . . . . . . . . . . . . . . . . . . . . . . . . . . . . . . . . . . . . . . . . . . . . . . . . . . . . . . . . . . . . . . . . . . . 30
26 Viewing a Label . . . . . . . . . . . . . . . . . . . . . . . . . . . . . . . . . . . . . . . . . . . . . . . . . . . . . . . . . . . . . . . . . . . . . . . . . . . . . . . . . . . . . . . . . . . . . . .31
27 Viewing a Device Icon . . . . . . . . . . . . . . . . . . . . . . . . . . . . . . . . . . . . . . . . . . . . . . . . . . . . . . . . . . . . . . . . . . . . . . . . . . . . . . . . . . . . . . . . . .32
28 Device Icon - Hollow Outline . . . . . . . . . . . . . . . . . . . . . . . . . . . . . . . . . . . . . . . . . . . . . . . . . . . . . . . . . . . . . . . . . . . . . . . . . . . . . . . . . . . . .32
29 Device List . . . . . . . . . . . . . . . . . . . . . . . . . . . . . . . . . . . . . . . . . . . . . . . . . . . . . . . . . . . . . . . . . . . . . . . . . . . . . . . . . . . . . . . . . . . . . . . . . . . 33
30 PTZ Gadget . . . . . . . . . . . . . . . . . . . . . . . . . . . . . . . . . . . . . . . . . . . . . . . . . . . . . . . . . . . . . . . . . . . . . . . . . . . . . . . . . . . . . . . . . . . . . . . . . . . 35
31 Device Control Dialog Box - Control Tab . . . . . . . . . . . . . . . . . . . . . . . . . . . . . . . . . . . . . . . . . . . . . . . . . . . . . . . . . . . . . . . . . . . . . . . . . . . .36
32 Device Control Dialog Box - Presets Tab . . . . . . . . . . . . . . . . . . . . . . . . . . . . . . . . . . . . . . . . . . . . . . . . . . . . . . . . . . . . . . . . . . . . . . . . . . . .37
33 Add New Preset Dialog Box. . . . . . . . . . . . . . . . . . . . . . . . . . . . . . . . . . . . . . . . . . . . . . . . . . . . . . . . . . . . . . . . . . . . . . . . . . . . . . . . . . . . . .39
34 Edit Preset Properties Dialog Box . . . . . . . . . . . . . . . . . . . . . . . . . . . . . . . . . . . . . . . . . . . . . . . . . . . . . . . . . . . . . . . . . . . . . . . . . . . . . . . . .39
35 Edit Home Preset Dialog Box . . . . . . . . . . . . . . . . . . . . . . . . . . . . . . . . . . . . . . . . . . . . . . . . . . . . . . . . . . . . . . . . . . . . . . . . . . . . . . . . . . . . .40
36 Device Control Dialog Box - Patterns Tab . . . . . . . . . . . . . . . . . . . . . . . . . . . . . . . . . . . . . . . . . . . . . . . . . . . . . . . . . . . . . . . . . . . . . . . . . . .41
37 Record New Pattern Dialog Box. . . . . . . . . . . . . . . . . . . . . . . . . . . . . . . . . . . . . . . . . . . . . . . . . . . . . . . . . . . . . . . . . . . . . . . . . . . . . . . . . . .42
38 Record New Pattern - Stop Recording . . . . . . . . . . . . . . . . . . . . . . . . . . . . . . . . . . . . . . . . . . . . . . . . . . . . . . . . . . . . . . . . . . . . . . . . . . . . . . 43
39 Edit Pattern Properties Dialog Box. . . . . . . . . . . . . . . . . . . . . . . . . . . . . . . . . . . . . . . . . . . . . . . . . . . . . . . . . . . . . . . . . . . . . . . . . . . . . . . . .43
40 Edit Pattern Properties - Stop Recording . . . . . . . . . . . . . . . . . . . . . . . . . . . . . . . . . . . . . . . . . . . . . . . . . . . . . . . . . . . . . . . . . . . . . . . . . . . .43
41 Edit Default Pattern Dialog Box . . . . . . . . . . . . . . . . . . . . . . . . . . . . . . . . . . . . . . . . . . . . . . . . . . . . . . . . . . . . . . . . . . . . . . . . . . . . . . . . . . .44
42 Device Control Dialog Box - Auxiliaries Tab . . . . . . . . . . . . . . . . . . . . . . . . . . . . . . . . . . . . . . . . . . . . . . . . . . . . . . . . . . . . . . . . . . . . . . . . . 45
43 Device Control Dialog Box - On-Screen Display Tab (left) and Sample On-Screen Display (right) . . . . . . . . . . . . . . . . . . . . . . . . . . . . . . . .46
44 Lock Button Locations . . . . . . . . . . . . . . . . . . . . . . . . . . . . . . . . . . . . . . . . . . . . . . . . . . . . . . . . . . . . . . . . . . . . . . . . . . . . . . . . . . . . . . . . . .48
45 Selecting a PelcoNet Gadget . . . . . . . . . . . . . . . . . . . . . . . . . . . . . . . . . . . . . . . . . . . . . . . . . . . . . . . . . . . . . . . . . . . . . . . . . . . . . . . . . . . . . 50
46 PelcoNet MPEG Gadget . . . . . . . . . . . . . . . . . . . . . . . . . . . . . . . . . . . . . . . . . . . . . . . . . . . . . . . . . . . . . . . . . . . . . . . . . . . . . . . . . . . . . . . . .50
47 \PelcoNet Canvas Gadget for Live Video . . . . . . . . . . . . . . . . . . . . . . . . . . . . . . . . . . . . . . . . . . . . . . . . . . . . . . . . . . . . . . . . . . . . . . . . . . . .51
48 PelcoNet Canvas Gadget for Archived Video. . . . . . . . . . . . . . . . . . . . . . . . . . . . . . . . . . . . . . . . . . . . . . . . . . . . . . . . . . . . . . . . . . . . . . . . .51
49 DX8000 Gadget for Live Video . . . . . . . . . . . . . . . . . . . . . . . . . . . . . . . . . . . . . . . . . . . . . . . . . . . . . . . . . . . . . . . . . . . . . . . . . . . . . . . . . . . . 52
50 DX8000 Gadget for Archived Video . . . . . . . . . . . . . . . . . . . . . . . . . . . . . . . . . . . . . . . . . . . . . . . . . . . . . . . . . . . . . . . . . . . . . . . . . . . . . . . .53
51 Selecting Live Video. . . . . . . . . . . . . . . . . . . . . . . . . . . . . . . . . . . . . . . . . . . . . . . . . . . . . . . . . . . . . . . . . . . . . . . . . . . . . . . . . . . . . . . . . . . .54
52 DX9000 Gadget - Live Video . . . . . . . . . . . . . . . . . . . . . . . . . . . . . . . . . . . . . . . . . . . . . . . . . . . . . . . . . . . . . . . . . . . . . . . . . . . . . . . . . . . . .55
53 Selecting Archived Video . . . . . . . . . . . . . . . . . . . . . . . . . . . . . . . . . . . . . . . . . . . . . . . . . . . . . . . . . . . . . . . . . . . . . . . . . . . . . . . . . . . . . . . . 55
54 Locating Archived Video. . . . . . . . . . . . . . . . . . . . . . . . . . . . . . . . . . . . . . . . . . . . . . . . . . . . . . . . . . . . . . . . . . . . . . . . . . . . . . . . . . . . . . . . .56
55 Viewing Archived Video . . . . . . . . . . . . . . . . . . . . . . . . . . . . . . . . . . . . . . . . . . . . . . . . . . . . . . . . . . . . . . . . . . . . . . . . . . . . . . . . . . . . . . . . . 57
56 Using an Alarm or Event to Locate Archived Video . . . . . . . . . . . . . . . . . . . . . . . . . . . . . . . . . . . . . . . . . . . . . . . . . . . . . . . . . . . . . . . . . . . . 58
57 Using an Alarm or Event to Locate Archived Video . . . . . . . . . . . . . . . . . . . . . . . . . . . . . . . . . . . . . . . . . . . . . . . . . . . . . . . . . . . . . . . . . . . . 59
58 DX9000 Gadget - Archived Video. . . . . . . . . . . . . . . . . . . . . . . . . . . . . . . . . . . . . . . . . . . . . . . . . . . . . . . . . . . . . . . . . . . . . . . . . . . . . . . . . .60
59 Selecting Cursor Mode. . . . . . . . . . . . . . . . . . . . . . . . . . . . . . . . . . . . . . . . . . . . . . . . . . . . . . . . . . . . . . . . . . . . . . . . . . . . . . . . . . . . . . . . . .61
6 C1554M-A (4/05)
Page 7

60 ASCII Switcher Gadget. . . . . . . . . . . . . . . . . . . . . . . . . . . . . . . . . . . . . . . . . . . . . . . . . . . . . . . . . . . . . . . . . . . . . . . . . . . . . . . . . . . . . . . . . .62
61 Device Control Dialog Box - Date\Time Tab . . . . . . . . . . . . . . . . . . . . . . . . . . . . . . . . . . . . . . . . . . . . . . . . . . . . . . . . . . . . . . . . . . . . . . . . . .62
62 Device Control Dialog Box - On-Screen Display Tab . . . . . . . . . . . . . . . . . . . . . . . . . . . . . . . . . . . . . . . . . . . . . . . . . . . . . . . . . . . . . . . . . . .63
63 Sample On-Screen Display. . . . . . . . . . . . . . . . . . . . . . . . . . . . . . . . . . . . . . . . . . . . . . . . . . . . . . . . . . . . . . . . . . . . . . . . . . . . . . . . . . . . . . .63
64 ASCII Camera Gadget. . . . . . . . . . . . . . . . . . . . . . . . . . . . . . . . . . . . . . . . . . . . . . . . . . . . . . . . . . . . . . . . . . . . . . . . . . . . . . . . . . . . . . . . . . .64
65 Device Control Dialog Box - Control Tab . . . . . . . . . . . . . . . . . . . . . . . . . . . . . . . . . . . . . . . . . . . . . . . . . . . . . . . . . . . . . . . . . . . . . . . . . . . .65
66 Device Control Dialog Box - Presets Tab . . . . . . . . . . . . . . . . . . . . . . . . . . . . . . . . . . . . . . . . . . . . . . . . . . . . . . . . . . . . . . . . . . . . . . . . . . . .66
67 Add New Preset Dialog Box - Presets Tab. . . . . . . . . . . . . . . . . . . . . . . . . . . . . . . . . . . . . . . . . . . . . . . . . . . . . . . . . . . . . . . . . . . . . . . . . . .67
68 Edit Preset Properties Dialog Box . . . . . . . . . . . . . . . . . . . . . . . . . . . . . . . . . . . . . . . . . . . . . . . . . . . . . . . . . . . . . . . . . . . . . . . . . . . . . . . . .68
69 Edit Home Preset Dialog Box . . . . . . . . . . . . . . . . . . . . . . . . . . . . . . . . . . . . . . . . . . . . . . . . . . . . . . . . . . . . . . . . . . . . . . . . . . . . . . . . . . . . .69
70 Device Control Dialog Box - Patterns Tab . . . . . . . . . . . . . . . . . . . . . . . . . . . . . . . . . . . . . . . . . . . . . . . . . . . . . . . . . . . . . . . . . . . . . . . . . . .70
71 Record New Pattern Dialog Box. . . . . . . . . . . . . . . . . . . . . . . . . . . . . . . . . . . . . . . . . . . . . . . . . . . . . . . . . . . . . . . . . . . . . . . . . . . . . . . . . . .71
72 Record New Pattern - Stop Recording . . . . . . . . . . . . . . . . . . . . . . . . . . . . . . . . . . . . . . . . . . . . . . . . . . . . . . . . . . . . . . . . . . . . . . . . . . . . . . 71
73 Edit Pattern Properties Dialog Box. . . . . . . . . . . . . . . . . . . . . . . . . . . . . . . . . . . . . . . . . . . . . . . . . . . . . . . . . . . . . . . . . . . . . . . . . . . . . . . . .72
74 Edit Pattern Properties - Stop Recording . . . . . . . . . . . . . . . . . . . . . . . . . . . . . . . . . . . . . . . . . . . . . . . . . . . . . . . . . . . . . . . . . . . . . . . . . . . .72
75 Edit Default Pattern Dialog Box . . . . . . . . . . . . . . . . . . . . . . . . . . . . . . . . . . . . . . . . . . . . . . . . . . . . . . . . . . . . . . . . . . . . . . . . . . . . . . . . . . .73
76 Device Control Dialog Box - Auxiliaries Tab . . . . . . . . . . . . . . . . . . . . . . . . . . . . . . . . . . . . . . . . . . . . . . . . . . . . . . . . . . . . . . . . . . . . . . . . . 74
77 Device Control Dialog Box - On-Screen Display Tab (left) and Sample On-Screen Display (right) . . . . . . . . . . . . . . . . . . . . . . . . . . . . . . . .75
78 Lock Button Locations . . . . . . . . . . . . . . . . . . . . . . . . . . . . . . . . . . . . . . . . . . . . . . . . . . . . . . . . . . . . . . . . . . . . . . . . . . . . . . . . . . . . . . . . . .76
79 Keyboard Functions . . . . . . . . . . . . . . . . . . . . . . . . . . . . . . . . . . . . . . . . . . . . . . . . . . . . . . . . . . . . . . . . . . . . . . . . . . . . . . . . . . . . . . . . . . . . 77
80 Relay Unit Device Icon . . . . . . . . . . . . . . . . . . . . . . . . . . . . . . . . . . . . . . . . . . . . . . . . . . . . . . . . . . . . . . . . . . . . . . . . . . . . . . . . . . . . . . . . . .79
81 CM9760-REL Device Control Dialog Box . . . . . . . . . . . . . . . . . . . . . . . . . . . . . . . . . . . . . . . . . . . . . . . . . . . . . . . . . . . . . . . . . . . . . . . . . . . .79
82 Relay Point 1 Disabled . . . . . . . . . . . . . . . . . . . . . . . . . . . . . . . . . . . . . . . . . . . . . . . . . . . . . . . . . . . . . . . . . . . . . . . . . . . . . . . . . . . . . . . . . .80
83 Serial Output Device Icon. . . . . . . . . . . . . . . . . . . . . . . . . . . . . . . . . . . . . . . . . . . . . . . . . . . . . . . . . . . . . . . . . . . . . . . . . . . . . . . . . . . . . . . .81
84 Device Control Dialog Box - Text Tab . . . . . . . . . . . . . . . . . . . . . . . . . . . . . . . . . . . . . . . . . . . . . . . . . . . . . . . . . . . . . . . . . . . . . . . . . . . . . . . 81
85 Device Control Dialog Box – Custom Buttons Tab. . . . . . . . . . . . . . . . . . . . . . . . . . . . . . . . . . . . . . . . . . . . . . . . . . . . . . . . . . . . . . . . . . . . .82
86 Using a Script to Control a Serial Output Device. . . . . . . . . . . . . . . . . . . . . . . . . . . . . . . . . . . . . . . . . . . . . . . . . . . . . . . . . . . . . . . . . . . . . .83
87 IP Device Status Monitor Icon . . . . . . . . . . . . . . . . . . . . . . . . . . . . . . . . . . . . . . . . . . . . . . . . . . . . . . . . . . . . . . . . . . . . . . . . . . . . . . . . . . . .83
88 Access Control Device Icon . . . . . . . . . . . . . . . . . . . . . . . . . . . . . . . . . . . . . . . . . . . . . . . . . . . . . . . . . . . . . . . . . . . . . . . . . . . . . . . . . . . . . .84
89 Monitoring Access Control Points . . . . . . . . . . . . . . . . . . . . . . . . . . . . . . . . . . . . . . . . . . . . . . . . . . . . . . . . . . . . . . . . . . . . . . . . . . . . . . . . .84
90 Port Buffer Tab . . . . . . . . . . . . . . . . . . . . . . . . . . . . . . . . . . . . . . . . . . . . . . . . . . . . . . . . . . . . . . . . . . . . . . . . . . . . . . . . . . . . . . . . . . . . . . . .85
91 Sample Camera Gadget . . . . . . . . . . . . . . . . . . . . . . . . . . . . . . . . . . . . . . . . . . . . . . . . . . . . . . . . . . . . . . . . . . . . . . . . . . . . . . . . . . . . . . . . .86
92 Gadgets Drop-Down List . . . . . . . . . . . . . . . . . . . . . . . . . . . . . . . . . . . . . . . . . . . . . . . . . . . . . . . . . . . . . . . . . . . . . . . . . . . . . . . . . . . . . . . . 86
93 Video for Windows Gadget . . . . . . . . . . . . . . . . . . . . . . . . . . . . . . . . . . . . . . . . . . . . . . . . . . . . . . . . . . . . . . . . . . . . . . . . . . . . . . . . . . . . . .87
94 Quad Video Display Gadget . . . . . . . . . . . . . . . . . . . . . . . . . . . . . . . . . . . . . . . . . . . . . . . . . . . . . . . . . . . . . . . . . . . . . . . . . . . . . . . . . . . . . .88
95 Quad Video Display Properties Dialog Box: General Tab. . . . . . . . . . . . . . . . . . . . . . . . . . . . . . . . . . . . . . . . . . . . . . . . . . . . . . . . . . . . . . . . 88
96 Quad Video Display Properties Dialog Box: Color Key Tab . . . . . . . . . . . . . . . . . . . . . . . . . . . . . . . . . . . . . . . . . . . . . . . . . . . . . . . . . . . . . .89
97 Quad Video Display Properties Dialog Box: Advanced Tab . . . . . . . . . . . . . . . . . . . . . . . . . . . . . . . . . . . . . . . . . . . . . . . . . . . . . . . . . . . . . .89
98 Custom Window Title Bar . . . . . . . . . . . . . . . . . . . . . . . . . . . . . . . . . . . . . . . . . . . . . . . . . . . . . . . . . . . . . . . . . . . . . . . . . . . . . . . . . . . . . . . 90
99 Custom Window Pop-up Menu . . . . . . . . . . . . . . . . . . . . . . . . . . . . . . . . . . . . . . . . . . . . . . . . . . . . . . . . . . . . . . . . . . . . . . . . . . . . . . . . . . . 91
100 Viewing Video in a Custom Window . . . . . . . . . . . . . . . . . . . . . . . . . . . . . . . . . . . . . . . . . . . . . . . . . . . . . . . . . . . . . . . . . . . . . . . . . . . . . . .93
101 Selecting a Date and Time. . . . . . . . . . . . . . . . . . . . . . . . . . . . . . . . . . . . . . . . . . . . . . . . . . . . . . . . . . . . . . . . . . . . . . . . . . . . . . . . . . . . . . .95
102 Viewing Archived Video . . . . . . . . . . . . . . . . . . . . . . . . . . . . . . . . . . . . . . . . . . . . . . . . . . . . . . . . . . . . . . . . . . . . . . . . . . . . . . . . . . . . . . . . . 96
103 Selecting a Date and Time in the Session Manager . . . . . . . . . . . . . . . . . . . . . . . . . . . . . . . . . . . . . . . . . . . . . . . . . . . . . . . . . . . . . . . . . . . 97
104 Viewing Video from an Archived Alarm or Event. . . . . . . . . . . . . . . . . . . . . . . . . . . . . . . . . . . . . . . . . . . . . . . . . . . . . . . . . . . . . . . . . . . . . .98
105 Selecting Cursor Mode. . . . . . . . . . . . . . . . . . . . . . . . . . . . . . . . . . . . . . . . . . . . . . . . . . . . . . . . . . . . . . . . . . . . . . . . . . . . . . . . . . . . . . . . . .99
106 Loading a Map into a Custom Window . . . . . . . . . . . . . . . . . . . . . . . . . . . . . . . . . . . . . . . . . . . . . . . . . . . . . . . . . . . . . . . . . . . . . . . . . . . .100
107 Viewing an Internet Page. . . . . . . . . . . . . . . . . . . . . . . . . . . . . . . . . . . . . . . . . . . . . . . . . . . . . . . . . . . . . . . . . . . . . . . . . . . . . . . . . . . . . . .101
108 Remote Desktop Log On Dialog Box . . . . . . . . . . . . . . . . . . . . . . . . . . . . . . . . . . . . . . . . . . . . . . . . . . . . . . . . . . . . . . . . . . . . . . . . . . . . . .102
109 Viewing a Remote PC. . . . . . . . . . . . . . . . . . . . . . . . . . . . . . . . . . . . . . . . . . . . . . . . . . . . . . . . . . . . . . . . . . . . . . . . . . . . . . . . . . . . . . . . . .102
110 Running a Script . . . . . . . . . . . . . . . . . . . . . . . . . . . . . . . . . . . . . . . . . . . . . . . . . . . . . . . . . . . . . . . . . . . . . . . . . . . . . . . . . . . . . . . . . . . . . . 103
111 Stopping a Script . . . . . . . . . . . . . . . . . . . . . . . . . . . . . . . . . . . . . . . . . . . . . . . . . . . . . . . . . . . . . . . . . . . . . . . . . . . . . . . . . . . . . . . . . . . . .104
112 Event Picker . . . . . . . . . . . . . . . . . . . . . . . . . . . . . . . . . . . . . . . . . . . . . . . . . . . . . . . . . . . . . . . . . . . . . . . . . . . . . . . . . . . . . . . . . . . . . . . . . 105
113 Session Manager . . . . . . . . . . . . . . . . . . . . . . . . . . . . . . . . . . . . . . . . . . . . . . . . . . . . . . . . . . . . . . . . . . . . . . . . . . . . . . . . . . . . . . . . . . . . .105
114 Sample Event Picker Date and Time Selection . . . . . . . . . . . . . . . . . . . . . . . . . . . . . . . . . . . . . . . . . . . . . . . . . . . . . . . . . . . . . . . . . . . . . .105
115 Using the Event Picker in Session Manager Archive View . . . . . . . . . . . . . . . . . . . . . . . . . . . . . . . . . . . . . . . . . . . . . . . . . . . . . . . . . . . . .106
116 Sample Event Picker Date and Time Selection . . . . . . . . . . . . . . . . . . . . . . . . . . . . . . . . . . . . . . . . . . . . . . . . . . . . . . . . . . . . . . . . . . . . . .106
117 Clearing the Event Picker . . . . . . . . . . . . . . . . . . . . . . . . . . . . . . . . . . . . . . . . . . . . . . . . . . . . . . . . . . . . . . . . . . . . . . . . . . . . . . . . . . . . . . .107
118 Selecting the Year . . . . . . . . . . . . . . . . . . . . . . . . . . . . . . . . . . . . . . . . . . . . . . . . . . . . . . . . . . . . . . . . . . . . . . . . . . . . . . . . . . . . . . . . . . . .107
119 Selecting the Month. . . . . . . . . . . . . . . . . . . . . . . . . . . . . . . . . . . . . . . . . . . . . . . . . . . . . . . . . . . . . . . . . . . . . . . . . . . . . . . . . . . . . . . . . . . 107
120 Sample Event Picker Date and Time . . . . . . . . . . . . . . . . . . . . . . . . . . . . . . . . . . . . . . . . . . . . . . . . . . . . . . . . . . . . . . . . . . . . . . . . . . . . . . 107
121 Event Picker Pop-up Menu . . . . . . . . . . . . . . . . . . . . . . . . . . . . . . . . . . . . . . . . . . . . . . . . . . . . . . . . . . . . . . . . . . . . . . . . . . . . . . . . . . . . . .108
C1554M-A (4/05) 7
Page 8

122 Session Manager . . . . . . . . . . . . . . . . . . . . . . . . . . . . . . . . . . . . . . . . . . . . . . . . . . . . . . . . . . . . . . . . . . . . . . . . . . . . . . . . . . . . . . . . . . . . .109
123 Session Manager Tool Bar. . . . . . . . . . . . . . . . . . . . . . . . . . . . . . . . . . . . . . . . . . . . . . . . . . . . . . . . . . . . . . . . . . . . . . . . . . . . . . . . . . . . . .109
124 Session Manager . . . . . . . . . . . . . . . . . . . . . . . . . . . . . . . . . . . . . . . . . . . . . . . . . . . . . . . . . . . . . . . . . . . . . . . . . . . . . . . . . . . . . . . . . . . . .110
125 Current Session Tree . . . . . . . . . . . . . . . . . . . . . . . . . . . . . . . . . . . . . . . . . . . . . . . . . . . . . . . . . . . . . . . . . . . . . . . . . . . . . . . . . . . . . . . . . .111
126 Session Manager - Activities List . . . . . . . . . . . . . . . . . . . . . . . . . . . . . . . . . . . . . . . . . . . . . . . . . . . . . . . . . . . . . . . . . . . . . . . . . . . . . . . . 111
127 Session Manager - Archive View. . . . . . . . . . . . . . . . . . . . . . . . . . . . . . . . . . . . . . . . . . . . . . . . . . . . . . . . . . . . . . . . . . . . . . . . . . . . . . . . .112
128 Sample Archived Event - Details . . . . . . . . . . . . . . . . . . . . . . . . . . . . . . . . . . . . . . . . . . . . . . . . . . . . . . . . . . . . . . . . . . . . . . . . . . . . . . . . .113
129 Browsing Archived Alarms and Events . . . . . . . . . . . . . . . . . . . . . . . . . . . . . . . . . . . . . . . . . . . . . . . . . . . . . . . . . . . . . . . . . . . . . . . . . . . . 113
130 Filtering Archived Alarms and Events . . . . . . . . . . . . . . . . . . . . . . . . . . . . . . . . . . . . . . . . . . . . . . . . . . . . . . . . . . . . . . . . . . . . . . . . . . . . . 114
131 Filter Dialog Box - Servers Tab. . . . . . . . . . . . . . . . . . . . . . . . . . . . . . . . . . . . . . . . . . . . . . . . . . . . . . . . . . . . . . . . . . . . . . . . . . . . . . . . . . .114
132 Filter Dialog Box - Categories Tab . . . . . . . . . . . . . . . . . . . . . . . . . . . . . . . . . . . . . . . . . . . . . . . . . . . . . . . . . . . . . . . . . . . . . . . . . . . . . . . .115
133 Filter Dialog Box - Acknowledged Tab. . . . . . . . . . . . . . . . . . . . . . . . . . . . . . . . . . . . . . . . . . . . . . . . . . . . . . . . . . . . . . . . . . . . . . . . . . . . .115
134 Filter Dialog Box - Source Device Tab . . . . . . . . . . . . . . . . . . . . . . . . . . . . . . . . . . . . . . . . . . . . . . . . . . . . . . . . . . . . . . . . . . . . . . . . . . . . .116
135 Filter Dialog Box - Advanced Tab. . . . . . . . . . . . . . . . . . . . . . . . . . . . . . . . . . . . . . . . . . . . . . . . . . . . . . . . . . . . . . . . . . . . . . . . . . . . . . . . .116
136 Server Status window . . . . . . . . . . . . . . . . . . . . . . . . . . . . . . . . . . . . . . . . . . . . . . . . . . . . . . . . . . . . . . . . . . . . . . . . . . . . . . . . . . . . . . . . .121
137 Configure Remote Desktop Server Dialog Box. . . . . . . . . . . . . . . . . . . . . . . . . . . . . . . . . . . . . . . . . . . . . . . . . . . . . . . . . . . . . . . . . . . . . . .122
138 Remote Desktop Server Dialog Box . . . . . . . . . . . . . . . . . . . . . . . . . . . . . . . . . . . . . . . . . . . . . . . . . . . . . . . . . . . . . . . . . . . . . . . . . . . . . . . 123
List of Tables
A Window Border Options . . . . . . . . . . . . . . . . . . . . . . . . . . . . . . . . . . . . . . . . . . . . . . . . . . . . . . . . . . . . . . . . . . . . . . . . . . . . . . . . . . . . . . . .20
B Methods of Switching Devices . . . . . . . . . . . . . . . . . . . . . . . . . . . . . . . . . . . . . . . . . . . . . . . . . . . . . . . . . . . . . . . . . . . . . . . . . . . . . . . . . . .34
C Mouse Controls . . . . . . . . . . . . . . . . . . . . . . . . . . . . . . . . . . . . . . . . . . . . . . . . . . . . . . . . . . . . . . . . . . . . . . . . . . . . . . . . . . . . . . . . . . . . . . .36
D Keyboard Controls . . . . . . . . . . . . . . . . . . . . . . . . . . . . . . . . . . . . . . . . . . . . . . . . . . . . . . . . . . . . . . . . . . . . . . . . . . . . . . . . . . . . . . . . . . . . . 37
E Different Lock Colors . . . . . . . . . . . . . . . . . . . . . . . . . . . . . . . . . . . . . . . . . . . . . . . . . . . . . . . . . . . . . . . . . . . . . . . . . . . . . . . . . . . . . . . . . . . 48
F Different States of the Lock Button . . . . . . . . . . . . . . . . . . . . . . . . . . . . . . . . . . . . . . . . . . . . . . . . . . . . . . . . . . . . . . . . . . . . . . . . . . . . . . . .49
G Mouse Controls . . . . . . . . . . . . . . . . . . . . . . . . . . . . . . . . . . . . . . . . . . . . . . . . . . . . . . . . . . . . . . . . . . . . . . . . . . . . . . . . . . . . . . . . . . . . . . . 65
H Keyboard Controls . . . . . . . . . . . . . . . . . . . . . . . . . . . . . . . . . . . . . . . . . . . . . . . . . . . . . . . . . . . . . . . . . . . . . . . . . . . . . . . . . . . . . . . . . . . . . 66
I Different States of the Lock Button . . . . . . . . . . . . . . . . . . . . . . . . . . . . . . . . . . . . . . . . . . . . . . . . . . . . . . . . . . . . . . . . . . . . . . . . . . . . . . . .77
J KBD300A Button Functions . . . . . . . . . . . . . . . . . . . . . . . . . . . . . . . . . . . . . . . . . . . . . . . . . . . . . . . . . . . . . . . . . . . . . . . . . . . . . . . . . . . . . .78
K Custom Window Pop-up Menu Options. . . . . . . . . . . . . . . . . . . . . . . . . . . . . . . . . . . . . . . . . . . . . . . . . . . . . . . . . . . . . . . . . . . . . . . . . . . . . 92
L Mouse Controls . . . . . . . . . . . . . . . . . . . . . . . . . . . . . . . . . . . . . . . . . . . . . . . . . . . . . . . . . . . . . . . . . . . . . . . . . . . . . . . . . . . . . . . . . . . . . . . 94
M Keyboard Controls . . . . . . . . . . . . . . . . . . . . . . . . . . . . . . . . . . . . . . . . . . . . . . . . . . . . . . . . . . . . . . . . . . . . . . . . . . . . . . . . . . . . . . . . . . . . . 94
N Event Picker Pop-up Menu Options . . . . . . . . . . . . . . . . . . . . . . . . . . . . . . . . . . . . . . . . . . . . . . . . . . . . . . . . . . . . . . . . . . . . . . . . . . . . . . . 108
O Session Manager Buttons . . . . . . . . . . . . . . . . . . . . . . . . . . . . . . . . . . . . . . . . . . . . . . . . . . . . . . . . . . . . . . . . . . . . . . . . . . . . . . . . . . . . . .110
8 C1554M-A (4/05)
Page 9

Introduction
Welcome to the VMX300(-E) video management system, designed to provide video and surveillance applications in a highly customizable and
user-friendly environment.
VMX300(-E) supports client-to-server, multiple clients-to-server, client-to-multiple servers, and server-to-server control and monitoring of CCTV
equipment via both analog and IP connections. VMX300(-E)’s strength lies in its ability to control virtually any number and combination of analog
and IP devices from different manufacturers with point and click simplicity. VMX300(-E) seamlessly integrates cameras, monitors, switchers,
VCRs, and a host of other types of devices.
This manual is describes the client application used by VMX300(-E) operators. The sections on workspaces, configuring servers, and remote desktop servers will also be of interest to system administrators.
VMX300(-E) supports a wide variety of equipment. For information on a specific device in your system, refer to the Devices section.
C1554M-A (4/05) 9
Page 10
Configuring Servers
NOTE: Typically, the system administrator or other system support professional configures the servers when the VMX300(-E) client is first
installed on a workstation. Do not attempt to configure servers without instruction from the system administrator.
The first time the VMX300(-E) client is run on a workstation, you must specify which VMX300(-E) server(s) to connect to from that client. Typically,
the system administrator configures servers for a client when the client is installed on the workstation. Once specified, a client will connect to the
configured servers by default, saving you from specifying a server every time you log in from that workstation. If you ever need to connect to
different servers than the currently configured ones, you can configure different ones when you log in.
NOTE: Server configuration applies to a client. The same server configuration will be used for every user who logs in from that client.
In order for you to be able to connect to a particular server, the system administrator must set up the server itself to allow it. The system
administrator should instruct you in which servers you can connect to.
Below is a typical approach to configuring servers.
1. Discover All servers to build a master list to work from.
2. Select a servservers you do not want to connect to.
Configuring servers to connect to is done within the login procedure. Start the VMX300(-E) client as described in Logging In and Out - Logging In
When the Client Is Not Already Running and click Servers.
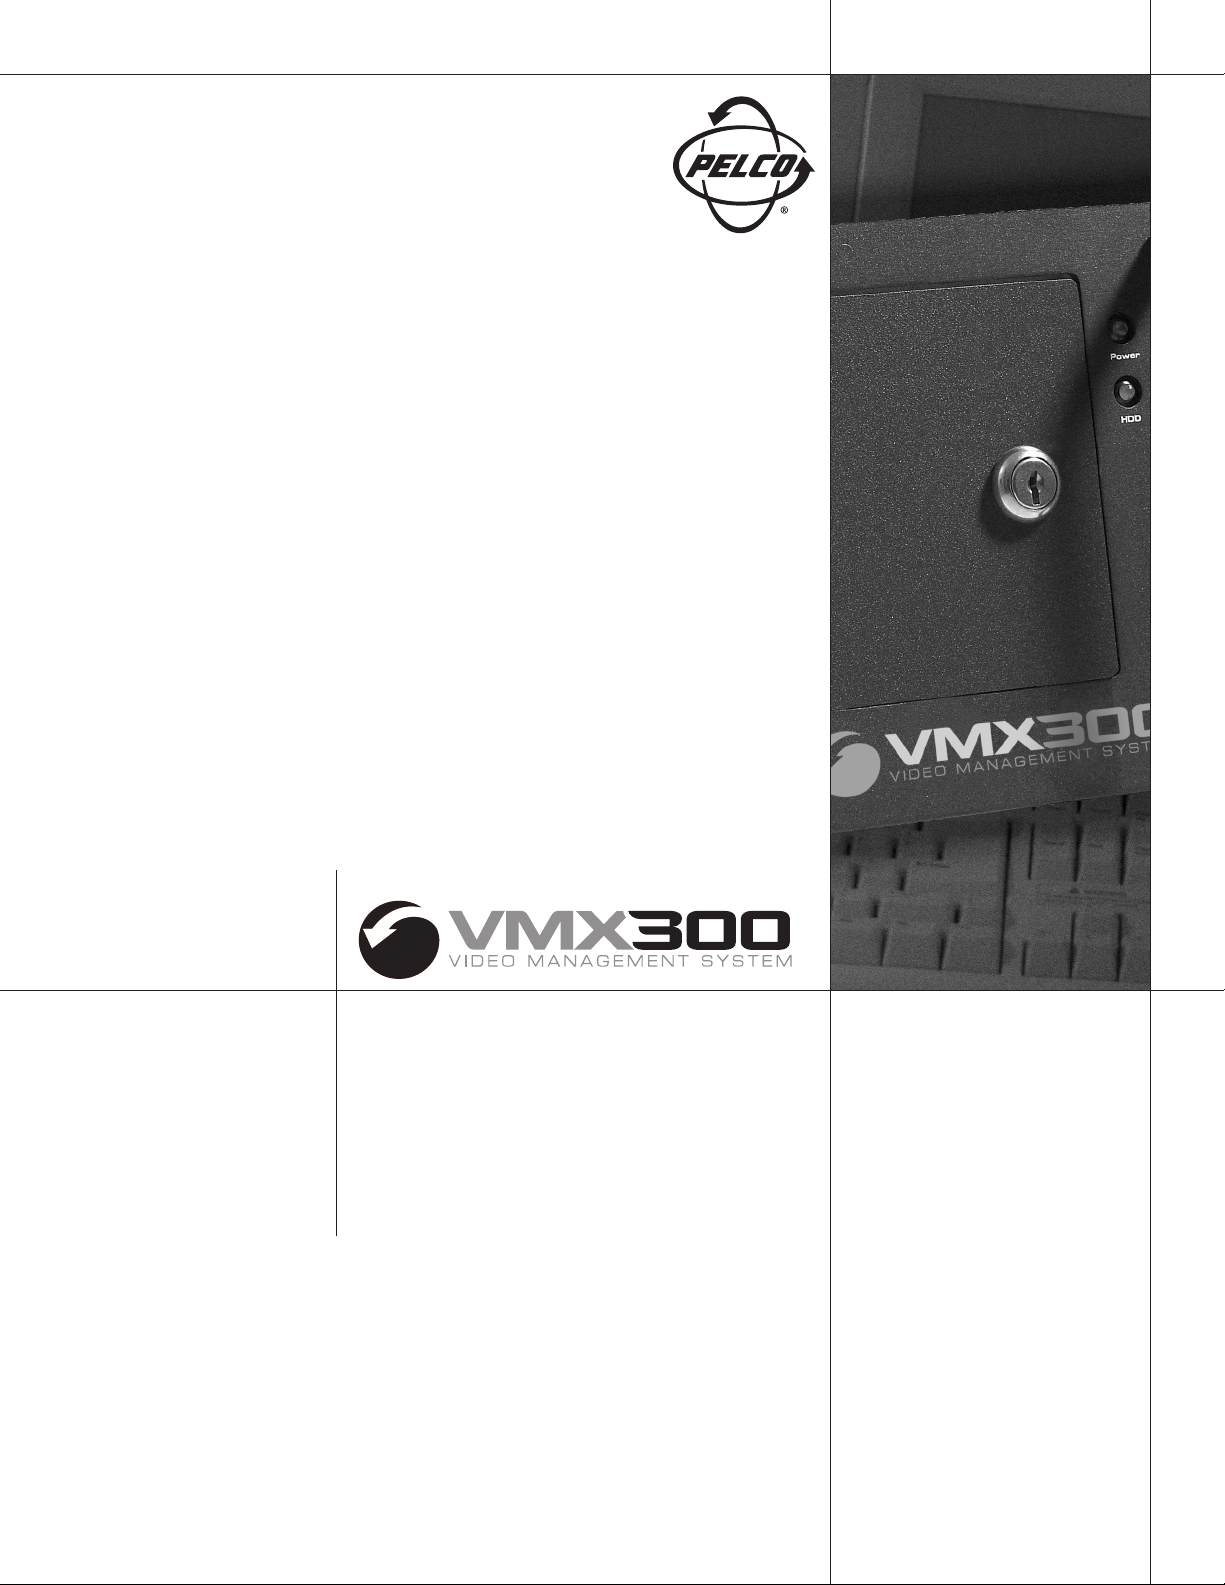
Figure 1. Login Dialog Box
The Configure Servers dialog box opens. The Configure Servers dialog box lists all currently configured servers.
Figure 2. Configure Servers Dialog Box
Configure servers as follows:
1. Discover all: To locate all VMX300(-E) servers that are visible over the network from your client, click Discover All. The system will warn
you that discovering all servers clears any servers that are currently configured. If you do not want to clear the currently configured servers,
click No and use the Add option instead of Discover All. If you want to proceed with discovering all servers, click Yes. The list of currently
configured servers is cleared and all the servers that could be located appear in the Configured Servers list.
Due to network configuration, Discover All might not locate all the VMX300(-E) servers on the network. If you know the IP address and port
number of a server that was not located automatically, you can add it to the Configured Servers list using the Add option.
If the Discover All option finds only one server, that server will automatically be made your home server. The home server displays in bold
face in the Configured Servers list.
10 C1554M-A (4/05)
Page 11
2.
Add: The Add option adds servers to the Configured Servers list without clearing the existing list. Use the Add option instead of Discover
All if you want to add a server without clearing the Configured Servers list, or if you know the server’s IP address and the server does not
appear using Discover All.
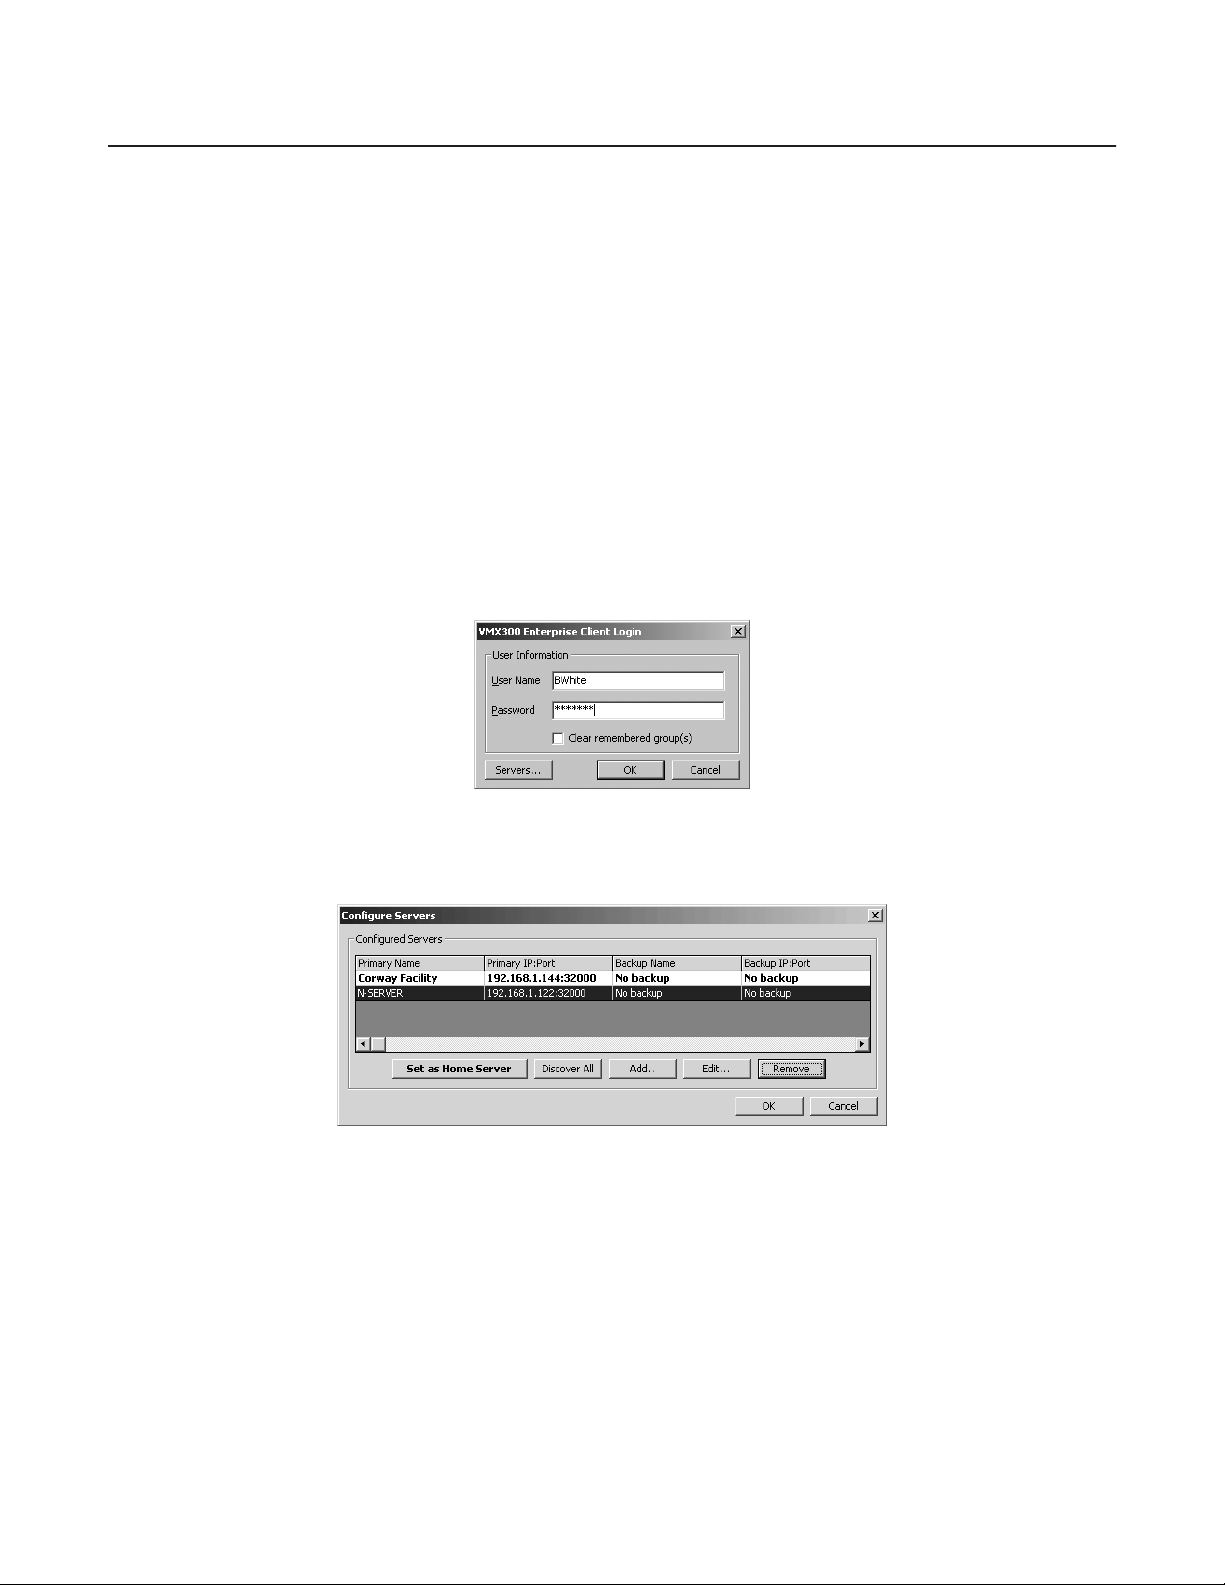
To add a server to the Configured Servers list, click Add. The Add Server dialog box appears.
Figure 3. Add Server Dialog Box
If you know the server’s IP address and port, type them in the Primary Server area. If the primary server has a backup server that you want
the client to connect to as well, type the backup server’s IP address and port in the Backup Server area. Your selections of primary and
backup servers must coincide with the set up performed by your system administrator on the servers themselves.
Alternatively, click Browse. Select the desired server from the list and click OK, or double-click the server.
Click Add. The Add Server dialog box closes and the server you added appears in the Configured Servers list.
3. Edit: To change the IP address or port of a server in your configured servers list, select the server and click Edit. The Edit Server dialog box
opens.
Figure 4. Edit Server Dialog Box
Change the IP address or port number of the server or its backup as desired. Your selections of primary and backup servers must coincide
with the set up performed by your system administrator on the servers themselves.
Alternatively, click Browse. Select the desired server from the list and click OK, or double-click the server.
Click OK. The Edit Server dialog box closes and your changes appear in the Configured Servers list.
4. Set as home server: Select the server you want to use as your home server in the Configured Servers list and click Set as Home Server.
You must be connected to your home server to be able to open, edit, or save workspaces. The home server is saved. It appears in bold face
in the Configured Servers list.
5. Remove: Remove every server you do not want to log in to from the Configured Servers list. To remove a server, select the server in the
Configured Servers list and click Remove. The server disappears from the Configured Servers list.
6. Click OK. The Configure Servers dialog box closes. If no home server is set, you are given the opportunity to set one before closing the
dialog box.
NOTE: Whenever you log in, you are logged in to every server in your Configured Servers list, provided your system administrator has set up the
servers themselves to allow it. If there are servers in the list that you do not want to log in to, make sure you remove them from the list.
C1554M-A (4/05) 11
Page 12

User Groups
When the system administrator sets up a user account for you, you are assigned to one or more user groups. Each user group embodies a set of
privileges the members of the group have. These privileges delineate which parts of the VMX300(-E) system members have access to and what
events members are notified of.
Your system administrator should instruct you in which user groups you belong to and what privileges you have. You can only exercise the
privileges of one group at a time. If you belong to more than one group, you must select one of the groups you belong to when you log in. For the
duration of that session, your privileges are limited to those granted by the group you selected when you logged in. To exercise the privileges of
another, different group that you belong to, you must log out and log in again, this time selecting the other group.
If you are connecting to more than one server, you can select a different user group to log in under for each server you connect to.
Default user group: To save yourself the trouble of selecting a user group every time you log in, you can set a user group to log in to by default.
Thereafter, the client will log you in automatically under the default group, providing you are connecting to the same server from the same client
as when you set the default. You can later override the default.
If you are connecting to more than one server, you can set a different default user group for each server you are connecting to.
Refer to Logging In and Out for instructions on setting and clearing the default user group.
12 C1554M-A (4/05)
Page 13
•
•
•
•
Logging In and Out
Before you log in to the VMX300(-E) client, you need to know the following information:
Your user name
Your password
Which user groups you belong to
The VMX300(-E) system administrator has this information. If you belong to more than one group, you should be instructed in what privileges each
group grants. For more information on user groups, refer to User Groups .
VMX300(-E) provides two ways for you to log in to the client:
Start the client and log in
When the client is already running, log in as a new user
Likewise, there are two ways for you to log out of the client:
Shut down the client
With the client running, let a new user log in using the Log In As New User option, which logs you out
•
•
•
•
•
2.
NOTES:
You are not logged out until someone else logs in or the client is shut down.
If you want to connect to a particular server from more than one client at one time, log in using different user accounts.
TIP: If you belong to more than one user group and you want to switch the group you are logged in under, use the Log In As New User
option to log you out of the one group and into the other.
LOGGING IN WHEN THE CLIENT IS NOT ALREADY RUNNING
To start the VMX300(-E) client and log in:
1. Select the VMX300(-E) client from the Windows Start menu, or double-click the VMX300(-E) client icon on the Windows desktop, if there is
one.
If this is the first time you are launching the client, the Corrupt or Missing Database message appears because VMX300(-E) must create a
new database the first time you use it. Click Create.
If this is not the first time you are launching the client, and the Corrupt or Missing Database message appears, then the client database is
corrupted or missing. If this is the case your system administrator needs to restore a backup or create a new client database.
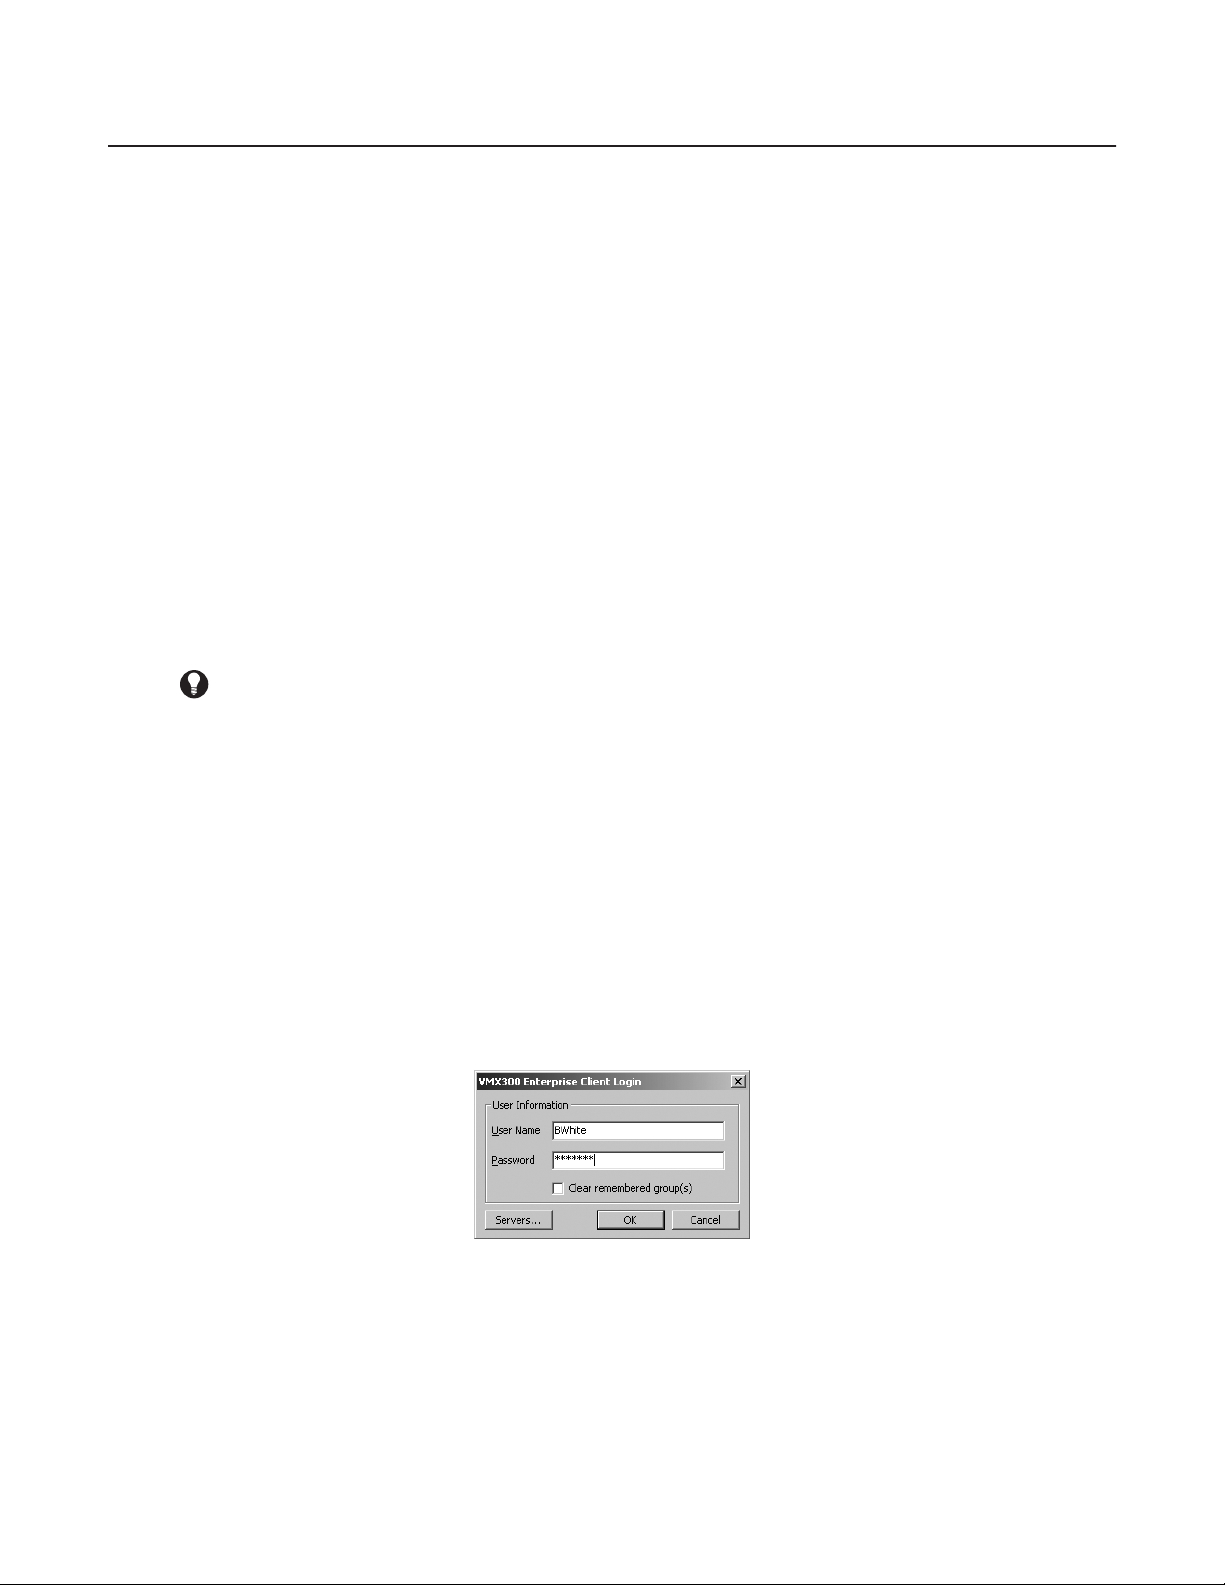
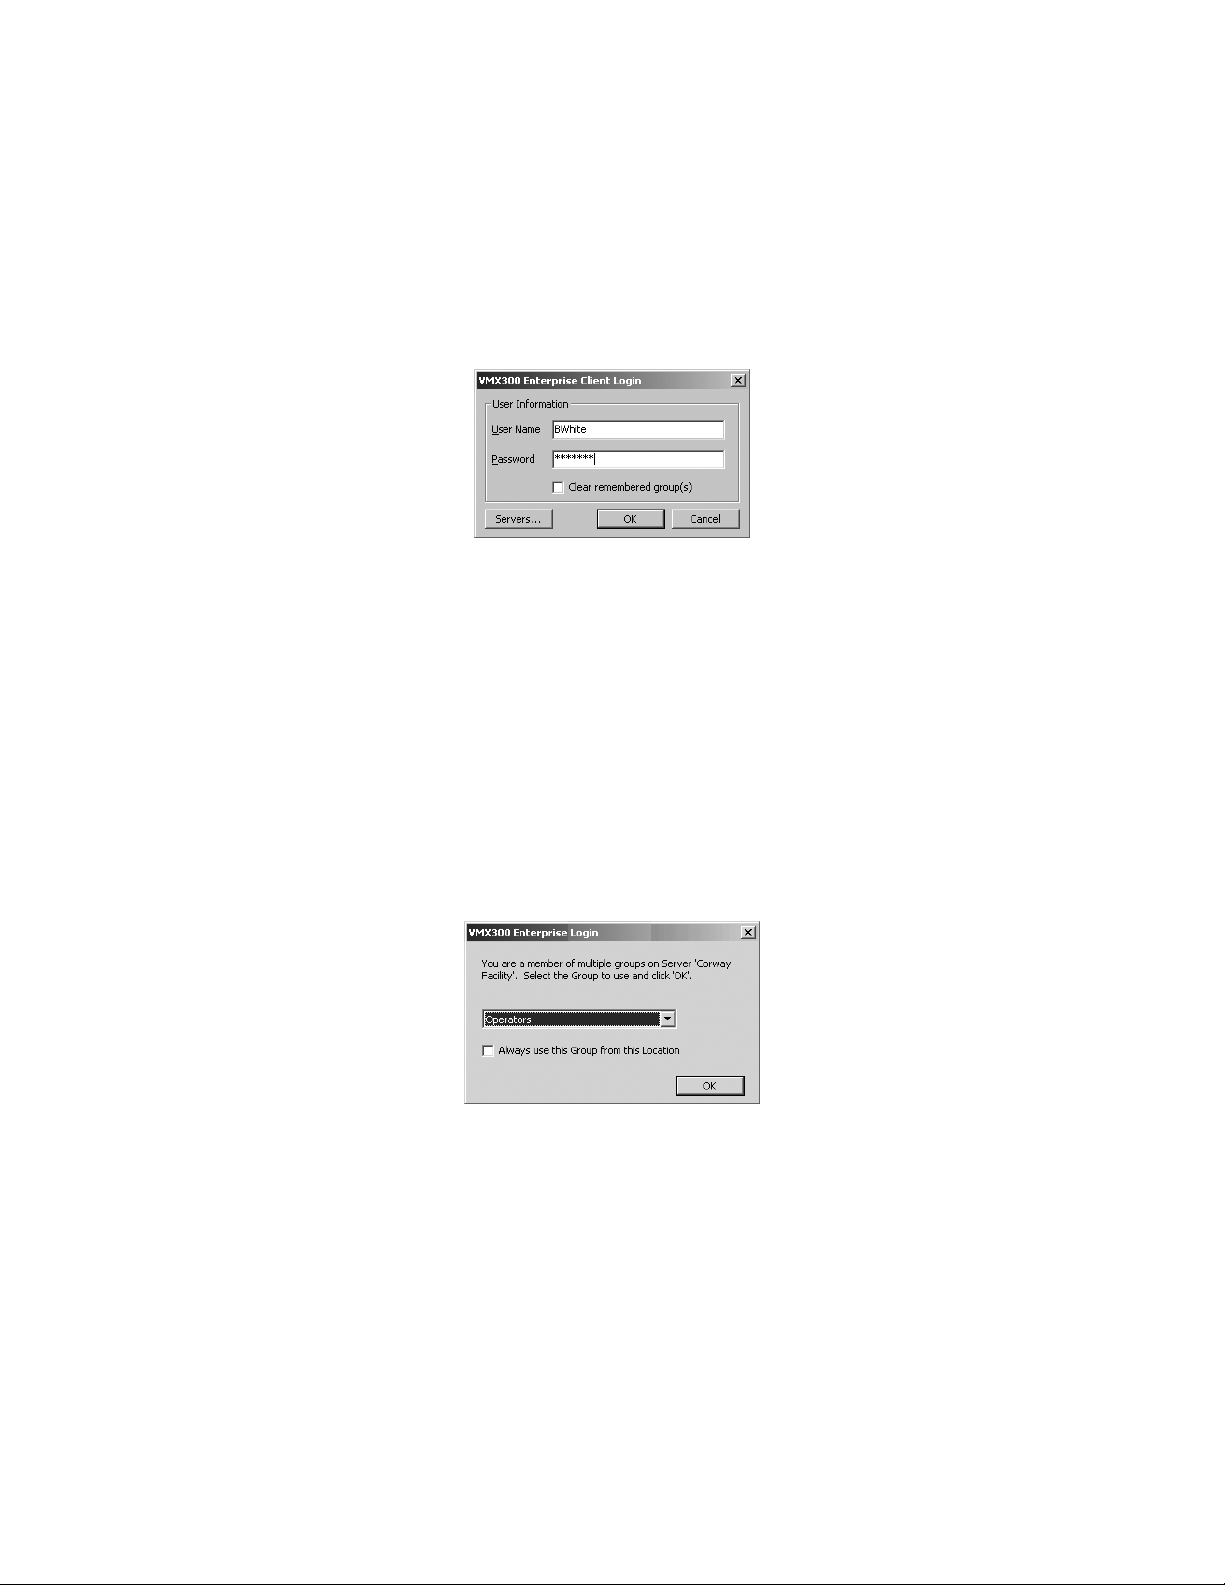
Once a valid database is in place, the Client Login dialox box opens.
Figure 5. Client Login Dialog Box
User name: Type your user name. User names are not case sensitive. For example, Operator and OPERATOR are the same as operator .
3. Password: Type your password. Passwords are case sensitive. For example, Op4days and OP4DAYS are different than op4days .
4. Servers: If this is the first time you have logged in, or if you want to log in to a server other than your usual server, click Servers. For more
information on selecting a server, refer to Configuring Servers .
C1554M-A (4/05) 13
Page 14
•
•
5. If you belong to only one user group, click OK.
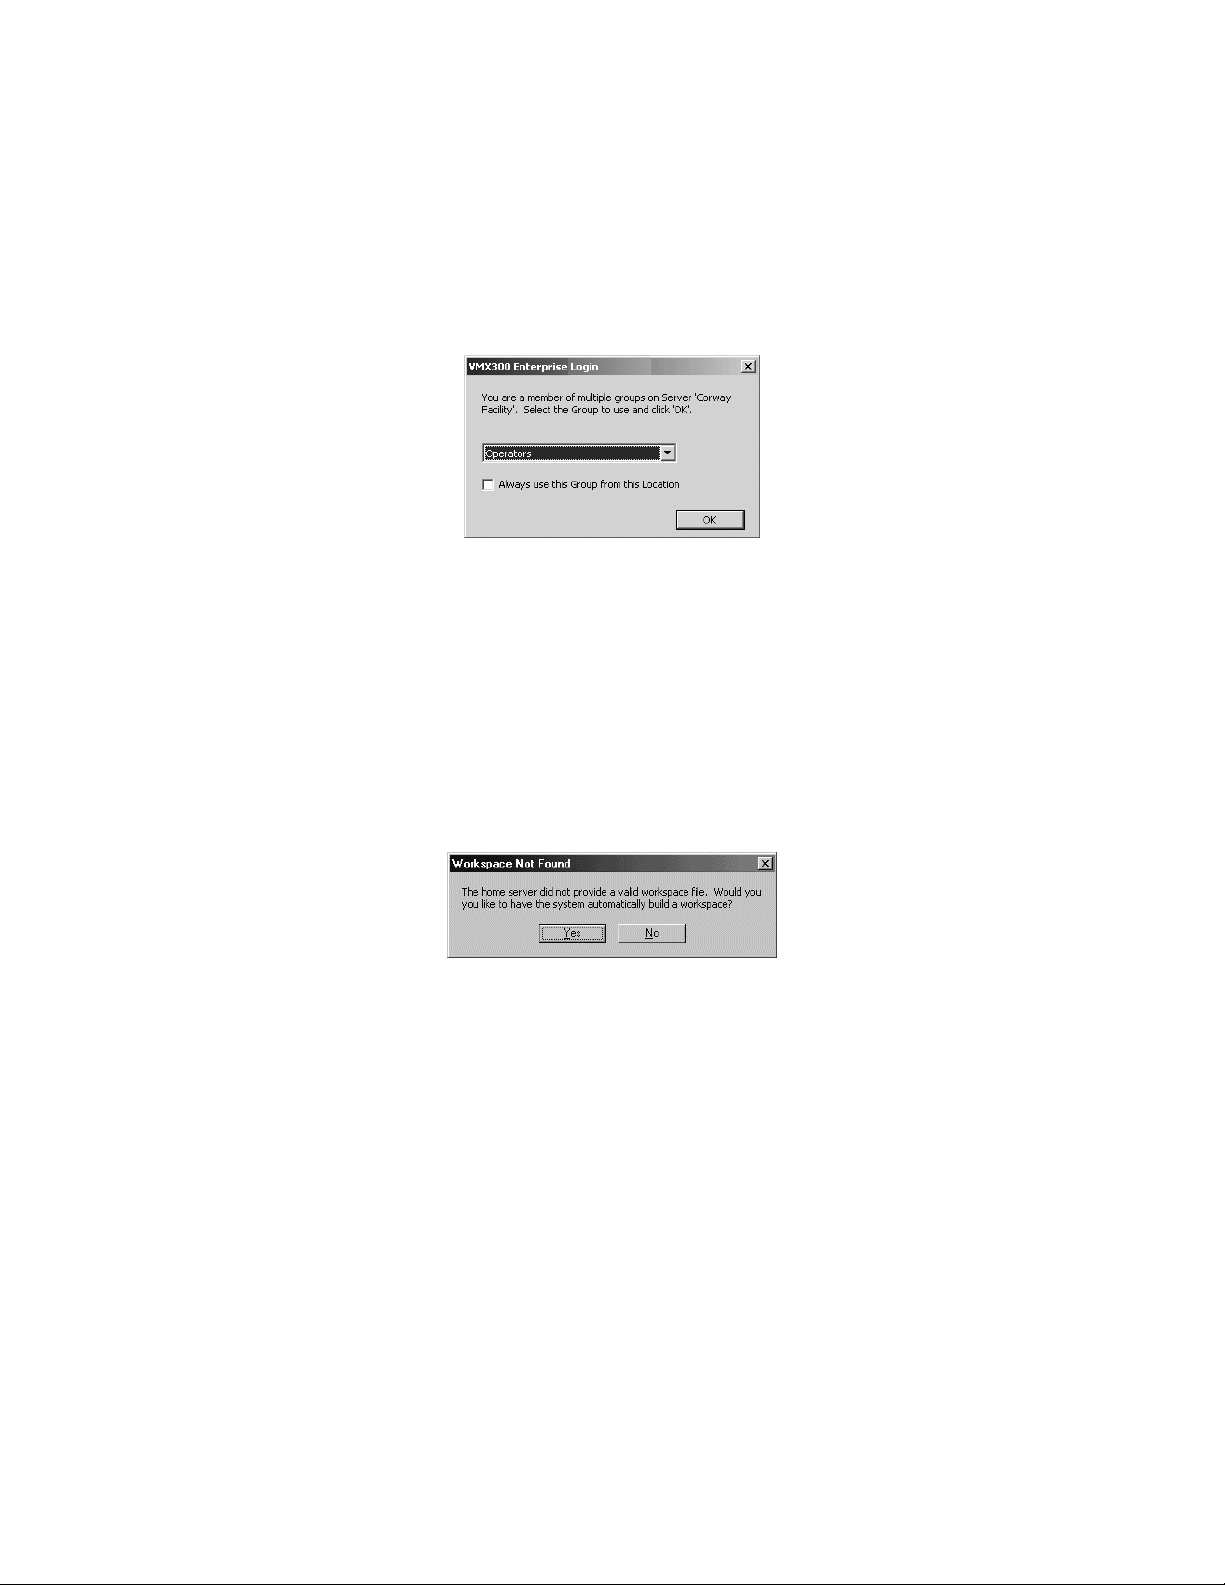
If you belong to more than one user group, VMX300(-E) needs to know which user group you want to log in under. You can either log in
under your default user group, if you have one set, or you can select the user group to log in under.
a. Log in under default: To log in under your default user group, click OK.
b. Override default: To override your default user group, select Clear Remembered Group(s) and click OK. TIP: If you do not know if you
have a default set, you can find out by selecting Clear Remembered Group(s).
The Select Group dialog box opens.
Figure 6. Select Group Dialog Box
Select group: Select the user group you want to log in under from the drop-down menu. If you are connecting to more than one
server, the user group you select here applies only to the server specified in the dialog box.
Set default: If you want to set the selected group as the default for the specified server, select “Always log in to this server as this
group from this location.”
Click OK. If you are connecting to more than one server, you will be prompted to select a user group for each server on which you
belong to more than one user group. You can also set a default for each server, if desired.
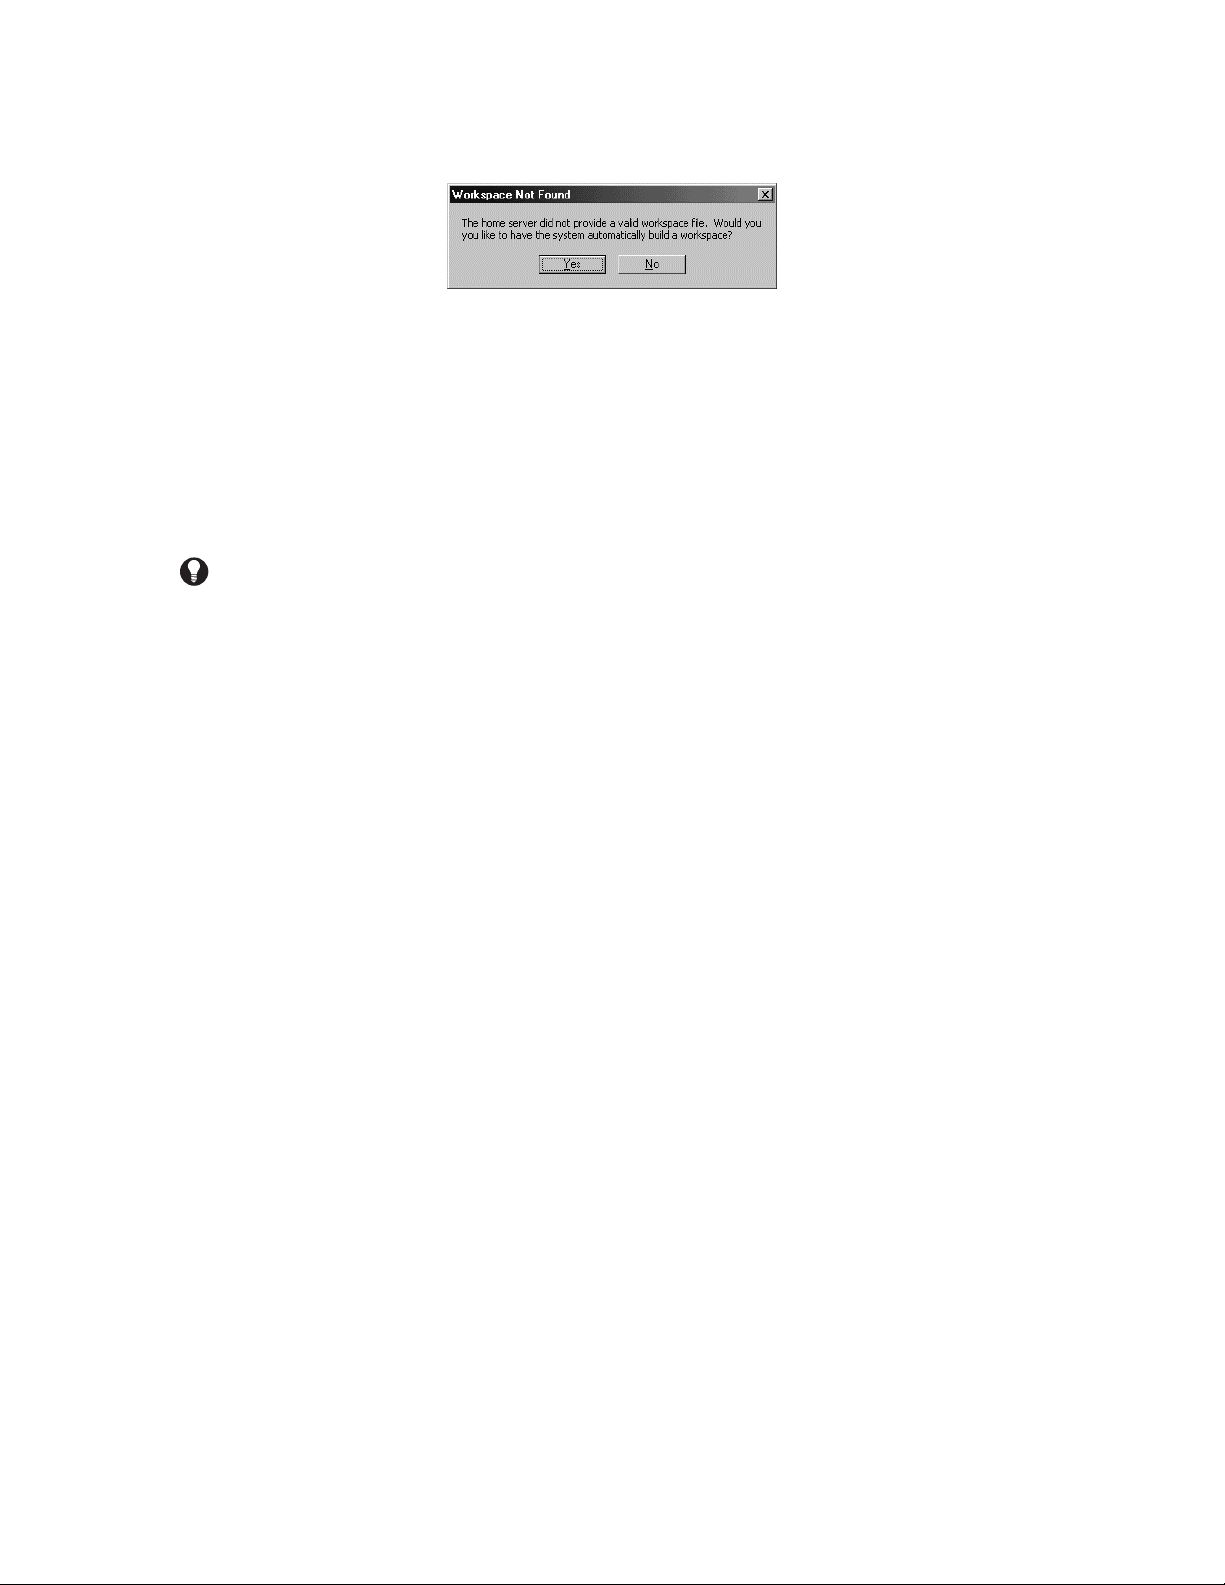
6. If no startup workspace is defined, you are asked whether you want the system to build a workspace for you automatically. Click Yes to
build a workspace, or No to work without a workspace.
Figure 7. Workspace Not Found Message
The VMX300(-E) Main window will open after several seconds and you will be connected to all the configured servers that are available.
NOTES:
The default group only applies when you connect to the same server from the same client as when you set the default.
VMX300(-E) can only connect you to servers that are running and available. If a server that was not available when you logged in becomes
available during your session, you will be logged in automatically.
14 C1554M-A (4/05)
Page 15
2.
LOGGING IN WHEN THE CLIENT IS ALREADY RUNNING
If the client is already running on the workstation you want to log in from, you can log in without having to shut down and re-start the client.
The File menu’s Log In As New User option allows you to connect to the same server(s) as the previous user. The previous user is logged out when
you log in.
NOTE: The Log In As New User option logs you in to the same server(s) as the previous user. To log in to different servers, you must shut down
the client, then start it as described in Logging In When the Client Is Not Already Running.
1. Click File > Log In As New User, or click the Main window and press Ctrl-U. If the current workspace has changed, you are asked whether
you want to save the changes. Click Yes to save the changes, or No to discard them. The Client Login dialog box opens.
Figure 8. Client Login Dialog Box
User name: Type your user name. User names are not case sensitive. For example, Operator and OPERATOR are the same as operator .
3. Password: Type your password. Passwords are case sensitive. For example, Op4days and OP4DAYS are different than op4days .
4. If you belong to only one user group, click OK.
If you belong to more than one user group, VMX300(-E) needs to know which user group you want to log in under. You can either log in
under your default user group, if you have one set, or you can select the user group to log in under.
a. Log in under default: To log in under your default user group, click OK.
b. Override default: To override your default user group, select Clear Remembered Group(s) and click OK. TIP: If you do not know if you
have a default set, you can find out by selecting Clear Remembered Group(s).
The Select Group dialog box opens.
Figure 9. Select Group Dialog Box
Select group: Select the user group you want to log in under from the drop-down menu. If you are connecting to more than one
server, the user group you select here applies only to the server specified in the dialog box.
Set default: If you want to set the selected group as the default for the specified server, select “Always log in to this server as this
group from this location.”
Click OK. If you are connecting to more than one server, you are prompted to select a user group for each server on which you belong
to more than one user group. You can also set a default for each server, if desired.
C1554M-A (4/05) 15
Page 16
•
•
•
•
•
5. If no startup workspace is defined, you are asked whether you want the system to build a workspace for you automatically. Click Yes to
build a workspace, or No to work without a workspace.
Figure 10. Workspace Not Found Message
The VMX300(-E) Main window will open after several seconds and you will be connected to all the configured servers that are available.
NOTES:
The default group only applies when you connect to the same server from the same client as when you set the default.
VMX300(-E) can only connect you to servers that are running and available. If a server that was not available when you logged in becomes
available during your session, you will be logged in automatically.
The previous user is not logged out until you have completed logging in. If you cancel out of the login procedure, the previous user will still
be logged in.
TIP: If you belong to more than one user group and you want to switch the group you are logged in under, use the Log In As New User
option to log you out of the one group and into the other.
LOGGING OUT
There are two ways for you to log out of the client:
Shut down the client. Refer to Shutting Down the Client for instructions.
With the client running, let a new user log in using the Log In As New User option, which logs you out. Refer to Logging In When the Client
Is Already Running for instructions.
SHUTTING DOWN THE CLIENT
To shut down the VMX300(-E) client:
Click File > Exit or click the X in the upper right corner of the Main window.
If the workspace has changed since you last saved it, you are given the opportunity to save before exiting. Select Yes to save the workspace, or
No to discard your changes. The client logs you out and shuts down.
Note that the monitor screen may appear black for about five seconds, and then the Windows desktop appears. This is part of the normal shutting
down process.
16 C1554M-A (4/05)
Page 17

Workspaces
Workspaces control the appearance of the VMX300(-E) client. In particular, they control which windows are displayed and their size, position, and
content.
You can set a default workspace to open when you log in, or you can explicitly open a workspace of your choice once you are logged in. Refer to
Workspace Preferences and Setting Your Preferences for information on setting a default workspace. Refer to Opening a Workspace for
instructions on opening a workspace after you are logged in. The name of the workspace that is currently open appears in the Main window
title bar.
The workspace affects the appearance of most windows in the client, including three predefined VMX300(-E) windows, as well as any custom
windows set up by your system administrator. The following predefined windows are affected by the workspace:
VMX300(-E) Main window, which includes the map viewport
Session Manager window
Device List window
Once logged in, you can change the appearance of the display either by using standard Windows techniques for resizing and repositioning
windows, or by editing the workspace. Refer to the Appendix for information on standard Windows techniques for adjusting the display. Refer to
Editing a Workspace for information on editing workspaces.
•
•
•
•
•
TIP: A workspace is like a snapshot of the client user interface. The easiest way to create the appearance you want for the client is to
adjust the display on-screen, then save the workspace. Whenever you open that workspace, the user interface will look just like it did when
you saved the workspace.
A workspace only works for the monitor configuration the workspace was created on. To create a workspace on one workstation that you can open
on other workstations, the workstations must have the same number of monitors, primary monitor configuration, and resolution.
NOTES:
To access workspaces, you must be connected to your home server. If you are not logged in to your home server, the workspace options in
the File menu are not available, regardless of whether you have permission to work with workspaces. For information on setting a home
server, refer to Configuring Servers.
Workspaces are defined for a particular user on a particular client. If you log in to different clients on a regular basis and you want a default
workspace to open whenever you log in, you must set a default workspace for each client.
OPENING A WORKSPACE
Opening a workspace sets the appearance of the client to the appearance specified in the workspace.
Access privileges: To open a workspace, you must belong to, and log in under, a user group that allows you to open workspaces. You must also
be logged in to your home server. If the Open Workspace option of the File menu is unavailable, then either you do not have permission to open
workspaces, or you are not logged in to your home server. Refer to User Groups for information on access privileges. Refer to Configuring Servers
for instructions on setting a home server.
To open a workspace:
1. Click File > Open Workspace, or click the Main window and then press Ctrl-O. The Open Workspace dialog box opens.
2. Select the workspace you want to open from the list, or browse to find the desired workspace file.
3. Click OK. If you have adjusted the display, you are asked whether you want to save the changes to the previous workspace. Click Yes to
save the changes or No to discard them. The previous workspace closes and the selected workspace opens.
TIP: If the workspace you want to open has recently been opened in that client, its name appears in the File menu, above the Exit option.
Open the workspace by clicking its name.
NOTE: You cannot open a workspace that was created on a system with a different monitor configuration. If the number of monitors, the primary
monitor, or the monitor’s resolution differ, the workspace will not open.
C1554M-A (4/05) 17
Page 18

AUTOGENERATING A WORKSPACE
Access privileges: To autogenerate a workspace, you must belong to, and log in under, a user group that allows you to open and edit work-
spaces. You must also be logged in to your home server. If the Open Workspace and/or Edit Workspaces option of the File menu is unavailable,
then either you do not have permission to open or edit workspaces, or you are not logged in to your home server. Refer to User Groups for
information on access privileges. Refer to Configuring Servers for instructions on setting a home server.
Autogenerating a workspace automatically builds a workspace correctly for one-monitor, two-monitor, and three-monitor systems:
One monitor: Displays the Device List and Session Manager. Aligns custom windows in the map viewport, obscuring part or all of the
map.
Two monitors: Displays the Device List, Session Manager, and map viewport on the left monitor. Aligns custom windows on the right
monitor.
•
Three monitors: Displays the Device List and map viewport on the left monitor. Displays the Session Manager full-screen on the center
monitor. Aligns custom windows on the right monitor.
When you autogenerate a workspace, you select the number of custom windows you want opened: 1, 4, 9, or 16. The number of custom windows
that actually open depends on how many windows you have access to. For example, suppose you have a total of 5 custom windows:
• Autogenerate 1 window: Builds a workspace with one custom window open.
• Autogenerate 4 windows: Builds a workspace with four custom windows open.
• Autogenerate 9 windows: Builds a workspace with all five custom windows open. Some of the space for custom windows is unused.
• Autogenerate 16 windows: Builds a workspace with all five custom windows open. Some of the space for custom windows is unused.
•
•
If you autogenerate a workspace when a custom window’s position is set to Fixed Position, VMX300(-E) automatically changes the setting to
Moveable.
NOTE: Autogenerating a workspace modifies the current workspace. To preserve your current workspace, save the autogenerated workspace
under a different file name.
To autogenerate a workspace, click File > Autogenerate Workspace and select the desired number of windows from the submenu. The workspace
is autogenerated.
EDITING A WORKSPACE
To edit a workspace, you must belong to, and log in under, a user group that allows you to edit workspaces. You must also be logged in to your
home server. If the Edit Workspaces option of the File menu is unavailable, then either you do not have permission to edit workspaces, or you are
not logged in to your home server. Refer to User Groups for information on access privileges. Refer to Configuring Servers for instructions on set-
ting a home server.
TIP: The easiest way to create the appearance you want for the client is to adjust the display on-screen using standard Windows
techniques to resize and reposition windows, then save the workspace. Use the Edit Workspace option to enable the type of adjustment
you want to make, but not to make the actual adjustment. For example, you might make a window sizeable through the Edit Workspace
option, but do the actual resizing on-screen using standard Windows techniques.
NOTE: Settings in the Edit Workspace dialog box come into effect immediately. This enables you to see the effect of your selections without
having to close the dialog box. However, you must explicitly save the workspace to make your changes permanent. Refer to Saving a Workspace
for instructions.
To edit a workspace:
1. If you want to edit a particular workspace file, open the workspace you want to edit, as described in Opening a Workspace. If you are
creating a new workspace, follow the instructions given here, then save the workspace when you have finished editing it. Refer to Saving a
Workspace for instructions.
18 C1554M-A (4/05)
Page 19

2. Click File > Edit Workspace, or click the Main window and press Ctrl-E. The Edit Workspace dialog box opens. The Edit Workspace dialog
box has five tabs, three of which control appearance: Appearance, Size, and Position. The Content tab controls window content. The Details
tab provides troubleshooting information.
Figure 11. Edit Workspace Dialog Box
3. Windows: The Windows list at the left of the Edit Workspace dialog box lists all the windows whose appearance is affected by a
workspace. This includes the VMX300(-E) Main window, Session Manager window, and Device List window, as well as any custom
windows the system administrator has defined on the server.
Select the window whose appearance you want to adjust by clicking the window’s name in the Windows list, or by clicking the window
itself. All the tabs in the Edit Workspaces dialog box display the settings for the selected window.
NOTE: The values of the settings you see on any tab in the Edit Workspace dialog box are for the window that is selected in the Windows list.
To adjust the workspace settings for a window, you must first select the window in the Windows list and select Visible on the Appearance tab.
TIP: You can adjust the appearance of more than one window at a time by selecting multiple windows in the Windows list. To select
nonconsecutive windows, hold the Ctrl key down while selecting with the mouse. To select consecutive windows, select the first window,
hold the Shift key down, and select the last window.
APPEARANCE TAB
Figure 12. Edit Workspace Dialog Box - Appearance Tab
C1554M-A (4/05) 19
Page 20
1. Window: With the desired window(s) selected in the Windows list:
a. Visible: Select Visible to open the window. Clear Visible to close the window. A window that has Visible selected automatically
opens when the workspace opens.
The Main window is always visible.
To adjust the appearance of a window through the Edit Workspace dialog box, the window must be selected in the Windows list and
Visible must be selected. When Visible is not selected, the settings on the tabs are not available.
b. Always on bottom: This option applies to custom windows only. Select Always on Bottom to have the selected window display
underneath other custom windows that overlap it.
c. Always on top: This option applies to custom windows only. Select Always on Top to have the selected window display on top of
other custom windows that it overlaps.
d. Minimize with main window: This option applies to custom windows only. Select Minimize with Main Window to have the
selected window minimize whenever you minimize the Main window. Clear Minimize with Main Window to have the selected
window remain at its current size when you minimize the Main window.
2. Window border: The Window Border settings apply to custom windows only. The differences between the different types of borders are
summarized in Table A.
Table A. Window Border Options
OPTION
OPTION
LOCATION
WINDOWS
CAPTION
AND BORDER
NO CAPTION
AND BORDER
CUSTOM
CAPTION AND
BORDER
Title bar Top of window Y N Y
Title bar Bottom of window N N Y
Maximize and Close buttons Title bar Y N N
User-defined caption Title bar N N Y
a. Windows caption and border: Select Windows Caption and Border to display the selected custom window with a standard
Windows title bar. If the Size tab’s Sizeable setting is selected for the window, the window’s border will allow on-screen resizing.
Figure 13. Custom Window - Windows Caption and Border Setting
b. No caption or border: Select No Caption or Border to display the selected custom window with no title bar. If the Size tab’s Sizeable
setting is selected for the window, the window’s border will allow on-screen resizing.
Figure 14. Custom Window - No Caption or Border Setting
20 C1554M-A (4/05)
Page 21
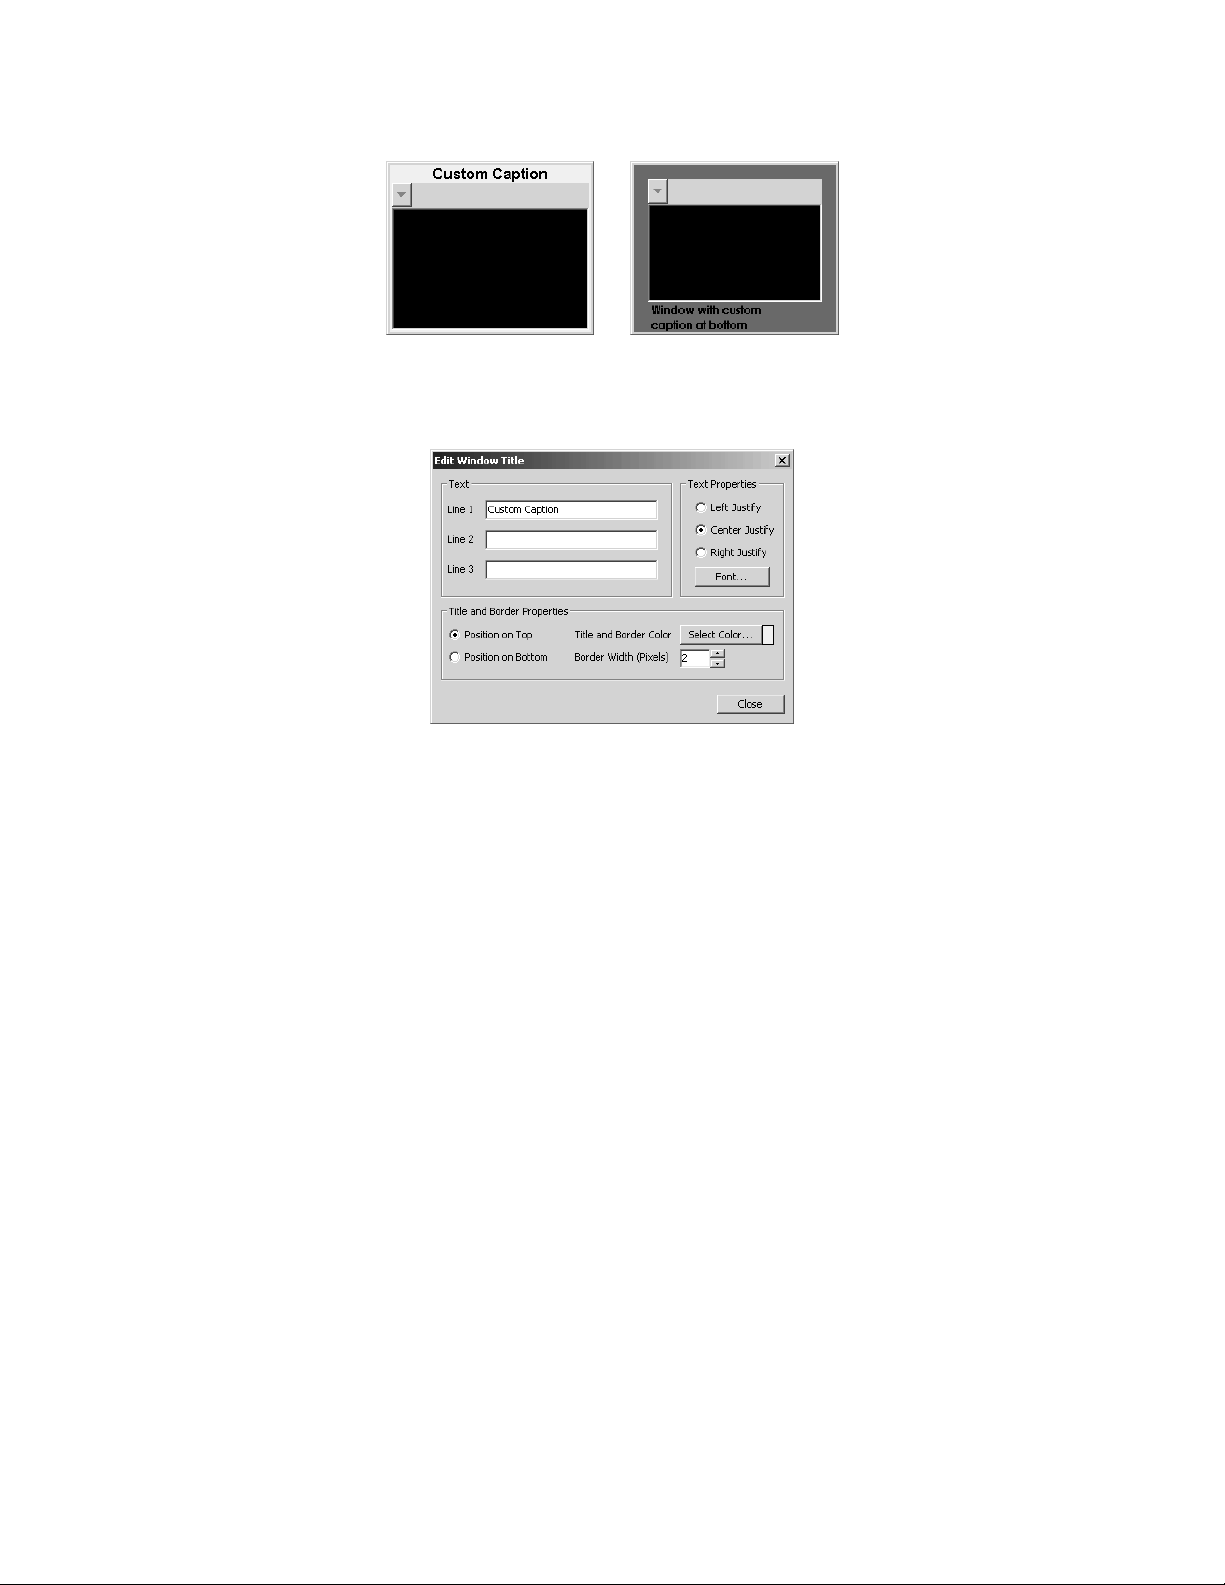
c. Custom caption and border: Select Custom Caption and Border to display the window with a caption and border of your choosing.
Figure 15. Custom Window - Custom and Border Setting
3. Click Settings to design the border. The Edit Window Title dialog box opens.
Figure 16. Edit Window Title Dialog Box
a. Text: Type up to three lines of text for the window caption. The caption appears in the window’s title bar. Each line of text can be at
most 50 characters long and can include any letter, digit or special character.
b. Text properties: Select the justification you want for the window caption. All the lines of text will be justified the same. Click Font to
select the font for the caption, and to select display attributes like bold face, italics, and text color.
c. Title and border properties: To have the title bar at the top of the window, select Position on Top. To have the title bar at the
bottom of the window, select Position on Bottom. Click Select Color to select a fill color for the border and title bar. Increase or
decrease the width of the border by increasing or decreasing the Border Width (Pixels) setting.
d. Click Close. The Edit Window Title dialog box closes.
C1554M-A (4/05) 21
Page 22
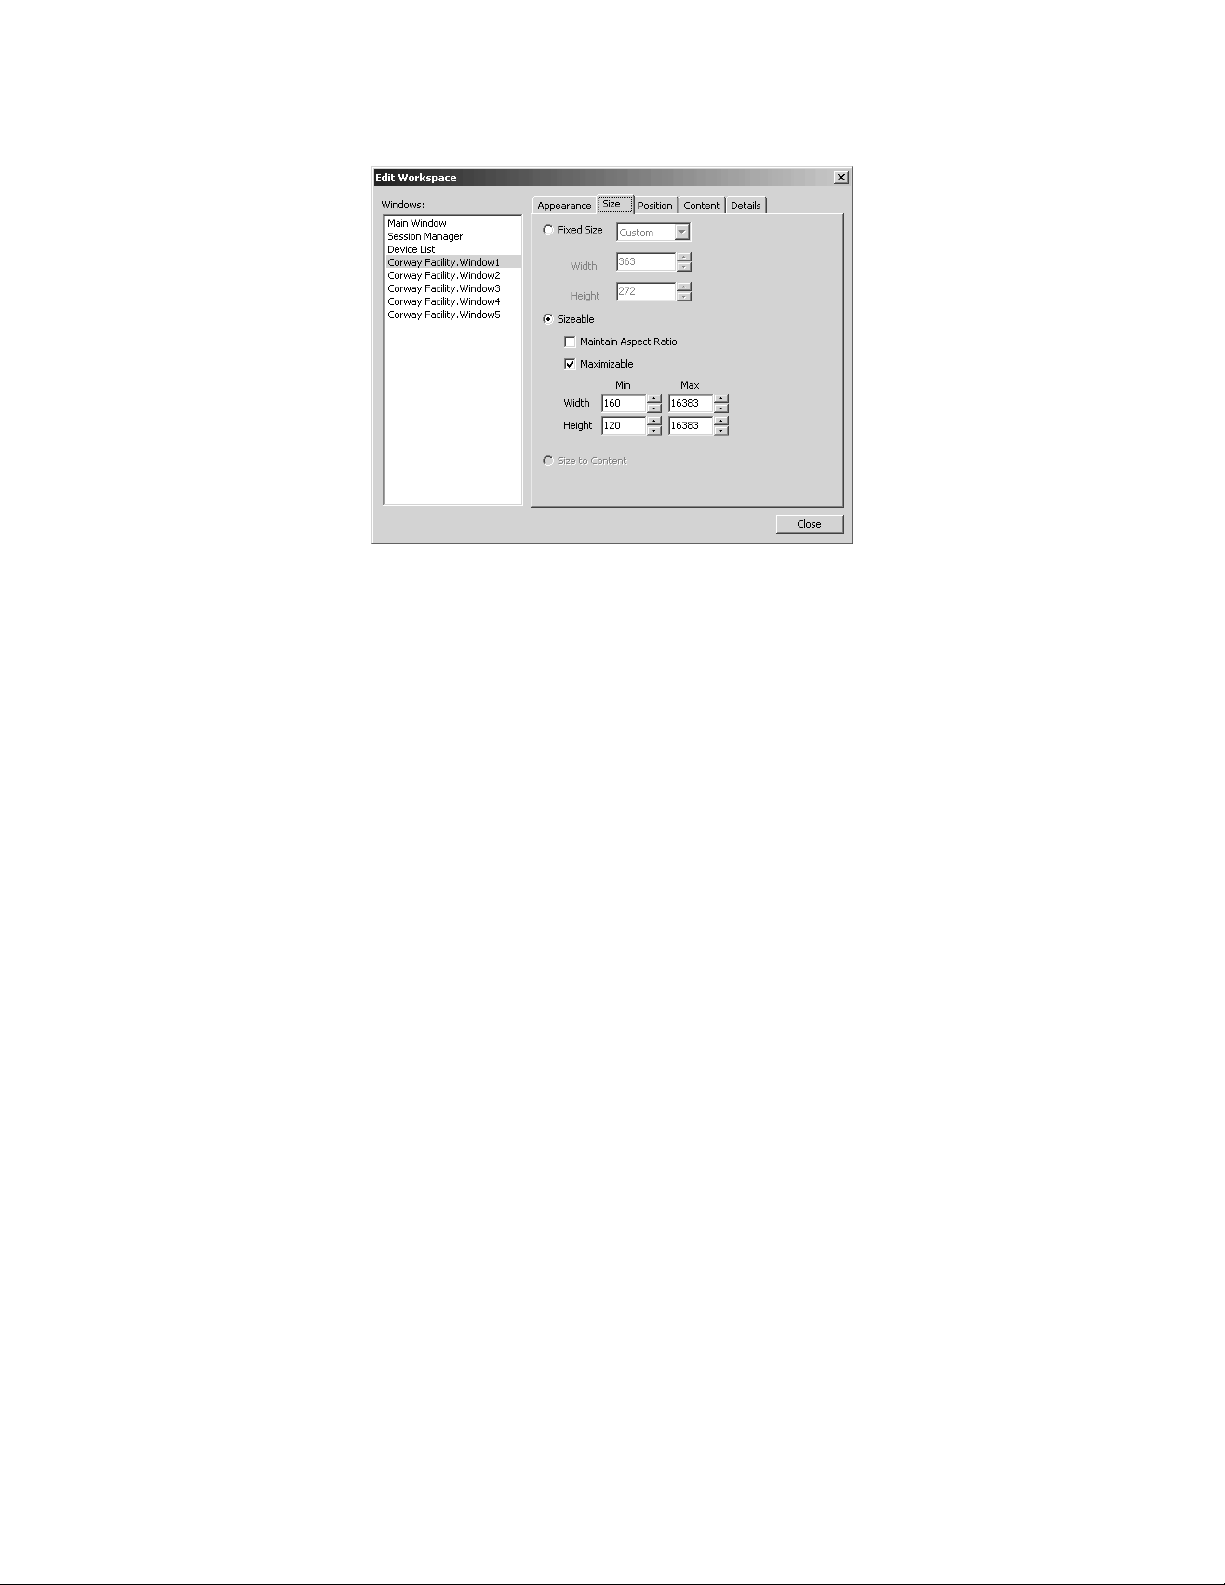
SIZE TAB
Figure 17. Edit Workspace Dialog Box - Size Tab
With the desired window(s) selected in the Windows list and with Visible selected on the Appearance tab:
1. Fixed size: Select Fixed Size if you want the window’s size fixed at a particular size. The smallest allowable size is 160 x 120 pixels.
Specify a custom size in pixels by entering the dimensions in the Width and Height boxes. Alternatively, select a predefined size that is a
fraction of the monitor size from the drop-down menu.
Selecting a predefined size creates an implicit grid that you can snap the selected window to using the Snap to Grid options of the Position
tab. Refer to Position Tab for instructions on snapping a window to the grid.
If you try to select a predefined size that makes the window smaller than the minimum size, VMX300(-E) will automatically set the size to
Custom 160 x 120.
2. Sizeable: Select Sizeable if you want to be able to resize the window by dragging its border.
a. Maintain aspect ratio: Select Maintain Aspect Ratio if you want the window proportions to remain constant when you resize it.
b. Maximizable: Select Maximizable if you want to be able to maximize the window.
To maximize a window, click the window, press Alt-Space Bar, and select Maximize from the drop-down menu. Windows of type
Windows Caption and Border can also be maximized using the Maximize button in the title bar, or by right-clicking the title bar and
selecting Maximize from the drop-down menu.
If you clear Maximizable, neither the Maximize option in the drop-down menu nor the Maximize button will be available.
c. Minimum and maximum dimensions: In the Min and Max boxes, specify the minimum and maximum size the window can be
resized to, in pixels.
3. Size to content: This field is reserved for future development.
22 C1554M-A (4/05)
Page 23

POSITION TAB
Figure 18. Edit Workspace Dialog Box - Position Tab
With the desired window(s) selected in the Windows list and with Visible selected on the Appearance tab:
1. Fixed position: Select Fixed Position to lock the selected window in a particular position.
Top, left: Specify a custom position by entering the position in the Top and Left boxes. Position [0,0] is the top left corner of the monitor
screen that the top left corner of the window is displayed on. The Top setting measures pixels down from the top of the screen to the top
edge of the window. The Left setting measures pixels in from the left of the screen that the window’s left edge is displayed on, to the left
edge of the window.
The value for Left can be negative, which is useful if you the workstation has more than one monitor. For example, if you have a twomonitor system and the window is open on the right monitor, you can give the window a fixed position on the left monitor by entering a
negative value for Left.
Snap to grid: Instead of specifying a custom position, click Snap to Grid repeatedly to jump the window through the implicit grid points
created by selecting a predefined fixed size. Snap to Grid is only available for windows with a predefined fixed size set on the Size tab.
Refer to Size Tab for instructions on selecting a predefined fixed size.
Snap to Grid only works within the current monitor. To snap a window in a different monitor, first move the window to the desired monitor,
then snap it.
If you autogenerate a workspace when a custom window’s position is set to Fixed Position, VMX300(-E) will automatically change the
setting to Moveable.
2. Moveable: Select Moveable if you want to be able to drag the selected window about freely on the monitor.
a. Restrict movement: To restrict the window from being moved to another monitor in a multi-monitor system, select Restrict
movement to current monitor.
b. Snap to grid: Select Snap to grid to have the window snap to the implicit grid points created by selecting a predefined fixed size.
Snap to Grid is only available for windows with a predefined fixed size set on the Size tab. Refer to Size Tab for instructions on
selecting a predefined fixed size.
c. Docked to main window: Select Docked to Main Window to dock the selected window to the Main window. Only the Device List
window and Session Manager window can be docked.
C1554M-A (4/05) 23
Page 24
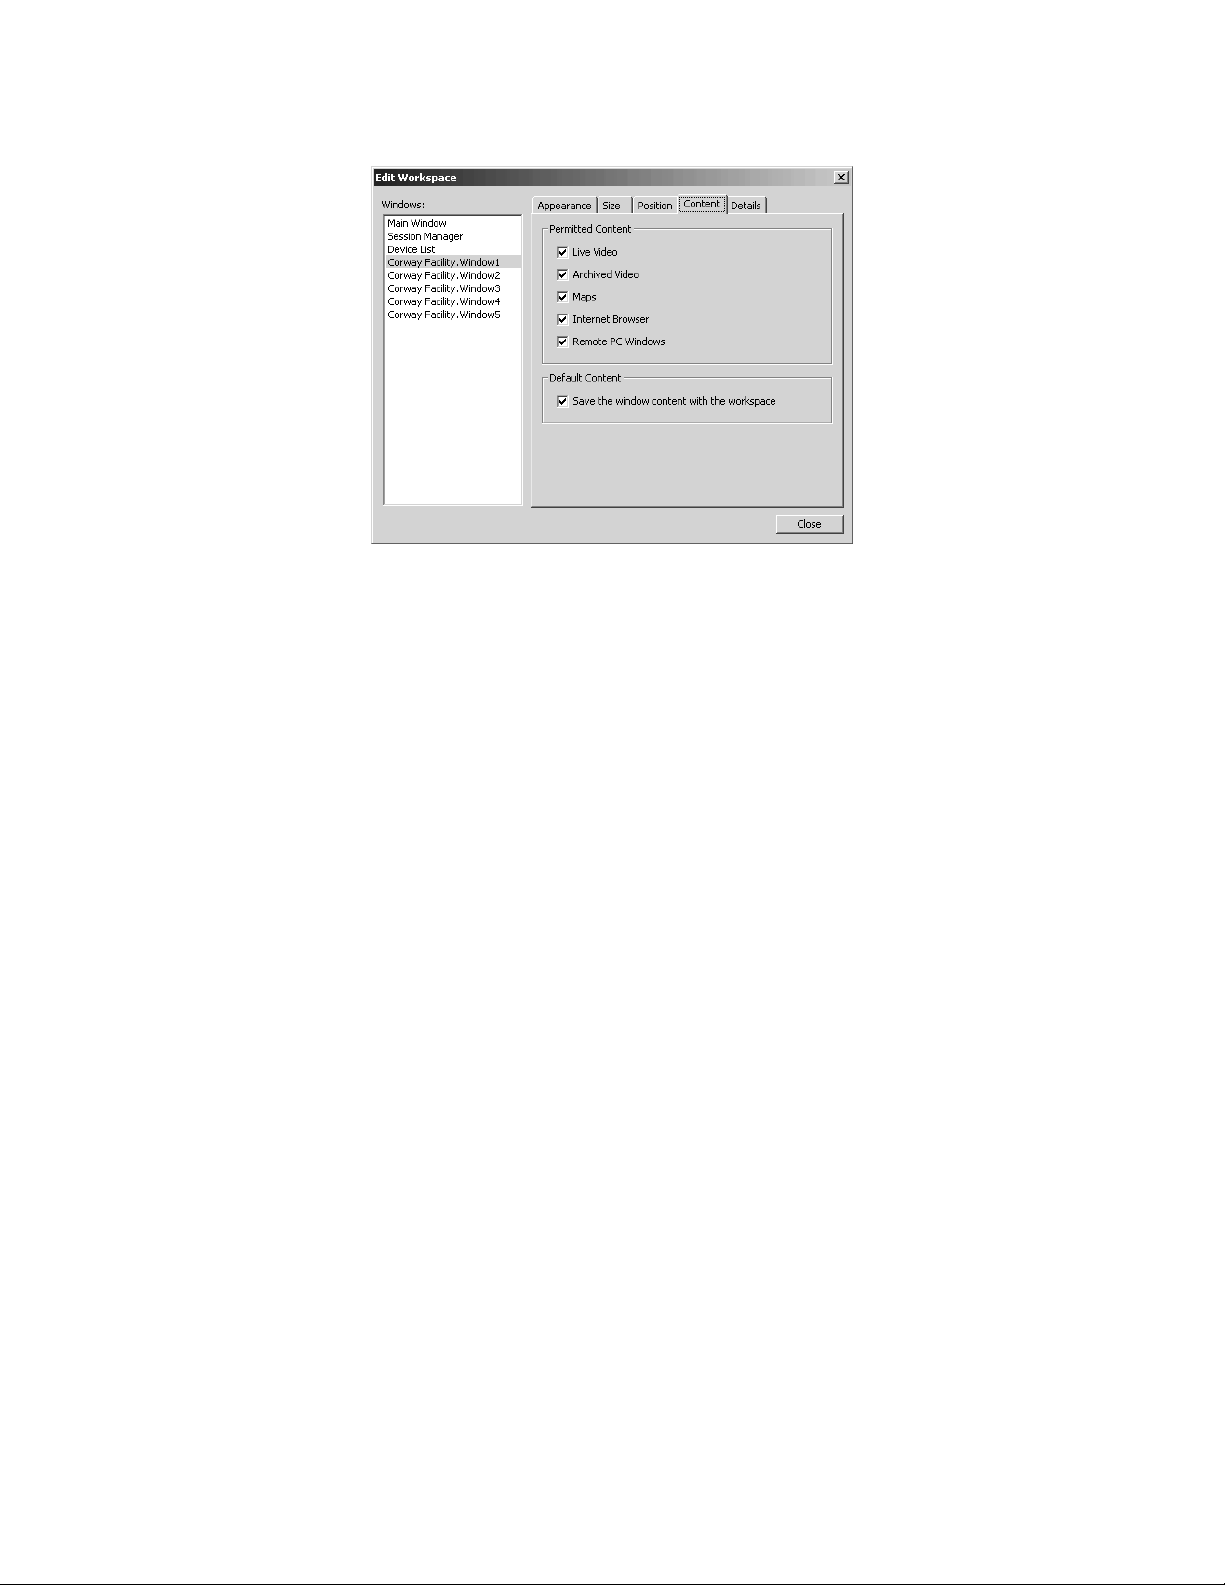
CONTENT TAB
Figure 19. Edit Workspace Dialog Box - Content Tab
With the desired window(s) selected in the Windows list and with Visible selected on the Appearance tab:
1. Permitted content: The Permitted Content settings are available for custom windows only.
Select the types of content that you want to be able to display in the selected window(s). For example, if you allow Live Video in a
particular window, but disallow all other types of content, then that window can only be used to view live video.
The following are the different types of content:
• Live video
• Archived video
• Maps
• Internet browser
• Remote PC windows
Refer to Custom Windows for information on how you view the different types of content.
Your system administrator specifies the types of content each user group can view. To allow or disallow a particular type of content, you
must belong to, and be logged in under, a user group that provides access to that type of content. For example, if you are logged in under a
user group that does not permit you to load maps in custom windows, then you will not be able to allow or disallow the Maps content type.
2. Default content: This setting is available for the Main window and custom windows only.
To load window content automatically when you open a workspace, select “Save the window content with the workspace.” For example, if
a custom window has an Internet browser loaded in it when you save the workspace, the next time you open the workspace, the browser
will automatically load in the window at the same Web page as when the workspace was saved.
Saving the window content of the Main window saves the map that is loaded in the viewport. Saving the window content of a custom
window saves the window mode (the type of content currently selected to display in the window) and, if the mode is Live Video or Archived
Video, the device that is switched to the window.
Every time you save the workspace, the current content is saved, overwriting the previously saved content. If there is some particular
content you always want to load in a window when the workspace is opened, such as Live Video, follow these steps:
• Select Live Video mode for the window.
• Drag the camera to the window.
• Edit the workspace.
• Select the window in the Windows list.
• Select “Save the window content with the workspace.”
• Close the Edit Workspace dialog box.
• Save the workspace.
24 C1554M-A (4/05)
Page 25
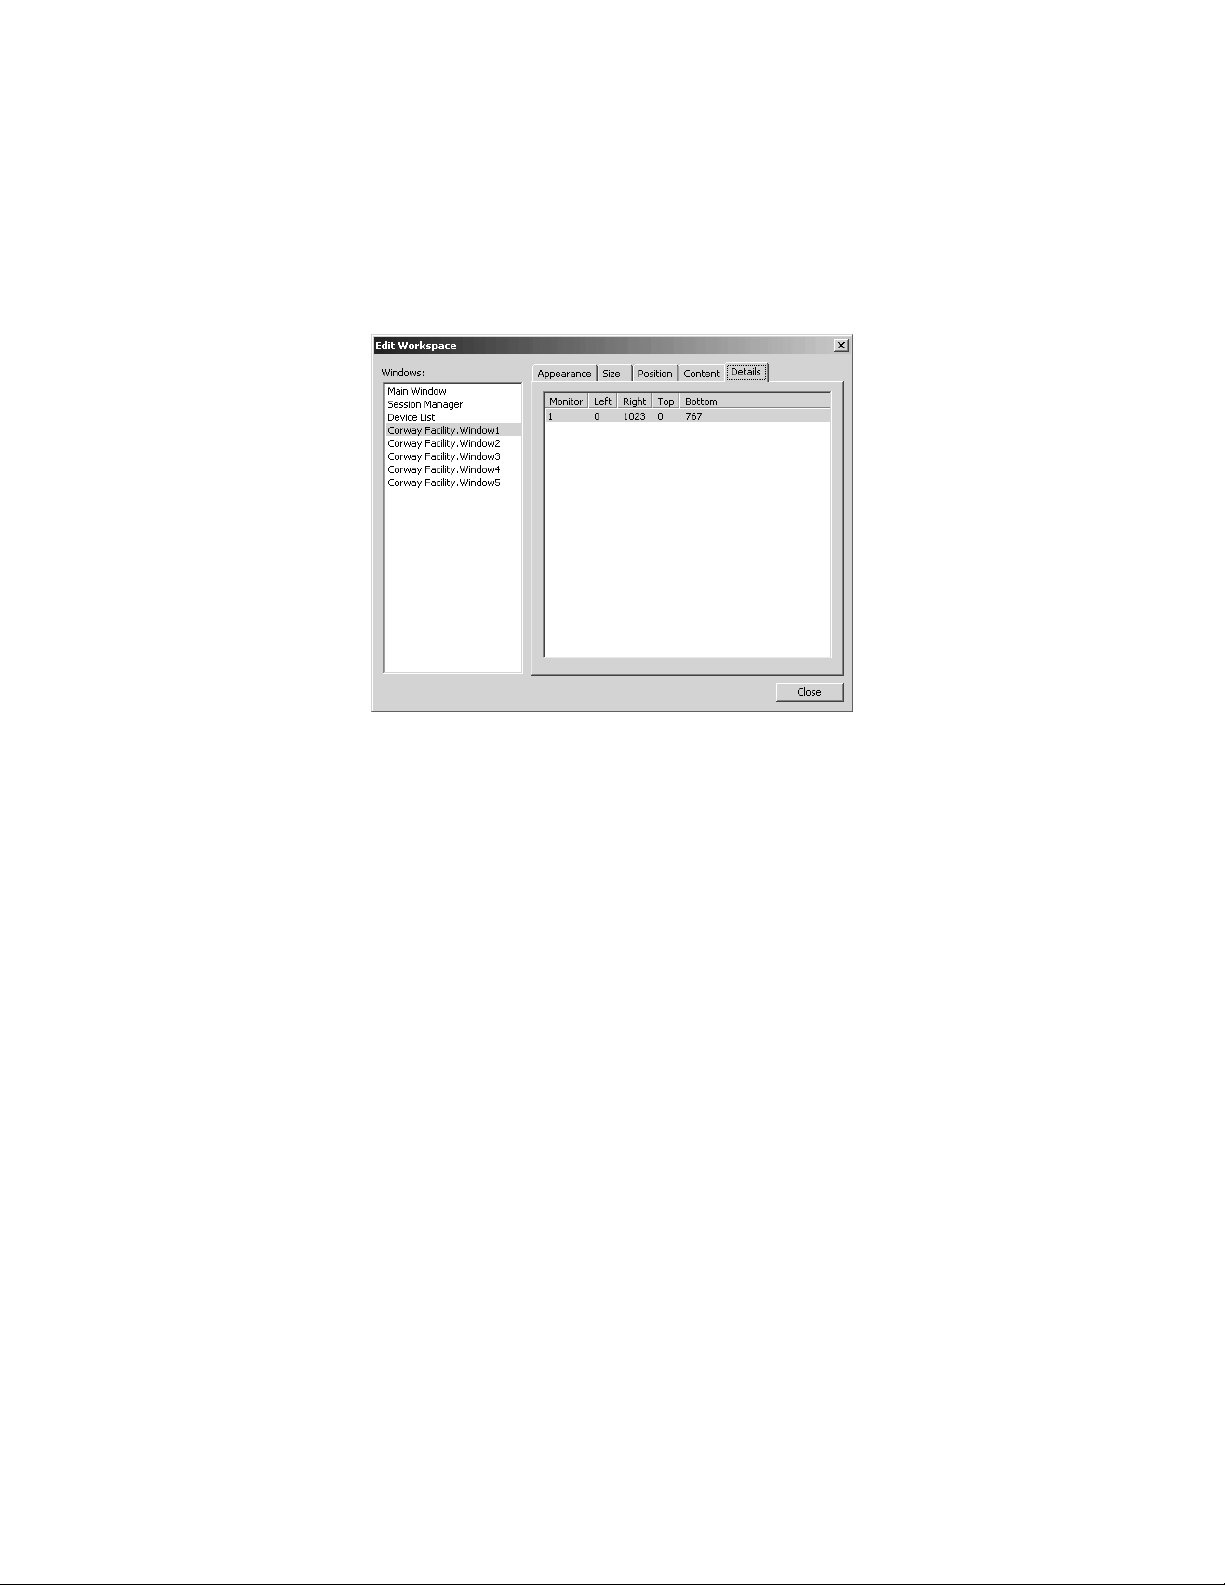
• Edit the workspace.
• Clear “Save the window content with the workspace.”
• Close the Edit Workspace dialog box.
Clearing the default content setting ensures that you do not inadvertently overwrite the content you have saved. Whenever the workspace is
opened, live video from the same camera will load in the window.
DETAILS TAB
The Details tab provides data on your monitor(s). It is used for troubleshooting.
SAVING A WORKSPACE
To save a workspace, you must belong to, and log in under, a user group that allows you to save workspaces. You must also be logged in to your
home server. If the Save Workspace option of the File menu is unavailable, then either you do not have permission to save workspaces, or you are
not logged in to your home server. Refer to User Groups for information on access privileges. Refer to Configuring Servers for instructions on
setting a home server.
To save a workspace:
1. If it is not already open, open the workspace you want to save, as described in Opening a Workspace. The name of the current workspace
appears in the Main window title bar.
2. Click File > Save Workspace, or click the Main window and press Ctrl-S. The workspace is saved.
To save a workspace under a new name:
1. If it is not already open, open the workspace you want to save under a new name, as described in Opening a Workspace. The name of the
current workspace appears in the Main window title bar.
2. Click File > Save Workspace As. The Save Workspace dialog box opens.
3. Select the folder where you want the new workspace saved and type a file name.
4. Click Save. The workspace is saved and the name of the new workspace appears in the Main window title bar.
Figure 20. Edit Workspace Dialog Box - Details Tab
C1554M-A (4/05) 25
Page 26
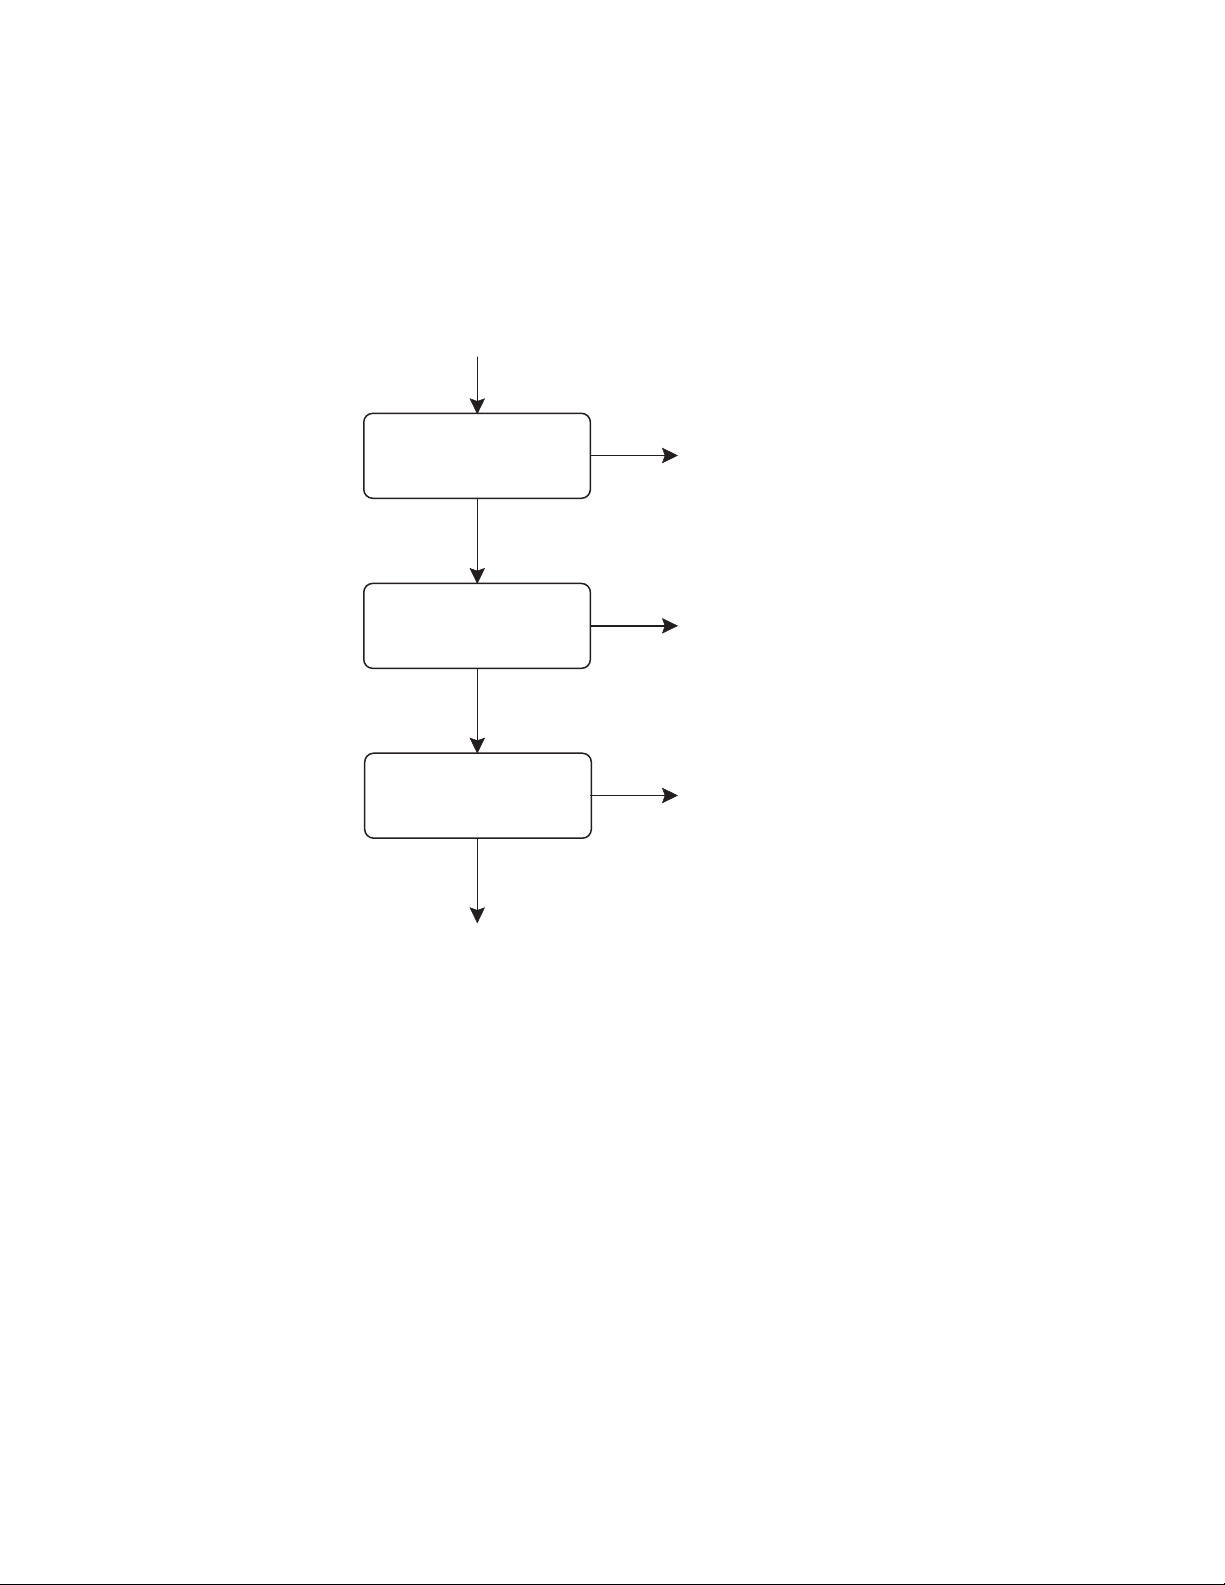
WORKSPACE PREFERENCES
Workspace preferences determine which workspace, if any, opens automatically when you log in.
VMX300(-E) decides which workspace to open when a user logs in according to the scheme in Figure 21. Note that user preferences override the
default workspace provided by your home server.
By default, your preferences are set to use the workspace provided by your home server. This applies the very first time you log in, and holds until
you change your preferences.
User logs in
Has the user set
preferences for this client?
No
Has the user’s home server
provided a default workspace?
No
Prompt the user: Do you
want the client to build
a workspace?
No
Don’t use a workspace
Figure 21. Workspace Decision Process
Yes
Yes
Yes
Open the workspace
defined in the user’s
preferences
Open the workspace
provided by the user’s
home server
Build a workspace
for the user
26 C1554M-A (4/05)
Page 27
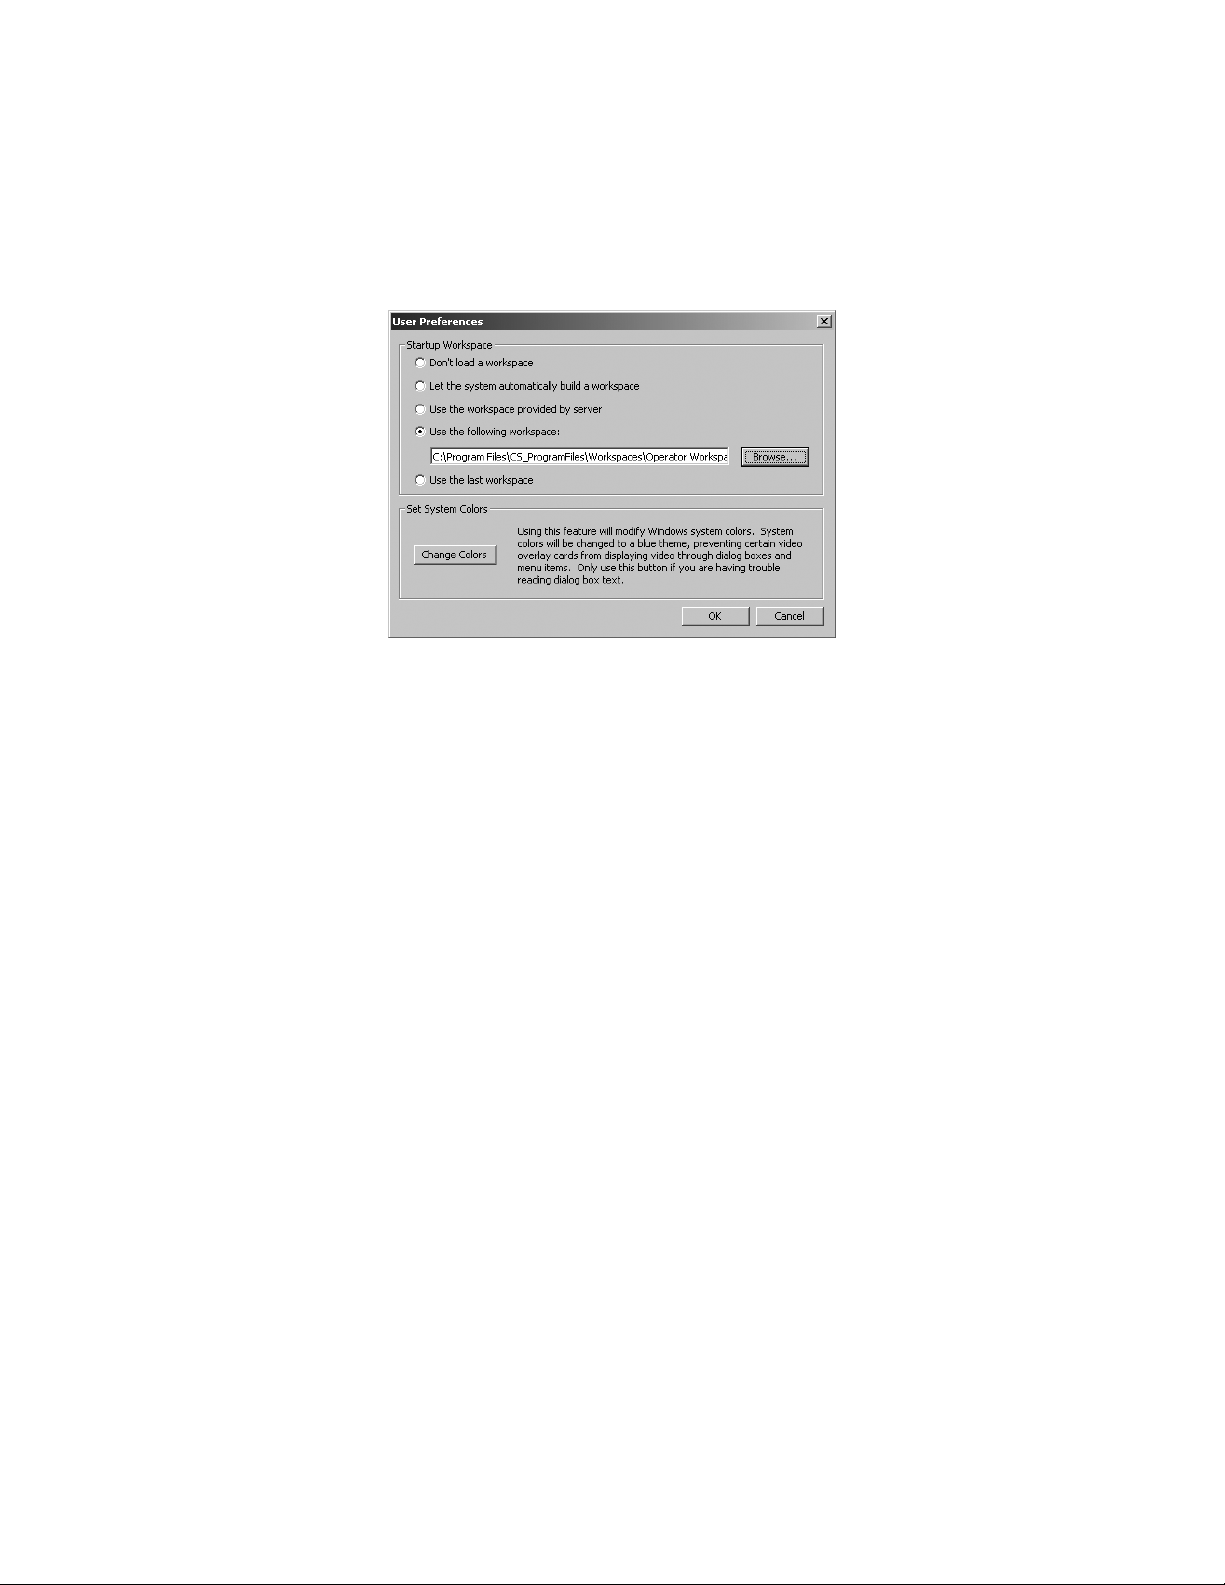
SETTING YOUR PREFERENCES
To set preferences, you must belong to, and log in under, a user group that allows you to open workspaces. You must also be logged in to your
home server. If the Preferences option of the File menu is unavailable, then either you do not have permission to set preferences, or you are not
logged in to your home server. Refer to User Groups for information on access privileges. Refer to Configuring Servers for instructions on setting
a home server.
1. Click File > Preferences. The User Preferences dialog box opens.
Figure 22. User Preferences Dialog Box
2. Startup workspace: The startup workspace is the workspace that is used when you log in. Select your preference:
a. No workspace: If you do not want VMX300(-E) to open a workspace for you automatically when you log in, click “Don’t load a
workspace.” VMX300(-E) opens the Main window only, leaving all other windows closed.
b. Build workspace: If you want VMX300(-E) to build a workspace for you automatically when you log in, click “Let the system
automatically build a workspace.” VMX300(-E) opens the Main window, the Device List, the Session Manager, and all your custom
windows.
c. Workspace supplied by server: If you want VMX300(-E) to automatically open the default workspace defined on your home server
when you log in, click “Use the workspace supplied by server.” If your home server has not provided a workspace, you are asked
whether you want to build a workspace. If you say Yes, VMX300(-E) opens the Main window, the Device List, the Session Manager,
and all your custom windows. If you say No, VMX300(-E) opens the Main window only, leaving all other windows closed.
d. Select workspace file: If you want to choose a workspace for VMX300(-E) to open when you log in, click “Use the following
workspace.” Type the pathname of the workspace file you want opened, or Browse to select the desired file.
e. Last workspace: If you want VMX300(-E) to reconstruct the workspace to look exactly like it looked when you were last logged in to
that client, click “Use the last workspace.” This allows you to reproduce the appearance of your last session, without having saved
the workspace. If a workspace file was open when you were last logged in, VMX300(-E) opens the file with the appearance it last had.
If you had made changes to the workspace, but you had not saved them, VMX300(-E) reproduces those changes, in spite of not having
been saved. You do not need to have permission to edit or save workspaces to use the last workspace preference.
3. Set system colors: Some video overlay cards, such as the Quad Video Display card, display video through the text and borders of dialog
boxes, making it difficult to read the information in the dialog box. If you have a video card in your workstation, and you are having trouble
reading dialog box text, click Change Colors. This changes the Windows system colors to a blue theme, which prevents video from showing
through. The blue theme lasts until you reboot the workstation, and it affects any one who uses the workstation for any application. If you
reboot the workstation, you must click Change Colors again to go back to the blue theme. If you decide you do not want the blue theme, you
can change the system colors through the Windows Control Panel Display Appearance or reboot the workstation.
4. Click OK. Your preferences are saved and the User Preferences dialog box closes.
C1554M-A (4/05) 27
Page 28
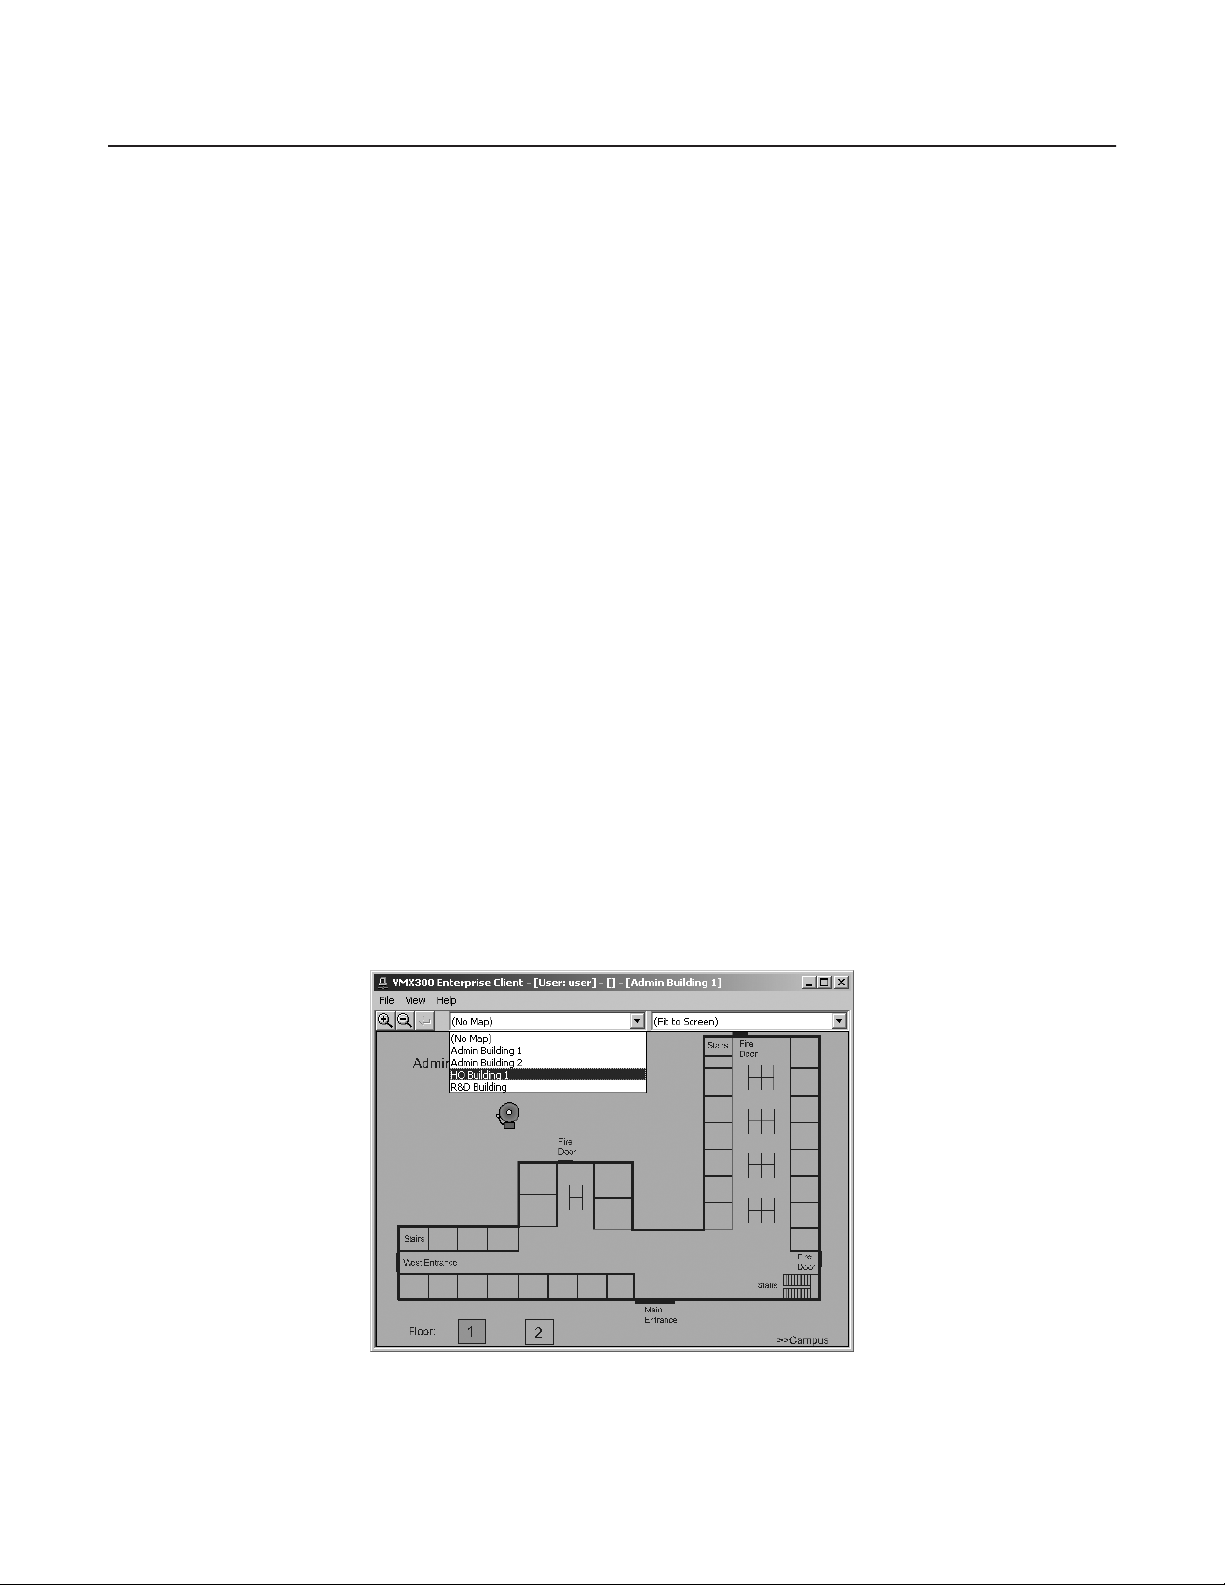
Maps
Maps provide VMX300(-E) operators with a visual representation of your site, complete with the devices and alarms that are installed.
The system administrator customizes maps through the use of following methods:
• Device icons: Icons that represent the devices installed at your site appear on the maps. You can access a device’s controls by clicking its
icon. Refer to Devices for more information.
• Predefined views: Predefined views that allow you to quickly focus on a particular view of a map appear in the predefined views drop-
down list. Refer to Predefined Views for more information.
• Links between maps: Hotlinks that allow you to load a related map or predefined view with a simple mouse click appear on the maps.
Refer to Hotlinks for more information.
• Scripts that automate common actions: Scripts that automate common actions appear as labels on the maps. Click a label to run its
script. Refer to Labels for more information.
Maps can be loaded into the map viewport that is part of the Main window, or into custom windows that are in Maps mode. The map viewport
and custom windows have tools for loading maps and adjusting the view. Refer to Loading Maps and Adjusting the Map Display for more
information.
LOADING MAPS
Maps can be loaded into the Main window map viewport or a custom window.
There are several ways you can load a map:
• Select the map from the maps drop-down list in the tool bar.
• Click a hotlink or label on a map that loads another map. Refer to Hotlinks and Labels for more information.
• Open a workspace that loads a map. Refer to Workspaces for more information.
• Drag the map from the Device List to the viewport or custom window. Refer to Devices for more information.
To load a map from the maps drop-down list:
1. Click the arrow to the right of the maps drop-down list. If you are loading the map into the map viewport, use the Maps drop-down list
above the map viewport. If you are loading the map in a custom window, use the Maps drop-down list in the custom window tool bar. A list
opens of all the maps you have access to on the servers you are connected to.
2. Click the name of the map you want to load. If a map is currently loaded, it closes. The selected map appears.
Figure 23. Loading a Map
28 C1554M-A (4/05)
Page 29

ADJUSTING THE MAP DISPLAY
The VMX300(-E) client provides the following methods for changing the view of a map:
• Zoom buttons
• Previous View button
• Predefined views
ZOOM BUTTONS
Zoom In
The Zoom In button works two ways:
• Zoom in incrementally
• Zoom in on a selected part of the map
Incremental: To zoom in incrementally:
1. Click the Zoom In button and position the pointer over the map. The pointer appears as a magnifying glass with a plus sign in it.
2. Click the part of the map you want to zoom in on. The map appears at about 110% of its previous scale.
Selected area: To zoom in on a particular part of the map:
1. Click the Zoom In button and position the pointer over the map. The pointer appears as a magnifying glass with a plus sign in it.
2. Position the pointer at one corner of the area you want to magnify. Press and hold the left mouse button.
3. Drag the pointer to the opposite corner of the area you want to magnify. A rectangle delineating the area to magnify appears.
4. Release the mouse button. The selected area appears as large as possible to fit within the display area.
NOTE: You must click the Zoom In button each time you want to zoom in.
Zoom Out
The Zoom-Out button decreases the size of the displayed map by about 10%. To zoom out, click the Zoom Out button.
NOTE: You must click the Zoom Out button each time you want to zoom out.
PREVIOUS VIEW BUTTON
The Previous View button retrieves whatever was last displayed in the map viewport, allowing you to step back through the history of the
viewport. Every time you change the display in the viewport, either by loading a different map or predefined view, or by zooming or scrolling,
VMX300(-E) records the view.
To display the previous view, click the Previous View button. Continue clicking the Previous View button until you have stepped back to the desired
view.
PREDEFINED VIEWS
Predefined views allow you to display a particular view of the currently loaded map by selecting a previously saved view from the predefined
views drop-down list.
VMX300(-E) provides two default predefined views, Fit to Screen and One to One. As well, your system administrator can create custom predefined views. Predefined views created and saved by the system administrator are listed at the bottom of the predefined views drop-down list.
If you adjust the view so it does not coincide with a predefined view, Custom View appears in the drop-down list.
Fit to screen: Fit to Screen displays the loaded map as large as possible to fit within the current size of the map viewport.
One to one: One to One displays the loaded map at its actual size. If the map viewport is not large enough to display the entire map at its actual
size, a portion of the map will be displayed.
C1554M-A (4/05) 29
Page 30
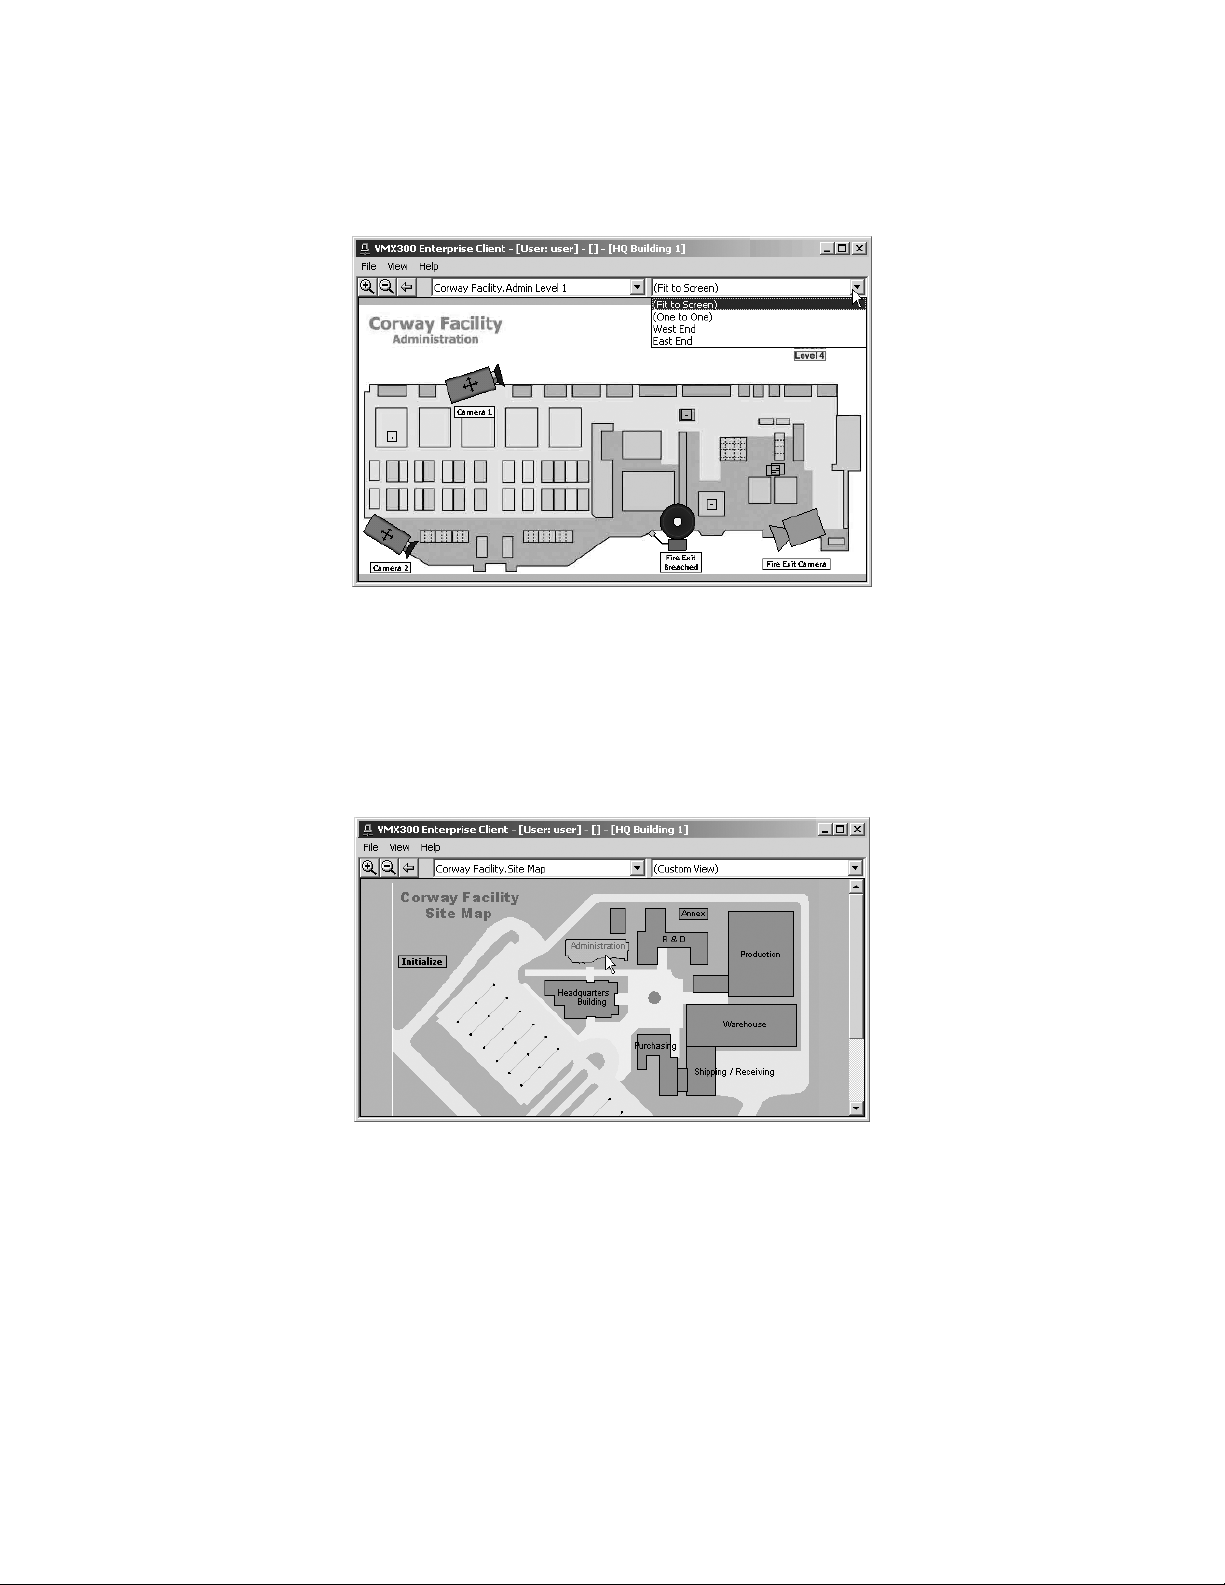
To load a predefined view:
1. Click the arrow to the right of the predefined views drop-down list. A list of all the predefined views for the current map drops down.
2. Click the name of the predefined view you want to display. The predefined view loads in the viewport.
Figure 24. Loading a Predefined View
NOTE: Only the predefined views for the currently loaded map appear in the predefined views drop-down list.
HOTLINKS
A hotlink is an area of a map that, when clicked, loads another map or predefined view, effectively linking the two.
Hotlinks are created by the system administrator. It is possible for the system administrator to define hotlinks that do not load another map or run
a script of any sort. In this case, the hotlink is for information only, to define an area on the map.
The system administrator also defines whether a particular hotlink works with a single click or a double click, and whether the hotlink changes
color when you move the pointer over it. Conventionally, a hotlink that runs a script changes color when you move the pointer over it.
NOTE: Your system administrator should instruct you in what hotlinks are available to you, as well as which hotlinks run a script, and how many
clicks each one requires.
Figure 25. Viewing a Hotlink
30 C1554M-A (4/05)
Page 31

LABELS
A label is text that your system administrator places on a map.
A label can have a script associated with it, so when you click the label, the script runs. In this case, the label provides a quick means of automatically executing a common action or sequence of actions.
It is also possible for the system administrator to define a label that does not run a script. In this case, the label is for information only. For
example, a label might be used to identify an item on a map.
You can tell whether a label runs a script by positioning the pointer over the label. If the pointer changes to a hand with the index finger extended,
the label runs a script.
Figure 26. Viewing a Label
ICONS
NOTE: The system administrator defines how many times you have to click a particular label to run its script. Your system administrator should
instruct you in which labels run a script and how many clicks each label requires.
Your system administrator can customize maps by placing icons on them that represent alarms, events, and devices installed at your site.
Device icons: Device icons provide tools that allow you to perform the following functions:
• Switch devices
• Access device controls
• View device gadgets
• Run scripts
• Stop scripts
For instructions on using device icons
to perform these operations, refer to Devices.
Alarm icons: Alarm icons perform the following functions:
• Indicate when an alarm has been triggered
• Indicate when an alarm has been handled by an operator
• Indicate whether the condition that triggers the alarm is true or false
• Allow an operator to acknowledge an alarm
For more information on alarms and alarm icons, refer to Alarms and Events.
C1554M-A (4/05) 31
Page 32

Devices
The equipment installed at your site is represented in VMX300(-E) through the Device List and device icons placed on maps, both of which provide
tools to switch devices, access a device’s controls, view device gadgets, run scripts, and stop scripts.
DEVICE ICONS
Device icons represent the equipment installed at your site.
Positioning the pointer over a device icon provides information on the device and its driver, including the device name, and the IP address and port
of the VMX workstation the device driver is running on.
NOTE: A device icon that appears as a hollow outline indicates that the device driver for that device is not running. Notify your system
administrator.
Figure 27. Viewing a Device Icon
Figure 28. Device Icon - Hollow Outline
32 C1554M-A (4/05)
Page 33

DEVICE LIST
The Device List lists the devices available on the servers the client is connected to, provided you have access privileges for the devices. The
Device List allows you to switch devices and access device controls, without having a map with device icons loaded.
Organization: The Device List is organized into sublists. At the top of the Device List is a sublist headed All Devices, which lists all devices
available on connected servers in alphabetical order. The All Devices sublist only appears in the Device List if you have access privileges for All
Devices. To view the individual devices in the All Devices sublist, expand the list by clicking the plus sign to the left of All Devices.
Figure 29. Device List
Below the All Devices sublist is a sublist for each map you have access to. Expand the sublist for a map to view the devices on the map. A map
only appears in the Device List if it has at least one device icon on it. This means that some devices listed in the All Devices sublist do not appear
under any of the maps’ sublists, namely, those devices that do not have an icon on a map.
A device can appear in the Device List more than once. If the device has an icon on more than one map, the device is listed under each map’s
sublist, as well as under the All Devices sublist.
Access privileges: If the Device List does not appear in the View menu, then you do not have permission to open or close it. If the Device List
is open, you cannot close it. If it is closed, you cannot open it.
Open and close device list: To open the Device List window, click View > Device List. To close the Device List, click the Close button in the right
corner of the window’s title bar, or clear View > Device List.
Alternatively, if you have permission to edit workspaces, you can open and close the Device List window using the Edit Workspace option of the
File menu. For information on adjusting the size and position of the Device List window, refer to Workspaces and Appendix: Adjusting the Display.
Load map: Load a map that is listed in the Device List by dragging the map from the Device List to the map viewport or to a custom window.
SWITCHING A DEVICE
Sources and destinations: The source of a signal is the device a signal originates from. For example, a video signal could come from a camera
(live video) or a DVR (archived video). A signal’s destination is where the signal is played (audio) or displayed (video). For example, monitors and
custom windows can be used to display video signals.
Switching refers to sending a source signal to a destination. For example, if you switch a camera to a custom window, the camera’s video signal
is sent to the custom window, resulting in the camera’s video displaying in the window.
Switching is accomplished in VMX300(-E) by dragging the source device to the destination. You can either drag device icons placed on maps, or
devices listed in the Device List. Table B lists the different ways of switching devices.
NOTE: Switching from or to a particular analog device only works if your system administrator has set up the server to allow it. The system
administrator should instruct you in which devices can be switched to which destinations.
C1554M-A (4/05) 33
Page 34

Table B. Methods of Switching Devices
DRAG SOURCE TO DESTINATION
Device in Device List Device in Device List
Device in Device List Device icon on map
Device in Device List Custom window
Device icon on map Device in Device List
Device icon on map Device icon on map
Device icon on map Custom window
CONTROLLING VMX300(-E) DEVICES
Instructions are provided in the following sections for controlling various VMX300(-E) devices. Note that the following devices do not have any
controls available through the VMX300(-E) system:
• CM9760-ALM units
• External monitors
• Fixed cameras
CONTROLLING A PELCO PTZ CAMERA
The Pelco PTZ device driver currently supports the following camera models:
• Pelco Spectra II
• Pelco Spectra III
• Pelco Esprit
To control a particular camera, you must belong to, and be logged in under, a user group that grants you the necessary privileges. Your system
administrator should instruct you in what privileges you have.
All Pelco PTZ camera controls are available through the Device Control dialog box. Some controls are also available in the gadget (go to a preset,
run a pattern) or in the custom window display area (pan, tilt, zoom, iris, focus).
Before you can control a camera, you must switch the camera to a destination device, such as a custom window or external monitor. To switch the
camera, drag the camera to the destination device. You can drag from/to device icons placed on maps or devices listed in the Device List. Refer
to Devices - Switching a Device for more information on switching devices.
You cannot control a Pelco PTZ camera if it is locked by another user or by a script. If you attempt to control a locked camera, VMX300(-E) will
display a message specifying that the camera is locked and who placed the lock. For more information, refer to Locking a Camera.
NOTE: To access Pelco PTZ camera controls, the Pelco PTZ device driver must be running. Device icons appear as a hollow outline when the
device driver is not running. If you try to open the Device Control dialog box when the driver is not running, you will get a connection error. Notify
your system administrator if the driver is not running.
34 C1554M-A (4/05)
Page 35

PELCO PTZ GADGET
Figure 30. PTZ Gadget
The Pelco PTZ gadget has four parts:
• Device control button: The Device Control button opens the Device Control dialog box.
• Presets drop-down list: The Presets drop-down list lists the user-defined presets for that camera. Select a preset from the list to make
the camera go to the preset. If the camera’s current view is not the result of going to a preset, <Custom View> appears in the drop-down
list. Refer to Presets for more information.
• Patterns drop-down list: The Patterns drop-down list lists the user-defined patterns for that camera. Select a pattern from the list to
make the camera run the pattern. The camera will run the pattern repeatedly until it receives a new movement command. If the camera is
not currently running a pattern, <No Pattern Running> appears in the drop-down list. Refer to Patterns for more information.
• Lock button: The Lock button allows you to take exclusive control of the camera. Click the Lock button to prevent a script or another
operator from moving or locking the camera. Refer to Locking a Camera for more information.
OPENING THE DEVICE CONTROL DIALOG BOX
The Device Control dialog box provides tools for controlling a Pelco PTZ camera. To access the Device Control dialog box, you must belong to, and
log in under, a user group that allows you to access the Device Control dialog box. The Device Control dialog box provides the following tabs:
• Control tab: Allows you to pan, tilt, zoom, and focus the camera, and adjust the Pan, Tilt, Zoom, Focus, and Iris for more information.
The Control tab also allows you to lock the camera. Refer to Locking a Camera for more information.
• Presets tab: Allows you to manage and use presets. Refer to Presets for more information.
• Patterns tab: Allows you to manage and use patterns. Refer to Patterns for more information.
• Auxiliaries tab: Allows you to use camera auxiliaries. Refer to Auxiliaries for more information.
• On-Screen Display tab: Allows you to access the camera’s On-Screen Display for more information.
Open the Device Control dialog box for a Pelco PTZ camera using one of the following methods:
• Double-click the camera’s icon on a map.
• Double-click the device in the Device List.
• Right-click the device in the Device List and select Show Control Dialog from the pop-up menu.
• Open the camera’s gadget and click the Device Control button.
PAN, TILT, ZOOM, IRIS, AND FOCUS
VMX300(-E) provides both mouse and keyboard controls for panning, tilting, zooming, focusing, and adjusting the iris of Pelco PTZ cameras.
Mouse Controls
You can control a camera from a custom window or from the Device Control dialog box:
• Custom window: To pan and tilt, click the custom window’s display area in the direction you want to move the camera. For example, to
pan and tilt up and to the left, click above and to the left of the center of the display area. Use the mouse wheel as described in Table C to
zoom, focus, and adjust the iris.
• Device Control dialog box: The square on the Control tab functions as a control pad. The dot in the center of the control pad represents
the current camera position. Click the control pad in the direction you want to pan and tilt the camera. For example, to pan and tilt down
and to the right, click below and to the right of the dot. Use the mouse wheel or the Zoom, Focus, and Iris buttons to control the camera.
The mouse and button functions are described in Table C.
C1554M-A (4/05) 35
Page 36

Figure 31. Device Control Dialog Box - Control Tab
Table C. Mouse Controls
CAMERA
CONTROL
MOUSE ACTION BUTTON
Pan left Click to the left of center N/A
Pan right Click to the right of center N/A
Tilt up Click above the center N/A
Tilt down Click below the center N/A
Zoom in Turn the mouse wheel away from you Zoom +
Zoom out Turn the mouse wheel toward you Zoom –
Close iris Hold the Alt key depressed and turn the mouse wheel away from you Iris –
Open iris Hold the Alt key depressed and turn the mouse wheel toward you Iris +
Focus out Hold the Shift key depressed and turn the mouse wheel away from you Focus –
Focus in Hold the Shift key depressed and turn the mouse wheel toward you Focus +
To pan and tilt the camera incrementally, click once. Clicking close to the center moves the camera in small increments. The further away from the
center you click, the larger the increments the camera moves.
To pan and tilt the camera continuously, click and hold the mouse button depressed. Clicking close to the center moves the camera slowly. The
further away from the center you click, the faster the camera moves. Release the mouse button to stop panning and tilting.
To zoom, focus, or adjust the iris incrementally, turn the mouse wheel one click. To zoom, focus, or adjust the iris continuously, turn the mouse
wheel continuously.
36 C1554M-A (4/05)
Page 37

Keyboard Controls
Keyboard controls work only in custom windows. They do not work in the Device Control dialog box. To use keyboard controls in a custom window,
click the window’s display area to make it active, then use keyboard controls as desired.
Table D. Keyboard Controls
CONTROL KEYSTROKE DESCRIPTION
Pan left f Left Arrow key
Pan right g Right Arrow key
Tilt up h Up Arrow key
Tilt down i Down Arrow key
Pan and tilt up and to the right Pg Up Page Up key on numeric keypad
Pan and tilt down and to the right Pg Dn Page Down key on numeric keypad
Pan and tilt up and to the left Home Home key on numeric keypad
Pan and tilt down and to the left End End key on numeric keypad
Zoom in + Plus key on numeric keypad
Zoom out - Minus key on numeric keypad
Open iris Alt + Hold Alt key depressed and press plus key on numeric keypad
Close iris Alt – Hold Alt key depressed and press minus key on numeric keypad
Focus out Shift + Hold Shift key depressed and press plus key on numeric keypad
Focus in Shift – Hold Shift key depressed and press minus key on numeric keypad
NOTE: To use navigation keys on the numeric keypad, Num Lock must be off.
PRESETS
Figure 32. Device Control Dialog Box - Presets Tab
A preset is a predefined camera position that is stored in the camera. Each camera can have a limited number of presets defined for it. The
maximum number of presets depends on the camera model.
The Presets tab of the Device Control dialog box lists the presets for the camera. Presets can appear in the list as Unassigned_i, where i is the
preset’s number. “Unassigned” indicates that the preset has not been assigned a name and script tag in VMX300(-E).
An unassigned preset might or might not have a stored camera position associated with it. To determine whether an unassigned preset has a
camera position stored for it, select the preset and click Goto. If the camera moves, there is a stored camera position.
Assigning a preset does the following:
• It makes the preset name appear in the presets drop-down list in the camera’s gadget.
• It gives the preset a script tag so scripts defined by the system administrator can refer to the preset.
C1554M-A (4/05) 37
Page 38

You can assign a preset in two ways:
• Save: By saving the preset. Saving a preset saves the camera position, focus setting, name, and script tag. Refer to Creating a Preset for
instructions on saving a preset to an unassigned preset number. Refer to Editing a Preset for instructions on saving a preset to a preset
number that is already assigned.
• Rename: By renaming the preset. Renaming a preset saves the name and script tag, but does not affect the camera position stored for the
preset. Refer to Renaming a Preset for information on renaming presets.
For information on presets defined in the camera, see the Pelco documentation for the appropriate camera model.
NOTE: Since presets are associated with a camera, rather than a user, any changes you make to a camera’s presets affect all users with
permission to access the presets.
TIP: The order of the list on the Presets tab is retained in the presets drop-down list in the gadget. This allows you to define presets in the
order you want them to appear in the drop-down list.
Going to a Preset
To make a camera go to a preset, you must belong to, and log in under, a user group that allows you to control that camera.
VMX300(-E) provides two methods of going to a preset:
• Custom window: Select the preset you want the camera to go to from the presets drop-down list in the camera’s gadget. The presets
drop-down list only lists presets that have been assigned a name and script tag through the Presets tab. To go to an unassigned preset, use
the Presets tab in the Device Control dialog box.
• Device control dialog box: On the Presets tab for the desired camera, select the preset you want the camera to go to from the list and
click Goto.
TIP: Use the Goto option on the Presets tab to test whether an unassigned preset has a camera position associated with it, by selecting
the preset and clicking Goto. If the camera moves, there is a stored camera position.
Creating a Preset
Creating a preset refers to saving a preset to an unassigned preset number. For instructions on saving a preset to a preset number that has
previously been assigned, refer to Editing a Preset.
To create a preset for a Pelco PTZ camera, you must belong to, and log in under, a user group that allows you to edit the presets for that camera.
When you create a preset, it becomes available to all users who have permission to control the camera.
The Save option used to create a preset saves the camera position, preset name, and script tag. If a camera position is already stored for that
preset number, the stored camera position is replaced by the new one.
To determine whether an unassigned preset number has a camera position stored for it, select the preset in the Presets tab and click Goto. If the
camera moves as result, there is a camera position stored for the selected preset number. To assign a name and script tag while retaining the
stored camera position, use the Rename option described in Renaming a Preset.
To create a preset:
1. Pan, tilt and zoom the camera until the desired view is showing.
2. Open the Device Control dialog box for the desired camera and go to the Presets tab.
3. You can click one of the unassigned preset numbers (Unassigned_i) or, if you do not select an unassigned number, the new preset will be
created in the next available unassigned position. Note: Selecting a preset that is already assigned is discussed in Editing a Preset.
4. Click Save. The Add New Preset dialog box opens.
38 C1554M-A (4/05)
Page 39

Figure 33. Add New Preset Dialog Box
5. Type a unique name for the preset. Preset names are at most 50 characters long. They can include any letter, digit or special character, with
the exception of single and double quotation marks. Preset names are not case sensitive.
A tag resembling the preset name appears in the Script Tag box. If the preset name contains special characters, they are omitted from the
tag. Spaces are replaced with an underscore.
6. If you do not want to use the script tag provided by the system, type a unique tag of your choice. Script tags are at most 50 characters long.
They can include any letter, digit or the underscore character, but cannot begin with a digit. They cannot contain spaces or special
characters. Tags are not case sensitive. The script tag is used by administrators to refer to the preset in scripts.
7. Click OK. The Add New Preset dialog box will close and the name of the new preset will appear in the list of presets. If you selected
Unassigned_i in step 3, the preset appears in the position you selected. If you did not select an unassigned position, the preset appears in
the next available unassigned position in the list.
Editing a Preset
Editing a preset refers to saving a preset to a preset number that is already assigned. For instructions on saving a preset to an unassigned preset
number, refer to Creating a Preset.
To edit a preset for a Pelco PTZ camera, you must belong to, and log in under, a user group that allows you to edit the presets for that camera.
When you edit a preset, the changes you make affect other users with permission to access the preset.
The Save option used to edit a preset saves the camera position, preset name, and script tag, replacing the previously defined camera position,
preset name, and script tag. To assign a name and script tag while retaining the existing camera position, use the Rename option described in
Renaming a Preset.
To edit a preset:
1. Pan, tilt and zoom the camera until the desired view is showing.
2. Open the Device Control dialog box for the desired camera and go to the Presets tab.
3. Click the desired preset in the list, and then Click Save. The Edit Preset Properties dialog box opens.
Figure 34. Edit Preset Properties Dialog Box
4. Edit the name and script tag, if desired.
5. Click OK. The Edit Preset Properties dialog box closes and the new settings are saved.
Renaming a Preset
Renaming a preset refers to changing the preset’s name and/or script tag using the Rename option. For instructions on changing the camera
position, refer to Editing a Preset.
To rename a preset for a Pelco PTZ camera, you must belong to, and log in under, a user group that allows you to edit the presets for that camera.
When you rename a preset, the changes you make affect other users with permission to access the preset.
C1554M-A (4/05) 39
Page 40

To rename a preset:
1. Open the Device Control dialog box for the desired camera and go to the Presets tab.
2. Click the preset you want to rename, and then click Rename. The Edit Preset Properties dialog box opens.
3. Edit the name and script tag as desired.
4. Click OK. The Edit Preset Properties dialog box closes and your changes are saved.
NOTE: Changing the script tag for a preset that is referred to in a script introduces an error into the script. To correct the error, the system
administrator must update the script so it uses the preset’s new script tag.
Unassigning a Preset
Unassigning a camera’s preset deletes the preset’s name and script tag, leaving the camera position stored in the camera intact. When you
unassign a preset, the following changes take effect:
• The preset name no longer appears in the presets drop-down list in the camera’s gadget.
• Scripts defined by the system administrator can no longer refer to the preset.
To unassign a camera’s preset, you must belong to, and log in under, a user group that allows you to edit the presets for that camera.
To unassign a preset:
1. Open the Device Control dialog box for the desired camera and go to the Presets tab.
2. Click the preset you want to unassign, and then click Unassign. The preset’s name and script tag are deleted and the preset appears in the
list as Unassigned_i. Scripts will no longer be able to refer to the preset, and the preset will no longer be available through the presets
drop-down list in the camera’s gadget.
NOTE: Unassigning a preset that is referred to in a script introduces an error into the script.
Setting the Camera’s Home Preset
A camera’s home preset is the preset the camera goes to when it has been idle for a predefined time. The home preset displays in bold print in
the Device Control dialog box presets list.
To set a camera’s home preset, you must belong to, and log in under, a user group that allows you to edit the presets for that camera.
NOTE: You can define a home preset or a default pattern for a camera, but not both. Setting the home preset clears the default pattern, if there
is one.
To set the home preset:
1. Open the Device Control dialog box for the desired camera and go to the Presets tab.
2. Click the preset you want as the home preset, and then click Set Home. The Edit Home Preset dialog box opens.
Figure 35. Edit Home Preset Dialog Box
3. Enter the number of hours, minutes, and seconds that you want the camera to be idle before it goes to the home preset position.
4. Click OK. The Edit Home Preset dialog box closes. The selected preset becomes the home preset, replacing the previous home preset or
default pattern if there was one. The new home preset appears in bold print in the list.
40 C1554M-A (4/05)
Page 41

Clearing the Camera’s Home preset
To clear a camera’s home preset, you must belong to, and log in under, a user group that allows you to edit the presets for that camera.
To clear the home preset:
1. Open the Device Control dialog box for the desired camera and go to the Presets tab.
2. Select the home preset from the list of presets, and then click Clear Home. The selected preset no longer appears in bold print in the list.
The camera has no home preset.
PATTERNS
Figure 36. Device Control Dialog Box - Patterns Tab
A pattern is a user-defined set of camera movements and iris/focus adjustments that is stored in the camera. Each camera can have a limited
number of patterns defined for it. The maximum number of patterns depends on the camera model.
The Patterns tab of the Device Control dialog box lists the patterns for the camera. Patterns can appear in the list as Unassigned_i, where i is the
pattern’s number. “Unassigned” indicates that the pattern has not been assigned a name and script tag in VMX300(-E).
To determine whether an unassigned pattern has a camera movement stored for it, select the pattern and click Run. If the camera moves as a
result, there is a stored camera movement.
Assigning a pattern does the following:
• It makes the pattern name appear in the patterns drop-down list in the camera’s gadget.
• It gives the pattern a script tag so scripts defined by the system administrator can refer to the pattern.
You can assign a pattern in two ways:
• Record: By recording the pattern. Recording a pattern saves the camera movement, name, and script tag. Refer to Creating a Pattern for
instructions on recording a pattern and saving it to an unassigned pattern number. Refer to Editing a Pattern for instructions on saving a
pattern to a pattern number that is already assigned.
• Rename: By renaming the pattern. Renaming a pattern saves the name and script tag, but does not affect the camera movement stored for
the pattern. Refer to Renaming a Pattern for information on renaming patterns.
For information on patterns defined in the camera, see the Pelco documentation for the appropriate camera model.
NOTE: Since patterns are associated with a camera, rather than a user, any changes you make to a camera’s patterns affect all users with
permission to access the pattern.
TIP: The order of the list on the Patterns tab is retained in the patterns drop-down list in the gadget. This allows you to define patterns in
the order you want them to appear in the drop-down list.
C1554M-A (4/05) 41
Page 42

Running a Pattern
To make a camera run a pattern, you must belong to, and log in under, a user group that allows you to control that camera. When you run a pattern,
the pattern runs repeatedly until the camera receives a new movement command. See Stopping a Pattern for more information.
VMX300(-E) provides two methods of running a pattern:
• Custom window: Select the pattern you want the camera to run from the patterns drop-down list in the camera’s gadget. Note: the
patterns drop-down list only lists patterns that have been assigned a name and script tag through the Patterns tab. To go to an unassigned
pattern, you must use the Patterns tab in the Device Control dialog box.
• Device control dialog box: On the Patterns tab for the desired camera, select the pattern you want the camera to run from the list and
click Run.
TIP: Use the Run option on the Patterns tab to test whether an unassigned pattern has a camera movement associated with it, by selecting
the pattern and clicking Run. If the camera moves, there is a stored camera movement.
Stopping a Pattern
To stop a pattern that a camera is running, you must belong to, and log in under, a user group that allows you to control that camera.
When a pattern is run, the pattern runs repeatedly until it receives a new movement command. Any of the following movement commands will
stop a running pattern:
• Pan
• Tilt
• Zoom
• Go to a pattern
• Run a (different) pattern
Creating a Pattern
Creating a pattern refers to recording a pattern to an unassigned pattern number. For instructions on saving a pattern to a pattern number that is
already assigned, refer to Editing a Pattern.
To create a pattern for a Pelco PTZ camera, you must belong to, and log in under, a user group that allows you to edit the patterns for that camera.
When you create a pattern, it becomes available to all users who have permission to control the camera.
The Record option used to create a pattern saves the camera movement, pattern name, and script tag. If a camera movement is already stored for
that pattern number, the stored camera movement will be replaced by the new one.
To determine whether an unassigned pattern number has a camera movement stored for it, select the pattern in the Patterns tab and click Run. If
the camera moves as result, there is a camera movement stored for the selected pattern number. To assign a name and script tag while retaining
the stored camera movement, use the Rename option described in Renaming a Pattern.
To create a pattern:
1. Open the Device Control dialog box for the desired camera and go to the Patterns tab.
2. If you want, select Unassigned_i for the desired pattern number from the list. If you do not select an unassigned number, the new pattern
will be created in the next available unassigned position.
3. Click Record. The Record New Pattern dialog box opens.
Figure 37. Record New Pattern Dialog Box
4. Type a unique name for the pattern. Pattern names are at most 50 characters long. They can include any letter, digit or special character,
with the exception of single and double quotation marks. Pattern names are not case sensitive.
42 C1554M-A (4/05)
Page 43

5. Optional: Type a script tag.
6. Click Start Recording. The Start Recording button changes to a Stop Recording button.
Figure 38. Record New Pattern - Stop Recording
7. Pan, tilt, zoom, focus, and adjust the camera’s iris as desired.
8. Click Stop Recording. The Record New Pattern dialog box closes and the name of the new pattern appears in the list of patterns. If you
selected Unassigned_i in step 2, the new pattern appears in the position you selected. If you did not select a position, the new pattern
appears in the next available unassigned position in the list.
Editing a Pattern
Editing a pattern refers to saving a pattern to a pattern number that is already assigned. For instructions on saving a pattern to an unassigned
pattern number, refer to Creating a Pattern.
To edit a pattern for a Pelco PTZ camera, you must belong to, and log in under, a user group that allows you to edit the patterns for that camera.
When you edit a pattern, the changes you make affect other users with permission to access the pattern.
The Record option used to edit a pattern saves the camera movement, pattern name, and script tag, replacing the previously defined camera
movement, pattern name, and script tag. To assign a name and script tag while retaining the existing camera movement, use the Rename option
described in Renaming a Pattern.
To edit a pattern:
1. Open the Device Control dialog box for the desired camera and go to the Patterns tab.
2. Click the desired pattern in the list, and then click Record. The Edit Pattern Properties dialog box opens.
Figure 39. Edit Pattern Properties Dialog Box
3. Edit the name and script tag, if desired.
4. Click Start Recording. The Start Recording button changes to a Stop Recording button.
Figure 40. Edit Pattern Properties - Stop Recording
5. Pan, tilt, zoom, focus, and adjust the camera’s iris as desired.
6. Click Stop Recording. The Edit Pattern Properties dialog box closes and the new settings are saved.
C1554M-A (4/05) 43
Page 44

Renaming a Pattern
Renaming a pattern refers to changing the pattern’s name and/or script tag using the Rename option. For instructions on changing the camera
movement, refer to Editing a Pattern.
To rename a pattern for a Pelco PTZ camera, you must belong to, and log in under, a user group that allows you to edit the patterns for that camera.
When you rename a pattern, the changes you make affect other users with permission to access the pattern.
To rename a pattern:
1. Open the Device Control dialog box for the desired camera and go to the Patterns tab.
2. Click the pattern you want to rename from the list of patterns, and then click Rename. The Edit Pattern Properties dialog box opens.
3. Edit the name and script tag as desired, and then click OK. The Edit Pattern Properties dialog box closes and your changes are saved.
NOTE: Changing the tag for a pattern that is referred to in a script introduces an error into the script. To correct the error, the system administrator
must update the script so it uses the pattern’s new script tag.
Unassigning a Pattern
Unassigning a camera’s pattern deletes the pattern’s name and script tag, leaving the camera movement stored in the camera intact. When you
unassign a pattern, the following changes take effect:
• The pattern name no longer appears in the patterns drop-down list in the camera’s gadget.
• Scripts defined by the system administrator can no longer refer to the pattern.
To unassign a camera’s pattern, you must belong to, and log in under, a user group that allows you to edit the patterns for that camera.
To unassign a pattern:
1. Open the Device Control dialog box for the desired camera and go to the Patterns tab.
2. Click the pattern, and then click Unassign. The pattern’s name and script tag are deleted and the pattern appears in the list as
Unassigned_i. Scripts will no longer be able to refer to the pattern, and the pattern will no longer be available through the patterns dropdown list in the camera’s gadget.
NOTE: Unassigning a pattern that is referred to in a script introduces an error into the script.
Setting the Camera’s Default Pattern
A camera’s default pattern is the pattern the camera runs when it has been idle for a predefined time. The default pattern displays in bold print in
the Device Control dialog box patterns list.
To set a camera’s default pattern, you must belong to, and log in under, a user group that allows you to edit the patterns for that camera.
NOTE: You can define a default pattern or a home preset for a camera, but not both. Setting the default pattern clears the home preset, if there
is one.
To set the default pattern:
1. Open the Device Control dialog box for the desired camera and go to the Patterns tab.
2. Click the pattern you want as the default pattern, and then click Set Default. The Edit Default Pattern dialog box opens.
Figure 41. Edit Default Pattern Dialog Box
44 C1554M-A (4/05)
Page 45

3. Enter the number of hours, minutes, and seconds that you want the camera to be idle before it runs the default pattern.
The Edit Default Pattern dialog box closes. The selected pattern becomes the default pattern, replacing the previous default pattern or
home preset if there was one. The new default pattern appears in bold print in the list.
Clearing the Camera’s Default Pattern
To clear a camera’s default pattern, you must belong to, and log in under, a user group that allows you to edit the patterns for that camera.
To clear the default pattern:
1. Open the Device Control dialog box for the desired camera and go to the Patterns tab.
2. Click the default pattern from the list of patterns, and then click Clear Default. The selected pattern no longer appears in bold print in the
list. There is no default pattern for that camera.
SEQUENCES
A sequence is a predefined series of camera movements and positions. Sequences are implemented in VMX300(-E) as scripts defined by the
system administrator. To run a script, you must belong to, and log in under, a user group that allows you to run that script.
Run: To run a script, complete the following steps
1. Open the pop-up menu using one of the following methods:
• Click the custom window you want to start the script from and press Alt-Space Bar.
• In the Device List, right-click the device you want to start the script from.
• Right-click the device icon for the destination device you want to start the script from.
2. In the pop-up menu, click Run Script, and then select the desired script from the submenu. The selected script will run, and an entry for the
script appears in the Session Manager.
Stop: To stop a script, use one of the following methods:
• Click the script entry in the Session Manager, and then click the Stop button on the Session Manager tool bar.
• Open the pop-up menu (using one of the methods described in step 1, above) and then click Stop Scripts. This stops all scripts started from
that destination device or window.
For more information on working with scripts, refer to the Scripts section.
AUXILIARIES
Figure 42. Device Control Dialog Box - Auxiliaries Tab
Pelco PTZ cameras can support auxiliary features, such as a wiper or lights, which are physically connected to auxiliary points on the camera. Each
camera can have a limited number of auxiliaries. The maximum number depends on the camera model.
Auxiliaries are listed on the Auxiliaries tab of the Device Control dialog box. By default, auxiliaries are named Auxiliaryi, where i is the auxiliary’s
number. Your system administrator can change an auxiliary’s name to something more meaningful.
C1554M-A (4/05) 45
Page 46

Controlling an Auxiliary
To control a camera’s auxiliaries, you must belong to, and log in under, a user group that allows you to control the auxiliaries for that camera.
VMX300(-E) allows you to set an auxiliary to run continuously, or to run for just a moment.
To run an auxiliary for a moment, select the desired auxiliary on the Auxiliaries tab and click Momentary. The auxiliary feature operates for a
moment, then stops.
To run an auxiliary continuously, select the desired auxiliary on the Auxiliaries tab, or double-click the auxiliary name. The auxiliary feature
operates until the check box is cleared.
The Momentary option stops the auxiliary feature from running continuously. If the auxiliary is running continuously when you give the command
to run it momentarily, the feature operates for a moment, then stops, and the check box is automatically cleared.
NOTE: In order for auxiliary controls to function as described here, the camera’s auxiliary setting must be set to continuous mode.
ON-SCREEN DISPLAY
Figure 43. Device Control Dialog Box - On-Screen Display Tab (left) and Sample On-Screen Display (right)
The On-Screen Display tab of the Device control dialog box allows you to display the camera’s on-screen menu on the destination device or custom
window the camera is switched to. The options presented in the on-screen display depend on the camera model. Refer to the Pelco camera
documentation for information on specific options.
Using the On-Screen Menu
To display the camera’s on-screen menu:
1. Open the Device Control dialog box for the desired camera and go to the On-Screen Display tab.
2. Click Show On-Screen Display. The camera’s on-screen menu appears in the destination device or custom window.
3. Navigate the menu: Use the up arrow and down arrow buttons on the On-Screen Display tab to move the option selector beside the
desired menu option. Or you can send tilt up and tilt down commands using mouse or keyboard controls to move the option selector up and
down in the menu. When instructed to press Iris Open or Iris Close, use the Iris Open and Iris Close button on the On-Screen Display tab
(these buttons do not actually open or close the iris).
4. Select a menu item: With the option selector positioned beside the desired option, click the Select On-Screen Display Menu Item button.
The selected option executes.
5. Exit: To close the menu, navigate to the Exit option and click the Select On-Screen Display Menu Item button.
46 C1554M-A (4/05)
Page 47

LOCKING A CAMERA
You can prevent other users or scripts from controlling a Pelco PTZ camera by locking the camera. When a camera is locked, only the user or script
that placed the lock can control the camera. If you attempt to control a locked camera, VMX300(-E) will display a message specifying that the
camera is locked and who placed the lock. To lock and control a particular camera, you must belong to, and log in under, a user group that allows
you to lock and control that camera.
Locking a camera prevents another user or script from:
• Panning, tilting, zooming, focusing, and adjusting the camera’s iris
• Managing presets and sending the camera to presets
• Managing and running patterns
Locking has no effect on auxiliaries. Scripts and other users can still control auxiliaries when the camera is locked, regardless of their priority.
Priority: Every VMX300(-E) user and script has a priority assigned by the system administrator. VMX300(-E) uses these priorities to resolve
situations in which two or more users or scripts attempt to control a particular device at the same time. The user with the higher priority is given
control of the device.
Taking the Lock: Depending on your priority, you might be able to take the lock from another user or a script that has locked a camera, giving you
control of the camera. You can take the lock from any user with lower priority than you. You can take the lock from any script with equal or lower
priority.
Automatic Unlock: VMX300(-E) automatically unlocks a camera you have locked under the following circumstances:
• If you log off, either by closing the client or by logging in a new user.
• If a workspace is opened.
• If you locked the camera from the Control tab of the Device Control dialog box and you close the dialog box.
• If you locked the camera from the gadget in a custom window and you change the content type for that window.
• If you locked the camera from the gadget in a custom window and the video input to the window is changed, either by you or by a script.
• If you locked the camera from the gadget in a custom window and you clear Visible for that window in the Workspace Properties dialog
box.
TIP: To prevent VMX300(-E) from automatically unlocking a camera you have locked, use the Lock button on the Device Control dialog box,
rather than the Lock button in the gadget.
C1554M-A (4/05) 47
Page 48

Understanding the Lock Button
The Lock button is used to lock and unlock the camera, and also provides information on whether the camera is currently locked, whether you can
take the lock, and whether you can control the camera.
Color: The color of the padlock in the Lock button indicates whether you can control the camera. When the padlock is green, you can control the
camera. When the padlock is yellow or red, you cannot control the camera. To control a particular camera, you must belong to, and log in under,
a user group that allows you to control that camera. If you do not have permission to control the camera, the padlock will always be red or yellow.
Table E summarizes the meanings of the different lock colors.
Table E. Different Lock Colors
LOCK
COLOR
Green The camera is unlocked.
Yellow A script has locked the camera.
Red A user has locked the camera.
Position: The position of the Lock button indicates whether or not you can lock the camera. When the button is out, the camera either isn’t locked,
or it is locked, but you can take the lock from the user or script that placed the lock. When the Lock button is in, the camera is locked and you
cannot take the lock from the user or script that placed the lock. To lock a particular camera, you must belong to, and log in under, a user group
that allows you to lock that camera. If you do not have permission to lock the camera, the Lock button will always be in.
Permissions override priority. No matter how high your priority, you will never be able to lock or control a camera unless you have the necessary
permissions.
Location of Lock Buttons: The Lock button is located in the Pelco PTZ gadget and on the Control tab of the Device Control dialog box.
INDICATES
Figure 44. Lock Button Locations
If you have the Control tab and the camera gadget open at the same time, you see two different instances of the Lock button. These two Lock
buttons are independent of each other:
• Lock from Gadget: If you locked the camera from the gadget, the Lock button on the Control tab is red/in, indicating that you cannot take
the lock or control the camera from the Control tab. The Lock button on the gadget is green/in, indicating that you have locked the camera
and can control it using keyboard controls or by clicking a custom window.
• Lock from Device Control: If you locked the camera from the Control tab, the Lock button in the gadget is red/in, indicating that you
cannot take the lock through the gadget or control the camera using keyboard controls or by clicking a custom window. The Lock button on
the Control tab is green/in, indicating that you have locked the camera and can control it through the Control tab.
When you do not have the lock, the different instances of the Lock button are always in the same state.
Table F summarizes the different states of the Lock button.
48 C1554M-A (4/05)
Page 49

Table F. Different States of the Lock Button
LOCK BUTTON
COLOR/POSITION
Green/In You have locked the camera from the window where the green/in Lock button is
Green/Out The camera is not locked. You can control the camera. You can lock the camera.
Yellow/In A script with higher priority than you has locked the camera. The script can control
Yellow/Out A script with equal or lower priority than you has locked the camera. You cannot
Red/In A user with equal or higher priority than you has locked the camera. The user can
Red/Out A user with lower priority than you has locked the camera. You cannot control the
TIP:
• You can only lock the camera when the Lock button is out.
• You can only control the camera when the padlock is green.
INDICATES
located. You can control the camera from this window. A user with higher priority
can take the lock from you and subsequently control the camera. A script with equal
or higher priority can take the lock from you and subsequently control the camera.
the camera. You cannot take the lock from the script. You cannot control the camera.
control the camera, but you can take the lock from the script and subsequently
control the camera.
control the camera. You can neither take the lock nor control the camera from the
window where the red/in Lock button is located. Note: The user who locked the
camera could be you. When you lock the camera through the gadget, the Lock button
on the Control tab is red/in. When you lock the camera through the Control tab, the
Lock button in the gadget is red/in.
camera, but you can take the lock from the lower priority user and subsequently
control the camera.
CAPTURING LIVE VIDEO
Some canvas gadgets have a Capture and Save Image button that allows you to capture an image of the video displayed in the window. Images
are saved in JPEG file format.
To capture a live video image complete the following steps:
1. Click the Gadgets button, and then select the canvas gadget from the drop-down list. The canvas gadget displays in the window’s control
bar.
2. Click the Capture and Save Image button. The Save JPEG As dialog box opens.
3. Browse to the desired folder and type in a file name.
4. Click Save. The image file is saved and the Save JPEG As dialog box closes.
CONTROLLING A PELCONET DEVICE
The PelcoNet MPEG device driver currently supports the following devices:
• PelcoNet 300 Series decoders
• PelcoNet 350 Series encoders
• PelcoNet 4001A encoder/decoder
• NVR300 Series network video recorders
To control a particular PelcoNet device, you must belong to, and log in under, a user group that grants you the necessary privileges. Your system
administrator should instruct you in what privileges you have.
NOTE: To access PelcoNet device controls, the PelcoNet MPEG device driver must be running. Device icons appear as a hollow outline when the
device driver is not running. If you try to open the Device Control dialog box when the driver is not running, you will get a connection error. Notify
your system administrator if the driver is not running.
C1554M-A (4/05) 49
Page 50

PELCONET DEVICE CONTROLS
PelcoNet device controls are available through the PelcoNet embedded web server, which can be accessed using any of the following methods:
• Double-click the device icon on a map.
• Double-click the device in the Device List.
• Right-click the device in the Device List and then click Show Control Dialog from the pop-up menu.
• Open the PelcoNet MPEG Gadget, and then click the Device Control button (refer to the PelcoNet MPEG Gadget section for instructions on
opening this gadget).
Refer to the PelcoNet product documentation for information on controls available through the embedded web server.
GADGETS AVAILABLE WHEN VIEWING VIDEO FROM A PELCONET DEVICE
When you are viewing video from a PelcoNet transmission system, VMX300(-E) provides the following gadgets:
• A gadget for the camera that is connected to the PelcoNet device. A fixed camera gadget contains no tools. Refer to the Controlling a Pelco
PTZ Camera section for information on the gadget provided with a PTZ camera.
• A gadget for the PelcoNet device; this provides only one tool, the Device Control button, which is described in the PelcoNet MPEG Gadget
section.
• A gadget for the tools provided by the VMX300(-E) PelcoNet MPEG driver; these tools are described in the PelcoNet Canvas Gadget:
VMX300(-E) Tools section.
To select a gadget, click on the gadgets button, and then click the type of gadget that you want to view.
Figure 45. Selecting a PelcoNet Gadget
PelcoNet MPEG Gadget
The PelcoNet MPEG gadget has one button, the Device Control button, which opens the PelcoNet device’s embedded web server. Refer to the
PelcoNet product documentation for information on controls available through the embedded web server.
Figure 46. PelcoNet MPEG Gadget
PelcoNet Canvas Gadget: VMX300(-E) Tools
The VMX300(-E) tools provided by the PelcoNet canvas gadget depend on what mode the custom window is in, Live Video mode or Archived Video
mode.
50 C1554M-A (4/05)
Page 51

Live Video Mode: Audio Controls and Image Capture
Figure 47. \PelcoNet Canvas Gadget for Live Video
When the custom window is in Live Video mode, the PelcoNet canvas gadget provides the following tools and information:
Registered IP: This section of the gadget displays the IP address of the PelcoNet device.
Microphone button: The Microphone button opens an audio channel from your VMX300(-E) workstation to the
PelcoNet device. It mimics a push-to-talk microphone: click the Microphone button and hold it depressed to talk,
and release the button when you have finished talking. If the Speaker button is on, the Microphone button mutes
incoming audio from the speaker. For the Microphone button to work, the PelcoNet device must be configured for
audio. Your system administrator should inform you on whether the device is configured for audio.
Speaker button: The Speaker button allows you to listen to audio from the source device connected to the
PelcoNet device, such as a camera equipped with a microphone. Click the Speaker button to listen. Click the
button again to close the audio channel. For the Speaker button to work, the PelcoNet device and the source
device must be configured for audio. Your system administrator should inform you on whether the devices are
configured for audio.
Capture and Save button: The Capture and Save button allows you to take a snapshot of the video displayed in
the window and save the image as a JPEG file.
Stream-type identification: This section of the gadget identifies the current stream as MPEG-4 or MPEG-2.
Archived Video Mode: NVR300 Controls
Figure 48. PelcoNet Canvas Gadget for Archived Video
When the custom window is in Archived Video mode, the PelcoNet canvas gadget provides the following tools and information:
Date/Time: This section identifies the date and time of the recorded video that is currently displayed in the
custom window.
Stream Selector: Select the stream you want to view from the drop-down list. This option is not available when
the stream number at the left is grayed out.
Back 1 Minute: Click this button to rewind the video one minute.
Back 10 Seconds: Click this button to rewind the video 10 seconds.
Pause: Click this button to pause the video.
Play: Click this button to play the video.
Fast Forward: Click this button to advance the video.
Forward 1 Minute: Click this button to advance the video one minute.
% Playback Speed: Move the slider to the right to increase the speed at which the video plays. Move the slider
to the left to decrease the speed at which the video plays.
C1554M-A (4/05) 51
Page 52

CONTROLLING A DX8000 SERIES DVR
The VMX300(-E) controls Pelco DX8000 Series digital video recorders (DVRs). In this document, the term “DX8000 DVR” is used to refer to any DVR
in the DX8000 series that is supported by the DX8000 driver. Note that the VMX300(-E) supports DX8000 software version level 1.1.00.1121 only.
To control a DX8000 DVR, you must belong to, and be logged in under, a user group that grants you the necessary privileges. Your system
administrator should instruct you in what privileges you have.
NOTE: To access DX8000 DVR controls, the DX8000 driver must be running. If the DX8000 DVR icons appear as a hollow outline, notify your
system administrator that the device driver is not running.
You can view live video from a camera that is connected, either directly or through one or more other devices, to a DX8000 Series DVR. To view
live video in a custom window, the window must be in Live Video mode. The DX8000 gadget provides one tool for controlling the DVR when
viewing live video.
You can view archived video from a DX8000 DVR in a custom window that is in Archived Video mode. The DX8000 gadget provides tools for
controlling the DVR when viewing archived video.
VIEWING LIVE VIDEO
You can view live video and control cameras through the DX8000. Simply drag the DX8000 camera to the custom window and use the standard
keyboard and mouse controls to pan, tilt, zoom, focus, adjust the iris, go to presets, and run patterns. For information on the specific controls
available for a particular camera, refer to the instructions for the appropriate camera or PelcoNet device in this Devices section.
1. Click the custom window you want to view video in and press Alt-Space Bar. Or, if the window has a Windows title bar, right-click the title
bar. The custom window drop-down menu opens.
2. Select Live Video from the drop-down menu.
3. Drag the DX8000 recorder or one of its cameras to the window, the video from that camera appears.
4. Click the gadget selector button at the left end of the custom window control bar, and then select the DX8000 DVR from the drop-down list.
The gadget for the DVR displays in the control bar, to the right of the gadget selector button. The gadget displays the current date and time,
and an indication that the video is live.
Figure 49. DX8000 Gadget for Live Video
Capturing Live Video
The DX8000 gadget provides a Capture and Save Image button that allows you to capture an image of the video displayed in the window. Images
are saved in JPEG file format.
To capture a live video image complete the following steps:
1. Click the Capture and Save Image button. The Save JPEG As dialog box opens.
2. Browse to the desired folder and type in a file name.
3. Click Save. The image file is saved and the Save JPEG As dialog box closes.
WORKING WITH ARCHIVED VIDEO
To switch a custom window to view archived video through the DX8000, complete the following steps:
1. Click the custom window you want to view video in and press Alt-Space Bar. Or, if the window has a Windows title bar, right-click the title
bar. The custom window drop-down menu opens.
2. Select Archived Video from the drop-down menu. If a camera is currently switched to the window and the camera is connected to more
than one archiving device, a drop-down list of archiving devices opens; select the desired DX8000 DVR from the list.
The DX8000 gadget appears in the window’s control bar. A description of the tools available in the DX8000 gadget is provided in the
following section.
52 C1554M-A (4/05)
Page 53

If there is archived video for the currently switched camera, the archived video from that camera appears. VMX300(-E) cues the video to the
date/time selected in the window’s Event Picker if one is selected; otherwise, VMX300(-E) cues the video at or near the current time.
For instructions on locating archived video, refer Working with Archived Video in the Controlling a DX9000 Series DVR section, which can be found
in subsequent pages.
DX8000 Gadget for Archived Video
When the custom window is in Archived Video mode, the DX8000 canvas gadget provides the tools described below. The date and time of the
recorded video appears at the left of the gadget.
Figure 50. DX8000 Gadget for Archived Video
Previous Track/Clip: This tool is reserved for future development.
Fast Rewind: This tool is reserved for future development.
Skip Back 10 Seconds: This tool is reserved for future development.
Previous Frame: Click this button to skip the video to the previous frame.
Play Backwards: Click this button to play the video backwards.
Stop: Click this button to stop the video.
Play: Click this button to play the video.
Pause: Click this button to pause the video.
Next Frame: Click this button to skip to the next frame.
Skip Forward 10 Seconds: This tool is reserved for future development.
Fast Forward: This tool is reserved for future development.
Next Track/Clip: This tool is reserved for future development.
Capture and Save button: The Capture and Save button allows you to take a snapshot of the video displayed in the window and
save the image as a JPEG file.
Export Specified Time Range: Click this button to copy the video for a specific time range to a file. The maximum you can export
at one time is 5 minutes of video.
Video Export to AVI: Click this buttonto start copying the currently playing video to an AVI file. Click again to stop copying the
video and specify a file name and location. The video is transferred from the recorder after the button is pressed the second time.
Since the file is created after the transfer is complete, the file may not appear immediately. The maximum you can export at one
time is 5 minutes of video.
Instant Record: Click this button to start recording, overriding the record mode, if necessary. Click again to stop recording.
If record mode is Normal, this button has no effect. If you stop the instant recording when the record mode requires recording
(e.g. motion has been detected and the record mode is Motion), recording will continue.
Saving Video to CD
1. Drag the desired camera or recorder to a custom window.
2. Click the Gadgets button.
3. Select the DX8000 gadget from the drop-down list.
4. Export the desired video to an AVI file on your hard drive using either of the tools provided by the DX8000 canvas gadget in Archived Video
mode:
Export Specified Time Range
Video Export to AVI
5. Use the Roxio Easy CD Creator, which is provided on the VMX300(-E) workstation, to copy the AVI file to CD.
C1554M-A (4/05) 53
Page 54

CONTROLLING A DX9000 SERIES DVR
You can view live video from a camera that is connected, either directly or through one or more other devices, to a DX9000 Series DVR. To view
live video in a custom window, the window must be in Live Video mode. There are no DVR controls available in a custom window when it is being
used to view live video.
You can view archived video from a DX9000 DVR in a custom window that is in Archived Video mode. The DX9000 gadget provides tools for
controlling the DVR when viewing archived video.
NOTE: You can control cameras, but not DVRs, from a custom window that is in Live Video mode. You can control DVRs, but not cameras, from
a custom window that is in Archived Video mode.
Troubleshooting: How to Connect to the DX9000 Series DVR Server from the VMX300(-E)
If the system administrator changed the VMX300(-E) operating system password, system operators must complete a connection procedure to
connect to the DVR server. Your system administrator will provide you with this procedure. If the password was not changed, you can view video
as described in the Viewing Live Video and Working with Archived Video sections.
VIEWING LIVE VIDEO
When viewing live video from a camera that is connected to a DX9000 DVR, whether the camera is connected directly to the DVR or through one
or more other devices, you can only view the video. You cannot control the camera or the DVR.
You can simultaneously view live video in one custom window and archived video in another custom window. Suppose you have two custom
windows open, one of which is in Live Video mode and the other in Archived Video mode. If you have switched a camera that is connected to a
DX9000 DVR to both windows, you can view live video in the Live Video window at the same time as you view archived video and control the DVR
in the other window.
1. Click the custom window you want to view video in and press Alt-Space Bar. Alternatively, if the window has a Windows title bar, rightclick the title bar. The custom window drop-down menu opens.
2. Select Live Video from the drop-down menu. If a camera is currently switched to the window, the video from that camera appears.
Figure 51. Selecting Live Video
3. If necessary, switch a (different) camera to the custom window. To switch a camera, drag the camera to the custom window either from a
map or from the Device List. The video from that camera appears in the window’s display area.
TIP: VMX300(-E) provides keyboard shortcuts to select the content type for a custom window. To select live video, click the custom
window and press Alt-L.
NOTE: If you switch a DX9000 DVR to a custom window when Live Video is selected, No Live Sources appears in the window’s title bar (if it has
one). No video appears in the window. Drag a camera to the window to view video.
54 C1554M-A (4/05)
Page 55

View the DX9000 DVR Gadget for Live Video
When viewing live video, the DX9000 gadget displays the current date and time. The gadget does not provide any tools for controlling the DVR in
Live Video mode.
Click the gadget selector button at the left end of the custom window control bar and select the DX9000 DVR from the drop-down list.
The gadget for the DVR will display in the control bar, to the right of the gadget selector button. The gadget displays the current date and time,
and an indication that the video is live.
Figure 52. DX9000 Gadget - Live Video
WORKING WITH ARCHIVED VIDEO
To control a DX9000 DVR, you must belong to, and be logged in under, a user group that grants you the necessary privileges. Your system
administrator should instruct you in what privileges you have.
NOTE: To access DX9000 DVR controls, the DX9000 driver must be running. If the DX9000 DVR icons appear as a hollow outline, notify your
system administrator that the device driver is not running.
Selecting Archived Video
1. Click the custom window you want to view video in and press Alt-Space Bar. Alternatively, if the window has a Windows title bar, rightclick the title bar. The custom window drop-down menu opens.
2. Select Archived Video from the drop-down menu. If a camera is currently switched to the window and the camera is connected to more
than one archiving device, a drop-down list of archiving devices opens; select the desired DX9000 DVR from the list.
The DX9000 gadget appears in the window’s control bar. If there is archived video for the currently switched camera, the archived video
from that camera appears. VMX300(-E) cues the video to the date/time selected in the window’s Event Picker if one is selected; otherwise,
VMX300(-E) cues the video at or near the current time.
Figure 53. Selecting Archived Video
TIP: VMX300(-E) provides keyboard shortcuts to select the content type for a custom window. To select Archived Video, click the custom
window and press Alt-A. If the currently switched camera is connected to more than one archiving device, VMX300(-E) automatically
selects one.
C1554M-A (4/05) 55
Page 56

Locating Archived Video
There are two common approaches to locating archived video:
• Using the date/time and an archived alarm or event: The video you want to view coincided with an alarm or event, and you know the
approximate date/time of the alarm or event. For example, you might want to view the video recorded when a door alarm was triggered. In
this scenario, you use an estimate of the date/time to locate the alarm or event in the Session Manager, then drag the alarm or event from
the Session Manager to the custom window to copy the selection to the window. You can only use this approach if the alarm or event is
archived.
• Using the date/time only: You know the approximate date/time of the video you want to view, but there is no corresponding alarm or
event archived. In this scenario, you use the Event Picker in the custom window to zero in on the date/time as closely as you can, then you
browse to locate the desired archives.
These approaches are described in the following section.
Locating Archived Video via the Date/Time Only
Follow this approach when you know the approximate date/time of the video you want to view, but there is no corresponding archived alarm or
event.
1. Select Archived Video for the custom window you want to view the video in. Refer to Selecting Archived Video for instructions.
2. Use the custom window’s Event Picker to select a date/time as close to the date/time of the archive as possible, either by building a date/
time from the year down, or by zooming to a time unit. Refer to the Event Picker - Building a Date/Time and Zooming to a Time Unit sections
for instructions. The selected date/time appears in the bottom row of the Event Picker.
3. Click the date/time in the bottom row of the custom window’s Event Picker. If a camera is switched to the window, VMX300(-E) loads and
plays the archived video for that camera, cued to the date/time selected in the Event Picker.
Figure 54. Locating Archived Video
4. If desired, switch a (different) camera to the custom window. To switch a camera, drag the camera to the custom window either from a map
or from the Device List. The gadget for the archiving device the camera is connected to appears in the window’s control bar. If there is
archived video for that camera, it loads and plays in the window’s display area, cued to the date/time selected in the Event Picker.
56 C1554M-A (4/05)
Page 57

Figure 55. Viewing Archived Video
TIPS:
• If you know which camera the desired video originated from, you can switch the camera to the custom window before selecting a
date/time in the Event Picker. If the camera is already switched to the window, you do not need to switch it again. If you do not know
which camera the video originated from, first select the date/time, then switch different cameras to the window successively until
you find the one you want.
• If your installation has multiple cameras and you have more than one custom window to view video in, you can play back synchronized archived video from several cameras simultaneously. Drag a different camera to each custom window and select the desired
date/time in each window’s Event Picker. There will be a delay between windows equivalent to the length of time it took you to drag
the next camera to its window.
• You can track a moving object, such as a person or vehicle, in a single custom window by successively dragging adjacent cameras to
the window. Suppose the object moves across the range of Camera 1 to within the range of Camera 2. First, set the cursor mode to
Synchronized, as described in Controlling a DX9000 DVR - Playing Archived Video. Now, drag Camera 1 to the window and start the
video playing at the desired time. When the object leaves the range of Camera 1, drag Camera 2 to the window. The video from
Camera 2 will automatically cue to the Event Picker time, which is synchronized with the playback time, picking up where the
Camera 1 video left off.
NOTES:
• If you attempt to load archived video from a date/time and camera for which no archived video exists, “No Video Found” appears in the custom window control bar.
• DX9000 DVRs overwrite old archives when they run out of recording space. If you try to view old video that has been overwritten, “No
Video Found” appears in the custom window’s control bar. Note that VMX300(-E) does not delete archived alarms and events when the
DX9000 DVR overwrites the video. Archived alarms and events for the selected date/time still exist, even though the video for that date/
time has been overwritten.
• DX9000 DVRs can be configured to start recording when motion is detected, according to a schedule, or in response to a device-internal
alarm.
If you attempt to load archived video and it fails because no video was found, it could be for the following reasons:
• The DVR is configured to record when motion is detected. No motion was detected on the switched camera at the date/time you selected
in the Event Picker, so the DVR was not recording at that time.
• The DVR is configured to record at scheduled times. The DVR was not scheduled to be recording video from the switched camera at the
date/time you selected in the Event Picker.
• The DVR is configured to record when a DVR-internal alarm is triggered. No alarm was triggered, so the DVR was not recording video from
the switched camera at the selected date/time.
C1554M-A (4/05) 57
Page 58

Locating Archived Video via an Archived Alarm or Event
Follow this approach when the video you want to view coincided with an alarm or event, and you know the approximate date/time of the alarm
or event. In this scenario, you use an estimate of the date/time to locate the alarm or event in the Session Manager, then drag the alarm or event
from the Session Manager to the custom window to copy the selection to the window. You can only use this approach if the alarm or event is
archived.
1. If necessary, open the Session Manager by selecting Session Manager from the View menu.
2. Click the Archive View button on the Session Manager tool bar to go into Archive View. The Event Picker appears at the bottom of the
Session Manager window, with an area for listing archived alarms and events above it.
3. Use the Session Manager’s Event Picker to select a date/time as close to the date/time of the alarm or event as possible, either by building
a date/time from the year down, or by zooming to a time unit. Refer to the Event Picker - Building a Date/Time and Zooming to a Time Unit
sections for instructions. The selected date/time appears in the bottom row of the Event Picker.
Figure 56. Using an Alarm or Event to Locate Archived Video
4. Click the date/time in the bottom row of the Session Manager’s Event Picker. A list of the retrieved alarms and events appears in the
Session Manager window, above the Event Picker. As well, each archived alarm or event is represented as a small vertical bar in the Event
Picker’s Event Row. Each entry in the list is colored the same as the corresponding bar in the Event row.
Only the alarms and events for the selected time period are retrieved. For example, if you specified a date/time down to the hour, only the
archived alarms and events for that hour appear.
5. Locate the alarm or event by browsing or filtering the archives. Refer to Event Picker for instructions.
6. Drag the alarm or event from the list in the Session Manager to the custom window’s display area. The custom window’s Event Picker
acquires the same selection as the Session Manager’s Event Picker, including the date/time range and the alarm or event selected.
If the system administrator has associated the alarm or event with a camera, VMX300(-E) switches the camera to the window and retrieves
its archived video, cued to the date/time of the alarm or event. For example, the system administrator might associate a door alarm with a
58 C1554M-A (4/05)
Page 59

camera that points at the door. When you drag the archived alarm from the Session Manager to the custom window, the video from the
camera that points at the door loads and plays, cued to the time of the alarm.
If the system administrator has not associated a camera with the alarm or event and a camera is switched to the window, VMX300(-E)
loads and plays the archived video for the currently switched camera, cued to the date/time of the dragged alarm or event.
7. If desired, switch a (different) camera to the custom window. To switch a camera, drag the camera to the custom window either from a map
or from the Device List. The gadget for the archiving device the camera is connected to appears in the window’s control bar. If there is
archived video for that camera, it loads and plays in the window’s display area, cued to the date/time selected in the Event Picker.
Figure 57. Using an Alarm or Event to Locate Archived Video
TIPS:
• If you know which camera the desired video originated from, you can switch the camera to the custom window before locating the
alarm or event. If the camera is already switched to the window, you do not need to switch it again. If you do not know which camera
the video originated from, first locate the alarm or event and drag it to the window, then switch different cameras to the window
successively until you find the one you want.
• You can prevent VMX300(-E) from automatically loading the video associated with an alarm or event by dragging the alarm or event to
the custom window’s Event Picker instead of to the custom window’s display area.
• If your installation has multiple cameras and you have more than one custom window to view video in, you can play back synchro-
nized archived video from several cameras simultaneously. Select the desired date/time in each window’s Event Picker. Drag a
different camera to each custom window. There will be a delay between windows equivalent to the length of time it took you to drag
the next camera to its window.
• You can track a moving object, such as a person or vehicle, in a single custom window by successively dragging adjacent cameras to
the window. Suppose the object moves across the range of Camera 1 to within the range of Camera 2. First, set the cursor mode to
Synchronized, as described in Controlling a DX9000 DVR - Playing Archived Video. Now, drag Camera 1 to the window and start the
video playing at the desired time. When the object leaves the range of Camera 1, drag Camera 2 to the window. The video from
Camera 2 automatically cues to the Event Picker time, which is synchronized with the playback time, picking up where the Camera 1
video left off.
C1554M-A (4/05) 59
Page 60

NOTES:
• If you select a date/time and camera for which no archived video exists, “No Video Found” appears in the custom window control bar.
• DX9000 DVRs overwrite old archives when they run out of recording space. If you try to view old video that has been overwritten, “No
Video Found” appears in the custom window’s control bar. Note that VMX300(-E) does not delete archived alarms and events when the
DX9000 DVR overwrites the video. Archived alarms and events for the selected date/time still exist, even though the video for that date/
time has been overwritten.
• DX9000 DVRs can be configured to start recording when motion is detected, according to a schedule, or in response to a device-internal
alarm.
If you attempt to load archived video and it fails because no video was found, it could be for the following reasons:
• The DVR is configured to record when motion is detected. No motion was detected on the switched camera at the date/time you selected
in the Event Picker, so the DVR was not recording at that time.
• The DVR is configured to record at scheduled times. The DVR was not scheduled to be recording video from the switched camera at the
date/time you selected in the Event Picker.
• The DVR is configured to record when a DVR-internal alarm is triggered. No alarm was triggered, so the DVR was not recording video from
the switched camera at the selected date/time.
Controlling a DX9000 DVR
DX9000 DVR controls are available through the DX9000 gadget. The gadget displays in the custom window control bar when Archived Video is
selected for the window.
You can simultaneously view archived video in one custom window and live video in another custom window. Suppose you have two custom
windows open, one of which is in Archived Video mode and the other in Live Video mode. If you have switched a camera that is connected to a
DX9000 DVR to both windows, you can view archived video and control the DVR in the Archived Video window at the same time as you view live
video in the other window.
DX9000 DVR Gadget for Archived Video
Figure 58. DX9000 Gadget - Archived Video
The gadget provides the following tools to control the DX9000 DVR:
• Play: Play the selected video.
• Pause: Pause playing video. Click the Pause button again to resume playing.
• Stop: Stop playing video and unload it from the custom window.
• Rewind: Rewind the video 10 seconds.
• Fast forward: Advance the video 10 seconds.
• Date and time: Indicates the playback date and time of the currently playing video.
Playing Archived Video
Archived video automatically starts playing when it is loaded into a custom window. If a date/time is selected in the Event Picker, the video is cued
to that date/time. If no date/time is selected, the video is cued at or near the current date/time. If you have stopped or paused the video, you can
resume it by clicking the Play button in the custom window control bar.
While archived video is playing, the green arrow in the Event Picker advances across the Event row. The playback time in the window’s control bar
displays the date/time of the video that is currently playing, to the second. The Event Picker time displayed in the top row of the Event Picker
depends on the cursor mode selected:
• Independent: When Independent cursor mode is selected, the Event Picker time remains fixed at the original date/time you selected,
independent of the playback time.
• Auto select: When Auto Select cursor mode is selected, the Event Picker time advances whenever the playback time coincides with an
archived alarm or event. Thus the Event Picker time always shows the date/time of the most recently passed alarm or event.
• Synchronized: When Synchronized cursor mode is selected, the Event Picker time advances in step with the playback time.
60 C1554M-A (4/05)
Page 61

To set the cursor mode, right-click the custom window Event Picker and select the desired mode from the pop-up menu.
Figure 59. Selecting Cursor Mode
TIP: Use Synchronized cursor mode to track a moving object, such as a person or vehicle, in a single custom window. Suppose the object
moves across the range of Camera 1 to within the range of Camera 2. First, set the cursor mode to Synchronized. Now, drag Camera 1 to the
window and start the video playing at the desired time. When the object leaves the range of Camera 1, drag Camera 2 to the window. The
video from Camera 2 automatically cues to the Event Picker time, which is synchronized with the playback time, picking up where the
Camera 1 video left off.
Pausing Archived Video
To pause archived video, click the Pause button in the custom window control bar. Click the Pause button again to resume playing at the date/time
it was paused. The playback time blinks when video is paused.
Stopping Archived Video
To stop archived video, click the Stop button on the custom window control bar. The video is unloaded from the window when it is stopped.
To resume playing the video, click the Play button.
Rewinding Archived Video
To rewind archived video by 10 seconds, click the Rewind button on the custom window control bar. You can also rewind by dragging the picker
to the left, or by selecting an earlier date/time in the Event Picker. Refer to Event Picker for more information.
Advancing Archived Video
To advance archived video by 10 seconds, click the Fast Forward button on the custom window control bar. You can also advance the video by
dragging the picker to the right, or by selecting a later date/time in the Event Picker. Refer to Event Picker for more information.
C1554M-A (4/05) 61
Page 62

CONTROLLING AN ASCII SWITCHER
The Pelco ASCII device driver is intended to control cameras routed through a Pelco matrix switcher using the Pelco ASCII protocol.
To control a particular switcher, you must belong to, and be logged in under, a user group that grants you the necessary privileges. Your system
administrator should instruct you in what privileges you have.
NOTE: To access ASCII switcher controls, the Pelco ASCII device driver must be running. Switcher icons appear as a hollow outline when the
device driver is not running. If you try to open the Device Control dialog box when the driver is not running, you will get a connection error. Notify
your system administrator if the driver is not running.
ASCII SWITCHER GADGET
Figure 60. ASCII Switcher Gadget
The switcher gadget has two parts:
• Device control button: The Device Control button opens the switcher’s Device Control dialog box.
• Communications status: Comm Status indicates whether the switcher is currently online or offline.
OPENING THE SWITCHER’S DEVICE CONTROL DIALOG BOX
Switcher controls are available through the switcher’s Device Control dialog box. To access the Device Control dialog box, you must belong to, and
log in under, a user group that allows you to access the Device Control dialog box.
Open the Device Control dialog box for an ASCII switcher using one of the following methods:
• Double-click the switcher’s icon on a map.
• Double-click the switcher in the Device List.
• Right-click the switcher in the Device List and then click Show Control Dialog from the pop-up menu.
• Open the switcher’s gadget and click the Device Control button.
DATE\TIME TAB
Figure 61. Device Control Dialog Box - Date\Time Tab
The Date\Time tab allows you to manually set the switcher’s date/time, which displays optionally when you view live video.
To set the switcher’s date and time:
1. Date: Click the month and type the new month. Repeat for the day and year, as required. Single-digit months and days do not require a
leading zero. Alternatively, click the arrow to the right of the date box to open a drop-down calendar. Use the left and right arrows in the
calendar to select the year and month, then click a day to select it. Today’s date is circled in red.
62 C1554M-A (4/05)
Page 63

2. Time: Click the hour and either type the new hour or click the up and down arrows at the right of the box to advance the time or set it back.
Repeat for the minutes and seconds, as required. You do not need to type leading zeros in single-digit hours, minutes or seconds.
3. Set: To have the date and time you entered come into effect, click Set.
ON-SCREEN DISPLAY
The On-Screen Display tab of the switcher’s Device Control dialog box allows you to display the switcher’s on-screen menu on the active destination device or custom window. The options presented in the on-screen display depend on the switcher model. In general, arrow keys are used for
menu navigation and selection of menu options. The numeric keys are used for entering the password. Refer to the Pelco switcher documentation
for information on specific options.
To display the switcher’s on-screen menu:
1. Open the switcher’s Device Control dialog box and go to the On-Screen Display tab.
Figure 62. Device Control Dialog Box - On-Screen Display Tab
2. Click Show On-Screen Display.
If the switcher requires a password, you are prompted to enter the password before the on-screen display opens. The on-screen menu
appears in the active destination device or custom window. Refer to the Pelco switcher documentation for information on navigating the
menu, selecting options and exiting the on-screen display.
Figure 63. Sample On-Screen Display
NOTE: Having the on-screen display open interferes with camera control. The cameras cannot be controlled by any user when the on-screen
display is open. Control returns when the on-screen display is closed.
C1554M-A (4/05) 63
Page 64

CONTROLLING AN ASCII CAMERA
NOTE: Fixed cameras are not controllable. This section applies to controllable cameras only.
To control a particular camera, you must belong to, and be logged in under, a user group that grants you the necessary privileges. Your system
administrator should instruct you in what privileges you have.
Before you can control a camera, you must switch the camera to a destination device, such as a custom window or external monitor. To switch the
camera, drag the camera to the destination device. You can drag from/to device icons placed on maps or devices listed in the Device List. Refer
to Devices - Switching a Device for more information on switching devices.
All ASCII camera controls are available through the camera’s Device Control dialog box. Some controls are also available in the camera’s gadget
(go to a preset, run a pattern) or in the custom window display area (pan, tilt, zoom, iris, focus).
You cannot control an ASCII camera if it is locked by another user or by a script. If you attempt to control a locked camera, VMX300(-E) displays a
message saying the camera is locked and identifying who placed the lock. For more information, refer to Locking a Camera.
NOTE: To access ASCII camera controls, the Pelco ASCII device driver must be running. Device icons appear as a hollow outline when the device
driver is not running. If you try to open the Device Control dialog box when the driver is not running, you will get a connection error. Notify your
system administrator if the driver is not running.
ASCII CAMERA GADGET
The camera gadget has four parts:
Figure 64. ASCII Camera Gadget
• Device control button: The Device Control button opens the camera’s Device Control dialog box.
• Presets drop-down list: The Presets drop-down list lists the user-defined presets for that camera. Click a preset to make the camera go
to the preset. If the camera’s current view is not the result of going to a preset, <Custom View> appears in the drop-down list. Refer to
Presets for more information.
• Patterns drop-down list: The Patterns drop-down list lists the user-defined patterns for that camera. Click a pattern to make the camera
run the pattern. The camera will run the pattern repeatedly until it receives a new movement command. If the camera is not currently
running a pattern, <No Pattern> appears in the drop-down list. Refer to Patterns for more information.
• Lock button: The Lock button allows you to take exclusive control of the camera. Click the Lock button to prevent a script or another
operator from controlling the camera. Refer to Locking a Camera for more information.
OPENING THE CAMERA’S DEVICE CONTROL DIALOG BOX
To access the camera’s Device Control dialog box, you must belong to, and log in under, a user group that allows you to access the Device Control
dialog box.
Open the Device Control dialog box for an ASCII camera using one of the following methods:
• Double-click the camera’s icon on a map.
• Double-click the switcher in the Device List.
• Right-click the camera in the Device List, and then click Show Control Dialog from the pop-up menu.
• Open the camera’s gadget and click the Device Control button.
PAN, TILT, ZOOM, IRIS, AND FOCUS
VMX300(-E) provides both mouse and keyboard controls for panning, tilting, zooming, focusing, and adjusting the iris of ASCII cameras that
support pan/tilt/zoom functionality. Your administrator should instruct you in which cameras support pan/tilt/zoom.
64 C1554M-A (4/05)
Page 65

Mouse Controls
You can control a camera from a custom window or from the Device Control dialog box:
• Custom window: To pan and tilt, click the custom window’s display area in the direction you want to move the camera. For example, to
pan and tilt up and to the left, click above and to the left of the center of the display area. Use the mouse wheel as described in Table G to
zoom, focus, and adjust the iris.
• Device control dialog box: The square on the Control tab functions as a control pad. The dot in the center of the control pad represents
the current camera position. Click the control pad in the direction you want to pan and tilt the camera. For example, to pan and tilt down
and to the right, click below and to the right of the dot. Use the mouse wheel as described in Table G to zoom, focus, and adjust the iris.
Figure 65. Device Control Dialog Box - Control Tab
Table G. Mouse Controls
CAMERA CONTROL MOUSE ACTION
Pan left Click to the left of center.
Pan right Click to the right of center.
Tilt up Click above the center.
Tilt down Click below the center.
Zoom in Turn the mouse wheel away from you.
Zoom out Turn the mouse wheel toward you.
Close iris Hold the Alt key depressed and turn the mouse wheel away from you.
Open iris Hold the Alt key depressed and turn the mouse wheel toward you.
Focus out Hold the Shift key depressed and turn the mouse wheel away from you.
Focus in Hold the Shift key depressed and turn the mouse wheel toward you.
To pan and tilt the camera incrementally, click once. Clicking close to the center moves the camera in small increments. The further away from the
center you click, the larger the increments the camera moves.
To pan and tilt the camera continuously, click and hold the mouse button depressed. Clicking close to the center moves the camera slowly. The further away from the center you click, the faster the camera moves. Release the mouse button to stop panning and tilting.
To zoom, focus, or adjust the iris incrementally, turn the mouse wheel one click. To zoom, focus, or adjust the iris continuously, turn the mouse
wheel continuously.
Keyboard Controls
Keyboard controls work only in custom windows. They do not work in the Device Control dialog box. To use keyboard controls in a custom window,
click the window’s display area to make it active, then use keyboard controls as desired.
Table H lists the keyboard controls for panning, tilting, zooming, focusing, and adjusting the iris of ASCII cameras.
C1554M-A (4/05) 65
Page 66

Table H. Keyboard Controls
CONTROL KEYSTROKE DESCRIPTION
Pan left Left Arrow key
Pan right Right Arrow key
Tilt up Up Arrow key
Tilt down Down Arrow key
Pan and tilt up and to the right Pg Up Page Up key on numeric keypad
Pan and tilt down and to the right Pg Dn Page Down key on numeric keypad
Pan and tilt up and to the left Home Home key on numeric keypad
Pan and tilt down and to the left End End key on numeric keypad
Zoom in + Plus key on numeric keypad
Zoom out – Minus key on numeric keypad
Open iris Alt + Hold Alt key depressed and press plus key on numeric keypad
Close iris Alt – Hold Alt key depressed and press minus key on numeric keypad
Focus out Shift + Hold Shift key depressed and press plus key on numeric keypad
Focus in Shift – Hold Shift key depressed and press minus key on numeric keypad
NOTE: To use navigation keys on the numeric keypad, Num Lock must be off.
PRESETS
Figure 66. Device Control Dialog Box - Presets Tab
A preset is a predefined camera position that is stored in the camera. Each camera can have a limited number of presets defined for it. The
maximum number of presets depends on the camera model.
The Presets tab of the Device Control dialog box lists the presets for the camera. Presets can appear in the list as Unassigned_i, where i is the
preset’s number. “Unassigned” indicates that the preset has not been assigned a name and script tag in VMX300(-E).
To determine whether an unassigned preset has a camera position stored for it, click the preset, and then click Goto. If the camera moves as a
result, there is a stored camera position.
Assigning a preset does the following:
• It makes the preset name appear in the presets drop-down list in the camera’s gadget.
• It gives the preset a script tag so scripts defined by the system administrator can refer to the preset.
You can assign a preset in two ways:
• Save: By saving the preset. Saving a preset saves the camera position, focus setting, name, and script tag. Refer to Creating a Preset for
instructions on saving a preset to an unassigned preset number. Refer to Editing a Preset for instructions on saving a preset to a preset
number that is already assigned.
• Rename: By renaming the preset. Renaming a preset saves the name and script tag, but does not affect the camera position stored for the
preset. Refer to Renaming a Preset for information on renaming presets.
66 C1554M-A (4/05)
Page 67

For information on presets defined in the camera, refer to the camera documentation.
NOTE: Since presets are associated with a camera, rather than a user, any changes you make to a camera’s presets affect all users with
permission to access the presets.
TIP: The order of the list on the Presets tab is retained in the presets drop-down list in the gadget. This allows you to define presets in the
order you want them to appear in the drop-down list.
Going to a Preset
To make a camera go to a preset, you must belong to, and log in under, a user group that allows you to control that camera.
VMX300(-E) provides two methods of going to a preset:
• Custom window: Select the preset you want the camera to go to from the presets drop-down list in the camera’s gadget. Note: the
presets drop-down list only lists presets that have been assigned a name and script tag through the Presets tab. To go to an unassigned
preset, you must use the Presets tab in the Device Control dialog box.
• Device control dialog box: On the Presets tab for the desired camera, select the preset you want the camera to go to from the list and
click Goto.
TIP: Use the Goto option on the Presets tab to test whether an unassigned preset has a camera position associated with it, by selecting
the preset and clicking Goto. If the camera moves as a result, there is a stored camera position.
Creating a Preset
Creating a preset refers to saving a preset to an unassigned preset number. For instructions on saving a preset to a preset number that has
previously been assigned, refer to Editing a Preset.
To create a preset for an ASCII camera, you must belong to, and log in under, a user group that allows you to edit the presets for that camera.
When you create a preset, it becomes available to all users who have permission to control the camera.
The Save option used to create a preset saves the camera position, preset name, and script tag. If a camera position is already stored for that
preset number, the stored camera position is replaced by the new one.
To determine whether an unassigned preset number has a camera position stored for it, click the preset in the Presets tab, and then click Goto.
If the camera moves as result, there is a camera position stored for the selected preset number. To assign a name and script tag while retaining
the stored camera position, use the Rename option described in Renaming a Preset.
To create a preset:
1. Pan, tilt and zoom the camera until the desired view is showing.
2. Open the Device Control dialog box for the desired camera and go to the Presets tab.
3. You can click one of the unassigned preset numbers (Unassigned_i) or, if you do not select an unassigned number, the new preset will be
created in the next available unassigned position. Note: Selecting a preset that is already assigned is discussed in Editing a Preset.
4. Click Save. The Add New Preset dialog box opens.
Figure 67. Add New Preset Dialog Box - Presets Tab
5. Name: Type a unique name for the preset. Preset names are at most 50 characters long. They can include any letter, digit or special
character, with the exception of single and double quotation marks. Preset names are not case sensitive.
A tag resembling the preset name appears in the Script Tag box. If the preset name contains special characters, they are omitted from the
tag. Spaces are replaced with underscores. Leading digits are removed.
C1554M-A (4/05) 67
Page 68

6. Script tag: If you do not want to use the script tag provided by the system, type a unique tag of your choice. Script tags are at most 50
characters long. They can include any letter, digit or the underscore character, but cannot begin with a digit. They cannot contain spaces or
special characters. Tags are not case sensitive. The script tag is used by administrators to refer to the preset in scripts.
7. Click OK. The Add New Preset dialog box will close and the name of the new preset will appear in the list of presets. If you selected
Unassigned_i in step 3, the new preset appears in the position you selected. If you did not select an unassigned position, the new preset
appears in the next available unassigned position in the list.
Editing a Preset
Editing a preset refers to saving a preset to a preset number that is already assigned. For instructions on saving a preset to an unassigned preset
number, refer to Creating a Preset.
To edit a preset for an ASCII camera, you must belong to, and log in under, a user group that allows you to edit the presets for that camera. When
you edit a preset, the changes you make affect other users with permission to access the preset.
The Save option used to edit a preset saves the camera position, preset name, and script tag, replacing the previously defined camera position,
preset name, and script tag. To assign a name and script tag while retaining the existing camera position, use the Rename option described in
Renaming a Preset.
To edit a preset:
1. Pan, tilt and zoom the camera until the desired view is showing.
2. Open the Device Control dialog box for the desired camera and go to the Presets tab.
3. Click the desired preset in the list, and then click Save. The Edit Preset Properties dialog box opens.
Figure 68. Edit Preset Properties Dialog Box
4. Edit the name and script tag, if desired.
5. Click OK. The Edit Preset Properties dialog box closes and the new settings are saved.
Renaming a Preset
Renaming a preset refers to changing the preset’s name and/or script tag using the Rename option. For instructions on changing the camera
position, refer to Editing a Preset.
To rename a preset for an ASCII camera, you must belong to, and log in under, a user group that allows you to edit the presets for that camera.
When you rename a preset, the changes you make affect other users with permission to access the preset.
To rename a preset:
1. Open the Device Control dialog box for the desired camera and go to the Presets tab.
2. Select the preset you want to rename from the list of presets.
3. Click Rename. The Edit Preset Properties dialog box opens.
4. Edit the name and script tag as desired, and then click OK. The Edit Preset Properties dialog box closes and your changes are saved.
NOTE: Changing the script tag for a preset that is referred to in a script introduces an error into the script. To correct the error, the system
administrator must update the script so it uses the preset’s new script tag.
68 C1554M-A (4/05)
Page 69

Unassigning a Preset
Unassigning a camera’s preset deletes the preset’s name and script tag, leaving the camera position stored in the camera intact. When you
unassign a preset, the following changes take effect:
• The preset name no longer appears in the presets drop-down list in the camera’s gadget.
• Scripts defined by the system administrator can no longer refer to the preset.
To unassign a camera’s preset, you must belong to, and log in under, a user group that allows you to edit the presets for that camera.
To unassign a preset:
1. Open the Device Control dialog box for the desired camera and go to the Presets tab.
2. Click the preset, and then click Unassign. The preset’s name and script tag are deleted and the preset appears in the list as Unassigned_i.
Scripts will no longer be able to refer to the preset, and the preset will no longer be available through the presets drop-down list in the
camera’s gadget.
NOTE: Unassigning a preset that is referred to in a script introduces an error into the script.
Setting the Camera’s Home Preset
A camera’s home preset is the preset the camera goes to when it has been idle for a predefined time. The home preset displays in bold print in
the Device Control dialog box presets list.
To set a camera’s home preset, you must belong to, and log in under, a user group that allows you to edit the presets for that camera.
NOTE: You can define a home preset or a default pattern for a camera, but not both. Setting the home preset clears the default pattern, if there
is one.
To set the home preset:
1. Open the Device Control dialog box for the desired camera and go to the Presets tab.
2. Click the preset you want as the home preset, and then click Set Home. The Edit Home Preset dialog box opens.
Figure 69. Edit Home Preset Dialog Box
3. Enter the number of hours, minutes, and seconds that you want the camera to be idle before it goes to the home preset position.
4. Click OK. The Edit Home Preset dialog box closes. The selected preset becomes the home preset, replacing the previous home preset or
default pattern if there was one. The new home preset appears in bold print in the list.
Clearing the Camera’s Home Preset
To clear a camera’s home preset, you must belong to, and log in under, a user group that allows you to edit the presets for that camera.
To clear the home preset:
1. Open the Device Control dialog box for the desired camera and go to the Presets tab.
2. Click the home preset from the list of presets, and then click Clear Home. The selected preset no longer appears in bold print in the list.
The camera has no home preset.
C1554M-A (4/05) 69
Page 70

PATTERNS
A pattern is a user-defined set of camera movements and iris/focus adjustments that is stored in the camera. Each camera can have a limited
number of patterns defined for it. The maximum number of patterns depends on the camera model.
The Patterns tab of the Device Control dialog box lists the patterns for the camera. Patterns can appear in the list as Unassigned_i, where i is the
pattern’s number. “Unassigned” indicates that the pattern has not been assigned a name and script tag in VMX300(-E).
To determine whether an unassigned pattern has a camera movement stored for it, select the pattern and click Run. If the camera moves as a
result, there is a stored camera movement.
Figure 70. Device Control Dialog Box - Patterns Tab
Assigning a pattern does the following:
• It makes the pattern name appear in the patterns drop-down list in the camera’s gadget.
• It gives the pattern a script tag so scripts defined by the system administrator can refer to the pattern.
You can assign a pattern in two ways:
• Record: Recording a pattern saves the camera movement, name, and script tag. Refer to Creating a Pattern for instructions on recording a
pattern and saving it to an unassigned pattern number. Refer to Editing a Pattern for instructions on saving a pattern to a pattern number
that is already assigned.
• Rename: Renaming a pattern saves the name and script tag, but does not affect the camera movement stored for the pattern. Refer to
Renaming a Pattern for information.
For information on patterns defined in the camera, see the Pelco documentation for the appropriate camera model.
NOTE: Since patterns are associated with a camera, rather than a user, any changes you make to a camera’s patterns affect all users with
permission to access the pattern.
TIP: The order of the list on the Patterns tab is retained in the patterns drop-down list in the gadget. This allows you to define patterns in
the order you want them to appear in the drop-down list.
Running a Pattern
To make a camera run a pattern, you must belong to, and log in under, a user group that allows you to control that camera. When you run a pattern,
the pattern runs repeatedly until the camera receives a new movement command. Refer to Stopping a Pattern for more information.
VMX300(-E) provides two methods of running a pattern:
• Custom window: Select the pattern you want the camera to run from the patterns drop-down list in the camera’s gadget. Note: the
patterns drop-down list only lists patterns that have been assigned a name and script tag through the Patterns tab. To go to an unassigned
pattern, you must use the Patterns tab in the Device Control dialog box.
• Device control dialog box: On the Patterns tab for the desired camera, select the pattern you want the camera to run from the list and
click Run.
TIP: Use the Run option on the Patterns tab to test whether an unassigned pattern has a camera movement associated with it, by selecting
the pattern and clicking Run. If the camera moves as a result, there is a stored camera movement.
70 C1554M-A (4/05)
Page 71

Stopping a Pattern
To stop a pattern that a camera is running, you must belong to, and log in under, a user group that allows you to control that camera.
When a pattern is run, the pattern runs repeatedly until it receives a new movement command. Any of the following movement commands will
stop a running pattern:
• Pan
• Tilt
• Zoom
• Focus
• Adjust the iris
• Go to a pattern
• Run a (different) pattern
Creating a Pattern
Creating a pattern refers to recording a pattern to an unassigned pattern number. For instructions on saving a pattern to a pattern number that is
already assigned, refer to Editing a Pattern.
To create a pattern for an ASCII camera, you must belong to, and log in under, a user group that allows you to edit the patterns for that camera.
When you create a pattern, it becomes available to all users who have permission to control the camera.
The Record option used to create a pattern saves the camera movement, pattern name, and script tag. If a camera movement is already stored for
that pattern number, the stored camera movement will be replaced by the new one.
To determine whether an unassigned pattern number has a camera movement stored for it, select the pattern in the Patterns tab and click Run. If
the camera moves as result, there is a camera movement stored for the selected pattern number. To assign a name and script tag while retaining
the stored camera movement, use the Rename option described in Renaming a Pattern.
1. Open the Device Control dialog box for the desired camera and go to the Patterns tab.
2. If you want, select Unassigned_i for the desired pattern number from the list. If you do not select an unassigned number, the new pattern
will be created in the next available unassigned position.
3. Click Record. The Record New Pattern dialog box opens.
Figure 71. Record New Pattern Dialog Box
4. Type a unique name for the pattern. Pattern names are at most 50 characters long. They can include any letter, digit or special character,
with the exception of single and double quotation marks. Pattern names are not case sensitive.
5. Optional: Type a script tag.
6. Click Start Recording. The Start Recording button changes to a Stop Recording button.
Figure 72. Record New Pattern - Stop Recording
C1554M-A (4/05) 71
Page 72

7. Pan, tilt, zoom, focus, and adjust the camera’s iris as desired.
8. Click Stop Recording. The Record New Pattern dialog box closes and the name of the new pattern appears in the list of patterns. If you
selected Unassigned_i in step 2, the new pattern appears in the position you selected. If you did not select a position, the new pattern
appears in the next available unassigned position in the list.
Editing a Pattern
Editing a pattern refers to saving a pattern to a pattern number that is already assigned. For instructions on saving a pattern to an unassigned
pattern number, refer to Creating a Pattern.
To edit a pattern for an ASCII camera, you must belong to, and log in under, a user group that allows you to edit the patterns for that camera. When
you edit a pattern, the changes you make affect other users with permission to access the pattern.
The Record option used to edit a pattern saves the camera movement, pattern name, and script tag, replacing the previously defined camera
movement, pattern name, and script tag. To assign a name and script tag while retaining the existing camera movement, use the Rename option
described in Renaming a Pattern.
To edit a pattern:
1. Open the Device Control dialog box for the desired camera and go to the Patterns tab.
2. Click the desired pattern in the list and then click Record. The Edit Pattern Properties dialog box opens.
Figure 73. Edit Pattern Properties Dialog Box
3. Edit the name and script tag, if desired.
4. Click Start Recording. The Start Recording button changes to a Stop Recording button.
Figure 74. Edit Pattern Properties - Stop Recording
5. Pan, tilt, zoom, focus, and adjust the camera’s iris as desired.
6. Click Stop Recording. The Edit Pattern Properties dialog box closes and the new settings are saved.
Renaming a Pattern
Renaming a pattern refers to changing the pattern’s name and/or script tag using the Rename option. For instructions on changing the camera
movement, refer to Editing a Pattern.
To rename a pattern for an ASCII camera, you must belong to, and log in under, a user group that allows you to edit the patterns for that camera.
When you rename a pattern, the changes you make affect other users with permission to access the pattern.
To rename a pattern:
1. Open the Device Control dialog box for the desired camera and go to the Patterns tab.
2. Click the pattern you want to rename, and then Click Rename. The Edit Pattern Properties dialog box opens.
72 C1554M-A (4/05)
Page 73

3. Edit the name and script tag as desired.
4. Click OK. The Edit Pattern Properties dialog box closes and your changes are saved.
NOTE: Changing the tag for a pattern that is referred to in a script introduces an error into the script. To correct the error, the system administrator
must update the script so it uses the pattern’s new script tag.
Unassigning a Pattern
Unassigning a camera’s pattern deletes the pattern’s name and script tag, leaving the camera movement stored in the camera intact. When you
unassign a pattern the following changes take effect.
• The pattern name no longer appears in the patterns drop-down list in the camera’s gadget.
• Scripts defined by the system administrator can no longer refer to the pattern.
To unassign a camera’s pattern, you must belong to, and log in under, a user group that allows you to edit the patterns for that camera.
To unassign a pattern:
1. Open the Device Control dialog box for the desired camera and go to the Patterns tab.
2. Click the pattern you want to unassign, and then click Unassign. The pattern’s name and script tag are deleted and the pattern appears in
the list as Unassigned_i. Scripts will no longer be able to refer to the pattern, and the pattern will no longer be available through the
patterns drop-down list in the camera’s gadget.
NOTE: Unassigning a pattern that is referred to in a script introduces an error into the script.
Setting the Camera’s Default Pattern
A camera’s default pattern is the pattern the camera runs when it has been idle for a predefined time. The default pattern displays in bold print in
the Device Control dialog box patterns list.
To set a camera’s default pattern, you must belong to, and log in under, a user group that allows you to edit the patterns for that camera.
NOTE: You can define a default pattern or a home preset for a camera, but not both. Setting the default pattern clears the home preset, if there
is one.
To set the default pattern:
1. Open the Device Control dialog box for the desired camera and go to the Patterns tab.
2. Click the pattern you want as the default pattern, and then click Set Default. The Edit Default Pattern dialog box opens.
Figure 75. Edit Default Pattern Dialog Box
3. Enter the number of hours, minutes, and seconds that you want the camera to be idle before it runs the default pattern.
The Edit Default Pattern dialog box closes. The selected pattern becomes the default pattern, replacing the previous default pattern or
home preset if there was one. The new default pattern appears in bold print in the list.
C1554M-A (4/05) 73
Page 74

Clearing the Camera’s Default Pattern
To clear a camera’s default pattern, you must belong to, and log in under, a user group that allows you to edit the patterns for that camera.
To clear the default pattern:
1. Open the Device Control dialog box for the desired camera and go to the Patterns tab.
2. Click the default pattern from the list of patterns, and then click Clear Default. The selected pattern no longer appears in bold print in the
list. There is no default pattern for that camera.
SEQUENCES
A sequence is a predefined series of camera movements and positions. Sequences are implemented in VMX300(-E) as scripts defined by the
system administrator. To run a script, you must belong to, and log in under, a user group that allows you to run that script.
To run a script:
1. If the camera is switched to a destination device like an external monitor, open the device pop-up menu by right-clicking the destination
device in the Device List, or right-clicking the device’s icon on a map. If the camera is switched to a custom window, open the custom
window drop-down menu by clicking the window and pressing Alt-Space Bar.
2. Click Run Script and select the desired script from the pop-up menu. The selected script runs. An entry for the script appears in the Session
Manager.
AUXILIARIES
Figure 76. Device Control Dialog Box - Auxiliaries Tab
ASCII cameras can support auxiliary features, such as a wiper or lights, which are physically connected to auxiliary points on the camera. Each
camera can have a limited number of auxiliaries. The maximum number depends on the camera model.
Auxiliaries are listed on the Auxiliaries tab of the Device Control dialog box. By default, auxiliaries are named Auxiliaryi, where i is the auxiliary’s
number. Your system administrator can change an auxiliary’s name to something more meaningful.
Controlling an Auxiliary
To control a camera’s auxiliaries, you must belong to, and log in under, a user group that allows you to control the auxiliaries for that camera.
VMX300(-E) allows you to set an auxiliary to run continuously, or to run for just a moment.
To run an auxiliary for a moment, select the desired auxiliary name on the Auxiliaries tab and click Momentary. The auxiliary feature operates for
a moment, then stops.
To run an auxiliary continuously, select desired auxiliary on the Auxiliaries tab, or double-click the auxiliary name. The auxiliary feature operates
until the auxiliary’s check box is cleared.
The Momentary option stops the auxiliary feature from running continuously. If the auxiliary is running continuously when you give the command
to run it momentarily, the feature operates for a moment, then stops, and the check box is automatically cleared.
NOTE: In order for auxiliary controls to function as described here, the camera’s auxiliary setting must be set to continuous mode.
74 C1554M-A (4/05)
Page 75

ON-SCREEN DISPLAY
The On-Screen Display tab of the Device Control dialog box allows you to display the camera’s on-screen menu on the destination device or
custom window the camera is switched to. The options presented in the on-screen display depend on the camera model. Refer to the Pelco
camera documentation for information on specific options.
Figure 77. Device Control Dialog Box - On-Screen Display Tab (left) and Sample On-Screen Display (right)
Using the On-Screen Menu
To display the camera’s on-screen menu:
1. Open the Device Control dialog box for the desired camera and go to the On-Screen Display tab.
2. Click Show On-Screen Display. The camera’s on-screen menu appears in the destination device or custom window.
3. Navigate the menu: Use the up arrow and down arrow buttons on the On-Screen Display tab to move the option selector beside the
desired menu option. Alternatively, send tilt up and tilt down commands using mouse or keyboard controls to move the option selector up
and down in the menu.
4. Select a menu item: With the option selector positioned beside the desired option, click the Select On-Screen Display Menu Item button.
The selected option executes.
5. Exit: To close the menu, navigate to the Exit option and click the Select On-Screen Display Menu Item button. The menu no longer appears.
LOCKING A CAMERA
You can prevent other users or scripts from controlling an ASCII camera by locking the camera. When a camera is locked, only the user or script
that placed the lock can control the camera. If you attempt to control a locked camera, VMX300(-E) will display a message specifying that the
camera is locked and who placed the lock. To lock and control a particular camera, you must belong to, and log in under, a user group that allows
you to lock and control that camera.
Every VMX300(-E) user and script has a priority assigned by the system administrator. VMX300(-E) uses these priorities to resolve situations in
which two or more users or scripts attempt to control a particular device at the same time. The user with the higher priority is given control of the
device.
Depending on your priority, you might be able to take the lock from another user or a script that has locked a camera, giving you control of the
camera. You can take the lock from any user with lower priority than you. You can take the lock from any script with equal or lower priority.
VMX300(-E) automatically unlocks a camera you have locked under the following circumstances:
• If you log off, either by closing the client, or by logging in a new user.
• If you locked the camera from the Control tab of the Device Control dialog box and you close the dialog box.
• If you locked the camera from the gadget in a custom window and you change the content type for that window.
• If you locked the camera from the gadget in a custom window and you clear Visible for that window in the Workspace Properties dialog
box.
Locking has no effect on auxiliaries. Scripts and other users can still control auxiliaries when the camera is locked, regardless of their priority.
C1554M-A (4/05) 75
Page 76

Understanding the Lock Button
The Lock button is used to lock and unlock the camera, and also provides information on whether the camera is currently locked, whether you can
take the lock, and whether you can control the camera. The Lock button is located in the ASCII camera gadget and on the Control tab of the
camera’s Device Control dialog box.
Figure 78. Lock Button Locations
The color of the padlock in the Lock button indicates whether you can control the camera. When the padlock is green, you can control the camera.
When the padlock is yellow or red, you cannot control the camera. To control a particular camera, you must belong to, and log in under, a user
group that allows you to control that camera. If you do not have permission to control the camera, the padlock will always be red or yellow.
The state of the Lock button indicates whether or not you can lock the camera. When the button is out, the camera either isn’t locked, or it is
locked, but you can take the lock from the user or script that placed the lock. When the Lock button is in, the camera is locked and you cannot take
the lock from the user or script that placed the lock. To lock a particular camera, you must belong to, and log in under, a user group that allows you
to lock that camera. If you don’t have permission to lock the camera, the Lock button will always be in.
Permissions override priority. No matter how high your priority, you will never be able to lock or control a camera unless you have the necessary
permissions.
If you have permission to lock and control a camera and a user with lower priority than you has the camera locked, your Lock buttons are red/out,
indicating that you cannot control the camera, but you can take the lock from the other user and subsequently control the camera.
When another user with the same or higher priority than you has the camera locked, your Lock buttons are red/in, indicating that you cannot
control the camera and you cannot take the lock from the other user.
When a script with equal or lower priority than you has the camera locked, your Lock buttons are yellow/out, indicating that you cannot control
the camera, but you can take the lock from the script and subsequently control the camera.
When a script with higher priority than you has the camera locked, your Lock buttons are yellow/in, indicating that you cannot control the camera
and you cannot take the lock from the script.
If you have the Control tab and the camera gadget open at the same time, you see two different instances of the Lock button. These two Lock
buttons are independent of each other:
• If you locked the camera from the gadget, the Lock button on the Control tab is red/in, indicating that you cannot take the lock or control the
camera from the Control tab. The Lock button on the gadget is green/in, indicating that you have locked the camera and can control it using
keyboard controls or by clicking a custom window.
• If you locked the camera from the Control tab, the Lock button in the gadget is red/in, indicating that you cannot take the lock through the
gadget or control the camera using keyboard controls or by clicking a custom window. The Lock button on the Control tab is green/in,
indicating that you have locked the camera and can control it through the Control tab.
When you do not have the lock, the different instances of the Lock button are always in the same state.
Table I summarizes the different states of the Lock button.
76 C1554M-A (4/05)
Page 77

Table I. Different States of the Lock Button
LOCK BUTTON
COLOR/POSITION
Green/In
Green/Out The camera is not locked. You can control the camera. You can lock the camera.
Yellow/In
Yellow/Out
Red/In
Red/Out
TIP: You can only lock the camera when the Lock button is out. You can only control the camera when the padlock is green.
INDICATES
You have locked the camera from the window where the green/in Lock button is located. You can control the
camera from this window. A user with higher priority can take the lock from you and subsequently control the
camera. A script with equal or higher priority can take the lock from you and subsequently control the camera.
A script with higher priority than you has locked the camera. The script can control the camera. You cannot take
the lock from the script. You cannot control the camera.
A script with equal or lower priority than you has locked the camera. You cannot control the camera, but you can
take the lock from the script and subsequently control the camera.
A user with equal or higher priority than you has locked the camera. The user can control the camera. You can
neither take the lock nor control the camera from the window where the red/in Lock button is located. Note: The
user who locked the camera could be you. When you lock the camera through the gadget, the Lock button on the
Control tab is red/in. When you lock the camera through the Control tab, the Lock button in the gadget is red/in.
A user with lower priority than you has locked the camera. You cannot control the camera, but you can take the
lock from the lower priority user and subsequently control the camera.
CONTROLLING A KBD300A KEYBOARD
The Pelco KBD300 driver is intended to control the KBD300A keyboard in CM6800 ASCII mode (keyboard firmware version 5.00 or higher required).
17
16
15
14
2
1
3
4A
4B
4C
5
6
7
8
9
10
13
12
Figure 79. Keyboard Functions
11
C1554M-A (4/05) 77
Page 78

Table J. KBD300A Button Functions
REFERENCE
NUMBER
DESCRIPTION
1 LED display
2 Shift key
3 Shift key LED
4A-C Sequence keys: Previous, Next, Hold
5 Function keys F1/Latch, F2/Off, F3/Mom control auxiliaries.
With Shift on they control multiplexer display.
6 The AUX ON and AUX OFF keys control receiver auxiliaries.
With Shift on they control multiplexer display.
7 Program key
8 Macro sequence key
9 Preset key
10 Pattern key
11 Joystick
12 Focus and iris keys (iris keys can be used to scroll through menus on the CM6800 only)
13 Clear key
14 Camera selection key
15 Keypad (numbers 1 through 0)
16 Acknowledge key
17 Monitor selection key
General instructions: Use the numeric keypad to type camera numbers, monitor numbers, and preset numbers. Your administrator should
instruct you in the valid numbers. The MOM, AUX ON, AUX OFF, HOLD, PATTERN, and MACRO keys are custom keys. Your administrator should
instruct you in each key’s function.
NOTE: SHIFT must be off. Make sure the LED above the SHIFT key is not illuminated.
Log in: Press the ACK key. Type your user name. Press the CAM key. If you have a password, type your password and press the MON key.
Log out: Press the ACK key.
Select monitor: Type the monitor number and then press the MON key. The keyboard LED displays the selected monitor number.
Switch camera to monitor: Select the desired monitor. Type the camera number. Press the CAM key.
Switch to next camera number: Press the NEXT key.
Switch to previous camera number: Press the PREV key.
Pan and tilt: Select the desired camera. Move the joystick in the direction you want to pan and tilt the camera.
Zoom: Select the desired camera. Twist the joystick counterclockwise to zoom in. Twist the joystick clockwise to zoom out.
Focus near: Select the desired camera. Press and hold the NEAR key until the desired focus is attained.
Focus far: Select the desired camera. Press and hold the FAR key until the desired focus is attained.
Open iris: Select the desired camera. Press and hold the OPEN key until the desired iris is attained.
Close iris: Select the desired camera. Press and hold the CLOSE key until the desired iris is attained.
Preset: Select the desired camera. Type the preset number. Press the PRESET key.
78 C1554M-A (4/05)
Page 79

CONTROLLING A CM9760-REL RELAY OUTPUT UNIT
The following control options are available for CM9760-REL relay units:
• Set a point to True.
• Set a point to False.
• Set a point’s value momentarily to True.
• Disable a point.
• Enable a point.
All relay unit controls are available through the Device Control dialog box. In addition, your system administrator can write scripts that set the
state of a relay point. Your system administrator should instruct you in what scripts are available to you and how to run them.
NOTE: To access a relay unit, the Pelco Relay driver must be running. Device icons appear as a hollow outline when the device driver is not
running. If you try to open the Device Control dialog box when the driver is not running, you will get a connection error. Notify your system
administrator if the driver is not running.
OPENING A CM9760-REL RELAY UNIT’S DEVICE CONTROL DIALOG BOX
The Device Control dialog box provides tools for controlling a relay unit. To access the Device Control dialog box, you must belong to, and log in
under, a user group that allows you to access the Device Control dialog box.
Open the Device Control dialog box for a relay unit using one of the following methods:
• Double-click the device icon on a map.
• Double-click the device in the Device List.
• Right-click the device in the Device List and then click Show Control Dialog from the pop-up menu.
Figure 80. Relay Unit Device Icon
Figure 81. CM9760-REL Device Control Dialog Box
C1554M-A (4/05) 79
Page 80

HOW TO CONTROL A RELAY UNIT
To control a relay unit, you must belong to, and log in under, a user group that grants you the necessary privileges. Your system administrator
should instruct you in what privileges you have.
Set a Point to True
Click the desired point, and then click True. The point will be set to True. The point will appear in bold print in the Device Control dialog box.
Set a Point to False
Click the desired point, and then click False. The point will be set to False. The point will appear in normal print in the Device Control dialog box.
Set a Point’s Value Momentarily to True
Click the desired point, and then position the pointer over the Momentary button, and click and hold the mouse button.
The point will be set to True for as long as you keep the mouse button depressed. The point will be set to False when you release the mouse
button.
Disable a Point
Disabling a point prevents the point from changing state. Click the desired point, and then click Disable. The point will not be able to change state.
The point will appear in the Device Control dialog box in italics. When the point is selected in the list, none of the buttons in the Device Control
dialog box will be available, except the Enable button.
Figure 82. Relay Point 1 Disabled
Enable a Point
Enabling a point allows the point to change state. Click the desired point, and then click Enable. The point will appear in normal print in the Device
Control dialog box.
80 C1554M-A (4/05)
Page 81

CONTROLLING A SERIAL OUTPUT DEVICE
The serial output driver allows you to send ASCII commands to an external serial device, such as a camera. For example, you could send ASCII
commands to report alarms to an access control system, start a VCR in play mode, or control a camera.
You can control a serial output device by sending ASCII commands to the device using one of the following methods:
• Custom button: Click a custom button in the device’s Device Control dialog box.
• Script: Run a script.
• Text tab: Type an ASCII string on the Text tab of the desired device’s Device Control dialog box, and then press Send.
Your administrator should instruct you in the particular device-control commands that are available for each serial output device and the method
for sending them.
To control a particular serial output device, you must belong to, and be logged in under, a user group that grants you the necessary privileges. Your
system administrator should instruct you in what privileges you have.
NOTE: To access a serial output device, the Serial Output driver must be running. Device icons appear as a hollow outline when the device driver
is not running. If you try to open the Device Control dialog box when the driver is not running, you will get a connection error. Notify your system
administrator if the driver is not running.
OPENING A SERIAL OUTPUT DEVICE’S DEVICE CONTROL DIALOG BOX
The custom buttons and Text tab methods of sending commands are available through the device’s Device Control dialog box. To access the Device
Control dialog box, you must belong to, and log in under, a user group that allows you to access the Device Control dialog box.
Open the Device Control dialog box for a serial output device using one of the following methods:
• Double-click the device icon on a map.
• Double-click the device in the Device List.
• Right-click the device in the Device List and then click Show Control Dialog from the pop-up menu.
Figure 83. Serial Output Device Icon
Using the Text Tab
Figure 84. Device Control Dialog Box - Text Tab
The Text tab method of sending ASCII commands allows you to type any device-control command and then send it. Unlike the custom buttons and
scripts methods, you can send a command without the system administrator having to predefine it.
To control a serial output device using the Text tab, complete the following steps:
1. Open the Device Control dialog box for the serial output device you want to control.
2. Type the device-control command. Your system administrator should instruct you in what commands are available for each serial output
device. Refer to ASCII Command Special Characters for instructions on incorporating unprintable characters and quotation marks into a
command.
3. Click Send. The command is sent to the device.
C1554M-A (4/05) 81
Page 82

ASCII Command Special Characters
If a command contains unprintable characters, replace each unprintable character with its three-digit ASCII code between angle brackets. For
example, the command BLACK-HOT<Carriage Return> is represented in VMX300(-E) as BLACK-HOT<013>. Note that ASCII codes must be three
digits in length. Add leading zeroes if an ASCII code contains less than three digits.
If a command contains single or double quotation marks, replace the quotation marks with their ASCII codes: <039> for a single quotation mark
and <034> for a double quotation mark.
Other useful ASCII codes for unprintable characters are <002> for the Start of Text (STX) character and <003> for the End of Text (ETX) character.
Using Custom Buttons
Figure 85. Device Control Dialog Box – Custom Buttons Tab
The Custom Buttons method of sending ASCII commands allows you to send commands that have been predefined by the system administrator.
Clicking a custom button sends the command associated with the button to the serial output device. Your system administrator should instruct you
in what each button does.
If the Custom Buttons tab is blank, the system administrator has not defined any custom buttons for that device.
To control a serial output device with a custom button, complete the following steps:
1. Open the Device Control dialog box for the serial output device you want to control.
2. Click the custom button for the command you want to send. The command is sent to the device.
Using a Script to Control a Serial Output Device
The system administrator can define scripts to send device-control commands to serial output devices. A script can be associated with a hotlink
or label that you click, or it can be a freestanding entity that you run from a menu. Your administrator should instruct you in what scripts are
available to you and what each script does.
To run a freestanding script, complete the following steps:
1. Open a script menu using one of the following methods:
• Click a custom window, and then press Alt-Space Bar.
• Right-click the device icon for a destination device.
• In the Device List, right-click the serial output device you want to control.
The device pop-up menu opens.
82 C1554M-A (4/05)
Page 83

Figure 86. Using a Script to Control a Serial Output Device
2. Click Run Script, and then click the desired script from the submenu. The selected script runs.
For more information on working with scripts, refer to the Scripts section.
CONTROLLING AN IP DEVICE STATUS MONITOR
An IP device status monitor allows you to monitor the status of a networked device. Since almost every other VMX300(-E) device driver allows you
to monitor the status of that device, you would only need to use the IP device status monitor to keep track of an IP device that is not in the
VMX300(-E) system.
When the system administrator adds an IP device status monitor to the VMX300(-E) system, it acts as a placeholder for the IP device. The IP device
status monitor periodically pings the IP device, and if the device fails to respond to the ping, then a notification appears in the VMX300(-E) system.
Your system administrator should advise you as to what forms of notification are used for any IP device status monitors in your system.
Example: The system administrator configures a status monitor for an encoder/decoder that is not in the VMX300(-E) system. He then defines
an alarm that prompts an operator to ask a technician to troubleshoot the encoder/decoder if it remains inaccessible for more than a minute.
ACCESSING IP DEVICE CONTROLS THROUGH AN EMBEDDED WEB SERVER
If the IP device has an embedded web server, you can access the embedded web server from the VMX300(-E) client, provided you log in under a
user group that allows you to access the Device Control dialog box.
Open the Device Control dialog box for an IP device status monitor using one of the following methods:
• Double-click the device icon on a map.
• Double-click the device in the Device List.
• Right-click the device in the Device List and then click Show Control Dialog from the pop-up menu.
For information on controls available through the embedded web server, refer to the product documentation for the IP device.
Figure 87. IP Device Status Monitor Icon
C1554M-A (4/05) 83
Page 84

MONITORING AN ACCESS CONTROL DEVICE
The Access Control driver allows you to monitor an access control device through the Device Control dialog box. To access an access control
device’s Device Control dialog box, you must belong to, and log in under, a user group that allows you to access the Device Control dialog box.
NOTE: To access the Device Control dialog box, the Serial Access Control must be running. Device icons appear as a hollow outline when the
device driver is not running. If you try to open the Device Control dialog box when the driver is not running, you will get a connection error. Notify
your system administrator if the driver is not running.
Open the Device Control dialog box for an access control device using one of the following methods:
• Double-click the device icon on a map.
• Double-click the device in the Device List.
• Right-click the device in the Device List and then click Show Control Dialog from the pop-up menu.
Figure 88. Access Control Device Icon
MONITORING ACCESS CONTROL POINTS
The Point Status tab shows the current status of each of the access control device’s points. A point in bold print currently has value True. A point
in regular print currently has value False. In Figure 89, point 4 is currently true, indicating that an alarm has been received from the northeast fire
exit.
Your system administrator should instruct you in how you should respond to access control alarms.
Figure 89. Monitoring Access Control Points
84 C1554M-A (4/05)
Page 85

PORT BUFFER TAB
The Port Buffer tab shows the data coming in the COM port. The Port Buffer tab is used for diagnostic purposes.
Figure 90 shows an incoming string that matches the Pelco ASCII Protocol Alarm Pattern. Specifically, the substring ‘3Ea’ matches the Pelco ASCII
Protocol Alarm Pattern.
Once a string has been matched, it remains on the Point Buffer tab until a new string starts to come in, at which point the new string displays on
the tab.
Figure 90. Port Buffer Tab
C1554M-A (4/05) 85
Page 86

Gadgets
A gadget is a tool bar that provides tools for controlling a particular type of device.
For example, the gadget for a particular model of camera might have tools to move the camera to a preset, make the camera run a pattern, and
lock the camera.
NOTE: Only devices that are controllable have a gadget. Devices that cannot be controlled in any way, like fixed cameras and external monitors,
do not have a gadget.
For information on the tools available for a particular type of device, refer to the Devices section.
Canvas Gadgets
Custom windows also have gadgets associated with them. A window’s gadgets are actually associated with the window’s canvases, which define
the video display technology available to the window. Since a window might have access to more than one type of video display technology,
windows can have more than one canvas. A window has a different gadget for each of its canvases. When video is displayed in a custom window,
VMX300(-E) automatically uses the appropriate canvas for that signal and makes the gadget for that canvas available to you.
Analog Video Gadgets
VMX300(-E) supports the following video display technologies for analog video:
Figure 91. Sample Camera Gadget
• Video for Windows
• Quad Video Display
Refer to the Video for Windows Gadget section and the Quad Video Display Gadget section for more information.
Gadgets Button
The gadgets button allows you to open the gadget for any device the video signal is switched through. In this way, a gadget provides access to
all the devices in the switch path.
For example, a camera’s signal might pass through an encoder/decoder before being transmitted to a custom window. In this case, the gadget
allows you to access three gadgets: the camera’s, the encoder/decoder’s, and the canvas’s. To open the gadget for one of the other devices in the
switch path, click the Gadgets button and select the desired gadget from the drop-down list.
Figure 92. Gadgets Drop-Down List
86 C1554M-A (4/05)
Page 87

VIDEO FOR WINDOWS GADGET
The gadget for the Video for Windows canvas has the following tools:
1. Gadgets: The Gadgets button allows you to open the gadgets for the other devices in the switch path.
2. VFW devices: This button is used by administrators for troubleshooting the server configuration. If the workstation has more than one
Video for Windows card in it, click this button to see a list of installed cards, including the card number for each card. This allows you to
double-check that you used the correct card numbers when you configured the Video for Windows canvases in the server configuration.
3. Properties: Clicking the Properties button opens a drop-down menu with three options:
• Format
• Source
• Display
Each of these options allows you to set device settings for the Video for Windows card associated with the canvas. The device settings are
specific to the model of Video for Windows card installed in your workstation. For more information on the device settings for your Video for
Windows card, refer to the card’s product documentation.
4. Overlay: Video for Windows canvases allow you to display video at a higher quality setting, Overlay, or lower quality, Preview. Click the
Overlay button to display video at the higher quality setting. Motion appears smooth in Overlay mode.
Video displayed in Overlay mode cannot be maximized. If you maximize a custom window displaying Overlay video, the window itself will
maximize, but the video will not change size.
Figure 93. Video for Windows Gadget
In a multi-monitor system, Overlay mode only works on the primary monitor. Older workstations might not have the processing power
required to display Overlay video.
5. Preview: Video for Windows canvases allow you to display video at a higher quality setting, Overlay, or lower quality, Preview. Click the
Preview button to display video at the lower quality setting. Motion appears choppy in Preview mode.
Unlike video displayed in Overlay mode, video displayed in Preview mode can be maximized. If you maximize a custom window displaying
Preview video, the window and video will both maximize.
In a multi-monitor system, Preview mode works on any monitor.
6. Fit to window: Click the Fit to Window button to fit the video perfectly within the video display area. This eliminates the black areas that
appear on one or more sides of the video when the video does not fit exactly.
7. Capture and save image: The Capture and Save Image button allows you to take a snapshot of the video displayed in the window and
save the image as a JPEG file. Clicking the button opens the Save JPEG As dialog box. Browse to the desired folder and type in a file name.
Click Save to save the file and close the dialog box.
8. Frames per second: The Frames per Second setting controls how many video frames are displayed every second in Preview mode. Select
a number from the drop-down list. A larger number results in smoother video, but requires more processing time. A smaller number gives
choppier video, but requires less processing power.
The Frames per Second setting is not available in Overlay mode.
C1554M-A (4/05) 87
Page 88

QUAD VIDEO DISPLAY GADGET
The Quad Video Display gadget provides the following tools:
Gadgets button: The Gadgets button allows you to open the gadgets for the other devices in the switch path.
Properties button: The Properties button opens the Quad Video Display Properties dialog box. Refer to Configure Quad Video
Display Properties for instructions on using these tools.
Capture and Save button: The Capture and Save button allows you to take a snapshot of the video displayed in the window and
save the image as a JPEG file.
CONFIGURE QUAD VIDEO DISPLAY PROPERTIES
Click each tab on the Quad Video Display Properties dialog box to adjust the settings contained on the tab. On each tab you can click Load Defaults
to restore the default settings for the properties on that tab.
General Tab
Figure 94. Quad Video Display Gadget
Figure 95. Quad Video Display Properties Dialog Box: General Tab
Use the General Tab to configure the following properties:
Contrast
Use the Contrast slider bar to increase or decrease the contrast of the video in the window.
Brightness
Use the Brightness slider bar to increase or decrease the brightness of the video in the window.
Saturation
Use the Saturation slider bar to increase or decrease the saturation of the video in the window.
Hue
Use the Hue slider bar to increase or decrease the hue of the video in the window.
Horizontal Offset
Use the Horizontal offset slider bar to move the video left or right within the video display area.
Vertical Offset
Use the Vertical offset slider bar to move the video up or down within the video display area.
88 C1554M-A (4/05)
Page 89

Color Key Tab
Figure 96. Quad Video Display Properties Dialog Box: Color Key Tab
The properties on the Color Key tab are reserved for future use.
Advanced Tab
Figure 97. Quad Video Display Properties Dialog Box: Advanced Tab
Use the Advanced tab to adjust the horizontal and vertical sync of the video in the window.
C1554M-A (4/05) 89
Page 90

Custom Windows
Custom windows are windows created by your system administrator that can be used for the following purposes:
• View live and archived video
• Display an Internet browser
• Connect to a remote workstation
• Display maps
NOTE: Custom windows that are used for viewing video are defined by the system administrator to display specific types of analog or digital
video. Depending on your system’s specific settings, you may be able to display more than one digital video window at a time. The number of
digital video windows that can be displayed at one time is limited by the size and type of images selected for viewing.
Window mode: Only one type of content can be loaded in a window at a time. The window mode determines the type of content a window is
prepared to accept.
There are five window modes:
• Live Video
• Archived Video
• Map
• Internet Browser
• Remote PC
You can set a window’s mode by selecting the desired mode from the custom window pop-up menu. Refer to Custom Window Pop-up Menu for
instructions.
Open and close windows: To open and close custom windows, you must have permission to edit workspaces. If the Windows option does not
appear in the View menu, then you do not have permission to open and close custom windows.
To open a custom window, click View > Windows > <custom window>. To close a custom window, clear View > Windows > <custom window>, or
click the window, press Alt-Space Bar, and select Close from the pop-up menu. A window with a Windows border can also be closed by clicking
the Close button at the right of the window’s title bar.
Alternatively, you can open and close custom windows using the Edit Workspace option of the File menu.
For information on adjusting the size and position of a custom window, refer to Workspaces and the Appendix: Adjusting the Display.
Components: Custom windows have the following components:
• Title bar (optional)
• Tool bar
• Display area
• Custom window pop-up menu
Title Bar
The title bar lists the window name and the name of the source device currently switched to the window.
Figure 98. Custom Window Title Bar
A custom window only has a title bar if the border specified in the workspace is a Windows Caption and Border. See Workspaces for more
information. A Windows Caption and Border allows you to open the custom window pop-up menu by right-clicking the title bar. Refer to Custom
Window Pop-up Menu for more information.
Tool Bar
The tool bar provides tools to control the window content. The specific controls depend on the type of content loaded in the window. For example,
when video is loaded in the window, the control bar contains a gadget for controlling the video source device, whereas in Map mode, the tool bar
contains tools for loading maps and adjusting how the map is displayed. Refer to Window Mode for information on the different types of content
that can be displayed in custom windows.
90 C1554M-A (4/05)
Page 91

Display Area
The display area is the part of the custom window used to display content. The type of content depends on the window mode. For example, in Live
Video or Archived Video mode, the video displays in the display area, whereas in Map mode, the map displays in the display area.
Custom Window Pop-up Menu
The custom window pop-up menu allows you to do the following things:
• Select the window mode
• Run and stop scripts
• Adjust how the window is displayed
These options are also available through keystroke commands.
Figure 99. Custom Window Pop-up Menu
Open menu: To open the custom window pop-up menu, click the desired window and press Alt-Space Bar. Alternatively, if the window has a
Windows title bar, you can right-click the title bar to open the pop-up menu. Select an option by clicking it in the menu.
Use keystroke: To select an option using a keystroke, click the window and press the keystroke for the desired option.
Table K lists the custom window pop-up menu options and what they do.
C1554M-A (4/05) 91
Page 92

Table K. Custom Window Pop-up Menu Options
COMMAND KEYSTROKE USE OPTION AVAILABLE WHEN
Show Controls Alt-S Display the window’s control bar. The window’s control bar is hidden.
Hide Controls Alt-H Hide the window’s control bar. The window’s control bar is showing.
Live Video Alt-L Prepare the window to display live
video.
Archived Video Alt-A Prepare the window to display
archived video.
Map Alt-M Prepare the window to display a map. You have permission to view maps, and the workspace has
Internet Browser Alt-I Load the workstation’s default
Internet browser into the window.
Remote PC Alt-P Prepare to connect to a remote
workstation.
Run Script n/a Select a script and run it on your
workstation.
Stop Scripts n/a Stop all the scripts that you started
from that window.
Restore n/a Restore a maximized window to its
previous size and position.
Move n/a Reposition window. The workspace has Moveable selected.
Size n/a Resize window. The workspace has Sizeable selected.
Maximize n/a Maximize window. The workspace has Maximizable selected.
Close Alt-F4 Close window. You have permission to edit workspaces.
You have permission to view live video, and the workspace
has Live Video selected as permitted content.
You have permission to view archived video, and the workspace has Archived Video selected as permitted content.
Maps selected as permitted content.
You have permission to view Web pages, and the workspace
has Internet Browser selected as permitted content
You have permission to view remote PCs (workstations), and
the workspace has Remote PC windows selected as
permitted content.
Always available. If you do not have permission to run any
scripts, the Run Script submenu will say <no scripts>.
Always available. If you did not start any scripts from that
window, this option has no effect. This option does not affect
scripts you have started from other windows or devices, nor
does it affect scripts started by another operator.
The workspace has Maximizable selected.
NOTES:
• To use the Move command to move a custom window that has a border of type Windows Caption and Border, select Move from the menu,
position the pointer over the title bar, and drag the window to its new location.
• To use the Move command to move a custom window that has a border of type No Caption or Border, or of type Custom Caption and Border,
select Move from the menu, click an arrow key, then either use the arrow keys to position the window, or simply move the pointer to the
new location and click to freeze the window in place.
• A window’s border type is given on the Appearance tab of the Edit Workspace dialog box. Refer to Editing a Workspace for more
information.
VIEWING LIVE VIDEO
To view live video in a custom window:
• You must belong to, and be logged in under, a user group that permits you to view live video in custom windows. Refer to User Groups for
more information.
• The workspace must have Live Video selected as permitted content. If you have permission to work with workspaces, you can edit the
workspace and set the types of permitted content. Refer to Workspaces for more information.
• The system administrator must set up the server to allow live video in that window.
NOTE: You can only view video from a server other than your home server if your system administrator has set up the servers to allow it.
To view live video in a custom window:
1. Change the window mode to Live Video. Refer to Custom Window Pop-up Menu for instructions. If a device is switched to the window, a
gadget appears in the window’s control bar. If no device is switched to the window, << no controls available >> appears in the control bar.
2. Switch the source device (generally a camera) to the window. Refer to Devices - Switching a Device for instructions. The video appears in
the display area and the source device’s gadget appears in the window’s control bar.
92 C1554M-A (4/05)
Page 93

Figure 100. Viewing Video in a Custom Window
CAPTURING LIVE VIDEO
Some canvas gadgets have a Capture and Save Image button that allows you to take a snapshot of the video displayed in the window. Images are
saved in JPEG file format.
To capture a live video image:
1. Click the Gadgets button and select the canvas gadget from the drop-down list. The canvas gadget appears in the window’s control bar.
2. Click the Capture and Save Image button. The Save JPEG As dialog box opens.
3. Browse to the desired folder and type in a file name.
4. Click Save. The image file is saved and the Save JPEG As dialog box closes.
CONTROLLING A CAMERA
The particular tools available for controlling a camera depend on the model of camera. Typically, the tools include the following:
• Pan, tilt, zoom controls: VMX300(-E) provides both mouse and keyboard controls for panning, tilting, and zooming. To pan and tilt using
the mouse, click the custom window’s display area in the direction you want to move the camera. For example, to pan and tilt up and to the
left, click above and to the left of the center of the display area. Refer to PTZ Controls for more information.
• Presets: The Presets drop-down list in the camera’s gadget lists the presets for that camera. Select a preset from the list to make the
camera go to the preset. If the camera’s current view is not the result of going to a preset, <Custom View> appears in the drop-down list.
You can also create, modify, and delete presets, provided you have permission to open the camera’s Device Control dialog box. For detailed
information on presets, refer to the Devices section.
• Lock: The Lock button allows you to take exclusive control of the camera. Click the Lock button to prevent a script or another operator from
controlling the camera. You can only lock the camera when the Lock button is out. You can only control the camera when the Lock button’s
padlock is green. For detailed information on locking the camera, refer to the Devices section.
For information on the other tools available for controlling a particular camera, refer to the Devices section.
PTZ CONTROLS
VMX300(-E) provides both mouse and keyboard controls for panning, tilting, and zooming.
Mouse controls: To use the mouse to control a camera, click the custom window’s display area in the direction you want the camera to move.
Table L lists the mouse controls for panning, tilting, and zooming a camera.
C1554M-A (4/05) 93
Page 94

Table L. Mouse Controls
CAMERA CONTROL MOUSE ACTION
Pan left Click to the left of center
Pan right Click to the right of center
Tilt up Click above the center
Tilt down Click below the center
Zoom in Turn the mouse wheel away from you
Zoom out Turn the mouse wheel toward you
Focus near <Shift> Zoom in
Focus far <Shift> Zoom out
Iris open <Alt> Zoom in
Iris closed <Alt> Zoom out
To pan and tilt the camera incrementally, click once. Clicking close to the center moves the camera in small increments. The further away from the
center you click, the larger the increments the camera moves.
To pan and tilt the camera continuously, click and hold the mouse button depressed. Clicking close to the center moves the camera slowly. The
further away from the center you click, the faster the camera moves. Release the mouse button to stop panning and tilting.
To zoom incrementally, turn the mouse wheel one click. To zoom continuously, turn the mouse wheel continuously.
Keyboard controls: To use keyboard controls in a custom window, click the window’s display area to make it active, then use keyboard controls
as desired. Table M describes keyboard controls.
Table M. Keyboard Controls
CONTROL KEYSTROKE DESCRIPTION
Pan left Left Arrow key
Pan right Right Arrow key
Tilt up Up Arrow key
Tilt down Down Arrow key
Pan and tilt up and to the right Pg Up Page Up key on numeric keypad
Pan and tilt down and to the right Pg Dn Page Down key on numeric keypad
Pan and tilt up and to the left Home Home key on numeric keypad
Pan and tilt down and to the left End End key on numeric keypad
Zoom in + Plus key on numeric keypad
Zoom out – Minus key on numeric keypad
Focus near <Shift> + Shift key and Plus key
Focus far <Shift> – Shift key and Minus key
Iris open <Alt> + Alt key and Plus key
Iris closed <Alt> – Alt key and Minus key
NOTE: To use navigation keys on the numeric keypad, Num Lock must be off.
94 C1554M-A (4/05)
Page 95

VIEWING ARCHIVED VIDEO
To view archived video in a custom window:
• You must belong to, and be logged in under, a user group that permits you to view archived video in custom windows. Refer to User Groups
for more information.
• The workspace must have Archived Video selected as permitted content. If you have permission to work with workspaces, you can edit the
workspace and set the types of permitted content. Refer to Workspaces for more information.
• The system administrator must set up the server to allow archived video in that window.
LOCATING ARCHIVED VIDEO
There are two common approaches to locating archived video:
• Using the date/time of an archived alarm or event: The video you want to view coincided with an alarm or event that is archived, and
you know the approximate date/time of the alarm or event. For example, you might want to view the video recorded when a door alarm was
triggered.
In this scenario, you use an estimate of the date/time to locate the alarm or event in the Session Manager, then drag the alarm or event
from the Session Manager to the custom window to copy the selection to the window.
You can only use this approach if the system administrator has set up the server to associate the camera with the alarm. Your system
administrator should instruct you in whether you can use this approach. Refer to Locating Archived Video via an Archived Alarm or Event for
instructions.
• Using the date/time only: You know the approximate date/time of the video you want to view, but there is no corresponding alarm or
event archived.
In this scenario, you use the Event Picker in the custom window to zero in on the date/time as closely as you can, then you browse to locate
the desired archives. Refer to Locating Archived Video via the Date/Time Only for instructions on using this approach.
Locating Archived Video via the Date/Time Only
Follow this approach when you know the approximate date/time of the video you want to view, but there is no corresponding archived alarm or
event.
1. Change the window mode to Archived Video. Refer to Custom Window Pop-up Menu for instructions.
2. Use the custom window’s Event Picker to select a date/time as close to the date/time of the archive as possible, either by building a date/
time from the year down, or by zooming to a time unit. Refer to Event Picker - Building a Date/Time and Zooming to a Time Unit for
instructions. The selected date/time appears in the bottom row of the Event Picker.
Figure 101. Selecting a Date and Time
3. Click the date/time in the bottom row of the custom window’s Event Picker. If a camera is switched to the window, VMX300(-E) loads and
plays the archived video for that camera, cued to the date/time selected in the Event Picker, provided the video exists.
C1554M-A (4/05) 95
Page 96

Figure 102. Viewing Archived Video
4. If desired, switch a (different) camera to the custom window. Refer to Devices - Switching a Device for instructions. The gadget for the
archiving device the camera is connected to appears in the window’s control bar. If there is archived video for that camera, it loads and
plays in the window’s display area, cued to the date/time selected in the Event Picker.
TIPS:
• If you know which camera the archived video originated from, you can switch the camera to the custom window before selecting a
date/time in the Event Picker. If the camera is already switched to the window, you do not need to switch it again. If you do not know
which camera the video originated from, first select the date/time, then switch different cameras to the window successively until
you find the one you want.
• If your installation has multiple cameras and you have more than one custom window to view video in, you can play back synchro-
nized archived video from several cameras simultaneously. Drag a different camera to each custom window and select the desired
date/time in each window’s Event Picker. There is a delay between windows equivalent to the length of time it took you to drag the
next camera to its window.
NOTE: If you attempt to load archived video from a camera or date/time for which no archived video exists, “No Video Found” appears in the
custom window control bar.
Locating Archived Video via an Archived Alarm or Event
Follow this approach when the video you want to view coincided with an alarm or event, and you know the approximate date/time of the alarm
or event. In this scenario, you use an estimate of the date/time to locate the alarm or event in the Session Manager, then drag the alarm or event
from the Session Manager to the custom window to copy the selection to the window. The alarm or event must be archived.
NOTE: You can only use this approach if the system administrator has set up the server to associate the camera with the alarm. Your system
administrator should instruct you in whether you can use this approach.
1. If necessary, open the Session Manager by clicking View > Session Manager.
2. Click the Archive View button on the Session Manager tool bar to go into Archive View. The Event Picker appears at the bottom of the
Session Manager window, with an area for listing archived events above it.
3. Use the Session Manager’s Event Picker to select a date/time as close to the date/time of the alarm or event as possible, either by building
a date/time from the year down or by zooming to a time unit. Refer to Event Picker - Building a Date/Time and Zooming to a Time Unit for
instructions. The selected date and time appears in the bottom row of the Event Picker.
96 C1554M-A (4/05)
Page 97

Figure 103. Selecting a Date and Time in the Session Manager
4. Click the date/time in the bottom row of the Session Manager’s Event Picker. A list of the retrieved events appears in the Session Manager
window above the Event Picker. As well, each archived alarm or event is represented as a small vertical bar in the Event Picker’s Event Row.
Each entry in the list is colored the same as the corresponding bar in the Event row.
Only the events for the selected time period are retrieved. For example, if you specified a date/time down to the hour, only the archived
events for that hour appear.
5. Locate the alarm or event by browsing or filtering the archives. Refer to Session Manger - Browsing Archived Alarms and Events and
Filtering Archived Alarms and Events for instructions.
6. Drag the alarm or event from the list in the Session Manager to the custom window’s display area. The custom window’s Event Picker
acquires the same selection as the Session Manager’s Event Picker, including the date/time range and the alarm or event selected.
If the system administrator has associated the alarm or event with a camera, VMX300(-E) automatically switches the camera to the
window and retrieves its archived video, cued to the date/time of the alarm or event. For example, the system administrator might
associate a door alarm with a camera that points at the door. When you drag the archived alarm from the Session Manager to the custom
window, the video from the camera that points at the door loads and plays, cued to the time of the alarm.
C1554M-A (4/05) 97
Page 98

Figure 104. Viewing Video from an Archived Alarm or Event
If the system administrator has not associated a camera with the alarm or event and a camera is switched to the window, VMX300(-E)
loads and plays the archived video for the currently switched camera, cued to the date/time of the dragged alarm or event.
TIPS:
• You can prevent VMX300(-E) from automatically loading the video associated with an alarm or event by dragging the alarm or event to
the custom window’s Event Picker instead of to the custom window’s display area.
• If your installation has multiple cameras and you have more than one custom window to view video in, you can play back synchro-
nized archived video from several cameras simultaneously. Select the desired date/time in each window’s Event Picker. Drag a
different camera to each custom window. There is a delay between windows equivalent to the length of time it took you to drag the
next camera to its window.
NOTE: If you select a date/time and camera for which no archived video exists, “No Video Found” appears in the custom window control bar.
98 C1554M-A (4/05)
Page 99

CONTROLLING AN ARCHIVE DEVICE
The particular tools available for controlling an archive device depend on the model of archive device. Typically, there are these tools:
• Play: Play the video.
• Pause: Pause playing video. Click the Pause button again to resume playing.
• Stop: Stop playing video and unload it from the custom window.
• Rewind: Rewind the video.
• Fast forward: Advance the video.
• Date and time: Indicates the playback date and time of the currently playing video.
For information on the tools available for a particular model of archive device, refer to the Devices section.
Archived video automatically starts playing when it is loaded into a custom window. If a date/time is selected in the Event Picker, the video will
be cued to that date/time. If no date/time is selected, the video will be cued at or near the current date/time. While archived video is playing, the
green arrow in the Event Picker advances across the Event row. Refer to Event Picker for instructions on locating, selecting and loading archived
video.
If you have stopped or paused the video, you can resume it by clicking the Play button.
CURSOR MODE
The playback time in the gadget displays the date/time of the video that is currently playing. The Event Picker time displayed in the top row of the
Event Picker depends on the cursor mode selected:
• Independent: When Independent cursor mode is selected, the Event Picker time remains fixed at the original date/time you selected,
independent of the playback time.
• Auto select: When Auto Select cursor mode is selected, the Event Picker time advances whenever the playback time coincides with an
archived alarm or event. Thus the Event Picker time always shows the date/time of the most recently passed alarm or event.
• Synchronized: When Synchronized cursor mode is selected, the Event Picker time advances in step with the playback time.
To set the cursor mode, right-click the Event Picker in the custom window and select the desired mode from the pop-up menu.
Figure 105. Selecting Cursor Mode
C1554M-A (4/05) 99
Page 100

TIP: Use Synchronized cursor mode to track a moving object, such as a person or vehicle, in a single custom window. Suppose the object
moves across the range of Camera 1 to within the range of Camera 2. Track the object as follows:
1. Set the cursor mode to Synchronized.
2. Switch Camera 1 to the window.
3. Start the video playing at the desired time.
4. When the object leaves the range of Camera 1, switch Camera 2 to the window. The video from Camera 2 automatically cues to the
Event Picker time, which is synchronized with the playback time, picking up where the Camera 1 video left off.
VIEWING MAPS
To load a map into a custom window:
• You must belong to, and be logged in under, a user group that permits you to view maps in custom windows. Refer to User Groups for more
information.
• The workspace must have Maps selected as permitted content. If you have permission to work with workspaces, you can edit the workspace and set the types of permitted content. Refer to Workspaces for more information.
To load a map into a custom window:
1. Change the window mode to Map. Refer to Custom Window Pop-up Menu for instructions.
The tool bar for maps will appear in the window’s control bar. The tool bar has the same tools as the Main window’s map viewport tool bar.
The tools work the same way, except they act on the map in the custom window rather than the map in the Main window’s map viewport.
For information on using the zoom buttons, the Previous View button and predefined views drop-down list, refer to Maps - Adjusting the
Map Display.
2. Click the arrow to the right of the maps drop-down list and select a map from the list. The map appears in the display area.
Figure 106. Loading a Map into a Custom Window
NOTE: A hotlink or label that loads a map into a specific window always loads the map into the same window, no matter where the script is run
from. For example, suppose a hotlink on Map 1 loads Map 2 into the Main window map viewport. If Map 1 is loaded into the Main window map
viewport and the hotlink is clicked, Map 2 loads in the Main window map viewport. If Map 1 is loaded into a custom window and the hotlink is
clicked, Map 2 still loads in the Main window map viewport, not the custom window.
VIEWING AN INTERNET BROWSER
To view an Internet browser in a custom window:
• You must belong to, and be logged in under, a user group that permits you to view Web pages in custom windows. Refer to User Groups for
more information.
• The workspace must have Internet Browser selected as permitted content. If you have permission to work with workspaces, you can edit
the workspace and set the types of permitted content. Refer to Workspaces for more information.
100 C1554M-A (4/05)
 Loading...