


Car receiver PY-9348
MOD
PY-9348
Owner’s manual EN
Bedienungsanleitung DE
Instrukcja obsługi PL
Manual de utilizare RO

Owner’s manual |
|
|
|
ITEM |
|
Notes on Installation |
04 |
Control Panel Layout |
05 |
Wiring Diagram |
06 |
Basic Operation |
06 |
Radio Operation |
08 |
Music and MP4 Video Play |
08 |
RDS Operation |
10 |
Bluetooth Operation |
11 |
Remote Control Layout |
12 |
Remote Control Operation |
13 |
Setup |
16 |
Installing the Front Panel |
22 |
Detaching the Front Panel |
22 |
Cleaning the Connector |
22 |
Unit Installation |
23 |
Specification |
24 |
 EN
EN
3

Owner’s manual
NOTES ON INSTALLATION
The unit is designed for 14.4V DC, negative ground operation system only. Before installing the unit, make sure your vehicle is connected to 14.4V DC negative grounded electrical system.
The negative battery terminal must be disconnected before making connections, Incorrect can reduce damaging to the unit due to short circuit.
Be sure to connect the color coded leads correctly according to the diagram. Incorrect connections may cause the unit malfunction or damage the vehicle’s electrical system.
Be sure to connect the speaker(-) leads to the speaker(-)terminal. Never connect the left and right channel speaker cables each other or to the vehicle body. Do not block vents or radiator panels.
Blocking them will cause heat to build up inside and may result in fire.
After the completion of the installation and begin to operate the unit(including replacing the battery), please press the RESET button on the front panel with pointed objects(such as ball pen)bo set the unit to initial status.
DO NOT ATTEMP TO MODIFY THE UNIT, MODIFYING THE UNIDO NOT MAY CAUSE AN ACCIDENT.
STOP THE VEHICLE BEFORE CARRYING OUT ANY OPERATION THAT COULDINTERFERE WITH YOUR DRIVING.
DO NOT TURN ON THE UNIT IF THE TEMPERATURE INSIDE THE VEHICLE IS OUT OF - 20 C
TO 60 C
THIS PRODUCT IS DESIGNED FOR ONE SINGLE VIDEO OUTPUT, PLEASE USE A SPLITTER
IF YOU WOULD LIKE TO CONNECT FOR MULTIPLE VIDEO OUTPUT.
EN
4
Owner’s manual
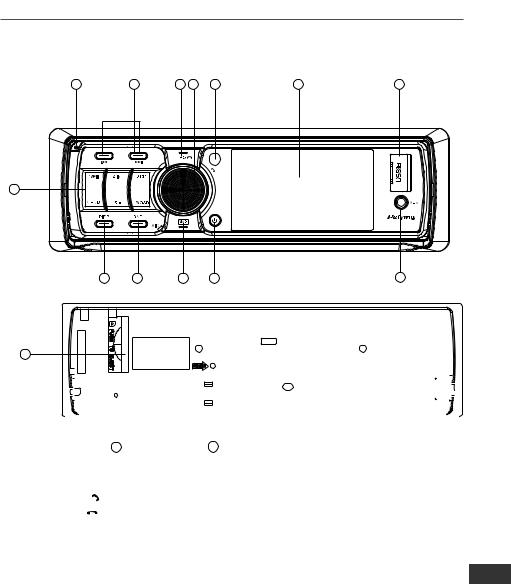
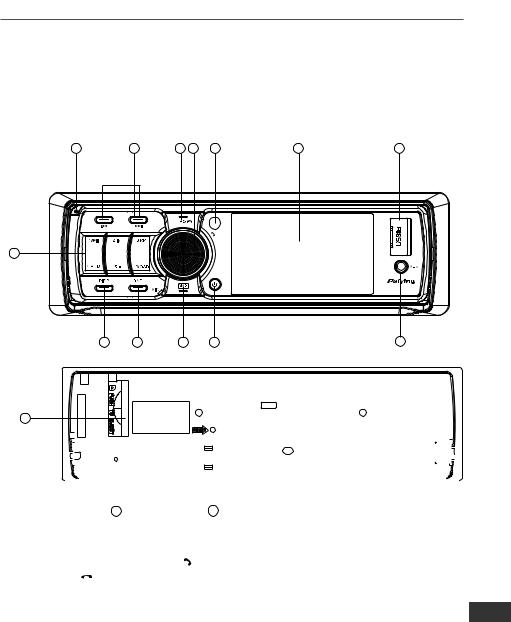
FRONT PANEL LAYOUT
14 |
7 |
4 |
3 |
5 |
13 |
16 |
11
|
|
|
|
MOD |
|
|
|
|
PY-9348 |
9 |
6 |
10 |
2 |
8 |
12
|
|
|
|
|
|
|
|
|
|
|
|
|
|
|
|
|
|
|
|
|
|
|
|
|
|
|
|
|
|
|
|
|
|
|
|
|
|
|
|
|
|
|
|
|
|
|
|
|
|
|
|
|
|
|
|
|
|
|
|
|
|
|
|
|
|
|
|
|
|
|
|
|
|
|
|
|
|
|
|
|
|
|
|
|
|
|
|
|
|
|
|
|
|
|
|
|
|
|
|
|
|
|
|
|
|
|
|
|
|
|
|
|
|
|
|
|
|
|
|
|
|
|
|
|
|
|
|
|
|
|
|
|
|
|
|
|
|
|
|
|
15 |
1 |
|
|
|
|
|
|
|
|
||
1. |
Reset Button |
|
|
|
11. Number Button |
|||||||||||
2. |
Power /MOD Button |
12. |
SD/MMC slot |
|||||||||||||
3. |
Volume/ Sel/ |
Button |
|
13. TFT Display |
||||||||||||
4. |
Preset EQ / |
Button |
14. |
Release Button |
||||||||||||
5. |
Remote Control Sensor |
15. |
Flashing LED |
|||||||||||||
6. |
Band Button/ID3 select |
16. |
USB connecter |
|||||||||||||
7.Tuning/Selcting Tracks/FW/RW
8.AUX IN
9.Disp-Color/ setting
10.Preset Stations/AMS
EN
5
Owner’s manual
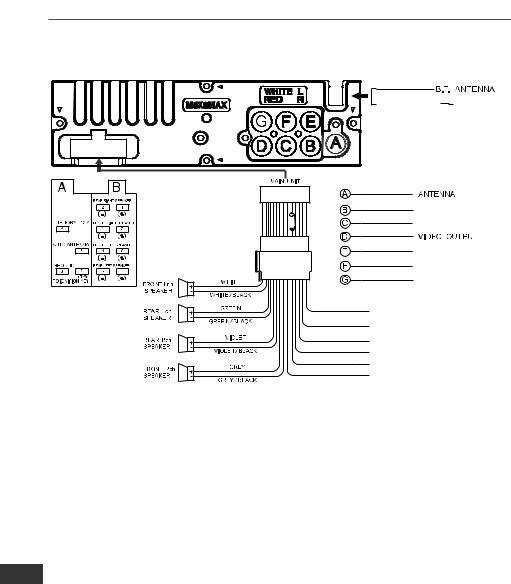
DIAGRAM PODŁĄCZANIA PRZEWODÓW
 15A
15A


 SU BWO OF ER
RE AR Rc h LI NE OUT
RE AR Lc h LI NE OUT
FR ON T Rc h LI NE OUT
FR ON T Lc h LI NE OUT
BA CK VI EW I NP UT
PINK |
|
BACK VIEW (B+) |
||
BROWN |
|
SAFETY WIRE |
||
|
||||
RED |
|
IGNITION SWITCH (B+) |
||
|
||||
|
|
|
|
|
BLACK |
|
GROUND (B-) |
||
|
||||
|
|
|
|
|
YELLOW |
|
MEMORY BACK -UP |
||
|
||||
BLUE |
|
|
|
|
|
POWER ANTENNA |
|||
|
||||
Warnning
Safety wire.This wire must connect to the ground of car.Otherwise,there are no picture on the TFT screen when playing video file or a picture.
BASIC OPERATION
EN INITIAL SYSTEM STARTSUP
Operating the unit for the first time or after replacing the car battery, you should press ( 14) to detach the front panel, and LED ( 15) will be blinking. Press( 1) Reset button with a pointed object( such as a ballpoint) to set the unit to initial procedure.
Note: When some errors occur in the LCD display, you can also press RESET button to resume tonormal. And it will erase the clock setting and some memorized functions.
TURNING THE UNIT ON/OFF
Press any button to turn on the unit, Press (2)POWER button more than 3 seconds to turn off.
6
Owner’s manual
VOLUME SELECTOR
Rotate Volume button(3) to adjust the sound level
BASS/TREBLE/BAL(L-R)/FADE SELECTOR
Press SEL button to enter Sound-setting menu, Rotate Volume knob to select your desired mode, adjust the level by pressing” ” or ”
  ”button.
Note: If you don’t adjust the knob within 5 seconds after selecting the desired, the unit will automatically return to the current mode being displayed. To adjust Bass/Trable level, EQ setting must set to FLAT. Details check setting EQ
MUTE FUNCTION
Long press EQ button to mute the Radio. Long press EQ again to disable mute function.
SETTING EQ
While listening music, you can set up rock music, popular, classic music or jazz pre-EQ by pressing(4)” EQ” button the procedure as follows:
1 Press EQ button repeatedly to select EQ mode in the following order:
ROCK-POP  CLASSIC
  JAZZ
JAZZ  FLAT
FLAT
2, Press SEL to enter Sound-Setting menu, rotate volume knob to select EQ, press ”  ” or ”
 ” to set EQ mode.
MODE SELECTOR
Press (2) „MOD„ button to select Radio USB SD Card TV(optional) AUX mode.(When the unit without connect anyone function. Press mode button the unit will skip over this function.)
SENSOR
(5) Receptor for the card remote commander.
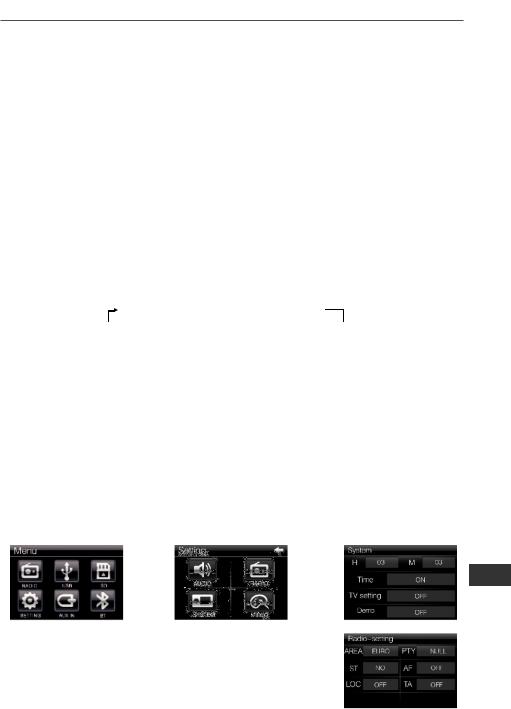
ADJUST TIME
Long press SEL, rotate volume to select SETTING, press SEL to enter. Rotate volume to select
SYSTEM, press SEL to enter. Rotate volume to select H or M, press ” ” or ”
  ” , to adjust hours or minutes.
EN
AREA USA/EUR SETUP
In Radio mode, long press SEL, rotate volume to select SETTING, press SEL to enter. Rotate volume to select RADIO, press SEL to enter, set area by pressing ” ” or ”
  ”.
”.
7

Owner’s manual
RGB (Customize RGB Color illumination)
The illumination color keep changing when unit Power on.
Fixed Color Setting:
Short press DISP to select fixed color from blue, green, red, yellow, purple and white.
Customize Color Setting:
Long press DISP key, rotate Volume to select Auto OFF. press SEEK+/- to select RED, rotate Volume to select 00 32
press SEEK+/- to select GREEN, rotate Volume to select 00 32 press SEEK+/- to select BLUE, rotate Volume to select 00 32, press DISP to confirm this setting
RADIO OPERATION
BAND SELECTOR
Press ( 6) ( BAND) button repeatedly to select band in the following order:
NOTE: On v i d e o playing mode, press ( 6) button to switch to AUTO PAL or NTSC system
MANUAL/AUTOMATIC TUNING
Manual Tuning: Press ( 7) button continuously to select a station upward or downward respectively.
Automatic Tuning: Press and hold ( 7) button for more than 3 seconds, the radio utomatically searches a station upward or downward respectively and plays when it find a station.
Scanning/Memorizing Stations Automatically
Press ( 10) button to scan each stored station for 5 seconds respectively which stored in ( 11) ( 1~ 6) number buttons. When AMS mode is carrying out. You also can press the
corresponding number button or AMS button when your desired station is changed. It starts playing that station.
Press and hold( 11) button for more than 3 seconds to activate automatically memory storing function. The radio automatically selects a station and has it stored in any one of the number Button( 11) ( 1~ 6)
NOTE: The unit can be stored up to 6 stations for each band. Regarding the function of nu mber button,
EN
MP4 OPERATION
The root menu is displayed on monitor when beginning to swith on USB/SD card mode. Select a file then Pres s PLAY Button or Enter to play the file.
During playback. Press the “STOP” button to stop playing and return the root menu. When display the root menu. Press the direction button to select your desired FOLDER or file. Then press
ENTER or PLAY button open the FOLDER. Or play the selected file. When displaying the root menu. You can also use the number buttons to select the serial number of The file and play the file.
8
Owner’s manual
SELECTING TRACKS/ FW. / RW |
|
|
Press ( 7) to choose your favorite track upward or downward respectively. Press and hold( 7) |
|
|
button to fast forward or rewind the track upward or downward respectively. |
|
|
PLAYING AUDIO/VIDEO FILE REPEATLY |
|
|
Press “RPT/3”button to perform repeat playing.when you need to repeat playing the track you like. |
|
|
Press “RPT/3”buttonf or the first time.it will repeat playing the same track for mp3 and WMA or a same |
|
|
Video File“, RPT” 1 appears. |
|
|
Press “RPT/3”buttonf or the second time.it will repeat playing the same AV directory ,“RPTD IR” |
|
|
appears. |
|
|
Press “RPT/3”buttonf or the third time. The entire directory for audio or video will repeat playing , |
|
|
“RPT ALL” appears. |
|
|
Press “RPT/3”button for the forth time to off the repeat playing function, “RPTOFF”appears. |
|
|
SCANNING TRACK AUTOMATICALLY |
|
|
During Mp3 or WMA songs playback, press „INT/2” button, to play the first 10 seconds of each |
|
|
Track, The display will show „ INT” , track number. Which indicates INT function is already |
|
|
activated. Press „INT/2”button once again to return to normal playback. |
|
|
NOTE: INT doesn’ t work during playing video file. |
|
|
PLAYING TRACKS IN RANDOM ORDER |
|
|
During playback, press „RDM/4” button,and „RDM” appears on the display, which indicates RDM |
|
|
function is carried out. The unit plays any track at random. Press RDM once again to return to |
|
|
normal playback mode. |
|
|
STOP PLAYING |
|
|
During playback, press ( 11) „ 5STOP” button to stop the playback, TFT will show „STOP” . |
|
|
Press the button once again To return to normal play mode, press „ „ button again. |
|
|
PAUSE THE PLAYBACK |
|
|
During playback, press ( 11) „ 1PLAY” button to suspend the playback, on the TFT display |
|
|
and show „PAUSE” ,To return to normal play node by press it again. |
|
|
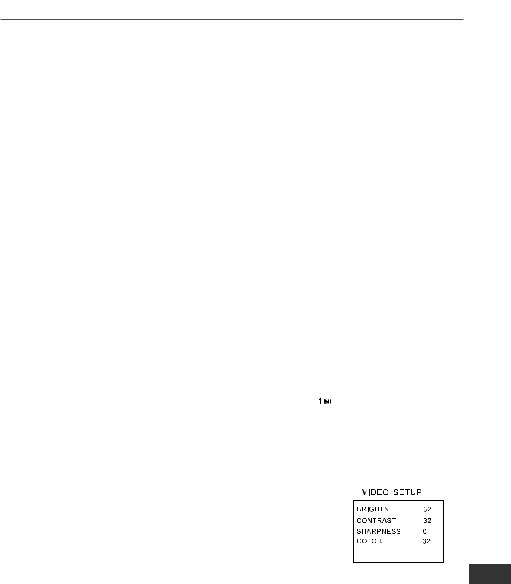
VIDEO SETUP |
|
|
While you watching Video or picture. you can enter “VIDEO SETUP” |
|
|
to adjust the picture quality. IF the picture appear to disorder when |
|
|
you adjustment. Please come into the “SYSTEM SETUP”select the |
|
|
“DEFAULT” menu, then press the knob of VOL +/- to confirm the value |
|
|
of factory recognize tacitly. |
EN |
|
BACK VIEW SETUP |
||
|
Put the unit back view control view connect to power 14.4 V negative grounded electrical system.
Connect car back view camra output to the “BACK VIEW VIDEO” input.When you backward your car. The back view picture will automatically turn to the front screen.
DOS (Dynamic Open Screen - wygaszacz ekranu)
The Dynamic Open Screen (Motion effect) when unit power on. Press any key to stop and return to the current mode.
DEMO ON: Long press SEL key, select Setting--> System --> Demo, press SEEK +/- to set ON.
Dynamic open screen mode repeat.DEMO ON mode used to demonstration. All buttons are not workable except „SEL” button.
DEMO OFF: Press SEL key, press SEEK +/- to set RGB drmo Off, then back to default status.
9

Owner’s manual
RDS (RADIO DATA SYSTEM) OPERATlON
AF :Alternative Frequencies
~ Setting RDS Mode Press AF button (26) and release immediately to switch on or off RDS mode.
Whenever RDS is switched on, symbol “AF” appears on the display.
AF / REG AF
-AF I REG key directs the activation of AF SEARCH.
-AF indicator is displayed when AF is ON, AF search is activated when reception is bad.
-During FM MODE, when AF is ON, SEEK, SCAN, AUTO, MEMORY function can only receive and save RDS program. However, when Italy option is in use, regardless of RDS programs that satisfy SD LEVEL Can be received and saved.
Indicator |
Condition |
AF ON |
AF ON MODE, RDS information is received. |
AF OFF |
AF OFF MODE |
AF blink |
AF ON MODE, RDS information is not received. |
REGION
-AF MODE is converted to REGION ON I OFF MODE when AF ON MODE 15 pressed for longer lsec.
-ON : Pl CODE is checked when AF CHECK in progress
-OFF: PI CODE and COVERAGE AREA is not checked when AF CHECK in progress.
PTY
RADIO MODE
- Previous PTY is displayed when PTY key (27) is pressed. If there are no keys entered for
2 seconds, previously selected PTY is searched. During 1 LOOP, if desired PTY is not found, NO
PTY is displayed.
- 2 program types are SPEECH and MUSIC.
By pressing PTY once, MUSIC is entered. When PTY is pressed the second time, SPEECH is entered.
M1~M6 keys can be used to select the desired program type.
TA
TA button (28) is operated as follows:
- TA is turned ON / OFF and TA indicator is displayed. When traffiic announcement is transmitted, regardless of the mode, traffic announcement is received.
If VOLUME LEVEL is below 20, VOLUME LEVEL is raised to 20, and returns to its previous
EN mode and volume level when the traffic announcement is over.
If volume is adjusted during traffic announcement, only the previous volume is valid.
-When TA is on, SEEK, SCAN, AUTO MEMORY function can be received or saved only when traffic program identification code has been received.
-When TA is ON, traffic program identification code is not received during specified time.
TAALARM : NO TA/ TP is displayed and alarm is set off. TA SEEK : TA SEEK is activated.
10
Owner’s manual
BLUETOOTH FUNCTION OPERATION
1. Pairing connected.
Turn on your CAR AUDIO SYSTEM, Put the mobile which with bluetooth device function close to the CAR AUDIO Unit, Soon.
The mobile will find the new bluetooth device “CAR AUDIO”,Input the pairing password “8888”and clik ok, the mobile will prompt the matching successful,when the pairing conneted is successed, On the TFT screen, bluetooth logo “BLUETOOTH”will stop blinking .
Then you may perform the bluetooth operation by press the button on the front panel on remote controler.
REMARK: depend on bluetooth mobile, the bluetooth system support “HSP” “HFP” “A2DP” and AVRCP bluetooth profile.
2. Handsfree phone service Function
If your mobile have matched with the CAR AUDIO system. When a phone is calling in, the bluetooth system will turn the phone’s ring to the CAR AUDIO speakers automatically, and the calling phone’s number will indicat on the TFT screen.
-Press the “ SEL/  button shortly to accept the call.
Then you can talking with the other party through t h e micphone on the front panel. -Press “EQ/  ” button shortly to reject the call wh e n call is comeing.
-Press “EQ/  ” button shortly to hand up after y o u finish the talking.
3. Playing Music by A2DP. |
|
|
|
|
|||||
Through the A2DP connected by mobile and unit, When you activated your mobile music |
|
||||||||
player to play music, Sound of the music playing in the mobile music player will turn to the |
|
||||||||
CAR AUDIO system playing, press the button“ |
„ and „ |
„can select the music track. After |
|
||||||
connecting mobile and head unit through A2DP, while mobile play music, press |
|
||||||||
“MODE” button to A2DP mode, the voice of the mobile will come out from car speaker. |
|
||||||||
Select music by pressing “ |
„ and „ |
„on the head unit. |
|
|
|||||
Press the button “ |
” or ” |
|
” have a same function as playing a disc. |
|
|||||
|
|
||||||||
4. Dialling a call use Remote control. |
|
|
|
|
|||||
Press „EQ / |
” button shortly to enter the bluetooth screen, then press the number button |
|
|||||||
“ O-9 ” and “ * ” “ # ” to select a phone number. |
|
|
|
||||||
- Press button ” |
|
” can delete the mistaken number during you dialling. |
|
||||||
|
|
||||||||
- Press the button ”SEL / |
” to confirm and call out a phone number which you have selected. |
|
|||||||
- Press ”EQ / |
” to hand up after you finish your talking. |
|
|
||||||
5. Calling in Phone Number BooK |
|
|
|
|
|||||
This bluetooth system can automatacally record the call in Phone number which you have |
EN |
||||||||
missed ( up to 10 phone number) . |
|
|
|
||||||
|
|
|
|
||||||
-Eeter the bluetooth screen,Then Press “EQ / |
” button shortly, can look up the phone numbers. |
|
|||||||
-Press “SEL |
” butoon shortly to call out anyone phone number in the phone number book. |
|
|||||||
6. Interrupt Bluetooth Connection/Reconnection.
Pressing the “ BND ” button more than I second to interrupt the current blutooth connection, when the phone at hands free or A2DP state, sounds of phone or music will turn back to mobile speaker.
Press the “ BND ” button more then I second again can reconnect the bluetooth matching
( some brand bluetooth mobile must actirate mobile bluetooth system or music player).
NOTE:Different mobile phone have different responses. We do not guarantee all the operation of connectable devices.
11
Owner’s manual
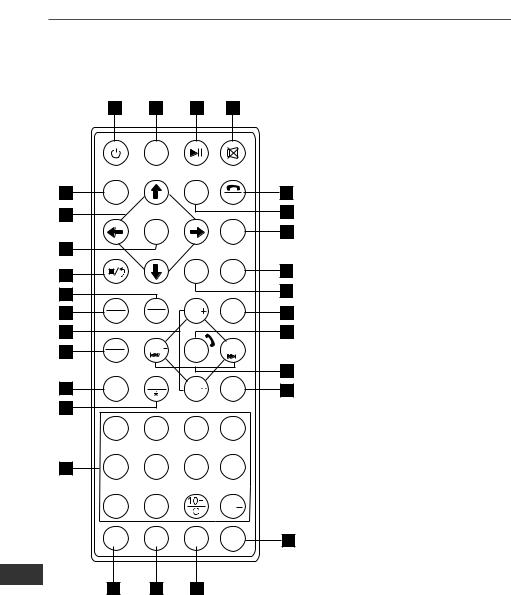
REMOTE CONTROL LAYOUT
5
4
6
20
9
12
7
13
16
10
14
EN
1 |
19 |
2 |
3 |
|
|
MODE |
|
|
|
BND |
|
DISP |
EQ |
|
SYS |
|
|||
|
|
|||
|
ENTER |
|
Setup |
|
|
|
LOUD |
SLOW |
|
AMS |
ST |
VOL + |
Zoom |
|
RPT |
PROG |
|||
|
|
|||
LOC |
SEEK |
SEL |
SEEK+ |
|
RDM |
||||
|
|
|
||
SCAN |
OSD |
VOL - |
AUDIO |
|
INT |
|
|||
|
|
|
1 2 3 4
5 6 7 8
9 |
0 |
|
10 |
|
AF |
PTY |
TA |
GOTO |
|
# |
||||
|
|
|
26 27 28
17
24
23
22
21
25
11
8
15
18
1.Power Button
2.Pause/play Button1
3.Mute Button
4.Selecting Menu Button
5.Band/ System Switch
6.Enter Button
7.Volume Control
8 Tuning/ Selecting/ FW/RW9.
9.Program Playing
10.OnScreen Display
11.Setting the Sound/  setting
12.Repeat Playing
13.Random Playing
14.Number Button
15.Audio Setting
16.SCAN Button
17.EQ/  setting
18.Playing Time setting
19.Mode Switch
20.Stop Button
21.Loud Button
22.Slow Motion Play
23.Setup Menu
24.Display Button
25.Zoom Setting
26.Alternative Frequencies Button
27.Programme Type Button
28.Traffic Announcement Button
12
Owner’s manual
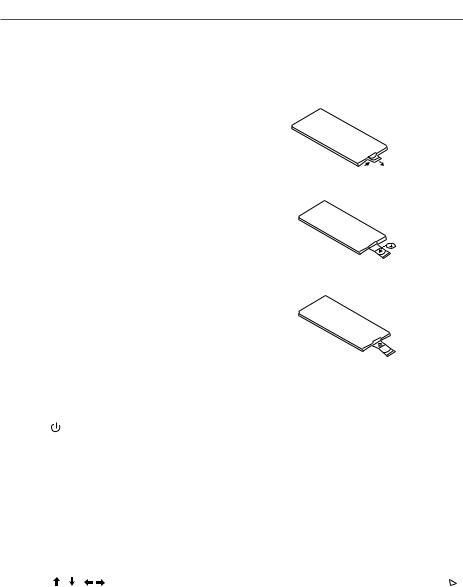
REPLACING THE BATTERY
When the operational range of the remote control becomes short or non functions while operating. Replace a new CR2025 battery. Make sure the battery polarity before replacement.
1.Pull out Battery Holder while pressing the stopper
2.Put the button type battery( + )mark upward into the Battery Holder.
3.Insert the Battery Holder into the Remote control
POWER BUTTON
Press(1) button to turn power On/ Off.
PAUSE/ PLAY BUTTON
Press (2) 
 button to suspend the playback of Mp3,wma music or mp4 Video file Press it again to return to normal palyback mode.
MUTE BUTTON
Press (3)  button to cut down the sound output, press it again to resume the previous sound level.
MENU SELECTOR |
|
|||
EN |
||||
Press (4) / / / , to select your desired menu, then press( 6) ( ENTER) or play button (2) |
|
|
||
|
||||
|
||||
|
|
|||
to confirm. |
|
|||
BAND/ SYSTEM SWITCH
During radio mode, Press (5) (BAND/SYS)to switch receiving band.
During the player mode, press (5) (BAND/SYS) button to switch to AUTO, PAL OR NTSC system.
13

Owner’s manual
VOLUME INCREASING/ DECREASING
Press( 7) ( VOL+ OR VOL- ) button to increase or decrease the volume level respectively.
TUNING/ SELECTING TRACKS/ FAST FORWARD/ REWIND
During radio mode, continuously press( 8) button to manual search a station downward or upward respectively; if press and hold the button for more than 3seconds. The radio will automatically search a station downward of upward respectively until it finds a station.
During the playing mode press the 8 button to rewind or forward , ( ) for you to reach your desired track quickly. When discontinuously press (8) button, you can select your desired portion downward or upward or upward respectively. if press and hold the button for more than 3second- s,you can select you desired portion fast forward/rewind.
PROGRAM PLAYING/ ST
During Music files playing mode, press(9) PROG button to enter programming page.
Press(4) button and (14) numbers button to program the tracks to be played.
NOTE: ST will only work on Radio mode.
ON - SCREEN DISPLAY
During Playing USB or SD Card mode, press( 10) (OSD) button. The displayer shows Track/
Chapter,Current Time.
NOTE: During MP3/WMA mode, only show directory and tracks.
VOL/ BAS/ TRE/ BAL/ FAD SELECTOR
During radio or playing mode. Repeat press( 11) (SEL) button to select the desired
mode in the following order:
VOL  BAS
BAS  TRE
TRE  BAL
BAL
FAD  BRI
BRI  CON
CON  SHAP
SHAP
NOTE: After selecting your desired mode, your can adjust the current mode being displayed by(
VOL) button. When P- EQ mode isactivated, press SEL button to select the modes, And Bass/
Treble mode are invalid. ( show as below)
VOL |
BAL |
FADB |
RI |
CON |
SHAP  CON
CON
EN
REPEAT PLAYING/ AMS
1. press AMS button(12),
In playing mode, repeat function is: RPT1 RPT , DIR,R PT ALL,R PT OFF.
2.Radio mode is AMS function
RANDOM PLAYING
During the songs playing mode, press( 13) (RDM) button to play any track at random.
During the RADIO mode, press the button is LOCAL function.
14

Owner’s manual
NUMBER BUTTONS
During radio mode, you can select one of the 6 stored stations on each band by pressing any one of the number button( 14) . During the playing mode, you can select any track directly by using number button( 14) ( 0~ 10+ ) . For example, if you need the fifteenth track, you can first press button 10+ and press button 5, the corresponding track( 15) will be played.
NOTE: In Mp3 or WMA songs playing mode.When button 10+ is first pressed. It work as 10+ , it work as 20+ when pressed at the second ti m e ,the third time...30+...and so on.
LEFT/ RIGHT/ STEREO SELECTOR
During the playing mode , continuously press( 15) (Audio) can change the sound to left/ right speaker or stereo mode.
SETTING DISC PLAYBACK TIME
During playing mode, press( 18)GOTO button can set the specific time to play. Using( 4) and ( 14) number button to set track/Chapter or time, and press ENTER button to play
MODE SWITCH
Press ( 19) button to switch Radio, USB/SD/MMC or AUX mode.
PAUSE
In playing mode, press ( 20) button to suspend the playback, press it again to stop the playback.
SCAN/INT
In playing mode. Press Scan/INT button is “INT”function. It can playing the first 10 seconds of each songs track.
In radio mode. Press Scan/INT button is scan function to search radio station. when a station signal strength level more than the level to stop. The radio will playing the station for 5 seconds and the frequency blinking on the TFT screen. at the same time. Press and hold scan button more them 3 second to select the station. the mechanism will start play the radio station.
SLOW REVERSE/ SLOW ADVANCE PLAY
During Mp4 video playing mode, press( 22) key once for ½ slow advance, twice for 1/ 3, third for 1/4, fourth 1/5,fifth for 1/6,sixth 1/7,seventh return to normal playback speed.
ZOOM KEY
In Mp4 Video playng mode, press( 25) key once for 2 x zoom, twice for 3 x zoom, third time for 4 x |
|
zoom, fourth time for ½ zoom, fifth time for 1/ 3 x zoom, sixth time for 1/ 4 x zoom, seventh time to |
|
cancel the zoom mode .And you can pan the picture by pressing the cursor keys. |
EN |
|
NOTE: No zoom function for MP3, WMA,Songs playing mode.
15

Owner’s manual
SETUP
1.Press SETUP ( 23) key of remote control in the stop mode. (Press the STOP button twice to ensure the player is under STOP mode.
2.The main page of setup menu is displayed.
3.Select the preferred item by using the ( 4) button
4.Press ( 6) ENTER button
A. System Setup
This setup page includes all the items of TV system, Screen saver ,TV type, sale Password, Rating & Default features. The detail please refer to SYSTEM SETUP MENU.
B. Language Setup
This setup page includes all the items of OSD Language, Audio Language, Subtitle Language and Menu Language features. The detail please refer to LANGUAGE SETUP MENU.
C. Audio Setup
This setup page includes all the items for AUDIO. Please to AUDIO SETUP MENU.
D.Video Setup
This setup page includes all the items for VIDEO. The details please refer to VIDEO SETUP MENU.
E. Digital setup
EQ Button
Press (26) button to select PRE-EQ:
ROCK -> POP -> CLASSIC -> JAZZ -> FLAT mode
EN
16

Owner’s manual
MIXED FILE FORMAT USB/SD/MMC CARD
While you listen to (or watching) mixed file format directory.Which is together whith MP3,WMA.
JPG or MPEG4 formats.just instert the USB or SD/MMC card. The mechanism will Automatically switch on. For details, please rfer to the following steps:
EN
Elec t numbe r for you desir e song .
17
|
Owner’s manual |
|
|
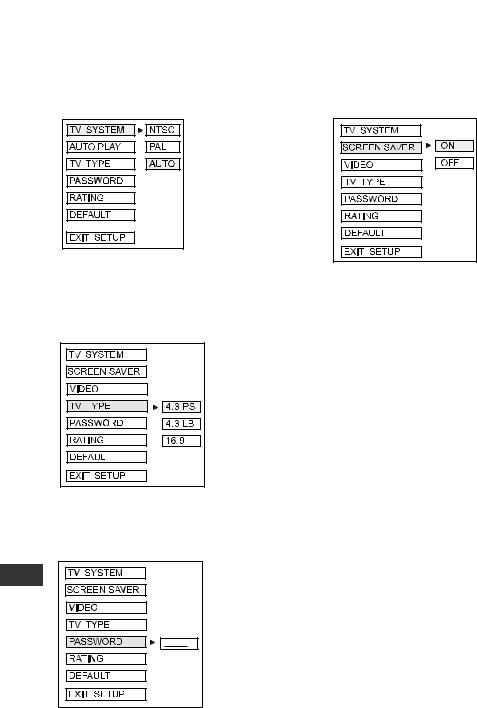
A. SYSTEM SETUP |
|
a. TV System |
b. Screen Saver |
This player can play
Mp4 video in either PAL or NTSC format. Select NTSC format when you connected to NTSC TV. Select PAL format when you connected to PAL
TV. If you select AUTO, the unit will auto select the format (PAL/NTSC) according to your TV system.
c. TV Type
1) 4:3 PS
Played back in the PAN & SCAN style (if connected to wide-
-screen TV, the left and right edges are cut off) 2) 4:3 LB
Played back in LETTERBO style (if connected to wide-scre- en TV, black bands appear at top oand button of the screen
3) 16: 9
Aelect when a wide - screen TV set is connected.
d. Password
EN |
Enter the password and press ENTER button.
Type the old password (The instal factory code is 0000) and key in 4 characters password now you want to use, and typw again to confirm
18

Owner’s manual
e. Rating
1 KID SAFE |
2G |
3PG |
4PG1 3 |
5PG-R |
6R |
7 NC 17 |
8 ADULT |
Select suitable guidance rating by the cursor button and confirmed by pressing ENTER button.
Rating 1: [ Kid Safe] - Select this when the programs are safe to all kid view.
Rating 2: [ G] - Select this that allows admission to person of all ages.
Rating 3[ PG] - Select this that needs parental guiding their children.
Rating 4[ PG13] - Select following when children under 13 are forbidden to view.
Rating 5[ PG- R] - Select this when the” PG- R” was printed on the DVD disc.
Rating 6 [ R] - Select this when children under 17 must be guide to view by their parents.
Rating 7[ NC17] - Select this when children under 17 are forbidden to view
Rating 8[ Adult] - Select this, when only allows admission to all adults.
f. Default
RESTORE |
Recover acquiescing in state when leaving the factory
B. LANGUAGE SETUP
Select the preferred OSD Language, Audio Language, Subtitle Language and Menu
Language by using the cursor buttons.
a. OSD Language |
|
|
b. Audio Language |
|||||||||
|
|
|
|
|
|
|
|
|
|
|
|
|
|
|
OSD LANGUAGE |
|
|
ENGLIS H |
|
|
|
OSD LANGUAG E |
|
ENGLIS H |
|
|
|
|
|
|
|
|
|
|
|
|
|
|
|
|
AUDI O LANG |
|
|
CHINESE |
|
|
|
AUDI O LANG |
|
CHINESE |
|
|
|
|
|
|
|
|
|
|
|
|
|
|
|
|
SUBTITLE LANG |
|
|
GERMAN |
|
|
|
SUBTITL E LANG |
|
GERMAN |
|
|
|
|
|
|
|
|
|
|
|
|
|
|
|
|
|
|
|
|
|
|
|
|
|
|
|
|
|
MEN U LANG |
|
|
SPANIS H |
|
|
|
MEN U LANG |
|
SPANIS H |
|
|
|
|
|
|
|
|
|
|
|
|
|
|
|
|
|
|
|
|
|
|
|
|
|
|
|
|
|
DIVX[R] VOD |
|
FRENCH |
|
|
|
EXIT SETU P |
|
FRENCH |
|
|
|
|
|
|
|
||||||||
|
|
|
|
|
|
|
|
|
|
|
|
|
|
|
EXI T SETU P |
|
PORTUGUESE |
|
|
|
|
|
PORTUGUES E |
|
|
|
|
|
|
|
|
|
|
|||||
|
|
|
|
|
|
|
|
|
|
|
|
|
|
|
|
|
|
|
|
|
|
|
|
|
|
|
|
|
|
|
|
|
|
|
|
|
|
|
|
|
|
|
|
|
|
|
|
|
|
LATIN |
|
|
|
|
|
|
|
|
|
|
|
|
|
|
|
|
|
|
|
|
|
|
|
|
|
JAPAN |
|
|
|
|
|
|
|
|
|
|
|
|
|
|
EN
19

Owner’s manual
c. SUBTITLE Language
OSD LANGUAG E |
ENGLISH |
AUDI O LANG |
CHINESE |
SUBTITLE LANG |
GERMAN |
MENU LANG |
SPANISH |
EXIT SETUP |
FRENCH |
|
PORTUGUESE |
|
JAPAN |
|
OFF |
d. MENU Language
OSD LANGUAGE |
ENGLIS H |
AUDI O LANG |
CHINESE |
SUBTITL E LANG |
GERMAN |
MEN U LANG |
SPANISH |
EXI T SETU P |
FRENCH |
|
PORTUGUES E |
|
JAPAN |
|
LATIN |
C. AUDIO SETUP
a. Audio out
SPDIF/OFF:
Analog or optical output port all has not output signal. SPDIF/RAW:
When the player is connected with the powet amplifier by the analog or optical port, please select this item; when playing disc which is recorded by Dolby Digital, DTS or MPEG recording system, the analog or optical output signal of the unit will by the same as the digital signal (RAW format) of the playing disc. At the same time, the power amplifier you connected must have the decode function of dolby Digial, DTS or MPEG.
SPDIF/PCM:
When the player is connteced with the 2 channel, digital stereo amplifier, please select this item; when the playing disc which is recorded by Dolby Digital or MPEG recording system, the analog or optical output will be modulated to 2 channel output by PCM.
b. Key
EN
D. VIDEO SETUP
BRIGHTNESS
CONTRAST
HUE
SATURA TIO N
SHARPNES S
EXI T SETU P
a. Brightness
BRIGHTNESS |
|
|
CONTRAST |
12 |
|
10 |
||
|
||
HUE |
8 |
|
6 |
||
|
||
SATURA TIO N |
4 |
|
2 |
||
SHARPNES S |
||
0 |
||
EXI T SETU P |
|
20
Owner’s manual
b. Contrast
BRIGHTNES S |
|
|
CONTRAST |
12 |
|
10 |
||
|
||
HUE |
8 |
|
6 |
||
|
||
SATURA TION |
4 |
|
2 |
||
SHARPNESS |
||
0 |
||
EXI T SETU P |
|
d. Saturation
BRIGHTNESS |
|
|
CONTRAST |
12 |
|
10 |
||
HUE |
8 |
|
6 |
||
|
||
SATURA TION |
4 |
|
2 |
||
SHARPNES S |
||
0 |
||
EXIT SETUP |
|
E. DIGITAL SETUP
a. Dynamic range
DYNAMI C RANG E |
FULL |
6/8 |
|
DUAL MONO |
4/8 |
2/8 |
|
EXI T SETUP |
OFF |
|
To set the dynamic range compression
c. Hue
BRIGHTNESS |
|
|
CONTRAST |
+6 |
|
+4 |
||
HUE |
+2 |
|
0 |
||
|
||
SATURA TION |
-2 |
|
-4 |
||
SHARPNES S |
||
-6 |
||
EXI T SETUP |
|
e. Sharpness
BRIGHTNES S |
|
|
|
CONTRAST |
|
|
|
HUE |
8 |
8 |
|
|
|||
SATURA TION |
6 |
6 |
|
4 |
4 |
||
SHARPNESS |
|||
2 |
2 |
||
EXIT SETU P |
0 |
0 |
|
|
|
b. Dual mono
DYNAMIC RANG E |
STER EO |
DUAL MONO |
MONO LEFT |
EXIT SETU P |
MONO RIGH T |
|
MIX MONO |
To set the stereo mode.
EN
21
Owner’s manual
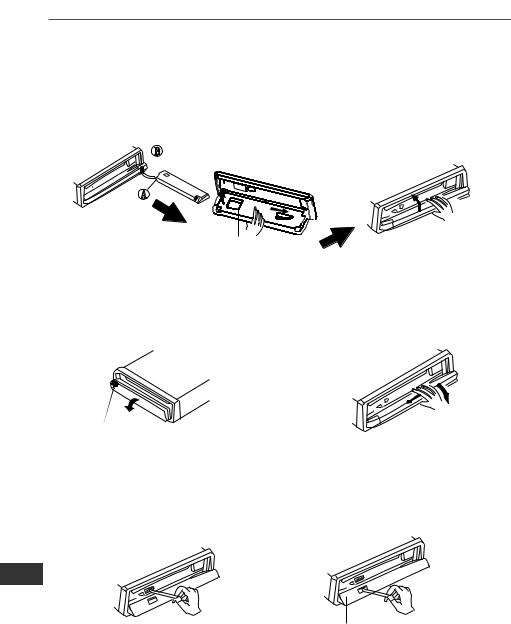
INSTALLING THE FRONT PANEL
To install the front panel, insert the panel into the housing and make sure the panel
is properly installed, otherwise, abnormalities occurs on the display or some keys will not function properly
B
A
2ND
1ST
DETACHING THE FRONT PANEL
Press REL but ton in the upper left cor ner , and hen front panel will not funct ion proper ly.
REMOVING THE FRONT PANEL
When the front panel was turned down to a pos ition of 90 , hold and slide the front panel to left, and then pul l it out .
RE LE AS E
CLEANING THE CONNECTOR
If the connector between the main unit and the front panel is dirty, it may result the unit in abnormal working condition. To avoid such problem happening , please detach the front panel, and clean the connector with an alcohol swab. Gently clean and avoid damaging the connector.
EN
NOTE: For safekeeping, always shut down the generator and take out the key from the ignition before cleaning. And never keep your finger of any metal device in touch with the connector directly.
22

Owner’s manual
DIN FRONT-MOUNT (Method A)
1. Dashboard
2. Holder
After inserting the holder into the dashboard, select the appropriate tab according to the thickness of the dashboard material and bend them inwards to secure the holder in place 3. Screw
Rys.2
Rys.3
1.Dashboard
2.Nut (5mm)
3.Spring Washer
4.Screw (5 x 25mm)
5.Screw
6.Strap
Be sure to use the strap to secure the back of the unit in place. The strap can be bent by hand to the desired angle.
7. Plain Washer
DIN REAR-MOUNT (Method B)
1.Frame
2.Insert fingers into the groove in the front of frame and pul l out to remove the frame. (When reatt achi ng the frame, point the side with a groove dow nwards and attach it. )
3.Lever
Insert the levers supp lied with the uni t into the grooves at both sides of the uni t ad show n in figure unti l they click. Pulling the levers makes possible to remove the unit fro m the dashboard.
1. Select a position where the screw
holes of the bracket and the screw holes of the main unit become aligned (are fitted), and tighten the screws at 2 places on each side. Use either truss screws (5 x 5mm) or flush surface screws
(4 x 5mm)
2.Screw
3.Dashboard or Console
EN
INPUT THE SD CARD
The SD oblique angle keeps upward exposure, put into the SD slot and press it again to eject.
23

|
Owner’s manual |
|
|
SPECIFICATION |
|
GENERAL |
|
Power Supply Requirements: |
DC 14,4V, Negative Ground |
Load Impedance |
4 ohms |
Maximum Output Power: |
40W X 4(CH) |
Chassis Dimensions: |
178x124.6x50mm(WxDxH) |
Current Drain: |
15A |
Compatible Flash File Formats
Audio
Video
Picture
Video system
Video Section
Video System:
Video Output Level:
Audio Section
Maximium Output LEVEL:
Frequency Response: Signal- to-noise Ratio:
Separation:
FM Tuner Section
WMA, MP3, WMV
MPEG4, Divx, Xvid, MPEG2, AVI
JPEG
AUTO / PAL / NTSC
4:3 Letter Box, 4:3 Pan Scan, 16:9
1.0V p-p 75 ohms
2Vrms (+ 3dB) 20~20KHz 65dB
60dB
|
Tuning Range: |
87.5 - 108MHz |
|
IF: |
10.7MHz |
|
Usable Sensitity ( - 30dB) |
15dB |
|
Signalto- noise Ratio: |
60dB |
|
Stereo Separation: |
30dB(1KHz) |
|
Frequency Response: |
30 ~ 15000 Hz |
|
AM Tuner Section |
|
|
Tuning Range: |
522 - 1620KHz |
|
IF: |
450KHz |
|
Usable Sensitivity( - 20dB) : |
28dB |
|
|
|
EN |
Remarks |
|
|
Specifications subject to change without notice. |
|
„The Lechpol company declares that product PY-9348 is consistent with the essential requirements and other relevant provisions of directive 1999/5/EC. The proper declaration for download from www.lechpol.eu”
24

Bedienungsanleitung |
|
|
|
INHALT |
|
Hinweise zur Installation |
26 |
Frontplatte |
27 |
Anschlussdiagram |
28 |
Allgemeine Funktionen |
28 |
Radiofunktionen |
30 |
Musik und MP4 Video Wiedergabe |
30 |
RDS Funktionen |
32 |
Bluetooth Funktionen |
33 |
Fernbedienung |
34 |
Funktionen der Fernbedienung |
35 |
Einstellungen |
38 |
Einsetzen der Frontplatte |
44 |
Abnehmen der Frontplatte |
44 |
Reinigen des Steckers |
44 |
Geräteinstallation |
45 |
Technische Daten |
46 |
DE
25

Bedienungsanleitung
INSTALLATION
VORSICHTSMASSNAHMEN
Der Ort der Montage sollte so gewählt werden, dass das Gerät den Fahrer nicht stört.
Vor dem endgültigen Einbau, vorübergehend Gerät mit Spannung versorgen und sicherstellen, dass es richtig angeschlossen ist und dass sowohl das Gerät als auch das System in normalen Parameter funktionieren.
Verwenden Sie nur die mitgelieferten Teile zur korrekten Installation. Die Verwendung anderer Bauteile kann zu Störungen oder Geräteschäden führen.
Fragen Sie Ihren nächstgelegenen Autohändler, wenn die Installation Bohrungen oder sonstige Änderungen des Autos erfordert.
Installieren Sie das Gerät so, dass es nicht den Fahrer stört und die Passagiere nicht verletzt im Falle eines plötzlichen Bremsmanövers, wie eine Not-Bremsung.
Installieren das Gerät nicht an Orten, wo es hohen Temperaturen, wie Sonnenlicht, warme Luft, heiße Luft von der Heizung oder an Orten mit Staub, Schmutz oder starken Vibrationen ausgesetzt ist.
Schützen Sie das Gerät vor Feuchtigkeit.
VERSUCHEN SIE NICHT ÄNDERUNGEN AN DEM GERÄT DURCHZUFÜHREN. ÄNDERUNGEN KÖNNEN ZU UNFÄLLEN FÜHREN
HALTEN SIE DAS FAHRZEUG AN BEVOR SIE EINE EINSTELLUNG DURCHFÜHREN, DIE DIE FAHRTÄTIGKEIT BEEINTRÄCHTIGT.
GERÄT NICHT EINSCHALTEN WENN DIE INNENTEMPERATUR DES FAHRZEUGES UNTER
20ºC ODER ÜBER 60ºC LIEGT.
DIESES GERÄT IST MIT EINEM EINZIGEN VIDEOAUSGANG AUSGESTATTET. VERWENDEN
SIE EINEN VIDEO-SPLITTER WENN SIE MEHRERE MONITORE ZUGLEICH BETREIBEN
MÖCHTEN.
DE
26
Bedienungsanleitung
ANORDNUNG DER BEDIENELEMENTE
FRONTPLATTE
14 |
7 |
4 |
3 |
5 |
13 |
16 |
11
|
|
|
|
MOD |
|
|
|
|
PY-9348 |
9 |
6 |
10 |
2 |
8 |
12
|
|
|
|
|
|
|
|
|
|
|
|
|
|
|
|
|
|
|
|
|
|
|
|
|
|
|
|
|
|
|
|
|
|
|
|
|
|
|
|
|
|
|
|
|
|
|
|
|
|
|
|
|
|
|
|
|
|
|
|
|
|
|
|
|
|
|
|
|
|
|
|
|
|
|
|
|
|
|
|
|
|
|
|
|
|
|
|
|
|
|
|
|
|
|
|
|
|
|
|
|
|
|
|
|
|
|
|
|
|
|
|
|
|
|
|
|
|
|
|
|
|
|
|
|
|
|
|
|
|
|
|
|
|
|
|
|
|
|
|
|
15 |
1 |
|
|
|
|
|
|
|
|
||
1. |
Taste Reset |
|
|
|
11. Zahlentasten |
|||||||||||
2. |
Taste Ein/Aus /Modus |
12. |
Steckplatz für SD/MMC Karte |
|||||||||||||
3. |
Lautstärkeregler / Auswahltaste/ |
Taste 13. TFT Display |
||||||||||||||
4. |
Taste EQ/ |
Taste |
|
14. Taste Lösen der Frontplatte |
||||||||||||
5. |
Sensor für Fernbedienung |
15. |
Blinkende LED |
|||||||||||||
6. |
Taste Wellenbereich wählen/ ID3 |
16. |
Mini USB Steckplatz |
|||||||||||||
7.Taste Frequenz suchen / Melodie /
Schneller Vorlauf/ Rücklauf
8.AUX Eingang
9.Taste Displayfarbe/ Einstellungen
10.Stationstasten/ AMS
DE
27

Bedienungsanleitung
WEITERE INFORMATIONEN
ANSCHLUSSDIAGRAMM
BLUETOOTH - ANTENNE
Subwoofer
|
LAUTSPRECHER |
|
|
HINTEN RECHTS |
|
SPEICHER +12V |
LAUTSPRECHER |
|
|
VORNE RECHTS |
|
|
LAUTSPRECHER |
|
ANTENNE |
VORNE LINKS |
|
|
||
ZUM |
LAUTSPRECHER |
|
ZÜNDSCHLÜSSEL |
||
HINTEN LINKS |
||
|
||
MASSEANSCHLUSS |
|
|
|
LAUTSPRECHER |
|
|
VORNE LINKS |
|
|
LAUTSPRECHER |
|
|
HINTEN LINKS |
LAUTSPRECHER
HINTEN LINKS
LAUTSPRECHER
VORNE RECHTS
 15A
15A
weißes Kabel
 schwarz/weiß Kabel grünes Kabel
grün/schwarz Kabel violettes Kabel
violett/ schwarz Kabel graues Kabel
 grau/schwarz Kabel
 ANTENNE
LINIENAUSGANG HINTEN RECHTS LINIENAUSGANG HINTEN LINKS VIDEOAUSGANG LINIENAUSGANG VORNE RECHTS LINIENAUSGANG VORNE LINKS EINGANG RÜCKFAHRTKAMERA
ROSA
rosa Kabel STROMVERSORGUNGRÜCKFAHRTKAMERA
BRAUNES SICHERHEITSKABEL
rotes Kabel ZÜNDSCHLÜSSEL (B+) schwarzes Kabel MASSEANSCHLUSS (B –)
gelbes Kabel STROMVERSORGUNG SPEICHER
blaues Kabel STROMVERSORGUNG ANTENNE
ACHTUNG: Braunes Kabel (brown - safety wire) an Masse anschließen ( - ).
ALLGEMEINE FUNKTIONEN
ERSTER SYSTEMSTART
Beim ersten Mal einschalten, oder nach den ersetzen der Fahrzeugbatterie, drücken Sie die Taste
(14) zum lösen der Frontplatte, die LED (15) blinkt. Drücken Sie die Taste (1) Reset mit einem dünnen Gegenstand, wie z.B. Kugelschreibermine um das Gerät in den Ausgangszustand zu versetzen.
DE HINWEIS: Wenn ein Fehler im LCD Display erscheint, können Sie die Taste Reset drücken um das Gerät in den Ausgangszustand zu versetzen. Die Uhreinstellung sowie einige gespeicherte
Funktionen werden gelöscht.
GERÄT EIN-/AUSSCHALTEN
Drücken Sie eine beliebige Taste um das Gerät einzuschalten, drücken Sie die Taste (2) EIN/AUS länger als 3 Sekunden um das Gerät auszuschalten.
28
 Loading...