


Car receiver PY-9348
MOD
Owner’s manual
PY-9348
EN
Bedienungsanleitung DE
Instrukcja obsługi PL
Manual de utilizare
RO


Owner’s manual
ITEM
Notes on Installation 04
Control Panel Layout 05
Wiring Diagram 06
Basic Operation 06
Radio Operation 08
Music and MP4 Video Play 08
RDS Operation 10
Bluetooth Operation 11
Remote Control Layout 12
Remote Control Operation 13
Setup 16
Installing the Front Panel 22
Detaching the Front Panel 22
Cleaning the Connector 22
Unit Installation 23
Specication 24
EN
3

Owner’s manual
NOTES ON INSTALLATION
The unit is designed for 14.4V DC, negative ground operation system only. Before installing the
unit, make sure your vehicle is connected to 14.4V DC negative grounded electrical system.
The negative battery terminal must be disconnected before making connections, Incorrect can
reduce damaging to the unit due to short circuit.
Be sure to connect the color coded leads correctly according to the diagram. Incorrect connections may cause the unit malfunction or damage the vehicle’s electrical system.
Be sure to connect the speaker(-) leads to the speaker(-)terminal. Never connect the left and right
channel speaker cables each other or to the vehicle body. Do not block vents or radiator panels.
Blocking them will cause heat to build up inside and may result in re.
After the completion of the installation and begin to operate the unit(including replacing the battery), please press the RESET button on the front panel with pointed objects(such as ball pen)bo set
the unit to initial status.
DO NOT ATTEMP TO MODIFY THE UNIT, MODIFYING THE UNIDO NOT MAY CAUSE AN
ACCIDENT.
STOP THE VEHICLE BEFORE CARRYING OUT ANY OPERATION THAT COULDINTERFERE
WITH YOUR DRIVING.
DO NOT TURN ON THE UNIT IF THE TEMPERATURE INSIDE THE VEHICLE IS OUT OF - 20 C
TO 60 C
THIS PRODUCT IS DESIGNED FOR ONE SINGLE VIDEO OUTPUT, PLEASE USE A SPLITTER
IF YOU WOULD LIKE TO CONNECT FOR MULTIPLE VIDEO OUTPUT.
EN
4
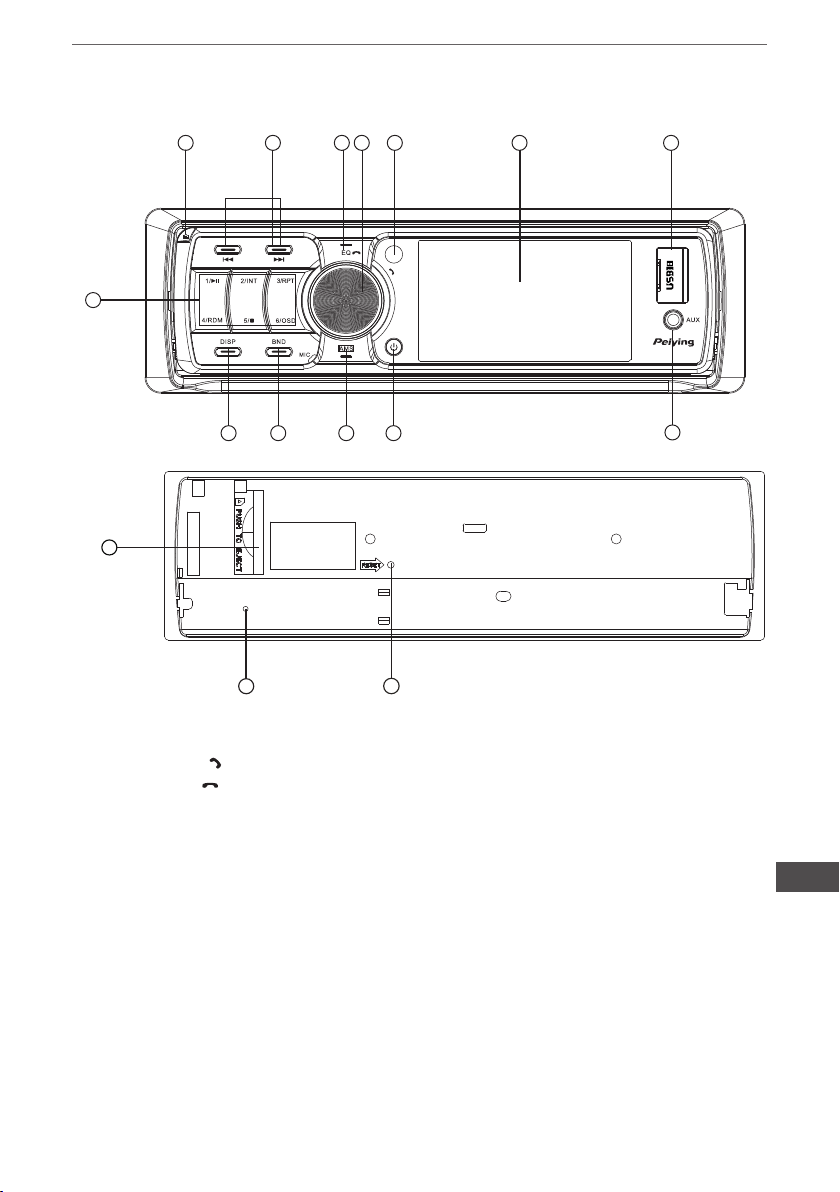
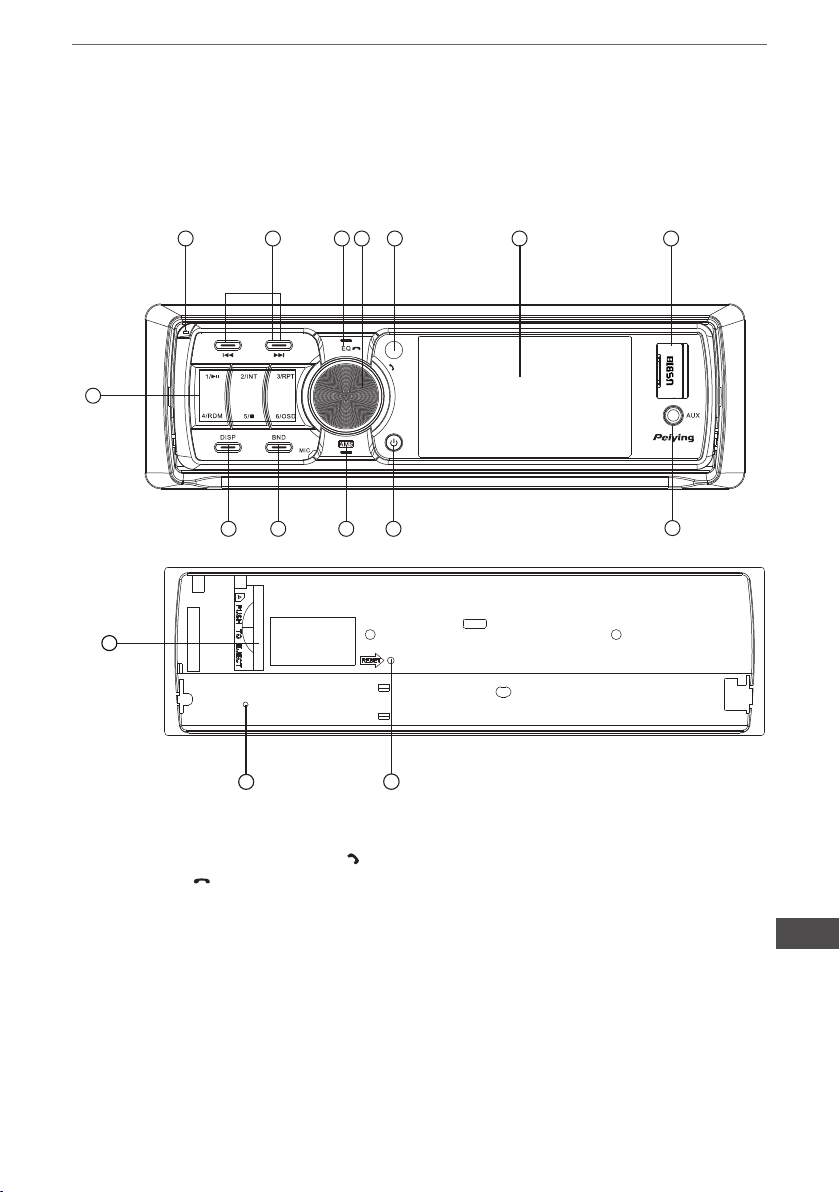
FRONT PANEL LAYOUT
Owner’s manual
14
11
12
7
9
6
15
5
4
3
MOD
2
10
13
16
PY-934 8
8
1
1. Reset Button
2. Power /MOD Button
3. Volume/ Sel/ Button
4. Preset EQ / Button
5. Remote Control Sensor
6. Band Button/ID3 select
7. Tuning/Selcting Tracks/FW/RW
8. AUX IN
9. Disp-Color/ setting
10. Preset Stations/AMS
11. Number Button
12. SD/MMC slot
13. TFT Display
14. Release Button
15. Flashing LED
16. USB connecter
EN
5
Owner’s manual
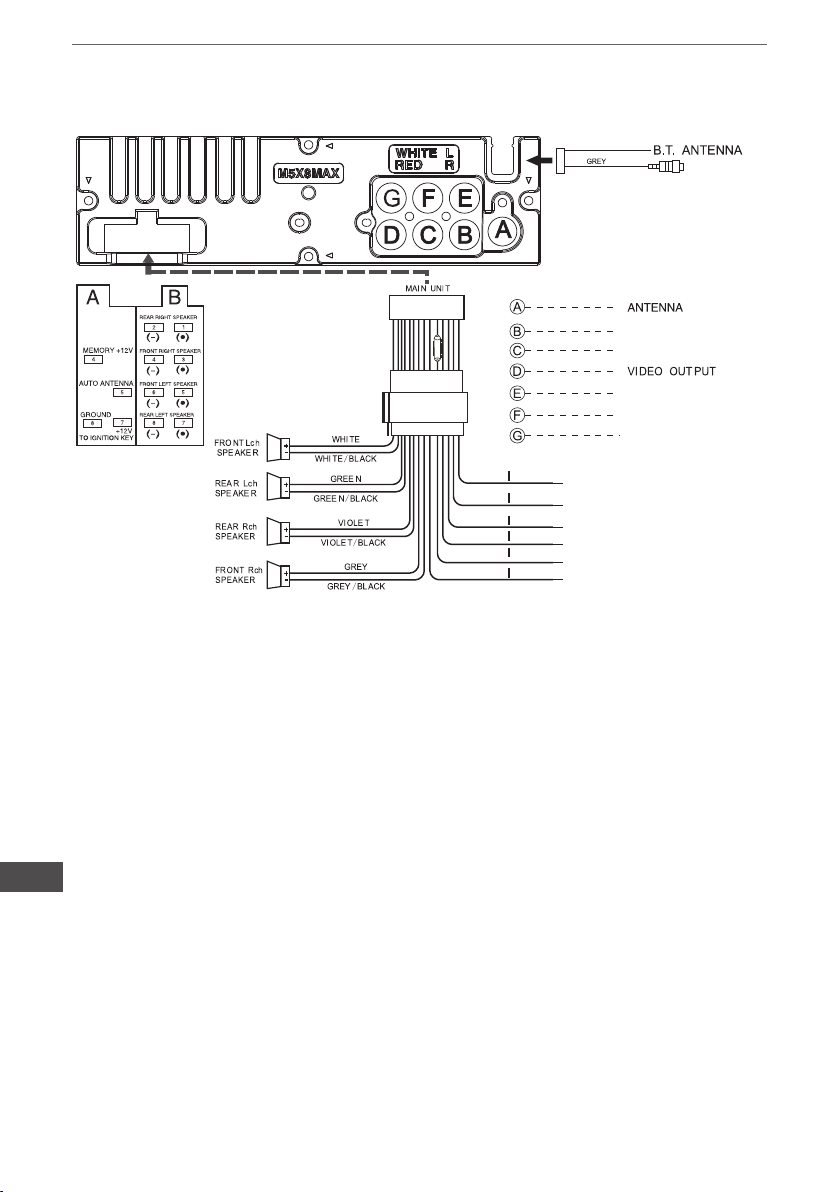
DIAGRAM PODŁĄCZANIA PRZEWODÓW
SU BWO OF ER
15A
BAC K VIEW (B +)
PIN K
SAF ETY WIRE
BRO WN
IGN ITION S WITCH ( B+)
RED
GRO UND (B- )
BLA CK
YEL LOW
MEM ORY BACK - UP
BLU E
POW ER ANTEN NA
RE AR Rc h LI NE OUT
RE AR Lc h LI NE OUT
FR ON T Rc h LI NE OUT
FR ON T Lc h LI NE OUT
BA CK VI EW I NP UT
Warnning
Safety wire.This wire must connect to the ground of car.Otherwise,there are no picture on
the TFT screen when playing video le or a picture.
BASIC OPERATION
INITIAL SYSTEM STARTS- UP
EN
Operating the unit for the rst time or after replacing the car battery, you should press ( 14) to
detach the front panel, and LED ( 15) will be blinking. Press( 1) Reset button with a pointed object(
such as a ballpoint) to set the unit to initial procedure.
Note: When some errors occur in the LCD display, you can also press RESET button to resume
tonormal. And it will erase the clock setting and some memorized functions.
TURNING THE UNIT ON/OFF
Press any button to turn on the unit, Press (2)POWER button more than 3 seconds to turn off.
6

Owner’s manual
VOLUME SELECTOR
Rotate Volume button(3) to adjust the sound level
BASS/TREBLE/BAL(L-R)/FADE SELECTOR
Press SEL button to enter Sound-setting menu, Rotate Volume knob to select your desired mode,
adjust the level by pressing” ” or ” ”button.
Note: If you don’t adjust the knob within 5 seconds after selecting the desired, the unit will
automatically return to the current mode being displayed. To adjust Bass/Trable level, EQ setting
must set to FLAT. Details check setting EQ
MUTE FUNCTION
Long press EQ button to mute the Radio. Long press EQ again to disable mute function.
SETTING EQ
While listening music, you can set up rock music, popular, classic music or jazz pre-EQ by
pressing(4)” EQ” button the procedure as follows:
1 Press EQ button repeatedly to select EQ mode in the following order:
2, Press SEL to enter Sound-Setting menu, rotate volume knob to select EQ, press ” ” or ” ”
to set EQ mode.
ROCK-POP C LASSIC JAZZ FLAT
MODE SELECTOR
Press (2) „MOD„ button to select Radio USB SD Card TV(optional) AUX mode.(When the unit
without connect anyone function. Press mode button the unit will skip over this function.)
SENSOR
(5) Receptor for the card remote commander.
ADJUST TIME
Long press SEL, rotate volume to select SETTING, press SEL to enter. Rotate volume to select
SYSTEM, press SEL to enter. Rotate volume to select H or M, press ” ” or ” ” , to adjust hours
or minutes.
AREA USA/EUR SETUP
In Radio mode, long press SEL, rotate volume to select SETTING,
press SEL to enter. Rotate volume to select RADIO, press SEL to
enter, set area by pressing ” ” or ” ”.
EN
7

Owner’s manual
RGB (Customize RGB Color illumination)
The illumination color keep changing when unit Power on.
Fixed Color Setting:
Short press DISP to select xed color from blue, green, red, yellow, purple and white.
Customize Color Setting:
Long press DISP key, rotate Volume to select Auto OFF.
press SEEK+/- to select RED, rotate Volume to select 00~32
press SEEK+/- to select GREEN, rotate Volume to select 00~32
press SEEK+/- to select BLUE, rotate Volume to select 00~32,
press DISP to conrm this setting
RADIO OPERATION
BAND SELECTOR
Press ( 6) ( BAND) button repeatedly to select band in the following order:
NOTE: On v i d e o playing mode, press ( 6) button to switch to AUTO PAL or NTSC system
MANUAL/AUTOMATIC TUNING
Manual Tuning: Press ( 7) button continuously to select a station upward or downward
respectively.
Automatic Tuning: Press and hold ( 7) button for more than 3 seconds, the radio utomatically
searches a station upward or downward respectively and plays when it nd a station.
Scanning/Memorizing Stations Automatically
Press ( 10) button to scan each stored station for 5 seconds respectively which stored in
( 11) ( 1~ 6) number buttons. When AMS mode is carrying out. You also can press the
corresponding number button or AMS button when your desired station is changed. It starts
playing that station.
Press and hold( 11) button for more than 3 seconds to activate automatically memory storing
function. The radio automatically selects a station and has it stored in any one of the number
Button( 11) ( 1~ 6)
NOTE: The unit can be stored up to 6 stations for each band. Regarding the function of nu mber
button,
EN
MP4 OPERATION
The root menu is displayed on monitor when beginning to swith on USB/SD card mode. Select a
le then Pres s PLAY Button or Enter to play the le.
During playback. Press the “STOP” button to stop playing and return the root menu. When display
the root menu. Press the direction button to select your desired FOLDER or le. Then press
ENTER or PLAY button open the FOLDER. Or play the selected le. When displaying the root
menu. You can also use the number buttons to select the serial number of The le and play the
le.
8
Owner’s manual
SELECTING TRACKS/ FW. / RW
Press ( 7) to choose your favorite track upward or downward respectively. Press and hold( 7)
button to fast forward or rewind the track upward or downward respectively.
PLAYING AUDIO/VIDEO FILE REPEATLY
Press “RPT/3”button to perform repeat playing.when you need to repeat playing the track you like.
Press “RPT/3”buttonf or the rst time.it will repeat playing the same track for mp3 and WMA or a same
Video File“, RPT” 1 appears.
Press “RPT/3”buttonf or the second time.it will repeat playing the same AV directory ,“RPTD IR”
appears.
Press “RPT/3”buttonf or the third time. The entire directory for audio or video will repeat playing ,
“RPT ALL” appears.
Press “RPT/3”button for the forth time to off the repeat playing function, “RPTOFF”appears.
SCANNING TRACK AUTOMATICALLY
During Mp3 or WMA songs playback, press „INT/2” button, to play the rst 10 seconds of each
Track, The display will show „ INT” , track number. Which indicates INT function is already
activated. Press „INT/2”button once again to return to normal playback.
NOTE: INT doesn’ t work during playing video le.
PLAYING TRACKS IN RANDOM ORDER
During playback, press „RDM/4” button,and „RDM” appears on the display, which indicates RDM
function is carried out. The unit plays any track at random. Press RDM once again to return to
normal playback mode.
STOP PLAYING
During playback, press ( 11) „ 5STOP” button to stop the playback, TFT will show „STOP” .
Press the button once again To return to normal play mode, press „ „ button again.
PAUSE THE PLAYBACK
During playback, press ( 11) „ 1PLAY” button to suspend the playback, on the TFT display
and show „PAUSE” ,To return to normal play node by press it again.
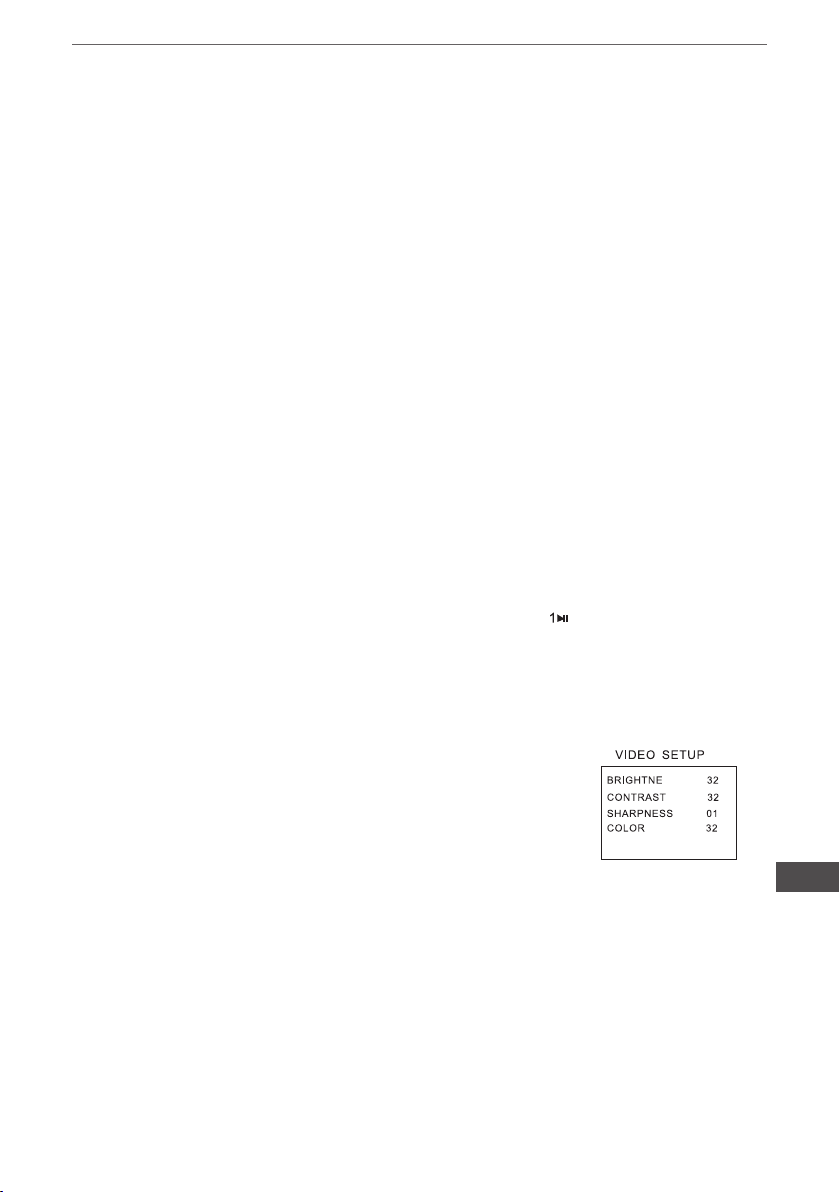
VIDEO SETUP
While you watching Video or picture. you can enter “VIDEO SETUP”
to adjust the picture quality. IF the picture appear to disorder when
you adjustment. Please come into the “SYSTEM SETUP”select the
“DEFAULT” menu, then press the knob of VOL +/- to conrm the value
of factory recognize tacitly.
BACK VIEW SETUP
Put the unit back view control view connect to power 14.4 V negative grounded electrical system.
Connect car back view camra output to the “BACK VIEW VIDEO” input.When you backward your
car. The back view picture will automatically turn to the front screen.
DOS (Dynamic Open Screen - wygaszacz ekranu)
The Dynamic Open Screen (Motion effect) when unit power on. Press any key to stop and
return to the current mode.
DEMO ON: Long press SEL key, select Setting--> System --> Demo, press SEEK +/- to set ON.
Dynamic open screen mode repeat.DEMO ON mode used to demonstration. All buttons
are not workable except „SEL” button.
DEMO OFF: Press SEL key, press SEEK +/- to set RGB drmo Off, then back to default status.
EN
9
Owner’s manual
RDS (RADIO DATA SYSTEM) OPERATlON
AF :Alternative Frequencies
~ Setting RDS Mode Press AF button (26) and release immediately to switch on or off RDS mode.
Whenever RDS is switched on, symbol “AF” appears on the display.
AF / REG
AF
- AF I REG key directs the activation of AF SEARCH.
- AF indicator is displayed when AF is ON, AF search is activated when reception is bad.
- During FM MODE, when AF is ON, SEEK, SCAN, AUTO, MEMORY function can only receive
and save RDS program. However, when Italy option is in use, regardless of RDS programs that
satisfy SD LEVEL Can be received and saved.
Indicator Condition
AF ON AF ON MODE, RDS information is received.
AF OFF AF OFF MODE
AF blink AF ON MODE, RDS information is not received.
REGION
- AF MODE is converted to REGION ON I OFF MODE when AF ON MODE 15 pressed for
longer lsec.
- ON : Pl CODE is checked when AF CHECK in progress
- OFF: PI CODE and COVERAGE AREA is not checked when AF CHECK in progress.
PTY
RADIO MODE
- Previous PTY is displayed when PTY key (27) is pressed. If there are no keys entered for
2 seconds, previously selected PTY is searched. During 1 LOOP, if desired PTY is not found, NO
PTY is displayed.
- 2 program types are SPEECH and MUSIC.
By pressing PTY once, MUSIC is entered. When PTY is pressed the second time, SPEECH is
entered.
M1~M6 keys can be used to select the desired program type.
TA
TA button (28) is operated as follows:
- TA is turned ON / OFF and TA indicator is displayed. When trafc announcement is transmitted,
regardless of the mode, trafc announcement is received.
If VOLUME LEVEL is below 20, VOLUME LEVEL is raised to 20, and returns to its previous
mode and volume level when the trafc announcement is over.
EN
If volume is adjusted during trafc announcement, only the previous volume is valid.
- When TA is on, SEEK, SCAN, AUTO MEMORY function can be received or saved only when
trafc program identication code has been received.
- When TA is ON, trafc program identication code is not received during specied time.
TAALARM : NO TA/ TP is displayed and alarm is set off.
TA SEEK : TA SEEK is activated.
10
Owner’s manual
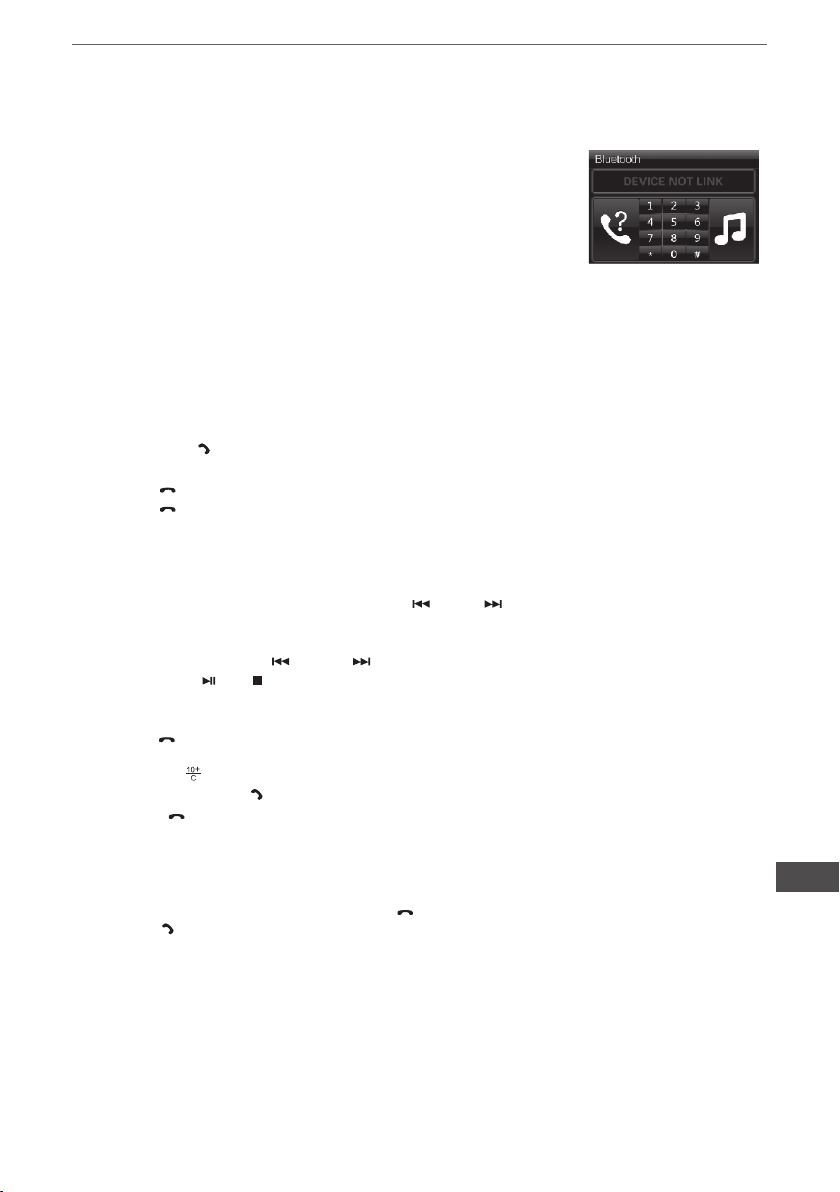
BLUETOOTH FUNCTION OPERATION
1. Pairing connected.
Turn on your CAR AUDIO SYSTEM, Put the mobile which with
bluetooth device function close to the CAR AUDIO Unit, Soon.
The mobile will nd the new bluetooth device “CAR AUDIO”,Input
the pairing password “8888”and clik ok, the mobile will prompt the
matching successful,when the pairing conneted is successed, On
the TFT screen, bluetooth logo “BLUETOOTH”will stop blinking .
Then you may perform the bluetooth operation by press the button
on the front panel on remote controler.
REMARK: depend on bluetooth mobile, the bluetooth system support “HSP” “HFP” “A2DP”
and AVRCP bluetooth prole.
2. Handsfree phone service Function
If your mobile have matched with the CAR AUDIO system. When a phone is calling in, the
bluetooth system will turn the phone’s ring to the CAR AUDIO speakers automatically, and
the calling phone’s number will indicat on the TFT screen.
-Press the “ SEL/ button shortly to accept the call.
Then you can talking with the other party through t h e micphone on the front panel.
-Press “EQ/ ” button shortly to reject the call wh e n call is comeing.
-Press “EQ/ ” button shortly to hand up after y o u nish the talking.
3. Playing Music by A2DP.
Through the A2DP connected by mobile and unit, When you activated your mobile music
player to play music, Sound of the music playing in the mobile music player will turn to the
CAR AUDIO system playing, press the button“ „ and „ „can select the music track. After
connecting mobile and head unit through A2DP, while mobile play music, press
“MODE” button to A2DP mode, the voice of the mobile will come out from car speaker.
Select music by pressing “ „ and „ „on the head unit.
Press the button “ ” or ” ” have a same function as playing a disc.
4. Dialling a call use Remote control.
Press „EQ / ” button shortly to enter the bluetooth screen, then press the number button
“ O-9 ” and “ * ” “ # ” to select a phone number.
- Press button ” ” can delete the mistaken number during you dialling.
- Press the button ”SEL / ” to conrm and call out a phone number which you have selected.
- Press ”EQ / ” to hand up after you nish your talking.
5. Calling in Phone Number BooK
This bluetooth system can automatacally record the call in Phone number which you have
missed ( up to 10 phone number) .
-Eeter the bluetooth screen,Then Press “EQ / ” button shortly, can look up the phone numbers.
-Press “SEL ” butoon shortly to call out anyone phone number in the phone number book.
6. Interrupt Bluetooth Connection/Reconnection.
Pressing the “ BND ” button more than I second to interrupt the current blutooth connection,
when the phone at hands free or A2DP state, sounds of phone or music will turn back to mobile
speaker.
Press the “ BND ” button more then I second again can reconnect the bluetooth matching
( some brand bluetooth mobile must actirate mobile bluetooth system or music player).
NOTE:Different mobile phone have different responses. We do not guarantee all the
operation of connectable devices.
EN
11
Owner’s manual
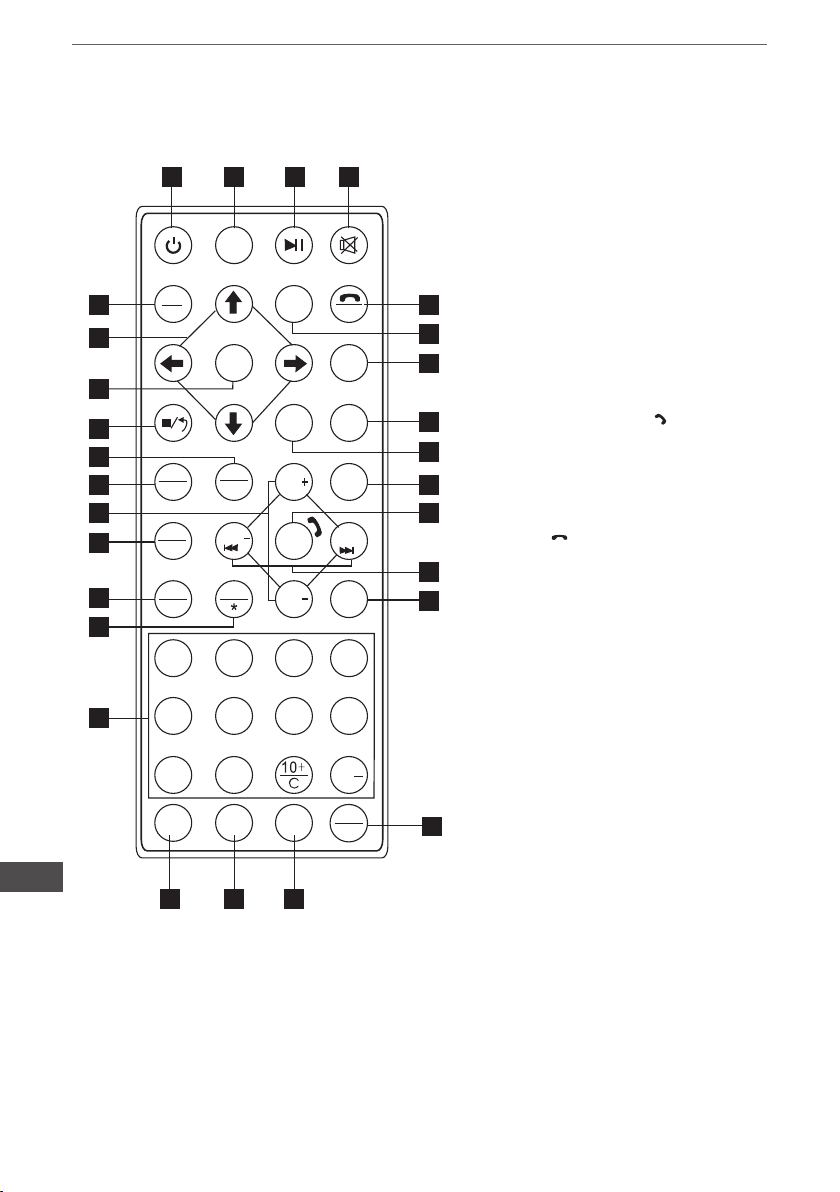
REMOTE CONTROL LAYOUT
20
12
13
16
10
14
19
1
3
2
1. Power Button
MOD E
2. Pause/play Button1
3. Mute Button
5
BND
SYS
4
ENTE R
DISP
EQ
Setup
17
24
23
6
LOU D
SLO W
9
AMS
RPT
ST
PRO G
VOL
Zoom
+
7
LOC
RDM
SEE K
SEL
SEE K
+
22
21
25
11
8
SCA N
INT
OSD
VOL
AUD IO
-
15
4. Selecting Menu Button
5. Band/ System Switch
6. Enter Button
7. Volume Control
8 Tuning/ Selecting/ FW/RW9.
9. Program Playing
10. On- Screen Display
11. Setting the Sound/ setting
12. Repeat Playing
13. Random Playing
14. Number Button
15. Audio Setting
16. SCAN Button
17. EQ/ setting
18. Playing Time setting
19. Mode Switch
20. Stop Button
21. Loud Button
22. Slow Motion Play
1 2
3
4
23. Setup Menu
24. Display Button
25. Zoom Setting
5
6 87
26. Alternative Frequencies Button
27. Programme Type Button
28. Trafc Announcement Button
9 0
10
EN
12
PTYAF TA
GOT O
#
18
282726
Owner’s manual
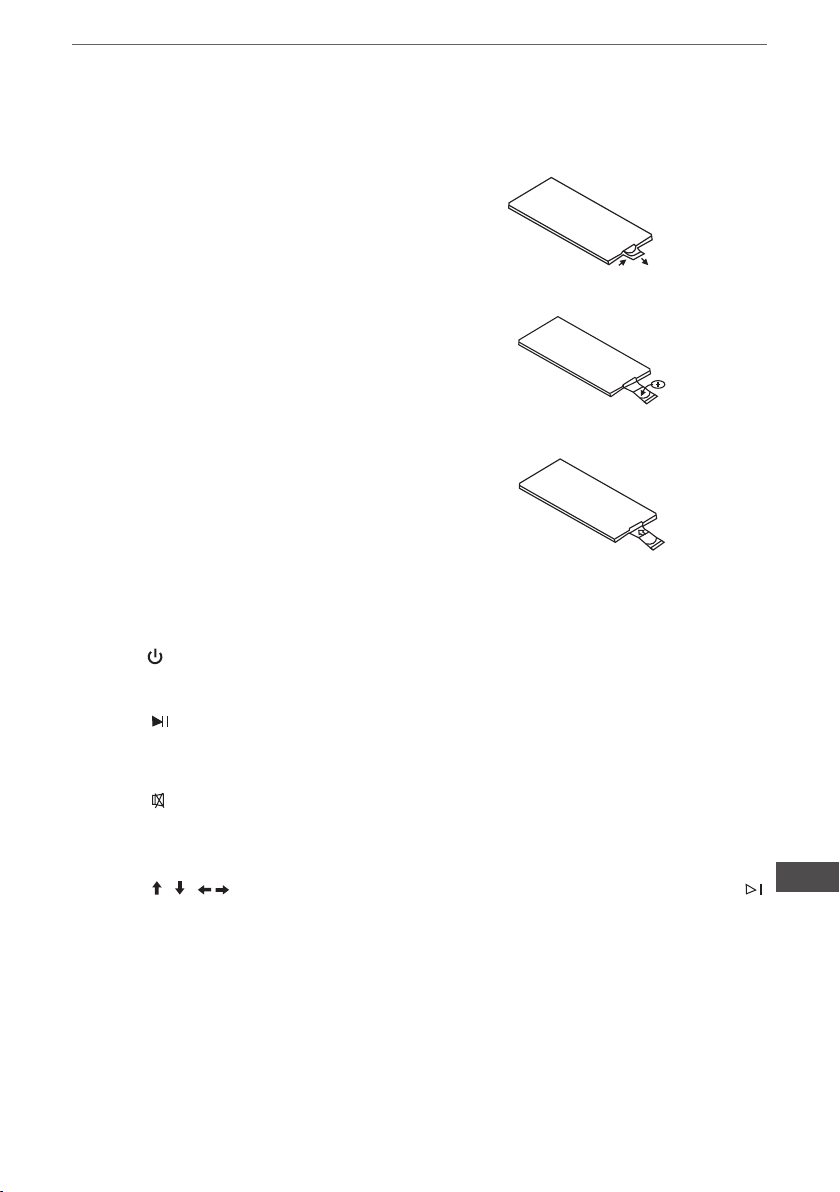
REPLACING THE BATTERY
When the operational range of the remote control becomes short or non functions while
operating. Replace a new CR2025 battery. Make sure the battery polarity before
replacement.
1. Pull out Battery Holder while pressing the stopper
2. Put the button type battery( + )mark upward into the
Battery Holder.
3. Insert the Battery Holder into the Remote control
POWER BUTTON
Press(1) button to turn power On/ Off.
PAUSE/ PLAY BUTTON
Press (2) button to suspend the playback of Mp3,wma music or mp4 Video le Press it again to
return to normal palyback mode.
MUTE BUTTON
Press (3) button to cut down the sound output, press it again to resume the previous sound
level.
MENU SELECTOR
Press (4) / / / , to select your desired menu, then press( 6) ( ENTER) or play button (2)
to conrm.
BAND/ SYSTEM SWITCH
During radio mode, Press (5) (BAND/SYS)to switch receiving band.
During the player mode, press (5) (BAND/SYS) button to switch to AUTO, PAL OR
NTSC system.
EN
13

Owner’s manual
VOLUME INCREASING/ DECREASING
Press( 7) ( VOL+ OR VOL- ) button to increase or decrease the volume level respectively.
TUNING/ SELECTING TRACKS/ FAST FORWARD/ REWIND
During radio mode, continuously press( 8) button to manual search a station downward or
upward respectively; if press and hold the button for more than 3seconds. The radio will
automatically search a station downward of upward respectively until it nds a station.
During the playing mode press the 8 button to rewind or forward , ( ) for you to reach your
desired track quickly. When discontinuously press (8) button, you can select your desired portion
downward or upward or upward respectively. if press and hold the button for more than 3seconds,you can select you desired portion fast forward/rewind.
PROGRAM PLAYING/ ST
During Music les playing mode, press(9) PROG button to enter programming page.
Press(4) button and (14) numbers button to program the tracks to be played.
NOTE: ST will only work on Radio mode.
ON - SCREEN DISPLAY
During Playing USB or SD Card mode, press( 10) (OSD) button. The displayer shows Track/
Chapter,Current Time.
NOTE: During MP3/WMA mode, only show directory and tracks.
VOL/ BAS/ TRE/ BAL/ FAD SELECTOR
During radio or playing mode. Repeat press( 11) (SEL) button to select the desired
mode in the following order:
VOL BAS TRE BAL
FAD BR I CON SHAP
NOTE: After selecting your desired mode, your can adjust the current mode being displayed by(
VOL) button. When P- EQ mode isactivated, press SEL button to select the modes, And Bass/
Treble mode are invalid. ( show as below)
VOL BAL FA DB RI CON
SHA P CON
EN
REPEAT PLAYING/ AMS
1. press AMS button(12),
In playing mode, repeat function is: RPT1 RPT , DIR,R PT ALL,R PT OFF.
2.Radio mode is AMS function
RANDOM PLAYING
During the songs playing mode, press( 13) (RDM) button to play any track at random.
During the RADIO mode, press the button is LOCAL function.
14

Owner’s manual
NUMBER BUTTONS
During radio mode, you can select one of the 6 stored stations on each band by pressing any
one of the number button( 14) . During the playing mode, you can select any track directly by
using number button( 14) ( 0~ 10+ ) . For example, if you need the fteenth track, you can rst
press button 10+ and press button 5, the corresponding track( 15) will be played.
NOTE: In Mp3 or WMA songs playing mode.When button 10+ is rst pressed. It work as 10+ , it
work as 20+ when pressed at the second ti m e ,the third time...30+...and so on.
LEFT/ RIGHT/ STEREO SELECTOR
During the playing mode , continuously press( 15) (Audio) can change the sound to left/ right
speaker or stereo mode.
SETTING DISC PLAYBACK TIME
During playing mode, press( 18)GOTO button can set the specic time to play. Using( 4) and ( 14)
number button to set track/Chapter or time, and press ENTER button to play
MODE SWITCH
Press ( 19) button to switch Radio, USB/SD/MMC or AUX mode.
PAUSE
In playing mode, press ( 20) button to suspend the playback, press it again to stop the playback.
SCAN/INT
In playing mode. Press Scan/INT button is “INT”function. It can playing the rst 10 seconds
of each songs track.
In radio mode. Press Scan/INT button is scan function to search radio station. when a station
signal strength level more than the level to stop. The radio will playing the station for 5 seconds
and the frequency blinking on the TFT screen. at the same time. Press and hold scan button more
them 3 second to select the station. the mechanism will start play the radio station.
SLOW REVERSE/ SLOW ADVANCE PLAY
During Mp4 video playing mode, press( 22) key once for ½ slow advance, twice for 1/ 3, third
for 1/4, fourth 1/5,fth for 1/6,sixth 1/7,seventh return to normal playback speed.
ZOOM KEY
In Mp4 Video playng mode, press( 25) key once for 2 x zoom, twice for 3 x zoom, third time for 4 x
zoom, fourth time for ½ zoom, fth time for 1/ 3 x zoom, sixth time for 1/ 4 x zoom, seventh time to
cancel the zoom mode .And you can pan the picture by pressing the cursor keys.
NOTE: No zoom function for MP3, WMA,Songs playing mode.
EN
15

Owner’s manual
SETUP
1.Press SETUP ( 23) key of remote control in the stop mode. (Press the STOP button
twice to ensure the player is under STOP mode.
2.The main page of setup menu is displayed.
3.Select the preferred item by using the ( 4) button
4.Press ( 6) ENTER button
A. System Setup
This setup page includes all the items of TV system, Screen saver ,TV type, sale Password, Rating & Default features. The detail please refer to SYSTEM SETUP MENU.
B. Language Setup
This setup page includes all the items of OSD Language, Audio Language, Subtitle Language and
Menu Language features. The detail please refer to LANGUAGE SETUP MENU.
C. Audio Setup
This setup page includes all the items for AUDIO. Please to AUDIO SETUP MENU.
D.Video Setup
This setup page includes all the items for VIDEO. The details please refer to VIDEO SETUP
MENU.
E. Digital setup
EQ Button
Press (26) button to select PRE-EQ:
ROCK -> POP -> CLASSIC -> JAZZ -> FLAT mode
EN
16
Owner’s manual
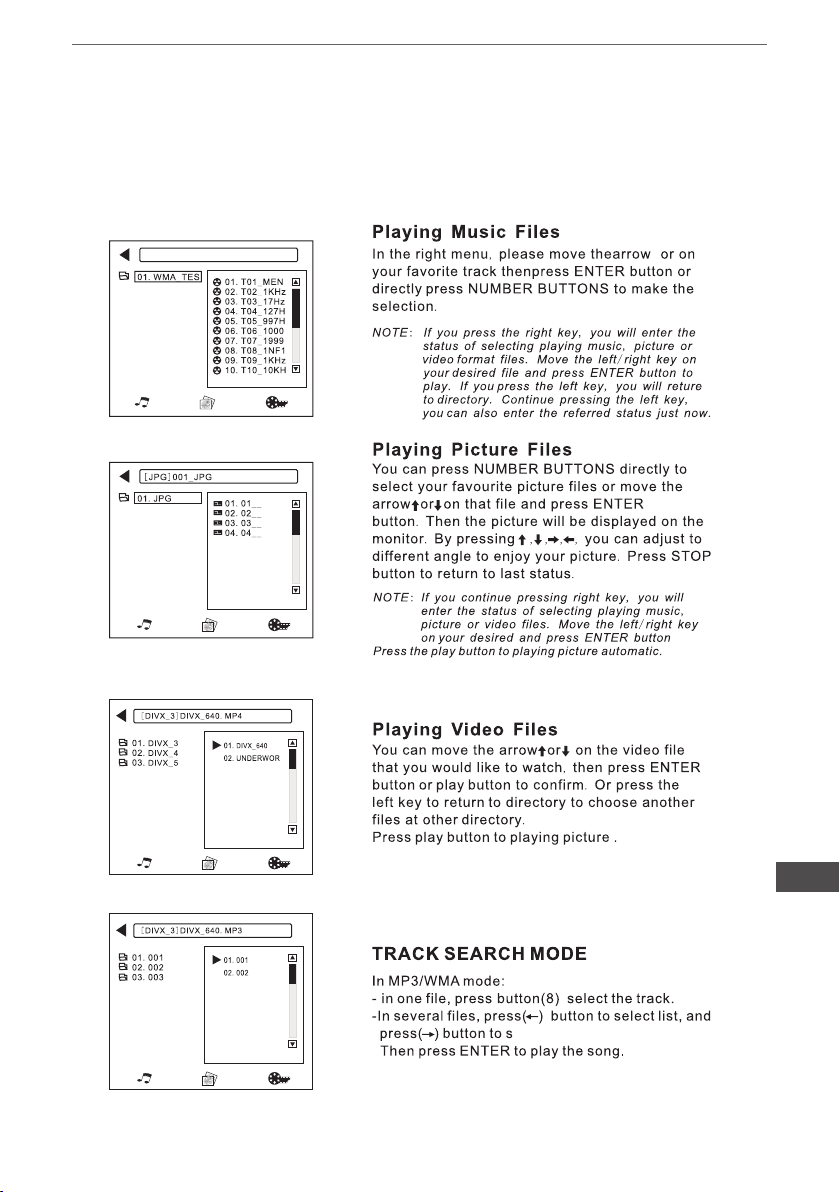
MIXED FILE FORMAT USB/SD/MMC CARD
While you listen to (or watching) mixed le format directory.Which is together whith MP3,WMA.
JPG or MPEG4 formats.just instert the USB or SD/MMC card. The mechanism will Automatically
switch on. For details, please rfer to the following steps:
Elec t numbe r for you desir e song .
EN
17
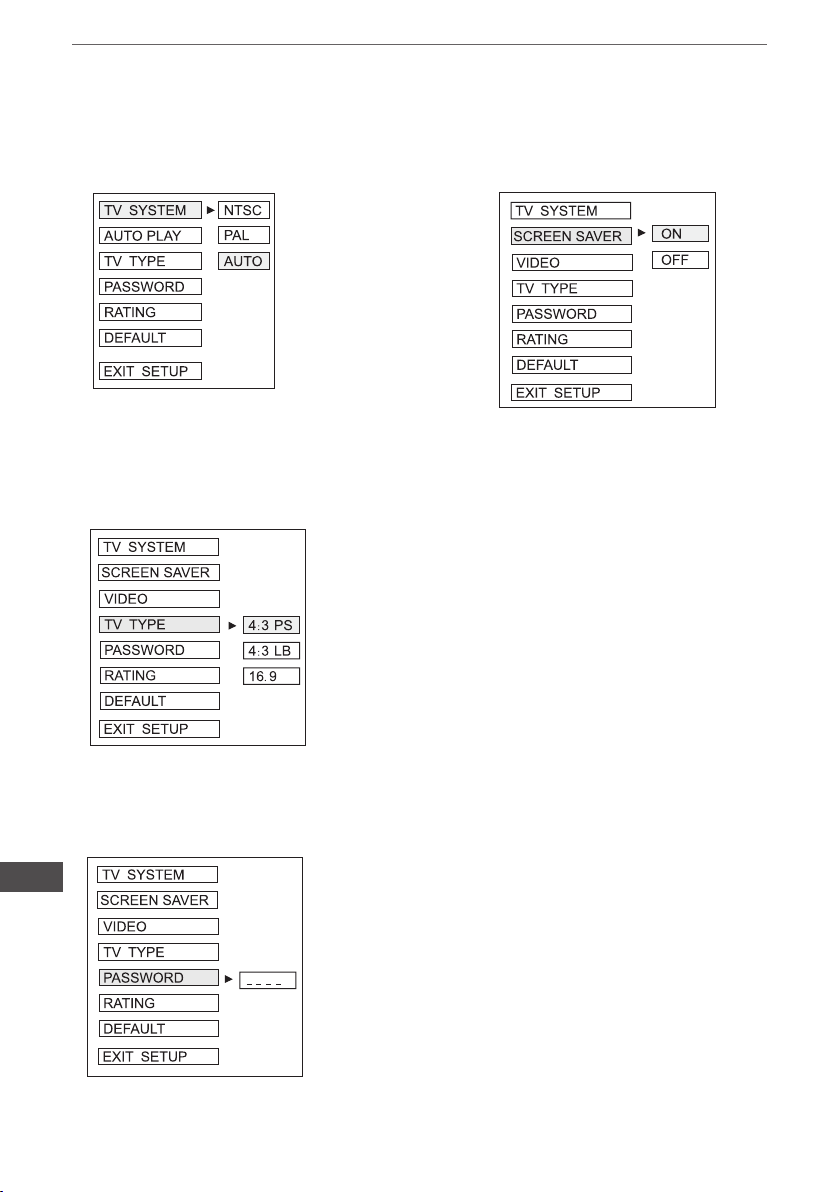
A. SYSTEM SETUP
Owner’s manual
a. TV System
c. TV Type
b. Screen Saver
This player can play
Mp4 video in either PAL
or NTSC format. Select
NTSC format when you
connected to NTSC TV.
Select PAL format when
you connected to PAL
TV. If you select AUTO,
the unit will auto select
the format (PAL/NTSC)
according to your TV
system.
1) 4:3 PS
Played back in the PAN & SCAN style (if connected to wide-
-screen TV, the left and right edges are cut off)
2) 4:3 LB
Played back in LETTERBO style (if connected to wide-screen TV, black bands appear at top oand button of the screen
3) 16: 9
Aelect when a wide - screen TV set is connected.
EN
18
d. Password
Enter the password and press ENTER button.
Type the old password (The instal factory code
is 0000) and key in 4 characters password now
you want to use, and typw again to conrm

Owner’s manual
e. Rating
f. Default
1 KID SAFE
2G
3PG
4PG1 3
5PG
-R
6R
7 NC 17
8 ADUL T
REST ORE
Select suitable guidance rating by the cursor button
and conrmed by pressing ENTER button.
Rating 1: [ Kid Safe] - Select this when the programs are safe to all
kid view.
Rating 2: [ G] - Select this that allows admission to person of all
ages.
Rating 3[ PG] - Select this that needs parental guiding their children.
Rating 4[ PG13] - Select following when children under 13 are
forbidden to view.
Rating 5[ PG- R] - Select this when the” PG- R” was printed on the
DVD disc.
Rating 6 [ R] - Select this when children under 17 must be guide to
view by their parents.
Rating 7[ NC- 17] - Select this when children under 17 are forbidden to view
Rating 8[ Adult] - Select this, when only allows admission to all
adults.
Recover acquiescing in state
when leaving the factory
B. LANGUAGE SETUP
Select the preferred OSD Language, Audio Language, Subtitle Language and Menu
Language by using the cursor buttons.
a. OSD Language
OSD LANGUAGE
AUDI O LANG
SUBTITLE
MEN U
DIVX[R] VO D
EXI T SETU P
LANG
LANG
ENGLIS H
CHINESE
GERMAN
SPANIS H
FRENCH
PORTUGUESE
b. Audio Language
OSD LANGUAG E
AUDI O LANG
LANG
SETU P
LANG
SUBTITL E
MEN U
EXIT
ENGLIS H
CHINESE
GERMAN
SPANIS H
FRENCH
PORTUGUES E
LATIN
JAPAN
EN
19
Owner’s manual
c. SUBTITLE Language
OSD LANGUAG E
AUDI O LANG
SUBTITLE
MENU
EXIT
LANG
LANG
SETUP
ENGLISH
CHINESE
GERMAN
SPANIS
FRENCH
PORTUGUESE
JAPAN
OFF
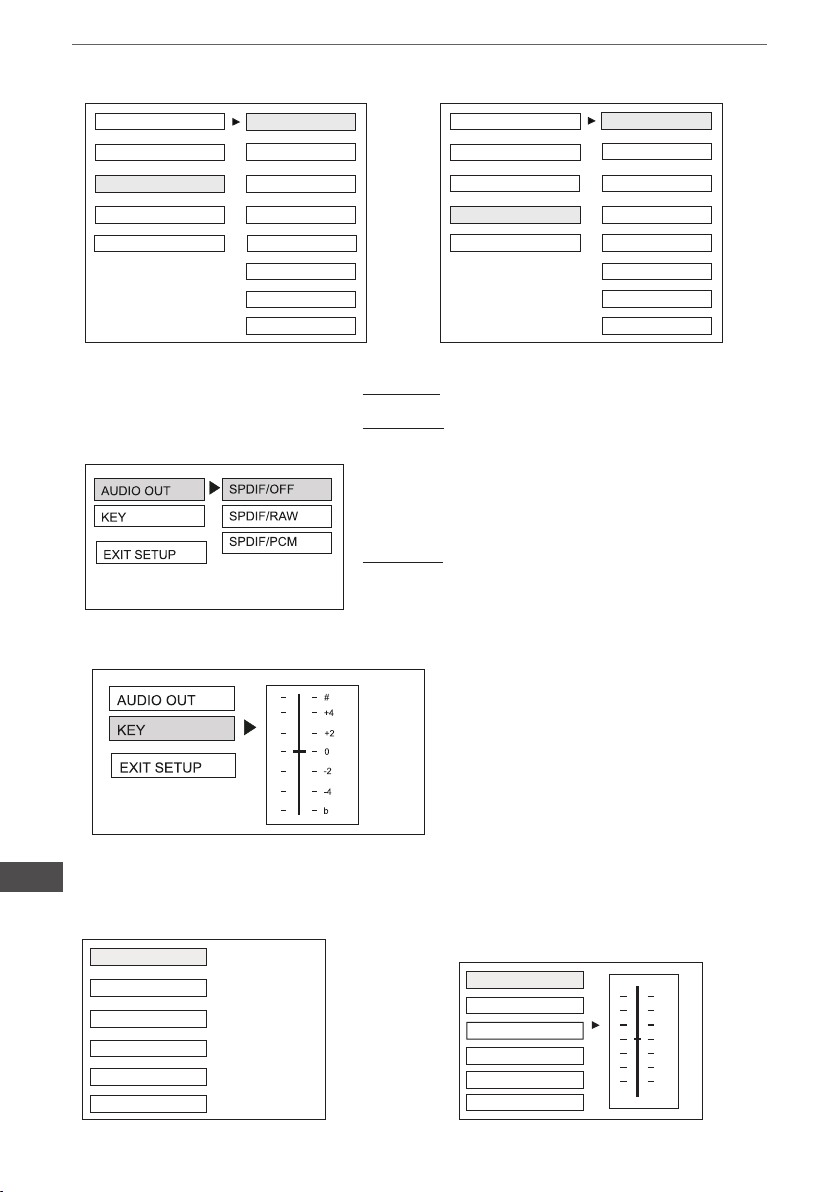
C. AUDIO SETUP
a. Audio out
b. Key
d. MENU Language
OSD LANGUAGE
AUDI O LANG
SUBTITL E
H
MEN U
EXI T
LANG
LANG
SETU P
SPDIF/OFF:
Analog or optical output port all has not output signal.
SPDIF/RAW:
When the player is connected with the powet amplier by the
analog or optical port, please select this item; when playing disc
which is recorded by Dolby Digital, DTS or MPEG recording
system, the analog or optical output signal of the unit will by the
same as the digital signal (RAW format) of the playing disc. At
the same time, the power amplier you connected must have the
decode function of dolby Digial, DTS or MPEG.
SPDIF/PCM:
When the player is connteced with the 2 channel, digital stereo
amplier, please select this item; when the playing disc which is
recorded by Dolby Digital or MPEG recording system, the analog
or optical output will be modulated to 2 channel output by PCM.
ENGLIS H
CHINESE
GERMAN
SPANISH
FRENCH
PORTUGUES E
JAPAN
LATIN
EN
20
D. VIDEO SETUP
BRIGHTNESS
CONTRAST
HUE
SATURA TION
SHARPNES S
EXI T SETU P
a. Brightness
BRIGHTNESS
CONTRAST
HUE
SATURA TION
SHARPNES S
EXI T SETU P
12
10
8
6
4
2
0

Owner’s manual
b. Contrast
BRIGHTNES S
CONTRAST
HUE
SATURA TION
SHARPNESS
EXI T SETU P
d. Saturation
BRIGHTNESS
CONTRAST
HUE
SATURA TION
SHARPNES S
EXIT SETUP
E. DIGITAL SETUP
a. Dynamic range
c. Hue
12
10
8
6
4
2
0
CONTRAST
HUE
SATURA TION
SHARPNES S
EXI T SETUP
BRIGHTNESS
+6
+4
+2
0
-2
-4
-6
e. Sharpness
12
10
8
6
4
2
0
BRIGHTNES S
CONTRAST
HUE
SATURA TION
SHARPNESS
EXIT SETU P
88
6
6
4
4
2
2
0
0
b. Dual mono
DYNAMI C RANG E
DUAL MONO
EXI T SETUP
FULL
6/8
4/8
2/8
OFF
To set the dynamic range compression
DYNAMIC RANG E
DUAL MONO
EXIT SETU P
STER EO
MONO LE FT
MONO RIGH T
MIX MONO
To set the stereo mode.
EN
21
Owner’s manual
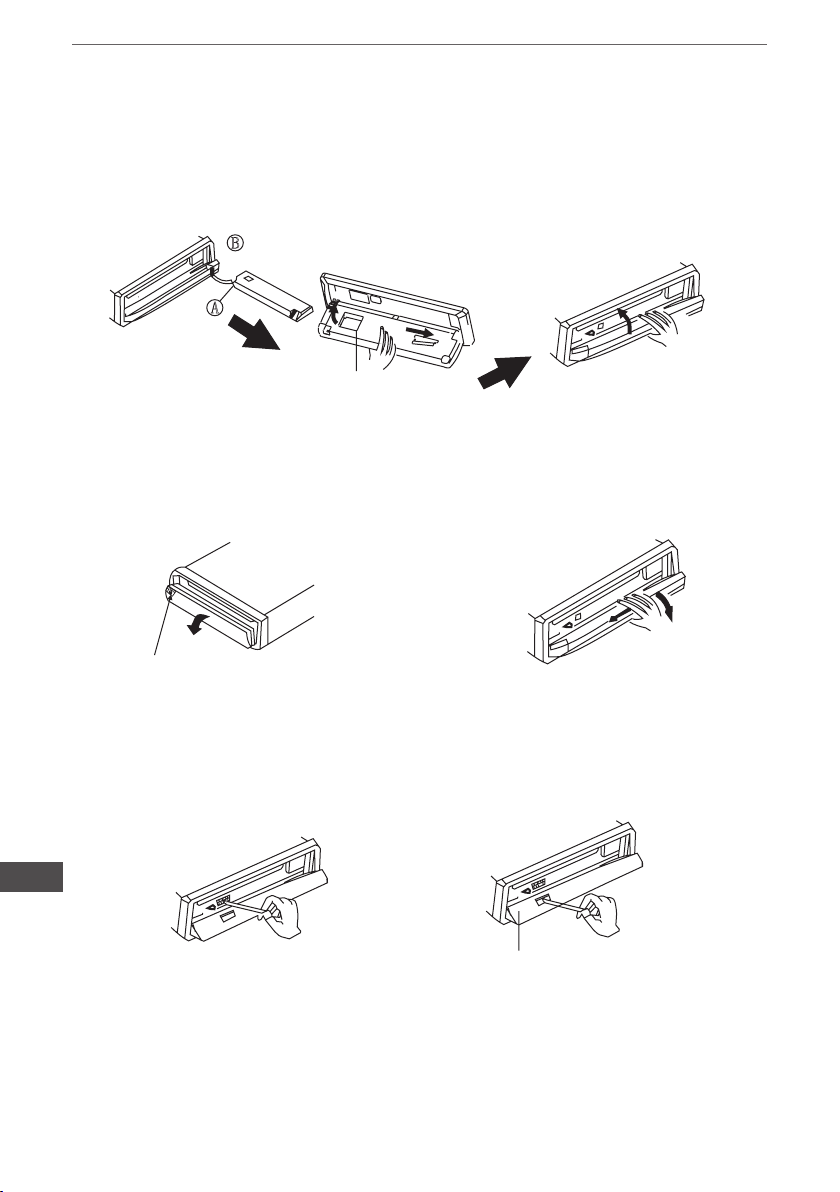
INSTALLING THE FRONT PANEL
To install the front panel, insert the panel into the housing and make sure the panel
is properly installed, otherwise, abnormalities occurs on the display or some keys will not function
properly
B
A
2
N
D
1ST
EN
DETACHING THE FRONT PANEL
Press REL but ton in the upper left
cor ner , and hen front panel will not
funct ion proper ly.
RE LE AS E
REMOVING THE FRONT PANEL
When the front panel was turned down
to a pos ition of 90 , hold and slide the
front panel to left, and then pul l it out .
CLEANING THE CONNECTOR
If the connector between the main unit and the front panel is dirty, it may result the unit in
abnormal working condition. To avoid such problem happening , please detach the front
panel, and clean the connector with an alcohol swab. Gently clean and avoid damaging
the connector.
NOTE: For safekeeping, always shut down the generator and take out the key from the ignition before cleaning. And never
keep your nger of any metal device in touch with the connector directly.
22

Owner’s manual
DIN FRONT-MOUNT (Method A)
1. Dashboard
2. Holder
After inserting the holder into the
dashboard, select the appropriate
tab according to the thickness of the
dashboard material and bend them
inwards to secure the holder in place
3. Screw
Rys.2
Rys.3
1. Dashboard
2. Nut (5mm)
3. Spring Washer
4. Screw (5 x 25mm)
5. Screw
6. Strap
Be sure to use the strap to secure the back
of the unit in place. The strap can be bent
by hand to the desired angle.
7. Plain Washer
1. Frame
2. Insert ngers into the groove in the
front of frame and pul l out to remove
the frame. (When reatt achi ng the
frame, point the side with a groove
dow nwards and attach it. )
3. Lever
Insert the levers supp lied with the uni t into
the grooves at both sides of the uni t ad show
n in gure unti l they click. Pulling the levers
makes possible to remove the unit fro m the
dashboard.
DIN REAR-MOUNT (Method B)
1. Select a position where the screw
holes of the bracket and the screw holes of the
main unit become aligned (are tted), and tighten
the screws at 2 places on each side. Use either
truss screws (5 x 5mm) or ush surface screws
(4 x 5mm)
2. Screw
3. Dashboard or Console
INPUT THE SD CARD
The SD oblique angle keeps
upward exposure, put into
the SD slot and press it again
to eject.
EN
23

SPECIFICATION
GENERAL
Power Supply Requirements:
Load Impedance
Maximum Output Power:
Chassis Dimensions:
Current Drain:
Compatible Flash File Formats
Audio
Video
Picture
Video system
Video Section
Video System:
Video Output Level:
Audio Section
Maximium Output LEVEL:
Frequency Response:
Signal- to-noise Ratio:
Separation:
FM Tuner Section
Tuning Range:
IF:
Usable Sensitity ( - 30dB)
Signal- to- noise Ratio:
Stereo Separation:
Frequency Response:
AM Tuner Section
Tuning Range:
IF:
Usable Sensitivity( - 20dB) :
Owner’s manual
DC 14,4V, Negative Ground
4 ohms
40W X 4(CH)
178x124.6x50mm(WxDxH)
15A
WMA, MP3, WMV
MPEG4, Divx, Xvid, MPEG2, AVI
JPEG
AUTO / PAL / NTSC
4:3 Letter Box, 4:3 Pan Scan, 16:9
1.0V p-p 75 ohms
2Vrms (+ 3dB)
20~20KHz
65dB
60dB
87.5 - 108MHz
10.7MHz
15dB
60dB
30dB(1KHz)
30 ~ 15000 Hz
522 - 1620KHz
450KHz
28dB
EN
24
Remarks
Specications subject to change without notice.
„The Lechpol company declares that product PY-9348 is consistent with the essential requirements and other relevant provisions
of directive 1999/5/EC. The proper declaration for download from www.lechpol.eu”
Bedienungsanleitung
INHALT
Hinweise zur Installation 26
Frontplatte 27
Anschlussdiagram 28
Allgemeine Funktionen 28
Radiofunktionen 30
Musik und MP4 Video Wiedergabe 30
RDS Funktionen 32
Bluetooth Funktionen 33
Fernbedienung 34
Funktionen der Fernbedienung 35
Einstellungen 38
Einsetzen der Frontplatte 44
Abnehmen der Frontplatte 44
Reinigen des Steckers 44
Geräteinstallation 45
Technische Daten 46
DE
25

Bedienungsanleitung
INSTALLATION
VORSICHTSMASSNAHMEN
Der Ort der Montage sollte so gewählt werden, dass das Gerät den Fahrer nicht stört.
Vor dem endgültigen Einbau, vorübergehend Gerät mit Spannung versorgen und sicherstellen,
dass es richtig angeschlossen ist und dass sowohl das Gerät als auch das System in normalen
Parameter funktionieren.
Verwenden Sie nur die mitgelieferten Teile zur korrekten Installation. Die Verwendung anderer
Bauteile kann zu Störungen oder Geräteschäden führen.
Fragen Sie Ihren nächstgelegenen Autohändler, wenn die Installation Bohrungen oder sonstige
Änderungen des Autos erfordert.
Installieren Sie das Gerät so, dass es nicht den Fahrer stört und die Passagiere nicht verletzt im
Falle eines plötzlichen Bremsmanövers, wie eine Not-Bremsung.
Installieren das Gerät nicht an Orten, wo es hohen Temperaturen, wie Sonnenlicht, warme Luft,
heiße Luft von der Heizung oder an Orten mit Staub, Schmutz oder starken Vibrationen ausgesetzt ist.
Schützen Sie das Gerät vor Feuchtigkeit.
VERSUCHEN SIE NICHT ÄNDERUNGEN AN DEM GERÄT DURCHZUFÜHREN. ÄNDERUNGEN KÖNNEN ZU UNFÄLLEN FÜHREN
HALTEN SIE DAS FAHRZEUG AN BEVOR SIE EINE EINSTELLUNG DURCHFÜHREN, DIE DIE
FAHRTÄTIGKEIT BEEINTRÄCHTIGT.
GERÄT NICHT EINSCHALTEN WENN DIE INNENTEMPERATUR DES FAHRZEUGES UNTER
20ºC ODER ÜBER 60ºC LIEGT.
DIESES GERÄT IST MIT EINEM EINZIGEN VIDEOAUSGANG AUSGESTATTET. VERWENDEN
SIE EINEN VIDEO-SPLITTER WENN SIE MEHRERE MONITORE ZUGLEICH BETREIBEN
MÖCHTEN.
DE
26
Bedienungsanleitung
ANORDNUNG DER BEDIENELEMENTE
FRONTPLATTE
14
11
12
7
9
6
15
5
4
3
MOD
2
10
13
16
PY-934 8
8
1
1. Taste Reset
2. Taste Ein/Aus /Modus
3. Lautstärkeregler / Auswahltaste/ Taste
4. Taste EQ/ Taste
5. Sensor für Fernbedienung
6. Taste Wellenbereich wählen/ ID3
7. Taste Frequenz suchen / Melodie /
Schneller Vorlauf/ Rücklauf
8. AUX Eingang
9. Taste Displayfarbe/ Einstellungen
10. Stationstasten/ AMS
11. Zahlentasten
12. Steckplatz für SD/MMC Karte
13. TFT Display
14. Taste Lösen der Frontplatte
15. Blinkende LED
16. Mini USB Steckplatz
DE
27

Bedienungsanleitung
WEITERE INFORMATIONEN
ANSCHLUSSDIAGRAMM
BLUETOOTH - ANTENNE
Subwoofer
ANTENNE
LINIENAUSGANG HINTEN RECHTS
LINIENAUSGANG HINTEN LINKS
VIDEOAUSGANG
LINIENAUSGANG VORNE RECHTS
LINIENAUSGANG VORNE LINKS
EINGANG RÜCKFAHRTKAMERA
ROSA
rosa Kabel
BRAUNES
rotes Kabel
gelbes Kabel
blaues Kabel
STROMVERSORGUNG
RÜCKFAHRTKAMERA
SICHERHEITSKABEL
ZÜNDSCHLÜSSEL (B+)
MASSEANSCHLUSS (B –)
STROMVERSORGUNG
SPEICHER
STROMVERSORGUNG
ANTENNE
SPEICHER +12V
ANTENNE
ZÜNDSCHLÜSSEL
MASSEANSCHLUSS
LAUTSPRECHER
HINTEN RECHTS
LAUTSPRECHER
VORNE RECHTS
LAUTSPRECHER
VORNE LINKS
ZUM
LAUTSPRECHER
HINTEN LINKS
LAUTSPRECHER
VORNE LINKS
LAUTSPRECHER
HINTEN LINKS
LAUTSPRECHER
HINTEN LINKS
LAUTSPRECHER
VORNE RECHTS
weißes Kabel
schwarz/weiß Kabel
grünes Kabel
grün/schwarz Kabel
violettes Kabel
violett/ schwarz Kabel
graues Kabel
grau/schwarz Kabel
15A
schwarzes Kabel
ACHTUNG: Braunes Kabel (brown - safety wire) an Masse anschließen ( - ).
ALLGEMEINE FUNKTIONEN
ERSTER SYSTEMSTART
Beim ersten Mal einschalten, oder nach den ersetzen der Fahrzeugbatterie, drücken Sie die Taste
(14) zum lösen der Frontplatte, die LED (15) blinkt. Drücken Sie die Taste (1) Reset mit einem
dünnen Gegenstand, wie z.B. Kugelschreibermine um das Gerät in den Ausgangszustand zu
versetzen.
DE
HINWEIS: Wenn ein Fehler im LCD Display erscheint, können Sie die Taste Reset drücken um
das Gerät in den Ausgangszustand zu versetzen. Die Uhreinstellung sowie einige gespeicherte
Funktionen werden gelöscht.
GERÄT EIN-/AUSSCHALTEN
Drücken Sie eine beliebige Taste um das Gerät einzuschalten, drücken Sie die Taste (2) EIN/AUS
länger als 3 Sekunden um das Gerät auszuschalten.
28

Bedienungsanleitung
LAUTSTÄRKE REGELN
Drehen Sie den Lautstärkeregler (3) zum einstellen der Lautstärke.
BASS/HÖHEN/BALANCE (L-R)/FADER AUSWAHL
Drücken Sie die AUSWAHLTASTE zum Aufruf des Klangeinstellungs-Menüs. Drehen Sie den
Lautstärkeregler zur Auswahl des Einstellungs-Modus, regeln Sie den Einstellungswert durch
drücken der Tasten ” ” oder ” ”
HINWEIS: Wenn keine Einstellung im Zeitraum von 5 Sekunden nach Auswahl des
Klangmodus geschieht, kehrt das gerät automatisch in den vorherigen Anzeigemodus zurück.
Um Bass/Höhen einstellen zu können muss die EQ Einstellung auf FLAT sein. Für weitere
Angaben siehe EQ Einstellungen.
FUNKTION TON AUS
Langes drücken der Taste EQ schaltet das Radio auf stumm. Durch erneutes langes drücken
der Taste EQ wird die Stummschaltung aufgehoben.
EQ
Während der Musikwiedergabe können Sie verschiedene EQ Klangeinstellungen auswählen
(Rockmusik, Volksmusik, Klassische Musik oder Jazz), durch drücken der Taste (4) „EQ”,
siehe unten:
1 drücken Sie wiederholt die Taste EQ zur Auswahl der gewünschten EQ Einstellung in der
Reihenfolge:
2, Drücken Sie die AUSWAHLTASTE zum Aufruf des Klangeinstellungs-Menüs. Drehen Sie
den Lautstärkeregler zur Auswahl des EQ Einstellungs-Modus, wählen Sie den gewünschten
EQ Modus durch drücken der Tasten ” ” oder ” ”.
ROCK-POP C LASSIC JAZZ FLAT
FUNKTIONSMODUS AUSWÄHLEN
Drücken Sie die Taste (2) “MODUS” zur Auswahl von Radio USB SD Karte TV (optional) AUX
Modus. (Wenn kein externes gerät angeschlossen ist, wird dieser Modus übersprungen).
SENSOR
(5) Sensor für die Fernbedienung.
UHRZEITEINSTELLUNG
Langes drücken der AUSWAHLTASTE, drehen Sie den Lautstärkeregler zur Auswahl von
EINSTELLUNGEN und drücken die AUSWAHLTASTE zum Aufruf des Menüs. Drehen Sie
den Lautstärkeregler zur Auswahl von S oder M, durch drücken der Tasten ” ” oder ” ” ,
werden die Stunden oder Minuten eingestellt.
ZONENEINSTELLUNG USA/EUR
Im Radiomodus, langes drücken der AUSWAHLTASTE, drehen
Sie den Lautstärkeregler zur Auswahl von EINSTELLUNGEN
und drücken die AUSWAHLTASTE zum Aufruf des Menüs.
Drehen Sie den Lautstärkeregler zur Auswahl von RADIO und
drücken die AUSWAHLTASTE. Zonenwahl drücken der
Tasten ” ” oder ” ” .
DE
29

Bedienungsanleitung
RGB (BENUTZEREINSTELLBARE RGB FARBBELEUCHTUNG)
Die Beleuchtungsfarbe ändert sich ständig, wenn das Gerät eingeschaltet ist.
Feste Farbeinstellung:
Langes Drücken der Taste DISPLAY, um bestimmte Farben von blau, grün, rot, gelb, lila und weiß
auszuwählen.
Einstellen der Farbbeleuchtung durch den Benutzer:
Langes Drücken der Taste DISPLAY, drehen Lautstärkeregler auf Auto AUS.
Drücken Sie die Taste (8) SUCHEN +/- und wählen ROT, durch drehen des Lautstärkeregler wird der
Farbwert 00 ~ 32 eingestellt
Drücken Sie die Taste (8) SUCHEN +/- und wählen GRÜN - durch drehen des Lautstärkeregler wird der
Farbwert 00 ~ 32 eingestellt.
Drücken Sie die Taste (8) SUCHEN +/- und wählen BLAU - durch drehen des Lautstärkeregler wird der
Farbwert 00 ~ 32 eingestellt.
Drücken Sie DISPLAY, um die Einstellung zu bestätigen.
RADIOFUNKTIONEN
WELLENBEREICH AUSWÄHLEN
Drücken Sie wiederholt die Taste (6) (WELLENBEREICH) zur Auswahl des Wellenbereichs in der
Reihenfolge:
Hinweis: Im Videomodus, drücken Sie die Taste (6) zum Umschalten zwischen AUTO PAL oder NTSC
System
MANUELLE/AUTOMATISCHE SENDERSUCHE
Manuelle Sendersuche: Halten Sie die Taste (7) gedrückt zur Suche eines Senders aufwärts oder
abwärts.
Automatische Sendersuche: Drücken und halten Sie die Taste (7) länger als 3 Sekunden gedrückt,
das Radio sucht automatisch einen Sender aufwärts oder abwärts und startet die Wiedergabe des
gefundenen Senders.
Suchen/Automatische Speicherung der Sender
Drücken Sie die Taste (10) um für 5 Sekunden die in (11) gespeicherten Stationstasten (1~6)
Radiosender bei der Ausführung von AMS, anzuhören. Sie können auch die zugehörige Stationstaste
oder AMS drücken beim anhören des gewünschten Senders. Die Wiedergabe des ausgewählten
Senders beginnt. Drücken und halten Sie die Taste (11) länger als 3 Sekunden gedrückt zum ausführen
der Funktion Automatische Speicherung. Das Radio sucht einen Sender und speichert diesen
automatisch in eine der Stationstasten. (11) (1~ 6) .
HINWEIS: das Gerät kann bis zu 6 Sender für jeden Wellenbereich speichern. Für weitere Angaben
siehe (11) Zahlentasten.
MUSIK UND MP4 VIDEO WIEDERGABE
MP4 Funktionen
Der Hauptordner wird am Monitor angezeigt beim Umschalten in den USB/SD Kartenmodus. Wählen Sie eine
DE
Datei aus und drücken die Taste (11) ”PLAY” oder Enter zum abspielen der Datei. Während der Wiedergabe
drücken Sie die Taste “STOPP” um die Wiedergabe zu beenden und zum Hauptordner zurückzukehren. Bei
anzeigen des Hauptordners, drücken Sie die Pfeiltasten zur Auswahl des gewünschten ORDNERS oder Datei.
Drücken Sie danach die Taste ENTER oder WIEDERGABE um den Ordner zu öffnen oder die Datei abzuspielen.
Bei anzeigen des Hauptordners können Sie auch mit den Zahlentasten die Dateinummer auswählen und diese
dann abspielen.
AUSWAHL DER MELODIEN/ VORLAUF/ RÜCKLAUF
Drücken Sie (7) zur Auswahl der gewünschten Melodie aufwärts oder abwärts. Drücken und halten der
Taste (7) für schnellen Vorlauf/Rücklauf.
30

Bedienungsanleitung
WIEDERHOLTE WIEDERGABE DER AUDIO/VIDEO DATEIEN
Drücken Sie die Taste “RPT/3” für wiederholte Wiedergabe der gewünschten Melodie.
Drücken Sie die Taste “RPT/3” zum ersten Mal wiederholt die Wiedergabe der mp3 und WMA oder
einer Video Datei “RPT 1” wird angezeigt.
Drücken Sie die Taste “RPT/3” zum zweiten Mal, der gesamte AV Ordner wird wiederholt, “RPT DIR”
wird angezeigt.
Drücken Sie die Taste “RPT/3” zum dritten Mal, alle audio- oder Videodateien werden wiederholt, “RPT
ALL” wird angezeigt.
Drücken Sie die Taste “RPT/3” zum vierten Mal um die Wiederholungsfunktion auszuschalten, “RPT
OFF” wird angezeigt.
AUTOMATISCHE MELODIESUCHE
Wăhrend der Mp3 oder WMA Melodiewiedergabe, drücken Sie die Taste „INT/2” um die ersten 10
Sekunden jeder Melodie, anzuhören; „INT”, Melodienummer wird angezeigt. Die Funktion INT ist aktiv.
Erneutes drücken der Taste „INT/2” für die Rückkehr zur normalen Wiedergabe.
HINWEIS: INT funktioniert nicht bei der Wiedergabe von Videodateien.
WIEDERGABE IN ZUFÄLLIGER REIHENFOLGE
Während der Wiedergabe drücken Sie die Taste „RDM/4” und „RDM” wird angezeigt. Die Funktion
RDM ist aktiv. Die Melodien werden in zufälliger Reihenfolge abgespielt. Erneutes drücken der Taste
„RDM/4” für die Rückkehr zur normalen Wiedergabe.
BEENDEN DER WIEDERGABE
Während der Wiedergabe drücken Sie die Taste (11) „5 STOPP” zum beenden der Wiedergabe,
am TFT wird „STOP” angezeigt. Erneutes drücken der Taste „ ” für die Rückkehr zur normalen
Wiedergabe.
ANHALTEN DER WIEDERGABE (PAUSE)
Während der Wiedergabe drücken Sie die Taste (11) „1 PLAY” um die Wiedergabe anzuhalten, am TFT
wird „PAUSE” angezeigt. Erneutes drücken der Taste „ ” für die Rückkehr zur normalen Wiedergabe.
VIDEOEINSTELLUNG
Während Sie Videos oder Bilder betrachten, können Sie das Menü
„VIDEO-EINSTELLUNGEN“ aufrufen um die Bildqualität zu verbessern.
Wenn das Bild gestört erscheint während der Einstellungen, rufen Sie das
Menü „SYSTEMEINSTELLUNGEN“ auf und wählen
„WERKSEINSTELLUNGEN“. Drücken Sie die Auswahltaste um das
Zurücksetzen auf die Werkseinstellungen zu bestätigen.
EINSTELLEN DER RÜCKFAHRTKAMERA
Verbinden Sie die Kabel der Rückfahrtkamera an das 14,4 V elektrische System mit negativer Masse.
Verbinden Sie den Kameraausgang mit “ EINGANG RÜCKFAHRTKAMERA”. Beim Rückwärtsfahren
erscheint automatisch das Kamerabild am Bildschirm.
DOS (DYNAMISCHER OFFENER BILDSCHIRM)
Dynamischer Offener Bildschirm (Bewegungs-Effekt), beim eingeschalten des Gerätes. Drücken Sie
eine beliebige Taste, um diese zu beenden und zum aktuellen Modus zurückzukehren.
DEMO EIN: Langes drücken der Auswahltaste, wählen Sie Einstellungen → System → Demo,
drücken Sie die Taste (8) SUCHEN +/- und wählen Demo EIN, danach drücken Sie die Auswahltaste,
zum bestätigen. Das Dynamische Offene Bildschirm Display benutzt diesen Modus um wiederholt
Vorführungen zu zeigen. Keine Tasten funktionieren, außer der Auswahltaste.
DEMO AUS: Drücken Sie die Auswahltaste, drücken Sie die Taste (8) SUCHEN +/- und wählen Demo
AUS, danach drücken Sie die Auswahltaste, zum bestätigen, Rückkehr zum ursprünglichen Status.
DE
31

Bedienungsanleitung
RDS FUNKTIONEN (RADIO INFORMATIONEN SYSTEM)
AF – ALTERNATIVE FREQUENZEN
Drücken Sie die Taste (26) [AF] um den RDS – Modus Ein- oder Auszuschalten. Wenn der RDS –
Modus Eingeschaltet ist, erscheint die Anzeige „AF“ am Display.
Die Anzeige „AF“ Erscheint sobald AF Eingeschaltet wird. Die Suche nach einer alternativen
Frequenz startet sobald das Radiosignal zu schwach wird.
Bei FM Empfang, wenn AF Eingeschaltet ist, die Funktionen Suchen, Speichern, Auto, können
nur RDS - Programme empfangen und speichern. Trotzdem, wenn die Option ITALIA aktiviert ist,
können alle Programme die den Grenzwert überschreiten Empfangen und Gespeichert werden
INDIKATOR KONDITIONEN
AF ON Option AF EIN, Empfang von RDS Informationen
AF OFF Option AF AUS
AF Blink Option AF EIN, kein Empfang von RDS Informationen
REGION
AF –Beim drücken der Taste AF länger als eine Sekunde wird in Modus REGION EIN/AUS umgeschaltet
EIN (ON) – PI- Kode (Programm–Identikations-Kode) wird überprüft wenn AF Kontrolle im Gange
ist
AUS (OFF) – PI – Kode und Flächendeckung werden nicht überprüft wenn AF Kontrolle im Gange
ist
PROGRAMMTYP (PTY)
RADIO MODUS
Vorheriger PTY wird angezeigt beim drücken der Taste (27) PTY. Wenn keine andere Taste in den
nächsten 2 Sekunden gedrückt wird, vorheriger PTY wird gesucht. Im 1 Suchzyklus, wenn der
gesuchte Programmtyp nicht gefunden wird, erscheint die Anzeige „NO PTY“.
Zwei Programmtypen stehen zur Verfügung: SPRACHE (SPEECH) UND MUSIK (MUSIC).
Einmaliges drücken von PTY: Option Musik; Nochmaliges drücken: Option Sprache.
Die Stationstasten M1-M6 werden zur Auswahl des Programmtyps verwendet:
VERKEHRSINFORMATIONEN (TA)
Die Taste (28) TA hat folgende Funktionen:
TA EIN Am Display wird TA Angezeigt.
Wenn Verkehrsinformationen gesendet werden, wird die aktuelle Tonquelle unterbrochen.
Wenn die Lautstärke unter 20 ist, wird die Lautstärke auf 20 gestellt und nach den Verkehrsinformationen wieder zurückgestellt
Wenn die Lautstärke während einer Verkehrsinformation geregelt wird, ist nur die vorherige Lautstärke gültig.
Wenn TA Eingeschaltet ist, die Funktionen Suchen, Automatische Speicherung können emp-
fangen oder gespeichert werden nur wenn der Identikationskode des Verkehrsinformationen
DE
Programms erhalten wird
Wenn TA Eingeschaltet ist, der Identikationskode des Verkehrsinformationen Programms wird
nicht in einer bestimmten Zeit Empfangen
ALARM TA: NO TA/TP wird Angezeigt und der Alarm ist Ausgeschaltet
SUCHEN TA (TA SEEK): die TA Suche ist aktiviert.
32

Bedienungsanleitung
BLUETOOTH-FUNKTIONEN
1. Koppeln der Geräte
Schalten Sie Ihr Autoradio ein; Legen Sie das Mobiltelefon mit Bluetooth
Funktion in der Nähe des Autoradios, kurz danach ndet das
Mobiltelefon das neue Bluetooth-Gerät „CAR AUDIO”, Geben Sie das
Kopplungs-Passwrt „8888” ein und klicken auf OK, es erscheint die
Meldung Kopplung erfolgreich, wenn die Verbindung erfolgreich
hergestellt wurde, auf dem TFT-Bildschirm, hört das Bluetooth-Logo
„ „ auf zu blinken. Danach können Sie die Bluetooth-Funktionen
durch drücken der Tasten auf der Fernbedienung ausführen.
HINWEIS: abhängig vom Bluetooth Mobiltelefon unterstützt das Bluetooth System “HSP” “HFP”
“A2DP” und AVRCP Bluetooth Prol
2. Funktion Mobiltelefon Freisprecheinrichtung
Wenn Ihr Mobiltelefon mit dem CAR AUDIO System verbunden ist, bei Eingang eines Anrufes
wird das Klingeln des Mobiltelefons automatisch zu den Lautsprechern des Autoradios umgeleitet
und die Telefonnummer des Anrufers erscheint am TFT Bildschirm.
- Drücken Sie kurz die Taste “SEL/ um das Gespräch anzunehmen.
Nun können Sie das Gespräch führen über das Mikrofon an der Frontplatte.
- Drücken Sie kurz die Taste “EQ/ ”um aufzuhängen wenn das Gespräch beendet ist.
- Drücken Sie kurz die Taste “EQ/ „ um das Gespräch abzulehnen bei eingehenden Anruf.
3. Musikwiedergabe über A2DP.
Ihr Mobiltelefon und Autoradio sind über A2DP verbunden. Wenn Sie Ihren mobilen Musik-Player
aufrufen, um Musik zu hören, wird der Musik-Ton über das Audiosystem des Fahrzeugs übertragen, drücken Sie die Taste “ << ” lub “ >> ” zum Auswählen der Musiktitel.
Drücken der Tasten “ ” oder ” ” haben die gleiche Funktion wie beim abspielen einer CD/DVD.
4. Wählen einer Nummer mit der Fernbedienung
Drücken Sie kurz die Taste “ EQ/ ” ” zum Aufruf des Bluetooth Menüs, drucken Sie die Tasten “
0-9” und “*”, “#” zur Auswahl einer Telefonnummer.
- Drücken der Taste ” ” kann die falsch gewählte Nummer löschen.
- Drücken Sie die Taste “SEL/ ” um die gewählte Telefonnummer zu bestätigen und den Wahlvorgang zu starten.
- Drücken Sie die Taste Press “ EQ/ ” um aufzuhängen wenn das Gespräch beendet ist.
5. Wählen einer Nummer aus dem Telefonbuch
Dieses Bluetooth System kann automatisch die vermissten Telefonanrufe speichern (bis zu 10
Telefonnummern).
- Rufen Sie das Bluetooth Menüs auf und drücken kurz die Taste “EQ / ” zum suchen der
Telefonnummern.
- Drücken Sie kurz die Taste “SEL / ” um den Wahlvorgang mit der gewählte Telefonnummer zu
starten.
6. Bluetooth Verbindung unterbrechen/wiederherstellen.
Durch drücken der Taste “BND” länger als eine Sekunde wird die aktuelle Bluetooth Verbindung
unterbrochen, wenn das Mobiltelefon im Freisprechmodus oder A2DP Modus war, wird der Ton
oder Musikwiedergabe des Mobiltelefons wieder auf die Telefonlautsprecher geleitet.
Erneutes drücken der Taste “BND” länger als eine Sekunde wird die Bluetooth Verbindung wieder
hergestellt. (Einige Marken Bluetooth Mobiltelefone müssen mobilen Bluetooth System oder
Musik-Player aktivieren)
HINWEIS: Verschiedene Mobiltelefone haben verschiedene Reaktionen. Wir garantieren nicht alle
Funktionen der anschließbaren Geräte.
DE
33

FERNBEDIENUNG
Bedienungsanleitung
20
12
13
16
10
14
19
1
3
2
1. Taste Ein/Aus
MOD E
2. Taste Wiedergabe/ Pause
3. Taste Ton aus
5
BND
SYS
DISP
EQ
4
ENTE R
Setup
6
LOU D
SLO W
9
AMS
RPT
ST
PRO G
VOL
Zoom
+
7
LOC
RDM
SCA N
INT
SEE K
OSD
VOL
SEL
SEE K
+
AUD IO
-
4. Auswahltasten Bewegen im Menü
5. Taste Wellenbereich/ System
17
6. Taste Enter
24
7. Taste Lautstärke Erhöhen/ Verringern
8. Taste Frequenz /Suchen/ Vorlauf/
23
Rücklauf
9. Taste Stereo/Programmierte
Wiedergabe
22
10. Taste Bildschirmmenü (OSD)
21
11. Taste Klangmodus/ Taste
12. Taste Wiederholung/ AMS
25
13. Taste Lokal/ RDM zufällige
11
Reihenfolge
14. Zahlentasten
15. Taste Audioeinstellungen
16. Taste Frequenz suchen/ INT
8
17. Taste EQ / Taste
15
18. Taste Spielzeit einstellen
19. Taste Modus
1 2
3
4
20. Taste Stopp
21. Taste Loudness
22. Taste Zeitlupe
5
6 87
23. Taste Einstellen
24. Taste Display
25. Taste Zoom
9 0
PTYAF TA
10
GOT O
#
26. Taste Alternative Frequenzen (RDS)
27. Taste Programmtyp (RDS)
28. Taste Verkehrs-Mitteilungen (RDS)
18
DE
34
282726

Bedienungsanleitung
BATTERIE AUSTAUSCHEN
Wenn die Reichweite der Fernbedienung nachläst, oder nicht mehr Funktioniert, muss die Batterie
Ausgetauscht werden. Verwenden Sie für die neue Batterie den Typus CR2025. Beim Einlegen
der Batterie achten Sie auf die korrekte Polarität.
1. Ziehen Sie das Batteriefach hinaus bei gedrückter
Sicherung.
2. Legen Sie die Batterie mit dem (+) Zeichen nach oben
in den Halter.
3. Schieben Sie das Batteriefach in die Fernbedienung.
TASTE EIN/AUS
Drücken Sie die Taste (1) zum Ein oder Ausschalten des Gerätes.
TASTE PAUSE/START
Drücken Sie die Taste (2) um die Wiedergabe anzuhalten. Nochmaliges drücken startet die Wiedergabe.
TASTE TON AUS
Durch drücken der Taste (3) wird der Ton abgeschaltet oder wieder eingeschaltet.
AUSWAHLTASTEN
Drücken Sie die Auswahltasten (4) um eine Option zu suchen und mit der Taste (6) ENTER oder
(2) START ausgewählt.
HINWEIS: Diese Funktion ist nur im Hauptmenü aktiv.
TASTE WELLENBEREICH/TV SYSTEM
Im RADIO MODUS, drücken Sie die Taste (5) [BAND/SYS] um den Wellenbereich
auszuwählen.
Im TV MODUS drücken Sie die Taste (5) [BAND/SYS] um das TV System auszuwählen:
AUTO, PAL oder NTSC.
DE
35

Bedienungsanleitung
LAUTSTÄRKE ERHÖHEN/ VERRINGERN
Drücken Sie die Taste (7) (VOL+ ODER VOL-) um die Lautstärke zu erhöhen oder zu verringern.
SENDERSUCHE/AUSWAHL DER MELODIEN/ SCHNELLER VORLAUF/
RÜCKLAUF
Im Radiomodus, halten Sie die Taste (8) gedrückt zur Suche eines Senders aufwärts oder abwärts
Drücken und halten der Taste länger als 3 Sekunden sucht das Radio automatisch einen Sender
aufwärts oder abwärts und startet die Wiedergabe des gefundenen Senders.
Im Wiedergabemodus, drücken Sie (8) zur Auswahl der gewünschten Melodie aufwärts oder
abwärts. Wiederholtes drücken der Taste für schnellen Vorlauf/Rücklauf um Ihr gewünschtes
Musiksegment zu suchen.
Drücken und halten der Taste länger als 3 Sekunden für schnellen Vorlauf/Rücklauf.
PROGRAMMWIEDERGABE/ ST
Im Wiedergabemodus drücken Sie die Taste (9) PROGRAMM zum Aufruf des Programmmenüs.
Drücken Sie die Tasten (4) und (14) Zahlentasten zur Programmierung der Wiedergabe.
HINWEIS: ST funktioniert nur im Radiomodus.
BILDSCHIRMANZEIGE
Während der Wiedergabe im USB oder SD Kartenmodus, drücken Sie die Taste (10) (OSD). Am
Bildschirm wird Melodienummer/ Kapitel/ Aktuelle Zeit angezeigt.
HINWEIS: Im MP3/WMA Modus, werden nur Ordner und Melodienummer angezeigt.
VOL/ BAS/ TRE/ BAL/ FAD AUSWÄHLEN
Im Radio- oder Wiedergabemodus, drücken Sie wiederholt die Taste (11) (SEL) zur
Auswahl der gewünschten Funktion in der Reihenfolge:
VOL BAS TRE BAL
FAD BR I CON SHAP
HINWEIS: Nach Auswahl der gewünschten Funktion, können Sie den Einstellungswert mit dem
Lautstärkeregler (VOL) verändern. Wenn P- EQ Modus aktiviert ist, drücken Sie die Auswahltaste
SEL für gewünschten Modus. Bass/ Höhen sind inaktiv und können nicht verändert werden (siehe
unten)
VOL BAL FA DB RI CON
SHA P CON
WIEDERGABEWIEDERHOLUNG/ AMS
1. Drücken Sie die Taste AMS (12),
Im Wiedergabemodus ist die Wiederholungsfunktion: RPT 1 (Einmal Wiederholen); RPT DIR
DE
(Ordner Wiederholen), RPT ALL (Alles Wiederholen), RPT OFF (Wiederholen ausgeschaltet).
2.Im Radiomodus ist AMS Funktion
ZUFÄLLIGE WIEDERGABE
Während der Wiedergabe drücken Sie die Taste (13) (RDM); die Melodien werden in zufälliger
Reihenfolge abgespielt.
Im Radiomodus, drücken der Taste hat die Funktion LOKAL.
36

Bedienungsanleitung
ZAHLENTASTEN
Im Radiomodus, können Sie eine der 6 gespeicherten Sender für jeden Wellenbereich auswählen, durch drücken einer Zahlentaste (14). Während der Wiedergabe können Sie eine Melodie
direkt mit den Zahlentasten (14) ( 0~ 10+) auswählen Zum Beispiel für Melodie Nummer fünfzehn,
drücken Sie zuerst die Taste 10+ und danach 5, die zugehörige Melodie (15) wird abgespielt.
HINWEIS: Bei Mp3 oder WMA Wiedergabe, einmaliges drücken der Taste 10+ hat die Funktion
10+, zweimaliges drücken 20+, dreimal 30+ und so weiter.
LINKS/RECHTS/STEREO AUSWÄHLEN
Während der Wiedergabe, drücken der Taste ( 15) (Audio) ändert den Ton zu linkem/rechtem
Lautsprecher oder Stereomodus.
EINSTELLEN DER DISK-WIEDERGABEZEIT
Während der Wiedergabe drücken Sie die Taste (18) GOTO zum einstellen der Wiedergabezeit.
Mit den Tasten (4) und Zahlentasten (14) wählen Sie Melodienummer/Kapitel oder Zeit und drücken die Taste ENTER um die Wiedergabe zu starten.
TASTE MODUS
drücken Sie die Taste (19) um zwischen Radio, USB/SD/MMC oder AUX Modus umzuschalten.
PAUZA
Während der Wiedergabe drücken Sie die Taste (20) um die Wiedergabe anzuhalten, nochmaliges drücken beendet die Wiedergabe.
SCAN/INT
Während der Wiedergabe, drücken Sie die Taste SCAN/INT um die ersten 10 Sekunden jeder
Melodie, anzuhören.
Im Radiomodus, drücken Sie die Taste SCAN/INT für die Suchfunktion. Das Radio überprüft die
Frequenzen und wenn die stärke des Radiosignals den Grenzwert überschreitet wird der Sender
für 5 Sekunden übertragen und die Frequenz blinkt im Display. Drücken und halten der Taste für
mehr als 3 Sekunden wird der aktuelle Sender weiter übertragen, die Suchfunktion wird beendet.
LANGSAMER RÜCKLAUF/VORLAUF
Während der MP4 Videowiedergabe drücken Sie die Taste (22) einmal für 1/2 langsame Wiedergabe, zweimal für 1/3, dreimal für 1/4, viermal für 1/5,fünfmal für 1/6,sechsmal für 1/7, siebenmal
für normale Geschwindigkeit.
TASTE ZOOM
Während der MP4 Videowiedergabe drücken Sie die Taste (25) einmal für 2x Zoom, zweimal für
3x Zoom, dreimal für 4x Zoom, viermal für ½ Zoom, fünfmal für 1/3 Zoom, sechsmal für 1/4 Zoom,
siebenmal für normalen Betrachtungsmodus, das Bild kann mit den Pfeiltasten bewegt werden.
HINWEIS: Keine Zoomfunktion für MP3, WMA, Melodiewiedergabe.
DE
37

Bedienungsanleitung
MENÜEINSTELLUNGEN
1. Drücken Sie die Taste (23) SETUP der Fernbedienung wenn das Gerät angehalten ist. Drücken
Sie zweimal die Taste (20) STOP an der Fernbedienung um sicherzustellen dass das Gerät angehalten ist.
2. Die Hauptseite des Einstellungsmenüs wird Angezeigt.
3. Wählen Sie die gewünschte Einstellung durch drücken der Tasten (4).
4. Drücken Sie die Taste (6) ENTER.
A. SYSTEMEINSTELLUNGEN
Diese Seite enthält alle Einstellungen für TV-System. Bildschirmschoner, TV-Typ, Passwort,
Bewertung und Werkseinstellungen. Weitere Informationen nden Sie im Menü Systemeinstellungen.
B. SPRACHEINSTELLUNGEN
Diese Seite enthält alle Einstellungen für Bildschirmmenü, Audiosprache, Untertitel, und Me-
nüsprache. Weitere Informationen nden Sie im Menü Spracheinstellungen.
C. AUDIOEINSTELLUNGEN
Diese Seite enthält alle Audioeinstellungen. Weitere Informationen nden Sie im Menü Audioeinstellungen.
D. VIDEOEINSTELLUNGEN
Diese Seite enthält alle Videoeinstellungen. Weitere Informationen nden Sie im Menü Videoeinstellungen.
E. DIGITALE EINSTELLUNGEN
Einstellung von Funktionsmodus, dynamische Bandbreite und Stereomodus. Weitere Informatio-
nen nden Sie im Menü Digitale Einstellungen.
Taste EQ
Drücken Sie die Taste (26) zur Auswahl der verschiedene EQ Klangeinstellungen:
ROCK →POP →CLASSIC →JAZZ →FLAT Modus
DE
38

Bedienungsanleitung
GEMISCHTE DISKS
Beim Einlegen eines gemischten Discs (Formate MP3, WMA, JPG oder MPEG4) in den CD-
-Schacht beginnt die Wiedergabe automatisch, wie folgt:
Musikwiedergabe
Durch drücken der Auswahltasten, Pfeil auf die gewünschte
Melodie setzen (oder direkt durch die Zahlentasten auswählen) und ENTER drücken. Die Wiedergabe beginnt.
HINWEIS: Durch drücken der rechten Auswahltaste wird der
Auswahlstatus der Melodie, Bilder, oder Filme angezeigt.
Durch die Auswahltasten links, rechts im Ordner blättern
und durch ENTER auswählen. Durch drücken der linken
Auswahltaste kehrt man zum Ordner zurück.
Bildwiedergabe
Durch drücken der Auswahltasten, Pfeil auf das gewünschte
Bild setzen (oder direkt durch die Zahlentasten auswählen)
und ENTER drücken. Das ausgewählte Bild erscheint am
Bildschirm. Durch drücken der Auswahl-Tasten, ↑, ↓, →,
←, wird das Bild in verschiedene Winkel gedreht. Durch
drücken der Taste STOPP kehrt das Bild in den Ausgangszustand zurück.
HINWEIS: Durch drücken der rechten Auswahltaste wird der
Auswahlstatus der Melodie, Bilder, oder Filme angezeigt.
Durch die Auswahltasten links, rechts im Ordner blättern und
durch ENTER auswählen. Durch drücken der Taste Play
beginnt die automatische Wiedergabe der Bilder.
Videowiedergabe
Durch drücken der Auswahltasten, ↑, ↓, →, ←, Pfeil auf den
gewünschten Film setzen (oder direkt durch die Zahlentasten auswählen) und ENTER oder PLAY drücken. Die
Wiedergabe beginnt.
HINWEIS: Durch drücken der linken Auswahltaste kehrt
man zum Ordner zurück um eine andere Datei oder Ordner
Auszuwählen. Drücken der Taste PLAY beginnt die Wiedergabe.
Aussuchen der Melodien
Im MP3/WMA Modus:
Eine einzelne Datei durch drücken der Tasten (8) Auswählen.
In einem Ordner die Taste ( ) öffnet den Ordner; Melodie
durch die Taste ( ) Auswählen.
Taste ENTER drücken. Die Wiedergabe beginnt.
DE
39

A. SYSTEMEINSTELLUNGEN
Bedienungsanleitung
a. TV SYSTEM
c. TV TYP
b. BILDSCHIRMSCHONER
Dieses Gerät kann MP4
Dateien im Format PAL
oder NTSC wiedergeben.
Format PAL oder NTSC
je nach dem TV System
auswählen. AUTO – das
Gerät wählt automatisch
das passende Format
4:3 PS
Wiedergabe PAN und SCAN (Die Kanten links und rechts
des Fernsehbildes sind geteilt).
4:3 LB
Wiedergabe Schachtel („LETTERBOX“) . (Das Bild ist
durch schwarze Streifen oben und unten begrenzt).
16:9
Format 16:9 bei Anschluss an einen Flachbildschirm wählen
DE
40
d. PASSWORT
Passwort eingeben und ENTER drücken.
Altes Passwort eingeben (Werkseitig ist „0000“
eingestellt) und neues 4-steliges Passwort
eingeben und nochmals zur Bestätigung
eingeben

Bedienungsanleitung
e. BEWERTUNG (FSK)
1 KID SAFE
2G
3PG
4PG1 3
5PG
-R
6R
7 NC 17
8 ADUL T
f. WERKSEINSTELLUNGEN
REST ORE
Bewertung der Programme mit den Auswahltasten
einstellen und durch drücken von ENTER Bestätigen.
1: [KID SAFE] Für Kinder Freigegeben
Programme können von Kindern Angesehen werden
2: [G] Freigegeben für alle Altersklassen.
3: [PG] Die Erlaubnis der Eltern wird benötigt.
4: [PG 13] Verboten für Kinder unter 13 Jahren.
5: [PG-R] Auswählen wenn die DVD mit “PG-R”.
Beschriftet ist. Kinder unter 17 Jahren nur mit Erlaubnis
der Eltern.
6: [R] Kinder unter 17 Jahren nur zusammen mit den
Eltern oder einem Erwachsenen.
7: [NC-17] Verboten für Kinder unter 17 Jahren.
8: [ADULT] Nur für Erwachsene.
Alle Einstellungen werden auf die Werkseinstellungen
zurückgesetzt.
RESTORE - WERKSEINSTELLUNGEN
B. SPRACHEINSTELLUNGEN
Einstellen der Sprache für Bildschirmmenü, Audio, Untertitel, und Menü
a. BILDSCHIRMMENÜ
OSD LANGUAGE
AUDI O LANG
LANG
LANG
SUBTITLE
MEN U
DIVX[R] VO D
EXI T SETU P
ENGLIS H
CHINESE
GERMAN
SPANIS H
FRENCH
PORTUGUESE
b. AUDIOSPRACHE
OSD LANGUAG E
AUDI O LANG
LANG
SETU P
LANG
SUBTITL E
MEN U
EXIT
ENGLIS H
CHINESE
GERMAN
SPANIS H
FRENCH
PORTUGUES E
LATIN
JAPAN
DE
41

Bedienungsanleitung
c. UNTERTITELSPRACHE
OSD LANGUAG E
AUDI O LANG
LANG
SETUP
LANG
SUBTITLE
MENU
EXIT
ENGLISH
CHINESE
GERMAN
SPANIS
H
FRENCH
PORTUGUESE
JAPAN
OFF
C. AUDIOEINSTELLUNGEN
a. AUDIOAUSGANG
b. TASTE
d. MENÜSPRACHE
OSD LANGUAGE
AUDI O LANG
SUBTITL E
MEN U
EXI T
SPDIF/OFF - Der analoge Ausgang hat Kein Signal.
SPDIF/RAW - Wenn das Gerät, an einen analogen oder optischen
Verstärker verbunden ist, sollten Sie diese Einstellung vornehmen.
Wenn die Disk mit Dolby Digital, DTS oder MPEG aufgenommen
wurde ist das analoge oder optische Ausgangssignal des
Gerätes das gleiche mit dem digitalen Signal (RAW-Format) des
Datenträgers. Der benutzte Verstärker muss Dolby Digital, DTS
oder MPEG entschlüsseln können
SPDIF/PCM - Wenn das Gerät an zwei Kanälen digitaler
Stereoverstärker, angeschlossen ist, wird diese Einstellung
ausgewählt. Wenn die Disk mit Dolby Digital oder MPEG
aufgenommen wurde, wird das analoge oder optische
Ausgangssignal des Gerätes auf zwei Kanäle durch das Modul
PCM aufgeteilt.
LANG
LANG
SETU P
ENGLIS H
CHINESE
GERMAN
SPANISH
FRENCH
PORTUGUES E
JAPAN
LATIN
D. VIDEOEINSTELLUNGEN
Diese Einstellungen werden verwendet um Helligkeit, Kontrast, Farbton, Sättigung, oder Bildschärfe durch die Pfeiltasten zu regeln. Durch drücken von ENTER wird die Einstellung (Menü)
aktiviert.
HINWEIS: Videoeinstellungen sind nur im TV/AV Modus möglich
DE
42
BRIGHTNESS
CONTRAST
HUE
SATURA TION
SHARPNES S
EXI T SETU P
a. HELLIGKEIT
BRIGHTNESS
CONTRAST
HUE
SATURA TION
SHARPNES S
EXI T SETU P
12
10
8
6
4
2
0

Bedienungsanleitung
b. KONTRAST
BRIGHTNES S
CONTRAST
HUE
SATURA TION
SHARPNESS
EXI T SETU P
d. FARBSÄTTIGUNG
BRIGHTNESS
CONTRAST
HUE
SATURA TION
SHARPNES S
EXIT SETUP
12
10
8
6
4
2
0
12
10
8
6
4
2
0
c. FARBTON
BRIGHTNESS
CONTRAST
HUE
SATURA TION
SHARPNES S
EXI T SETUP
e. BILDSCHÄRFE
BRIGHTNES S
CONTRAST
HUE
SATURA TION
SHARPNESS
EXIT SETU P
+6
+4
+2
0
-2
-4
-6
88
6
6
4
4
2
2
0
0
E. DIGITALE EINSTELLUNGEN
Diese Einstellungen werden verwendet um Dynamikkompression und Stereomodus zu regeln.
a. DYNAMIKKOMPRESSION
DYNAMI C RANG E
DUAL MONO
EXI T SETUP
Zur Einstellung der
Dynamikkompression
FULL
6/8
4/8
2/8
OFF
b. ZWEIFACH MONO
DYNAMIC RANG E
DUAL MONO
EXIT SETU P
Stereoeinstellungen: Stereo, Mono
links, Mono rechts, Zweifach Mono.
STER EO
MONO LE FT
MONO RIGH T
MIX MONO
DE
43

Bedienungsanleitung
EINSETZEN UND ABNEHMEN DER FRONTPLATTE
Einsetzen
Die Kerbe A (siehe Bild) in die Welle B einstecken und leicht in die linke Seite drücken.
B
A
2
N
D
1ST
ABNEHMEN
Drücken Sie die Taste (14) Frontplatte Entriegeln [REL] (rechts oben) zum entfernen der Frontplatte.
Wenn die Frontplatte aufklappt, in einen Winkel von 900 halten und nach links herausziehen
RE LE AS E
REINIGUNG PIN
Wenn die Kontakte zwischen dem Radio und dem DCP verschmutzt ist, kann Radio nicht richtig. So reinigen Sie die Kontakte Abdeckung abnehmen und reinigen Sie die Kontakte mit einem
Wattestäbchen in Alkohol getränkt wurde. Folgen Sie dazu den sanft um eine Beschädigung der
Kontakte.
DE
Hinweis: Aus Sicherheitsgründen vor dem Beitritt zur Aktion, ziehen Sie den Schlüssel aus dem stacyjni. Nicht direkt
berühren die Kontakte mit den Fingern.
44

Bedienungsanleitung
GERÄTEEINBAU
1. Armaturenbrett
2. Rahmen
Nach dem Einlegen in das Armaturenbrett,
wählen Sie die Halter abhängig von der Dicke
des Armaturenbretts und biegen sie diese um
den Rahmen zu befestigen (Abb. 1)
3. Schraube
Fig.2
Fig.3
1. Armaturenbrett
2. Mutter (5mm)
3. Sicherungsscheibe
4. Schraube (5 x 25mm)
5. Schraube
6. Montageband
Verwenden Sie das Montageband zur
Sicherung der Rückseite des Geräts.
Das Band kann bis zum gewünschte
Winkel gebogen werden. (Abb. 2)
7. Flachscheibe
EINBAU DES GERÄTES IM WERKSEITIGEN
SCHACHT
1. Wählen Sie eine Position, wo die Bohrungen des
Halters und der zentralen Einheit in der gleichen Linie
sind und ziehen Sie die zwei Schrauben an jeder Seite
an. Verwenden Się entweder Ankerbolzen (5x5mm) oder
Schrauben mit Senkkopf (4x5mm).
2. Schraube
3. Armaturenbrett.
OBS.: La metoda B nu se utilizeaza suportul metalic, inelul
dreptunghiular de plastic si banda de montaj.
1. Rahmen (Abb. 3)
2. Legen Sie die Finger in die Nut im vorderen
Rahmen und ziehen Sie um den Rahmen zu
entfernen. (Um den Rahmen wieder zu
befestigen, einfach mit dem Schlitz nach unten
eindrücken).
3. Löseschlüssel
Setzen Sie die beigelegten Löseschlüssel in die
Nut auf beiden Seiten des Geräts so ein das się
mit einem Klicken einrasten. Durch ziehen an
beiden Schlüssel wird das Gerät aus dem
Armaturenbrett entfernt.
DE
EINFÜGEN VON SD
SD schrägen Winkel des Abstiegs zu halten
Exposition: Ich lege die SD-Bereich und drücken
Sie ihn erneut, um sie zu entfernen.
45

Bedienungsanleitung
TECHNISCHE DATEN
ALLGEMEINE TECHNISCHE DATEN
BETRIEBSSPANNUNG:
LAUTSPRECHERIMPEDANZ:
MAXIMALE AUSGANGSLEISTUNG:
MONTAGEABMESSUNGEN:
STROMVERBRAUCH:
VIDEO
AUDIO
VIDEO
FOTOS
VIDEO-SYSTEM
VIDEO SEKTION
VIDEO SYSTEM
VIDEO AUSGANG
AUDIO SEKTION
MAXIMALER AUSGANGSPEGEL:
FREQUENZGANG:
SIGNAL- RAUSCHABSTAND:
STATIONEN TRENNUNG:
RADIO FM
EMPFANGSBEREICH (MHz):
ZWISCHENFREQUENZ (IF):
SENSIBILITÄT (S/N-30 dB):
SIGNAL- RAUSCHABSTAND:
KANALTRENNUNG:
FREQUENZGANG:
RADIO AM
EMPFANGSBEREICH:
ZWISCHENFREQUENZ:
SENSIBILITÄT (S/N-20dB):
DC 14,4V, negativer Masseanschluss
4 ohms
40W X 4(CH)
178x124.6x50mm(WxDxH)
15A
WMA, MP3, WMV
MPEG4, Divx, Xvid, MPEG2, AVI
JPEG
AUTO / PAL / NTSC
4:3 Letter Box, 4:3 Pan Scan, 16:9
1.0V p-p 75 ohms
2Vrms (+ 3dB)
20~20KHz
65dB
60dB
87.5 - 108MHz
10.7MHz
15dB
60dB
30dB(1KHz)
30 ~ 15000 Hz
522 - 1620KHz
450KHz
28dB
HINWEIS: TECHNISCHE DATEN KÖNNEN OHNE VORANKÜNDIGUNG GEÄNDERT WERDEN
„Hiermit erklär die Firma Lechpol dass sich das Gerät PY-9348 im Einklang mit den grundlegenden Anforde-
DE
rungen und anderen relevanten Bestimmungen der Richtlinie 1999/5/EG bendet. Konformitätserklärung zum
Download auf www.lechpol.eu”
46

Instrukcja obsługi
SPIS TREŚCI
Uwagi 48
Panel przedni 49
Schematpodłączenia 50
Podstawowe operacje 50
Radio 52
Muzyka i video 52
RDS 54
Bluetooth 55
Pilot 56
Funkcje pilota 57
Setup 60
Instalacja panelu przedniego 66
Zdejmowanie panelu przedniego 66
Czyszczenie styków 66
Instalacja 67
Specykacja 68
PL
47

Instrukcja obsługi
INSTALACJA
Uwagi
Zainstaluj radio w taki sposób aby nie utrudniało prowadzenia pojazdu.
Przed ostatecznym zainstalowaniem radia w kieszeni podłącz wszystkie przewody i włącz radio
aby sprawdzić czy cały system nagłośnienia działa poprawnie.
Do poprawnej instalacji radia użyj dołączonych do niego akcesoriów, zastosowanie nieautoryzowanych komponentów może skutkować niepoprawnym działaniem radia.
Skonsultuj się Z autoryzowanym serwisem twojego samochodu jeżeli instalacja radia wymaga
dokonania modykacji w samochodzie np. wywiercenia otworów itp.
Zainstaluj radio w sposób solidny i bezpieczny, aby nie wyrządziło nikomu krzywdy w przypadku
np. awaryjnego hamowania.
Nie instaluj radia w miejscach gdzie będzie narażone na nadmierne nagrzewanie np. narażone na
bezpośrednie działanie promieni słonecznych, przy nawiewach ciepłego powietrza, w miejscach
gdzie nadmiernie zbiera się kurz, brud itp.
! NIE MODYFIKUJ URZĄDZENIA, MOŻE TO SPOWODOWAĆ NIEWŁAŚCIWE DZIAŁANIE.
! ZATRZYMAJ POJAZD JEŻELI ZAMIERZASZ KORZYSTAĆ URZĄDZENIA W SPOSÓB KTÓRY
UNIEMOŻLIWIA BEZPIECZNE PROWADZENIE.
! NIE KORZYSTAJ Z URZĄDZENIA JEŻELI TEMPERATURA W POJEŹDZIE JEST POZA ZA
KRESEM -20 +60 STOPNI C.
! URZĄDZENIE OBSŁUGUJE JEDEN MONITOR, GDY CHCESZ PODŁĄCZYĆ WIĘCEJ MONI
TORÓW UŻYJ DZIELNIKA SYGNAŁU.
PL
48

Instrukcja obsługi
PANEL PRZEDNI - OBJAŚNIENIE PRZYCISKÓW
14
11
12
7
9
6
15
5
4
3
MOD
2
10
13
16
PY-934 8
8
1
1. Przycisk reset
2. Przycisk power / wybór trybu
3. Regulacja poziomu dźwięku /
odebranie połączenia
4. Equalizer / zakończenie połączenia
5. Czujnik pilota zdalnego sterowania
6. Zmiana częstotliwości / lD3 select
7. Strojenie & wybór ścieżki / FW / RW
8. AUX IN
9. Zmiana koloru podświetlania
10. AMS / Preset station
11. Przycisk numeryczne 1-6
12. Gniazdo SD/MMC
13. Wyświetlacz TFT
14. Przycisk opuszczania panelu
15. Dioda LED
16. Port USB
PL
49

Instrukcja obsługi
DIAGRAM PODŁĄCZANIA PRZEWODÓW
Antena Bluetooth
Subwoofer
TYLNY
PRAWY GOŚNIK
PODTRZYMANIE
PAMIĘCI +12V
ANTENA
GND
ZASILANIE
+12V
PRZEDNI
PRAWY GOŚNIK
PRZEDNI
LEWY GOŚNIK
TYLNY
LEWYY GOŚNIK
GŁOŚNIK LEWY PRZÓD
GŁOŚNIK LEWY TYŁ
GŁOŚNIK PRAWY TYŁ
GŁOŚNIK PRAWY PRZÓD
15A
BIAŁY
BIAŁO-CZARNY
ZIELONY
ZIELONY-CZAARNY
FIOLETOWY
FIOLETOWY - CZARNY
SZARY
SZARO-CZARNY
Gniazdo anteny
Wyjście - kanał prawy tył
Wyjście - kanał lewy tył
Wyjście video
Wyjście - kanał prawy przód
Wyjście - kanał lewy przód
Wejście video kamery cofania
RÓŻOWY
BRĄZOWY
CZERWONY
CZARNY
NIEBIESKI
STEROWANIE KAMERĄ
COFANIA (B+)
PRZEWÓD
BEZPIECZEŃSTWA
ZASILANIE (B+)
UZIEMIENIE (B-)
PODTRZYMANIE PAMIĘCI
ŻÓŁTY
ZASILANIE ANTENY
Uwaga
Przewód bezpieczeñstwa. Ten przewód należy podłączyć do masy samochodu. W przeciwnym
razie, na ekranie nie wyßwietli sié obraz podczas odtwarzania pliku wideo lub zdjęć.
PODSTAWOWE OPERACJE
PIERWSZE URUCHOMIENIE
Przed pierwszym włączeniem radia lub przed włączeniem radia po tym jak został odłączony
akumulatora należy zdjąć panel i wąskim przedmiotem wcisnąć przycisk reset.
Uwaga: W przypadku gdy radio działa niepoprawne, na wyświetlaczu pojawiają się błędy
należy również zresetować radio w ten sam sposób. Reset powoduje wykasowanie ustawień
radia oraz kasuje ustawienia zegara.
PL
ON / OFF
Wciśnij przycisk POWER (2) aby włączyć radio. Naciśnij i przytrzymaj przycisk dłużej niż 3s by
wyłączyć radio.
50

Instrukcja obsługi
GŁOŚNOŚĆ
Za pomocą gałki VOL/ SEL (3) dostosujesz poziom dźwięku. Przekręć gałkę w lewo by
zmniejszyć poziom dźwięku, a w prawo by zwiększyć poziom dźwięku. Aby wybrać funkcję
naciśnij krótko przycisk. Na ekranie pokażą się wybrane funkcje. By dostosować ich ustawienia przekręć gałką w prawo lub lewo.
BASS/TREBLE/BAL(L-R)/FADE SELECTOR
Naciśnij przycisk SEL (3) by przejść do menu ustawień dźwięku. Obróć pokrętło głośności, aby
wybrać żądany tryb, następnie przez naciśniecie przycisku ” ” lub ” ”ustaw poziom .
Uwaga: Jeśli w przeciągu 5 sekund po wybrania żądanego trybu nie pokręcisz gałką nie
naciśniesz przycisku „ ” lub „ ”, urządzenie automatycznie powróci do aktualnego trybu.
Aby dostosować poziom basów / sopranów, EQ należy ustawić na FLAT.
EQUALIZER
Podczas słuchania muzyki wciśnij przycisk (4) EQ aby wybrać żądany tryb korektora.
1. Wciśnij przycisk EQ aby przełączać się kolejno pomiędzy trybami:
ROCK-POP C LASSIC JAZZ FLAT
2. Naciśnij SEL, aby wejść menu ustawienia dźwięku, obrócić pokrętło głośności, aby wybrać
EQ, naciśnij przycisk ” ” lub ” ” , aby ustawić tryb EQ.
WYBÓR TRYBU
Wciśnij przycisk trybu pracy MOD (2) aby wybrać tryb: radia, USB, kart SD, lub AUX.
ODBIORNIK FAL PILOTA
Aby kontrolować radio za pomocą pilota skieruj pilot w stronę odbiornika fal (5) znajdującego
się na radiu, oraz wciśnij dany przycisk na pilocie.
GODZINA I USTAWIENIA ZEGARA
Naciśnij i przytrzymaj przycisk VOL/SEL (3), pokręć gałką głośności i przejdź do menu
SETTING, a następnie do menu SYSTEM. Pokręć gałką głośności, aby wybrać ustawienia H
lub M, następnie naciśnij ” ” lub ” ” , aby ustawić godziny i minuty.
WYBÓR OBSZARU USA / EUR
W trybie radia naciśnij i przytrzymaj przycisk SEL przez kilka sekund.
Pokręć gałką głośności i przejdź do menu SETTING, a następnie
do menu RADIO. Przyciskami ” ” lub ” ” ustaw obszar.
PL
51

Instrukcja obsługi
KOLOR PODŚWIETLAMIA RADIA
Za pomocą tych ustawień można zmienić kolor podświetlania przycisków.
Domyślne ustawienia kolorów:
Naciśnij ponownie przycisk DISP i wybierz jeden z domyślnych kolorów: niebieski, zielony,
czerwony, żółty, purpurowy, lub biały.
Personalizacja ustawień kolorów:
Naciśnij i przytrzymaj przycisk DISP (6) następnie pokręć gałką regulacji głośności i wybierz
Auto OFF, naciśnij ponownie przycisk DISP i wybierz customize setting:
RED - obróć gałką regulacji głośności w lewo lub w prawo i wybierz wartość koloru
czerwonego zprzedziału 00~32 następnie naciśnij przycisk DISP by zaakceptować.
GREEN - obróć gałką regulacji głośności w lewo lub w prawo i wybierz wartość koloru
zielonego z przedziału 00~32 następnie naciśnij przycisk DISP by zaakceptować.
BLUE - obróć gałką regulacji głośności w lewo lub w prawo i wybierz wartość koloru
niebieskiego z przedziału 00~32 następnie naciśnij przycisk DISP by zaakceptować.
RADIO
WYBÓR PASMA
Wciśnij (6) BAND aby przełączać pasma według schematu jak wyżej.
STROJENIE RADIA
Ręczne: Za pomocą przycisku (7) ustaw żądaną stację.
Automatyczne: Wciśnij i przytrzymaj 3s przycisk (7) radio automatycznie przeszuka pasmo i
włączy pierwszą znalezioną stację.
Automatyczne strojenie stacji
Wciśnij przycisk (10) aby przeskanować (przez 5s ) w kolejności stacje zapisane w pamięci
(pod przyciskami 1-6).
Wciśnij i przytrzymaj 3s przycisk (11) aby aktywować funkcję auto-zapisu. Radio
automatycznie wyszuka i zapisze stacje radiowe w pamięci pod przyciskami 1-6.
Uwaga: Radio może zapamiętać 6 stacji w każdym paśmie.
MP4
W trybie USB/SD Wybierz plik a następnie za pomocą przycisku (11) na panelu radia bądź za
pomocą przycisku (2) na pilocie odtwórz go.
Aby zatrzymać odtwarzanie pliku video i powrócić do menu głównego naciśnij przycisk STOP.
Aby odtworzy plik wideo możesz też użyć przycisków numerycznych.
PL
WYBÓR ŚCIEŻKI / FW / RW
Podczas trybu odtwarzania naciśnij przycisk (7) aby przejść do poprzedniego lub następnego
utworu. Podczas odtwarzania utworów z USB / SD wciśnij i przytrzymaj przycisk (7) aby
przewinąć utwór do tyłu lub do przodu.
52

Instrukcja obsługi
RPT (funkcja powtórz)
Użyj tej funkcji jeżeli chcesz powtórzyć utwór, cały folder bądź ścieżkę na USB lub karcie SD.
Naciśnij przycisk (11) RPT/3 aby wybrać odpowiedni tryb:
Naciśnięcie przycisku 1 raz spowoduje że tylko jeden utwór/ ścieżka będzie powtarzana. Napis
„RPT 1” pojawi się na monitorze.
Naciśnięcie przycisku 2 razy spowoduje że pojedynczy folder z utworami bądź plikami video
będzie powtarzany. Napis „RPT DIR” pojawi się na monitorze.
Naciśnięcie przycisku 3 razy spowoduje że cała zawartość karty bądź urządzenia USB zostanie
powtórzona. Napis „RPT ALL” pojawi się na monitorze.
Naciśnięcie przycisku 4 raz spowoduje wyłączenie funkcji powtórz.
INTRO (automatycznie skanowanie ścieżek)
W trybie odtwarzania plików Mp3 lub WMA naciśnij przycisk (11) INT/2 aby radio odtworzyło
pierwsze 10s każdego utworu. Na wyświetlaczu pojawi się napis „INT” oznaczający że funkcja
jest włączona oraz numer ścieżki. Naciśnij przycisk (12) ponownie aby wyłączyć funkcję.
Uwaga: funkcja nie działa podczas odtwarzania plików Video.
RANDOM (funkcja odtwarzania losowego)
Podczas odtwarzania naciśnij przycisk (11) RDM/4 na wyświetlaczu pojawi się napis „RDM”
który będzie oznaczał że funkcja odtwarzania losowego jest aktywna. Aby wyłączyć funkcję RDM
naciśnij ponownie przycisk (11) .
ZATRZYMANIE ODTWARZANIA
Podczas odtwarzania naciśnij przycisk (11) STOP/5 aby zatrzymać odtwarzanie, napis „STOP”
wyświetli się na ekranie. aby wznowić odtwarzanie naciśnij przycisk (11)
PAUZA
Podczas odtwarzania naciśnij przycisk (11) PLAY/1 aby wstrzymać odtwarzanie, napis „PAUSE”
będzie migał na wyświetlaczu. Naciśnij przycisk ponownie aby wyłączyć pauze.
USTAWIENIA VIDEO
Podczas oglądania plików wideo lub przeglądania zdjęć można przejść
do ustawień „VIDEO SETUP” i dostosować jakość obrazu.
Jeśli po korekcie ustawień video obraz jest obraz jest zaburzony.
Proszę przyjść do Muenu „SYSTEM SETUP” wybrać „default” menu,
a następnie naciśnij pokrętło VOL + / -, aby potwierdzić.
KAMERA COFANIA
Podłacz kamerę cofania do zasilania 14.4 V. Następnie wyjście kamery cofania do wejścia
“BACK VIEW VIDEO” w radiu. Podczas cofania obraz z kamery zostania automatycznie
wyświetlony na ekranie radia.
DOS (Dynamic Open Screen - wygaszacz ekranu)
Wygaszacz ekranu uruchamia się gdy jednostka centralna jest włączona. Po naciśnieciu
jakiegokolwiek przycisku radio powraca do wybranego trybu.
DEMO ON: Naciśnij i przytrzymaj przycisk SEL i wybierz z menu „DEMO”, pokręć gałką regulacji
głośności i ustaw Demo ON. Następnie zatwierdź ustawienia przyciskiem SEL. Wygaszacz
ekranu od tej chwili będzie aktywny
DEMO OFF: Naciśnij i przytrzymaj przycisk SEL i wybierz z menu Demo OFF, zatwierdź
ustawienia przyciskiem SEL.
PL
53

Instrukcja obsługi
RDS (RADIO DATA SYSTEM)
AF: częstotliwość alternatywna
Aby włączyć /wyłączyć funkcję AF wciśnij przycisk AF (26 na pilocie). Funkcja aktywuje się gdy
odbierana stacja ma słaby sygnał. Gdy funkcja AF jest włączona funkcje SEEK, SCAN,
AUTO, MEMORY wyszukują tylko stacje z RDS-em.
Ikona Opis
AF ON AF ON MODE sygnał RDS jest odbierany
AF OFF AF OFF MODE
AF miga AF ON MODE sygnał RDS nie jest odbierany
PTY - typy programów
- użyj przycisku PTY (27 na pilocie) aby wybrać określony typ programu.
Po wciśnięciu przycisku PTY, ostatni typ programu zostanie wyświetlony. Jeżeli w
przeciągu 2s nie będzie wciśnięty przycisk z żądanym PTY, zostanie odszukany ostatnio
zapamiętany PTY. Radio zacznie wyszukiwać określonych informacji. Jeżeli określone
audycje nie zostaną znalezione, funkcja PTY automatycznie się wyłączy.
W pamięci są zapisane dwa typy programów SPEECH i MUSIC.
Wciśnij raz PTY aby wybrac’ MUSIC wciśnij dwa razy PTY aby wybrać SPEECH.
Przyciski M1-M6 znajdujące się na pilocie mogą być użyte do wyboru żądanego typu
programu:
TA - komunikaty drogowe
TP/TA (Trafc Programme/TrafcAnnoucement) TP przycisk (28 na pilocie) informuje nas, że
stacja przygotowuje i nadaje serwisy dla kierowców, a sygnał TA jest nadawany w czasie takiego
programu (następuje wtedy dodatkowo zmiana PTY na “Trafc”). Jeśli chcemy, gdy
ostatnio odbierana stacja nada sygnał TA, odbiornik na czas programu zatrzyma
odtwarzanie płyty, by po zakończeniu programu kontynuować poprzednio wykonywaną
czynność.
Podczas nadawania komunikatów drogowych. niezależnie od trybu. komunikaty są
odbierane. Jeżeli poziom dźwięku jest poniżej 20, jest automatycznie zwiększany do 20, a
po zakończeniu transmisji jest automatycznie przywracany do poprzedniego poziomu.
Jeżeli poziom dźwięku przestroi się na czas nadawania komunikatu, w tym momencie
tylko poprzednie ustawienie poziomu dźwięku jest dostępne.
Gdy funkcja TA jest włączona, funkcje SEEK, SCAN, AUTO MEMORY są dostępne.
PL
54

Instrukcja obsługi
BLUETOOTH
1. Parowanie urządzeń.
Włącz jednostkę w samochodzie, połóż telefon obok radia,
następnie aktywuj Bluetooth w telefonie i wyszukaj urządzenie.
Po pewnej chwili telefon znajdzie nowe urządzenie „CAR AUDIO„
Wprowadź hasło „8888” a następie je zatwierdź. Telefon poinformuje
o poprawnym sparowaniu urządzeń, na wyświetlaczu radia pojawi
się napis BT ON, a logo Bluetooth przestanie migać.
Uwaga: w zależności od rodzaju Bluetooth-a w telefonie, system bluetooth obsługuje prole:
„HSP”, „HFP”, „A2DP” i „AVRCP”.
2. Prol “wolne ręce” HFP (Hands-Free Prole)
Po poprawnym sparowaniu telefonu z urządzeniem będzie można wykonywać i odbierać połączenia używając prolu wolne ręce:
-Naciśnij przycisk „SELL / krótko, aby odebrać połączenie.
-Naciśnij przycisk „EQ/ ” krótko, aby odrzucić połączenie, bądź zakończyć rozmowę.
3. Prol zaawansowanej dystrybucji audio A2DP (Advanced Audio Distribution Prole)
Gdy telefon jest poprawnie sparowany z radiem naciśnij przycisk “MODE” i włącz prol A2DP. Po
włączeniu prolu A2DP muzyka z telefonu zacznie być odtwarzana w radiu. Na wyświetlaczu radia
wyświetli się napis „A2DP„
-Naciśnij przycisk “<< ” lub “>> ” by wybrać utwór muzyczny
-Naciśnij przycisk“ ” lub ” ” by zatrzymać odtwarzanie.
4. Wybieranie numeru telefonicznego za pomocą pilota zdalnego sterowania
Naciśnij przycisk „EQ / ” by przejść do menu bluetooth, następnie wybierz numer za pomocą
klawiszy numerycznych ”0-9, *, #”
- Aby skasować wprowadzony numer naciśnij przycisk ” ”
- Aby zatwierdzić wprowadzony numer telefonu i wybrać połączenie naciśnij przycisk ”SEL / ”
- Aby zakończyć połączenie naciśnij przycisk ”EQ / ”
5. Książka telefoniczna
System Bluetooth może automatycznie przechowywać numery przychodzących połączeń - max
10 numerów.
- Przejdź do menu bluetooth, następnie naciśnij “EQ / ” by przejść do książki telefonicznej
- Naciśnij przycisk ”SEL / ” by wywołać żądany numer telefonu.
6. Przerwanie połączenia Bluetooth
Podczas rozmowy naciśnij i przytrzymaj przycisk “BND” , by przerwać połączenie, głoś zostanie
przeniesiony na głośnik telefoniczny.
Naciśnij przycisk „BND„ ponownie, by wznowić połączenie bluetooth.
Uwaga: Różne telefony komórkowe mają różną reakcje. Nie gwarantujemy poprawnego działania
wszystkich operacji.
PL
55

Instrukcja obsługi
PILOT ZDALNEGO STEROWANIA
20
12
13
16
10
14
19
1
3
2
1. Power
MOD E
2. Pauza / Play
3. Wyciszenie
5
BND
SYS
4
ENTE R
DISP
EQ
Setup
17
24
23
6
LOU D
SLO W
9
AMS
RPT
ST
PRO G
VOL
Zoom
+
7
LOC
RDM
SEE K
SEL
SEE K
+
22
21
25
11
8
SCA N
INT
OSD
VOL
AUD IO
-
15
4. Strzałki
5. Zmiana pasma / System
6. Przycisk potwierdzenia
7. Regulacja poziomu dźwięku
8. Strojenie / Wybór ścieżki / F F / F R
9. Zmiana trybu Stereo / mono
10. OSD
11. Ustawienia dźwięku / odebranie
połączenia
12. Powtarzanie utworu / AMS
13. Odtwarzanie losowe
14. Przyciski numeryczne
15. Ustawienia dźwięku
16. Przycisk skan
17. EQ / zakończenie połączenia
telefonicznego
18. Przejście do wybranego punktu
odtwarzania
19. Wybór trybu pracy
1 2
3
4
20. Stop
21. Loud
22. odtwarzanie w zwolnionym tempie
5
6 87
23. Menu ustawień
24. Zmiana koloru podświetlania
25. Powiększanie obrazu podczas
9 0
PTYAF TA
10
GOT O
#
18
odtwarzania
26. AF
27. PTY
28. TA
PL
56
282726

Instrukcja obsługi
WYMIANA BATERII
Gdy skróci się zasięg działania pilota lub pilot przestanie funkcjonować, należy wymienić baterię
w pilocie na nową (typu CR2025) podczas wymiany należy zwrócić uwagę na polaryzację baterii.
1. Zdejmij pokrywę baterii pilota
2. Włóż nową baterie zgodnie z oznaczona polaryzacją
3. Załóż pokrywkę baterii
PRZYCISK POWER
Naciśnij przycisk (1) by włączyć / wyłączyć urządzenie.
PAUZA / PLAY
Naciśnij przycisk (2) by wstrzymać odtwarzanie muzyki. Ponowne jego naciśnięcie spowoduje
wznowienie odtwarzania.
WYCISZENIE
Naciśnij przycisk (3) by wyciszyć dźwięk. Naciśnij przycisku ponownie aby przywrócić poprzednie
ustawienia dźwięku.
STEROWANIE W MENU
Naciśnij przycisk (4), aby wybrać menu, a następnie naciśnij przycisk (6) (ENTER) lub przycisk
odtwarzania (2) w celu zatwierdzenia.
ZMIANA SYSTEMU / PASMA
W trybie radia naciśnij przycisk (5) (BAND/SYS) by zmienić pasmo.
W trybie odtwarzacza naciśnij przycisk (5) (BAND/SYS) aby zmienić system na PAL,
NTSC, lub AUTO.
PL
57

Instrukcja obsługi
REGULACJA POZIOMU DŹWIĘKU
Naciśnij przycisk (7) (VOL + lub VOL - ) aby wyregulować poziom dźwięku
STROJENIE / WYBÓR ŚCIEŻKI / PRZEWIJANIE
Podczas trybu radia, naciśnij przycisk (8) aby manualnie wyszukać stację. Przyciśnij i przytrzymaj przez kilka sekund przycisk aby automatyczne wyszukać stację.
Podczas trybu odtwarzacza naciśnij przycisk (8) aby wybrać poprzednią, następną ścieżkę. Wciśnij i przytrzymaj przycisk (8) aby przewinąć do przodu bądź do tyłu ścieżkę o kilka sekund.
PROGRAMOWANIE ODTWARZANIA / STEREO
Podczas trybu odtwarzacza wciśnij przycisk (9) PROG aby uruchomić tryb programowania. Za
pomocą strzałek (4) i klawiszy numerycznych (14) zaprogramujesz ścieżki które mają być odtwa-
rzane.
W trybie radia naciśnij przycisk ST (9) aby wybrać tryb stereo bądź mono.
Uwaga. Przycisk ST działa tylko w trybie radia
OSD
Podczas odtwarzania plików video z kart SD lub USB wciśnij przycisk (10) OSD aby na monitorze
wyświetlić ścieżkę, rozdział i aktualny czas.
Uwaga. Podczas odtwarzania MP3 / WMA, wyświetla się ścieżka oraz katalog
USTAWIENIA DŹWIĘKU VOL / BAS / TRE / BAL / FAD
Podczas trybu radia wciśnij przycisk SEL (11) aby przejść do ustawień według schematu poniżej.
VOL BAS TRE BAL
FAD BR I CON SHAP
Po wybraniu żądanego trybu można go dostosować za pomocą przycisku VOL. Przy aktywnym
trybie P-EQ, ustawienia BAS, TRE sa nieaktywne.
VOL BAL FA DB RI CON
SHA P CON
POWTARZANIE UTWORU / AMS
Funkcja powtórz (12) w trybie odtwarzania umożliwia powtarzanie: utwór, całego katalog, wszystkiego, wyłączenie funkcji. W trybie radia przycisk (12) oznacza funkcje AMS
ODTWARZANIE LOSOWE / LOC
W trybie odtwarzanie utworów naciśniecie przycisku (13) spowoduje aktywację funkcji odtwarza-
PL
nia losowego utworów.
W trybie radia po naciśnięciu przycisku (13) włączy się funkcja LOCAL.
58

Instrukcja obsługi
PRZYCISKI NUMERYCZNE
Podczas słuchania radia wciśnij 1 z 6 przycisków numerycznych aby wybrać żądaną stację radiową zapisaną w pamięci radia.
Podczas odtwarzania audio za pomocą przycisków wybierz nr. ścieżki do otworzenia.
Np. Jeżeli chcesz wybrać 15 ścieżkę, możesz to zrobić poprzez wybranie przycisku 10+ i przycisku 5, radio zacznie odtwarzać wybraną ścieżkę.
Przycisk 10+ po pierwszym wciśnięciu działa jako 10+, po naciśnięciu 2 razy działa jako 20+, za 3
razem jako 30+ etc.
LEFT / RIGHT / STEREO SELECTOR
Podczas odtwarzania muzyki wciśnij przycisk(15) aby zmienić tryb lewy kanał / prawy kanał/
stereo.
USTAWIENIA CZASU ODTWARZANIA
Podczas odtwarzania video naciśnij przycisk (18) GOTO aby przejść do określonego miejsca w
odtwarzaniu. Za pomocą (4) i przycisków numerycznych (14) wybierz ścieżkę / rozdział / czas,
następnie wciśnij ENTER aby potwierdzić.
TRYB PRACY
Wciśnij przycisk (19) aby przełączyć na tryb: Radio, USB/SD/MMC lub AUX
PAUZA
W trybie odtwarzania, naciśnij przycisk (20), aby wstrzymać odtwarzanie, naciśnij go ponownie,
aby wznowić odtwarzanie.
SCAN/INT
W trybie odtwarzania naciśnij przycisk (16) Scan/Int odtworzy pierwsze 10s każdego utworu.
W trybie radia naciśnij przycisk (16) aby wyszukać stacje radiowe. Gdy sygnał stacji jest wystarczająco mocny, radio przez 5 sekund będzie odtwarzało daną stację a na wyświetlaczu będzie
migała częstotliwość stacji. W tym czasie naciśnij i przytrzymaj przycisk (16) aby wybrać stację.
ODTWARZANIE W ZWOLNIONYM TEMPIE
Podczas odtwarzania wciśnij (22) aby zwolnić odtwarzanie lmu o: 1/2, 1/3, 1/4, 1/5, 1/6, 1/7, tępo
normalne.
ZOOM KEY
Podczas odtwarzania plików Mp4 naciśnięcie przycisku (25) ZOOM+ jeden raz spowoduje
powiększenie obrazu 2x, naciśnięcie dwa razy - powiększenie rzędu 3x, naciśniecie trzy razy powiększenie 4x, naciśniecie cztery razy - powiększenie rzędu 1/2x, pięć razy - powiększenie 1/3x
a sześć razy - 1/4x
Uwaga: Funkcja zoom jest nie dostêpna dla trybu MP3, WMA.
PL
59

Instrukcja obsługi
SETUP
1. Naciśnij przycisk SETUP (23) znajdujący się na pilocie. Upewnij się że odtwarzanie w radiu jest
zatrzymane.
2 Na ekranie wyświetli się główne menu.
3. Wybierz preferowane menu poprzez użycie strzałek (4)
4. Zatwierdź wybór poprzez urzycie przycisku ENTER (6)
A. System Setup - Ustawienia systemu
Menu to zawiera wszystkie ustawienia związane z wygaszaczem obrazu, formatem TV, hasłem,
trybem dostępu.
B. Language Setup - Ustawienia języka
Menu to zawiera ustawnia dotyczace języka: OSD, audio, napisów, menu.
C. Audio Setup - Ustawienia audio
Menu to zawiera ustawienia związane z systemem audio.
D. Video Setup - Ustawienia video
Menu to zawiera ustawienia związane z systemem video
E. Digital setup - ustawienia equalizera
Naciśńij przycisk 26 by wybrać jeden z trybów equalizera
Przyciks EQ
ROCK -> POP -> CLASSIC -> JAZZ -> FLAT mode
PL
60

Instrukcja obsługi
ODTWARZANIE RÓZNEJ ZAWARTOŚCI Z KART SD/MMC I PAMMIĘCI
USB
Gdy na jednej karcię SD / pamięci USB znajdują się pliki MP3, WMA, JPG, MPEG4 włóż kartę /
pamięć do radia i postępuj zgodnie z instrukcją poniżej.
Odtwarzanie muzyki
W prawym menu ustaw strzałkę na wybranym pliku i wciśnij
ENTER.
Pliki graczne
Możesz bezpośrednio za pomocą przycisków numerycznych
wybrać żądany plik lub zaznaczyć go strzałką i nacisnąć
ENTER.
Pliki video
Zaznacz strzałką żądany plik następnie potwierdź wybór
Enterem. Możesz również zmienić katalog za pomocą lewej
strzałki.
Wyszukiwanie ścieżek MP3/WMA
- wciśnij (8) aby wybrać jedną ścieżkę
- wciśnij lewą strzałkę aby wybrać listę, wciśnij prawą strzałkę aby wybrać numer ścieżki.
PL
61

A. USTAWIENIA SYSTEMU
Instrukcja obsługi
a. TV System
c. Proporcje obrazu
b. Wygaszacz ekranu
Urządzenie może
pracować zarówno z
monitorami w
systemie PAL jak
i NTSC. Wybierz
odpowiednie dla
twojego monitora
ustawienie
1) 4:3 PS
Odtwarzane w stylu Pan & Scan (jeśli do radia podłączony
jest standardowy wyświetlacz (4:3) lewa i prawa krawędź
obrazu zostanie odcięta)
2) 4:3 LB
Odtwarzane w letterbox. (jeśli do radia podłączony zostanie
standardowy wyświetlacz (4:3), to wyświetlany obraz będzie
miał czarne pasy na górze i na dole.
3) 16: 9
Tryb ten należy wyrać gdy do urzadzena zostanie podlaczony panoramiczny wyświetlacz.
PL
62
d. Hasło
Aby zmienić hasło najpierw
należy podać stare hasło a
następnie nowe. Domyślne
hasło fabryczne to „0000”.

e. Kontrola rodzicielska
Instrukcja obsługi
1 KID SAFE
2G
3PG
4PG1 3
5PG
-R
6R
7 NC 17
8 ADUL T
f. Ustawienia fabryczne
REST ORE
Przywracanie ustawień
fabrycznych
1. Programy bezpieczna dla dzieci
2. Programy bezpieczne dla osób w każdym wieku
3. Kontrola rodzicielska
4. Programy zabronione dla dzieci poniżej 13 roku życia
5. Wybierz dla płyt DVD z „PG-R”
6. Dla dzieci poniżej 17 roku programy dostępne warunkowo
7. Dla dzieci poniżej 17 roku programy niedostępne
8. Programy dostępne dla dorosłych
B. WYBÓR JĘZYKA
Wybierz język OSD, audio,napisów oraz menu
a. OSD
OSD LANGUAGE
AUDI O LANG
LANG
LANG
SUBTITLE
MEN U
DIVX[R] VO D
EXI T SETU P
ENGLIS H
CHINESE
GERMAN
SPANIS H
FRENCH
PORTUGUESE
b. Audio
OSD LANGUAG E
AUDI O LANG
LANG
SETU P
LANG
SUBTITL E
MEN U
EXIT
ENGLIS H
CHINESE
GERMAN
SPANIS H
FRENCH
PORTUGUES E
LATIN
JAPAN
PL
63

Instrukcja obsługi
c. Napisy
OSD LANGUAG E
AUDI O LANG
SUBTITLE
MENU
EXIT
LANG
LANG
SETUP
ENGLISH
CHINESE
GERMAN
SPANIS
FRENCH
PORTUGUESE
JAPAN
OFF
C. USTAWIENIA AUDIO
a. Wyjście audio
b. Key
d. Język menu
OSD LANGUAGE
AUDI O LANG
SUBTITL E
H
SPDIF/OFF:
Wyjście optyczne i analogowe są wyłączone.
SPDIF/RAW:
Gdy radio jest podpięte do wzmacniacza przez port analogowy lub
cyfrowy wybierz to ustawienie. Gdy odtwarzasz płytę w formacie
Dolby Digital, DTS lub MPEG wzmacniacz musi posiadać funkcję
dekodowania tego sygnału.
SPDIF/PCM:
Gdy radio jest podpięte do 2 kanałowego wzmacniacza wybierz
tą opcję. Gdy odtwarzasz płytę w formacie Dolby Digital,
DTS lub MPEG wyjście analogowe lub optyczne zostanie
przekonwerterowane na wyjście 2 kanałowe.
MEN U
EXI T
LANG
LANG
SETU P
ENGLIS H
CHINESE
GERMAN
SPANISH
FRENCH
PORTUGUES E
JAPAN
LATIN
D. USTAWIENIA VIDEO
BRIGHTNESS
PL
CONTRAST
HUE
SATURA TION
SHARPNES S
EXI T SETU P
64
Za pomocą tej funkcji dostosujesz
tony niskie i wysokie
a. Jasność
BRIGHTNESS
CONTRAST
HUE
SATURA TION
SHARPNES S
EXI T SETU P
12
10
8
6
4
2
0

Instrukcja obsługi
b. Kontrast
BRIGHTNES S
CONTRAST
HUE
SATURA TION
SHARPNESS
EXI T SETU P
d. Nasycenie
BRIGHTNESS
CONTRAST
HUE
SATURA TION
SHARPNES S
EXIT SETUP
E. USTAWIENIA
a. Dynamic range
c. Barwa
12
10
8
6
4
2
0
CONTRAST
HUE
SATURA TION
SHARPNES S
EXI T SETUP
BRIGHTNESS
+6
+4
+2
0
-2
-4
-6
e. Ostrość
12
10
8
6
4
2
0
BRIGHTNES S
CONTRAST
HUE
SATURA TION
SHARPNESS
EXIT SETU P
88
6
6
4
4
2
2
0
0
b. Dual mono
DYNAMI C RANG E
DUAL MONO
EXI T SETUP
Ustawienie zakresu dynamiki
FULL
6/8
4/8
2/8
OFF
DYNAMIC RANG E
DUAL MONO
EXIT SETU P
STER EO
MONO LE FT
MONO RIGH T
MIX MONO
Ustawienie trybu: stereo, mono
PL
65

Instrukcja obsługi
ZAKŁADANIE PANELU
Aby założyć panel wsuń go prawidłowo w zatrzaski tak jak na rysunku. W przypadku
niepoprawnego zamontowania panelu może nieprawidłowo działać wyświetlacz lub przyciski na
panelu.
B
A
2
N
D
1ST
PL
OPUSZCZANIE PANELU
Wciśnij przycisk (REL) znajdujący się
na panelu na górze z lewej strony.
Panel opuści się na dół.
RE LE AS E
WYJMOWANIE PANELU
Gdy panel jest opuszczony do końca
aby go wyjąć przesuń go w prawo a
następnie pociągnij.
CZYSZCZENIE STYKÓW
Jeżeli styki pomiędzy radiem a zdejmowanym panelem są zanieczyszczone, radio może działać
niepoprawne. Aby wyczyścić styki zdejmij panel i wyczyść styki wacikiem namoczonym w alkoholu. Czynność wykonuj delikatnie aby nie uszkodzić styków.
Uwaga: Dla bezpieczeństwa przed przystąpienia do tej czynności wyjmij kluczyk ze stacyjni. Nie dotykaj bezpośrednio
palcami styków.
66

INSTALACJA (Metoda A)
1. Deska rozdzielcza samochodu
2. Kieszeń
Po zainstalowaniu kieszeni we
wnęce, zabezpiecz ją przed
wypadaniem przez odgięcie
zaczepów.
3. Śruba
Rys.2
Instrukcja obsługi
Rys.3
1. Deska rozdzielcza
2. Nakrętka (5mm)
3. Podkładka
4. Śruba
5. Śruba
6. Uchwyt
Do przymocowania tylnej części radia
użyj uchwytu (6). Uchwyt ten można łatwo
wygiąć ręką.
7. Podkładka
1. Ramka
2. Złap palcami za brzeg ramki Jak na rysunku powyżej) i ją wyciągnij. Przy ponownym
montażu zwróć uwagę aby nie zamontować
jej odwrotnie.
3. Radio
Wsuń specjalne klucze (są w komplecie) w
szczeliny po obu stronach radia, aż usłyszysz
kliknięcie. Następnie pociągnij całość do
siebie aby wyjąć radio.
MONTAŻ RADIA W FABRYCZNEJ
KIESZENI (Metoda B)
Montaż radia w fabrycznej kieszeni 1,Wstaw
radio aby otwory na śruby w radiu pokrywały się z
otworami w kieszeni. Przymocuj radio za pomocą
śrub po dwie po każdej stronie Użyj śrub: 5x5mm
lub 4x5mm.
2. Śruby
3. Kokpit
INSTALACJA KARTY SD
Wsuń kartę do gniazda etykietką
do góry, aby wyjąc kartę z radia
ponownie ją naciśnij
PL
67

SPECYFIKACJA
Ogólna
Zasilanie:
Impedancja:
Maksymalna moc wyjściowa
Wymiary:
Pobór proądu:
Obsługiwane formatu
Audio
Video
Zdjęcia
Video system
Video
System video
Poziom sygnału wyjściowego
Audio
Max poziom wyjściowy
Pasmo przenoszenia:
S/N:
Separacja kanałów:
Tuner FM
Zakres:
Zakres IF:
Czułość użytkowa (-30dB):
S/N:
Separacja kanałów:
Pasmo przenoszenia:
Tuner AM
Zakres:
Zakres IF:
Czułość użytkowa (-20dB):
Instrukcja obsługi
DC 14,4V, Uziemienie na minusie
4 ohms
40W X 4(CH)
178x124.6x50mm(WxDxH)
15A
WMA, MP3, WMV
MPEG4, Divx, Xvid, MPEG2, AVI
JPEG
AUTO / PAL / NTSC
4:3 Letter Box, 4:3 Pan Scan, 16:9
1.0V p-p 75 ohms
2Vrms (+ 3dB)
20~20KHz
65dB
60dB
87.5 - 108MHz
10.7MHz
15dB
60dB
30dB(1KHz)
30 ~ 15000 Hz
522 - 1620KHz
450KHz
28dB
Uwaga:
specykacja urządzenia może ulec zmianie bez wcześniejszego powiadamiania.
„Niniejszym rma Lechpol oświadcza, że urządzenie PY-9348 jest zgodne z zasadniczymi wymaganiami oraz innymi stosownymi
postanowieniami dyrektywy 1999/5/WE. Właściwa deklaracja do pobrania na stronie www.lechpol.eu”
PL
68

Manual de utilizare
CUPRINS
NOTE PRIVND INSTALAREA 70
PANOUL FRONTAL 71
SCHEMA DE CONEXIUNI 72
FUNCTII DE BAZA 72
FUNCTII DE RADIO 74
REDARE MUZICA SI VIDEO MP4 74
FUNCTIA RDS 76
FUNCTII BLUETOOTH 77
DESCRIERE TELECOMANDA 78
FUNCTII TELECOMANDA 79
SETARE 82
INSTALAREA PARTII FRONTALE 88
DECUPLAREA PANOULUI FRONTAL 88
CURATAREA CONECTORULUI 88
INSTALAREA APARATULUI 89
SPECIFICATII 90
RO
69

Manual de utilizare
Locul de instalare trebuie ales astfel incat aparatul sa nu deranjeze conducatorul auto .
Inainte de instalarea nala, conectati temporar aparatul si asigurati-va ca este conectat in mod
adecvat si ca atat el cat si sistemul functioneaza in parametri normali.
Folositi numai componentele din dotare pentru a va asigura ca instalarea este corecta. Utilizarea
altor componente poate provoca defectarea aparatului.
Consultati cel mai apropiat dealer auto daca instalarea aparatului necesita gaurire sau alte modicari ale autoturismului (gaurire, cablare, etc.)
Instalati aparatul astfel incat acesta sa nu deranjeze soferul si sa nu raneasca pasagerii in cazul
unei opriri bruste.
! NU ÎNCERCAŢI SĂ MODIFICAŢI APARATUL, MODIFICAREA ACESTUIA POATE PROVOCA
ACCIDENTE.
! OPRIŢI AUTOMOBILUL ÎNAINTE DE A EFECTUA ORICE OPERAŢIE CARE AR PUTEA ÎMPIEDICA ŞOFATUL.
! NU PORNIŢI APARATUL DACĂ TEMPERATURA DIN INTERIORUL MAŞINII ESTE MAI MICĂ
DE -20ºC ŞI MAI MARE DE 60ºC.
! ACEST PRODUS ESTE CONCEPUT PENTRU O SINGURĂ IEŞIRE VIDEO, FOLOSIŢI UN
SPLITTER DACĂ DORIŢI CONECTAREA MAI MULTOR IEŞIRI VIDEO.
! PENTRU A VĂ BUCURA DE UN SUNET ŞI DE O IMAGINE OPTIME IN TIMPUL ASCULTĂRII
UNUI DISC, MANEVRAŢI DISCUL DUPĂ CUM URMEAZĂ:
RO
70

PANOUL FRONTAL
Manual de utilizare
14
11
12
7
9
6
15
5
4
3
MOD
2
10
13
16
PY-934 8
8
1
1. Tasta Resetare
2. Tasta Pornire/ Mod
3. Tasta Volum / Sel/
4. Tasta EQ/
5. Senzor telecomanda
6. Banda radio/ Selectare ID3
7. Tasta cautare frecventa / Selectare
piese/Derulare rapida inainte/ inapoi
8. Intrare AUX
9. Tasta culoare asaj/ Setare
10. Posturi radio presetate/ AMS
11. Przycisk numeryczne 1-6
12. Gniazdo SD/MMC
13. Wyświetlacz TFT
14. Przycisk opuszczania panelu
15. Dioda LED
16. Port USB
RO
71

SCHEMA DE CONEXIUNI
Manual de utilizare
ANTENA BLUETOOTH
Subwoofer
DIFUZOR DREAPTA
SPATE
MEMORIE +12V
ANTENA AUTO
PAMANTARE
DIFUZOR DREAPTA
FATA
DIFUZOR STANGA
FATA
DIFUZOR STANGA
SPATE
CATRE
CHEIA DE
CONTACT
DIFUZOR STANGA FATA
DIFUZOR STANGA SPATE
DIFUZOR DREAPTA SPATE
DIFUZOR DREAPTA FATA
cablu alb
cablu alb/negru
cablu verde
cablu verde/negru
cablu violet
cablu violet/negru
cablu gri
cablu gri/negru
15A
CABLU MARO
CABLU ROSU
CABLU NEGRU
CABLU GALBEN
CABLU ALBASTRU
ANTENA
LINIE IESIRE DREAPTA SPATE
LINIE IESIRE STANGA SPATE
IESIRE VIDEO
LINIE IESIRE DREAPTA FATA
LINIE IESIRE STANGA FATA
INTRARE PENTRU CAMERA
CABLU ROZ
VEDERE DIN SPATE B+
CABLU DE SIGURANTA
BUTON DE CONTACT (B+);
PAMANTARE (B –),
DISPOZITIV DE REZERVA
AKIMENTARE ANTENA
ATENTIE: rul maro (brown - safety wire) se leaga la masa (-)
FUNCTII DE BAZA
PORNIRE SISTEM
In cazul primei porniri a aparatului sau dupa inlocuirea bateriei de masina, ar trebui sa apasati
butonul (14) pentru desprinderea partii detasabile, iar LED-ul (15) va porni. Apasati (1) butonul
de RESETARE cu ajutorul unui obiect ascutit (cum ar un pix) pentru a seta aparatul pe starea
initiala.
Nota: Cand apar erori pe asajul LCD-ului, puteti de asemenea apasa butonul de RESETARE
pentru a reveni la starea initiala. Se vor sterge astfel setarile ceasului si functiile memorate.
PORNIREA/OPRIREA APARATULUI
RO
Apasati orice buton pentru a porni aparatul. Apasati butonul PORNIRE (2) mai mult de 3 secunde
pentru a-l inchide.
72

Manual de utilizare
SELECTARE VOLUM
Rotiti butonul de VOLUM (3) pentru a regla nivelul sunetului.
BASS/TREBLE/EGALIZATOR (L-R)/SELECTOR FADE
Apasati butonul “SEL” pentru a accesa meniul “SETARII AUDIO”. Rotiti butonul de Volum
pentru a selecta modul dorit, reglati nivelulu apasand butonul ” ” sau ” ”
NOTA: Daca nu reglati butonul timp de 5 secunde dupa selectarea modului dorit, aparatul va
reveni automat la modul curent asat. Pentru a regla nivelul Bass/Treble, setarea EQ trebuie
sa e pe FLAT.
FUNCTIA MUTE – (SILENTIOS)
Apasati butonul EQ pentru mai mult de o secunda pentru activarea functiei MUTE. Apasati-l
inca o data pentru a dezactiva functia silentios.
SETAREA EGALIZATORULUI
In timp ce ascultati muzica, puteti seta egalizari pentru muzica tip rock, pop, muzica clasica
sau jazz PRE-EQ apasand butonul (4) “EQ” dupa cum urmeaza:
1. Apasati butonul EQ in mod repetat pentru a selecta modul EQ in urmatoarea ordinea:
ROCK-POP C LASSIC JAZZ FLAT
2. Apasati tasta SEL pentru a accesa meniul Setarii Sunetului, rotiti butonul de volum pentru a
selecta optiunea EQ, apasati butonul ” ” sau ” ” , pentru a seta modul EQ.
Modul SELECTARE
Apasati butonul “MOD” (2) pentru a selecta modurile RADIO→USB→card SD→TV (optional)
→AUX. (In cazul in care nici un dispozitiv extern nu este conectat, acest mod va ignorat).
SENZOR
(5) Receptor pentru telecomanda.
REGLAREA TIMPULUI (OREI)
Apasati lung tasta SELECTARE, rotiti butonul de volum pentru a selecta optiunea SETARI
si apasati tasta SELECT pentru a accesa meniul. Rotiti butonul de volum pentru a selecta
optiunea H sau M, apasand tasta ” ” sau ” ” , pentru a regla ora sau minutele.
SETAREA ZONEI SUA / EUR
Pe modul radio, apasati lung tasta SELECTARE, rotiti butonul de
volum pentru a selecta optiunea SETARI si apasati tasta
SELECTARE pentru a accesa meniul. Rotiti butonul de volum
pentru a selecta optiunea RADIO si apasati tasta SELECTARE
pentru a seta zona apasand butoanele ” ” sau ” ” .
RO
73

Manual de utilizare
RGB (ILUMINARE REGLABILA COLOR RGB)
Culoarea iluminarii se modica continuu cand aparatul este pornit.
Setare culori xe:
Apasand butonul DISP scurt pentru a selecta anumite culori de albastru, verde, rosu, galben,
violet si alb.
Ajustarea culorii de catre utilizator:
Apasand butonul DISP pentru a selecta oprirea automata a Volumului.
Apasati butonul (8) CAUTARE + / - pentru a selecta Rosu, prin rotirea butonului de volum,
valoarea de culoare este setata la 00 ~ 32
Apasati butonul (8) CAUTARE + / - pentru a selecta VERDE - rotind controlul volumului valoarea
de culoare de la 00 ~ 32 este setata.
Apasati butonul (8) CAUTARE + / - pentru a selecta ALBASTRU - prin rotirea butonului de volum,
valoarea de culoare este setata la 00 ~ 32.
Apasati DISP pentru a conrma.
FUNCTII RADIO
Setarea EGALIZATORULUI
Apasati butonul (6) (BAND-banda radio) in mod repetat pentru a alege lungimea de unda in
urmatoarea ordine:
NOTA: Pentru modul DVD, apasati butonul (6) pentru a schimba pe sistemul AUTO PAL sau
NTSC
REGLARE MANUALA/AUTOMATA
Reglare manuala: Apasati butonul (7) in mod continuu pentru a selecta un post radio in sens
crescator al frecventei sau in sens descrescator.
Reglare automata: Apasati si tineti apasat butonul (7) pentru mai mult de 3 secunde, radioul
cauta in mod automat un post radio in sens crescator al frecventei sau in sens descrescator.
Scanarea/memorarea automata a posturilor radio
Apasati si tineti apasat butonul (11) pentru mai mult de 3 secunde pentru activarea automata a
functiei de memorare a posturilor radio. Radioul va alege automat un post si il va memora la unul
dintre butoanele numerotate (1~6).
NOTA: Aparatul poate memora pana la 6 posturi radio pentru ecare lungime de unda.
REDARE MUZICA SI REDARE FISIERE MP4
Un maniu este asat pe monitor cand veti incepe sa utilizati modul de redare USB/SD. Selectati
un sier, apoi apasati butonul (11) sau tasta ENTER pentru redarea sierului.
In timpul redarii, apasati butonul „STOP” pentru a opri redarea si pentru a reveni la meniul
principal.Cand meniul principal este asat, apasati butonul corespunzator pentru a selecta
directorul sau sierul dorit. Apasati apoi butonul ENTER sau PLAY pentru a deschide directorul
sau incepeti redarea sierului selectat. Cand meniul principal este asat, puteti folosi de
asemenea butoanele numerotate pentru a selecta sierul.
RO
SELECTAREA MELODIILOR/ FW/ RW
Apasati butonul (7) pentru a alege in sens crescator sau in sens descrescator melodia preferata.
Apasati si tineti apasat butonul (7) pentru derularea inainte si inapoi a melodiei in sens crescator
sau in sens descrescator.
74

Manual de utilizare
REPETAREA FISIERELOR AUDIO/VIDEO
Apasati butonul „RPT/3” pentru efectuarea functiei de repetare cand doriti ca melodia preferata
sa se repete.
Apasati butonul „RPT/3” o data, va repeta aceeasi melodie pentru MP3 si WMA, sau acelasi
sier video pentru modul DVD; „RPT” 1 apare.
Apasati butonul „RPT/3” pentru a doua oara, va repeta redarea aceluiasi director AV „RPTDIR”
apare pe asajul LCD-ului.
Apasati butonul „RPT/3” pentru a treia oara. Intregul director pentru audio sau video va repetat,
iar pe asaj va aparea simbolul „RPT ALL”.
Apasati butonul „RPT/3” pentru a patra oara, pentru oprirea modului REPETARE pe asaj va
aparea simbolul „RPTOFF”
REDAREA INTRO A MELODIEI
In timpul redarii MP3 sau WMA, apasati butonul „INT/2”, pentru ascultarea primelor 10 secunde
din ecare melodie de pe disc, asajul va arata „INT”, numarul piesei. Acest lucru indica faptul
ca functia INT este deja activata. Apasati butonul „INT/2” inca o data pentru a reveni la redarea
normala.
NOTA: INT nu functioneaza in timpul redarii sierelor video.
ASCULTAREA ALEATOARE A MELODIILOR (RANDOM)
In timpul redarii, apasati butonul „RDM/4”, si simbolul „RDM” va aparea pe asaj, ceea ce va
indica ca functia RDM a fost activata. Aparatul reda orice melodie la intamplare. Apasati RDM
inca o data pentru a reveni la modul normal de redare.
OPRIREA REDARII
In timpul redarii, apasati butonul (11) „5STOP” pentru oprire, pe LCD va aparea „STOP” si
aparatul va opri redarea. Pentru a reveni la modul normal de redare, apasati butonul inca o
data.
PAUZA REDARE
In timpul redarii, apasati butonul (11) „1PLAY” pentru a sista redarea, pe asajul LCD-ului va
aparea „PAUZA”. Pentru a reveni la modul initial, apasati inca o data, pentru a relua redarea.
SETARE VIDEO
In timpul vizionarii unui lm pe DVD sau a unui program TV puteti
accesa SETAREA VIDEO pentru a regla calitatea imaginii.
Daca in timpul reglarii, imaginea incepe sa se deregleze accesati
SETAREA SISTEMULUI selectand meniul “DEFAULT (prestabilit)”,
apasati apoi butonul de VOLUM +/- pentru conrmare.
SETAREA CAMEREI VIDEO PENTRU MERS INAPOI
Conectati iesirea camerei pentru mers inapoi la intrarea VIDEO din spatele aparatului. Imaginea
din spate va aparea automat pe ecran.
DOS (DINAMIC OPEN SCREEN)
Ecranul deschis dinamic (efect de miscare), atunci cand este pornit aparatul. Apasati orice tasta
pentru a iesi si a reveni la modul curent.
DEMO ON: Apasati lung butonul de selectare, selectati optiunile Setari → Sistem → Demo,
apasati butonul CAUTARE +/- pentru a selecta Demo ON, apoi apasati butonul de selectare
pentru a conrma. Nu toate butoanele functioneaza, cu exceptia butonului de selectare.
DEMO OFF: Apasati butonul de selectare, apasati butonul (8) CAUTARE +/- pentru a selecta
demo OFF, apoi apasati butonul de selectare pentru a conrma revenirea la starea initiala.
RO
75

Manual de utilizare
FUNCTIA RDS
AF: frecvente alternative de emisie ale postului radio
- Pentru setarea modului RDS apasati lung butonul RDS si selectati optiunea AF si TA ON, simbo-
lul AF palpaie pe asaj si TA apare pe ecran.
AF/REG
AF
- Tasta AF/REG indica activarea CAUTARII AF.
- indicatorul AF este asat cand AF este pornit, cautarea AF este activata cand semnalul este
slab.
- Pe modul FM, cand AF este pornit, functiile SEEK (CAUTARE), SCAN(SCANARE) , AUTO, MEMORY (MEMORIE) pot doar receptiona si salva programe RDS. Cu toate acestea, cand optiunea
ITALIA este activata, indiferent daca e sau nu RDS, programele care corespund nivelului SD pot
receptionate si salvate.
INDICATOR CONDITII
AF ON modul AF ON, informatie RDS primita
AF OFF modul AF OFF
AF intermitent modul AF ON, nu se receptioneaza informatii RDS
REGION
- modul AF este transformat in modul REGION ON/OFF cand modul SEL este apasat pentru mai
mult de 3 secunde.
- ON: CODUL PI este vericat cand controlul AF este in desfasurare.
- OFF: CODUL PI si SUPRAFATA DE ACOPERIRE nu sunt vericate cand functia AF este in curs.
PTY
MODUL RADIO
- Apasati butonul „SEL” mai mult de o secunda pentru a porni functia PTY. Simbolul PTY palpaie
pe ecran atunci cand selectati functia PTY. Daca nici o alta tasta nu este apasata timp de 2 secun-
de, PTY anterior selectat va cautat. Dupa ce se incheie un ciclu de cautare posturi, daca PTY
dorit nu este gasit, simbolul NO PTY va asat.
- exista 2 tipuri de programe: SPEECH si MUSIC.
Apasand PTY o data, apare programul MUSIC. Cand PTY este apasat de doua ori, apare progra-
mul SPEECH. Tastele M1~M6 pot folosite pentru a selecta tipul de program dorit.
TA ( Informatii trac)
TA functioneaza dupa cum urmeaza:
- TA este pornit/oprit si indicatorul TA este asat.
Cand se transmit informatii despre trac, acestea se primesc indiferent de modul aparatului.
Daca NIVELUL VOLUMULUI este sub 20, volumul se ridica automat la 20, si revine la modul si
volumul anterior cand informatiile despre trac s-au oprit.
Daca volumul este modicat in timpul unei informatii despre trac, numai volumul anterior recep-
tiei TA este valabil.
- Cand TA este pornit, functiile SEEK, SCAN, AUTO MEMORY pot receptionate sau salvate
numai daca s-a receptionat codul de identicare al programului de trac.
RO
ALARMA TA: Simbolul TA/TP nu este asat si alarma este oprita.
CAUTARE TA: CAUTAREA TA este activata.
76

Manual de utilizare
FUNCTII BLUETOOTH
1. Imperecherea cu un telefon mobil
Porniti sistemul audio al masinii si activati functia bluetooth al
telefonului dvs. (plasati telefonul in apropierea dispozitivului).
Mobilul va gasi noul dispozitiv Bluetooth “CAR AUDIO”; introduceti
parola “8888” si apasati tasta OK. Cand conexiunea a reusit pe asajul
TFT avertizarea luminoasa intermitenta a logo-ului Bluetooth-ului
„ „ se va opri. Derularea functiilor Bluetooth va putea efectuata prin
apasarea butonului de pe panoul din fata sau prin telecomanda.
OBSERVATIE: bluetooth-ul sistemului audio al masinii suporta variantele “HSP”, “HFP”, “A2DP” si
“AVRCP”.
2. Functia hands-free
Pentru ca aceasta functie sa e activa vericati variantele de compatibilitate de mai sus dintre
telefonul dumneavoastra si sistemul audio al masinii. Cand se receptioneaza un apel, soneria
telefonului se va auzi automat in difuzoarele sistemului audio ale masinii si numarul apelantului va
aparea pe ecranul TFT.
- Apasati butonul “SEL/ scurt, pentru a prelua apelul. Veti putea astfel vorbi cu apelantul prin
microfonul ce se aa pe panoul din fata.
- Apasati butonul “EQ/ scurt, pentru respingerea apelului.
- Apasati butonul “EQ/ scurt, pentru a inchide dupa ce ati terminat convorbirea.
3. Redarea muzicii prin A2DP
Prin functia A2DP se realizeaza conexiunea dintre sistemul audio si telefonul mobil pentru redarea
sierelor muzicale. Cand veti activa muzica din telefonul mobil, A2DP va realiza transferul pe
sistemul audio al masinii, apasati butonul ” ” si ” ” selectati melodia .
Dupa conectarea sistemului audio si a telefonului mobil prin A2DP, in timp ce telefonul mobil reda
muzica, apadati butonul “MODE” pe modul A2DP, sunetul ce provine de la telefonul mobil va
putea auzit acum in difuzoarele masinii.
- Selectati piesele apasand butoanele ale ” ” si ” ” stemului audio.
- Apasati butonul ” ” sau ” ” care au aceeasi functie ca si redarea unui disc.
4. Efectuarea apelurilor cu ajutorul telecomenzii
Apasati butonul “EQ/ ” scurt pentru a accesa ecranul bluetooth-ului, apasati apoi tastele numerotate de la “0-9” si “*” “#” pentru a forma un numar de telefon.
- Apasati butonul ” ” pentru a putea sterge un numar gresit in timpul apelarii.
- Apasati butonul “SEL/ ” pentru a conrma si a apela un numar pe care l-ati ales.
- Apasati butonul “EQ/ ” pentru a inchide dupa ce ati terminat convorbirea.
5. Apelare din agenda telefonului
Acest sistem Bluetooth poate inregistra automat apelurile pierdute (ultimele 10 numere de telefon).
- Apasati butonul “EQ/ ” scurt, pentru a cauta numere de telefon.
- Apasati butonul “SEL/ ” scurt, pentru a apela orice numar din agenda telefonica.
6. Intreruperea conexiunii Bluetooth/Reconectare
Apasand butonul “BND” mai mult de o secunda veti intrerupe conexiunea curenta prin bluetooth.
Apasand butonul “BND” inca o data mai mult de o secunda puteti conecta din nou bluetooth-ul.
NOTA: Modalitatile de raspuns depind de diferitele tipuri de telefoane. Nu garantam functionarea
tuturor dipozitivelor ce pot conectate.
RO
77

TELECOMANDA
Manual de utilizare
20
12
13
16
10
14
19
1
3
2
1. Tasta Pornire/Oprire
MOD E
2. Tasta Pauza/ redare
3. Tasta Mute
5
BND
SYS
DISP
EQ
4
ENTE R
Setup
6
LOU D
SLO W
9
AMS
RPT
ST
PRO G
VOL
Zoom
+
7
LOC
RDM
SCA N
INT
SEE K
OSD
VOL
SEL
SEE K
+
AUD IO
-
4. Tasta Selectare meniu
5. Taste Banda de frecventa/ Sistem
17
6. Tasta Enter
24
7. Tasta Volum
8. Tasta Frecventa /Selectare/ Derulare
23
inainte/ inapoi
9. Taste redarea programata
10. Tasta Asare pe ecran(OSD)
22
11. Tasta modului de setare al sunetului/
21
12. Tasta de repetare redare
13. Tasta de redare aleatorie
25
14. Taste numerice
11
15. Tasta setari audio
16. Tasta SCANARE
17. Tasta EQ /
18. Tasta de setare a duratei de redare
8
19. Tasta Mod
15
20. Tasta Stop
21. Tasta Loud (intensitatea sunetului)
1 2
3
4
22. Tasta Slow motion
23. Tasta Setare
24. Tasta Asaj
5
6 87
25. Tasta Zoom
26. Tasta Frecvente Alternative (RDS)
27. Tasta Tipul de program (RDS)
9 0
10
28. Tasta Informatii din trac(RDS)
RO
78
PTYAF TA
282726
GOT O
#
18

Manual de utilizare
INLOCUIREA BATERIEI LA TELECOMANDA
Cand raza de operare a lelecornenzii slabeste sau telecomanda nu mai functioneaza este
recornandata inlocuirea bateriei vechi si inlocuirea cu o baterie noua. Asigurati-va ca
polaritatea bateriei este corecta ínainte de inlocuire, in caz contrar telecomanda se poate
defecta.
1. Scoateti suportul pentru baterie in timp ce apasati
sistemul de blocare
2. Puneti bateria ou semnul (+) in sus in suport
3. Inserati suportul in telecomanda
BUTONUL DE PORNIRE
Apasati butonul (1) de alimentare pentru a porni / opri radioul.
BUTONUL PENTRU PAUZA/REDARE
Apasati butonul (2) pentru a intrerupe muzica. Apasarea din nou va relua redarea.
BUTONUL MUTE (SILENTIOS)
Apasati butonul (3) pentru a opri sunetul. Apasati din nou butonul pentru a restabili setarile de
sunet anterioare.
SELECTARE MENIU
Apasati butonul (4) pentru a selecta meniul, apoi apasati butonul (6) (ENTER) sau tasta butonul
de redare (2), pentru aprobare.
LUNGIME DE UNDA/ SYS
In modul radio, apasati (5) (BAND / SYS) pentru a schimba banda.
In modul Player, apasati (5) (BAND / SYS) pentru a schimba sistemul de PAL, NTSC
sau AUTO.
RO
79

Manual de utilizare
MARIRE/MICSORARE VOLUM
Apasati butonul (7) (VOL+ sau VOL-) pentru a mari sau scadea nivelul volumului.
REGLARE/ ALEGERE PIESE/ DERULARE INAINTE/ DERULARE INAPOI
Pe modul RADIO, apasati continuu butonul (8) pentru a cauta manual un post radio in sens crescator sau descrescator al frecventei. Daca apasati si tineti apasat butonul pentru mai mult de 3
secunde, radioul va cauta automat un post descendent sau ascendent pana cand il va gasi.
In timpul redarii, apasati butonul (8) pentru derulare inapoi sau inainte pentru a gasi melodia dorita
mai repede. In cazul apasarii in mod discontinuu a butonului (8) puteti selecta partea dorita dintr-o
piesa descendent sau ascendent.
REDARE PROGRAM/ST
In timpul redarii discului, apasati butonul (9) PROG pentru a accesa pagina de programare. Apa-
sati butonul (4) si butoanele numerotate (14) pentru a programa melodiile ce vor ascultate.
NOTA: ST va functiona doar pe modul RADIO.
AFISAREA PE ECRAN
Pe modul USB sau SD, apasati butonul (10) (OSD). Asajul va indica Piesa/ Capitolul/ Timpul.
NOTA: Pe modul MP3/WMA pe asaj vor aparea doar directorul si melodiile.
SELECTAREA VOL/ BAS/ TRE/ BAL/ FAD
Pe modul RADIO sau in timpul redarii, apasati in mod repetat butonul (11) (SEL) pentru
alegerea modului dorit dupa cum urmeaza:
VOL BAS TRE BAL
FAD BR I CON SHAP
NOTA: Dupa selectarea modului dorit, puteti regla modul curent ind asat prin butonul (VOL).
Cand modul PRESETARE-EGALIZATOR este activat, apasati butonul SEL pentru selectarea
modurilor, (modurile BASS/TREBLE nu sunt valide) dupa cum se arata mai jos:
VOL BAL FA DB RI CON
SHA P CON
REPETAREA REDARII/AMS
1. Apasati butonul (12) AMS, functia de repetare va succesiv: RPT1 RPT, DIR, RPT ALL (toate
melodiile), RPT OFF (oprire).
2. Modul Radio este functia AMS.
REDARE ALEATOARE (RANDOM)
In timpul redarii discului apasati butonul (13) (RDM) pentru ascultarea oricarei piese la intamplare.
Pe modul RADIO, apasarea butonului va activa functia LOCAL.
NOTA: pe modul VCD PCB si la anumite DVD-uri, redarea la intamplare functioneaza.
RO
80

Manual de utilizare
BUTOANELE NUMEROTATE
Pe modul RADIO puteti selecta unul din cele 6 posturi radio apasand oricare dintre butoanele
numerotate (14). In timpul redarii puteti alege orice piesa folosind direct butoanele numerotate
(14) (0~10+). De exemplu, daca vreti piesa 15, puteti apasa intai butonul 10+ iar apoi butonul 5, si
veti putea asculta piesa respectiva.
NOTA: Pe modurile MP3 sau WMA cand butonul 10+ este primul apasat, functioneaza ca 10+, ca
20+ cand este apasat pentru a doua oara, a treia oara….30+…s.a.m.d.
SELECTARE STANGA/DREAPTA/STEREO
In timpul redarii apasati butonul (15) (AUDIO) continuu, se poate schimba astfel sunetul la difuzorul stanga/dreapta sau modul stereo.
SETARE DISC PLAYBACK (REDARE) TIMP (DURATA)
In timpul redarii discului, prin apasarea butonului (18) (GO TO) se va seta durata redarii. Folositi
butoanele (4) si butoanele numerotate (14) pentru a seta melodia/capitolul sau timpul, si apasati
butonul ENTER pentru pornire.
SCHIMBARE MOD
Apasati butonul (19) pentru a schimba pe RADIO, Redare Disc USB/SD/MMC sau pe modul AUX.
OPRIRE PLAYBACK
In timpul redarii discului, apasati butonul (20) pentru a porni playback-ul, apasandu-l inca o data
veti opri Playback-ul.
SCAN/INT
Pe modul redarii, apasati butonul Scan/INT pentru activarea functiei “INT”. Primele 10 secunde
din ecare melodie vor redate.
Pe modul radio, prin apasarea butonului Scan/INT veti activa functia de scanare pentru cautarea
posturilor radio. Apasati si tineti apasat butonul scanare mai mult de 3 secunde pentru a selecta
postul radio. Va incepe astfel redarea acestui post.
REDARE DERULARE LENTA INAPOI/INAINTE
In timpul redarii modului MP4, apasati tasta (22) o data pentru ½ derulare lenta inainte, de doua
ori pentru ⅓, de trei ori pentru ¼, etc. a saptea oara se revine la viteza normala de redare.
TASTA ZOOM
Pe modul MP4, apasati tasta (25) o data pentru 2 x zoom, de doua ori pentru 3 x zoom, de trei ori
pentru 4 x zoom, de patru ori pentru ½ zoom, de cinci ori pentru ⅓ zoom, de sase ori pentru ¼
zoom, de sapte ori pentru anularea modului ZOOM. Puteti misca imaginea apasand cursorul.
NOTA: Aceasta functie nu este valabila pentru MP3, WMA si CD.
RO
81

Manual de utilizare
SETARE
1. Apasati tasta (23) SETUP a telecomenzii ce se aa pe modul STOP. Apasati butonul STOP de
doua ori pentru a va asigura ca aparatul este pe modul STOP.
2. Pagina principala a meniului setarii este asata.
3. Alegeti pozitia dorita folosind butonul (4).
4. Apasati butonul (6) ENTER.
A. Setare sistem
Aceasta pagina de setare include toate pozitiile din sistemul televizorului: Screen saver, Tipul TV,
Parola, etc. Pentru detalii consultati Meniul Setarii Sistemului.
B. SETARE LIMBAJ
Aceasta pagina de setare include toate pozitiile Limbajului OSD: Limbaj Audio, Limbaj Subtitrare
si caracteristicile meniului pentru limbaj. Pentru detalii consultati Meniul Setarii Limbajului.
C. SETARE AUDIO
Aceasta pagina de setare include toate pozitiile pentru AUDIO. Pentru detalii consultati Meniul
Setarii Audio.
D. SETARE VIDEO
Aceasta pagina de setare include toate pozitiile pentru VIDEO. Pentru detalii consultati Meniul
Setarii Video.
E. SETARE DIGITALA
Butonul EQ (Egalizator)
Apasati butonul (26) pentru a selecta PRE-EQ:
ROCK -> POP -> CLASSIC -> JAZZ -> FLAT mode
RO
82

Manual de utilizare
FORMAT MIXT AL DISCULUI
In timpul ascultarii (sau al vizionarii) formatelor mixte de disc, impreuna cu formatele MP3, WMA,
JPG sau MPEG4, introduceti discul in slot-ul destinat acestuia, mecanismul va porni automat.
Pentru detalii, apelati la urmatorii pasi:
Redarea sierelor cu muzica
La meniul de mai sus, pozitionati sageata pe melodia preferata
apoi apasati butonul ENTER sau apasati direct butoanele numerotate pentru a alege melodia.
NOTA: Daca apasati tasta din dreapta, veti accesa statusul de
selectare al muzicii, imaginii sau formatelor video. Mutati tasta din
stanga/dreapta si apasati butonul ENTER pentru pornire. Daca
apasati tasta din stanga va veti intoarce la director.
Redarea sierelor imagine
Puteti apasa butoanele numerotate direct, pentru a alege imaginile
dorite sau pentru a muta sageata ↑ sau ↓ pe sierul respectiv si
apasati apoi tasta ENTER. Imaginea va astfel asata pe monitor.
Apasand sagetile , , , , puteti regla imaginea din diferite
unghiuri. Apasati butonul STOP pentru a reveni la pozitia anterioara.
NOTA: Daca continuati sa apasati tasta din dreapta veti accesa
statusul selectarii muzicii, imaginii sau sierelor video. Mutati tasta
stanga/dreapta pe pozitia dorita si apasati butonul ENTER. Apasati
butonul PLAY pentru vizionarea automata a imaginii.
Redarea sierelor video
Miscati sagetile sau pe sierul video pe care ati dori sa-l
vedeti, apoi apasati tasta ENTER sau apasati butonul pentru con-
rmare. Puteti apasa tasta din stanga pentru a reveni la director
pentru alegerea altor siere dintr-un alt director.
Apasati butonul PLAY pentru vizionarea imaginii.
Modul de cautare al melodiilor
Pe modul MP3/WMA:
- intr-un singur sier, apasati butonul (8) pentru a selecta melodia
- in mai multe siere, apasati butonul ( ) pentru a selecta lista si
butonul ( ) pentru a selecta numarul melodiei pe care vreti sa o
ascultati.
Apasati apoi tasta ENTER pentru redarea cantecului.
RO
83

A. SETARE SISTEM
Manual de utilizare
a. SISTEM TV
c. VIDEO
b. SCREEN SAVER
Acest aparat poate reda discuri
MP4 inregistrate e in format PAL
e in NTSC. Selectati formatul
NTSC cand aparatul este conectat
la televizorul NTSC. Selectati
formatul PAL cand conectati
aparatul la televizorul PAL. Daca
selectati AUTO, aparatul va
selecta automat formatul (PAL/
NTSC) in conformitate cu sistemul
televizorului dumneavoastra.
Selectati iesirea SCREEN SAVER
pe ON/OFF. (pornire/oprire)
1) 4:3 PS
Playback in stil PAN si SCAN (daca este conectat la ecranul
televizorului, muchiile din stanga si dreapta sunt separate.)
2) 4:3 LB
Play back in stil LETTERBOX. (daca este conectat la
ecranul televizorului, linii negre apar in partea de sus si jos
a ecranului).
3) 16:9 Selectati cand un televizor cu ecran plat este conectat.
RO
84
d. PAROLA
Introduceti parola si apasati butonul ENTER.
Introduceti parola veche (codul de instalare
este 0000) si stabiliti o noua parola din 4 litere,
si introduceti-o inca o data pentru conrmare.

e. CLASIFICARE
f. PRESTABILIT
1 KID SAFE
2G
3PG
4PG1 3
5PG
-
6R
7 NC 17
8 ADUL T
REST ORE
Manual de utilizare
Selectati ghidul pentru clasicari programe cu ajutorul butonului cursorului si
conrmati apasand butonul ENTER.
Pozitia 1 : [ Protectie pentru copiii] - Selectati aceasta pozitie cand programele pot
vizionate de catre copiii.
Pozitia 2 : [G] - Selectati aceasta pozitie care permite accesul persoanelor de toate
varstele.
Pozitia 3 : [PG] - Selectati aceasta pozitie cand este nevoie de acordul parintilor.
Pozitia 4 [PG 13] - Selectati aceasta pozitie cand copiilor cu varste sub 13 ani le este
interzisa vizionarea.
R
Pozitia 5 [PG-R] - Selectati aceasta pozitie cand pe discul DVD apare imprimat
“PG-R”.
Pozitia 6 [R] - Selectati aceasta pozitie cand copiii cu varste sub 17 ani au nevoie de
acordul parintilor.
Pozitia 7 [NC-17] - Selectati aceasta pozitie cand copiilor sub 17 ani le este interzisa
vizionarea.
Pozitia 8 [Adulti] - Selectati aceasta pozitie cand este permis accesul adultilor.
Revenire la setarile din
fabrica.
B. SETARE LIMBA
Selectati limbajul OSD preferat, limbajul Audio, limbajul Subtitrarii si Limbajul Meniului folosind
butoanele cursorului.
a. LIMBAJ OSD
OSD LANGUAGE
AUDI O LANG
LANG
LANG
SUBTITLE
MEN U
DIVX[R] VO D
EXI T SETU P
ENGLIS H
CHINESE
GERMAN
SPANIS H
FRENCH
PORTUGUESE
b. LIMBAJ AUDIO
OSD LANGUAG E
AUDI O LANG
LANG
SETU P
LANG
SUBTITL E
MEN U
EXIT
ENGLIS H
CHINESE
GERMAN
SPANIS H
FRENCH
PORTUGUES E
LATIN
JAPAN
RO
85

Manual de utilizare
c. LIMBAJ SUBTITRARE
OSD LANGUAG E
AUDI O LANG
SUBTITLE
MENU
EXIT
LANG
LANG
SETUP
ENGLISH
CHINESE
GERMAN
SPANIS
FRENCH
PORTUGUESE
JAPAN
OFF
C. SETARE AUDIO
a. IESIRE AUDIO
c. LIMBAJ MENIU
OSD LANGUAGE
AUDI O LANG
SUBTITL E
H
MEN U
EXI T
SPDIF/OFF:
Iesirea analogica sau optica nu are semnal de iesire
SPDIF/RAW:
Cand aparatul este conectat la amplicator prin intrarea analogica sau
optica, selectati aceasta pozitie: cand discul care este inregistrat de
Dolby Digital, DTS sau MPEG, semnalul iesirii analoge sau optice a
aparatului va acelasi cu semnalul digital (format RAW) al discului. In
acelasi timp, amplicatorul pe care l-ati conectat trebuie sa aiba functia
decodicata Dolby Digital, DTS sau MPEG.
SPDIF/PCM:
Cand aparatul este conectat la 2 canale, amplicator stereo digital,
selectati aceasta pozitie: cand discul care este inregistrat de Dolby
Digital, DTS sau MPEG, iesirea analogica sau optica va avea 2 iesiri de
canal PCM.
LANG
LANG
SETU P
ENGLIS H
CHINESE
GERMAN
SPANISH
FRENCH
PORTUGUES E
JAPAN
LATIN
b. TASTA
D. SETARE VIDEO
BRIGHTNESS
CONTRAST
HUE
RO
SATURA TION
SHARPNES S
EXI T SETU P
86
Cu aceasta functie, reglati joase si
înalte
a. LUMINOZITATE
BRIGHTNESS
CONTRAST
HUE
SATURA TION
SHARPNES S
EXI T SETU P
12
10
8
6
4
2
0

Manual de utilizare
b. CONTRAST
BRIGHTNES S
CONTRAST
HUE
SATURA TION
SHARPNESS
EXI T SETU P
d. SATURATIE
BRIGHTNESS
CONTRAST
HUE
SATURA TION
SHARPNES S
EXIT SETUP
E. SETARE DIGITALA
a. DOMENIU DINAMIC
c. NUANTA
12
10
8
6
4
2
0
CONTRAST
HUE
SATURA TION
SHARPNES S
EXI T SETUP
BRIGHTNESS
+6
+4
+2
0
-2
-4
-6
e. CLARITATEA IMAGINII
12
10
8
6
4
2
0
BRIGHTNES S
CONTRAST
HUE
SATURA TION
SHARPNESS
EXIT SETU P
88
6
6
4
4
2
2
0
0
b. MONO DUAL/DUBLU MONO
DYNAMI C RANG E
DUAL MONO
EXI T SETUP
FULL
6/8
4/8
2/8
OFF
Pentru setarea domeniului dinamic.
DYNAMIC RANG E
DUAL MONO
EXIT SETU P
STER EO
MONO LE FT
MONO RIGH T
MIX MONO
Pentru setarea modului Stereo.
RO
87

Manual de utilizare
INSTALAREA PANOULUI FRONTAL
Crestatura/taietura A (din imagine) trebuie asezata pe manerul B si apoi apasati usor in
partea stanga.
B
A
2
N
D
1ST
DETASAREA PANOULUI FRONTAL
Apasati butonul RELEASE (3) din coltul stanga sus, panoul frontal se va indoi/plia.
Cand panoul frontal s-a pliat, tineti-l si glisati in partea dreapta si trageti-l afara.
Nota: Pentru o pastrare in siguranta, pastrati panoul in carcasa de protectie din dotare
imediat dupa ce a fost scoasa din cutie.
RO
88
RE LE AS E
CLEANING PIN
In cazul in care contactele dintre radio si DCP este murdar, radio, pot lucra incorect. Pentru a
curata contactele scoateti panoul si curatati contactele cu un tampon de vata imbibat in alcool.
Pentru a face acest lucru urmati cu grija pentru a evita deteriorarea contactelor.
Nota: Pentru securitate inainte de aderarea la actiune, scoateti cheia din stacyjni. Nu atingeti direct contactele cu degetele.

Manual de utilizare
MONTARE PRIN FATA (Metoda A)
Installing the unit
1. Tabloul de bord
2. Suportul
Dupa inserarea suportului in tabloul de bord,
selectati agatatorile in functie de grosimea
materialului tabloului de bord si indoiti-le pentru a
xa suportul la locul lui. (g.1)
3. Surub
Fig.2
1. Tablou de bord
2. Piulita (5mm)
3. Saiba de siguranta
4. Surub (5 x 25mm)
5. Surub
6. Banda
Folositi banda pentru a xa partea din spate
a aparatului. Banda poate indoita pana in
unghiul dorit.
7. Saiba fara let.
1. Cadru
2. Introduceti degetele in canelura din fata
cadrului si trageti pentru a scoate cadrul.
(Pentru a xa cadrul inca o data, formati alte
oricii si atasati aparatul).
3. Cheita
Introduceti cheita cu care este dotat aparatul in
canelura din ambele parti ale aparatului, pana
cand auziti un pocnet. Aceasta va face posibila
inlaturarea aparatului din tabloul de bord.
Fig.3
MONTARE PRIN SPATE (Metoda B)
Instalarea se face folosind gaurile suruburilor de pe
extremitatile aparatului .
Fixarea aparatului in lacasul original
Suport de montare:
1. Alegeti o pozitie in care gaurile de surub ale suportului si
cele ale unitatii centrale sa e pe aceeasi linie si strangeti
suruburile in doua locuri pe ecare parte. Folositi e suruburi
de ancorare (5x5mm) e suruburi cu cap ingropat (4x5mm).
2. Surub
3. Tablou de bord sau Consola.
INTRODUCEREA CARDULUI SD
Unghiul oblic al cardului SD mentine
expunerea descendenta: introduceti-I in spatiul
SD si apasati inca o data pentru a-l scoate.
RO
89

Specicatii generale
Manual de utilizare
Alimentarea la retea:
Impedanta:
Putere maxima:
Wymiary :
Consumul de curent:
Format siere compatibile
Audio
Video
Imagine
Sisteme video
Sectiunea video
System video
Poziom sygnału wyjściowego
Sectiunea audio
Nivelul maxim al iesirii:
Raspuns in frecventa::
S/N:
Separare:
Sectiune frecventa FM
Gama de acord::
IF:
Sensibilitate utila (-30dB):
S/N:
Separare stereo:
Raspuns in frecventa:
Tuner AM
Gama de acord::
IF:
Sensibilitate utila (-20dB):
DC 14,4V, Impamantare negativa
4 ohms
40W X 4(CH)
178x124.6x50mm(WxDxH)
15A
WMA, MP3, WMV
MPEG4, Divx, Xvid, MPEG2, AVI
JPEG
AUTO / PAL / NTSC
4:3 Letter Box, 4:3 Pan Scan, 16:9
1.0V p-p 75 ohms
2Vrms (+ 3dB)
20~20KHz
65dB
60dB
87.5 - 108MHz
10.7MHz
15dB
60dB
30dB(1KHz)
30 ~ 15000 Hz
522 - 1620KHz
450KHz
28dB
RO
90
NOTA:
SPECIFICATIILE SE POT SCHIMBA FARA O INSTIINTARE PREALABILA
„Compania Lechpol declară că produsul PY-9348 este în conformitate cu cerinţele esenţiale şi alte prevederi
relevante ale Directivei 1999/5/CE. Declaraţia pentru descărcare este postata pe site-ul www.lechpol.eu”


www.peiying.eu
 Loading...