


Car receiver PY6334
Owner’s manual
Bedienungsanleitung DE
Instrukcja obsługi PL
Manual de utilizare
EN
RO


Owner’s manual
ITEM
Installation 4
Wire connection diagram 6
Front panel 7
General operations 8
Radio operations 11
CD / SD / MMC / USB operations 13
RDS Operations 16
MP3 / WMA overview 17
Remote control layout 18
Specication 20
Beforeplayingdiscs 21
Troubleshooting 22
Newfeatureandoperationnotice 23
EN
3
Owner’s manual
PRECAUTIONS
Choose the mounting location where the unit will not interfere with the normal driving function of
the driver.
Before nally installing the unit, connect the wiring temporarily and make sure it is all connected
up properly and the unit and the system work properly.
Use only the parts included with the unit to ensure proper installation. The use of unauthorized
parts can cause malfunctions.
Consult with your nearest dealer if installation requires the drilling of holes or other modications
of the vehicle.
Install the unit where it does not get in the driver‘s way and cannot injure the passenger if there is
a sudden stop. Like an emergency stop.
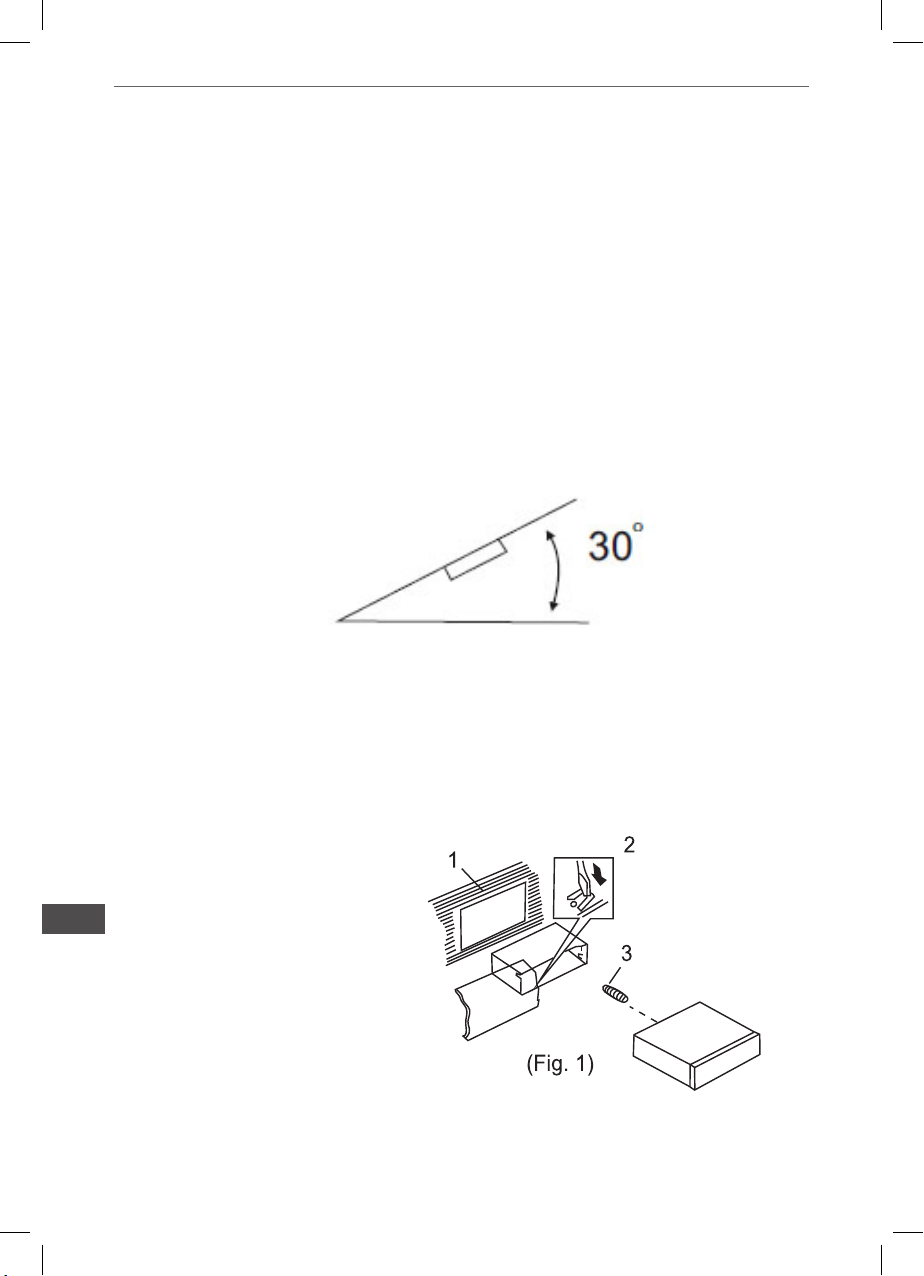
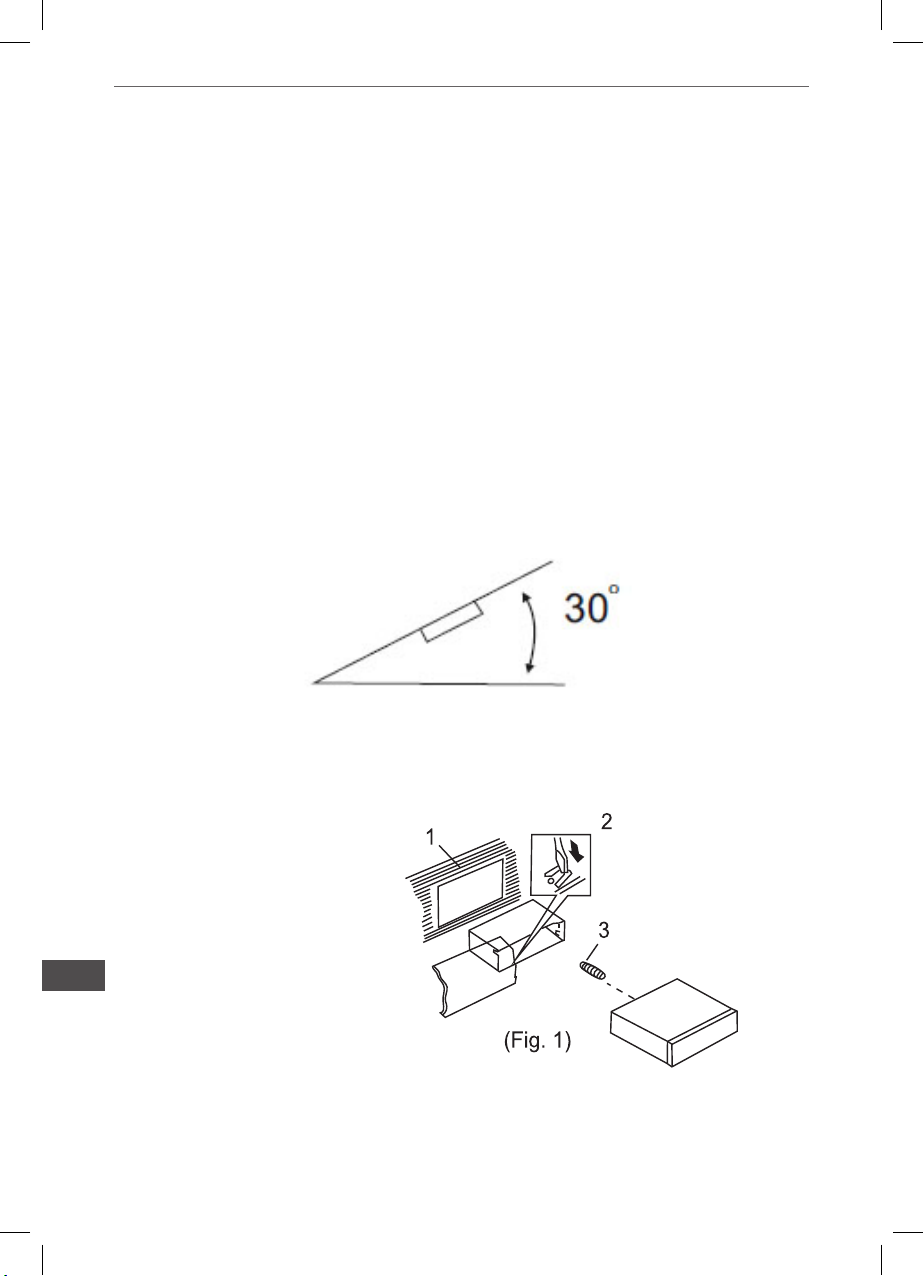
If installation angle exceeds 30 from horizontal, the unit might not give its optimum performance.
Avoid installing the unit where it would be subject to high temperature, such as from direct sunlight, or from hot air, form the heater, or where it would be subject to dust, dirt or excessive vibration. Do not expose this equipment to rain or moisture.
DIN FRONT-MOUNT (Method A)
Installing the unit
1. Dashboard
2. Holder
After inserting the holder into the
EN
dashboard, select the appropriate tab according to the thick-
ness of the dashboard material
and bend them inwards lo secure
the holder in (Fig. 1) place.
3. Screw
4
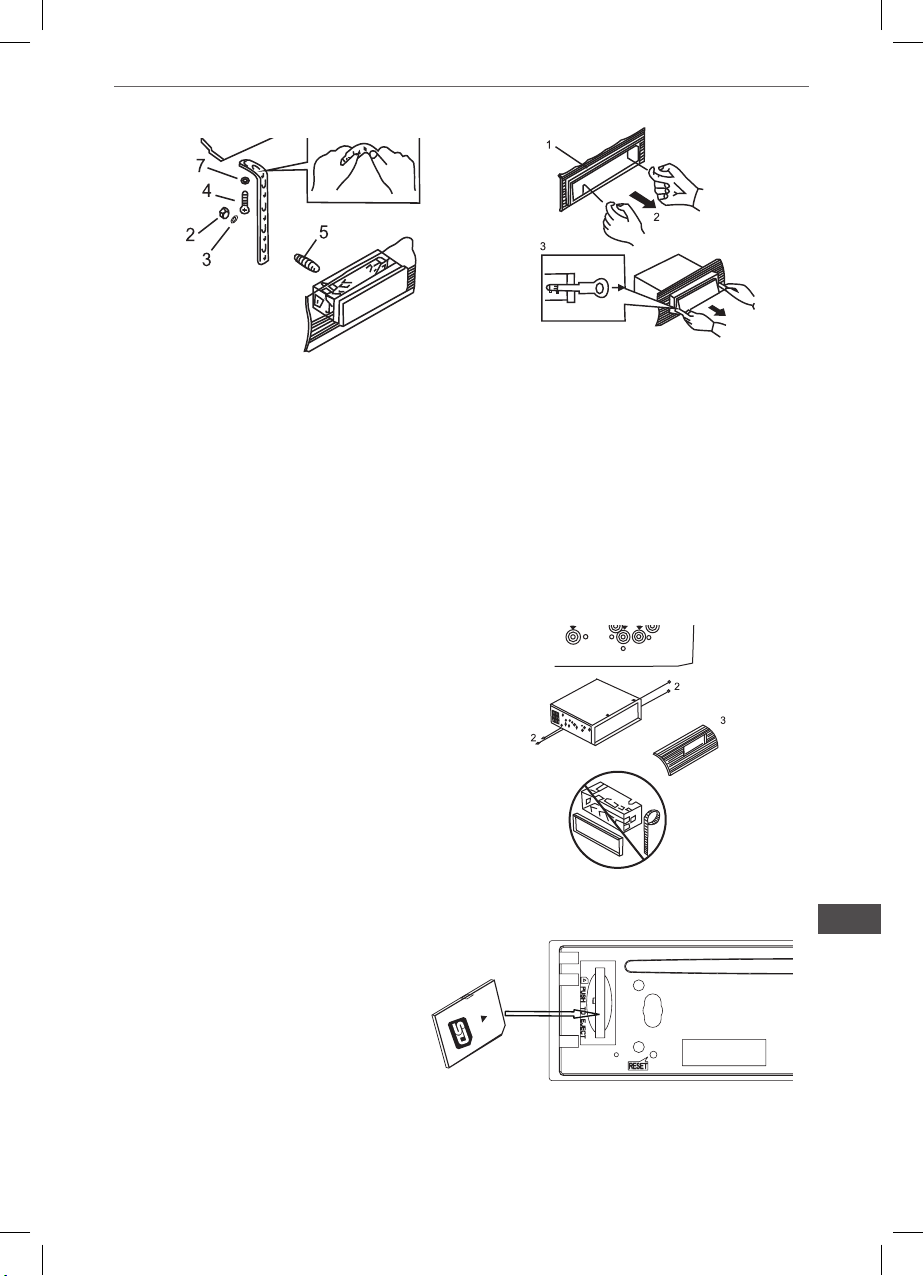
Fig.2
Owner’s manual
Fig.3
1. Dashboard
2. Nut(5 mm)
3. Spring Washer
4. Screw (5x25rnm)
5. Screw
6. Strap
Be sure to use the strap to secure the back of the unit in place.
The strap can be bent by hand to
the desired angle.
7. Plain Washer
DIN REAR-MOUNT (Method B)
Installation using the screw holes on the
sides of the unit
Fastening the unit to the factory
radio mounting bracket:
1. Select a position where the screw holes
oft he bracket and the screw holes of the
main unit become aligned (are tted), and
tighten the screws at 2 places on each
side. Use either truss screws (5 >< 5mm)
or ush surface screws (4 x 5mn1)
2. Screw
3. Dashboard or Console
INPUT THE SD CARD
The SD oblique angle keeps
Rightward exposure, put into the
SD slot and press it again to eject.
1. Frame
2. Insert ngers into the groove in the front
of frame and pull out to remove the frame.
(When reattaching the frame, point the side
with a groove downwards and attach it.)
3. Lever
Insert the levers supplied with the unit into
the grooves at both sides of the unit and
shown in gure until they click. Pulling the
levers makes possible to remove the unit
from the dashboard.
EN
5
Owner’s manual
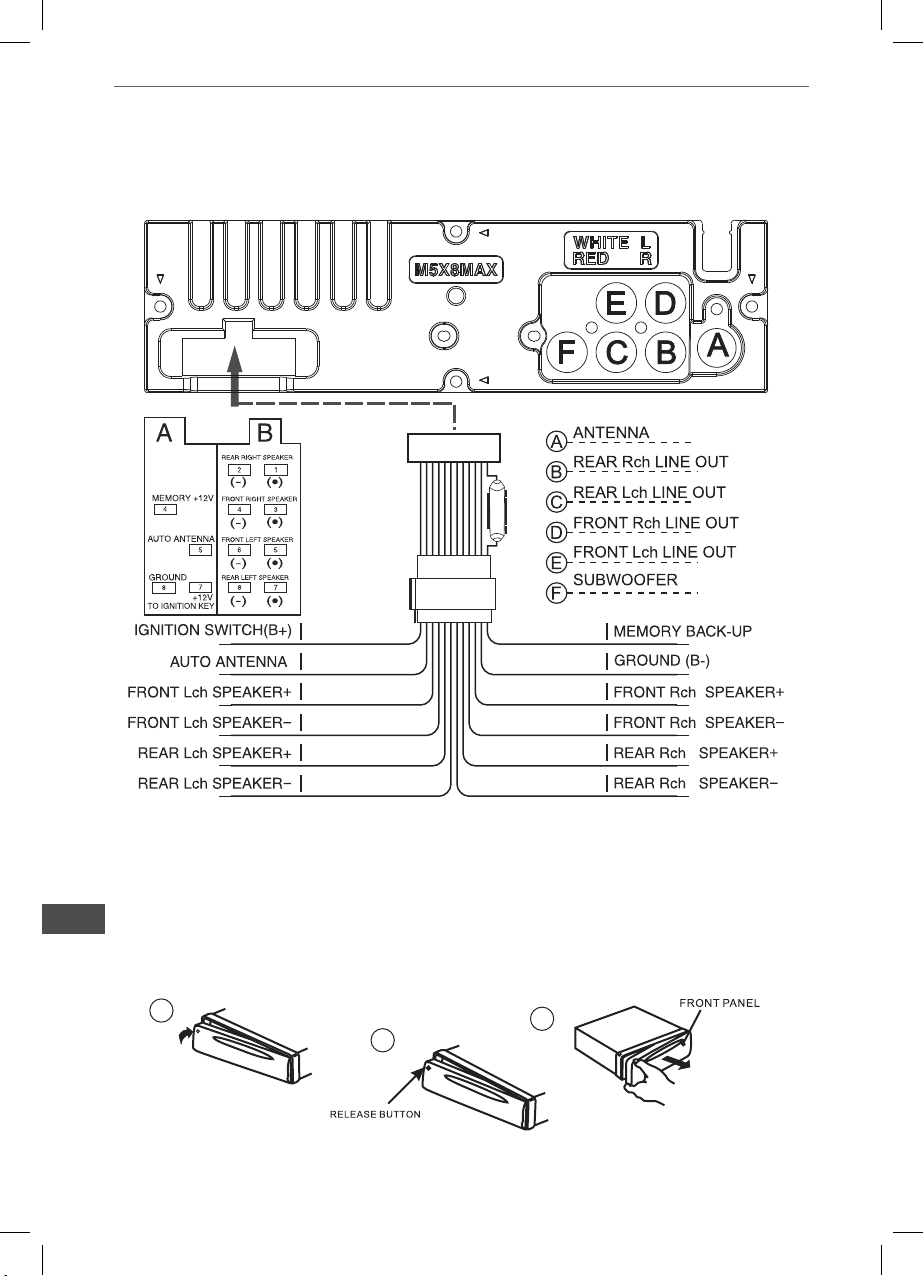
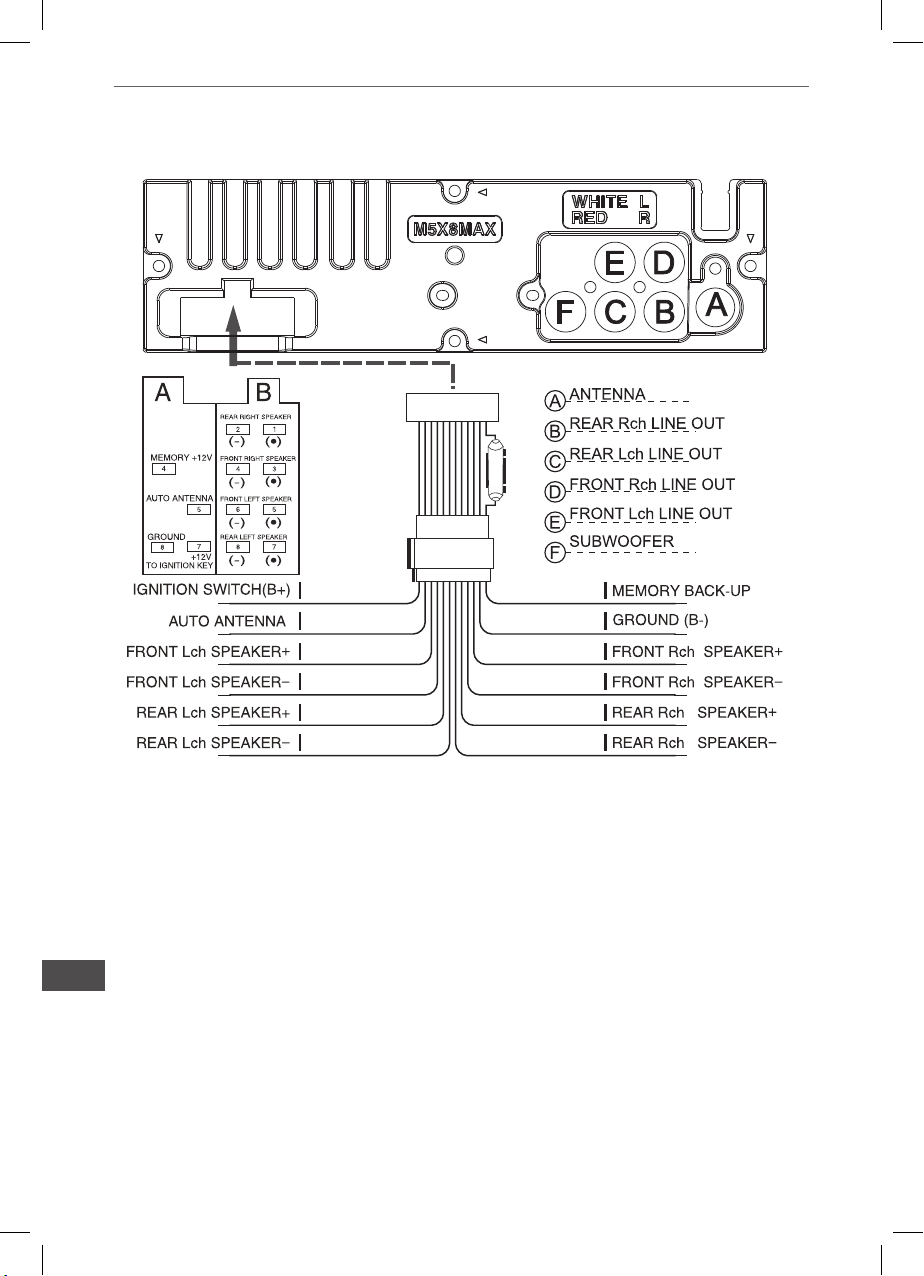
WIRE CONNECTION DIAGRAM
RE D YE LL OW
BL UE
WH IT E
WH IT E/ BL AC K
GR EE N
GR EE N/ BL AC K
15A
BL AC K
GR EY
GR EY /B LA CK
VI OL ET
VI OL ET /B LA CK
HOW TO INSTALL AND REMOVE THE FRONT PANEL
INSTALLING THE FRONT PANEL
EN
To install the front panel, insert the panel into the housing and make sure the panel is properly
installed, other wise,abnormalities occurs on the display or some keys will not function properly.
1
2
6
3
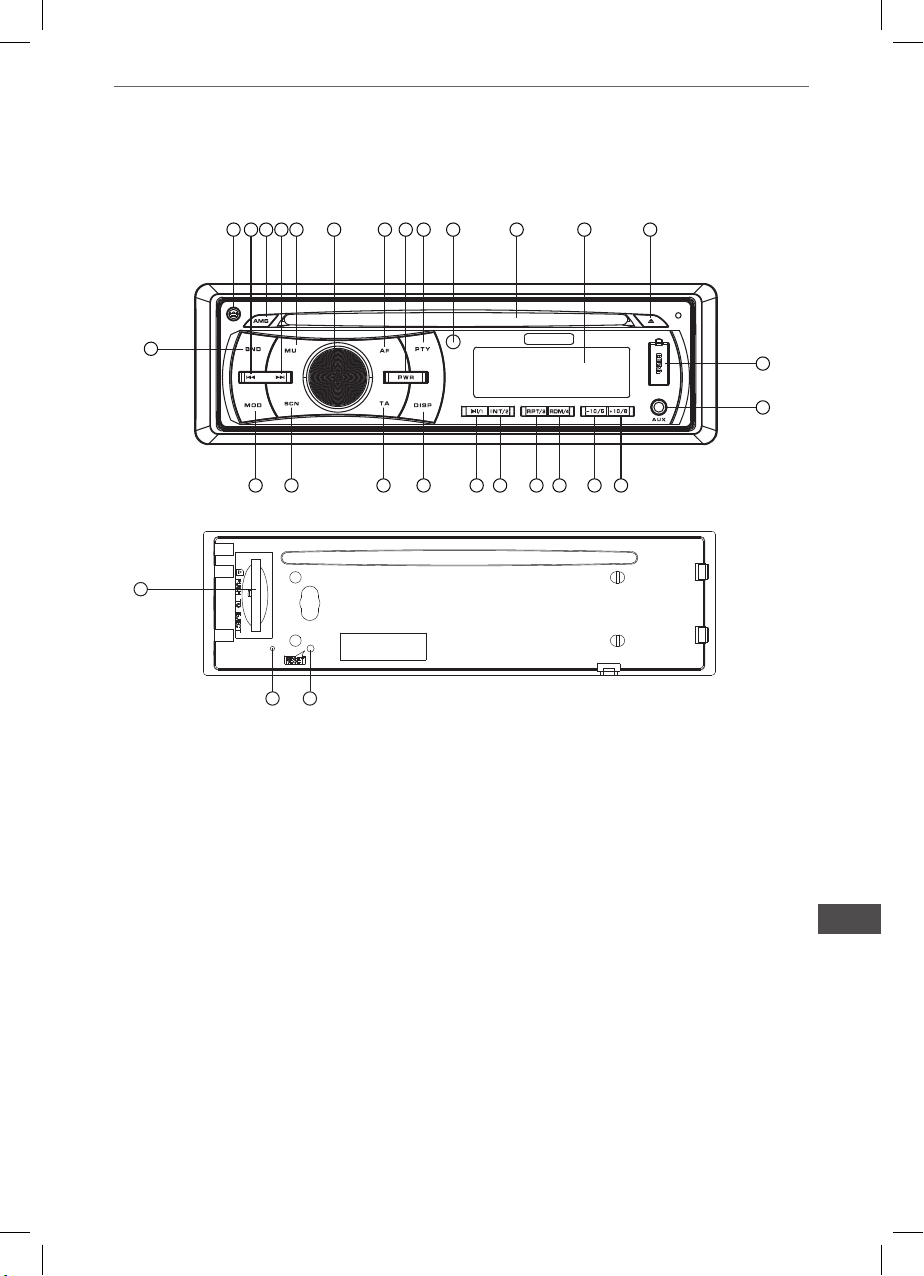
FRONT PANEL LAYOUT
Owner’s manual
12
13
5
4
11
8 9
22
2 3
10
27
1. Power Button
2. Release Button
3. Vo|ume / Sel Button
4. Mute Button
5. Mode switch
6. Disp-color setting
7. LCD Display
8. Flashing LED
9. Reset Button
10. Band switch / lD3 select
11. Tune Seek & Track forward Button
12. Tune Seek & Track reverse Button
13. Automatically memory storing
14. Play/Pause & Preset Button 1
2520
21
1
629
24 23
1514
16
15. Intro & Preset Button 2
16. Repeat & Preset Button 3
17. Random & Preset Button 4
18. Preset Button 5
19. Preset Button 6
20. Alternative Frequencies Button
21. Programme Type Button
22. Trafc Announcement Button
23. Eject knob
24. CD Slot
25. Remote Control Sensor
26. USB connecter
27. SD/MMC Slot
28. AUX IN JACK
29. SCN Button
7
26
28
191817
EN
7

Owner’s manual
GENERAL OPERATIONS
ON / OFF
Press POWER butt on (1 ) to turn on the unit. Press it more than 1 second to turn off
FRONT PANEL RELEASE
Press REL button (2) to detach the removable front panel
SOUND ADJUSTMENT
Turn on (3) can adjust the desired volume quality.
Press SEL button (3) will change in the following order.
Option:
VOLUME
Rotating this knob, you can adjust VOL/BASS/TREB/BAL/FAD . To select the functions, press
the VOL knob shortly until the desired functions are shown on the display.
Increase or decrease the volume by turn the VOL knob right or left. These buttons
can be used to adjust the BASS, TREBLE, BALANCE and FADER.
BASS
Press VOL/SEL button(3) one time. Adjust bass level by using VOL/SEL(3) Knob.
TREBLE
Press VOL/SEL button(3) two times. Adjust treble level by using VOL/SEL(3) Knob
BALANCE
Press VOL/SEL button(3) three times. Adjust sound balance between left and right speakers
by using VOL/SEL(3)Knob.
FADER (optional)
Press SEL button(3) four times. Adjust sound balance between front and rear speakers by using VOL/SEL(3) Knob.
EN
MUTE
Press MUTE button (4) to mute down the sound. Press it again to release this mode and
recover previous volume level.
8

Owner’s manual
OTHERS ADJUSTMENT
Press VOL/SEL bulton (3) for several seconds,it is activated as cyclical mode of following functions for user’s selection.
LOU D
TIM E DISPL AY DSP O FF ON
DX/ LOCALARE AEUR/ USA
Press and hold this button will go to different modes:
Press and hold will go to DSP mode automatically:
by turning this function button to choose Flat ,CLASSlC , Pop and Rock‘
by press the function button to select your favorite DSP mode.
When in the DSP mode,press the function button once will to ESP mode:
by turning the function button to choose 12 secods or 45 seconds ESP.
by press the function button to select your desire ESP seconds.
When in the DSP mode,press the function button twice will go to BEEP mode (the key pad
tone) by turning the function button to choose on or off by press the function button to select
on or off.
VOL LAST/ADJUST
This function allows to set the volume level of the unit after it was turned off and then turned on
again Choose VOL LAST if you want the volume level to be the same as it was before turning
off VOL ADJUST allows to choose volume level.
OFF /ON
STE REP/M ONO
DEM O OFF/O N
SEE K ½VOL LAST /AD J
AEM O FF/ON
BEE P
ON/ OFF
SEEK MODE
SEEK 1: When SEEK 1 mode is activated, AUTO SEEK SCAN is stopped when station is
detected even user still push SEEK button.
SEEK 2: Auto SEEK SCAN is not stopped even if station is detected if user pushes SEEK
button. When releases SEEK button, then stop when station is detected.
EN
9

Owner’s manual
SELECT MODE
By pressing this button(5) to go to different function mode:
-Tuner (radio)
-USB
to go to this mode USB device must be connected.
- Memory Card
to go to this mode must be have a Memory Card in.
-AUX in put
TIME ADJUSTING
Press and hold the SEL button until the current time is displayed. Then Press the vol “+” to
adjust hours, and press the vol ”-” to adjust minutes. After you nish the time adjustment, press
SEL button to conrm the time setting.
LIQUID CRYSTAL DISPLAY
Exhibit current frequency and activated functions on the display (7).
FLASHING LED
When ACC off ,take out the from panel from main unit that the LED (8) will be ashing.
EN
10

Owner’s manual
RADIO OPERATIONS
BAND SELECTION
At tuner mode, press BAND button (10) to select the desired band. The reception band will
change in the following order:
STATION SELECTION
Press TUNE/SEEK/TRACK FORWARD button (11) or TUNE/SEEK/TRACK
REVERSE button (12) shortly for manual tuning function.
Press for several seconds the automatic tuning mode (SEEK
mode) is selected.
AUTOMATICALLY MEMORY STORING & PROGRAM SCANNING
-Automatically Memory Storing
Press AMS(MP3) button (13) for several seconds, the radio searches from the current frequency
and checks the signal strength until one cycle search is nished.
And then 6 strongest stations are stored into the corresponding preset number button,
- Program Scanning
Press AMS(MP3) button (13) shortly to scan preset station. When the AMS mode is carry out,
“INT” appear on LCD display, the unit scan each stored station for 5 seconds, you also can press
the corresponding number button or AMS button. Your desired station will start playing.
STATION STORING
Press preset button (14~19)
1) RADIO MODE.
M1 ~ M6
- PRESET MEMORY is loaded when key is pressed for less than 1 second.
- PRESET MEMORY is saved when key is pressed for longer than 1 sec.
2) CD/MP3/FLASH MP3
PLAY/ PAUSE
Press preset button (14) is activated. During a PAUSE, DISC INDICATOR ashes.
TOP - First song will play when Top key is pressed for lunger than 0.5 sec during play.
INT
Press preset button (15) During INTRO ON, INT indicator comes on and begins playing the rst
10sec of each song, until the last song is played. It begins playing the entire track from where INT
started
EN
11

Owner’s manual
MO/ST SELECTOR
Press SEL button and select ST MONO or STEREO mode. When “ST”appears in the LCD dis-MONO or STEREO mode. When “ST”appears in the LCD display. During the player mode, press the button to switch left speaker/right speaker/stereo.
LOC/DX SELECTOR
Press SEL buttom and choose LOC to select strong or weak station reception. It is set to LOC
mode when LOC(21) button is rst pressed. “LOO” appears and only local station is available. It is
switched to DX mode when LOC(21) button is pressed again. Both distance and local stations can
be received.
LOUDNESS ON/OFF
Press SEL button, and choose LOU to increase the low frequency. This can improve the sensitivity
of your ears. And ” LOUD” appears in the LCD when the loudness mode is activated.
SCAN
Press scan button (29) to search radio station. When a station signal strength level is more than
the level to stop The radio will playing the station for 5 seconds and the frequency blinking on the
LCD at the same time.
Press and hold scan button (29) more than 3 seconds to select the station which you desired The
radio will start play the station.
AREA SETUP
In Radio mode‘ Press SEL button for several seconds, LCD will be show from DSP OFF/ON
AREAUSA/EUR. At AREA USA/EUR. You can use VOL +/- to select the AREA frequency.
EN
12

Owner’s manual
CD/SD/MMC/USB OPERATIONS
Discs for playback:
This unit can play disc types: CD/CD -R/-RW.
Compatible with formats: CDDA/MP3/WMA.
Loading and ejecting a disc
1. Turn the power on.
2. Insert the disc with the printed side facing upward into the slot.
3. Press EJECT button to eject the disc.
Multi-media card MMCISD card slot
Support MP3/WMA ID3 format music only. Detach the front panel. Carefully insert the SD/MMC
card into the card slot on the inner panel. Attach the panel. Unit starts playback automatically.
USBjack
Carefully connect the USB driver to the USB adapter cable and then insert it into the USB jack on
the front panel. Unit starts playback automatically.
USBISDIMMC notes:
USB functions (ash memory type) MP3 music play.
1. SDI MMC card support.
2. FAT 12/ FAT 16/ FAT 32 is possible
- FAT 12/16 (dir: 200 support, le:500 support).
- FAT 32 (dir: 200 support, |e:500 support).
3. Filename: 32 bytel Dir name: 32byte.
4.Tag (id3tag ver2.0)
- Title/Artist/Album: 32 byte support.
5. Multi card reader not support.
6. USB 2.0 support.
Note:
USB format supports 2.0.
Capacity: up to 32 GB.
SD cards brands: Cannon, Fuji lm, Palm, Motorola, Microsoft, IBM, HP, Compaq, Sharp, Samsung, etc.
Capacity: up to 32 GB.
MMC cards brands: Ericsson, Nokia, Motorola, HP, Palm, Sanyo, Microsystems etc.
Capacity: up to 32 GB.
Note: Because of the great variety of products with SD and MMC card slots and their sometimes
quite manufacturer-specic functions the producer can neither guarantee that all devices will be
recognized nor that all operating options that are possible in theory will actually work.
EN
13

Owner’s manual
CD/SD/MMC/USB OPERATIONS
|d3 Tag information
This unit supports ID3 tag ver2.0. If an MP3/WMAle has IDS Tag information, it will be displayed
on the LCD. lf there is no |D3 Tag information, nothing will be shown on LCD. The ID3 Tag information may include File, Folder, Music,A|bum or Artist data.
NEXTIPREVIOUS
Press NEXT/PREVIOUS buttons to choose next or previous track, Press longer than 1 sec., to
choose forward playback or backward playback.
PLAY/PAUSE
Press PAUSE button to pause the playback, press one more time to resume the normal playback.
INTRO (Preview all Tracks)
When this button is pressed, “INT ON” indication is displayed and the rst several seconds of
each track of the disc is played. Press again to stop intro and listen to track.
REPEAT
When RPT button is pressed, “PT ON” indication is displayed and playback of the selected track
will be continually repeated until the track repeat mode is cancelled by pressing RPT button again.
RANDOM
When RDM button is pressed,”RDM ON” indication is displayed and each track ofthe disc is
played in random instead of normal order. To cancel RANDOM mode, press RDM button again.
TRACK DOWN/UP SELECT (In case ofMP3/WMAles)
-10/5 button: 10 Track down
+10/6 button: 10 Track up
Selection of MP3/WMA les
1. Searching Time:
- Press AMS one time, then searching time is activated.
- Turn VOL knob to right or left, select the time you want.
- Press VOL knob, then the select time of the song will play
2. Searching Track:
- Press AMS twice, then searching track is activated.
EN
- Turn VOL knob to right or left, select the track you want.
- Press VOL knob, the song you selected will start.
14

Owner’s manual
CD/SD/MMC/USB OPERATIONS
3. Searching File Name:
- Press AMS 3 times, then le search is activated.
- Press VOL knob, then the rst directory is displayed.
- Turn VOL knob to right or left, you can select the directory you want.
- Press VOL knob again, then the directory is xed and the rst le name is displayed.
- Turn VOL knob to right or left, you can select the le you want.
- Press VOL knob, then the song you selected will start.
4. Searching Character:
- Press AMS 4 times, then character search mode is activated.
- Press VOL knob, then ‘ character is displayed.
- Turn VOL knob to right or left, you can select the letter you want.
- Press VOL knob longer than 2 sec.
- The song which has same character you selected is displayed.
- Turn VOL knob to right or left, you can select the song you want.
- Press VOL knob, then the song you selected will start.
EN
15
Owner’s manual
RDS (RADIO DATA SYSTEM) OPERATlON
AF :Alternative Frequencies
~ Setting RDS Mode Press AF button (20) and release immediately to switch on or off RDS mode.
Whenever RDS is switched on, symbol “AF” appears on the display.
AF / REG
AF
- AF I REG key directs the activation of AF SEARCH.
- AF indicator is displayed when AF is ON, AF search is activated when reception is bad.
- During FM MODE, when AF is ON, SEEK, SCAN, AUTO, MEMORY function can only receive
and save RDS program. However, when Italy option is in use, regardless of RDS programs that
satisfy SD LEVEL Can be received and saved.
Indicator Condition
AF ON AF ON MODE, RDS information is received.
AF OFF AF OFF MODE
AF blink AF ON MODE, RDS information is not received.
REGION
- AF MODE is converted to REGION ON I OFF MODE when AF ON MODE 15 pressed for
longer lsec.
- ON : Pl CODE is checked when AF CHECK in progress
- OFF: PI CODE and COVERAGE AREA is not checked when AF CHECK in progress.
PTY
RADIO MODE
- Previous PTY is displayed when PTY key (21) is pressed. If there are no keys entered for
2 seconds, previously selected PTY is searched. During 1 LOOP, if desired PTY is not found, NO
PTY is displayed.
- 2 program types are SPEECH and MUSIC.
By pressing PTY once, MUSIC is entered. When PTY is pressed the second time, SPEECH is
entered.
M1~M6 keys can be used to select the desired program type.
TA
TA button (22) is operated as follows:
- TA is turned ON / OFF and TA indicator is displayed. When trafc announcement is transmitted,
regardless of the mode, trafc announcement is received.
If VOLUME LEVEL is below 20, VOLUME LEVEL is raised to 20, and returns to its previous
EN
mode and volume level when the trafc announcement is over.
If volume is adjusted during trafc announcement, only the previous volume is valid.
- When TA is on, SEEK, SCAN, AUTO MEMORY function can be received or saved only when
trafc program identication code has been received.
- When TA is ON, trafc program identication code is not received during specied time.
TAALARM : NO TA/ TP is displayed and alarm is set off.
TA SEEK : TA SEEK is activated.
16

Owner’s manual
MP3 / WMA
- MP3 is short for MPEG Audio Layer 3 and refers to an audio compression technology standard.
- This product allows playback of MP3 les on CD-ROM, CD-R or CD-RW discs.
- The unit can read MP3 les written in the format compliant with ISO 9660. However it does not
support the MP3 data written by the method of packet write
- The unit can not read an MP3 le that has a le extension other than “.mp3”
- If you play a non- MP3 le that has the “.mp3” extension, you may hear some noise.
- In this manual, we refer to what are called “MP3 le” and “folder” in PC terminology as “ track “
and “ album “, respectively.
- Maximum number of directory level is 8, including the root directory. Maximum number of les
and folders per disc is 256.
- The unit may not play tracks in the order of Track numbers.
- The unit plays only the audio tracks if a disc contains both audio tracks and MP3 les.
- When playing a disc of8 kbps or “VBR”, the elapsed playing time in the display window will not
be correct and also the intro play may not function properly. “ VBR “:Variable Bit Rate.
- The unit supports the playback of WMA les. The playback of ID3 tags for WMA format is not
guaranteed, it depends on versions and availability of Cyrillic alphabet.
- WMA(Windows Media Audio) -music data compression format, created by Microsoft Corporation.
This format uses coding algorithm for compression of initial audio-record, greatly decreasing the
le size, but, saving the good sound quality even when the bit rate is low (for example, 64 Kbit/s).
- Remember that the unit may not play the tracks in order they are written on disc
Notes on creating your own CD-R or CD-RW containing MP3 les:
- To enjoy high quality sound, we recommend converting to MP3 les with a sampling frequency of
44.1 kHz and a xed bit rate of 128 kbps. DO NOT store more than 256 MP3 les per disc.
~ For ISO 9660 - compliant format, the maximum allowable depth of nested folders is 8, including
the root directory (folder).
- When CD-R disc is used, playback is possible only for discs, which have been nalized.
- Make sure that when MP3 CD-R or CD-RW is burned that it is formatted as a data disc and NOT
as an audio disc.
- You should not write non-MP3 les or unneeded folders along with MP3 les on the disc otherwise it takes a long time until the unit starts to play MP3 les.
- With some CD-R or CD-RW media, data may not be properly written depending on its manufacturing quality. In this case, data may not be reproduced correctly. High quality CD-R or CD-RW
disc is recommended.
- Up to 16 characters are displayed for the name of an Album or a Track. lD3TAG version 1.x is
required.
- Note that the unit may not play Tracks in the order that you wrote them to the disc.
EN
17
Owner’s manual
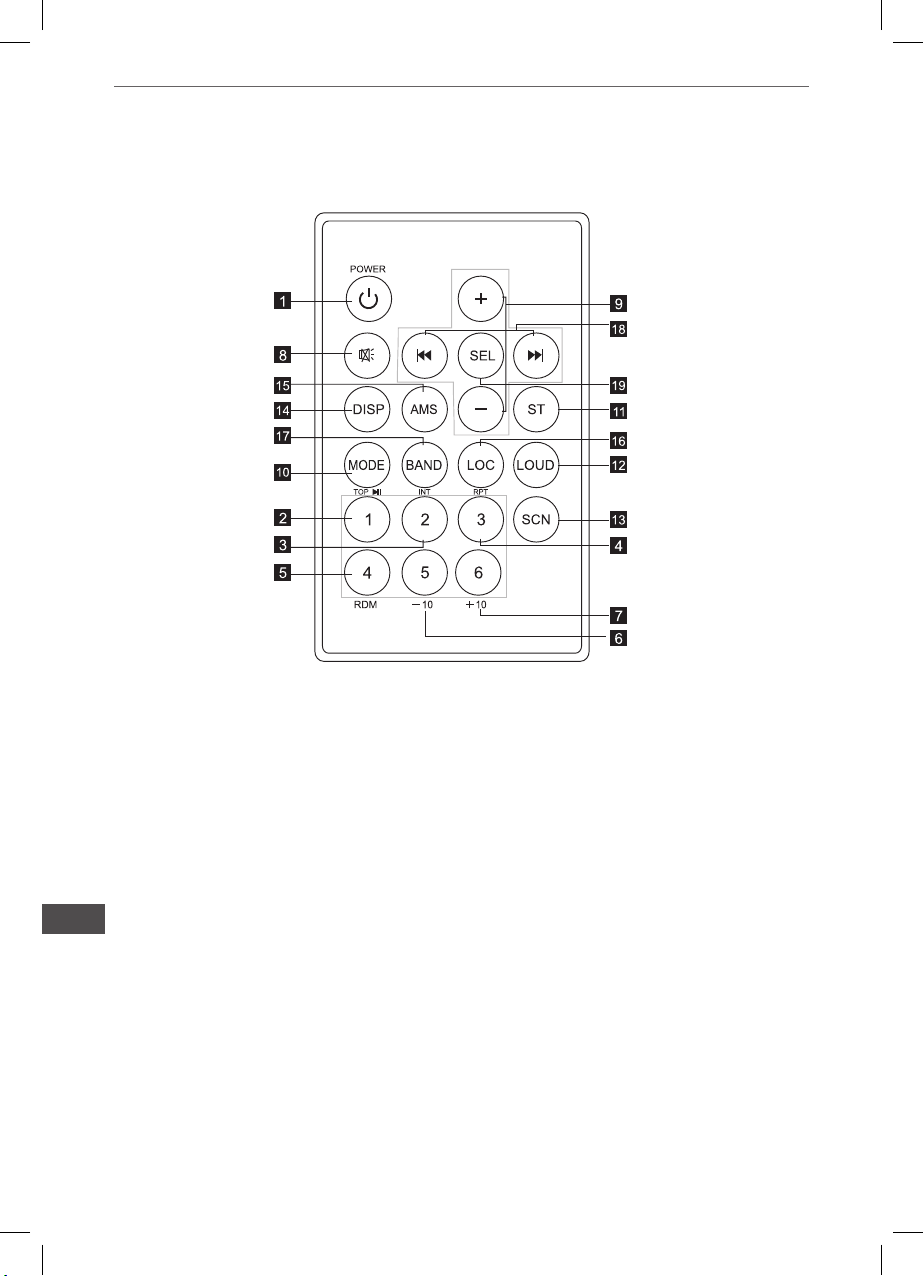
REMOTE CONTROL LAYOUT
EN
18
1. PowerButton
2. Pause / Play / Preset Button1
3. Intro / Preset Button2
4. Repeat Playing / Preset Button3
5. Random / Preset Button4
6. Preset Button5
7. Preset Button6
8. Mute Button
9. Volume Control
10. Mode Switch
11. Alternative Frequencies Button
12. TrafcAnnouncement Button
13. Scan Button
14. APS / AMS Button
15. Programe Type Button
16. Band Switch
17. Tuning / Selecting Tracks / F F / F R
18. Select Button

Owner’s manual
Replacing the Battery
When the operational range of the remote control becomes short or non functions while operating
Replace a new CR2025 battery Make sure the battery polarity before replacement
1. Pull out Battery Holder while pressing the stopper
2. Put the button type battery(+)mark upward into the Battery Holder
3. Insert the Battery Holder into the Remote control
EN
19
SPECIFICATION
General
Power Supply Requirements:
Load Impedance
Maximum Output Power:
Chassis Dimensions:
Current Drain:
Tone Controls
Bass (at 100Hz):
Treble (at 10K):
USB/SD MUSIC Player
Signal to Noise Ratio:
Channel Separation:
Frequency Response:
FM Radio
Frequency Coverage (MHz):
IF:
Sensitivity (S/N-30dB):
Stereo Separation:
Owner’s manual
DC 14,4V, Negative Ground
4 ohms
40W X 4(CH)
178x163x50mm(WxDxH)
15A
+10dB/-10dB
+10dB/-10dB
More than 60dB
More than 60dB
20Hz-20KHz
87 5 -108MHz
10.7MHz
12dBu
>30dB
AM Radio
Frequency Coverage (KHz):
IF:
Sensitivity (S/N-20dB):
Remarks
Specications subject to change without notice.
EN
20
522 -1620KHz
450KHz
42dBu

Owner’s manual
BEFORE PLAYING DISCS
Cleaning the CD
Before playing a CD, wipe it off with a clean, dust-free cleaning cloth wipe the disc in the direction
of the arrow.
Always insert the CD with the label side facing upwards. If the CD is inserted with the printed side
facing downwards, the device may be damaged.
Note: lf there is already a CD in the CD slot , do not try to insert a second CD. This may damage
the device. Always hold CDs by the edge. In order to keep the CD clean do not touch the surface.
Pull out the CD as follows.
Do not attach any sticker or adhesive tape on the CD.
Do not expose the CD to direct sunlight or sources of heating.
Do not leave CDs in a car if it parked in direct sunlight as that will lead to a considerable rise in the
temperature inside the car.
Note: Do not use any solvents such as petrol or thinning agents. Commercially available cleaning
substances of antistatic spray will damage the device.
EN
21
Owner’s manual
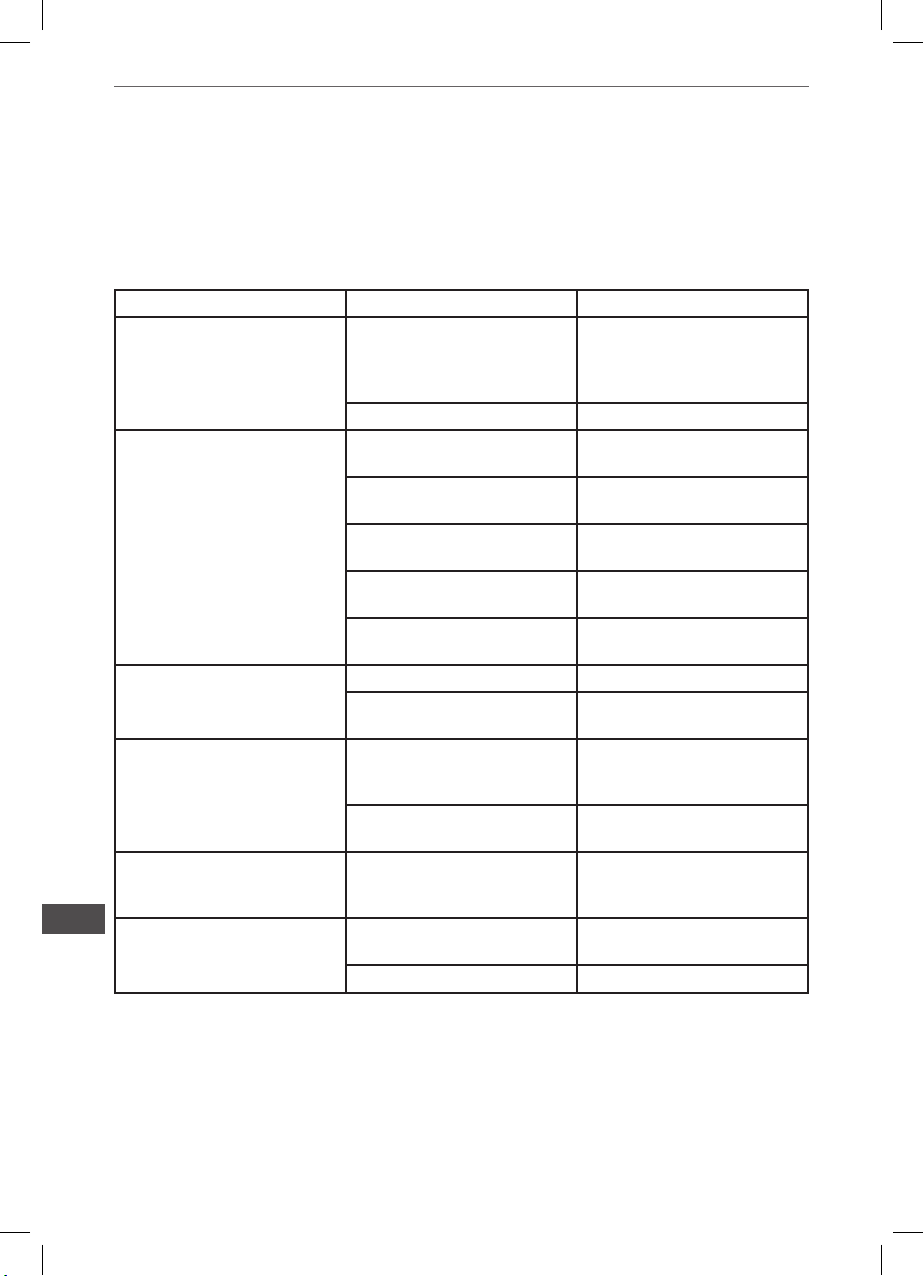
TROUBLE SHOOTING
Before going through the check list, check wiring connection. If any of the problems persist after
checklist has been made, consult your nearest service dealer.
Symptom Causes Solution
No power The car ignition key not been
CD cannot be loaded or
ejected
No sound Volume is at minimum Adjust volume to desired level
Sound skipping The installation angle is more
switched on
The fuse is blown Replace a new fuse
A CD is already inside the
player slot
Inserting the CD in reverse
direction
The CD is extremely dirty or
defected
Temperature inside the car is
too high
Condensation Leave the player off for an
Wiring is not properly connected
than 30”
if the power supply is properly
connected to the car ac-
cessory terminal, switch the
ignition key to ACC
Remove the CD from the
player and insert the new one
Insert the on with the label
facing up
Clean the CD or try to play
a new one
Cool off until the ambient
temperature return to normal
hour or so and try again
Check wiring connection
Adjust the installation angle to
less than 30”
EN
22
The Operation Keys
Do Not Work
The Radio or
Automatic Selection
Does Not Work
CD is extremely dirty or
Defected
The built-in microcomputer is
not operating properly due to
Interference
The antenna cable is not
connected correctly
The signals are too weak Select the station manually
Clean the CD or try to play
a new one
Press the RESET button or
reinstall the front panel
properly
Connect the antenna cable
correctly
Owner’s manual
CD/DVD New feature and ope ration notice
1. DOS (Dynamic Open Screen)
The Dynamic Open Screen (Motion effect) when unit power on. Press any key to stop and
return to the current mode.
DEMO ON:
Long press SEL key (chang to SEL mode), then short press SEL to select Demo ON/OFF, rotate
Volume knob to set Demo ON, Then press SEL to conrm. The Dynamic Open Screen display will
repeatedly.
DEMO OFF:
Press SEL key, rotate Volume knob to set Demo OFF , press SEL to conrm, then back to default
status
2. RGB (Customize RGB Color illumination)
The illumination color keep changing when unit Power on.
Fixed Color Setting:
Long press DISP key , rotate Volume to select Auto OFF, short press DISP to select xed color
from blue, green, red, orange, purple and while.
Customize Color Setting:
Long press DISP key rotate Volume to select Auto OFF, press DISP to enter customize
color setting:
e.g. RED - rotate volume to select 00~32, press DlSP to conrm the setting.
GREEN- rotate Volume to select 00-32, press DlSPt o conrm the setting.
BLUE - rotate Volume to select 00~32, press DlSP to conrm the setting.
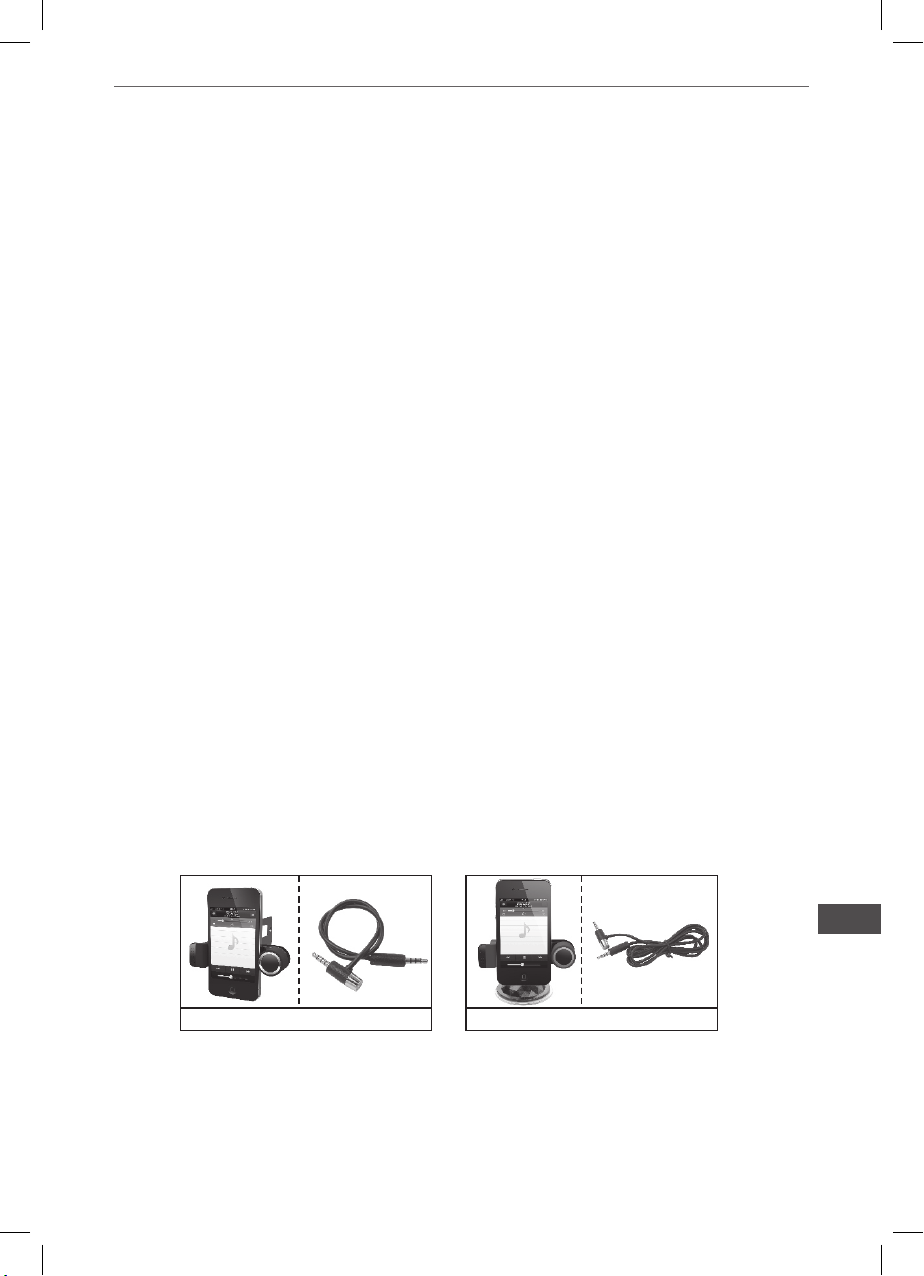
3. IPC (iPhone Control Music)
With this function, the music in iPhone can be played on head unit, and can be controlled by head
unit to operate PLAY/PAUSE, PREV, NEXT.
Press Mode button to select Aux model. Connect iPhone to Aux in with provided cable (option to
be sold separately).
Below two brackets are provided for your choice:
4301SP R 4303SP R
EN
23
Owner’s manual
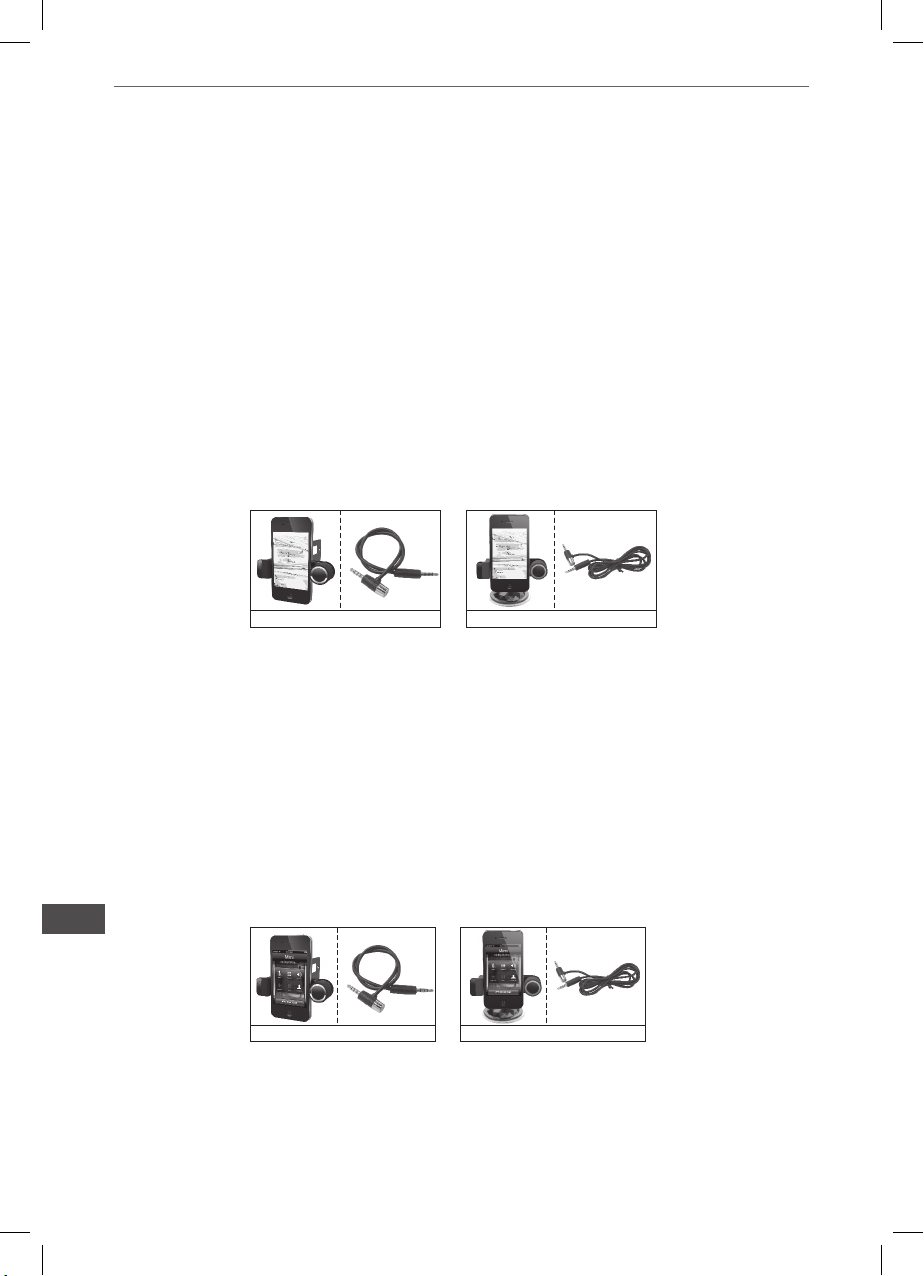
4. AEM (Aux Extend voice control Mode)
GPS trafc broadcasting:
Under any mode, connect iPhone to AUX in, activate GPS Navigation function on the phone (The
phone must have this Apps).
Set AEM ON, while GPS Navigation trafc broadcasting, the radio sound of current mode will be
decreased, if the Navigation stop broadcasting over 5 sec, the radio sound will be
back to play.
AEM ON:
Long press SEL key, then short press SEL to select AEM ON/OFF, rotate Volume knob to set ON,
AEM function activated.
AEM OFF:
Repeat above steps, just in the last step, set OFF to deactivate AEM function.
‘ Connect iPhone to Aux in with provided cable (option to be sold separately).
** When AEM ON, any audio source from iPhone can be broadcasted to Headunit.
Below two brackets are provided for your choice:
430 1SP R 430 3SP R
5. IPH (iPhone Handfree)
Answering Phone Calls:
Under any mode, connect iPhone to AUX in, when call’s coming , press PLAY key or Mobile
Phone’s answer key to answer it.
Press again to hang up, During answer call,The sound of current mode will be decreased
lf the Call nish over 5 sec, the sound will be back to play.
- IPC, AEM, IPH functions support iPhone, some smartphone models of Motorola, HTC, T-Mobile,
BlackBerry, LG and Sumsung (which comply with iPhone’s socket 4H / 3.5mm). e.g. Motorola
XT615, LG920, Sumsung Galaxy Note....etc.
** Support compatibility subject to change without further notice & not guarantee.
Below two brackets are provided for your choice:
EN
430 1SP R 4303 SPR
24

Bedienungsanleitung
INHALT
Instalation 26
Anschlussdiagramm 28
Frontplatte 29
AllgemeineFunktionen 30
Radio Funktionen 33
CD/SD/MMC/USB Funktionen 35
RDS Funktionen 38
ÜberblickMP3/WMA 39
Fernbedienung 40
TechnischeDaten 42
Allgemeine Hinweise For Der CD Inbetriebnehme 43
Störungsbehebung 44
CD/DVD Neue funktionen und bedienungshinweise 45
DE
25
Bedienungsanleitung
INSTALLATION
VORSICHTSMASSNAHMEN
Der Ort der Montage sollte so gewählt werden, dass das Gerät den Fahrer nicht stört.
Vor dem endgültigen Einbau, vorübergehend Gerät mit Spannung versorgen und sicherstellen,
dass es richtig angeschlossen ist und dass sowohl das Gerät als auch das System in normalen
Parameter funktionieren.
Verwenden Sie nur die mitgelieferten Teile zur korrekten Installation. Die Verwendung anderer
Bauteile kann zu Störungen oder Geräteschäden führen.
Fragen Sie Ihren nächstgelegenen Autohändler, wenn die Installation Bohrungen oder sonstige
Änderungen des Autos erfordert.
Installieren Sie das Gerät so, dass es nicht den Fahrer stört und die Passagiere nicht verletzt im
Falle eines plötzlichen Bremsmanövers, wie eine Not-Bremsung.
Installieren das Gerät nicht an Orten, wo es hohen Temperaturen, wie Sonnenlicht, warme Luft,
heiße Luft von der Heizung oder an Orten mit Staub, Schmutz oder starken Vibrationen ausgesetzt ist.
Schützen Sie das Gerät vor Feuchtigkeit.
FRONTMONTAGE (Methode A) Geräteeinbau
Zum Einbau beobachten Sie
Abb.1 oder Abb.2
1. Armaturenbrett
2. Halter
Nach dem Einlegen des Halters
in das Armaturenbrett, wählen
Sie die Spangen abhängig von
der dicke des Armaturenbrettes
und biegen Sie diese um das
Gerät zu befestigen. (Abb.1)
DE
3. Schraube
26

Fig.2
Bedienungsanleitung
Fig.3
1. Tablou de bord
2. Piulita (5mm)
3. Saiba de siguranta
4. Surub (5 x 25mm)
5. Surub
6. Banda
Folositi banda pentru a xa partea
din spate a aparatului. Banda poate
indoita pana in unghiul dorit.
7. Saiba fara let.
1. Cadru
2. Introduceti degetele in canelura din fata
cadrului si trageti pentru a scoate cadrul.
(Pentru a xa cadrul inca o data, formati
alte oricii si atasati aparatul).
3. Cheita
Introduceti cheita cu care este dotat
aparatul in canelura din ambele parti ale
aparatului, pana cand auziti un pocnet.
Aceasta va face posibila inlaturarea
aparatului din tabloul de bord.
MONTARE PRIN SPATE (Metoda B)
Instalarea se face folosind gaurile suruburilor de
pe extremitatile aparatului .
Fixarea aparatului in lacasul original
Suport de montare:
1. Alegeti o pozitie in care gaurile de surub ale
suportului si cele ale unitatii centrale sa e pe
aceeasi linie si strangeti suruburile in doua locuri
pe ecare parte. Folositi e suruburi de ancorare
(5x5mm) e suruburi cu cap ingropat (4x5mm).
2. Surub
3. Tablou de bord sau Consola.
INTRODUCEREA
CARDULUI SD
Unghiul oblic al cardului SD
mentine expunerea descendenta:
introduceti-I in spatiul SD si apasati
inca o data pentru a-l scoate.
DE
27
Bedienungsanleitung
WEITERE INFORMATIONEN
ANSCHLUSSDIAGRAMM
RE D YE LL OW
BL UE
WH IT E
WH IT E/ BL AC K
GR EE N
GR EE N/ BL AC K
15A
BL AC K
GR EY
GR EY /B LA CK
VI OL ET
VI OL ET /B LA CK
A) ANTENNE
B) LINIENAUSGANG HINTEN RECHTS
C) LINIENAUSGANG HINTEN LINKS
D) LINIENAUSGANG VORNE RECHTS
E) LINIENAUSGANG HINTEN LINKS
F) SUBWOOFER
IGNITION SWITCH (B+); RED – ZÜNDSCHLÜSSEL (B+); rotes Kabel
AUTO ANTENNA, BLUE – ANTENNENANSCHLUSS, blaues Kabel
FRONT Lch SPEAKER „+”, WHITE –LAUTSPRECHER VORNE LINKS „+”, weißes Kabel
FRONT Lch SPEAKER „-“, WHITE/BLACK –LAUTSPRECHER VORNE LINKS „-“ schwarz/weiß Kabel
DE
REAR Lch SPEAKER „+”, GREEN – LAUTSPRECHER HINTEN LINKS „+”, grünes Kabel
REAR Lch SPEAKER „-”, GREEN/BLACK – LAUTSPRECHER HINTEN LINKS „-”, grün/schwarz Kabel
MEMORY BACKUP, YELLOW – STROMVERSORGUNG SPEICHER, gelbes Kabel (an + Anschließen)
GROUND, BLACK – MASSEANSCHLUSS, schwarzes Kabel
FRONT Rch SPEAKER „+”, GREY –LAUTSPRECHER VORNE RECHTS „+”, graues Kabel
FRONT Rch SPEAKER „-“, GREY/BLACK – LAUTSPRECHER VORNE RECHTS „-”, grau/schwarz
Kabel
REAR Rch SPEAKER „+”, VIOLET – LAUTSPRECHER HINTEN LINKS „+”, violettes Kabel
REAR Rch SPEAKER „- “, VIOLET/BLACK – LAUTSPRECHER HINTEN LINKS „-“, violett/ schwarz
Kabel
28

Bedienungsanleitung
ALLGEMEINE FUNKTIONEN
FRONTPLATTE
4
2 3
10
27
1. Taste Ein/Aus Schalter
12
5
11
13
8 9
1
22
2. Taste Lösen der Frontplatte
3. Lautstärkeregler / Auswahltaste
4. Taste Ton Aus
5. Taste Auswählen
6. Taste Display
7. LCD Display
8. Blinkende LED
9. Taste Reset
10. Taste Wellenbereich /ID3
11. Taste Frequenz suchen / Schneller Vorlauf
12. Taste Frequenz suchen / Schneller Rücklauf
13. Taste Automatische Speicherung
14. Taste Start / Pause und Stationstaste 1
24 23
2520
21
629
1514
7
16
191817
16. Wiederholung und Stationstaste 3
17. Zufallsgesteuerte Reihenfolge und Stationstaste 4
18. -10/Stationstaste 5
19. +10/Stationstaste 6
20. Taste Alternative Frequenzen
21. Taste Programmtyp
22. Taste Verkehrsdurchsagen
23.Taste Auswerfen
24. CD Fach
25. Sensor für Fernbedienung
26. USB Steckplatz
27. Steckplatz für SD/MMC Karte
28. AUX Eingang
29. Taste SCAN
26
28
EINSETZEN DER FRONTPLATTE
Frontplatte in das Gehäuse einsetzen und stellen Sie sicher dass die Frontplatte korrekt eingesetzt ist, andernfalls treten Abweichungen auf dem Display auf, oder einige Tasten werden nicht
richtig funktionieren.
1
2
3
DE
29

Bedienungsanleitung
ALLGEMEINE FUNKTIONEN
EIN / AUS-SCHALTEN/TON AUS
Drücken Sie den Ein/Aus Schalter (1) um das Gerät einzuschalten. Nochmaliges drücken und
gedrückt halten schaltet das Gerät aus.
ABNEHMEN DER FRONTPLATTE
Drücken Sie die Taste Entriegeln der Frontplatte (2) zum entfernen der Frontplatte.
REGLAREA SUNETULUI
Accesand aceasta setare (3) puteti regla calitatea volumului dorita.
Apasati butonul SEL (3) pentru a schimba setarile in urmatoarea ordine:
LAUTSTÄRKE
Durch drehen der Taste (3) kann die gewünschte Lautstärke geregelt werden. Drehen der
Taste VOL nach rechts erhöht die Lautstärke; drehen der Taste VOL nach links verringert die
Lautstärke;
Hinweis: Werkseitig ist das Gerät auf Lautstärkeregelung eingestellt.
BASS
Drücken Sie die Auswahltaste (3) SEL einmal. Regeln Sie den Bass durch drehen der Taste
(3) VOL/SEL.
TREBLE
Drücken Sie die Auswahltaste (3) SEL zweimal. Regeln Sie die hohen Töne durch drehen der
Taste (2) VOL/SEL.
BALANCE
Drücken Sie die Auswahltaste (3) SEL dreimal. Regeln Sie die Balance zwischen rechten und
linken Lautsprecher durch drehen der Taste (3) VOL/SEL.
FADER (optional)
Drücken Sie die Auswahltaste (3) SEL viermal. Regeln Sie die Balance zwischen vordere und
hintere Lautsprecher durch drehen der Taste (3) VOL/SEL.
TON ABSCHALTEN
DE
Wählen Sie „MUTE ON“ (4) der Ton wird abgeschaltet; Wählen Sie „MUTE OFF“ der Ton wird
wieder eingeschaltet.
30

Bedienungsanleitung
ANDERE EINSTELLUNGEN
Halten Sie die Auswahltaste (3) für zwei Sekunden gedrückt; folgende Optionen werden
zyklisch wie folgt aktiviert:
LOU D
TIM E DISPL AY DSP O FF ON
DX/ LOCALARE AEUR/ USA
Drücken und halten der Taste aktiviert folgende Funktionen:
OPTION DSP (EIN/AUS)
Drücken und halten der Taste aktiviert automatisch den DSP-Modus (Equalizer Funktion). Sie
können wählen zwischen Pop, Rock, Klassik, Flat (niedriger in der Tonhöhe), oder DSP aus
durch drehen des Lautstärkereglers. Kurzes drücken der Auswahltaste aktiviert die Funktion.
OPTION ESP (CD – MODUS)
Im DSP-Modus durch einmaliges drücken wird ESP (Elektronischer Schockprotektor) aktiviert:
Durch drehen des Lautstärkereglers können Sie zwischen 12 Sekunden oder 45 Sekunden
ESP wählen. Kurzes drücken der Auswahltaste aktiviert die Funktion.
OPTION BEEP
Im DSP-Modus durch zweimaliges drücken wird BEEP ON/OFF aktiviert Durch drehen des
Lautstärkereglers können Sie zwischen BEEP ON (EIN - es ertönt ein Piepton beim drücken
der Tasten) oder OFF (AUS) wählen. Kurzes drücken der Auswahltaste aktiviert die Funktion.
OPTION SUCHEN (SEEK 1/2)
SUCHEN 1 (SEEK 1): Wenn die Option SUCHEN 1 aktiviert ist, wird die AUTOMATISCHE
SENDERSUCHE unterbrochen wenn ein Radiosender gefunden wird, auch wenn der Benutzer weiter die Taste SUCHEN drückt.
SUCHEN 2 (SEEK 2): Die Sendersuche wird nicht unterbrochen wenn ein Sender gefunden
wird, auch wenn der Benutzer weiter die Taste SUCHEN drückt. Die Option wird bei Freilassung der Taste SUCHEN beendet sobald ein Sender erkannt wird.
OFF /ON
STE REP/M ONO
DEM O OFF/O N
SEE K ½VOL LAST /AD J
AEM O FF/ON
BEE P
ON/ OFF
OPTION LETZTE LAUTSTÄRKE/ REGELUNG (VOL LAST/ADJ)
Mit dieser Funktion können Sie die Lautstärke des Geräts beim einschalten einstellen. Wählen
Sie VOL LAST, wenn Sie die Lautstärke vor dem ausschalten des Gerätes beibehalten wollen.
Durch die Option VOL ADJUST können Sie die gewünschte Lautstärke einstellen.
DE
31

Bedienungsanleitung
TASTE FUNKTION
Durch drücken der Taste (5) können Sie verschiedene Funktionen auswählen:
- Frequenz (Radio)
- CD (MP3 CD)
- Für diese Funktion muss sich eine CD im Gerät benden.
- SPEICHERKARTE
- Für diese Funktion muss sich eine Speicherkarte im Gerät benden.
- USB
- Für diese Funktion muss ein USB - Speichermedium angeschlossen sein.
- AUX Komponente.
EINSTELLEN DER UHRZEIT:
Drücken Sie die Auswahltaste bis die aktuelle Uhrzeit angezeigt wird. Nun kann die Stundenanzeige durch drehen des Lautstärkeregler VOL+ Eingestellt werden. und die Minutenanzeige kann durch drehen des Lautstärkeregler VOL- Eingestellt werden. Nochmaliges drücken
der Auswahltaste VOL/SEL und die Uhr ist eingestellt.
LCD - DISPLAY-ANZEIGE
In diesem Bereich werden Informationen zum Wellenbereich, zur Frequenz und zu anderen
Einstellungen angezeigt. (7).
BLINKENDE LED
Wenn die Frontplatte nicht richtig einrastet blinkt die LED.
DE
32

Bedienungsanleitung
RADIO FUNKTIONEN
WELLENBEREICH AUSWÄHLEN
Im Radiomodus, durch wiederholtes drücken der Taste Wellenbereich () BAND, wird der Wellenbereich in folgender Reihenfolge ausgewählt:
RADIOSENDER AUSWÄHLEN
Im Radiomodus drücken Sie kurz die Tasten (11) Frequenz erhöhen (SEEK ) oder (12) Frequenz
verringern (SEEK ) zur automatischen Suche eines Radiosenders.
Drücken Sie die Tasten (11) Frequenz erhöhen (SEEK ) oder (12) Frequenz verringern (SEEK )
länger als 1 Sekunde zur manuellen Einstellung des Senders.
AUTOMATISCHE SPEICHERUNG UND SENDERSUCHE
-Automatische Speicherung
Drücken Sie die Taste AMS (13) für einige Sekunden, das Radio sucht von der aktuellen Frequenz
an und überprüft die Signalstärke bis ein Zyklus beendet ist. Nun sind die 6 stärksten Radiosender gespeichert in den zugehörigen Stationsspeicher.
- Programmsuche
Drücken Sie kurz die Taste AMS (13), um die gespeicherten Sender für kurze Zeit (5 Sekunden)
anzuhören. Im Display wird ÏNT angezeigt. Um den gewünschten Sender anzuhören können Sie
die zugehörige Stationstaste oder die Taste AMS drücken.
SPEICHERN DER RADIOSENDER
Drücken Sie eine Stationstaste (14 ~ 19) im Radiomodus M1-M6
- Radiosender wird aus dem Speicher aufgerufen beim drücken der Taste unter 1 Sekunde
- Radiosender wird gespeichert beim drücken der Taste länger als 1 Sekundea.
DE
33

Bedienungsanleitung
STEREO/MONO
Wenn FM Sender schwach und unterbrochen empfangen werden, kann dieses durch umschalten
auf Mono-Wiedergabe verbessert werden.
LOCAL / DX
In Gegenden mit starkem Signal, durch Auswahl der Option „LOCAL“ werden nur lokale Sender
mit starkem Signal empfangen. In Gegenden mit schwachem Signal, durch Auswahl der Option
„DX“ werden alle Sender empfangen.
LOUDNESS EIN/AUS
Im Modus „LOUD ON“ werden die Bässe und Höhen angehoben.
SCAN
Drücken Sie die Taste SCAN (29) um Radiosender zu suchen. Wenn der Signalpegel größer ist
als der Grenzwert, wird der Sender für 5 Sekunden übertragen und die Frequenzanzeige blinkt
zugleich im LCD-Display. Halten Sie die Taste SCAN für länger als 3 Sekunden gedruckt zur
Auswahl des gewünschten Senders. Das Radio beginnt die Wiedergabe des Senders.
ZONE AUSWÄHLEN
Im Radiomodus drücken Sie die Auswahltaste (3) SEL einige Sekunden. Im LCD Display erscheint BEEP ON >>AREA USA/EUR. Durch drehen der Taste (3) VOL/SEL wird die Option USA oder
EUROPA ausgewählt.
DE
34

Bedienungsanleitung
CD/SD/MMC/USB FUNKTIONEN
DISKS FÜR WIEDERGABE
Dieses Gerät kann folgende Disks abspielen: CD/CD -R/-RW
Kompatibel mit folgenden Formaten: CDDA/MP3/WMA.
CD EINLEGEN UND AUSWERFEN
1. Gerät einschalten
2. CD mit der bedruckten Seite nach oben in das Fach einlegen
3. Drücken Sie die Taste (23) um die CD anzuhalten und auszuwerfen.
MULTIMEDIAKARTE MMC/SD KARTENSTECKPLATZ
Unterstützt nur MP3/WMAID3 Musikformate. Achtsam die Frontplatte entfernen und SD/MMC
Karte in den Steckplatz im inneren des Gerätes einfügen. Die Wiedergabe beginnt automatisch.
USB ANSCHLUSS
Achtsam USB Speicher an das Adapterkabel anschließen und in den USB-Steckplatz an der
Frontplatte einfügen. Die Wiedergabe beginnt automatisch.
HINWEISE USB/SD/MMC
USB Funktionen, (Flash memory); MP3 – Wiedergabe
1. Kartensteckplatz SD/MMC
2. FAT 12/FAT 16/FAT 32
FAT 12/FAT 16 (Ordner Maximum: 200, Dateien Maximum: 500)
FAT 32 (Ordner Maximum: 200, Dateien Maximum: 500)
3. Dateinamen 32 Byte; Ordnername 32 Byte
4. Tag (ID3 Tag Ver. 2.0)
Titel/Interpret/Album: 32 Byte.
5. Ein Gerät für mehrere Karten wird nicht unterstützt.
6. Kompatibel USB 2.0.
HINWEIS:
USB Format unterstützt Ver. 2.0
Kapazität bis 32 GB
SD Kartenhersteller: Canon, Fuji, Palm, Motorola, Microsoft, IBM, HP, Compaq, Sharp, Samsung,
usw.
Kapazität bis 32 GB
MMC Kartenhersteller: Ericsson, Nokia, Motorola, HP, Palm, Sanyo, Microsystem, usw.
Kapazität bis 32 GB
Hinweis: Durch die breite Palette von Produkten mit MMC-und SD-Karten-Geräte und ihrer
Hersteller-spezische Funktionen, kann nicht garantiert werden, dass die Speicherkarten erkannt,
oder mögliche Funktion in der Theorie auch in der Realität funktioniere
DE
35

Bedienungsanleitung
CD/SD/MMC/USB FUNKTIONEN
Id3 TAG INFORMATION
Dieses Gerät unterstützt ID3 tag Ver2.0. Wenn eine MP3-Datei über ID3-Tag-Informationen verfügt, werden diese auf dem LCD Display angezeigt werden. Wenn es keine ID3-Tag-Informationen gibt, wird nichts auf dem LCD Display angezeigt werden. Die ID3-Tag-Informationen können
Datei-, Ordner, Musik, Album oder Interpret Daten sein.
NÄCHSTE/VORHERIGE
Drücken Sie die tasten NÄCHSTE/VORHERIGE zur Auswahl der vorherigen oder nächsten Titel.
Drücken der Tasten länger als 1 Sekunde zur Auswahl von Wiedergabe vorwärts oder rückwärts.
WIEDERGABE/PAUSE
Drücken der Taste PAUSE startet oder stoppt die Wiedergabe.
INTRO
Beim drücken der Taste INTRO, erscheint im Display „INT ON“ und die Wiedergabe startet mit
den ersten 10 Sekunden von jeder Titel bis zur letzten. Es wird die gesamte CD abgespielt von
INTRO Angefangen. Nochmaliges drücken der Taste beendet die Funktion, normale Wiedergabe
der Titel.
WIEDERHOLUNG
Beim drücken der Taste WIEDERHOLUNG, erscheint im Display „RPT ON“ und die gerade
gespielte Titel wird solange wiederholt, bis die Funktion durch nochmaliges drücken der Taste
beendet wird.
ZUFÄLLIGE REIHENFOLGE
Beim drücken der Taste ZUFÄLLIGE REIHENFOLGE, erscheint im Display „RDM ON“ und die
Titeln werden in zufälliger Reihenfolge abgespielt. Nochmaliges drücken der Taste beendet die
Funktion.
SUCHMODUS FÜR MP3/WMA DATEIEN
1. Zeitsuche:
– Drücken Sie die Taste AUTOMATISCHE SPEICHERUNG (AMS) einmal, die Zeitsuche ist
aktiviert.
– Drehen Sie den Lautstärkeregler nach rechts oder links zur Auswahl der Zeit
– Drücken Sie die Auswahltaste und die ausgewählte Zeit der Titel wird abgespielt.
2. Titelsuche
– Drücken Sie die Taste AUTOMATISCHE SPEICHERUNG (AMS) zweimal, die Titelsuche ist
aktiv.
– Drehen Sie den Lautstärkeregler nach rechts oder links zur Auswahl der Titel
DE
– Drücken Sie die Auswahltaste und der ausgewählte Titel wird abgespielt.
36

Bedienungsanleitung
SUCHMODUS
3. Dateisuche
– Drücken Sie die Taste AUTOMATISCHE SPEICHERUNG (AMS) dreimal, die Dateisuche ist
aktiv.
– Drücken Sie die Auswahltaste und der erste Ordner wird angezeigt.
– Drehen Sie den Lautstärkeregler nach rechts oder links zur Auswahl des Ordners.
– Drücken Sie die Auswahltaste und der erste Titel im ausgewählten Ordner wird angezeigt.
– Drehen Sie den Lautstärkeregler nach rechts oder links zur Auswahl der Titel.
– Drücken Sie die Auswahltaste und der ausgewählte Titel wird abgespielt.
4. Zeichensuche
– Drücken Sie die Taste AUTOMATISCHE SPEICHERUNG (AMS) viermal, die Zeichensuche ist
aktiv.
– Drücken Sie die Auswahltaste und das Zeichen „*“ wird angezeigt.
– Drehen Sie den Lautstärkeregler nach rechts oder links zur Auswahl des Buchstaben.
– Drücken Sie die Auswahltaste länger als 2 Sekunden.
– Die Titeln mit dem ausgewählten Anfangsbuchstaben werden angezeigt
– Drehen Sie den Lautstärkeregler nach rechts oder links zur Auswahl der Titel
– Drücken Sie die Auswahltaste und der ausgewählte Titel wird abgespielt.
DE
37

Bedienungsanleitung
RDS FUNKTIONEN (RADIO INFORMATIONEN SYSTEM)
AF – ALTERNATIVE FREQUENZEN
Drücken Sie die Taste (20) [AF] um den RDS – Modus Ein- oder Auszuschalten. Wenn der RDS –
Modus Eingeschaltet ist, erscheint die Anzeige „AF“ am Display.
Die Anzeige „AF“ Erscheint sobald AF Eingeschaltet wird. Die Suche nach einer alternativen
Frequenz startet sobald das Radiosignal zu schwach wird.
Bei FM Empfang, wenn AF Eingeschaltet ist, die Funktionen Suchen, Speichern, Auto, können
nur RDS - Programme empfangen und speichern. Trotzdem, wenn die Option ITALIA aktiviert ist,
können alle Programme die den Grenzwert überschreiten Empfangen und Gespeichert werden
INDIKATOR KONDITIONEN
AF ON Option AF EIN, Empfang von RDS Informationen
AF OFF Option AF AUS
AF Blink Option AF EIN, kein Empfang von RDS Informationen
REGION
AF –Beim drücken der Taste AF länger als eine Sekunde wird in Modus REGION EIN/AUS umgeschaltet
EIN (ON) – PI- Kode (Programm–Identikations-Kode) wird überprüft wenn AF Kontrolle im Gange
ist
AUS (OFF) – PI – Kode und Flächendeckung werden nicht überprüft wenn AF Kontrolle im Gange
ist
PROGRAMMTYP (PTY)
RADIO MODUS
Vorheriger PTY wird angezeigt beim drücken der Taste (21) PTY. Wenn keine andere Taste in den
nächsten 2 Sekunden gedrückt wird, vorheriger PTY wird gesucht. Im 1 Suchzyklus, wenn der
gesuchte Programmtyp nicht gefunden wird, erscheint die Anzeige „NO PTY“.
Zwei Programmtypen stehen zur Verfügung: SPRACHE (SPEECH) UND MUSIK (MUSIC).
Einmaliges drücken von PTY: Option Musik; Nochmaliges drücken: Option Sprache.
Die Stationstasten M1-M6 werden zur Auswahl des Programmtyps verwendet:
VERKEHRSINFORMATIONEN (TA)
Die Taste (22) TA hat folgende Funktionen:
TA EIN Am Display wird TA Angezeigt.
Wenn Verkehrsinformationen gesendet werden, wird die aktuelle Tonquelle unterbrochen.
Wenn die Lautstärke unter 20 ist, wird die Lautstärke auf 20 gestellt und nach den Verkehrsinformationen wieder zurückgestellt
Wenn die Lautstärke während einer Verkehrsinformation geregelt wird, ist nur die vorherige Lautstärke gültig.
Wenn TA Eingeschaltet ist, die Funktionen Suchen, Automatische Speicherung können empfangen oder gespeichert werden nur wenn der Identikationskode des Verkehrsinformationen
DE
Programms erhalten wird
Wenn TA Eingeschaltet ist, der Identikationskode des Verkehrsinformationen Programms wird
nicht in einer bestimmten Zeit Empfangen
ALARM TA: NO TA/TP wird Angezeigt und der Alarm ist Ausgeschaltet
SUCHEN TA (TA SEEK): die TA Suche ist aktiviert.
38

Bedienungsanleitung
MP3/WMA ÜBERSICHT
1. MP3 ist die Abkürzung von MPEG-1 Audio Layer 3 und bezieht sich auf ein Verfahren zur verlustbehafteten Kompression digital gespeicherter Audiodaten.
2. Dieses Gerät ermöglicht die Wiedergabe der MP3 Dateien von CD-ROM, CD-R oder CD-RW
3. Das Gerät kann MP3 Dateien lesen die nach der Norm ISO 9660 geschrieben sind.
Komprimierte MP3 Dateien werden nicht unterstützt.
4. Das Gerät kann keine Dateien lesen die eine andere Endung als MP3 haben
5. Beim Versuch eine Datei mit der Endung MP3 abzuspielen, die aber keine solche ist bekommt
man nur Rauschen zu hören
6. In dieser Bedienungsanleitung beziehen wir uns auf die sogenannten „MP3-Datei” und „Ordner”
in der PC-Terminologie als „Titel” und „Album.
7. Es sind maximal acht Verzeichnisebenen zulässig, inklusive der Hauptebene. Die maximale
Anzahl von Ordnern und Dateien pro CD ist 256.
8. Die Wiedergabe erfolgt nicht nach den Dateinummern. Wenn die CD sowohl Audio als auch
MP3 Dateien enthalt, werden nur Audiodateien abgespielt.
9. Bei der Widergabe einer VBR-Datei (Variable Bitrate) von 8 Kbps wird die Spieldauer im Display nicht richtig angezeigt und die Option Intro kann Fehlerhaft funktionieren.
10. Das Gerät unterstützt die Wiedergabe von WMA – Dateien. Die Wiedergabe von ID3 Tag ist
Abhängig von der Version und Disponibilität des kyrillischen Alphabetes.
11. WMA (Windows Media Audio) – Format zur Komprimierung von digitalen Audioinhalten mit
verlustbehafteter Kompression und ist ein Audio-Codex von Microsoft. Die Audiodatei wird komprimiert, beinhaltet aber eine gute Tonqualität auch bei niedrigen Transferraten (z.B. 64 Kbit/s)
12. Das Gerät spielt die Titel nicht in der Reihenfolge ab wie sie sich auf der CD benden
Anmerkungen zum brennen von MP3 Dateien auf CD-R oder CD-RW
1. Für eine gute Klangqualität wird empfohlen die MP3 Dateien mit einer Frequenz von 44,1 KHz
und einer Transferrate von 128 Kbps zu konvertieren.
2. Speichern Sie nicht mehr als 256 Dateien auf einer CD.
3. Gemäß ISO 9660 sind maximal acht Verzeichnisebenen zulässig.
4. Eine nicht abgeschlossene CD-R wird nicht erkannt.
5. Das brennen von MP3, CD-R oder CD-RW muss als Datenformat und nicht als Audioformat
geschehen.
6. Die CD sollte keine anderen Dateien außer MP3 enthalten, da dieses die Wiedergabe verzögert.
7. Niedrigere Qualität der Rohlinge kann die Wiedergabe beinträchtigen. Es wird empfohlen hochwertige CD-R oder RW Rohlinge zu verwenden.
8. Im Display werden bis zu 16 Buchstaben der Titel oder Alben angezeigt. Version 1x von ID3Tag
ist notwendig.
9. Das Gerät spielt die Titel nicht in der Reihenfolge ab wie sie sich auf der CD benden.
DE
39

FERNBEDIENUNG
Bedienungsanleitung
DE
40
1. Taste Ein/Aus
2. Taste Pause/Start/Stationstaste 1
3. Taste Intro/ Stationstaste 2
4. Taste Wiederholung/Stationstaste 3
5. Taste Zufällige Reihenfolge/
Stationstaste 4
6. Taste Stationstaste 5
7. Taste Stationstaste 6
8. Taste Ton aus
9. Taste Lautstärke
10. Taste Quelle auswählen
11. Taste Stereo/Mono
12. Taste Loudness
13. Taste Suchen
14. Taste Display
15. Taste APS/AMS
16. Taste LOKAL/DX
17. Taste Wellenbereich wählen
18. Taste Einstellen/Melodie Auswählen/
Schneller Vorlauf/Rücklauf
19. Tasten zum Auswählen.

Bedienungsanleitung
BATTERIE AUSTAUSCHEN
Wenn die Reichweite der Fernbedienung nachläst, oder nicht mehr Funktioniert, muss die Batterie
Ausgetauscht werden. Verwenden Sie für die neue Batterie den Typus CR2025. Beim Einlegen
der Batterie achten Sie auf die korrekte Polarität.
1. Ziehen Sie das Batteriefach hinaus bei gedrückter Sicherung.
2. Legen Sie die Batterie mit dem (+) Zeichen nach oben in den Halter.
3. Schieben Sie das Batteriefach in die Fernbedienung.
DE
41

TECHNISCHE DATEN
ALLGEMEINE TECHNISCHE DATEN
BETRIEBSSPANNUNG:
AUSGANGSIMPEDANZ:
MAXIMALE AUSGANGSLEISTUNG:
ABMESSUNGEN:
LEISTUNGSAUFNAHME:
TONKONTROLLE
BASS (bei 100 Hz):
HÖHEN (bei 100 KHz):
USB/SD MUSIKWIEDERGABE
SIGNAL- RAUSCHABSTAND:
STATIONEN TRENNUNG:
FREQUENZGANG:
RADIO FM
EMPFANGSBEREICH (MHz):
ZWISCHENFREQUENZ (IF):
SENSIBILITÄT (S/N-30 dB):
KANALTRENNUNG:
Bedienungsanleitung
DC 14,4V, negativer Masseanschluss
4 ohms
40W X 4(CH)
178x163x50mm(WxDxH)
15A
+10dB/-10dB
+10dB/-10dB
größer als 60dB
größer als 60dB
20Hz-20KHz
87 5 -108MHz
10.7MHz
12dBu
>30dB
RADIO AM
EMPFANGSBEREICH (KHz):
ZWISCHENFREQUENZ (IF):
SENSIBILITÄT (S/N-20 dB):
HINWEIS: TECHNISCHE DATEN KÖNNEN OHNE VORANKÜNDIGUNG GEÄNDERT WERDEN
522 -1620KHz
450KHz
42dBu
DE
42

Bedienungsanleitung
ALLGEMEINE HINWEISE FOR DER CD INBETRIEBNAHME
CD-Reinigung
Vor der Wiedergabe einer CD, wischen Sie die CD-s zum Reinigen mit einem weichen Tuch von
der Mitte zum Rand hin ab. Reinigen Si die CD mit sauberem Material, frei von Staub. Reinigen
Sie die CD in Richtung des Pfeils.
Legen Sie die CD ein mit der Beschriftung nach oben. Wenn die CD mit der bedruckten Seite
nach unten eingelegt ist, kann das Gerät beschädigt werden.
HINWEIS: Wenn sich bereits eine CD im Gerät bendet, versuchen Sie nicht eine andere einzulegen. Auch das kann das Gerät beschädigen.
Halten Sie die CD am Rand. Damit die Oberäche der CD sauber bleibt sollte man die Oberäche
nicht berühren. Entnehmen Sie die CD richtig.
Kleben Sie kein Band, Etiketten oder andere Klebstoffe auf die CD.
Vermeiden Sie direktes Sonnenlicht oder Kontakt mit anderen Wärmequellen.
Die CD-s sollten nicht im Auto Aufbewahrt werden wenn es in der Sonne steht, da dieses zu einer
Erwärmung des Autos führt und die CD-s können dadurch beschädigt werden.
HINWEIS:
Vermeiden Sie die Verwendung von Lösungsmitteln wie Petroleum oder andere Verdünnungsmittel. Auch handelüblicher Antistatikspray kann das Gerät beschädigen
DE
43

Bedienungsanleitung
STÖRUNGSBEHEBUNG
Vor dem Studium der Tabelle, überprüfen Sie die Anschlusskabel. Sollte Ihr Problem nicht behoben werden, nachdem Sie die Tabelle überprüft haben, wenden Sie sich bitte an Ihren nächstgele-
genen Service.
Symptome Ursache Abhilfemaßnahme
Brak zasilania Kein Kontakt Wenn die Stromzufuhr in
Die Sicherung ist durchgebrannt
Die Cd Läst Sich Nicht Einlegen Oder Herausnehmen
Kein Ton Lautstärke ist Minimum Lautstärke regeln
Ton Unterbrechungen Der Montagewinkel ist größer
Es bendet sich bereits eine
CD im Gerät
Die CD ist nicht richtig Eingelegt
CD ist beschmutzt oder defekt CD reinigen oder andere CD
Die Innentemperatur des
Autos ist zu hoch
Kondensation Lassen Sie das Gerät Ausge-
Die Kabel sind nicht richtig
Angeschlossen
als 30o
Ordnung ist, dann Kontakt
auf ACC
Sicherung Austauschen
CD herausnehmen und eine
andere einlegen
CD richtig einlegen, mit der
bedruckten Seite nach obe
einlegen
Lüften bis sich die Temperatur
wieder normalisiert
schaltet für eine Stunde oder
länger
Überprüfen Sie die Kabelverbindungen
Verkleinern Sie den Montagewinkel unter 30o
DE
44
Die Tasten Funktionieren
Nicht
Radio Oder Automatische
Sendersuche Funktionieren
Nicht
Der Mikroprozessor funktioniert nicht richtig
Das Antennenkabel ist nicht
richtig Angeschlossen
Das Signal ist zu Schwach Der Radiosender wird manuell
Drücken Sie RESET oder
überprüfen Sie den Sitz der
Frontplatte
Überprüfen Sie den Anschluss
der Antenne
Eingestellt

Bedienungsanleitung
CD/DVD NEUE FUNKTIONEN UND BEDIENUNGSHINWEISE
1. DOS (DYNAMISCHER OFFENER BILDSCHIRM)
Dynamischer Offener Bildschirm (Bewegungs-Effekt), beim eingeschalten des Gerätes. Drücken
Sie eine beliebige Taste, um diese zu beenden und zum aktuellen Modus zurückzukehren.
DEMO EIN:
Lange drücken der Auswahltaste (Auswahl-Modus), dann drücken Sie kurz die Auswahltaste zum
Auswählen von Demo EIN/AUS, drehen Sie den Lautstärkeregler und wählen Demo EIN, danach
drücken Sie die Auswahltaste, zum bestätigen. Das Dynamische Offene Bildschirm Display benutzt diesen Modus um wiederholt Vorführungen zu zeigen. Keine Tasten funktionieren, außer der
Auswahltaste.
DEMO AUS:
Drücken Sie die Auswahltaste, drehen Lautstärkeregler und wählen Demo AUS, danach drücken
Sie die Auswahltaste, zum bestätigen, Rückkehr zum ursprünglichen Status.
2. RGB (EINSTELLBARE RGB FARBBELEUCHTUNG)
Die Beleuchtungsfarbe ändert sich ständig, wenn das Gerät eingeschaltet ist.
Feste Farbeinstellung:
Langes Drücken der Taste DISPLAY, drehen Lautstärkeregler auf Auto AUS, kurzes drücken von
DISPLAY, um bestimmte Farben von blau, grün, rot, orange, lila und weiß auszuwählen.
Einstellen der Farbauswahl:
Langes Drücken der Taste DISPLAY, drehen Lautstärkeregler auf Auto AUS, kurzes drücken von
DISPLAY, zum einstellen der Farbauswahl:
z.B. ROT - drehen Lautstärkeregler zur Auswahl 00 ~ 32, drücken Sie DISPLAY, um die Einstellung zu bestätigen.
GRÜN - drehen Lautstärkeregler zur Auswahl 00 ~ 32, drücken Sie DISPLAY, um die Einstellung
zu bestätigen.
BLAU - drehen Lautstärkeregler zur Auswahl 00 ~ 32, drücken Sie DISPLAY, um die Einstellung
zu bestätigen.
3. IPC (iPHONE MUSIKSTEUERUNG)
Mit dieser Funktion kann die Musik vom iPhone am Hauptgerät abgespielt werden, und kann
durch dieses folgende Funktionen des iPhone steuern: WIEDERGABE/PAUSE, VORHERIGE,
NÄCHSTE.
Drücken Sie die Taste MODUS, um Aux Modus zu wählen. Verbinden Sie das iPhone mit Aux
Eingang durch das mitgelieferte Kabel (Option wird separat verkauft).
Nachfolgend werden zwei Bügel Ihrer Wahl zur Verfügung gestellt:
4301SP R 4303SP R
DE
45

Bedienungsanleitung
4. AEM (AUXILIARE ERWEITERTER SPRACHSTEUERUNGSMODUS)
GPS Verkehr Rundfunk:
Unter einem beliebigen Modus, verbinden das iPhone mit dem Aux-Eingang, aktivieren Sie GPS
Navigations-Funktion auf dem Handy (Das Telefon muss diese Apps haben).
Wăhlen Sie AEM EIN, während GPS Navigation Verkehrs-Rundfunk, die Lautstärke des aktuellen
Radiosenders wird verringert werden, wenn die Navigation Ausstrahlung über 5 Sekunden Stoppt,
das die Lautstärke des aktuellen Radiosenders wieder normal zu hören sein.
AEM EIN:
Langes drücken der Auswahltaste, danach kurzes drücken der Auswahltaste zur Auswahl AEM
EIN/AUS, drehen Lautstärkeregler auf AEM EIN, danach drücken Sie die Auswahltaste, zum
bestätigen, AEM-Funktion wird aktiviert.
AEM AUS:
Wiederholen Sie die obigen Schritte, nur im letzten Schritt, wählen Sie AUS, um AEM-Funktion zu
deaktivieren.
* Verbinden Sie das iPhone mit Aux Eingang durch das mitgelieferte Kabel (Option wird separat
verkauft).
** Wenn AEM EIN, kann jede Audioquelle vom iPhone am Hauptgerät abgespielt werden.
Nachfolgend werden zwei Bügel Ihrer Wahl zur Verfügung gestellt:
430 1SP R 430 3SP R
5. IPH (iPHONE FREISPRECHANLAGE)
Anrufe entgegennehmen:
Unter einem beliebigen Modus, verbinden das iPhone mit Aux-Eingang, wenn ein Anruf kommt,
drücken Sie Taste WIEDERGABE oder Mobiltelefon Antwort Taste, um den Anruf anzunehmen.
Drücken Sie erneut, um aufzulegen. Während des Anrufs, wird der Ton des aktuellen Modus
verringert werden.
Wenn der Anruf über 5 Sekunden beendet ist, wird der Ton wieder auf normale Lautstärke hergestellt.
** Um eine bessere Anrufqualität zu bekommen, drücken Sie „MU” lange für „TELEFON” Modus,
wenn Sie das Telefon zu beantworten haben. Wenn der Anruf beendet ist, erneut „MU” lange
drücken zur Rückkehr zum vorherigen Modus.
AEM Standardeinstellung ist AEM EIN.
● IPC, AEM, IPH Funktionen unterstützen iPhone, einige Smartphone-Modelle von Motorola,
HTC, T-Mobile, Blackberry, LG und Samsung (kompatibel mit dem iPhone Socket 4H / 3,5 mm
entsprechen). z.B. Motorola XT615, LG920, Samsung Galaxy Note .... usw.
** Kompatibilitäts-Unterstützungen können ohne weitere Ankündigung geändert & nicht garantie-
ren werden.
DE
Nachfolgend werden zwei Bügel Ihrer Wahl zur Verfügung gestellt:
430 1SP R 4303 SPR
46

Instrukcja obsługi
SPIS TREŚCI
Instalacja radia 48
Schematpodłączenia 50
Panelprzedni 51
Podstawoweoperacje 52
Radio 55
CD / SD / MMC / USB 57
RDS 60
MP3 / WMA 61
Pilotzdalnegosterowania 62
Specykacjatechniczna 64
CzyszczeniepłytyCD 65
Rozwiązywanieproblemów 66
Nowe Funkcje 67
PL
47

Instrukcja obsługi
INSTALACJA
Uwagi
Zainstaluj radio w taki sposób aby nie utrudniało prowadzenia pojazdu.
Przed ostatecznym zainstalowaniem radia w kieszeni podłącz wszystkie przewody i włącz radio
aby sprawdzić czy cały system nagłośnienia działa poprawnie.
Do poprawnej instalacji radia użyj dołączonych do niego akcesoriów, zastosowanie nieautoryzowanych komponentów może skutkować niepoprawnym działaniem radia.
Skonsultuj się Z autoryzowanym serwisem twojego samochodu jeżeli instalacja radia wymaga
dokonania modykacji w samochodzie np. wywiercenia otworów itp.
Zainstaluj radio w sposób solidny i bezpieczny, aby nie wyrządziło nikomu krzywdy w przypadku
np. awaryjnego hamowania.
Nie instaluj radia w miejscach gdzie będzie narażone na nadmierne nagrzewanie np. narażone na
bezpośrednie działanie promieni słonecznych, przy nawiewach ciepłego powietrza, w miejscach
gdzie nadmiernie zbiera się kurz, brud itp.
INSTALACJA (Metoda A)
Instalacja urządzenia
1. Deska rozdzielcza samochodu
2. Kieszeń
Po zainstalowaniu kieszeni we
wnęce, zabezpiecz ją przed
wypadaniem przez odgięcie
zaczepów.
3. Śruba
PL
48

Rys.2
Instrukcja obsługi
Rys.3
1. Deska rozdzielcza
2. Nakrętka (5mm)
3. Podkładka
4. Śruba
5. Śruba
6. Uchwyt
Do przymocowania tylnej części radia
użyj uchwytu (6).
Uchwyt ten można łatwo wygiąć ręką.
7. Podkładka
MONTAŻ RADIA W FABRYCZNEJ KIESZENI (Metoda B)
Montaż radia w fabrycznej kieszeni
1,Wstaw radio aby otwory na śruby w
radiu pokrywały się z otworami w
kieszeni.
Przymocuj radio za pomocą śrub po
dwie po każdej stronie
Użyj śrub: 5x5mm lub 4x5mm.
2. Śruby
3. Kokpit
INSTALACJA KARTY SD
Wsuń kartę do gniazda etykietką
do góry, aby wyjąc kartę z radia
ponownie ją naciśnij
1. Ramka
2. Złap palcami za brzeg ramki Jak na
rysunku powyżej) i ją wyciągnij. Przy
ponownym montażu zwróć uwagę aby
nie zamontować jej odwrotnie.
3. Radio
Wsuń specjalne klucze (są w komplecie)
w szczeliny po obu stronach radia, aż
usłyszysz kliknięcie. Następnie pociągnij
całość do siebie aby wyjąć radio.
PL
49

Instrukcja obsługi
DIAGRAM PODŁĄCZANIA PRZEWODÓW
TYLNY
PRAWY GOŚNIK
ANTENA
PODTRZYMANIE
PAMIĘCI
GND
ZASILANIE
PRZEDNI
PRAWY GOŚNIK
PRZEDNI
LEWY GOŚNIK
TYLNY
LEWYY GOŚNIK
15A
GŁOŚNIK LEWY PRZÓD -
GŁOŚNIK LEWY TYLNY +
GŁOŚNIK LEWY TYLNY -
CZERWONYZASILANIE (B+)
NIEBIESKIZASILANIE ANTENY
BIAŁYGŁOŚNIK LEWY PRZÓD +
BIAŁO-CZARNY
ZIELONY
ZIELONY
-CZAARNY
SZARO-CZARNY
ŻÓŁTY
CZARNY
SZARY
FIOLETOWY
FIOLETOWY
- CZARNY
PODTRZYMANIE PAMIĘCI
UZIEMIENIE (B-)
GŁOŚNIK PRAWY PRZÓD +
GŁOŚNIK PRAWY PRZÓD -
GŁOŚNIK PRAWY TYLNY +
GŁOŚNIK PRAWY TYLNY -
ZAKŁADANIE PANELU
Aby założyć panel wsuń go prawidłowo w zatrzaski tak jak na rysunku. W przypadku nie poprawnego zamontowania panelu może nieprawidłowo działać wyświetlacz lub przyciski na panelu.
PL
50
1
2
3

Instrukcja obsługi
PANEL PRZEDNI - OBJAŚNIENIE PRZYCISKÓW
12
13
5
4
11
8 9
1
22
2 3
10
27
1. Przycisk power
2. Przycisk opuszczania panelu
3. Regulacja poziomu dźwięku / menu
4. Przycisk mute
5. Wybór trybu pracy
6. Przycisk ustawień podświetlania
7. Wyświetlacz LCD
8. Dioda LED
9. Przycisk reset
10. Zmiana częstotliwości / lD3 select
11. Strojenie & wybór ścieżki
12. Strojenie & wybór ścieżki
13. AMS
14. Play/Pauza & Przycisk numeryczny 1
2520
21
629
24 23
1514
7
16
191817
15. Intro & Przycisk numeryczny 2
16. Repeat & Przycisk numeryczny 3
17. Random & Przycisk numeryczny 4
18. Przycisk numeryczny 5
19. Przycisk numeryczny 6
20. AF
21. PTY
22. TS
23. Przycisk wysuwania płyty CD
24. Kieszeń płyt CD
25. Czujnik pilota zdalnego sterowania
26. Port USB
27. Gniazdo SD/MMC
28. AUX IN
29. SCN
26
28
PL
51

Instrukcja obsługi
PODSTAWOWE OPERACJE
ON / OFF
Wciśnij przycisk POWER (1) aby włączyć radio. Naciśnij i przytrzymaj przycisk dłużej niż 1s by
wyłączyć radio.
OPUSZCZANIE PANELU
Naciśnij przycisk REL (2) by opuścić panel.
USTAWIENIA DŹWIĘKU
Naciśnij przycisk SEL (3) aby przejść do ustawień według schematu.
GŁOŚNOŚĆ
Za pomocą gałki VOL/ SEL (3) dostosujesz poziom dźwięku. Przekręć gałkę w lewo by
zmniejszyć poziom dźwięku, a w prawo by zwiększyć poziom dźwięku. Aby wybrać funkcję
naciśnij krótko przycisk. Na ekranie pokażą się wybrane funkcje. By dostosować ich ustawienia przekręć gałką w prawo lub lewo.
NISKIE TONY (BASS)
Naciśnij przycisk VOL/SEL (3) jeden raz, aby przejść do trybu ustawień bassu. Następnie
obróć pokrętło VOL (3) zgodnie lub przeciwnie do ruchu wskazówek zegara aby
dostosować poziom basu.
WYSOKIE TONY (TREBLE)
Naciśnij przycisk VOL/SEL (3) dwa razy, aby przejść do trybu ustawień treble. Następnie
obróć pokrętło VOL (3) zgodnie lub przeciwnie do ruchu wskazówek zegara aby
dostosować poziom wysokich tonów.
BALANS PRAWO / LEWO
Naciśnij przycisk VOL/SEL (3) trzy razy, aby przejść do trybu ustawień balance. Następnie
obróć pokrętło VOL (3) zgodnie lub przeciwnie do ruchu wskazówek zegara aby ustawić
balans prawo-lewo.
BALANS TYŁ / PRZÓD (FADER)
Naciśnij przycisk VOL/SEL (3) cztery razy, aby przejść do trybu ustawień fader. Następnie
obróć pokrętło VOL (3) zgodnie lub przeciwnie do ruchu wskazówek zegara aby ustawić
balans tyl-przód.
Wyciszanie
By natychmiast wyciszyć radio naciśnij przycisk MUTE (4). Naciśnięcie przycisku ponownie
PL
spowoduje powrót do poprzedniego poziomu dźwięku.
52

Instrukcja obsługi
USTAWIENIA DODATKOWE
Naciśnij i przytrzymaj przycisk VOL/SEL (3) przez kilka sekund, aktywowany zostanie cykliczny tryb wyświetlający następujące funkcje:
LOU D
TIM E DISPL AY DSP O FF ON
DX/ LOCALARE AEUR/ USA
Naciśnięcie i przytrzymanie przycisk SEL a następnie obróć w prawo lub w lewo aby przejść
do żądanego trybu:
Tryb DSP ON/OFF:
Obróć gałkę VOL aby wybrać opcję ęqualizeraz POP M, ROCK M, CLASS M, FLAT M.
DSP OFF.
Tryb ESP (Elektroniczny system przeciwwstrząsowy) 12/45.
Obroć gaikę SEL aby wybrać odpowiednią wartość trybu ESP.
Tryb BEEP ON/OFF:
BEEP ON: Sygnai BEEP bedzie słyszany w głośnikach po naciśnięciu przycisku.
VOL LAST/ADJUST
Funkcja umożliwia ustawienie poziomu dźwięku po wyłączeniu i ponownym włączeniu radia .
VOL LAST - poziom dźwięku jest taki sam jak przed wyłączeniem
VOL ADJUST - ręczne ustawienie poziomu dźwięku.
OFF /ON
STE REP/M ONO
DEM O OFF/O N
SEE K ½VOL LAST /AD J
AEM O FF/ON
BEE P
ON/ OFF
SEEK MODE
SEEK 1: Gdy tryb SEEK 1 jest aktywny, funkcja automatycznego wyszukiwania kanałów
zatrzyma się na pierwszym wyszukanym kanale nawet , gdy użytkownik nadal będzie trzymał
przycisk SEEK.
SEEK 2: Gdy tryb SEEK 2 jest aktywny, funkcja automatycznego wyszukiwania kanałów nie
zatrzyma się na wyszukanym kanale (gdy użytkownik nadal będzie trzymał przycisk SEEK) Po
puszczeniu przycisku SEEK funkcja wyszukiwania zatrzyma się na pierwszym wyszukanym
kanale.
PL
53

Instrukcja obsługi
WYBÓR TRYBU ODTWARZANIA
Naciśnij przycisk (5) aby wybrać tryb odtwarzania:
- Tuner
- USB
Aby przejść do tego trybu, pamięć USB musi być podłączona
- SD/MMC
Aby przejść do tego trybu, karta pamięci musi być podłączona do urządzenia
-AUX
USTAWIENIA CZASU
Naciśnij i przytrzymaj przycisk SEL do czasu aż na ekranie nie wyświetli się obecny czas.
Następnie by zmienić godzinę przekręć gałkę regulacji głośności w prawo vol “+” lub by zmienić ustawienia minut przekręć gałkę regulacji głośności w lewo vol ”-”. A następnie zatwierdzi
ustawienia przyciskając ponownie przycisk SEL.
WYŚWIETLACZ LCD
Wyświetlacz LCD (7) pełni funkcję informacyjną, wyświetla obecny status radia.
DIODA LED
Po zdjęciu panelu przedniego i wyłaczonym zasilaniu dioda led zacznie migać.
PL
54

Instrukcja obsługi
RADIO OPERATIONS
WYBÓR PASMA
W trybie radia naciśnij przycisk BAND (10) aby wybrać żądane pasmo fal radiowych. Pasmo
fal będzie zmieniane w następującej kolejności:
WYBÓR STACJI
W trybie radia naciśnij przycisk (11) „SEEK <<” lub (12) „SEEK >>”, aby automatycznie wyszukać
stacje radiowe.
W trybie radia naciśnij i przytrzymaj przycisk „SEEK <<” lub „SEEK >>” aby ręcznie wyszukać
stacje radiowe.
AUTOMATYCZNE PROGRAMOWANIE STACJI, SKANOWANIE STACJI
-Automatyczne programowanie stacji
Naciśnij i przytrzymaj przycisk AMS (Mp3) (13) przez kilka sekund. Urządzenie przeszuka
aktualny zakres częstotliwości. Po przeszukaniu całego zakresu 6 stacji z najsilniejszym
sygnałem zostanie zapisanych.
- Strojenie stacji
Naciśnij krótko przycisk AMS (13) aby przeskanować zaprogramowane stacje. Na
wyświetlaczu pojawi się napis „INT” Urządzenie przeskanuje zapamiętane stacje przez 5
sekund.
ZAPAMIĘTYWANIE STACJI
Naciśnij jeden z przycisków numerycznych (14~19)
1) TRYB RADIA.
M1 ~ M6
- Aby wybrać wcześniej zaprogramowaną stację wciśnij szybko (<1s) przycisk 1-6
- Aby zapisać aktualną częstotliwość do pamięci wciśnij i przytrzymaj przycisk 1-6.
2) Tryb CD/MP3/FLASH MP3
PLAY/ PAUZA
Wciśnij przycisk (14) aby rozpaczać odtwarzanie / wyłączyć pauze. Podczas pauzy wskaźnik
dysku na wyświetlaczu miga .
TOP - Wciśnij i przytrzymaj przycisk aby zacząć odtwarzanie od pierwszego utworu.
INT
Funkcja Intro Wciśnij przycisk (15) radio będzie odtwarzać po 10s każdego utworu. Po odtworzeniu wszystkich zacznie normalnie odtwarzać utwory zaczynające się od miejsca w którym funkcja
została wyłączona.
PL
55

Instrukcja obsługi
MO/ST
Naciśnij przycisk SEL i przejdź do ustawień STEREO (MONO)
Kiedy stacja FM ma słaby sygnał i jest zakłócana. Wybierając tryb MONO można poprawić jej
sygnał i wyeliminować szumy.
LOC/DX
Naciśnij przycisk SEL i wybierz ustawienia LOC(21) Pokręć gałką zmiany regulacji głośności i
ustaw tryb LOC aby odbierać tylko stacje lokalne. Na ekranie pojawi się napis “LOC”Wybierz DX
aby odbierać wszystkie stacje.
LOUDNESS ON/OFF
Naciśnij przycisk SEL i wybierz ustawienia LOUD. By aktywować funkcję przekręć gałką regulacji
głośności. Na ekranie pojawi się napis “LOUD“ gdy opcja zostanie aktywowana.
SKANOWANIE STACJI
Naciśnij przycisk (29) aby rozpocząć skanowanie stacji. Gdy sygnał stacji jest wystarczająco silny,
radio zacznie odtwarzać stację przez 5s a na ekranie zacznie mrugać częstotliwość stacji.
WYBÓR OBSZARU USA / EUR
W trybie radia naciśnij przycisk SEL przez kilka sekund. Na wyświetlaczu ukażą się opcje
DSP OFF/ON AREA USA/EUR. Opcja AREA USA/EUR umożliwia wybór częstotliwości obszaru
poprzez VOL +/-.
PL
56

Instrukcja obsługi
CD/SD/MMC/USB
CD:
Radio obsługuje płyty: CD/CD -R/-RW.
Zgodne z formatami: CDDA/MP3/WMA.
Wkładanie / wyjmowanie płyty CD
1. Włącz radio.
2. Włóż dysk CD zadrukowaną stroną do góry.
3. Naciśnij przycisk EJECT (23) aby wyjąć płytę.
MMC/SD
Radio obsługuje formaty plików MP3/WMA ID3 opuść przedni panel. Ostrożnie włóż kartę SD/
MMC do gniazda kart znajdującego się na wewnętrznym panelu. Podnieś panel przedni, radio
zacznie automatycznie odtwarzać zawartość karty SD/MMC.
USB
Ostrożnie podłącz urządzenie USB do gniazda USB znajdującego się na przednim panelu urządzenia.
USB/SD/MMC notes:
1. Obsługa kart SD/MMC.
2. FAT 12/ FAT 16/ FAT 32
- FAT 12/16 (maksymalna liczba katalogów: 200, plików: 500).
- FAT 32 (maksymalna liczba katalogów: 200, plików: 500).
3. Standard nazwy plików, katalogów: 32 bajty.
4.Tag (id3tag ver2.0)
- Tytuł/Artysta/Album: 32 bajty.
5. Brak wsparcia dla uniwersalnego czytnika pamięci.
6. Obsługa USB 2.0.
Uwaga:
USB standard 2.0.
Pojemność do 32 GB.
SD/MMC
Pojemność do: 32 GB.
Uwaga: Ze względu na duża różnorodność kart CD/MMC i ich niekiedy bardzo specyczne
funkcje, producent nie może zagwarantować, że wszystkie urządzenia będą rozpoznawalne, ani
że wszystkie operacje, które są możliwe w teorii, faktycznie będą działały
PL
57

Instrukcja obsługi
CD/SD/MMC/USB
|d3 Tag
Radio obsługuje ID3 tag ver2.0. Jeśli jakiś plik MP3/WMAle posiada informacje ID3 Tag. Zostaną
one wyświetlone na wyświetlaczu LCD Informacje ID3 Tag mogę zawierać pliki, foldery, albumy,
lub dane artysty.
NASTĘPNY / POPRZEDNI UTWÓR
Aby przejść do następnego bądź poprzedniego utworu naciśnij przycisk NEXT/PREVIOUS. Przytrzymanie przycisku dłużej niż 1 sekundę spowoduje przewinięcie do przodu bądź do tyłu obecnie
odtwarzanego utworu.
PLAY/PAUZA
Aby zatrzymać odtwarzanie naciśnij przycisk PAUSE, aby wznowić odtwarzanie naciśnij ponownie
przycisk PAUSE
INTRO (Podgląd wszystkich utworów)
Gdy przycisk INT jest włączony na ekranie wyświetla się napis INT ON, kilka pierwszych sekund
każdego utworu z płyty jest odtwarzanych Naciśnięcie ponownie przycisku spowoduje powrót
radia do normalnego trybu odtwarzania utworów.
POWTARZANIE
Po naciśnięciu przycisku RPT na wyświetlaczu ukaże się napis RPT ON, odtwarzanie wybranego
utworu będzie stale powtarzane aż do momentu gdy funkcja RPT nie zostanie wyłączona poprzez
ponowne naciśnięcie przycisku RPT.
ODTWARZANIE LOSOWE
Po naciśnięciu przycisku RDM na wyświetlaczu ukaże się napis RDM ON, a każdy utwór z
nośnika jest odtwarzany w kolejności losowej. Aby wyłączyć tryb odtwarzania losowego należy
ponownie nacisnąć przycisk RDM.
Wyszukiwanie plików MP3/WMA:
1. Przejście do określonego czasu utworu:
- Naciśnij przycisk AMS jednokrotnie
- Obróć gałkę VOL w prawo lub lewo aby wybrać żądany czas utworu.
- Naciśnij przycisk VOL aby uruchomić odtwarzanie.
2. Wyszukiwanie utworów:
- Naciśnij przycisk AMS dwukrotnie
- Obróć gałkę VOL w prawo lub lewo aby wybrać żądany utwór .
- Naciśnij przycisk VOL aby uruchomić odtwarzanie.
PL
58

Instrukcja obsługi
CD/SD/MMC/USB
3. Wyszukiwanie plików w katalogach:
- Naciśnij przycisk AMS trzykrotnie.
- Naciśnij przycisk VOL, wyświetlony zostanie pierwszy folder.
- Obróć gałkę VOL w prawo lub lewo aby wybrać żądany folder.
- Ponownie naciśnij przycisk VOL aby wyświetlić pliki z wybranego folderu.
- Obróć gałkę VOL w prawo lub lewo aby wybrać żądany plik.
- Naciśnij przycisk VOL aby uruchomić odtwarzanie.
4. Wyszukiwanie utworów po nazwie:
- Naciśnij przycisk AMS czterokrotnie.
- Naciśnij przycisk VOL na ekranie ukaże się znak *.
- Obróć gałkę VOL w lewo lub w prawo aby wybrać pierwszą literę szukanego utworu.
- Naciśnij i przytrzymaj przycisk VOL przez ponad 2 sekundy.
- Wyświetlone zostaną utwory zaczynające się na podana literę .
- Obróć gałkę VOL w prawo lub lewo aby wybrać żądany utwór.
- Naciśnij przycisk VOL aby uruchomić odtwarzanie.
PL
59

Instrukcja obsługi
RDS (RADIO DATA SYSTEM)
AF: częstotliwość alternatywna
Aby włączyć /wyłączyć funkcję AF wciśnij przycisk AF (20). Funkcja aktywuje się gdy
odbierana stacja ma słaby sygnał. Gdy funkcja AF jest włączona funkcje SEEK, SCAN,
AUTO, MEMORY wyszukują tylko stacje z RDS-em.
Ikona Opis
AF ON AF ON MODE sygnał RDS jest odbierany
AF OFF AF OFF MODE
AF miga AF ON MODE sygnał RDS nie jest odbierany
PTY - typy programów
- użyj przycisku PTY (21) aby wybrać określony typ programu.
Po wciśnięciu przycisku PTY, ostatni typ programu zostanie wyświetlony. Jeżeli w
przeciągu 2s nie będzie wciśnięty przycisk z żądanym PTY, zostanie odszukany ostatnio
zapamiętany PTY. Radio zacznie wyszukiwać określonych informacji. Jeżeli określone
audycje nie zostaną znalezione, funkcja PTY automatycznie się wyłączy.
W pamięci są zapisane dwa typy programów SPEECH i MUSIC.
Wciśnij raz PTY aby wybrac’ MUSIC wciśnij dwa razy PTY aby wybrać SPEECH.
Przyciski M1-M6 znajdujące się na pilocie mogą być użyte do wyboru żądanego typu
programu:
TA - komunikaty drogowe
TP/TA (Trafc Programme/TrafcAnnoucement) TP przycisk (22) informuje nas, że stacja
przygotowuje i nadaje serwisy dla kierowców, a sygnał TA jest nadawany w czasie takiego
programu (następuje wtedy dodatkowo zmiana PTY na “Trafc”). Jeśli chcemy, gdy
ostatnio odbierana stacja nada sygnał TA, odbiornik na czas programu zatrzyma
odtwarzanie płyty, by po zakończeniu programu kontynuować poprzednio wykonywaną
czynność.
Podczas nadawania komunikatów drogowych. niezależnie od trybu. komunikaty są
odbierane. Jeżeli poziom dźwięku jest poniżej 20, jest automatycznie zwiększany do 20, a
po zakończeniu transmisji jest automatycznie przywracany do poprzedniego poziomu.
Jeżeli poziom dźwięku przestroi się na czas nadawania komunikatu, w tym momencie
tylko poprzednie ustawienie poziomu dźwięku jest dostępne.
Gdy funkcja TA jest włączona, funkcje SEEK, SCAN, AUTO MEMORY są dostępne.
PL
60

Instrukcja obsługi
MP3 / WMA
- MP3 jest skrótem od MPEG Audio Layer 3 i odnosi się do standardowej technologii
kompresji dźwięku.
- Produkt ten pozwala na odtwarzanie plików MP3 z plyt CD-ROM, CD-R. CD-RW.
- Urządzenie odczytuje pliki MP3 zapisane w formacie ISO 9660. Jednakże nie obsługuje danych
zapisanych metodą packet write.
- Urządzenie nie może odczytać plików MP3 których rozszerzenie jest inne niż „.mp3”
- Jeżeli odtwarzasz pliki inne niż MP3 lecz mające rozszerzenie „.mp3” możesz słyszeć
zakłócenia, trzaski etc.
- Maksymalna liczba poziomów łącznie z katalogiem głównym wynosi 8. Maksymalna liczba
plików i folderów na dysku wynosi 256.
- Urządzenie może nie odtworzyć utworów w kolejności z jaką zostały one nagrane na płytę
- Jeżeli płyta audio zawiera także pliki mp3 urządzenie odtworzy tylko ścieżki audio.
- Podczas odtwarzania dysku nagranego z transmisja 8 kbps lub „VBR” czas
odtwarzania utworu nie będzie wyświetlany poprawnie, jak również funkcja intro może
nie działać prawidłowo.
„VBR” Variable Bit Rate - zmienna szybkość transmisji bitów.
- Urządzenie obsługuje format plików WMA. Jednakże wyświetlanie tagów ID3 dla formatu WMA
nie jest gwarantowane, zależy to od wersji i alfabetu.
- WMA (Windows Media Audio) - format kompresji dźwięku, stworzony przez Microsoft Corpora-
tion.
Uwagi na temat tworzenia własnych płyt CD-R lub CD-RW zawierających pliki mp3:
- Aby cieszyć się wysokiej jakości dźwiękiem, zalecamy konwersje do plików MP3 o stalej szybkość transmisji bitów 128kbps i częstotliwości próbkowania 44.1 kHz.
- Nie zapisuj na dysk więcej niż 256 plików.
- Dla ISO 9660 maksymalna liczba poziomów łącznie z katalogiem głównym wynosi 8.
- Gdy używany jest dysk CD-R, odtwarzanie jest możliwe tylko dla dysków, które zostały
zamknięte.
- Upewnij się że gdy wypalasz plik MP3 na płytach CD-R lub CD-RW, nagrywasz je jako
dysk z danymi a nie jako dysk audio.
- Nie powinno się zapisywać innych plików bądź niepotrzebnych folderów razem Z plikami MP3, w
przeciwnym razie czas startu odtwarzania utworów może się wydłużyć.
- Dla niektórych płyt CD-R/RW w zależności od jakości produktu dane mogą być niepoprawnie
nagrane.
- Zaleca się stosowanie wysokiej jakości płyt CD-R, CD-RW.
- Wyświetlane jest do 16 znaków dla nazwy albumu lub ścieżki, wymagany ID3 tag 1.x
- Urządzenie może nie odtworzyć utworów w kolejności z jaką zostały one nagrane na płytę.
PL
61

Instrukcja obsługi
PILOT ZDALNEGO STEROWANIA
PL
62
1. Włącznik
2. Pauza / Play / Przycisk numeryczny1
3. Intro / Przycisk numeryczny2
4. Powtarzanie / Przycisk numeryczny3
5. Random / Przycisk numeryczny4
6. Przycisk numeryczny5
7. Przycisk numeryczny6
8. Wyciszenie
9. Regulacja poziomu dźwięku
10. Przełącznik trybu pracy
11. AF (RDS)
12. TA (RDS)
13. Scan
14. APS / AMS
15. PTY (RDS)
16. Zmiana pasma
17. Strojenie
18. Wybór ścieżki / F F / F R
19. Ustawienia dźwięku

Instrukcja obsługi
WYMIANA BATERII
Gdy skróci się zasięg działania pilota lub pilot przestanie funkcjonować, należy wymienić baterię
w pilocie na nową (typu CR2025) podczas wymiany należy zwrócić uwagę na polaryzację baterii.
1. Zdejmij pokrywę baterii pilota
2. Włóż nową baterie zgodnie z oznaczona polaryzacją
3. Załóż pokrywkę baterii
PL
63

SPECYFIKACJA
Ogólna
Power Supply Requirements:
Load Impedance
Maximum Output Power:
Chassis Dimensions:
Current Drain:
Kontrola tonów
Bass (at 100Hz):
Treble (at 10K):
USB/SD
Signal to Noise Ratio:
Channel Separation:
Frequency Response:
Radio FM
Frequency Coverage (MHz):
IF:
Sensitivity (S/N-30dB):
Stereo Separation:
Instrukcja obsługi
DC 14,4V, Uziemienie na minusie
4 ohms
40W X 4(CH)
178x163x50mm(WxDxH)
15A
+10dB/-10dB
+10dB/-10dB
> 60dB
> 60dB
20Hz-20KHz
87 5 -108MHz
10.7MHz
12dBu
>30dB
Radio AM
Frequency Coverage (KHz):
IF:
Sensitivity (S/N-20dB):
Uwaga:
specykacja urządzenia może ulec zmianie bez wcześniejszego powiadamiania.
522 -1620KHz
450KHz
42dBu
PL
64

Instrukcja obsługi
Czyszczenie płyty CD
Przed włożeniem płyty do odtwarzacza, przetrzyj ją czystą miękką, bezpyłową ściereczką.
Zawsze wkładaj płytę etykietką do góry, jeżeli płyta jest włożona etykietką do dołu, może uszkodzić urządzenie.
Uwaga: jeśli w gnieździe płyt znajduje się już płyta CD, nie próbuj wkładać drugiej, ponieważ
może to uszkodzić urządzenie.
Zawsze chwytaj płytę za brzegi. Aby utrzymać płytę w czystości nie dotykaj nie zadrukowanej
strony. patrz rysunek poniżej:
Nie przyklejaj żadnych nalepek lub karteczek na płytę.
Nie zostawiaj płyty bezpośrednio na słońcu lub przy źródle ciepła.
Nie zostawiaj płyty w samochodzie zaparkowanym bezpośrednio na słońcu,samochód w takich
warunkach bardzo się nagrzewa.
Uwaga: do czyszczenia płyty nie używaj środków chemicznych, Dostępne w sprzedaży środki w
aerozolu mogą zniszczyć urządzenie.
PL
65

Instrukcja obsługi
ROZWIĄZYWANIE PROBLEMÓW
W przypadku wystąpienia jakichkolwiek problemów z urządzeniem, na początku sprawdź poprawność podłączenia przewodów. Jeżeli kłopoty z urządzeniem nie znikną po prześledzeniu poniższej
listy skontaktuj się z serwisem.
Symptom Przyczyna Rozwiązanie
Brak zasilania Wyłączona stacyjka Przekręć kluczyk w stacyjce
Spalony bezpiecznik Wymień bezpiecznik
Nie można włożyć lub wyjąć
płyty
Brak dźwięku Dźwięk jest wyciszony Zwiększ poziom dźwięku
Dźwięk przerywa Radio zainstalowane pod
Przyciski nie działają Niepoprawna instalacja
Radio lub automatyczne
wyszukiwanie nie działa
Jedna płyta już jest w odtwarzaczu
Płyta wkładana odwrotnie Wkładaj płyty nadrukiem do
Płyta jest zabrudzona lub
uszkodzona
Temperatura w samochodzie
jest za wysoka
Kondensacja Wyłącz odtwarzanie na ok
Kable podłączone niewłaści-
wie
kątem powyżej 30 stopni
Płyta jest mocno zabrudzona
lub uszkodzona
panela
Antena jest niepoprawnie
podłączona
Sygnał jest za słaby Ustaw stacje ręcznie
Wyjmij płytę z odtwarzacza
góry
Wyczyść płytę lub włóż nową
Przewietrz samochód aby
temperatura spadła do normalnego poziomu
godzinę i spróbuj ponownie
Sprawdź podłączenie przewodów
Zainstaluj poprawnie radio
Wyczyść płytę lub włóż nową
Wciśnij przycisk RESET załóż
poprawnie panel
Poprawnie podłącz antenę
PL
66

Instrukcja obsługi
Nowe funkcje CD/DVD
1. DOS (Dynamic Open Screen - wygaszacz ekranu)
Wygaszacz ekranu uruchamia się gdy jednostka centralna jest włączona. Po naciśnieciu jakiegokolwiek przycisku radio powraca do wybranego trybu.
DEMO ON:
Naciśnij i przytrzymaj przycisk SEL i wybierz z menu Demo On, pokręć gałką regulacji głośności
i ustaw Demo ON. Następnie zatwierdź ustawienia przyciskiem SEL. Wygaszacz ekranu od tej
chwili będzie aktywny
DEMO OFF:
Naciśnij i przytrzymaj przycisk SEL i wybierz z menu Demo OFF, zatwierdź ustawienia przyciskiem SEL.
2. RGB (Ustawienia podświetlania)
Za pomocą tych ustawień można zmienić kolor podświetlania przycisków.
Domyślne ustawienia kolorów:
Naciśnij i przytrzymaj przycisk DISP (6) następnie pokręć gałką regulacji głośności i wybierz Auto
OFF, naciśnij ponownie przycisk DISP i wybierz jeden z domyślnych kolorów: niebieski, zielony,
czerwony, pomarańczowy, purpurowy, lub biały.
Personalizacja ustawień kolorów:
Naciśnij i przytrzymaj przycisk DISP (6) następnie pokręć gałką regulacji głośności i wybierz Auto
OFF, naciśnij ponownie przycisk DISP i wybierz customize setting:
RED - obróć gałką regulacji głośności w lewo lub w prawo i wybierz wartość koloru czerwonego z
przedziału 00~32 następnie naciśnij przycisk DISP by zaakceptować.
GREEN - obróć gałką regulacji głośności w lewo lub w prawo i wybierz wartość koloru zielonego z
przedziału 00~32 następnie naciśnij przycisk DISP by zaakceptować.
BLUE - obróć gałką regulacji głośności w lewo lub w prawo i wybierz wartość koloru niebieskiego
z przedziału 00~32 następnie naciśnij przycisk DISP by zaakceptować.
3. IPC (iPhone - kontrola muzyki)
Przy użyciu tej funkcji muzyka z iPhona może być odtwarzana i kontrolowana przez urządzenie:
Play / Pauza / następny utwór / poprzedni utwór.
Naciśnij przycisk Press Mode (5) i wybierz tryb AUX i podłącz iPhone przez dostarczony kabel.
Dwa rodzaje uchwytów do wyboru:
4301SP R 4303SP R
PL
67

Instrukcja obsługi
4. AEM (Aux Extend voice control Mode)
Komunikaty GPS:
Dostępne w każdym trybie, podłącz iPhona do gniazda AUX-in, aktywuj funkcję GPS w telefonie
(Telefon musi mieć zainstalowaną tą aplikację).
Ustaw AEM ON w urządzeniu , by podczas komunikatów GPS nadawanych z iPhona, radio na
ten czas ściszało głośność i podawało komunikaty GPS. Po 5 sekundach od chwili zakończenia
nadawania komunikatów, głośność radia wróci do poprzedniego poziomu.
AEM ON:
Naciśnij i przytrzymaj przycisk SEL i wybierz z menu AEM ON/OFF, gałką zmiany głośności
ustaw opcję na ON.
AEM OFF:
Naciśnij i przytrzymaj przycisk SEL i wybierz z menu AEM ON/OFF gałką zmiany głośności ustaw
opcję na OFF.
‘ Podłącz iPhone do gniazda AUX dostarczonym kablem.
** Gdy funkcja AEM jest włączona, Każde źródło dźwięku z iPhona zostanie przetransmitowane do radia.
Dwa rodzaje uchwytów do wyboru:
430 1SP R 430 3SP R
5. IPH (iPhone Handfree)
Answering Phone Calls:
Dostępne w każdym trybie, podłącz iPhona do gniazda AUX-in. Gdy nadejdzie połączenie,
odbierz je na iPhone lub naciśnij przycisk PLAY na radiu. Naciśnij go ponownie by się rozłączyć.
Podczas rozmowy telefonicznej dźwięk obecnego trybu radia zostanie wyciszony. Po 5 sekundach
od zakończenia połączenia dźwięk zostanie wznowiony.
- Funkcje IPC, AEM, IPH są dostępne iPhone, niektórych modelach Motorola, HTC, T-Mobile,
BlackBerry, LG i Sumsung (zgodnych z gniazdem iPhone 4h / 3,5 mm). na przykład Motorola
XT615, LG920, Sumsung Galaxy Note....itd.
** Producent nie gwarantuje kompatybilności z różnymi wersjami wymienionych modeli
Specykacja może ulec zmianie bez wcześniejszego powiadamiania.
i nie jest gwarantowany.
Dwa rodzaje uchwytów do wyboru:
PL
430 1SP R 4303 SPR
68

Manual de utilizare
CUPRINS
Instalare 70
Schemadeconectare 72
Panoul frontal 73
Functii generale 74
Functii radio 77
CD / SD / MMC / USB 79
SystemRDS 82
MP3 / WMA 83
Telecomanda 84
Specycatii 86
De retinut inainte de operare 87
Depanare 88
Noile caracteristici CD / DVD 89
RO
69

Manual de utilizare
PRECAUTIONS
Locul de instalare trebuie ales astfel incat aparatul sa nu deranjeze conducatorul auto .
Inainte de instalarea nala, conectati temporar aparatul si asigurati-va ca este conectat in mod
adecvat si ca atat el cat si sistemul functioneaza in parametri normali.
Folositi numai componentele din dotare pentru a va asigura ca instalarea este corecta. Utilizarea
altor componente poate provoca defectarea aparatului.
Consultati cel mai apropiat dealer auto daca instalarea aparatului necesita gaurire sau alte modicari ale autoturismului (gaurire, cablare, etc.)
Instalati aparatul astfel incat acesta sa nu deranjeze soferul si sa nu raneasca pasagerii in cazul
unei opriri bruste.
MONTARE PRIN FATA (Metoda A)
Installing the unit
1. Tabloul de bord
2. Suportul
Dupa inserarea suportului in
tabloul de bord, selectati ag-
atatorile in functie de grosimea
materialului tabloului de bord si
indoiti-le pentru a xa suportul la
locul lui. (g.1)
3. Surub
RO
70

Fig.2
Manual de utilizare
Fig.3
1. Tablou de bord
2. Piulita (5mm)
3. Saiba de siguranta
4. Surub (5 x 25mm)
5. Surub
6. Banda
Folositi banda pentru a xa partea
din spate a aparatului. Banda poate
indoita pana in unghiul dorit.
7. Saiba fara let.
1. Cadru
2. Introduceti degetele in canelura din fata
cadrului si trageti pentru a scoate cadrul.
(Pentru a xa cadrul inca o data, formati
alte oricii si atasati aparatul).
3. Cheita
Introduceti cheita cu care este dotat
aparatul in canelura din ambele parti ale
aparatului, pana cand auziti un pocnet.
Aceasta va face posibila inlaturarea
aparatului din tabloul de bord.
MONTARE PRIN SPATE (Metoda B)
Instalarea se face folosind gaurile suruburilor de
pe extremitatile aparatului .
Fixarea aparatului in lacasul original
Suport de montare:
1. Alegeti o pozitie in care gaurile de surub ale
suportului si cele ale unitatii centrale sa e pe
aceeasi linie si strangeti suruburile in doua locuri
pe ecare parte. Folositi e suruburi de ancorare
(5x5mm) e suruburi cu cap ingropat (4x5mm).
2. Surub
3. Tablou de bord sau Consola.
INTRODUCEREA
CARDULUI SD
Unghiul oblic al cardului SD
mentine expunerea descendenta:
introduceti-I in spatiul SD si apasati
inca o data pentru a-l scoate.
RO
71

Manual de utilizare
SCHEMA DE CONECTARE
RE D YE LL OW
BL UE
WH IT E
WH IT E/B LA CK
GR EE N
GR EE N/B LA CK
15A
BL AC K
GR EY
GR EY /BLAC K
VI OL ET
VI OL ET/BL AC K
RO
72
IGNITION SWITCH (B+); RED – BUTON CONTACT (B+); cablu rosu
AUTO ANTENNA, blue – ANTENA AUTO, cablu albastru
FRONT Lch SPEAKER „+” ,WHITE – DIFUZOR FATA Lch „+”, cablu alb
FRONT Lch SPEAKER „-„ , WHITE/BLACK– DIFUZOR FATA Lch „-„, cablu alb/negru
REAR Lch SPEAKER „+”,GREEN – DIFUZOR SPATE Lch „+”, cablu verde
REAR Lch SPEAKER „-„ , GREEN/BLACK – DIFUZOR SPATE Lch „-”, cablu verde/negru
YELLOW , MEMORY BACKUP– ALIMENTARE MEMORIE, r galben (se leaga la +)
BLACK, GROUND– MASA, cablu negru
FRONT Rch SPEAKER „+”, GREY – DIFUZOR FATA Rch „+”, cablu gri
FRONT Rch SPEAKER „-„, GREY/BLACK – DIFUZOR FATA Rch „-”, cablu gri/negru
REAR Rch SPEAKER „+” , VIOLET– DIFUZOR SPATE Rch „+”, cablu violet
REAR Rch SPEAKER „-„ ,VIOLET/BLACK– DIFUZOR SPATE Rch „-„, cablu violet/negru
ANTENNA – ANTENA
REAR Rch LINE OUT– IESIRE LINIE Rch SPATE
REAR Lch LINE OUT– IESIRE LINIE Lch SPATE
FRONT Rch LINE OUT– IESIRE LINIE Rch FATA
FRONT Lch LINE OUT– IESIRE LINIE Lch FATA
SUBWOOFER

PANOUL FRONTAL
24 23
22
21
5
4
2 3
7
2520
191817
16
1514
13
11
12
629
1
10
26
28
27
8 9
Manual de utilizare
1. Buton de pornire
2. Buton RELEASE (pentru detasare fata)
3. Butonul pentru VOLUM/SELECTARE
4. Buton MUTE
5. Comutator MOD
6. Culori asaj/setare
7. Asaj LCD
8. LED intermitent
9. Resetare
10. Comutator Lungime de banda /selectare ID3
11. Cautarea frecventei si Derulare inainte
12. Cautarea frecventei si Derulare inapoi
13. Stocare automata a memoriei
14. Redare/Pauza si butonul presetat 1
15. Intro si butonul presetat 2
16. Repetare si butonul presetat 3
17. Alegere la intamplare a melodiilor si
butonul presetat 4
18. Butonul presetat 5
19. Butonul presetat 6
20. Buton frecvente alternative
21. Buton pentru tipul programului
22. Buton informatii trac
23. Eject
24. Slot CD
25. Senzorul pentru telecomanda
26. Conector USB
27. Slot card SD/MMC
28. Mufa pentru AUX
29. Buton SCN
INSTALAREA PANOULUI FRONTAL
Pentru instalarea panoului frontal, introduceti-l in suport conform gurii de mai jos. Asigurati-va ca
este instalat corespunzator, in caz contrar, pe asaj pot aparea neregularitati sau unele butoane
nu vor functiona corespunzator.
1
2
3
RO
73

Manual de utilizare
FUNCTII GENERALE
Pornire/Oprire sistem
Apasati orice buton pentru a porni aparatul. Apasati si tineti apasat butonul PORNIRE pentru
a opri aparatul.
Nota: Dupa oprirea aparatului, nivelul volumului si setarile radio curente vor memorate, iar la
pornirea aparatului, acesta va relua statusul memorat, pe care l-ati setat.
Deconectare panou frontal
Apasati butonul REL (2) pentru demontarea panoului frontal detasabil.
Reglarea sunetului
Apasarea butonului (3) poate regla calitatea dorita a volumului.
A) Apasarea butonului SEL (3) va schimba urmatoarea ordine:
Optiuni:
Controlul Volumului/ Selectare
Rotiti acest buton pentru a regla Volumul/Bass/Treb/Bal/Fad. Pentru a selecta functiile, apasati
butonul pentru VOL scurt pana cand functiile dorite apar pe asaj.
Mariti sau micsorati volumul prin rotirea butonului VOL la dreapta sau stanga. Aceste butoane
pot folosite pentru reglare BASS, TREBLE, BALANCE si FADER.
Bass
Apasati butonul VOL/SEL (3) o data. Reglati nivelul de bass folosind butonul VOL/SEL (3).
Treble
Apasati butonul VOL/SEL (3) de doua ori. Reglati nivelul de inalte (treble) folosind butonul
VOL/SEL (3).
Balans
Apasati butonul SEL (3) de trei ori. Reglati balansul intre difuzoarele stanga si dreapta folosind
butonul VOL/SEL (3).
Fader
Apasati butonul VOL/SEL (3) de patru ori. Reglati balansul dintre difuzoarele din fata si cele
din spate folosind butonul VOL/SEL (3).
MUTE - SILENTIOS
Apasati butonul MUTE (4) pentru a pune sunetul pe silentios. Apasati-l inca o data pentru a
reveni la volumul anterior.
RO
74

Manual de utilizare
ALTE REGLARI
Apasati butonul VOL/SEL (3) timp de cateva secunde se va activa ca si mod ciclic al urmatoarelor functii la alegerea utilizatorului:
LOU D
TIM E DISPL AY DSP O FF ON
DX/ LOCALARE AEUR/ USA
Apasati si tineti apasat butonul pentru a accesa diferite moduri:
Apasati si tineti apasat butonul pentru a accesa automat modul DSP:
Prin rotirea butonului puteti alege intre functiile Flat, CLASSIC, Pop si Rock.
Prin apasarea butonului puteti alege modul favorit DSP.
Pe modul DSP, apasati butonul o data pentru accesarea modului ESP (Protectie Electronica
la socuri):
Prin rotirea butonului puteti alege optiunea de 12 secunde sau 45 secunde ESP.
Prin apasarea butonului puteti selecta optiunea de secunda dorita ESP.
Pe modul DSP, apasati butonul de 2 ori pentru accesarea modului BEEP, prin rotirea butonului pentru alegerea optiunii on (pornit) sau off (oprit), apasati butoanele pentru a selecta
optiunea on (pornire) sau off (pornire).
VOL LAST/ADJUST
Aceasta functie va permite sa setati nivelul volumului aparatului dupa ce a fost oprit si pornit
din nou.
Alegeti VOL LAST daca doriti ca nivelul volumului sa acelasi cu cel de dinainte de oprirea
aparatului.
VOL ADJUST va permite sa alegeti nivelul volumului.
OFF /ON
STE REP/M ONO
DEM O OFF/O N
SEE K ½VOL LAST /AD J
AEM O FF/ON
BEE P
ON/ OFF
Modul CAUTARE
CAUTARE 1: Cand modul CAUTARE 1 este activate, SCANAREA AUTOMATA este oprita
cand un post radio este detectat, chiar daca utilizatorul continua sa apese butonul de CAUTA-
RE.
CAUTARE 2: SCANAREA AUTOMATA nu s-a oprit chiar daca postul radio a fost detectat si
utilizatorul continua sa apese butonul. Cand butonul CAUTARE este eliberat, modul se va opri
dupa detectarea postului radio.
RO
75

Manual de utilizare
SELECT MODE – MODUL SELECTARE
Apasand acest buton (5) veti putea alege intre diferite functii:
- Frecventa (radio)
- CD (MP3 CD)
Pentru a avea acces la acest mod trebuie sa existe un CD in aparat.
- CARDUL DE MEMORIE
Pentru a accesa acest mod trebuie sa existe un card in aparat.
- USB
Pentru a accesa acest mod un dispozitiv USB trebuie conectat.
- componenta AUX.
REGLARE ORA
Apasati si tineti apasat butonul SEL pana cand ora curenta este asata. Apasati apoi butonul
vol „+” pentru a regla orele si apasati butonul vol „-„ pentru a regla minutele. La nalizarea
reglarii orei, apasati butonul SEL pentru a conrma setarea orei.
LIQUID CRYSTAL DISPLAY- AFISAJ CU CRISTALE LICHIDE
Sunt expuse aici frecventa curenta si functiile activate (7).
FLASHING LED – LED INTERMITENT
Daca partea detasabila a aparatului nu se xeaza in aparat, LED-ul (8) va lumina intermitent.
RO
76

Manual de utilizare
FUNCTII RADIO
Alegerea Iungimii de unda
Apasati butonul (10) (BAND-Lungimea de unda) in mod repetat pentru a alege Iungimea de
unda in urmatoarea ordine:
Alegerea postului radio
Pe modul RADIO, apasati scurt SEEK << (cauiare) sau butonul sau SEEK >> pentru a
cauta automat un post radio, apasati SEEK << (cautare) sau butonul sau SEEK >>
timp mai multe secunde pentru functia de reglare manuala.
Memorare automata si scanare programe
- MEMORARE AUTOMATA
Apasati butonul (13) AMS (MP3) pentru cateva secunde, radioul cauta o frecventa si
verica semnalul pana cand un ciclu de cautare este terminat.
Astfel, primele 6 dintre posturile de radio receptionate sunt stocate ecare la butonul
corespunzator.
- SCANARE PROGRAME
Apasati scurt butonul (13) AMS (MP3) pentru a scana un post de radio reglat. Cand modul
AMS este pornit, simbolul „INT” apare pe asaj. Puteti de asemenea apasa butoanele
corespunzatoare sau butonul AMS cand postul radio dorit este schimbat. Acel post radio va
porni.
Stocarea posturilor radio
Apasati butoanele presetate (14-19)
MODUL RADIO
M1 ~M6
- MEMORIE PRESETATA este incarcata cand este apasat butonul pentru mai putin de 1
secunda.
- MEMORIE PRESETATA este salvata cand este apasat butonul pentru mai mult de 1
secunda.
2) CD/ MP3/ FLASH MP3
PORNIRE/PAUZA
Apasati si butonul (14) este activat. In Iimpul PAUZEI, INDICATORUL DE DISC Iumineaza
intermitent.
TOP- prima melodie va incepe cand primul buton este apasat pentru mai muli de 0.5 sec.
INT
Apasati butonul (15). In timp ce butonul INTRO este pomit, indicatorul INT va pomi primeIe
10 secunde din ecare melodie, pana la ultima. Se va derula tot discul de unde a inceput INT
RO
77

Manual de utilizare
STEREO/MONO
Cand posturile radio FM au semnal slab si se receptioneaza cu bruiaje, receptionarea acestora
poate imbunatatita prin selectarea modului MONO.
LOCAL/DX
Alegeti pozitia “locala” in zone cu semnal puternic pentru a permite radioului sa selecteze doar
posturile radio cu semnal puternic in timpul reglarii manuale.
Nu alegeti aceasta optiune in zone cu semnal mai slab, pentru a putea asculta toate posturile
radio.
MODUL LOUD PORNIT/OPRIT
Pe modul LOUD frecventele joase (basii) si cele inalte (treble) vor accentuate.
LOUDNESS
Naciśnij przycisk SEL i wybierz ustawienia LOUD . By aktywować funkcję przekręć gałką regulacji
głośności.
SCANARE
Apasati butonul (29) pentru a cauta un post radio. Cand nivelul intensitatii semnalului este
mai mare decat nivelul de oprire, radioul va continua redarea postului timp de 5 secunde si
frecventa va palpai intermitent pe asajul LCD.
Apasati si tineti apasat butonul de scanare (29) mai mult de 3 secunde pentru a selecta
postul dorit. Radioul va porni redarea postului.
SETARE ZONA
Pe modul Radio, apasati butonul SEL timp de cateva secunde. Asajul LCD va indica BEEP
ON
RO
78

Manual de utilizare
CD/SD/MMC/USB
REDARE DISCURI
Acest aparat functioneaza cu urmatoarele tipuri de discuri: CD/CD-RI-RW.Este compatibil cu
formatele: CD DNMP3/WMA.
INCARCAREA SI SCOATEREA UNUI DISC
1.Pomiti aparatul.
2. lntroduceti discul cu partea imprimata in sus in spatiul destinat acestuia.
3. Apasati butonul EJECT pentru a scoate discul.
CARD MULTI-MEDIA MMC/SLOT CARD SD
Aparatul suporta doar formatele MP3JWMNID3. Detasati panoul frontal. lntroduceti cu grija cardul
SD/MMC in spatiul destinat acestuia in panoul din interior. Atasati panoul frontal la loc. Aparatul
pomeste redarea in mod automat.
SLOT USB
Conectati cu grija dispozitivul USB Ia cablul adaptorului USB si apoi introduceti-l in mufa USB a
panoului frontal. Aparatul porneste redarea automat.
NOTE ASUPRA SLOTULUI USB/SD/MMC
Functiile USB (memorie tip ash), redare muzica MP3:
1. Suporta card SD/MMC.
2. FAT12/ FAT16/ FAT 32
FAT12/ FAT16 (nr. max. directoare:200, nr. maxim siere: 500) FAT32 (nr. max. directoare:200, nr.
maxim siere: 500)
3. Denumire sier. 32 biti/ Denumire dir.: 32 biti.
4.Tag(id3 tag ver 2.0) TitluVArtistfAibum: suporta 32 biti.
5. Nu suporta un dispozitiv ce citeste mai multe carduri.
6. Suporta un dispozitiv USB 2.0.
Nota:
Formatul USB suporta 2.0. Capacitate: pana Ia 0.4GB.
Marci carduri SO: Cannon, Fuji, Palm, Motorola, Microsoft, IBM, HP, Compaq, Sharp, Samsung,
etc.
Capacitate: pana Ia 4GB.
Marci carduri MMC: Ericsson, Nokia, Motorola, HP, Palm, Sanyo, Microsystem, etc. Capacitate:
pana Ia 4GB.
Nota: Datorita gamei largi de produse cu dispozitive pentru card SO si MMC si
functiile acestora specice producatorului, acesta din urma nu poate garanta nici ca dispozitivele
vor recunoscute, dar nici ca optiunile de functionare posibile in teorie vor functions in realitate.
RO
79

Manual de utilizare
CD/SD/MMC/USB OPERATIONS
INFORMATII ID3 TAG
Acest aparat suporta Id3 tag ver. 2.0. Daca un sier MP3 detine informatie Id3 tag, va asat pe
LCD. Daca nu exista informatie 103 tag, pe ecran nu va aparea nimic. lnformatia 103 tag poate
include Fisier, Director, Muzica, Album sau date despre Artist.
URMATOR/ANTERIOR
Apasati butoanele URMATORIANTERIOR pentru a alege piesa urmatoare sau anterioara. Apasati
mai mult de o secunda, pentru a alege derulare inainte sau inapoi.
PORNIRE/PAUZA
Apasati butonul PAUZA pentru a intrerupe redarea, apasati inca o data pentru a relua redarea
normala.
INTRO (examinare toate piesele)
Cand apasati acest buton, simbolul INT ON este asat si primele cateva secunde din ecare piesa vor redate. Apasati inca o data pentru a opri optiunea INTRO pentru a asculta piesa.
REPETARE
Cand apasati butonul RPT, simbolul “RPT” va aparea pe ecran, iar redarea piesei selectate se va
repeta continuu pana Ia anularea modului printr-o noua apasare a butonului.
RANDOM
Cand apasati butonul RDM, simbolul “RDM ON” va aparea pe ecran, iar ecare piesa va redata Ia intamplare si nu in ordine normala. Pentru anularea modului RANDOM apasati inca o data
butonul.
SELECTARE PIESA UP/DOWN (In cazul sierelor MP3/WMA)
- Buton 10/5: 10 piese jos.
+ Buton 10/6: 10 piese sus.
SELECTAREA FISIERELOR MP3/WMA
1.Durata cautare:
- Apasati butonul AMS o singura data, durata de cautare este activata.
- Rotiti butonul VOL Ia dreapta sau stanga, selectati durata dorita.
- Apasati butonul VOL, durata selectarii piesei va redata.
2. Cautare Piesa:
- Apasati butonul AMS de doua ori, cautarea piesei este activata.
- Rotiti butonul VOL spre dreapta sau stanga, selectati piesa dorita.
- Apasati butonul VOL, piesa aleasa va porni.
RO
80

Manual de utilizare
CD/SD/MMC/USB
3. Cautare denumire sier:
- Apasati butonul AMS de 3 ori, cautarea sierului este activata.
- Apasati butonul VOL, primul director va asat.
- Rotiti butonul VOL spre dreapta sau stanga, puteti selects directorul dorit.
- Apasati butonul VOL inca o data, directorul este stability si denumirea primului sier va asata.
- Rotiti butonul VOL spre dreapta sau stanga, puteti selecta sierul dorit.
- Apasati butonul VOL, piasa selectata va pomi.
4. Cautare Caracter:
- Apasati butonul AMS de 4 ori, modul de cautare al caracterelor este activat.
- Apasati butonul VOL, caracterul * va asat.
- Rotiti butonul VOL spre dreapta sau stanga, puteti selecta litera dorita.
- Apasati butonul VOL mai mult de 2 sec.
- Piesa avand acelasi character cu eel selectat este asata.
- Rotiti butonul VOL spre dreapta sau stanga, puteti selecta piesa dorita.
- Apasati butonul VOL , piesa selectata va pomi.
RO
81

Manual de utilizare
FUNCTII RDS (SISTEM DE DATE RADIO)
AF: Frecvente Alternative
- pentru a seta Modul RDS, apasati butonul AF (20) si eliberati butonul pentru a porni sau opri modul
RDS. Ori de cate ori modul RDS este pornit, simbolul AF va aparea pe asaj.
AF/REG
AF
- tasta AF/REG indica activarea CAUTARII FRECVENTELOR ALTERNATIVE.
- Indicatorul AF este asat cand AF este pornit, cautarea se activeaza atunci cand semnalul recep-
tionat nu mai este bun.
- In modul FM, cand AF este pornit, functiile de CAUTARE, SCANARE, AUTO, MEMORARE pot
receptiona si salva doar programe RDS. Cu toate acestea, cand optiunea ITALIA este activata, indiferent daca e sau nu RDS, programele care corespund nivelului SD pot receptionate si salvate.
Ikona Opis
AF ON modul AF ON, informatie RDS primita
AF OFF modul AF OFF
AF blink modul AF ON, nu se recepteaza informatii RDS
REGION
- modul AF este transformat in modul REGION ON/OFF cand modul AF ON este apasat pentru mai
mult de 1 secunda.
- ON: CODUL PI este vericat cand controlul AF este in desfasurare.
- OFF: CODUL PI si SUPRAFATA DE ACOPERIRE nu sunt vericate cand AF este in desfasurare.
PTY
MODUL RADIO
- PTY anterior este asat cand tasta PTY (21) este apasata. Daca nici o alta tasta nu este apasata
timp de 2 secunde, PTY anterior selectat va cautat. In timpul LOOP 1, daca PTY dorit nu este
gasit, NO PTY va asat.
- 2 tipuri de programe: SPEECH si MUSIC.
Apasand PTY o data, apare optiunea MUSIC. Cand PTY este apasat a doua oara, apare optiunea
SPEECH.
Tastele M1-M6 pot folosite pentru alegerea tipului de program dorit.
TA
Butonul TA (22) functioneaza dupa cum urmeaza:
- TA este pornit/oprit si indicatorul TA este asat.
Cand se transmit informatii despre trac, indiferent de mod, informatiile se primesc.
Daca NIVELUL VOLUMULUI este sub 20, volumul se ridica la 20, si revine la modul si volumul
anterior daca informatiile despre trac s-a oprit.
Daca volumul este modicat in timpul unei informatii despre trac, numai volumul anterior este
valabil.
- Cand TA este pornit, functiile SEEK, SCAN, AUTO MEMORY pot receptionate sau salvate numai
daca se primeste codul de identicare al programului tracului.
- Cand TA este pornit, codul de identicare al programului tracului nu se receptioneaza intr-un timp
stabilit.
ALARMA TA: nici o functie TA/TP nu este asata iar alarma este dezactivata.
CAUTARE TA: CAUTAREA TA este activata.
RO
82

Manual de utilizare
MP3 / WMA
- MP3 reprezinta prescurtarea pentru Nivelul Audio 3 MPEG si face referire Ia un standard de
compresie audio.
- Acest dispozitiv permite redarea sierelor MP3 de pe CD-ROM,CD-R sau CD-RW.
- Aparatul poate citi siere scrise in format MP3 conform standardului ISO 9660. Cu toate acestea
nu suporta date MP3 scrise cu ajutorul metodei impachetarii.
- Aparatul nu poate citi un sier MP3 cu o alta extensie decat .mp3”.
- Daca incercati sa ascultati un sier care nu este in format MP3 si care are extensie .mp3”, se pot
auzi niste zgomote.
- In acest manual facem referire Ia ceea ce se numesc .sier MP3” si .director” in terminologia PC
ca si .piesa” si respectiv .album”.
- Numarul maxim la nivelului directorului este 8, inclusiv directorul radacina. Numarul maxim de
siere si directoare/ disc este de 256.
- Aparatul nu poate reda piesele in ordinea numerelor pieselor.
- Aparatul reda doar piesele audio, daca discul contine atat piese audio cat si siere MP3.
- Cand ascultati un disc de 9 kbps sau .VBR” , durata redarii de pe asaj nu va corecta side
asemenea redarea intro s-ar putea sa nu functioneze corespunzator. (VBR”: Rata Biti Variabila)
- Aparatul suporta redarea sierelor WMA. Redarea ID3 tag pentru formatul WMA nu este garantata, depinde de versiuni si de disponibilitatea alfabetului chirilic.
- WMA ( Windows Media Audio) -format comprimare muzica, creat de Microsoft Corporation.
Acest format utilizeaza algoritm codicat pentru comprimarea inregistrarii audio initiale, diminuand
considerabil dimensiunile sierului, dar pastrand o calitate buna a sunetului chiar si atunci cand
rata de transfer este mica (de exemplu 64 Kbit/s).
- Trebuie sa tineti minte ca aparatul s-ar putea sa nu redea piesele in ordinea in care sunt scrise
pe disc.
NOTE PRIVIND CREAREA PROPRIULUI CD-R sau CD-RW CARE SA CONTINA FISIERE MP3
- Pentru a va bucura de o calitate mai buna a sunetului,va recomandam conversia sierelor MP3
cu o frecventa de 44.1kHz si o rata xa de transfer de 128 kbps.
- Nu memorati mai mult de 256 siere MP3/disc.
- Pentru ISO 9660 - format conform cu acest standard, numarul maxim de directoare permise este
de 8, inclusiv directorul baza.
- Cand folositi un disc CD-R,redarea este posibila dear pentru discuri care au fost nalizate Ia
scriere.
- Asigurati-va ca atunci cand scrieti MP3 pe CD-R sau CD-RW,, sa e formatat ca un disc ce
contine date si NU ca un disc audio.
- Nu trebuie sa scrieti siere ce nu sunt MP3 sau siere de care nu aveti nevoie impreuna cu
siere MP3, in caz contrar va nevoie de mai mult timp pentru ca aparatul sa inceapa sa redea
siere MP3.
- Cu anumite CD-R sau CD-RW, s-ar putea ca informatiile sa nu e scrise corespunzator in functie
de calitatea discului. In acest caz, informatiile pot sa e reproduse incorect. Se recomanda folosirea de CD-R sau CD-RW de calitate superioara.
- Pana Ia 16 litere sunt asate pentru numele unui Album sau a unei Piese. Versiunea ID3 tag 1x
este necesara.
- Trebuie sa retineti faptul ca aparatul nu poate reda piesele in ordinea in care le-ati scris pe disc.
RO
83

TELECOMANDA
Manual de utilizare
RO
84
1. Butonul de pornire
2. Buton pauza/ redare/presetare 1
3. Intro/Buton presetare 2
4. Repeatre redare/ Buton presetare 3
5. Redare RANDOM/ Buton presetare 4
6. Buton presetat 5
7. Buton presetat 6
8. Buton MUTE
9. Volum
10. Comutator MODE
11. Buton ST/MO
12. Buton Loudness
13. Buton SCAN
14. Buton Asaj
15. Buton APS/AMS
16. Buton LOC/DX
17. Comutator lungime de banda
18. Reglare/Alegerea melodiilor /F.F /F.R
19. Buton pentru selectarea meniului.

Manual de utilizare
INLOCUIREA BATERIEI LA TELECOMANDA
Cand raza de operare a lelecornenzii slabeste sau telecomanda nu mai functioneaza este
recornandata inlocuirea bateriei vechi si inlocuirea cu o baterie noua. Asigurati-va ca
polaritatea bateriei este corecta ínainte de inlocuire, in caz contrar telecomanda se poate
defecta.
1. Scoateti suportul pentru baterie in timp ce apasati sistemul de blocare
2. Puneti bateria ou semnul (+) in sus in suport
3. Inserati suportul in telecomanda
RO
85

SPECIFICATII
SPECIFICATII GENERALE
ALIMENTAREA LA RETEA:
IMPEDANTA
PUTERE MAXIMA:
DIMENSIUNI:
CURENT CONSUMAT:
FRECVENTE
BASS (la 100Hz):
TREBLE (la 10K):
USB/SD
RAPORT SEMNAL / ZGOMOT
SEPARARE POSTURI:
RASPUNS IN FRECVENTA:
RADIO FM
Frequency Coverage (MHz):
IF:
SENSIBILITATE (S/N-30dB):
SEPARARE STEREO:
Manual de utilizare
DC 14,4V, Minusul la masa
4 ohms
40W X 4(CH)
178x163x50mm(WxDxH)
15A
+10dB/-10dB
+10dB/-10dB
> 60dB
> 60dB
20Hz-20KHz
87 5 -108MHz
10.7MHz
12dBu
>30dB
RADIO AM
Frequency Coverage (KHz):
IF:
SENSIBILITATE (S/N-20dB):
NOTA:
SPECIFICATIILE SE POT SCHIMBA FARA O INSTIINTARE PREALABILA
522 -1620KHz
450KHz
42dBu
RO
86

Manual de utilizare
DE RETINUT INAINTE DE OPERARE
Inainle de ascultarea unui CD. curałati-I cu un materlal curat, fara praf. Curałati discul in
directia sagetii.
lntroduceti intotdeauna discul cu eticheta in sus. Daca CD-ul este introdus cu panea
printata in jos, aparatul poate suferi pagube.
NOTA: Daca exista deja un CD in aparat, nu incercati sa introduceti un altul. Si acest
lucru poate strica aparatul.
Intotdeauna tineti CD-ul de margine. Pentru a pastra CD-ul curat nu atingeti suprafata
acestuia Scoateti CD-ul in mod adecvat.
Nu Iipiti banda adeziva sau orice alli adezivi pe CD.
Nu expuneti CD-ul Iuminii directe a soarelui sau altor surse de caldura.
Nu Iasati Cd-urile in masina daca aceasta e parcata in Iumina directa a soarelui pentru
ca aceasta va duce la cresterea temperaturii din masina.
Nota:
Nu folositi dizolvanti precum petrolul sau alti díluanti. Substante antistatice sub forma de
spray pentru curatat ce se gasesc in comert vor produce pagube aparatului.
RO
87

Manual de utilizare
DEPANARE
Inainte de a consulta tabelul, vericati conexiunile cablurilor. Daca vreuna din probleme
persísta dupa ce ati parcurs tabelul de mai jos, consultati cel mai apropiat furnizor.
Simptome Cauze Solutii
Nu se ahmenleaza Nu este pus contacul Daca alimentare este core-
Siguranta s-a ars Inlocuiti siguranta
Nu se poate introduce
sau scoate cd-ul
Fara sunet Volumul este la minim Reglati volumul la nivelul dorit
sunet intrerrupt Unghiul de instalare estre mai
Butoanele de comanda nu
Functicneaza
Radioul sau selectarea
automata nu funclioneaza
Exista deja un CD in aparat Scoateti CD-ul din aparat si
S-a introdus gresit CD-ul Introduceti corect CD-ul
CD-ul este foarte murdar sau
defect
Temperatura din masina este
prea ridicata
Condens Lasati casetofonul inchis
Cablurile nu sunt conectate
corespunzator
mare de 30
CD-ul este foarte murdar sau
defect
Microprocesorul montat in
interior nu functioneaza corespunzator
Cablul de antena nu este
conectat corespunzator
Semnalul este prea slab Selectati posturile de radio
spunzatore puneti
introduceti corect CD-ul
Curatatu CD-ul sau incercati
sa intruceti un alt CD
Aerisiti pana cand temperatura revine la normala
pentru o ora sau mai mult
Vericati conexiunea cablu-
rilor
Reglati unghiul de instalare la
mai putin de 30
Curatati CD-ul sau incercati
sa introduceti un alt CD
Apasati bunonul RESETARE
sau reinstati
Conectati cblul antenei in mod
corespunzator
manual
RO
88

Manual de utilizare
Noile caracteristici CD / DVD
1. DOS (Dynamic Open Screen)
Aceasta optiune este activa cand aparatul este pornit.Apasati orice buton pentru a dezactiva
functia si a va reintoarce in modul curent.
DEMO ON
Apasati prelung pe butonul SEL, apoi apasati scurt butonul SEL pentru a trece pe modul DEMO
ON/OFF, rotiti butonul de volum pentru a selecta DEMO ON apoi apasati SEL pentru conrmare.
Modul DEMO ON este utilizat pentru demonstratie. Nici un alt buton nu va mai functional in
acest mod cu exceptia butonului SEL.
DEMO OFF
Apasati butonul SEL, rotiti din butonul volum pentru a selecta modul DEMO OFF, apoi apasati
SEL pentru conrmare.
2. RGB (selectare iluminare RGB)
Iluminarea de fundal se schimba cand aparatul este pornit.
Setare xa culoare de iluminare
Apasati lung butonul DISP, rotiti butonul volum pentru a selecta functia AUTO OFF, apasati scurt
DISP pentru a selecta o culoare xa (din albastru, verde, orange, purpuriu, alb).
Setare culoare preferata de iluminare
Apasati lung butonul DISP, rotiti butonul volum pentru a selecta functia AUTO OFF, apasati scurt
DISP pentru a selecta o culoare dorita:
- RED – rotiti volumul pentru a selecta intre valorile 00 – 32, apasati DISP pentru conrmare
- GREEN - rotiti volumul pentru a selecta intre valorile 00 – 32, apasati DISP pentru conrmare
- BLUE - rotiti volumul pentru a selecta intre valorile 00 – 32, apasati DISP pentru conrmare
3. IPC ( control muzica iPhone)
Cu aceasta functie se poate reda muzica de pe iPhone. Apasati pe butonul MODE pentru a selecta AUX. Conectati aparatul iPhone la intrarea AUX cu ajutorul cablului din dotare (sau achizitionat
separat).
In gura de mai jos se arata modelele de suport iPhone care sunt disponibile.
4301SP R 4303SP R
RO
89

Manual de utilizare
4. AEM (Aux Extend voice control Mode)
4. AEM (Aux Extend voice control Mode)
GPS trac
In orice mod, conectati iPhone-ul la intrarea Aux IN si activati functia GPS la telefon (aparatul
trebuie sa aiba aceasta functie)
Setati AEM ON, volumul radio-ului va scadea. Daca functia GPS trac nu se mai receptioneaza,
radio-ul va reveni la volumul normal.
Setarea implicita a modului AEM este AEM ON.
AEM ON
Apasati lung tasta SEL, apoi apasati scurt SEL pentru a selecta AEM ON/OFF, rotiti butonul de
volum pentru a alege AEM ON si functia devine activa.
AEM OFF
Apasati lung tasta SEL, apoi apasati scurt SEL pentru a selecta AEM ON/OFF, rotiti butonul de
volum pentru a alege AEM OFF si functia devine inactiva.
Cu functia AEM ON, orice sursa audio de la iPhone poate redata la aparat.
In gura de mai jos se arata modelele de suport iPhone care sunt disponibile.
430 1SP R 430 3SP R
5. IPH (iPhone Handfree)
Raspundeti la un apel telefonic
Pe orice mod, conectati iPhone-ul la intrarea AUX IN, cand receptionati un apel, apasati tasta
PLAY sau butonul de raspuns de la iPhone pentru a raspunde apelului.
Apasati din nou pentru a intrerupe convorbirea. Pe durata cat raspundeti la telefon, volumul sunetului de la aparat se reduce automat, urmand sa revina la volumul normal dupa 5 secunde de la
terminarea convorbirii.
Pentru o receptie mai buna a convorbirii telefonice apasati lung tasta MU pentru a intra in modul
telefon cand raspundeti. Daca apasati din nou lung pe tasta MU, aparatul revine la modul anterior
convorbirii.
• Functiile IPC, AEM IPH sunt suportate de iPhone precum si de unele smart-phone din gama Motorola, HTC, T-Mobile, BlackBerry, LG si Samsung (care sunt compatibile cu soclul iPhone 4H/3.5
mm) – de ex. Motorola XT615, LG920, Samsung GalaxyNote, etc.
Lista cu telefoanele compatibile nu este garantata si se poate schimba fara o instiintare prealabila.
In gura de mai jos se arata modelele de suport iPhone care sunt disponibile.
RO
430 1SP R 4303 SPR
90

Bedienungsanleitung
DE
91

www.peiying.eu
 Loading...