


1 |
Introduction |
|
1.1 ATTENTION: Informations relatives à votre sécurité
01

1 |
Introduction |
|
1.2 Informations importantes
950
02
2 |
Première utilisation |
|
|
|
|
|
|
|
|
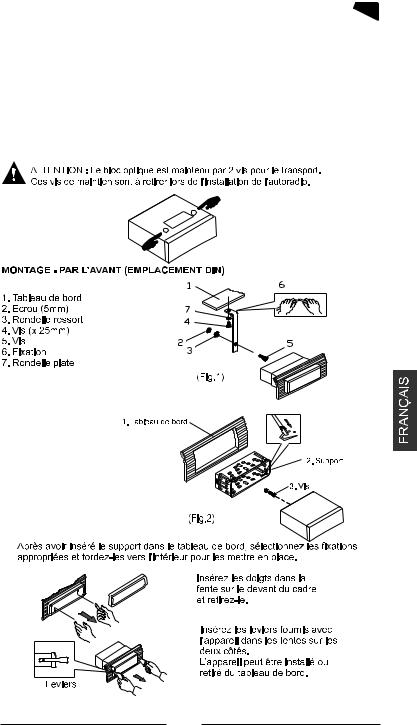
2.1 Installation de I’appareil |
|
|
|
(Fig,3)
Cadre
03

2 |
Première utilisation |
|
|
|
|
|
|
|
|
2.2 Information sur le RDS |
|
|
|
04

2 |
Première utilisation |
|
|
|
|
|
|
|
|
|
|
|
|
|
|
|
|
|
|
2.3 Précautions d’installation |
|
|
|
|
|
|
|
|
|
|
|
05

2 |
Première utilisation |
|
|
|
|
|
|
|
|
2.4 Connexion de I’appareil |
|
|
|
Micro |
06

2 |
Première utilisation |
|
2.5 Branchement du microphone
MELODY 1
39
Phone |
MELODY 1 |
Tel 20 |
Tel 30 |
07

3 |
Utilisation |
|
3.1 Fonctions des touches
Fm1 87.5 


1.Touche POWER
2.Fente pour carte SD
3.Prise USB
4.Entrée Auxiliaire
5.Contrôle du volume / Paramètres sonores
6.Affichage LCD
7.Touche TA
8.Lecteur CD
9.Touche F/PSRépétition
10.Touche PTY
11.Commutateur de mode / Muting
12.Récepteur IR de la télécommande
13.Recherche radio/Sélection pistes
14.Touche éjection de la façade
15.Touche éjection CD
16.Stations préprogrammées
17.Sélecteur de Subwoofer/bande radio
18.Téléphone
19.Bouton répondre à un appel
20.Bouton terminer un appel / Affichage horloge
21.Bouton “ ”
”
22.Bouton “ # ”
23.Témoin BLUETOOTH
24.Bouton AF.
25.Clavier numérique
26.Bouton Random
08

3 |
Utilisation |
|
3.2 Fonctions de I’appareil


 Welcome


-Appuyez sur la touche (PWR) pour mettre l'appareil en marche et maintenez la touche enfoncée pour l'éteindre, l'affichage indiquera “GOODBYE”.
Card
USB
AUX IN
09
 Loading...