

Page 1
F3
I
Page 2
Intended to alert the user to the presence of uninsulated “dangerous voltage” within the product’s enclosure
A
A
CAUTION: Risk of electrical shock - DO NOT OPEN!
CAUTION: To reduce the risk of electric shock, do not remove cover. No user serviceable parts inside. Refer servicing to
I
1
qualified service personnel.
WARNING: To prevent electrical shock or fire hazard, do not expose this appliance to rain or moisture. Before using this
appliance, read the operating guide for further warnings.
A
A
PRECAUCION: Riesgo de corrientazo - No
PRECAUCION: Para disminuir el riesgo de corrientazo, no
reparar. Deje todo mantenimiento a
I
ADVERTENCIA:
Antes de usar este aparato, lea
that may be of sufficient magnitude to constitute a risk of electric shock to persons.
Intended to alert the user of the presence of important operating and maintenance (servicing) instructions in the
literature accompanying the product.
Este simbolo tiene el proposito de alertar al usuario de la presencia de “(voltaje) peligroso” que no tiene
aislamiento dentro de la caja
corrientazo.
Este simbolo tiene el proposito de alertar al usario de la presencia de instruccones importantes sobre la operation
y mantenimiento en la literatura que viene con el
Para
evitar corrientazos o peligro de incendio, no deje expuesto a la lluvia o humedad este aparato
de1
product0 que puede tener una magnitud suficiente coma
producto.
abra.
10s
tecnicos calificados.
mas
advertencias en la guia de operation.
para
constituir riesgo de
abra
la cubierta. No hay piezas adentro que el usario pueda
I
-I
Ce symbole est utilise pur indiquer a l’utilisateur la presence a
A
IA
ATTENTION: Risques de
ATTENTION: Afin de reduire le risque de
aucune piece pouvant
I
I I
AVERTISSEMENT: Afin de prevenir les
ou a
A
A
VORSICHT: Risiko - Elektrischer Schlag! Nicht
VORSICHT:
keine Teile darin, die vom Anwender repariert werden konnten.
durchfuhren
ACHTUNG: Um einen elektrischen Schlag oder Feuergefahr zu vermeiden, sollte dieses Gerst
Feuchtigkeit ausgesetzt werden. Vor Inbetriebnahme unbedingt die Bedienungsanleitung lesen.
dangereuse pouvant
Ce symbole est utilise pour indiquer a l’utilisateur qu’il ou qu’elle trouvera d’importantes instructions sur
l’utilisation et l’entretien (service) de l’appareil dans la litterature accompagnant le produit.
l’humidite.
Avant d’utiliser cet appareil,
Dieses Symbol
von Ausreichender
Dieses Symbol
Handhabung und Wartung des Produkts betreffen.
Urn
das Risiko eines elektrischen Schlages zu vermeiden, nicht die Abdeckung enfernen. Es befinden
lassen.
etre d’intensite
choc
electrique - NE PAS OUVRIR!
etre reparee
sol1
sol1
par
den Anwender vor unisolierten gefahrlichen Spannungen innerhalb des Gehauses
Starke
sind,
den Benutzer auf wichtige Instruktionen in der Bedienungsanleitung aufmerksam
suffisante pour constituer un risque de
choc
electrique, ne pas enlever le couvercle. I1 ne se trouve a
l’utilisateur.
urn
Confier
risques
de decharge electrique ou de feu, n’exposez pas cet appareil a la pluie
einen elektrischen Schlag verursachen zu
ijffnen!
l’entretien a
lisez les avertissements supplementaires situ& dans le guide.
l’interieur
un personnel qualifie.
Reparaturen nur von qualifiziertern Fachpersonal
de ce produit de tension non-isolee
choc electrique.
l’interieur
konnen.
nicht
warnen,
machen,
dem Regen oder
die
die
sich
2
Page 3
Ultra’”
Plus Features
l
All-tube design
l
Four 12AX7
l
Four 6L6GC
l
120 watts RMS @ 4,8, or 16
l
Three switchable channels
l
Master Reverb
l
Low-level effects
l
Master level control
l
Three-position resonance switch
l Half-power
The new
three channel amp has features and tone rivaling amps 2 or 3 times its price.
Dial in any degree of Clean, Crunch, or Dirty with the amp’s three channels and switch among them from the front panel
or the footswitch. Peavey’s patented, three-way Resonance switch custom-tailors bottom end to your speaker cabinet
and room environment. A half-power switch provides low-volume output tube saturation and ideal power for practice or
small halls.
Determining which channel you are in is made easy by the large illuminated logo that changes color with channel
selection-Green for Clean, Yellow for Crunch, and Red for Overdrive. Gain boost and Bright push switches add extra
control over tone shaping.
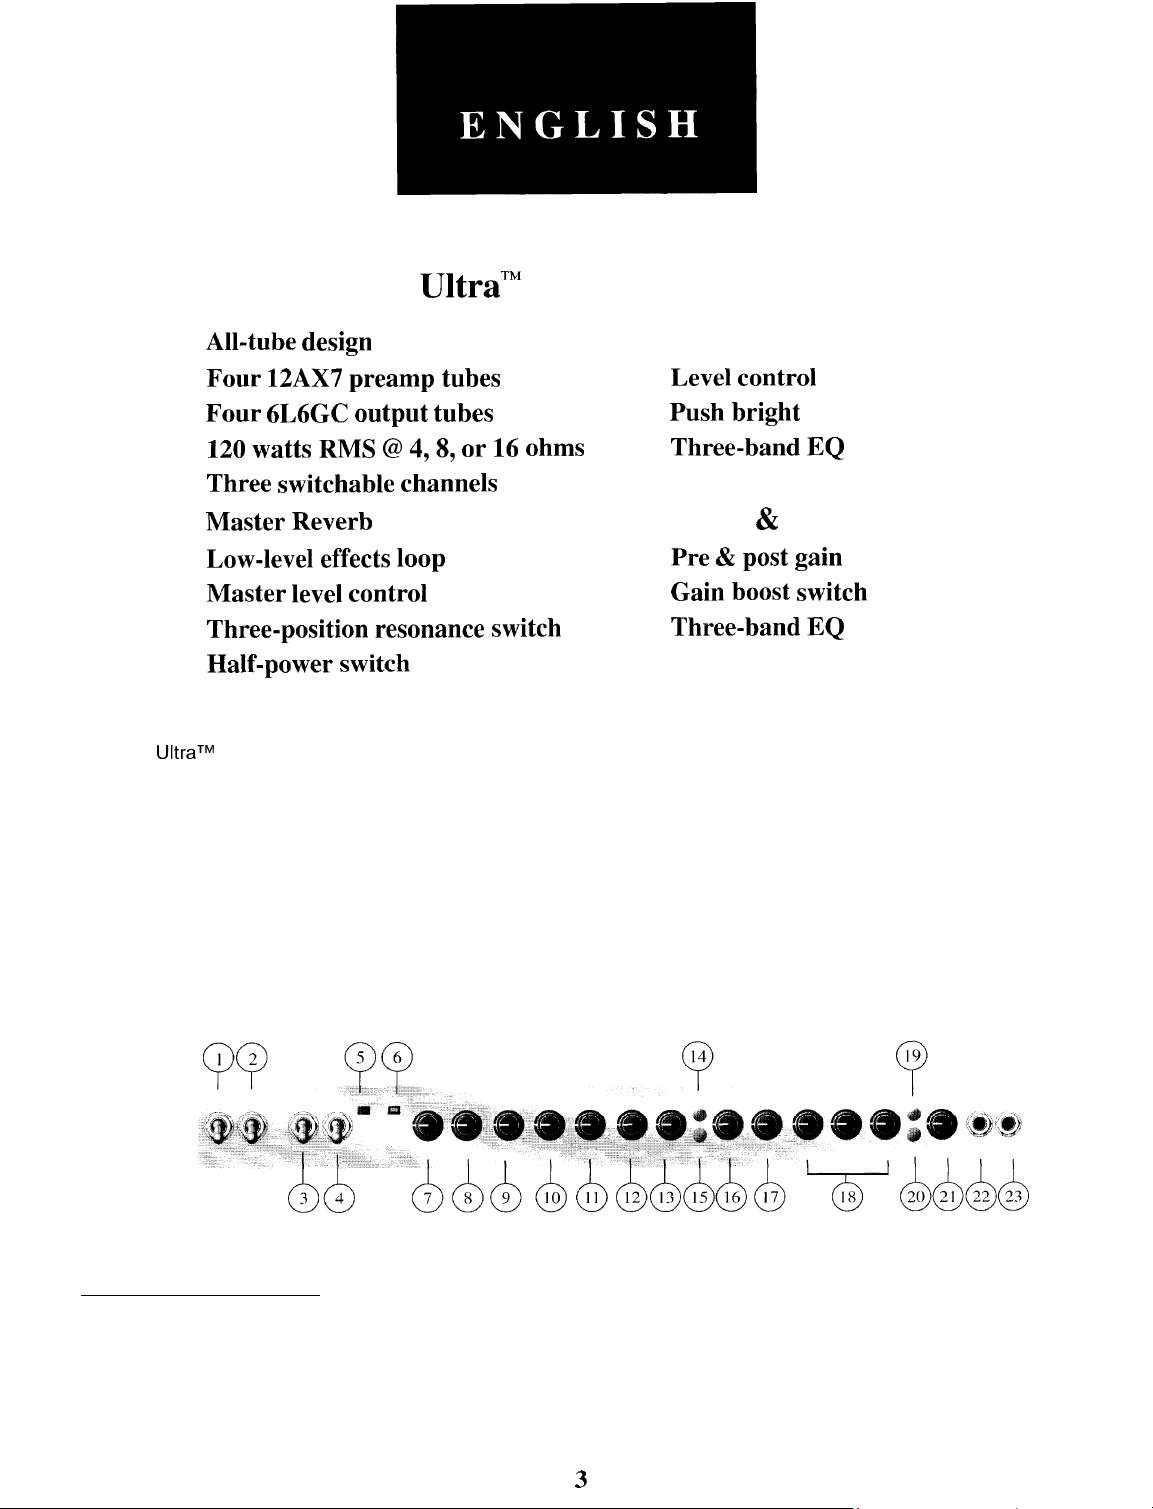
Front Panel:
UltraTM
Plus all-tube, 120 watt guitar amp head is designed for maximum tonal flexibility and power. This
preamp
output
loop
switch
tubes
tubes
ohms
Clean Channel
l
Level control
l
Push bright
l
Three-band EQ
Crunch & Ultra Channels
l
Pre & post gain
l
Gain
boost
l
Three-band EQ
switch
FRONT PANEL FEATURES
POWER SWITCH (1)
Switch to “on” position to turn on. The red LED will illuminate indicating power is being supplied to the unit.
STANDBY SWITCH (2)
Allows amp to be placed in Standby or Active mode. In Standby mode the tubes remain hot but the amplifier is not
operational.
3
Page 4

RESONANCE SWITCH (3)
Used to fine tune the low frequency range of the speaker enclosure by varying the damping factor of the amplifier
between three presets.
OUTPUT SWITCH (4)
Allows selection of power amp output to be selected from full power (120 watts) to half power (60 watts output).
POWER LED (5)
Illuminates when AC power is being supplied to the amp.
STATUS LED (6)
Illuminates when amp is switched to “Standby” indicating amplifier is not operational.
MASTER VOLUME (7)
Controls the overall volume level of the system. Once a desired balance of the Clean, Crunch, and Ultra channels is
achieved, the entire system level may be increased or decreased with the Master Volume level control.
REVERB LEVEL (8)
Reverberation is an echo effect. Rotate clockwise to increase the effect. Remote footswitch can control On/Off.
EDGE (9)
An active tone control (Shelving type,
Note: This control is not functional on the Clean channel.
BODY (10)
An active tone control (Peak/notch,
Note: This control is not functional on the Clean channel.
BOTTOM (11)
An active tone control (Shelving type,
Note: This control is not functional on the Clean channel.
+I5 dB)
+I5 dB)
*I5 dB)
that varies the high frequency boost or cut.
that varies the mid frequency boost or cut.
that varies the low frequency boost or cut.
ULTRA VOLUME (12)
Controls the overall volume level of the channel. The final level adjustment should be made after the desired sound has
been achieved.
ULTRA GAIN CONTROL (13)
Controls the input volume level of the channel.
ULTRA GAIN SWITCH (14)
Boosts the overall system gain of the Ultra channel. Depress to the “in” position to activate.
CRUNCH GAIN SWITCH (15)
Boosts the overall system gain of the Crunch channel. Depress to the “in” position to activate.
CRUNCH VOLUME (16)
Controls the overall volume level of the channel. The final level adjustment should be made after the desired sound has
been achieved.
CRUNCH GAIN CONTROL (17)
Controls the input volume level of the channel.
HIGH, MID, & LOW EQ (18)
Passive tone controls that regulate the high, mid, and low frequencies.
BRIGHT SWITCH (19)
Provides a preset boost to treble frequencies. To activate, depress the switch to its “in” position. The bright function
affects only the Clean channel.
CHANNEL SELECT SWITCH (20)
Allows selection of the Ultra or Clean channel. The “out” position selects the Clean channel.
Note: Channel selection may also be accomplished by the remote footswitch. If remote selection is desired, the
Channel switch must be in the “in” (Ultra) position.
4
Page 5
VOLUME (21)
Controls the overall volume level of the Clean channel.
LOW GAIN INPUT (22)
Provided for instruments that have extremely high outputs, which can result in overdriving (distorting) the High Gain
input. If both inputs are used simultaneously, the output levels are the same (both are low gain).
HIGH GAIN INPUT (23)
Used for most electric guitars. It is 6 dB louder than the Low Gain input.
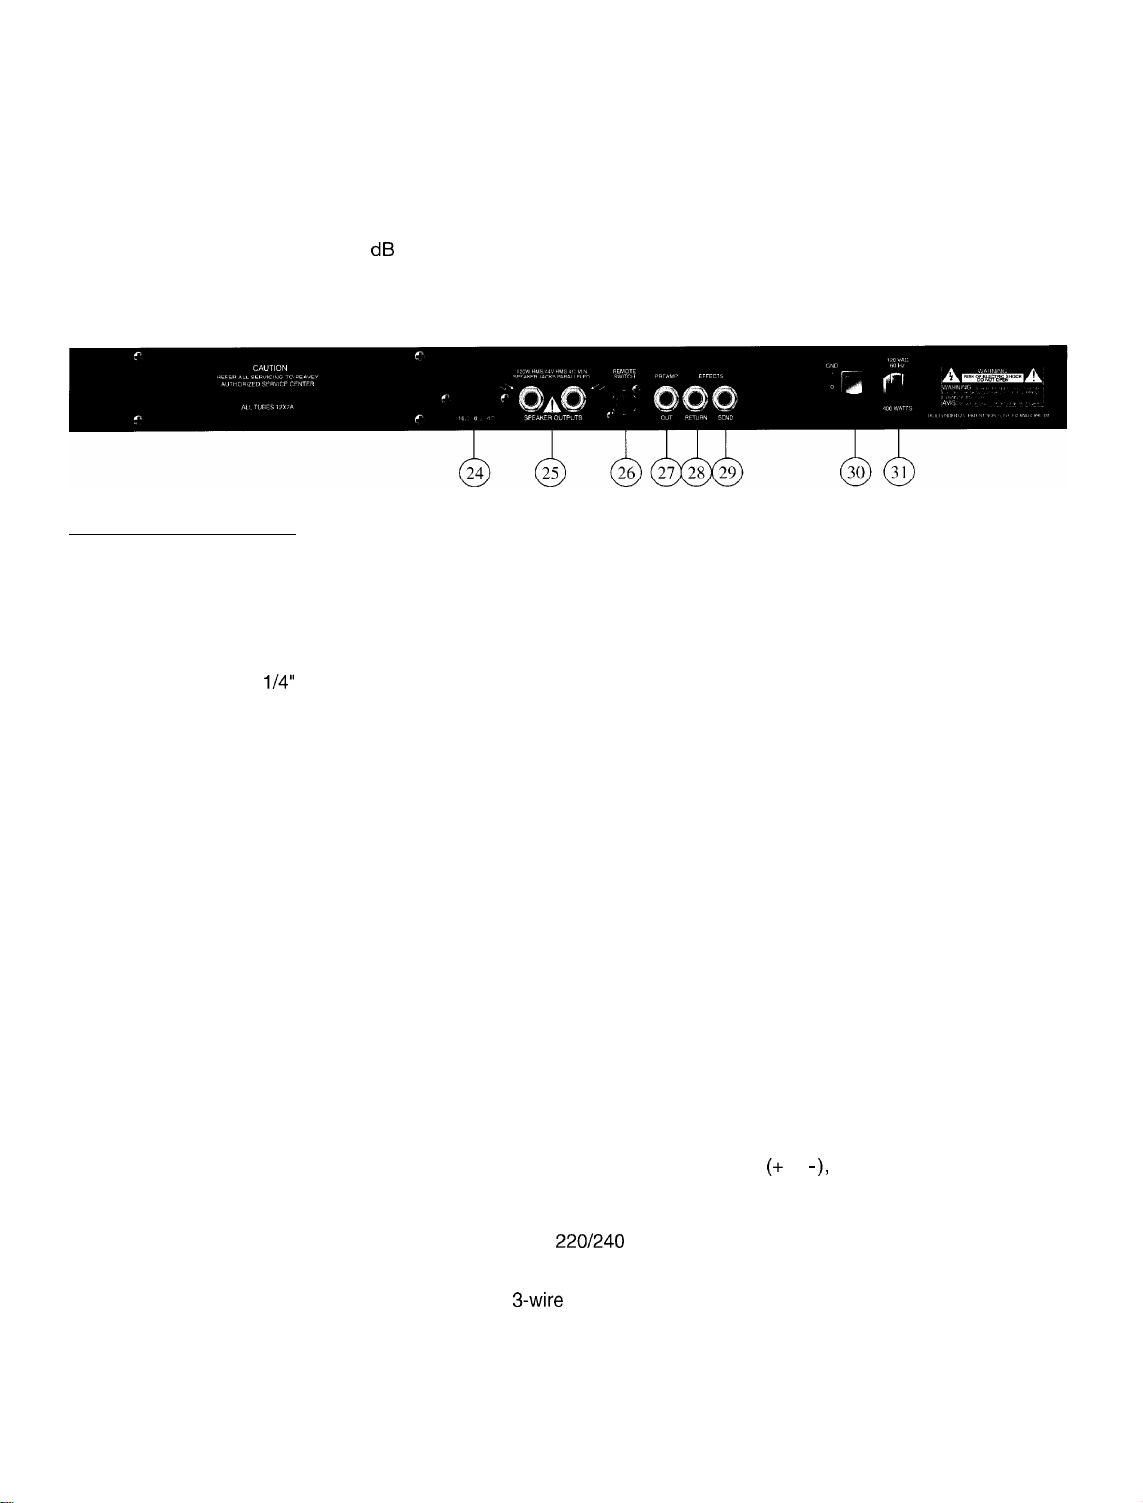
Back Panel:
BACK PANEL FEATURES
IMPEDANCE SELECTOR SWITCH (24)
Used to select the appropriate impedance of the speaker enclosure(s). If two enclosures of equal impedance are used,
the switch should be set at one half of that value (e.g. for two 16 ohm enclosures, set switch to 8 ohms; for two 8 ohms
enclosures, set switch to 4 ohms).
SPEAKER OUTPUTS (25)
A
Paralleled
When using more than one enclosure, be sure to calculate the total impedance and set the Impedance
switch (24) accordingly. (See above section on Impedance Selector Switch).
Important: Use only high-quality, unshielded cable for speaker connections.
l/4”
output jacks for connecting speaker enclosure(s) to the amplifier (minimum is 4 ohms).
REMOTE FOOTSWITCH JACK (26)
Provided for the connection of the supplied remote footswitch. Footswitch is used to select the Ultra Gain, Crunch Gain,
or Clean channel and defeat Reverb.
PREAMP OUT (27)
The Preamp Out can be used to route the amplified signal to a mixing console, tape recorder, etc. Connect the Preamp
output using a shielded cable to an input of the tape recorder, mixer, etc. This patch does not affect the operation of the
amplifier.
EFFECTS RETURN (28)
Input for returning signals from external low-level effects or signal processing equipment.
EFFECTS SEND (29)
Output for supplying signals from external effects or signal processing equipment.
GROUND SWITCH (30)
Three-position, rocker-type switch which, in most applications, should be operated in its center (zero)
A
Note: Should the noise problem continue, consult your Authorized Peavey dealer, the Peavey factory, or a qualified
service technician. The Ground Switch is not functional on 220/240 volt models.
LINE CORD-120 V products only (31)
A
position. There may be some situations when audible hum and/or noise will come from the loudspeaker.
If this occurs, position the Ground Switch to either positive or negative (+ or - ), or until the noise is
minimized.
For your safety, we have incorporated a 3-wire line (mains) cable with proper grounding facilities. It is not
advisable to remove the ground pin under any circumstances. If it is necessary to use the equipment
without proper grounding facilities, suitable grounding adaptors should be used. Less noise and greatly
reduced shock hazard exists when the unit is operated with properly grounded receptacles.
5
Page 6
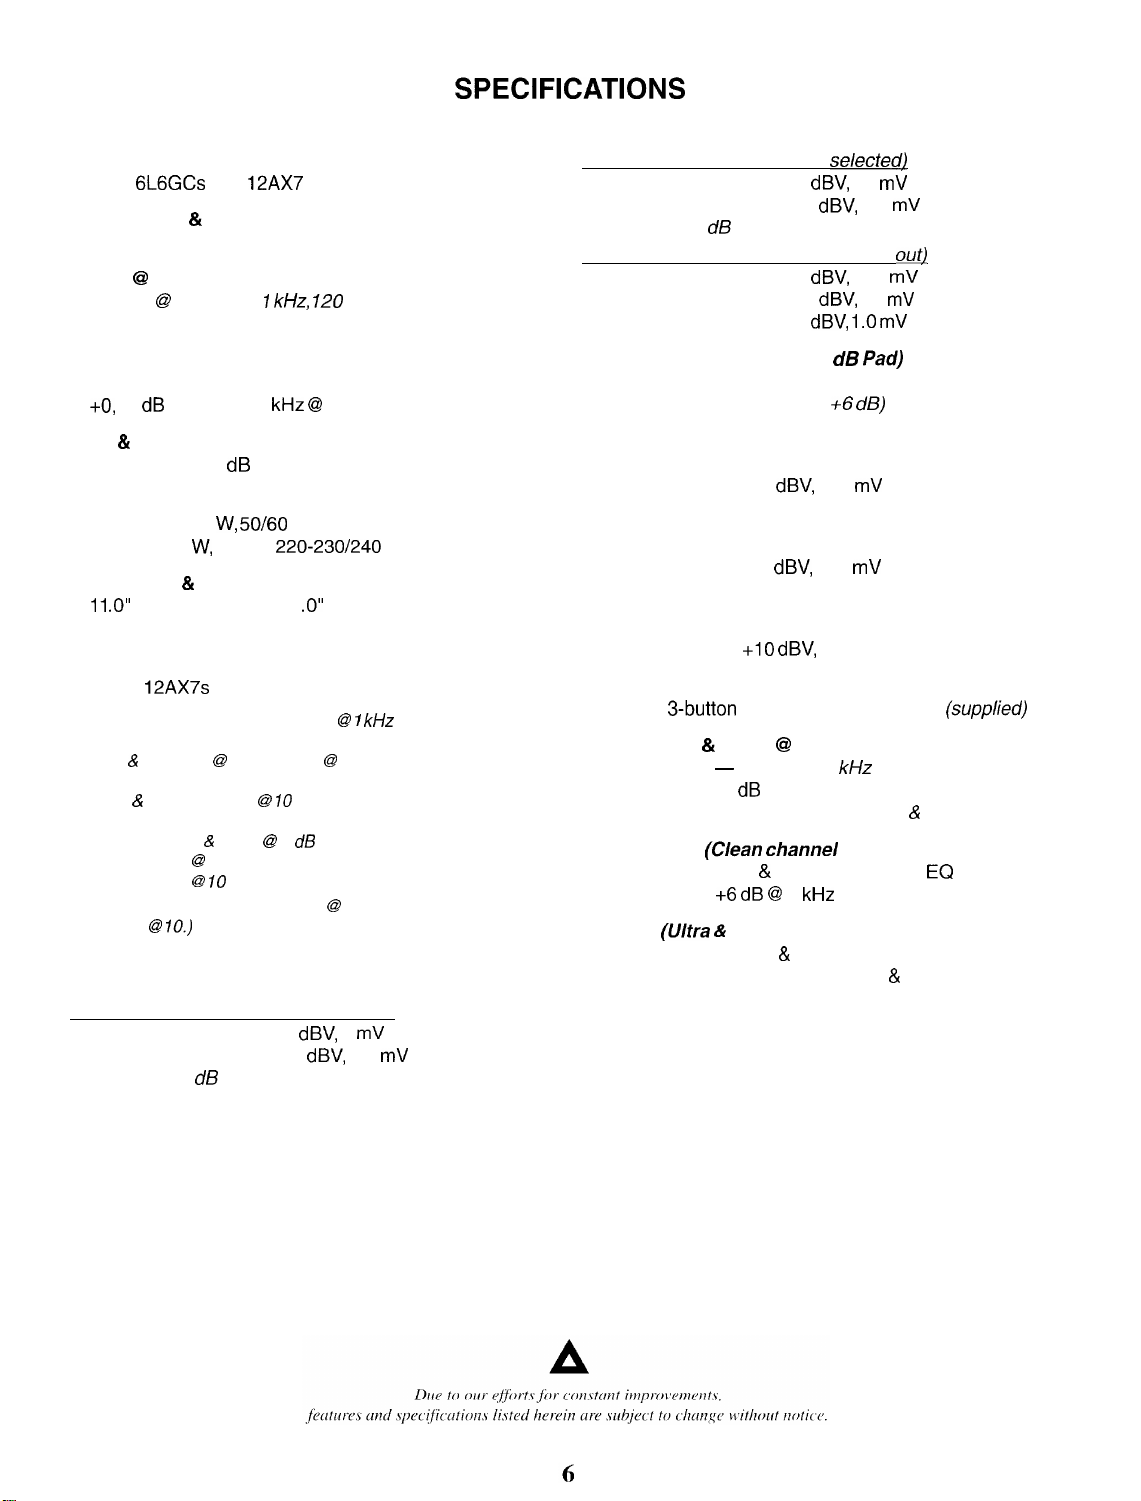
SPECIFICATIONS
POWER AMPLIFIER SECTION
Four 6L6GCs with 12AX7 driver
Rated Power & Load:
120 W RMS into 16, 8, or 4 ohms
Power @ Clipping:
(typically @ 5% THD, 1
kHz, 120
VAC line)
130 W RMS into 16, 8, or 4 ohms
(Bias must be reduced to measure)
Frequency Response:
+0,
-2 dB 50 Hz to 20 kHz @ 100 W RMS into 8 ohms
Hum 81 Noise:
Greater than 76 dB below rated power
Power Consumption:
Domestic: 400 W, 50/60 Hz, 120 V AC
Export: 400 W, 60 Hz, 220-230/240 V AC
Dimensions & Weight:
11 .O”
(H) x 26.5” (W) x 11
.O”
(D)
50.1 Ibs.
PREAMP SECTION
Three 12AX7s
The following specs are measured @ 1 kHz with the controls
preset as follows:
Low & High EQ @ 10, Mid EQ @ 0
Bright out
Ultra & Crunch Posts @
Gain switches out
Bottom, Body, & Edge @ 0 dB
Reverb level @ 0
Master level @
(Nominal levels are with Pre Gain @ 5. Minimum levels are with
Pre Gain @
10
10.)
IO
Preamp High Gain Input:
Impedance: Very High-Z, 470 K ohm
Ultra Channel: (with Channel Select in)
Nominal Input Level: -46
Minimum Input Level: -64
dBV,
5 mV RMS
dBV,
0.6 mV RMS
(subtract 15 dB with Gain switch in)
Crunch Channel: (Footswitch
Nominal Input Level: -34
Minimum Input Level: -52
selectecI1
dBV,
20 mV RMS
dBV,
2.5 mV RMS
(subtract 15 dB with Gain switch in)
Clean Channel: (with Channel Select out!
Nominal Input Level: -16
Minimum Input Level: -34
Maximum Input Level: 0
dBV,
150 mV RMS
dBV,
20 mV RMS
dBV, 1 .O mV
RMS
Preamp Low Gain Input: (-6 dB Pad)
Impedance: High-Z, 44 K ohms
(all levels are increased by +6 dB)
Effects Send:
Load Impedance: 47 K ohms or greater
Nominal Output: -10
dBV,
300 mV RMS
Effects Return:
Impedance: Very High-Z, 470 K ohms
Designed Level: -10
dBV,
300 mV RMS
Preamp Output:
Load Impedance: 47 K ohms or greater
Nominal Output:
+I0 dBV,
3 V RMS
Remote Footswitch:
Special 3-button unit with LED indicators (supplied)
System Hum & Noise @ Nominal Level:
(Clean channel - 20 Hz to 20 kHz unweighted)
Greater than 74 dB below rated power
(Special noise gate circuitry for Ultra & Crunch)
Equalization:
Custom Low, Mid, & High passive type
Push Bright: +6 dB @ 2
(clean
channel on/y)
EQ
kHz
Voicing: (U/tra & Crunch channels only)
Active Bottom, Body, & Edge EQ
Push Gain: Increases gain in Ultra & Crunch channels
Page 7

Page 8

Tone Settings
A’ A
!
Adjust for Preference
our
I
I
IN
Adtust for Preference
I
Select for Preference
METAL CLEAN
MILD
DISTORTION
OUT’
I
A A
I
Adjust for Preference
COUNTRY/ROCK COUNTRY
LEAD
I
‘OUT’
MILD RHYTHM
DISTORTION
Adjust for Preference
A !@ .?!b
I
“IN”
CLEAN
I
I
Tone settings given are general and will vary according to the type of guitar, gauge type of the strings, the type of pickup, and
even the type of pick. Personal preference, playing style, and type of music greatly contribute to desired tonality.
8
Page 9

Consulte
10s
diagramas
de1
panel
delantero en la
seccih
de
inglh
de este manual.
Ultra’” Plus Caracteristicas
l Diseno a base de tubos exclusivamente
l Cuatro tubos de preamp de
l Cuatro tubos de
l 120 watts RMS
l
Tres canales conmutables
l
Master Reverb
l
Circuit0
l
Control maestro de nivel
de efectos de bajo nivel
salida
@ 4,8
o 16 ohms
de
12AX7
6L6GC
ganancia
l Conmutador de resonancia de tres
posiciones
l Conmutador de mitad de potencia
El
diseiio
exclusivamente a base de tubos del nuevo cabezal de amplificador de guitarra
brinda
versatilidad
ponen a la altura de amplificadores dos o tres
Seleccione cualquier nivel de sonido Clean (puro), Crunch (crujido) o Dirty (sucio), con
y combinelos desde el panel frontal o con el conmutador de pie. El conmutador Resonance patentado de tres vias de
Peavey tiene un diseno que armoniza perfectamente con la parte inferior del gabinete de su altavoz y el entorno de su
habitation.
ideal para practicar o para actuaciones en locales pequenos.
Para saber que canal se ha elegido, el gran logo iluminado cambia de color al seleccionar
Clean (puro), Amarillo para Crunch (crujido) y Rojo para
ganancia y de brillo, le brindan posibilidades adicionales para controlar el modelado del
Un conmutador de potencia media provee
tonal y potencia maximas. Este amplificador de 3 canales presenta caracteristicas y tono que lo
veces
mas cares.
Canal
l
Control de nivel
l Brillo controlado por pulsador de
l
EQ de tres bandas
Canales
l
Pre y post ganancia
l Conmutador de intensification de
l
EQ de tres bandas
saturation
saturation.
Clean (puro)
Crunch (de crujido) y Ultra
UltraTM
10s
de tubo de bajo volumen de
Los conmutadores pulsadores de refuerzo de
tono.
presion
Plus de 120 watt,
tres canales del amplificador
salida
y una potencia
10s
canales - Verde para
FUNCIONES DEL TABLERO FRONTAL
POWER SWITCH (Interruptor de corriente) (1)
Coloque a la
recibiendo corriente alterna.
STANDBY SWITCH (Interrupteur de
Este interruptor le permite a su aparato estar en
“standby”
RESONANCE SWITCH (Interrupteur de resonancia) (3)
Utilizado para realizar ajustes precisos del rango de frecuencias graves de la caja de altavoces a traves de la
del
factor de amortiguacion entre tres fijacion del amplificador.
position
10s
tubos permanecen calientes, pero el amplificador no esta en
“on” para encender. La luz roja
condicih
de espera) (2)
condition
del
pilot0 (indicador) se encendera indicando que la unidad esta
de “espera” o la
condition
operation.
de active. En la
condition
variation
Page 10

OUTPUT SWITCH (Conmutador de salida) (4)
Permite seleccionar la potencia de
potencia media (60 watts de salida).
POWER LED (LED indicador de corriente) (5)
Se ilumina cuando el amplificador recibe corriente alterna.
salida
del amplificador en una gama que va desde potencia tonal (120 watts) hasta
STATUS LED (LED indicador de
Se ilumina cuandeo el amplificador esta en la
funcionamiento.
MASTER VOLUME (El Volumen maestro) (7)
Controla el nivel global de volumen del sistema. Una vez que se logra el balance deseado de
“crujido”, y “ultra”, el nivel
maestro.
REVERB LEVEL (Nivel de
La
reverberation
reloj. Un pedal interruptor remoto puede controlar la
EDGE (Filo) (9)
Un control de tono
Nota:
Este control no funciona en el canal “clean”.
BODY (El conjunto) (10)
Un control de tono
Nota:
Este control no funciona en el canal “clean”.
BOTTOM (Fondo) (11)
Un control de tono
Nota:
Este control no funciona en el canal “clean”.
ULTRA VOLUME (El volumen
Controla el nivel del volumen general del canal. El ajuste final de nivel debe hacerse despues de que se haya obtenido
el
sonido deseado.
es un efecto de eco. Para aumentar el efecto haga girar en control en la direction de la agujas del
del
active
(de estante, +I 5
active
(gradual &I 5
active
(de estante, k15
condich)
sistema enter0 puede aumentarse o disminuirse con el control de nivel del volumen
reverberacih)
del
canal “ultra”) (12)
(6)
condition
(8)
dB)
que varia el aumento o disminuicion de frecuencias agudas.
dB)
que varia el aumento o disminuicion de frecuencias medias.
dB)
que varia el aumento o disminuicion de frecuencias graves.
de espera (“standby”), indicando que el amplificador no esta en
10s
condition
de
activado/desactivado.
canales “clean”,
ULTRA GAIN CONTROL (Control de ganancia
Controla el nivel del entrada de volumen del canal.
ULTRA GAIN SWITCH (Interruptor de ganancia
Proporciona impulso a la ganancia del canal “ultra”. Para activarlo oprimalo a la
CRUNCH GAIN SWITCH (Interruptor de ganancia
Proporciona impulso a la ganancia del canal “crujido”. Para activarlo oprimalo a la
CRUNCH VOLUME (El volumen
Controla el nivel
el sonido deseado.
CRUNCH GAIN CONTROL (Control de ganancia
Controla el nivel
LOW, MID, & HIGH EQ (Ecualizador de frecuencias graves, medias, y agudas) (18)
Controles de tono pasivo que regulan las frecuencias graves, medias, y agudas.
BRIGHT SWITCH (Interruptor de brillo) (19)
Proporciona un impulso reajustado a las frecuencias de tiple. Para activar, oprima el interruptor a la
adentro”. La funcion de brillo solamente afecta el canal “limpio”.
CHANNEL SELECT SWITCH (Interruptor
Permite la
fuera selecciona el canal “clean”.
Nota:
Tambien se puede lograr la
control remoto, el interruptor de canal debe estar en la
del
volumen general del canal. El ajuste final de nivel debe hacerse despues de que se haya obtenido
del
entrada de volumen del canal.
selection del
canal “ultra” o “clean.” La
del
canal crujido) (16)
selection
del
canal “ultra”) (13)
del
canal “ultra”) (14)
position ‘%V
del
canal crujido) (15)
position
del
canal crujido) (17)
para
selecci6n
position
del canal por medio del pedal interruptor remoto. Si desea la
del
canal) (20)
hacia dentro selecciona el canal “ultra” y la
position
“in” (hacia adentro) (canal “ultra”).
(hacia adentro).
“in” (hacia adentro).
position
position
“hacia
hacia
selection
a
10
Page 11

VOLUME (El volumen) (21)
Controla el nivel de volumen del canal “clean”.
LOW GAIN INPUT (Entrada de baja ganancia) (22)
Se suministra para instrumentos que tienen una
(distorsion) de la entrada de alta ganancia.
HIGH GAIN INPUT (Entrada de ganancia alta) (23)
Se usa para la mayoria de las guitarras electricas. Tiene 6 dB mas volumen que la entrada de baja ganancia.
Tablero Trasero:
FUNCIONES DEL TABLERO TRASERO
IMPEDANCE SELECTOR SWITCH (Conmutador de impedancia) (24)
Se utiliza para seleccionar la impedancia apropiada de
misma impedancia, se debe ajustar el interruptor a la mitad de este valor. Si se utilizan dos bafles de 16 ohmios, se
debe ajustar el selector de impedancia a 8 ohmios; si se utilizan dos bafles de 8 ohmios, se debe ajustar el selector de
impedancia a 4 ohmios.
salida
extremadamente alta, la cual puede
10s
altavoces. Por ejemplo, si se utilizan dos altavoces de la
causar
la sobrecarga
SPEAKER OUTPUTS (Salidas de altavoces) (25)
Jacks de
A
Importante: Para las conexiones de
REMOTE FOOTSWITCH JACK (Enchufe hembra
Se suministra para la conexion del pedal interruptor de control remoto. El pedal se utiliza para seleccsionar
de Ultra Ganancia, Ganancia de Crujido, or Limpio y para desactivar la
PREAMP OUT (Salida de preamplificador) (27)
La
salida
salida
interconexion no afecta la
EFFECTS RETURN (Retorno de efectos) (28)
Entrada para el retorno de
de serial.
EFFECTS SEND (Envio de efectos) (29)
Salida para proporcionar
VOLTAGE SELECTOR SWITCH (Interruptor de
A
Nota:
La
4 ohms). Cuando utilice mas de una caja acustica asegurese de calcular la impedancia tonal y ajuste
conmutador de impedancia (24) segun corresponda. (Ver a
de impedancia).
del preamplificador puede usarse para mandar la serial a una consola de mezcla, grabadora, etc. Conecte la
del preamplificador, utilizando un cable blindado, a una entrada de la grabadora, mezclador, etc. Esta
Los models para
220/240 voltios. Antes de operar este equipo, asegurerse de que el interruptor esta ajustado para
voltaje correcto.
operacih
salida
de este
en paralelo de
10s
operation
seiiales
senales
equip0
del amplificador.
procedentes de equipos de efectos externos de bajo nivel o de procesadores
a efectos externosl o a equipos procesadores de serial.
exportation
con un ajuste incorrect0 de voltaje puede causar
i/4”
permiten conectar la(s) caja(s) acustica(s) al amplificador (minim0 de
altavoces use solamente cable no blindado de alta calidad.
del
pedal interruptor de control remoto) (26)
selection
de este product0 estan suministrados con un interruptor selector para
de voltaje) (30)
continuation
reverberation.
daiio
al transformador o la perdida de potencia.
la
section
sobre el conmutador
el
10s canales
el
AC LINE CORD SOCKET (Tomacorriente para el cable de corriente) (31)
Se suministra para enchufar el cable de corriente.
A
11
Page 12

Veuillez-vous
refkrer
au “front panel art”
situ6 dans la section en langue anglaise de ce manuel.
Ultra’r”
l Conception
l
Prkamplificateur h
l Quatre tubes de sortie
l
Intensitb
l
Trois canaux commutables
l
Rkverbbration principale
l Boucle d’effets de bas niveau
l Commande de niveau principal l Commutateur d’augmentation du gain
l Commutateur de
l Commuteur de demi puissance
Avec sa construction
pour offrir le maximum de puissance et de
caract&istiques
plus
cher.
Rbglez n’importe quelle valeur de modification du signal & I’aide des trois canaux de I’amplificateur: clean (non traite),
crunch (croquant) et dirty (sale), et passez de I’un 2 I’autre g I’aide du panneau avant ou de la pedale. Le commutateur
de rksonance & trois voies brevet6 par Peavey vous permet d’adapter la profondeur des basses ti votre haut-parleur et
aux dimensions de la
est idbal pour les
Rien de plus facile que de
vet-t pour Clean, jaune pour Crunch et rouge pour Overdrive. Les commutateurs a bouton-poussoir Gain boost et bright
permettent encore plus de contr6le sur le timbre.
entihrement
tubulaire
quatre tubes
6L6GC
efficace:l20 watts @
rbsonance Sr
entierement 5
et une sonoritk qui lui permettent de rivaliser avec des amplificateurs vendux deux et meme trois fois
Salle.
Un commutateur de demi-puissance permet d’obtenir une saturation de tube bas volume et
rkp&itions
ou pour les petites salles!
dkterminer
4,8
trois positions
tubes, le nouveau
sur quel canal vous
Plus
12AX7
ou 16 ohms
preamplificateur
flexibilite
tonale. Avec ses trois canaux, notre
Caractbristiques
Canal Clean
l
Contrble du niveau
l
ContrGle
l Egalisateur
Canaux Crunch et Ultra
l
Prk-
l Egalisateur
joupz1; il
suffit d’observer la couleur du grand logo lumineux:
de la brillance par bouton-poussoir
B
trois bandes
et post- gain
&
trois bandes
de guitare Ultra
TM
Plus de 120 watts a &5
preamplificateur
posskde des
conqu
CARACTERISTIQUES DU PANNEAU AVANT
POWER SWITCH (Interrupteur d’alimentation) (1)
<<
Mettre en position
est aliment6 en courant.
STANDBY SWITCH (Commutateur d’attente) (2)
Permet de
I’amplificateur ne fonctionne pas mais les lampes
sans
RESONANCE SWITCH (Commutateur de resonance) (3)
Sert ti ajuster finement le registre des frequences graves de I’enceinte de haut-parleur(s) en variant le facteur
d’amortissement
OUTPUT SWITCH (Commutateur de sortie) (4)
Permet de choisir entre deux puissances de sortie du signal: 120 watts (pleine puissance) ou 60 watts (puissance
reduite de moitie).
sklectionner l’&at
d&ai.
on >> pour mettre sous tension. La lampe tbmion rouge (DEL) s’illumine indiquante que I’appareil
cc
Standby b> (attente). En position << Standby
(cc
damping
de I’ampli: mode c< Active ‘> (actif) ou mode
(cc
tubes
,,)
restent chaudes pour permettre de le remettre en service
>>)
de I’amplificateur.
12
>>,
Page 13

POWER LED (DEL temoin de mise
S’allume lorsque I’ampli recoit I’alimentation CA.
STATUS LED (DEL temoin) (6)
S’allume lorsque I’ampli est en mode d’attente
MASTER VOLUME (Principal volume) (7)
Contr6le le niveau de volume global du systhme. Une fois la balance des canaux (< Clean
ktablie, le volume du syst&me
REVERB LEVEL (Niveau de reverberation) (8)
La
r&erb&ation
I’intensit6 de I’effet. Cinterrupteur au pied peut contr6ler la mise en circuit ou hors circuit
EDGE (Aigue) (9)
Bouton
de
aigues.
Remarque: Cette commande ne fonctionne pas sur le canal c< Clean
est un effect
Gglage
de
tonalit
entier
d’kho.
actif (type passe haut
sous
tension) (5)
<<
Standby )’ pour indiquer que I’amplificateur
peut 6tre
Tournez dans le sens du mouvement des aiguilles d’une montre pour augmenter
haus&
ou
dimin& &
+I5 dB)
I’aide de la commande << Master Volume
(<<
faisant varier la coupure ou I’amplification des frhquences
>a.
test
>‘, <(
Crunch
on/off
pas
Q).
op&ationnel.
a),
et <( Ultra
“.
a>
BODY (Corps)
Bouton
de rkglage de
moyennes.
Remarque: Cette commande ne fonctionne pas sur le canal c< Clean
BOTTOM (Grave) (11)
Bouton de rkglage de
graves.
Remarque: Cette commande ne fonctionne pas sur le canal << Clean
ULTRA VOLUME (12)
Commande le volume global du canal. Le rkglage final de niveau doit
d&it-he &
ULTRA GAIN CONTROL (Commande de
ContrBle le niveau de volume d’entrke du canal.
ULTRA GAIN SWITCH (interrupteur de gain Ultra) (14)
Hausse le gain global du canal
CRUNCH GAIN SWITCH (interrupteur de gain Crunch) (15)
Hausse le gain global du canal
CRUNCH VOLUME (16)
Commande le volume global du canal. Le
d&ir6e 51
CRUNCH GAIN CONTROL (Commande de
Contr6le le niveau de volume d’entr6e du canal.
(IO)
tonalit
actif (correction + 15
tonalit
actif (type passe bas + 15
I’aide des autres rkglages.
<(
Ultra
Crunch
<<
I’aide des autres reglages.
dB)
faisant varier la coupure ou I’amplification des
dB)
faisant varier la coupure ou I’amplification des frequences
gainultra)
‘).
Abaisser TV la position << in )> pour activer.
‘>.
Abaisser 2 la position <c in ” pour activer.
kglage
gaincrunch)
(13)
final de niveau doit
(17)
‘b.
>>.
&Ire effect& apr&s
W-e effect& apt-&
fkquences
avoir obtenu le sonorit6
avoir obtenu le sonorit6
LOW, MID, & HIGH EQ (Bgalisation graves, moyennes et aigues) (18)
Rbglages de
BRIGHT SWITCH (Commutateur de brillance) (19)
Produit un renforcement des fr6quences aigues. Pour activer, enclenchez le bouton & la position << in Q. Cette fonction
de brillance n’affecte que le canal <q Clean
CHANNEL SELECT SWITCH (Commutateur de sklection de canal) (20)
Permet la s6lection des canaux dc Ultra )> ou << Clean
Remarque: La
&lection
VOLUME (21)
Contr6le le niveau de volume
tonalit
passifs reglant les
sklection
de canal doit alors 6tre en position << in >> (Ultra).
de canal peut aussi s’effectuer A distance g I’aide de I’interrupteur au pied. Le commutateur de
g&&al
frkquences
>>.
du canal << Clean
graves, moyennes et aigues.
>a.
La position <q out >> active le canal cc Clean
>a.
)a.
13
Page 14

LOW GAIN INPUT (Entree faible gain) (22)
Cette prise accepte les instruments a tres haut niveau de sortie qui causeraient de la saturation (distorsion) sur I’entree
<<
High Gain
HIGH GAIN INPUT (Entree haut gain) (23)
Cette prise s’utilise avec la plupart des guitares electriques. Elle donne un gain superieur de 6 dB a I’entree
<<
Low Gain
Panneau Arriere:
CARACTERISTIQUES DU PANNEAU ARRIERE
IMPEDANCE SELECTOR SWITCH (Commutateur d’impedance) (24)
Set-t ti selectionner I’impedance appropriee pour le ou les haut-parleurs. Par exemple, si deux haut-parleurs de meme
impedance sont utilises, le selecteur doit etre regle a la moitie de cette valeur. Si deux baffles de 16 ohms sont utilises,
le
selecteur d’impedance doit etre regle 8 ohms ; si deux baffles de 8 ohms sont utilises, le selecteur d’impedance doit
etre regle 4 ohms.
>>.
Si les deux entrees sont
)>.
utilisees
simultanement, les niveaux son alors equivalents
(cc
Low Gain
>>).
SPEAKER OUTPUTS (Sorties de haut-parleur) (25)
Le raccord de I’amplificateurs aux enceintes de haut-parleurs se fait au moyen de prises de sortie
A
Important: Pour raccorder cet amplificateur aux haut-parleurs, n’utilisez que des cables non
qualite.
REMOTE FOOTSWITCH JACK (Jack pour interrupteur au pied) (26)
Permet de brancher la commande a distance incluse. L’interrupteur au pied est utilise pour selectionner les canaux
c(
Ultra Gain
PREAMP OUT (Sortie preampli) (27)
La sortie preampli peut etre
cables
n’affecte pas le fonctionnement de I’amplificateur.
EFFECTS RETURN (Retour d’effets) (28)
Prise d’entree pour signaux provenant d’appareils externes de traitement de signal ou d’effets ti bas niveau.
EFFECTS SEND (Envoi d’effets) (29)
Prise de sortie servant a fournir des signaux a des appareils externes de traitement de signal ou d’effets.
VOLTAGE SELECTOR SWITCH (Selecteur de tension) (30)
A
(6,35mm) en
vous de tenir compte de I’impedance
section ci-dessus au sujet du commutateur d’impedance).
>>, <<
Crunch Gain
blind&
pour brancher la sortie du preampli a I’entree d’un magnetophone, d’un melangeur, etc. Ce branchement
Les modeles pour exportation de ce produit sont dotes d’un selecteur 220/240 volts. Avant toute mise en
service, assurez-vous que le selecteur est regle a la tension appropriee.
Remarque: L’utilisation de ce produit sous un mauvais reglage de tension peut causer des dommages au
transformateur ou une perte de puissance de sortie.
parallele,
pour un minimum de 4 ohms. Lorsque vous utilisez plus d’une enceinte, assurez-
totale
avant de regler le commutateur d’impedance (24) (voir la
ou << Clean >) et pour mettre la reverberation hors circuit.
>>,
utilisee
pour amener le signal & une table de mixage, un magnetophone, etc. Utilisez des
blind&
d’excellente
l/4”
AC LINE CORD SOCKET (Prise pour cable d’alimentation) (31)
A
Prise de branchement du cordon d’alimentation CA detachable.
14
Page 15

Siehe Diagramm der Frontplatte im englischen Teil des Handbuchs.
Ultra’” Plus Technische Daten
l
Riihrensystem
l
Vier 12AX7
l
Vier 6L6GC Ausgangsriihren
l 120 Watt RMS
l
Drei verstellbare Kaniile
l
Zentralresonator
l Resonanzkreis fur Effekte
Eingangsrohren
bei 4,s
oder 16 Ohm
bei
niedriger Starke
l Zentrale Starkeregelung
l Drei-Positionsresonanzschalter
l Halbleistungsschalter
Der neue
Der 3-Kanal-Verst&-ker besitzt technische Eigenschaften und eine Tonqualittit, die mit Gertiten zweifachen bis
dreifachen Preises konkurrieren kijnnen.
Wtihlen Sie jeden Verstarkungsgrad in clean (Klarton), crunch (mittelstarke Verzerrung) oder dirty (starke Verzerrung)
mit dem 3-Kanal-Verstarker, und schalten Sie von einem Kanal zum anderen, entweder am Schaltbord oder mit der
FuOpedale. Der patentierte Peavey 3-Wege Resonanzschalter
und an die r8umliche Umgebung anpassen. Ein Halbleistungsschalter garantiert
Lautsttirke und ideale Leistung
Die Bestimmung des Kanals, auf dem Sie sich gerade befinden, ist einfach: Die Farbe des
andet-t
Overdrive (starke Verzerrung). Schalter zur
Kontrolle
UltraTM-Plus-
sich
bei
tiber
Rdhrensystem-, 120-Watt-GitarrenversMrkerkopf bietet
fijr
Proben oder kleinere Hallen.
Kanalumschaltung - grtin
die Tonabstimmung.
fiir
Clear (Klarton), gelb
Versttirkungsmultiplikation
Clean Channel (Kanal
l
Stgrkeregelung
l
Tonaufheller
l
Drei-Band Equalizer
Crunch & Ultra Channels
mittelstarke & starke Verzerrung)
l
Vor-und
l
Schalter zur
l Drei-Band Equalizer
M3t
fijr
Nachverstarkung
Verstarkungs-multiplikation
maximale Tonflexibilittit
sich am unteren Ende an den Lautsprecherstellplatz
fiir
Rijhrenauslastung
Crunch (mittelstarke Verzerrung) und rot
und zur Tonaufhellung
fiir
Klarton)
(Kantile fiir
und -leistung.
bei
niedridger
groBen,
leuchtenden Logo
ermijglichen zusatzliche
fijr
BESCHREIBUNG DER FRONTPLATTE
POWER SWITCH (Netzschalter) (1)
Zum einschalten diesen schalter auf
eingeschaltet ist.
STANDBY SWITCH (2)
Ermijglicht
die rijhren weiter beheizt, das signal ist jedoch abgeschaltet.
RESONANCE CONTROL (Resonance regler) (3)
Hiermit kann die tieff requentz-wiedergabe der lautsprecherbox angepaOt werden durch veranderung des
d2mpfungsfaktors des
OUTPUT SWITCH (Ausgtingschalter) (4)
Er
ermijglicht,
POWER LED (Betriebsanzeige) (5)
Zeigt die eingeschaltete netzspannung an.
es, den
die
versttirker
verstarkers
voile
Leistung des
mit abgeschaltetem tonsignal betriebsbereit zu halten. In der ,,standby“ betriebsart werden
,,on“
stellen. Die rote kontrollampe (LED) leuchtet und zeigt an,
zwischen drei voreingestellten.
Versttirkers
(120 Watt) auf die halbe Leistung (60 Watt) zu reduzieren.
daB
15
das ger8t
Page 16

STATUS LED (Zustand kontrollampe) (6)
Leuchtet auf, wenn der verst rker aut standby“ steht und zeight an,
MASTER VOLUME (Hauptlautstiirke) (7)
Regelt die Gesamtlautstarke des
ist, kann die Gesamtlautstarke des Gerats mit diesem Hauptlautstarke regler angehoben oder abgesenkt werden.
REVERB LEVEL (Reverbpegel) (8)
Reverb ist ein echoeffekt. Drehen im uhrzeigersinn verstarkt den effekt.
fuf3schalter ein oder auszuschalten.
EDGE (9)
Ein aktiver klangregler (shelving type +I 5
Merke: Dieser regler wirkt nicht auf dem clean-kanal.
BODY (10)
Ein aktiver klangregler
Merke: Dieser regler wirkt nur auf den clean-kanal.
BOTTOM (11)
Ein aktiver klangregler (shelving type +I 5
Merke: Dieser regler wirkt nicht auf dem clean-kanal.
ULTRA VOLUME (12)
Regelt die Gesamtlautstarke das kanals. Die feineinstellung sollte erfolgen, wenn der gewunschte klang erreicht wurde.
ULTRA GAIN CONTROL (13)
Regelt den
einganglautstarke
(spitzenwert/mittenrastung +I
Get-&s.
das kanals.
Wenn die gewunschte Balance der Clean, Crunch und Ultra-Kanale erreicht
dB),
der die hohen frequenzen anhebt oder absenkt.
5
dB)
der die mitten frequenzen anhebt oder absenkt.
dB),
der die tiefen frequenzen anhebt oder absenkt.
daB
er nicht arbeitet.
Auch
mit dem als zubehor erhaltlichen
ULTRA GAIN SWITCH (14)
Hebt generell die lautstarke das ultra-kanals an. Zum einschalten in die
CRUNCH GAIN SWITCH (15)
Hebt generell die laustarke das crunch-kanals an. Zum einschalten in die
CRUNCH VOLUME (16)
Regelt die Gesamtlautstarke das kanals. Die feineinstellung sollte erfolgen, wenn der gewunschte klang erreicht wurde.
CRUNCH GAIN CONTROL (17)
Regelt den
LOW, MID, & HIGH EQ (18)
Hierbei handelt es sich
BRIGHT SWITCH (19)
Bringt einen voreingestellten boost der
,,bright“-funktion wirkt nur auf den
CHANNEL SELECT SWITCH (Kanal Wiihl Schalter) (20)
Wahlt den
Merke: Kanalwahl kann ebenfalls per FusBschalter erfolgen.
position (ultra) befinden.
VOLUME (Lautstiirke) (21)
Regelt den Gesamtlautstarke das clean kanals.
LOW GAIN INPUT (22)
Dieser Eingang ist fur die lnstrumente vorgesehen, die ein besonders hohes Ausgangssignal erzeugen. Falls beide
Eingange gleichzeitig benutzt werden, sind die Ausgangssignal gleich (beide sind dann Low Gain).
einganglautstarke
,,ultra“
oder ,,clean“-kanal an. Die
das kanals.
urn
passive klangregler, die tiefe, mittlere und
clean”
hohen
frequenzen. Zum einschalten den schalter in die
kanal.
,,out“
position wahlt
,,clean“
1st
dies gewunscht,
,,in“
position bringen.
,,in”
position bringen.
hohe
frequenzen ent sprechend regeln.
,,in”
an.
muf3
der schalter sich in der
position bringen. Die
,,in“
HIGH GAIN INPUT (23)
Dieser eingang kann fur die meisten elektrischen gitarren verwendet werden. Er ist 6 dB empfindlicher als der Low Gain
input.
16
Page 17

Riickplatte:
BESCHREIBUNG DER RUCKPLATTE
IMPEDANCE SELECTOR SWITCH (Impedanz Wahlschalter) (24)
Hiermit wird die entsprechende lautsprecher-impedanz eingestellt.
gleicher impedanz sollte der schalter auf die halfte des werts eingestellt werden. Wenn
angeschlossen werden, sollte der impedanz-wahlschalter auf 8 ohm eingestellt sein.
SPEAKER OUTPUTS (Lautsprecherausgang) (25)
l/4”
(entspricht 0.653 cm)
A
Wichtig: Benutzen Sie nur unverkleidetes Kabel von hoher
REMOTE FOOTSWITCH JACK (Zwischen FuOschalter Busche) (26)
Zum
anschluf3
schaltet reverb.
PREAMP OUT (Vorstufenausgang) (27)
Dieser ausgang kann zum
Verbinden sie den ausgang mit hilfe eines abgeschirmten
anschluf3
(das Minimum ist 4 Ohm). Wenn Sie mehr als eine Box benutzen, ist unbedingt die Gesamtimpedanz zu
berechnen und der lmpedanzschalter dementsprechend einzustellen. (Siehe obiges Kapitel zum
Impedanzschalter).
des mitgelieferten fuf3schalters. Dieser wahlt zwischen von ultra gain, crunch gain oder clean Kanals und
anschluf3
beeinfluBt die funktionen des verstarkers
Parallelanschltisse, urn
Qualitat
des verstarkers an einen mixer, eine bandmaschine, etc. verwendet werden.
kabels mit dem eingang des
nicht.
Bei
der verwendung von z.B. zwei lautsprechern
die Lautsprecherboxen an den Verstarker anzuschlief3en
fur den AnschluB der Lautsprecher.
zwei 16 ohm
entsprechenden gerates. Dieser
boxen
EFFECTS RETURN (Effekteingang) (28)
Eingang
EFFECTS SEND (Effektausgang) (29)
Ausgang fur Versorgung signale von externe effekte oder signal-prozessoren.
VOLTAGE SELECTOR SWITCH (Spannungs-Wahlschalter) (30)
AC LINE CORD SOCKET (Stromanschluss) (31)
A
fijr
ruckfuhrende
Export-Ausfiihrungen
lnbetriebnahme
Vorsicht: Die Verwendung dieses Gerates mit falsch eingestellter Netzspannung kann zu Schaden am
Transformer oder zu Verlust an Ausgangsleistung fuhren!.
Zum Anschliessen des abnehmbaren Wechselstrom-Kabels.
signale
von niederohmigen externe effekten oder signal-prozessoren.
dieses Modells sind mit einem 220/240 Volt-Umschalter
muB
sichergestellt werden,
daB
die Spannung den lokalen
A
ausgertistet.
Verhtiltnissen
Vor der ersten
angepaBt ist.
17
Page 18

THIS LIMITED WARRANTY VALID ONLY WHEN PURCHASED AND REGISTERED IN THE UNITED STATES OR CANADA. ALL EXPORTED PRODUCTS
ARE SUBJECT TO WARRANTY AND SERVICES TO BE SPECIFIED AND PROVIDED BY THE AUTHORIZED DISTRIBUTOR FOR EACH COUNTRY.
Ces clauses de garantie ne sont vaiables qu’aux Etats-Unis et au Canada. Dans tour les autres pays, les clauses de garantie et de maintenance sont
fixees par le distributeur national et assuree par
lul
seion la legislation envigueur.
Produkte sind der Garantie und dem Service des lmporteurs des jewelligen Landes unterworfen.
product0
es
servicio que cada distribuidor autorizado determine y ofrezca en
comprado
en E.U. continentales o en Canada. Todos
PEAVEY ONE-YEAR LIMITED
10s productos
10s
diferentes paises.
WARRANTY/REMEDY
l l
Diese Garantie ist nur in den USA and Kanada gultig. Alle Export-
que
Sean
l l
Esta garantia es valida solamente cuando
comprados en el extranjero, estan sujetos a
las
el
garantias y
PEAVEY ELECTRONICS CORPORATION (“PEAVEY”) warrants this product, EXCEPT for covers, footswitches, patchcords, tubes and meters, to be free from
defects in material and workmanship for a period of one (1) year from date of purchase, PROVIDED, however, that this limited warranty is extended only to the
original purchaser
subject
condltlons, exclusions, and limitations hereinafter set forth:
PEAVEY 90-DAY LIMITED WARRANTY ON TUBES AND METERS
If this product contains tubes or meters, Peavey warrants the tubes or meters contained in the product to be free from defects in material and workmanship for
a period df ninety
subject conditions, exclusions.
(90) days from date of purchase- PROVIDED, however, that this
and limitations hereinafter set forth.
CONDITIONS, EXCLUSIONS, AND LIMITATIONS OF
limited
warranty is extended only to the
WARRANTIES
onginal
retail purchaser and IS also
These limited warranties shall be void and of no effect, if:
a.
The first purchase of the product is for the purpose of resale; or
b.
The original retail purchase is not made from an AUTHORIZED PEAVEY DEALER; or
c.
The product has been damaged by accident or unreasonable use, neglect, improper service or maintenance, or other causes not
arising
out of defects in
material or workmanship; or
d.
The serial number affixed to the product is altered, defaced, or removed.
In the event of a defect in material and/or workmanship covered by this limited warranty, Peavey will:
a.
In the case of tubes or meters, replace the defective component without charge.
b.
In other covered cases (i.e., cases involving anything other than covers, footswitches, patchcords, tubes or meters), repair the defect in material or
workmanship or replace the product, at Peavey’s option; and provided, however, that, in any case, all costs of shipping, if necessary, are
purchaser.
THE WARRANTY REGISTRATION
SHOULD BE ACCURATELY
COMPLET ED AND MAILED TO AND RECEIVED BY PEAVEY
DAYS FROM THE DATE OF YOUR PURCHASE.
order to obtain service under these warranties, you must:
Bring the defective
item
to any PEAVEY AUTHORIZED DEALER or AUTHORIZED PEAVEY SERVICE CENTER and present therewith the
paid
by you, the
WITHIN FOURTEEN
ORIGINAL
(14)
PROOF OF PURCHASE supplied to you by the AUTHORIZED PEAVEY DEALER in connectlon with your purchase from him of this product.
If the DEALER or SERVICE CENTER
IS
unable to provide the necessary warranty service you will be directed to the nearest other PEAVEY AUTHORIZED
DEALER or AUTHORIZED PEAVEY SERVICE CENTER which can provide such service.
OR
b. Ship the defective item, prepaid, to:
PEAVEY ELECTRONICS CORPORATION
International Service Center
326 Hwy. 11 & 80 East
Meridian, MS 39301
including therewith a complete, detailed description of the problem, together with a legible copy of the original PROOF OF PURCHASE and a complete return
address. Upon Peavey’s receipt of these items: If the defect
have been complied with, Peavey will provide the necessary warranty service to repair or replace the product and will return
IS
remedial under these limited warranties and the other terms and conditions expressed herein
It,
FREIGHT COLLECT, to you,
the purchaser.
Peavey’s liability to the purchaser for damages from any cause whatsoever and regardless of the form of action, including negligence, is limited to the actual
damages up to the greater of $500.00 or an amount equal to the purchase price of the product that caused the damage or that
IS
the subject of or is directly related
to the cause of action. Such purchase price will be that in effect for the specific product when the cause of action arose. This limitation of liability will not apply to
claims for personal Injury or damage to real property or tangible personal property allegedly caused by Peavey’s negligence. Peavey does not assume liability for
personal Injury or property damage arising out of or caused by a non-Peavey alteration or attachment, nor does Peavey assume any responsibility for damage to
interconnected non-Peavey equipment that may result from the normal functioning and maintenance of the Peavey equtpment.
UNDER NO CIRCUMSTANCES WILL PEAVEY BE LIABLE FOR ANY LOST PROFITS, LOST SAVINGS, ANY INCIDENTAL DAMAGES, OR ANY
CONSEQUENTIAL DAMAGES ARISING OUT OF THE USE OR INABILITY TO USE THE PRODUCT, EVEN IF PEAVEY HAS BEEN ADVISED OF THE
POSSIBILITY OF SUCH DAMAGES.
THESE LIMITED WARRANTIES ARE IN LIEU OF ANY AND ALL WARRANTIES, EXPRESSED OR IMPLIED, INCLUDING, BUT NOT LIMITED TO, THE
IMPLIED WARRANTIES OF MERCHANTABILITY AND FITNESS FOR A PARTICULAR USE; PROVIDED, HOWEVER, THAT IF THE OTHER TERMS AND
CONDITIONS NECESSARY TO THE EXISTENCE OF THE EXPRESSED, LIMIT!
4
WARRANTIES, AS HEREINABOVE STATED, HAVE BEEN COMPLIED
WITH, IMPLIED WARRANTIES ARE NOT DISCLAIMED DURING THE APPLICABLE ONE-YEAR OR NINETY-DAY PERIOD FROM DATE OF PURCHASE OF
THIS PRODUCT.
SOME STATES DO NOTALLOW LIMITATION ON HOW LONG AN IMPLIED WARRANTY LASTS, OR THE EXCLUSION OR LIMITATION OF INCIDENTAL
OR CONSEQUENTIAL DAMAGES, SO THE ABOVE LIMITATIONS OR EXCLUSIONS MAY NOT APPLY TO YOU. THESE LIMITED WARRANTIES GIVE YOU
SPECIFIC LEGAL RIGHTS, AND YOU MAY ALSO HAVE OTHER RIGHTS WHICH MAY VARY FROM STATE TO STATE.
THESE LIMITED WARRANTIES ARE THE ONLY EXPRESSED WARRANTIES ON THIS PRODUCT, AND NO OTHER STATEMENT, REPRESENTATION,
WARRANTY, OR AGREEMENT BY ANY PERSON SHALL BE VALID OR BINDING UPON PEAVEY.
In the event of any modification or disclaimer of expressed or
implied
warranties, or any limitation of remedies, contained herein conflicts
with
applicable law,
then such modification, disclaimer or limitation, as the case may be, shall be deemed to be modified to the extent necessary to comply with such law.
Your remedies for breach of these warranties are limited to those remedies provided herein and Peavey Electronics Corporation gives this
with
respect to equipment purchased in the United States of America.
limited
warranty only
INSTRUCTIONS-WARRANTY REGISTRATION CARD
1.
Mail the completed WARRANTY REGISTRATION CARD to:
PEAVEY ELECTRONICS CORPORATION
P.O. BOX 2898
Mendian,
a. Keep the PROOF OF PURCHASE. In the event warranty service is required
identification card
2.
IMPORTANCE OF WARRANTY REGISTRATION CARDS AND NOTIFICATION OF CHANGES OF ADDRESSES:
issued
by Peavey Electronics Corporation.
MS 39302-2898
during
the warranty period, you will need
this
document. There
WIII
be no
a. Completion and mailing of WARRANTY REGISTRATION CARDS - Should notification become necessary for any condition that may require correctlon,
the REGISTRATION CARD
will
help ensure that you are contacted and properly notified.
b. Notice of address changes - If you move from the address shown on the WARRANTY REGISTRATION CARD, you should notify Peavey of the change of
address so as to facilitate your receipt of any bulletins or other forms of notification which may become necessary in connection with any condition that may
require dissemination of information or correction.
3.
You may contact Peavey directly by telephoning (601)
483-5365.
1s
Page 19

IMPORTANT SAFETY INSTRUCTIONS
WARNING: When using electric products, basic cautions should always be followed, including the following:
Read all safety and operating instructions before using this product.
1.
All safety and operating instructions should be retained for future reference.
2.
3.
Obey all cautions in the operating instructions and on the back of the unit.
All operating instructions should be followed.
4.
5.
This product should not be used near water, i.e., a bathtub, sink, swimming pool, wet basement, etc.
This product should be located so that its position does not interfere with its proper ventilation. It should not be placed flat against a
6.
wall or placed in a built-in enclosure that will impede the flow of cooling air.
7.
This product should not be placed near a source of heat such as a stove, radiator, or another heat producing amplifier.
Connect only to a power supply of the type marked on the unit adjacent to the power supply cord.
8.
Never break off the ground pin on the power supply cord. For more information on grounding, write for our free booklet “Shock
9.
Hazard and Grounding.”
10.
Power supply cords should always be handled carefully. Never walk or place equipment on power supply cords. Periodically check
cords for cuts or signs of stress, especially at the plug and the point where the cord exits the unit.
11.
The power supply cord should be unplugged when the unit is to be unused for long periods of time.
12.
If this product is to be mounted in an equipment rack, rear support should be provided.
Metal parts can be cleaned with a damp rag. The vinyl covering used on some units can be cleaned with a damp rag or an ammonia-
13.
based household cleaner if necessary. Disconnect unit from power supply before cleaning.
Care should be taken so that objects do not fall and liquids are not spilled into the unit through the ventilation holes or any other
14.
openings.
This unit should be checked by a qualified service technician if:
15.
a.
The power supply cord or plug has been damaged.
b.
Anything has fallen or been spilled into the unit.
The unit does not operate correctly.
C.
d.
The unit has been dropped or the enclosure damaged.
The user should not attempt to service this equipment. All service work should be done by a qualified service technician.
16.
17.
This product should be used only with a cart or stand that is recommended by Peavey Electronics.
18.
Exposure to extremely high noise levels may cause a permanent hearing loss. Individuals vary considerably in susceptibility to noise
induced hearing loss, but nearly everyone will lose some hearing if exposed to sufficiently intense noise for a sufficient time.
The U.S. Government’s Occupational Safety and Health Administration (OSHA) has specified the following permissible noise level
exposures.
Duration Per Day In Hours
8
6
4
3
2
1
l/2
1
l/2
l/4
or less
According to OSHA, any exposure in excess of the above permissible limits could result in some hearing loss.
Ear plugs or protectors in the ear canals or over the ears must be worn when operating this amplification system in order to prevent a
permanent hearing loss if exposure is in excess of the limits as set forth above. To ensure against potentially dangerous exposure to high
sound pressure levels, it is recommended that all persons exposed to equipment capable of producing high sound pressure levels such as
this amplification system be protected by hearing protectors while this unit is in operation.
Sound Level
dBA,
Slow Response
90
92
95
97
100
102
105
110
115
SAVE THESE INSTRUCTIONS!
19
Page 20

01996
Features and specifications subject to change without notice.
Peavey Electronics Corporation 711 A Street
/
Meridian, MS 39301 / U.S.A. / (601) 483-5365 / Fax 486-l 278
#80300294
Printed in U.S.A.
A
4/96
 Loading...