

Page 1
ª
¨
SPECIAL
GUITAR
OPERATING
GUIDE
Page 2

Contents:
Introduction ............................................................................ 3
Features................................................................................... 4
Body........................................................................... 4
Electronics .................................................................. 4
Neck........................................................................... 4
Hardware.................................................................... 4
Construction............................................................................ 5
Body........................................................................... 5
Neck........................................................................... 5
Pickups....................................................................... 5
Controls................................................................................... 5
Pickup Selector Switch................................................ 5
Volume....................................................................... 6
Output Jack................................................................. 6
Adjustments............................................................................. 6
Torsion Rod................................................................ 6
Tremolo Bridge........................................................... 7
String Retainer Bar...................................................... 7
Locking Topnut ........................................................... 7
String Installation........................................................ 8
D-Tuner Operation/Adjustment................................... 8
Tremolo Bridge Height/Tension .................................. 9
Tremolo Arm ............................................................ 10
String Intonation ................................................................... 11
Care of Your Instrument ....................................................... 13
Temperature & Humidity.......................................... 13
Strings....................................................................... 13
Finish........................................................................ 13
Accessories............................................................... 13
5150®Stack/212 Combo Amps ............................................. 14
Warnings............................................................................... 15
Español ................................................................................. 14
Français................................................................................. 27
Deutsch................................................................................. 38
Warranty............................................................................... 53
2
Page 3

Introduction
For as long as
I’ve been
playing guitar,
I’ve always been
searching for a
certain feel and
tone...I’ve
experimented
by tearing apart
and reassembling hundreds
of guitars in
different ways
searching for
these qualities.
Although I’ve
ruined a lot of
great guitars by having done this, I have learned what it takes
to make a truly great guitar. The Wolfgang
and error, (for me) is that guitar.
®
, after years of trial
Based on the familylike atmosphere, their commitment to
quality and the camaraderie we established during the
research and development process of the 5150®stack and
combo amplifier projects, Peavey was my logical choice as
the company to bring my ideas to life.
Our collective efforts in designing the Wolfgang guitar have
resulted in a versatile, quality-crafted guitar that feels great,
sounds great and is truly inspiring to play. I’ve already put
mine to the test in the studio and on tour and now it’s your
turn.
Stay Tuned,
3
Page 4

Thank you for buying a Peavey EVH Wolfgang Special
guitar. This guitar was built by the most skilled craftsmen
and made from the finest materials available. As with all
of our musical equipment, we have built our guitars using
a combination of leading-edge technology and traditional
handcrafted methods. Ask your Peavey dealer for a full list
of other Peavey musical equipment and accessories.
EVH Wolfgang Special Features
Body
•
Solid basswood construction
•
Unique offset cutaway design
Neck
•
Hardrock maple neck and fingerboard, oil-finished
•
Dual graphite reinforcements and adjustable torsion rod
•
25 1/2" scale length, 22 jumbo frets
•
15" fingerboard radius
•
Straight headstock with 3+3 tuning machine configuration
•
Bolt-on construction with contoured neck heel
Electronics
•
Two custom-wound Peavey humbucking pickups
•
Master volume control
•
Switchcraft®3-way toggle switch and output jack
Hardware
•
Precision die-cast tuning machines
•
Peavey/Floyd Rose®licensed, double-locking
tremolo assembly
•
D-Tuner
•
Chrome-plated hardware finish
4
Page 5
Construction
Body
The body of this instrument is constructed of select basswood
chosen specifically for tonal qualities as well as for weight
characteristics. The offset, asymmetrical body design offers
comfort, proper balance and maximum playing ease.
Neck
The select hardrock maple neck is crafted to provide
unmatched rigidity and freedom from warpage.
Additional strength is provided by the dual graphite
reinforcement bars and an easy access, adjustable steel
torsion rod. (See
ment instructions.)
Pickups
The two Peavey humbucking pickups, custom-wound to
Edward's specifications, supply optimal output and tonal
response. A two-step wax dipping process is used to provide ultra-low noise operation and resistance to microphonic feedback. The pickups are mounted directly to the
body, which further reduces feedback at high volume
levels and offers enhanced tonal response.
Adjustments–Torsion Rod
for adjust-
Controls
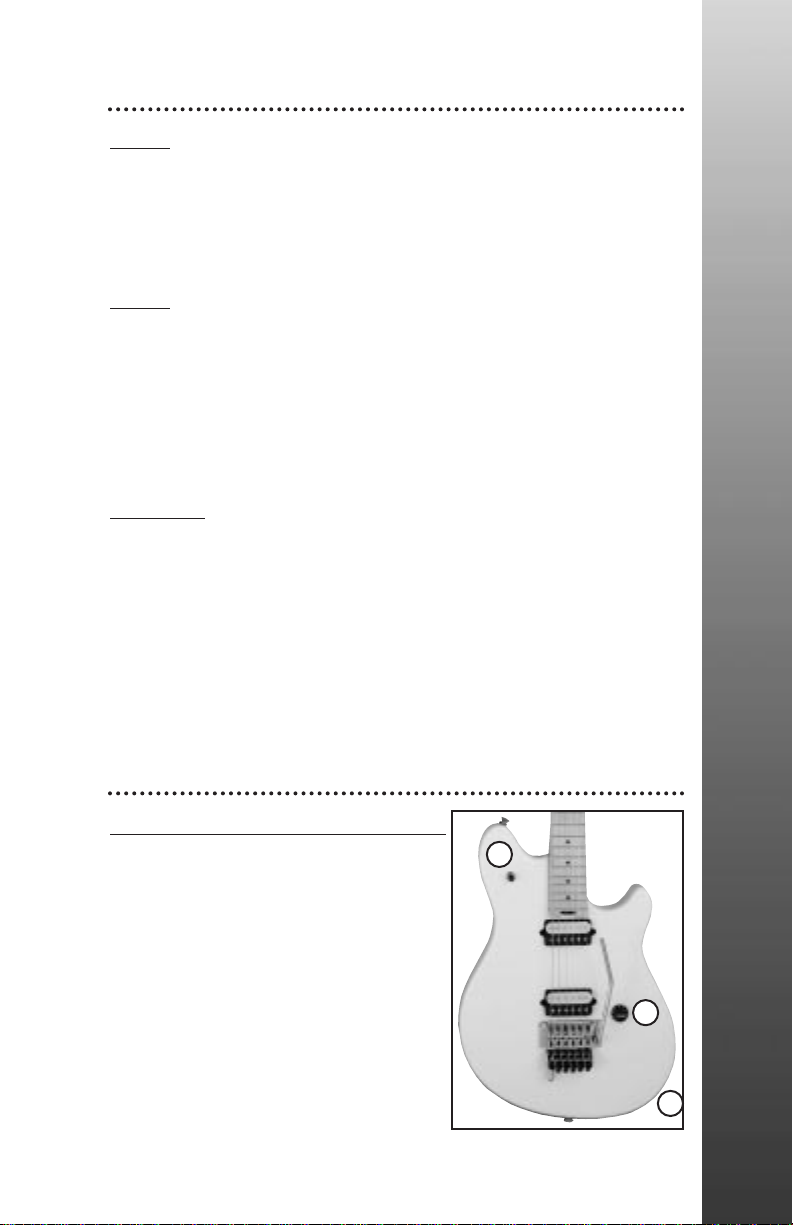
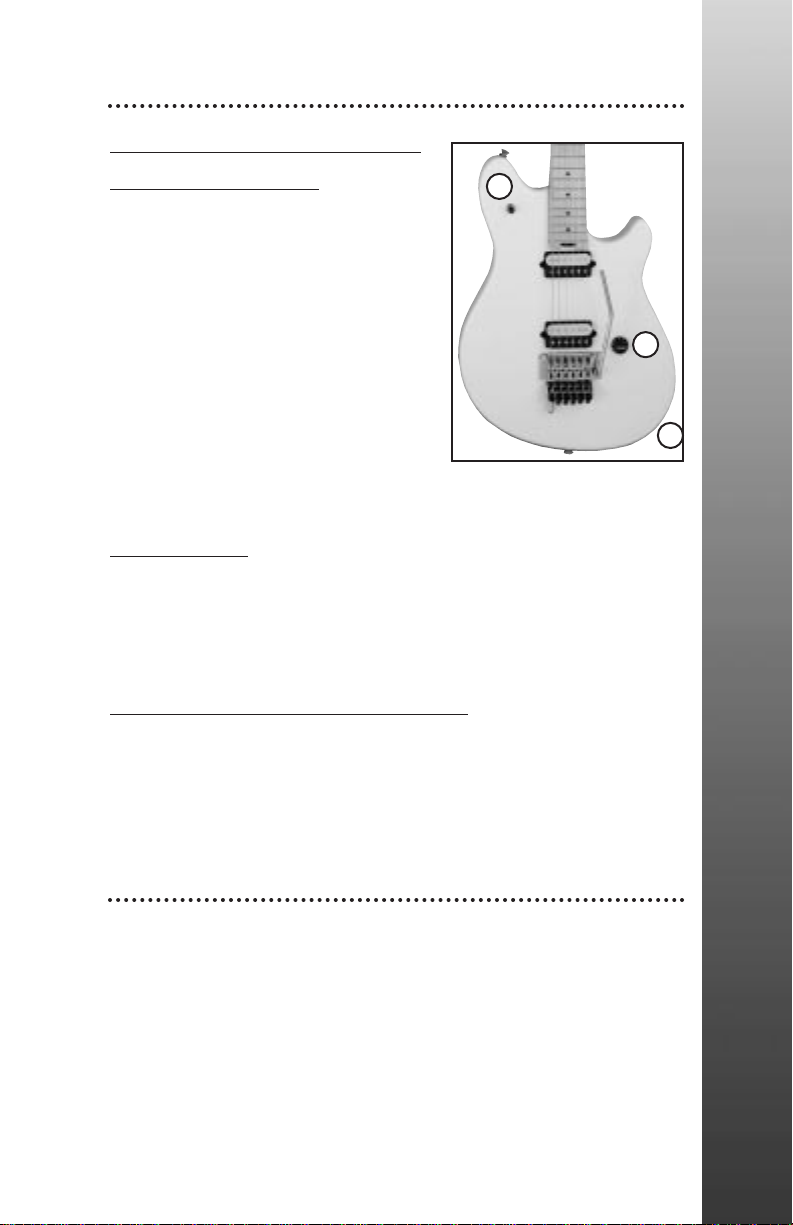
Pickup Selector Switch (1)
This three-position switch
allows selection of pickups
in various combinations. The
selection possibilities are as
follows:
•
Up = Bridge pickup
•
Center = Both pickups
•
Down = Neck pickup
1
2
3
5
Page 6
Volume (2)
The volume knob controls the total signal delivered
from both pickups. Rotating clockwise will increase
volume; rotating counterclockwise will reduce volume.
Output Jack (3)
The output jack accepts standard guitar patch cords.
(We recommend high-quality Peavey “shielded” patch
cords.)
Adjustments
Your instrument has been carefully adjusted at the Peavey
factory for accurate intonation and playing ease. However,
your playing style and requirements may necessitate additional adjustments. These should be made by your authorized Peavey dealer; but with a little care and by closely
adhering to the following instructions, you may attempt
these adjustments yourself.
Please read the instructions thoroughly before attempting
any adjustments
.
Torsion Rod (1)
All guitar necks have a slight amount
of bow to keep the strings from
“buzzing” on the frets. This instrument
features an easy access torsion rod
adjustment wheel located at the end of
the neck. This wheel can be adjusted
with a hex wrench or small screwdriver. Just insert the tool into the adjustment wheel and rotate accordingly.
1. Tune the instrument to
standard (A-440) pitch.
2. Fret the sixth string (E) at the
first and last frets.
3. Check for clearance between the string and the
eighth fret.
6
1
Page 7
4. Clearance should be no less than .005" and no
more than .015".
5. To increase clearance‚ loosen (counterclockwise) the torsion rod adjustment wheel.
Less clearance (straightening of the neck) is
accomplished by tightening (clockwise) the
torsion rod adjustment wheel.
6. Retune the instrument and repeat steps 1-5 until
proper clearance has been achieved.
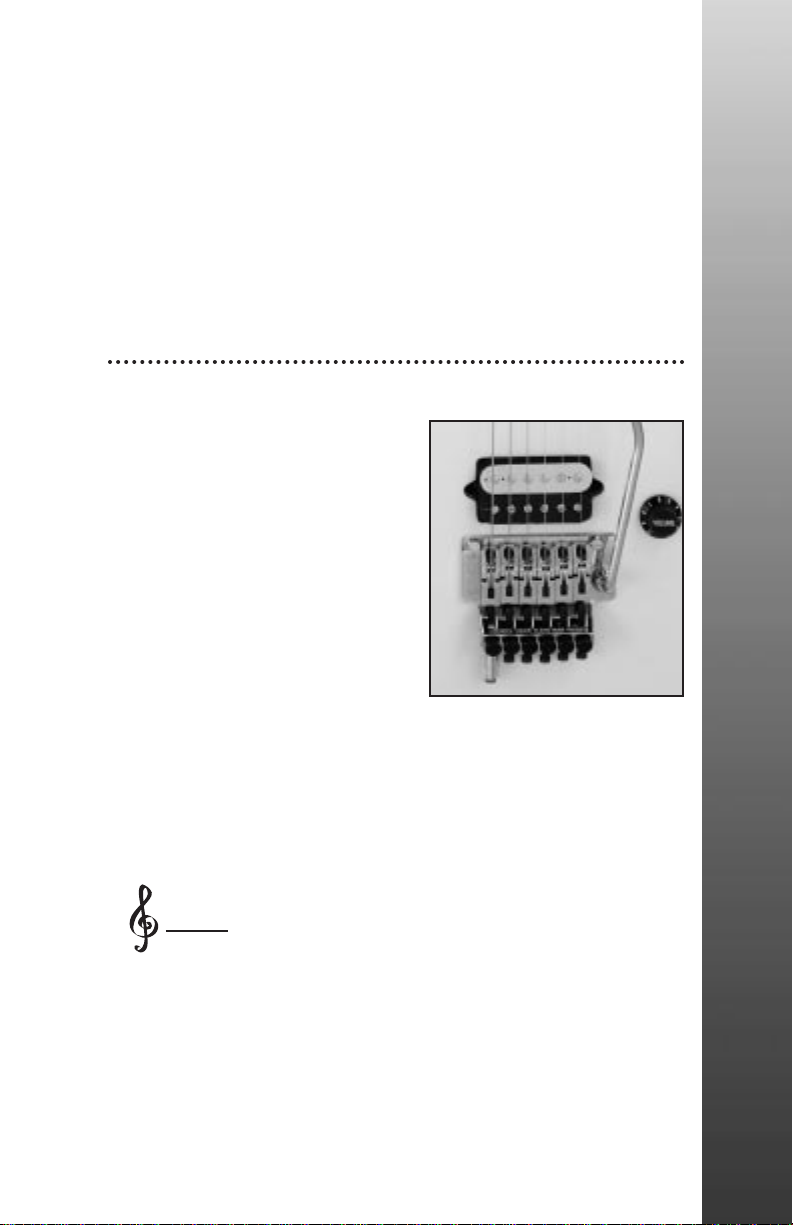
Tremolo Bridge
The Peavey/Floyd Rose®licensed, double-locking tremolo
system features a locking topnut, locking bridge saddles and
a steel bridge plate with a massive brass inertia block for
maximum tuning stability, sustain and tonal response. This
tremolo system has been carefully adjusted for accurate
intonation, playing ease and pitch change. To adjust this
unit properly, you must first understand the operating principle. The strings are clamped at the locking topnut and
bridge areas, ensuring increased tuning stability during use.
Proper tremolo action is also a result of accurate balancing
between string tension and tremolo spring tension. This
instrument has been set up at the factory with high-quality
Peavey EVH Wolfgang guitar strings. Should you desire a
larger or smaller gauge of strings, the spring tension, as well
as the intonation, must be adjusted. For string changes, and
in case an adjustment needs to be made, read the instructions carefully.
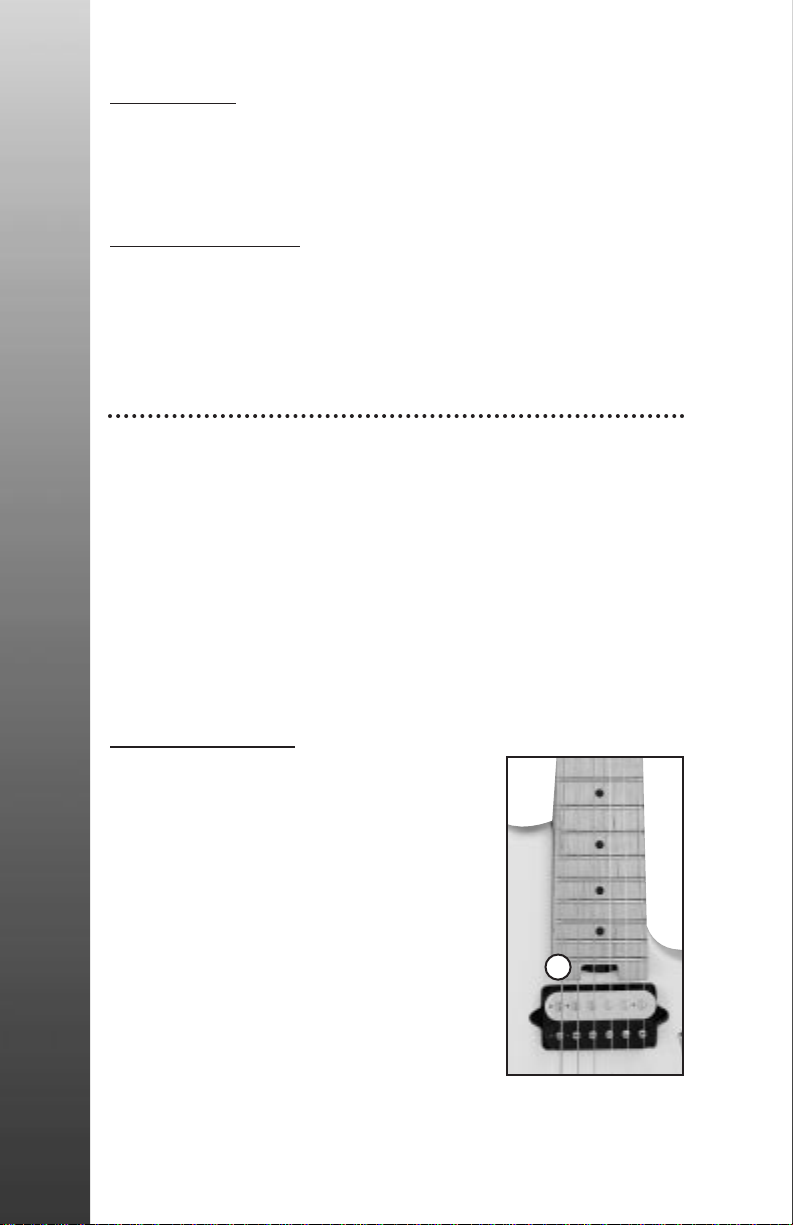
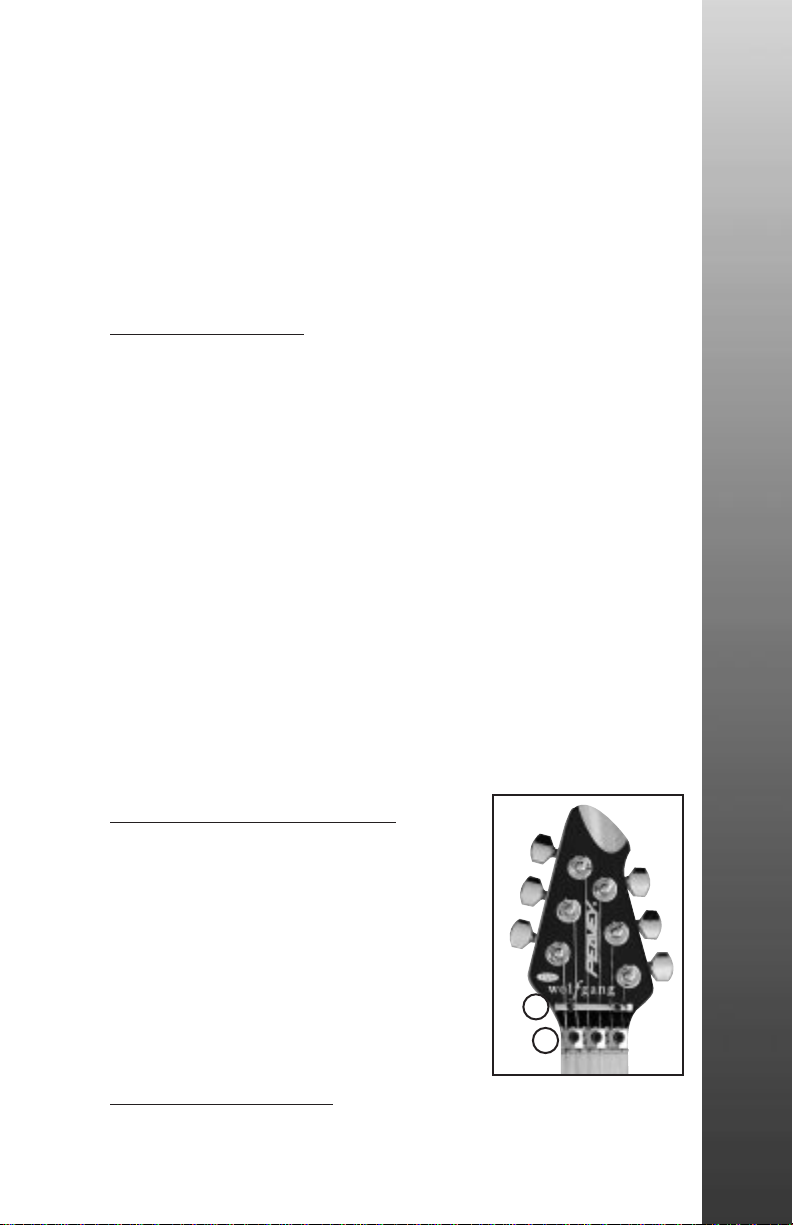
String Retainer Bar (1)
The string retainer bar is used to
provide the proper amount of downward string pressure over the locking topnut. This should be adjusted
only low enough to keep the strings
in contact with the surface of the
locking topnut, which will prevent
the strings from going sharp in pitch
after tightening the locking topnut.
1
2
Locking Topnut (2) (at headstock)
With the supplied 3mm hex wrench, loosen the three locking
7
Page 8
topnut screws to allow the strings to pass through the string
slots. Tune to pitch and tighten locking topnut screws until
snug. DO NOT OVERTIGHTEN SCREWS.
String Installation
After loosening topnut screws (at headstock), use tuning
machines to remove string tension. Loosen string lock
bolts at bridge approximately three turns using the 3mm
hex wrench. Insert string end through tuning machines
and locking topnut. Cut off excess string length approximately one inch past string of lock bolts. Insert string end
into bridge saddle (between saddle housing and lock
block) and tighten until snug. DO NOT OVERTIGHTEN.
Adjust fine tuning knobs to middle position. Stretch strings
and tune to pitch. Tighten locking topnut, stretch string
once more and fine-tune to pitch. (See
and Adjustment
below.
)
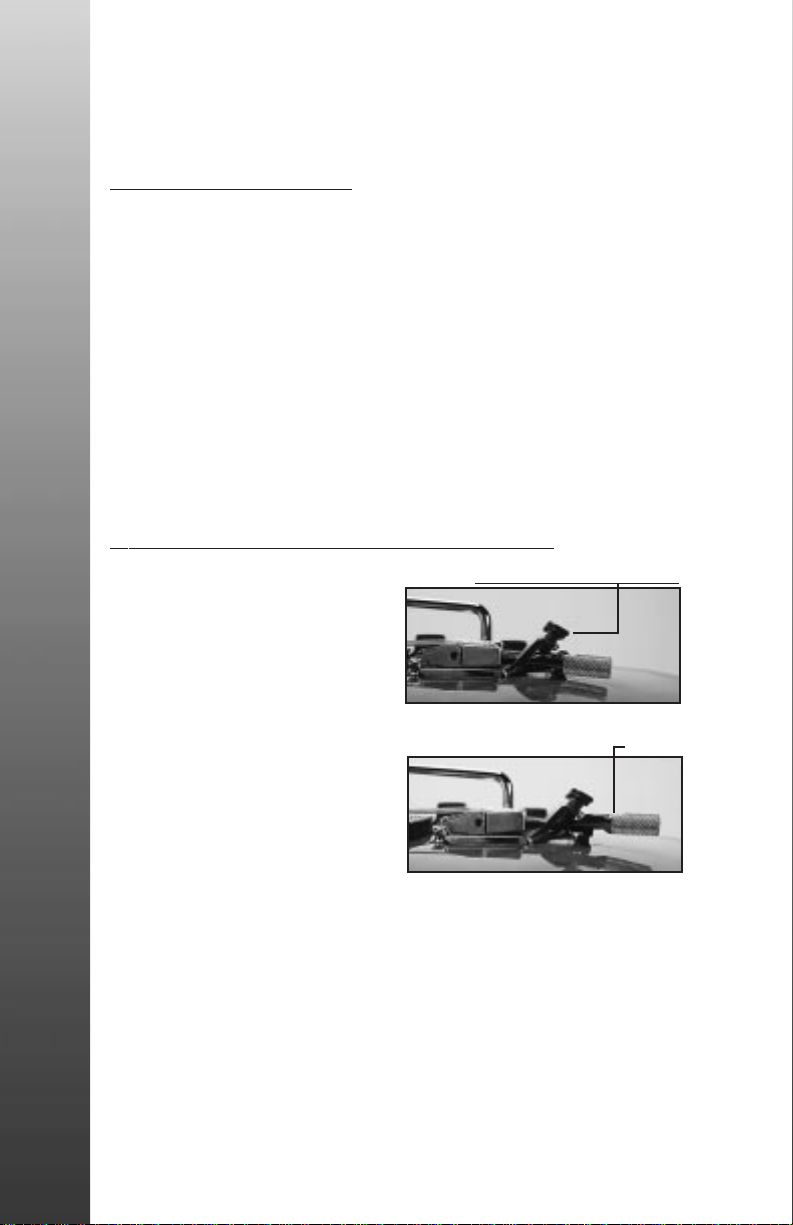
D-Tuner Operation
D-Tuner Operation and Adjustment
The D-Tuner is a unique
pitch dropping device that
offers instant “Drop-D” tuning by dropping the low-E
string down to D. This is
located on the low-E string
lock bolt, and is actuated by
simply sliding the mechanism in (for E) or out (for D).
Please read the instructions
carefully to understand the
operation and adjustment of
the D-Tuner.
1. Loosen the locking topnut screw for the low-E string.
2. Adjust the D-Tuner to the “D” position by pulling it
back (away from the tremolo).
3. Turn the fine-tuning adjustment screw for the low-E
string counterclockwise until it stops. Then, turn
the fine-tuning adjustment screw clockwise approximately one full turn. This will allow proper travel for
the D-Tuner.
fine-tuning adjustment screw
“E” position
set screw
“D” position
8
Page 9
4. Using the tuning machine, stretch and retune the low-E
string to “D.” Then, tighten the locking topnut screw and
fine tune the “D” using the fine-tuning adjustment
screw.
5. Slide the D-Tuner forward (toward the bridge) while
applying slight downward pressure. The D-Tuner will
now be in the “E” position. The fine-tuning screw will
now be positioned on the top, flat surface of the
D-Tuner.
6. Check the tuning of the low-E string.
7. If the low-E string is out of tune, use the supplied 1.5mm
hex wrench to turn the set screw on the D-Tuner clockwise if the pitch is flat, or counterclockwise if the pitch is
sharp.
8. Pull the D-Tuner back to the “D” position and check tuning. Push it back to the “E” position, check tuning and
readjust the set screw if necessary.
9. Once the set screw on the D-Tuner is correctly adjusted,
use only the fine-tuning screw for tuning. (The fine-tuning screw will simultaneously tune both notes in either
position.)
Note
ation. The saddle should be allowed to pivot up and down
freely to ensure proper operation of the D-Tuner.
Changing string gauges or deviation from proper pitch
(A-440) will necessitate readjustment of the D-Tuner.
It is recommended that the D-Tuner, fine-tuning
adjustment screw and bridge saddle be
cleaned and lubricated to ensure smooth oper-
Tremolo Bridge Height
Bridge height may be adjusted by means of the bridge
pivot bolts. Turn the pivot bolts clockwise to reduce
bridge height. Turn the pivot bolts counterclockwise to
increase bridge height.
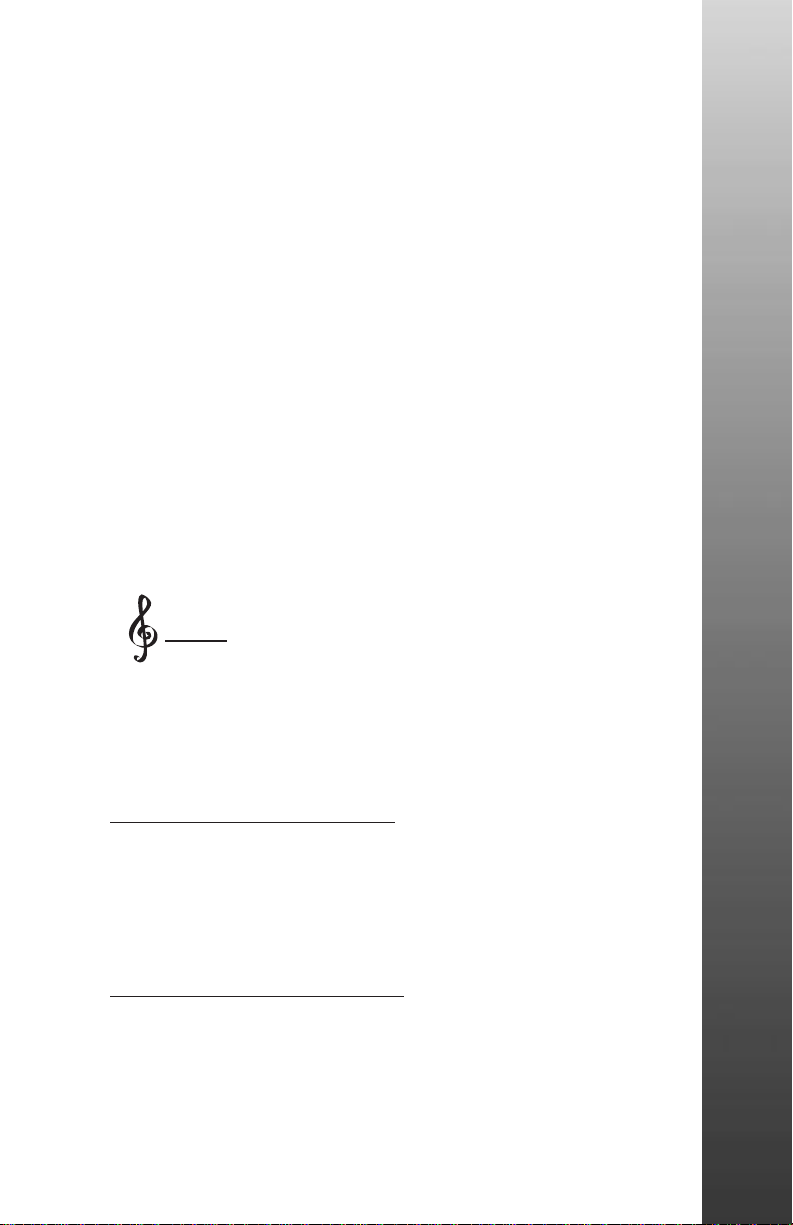
tremolo Bridge Tension
The tension of the tremolo bridge is set by adjusting the
spring tension screws which hold the spring claw in place.
To gain access to the spring tension screws and spring
claw, remove the spring cover on the back of the guitar.
9
Page 10
Per Edward’s specification, the tremolo system is adjusted to rest on the
body surface for maximum sustain and
tonality. This will only allow th e
strings to be dropped below pitch.
This also ensures tuning stability when
using the D-Tuner or when a string
breaks. The instrument is equipped
with two springs, which allow proper
tension for the string gauge supplied
with the guitar. The extra spring is
enclosed should you prefer to use a heavier string gauge.
Proper tremolo tension is achieved when the bottom of the
tremolo bridge plate rests on the top surface of the guitar
body without requiring excessive force to depress the
tremolo arm.
The tremolo can be adjusted to operate as a floating style
tremolo by loosening the spring tension. Turn the spring
tension screws clockwise to increase the spring tension,
and counterclockwise to decrease the spring tension.
This instrument should be tuned to proper pitch (A-440)
before and after making adjustments.
10
Note
sion that will affect the tuning of the other strings. An extra
string lock bolt is enclosed in the case, should the D-Tuner
be removed.
If the floating tremolo style is desired, it is
recommended that you remove the D-Tuner,
as its operation causes a change in string ten-
CAUTION: Loosen all string tension before installing or
removing tension springs. Tremolo springs are designed
for high tension. Extreme care should be taken when
installing and removing these springs.
Tremolo Arm
The tremolo arm is inserted and screwed into the tremolo
arm socket on the bridge plate. This assembly can be
adjusted to control the amount of torque required to rotate
the tremolo arm. Some players prefer the tremolo arm to
stay in place when used. This can be accomplished by
using the supplied 12mm wrench to hold the top of the
tremolo arm socket while screwing the tremolo arm firmly
into place.
Page 11
If you prefer to have the tremolo arm swing freely, loosen
the nut on the bottom of the tremolo arm socket. This is
accessible through the tremolo spring pocket. Edward
prefers an extremely loose feel, allowing approximately
one inch of play before the tremolo is actuated. This
adjustment accommodates Edward’s particular playing
style. It allows him to hold onto the tremolo arm while
picking without moving the tremolo until needed.
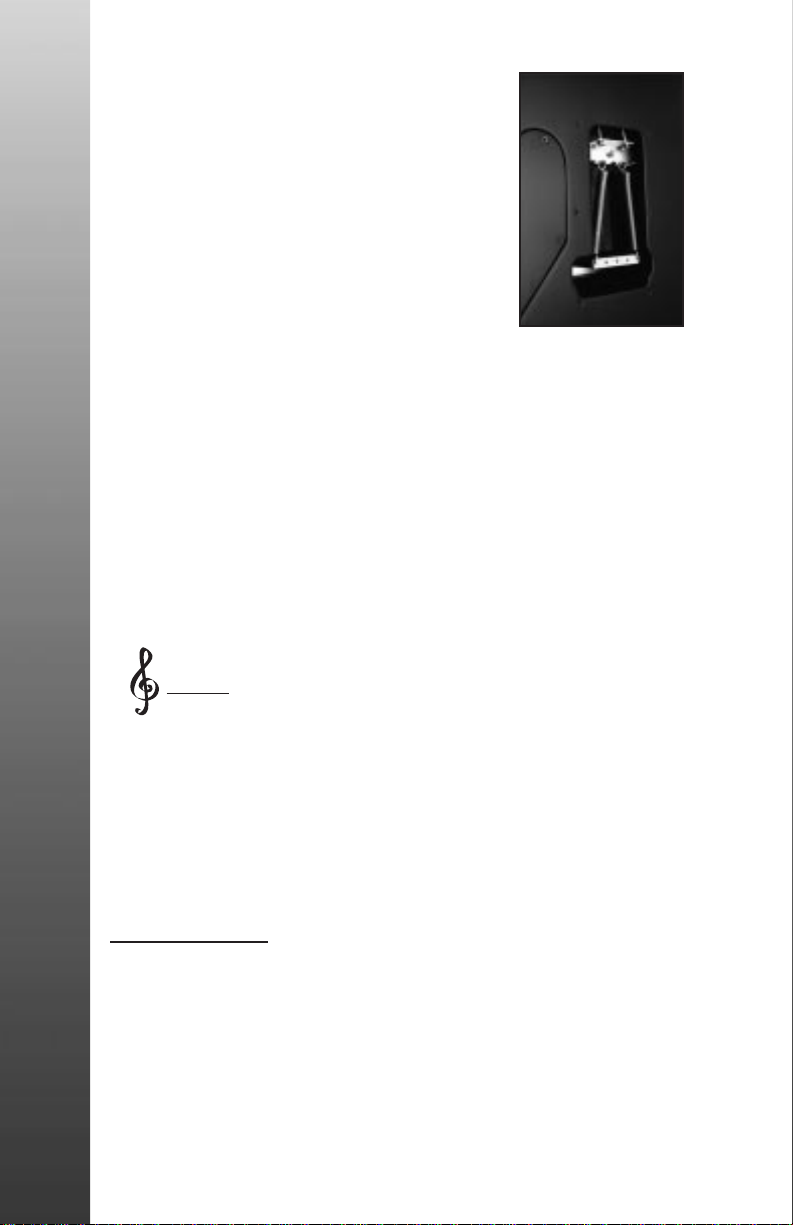
String Intonation
Accurate string intonation settings ensure that your instrument will play in tune at any
point on the neck. Although
“perfect intonation” is an
impossibility with a fretted
instrument, the proper
adjustments will maximize
the accuracy of individual
notes up and down the
neck.
Intonation is set by comparing the pitch of an open
string to the pitch of the
same string when played
one octave higher at the 12th fret. The actual “vibrating
length” of that string is varied until the notes are both at
the correct pitch. The vibrating length of the string is
altered by adjusting the individual saddles either forward
or backward, depending on whether the fretted note is
sharper or flatter in pitch than the open note.
Note
the untrained ear to determine when the open note and the
fretted note are at precisely the same pitch. Some players
find that comparing the 12th fret harmonic of the string
(rather than the open note) to the fretted note is much
easier.
This process should always be performed with
new strings. Intonation problems can often
result from worn strings. It is often difficult for
11
Page 12

A harmonic is played by plucking the string with the right
hand while touching the string with the left index finger (as
lightly as possible) directly above the 12th fret. The left finger is drawn away as quickly as possible after the string is
plucked, producing a ÒchimeÓ effect. This chimed note is
then compared to the fretted note. For greater ease and
accuracy, we recommend one of the many types of electronic guitar tuners that are available from most music
stores.
1. Ensure that the torsion rod and string-height settings
are accurate and the strings are new.
2. Tune the instrument to standard (A-440) pitch.
3. Hold the instrument in a normal playing position or
place the guitar on a clean, flat surface so that the
body is in contact with the work surface. Any pressure
on the neck will affect intonation settings.
4. Play the first (E) string open and compare it to the
pitch of the same string when it is played at the 12th
fret. These notes should sound the same (actually,
there is an octave difference).
5. Using a 2.5mm hex wrench for the tremolo, adjust the
string saddle so that both the fretted and open notes
are the same. If the fretted note is sharper than the
open note, the vibrating length of the string must be
increased. Move the bridge saddle to the rear–away
from the pickups. If the fretted note is flat, the vibrating length must be shortened. Move the bridge saddle
forward–toward the pickups–to shorten the length.
12
Note
It will often be necessary to retune the open
string to standard pitch after the bridge
position is altered.
6. Repeat steps 4 and 5 for the remaining strings.
7. Repeat steps 1-6 until the intonation of all the strings
is accurately adjusted.
Page 13

Care of your Instrument
The EVH Wolfgang is a high-quality musical instrument
constructed from the finest materials, using the most upto-date production methods. With reasonable care, it
should provide many years of service and outstanding
playability.
Temperature and Humidity
It is important to protect your instrument from any extreme
or sudden changes in temperature or humidity. You should
store the instrument in its case when not using it.
Strings
Your instrument is equipped with high-quality Peavey EVH
Wolfgang strings. String life may be greatly extended by
frequent cleaning with string cleaner. Dirt and perspiration tend to build up on the underside of the strings, so it
is often necessary to slide a rag between the strings and
the fingerboard. Dirt-laden strings cause tuning and intonation problems, as well as rust and corrosion.
For optimum performance, strings should be changed
approximately once a month, or after about every twentyfour hours of playing. Some players prefer to change
strings more often.
Finish
Your instrument has a polyester/urethane finish that is
both durable and weather-resistant, but requires care.
Regular cleaning with Peavey guitar polish is recommended. Between polishes, the instrument should be wiped
with a dry, soft cloth.
Accessories
Peavey offers a full line of accessories for your instruments. Cases, amplifiers, strings, polishes, straps and more
are all available from a Peavey dealer near you.
13
Page 14

WARNINGS
All amplification accessories, microphones, mixers,
etc., must be properly grounded and should be
utilized with a 3-wire mains system in order to
prevent electrical shock.
Do not come into contact with other electrical
apparatus when playing (or touching) your
instrument. The metal parts of this instrument are
grounded according to proper and accepted
industry practice, but it is possible to encounter an
electrical shock when coming into contact with
another electrical apparatus if it has improper
grounding facilities.
Do not use improper or poorly designed guitar
straps or other means of support. Possible injury
could result if improper, inferior, ill-fitting, or worn
out straps are used. The instrument could possibly
fall, causing bodily injury or damage to the
instrument or associated equipment if the holding
devices fail for any reason.
Guitar strings are made from very strong steel
alloys and are under considerable tension when
tuned to pitch. Exercise extreme care when tuning
(especially above concert pitch) or when employing
string bending or "popping" playing techniques. The
possibility of string breakage and personal injury
exists under these conditions.
14
Note
link for optimum performance. A high-quality,
well-shielded cord should be used in this
application.
®
5150
Floyd Rose®is a registered trademark of Floyd Rose
Marketing, Inc.
Switchcraft®is a registered trademark of Switchcraft, Inc.
The patch cord between the guitar and
the amplifier is an extremely important
is a registered trademark of Edward Van Halen.
Page 15

ESPAÑOL
Gracias por comprar una guitarra Wolfgang Special
EVH de Peavey. Esta guitarra fue construida por los
artesanos más habilidosos y los mejores materiales
disponibles. Al igual que todos nuestros equipos de
música, hemos fabricado nuestras guitarras combinando una tecnología de vanguardia con métodos artesanales tradicionales. Solicite a su distribuidor Peavey
una lista completa de los equipos de música y accesorios de Peavey.
Características de la guitarra
Wolfgang Special EVH
Cuerpo
•
Construcción de madera maciza de tilo
•
Exclusivo diseño con recorte desplazado
Cuello
•
Cuello y diapasón de madera de arce de extrema dureza,
brillantes
•
Refuerzos dobles de grafito y varilla de torsión regulable
•
Escala de 648 mm de longitud y 22 trastes
•
Radio del diapasón de 381 mm
•
Clavijero recto con configuración de dispositivo
de sintonía de 3+3
•
Fabricación atornillada con talón del cuello contorneado
Componentes electrónicos
•
Dos fonocaptores antizumbido Peavey de devanado per
sonalizado
•
Control maestro de volumen
•
Interruptor de conmutación Switchcraft®de 3 vías y
enchufe hembra de salida
15
Page 16

Componentes mecánicos
•
Dispositivos de afinación fundidos de precisión
•
Conjunto de trémolo de doble bloqueo con la licencia de
Peavey/Floyd Rose
•
Afinador D
•
Piezas mecánicas con acabado cromado
®
Construcción
Cuerpo
El cuerpo de este instrumento está construido con madera de
tilo seleccionada, elegida específicamente por sus cualidades
tonales así como por sus características de peso. El diseño
del cuerpo recortado en forma asimétrica resulta confortable,
equilibra el instrumento y ofrece una máxima facilidad de
uso.
Cuello
El cuello de madera seleccionada de arce de máxima dureza
está construido artesanalmente para darle una excepcional
rigidez y evitar el alabeo. La rigidez adicional se logra mediante barras de refuerzo dobles de grafito y una varilla de torsión regulable de acero que resulta fácil de ajustar.
(Encontrará las instrucciones de ajuste en la sección
Ajustes–Varilla de torsión
.)
16
Fonocaptores
Los dos fonocaptores antizumbido, devanados especialmente
según las especificaciones de Edward, proporcionan una salida y respuesta tonal óptimas. Se utiliza el proceso de bañado
en cera de dos etapas para lograr un funcionamiento con
nivel ultrabajo de ruidos y resistencia a la retroalimentación
de los micrófonos. Los fonocaptores están montados directamente sobre el cuerpo, lo que permite reducir aún más la
retroalimentación cuando se ejecuta con volumen muy alto y
ofrecer mejor respuesta tonal.
Page 17
Controles
Interruptor selector de
fonocaptores (1)
Este interruptor de tres posiciones
permite seleccionar las diferentes
combinaciones de los fonocaptores. Las posibilidades de selección son las siguientes:
•
Hacia arriba = Fonocaptor del
puente
•
En el centro = Ambos
fonocaptores
•
Hacia abajo = Fonocaptor
del cuello
1
Volumen (2)
La perilla de volumen controla el nivel total de las señales
de ambos fonocaptores. Para aumentar el volumen se debe
girar la perilla hacia la derecha y, para reducirlo, hacia la
izquierda.
Enchufe hembra de salida (3)
El enchufe hembra de salida permite realizar conexiones
temporales con guitarras convencionales. (Recomendamos
emplear cables “blindados” Peavey de alta calidad para las
conexiones temporales.)
2
3
Ajustes
Este instrumento ha sido ajustado cuidadosamente en la
fábrica de Peavey para estar entonado con precisión y simplificar el uso. Sin embargo, su manera personal de tocar y sus
requerimientos quizás exijan realizar ajustes adicionales. El
distribuidor autorizado Peavey puede realizar estos cambios,
pero con un poco de cuidado y si cumple estrictamente las
siguientes instrucciones, usted puede tratar de hacerlos por
su cuenta.
17
Page 18

Por favor, lea estas instrucciones completamente antes de
realizar cualquier tipo de ajuste.
Varilla de torsión (1)
Todas las guitarras necesitan arquearse
ligeramente para evitar que las cuerdas
“zumben” en los trastes. Las características de este instrumento permiten
acceder fácilmente a la rueda de
ajuste de la varilla de torsión que se
encuentra en el extremo del cuello.
Esta rueda puede ser regulada con una
llave hexagonal o pequeño destornillador; sólo es necesario que introduzca la herramienta en la rueda de ajuste
y la gire según sus necesidades.
1. Afine el instrumento en el tono
normal (A-440).
2. Toque la sexta cuerda (E) en el primer traste y en el
último.
3. Verifique la separación entre la cuerda y el octavo traste.
4. La separación no debe ser menor que 0,13
mm y tampoco mayor que 0,38 mm.
1
18
5. Para aumentar la separación, afloje (gire hacia la
izquierda) la rueda de ajuste de la varilla de torsión. Para
reducir la distancia (enderezar el cuello), apriete (gire
hacia la derecha) la rueda de la varilla de torsión.
6. Vuelva a afinar el instrumento y repita los pasos 1 a 5
hasta que la separación sea la correcta.
Puente del trémolo
El sistema del trémolo de doble bloqueo con la licencia de
Peavey/Floyd Rose®está formado por una tuerca superior de
bloqueo, abrazaderas en el puente de bloqueo y una placa
de acero para el puente con un bloque de inercia de bronce
macizo que ofrecen estabilidad de afinación, sostenimiento y
respuesta tonal máximos. Este sistema de trémolo ha sido
ajustado cuidadosamente para lograr una afinación precisa,
facilitar su uso y simplificar el cambio de tonos. Si usted
desea ajustar esta unidad correctamente, primero deberá
Page 19

comprender su principio de operación. Las cuerdas están
sujetas con abrazaderas a las zonas de la tuerca superior de
bloqueo y el puente con el fin de asegurar mayor estabilidad
de la afinación cuando se usan.
El correcto funcionamiento del trémolo también se obtiene
como resultado del equilibrio preciso entre la tensión de las
cuerdas y la del resorte del trémolo. Este instrumento ha sido
configurado en la fábrica con cuerdas de alta calidad para
guitarras Wolfgang EVH de Peavey. Si usted necesita un
juego de cuerdas de otro tamaño, deberá ajustar tanto la tensión del resorte como la afinación. Si necesita efectuar un
cambio de cuerdas y, en el caso de que deba realizar ajustes,
lea cuidadosamente las instrucciones.
Barra de retención de las cuerdas (1)
La barra para retener las cuerdas se
usa para ejercer la cantidad correcta
de presión sobre las cuerdas en la
tuerca superior de bloqueo. La barra
debe ajustarse sólo lo suficiente para
mantener las cuerdas en contacto
con la superficie de la tuerca superior de bloqueo e impedir que emitan
tonos agudos después de apretar la
tuerca de bloqueo.
1
2
Tuerca superior de bloqueo
(2) (en el clavijero)
Use la llave hexagonal de 3 mm provista para aflojar los tres
tornillos de la tuerca superior de bloqueo y permitir el paso
de las cuerdas a través de las ranuras. Afine y apriete los
tornillos de la tuerca de bloqueo hasta que estén firmes. NO
APRIETE LOS TORNILLOS EXCESIVAMENTE.
Instalación de las cuerdas
Después de aflojar los tornillos de la tuerca superior (en el
clavijero), utilice dispositivos de afinación para aflojar las
cuerdas. Afloje los pernos de bloqueo de las cuerdas en el
puente aproximadamente tres vueltas usando la llave hexagonal de 3 mm. Introduzca el extremo de la cuerda a través de
los dispositivos de afinación y la tuerca superior de bloqueo.
19
Page 20

Recorte el sobrante de cuerda a aproximadamente 25 mm de
los pernos de bloqueo. Introduzca el extremo de la cuerda en
la abrazadera del puente (entre el receptáculo de la
abrazadera y el bloque de bloqueo) y apriete hasta que
quede firme. NO APRIETE LOS TORNILLOS EXCESIVA-
MENTE. Regule las perillas de afinación precisa en la posición intermedia. Estire las cuerdas y afine. Apriete la tuerca
superior de bloqueo, estire la cuerda una vez más y realice la
afinación precisa en el tono normal. (Consulte la sección
Funcionamiento y ajuste del afinador D,
a continuación.)
Funcionamiento y ajuste del afinador D
El afinador D es un dis-
Tornillo de ajuste para afinación precisa
positivo exclusivo para
caída de tono que permite la afinación
inmediata de “caída D”
dejando caer la cuerda
E baja a la posición D.
Este dispositivo se
Posición “E”
Tornillo prisionero
encuentra en el perno
de bloqueo de la cuerda
E baja y, para activarlo,
simplemente deslice el
mecanismo hacia adentro (para E) o hacia afuera
Posición “D”
(para D). Por favor, lea
cuidadosamente las instrucciones para comprender el funcionamiento y ajuste del afinador D.
1. Afloje el tornillo de la tuerca superior de bloqueo para la
cuerda E baja.
2. Para ajustar el afinador D en la posición “D”, llévelo hacia
atrás (aléjelo del trémolo).
3. Gire el tornillo de ajuste de afinado preciso para la cuerda E
baja hacia la izquierda, hasta que se detenga. Luego, gire el
tornillo de ajuste de afinado preciso aproximadamente una
vuelta completa hacia la derecha. Esto permitirá que el afinador D se desplace correctamente.
4. Use el dispositivo de afinación para estirar y afinar nuevamente la cuerda E baja en “D”. Luego, apriete el tornillo de
la tuerca superior de bloqueo y realice la afinación precisa
de “D” utilizando el tornillo de ajuste de afinado preciso.
20
Page 21

5. Deslice el afinador D hacia adelante (hacia el puente) mientras ejerce una ligera presión hacia abajo. El afinador D
ahora se encontrará en la posición “E”. El tornillo de afinado
preciso estará en la superficie plana superior del afinador D.
6. Verifique la afinación de la cuerda E baja.
7. Si la cuerda no está afinada, use la llave hexagonal de 1,5
mm provista para girar el tornillo prisionero en el afinador D
hacia la derecha si el sonido es grave, o hacia la izquierda si
es agudo.
8. Lleve el afinador D nuevamente a la posición “D” y verifique
la afinación. Llévelo nuevamente a la posición “E”, verifique
la afinación y, si es necesario, vuelva a ajustar el tornillo
prisionero.
9. Después de ajustar correctamente el tornillo prisionero del
afinador D, sólo utilice el tornillo de afinación precisa
cuando deba afinar la guitarra. (Este tornillo afinará ambas
notas simultáneamente, cualquiera que sea la posición
seleccionada.)
Se recomienda limpiar y lubricar el afinador D,
Nota
funcionamiento. La abrazadera deberá girar libremente
hacia arriba y hacia abajo para asegurar el funcionamiento
adecuado del afinador D.
el tornillo de ajuste de afinado preciso y la
abrazadera del puente para asegurar su correcto
Si se cambia el tamaño de las cuerdas o se desvía el tono
correcto (A-440) será necesario reajustar el afinador D.
Altura del puente del trémolo
La altura del puente puede ajustarse mediante los pernos de
giro del puente. Gire los pernos hacia la derecha para reducir
la altura del puente. Gírelos hacia la izquierda para aumentar
la altura.
Tensión del puente del trémolo
La tensión del puente del trémolo se regula ajustando los tornillos de tensión del
resorte que sujetan la mordaza del
resorte en su lugar. Para acceder a los
tornillos de tensión y a la mordaza del
resorte, extraiga la cubierta del resorte en
la parte posterior de la guitarra.
21
Page 22

De acuerdo con las especificaciones de Edward, el sistema
de trémolo se ajustó para descansar sobre la superficie del
cuerpo y así alcanzar máximo sostenimiento y tonalidad. Esto
sólo permitirá dejar caer las cuerdas por debajo del tono.
Este diseño también asegura estabilidad de afinación cuando
se usa el afinador D o cuando se rompe una cuerda. El
instrumento cuenta con dos resortes que dan la tensión adecuada a las cuerdas del calibre provisto con la guitarra. Se
entrega un resorte adicional para que usted lo utilice si prefiere usar cuerdas de mayor calibre.
La tensión correcta del trémolo se logra cuando la parte inferior de la placa del puente del trémolo descansa sobre la
superficie superior del cuerpo de la guitarra sin exigir una
presión excesiva para llevar el brazo del trémolo hacia abajo.
El trémolo puede ajustarse para funcionar en el estilo flotante
si se afloja la tensión del resorte. Gire los tornillos de tensión
del resorte hacia la derecha para aumentar la tensión del
resorte y hacia la izquierda para reducirla.
Este instrumento debe afinarse con el tono normal (A-440)
antes y después de realizar ajustes.
Si desea usar el estilo de trémolo flotante,
Nota
tensión de las cuerdas que afectará la afinación del resto
de las cuerdas. En la caja encontrará un perno de bloqueo
para las cuerdas adicional, que puede usar si extrae el
afinador D.
recomendamos que extraiga el afinador D ya
que este dispositivo provoca un cambio en la
22
PRECAUCIÓN: Afloje todas las cuerdas antes de colocar o
retirar los resortes de tensión. Los resortes del trémolo
fueron diseñados para resistir gran tensión. Tenga mucho
cuidado cuando instale y extraiga estos resortes.
Brazo del trémolo
El brazo del trémolo se introduce y atornilla en el zócalo
para el brazo del trémolo en la placa del puente. Este conjunto puede ajustarse para controlar el par de apriete necesario para girar el brazo del trémolo. Algunas personas prefieren que el brazo del trémolo permanezca en su lugar
cuando lo usan. Esto puede lograrse usando la llave de 12
mm provista para sujetar la parte superior del zócalo para el
brazo del trémolo mientras se atornilla firmemente el brazo
del trémolo en su lugar.
Page 23

Si usted prefiere que el brazo del trémolo se balancee libremente, afloje la tuerca en la parte inferior del zócalo para el
brazo del trémolo. Puede acceder a esta tuerca a través del
bolsillo del resorte del trémolo. Edward prefiere usarlo muy
suelto, para permitir aproximadamente 25 mm de juego
antes de que se active el trémolo. Este ajuste corresponde al
estilo de ejecución específico de Edward. También le permite
mantener el brazo del trémolo mientras se realiza la
captación, sin mover el trémolo hasta que sea necesario.
Entonación de las cuerdas
Las configuraciones precisas para la entonación de las cuerdas aseguran que su instrumento se mantendrá afinado en
todas las posiciones del cuello. Pese a que la “entonación
perfecta” es imposible cuando
se trata de un instrumento
con trastes, los ajustes correctos maximizarán la precisión
de las notas individuales en
todas las posiciones del cuello. La entonación se configura
comparando el tono de una
cuerda abierta con el de la
misma cuerda cuando se toca
una octava más alta en el
duodécimo traste. La “longitud de vibración” real de esa
cuerda se cambia hasta que ambas notas estén en el tono
correcto. Para cambiar la longitud de vibración de la cuerda
es necesario ajustar las abrazaderas individuales hacia adelante o hacia atrás, si la nota pulsada tiene un tono más
agudo o más grave que la nota abierta.
Este proceso siempre debe realizarse con cuer
Nota
Para un oído no entrenado, es difícil determinar si la nota
abierta y la que se toca pulsando un traste están exactamente en el mismo tono. Algunas personas consideran que
es mucho más fácil comparar la armónica del decimosegundo traste de la cuerda (en lugar de la nota abierta) con la
nota pulsada.
das nuevas. Con frecuencia, los problemas de
entonación se deben al uso de cuerdas gastadas.
23
Page 24

Una armónica se ejecuta punteando la cuerda con la mano
derecha y tocándola con el dedo índice izquierdo (lo más
suavemente posible), directamente sobre el decimosegundo
traste. El índice izquierdo se debe quitar lo más rápidamente
posible después de puntear la cuerda para producir un efecto de “repique”. Esta nota de repique luego se compara con
la nota que se toca pulsando la cuerda contra el traste. Para
que este procedimiento resulte más fácil y exacto, recomendamos usar uno de los diversos tipos de afinadores para guitarras electrónicas que se venden en las tiendas de instrumentos musicales.
1. Asegúrese de los ajustes de la varilla de torsión y altura
de las cuerdas sean precisos y de que las cuerdas sean
nuevas.
2. Afine el instrumento en el tono normal (A-440).
3. Sostenga el instrumento en la posición normal de
ejecución o colóquelo sobre una superficie limpia y
plana, de forma que sólo el cuerpo esté en contacto con
la superficie de trabajo. Cualquier presión sobre el cuello
afectará los ajustes de entonación.
4. Toque la primera cuerda (E) abierta y compárela con el
tono de la misma cuerda cuando se toca en el
decimosegundo traste. Estas notas deberán sonar igual
(en realidad, hay una diferencia de una octava).
5. Use una llave hexagonal de 2,5 mm para el trémolo y
ajuste la abrazadera de la cuerda hasta que la nota
abierta y la que se toca pulsando el traste sean iguales.
Si esta última es más aguda que la nota abierta, se debe
aumentar la longitud de vibración de la cuerda.
Desplace la abrazadera del puente hacia atrás,
alejándola de los fonocaptores. Si la nota que se toca
pulsando el traste es más grave, se debe acortar la
longitud de vibración. Desplace la abrazadera hacia
adelante, acercándola a los fonocaptores.
24
Con frecuencia, será necesario volver a afinar la
Nota
6. Repita los pasos 4 y 5 para el resto de las cuerdas.
7. Repita los pasos 1 a 6 hasta que la entonación de todas
las cuerdas sea correcta.
cuerda abierta al tono normal después de
modificar la posición del puente.
Page 25

Cuidado del instrumento
La guitarra Wolfgang EVH es un instrumento musical de alta
calidad, construido con los mejores materiales y los métodos
de producción más modernos. Si se lo trata con cuidado,
debe durar varios años y proporcionar el mejor nivel de ejecución.
Temperatura y humedad
Es importante proteger su instrumento de cambios extremos o
bruscos de temperatura o humedad. Guárdelo en el estuche
cuando no lo use.
Cuerdas
Este instrumento tiene cuerdas de alta calidad Wolfgang EVH
de Peavey. La limpieza frecuente de las cuerdas con un
limpiador específico prolonga su duración. La suciedad y la
transpiración tienden a acumularse en la parte inferior de las
cuerdas; por lo tanto, resulta necesario deslizar un paño
entre ellas y el diapasón. Las cuerdas sucias causan problemas de afinación y entonación, como también oxidación y
corrosión.
Para lograr los mejores resultados, las cuerdas se deben cambiar aproximadamente una vez al mes o después de veinticuatro horas de ejecución. Hay quienes prefieren cambiarlas
con más frecuencia.
Acabado
Este instrumento tiene un acabado de poliéster/uretano
duradero y resistente al clima, que requiere cuidado. Se
recomienda limpiar el instrumento con cera para guitarras
Peavey y repasarlo con un paño seco y suave.
Accesorios
Peavey ofrece una línea
completa de accesorios
para sus instrumentos.
Estuches, amplificadores,
cuerdas, ceras, correas y
muchos otros artículos más
se pueden adquirir en el.
25
Page 26

PRECAUCIONES
Conecte correctamente a tierra todos los accesorios de amplificación, los micrófonos, las mezcladoras, etc. y use un sistema de red de suministro eléctrico de 3 cables para evitar
descargas eléctricas.
Evite el contacto con otros aparatos eléctricos cuando ejecuta
(o toca) su instrumento. Las partes metálicas están puestas a
tierra según las prácticas apropiadas y aceptadas en la industria, pero se puede producir una descarga eléctrica cuando se
pone en contacto con otros dispositivos eléctricos que no
están correctamente conectados a tierra.
No use correas para guitarra u otros medios de sujeción
inapropiados o de mal diseño. El uso de correas gastadas, de
mala calidad, mal colocadas o inapropiadas puede causar
lesiones. El instrumento se puede caer y dañarse o provocar
lesiones. Si los sistemas de sujeción fallan por algún motivo,
también se pueden dañar los equipos asociados.
Las cuerdas de la guitarra están hechas de aleaciones de acero
muy resistentes que, cuando se afinan, se someten a mucha
tensión. Tenga mucho cuidado cuando las afina (especialmente por encima del tono de concierto), o cuando emplea
técnicas de ejecución en las que las cuerdas se estiran o se
hace “popping”. En estas condiciones, existe la posibilidad de
que se corte una cuerda y se cause lesiones.
26
El cable de conexión entre la guitarra y el
Nota
ejecución. Utilice un cable blindado de alta calidad en esta
aplicación.
®
5150
Floyd Rose®es una marca registrada de Floyd Rose
Marketing, Inc.
Switchcraft®es una marga registrada de Switchcraft, Inc.
amplificador es un enlace sumamente
importante para lograr resultados óptimos en la
es una marca registrada de Edward Van Halen.
Page 27

FRANÇAIS
Nous vous remercion pour l’achat de cette guitare Peavey
EVH Wolfgang Special. Cette guitare a été construite par
les artisans les plus qualifiés à partir des meilleurs matériaux. Comme pour tous nos instruments et amplificateurs,
ces guitares ont été construites en utilisant technologies de
pointe et méthode manuelles traditionnelles. Demandez à
votre revendeur Peavey une liste complète des
équipements et accessoires Peavey.
EVH Wolfgang Special
Corps
•
Corps en tilleul
•
Design unique à simple pan coupé
Manche
•
Manche et touche en érable, finition huilée
•
Double renforcement graphite et tige de tension réglable
•
Diapason de 25 1/2" (inch), 22 frettes jumbo
•
Radius de 15 pouces
•
Tête du manche inclinée à 10 degrés et configuration
3+3 des mécaniques
•
Manche vissé avec talon profilé
Electronique
•
Deux humbuckers Peavey custom-wound
•
Contrôle master volume
•
Sélecteur de micros et sortie jack Switchcraft
Accessoires
•
Mécaniques de précision
•
Vibrato à blocage Peavey/Floyd Rose®sous licence
•
D-Tuner
•
Accastillage chromé
®
27
Page 28

Construction
Corps
Le corps de cette instrument a été réalisé avec des bois spécialement sélectionnés pour leurs qualités sonores et leur
poids. La table sculptée et le design asymétrique de cette guitare assurent un confort, un équilibre et une playabilité optimum.
Manche
Le manche en érable a été réalisé de manière à assurer
une rigidité maximum. Deux barres de graphite et la
tige de renfort réglable assurent une solidité accrue.
(Voir
Réglages–Tige de Renfort
réglage)
Micros
Les deux humbuckers Peavey Custom Wound réalisés selon
les spécifications d’Edward fournissent un niveau de sortie et une tonalité optimales. Un double trempage dans la
cire assure un fonctionnement à trés faible niveau de
bruit et une protection maximum contre les feedbacks
microphoniques. Les micros sont montés directement sur
la caisse, ce qui réduit encore le feedback à haut volume
et améliore leur réponse.
pour les instructions de
28
Contrôles
Selecteur de Micros (1)
Ce sélecteur trois positions assure la sélection des
micros selon différentes combinaisons. Les différentes
possibilités sont les suivantes:
•
Haut = Micro chevalet
•
Centre = Micros en parallèle
•
Bas = Micro manche
Volume (2)
Le contrôle de volume agit sur le signal des deux
micros. En le tournant dans le sens horaire, on augmente le volume; en le tournant dans le sens contraire, on le réduit.
Page 29

Jack de Sortie (3)
La prise de sortie jack accepte les câbles pour guitare
standard (Nous recommandons les câbles blindés
haute-qualité Peavey).
Réglages
Votre instrument a été soigneusement réglé dans l’une des
usines Peavey pour une intonation parfaite et un confort de
jeu maximum. Cependant, votre style de jeu ou vos
préférences peuvent nécessiter certains ajustements. Nous
vous conseillons pour cela d’aller voir votre revendeur
Peavey mais en suivant avec attention les instructions suivantes, vous devriez être capable de les effetuer vous-même.
Lisez attentivement ces instructions avant dÕeffectuer
toute manipulation
Tige de Renfort (1)
Tous les manches de guitare ont une
légère courbure concave évitant aux
cordes de friser sur les frettes. Cet
instrument possède un molette de
réglage de tige de renfort d’accès aisé
à l’extrémité du manche. Elle peut être
réglée à l’aide d’une clé à six pans ou
d’un petit tournevis. Insérez simplement l’outil dans la molette et tournez.
.
1
1. Accorder l’instrument (La-440).
2. Fretter la sixième corde (Mi)
à la première et dernière
case.
3. Mesurez l’espace entre la corde et la huitième
frette.
4. Il ne doit pas être inférieur à .005" (pouces) ou
supérieur à .015".
5. Pour augmenter la distance, dévissez (sens antihoraire) la molette de réglage. Pour la réduire,
il suffit de visser (sens horaire) la molette.
29
Page 30

6. Réaccordez l’instrument et répétez les étapes 1
à 5 jusqu’à ce que la distance idéale soit
atteinte.
Vibrato
Le vibrato Peavey/Floyd Rose®sous licence dispose d’un sillet à blocage et de pontets à blocage. Il est accompagné
d’un important bloc d’inertie en laiton permettant de maximiser le sustain, la réponse et la sonorité de l’instrument. Il
a par ailleurs été réglé pour une intonation et une playabilité parfaite. Pour régler cet accessoire, vous devez d’abord
comprendre son fonctionnement. Les cordes sont bloquées
au sillet et aux pontets pour une stabilité optimale de l’accord.
Une balance exacte entre la tension des cordes et celles des
ressorts est nécessaire à une action correcte de l’unité. Cet
instrument a été réglé à l’usine avec des cordes haute qualité Peavey EVH Wolfgang. Si vous désirez installer un tirant
de cordes plus fort ou plus faible, la tension des ressorts et
l’intonation doivent être ajustées. Pour effectuer des
changements de corde ou tout réglage, suivez attentivement
les instructions.
30
Barre de Rétension des Cordes (1)
Cette barre est utilisée afin que les
cordes appliquent une pression suffisante sur le sillet à blocage. Elle
doit être ajustée de manière à ce
que les cordes restent toujours en
contact avec la surface du sillet.
Ainsi, les cordes resteront accordées
aprés vissage du sillet à blocage.
1
Sillet à Blocage (2)
(sur la crosse)
Avec la clef à six pans fournie, dévissez les trois vis de serrage pour permettre aux cordes de passer librement.
Accordez l’instrument et resserez les vis jusqu’à ce que les
cordes soient correctement maintenues.
NE SERREZ PAS LES VIS DE MANIERE EXAGEREE.
2
Page 31

Installation des Cordes
Aprés avoir desserré les vis du sillet, utilisez les
mécaniques pour annuler la tension des cordes. Desserrez
d’environ 3 tours la vis de blocage du pontet à l’aide de la
clef Allen 3mm. Inserrez l’extrémité de la corde à travers
le sillet et les mécaniques. Coupez l’excés de corde à environ 2,5 cm des pontets de serrage. Placez l’extrémité de
la corde dans le pontet (entre le bloc de serrage et l’encastrement) et serrez la vis. NE PAS SERRER EXAGEREMENT.
Réglez les fine-tuners en position médiane. Accordez l’instrument. Serrez les vis du sillet, tirez un peu sur les
cordes et accordez avec les fine-tuners. (Voir
Réglage du D-Tuner
ci-dessous).
Utilisation et
Utilisation et Réglage du D-Tuner
Le D-Tuner est permet de
passer en un instant de
l’accordage standard en
accordage “Drop-D” en
faisant passer le bourdon
de Mi à Ré. Il est placé
sur la vis de serrage du
pontet de la corde de Mi
grave. Il suffit de le faire
glisser vers l’intérieur (Mi)
ou l’extérieur (Ré). Lisez
attentivement les instructions pour comprendre
son fonctionnement et
son réglage.
1. Desserrez la vis correspondant à la corde de Mi du sillet à blocage.
2. Placez le D-Tuner en position “Ré” en le tirant.
3. Tournez le fine-tuner de la corde de Mi dans le sens
anti-horaire au maximum puis tournez d’un tour le
dans le sens horaire.
4. A l’aide des mécaniques, accordez le bourdon en Ré.
Serez la vis du sillet et ajuster la note avec le fine-tuner.
5. Faite glisser le D-Tuner vers le vibrato en appliquant une
légère pression vers le bas. Il est à présent dans la posi
tion “Mi”. La vis du fine-tuner repose maintenant sur le
méplat du D-Tuner.
Position Mi
Position Ré
fine-tuners
Vis de réglage
31
Page 32

6. Vérifiez l’accord de la corde.
7. Si elle est désaccordée, utilisée la clef Allen 1.5mm
fournie pour tourner la vis de réglage du D-Tuner dans le
sens horaire si la note est trop basse ou le sens antihoraire si elle est trop haute.
8. Replacez le D-Tuner en position “Ré” et vérifiez l’ac
cord. Replacez le en position “Mi”, vérifier l’accord et
réajuster la vis de réglage si nécessaire.
9. Une fois le D-Tuner ajusté, n’utilisez que le fine-tuner
pour l’accordage (il accordera simultanément les deux
notes, quelquesoit la position).
32
Note
pour un rŽglage aisŽ. Le pontet doit pouvoir pivoter librement pour assurer la bonne opŽration du D-Tuner.
Si vous dŽsirer changer le tirant de vos cordes ou utiliser
un accordage non standard, il sera nŽcessaire de rŽgler ˆ
nouveau le D-Tuner.
Il est recommandŽ de nettoyer et lubrifier les
D-Tuner, fine-tuner, vis de rŽglage et pontet
Hauteur du Vibrato
Sa hauteur est ajustée grâce aux pivots sur lesquels il
repose. Vissez ces pivots pour abaisser le bloc vibrato.
Dévissez-les pour le réhausser.
Tension du Vibrato
La tension du vibrato se règle en ajustant les vis de fixation de la plaque
maintenant les ressorts. Pour y avoir
accès, il est nécessaire de dévisser la
plaque de protection située au dos de
la guitare
Selon les spécifications d’Edward, le
vibrato est réglé pour reposer sur la
surface de la caisse, assurant un sustain maximum. Il n’est donc possible
que de diminuer la hauteur des notes.
Cela assure par ailleurs une meilleurs tenue de l’accord
lors de l’utilisation du D-Tuner ou si vous cassez une
corde. La guitare est équipée de deux ressorts fournissant
la tension idéale pour le tirant des cordes installées sur
Page 33

l’instrument. Un ressort supplémentaire est fourni si vous
désirez utiliser un tirant supérieur.
La tension idéale du vibrato est obtenue lorsque celui-ci
repose sur la table de la guitare et qu’il se manipule sans
force excessive.
Le vibrato peut être réglé de manière à être flottant en
diminuant la tension des ressorts. Vissez les vis de rétention des ressorts pour augmenter la tension et dévissez-les
pour la diminuer.
L’instrument doit être correctement accordé avant et aprés
réglage.
Note
des cordes, risquera de dŽsaccorder la guitare. Une vis de
serrage de pontet supplŽmentaire est fournie si vous
dŽsirez retirer le D-Tuner.
Si vous dŽsirez rŽgler le vibrato pour quÕil soit
de type flottant, il est recomandŽ de retirer le DTuner car son action, en modifiant la tension
ATTENTION: Annulez la tension des cordes avant dÕen-
lever ou dÕinstaller un ressort. Ces ressorts peuvent supporter des tensions extr•mes. Prenez toutes les prŽcautions nŽcessaires lorsque vous installez ou retirez lÕun
dÕentre eux.
Barre de vibrato
Elle est insérée et vissée dans la plaque de vibrato. Son
orientation par rapport à l’axe des cordes peut être modifiée. Certains musiciens préfèrent que la tige reste fixe
lorsqu’elle est utilisée. Il est possible d’effectuer ce réglage
en maintenant le contre-écrou situé sur le vibrato avec la
clef 12mm fournie et en vissant la barre fermement.
Si vous désirez que la tige pivote librement, dévissez le
boulon situé à l’extrémité du trou du vibrato. vous pouvez
y accéder par la cavité des ressorts au dos de la guitare.
Edward préfère avoir une tige de vibrato trés peu serrée ce
qui lui permet de la maintenir tout en jouant sans actionner le vibrato.
33
Page 34

Intonation
Une bonne intonation vous
assure de sonner juste
quelquesoit l’endroit où
vous jouer sur le manche.
Bien qu’une intonation parfaite soit impossible sur un
instrument fretté, un réglage
précis optimisera la justesse
de l’instrument sur toute sa
tessiture.
On règle l’intonation en
comparant la hauteur de la
note d’une corde à vide à la
hauteur de la note produite par la même corde frettée à
l’octave (12ème case). La longueur de la corde vibrante
est modifiée jusqu’à ce que les deux notes soient identiques. On modifie cette longueur en déplaçant les pontet
en avant ou en arrière, selon que la note frettée est trop
haute ou trop basse par rapport à la note de la corde.
34
Note
peut •tre difficile pour une oreille non habituŽe de comparer la note frettŽe et la note ˆ vide. Certains musiciens
prŽf•rent comparer lÕharmonique de la douzi•me frette et la
note frettŽe ˆ la douzi•me case.
On produit une harmonique en jouant une corde que lÕon
touche trŽs lŽg•rement avec un doigt au dessus de la
douzi•me frette. Une fois la corde jouŽe, on retirerapidement la main gauche. La note produite est alors comparŽe
ˆ la note de la corde ˆ vide. Pour une prŽcision maximum,
nous recommandons lÕemploi dÕun accordeur Žlectronique.
Ce rŽglage doit toujours •tre effectuŽ avec des
cordes neuves. Des probl•mes dÕintonation
peuvent survenir avec des cordes usŽes. Il
1. Assurez-vous que le manche et la hauteur des cordes
sont correctement réglés.
2. Accordez l’instrument (La-440).
3. Placez l’instrument sur une surface plane et propre de
manière à ce que l’instrument repose sur son corps.
Toute tension sur le manche affectera les réglages.
4. Jouez la première corde à vide (Mi) et comparez la
hauteur de la note à celle de la note frettée à la
12ème case sur la même corde. Ces deux notes
doivent être identique (plus précisemment, séparée
d’une octave).
Page 35

5. Avec une clef six pans, ajustez le pontet de manière à
ce que la note à vide soit la même que la note frettée.
Si la note frettée est plus haute que la note à vide, la
longueur de corde vibrante doit être augmentée.
Déplacez le pontet vers l’extérieur (en l’éloignant des
micros). Si la note frettée est trop basse, la longueur
de corde vibrante doit être diminuée. Déplacez le
pontet pour le rapprocher des micros.
Note
6. Répétez les étapes 4 à 5 pour les cordes restantes.
Il sera souvent nŽcessaire de rŽaccorder la
corde aprŽs que le pontet ait ŽtŽ dŽplacŽ.
Entretien de Votre Instrument
L’EVH Wolfgang est un instrument de haute qualité construit à partir des meilleurs matériaux et avec les méthodes
de production les plus modernes. Avec un minimum d’attention, elle vous assurera une playabilité maximum pendant de nombreuses années.
Température and Humidité
Il est important de protéger votre instrument contre toute
variation soudaine de température ou d’humidité. Il est
conseillé de ranger votre guitare dans son étui entre
chaque utilisation.
Cordes
Votre instrument est équippé de cordes haute qualité
Peavey EVH Wolfgang. Leur durée de vie peut être considérablement étendue en les nettoyant fréquemment avec un
produit approprié. La saleté et la transpiration ont tendance à se placer sous les cordes. Il est donc souvent
nécessaire de passer un chiffon entre les cordes et la
touche. L’accumulation de saletés sur les cordes peut
provoquer des problèmes d’accordage et d’intonation en
plus des problèmes de corrosion.
Pour des performances optimum, vos cordes devraient être
changées chaque mois ou aprés avoir été jouées 24 heures
environ. Certains musiciens préfèrent les changer plus
souvent.
35
Page 36

Finition
Votre instrument possède une finition polyuréthane
durable et résistante mais qui doit être entretenue. Un nettoyage régulier avec le polish pour guitare Peavey est
recommandé. Aprés chaque application, l’instrument doit
être essuyé avec un chiffon doux et sec.
Accessoires
Peavey offre une ligne complète d’accessoires pour votre
instrument. Valises, amplificateurs, cordes, polish et bandoulières sont disponibles chez votre revendeur Peavey.
36
Page 37

ATTENTION
•
Tous les matériels d’amplification, microphones,
mixeurs, etc doivent être reliés à la terre et utiliser
un cordon d’alimentation à trois conducteurs afin
d’éviter tout risque de choc électrique.
•
N’entrez pas en contact avec tout autre appareil
électrique lorsque vous jouez (ou touchez) votre
instrument. Ses éléments métalliques sont reliés à
la terre selon la pratique communément adoptée
mais un choc électrique peut survenir si vous
entrez en contact avec un appareil n’ayant pas été
relié à la terre correctement.
•
N’utilisez pas de sangle guitare de mauvaise qualité. Des dommages peuvent être occasionnés en cas
d’utilisation d’une sangle de mauvaise qualité,
vieille ou endommagée. L’instrument ou l’un de ses
équipements pourrait être abimé en cas de chute.
•
Les cordes de guitare sont réalisées dans des
alliages de métaux résistants et sont soumises à
d’importantes tensions. Prenez garde lors de l’accordage (particulièrement au dessus de l’accordage
standard) ou lors de l’emploi de techniques de
bending ou “popping”. Les cordes peuvent occasionner des blessures réelles en cassant.
Note
formances du système. Un câble de haute qualité
correctement blindé doit être utilisé pour cette
application.
5150®est une marque déposée par Edward Van Halen.
Floyd Rose®est une marque déposée par Floyd Rose
Marketing, Inc.
Switchcraft®est une marque déposée par Switchcraft, Inc.
Le câble situé entre l’instrument et l’am
plificateur est déterminant pour les per
37
Page 38

DEUTSCH
Vielen Dank, daß Sie für den Kauf einer Peavey EVH
Wolfgang Special Gitarre entschieden haben. Diese
Gitarre wurde von Fachleuten gebaut, die nur das beste
Material, das man für Geld bekommen kann, verarbeitet
haben. Wie bei all unserem anderen Equipment haben
wir auch beim Bau unserer Gitarren eine Kombination
von leading-edge Technologie und traditioneller Handarbeit eingebracht. Fragen Sie Ihren Peavey-Händler nach
einer Liste unseres musikalischen Equipments und
Zubehörs.
EVH Wolfgang Special Features
Body (Korpus)
•
Schön gezeichnete Ahorndecke auf Lindenkorpus
•
Komfortables, einzigartiges Offset Cutaway Design
Neck/Hals
38
•
Hardrock Ahornhals und Griffbrett, oil-finish
•
Zweifache Graphitverstärkung und verstellbarer Halsstab
•
25 1/2" Mensur, 22 Jumbo-Bünde
•
15" Griffbrett
•
10 Grad geneigte Kopfplatte mit 3+3 Stimm-Mechaniken
•
Fest verschraubte Konstruktion
Schraubhals mit abgeflachtem Hals-Korpus-Übergang
Elektronik
•
Zwei speziell angefertigte Peavey humbucking pickups
•
Volumenregelung
•
Switchcraft®3-wege doppelpoliger Umschalter und
Ausgangsbuchse
Page 39

Hardware
•
Peavey/Floyd Rose®lizensierte, double-locking TremoloEinheit
•
D-Tuner (nur beim Tremolo-Model erhältlich)
•
Verchromte Hardware-finish
Konstruktion
Body/Korpus
Der Korpus dieses Instruments ist aus ausgewählten
Harthölzern hergestellt, die speziell für die Tonqualität, aber
auch ihrer Natürlichkeit wegen ausgesucht wurden. Die
gewölbte Oberseite sowie das asymmetrische Bodydesign
bieten Ihnen Komfort, die richtige Balance und die größtmöglichste Spielfreiheit.
Neck/Hals
Der ausgesuchte Ahornhals besticht besonders durch
seine Stabilität und ausgesprochene Unempfindlichkeit.
Die Halsschienen-Verstellung ist leicht erreichbar und
zusätzliche Stabilität wird durch zwei
Grafitverstärkungen erreicht.
Pickups/Tonabnehmer
Zwei Peavey Humbucking Pickups, die speziell nach
Edward's Vorstellungen gewickelt wurden, haben optimale Ausgangsleistung und Klangfarbe. Ein zweimaliger
Wachs-Tauchprozeß erlaubt Ihnen den Ultra-low NoiseBetrieb und verhindert die Mikrofonie. Die Pickups sind
direkt in den Body geschraubt, was gleichfalls zur
Mikrofonieverhinderung bei maximaler Lautstärke
beiträgt.
Controls/Regler
Pickup Wahlschalter (1)
Mit diesem 3-Stufenschalter können Sie verschiedene
Pickup-Kombinationen wählen.
39
Page 40

•
Up = Bridge Pickup
•
Center = beide Pickups
•
Down = Neck Pickup
1
Lautstärke (2)
Der Lautstärke-Regler kontrolliert alle Signale die von
den Pickups kommen.Im
Uhrzeigersinn gedreht, erhalten Sie Lautstärke, bei einer
Drehung entgegen dem
Uhrzeigersinn reduzieren Sie
die Lautstärke.
2
Ausgangsbuchse (3)
Sie können an die Ausgangsbuchse StandardGitarrenpatch-Kabel anschließen. (Wir empfehlen hier
Abschirmkabel von Peavey).
Einstellungen/Adjustment
Ihr Instrument wurde im Werk auf genaue Intonation eingestellt.
Selbstverständlich werden Sie Ihre Gitarre nach Ihren eigenen
Vorstellungen neu einstellen. Wenn Sie die nachfolgenden
Instruktionen beachten, können Sie dies leicht selbst tun.
3
40
Bitte lesen Sie sich diese Bedienungsanleitung durch,
bevor Sie irgendwelche
Einstellungen an Ihrer Gitarre
vornehmen.
Halsstab (1)
Alle Gitarrenhälse haben eine leichte
Krümmung, damit die Saiten nicht mit
den Bünden in Berührung kommen.
Dieses Instrument ermöglicht Ihnen
einen leichten Zugriff auf das
Halsstab-Einstellrad, welches sich am
Ende des Halses befindet. Dieses Rad
kann mit einem Schraubenschlüssel
oder einem kleinen Schraubenzieher
1
Page 41

eingestellt werden. Setzen Sie den Schraubenzieher an und
drehen Sie in die entsprechende Richtung.
1. Stellen Sie das Instrument auf Standard (A-440)
Stimmung
2. Drücken Sie die tiefe E-Seite am ersten und letzten Bund nieder.
3. Achten Sie darauf, daß zwischen der Saite und
dem achten Bund ein Zwischenraum vorhanden
ist.
4. Der Zwischenraum sollte allerdings nicht
weniger als .005"und nicht mehr als .015" betragen.
5. Um die Saitenlage zu erhöhen, lösen Sie das
Halsstab-Einstellrad, indem Sie es entgegen dem
Uhrzeigersinn drehen. Für eine geringere
Saitenlage (Geraderichten des Gitarrenhalses)
drehen Sie das Einstellrad im Uhrzeigersinn.
6. Stimmen Sie Ihr Instrument und wiederholen Sie
die Schritte 1- 5 so lange, bis Sie die die
Sauberkeit des Klanges eingestellt haben.
Tremolo Bridge
Das Peavey/Floyd Rose lizensierte double-locking TremoloSystem besteht aus der locking Topnut, locking Bridge Sattel
und einer Stahlbrückenplatte mit einem massiven MessingTrägheitsmoment-Block für maximale Einstellstabilität,
Widerstand und Klangübertragung. Dieses Tremelo-System
wurde für optimale Intonation, Tonhöhenwechsel und
leichte Bespielbarkeit entwickelt. Um dieses Gerät richtig
einzustellen, müssen Sie sich zuerst mit der
Bedienungsanleitung vertraut machen. Die Saiten sind an
der locking Topnut und der Brücke geklemmt, die Ihnen
während dem Spielen die bestmögliche Einstellung
gewährleistet.
Akurate Tremolo-Einstellung ist auch ein Resultat von
genauer Balance zwischen der Saitenspannung und der
Tremolo-Federspannung. Diese Gitarre wurde ab Werk mit
Peavey Wolfgang Gitarrensaiten bestückt. Wenn Sie eine
dickere oder dünnere Saitenstärke bevorzugen, müssen Sie
die Federspannung wie auch die Intonation wieder neu einstellen. Sollten Sie neue Saiten aufziehen wollen, lesen Sie
bitte die Bedienungsanleitung.
41
Page 42

Saitenniederhalter (1)
Der Saitenhalter wird für den richtigen Anpressdruck der Saiten auf den
Klemmsattel benötigt. Der
Saitenniederhalter sollte so niedrig
eingestellt werden, daß die Saiten
komplett auf der Oberfläche des
Klemmsattels anliegen. So wird einer
Verstimmung nach dem Festklemmen
vorgebeugt.
1
2
Klemmsattel (2)
Mit dem beigefügten 3mm
Imbusschlüssel lösen Sie bitte die drei Klemmschrauben, um
die die Saiten durch die Schlitze durchziehen zu können.
Stimmen Sie die Gitarre und ziehen Sie die Klemmschrauben
wieder an.
BITTE DIE SCHRAUBEN NICHT ÜBERDREHEN.
Saiten aufziehen
Nachdem Sie die Klemmschrauben an dem Sattel gelöst
haben, stellen Sie bitte die Gitarre anhand der StimmMechanik so ein, daß die Saitenspannung nachläßt. Lösen
Sie die Klemmschrauben an dem Tremolo mit ca. 3
Umdrehungen mit dem 3 mm Imbusschlüssel. Führen Sie
das Saitenende durch die Stimm-Mechanik und den
Klemmsattel. Überstehende Saitenlängen schneiden Sie
ungefähr 2,5 cm hinter den Klemmschrauben des
Tremolos ab. Führen Sie das Saitenende in das Böckchen
und ziehen Sie die Schrauben an.
BITTE DIE SCHRAUBEN NICHT ÜBERDREHEN.
Stellen Sie die Feinstimmschrauben auf mittlere Position
ein. Dehnen Sie die Saiten und stimmen Sie diese neu.
Drehen Sie den Klemmsattel wieder zu, dehnen Sie die
Saite noch einmal und beschäftigen Sie sich dann mit dem
Feinstimmung.tuning. (Bitte sehen Sie auch den nächsten
Abschnitt).
42
D-Tuner Betrieb und Einstellung.
Der D-Tuner ist eine einzigartige Umstimm-Vorrichtung, die
Ihnen sofortige “Drop-D” Einstellung ermöglicht, indem Sie
Page 43

die tiefe E-Saite auf D
fine-tuning adjustment screw
umstimmen. Die
Vorrichtung ist an der
Klemmschraube der
tiefen E-Seite angebracht, er wird aktiviert,
indem er entweder
hineingeschoben (ein für
“E” position
set screw
E) oder herausgezogen
(aus für D) wird. Bitte
lesen Sie die
Bedienungsanleitung
durch, bevor Sie
irgendwelche Einstellungen
“D” position
vornehmen.
1. Lösen Sie die Sattelklemmschraube für die tiefe ESaite.
2. Stellen Sie den D-Tuner auf Positioin “D” indem Sie
ihn vom Tremelo wegschieben.
3. Drehen Sie die Feinstimmschraube für die tiefe E-Saite
dem Uhrzeigersinn entgegengesetzt bis es nicht mehr
geht. Danach drehen Sie die Feinstimmschraube im
Uhrzeigersinn 1 mal eine ganze Drehung. Jetzt kann
der D-Tuner richtig funktionieren.
4. Unter Verwendung des Tuners strecken und stimmen
Sie die tiefe E-Saite auf “D”, dann schrauben Sie den
Klemmsattel wieder zu, stimmen Sie “D” fein ein, unter
Benutzung der Feinstimmschraube.
5. Schieben Sie den D-Tuner mit leichtem Druck an die
Brücke heran. Der D-Tuner steht jetzt in der “E”-Position.
Die Feinstimmschraube sollte jetzt oben auf der glatten
Fläche des D-Tuners positioniert sein.
6. Prüfen Sie die Stimmung der tiefen E-Saite.
7. Wenn die tiefe E-Saite nicht gestimmt ist, benutzen Sie
bitte den beigefügten 1.5mm Imbus-schlüssel, um die
gesetzte Schraube an dem D-Tuner einzustellen. Drehen
Sie im Uhrzeigersinn, wenn die Stimmung zu tief ist und
gegen den Uhrzeigersinn, wenn die Stimmung zu hoch
ist.
8. Ziehen Sie den D-Tuner zurück in die “D”-Position und
stimmen Sie erneut. Ziehen Sie ihn zurück zur “E”Position und überprüfen Sie erneut ihre Stimmung und
stellen Sie die Schraube ein, falls erforderlich.
43
Page 44

9. Wenn die Schraube am D-Tuner korrekt eingestellt ist,
verwenden Sie bitte nur die Feinstimmschraube für Ihre
Einstellungen. (Die Feinstimmschraube wird beide Noten
in beiden Positionen stimmen).
44
Hinweis
Ihnen dies eine einwandfreie Funktion des GerŠtes
gewŠhrleistet. Beim Bšckchen sollte darauf geachtet
werden, da§ es einen gewissen Freiraum hat, dies ist
fŸr den korrekten Betrieb des D-Tuners
unumgŠnglich.
Beim Wechseln zu anderen SaitenstŠrken oder
Abweichung der vorgeschriebenen Tonhšhe (A-440)
mu§ der D-Tuner wieder neu eingestellt werden.
Es wird empfohlen, da§ der D-Tuner, die
Feinstimmschraube und das Bšckchen
gesŠubert und eingefettet werden, da
Tremolo Bridge Höhe
Die Höhe der Bridge läßt sich mit 2 Einstellschrauben
justieren. Drehen Sie die beiden Einstellschrauben im
Uhrzeigersinn, um die Höhe der Brücke zu verringern.
Sie erweitern die Höhe der Brücke, wenn Sie die
Einstellschrauben entgegen dem Uhrzeigersinn drehen.
Tremolo Federspannung
Die Federspannung der Tremelo Brücke
wird eingestellt, indem Sie die
Federspannungsschraube, die die
Federkralle in Position hält, drehen.
Um an die Federspannungsschraube
und Federkralle heranzukommen,
müssen Sie den Deckel auf der
Rückseite der Gitarre entfernen.
Nach Edward’s Spezifikationen ist das
Tremolo System so eingestellt, daß es
für maximales Sustain und Klang auf dem Korpus aufliegt.
So kann nur nach unten tremoliert werden.
Das garantiert Ihnen auch dann eine Stimmstabilität, wenn
Sie den D-Tuner benutzen oder wenn eine Saite reißt.
Diese Gitarre ist mit 2 Federn ausgestattet, welche die
genaue Spannung für die Saitenstärke die mit dieser
Page 45

Gitarre mitgeliefert wird, hat. Eine extra Feder wird mitgeliefert, sollten Sie eine dickere Saitenstärke bevorzugen.
Die richtige Federspannung ist erreicht, wenn die
Unterseite der Tremolo-Grundplatte auf der Oberfläche
des Gitarrenkorpus aufliegt, ohne daß Sie viel Kraft aufbringen müssen, um den Tremolo-Arm zu bewegen.
Das Tremolo kann so eingestellt werden, daß es als ein
“floating Style Tremolo” eingesetzt werden kann, indem
Sie die Federspannung lösen. Drehen Sie die
Federspannungs-Schrauben im Uhrzeigersinn um die
Spannung zu vergrößern, und entgegengesetzt, um die
Spannung zu verringern.
Ihr Instrument sollte in der richtigen Tonhöhe Pitch (A-440)
gestimmt sein, bevor Sie irgendwelche Änderungen
vornehmen.
Wenn Sie den Òfloating Tremolo StyleÓ
Hinweis
Betrieb eine VerŠnderung in der Saitenspannung hervorruft, die dann das Stimmen der anderen Saiten
beeinflu§t. Soll der D-Tuner entfernt werden, finden
Sie eine extra Spannungsfeder in Ihrem Koffer.
ACHTUNG: Lockern Sie alle Saitenspannungen, bevor
Sie Tremolofe-der einbauen oder herausnehmen.
Tremolofedern sind fŸr hohe Spannungen entwickelt.
Wenn Sie VerŠnderungen vornehmen mšchten, tun
Sie dies sehr vorsichtig.
wŸnschen, dann empfehlen wir Ihnen,
den D-Tuner abzunehmen, da sein
Tremolo-Arm
Der Tremolo-Arm ist in die Tremolo Armfassung auf der
Grundplatte eingelassen und verschraubt. An dieser
Einheit kann die Vorspannung, die den Tremolo-Arm
lockert oder festsetzt eingestellt werden. Viele Gitarristen
bevorzugen den Tremolo-Arm fester eingestellt. Sie können dies tun, indem Sie den 12 mm-Schlüssel benutzen,
um den Tremolo-Arm in Position zu bringen und
festzuschrauben.
Wenn Sie den Tremolo-Arm nicht festschrauben möchten,
lösen Sie einfach die Mutter, die den Tremolo-Arm in
Position hält. Auf der Rückseite der Gitarre befindet sich
45
Page 46

eine Abdeckplatte, unter der sich die Mutter befindet.
Edward bevorzugt ein extrem gelöstes Feeling, mit einem
Spielraum von ca. 2,5 cm bevor das Tremolo ausgelöst
wird. Dies trifft jedoch nur auf Edward’s Spielstil zu,
welches es ihm erlaubt, den Tremolo-Arm festzuhalten,
während er spielt ohne den Tremolo-Arm zu bewegen
oder zu benutzen.
Saiten-Intonation
Die genaue Einstellung der
Saiten-Intonation garantiert
Ihnen, daß Ihr Instrument an
jedem Punkt des Halses
gespielt, stimmt.
Die Intonation wird
eingestellt, indem man die
Tonhöhe einer offenen Saite
mit der Tonhöhe derselben
Saite, die jedoch eine
Oktave höher gegriffen am
12ten Bund gespielt wird,
vergleicht. Die Saitenlänge der Saite wird verändert,
indem man den Sattel entweder vor oder zurückstellt.
Weiterhin ist es abhängig davon, ob die gespielte Note
höher oder tiefer ist als die offene gespielte Note.
46
Dieser Vorgang sollte immer nur mit
Hinweis
Einstellungsprobleme verursachen. Es ist oft sehr
schwer fŸr ein nicht geschultes Ohr zu hšren, wann
die offene und die gegriffene Note exakt die selbe
Stimmung haben.
Manche Musiker sind der Meinung, da§ es einfacher
ist, den Flageolet-Ton am 12ten Bund der Saite mit
dem der gegriffenen Note am 12ten Bund zu vergleichen. Ein Flageolet wird gespielt, indem man die
Saite mit der rechten Hand anschlŠgt und man
dieselbe Saite mit dem linken Zeigefinger (so leicht
wie mšglich) direkt Ÿber dem 12ten Bund berŸhrt.
Der linke Finger wird so schnell wie mšglich
weggenommen, wenn man die Saite gezupft hat, die
neuen Saiten durchgefŸhrt werden.
Gebrauchte Saiten kšnnen
Page 47

dann einen ÒChimeÓ-Effekt erklingen lŠ§t. Dies wird
dann mit der gegriffenen Note verglichen. Damit es
Ihnen erleichtert wird, die Gitarre akurat einzustimmen, empfehlen wir Ihnen ein StimmgerŠt, das Sie in
den meisten MusikgeschŠften kaufen kšnnen.
1. Achten Sie darauf, daß die Halsschieneneinstellung
und Saitenlage korrekt eingestellt sind. Die Saiten sollten neu sein.
2. Stimmen Sie das Instrument zu Standard (A-440)
Tonhöhe.
3. Halten Sie die Gitarre in einer normalen Spielhaltung
oder plazieren Sie die Gitarre auf eine saubere, flache
Ebene, so daß der Korpus mit der Arbeitsfläche in
Berührung ist. Der geringste Druck am Hals beeinflußt
die Einstellungen.
4. Spielen Sie die tiefe (E) Saite offen und vergleichen Sie
die Tonhöhe der gleichen Saite wenn sie am 12ten
Bund gegriffen wird. Diese Noten sollten gleich klingen (es gibt hier jedoch eine Differenz von einer
Oktave).
5. Nehmen Sie einen 2.5mm Imbussschlüssel für das
Tremolo oder einen flachen Schraubenzieher für die
Fixed Bridge und stellen Sie den Saitensattel so ein,
daß beide, die gegriffenen und offenen Noten gleich
klingen. Wenn die gegriffene Note höher ist als die
offene Note, muß die Saitenlänge der Saite erneut
eingestellt werden. Versetzen Sie den Brückensattel
weg von den Pickups. Wenn die gegriffene Note sich
tief anhört, muß die Saitenlänge verkürzt werden.
Wenn Sie den Brückensattel näher zu den Pickups hin
versetzen, verkürzen Sie die Länge der Saite.
Oft ist es notwendig, die Tonhšhe der
Hinweis
6. Wiederholen Sie die Schritte 4 und 5 für die restlichen
Saiten.
7. Wiederholen Sie die Schritte 1-6 bis die Einstellung
aller Saiten stimmt.
offenen Note neu einzustellen, wenn die
BrŸckenposition verŠndert wurde.
47
Page 48

Pflege Ihres Instruments
Die EVH Wolfgang ist ein erstklassiges musikalisches
Instrument, das nur aus den feinsten Materialien
hergestellt wurde. Wenn Sie Ihre Gitarre immer gut behandeln, dann wird Sie Ihnen auf Jahre hin beim Spielen viel
Freude bereiten.
Temperatur und Feuchtigkeit
Es ist wichtig, daß Ihr Instrument keinen extremen
Witterungsbedingungen ausgesetzt wird. Bitte bewahren
Sie Ihre Gitarre nur im Koffer auf, wenn Sie sie nicht spielen.
Saiten
Ihre Gitarre wurde mit Qualitäts-Saiten (Peavey EVH
Wolfgang) bestückt. Bei regelmäßiger Reinigung mit einem
Saitencleaner halten die Saiten viel länger. Schmutz und
Schweiß setzen sich an der Unterseite der Saite ab, so daß
es ratsam ist, die Saiten mit einem Lappen abzuziehen.
Verschmutzte Saiten können Tuning-Probleme hervorrufen, genau wie Rost und Korrosion. Für optimale
Performance sollten Sie die Saiten regelmäßig wechseln.
48
Finish
Ihre Gitarre hat ein dauerhaftes und witterungsbeständiges
Polyester/urethane-Finish, das dennoch gepflegt werden
muß. Regelmäßige Säuberung mit Peavey Gitarrenreiniger
wird empfohlen. Zwischen den Säuberungen sollte Ihr
Instrument immer mal wieder mit einem trockenen,
weichen Lappen abgerieben werden.
Zubehör
Peavey bietet Ihnen ein
reichhaltiges Angebot an
Zubehör für Ihre Gitarre
an. Warum gehen Sie
nicht einmal bei Ihrem
Peavey-Händler vorbei.
Page 49

WARNUNGEN
Sämtlicher Verstärker-Zubehör, Mikrofone, Mischer
etc. muß richtig geerdet sein und sollte mit einem
3-Weg-System ausgestattet sein, um einen
elektrischen Schock zu vermeiden.
Kommen Sie nicht mit anderen Apparturen in
Berührung, wenn Sie Ihr Instrument spielen oder
anfassen. Die Metallstücke dieses Instrumentes
sind richtig geerdet, es ist dennoch möglich, einen
elektrischen Schlag zu bekommen, wenn Sie mit
anderen Geräten in Berührung kommen, die nicht
richtig geerdet sind.
Benutzen Sie keine Gitarrengurte, die entweder
nicht richtig gefertigt oder gar abgetragen sind. Sie
könnten sich Verletzungen zuziehen, wenn der
Gurt reißt und Ihre Gitarre herunterfällt oder Ihre
Gitarre und andere herumstehende Gegenstände
könnten zu Schaden kommen.
Gitarrensaiten sind aus einer sehr starken MetallLegierung hergestellt, und stehen unter
entsprechender Spannung, wenn sie gestimmt sind.
Seien Sie besonders vorsichtig, wenn Sie
Spieltechniken wie “String bending” oder
“Popping” ausleben, noch dazu wenn es sich hier
um ein Konzert handelt. Die Wahrscheinlichkeit,
daß eine Saite reißt und Ihnen Verletzungen
zufügen kann, besteht hier sehr oft.
Hinweis
male Performance. Wir empfehlen die
Benutzung von Abschirmkabeln.
®
5150
ist ein registriertes Markenzeichen von Edward Van
Halen.
Floyd Rose®ist ein registriertes Markenzeichen von Floyd
Rose Marketing, Inc.
Switchcraft®ist ein registriertes Markenzeichen von
Switchcraft, Inc.
Das Patch-Kabel zwischen Ihrer
Gitarre und Ihrem Verstärker ist eine
sehr wichtige Verbindung für opti-
49
Page 50

The legendary 5150
sound of Edward Van
Halen
is now available in both stack
and combo. With Rhythm and
Lead channels voiced personally
by Edward Van Halen, the 5150
120 watt top features all-tube
pre- and power amps. Combined
with 5150 Straight and 5150
Slant cabinets, this stack supplies
big, muscular tone at any volume
level. Months of rigorous testing,
many combinations of speaker
voicing and cabinet construction
were scrutinized and discarded
before the ultimate combination
emerged.
Now, the new 5150 212 Combo
joins the 5150 amp stack, affording the recording guitarist or
club player the same signature
tone and drive in a compact,
self-contained package.
®
5150®Stack
The development of the 5150
212 Combo was no less
intense than that of the stack.
Numerous prototypes were
built and tweaked until the final
combo kicked and screamed with
fury only a stack could attain. At 60 watts, the all-tube 5150 212 Combo
speaks through two of the same Sheffield
the 5150 4 x 12 cabinets. The addition of reverb adds a new dimension
to the 5150’s exceptional tone.
50
™
1200 speakers found only in
5150®212 Combo
Page 51

Notes:
51
Page 52

Notes:
53
Page 53

Peavey Guitar One-Year Limited
Warranty/Remedy
PEAVEY ELECTRONICS CORPORATION (“Peavey”) warrants this guitar to be free
from defects in material and workmanship for a period of one year from date of
purchase. PROVIDED‚ however‚ that this limited warranty is extended only to the
original retail purchaser and is subject to the following conditions.
Conditions‚ Exclusions‚ and Limitations of Limited Warranty
This limited warranty shall be void and of NO EFFECT if:
1. The first purchase of the product is for the purpose of resale; or
2. The original retail purchase is not made from an AUTHORIZED
PEAVEY DEALER; or
3. The product has been damaged by accident or unreasonable
use‚ neglect‚ improper service or maintenance‚ or other causes
not arising out of defects in material or workmanship.
This Limited Warranty shall not extend to or cover guitar strings. Replacement of
guitar strings is deemed to be reasonable and necessary maintenance.
Purchaser’s exclusive remedy for breach of this limited warranty is repair of the
defect or replacement of the guitar‚ at the option of Peavey. Service work may be
performed by any Peavey Authorized Service Center or‚ if the service center is
unable to provide the necessary warranty service‚ you will be directed to the nearest Peavey Authorized Service Center which can provide such service. Or... you
may return the guitar‚ postage prepaid and insured‚ along with a description of the
problem‚ proof of purchase‚ and a complete return address to:
PEAVEY ELECTRONICS CORPORATION
International Service Center
Hwy. 80 East
Meridian‚ MS 39301
If the defect is remedial under this warranty‚ and the other terms and conditions
expressed herein have been complied with‚ Peavey will repair or replace the product and return it‚ freight collect‚ to the purchaser. Other than the postage and
insurance requirement‚ no charge will be assessed for such repair or replacement.
The liability of Peavey to the purchaser for any cost whatsoever‚ and regardless of
the form of action‚ whether in contract or in tort‚ including negligence‚ shall be
limited to actual damages up to an amount equal to the purchase price of the product or $500.00.
Under no circumstances will Peavey be liable for any lost profits‚ any incidental
damages‚ or any consequential damages resulting from the use of or inability to
use the guitar‚ even if Peavey has been advised of the possibility of such damages.
The foregoing limitation of remedy will not apply to the payment of cost and damage awards for personal injury or damage to real property or tangible personal
property caused by negligence on the part of Peavey.
16
53
Page 54

This limited warranty is in lieu of any and all warrantiesâ
expressed or impliedâ including but not limited toâ implied warranties of merchantability and fitness for a particular use; providedâ howeverâ that if the other terms and conditions necessary to the existence of the expressed limited warrantyâ as
hereinbefore statedâ have been complied withâ implied warranties are not disclaimed during the one-year period from date
of purchase of this product.
Some states do not allow limitation on how long an implied
warranty lastsâ or the exclusion or limitation of incidental or
consequential damagesâ so the above limitations or exclusions
may not apply to you. This warranty gives you specific legal
rightsâ and you may also have other rights which may vary
from state to state.
This limited warranty is the only expressed warranty on this
guitarâ and no other statementâ representationâ warranty or
agreement by any person shall be valid as to or binding upon
Peavey.
The warranty registration card and a legible copy of the proof
of purchase supplied to you by the authorized Peavey dealer in
connection with your purchase of this guitar should be accurately completedâ mailed toâ and received by Peavey within
fourteen (14) days from the date of your purchase.
Should notification become necessary for any condition that would require correction‚ the registration card will help ensure that you are contacted and properly
notified.
If you move from the address shown on the warranty registration card‚ you should
notify Peavey of the change of address to facilitate receipt of any bulletins or other
forms of notification which may become necessary in connection with any condition that may require dissemination of information or correction.
The warranty of registration card and subsequent notices of change of address
should be mailed to:
Peavey Electronics Corporation
P.O. Box 2898
Meridian‚ MS 39302-2898
In the event of any modification of disclaimer of expressed or implied warranties
or any limitation of remedies contained herein conflicts with applicable law‚ then
such modification‚ disclaimer or limitation‚ as the case may be‚ shall be deemed
to be modified to the extent necessary to comply with such law.
The limited warranty is given by Peavey Electronics Corporation with respect to
equipment purchased in the United States of America.
54
17
Page 55

Look for our other
®
products and Accessories
at your local
Peavey dealer.
Page 56

PEAVEY ELECTRONICS CORPORATION
®
80304377
711 A Street · Meridian‚ MS 39301 · USA
phone: (601)483-5365 · fax: (601)486-1278
©1998 Printed in USA 1/98
 Loading...