

PCTV Systems picoStick (74e) User guide [ml]
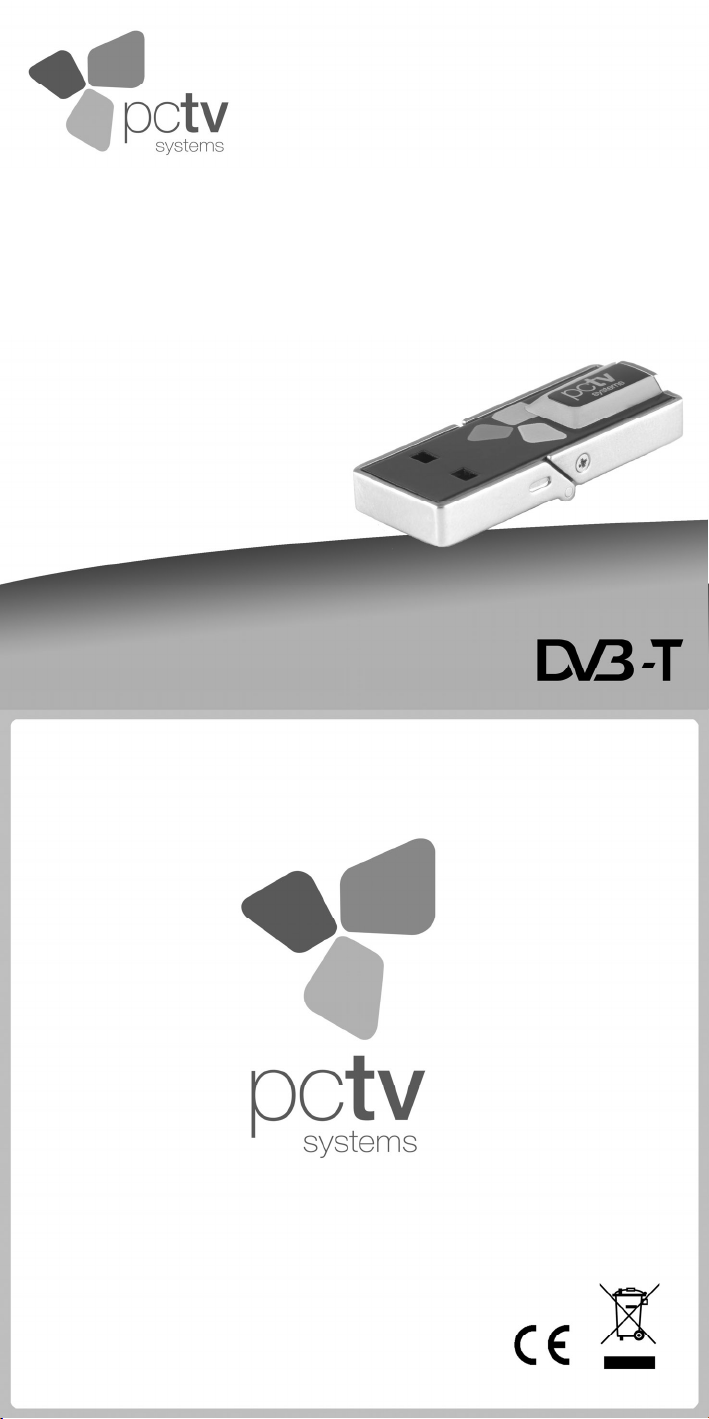
PCTV picoStick (74e)
Quick Start Guide
Kurzanleitung
Notice abrégée
Beknopte handleiding
Guida rapida
Guía de inicio rápido
“Hurtig start”-guide
Guide för snabbstart
Hurtigguide
Pika-aloitusopas
© 2008-2009 PCTV Systems S.à r.l. 8420-20037-01 R1
Scope of Delivery / Lieferumfang / Éléments fournis / Meegeleverd/
Contenuto della confezione / Contenido de la caja /
Indhold / Innehållet i kartongen /
Eskens innhold / Pakkauksen sisältö
1 2 3 4
5 6
I.a
I.b
II.a
Installation / Installatie / Installazione / Instalación
Installering / Asennus
II.b
II.c

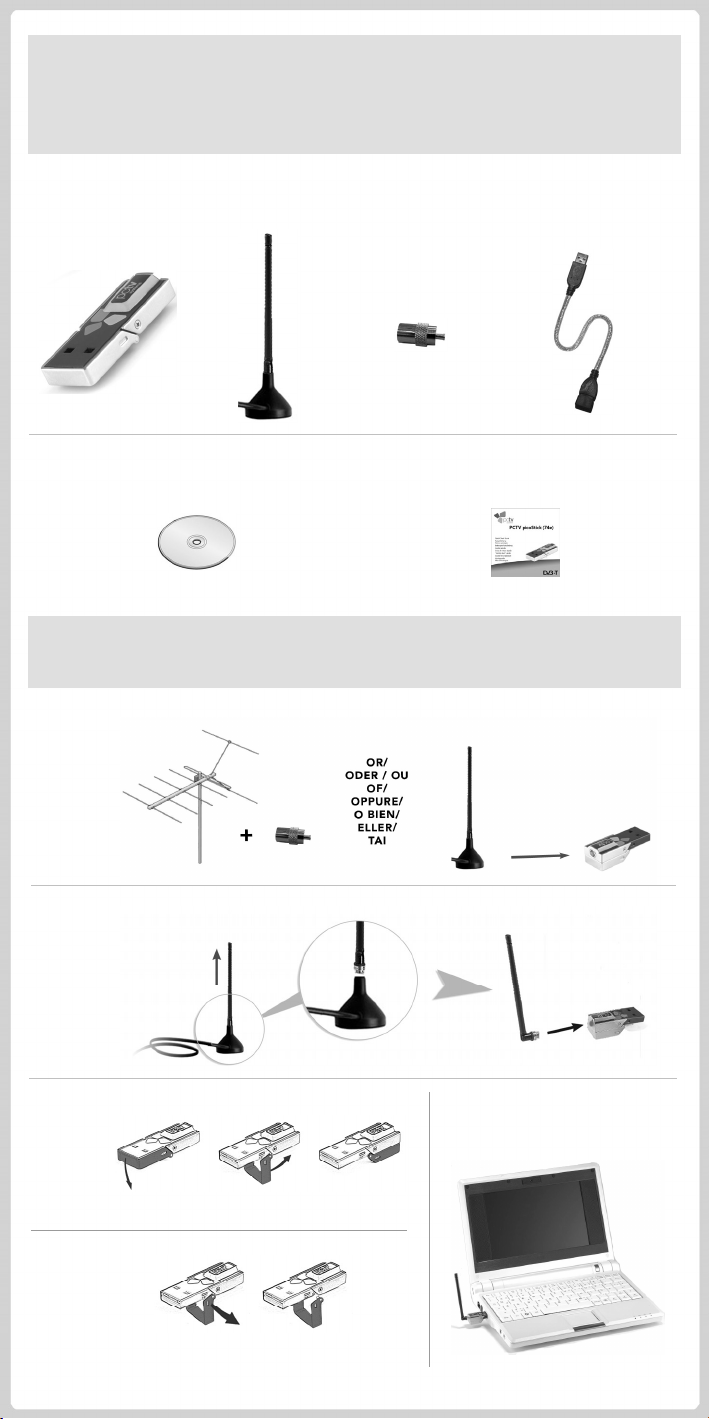
Scope of Delivery*
The scope of delivery is shown on the first page.
1. PCTV picoStick (74e) for digital terrestrial TV (DVB-T) reception
2. Passive mini telescopic antenna with detachable magnetic base
3. Antenna adapter for connecting an antenna with IEC connector
4. USB extension cable
5. Installation disc with software, drivers and documentation
6. Quick Start Guide
Note: depending on the version of your product, package contents may vary.
Installation and Use
I. Attach antenna
You can use your PCTV picoStick either with the provided telescopic antenna (with or without magnetic
base) or you can alternatively connect an external (roof-top or wall-mounted) antenna.
a)
Using the telescopic antenna with the magnetic base or an external antenna (see Figure I.a)
Connect the provided telescopic antenna with the magnetic base or an external antenna (using the
adapter supplied) to the antenna input of your PCTV picoStick.
b) Using the telescopic antenna without the magnetic base (see Figure I.b)
For this, carefully detach the telescopic antenna from the magnetic base and connect it to the antenna
input of your PCTV picoStick.
Note: If you use the rod antenna provided, position it as high and as close to the window as possible.
Reception depends on your location and can be impaired by steel-reinforced walls as well as tall
neighboring buildings. In this type of environment, an external/roof antenna is required. Please connect
the PCTV picoStick to your rooftop antenna using a double shielded antenna cable in order to get the
best possible signal quality.
In Great Britain, in most cases indoor reception with the rod antenna provided will not be possible.
Mobile reception of DVB-T, e.g., in a car or train, is generally not possible.
To avoid possible damage from the magnetic field surrounding the antenna foot and the PCTV
picoStick itself, maintain a sufficient distance from any components that are sensitive to magnetic
forces.
II. Computer connection
First push the folding clamp downwards and then backwards (see Figure II.a), in order to be able to
access the USB-connector of your PCTV picoStick. In this position the folding clamp is held by a
magnet.
Plug your PCTV picoStick into a free USB 2.0-Port of your PC (see Figure II.b) .
Note: Should the folding clamp disturb the connection process, you can easily remove it. To do so, pull
one end of the folding clamp to the right until it disengages (see Figure II.c). Repeat the procedure for
the other end of the folding clamp.
III. Software installation
You will need to have Administrator rights to be able to install the software on your Windows PC.
If the “Add new hardware” dialog window appears during installation, press cancel.
Insert the installation disc in the corresponding drive of your computer. If you have Autorun enabled,
the Welcome dialog will be displayed automatically. If you do not have Autorun enabled, navigate to
your DVD drive and double-click on Launcher.
From the Welcome dialog select: TVCenter.
Now follow the installation instructions displayed on the screen.
After installation, you might be prompted to restart your computer. This restart needs to be done in
order for the software to function properly.
Service and Support
To get technical support, visit the Internet site http://www.pctvsystems.com and select Support.
CE/FCC Conformity
PCTV Systems S.à r.l. hereby declares that this TV reception equipment complies with the fundamental
requirements and other relevant terms and conditions of EC directive number 89/336/EEC.
The EC and FCC declarations of conformity and identical construction can be downloaded from
http://www.pctvsystems.com
.
Specifications are subject to change without notice or obligation.
Lieferumfang*
Beispielhafte Abbildungen finden Sie auf der ersten Seite.
1. PCTV picoStick (74e) für den Empfang von digitalem terrestrischen Fernsehen
2. Passive Mini-Teleskopantenne mit abnehmbaren Magnetfuß
3. Antennenadapter für das Verbinden einer Antenne mit IEC-Anschluss
4. USB-Verlängerungskabel
5. Installations-Disc mit Software, Treibern und Dokumentation
6. Kurzanleitung
* Hinweis: Je nach Auslieferungsvariante kann der Lieferumfang vom hier geschilderten abweichen.
Installation und Verwendung
I. Antenne anschließen
Sie können Ihren PCTV picoStick entweder mit der gelieferten Teleskopantenne (mit oder ohne
Magnetfuß) verwenden, oder alternativ eine externe Antenne anschließen.
Verwendung der Teleskopantennte mit Magnetfuß oder einer externen Dach-/Zimmerantenne
a)
(siehe Abbildung I.a)
Verbinden Sie die mitgelieferte Teleskopantenne mit Magnetfuß oder eine Zimmer-/Dachantenne
(mittels des mitgelieferten Antennenadapters) mit dem Antenneneingang des PCTV picoSticks.
b) Verwendung der Teleskopantenne ohne Magnetfuß (siehe Abbildung I.b)
Hierfür ziehen Sie bitte die Teleskopantenne vom Magnetfuß ab und verbinden diese mit dem
Antenneneingang des PCTV picoSticks.
Hinweis: Wenn Sie die mitgelieferte Teleskopantenne verwenden, positionieren Sie diese bitte
möglichst hoch und möglichst nah am Fenster. Der Empfang hängt vom Standort ab und kann durch
dicke oder stahlverstärkte Wände sowie Nachbargebäude beeinträchtigt sein. In solchen Umgebungen
ist eine Außen-/Dachantenne erforderlich. Für einen bestmöglichen Empfang empfehlen wir Ihnen den
PCTV PicoStick mit Hilfe eines doppelt geschirmten Antennenkabels mit Ihrer Außen-/Dachantenne zu
verbinden.
Mobiler Empfang von DVB-T, z.B. im Auto oder Zug, ist im Allgemeinen nicht möglich.
Um mögliche Schäden durch das magnetische Feld des Antennenfußes und des PCTV picoSticks
selbst zu vermeiden, achten Sie bitte auf ausreichenden Abstand zu magnetisch empfindlichen
Komponenten.
II. Computer anschließen
Klappen Sie hierzu erst den Schutzbügel nach unten und dann nach hinten. (siehe Abbildung II.a).
sodass der USB-Anschluss des PCTV picoSticks zugänglich ist. Der Schutzbügel wird von einem
Magnet in dieser Position festgehalten.
Schließen Sie nun den PCTV picoStick an einen freien USB 2.0-Port Ihres PCs an (siehe Abbildung
II.b) .
Hinweis: Sollte beim Anschließen der Schutzbügel stören, können Sie diesen jederzeit entfernen.
Ziehen Sie hierzu ein Ende des Schutzbügels nach rechts bis er ausrastet (siehe Abbildung II.c).
Wiederholen Sie den Vorgang für das andere Ende des Schutzbügels.
III. Software installieren
Zur Installation der Software auf Ihren Windows-PC benötigen Sie Administrator-Rechte.
Sollte während der Installation das Dialogfenster für das “Hinzufügen neuer Hardware” auf dem
Bildschirm angezeigt werden, aktivieren Sie die Schaltfläche Abbrechen.
Legen Sie die Installations-Disc in das entsprechende Laufwerk Ihres Computers ein, wobei bei
aktivierter Autorun-Funktion automatisch ein Willkommens-Dialog aufgerufen wird. Navigieren Sie
andernfalls zu Ihrem DVD-Laufwerk und doppelklicken Sie auf die Datei Launcher.
Wählen Sie über den Willkommens-Dialog den Eintrag TVCenter.
Folgen Sie nun den Anweisungen, die auf dem Bildschirm angezeigt werden.
Nach erfolgter Installation werden Sie möglicherweise zum Neustart Ihres Computers aufgefordert.
Bitte starten Sie in diesem Fall Ihren Computer neu, damit die Software ordnungsgemäß
funktionieren kann.
Service und Support
Um technischen Support zu erhalten, besuchen Sie die Internetseite http://www.pctvsystems.com und
wählen Support aus.
CE-/FCC-Konformität
Hiermit erklärt PCTV Systems S.à r.l., dass sich dieses TV-Empfangsgerät in Übereinstimmung mit
den grundlegenden Anforderungen und den anderen relevanten Vorschriften der Richtlinie
89/336/EWG befindet. Die Erklärungen zur CE- und FCC-Konformität sowie zur Baugleichheit sind
unter http://www.pctvsystems.com
abrufbar.
Änderungen von Design/Technik vorbehalten.
Éléments fournis*
Vous trouverez des exemples d’illustrations sur la première page.
1. PCTV picoStick (74e) pour capter la télévision numérique terrestre (DVB-T)
2. Mini antenne passive, télescopique et amovible avec base magnétique
3. Adaptateur d'antenne pour le raccordement d'une antenne avec connecteur standard
4. Câble USB
5. Disque d’installation avec logiciel, pilotes et documentation
6. Notice abrégée
* Remarque : en fonction de la variante, les éléments reçus peuvent différer de ceux énumérés cidessus.
Installation et utilisation
I. Raccordement de l’antenne
Vous pouvez utiliser votre PCTV picoStick soit avec l'antenne télescopique fourni, avec ou sans la
base magnétique, soit avec une antenne externe.
a)
Utilisation de l'antenne télescopique avec la base magnétique ou une antenne externe
(voir Figure I.a)
Connectez l'antenne télescopique fournie à la base magnétique ou une antenne externe (en utilisant
l'adaptateur fourni) à l'entrée antenne de votre PCTV picoStick.
b) Utilisation de l'antenne télescopique sans la base magnétique (voir Figure I.b)
Détachez avec soin l'antenne télescopique de la base magnétique et connectez la directement à l'entrée
antenne de votre PCTV picoStick.
Remarque : si vous utilisez l’antenne tige fournie, placez-la le plus haut et le plus près possible de la
fenêtre. La réception dépend du lieu et peut être compromise par des murs épais ou blindés, ainsi que
par les bâtiments voisins. Dans de tels cas, il est nécessaire d’avoir recours à une antenne
extérieure/sur le toit. Pour une qualité optimale du signal, veuillez utiliser un câble d’antenne
doublement blindé pour relier le PCTV picoStick à votre antenne sur le toit.
Une réception mobile de la télévision numérique terrestre, par exemple en voiture ou en train, n’est
généralement pas possible.
Pour éviter d'éventuels dommages causés par le champ magnétique entourant la base magnétique de
l'antenne de pied et le PCTV picoStick lui-même, maintenez à une distance suffisante tous les
composants sensibles aux forces magnétiques, comme un disque dur, carte de crédit, etc...
II. Raccordement de l’ordinateur
Tout d'abord soulever le capot protecteur du connecteur USB (voir Figure II.a), afin d'être en mesure
de connecter votre PCTV picoStick. Dans cette position, le capot protecteur est tenue par un aimant.
Branchez votre PCTV picoStick dans un port USB 2.0 libre sur votre PC (voir Figure II.b) .
Remarque : Si le capot protecteur perturbe le processus de connexion, vous pouvez facilement le
supprimer. Pour ce faire, tirer sur une extrémité du capot sur la droite jusqu'à ce qu'il désaccouple (voir
Figure II.c). Répétez la procédure pour l'autre extrémité du capot.
III. Installation du logiciel
Pour installer ce logiciel sur votre ordinateur Windows, vous devez disposer de droits d’administrateur.
Si la fenêtre de dialogue “Ajouter un nouveau matériel ” s’affiche durant l’installation, cliquez sur
annuler.
Insérez le disque d’installation dans le lecteur correspondant de votre ordinateur. Si vous avez activé
Autorun, la fenêtre de dialogue de bienvenue s’affiche automatiquement. Si vous n’avez pas activé
Autorun, accédez à votre lecteur DVD et double-cliquez sur le fichier Launcher.
Depuis la fenêtre de dialogue de bienvenue, sélectionnez TVCenter.
Puis suivez les instructions d’installation qui s’affichent à l’écran.
Lorsque l’installation est terminée, il peut vous être demandé de redémarrer votre ordinateur. Ce
redémarrage est nécessaire pour que le logiciel fonctionne correctement.
Assistance technique
Si vous avez besoin d’assistance technique, allez sur notre site Web http://www.pctvsystems.com et
sélectionnez Support.
Conformité CE / FCC
PCTV Systems S.à r.l. certifie que cet appareil de réception TV est conforme aux exigences
fondamentales et autres prescriptions applicables de la directive 89/336/CEE.
Les déclarations de conformité européenne et FCC et les déclarations d’identité du modèle peuvent
être consultées sur le site Web http://www.pctvsystems.com
Sous réserve de modifications techniques ou de design.
.
Meegeleverd*
Voorbeeldafbeeldingen vindt u op de eerste pagina.
1. PCTV picoStick (74e) voor de ontvangst van digitale terrestrische televisie (DVB-T)
2. Passieve mini staafantenne met verwijderbare magnetische voet
3. Antenne-adapter voor het aansluiten aan antennes met IEC stekker.
4. USB-verlengkabel
5. Installatieschijf met software, drivers en documentatie
6. Beknopte handleiding
* Tip: Afhankelijk van de levervariant kan de meegeleverde inhoud afwijken van hetgeen hier wordt
aangegeven.
Installatie en gebruik
I. Antenne aansluiten
U kan uw PCTV picoStick ofwel met de meegeleverde staafantenne (met of zonder de magnetische
voet) of u kan alternatief een externe (dak- of buitenantenne) aansluiten.
a)
De staafantenne met de magnetische voet of een externe antenne gebruiken
(zie afbeelding I.a)
Sluit de meegeleverde staafantenne met de magnetische voet of een externe antenne (middels de
meegeleverde adapter) aan de antenne-aansluiting van uw PCTV picoStick aan.
b) De staafantenne zonder de magnetische voet gebruiken (zie afbeelding I.b)
Verwijder in dit geval voorzichtig de staafantenne van de magnetische voet en sluit deze dan aan de
antenne-aansluiting van uw PCTV picoStick aan.
Tip: Wanneer u de meegeleverde staafantenne gebruikt, plaats deze dan indien mogelijk hoog en
indien mogelijk in de buurt van het raam.
De ontvangst is afhankelijk van de positie en kan door dikke of met staal versterkte muren en
aangrenzende bebouwing worden beïnvloed. In dergelijke omgevingen is een buiten-/dakantenne
vereist. Sluit de PCTV picoStick op uw dakantenne aan met een dubbel afgeschermde antennekabel
om de best mogelijke signaalkwaliteit te verkrijgen.
Mobiele ontvangst van DVB-T, bijvoorbeeld in de auto of trein, is over het algemeen niet mogelijk.
Om schade aan magnetisch gevoelige componenten te verhinderen, dient u voldoende afstand tussen
deze componenten en de magnetische antennevoet alsook de PCTV picoStick te houden.
II. Computer aansluiten
Druk de wegklapbare beschermbeugel naar beneden en dan naar achter (zie afbeelding II.a), om de
USB stekker van uw PCTV picoStick vrij te maken. In deze positie wordt de beschermbeugel
magnetisch vastgehouden.
Sluit nu uw PCTV picoStick aan een vrije USB 2.0 poort van uw PC aan.
Tip: Indien de beschermbeugel bij het verbinden stoort, kan u deze eenvoudig verwijderen. Om dit te
doen, trekt u gewoon het ene einde van de beugel voorzichtig naar rechts uit de stick tot deze los is (zie
afbeelding II.c). Herhaal dit daarna voor het andere einde van de beugel.
III. Software installeren
U hebt beheerdersrechten nodig om de software op uw Windows-PC te kunnen installeren.
Als het dialoogvenster “Nieuwe hardware toevoegen” verschijnt tijdens de installatie, klikt u op
Annuleren.
Plaats de installatieschijf in het desbetreffende station op uw computer. Als de functie Autorun is
ingeschakeld, verschijnt nu automatisch het dialoogvenster Welkom. Als de functie Autorun niet is
ingeschakeld, gaat u naar uw DVD-station en dubbelklikt u op Launcher.
Selecteer in het dialoogvenster Welkom de optie TVCenter.
Volg nu de installatie-instructies op het scherm.
Na de installatie wordt u mogelijk gevraagd de computer opnieuw te starten. Dit is nodig om er zeker
van te zijn dat de software naar behoren functioneert.
Service en support
Voor technische ondersteuning bezoekt u onze website http://www.pctvsystems.com en selecteert
Support.
CE-/FCC-conformiteit
Hiermee verklaart PCTV Systems S.à r.l. dat dit TV-ontvangstapparaat in overeenstemming met de
elementaire eisen en de andere relevante voorschriften van de richtlijn 89/336/EWG is.
De EG- en FCC-conformiteitverklaringen, alsmede de verklaring over de gelijke bouwwijze zijn te
vinden op http://www.pctvsystems.com
.
Specificaties onder voorbehoud.

Contenuto della confezione*
La prima pagina riporta illustrazioni fornite a titolo di esempio.
1. PCTV picoStick (74e) per la ricezione della TV digitale terrestre (DVB-T)
2. Mini antenna telescopica passiva con base magnetica
3. Adattatore per l'antenna, per collegare l’antenna ad un connetore di tipo IEC
4. Cavo prolunga USB
5. Disco di installazione con software, driver e documentazione
6. Guida rapida
* Nota: Il contenuto della confezione può differire da quanto raffigurato, a seconda della variante
acquistata.
Installazione ed utilizzo
I. Collegamento dell’antenna
Potete utilizzare la vostra PCTV picoStick indipendentemente o l’antenna telescopica in dotazione (con
o senza base magnetica) o alternativamente utilizzare la vostra antenna centralizzata (da tetto).
Utilizzando l’antenna telescopica con la base magnetica (vedere immagine I.I )
a)
Collegare l’antenna telescopica fornita con la base magnetica o l’antenna esterna (utilizzando
l’adattatore fornito) all’ingresso d’antenna della PCTV picoStick.
b) Utilizzando l’antenna telescopica senza base magnetica (vedere immagine I.b)
Per fare questo scollegate con molta cautela la base magnetica dall’antenna telescopica e collegatela
all’ingresso antenna della vostra PCTV picoStick.
Nota: Se si utilizza l’antenna ad asta fornita in dotazione, si raccomanda di collocarla più in alto
possibile ed in prossimità di una finestra.
La ricezione dell’antenna dipende dall’ubicazione e può essere ostacolata da pareti spesse o rinforzate
in acciaio oppure da alti palazzi nelle vicinanze. In questi casi occorre utilizzare una antenna
esterna/da tetto. Per ottenere segnali della migliore qualità possibile, collegare PCTV picoStick
all’antenna da tetto utilizzando un cavo doppio schermato per antenne.
La ricezione mobile del segnale DVB-T, ad esempio in auto o in treno, in generale non è possibile.
Per evitare possibili danneggiamenti provocati da campi magnetici della base magnetica, si consiglia di
posizionare l’antenna ad un’adeguata distanza dalla the PCTV picoStick e da altre periferiche che
potrebbero essere danneggiate.
II. Collegamento del computer
Prima di tutto collegate il connettore sul retro del PC(vedere immagine II.a), per poter collegare la
PCTV picoStick al connettore USB.
Collegare la vostra PCTV picoStick in una porta USB 2.0 libare presente nel vostro PC (vedere
immagine II.b) .
Nota: Se il morsetto disturba l’inserimento , potete rimuoverlo semplicemente. Per fare questo, basta
spingere il morsetto da un lato fino a che questo non si scolleghi (vedere immagine II.c). Ripetere la
procedura anche dall’altra estremità.
III. Installazione del software
Per installare il programma sul PC con Windows è necessario disporre dei diritti di amministratore.
Se durante l'installazione compare la finestra di dialogo “Trovato nuovo hardware”, premere annulla.
Inserire il disco di installazione nel drive corrispondente del computer. Se è attiva l'opzione Autoplay,
la finestra iniziale comparirà automaticamente. Se l'opzione Autoplay non è attiva, selezionare l'unità
DVD e fare doppio clic sul file Launcher.
Nella finestra iniziale selezionare TVCenter.
Seguire ora le istruzioni di installazione visualizzate a schermo.
Dopo l'installazione, verrà chiesto di riavviare il computer. Il riavvio è necessario per far funzionare
correttamente il programma.
Assistenza e supporto
Per ottenere assistenza tecnica, visitare la pagina internet http://www.pctvsystems.com e selezionare
Support.
Conformità CEE/FCC
Con la presente PCTV Systems S.à r.l. dichiara che il presente ricevitore TV è conforme ai requisiti ed
alle disposizioni della Direttiva 89/336/CEE.
Le dichiarazioni di conformità CE e FCC e quelle sull'uguaglianza strutturale possono essere
consultate all’indirizzo http://www.pctvsystems.com
Le caratteristiche del prodotto possono variare senza preavviso.
.

PCTV picoStick (74e)
Quick Start Guide
Kurzanleitung
Notice abrégée
Beknopte handleiding
Guida rapida
Guía de inicio rápido
“Hurtig start”-guide
Guide för snabbstart
Hurtigguide
Pika-aloitusopas
© 2008-2009 PCTV Systems S.à r.l. 8420-20037-01 R1
 Loading...