

Page 1

Pinnacle
PCTV DVB-T Flash Stick
Page 2

Pinnacle PCTV DVB-T Flash Stick
User’s Guide
GB/US 06/2008
© Pinnacle Systems, Inc. 2008
All rights reserved.
No part of this manual may be reproduced or transferred to other media without
explicit written permission from Pinnacle Systems, Inc.
All brand or product names are trademarks or registered trademarks of their
respective holders.
Pinnacle Systems, Inc. has written this manual to the best of its knowledge, but
does not guarantee that the programs/systems will fulfill the users’ intended
applications.
No warranty is made as to the specifications of features.
Pinnacle Systems, Inc. retains the right to make alterations to the content of the
manual without obligation to inform third parties.
All quotes, sales, supply and manufacturing contracts from Pinnacle Systems,
Inc., including consulting, installation and other contractual services are subject
exclusively to the General Sales and Delivery Terms of Pinnacle Systems, Inc..
Avid Technology GmbH hereby declares that this TV reception equipment
complies with the fundamental requirements and other relevant terms and
conditions of EC directive number 89/336/EEC.
The EC and FCC declarations of conformity and identical construction can be
downloaded from http://www.pinnaclesys.com/compliance
.
Disposal and Recycling
Do not dispose of electric components in the garbage. Either return defective or
unwanted devices to the retailer or take them to an appropriate recycling station!
Page 3

Table of Contents
Introduction ........................................................................................................... 1
System Requirements............................................................................................ 3
Processor ............................................................................................................ 3
Working Memory............................................................................................... 3
Hard Disk ...........................................................................................................3
Graphics Card ....................................................................................................3
Sound Card......................................................................................................... 3
USB Port ............................................................................................................ 3
DVD-ROM Drive ..............................................................................................3
Supported Operating Systems............................................................................ 3
Initial Startup and Use........................................................................................... 4
Connecting the Antenna..................................................................................... 4
Rod Antenna Positioning Tips ...................................................................... 5
First Time Connection to Your Computer.........................................................6
The Drives on the PCTV DVB-T Flash Stick............................................... 6
Special Requirements: When Using Windows XP....................................... 8
Special Requirements: When Using Windows Vista.................................... 9
Initial Set-Up of Pinnacle TVCenter Pro......................................................... 10
Rescanning with Different Settings ............................................................ 10
Capturing, Saving and Playing Back ............................................................... 11
Recording Capacity Information for the PCTV DVB-T Flash Stick.......... 12
Ending the Program ......................................................................................... 13
Reconnecting to Your Computer ..................................................................... 14
Connecting the Stick without Automatically Starting the TVCenter Pro ....... 14
Setting Your Virus Scanner .............................................................................14
Connecting to a Different Computer ...............................................................15
Using the Remote Control...................................................................................16
Data Recovery on the PCTV DVB-T Flash Stick.............................................. 17
Starting the Recovery Tool .............................................................................. 17
The Restoring Data Process............................................................................. 17
Using the Stick after Data Recovery................................................................ 18
Installing New Drivers and Software Updates....................................................19
Installing New Drivers..................................................................................... 19
iii
Page 4

Installing Software Updates.............................................................................20
Technical Data..................................................................................................... 21
Bus System....................................................................................................... 21
Power Consumption......................................................................................... 21
TV Tuner..........................................................................................................21
DVB-T Demodulator .......................................................................................21
Antenna Input................................................................................................... 21
Dimensions ......................................................................................................21
Weight.............................................................................................................. 21
Operating temperature .....................................................................................21
iv
Page 5

Introduction
Congratulations on buying a new PCTV DVB-T Flash Stick!
PCTV DVB-T Flash Stick is the first product worldwide with Pinnacle's
innovative PCTV Flash™ technology.
PCTV DVB-T Flash Stick combines the following into one practical and easyto-use unit:
A DVB-T receiver
The TVCenter Pro program
Disk space for recorded shows or other user data
PCTV Flash™ technology allows the TVCenter Pro program to be started
directly from the stick. The software no longer needs to be installed onto your
computer from a CD or DVD.
If the PCTV DVB-T Flash Stick is connected to the USB port of a PC or
laptop, you will be asked whether you want to use the TVCenter Pro program. If
the program has already been installed on the PC and a channel scan has been
performed, the stick will access the existing channel list and immediately
display a TV image on your desktop.
The PCTV DVB-T Flash Stick lets you receive digital terrestrial television
according to the DVB-T standard (Digital Video Broadcasting - Terrestrial)
with excellent picture quality on your computer.
In addition to viewing live TV, the TVCenter Pro program also lets you watch
delayed TV (timeshift) as well as recorded shows - without any compromise in
sound or image quality.
You also get access to the free information services teletext and the Electronic
Program Guide (EPG), which let you program the shows you want to record
simply and easily.
Additional services planned for the future include digital radio via DVB-T.
Some of these services are already available in selected areas.
1
Page 6

PCTV Flash™ technology enables the direct recording of digital TV shows onto
the memory integrated on the stick. This makes the PCTV DVB-T Flash Stick
the "smallest digital video recorder in the world".
We hope you have lots of fun with the PCTV DVB-T Flash Stick.
More information about DVB-T can be found on the Internet at
www.dvb.org or at www.freeview.co.uk. For Australia, go to www.dba.org.au.
2
Page 7

System Requirements
In order for the PCTV DVB-T Flash Stick to function smoothly, your system
must fulfill the following requirements:
Processor
Minimum: Pentium IV with 2.4 GHz
or equivalent AMD Athlon XP processor (SD only)
Recommended: Intel Core Duo with 2.33 GHz
or equivalent AMD Athlon 64 processor (SD and HD)
Working Memory
Minimum: 256 MB RAM
Recommended: 512 MB RAM
Hard Disk
Minimum: IDE hard disk with master mode drivers and 5 GB free disk space
Recommended: U-DMA hard disk with 20 GB free disk space
Graphics Card
DirectX 9-compatible (or higher) graphics card
Sound Card
DirectX9-compatible or higher sound card
USB Port
USB 2.0 port (Hi-Speed)
DVD-ROM Drive
DVD-ROM drive
Supported Operating Systems
Windows XP (Home Edition, Professional Edition or Media Center Edition
2005) with the latest Service Pack
Windows Vista (32 bit)
3
Page 8
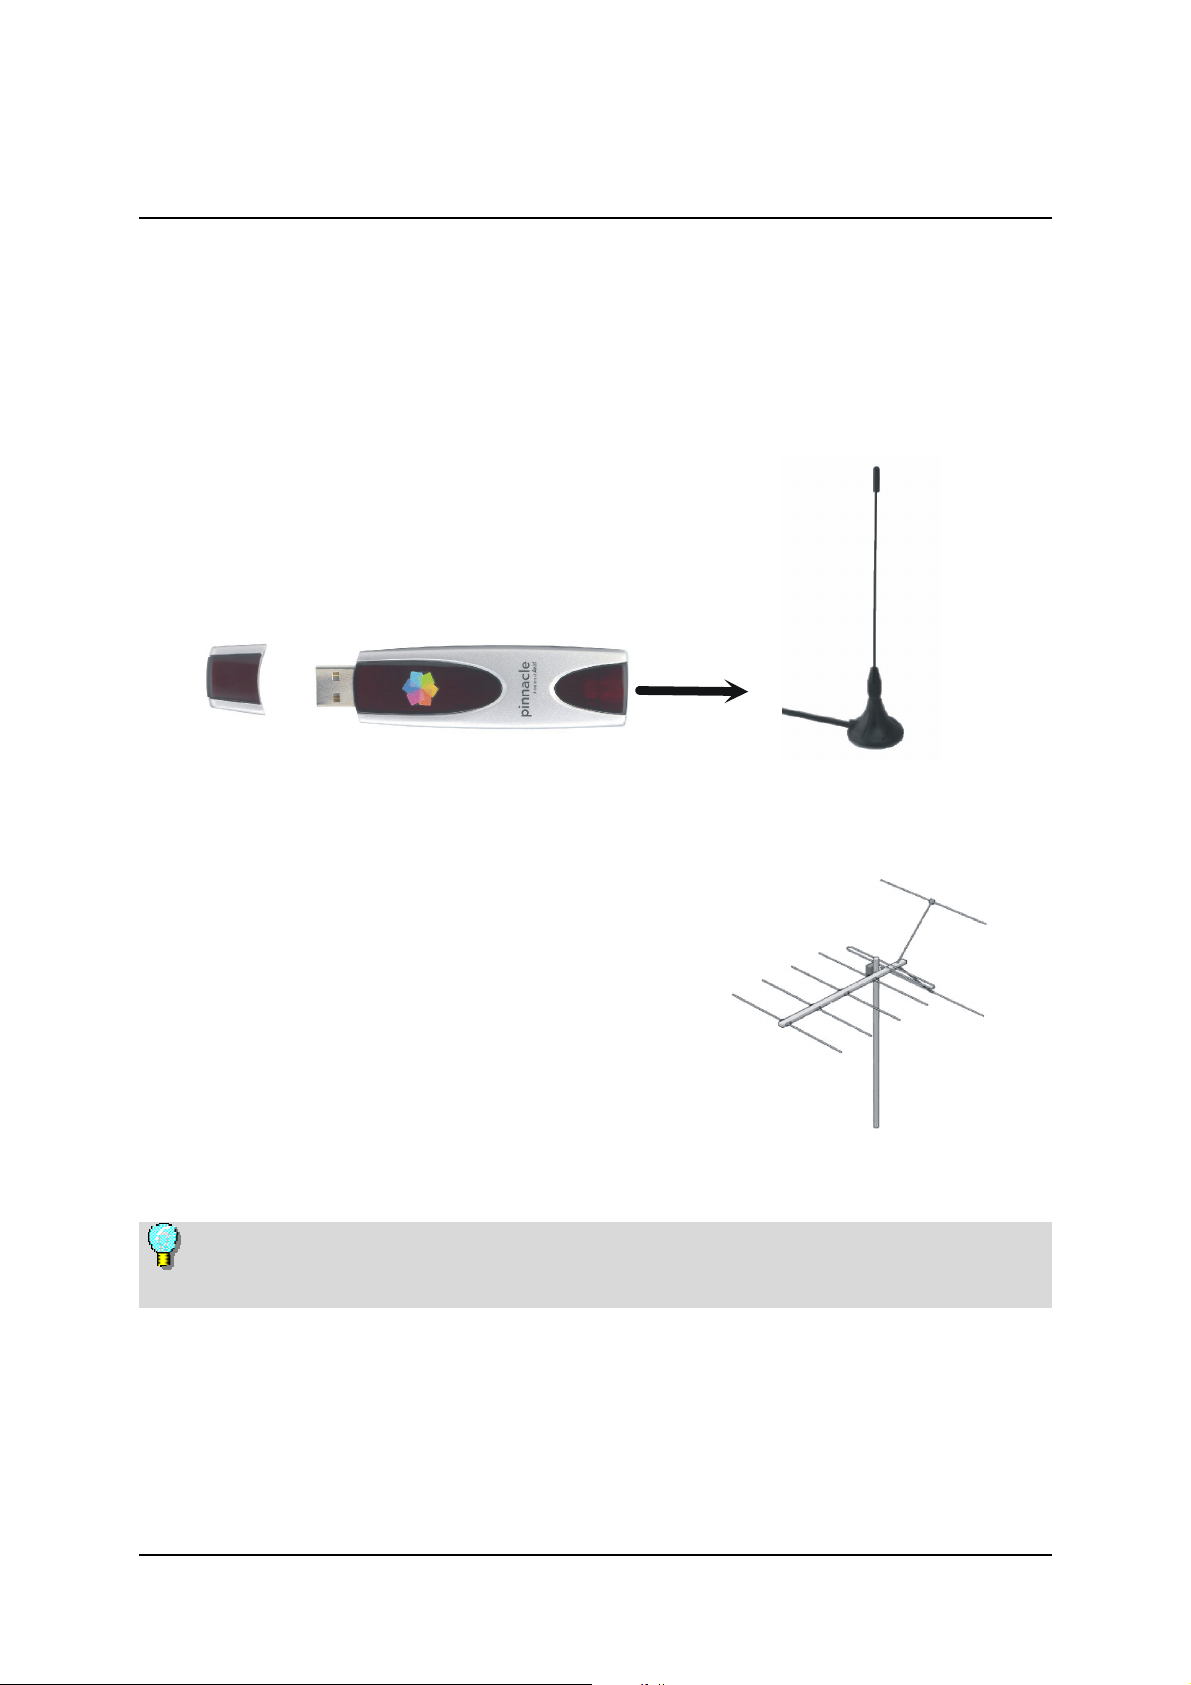
Initial Startup and Use
Connecting the Antenna
Connect the rod antenna contained in the package or your building antenna to
the antenna input on the PCTV DVB-T Flash Stick BEFORE inserting the
stick into the computer.
OR
To connect a building antenna, you need the corresponding cable. Note that
the quality of the cable has a great influence on the quality of the reception.
4
Page 9

Rod Antenna Positioning Tips
If you would like to use the rod antenna (optional) included in the package to get
television reception, note the following instructions (these instructions do not
apply to other antennas):
If possible, place the antenna near a window.
In addition, place the antenna as high as possible.
The antenna should not be placed near a cathode ray tube monitor or a
television or anything similar.
In order to prevent possible damage from the magnetic field of the antenna
pedestal, make sure that there is enough space between it and your hard drives
and other magnetically-sensitive components.
Reception of DVB-T is dependent on location and can be affected by thick or
steel-reinforced walls as well as neighboring buildings. In such environments, an
outdoor/roof antenna is required. Mobile reception of DVB-T, for example, in a
car or train, is generally not possible.
5
Page 10

First Time Connection to Your Computer
When you first install the PCTV DVB-T Flash Stick, it checks whether all
required drivers are available, and, for Windows XP, whether the .NET 2.0
Framework is already on your computer. If not, it installs these as necessary.
After this initial startup, every time you start the program, a TV screen appears
immediately on your desktop.
The Drives on the PCTV DVB-T Flash Stick
The PCTV DVB-T Flash Stick is divided into 2 different areas (drives):
A re-writable memory area (removable media area) with the
TVCenter Pro program and free memory for recorded shows or other data.
This drive is labeled PCTV Flash.
A read-only memory area (CD-ROM area) that contains the drivers.
This drive is labeled PCTV DVB-T Start.
6
Page 11

Depending on the drive letter allocation on your computer, the drive for the
PCTV DVB-T Flash Stick may be by "hidden" by assigned (mapped) network
drives so that one or both of the stick drives are not visible. This is an operating
system feature and may occur with other USB memory media as well. In this
case, change the assignment of your network drives accordingly. Both drives
must be visible to start from the stick.
Please do not rename the stick drives since this may cause problems during
startup.
If you have already installed the TVCenter Pro program on the hard disk of
your computer, make sure that it is the latest version.
End the TVCenter Pro program and all other programs before you install the
PCTV DVB-T Flash Stick for the first time.
Both operating systems, Windows XP and Windows Vista, react differently to
the two drives on the stick. Therefore, note the special requirements described
on following pages.
7
Page 12

Special Requirements: When Using Windows XP
You must have administrator rights to install the drivers. Therefore, log
onto the system as administrator before starting the PCTV DVB-T
Flash Stick for the first time.
If you run the initial installation with limited rights, a corresponding error
message will appear on the screen.
When installed properly, the TVCenter Pro program can also be used by
users with limited rights.
Insert the PCTV DVB-T Flash Stick in an available USB 2.0 connection on
your computer. If necessary, use the USB extension cable contained in the
package.
If the connected stick is not detected immediately, first remove it from your
computer, wait a few seconds and then reconnect it.
If, during installation, the system dialog window Assistant for new
hardware appears, cancel it.
In some cases, the PCTV DVB-T Start drive is not immediately detected as
long as this dialog window is open. The drive should be detected a few
seconds after the window is closed.
The TVCenter Pro program starts automatically as soon as you connect the
PCTV DVB-T Flash Stick to your computer.
If the AutoPlay function on your computer is disabled, manually start the
TVCenterPro.exe program by double-clicking the program icon from the
PCTV DVB-T Start drive on the stick.
Now follow the instructions on the screen.
For the TVCenter Pro program to function smoothly, .NET 2.0 must be
installed on your system. If necessary, the corresponding components will be
installed during the first start. If you do not install .NET, you will not be able to
use the TVCenter Pro program. The re-writable PCTV Flash drive on the stick
can, in this case, still be used as a mass storage medium.
The message New Hardware Found might appear in the task bar. This is not
important for the functionality of the stick and can therefore be ignored.
8
Page 13

Special Requirements: When Using Windows Vista
You must have administrator rights to install the drivers. Log onto the
system as administrator before starting the PCTV DVB-T Flash Stick for
the first time.
If you run the initial installation with limited rights, a corresponding error
message will appear on the screen.
When installed properly, the TVCenter Pro program can also be used by
users with limited rights.
Insert the PCTV DVB-T Flash Stick in an available USB 2.0 connection on
your computer. If necessary, use the USB extension cable contained in the
package.
If the connected stick is not detected immediately, first remove it from your
computer, wait a few seconds and then reconnect it.
The system now shows the internal system dialog window New Hardware
Found. Please cancel it.
In some cases, the PCTV DVB-T Start drive is not immediately detected as
long as this dialog window is open. The drive should be detected a few
seconds after the window is closed.
An AutoPlay window is now displayed for each of the two drives on the
stick. Caution: At first, the two windows might overlap each other. If
necessary, use your mouse to drag the windows to a better position.
In the PCTV DVB-T Start drive window, select the TVCenterPro.exe
program.
If the AutoPlay function on your computer is disabled, manually start the
TVCenterPro.exe program by double-clicking the program icon from the
PCTV DVB-T Start drive on the stick.
Now follow the instructions on the screen.
9
Page 14

Initial Set-Up of Pinnacle TVCenter Pro
As soon as the drivers are installed, the Pinnacle TVCenter Pro set-up
Wizard will start.
Select the TV connection type that is appropriate to your configuration.
A channel scan is carried out and a list of the channels found is saved on your
PCTV DVB-T Flash Stick.
As soon as the scan is finished, you will be ready to watch live TV on your
PC. The first channel in the list is automatically selected and you will see the
current show displayed on your desktop.
In addition, you can now record TV shows to your PC’s hard drive or
directly to your PCTV DVB-T Flash Stick.
To improve transmission reception, the integrated antenna amplifier is
switched on by default. Depending on the location and the system, channels may
be overlap. If this is the case, switch off the integrated antenna amplifier. To do
this, open the Settings dialog in the TVCenter Pro program by clicking the
Settings icon in the upper control bar or double-click the
TVCenterProSettings.exe program icon on the PCTV Flash drive on the stick.
Under Hardware - Antenna input, deactivate the Onboard Antenna
Amplifier option.
Rescanning with Different Settings
If you are temporarily in a different location or if you just want to update the
channel list, you can restart the channel scan later.
To do this, open the Settings dialog in the TVCenter Pro program by clicking
the Settings
TVCenterProSettings.exe program icon on the PCTV Flash drive on the
stick.
Select the country you are located in and then click the Scan button.
When the scan is finished, the channel list previously stored on your stick
will be replaced with a new one.
icon in the upper task bar or by double-clicking the
10
Page 15

Capturing, Saving and Playing Back
Using the TVCenter Pro program, you can save manually started or prescheduled recordings directly on your PCTV DVB-T Flash Stick as well as
play them from there.
The quick-to-open teletext window provides you with the most important news
any time you want it, and an Electronic Program Guide (EPG) guarantees you
an overview of the TV schedule as well as quick and uncomplicated recording
scheduling.
Due to the considerable memory requirements, we recommend saving timeshift
recordings on the hard disk of your computer. This is set as the default. If you
would also like to save these recordings on the stick, please change the
timeshifting path under Settings – Timeshifting in the TVCenter Pro program.
Caution: To prevent malfunctions and possible data loss, the stick should
never be removed from the computer while the TVCenter Pro program is
running.
Additional information on the use of the TVCenter Pro program is located
in the Online Help provided.
11
Page 16

Recording Capacity Information for the PCTV DVB-T Flash Stick
The maximum amount of digital video and audio data that can be saved is based
on the data rate.
Note the following: The better the image quality and the higher the data rate, the
lower the number of recordings that will fit on the corresponding storage
medium. The same movie recorded from different channels can, therefore,
require different amounts of memory.
Under Settings – Capture in the TVCenter Pro program, you can configure the
corresponding settings for the video format and video quality.
The following table shows the possible recording times for various memory
capacities depending on the data rate transmitted:
Memory
capacity
256 MByte 6 min 10 min 2 h
512 MByte 12 min 20 min 4 h
768 MByte 18 min 30 min 6 h
1 GByte 24 min 40 min 8 h
Recording time
for the DVD
format
Recording time
for the DVD
LongPlay
format
Recording time
for the DivX
Handheld
format
12
Page 17

Ending the Program
If you want to stop using the PCTV DVB-T Flash Stick for any reason, we
recommend the following procedure:
First, close the TVCenter Pro program.
Then click the Safely Remove Hardware icon in the task bar information
area and select Remove USB mass storage device.
Do not remove the stick from your computer until after you have done this.
"Safe removal" can prevent problems when the stick is reconnected to your
computer.
If necessary, first check which drive properties are set for USB storage devices
on your Windows system:
To do this, right click My Computer.
Select the Administration option.
Select the Device manager from the list.
Under Drives, double-click the PCTV Flash drive to select it.
Click the Policies tab.
We recommend that you activate the option Optimize for performance.
When the PCTV DVB-T Flash Stick is removed from your computer, only the
drivers are left on the hard drive of your computer. This helps the TVCenter Pro
program start faster when the stick is reinserted.
You can also leave the PCTV DVB-T Flash Stick connected to your
computer and only close the TVCenter Pro program. You can restart the
program by double-clicking the TVCenterPro.exe program icon on the
PCTV DVB-T Start drive or by double-clicking the PCTV Flash drive on the
stick.
13
Page 18

Reconnecting to Your Computer
Insert the PCTV DVB-T Flash Stick in an available USB 2.0 connection on
your computer.
If the program has already been installed and channel scan performed on
your computer, the stick will access the existing channel list. The current
program on the channel that was active last will be now displayed on your
desktop.
If the AutoPlay function on your computer is disabled, manually start the
TVCenterPro.exe program by double-clicking one of the two drives on the
stick.
The system is now ready to save shows directly onto your PCTV DVB-T
Flash Stick.
Detailed information on using the TVCenter Pro program is located in the
Online Help provided.
Connecting the Stick without Automatically Starting the TVCenter Pro
If you do not want the TVCenter Pro program to start automatically, for
example, because you only want to copy the recordings saved on the stick,
connect the stick while holding the Shift key on the computer.
Setting Your Virus Scanner
Virus scanners treat USB memory devices like disks ("floppy disks").
Depending on your virus scanner settings, the virus scanner may prompt you to
remove your disks when you shut down your computer. This virus scanner
behavior applies to all USB memory media. If this is the case, we recommend
that you remove the PCTV DVB-T Flash Stick from your computer. Or you
can deactivate this option in your virus scanner so that the stick can remain
connected to the computer.
Caution: To avoid malfunctions and possible data loss, the stick should
never be removed from the computer while the TVCenter Pro program is in use.
14
Page 19

Connecting to a Different Computer
To connect your PCTV DVB-T Flash Stick to a different computer, proceed
exactly as you did when you connected it to the first computer.
If you do not want the TVCenter Pro program to start automatically, for
example, because you only want to copy the recordings saved on the stick,
connect the stick while holding the Shift key on the computer.
15
Page 20

Using the Remote Control
If you would like to control the PCTV DVB-T Flash Stick using the remote
control contained in the package (optional), make sure that the remote control is
aimed as much as possible in the direction of the USB stick casing.
16
Page 21

Data Recovery on the PCTV DVB-T Flash Stick
In case of malfunction or if you have accidentally deleted or damaged files on
the flash memory of the stick, you can recover the original contents of the
PCTV DVB-T Flash Stick with the PCTV Flash Recovery Tool on the DVD
that came in the package.
Starting the Recovery Tool
To start the Recovery Tool, proceed as follows:
To work with the recovery tool, you will need to have Administrator rights.
Therefore, first log onto the system as administrator.
Plug the PCTV DVB-T Flash Stick into an available USB 2.0 port of your
computer.
Insert the DVD that came in the package into the drive of your computer. If
you have Autorun enabled, the Welcome dialog will be displayed
automatically. If you do not have Autorun enabled, navigate to your DVD
drive, and double-click on Launcher.exe.
From the Welcome dialog choose Flash Recovery. The Recovery Wizard
opens.
Now follow the on-screen instructions of the Recovery Wizard.
The Restoring Data Process
The PCTV DVB-T Flash Stick is divided into 2 different areas (drives):
A re-writable memory area (removable media area) with the
TVCenter Pro program and free memory for recorded shows or other user
data.
This drive is labeled PCTV Flash.
A read-only memory area (CD-ROM area) that contains the drivers.
This drive is labeled PCTV DVB-T Start.
17
Page 22

Data recovery is only necessary for the removable memory area with the drive
label PCTV Flash.
During the data recovery process the entire data contents on the re-writable
memory area are recovered by copying a corresponding file image from the
DVD.
Note that during the data recovery process recordings or other files saved on
the stick will be deleted.
You can track the progress of the recovery process in the lower part of the
Recovery Wizard window.
Caution: To avoid malfunctions, the copy procedure should never be
interrupted by removing the stick from the computer before the procedure is
finished.
Using the Stick after Data Recovery
When data recovery is complete, remove the stick from your computer and then
reconnect it after waiting a few seconds. The system is now ready to use again.
18
Page 23

Installing New Drivers and Software Updates
Installing New Drivers
To download new drivers from the Internet, copy them onto your stick and
install them on your computer, proceed as follows:
Connect the PCTV DVB-T Flash Stick
Do not start the TVCenter Pro program or close it if it is open.
The latest drivers for your product can be found on the Pinnacle website
http://www.pinnaclesys.com/support
directory on your computer.
. Download and save them in any
The new drivers must now be manually copied into the Driver directory on
the re-writable drive PCTV Flash on the stick.
Now remove the stick from your computer and then reinsert it after waiting a
few seconds.
The new drivers are now installed on your computer. Follow the instructions
on the screen.
Note the chapter “Special Requirements: When Using Windows XP” and
“Special Requirements: When Using Windows Vista” in the chapter “Initial
Startup and Use.”
As soon as the driver is installed and after you have confirmed, the
TVCenter Pro program starts.
19
Page 24

Installing Software Updates
To download software updates for the TVCenter Pro program from the Internet
and install them on your PCTV DVB-T Flash Stick, proceed as follows:
Insert the PCTV DVB-T Flash Stick into your computer.
The TVCenter Pro program now starts automatically; if not, start it
manually by double-clicking the TVCenterPro.exe program icon on the
PCTV DVB-T Start drive on the stick.
Open the Settings dialog by clicking the Settings icon in the upper task
bar in the TVCenter Pro program or by double-clicking the
TVCenterProSettings.exe program icon on the PCTV Flash drive on the
stick.
Select the Information menu. Under TVCenter Pro Installation, you will
find all the information about the currently installed software. Click the
Update now button to start the update.
During the update, the TVCenter Pro program will close automatically.
As soon as the update on the stick is complete, a corresponding message will
appear on the screen.
Now restart the TVCenter Pro program by double-clicking the
TVCenterPro.exe program icon on the PCTV DVB-T Start drive on the
stick.
The updated version of the TVCenter Pro is now on your PCTV DVB-T
Flash Stick.
Tip: In the TVCenter Pro settings under General – Check for Updates,
you can set how often the TVCenter Pro should automatically check for
available updates. Select the desired time frame from the drop-down menu.
Whenever an automatic update is performed, a message letting you know always
appears on the screen, and after a program restart, the latest version appears on
your PCTV DVB-T Flash Stick.
If the TVCenter Pro is not used for an extended period of time, the automatic
update search is postponed accordingly.
20
Page 25

Technical Data
Bus System
USB 2.0 (Hi-Speed)
Power Consumption
480mA (5V)
TV Tuner
Frequency range 42 to 860 MHz (VHF and UHF)
DVB-T Demodulator
16.64 QAM, QPSK
6,7,8 MHz band width
Antenna Input
75 Ohm IEC
Dimensions
97.3 x 24.0 x 16.4 mm
Weight
Approx. 27 g
Operating temperature
0°C-50°C at 5% to 95% relative humidity
21
 Loading...