

Page 1
PCTV DVB-T
Flash Stick
Quick Start Guide
Kurzanleitung
Notice abrégée
Beknopte handleiding
Guida rapida
Guía de inicio rápido
© 2003–2008 Pinnacle Systems, Inc. 8420-01042-01 R2
Page 2
Box Contents / Lieferumfang / Éléments fournis / Meegeleverd /
Contenuto della confezione / Contenido de la caja
1 2 3 4 5 6
I.
II.
Installation / Installatie / Installazione / Instalación
III.
Page 3

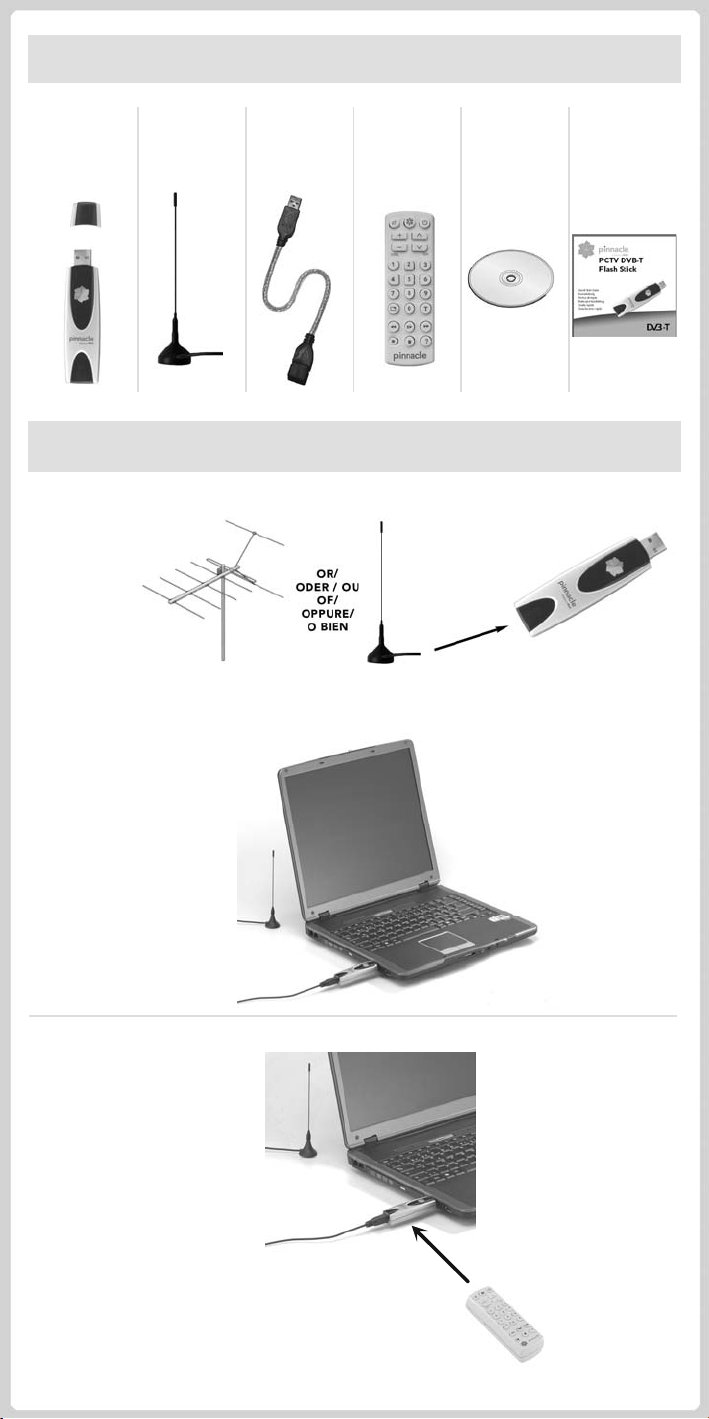
Box Contents*
Example illustrations can be found on the first page.
1. PCTV DVB-T Flash Stick
2. Passive mini-rod antenna with magnetic pedestal
3. USB extension cable
4. Mini-remote control with batteries
5. Inastallation disc with software, drivers and documentation
6. Quick Start Guide
* Note: Depending on the product variant, the box contents may vary from the list above.
Initial Startup and Use
Connecting to the Antenna (See Figure I)
Connect the rod antenna contained in the package or your building antenna to the antenna input on the
PCTV DVB-T Flash Stick BEFORE inserting the stick into the computer.
To connect a building antenna, you need the corresponding cable. Note that the quality of the cable
has a great influence on the quality of the reception.
Note: If you would like to use the rod antenna included in the package, place it as high as possible
and as close as possible to the window. Reception is dependent on location and can be affected
by thick or steel-reinforced walls as well as neighboring buildings. In such environments, an
outdoor/roof antenna is required. Mobile reception of DVB-T, for example, in a car or train, is
generally not possible. In order to prevent possible damage from the magnetic field from the
antenna foot, make sure that there is enough space between it and your hard drives and other
magnetically-sensitive components.
Connecting to Your Computer for the First Time (See Figure II)
When you first install the PCTV DVB-T Flash Stick, it checks whether all required drivers are available,
and, for Windows XP, whether the .NET 2.0 Framework is already on your computer. If not, it installs
these as necessary.
immediately on your desktop.
After the initial startup, every time you start the program, a TV screen appears
Drives on the PCTV DVB-T Flash Stick
The integrated memory on the PCTV DVB-T Flash Stick is divided into 2 different areas ("drives"):
A re-writable memory area (removable media area) with the TVCenter Pro program and
available memory for recorded shows or other user data. This drive is labeled PCTV Flash.
A read-only memory area (CD-ROM area) contains the drivers. This drive is labeled
PCTV DVB-T Start.
Installing the Drivers
You must have administrator rights to install the drivers. Therefore, log onto the system as
administrator before starting the PCTV DVB-T Flash Stick for the first time.
Insert the PCTV DVB-T Flash Stick in an available USB 2.0 connection on your computer.
If necessary, use the USB extension cable contained in the package.
If, during installation, the system dialog window Assistant for new hardware appears, cancel it.
Windows XP: The TVCenter Pro program starts automatically, as soon as you connect the
PCTV DVB-T Flash Stick to your computer.
If the AutoPlay function on your computer is disabled, manually start the TVCenterPro.exe program
by double-clicking the program icon on the PCTV DVB-T Start drive on the stick.
Windows Vista: An AutoPlay window is now displayed for each of the two drives on the stick.
Caution: At first, the two windows might overlap each other. If necessary, use your mouse to drag
the windows to a better position.
In the PCTV DVB-T Start drive window, select the TVCenterPro.exe program.
If the AutoPlay function on your computer is disabled, manually start the TVCenterPro.exe program
by double-clicking the program icon on the PCTV DVB-T Start drive on the stick.
Now follow the instructions on the screen.
Specifications are subject to change without notice or obligation.
Page 4

Scanning in the TVCenter Pro
As soon as the driver is installed, your system needs to perform a channel scan. The
TVCenter Pro Setup-Wizard is displayed on the screen.
Please select the TV connection type that is appropriate to your configuration and the channel
scan will start automatically. A list of the channels found is saved on your
PCTV DVB-T Flash Stick.
As soon as the scan is finished, the first channel in the list is automatically selected, and you will
see the current show displayed on your desktop.
In addition, you now have the option of saving captures directly onto your PCTV DVB-T Flash
Stick.
If you would like to control the PCTV DVB-T Flash Stick using the remote control contained in the
package (optional), make sure that the remote control is aimed as much as possible in the direction of
the USB stick casing.
Using the Remote Control (See figure III)
…for using this product can be found in the detailed User Manual in PDF format as well as in the
Online Help for the TVCenter Pro program on the installation disc included in the package.
More Information and Valuable Tips…
Avid Technology GmbH hereby declares that this TV reception equipment complies with the
fundamental requirements and other relevant terms and conditions of EC directive number
89/336/EEC.
The CE and FCC declarations of conformity and identical construction for this product can be
downloaded from http//www.pinnaclesys.com/compliance
CE / FCC Conformity Statement
.
Service and Support
To get technical support, visit the Internet site http://www.pinnaclesys.com/support
and select your product.
Specifications are subject to change without notice or obligation.
Page 5

Lieferumfang*
Beispielhafte Abbildungen finden Sie auf der ersten Seite.
1. PCTV DVB-T Flash Stick
2. Passive Mini-Stabantenne mit Magnetfuß
3. USB-Verlängerungskabel
4. Mini-Fernbedienung mit Batterien
5. Installations-Disc mit Software, Treibern und Dokumentation
6. Kurzanleitung
* Hinweis: Je nach Auslieferungsvariante kann der Lieferumfang vom hier geschilderten abweichen.
Inbetriebnahme und Verwendung
Anschluss an die Antenne (siehe Abbildung I)
Verbinden Sie die mitgelieferte Stabantenne oder Ihre Hausantenne mit dem Antenneneingang des
PCTV DVB-T Flash Stick BEVOR der Stick am Computer angeschlossen ist.
Um eine Hausantenne anzuschließen, benötigen Sie die entsprechenden Kabel. Bitte beachten Sie
hierbei, dass die Qualität der Kabel wesentlich zur Empfangsleistung beiträgt.
Hinweis: Wenn Sie die mitgelieferte Stabantenne verwenden, positionieren Sie diese bitte
möglichst hoch und möglichst nah am Fenster. Der Empfang hängt vom Standort ab und kann
durch dicke oder stahlverstärkte Wände sowie Nachbargebäude beeinträchtigt sein. In solchen
Umgebungen ist eine Außen-/Dachantenne erforderlich. Mobiler Empfang von DVB-T, z.B. im
Auto oder Zug, ist im Allgemeinen nicht möglich. Um mögliche Schäden durch das magnetische
Feld des Antennenfußes zu vermeiden, achten Sie bitte auf ausreichenden Abstand zu Festplatten
und sonstigen magnetisch empfindlichen Komponenten.
Erstmaliger Anschluss an Ihren Computer (siehe Abbildung II)
Bei Erstinstallation Ihres PCTV DVB-T Flash Sticks wird zunächst geprüft, ob alle Treiber verfügbar
sind und – in Kombination mit Windows XP -, ob das .NET 2.0 Framework bereits auf Ihrem Computer
installiert ist. Ist dies nicht der Fall, werden diese Komponenten soweit nötig nachinstalliert. Bei allen
nachfolgenden Starts der Applikation erscheint unmittelbar ein TV-Bild auf Ihrem Desktop.
Die Laufwerke auf dem PCTV DVB-T Flash Stick
Der integrierte Speicher des PCTV DVB-T Flash Stick ist in 2 verschiedene Bereiche („Laufwerke“)
aufgeteilt:
Ein wieder beschreibbarer Speicherbereich (Wechseldatenträger-Bereich) mit der
TVCenter Pro-Applikation und freiem Speicherplatz für aufgenommene Sendungen oder andere
Benutzerdaten. Dieses Laufwerk ist mit PCTV Flash bezeichnet.
Ein nicht beschreibbarer Speicherbereich (CD-ROM-Bereich), der die Treiber enthält. Dieses
Laufwerk ist mit PCTV DVB-T Start bezeichnet.
Treiberinstallation
Für die Installation von Treibern müssen Sie über Administrator-Rechte verfügen. Melden Sie sich
deshalb bitte vor der ersten Inbetriebnahme des PCTV DVB-T Flash Stick als Administrator im
System an.
Stecken Sie den PCTV DVB-T Flash Stick in einen freien USB 2.0-Anschluss Ihres Computers.
Gegebenenfalls verwenden Sie dazu das mitgelieferte USB-Verlängerungskabel.
Sollte während der Installation das systemeigene Dialogfenster Assistent für das Suchen neuer
Hardware erscheinen, brechen Sie dieses bitte ab.
Windows XP: Die TVCenter Pro-Applikation startet automatisch, sobald Sie den
PCTV DVB-T Flash Stick an Ihren Computer anschließen.
Sollte die AutoPlay-Funktionalität auf Ihrem Computer deaktiviert sein, so starten Sie das
Programm TVCenterPro.exe bitte manuell per Doppelklick aus dem PCTV DVB-T Start-Laufwerk
des Sticks.
Windows Vista: Für die beiden Laufwerke des Sticks wird nun je ein AutoPlay-Fenster angezeigt.
Achtung: Die beiden Fenster können sich zunächst überlagern. Ziehen Sie sie notfalls mit der
Maus in eine übersichtlichere Postition.
In dem Fenster für das Laufwerk PCTV DVB-T Start wählen Sie das Programm TVCenterPro.exe.
Sollte die AutoPlay-Funktionalität auf Ihrem Computer deaktiviert sein, so starten Sie das
Programm TVCenterPro.exe bitte manuell per Doppelklick aus dem PCTV DVB-T Start-Laufwerk
des Sticks.
Folgen Sie nun den Hinweisen am Bildschirm.
Änderungen von Design/Technik vorbehalten.
Page 6

Sendersuchlauf in TVCenter Pro
Unmittelbar nach Installation der Treiber muß Ihr System einen Sendersuchlauf durchführen. Der
TVCenter Pro Setup-Assistant wird auf den Bildschirm gerufen.
Bitte wählen Sie den für Ihre Konfiguration geeigneten TV-Anschluß, wonach der Sendersuchlauf
automatisch initialisiert wird. Eine Liste der gefundenen Sender wird auf Ihrem PCTV DVB-T Flash
Stick gespeichert.
Sobald der Sendersuchlauf abgeschlossen ist, wird der erste Sender in der Liste automatisch
ausgewählt und Sie sehen das dort laufende Programm auf Ihrem Desktop.
Außerdem haben Sie nun die Möglichkeit, Aufnahmen direkt auf Ihren PCTV DVB-T Flash Stick zu
speichern.
Wenn Sie den PCTV DVB-T Flash Stick über die optional mitgelieferte Fernbedienung steuern
möchten, achten Sie bitte darauf, dass die Fernbedienung möglichst direkt auf das Gehäuse des Sticks
gerichtet ist.
Verwendung der Fernbedienung (siehe Abbildung III)
…für die Verwendung dieses Produkts finden Sie sowohl in dem ausführlichen Benutzerhandbuch im
PDF-Format als auch in der Online-Hilfe für das TVCenter Pro-Programm auf der mitgelieferten
Installation-Disc.
Weiterführende Informationen und wertvolle Tipps…
Hiermit erklärt Avid Technology GmbH, dass sich dieses TV-Empfangsgerät in Übereinstimmung mit
den grundlegenden Anforderungen und den anderen relevanten Vorschriften der Richtlinie
89/336/EWG befindet.
Die Erklärungen zur CE- und FCC-Konformität sowie zur Baugleichheit sind unter
http://www.pinnaclesys.com/compliance
CE-/FCC-Konformität
abrufbar.
Service und Support
Um technischen Support zu erhalten, besuchen Sie die Internetseite
http://www.pinnaclesys.com/support
und wählen Sie Ihr Produkt aus.
Änderungen von Design/Technik vorbehalten.
Page 7

Éléments fournis*
Vous trouverez des exemples d’illustrations sur la première page.
1. PCTV DVB-T Flash Stick
2. Mini-antenne tige passive avec pied magnétique
3. Câble de rallonge USB
4. Mini-télécommande avec piles
5. Disque d’installation avec logiciel, pilotes et documentation
6. Notice abrégée
* Remarque : selon la version, les éléments fournis peuvent différer des éléments reproduits ci-contre.
Mise en service et utilisation
Raccordement à l’antenne (voir illustration I)
Reliez l’antenne tige fournie ou votre antenne domestique à l’entrée antenne du PCTV DVB-T
Flash Stick AVANT de raccorder le stick à l’ordinateur.
Pour raccorder une antenne domestique, vous avez besoin des câbles correspondants. Tenez compte
du fait que la qualité des câbles influe considérablement sur la qualité de la réception.
Remarque : si vous utilisez l’antenne tige fournie, placez-la le plus haut et le plus près possible de
la fenêtre. La réception dépend du lieu et peut être compromise par des murs épais ou blindés,
ainsi que par les bâtiments voisins. Dans ce cas de figure, il convient d'installer une antenne de
toit à l'extérieur. Une réception mobile de la télévision numérique terrestre, par exemple en voiture
ou en train, n’est généralement pas possible. Pour éviter tout dommage dû au champ magnétique
du pied de l’antenne, veillez à le placer à une distance suffisante de tout disque dur ou autre
composant sensible sur le plan magnétique.
Premier raccordement à votre ordinateur (voir illustration II)
Lorsque vous installez PCTV DVB-T Flash Stick pour la première fois, le système vérifie si tous les
pilotes nécessaires sont disponibles, et pour Windows XP, il vérifie en plus si votre ordinateur contient
déjà l’application .NET 2.0 Framework. Si ce n’est pas le cas, il installe les pilotes nécessaires. Chaque
fois que vous lancerez ensuite l’application, l’image de télévision apparaîtra directement sur votre
ordinateur.
Les lecteurs sur le PCTV DVB-T Flash Stick
Le PCTV DVB-T Flash Stick est divisé en 2 secteurs différents (« lecteurs ») :
un espace mémoire réinscriptible (secteur disque amovible) avec l’application TVCenter Pro et
de l’espace libre pour les enregistrements d’émissions ou d’autres données. Ce lecteur est appelé
PCTV Flash.
un espace mémoire non réinscriptible (secteur CD-ROM) qui contient les pilotes. Ce lecteur est
appelé PCTV DVB-T Start.
Installation du pilote
Pour installer des pilotes, vous devez disposer de droits d’administrateur. Veillez donc à vous
connecter comme administrateur dans le système avant la première mise en service du
PCTV DVB-T Flash Stick.
Branchez le PCTV DVB-T Flash Stick sur une prise USB 2.0 libre de votre ordinateur.
Utilisez au besoin pour cela le câble de rallonge USB fourni.
Si la boîte de dialogue du système d’exploitation Assistant Matériel détecté apparaît en cours
d’installation, refermez-la.
Windows XP : l’application TVCenter Pro démarre automatiquement dès que vous raccordez le
PCTV DVB-T Flash Stick à votre ordinateur.
Si la fonction de lecture automatique est désactivée sur votre ordinateur, lancez le programme
TVCenterPro.exe manuellement d’un double-clic à partir du lecteur PCTV DVB-T Start du stick.
Windows Vista : vous voyez s’afficher une fenêtre de lecture automatique pour chacun des
lecteurs du stick.
Attention : il est possible que les deux fenêtres soient superposées au départ. Déplacez-les au
besoin avec la souris pour qu’elles soient plus visibles.
Dans la fenêtre du lecteur PCTV DVB-T Start, sélectionnez le programme TVCenterPro.exe.
Si la fonction de lecture automatique est désactivée sur votre ordinateur, lancez le programme
TVCenterPro.exe manuellement d’un double-clic à partir du lecteur PCTV DVB-T Start du stick.
Suivez les instructions qui s’affichent à l’écran.
Sous réserve de modifications techniques ou de design.
Page 8

Recherche des chaînes dans TVCenter Pro
Dès que le pilote est installé, votre système doit effectuer une recherche des chaînes. L’assistant
d’installation de TVCenter Pro apparaît à l’écran.
Veuillez sélectionner le type de connexion TV qui convient à votre configuration et la recherche des
chaînes commence automatiquement. Une liste des chaînes disponibles est enregistrée sur votre
lecteur PCTV DVB-T Flash Stick.
Dès que la recherche des chaînes est achevée, la première chaîne de la liste est automatiquement
sélectionnée et vous voyez le programme sur votre bureau.
Vous pouvez en outre sauvegarder directement les enregistrements sur votre PCTV DVB-T
Flash Stick.
Lorsque vous souhaitez commander le PCTV DVB-T Flash Stick à l’aide de la télécommande fournie
en option, veillez à ce que la télécommande soit dans la mesure du possible orientée directement sur
le boîtier du stick.
Utilisation de la télécommande (voir illustration III)
…sur l’utilisation de ce produit se trouvent dans le Guide de l’utilisateur détaillé au format PDF ainsi
que dans l’Aide en ligne pour le programme TVCenter Pro sur le disque d’installation fourni avec
le logiciel.
Plus d’informations et de précieux conseils …
Avid Technology GmbH certifie que cet appareil de réception TV est conforme aux exigences
fondamentales et autres prescriptions applicables de la directive 89/336/CEE.
Les déclarations de conformité européenne et FCC et d’identité du modèle peuvent être consultées sur
le site http://www.pinnaclesys.com/compliance
Conformité CE / FCC
.
Assistance technique
Si vous avez besoin d’assistance technique, rendez-vous sur notre site Web
http://www.pinnaclesys.com/support
et sélectionnez votre produit.
Sous réserve de modifications techniques ou de design.
Page 9

PCTV DVB-T
Flash Stick
Quick Start Guide
Kurzanleitung
Notice abrégée
Beknopte handleiding
Guida rapida
Guía de inicio rápido
© 2003–2008 Pinnacle Systems, Inc. 8420-01042-01 R2
Page 10

Box Contents / Lieferumfang / Éléments fournis / Meegeleverd /
Contenuto della confezione / Contenido de la caja
1 2 3 4 5 6
I.
II.
Installation / Installatie / Installazione / Instalación
III.
Page 11

Meegeleverd*
Voorbeeldafbeeldingen vindt u op de eerste pagina.
1. PCTV DVB-T Flash Stick
2. Passieve mini-staafantenne met magneetvoet
3. USB-verlengkabel
4. Mini-afstandsbediening met batterijen
5. Installatieschijf met software, drivers en documentatie
6. Beknopte handleiding
* Tip: Afhankelijk van de levervariant kan de meegeleverde inhoud afwijken van hetgeen hier wordt
aangegeven.
Installatie en gebruik
Aansluiten op de antenne (zie afbeelding I)
Sluit de meegeleverde staafantenne of uw huisantenne aan op de antenne-ingang van de
PCTV DVB-T Flash Stick VOORDAT u de stick op de computer aansluit.
Voor het aansluiten van een huisantenne hebt u een bijbehorende kabel nodig. Houd er rekening
mee dat de kwaliteit van de kabel essentieel is voor de ontvangstprestaties.
Tip: Wanneer u de meegeleverde staafantenne gebruikt, plaats deze dan indien mogelijk hoog en
indien mogelijk in de buurt van het raam. De ontvangst is afhankelijk van de positie en kan door
dikke of met staal versterkte muren en aangrenzende bebouwing worden beïnvloed. In dergelijke
omgevingen is een buiten-/dakantenne vereist. Mobiele ontvangst van DVB-T, bijvoorbeeld in de
auto of trein, is over het algemeen niet mogelijk. Om mogelijke schade door het magnetische veld
van de antennevoet te voorkomen, dient u voldoende afstand tot harde schijven en andere
magnetisch gevoelige componenten te bewaren.
Eerste aansluiting op uw computer (zie afbeelding II)
Als u de PCTV DVB-T Flash Stick voor het eerst installeert, wordt er gecontroleerd of alle vereiste
drivers beschikbaar zijn; bij Windows XP wordt er tevens gecontroleerd of .NET 2.0 Framework zich al
op uw computer bevindt. Als dit niet het geval is, dient u deze indien nodig te installeren. Hierna
verschijnt er telkens wanneer u de applicatie start direct TV-beeld op uw bureaublad.
De stations op de PCTV DVB-T Flash Stick
Het geïntegreerde geheugen van de PCTV DVB-T Flash Stick is in 2 verschillende bereiken ('stations’)
verdeeld:
Een beschrijfbaar geheugengedeelte (gedeelte met wisselende gegevensdrager) met de
TVCenter Pro-applicatie en vrije ruimte voor opgenomen programma’s of andere
gebruikersgegevens. Dit station heeft de naam PCTV Flash.
Een niet-beschrijfbaar geheugengedeelte (CD-ROM-gedeelte) dat de drivers bevat. Dit station
heeft de naam PCTV DVB-T Start.
De drivers installeren
Voor de installatie van drivers moet u over Administrator-rechten beschikken. Meld u als
Administrator in het systeem aan voordat u de PCTV DVB-T Flash Stick voor het eerst gebruikt.
Steek de PCTV DVB-T Flash Stick in een vrije USB 2.0-aansluiting van uw computer.
Eventueel gebruikt u hiervoor de meegeleverde USB-verlengkabel.
Als tijdens de installatie het dialoogvenster Nieuwe hardware gevonden verschijnt, sluit u dit.
Windows XP: de TVCenter Pro-applicatie start automatisch zodra u de
PCTV DVB-T Flash Stick op uw computer aansluit.
Indien de AutoPlay-functie op uw computer is uitgeschakeld, dan start u het programma
TVCenterPro.exe handmatig door erop te dubbelklikken op het PCTV DVB-T Start-station van de
Stick.
Windows Vista: voor de beide stations op de Stick wordt nu een AutoPlay-venster weergegeven.
Let op: de beide vensters kunnen elkaar in eerste instantie overlappen. Sleep ze desnoods met de
muis naar een overzichtelijkere positie.
In het venster voor station PCTV DVB-T Start kiest u het programma TVCenterPro.exe.
Indien de AutoPlay-functie op uw computer is uitgeschakeld, dan start u het programma
TVCenterPro.exe handmatig door erop te dubbelklikken op het PCTV DVB-T Start-station van de
Stick.
Volg nu de aanwijzingen op het beeldscherm.
Specificaties onder voorbehoud.
Page 12

Zenders zoeken in TVCenter Pro
Zodra de driver is geïnstalleerd, moet uw systeem een kanaalscan uitvoeren. De TVCenter Pro
Setup-Wizard verschijnt nu op het scherm.
Selecteer het type TV-aansluiting dat bij uw configuratie wordt gebruikt en de kanaalscan, het
zoeken naar kanalen, start automatisch. Een lijst met gevonden kanalen wordt op uw PCTV DVB-T
Flash Stick opgeslagen.
Zodra de zoekactie is voltooid, wordt de eerste zender in de lijst automatisch geselecteerd en ziet u
het lopende programma op uw bureaublad.
Bovendien hebt u nu de mogelijkheid direct opnames op uw PCTV DVB-T Flash Stick op te slaan.
Als u de PCTV DVB-T Flash Stick via de optioneel geleverde afstandsbediening wilt bedienen, zorg er
dan voor dat u de afstandsbediening zo veel mogelijk rechtstreeks op de behuizing van de Stick richt.
Gebruik van de afstandsbediening (zie afbeelding III)
…voor het gebruik van dit product vindt u in de gedetailleerde Gebruikershandleiding in het PDFbestand en in de Online Help van het programma TVCenter Pro op de installatieschijf die in de
verpakking wordt meegeleverd.
Meer informatie en waardevolle tips…
Hiermee verklaart Avid Technology GmbH dat dit TV-ontvangstapparaat in overeenstemming met de
elementaire eisen en de andere relevante voorschriften van de richtlijn 89/336/EWG is.
De EG- en FCC-conformiteitverklaringen, alsmede de verklaring over de gelijke bouwwijze, zijn te
vinden op http://www.pinnaclesys.com/compliance
CE-/FCC-conformiteit
.
Service en support
Voor technische ondersteuning bezoekt u onze website http://www.pinnaclesys.com/support
en selecteert u uw product.
Specificaties onder voorbehoud.
Page 13

Contenuto della confezione*
Immagini a scopo illustrativo sono riportate sulla prima pagina.
1. PCTV DVB-T Flash Stick
2. Mini antenna ad asta, passiva, con base magnetica
3. Cavo di prolunga USB
4. Mini-telecomando con batterie
5. Disco di installazione con software, driver e documentazione
6. Guida rapida
* Nota: Il contenuto della confezione può differire da quanto raffigurato, a seconda della variante
acquistata.
Messa in funzione e utilizzo
Collegamento all’antenna (vedere Figura I)
Collegare l’antenna ad asta fornita in dotazione o l’antenna di casa all’ingresso per l’antenna del
PCTV DVB-T Flash Stick PRIMA di inserire la chiavetta nel computer.
Per effettuare il collegamento con l’antenna di casa è necessario disporre del relativo cavo. Tenere
presente, in questo caso, che la qualità del cavo contribuisce in maniera sostanziale alla qualità della
ricezione.
Nota: se si utilizza l’antenna ad asta, posizionarla il più in alto possibile e quanto più possibile
nelle vicinanze di una finestra. La ricezione dipende dall’ubicazione e può essere pregiudicata da
pareti spesse o con rinforzi in acciaio oppure da edifici vicini. In ambienti di questo tipo è
necessario utilizzare antenne esterne o da tetto. In generale la ricezione mobile di DVB-T, ad
esempio in auto o in treno, non è possibile. Per evitare possibili danni causati dal campo
magnetico sulla base dell’antenna, è bene mantenere una distanza sufficiente dal disco rigido e
altri componenti sensibili alle onde magnetiche.
Prima connessione al computer (vedere Figura II)
Terminata l'installazione di PCTV DVB-T Flash Stick, il dispositivo controlla se sono disponibili tutti i
driver necessari e, per Windows XP, verifica se sul computer è già installato .NET 2.0 Framework. In
caso contrario verranno installati i componenti necessari. In tutti i successivi avvii dell’applicazione sul
desktop appare uno schermo TV.
I drive sul PCTV DVB-T Flash Stick
La memoria integrata del PCTV DVB-T Flash Stick è suddivisa in due aree (“Drive”) distinte:
Un’area di memoria riscrivibile (area ‘periferica con archivio rimovibile’) che contiene
l’applicazione TVCenter Pro e spazio di memoria libero per trasmissioni registrate o altri dati
dell’utente. Questo drive è denominato PCTV Flash.
Un’area di memoria non riscrivibile (area ‘CD-ROM’) che contiene i driver. Questo drive è
denominato PCTV DVB-T Start.
Installazione dei driver
Per installare dei driver è necessario disporre di Diritti di amministratore. Prima della messa in
funzione iniziale del PCTV DVB-T Flash Stick occorre quindi accreditarsi al sistema come
amministratore.
Inserire il PCTV DVB-T Flash Stick in una porta USB 2.0 libera del computer, utilizzando
eventualmente il cavo di prolunga USB fornito in dotazione.
Chiudere la finestra di dialogo Assistente per la ricerca di nuovo hardware qualora comparisse
durante l’installazione.
Windows XP: L’applicazione TVCenter Pro si avvia automaticamente appena PCTV DVB-T
Flash Stick viene collegato al computer.
Se sul computer la funzionalità AutoPlay è disattivata, avviare manualmente il programma
TVCenterPro.exe facendo doppio clic sul drive PCTV DVB-T Start della chiavetta.
Windows Vista Ora viene visualizzata la finestra AutoPlay per entrambi i drive della chiavetta.
Attenzione: le due finestre in un primo momento potrebbero sovrapporsi. Eventualmente,
trascinarle con il mouse in modo che siano ben visibili.
Nella finestra relativa al drive PCTV DVB-T Start avviare il programma TVCenterPro.exe.
Se sul computer la funzionalità AutoPlay è disattivata, avviare manualmente il programma
TVCenterPro.exe facendo doppio clic sul drive PCTV DVB-T Start della chiavetta.
Ora seguire le indicazioni sullo schermo.
Le caratteristiche del prodotto possono variare senza preavviso.
Page 14

Ricerca canali in TVCenter Pro
Appena è installato il driver, il sistema esegue la ricerca dei canali. Sullo schermo comparirà la
procedura di installazione guidata di TVCenter Pro.
Selezionare il tipo di connessione TV indicato per la propria configurazione. La ricerca dei canali
verrà avviata automaticamente. Un elenco dei canali trovati verrà salvato sul PCTV DVB-T Flash
Stick.
Appena terminata la ricerca dei canali, il primo canale della lista viene selezionato automaticamente
e sul desktop appare il programma in corso.
Ora inoltre è possibile memorizzare direttamente le registrazioni su PCTV DVB-T Flash Stick.
Per comandare PCTV DVB-T Flash Stick utilizzando il telecomando fornito in dotazione come optional,
ricordare che il telecomando deve essere orientato quanto più possibile verso la chiavetta.
Utilizzo del telecomando (vedere Figura III)
… sull'uso di questo prodotto si trovano nella Guida utente dettagliata in formato PDF e nella Guida
online per il programma TVCenter Pro contenuta nel disco di installazione compreso nel
pacchetto.
Maggiori informazioni e consigli preziosi…
Con la presente Avid Technology GmbH dichiara che il presente ricevitore TV è conforme ai requisiti
ed alle disposizioni della Direttiva 89/336/CEE.
Le dichiarazioni di conformità CE e FCC e quelle sull'uguaglianza strutturale possono essere
consultate all’indirizzo http://www.pinnaclesys.com/compliance
Conformità CEE/FCC
.
Assistenza e servizi
Per ottenere assistenza tecnica, visitare la pagina internet http://www.pinnaclesys.com/support
e selezionare il prodotto di interesse.
Le caratteristiche del prodotto possono variare senza preavviso.
Page 15

Contenido de la caja*
Encontrará imágenes de ejemplo en la primera página.
1. PCTV DVB-T Flash Stick
2. Miniantena de varilla pasiva con base magnética
3. Cable USB de prolongación
4. Minimando a distancia con pilas
5. Disco de instalación con software, controladores y documentación
6. Guía de inicio rápido
* Nota: según la versión del producto, el contenido de la caja puede variar.
Funcionamiento y utilización
Conexión a la antena (véase la imagen I)
Conecte la antena de varilla suministrada o la antena de su vivienda a la entrada de antena de
PCTV DVB-T Flash Stick ANTES de conectar el dispositivo al ordenador.
Para conectar la antena de vivienda, necesita el cable correspondiente. Tenga en cuenta que la
calidad del cable contribuye a la calidad de recepción.
Nota: si utiliza la antena de varilla suministrada, colóquela lo más alta y lo más cerca posible de
una ventana. La recepción depende de la ubicación, y las paredes gruesas o de acero o los
edificios vecinos pueden perjudicar la transmisión.
antena externa o la propia toma de la vivienda. La recepción móvil de DVB-T, por ejemplo, en el
coche o en el tren, en general, no es posible. Para evitar posibles daños por el campo magnético
de la base de la antena, asegúrese de que haya distancia suficiente con respecto al disco duro y
a otros componentes magnéticos sensibles.
En tales entornos puede ser necesaria una
Primera conexión al ordenador (véase la imagen II)
Cuando instale PCTV DVB-T Flash Stick por primera vez, se comprueba si están disponibles todos los
controladores necesarios, y en el caso de Windows XP, también si tiene instalado .NET 2.0
Framework en su ordenador. En caso contrario, éste se encarga de instalarlo. Esto no será necesario
en posteriores usos, y aparecrá inmediatamente el programa de TV en pantalla.
Unidades del PCTV DVB-T Flash Stick
La memoria integrada de PCTV DVB-T Flash Stick se divide en 2 áreas ("unidades"):
Un área de memoria regrabable (área de medio de almacenamiento extraíble) con la aplicación
TVCenter Pro y espacio libre de memoria para las emisiones grabadas o para otros datos de
usuario. Esta unidad se denomina PCTV Flash.
Un área de memoria no regrabable (área de CD-ROM), que incluye el controlador. Esta unidad
se denomina PCTV DVB-T Start.
Instalación del controlador
Para instalar los controladores, debe disponer de derechos de administrador. Por este motivo,
asegúrese de iniciar sesión en Windows con un usuario administrador antes de usar por primera
vez PCTV DVB-T Flash Stick.
Introduzca PCTV DVB-T Flash Stick en un conector USB 2.0 libre del ordenador.
Si es necesario, utilice el cable USB de prolongación suministrado.
Si durante la instalación aparece el cuadro de diálogo Asistente para hardware nuevo
encontrado, cancélelo.
Windows XP: la aplicación TVCenter Pro se inicia de forma automática si
PCTV DVB-T Flash Stick está conectado al ordenador.
Si la función de reproducción automática del ordenador está desactivada, inicie de forma manual el
programa TVCenterPro.exe; para ello, haga doble clic en la unidad PCTV DVB-T Start del
dispositivo.
Windows Vista: se mostrará una ventana de reproducción automática para las dos unidades del
dispositivo.
Atención: es posible que las dos ventanas se superpongan al principio. Si es necesario,
arrástrelas con el ratón de modo que se puedan ver con claridad.
En la ventana de la unidad PCTV DVB-T Start, seleccione TVCenterPro.exe.
Si la función de reproducción automática del ordenador está desactivada, inicie de forma manual el
programa TVCenterPro.exe; para ello, haga doble clic en la unidad PCTV DVB-T Start del
dispositivo.
A continuación, siga las instrucciones que se indican en la pantalla.
Las especificaciones técnicas pueden ser modificadas.
Page 16

Buscador automático de canales de TVCenter Pro
Tan pronto se encuentre instalado el controlador, su sistema necesitará realizar una búsqueda de
canales. El asistente de configuración de TVCenter Pro aparecerá en la pantalla.
Seleccione el tipo de conexión de TV apropiado para su configuración y la búsqueda de canales
comenzará automáticamente. En su PCTV DVB-T Flash Stick se guarda una lista de los canales
encontrados.
Cuando haya concluido la búsqueda, el primer canal se selecciona automáticamente y se muestra
el programa actual en el escritorio. Además, tiene la posibilidad de realizar directamente las
grabaciones en el PCTV DVB-T Flash Stick.
Si desea controlar el PCTV DVB-T Flash Stick con el mando a distancia opcional suministrado, diríjalo
hacia el stick de la forma más directa posible.
Utilización del mando a distancia (véase imagen III)
Podrá encontrar más información y valiosos consejos …
… de utilización para este producto en el completo manual de usuario en formato PDF, además de
en la Ayuda online para el programa TVCenter Pro en el disco de instalación incluido en el
paquete.
Por la presente, Avid Technology GmbH declara que este receptor de televisión cumple con los
requisitos fundamentales y las demás prescripciones relevantes de la Directiva 89/336/CEE.
Puede descargar la Declaración de Conformidad CE y FCC, así como la construcción idéntica, en
http://www.pinnaclesys.com/compliance
Conformidad CE / FCC
.
Servicio y soporte
Si desea obtener soporte técnico, visite la página de Internet
http://www.pinnaclesys.com/support
y seleccione su producto.
Las especificaciones técnicas pueden ser modificadas.
 Loading...