

PCTV Systems 800i Quick Start Manual
PCTV HD Card (800i)
Quick Start Guide
Dear customer,
Thank you for purchasing this state of the art product from PCTV Systems. We hope
you will enjoy its high quality and extensive features.
PCTV HD Card (800i) is a a triple mode highly versatile TV tuner card for the
reception of digital free-to-air TV (ATSC), unencrypted digital cable TV (ClearQAM),
analog TV via cable or antenna, and FM radio.
Note: ClearQAM digital cable TV is not available from all cable operators in North
America. Please contact your local cable TV operator for the availability of
ClearQAM TV.
ATSC and ClearQAM can be received in both high and standard definition.
This guide is meant to get you set up and watching TV on your PC in minutes.
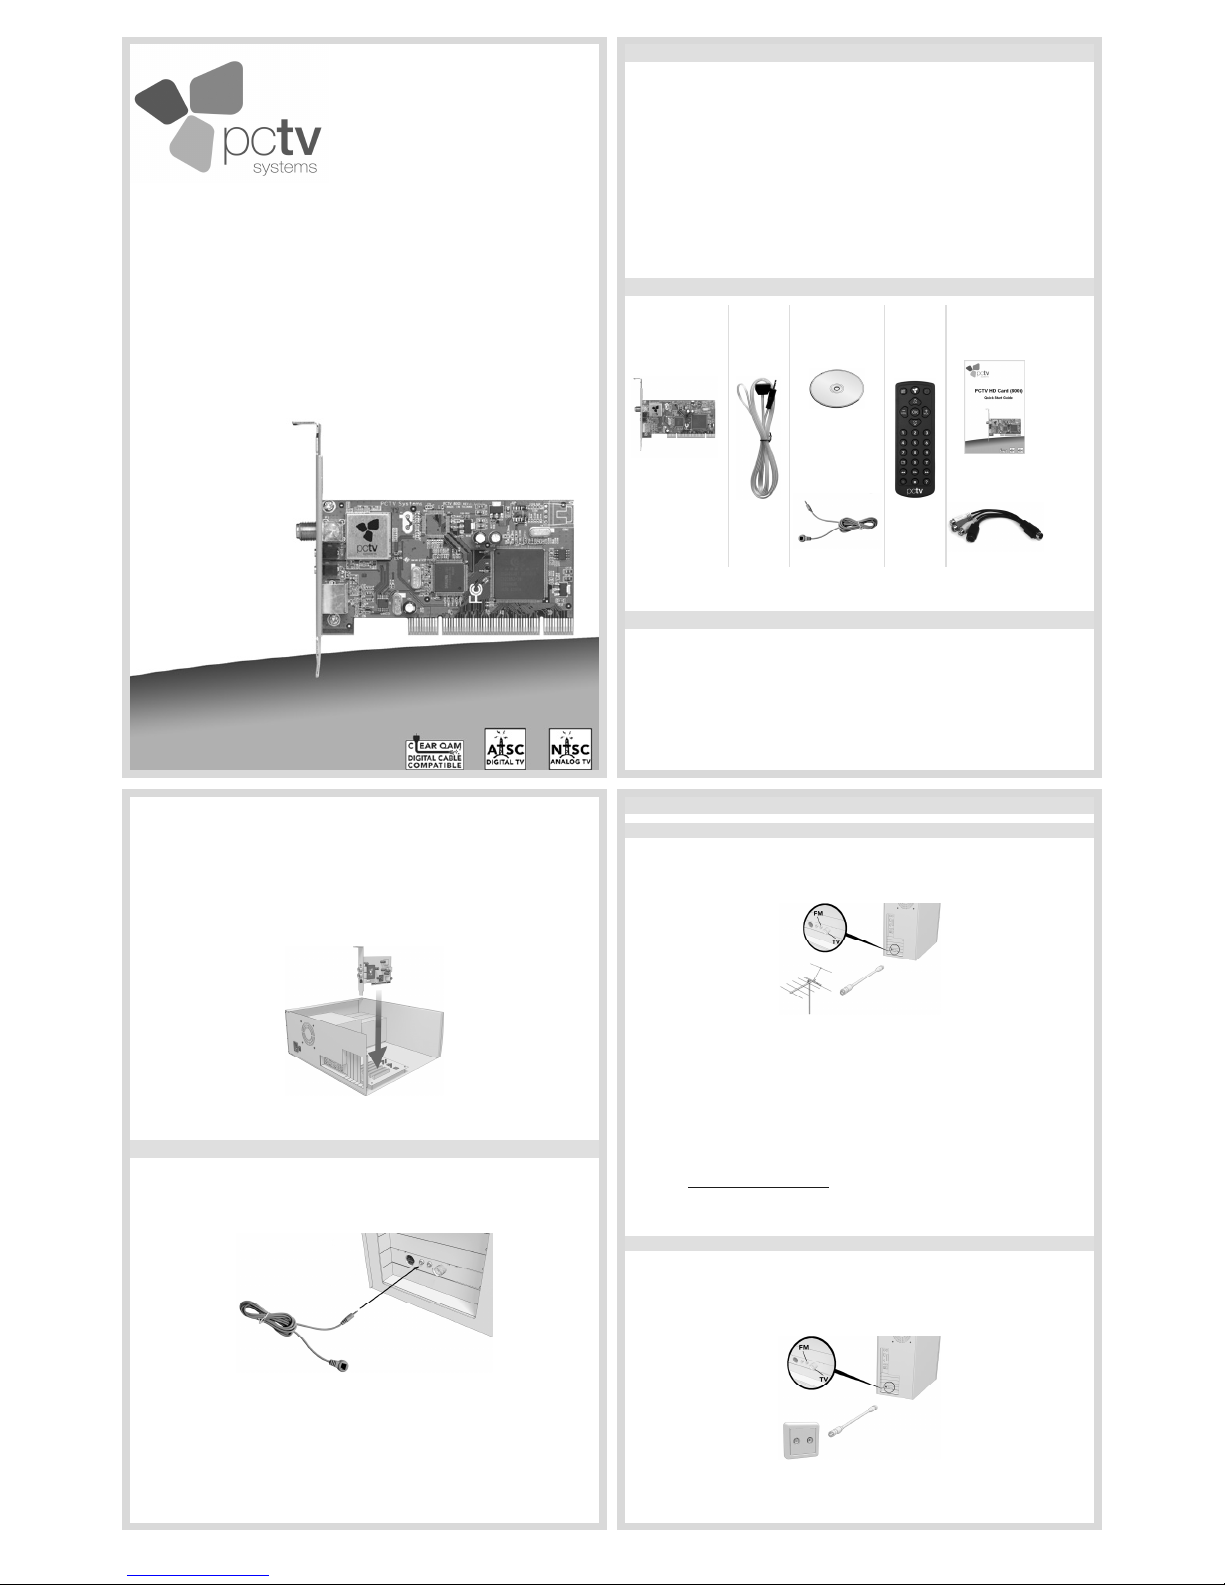
I. Pack Contents*
PCTV HD Card
(800i)
FM
antenna
PCTV
Installation Disc
Remote
control
Quick Start
Guide
Remote control
receiver cable
A/V input
adapter
* Illustrations are samples; pack contents may vary depending on the version of your product.
II. Hardware Installation
1. Divert any possible electrostatic charge from your body by touching the casing
of your PC.
2. Turn off your computer and any peripheral devices connected to it. Disconnect
your computer from the power supply as well as all necessary cables and
components.
3. Loosen the computer cover screws and remove the cover.
4. Select an available PCI slot. Loosen the slot cover on the back panel of the
computer. Make sure to keep the screws in a safe place.
5. Insert the card in the available PCI slot. Hold it firmly on the upper edge and ease
it down into the slot by applying even pressure on both ends. Press down on the
upper edge until the card fits securely in the expansion slot.
6. If you cannot easily insert the card, do not use force because this can bend and
damage the contact springs to the socket connector. Instead, remove the card and
try to insert it again.
7. After you have inserted the hardware, tighten the card retaining bracket firmly onto
the back of the computer.
8. Now put the cover back onto your computer and reconnect the peripherals and the
power supply.
Image is a sample.
III. Connecting the Remote Control Receiver Cable
1. In order to install the remote control device, insert the receiver cable of the
remote control into the remote control input of your hardware. During insertion,
note that although the jack needs to sit firmly in the socket, you should not
force the jack in as this may damage the socket.
Image is a sample.
2. Fasten the other end of the receiver cable to your monitor or the housing of
your computer by using the adhesive strip included in the delivery.
Make sure that the area between the remote control and the receiver is
unobstructed.
IV. Selecting the TV Connection Type
Option 1: Antenna (for ATSC reception)
Connect a coaxial cable from your rooftop aerial or an amplified indoor antenna to
your PCTV hardware input (Ant.).
For FM reception, connect the included FM antenna to your PCTV’s FM antenna input.
Image is a sample.
For digital TV (ATSC) reception, you will get the best results if you connect your
PCTV hardware to a properly adjusted rooftop antenna using double-shielded coaxial
cables and a digital-enabled antenna amplifier.
Please contact your local dealer for antennas optimized for digital TV (ATSC)
reception. Most cities have good ATSC transmission coverage.
Please note that the reception of digital TV (ATSC)is dependent on location and may
be impaired by steel-reinforced walls as well as tall neighboring buildings. In this type
of environment, an amplified external/roof antenna is required.
Check on http://www.antennaweb.org for information about ATSC availability in your
area. It is generally not possible to receive an ATSC signal while travelling (e.g. in a
car or train).
Option 2: Cable (for analog or ClearQAM digital reception)
Connect coaxial cable from your cable jack to your PCTV hardware input (Ant.). For
FM reception, connect the included FM antenna to your PCTV’s FM antenna input.
Note: This configuration will allow you to receive unencrypted digital cable TV
channels in SD and HD. Reception of encrypted digital premium channels is not
supported.
Image is a sample.
ClearQAM Note: not all cable TV operators send ClearQAM digital cable TV. Please
check with your local cable operator for the availability of ClearQAM digital cable.
Note: This configuration works with cable TV but not with satellite TV such as DISH
Network® or DirecTV®. For satellite TV, you can connect your PCTV to your satellite
receiver using the A/V inputs (Option 3). Alternatively, you may want to use an indoor
or outdoor antenna (Option 1) to receive free over-the-air TV in HD and SD.
Option 3: Capture from Set-top Box or Camcorder
Image is a sample.
a) Connect the A/V adapter cable (included) to your PCTV hardware as illustrated
above.
b) If your set-top box has a free S-Video output, connect the S-Video output with
the S-Video input of the A/V adapter cable.
Alternatively: if your set-top box has a free composite video output (RCA),
please connect it to the RCA composite video jack of the adapter cable.
c) Connect the audio outputs (left/right) of your set-top box with the corresponding
audio inputs of the adapter cable.
Note: If possible, use S-Video to ensure the highest picture quality. When using a
set-top box configuration with TVCenter, you will need to use your set-top box remote
to switch channels.
Electronic Program Guide will not be supported.
V. TVCenter Installation
1. Insert the PCTV Installation Disc into your PC’s CD or DVD drive. If you have
Autorun enabled, the Welcome dialog will be displayed automatically. If you do
not have Autorun enabled, navigate to your CD or DVD drive and double-click
Launcher.
2. Select the desired language and then click on the button TVCenter. Follow the
on-screen instructions.
3. When prompted, enter your serial number. You will find your serial number
printed on the software disc sleeve.
4. In the Setup Type Window, we recommend choosing the Complete option for
the complete PCTV experience.
5. Once installation is complete, restart your computer if the Install Wizard
prompts you to do so.
VI. TVCenter Setup
Step 1: Select the Language and the Location and then click Next.
Step 2: Select the TV connection type that is appropriate to your configuration and
then click Next.
Step 3: Make sure the location is setup correctly.
Start the channel scan by clicking the Start Scan button.
Once the channel scan is complete click the Next button to go to the next step.
Step 4: Select Start TVCenter and then close the TVCenter Wizard.
The TVCenter application starts automatically.
Troubleshooting – digital TV (ATSC) channels not found:
If you are using an antenna configuration (Option 1) and TVCenter does not
find any digital TV (ATSC) channels, please read the following:
Check on http://www.antennaweb.org whether ATSC reception should be
possible in your region and which kind of antenna will likely be required at
your location.
Try to improve the signal reception by repositioning or changing the
antenna (see II: Option 1).
If the antenna is not pointed at an ATSC transmitter, you will have a
difficult time receiving an ATSC signal.
After having finished the TVCenter Wizard, repeat the channel scan.
To do so, open the Windows Start menu and go to:
Programs > PCTV Systems > TVCenter Settings.
Now go to Channel Scan and press the Start Scan button.
VII. Enjoy TV on your PC with TVCenter
The first time TVCenter is accessed, you will see the player as shown below.
• To access your channel list, click on the Select Channel field.
• Use the bottom navigation nto change channels and for Time Shifting controls
and the icons in the Master Control menu to access other PCTV features.
Software screenshots may vary depending on the software version supplied.
VIII. Additional Information
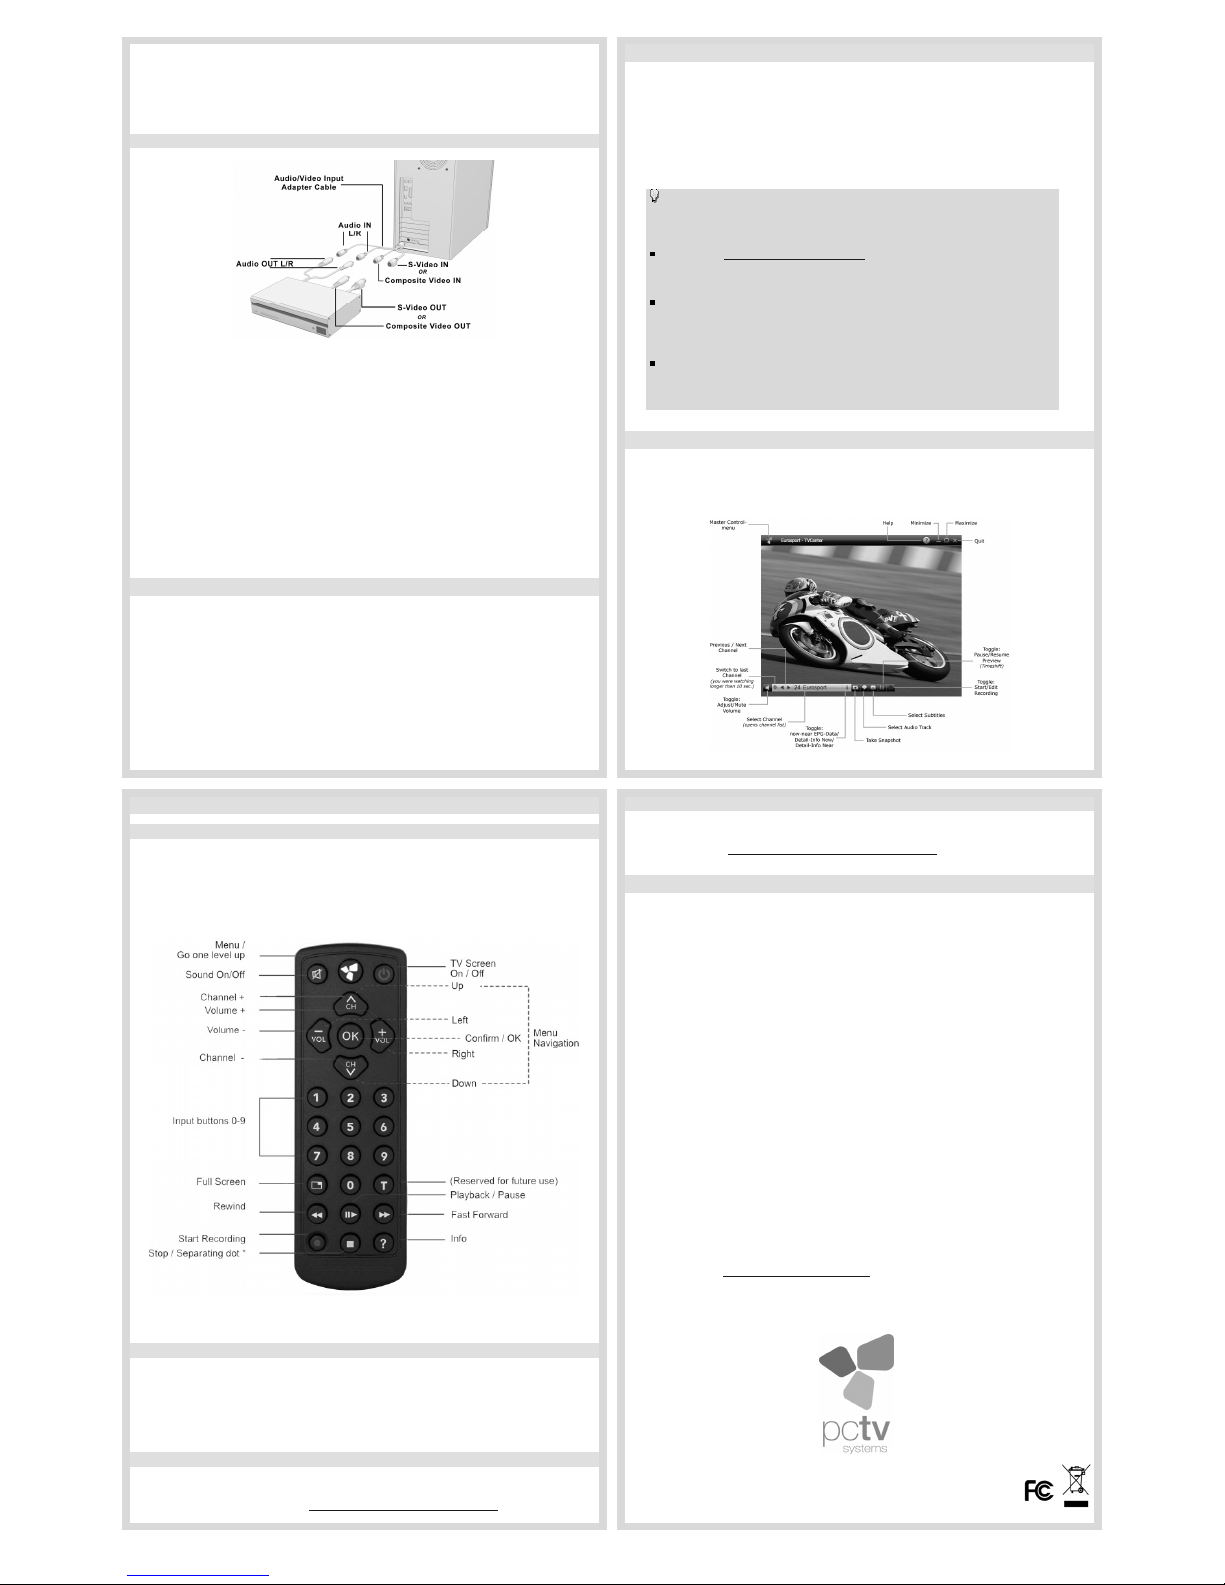
Using the PCTV Remote Control
This reference diagram displays the various functions of the PCTV remote control. For
more in-depth information, you can find the Remote Control User Guide by opening
your Windows Start menu and going to:
Programs > PCTV Systems > Documentation > Remote Control Manual.
* Separating dot – function available when entering a digital channel number (e.g. 7.2).
Advanced Features
Your TVCenter software comes with a handy User Guide that will show you how to
enrich your PCTV experience by using advanced features.
To access this document, open your Windows Start menu and go to:
Programs > PCTV Systems > Documentation > TVCenter User Manual.
Support
Are you in need of further assistance? We´re happy to help you.
For product support, please visit http://www.pctvsystems.com/support
.
FCC Conformity Statement
The FCC declarations of conformity and identical construction for this product can be
downloaded from http://www.pctvsystems.com/compliance.
IX. Appendix: Installation for Windows Media Center
If you have a PC equipped with Microsoft® Windows® 7 or Vista Home Premium or
Ultimate and want to watch and record TV using the Windows Media Center
application, please follow these steps (after having installed the hardware as
described):
1. Make sure you have installed the latest Windows updates.
2. Insert the Installation Disc into your PC’s CD or DVD drive. If you have
Autorun enabled, the Welcome Dialog will be displayed automatically. If you
do not have Autorun enabled, navigate to your CD or DVD drive and doubleclick on Launcher.
3. From the Menu choose Windows Media Center and follow the on-screen
instructions.
4. Please reboot your PC if prompted to do so.
5. Open the Windows Media Center application by double-clicking on the
desktop icon (or via Start > Programs > Media Center).
6. Go to Settings > TV > Set up TV signal and follow the instructions of th e TV
configuration wizard.
Note: At the time of printing, ClearQAM reception in Windows Media Center
was not supported.
7. If the automatic TV source selection does not det ect your TV signal, please
choose manual and select the TV connection type that is appropriate to your
configuration.
Note: The included remote control is not compatible with Windows Media Center; you
will need a specific Windows Media Center remote control kit (separately available,
please check on http://www.pctvsystems.com
).
Enjoy HDTV on your PC!
© 2008-2011 PCTV Systems S.à r.l. QI-PCTV-800I-ENG-V1.2
Specifications are subject to change without notice or obligation.
 Loading...