

PCE Instruments PCE-PA 8500 HP, PCE-PA 8500-ICA, PCE-PA 8500, PCE-PA 8500-CL1000, PCE-PA 8500-CL100 Users guide
...Page 1
User’s Guide
Power Quality Analyzer
PCE-PA 8500
PCE-PA 8500 HP
03/2022
Page 2

PCE-PA 8500 (HP) Power Quality Analyzer User‟s Guide
-1-
Introduction
With dual DSP processor architecture, large-scale integrated circuits (FPGA), and
embedded system (uClinux), the PCE-PA 8500 (HP) Power Quality Analyzer can calculate a
large number of electrical parameters and process all data quickly. The Analyzer is
designed specially for power inspection and maintenance department, offering extensive and
powerful measurements to check power distribution system, detecting quality and electrical
characteristics of power grid rapidly and conveniently. The analyzer has large-screen color
LCD display interface, and easy-to-use keyboard.
Main features:
Waveform real-time display(4 voltages/4 currents)
Half cycle RMS measurement (voltage and current)
intuitive operation
variety of optional current clamps
Measure DC component
Measurement, calculation and display of harmonics and interharmonics can be
up to 50 times.
Transient capture
Vector, Trend, Bar Graph and events table display
Active power, reactive power, apparent power and energy, shift power factor and
true power factor
Three-phase unbalance (voltage and current)
Flicker
Inrush current
Detection and record of Dips& Swells, Voltage Rapid Change, Interruption.
Detect according to EN50160 or grid with user-defined limit.
data storage and screenshots (can be replayed or output to a PC)
Through the LAN interface PC can keep real-time remote communication
with the Analyzer, operate the Analyzer and read back measurement data.
Built-in 8G memory card.
Page 3

PCE-PA 8500 (HP) Power Quality Analyzer User‟s Guide
The Analyzer and its accessories
PCE-PA 8500 (HP) Power Quality Analyzer
Program software for PC (CD)
2-meter-long voltage cable (with 4mm caliber banana
plug)
Crocodile clip
Power adapter
Power cord
Bag
Hang strap
1
1
5
5
1
1
1
1
-2-
Page 4

PCE-PA 8500 (HP) Power Quality Analyzer User‟s Guide
-3-
General Safety Information
The Analyzer is designed and produced according to IEC61010-1 strictly, and complies with
CAT III 1000V, CAT IV 600V and pollution degree II. Learn about below safety precautions to
avoid personal injury, and damage to the Analyzer or any other products connected to it.
To avoid electrical shock or fire:
Review the manual before use of the Analyzer and its accessories.
Read all instructions carefully.
Avoid working alone.
Do not operate the Analyzer around explosive gas, vapor or moist environment.
Use the Analyzer as specified, or the protection provided by the Analyzer might be
impaired.
Use only insulated current probes, test leads and adaptors as supplied with the
Analyzer, or indicated as suitable for the Analyzer.
Keep your fingers behind the finger guard on the probes.
Before use, inspect the Analyzer, voltage probes, test leads and accessories for
mechanical damage and replace when damaged. Look for cracks or missing plastic.
Pay special attention to the insulation surrounding the connectors.
Verify operation of the Analyzer by measuring known voltage.
Remove all probes, test leads and accessories that are not in use.
Always connect the power adapter first to the AC outlet before connecting it to the
Analyzer.
Do not touch high voltage: voltage>AC RMS 30V, or DC 60V.
Use the ground input only to ground the Analyzer and do not apply any voltage.
Do not apply input voltage above the rating of the Analyzer.
Do not apply voltages in excess of the marked ratings of the voltage probes or
current clamps.
Pay special attention when connecting or removing flexible current probes: power
down the device being tested or put on suitable protection suit.
Do not insert metal objects into connectors.
Use only power adapter provided by the Analyzer.
Page 5

PCE-PA 8500 (HP) Power Quality Analyzer User‟s Guide
Table Of Contents
Introduction ...................................................................................... 1
The Analyzer and its accessories ....................................................... 2
Options ............................................................................................. 2
General Safety Information ............................................................... 3
Table Of Contents ............................................................................. 4
Chapter 1 Getting started .................................................................. 6
1.1 Overview of The Analyzer .........................................................................................................6
1.2 Charge the Battery and Prepare for Use ..................................................................................6
1.3 Input Connections .....................................................................................................................7
1.4 Rapid Overview of Measuring Modes ......................................................................................7
1.5 Screen and Function Keys .........................................................................................................9
Chapter 2 Basic Operations ............................................................ 14
2.1 Tilt Stand and Hang Strap .......................................................................................................14
2.2 Power on/off ...........................................................................................................................14
2.3 Display Brightness ...................................................................................................................15
2.4 Update Firmware ....................................................................................................................15
2.5 Input Connections ...................................................................................................................15
2.6 Display Information ................................................................................................................16
2.7 Set Up the Analyzer ................................................................................................................17
2.8 Using Memory and PC ............................................................................................................20
Chapter 3 Application examples ..................................................... 22
3.1 Scope ......................................................................................................................................22
3.2 Voltage/Current/Frequency ...................................................................................................22
3.3 Dips and Swells .......................................................................................................................23
3.4 Harmonics ...............................................................................................................................26
3.5 Power and Energy ...................................................................................................................28
3.6 Flicker .....................................................................................................................................29
3.7 Unbalance ...............................................................................................................................30
3.8 Transients ..............................................................................................................................31
-4-
Page 6

PCE-PA 8500 (HP) Power Quality Analyzer User‟s Guide
-5-
3.9 Inrush currents ........................................................................................................................32
3.10 Power Quality Monitoring ....................................................................................................33
3.11 Logger ...................................................................................................................................37
Chapter 4 Service and Support ........................................................ 39
4.1 Warranty .................................................................................................................................39
4.2 Contact us ...............................................................................................................................39
Chapter 5 Specifications ................................................................ 40
5.1 Frequency Measurement .......................................................................................................40
5.2 Voltage Input ..........................................................................................................................40
5.3 Current Input ..........................................................................................................................40
5.4 Sampling System ....................................................................................................................40
5.5 Display Mode ..........................................................................................................................40
5.6 Measuring Modes and Parameters ........................................................................................41
5.7 Measurement Range, Resolution, Accuracy ...........................................................................41
5.8 Wiring Combinations ..............................................................................................................43
5.9 General Characteristics ...........................................................................................................44
5.10 The specification of optional current clamps .......................................................................45
Appendix 1: The instruction of PC software .................................... 46
1. Remote control through LAN interface ....................................................................................46
2. Check stored file .......................................................................................................................47
3. Report function ..........................................................................................................................49
Page 7
PCE-PA 8500 (HP) Power Quality Analyzer User‟s Guide
11
12
13
14
15
1
2
3
4
5
6
7
8
9
10
Chapter 1 Getting started
If this is your first time to use the Analyzer, or there is no time for you to read this manual
carefully, browsing the content of this chapter is a rapid method for you to learn about the
simple and practical functions of the Analyzer. For using more complex functions, please
continue to read chapter 2 “Basic Operations”, and chapter 3 “Application Example” if you
have difficulties during use.
1.1 Overview of The Analyzer
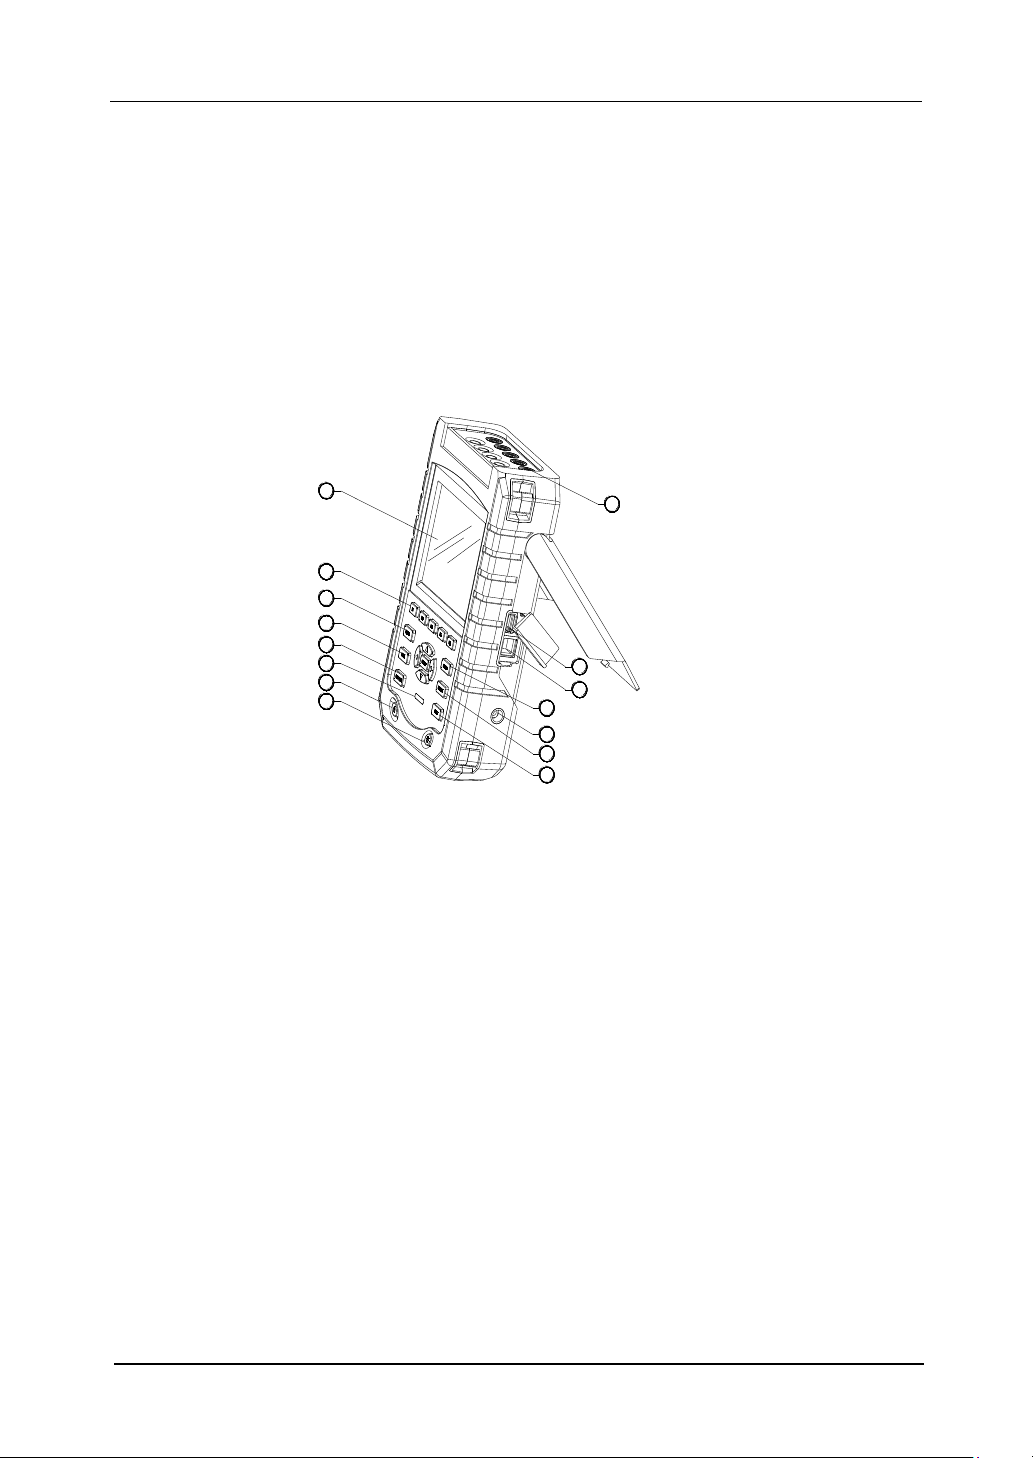
1. Menu keys 2. Scope mode
3. Measurement menus 4. Power Quality Monitoring
5. Power On/Off 6. Display brightness
7. Save 8. Storage information
9. Power adapter 10. Setup
11. LAN 12. USB Host
13. Input 14. Display screen
15. Charging indicator
1.2 Charge the Battery and Prepare for Use
At delivery, the built in chargeable battery may be empty and it is recommend to charge it
before use. A full charge for the first time takes at least 6 hours, it means the battery is fully
charged when the charging indicator change from Flicker to Always. No damage will occur if
the adapter is connected with the Analyzer for long periods. The Analyzer automatically cuts
off charging when the battery is fully charged. Before use, check that the adapter voltage and
-6-
Page 8
PCE-PA 8500 (HP) Power Quality Analyzer User‟s Guide
-7-
A
B
C
N
GND
frequency range match the local line power range. To prevent decrease of batter capacity,
charge it at least twice a year.
Before measurements, set the Analyzer according to the line voltage, frequency and wiring
configuration of power system you want to measure, read section ”Set the Analyzer” for more
information.
1.3 Input Connections
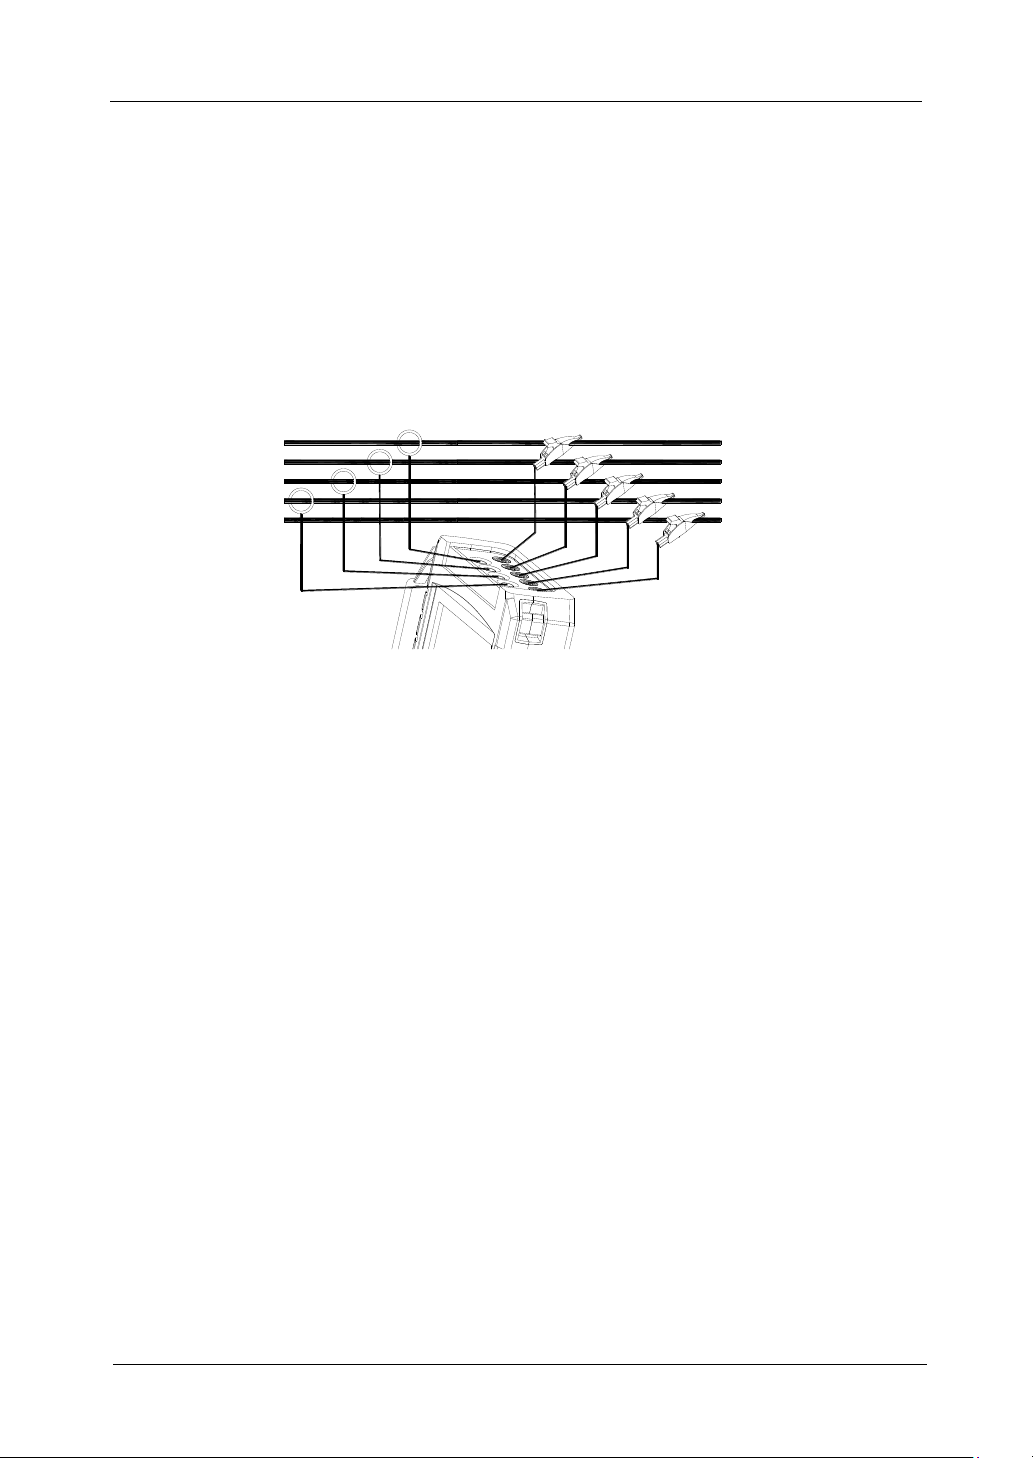
Fig.1-3-1 Connection of Analyzer to 3-phase distribution system
The Analyzer has 4 BNC-inputs for current clamps and 5 banana-inputs for voltages. For a 3phase system, make the connections as shown in Figure 1.
First put the current clamps around the conductors of phase A (L1), B (L2), C (L3) and N
(neutral). The clamps are marked with an arrow indicating the correct signal polarity.
Next make the voltage connections: start with Ground and then succession N, A (L1), B (L2),
C (L3). For correct measuring results, always connect the Ground input.
For single phase measurements, use voltage input A (L1) or current input A (L1) or voltage
inputs Ground.
1.4 Rapid Overview of Measuring Modes
This section provides an overview of all measuring modes. The screen information and the use
of function keys of the Analyzer will be explained in detail in the following sections.
SCOPE mode
Scope mode shows voltage/current by means of waveforms and numerical values, with cursor
and zoom functions.
Page 9
PCE-PA 8500 (HP) Power Quality Analyzer User‟s Guide
Measuring mode
Screen type
Form of measuring results
Scope
Waveforms
Scope shows waveforms of voltage or current
Measurement mode
Screen type
Form of measuring results
Voltage/Current/Frequency
Table screen
Numerical values: voltage, current, frequency and
waveform factor
Trend
Trends of voltage, current, frequency and
waveform factor over time
Dips & Swells
Trend
Trends of voltage and current rapid update over
time
Events table
Record events violate limit
Harmonics
Bar graph
Voltage, current harmonic, interharmonic, THD,
DC component
Table screen
Voltage, current harmonic, interharmonic,THD,
DC component
Power and Energy
Table screen
Numerical values: active power, reactive power,
apparent power, power factor, shift power factor,
voltage, current, energy usage
Trend
Trends of the numerical values in Table screen
over time
Flicker
Table screen
Numerical values: short time flicker Pst (1
minute), Pst (10 minutes), long time flicker Plt
Trend
Trends of the instantaneous flicker sensation level
over time
Unbalance
Table screen
Numerical values: voltage, current negative
unbalance percentage and zero unbalance
percentage, fundamental voltage, current
component and phase angle
Vector
Phase relation and numerical values of voltage
and current
MENU
Below measurements are available with MENU key:
-8-
Page 10
PCE-PA 8500 (HP) Power Quality Analyzer User‟s Guide
-9-
Transient
Waveforms
Voltage, current waveforms and values Record
events violate limit
Inrush current
Trend
Record events exceed limit
Logger
Table screen
Numerical value: all selected readings
Measurement mode
Screen type
Form of measuring results
Monitor
Bar graph
Display specifications like voltage, harmonics, flicker,
swells, dips, voltage rapid change, interruption,
unbalance, frequency etc. of power quality parameters
Bar graph
Detailed bar graph of harmonics
Trend
Trends of selected data set over time
Events table
Record events violate limit
MONITOR
Below functions are available:
1.5 Screen and Function Keys
The Analyzer uses five different screen types to present measuring results in the most effective
way.
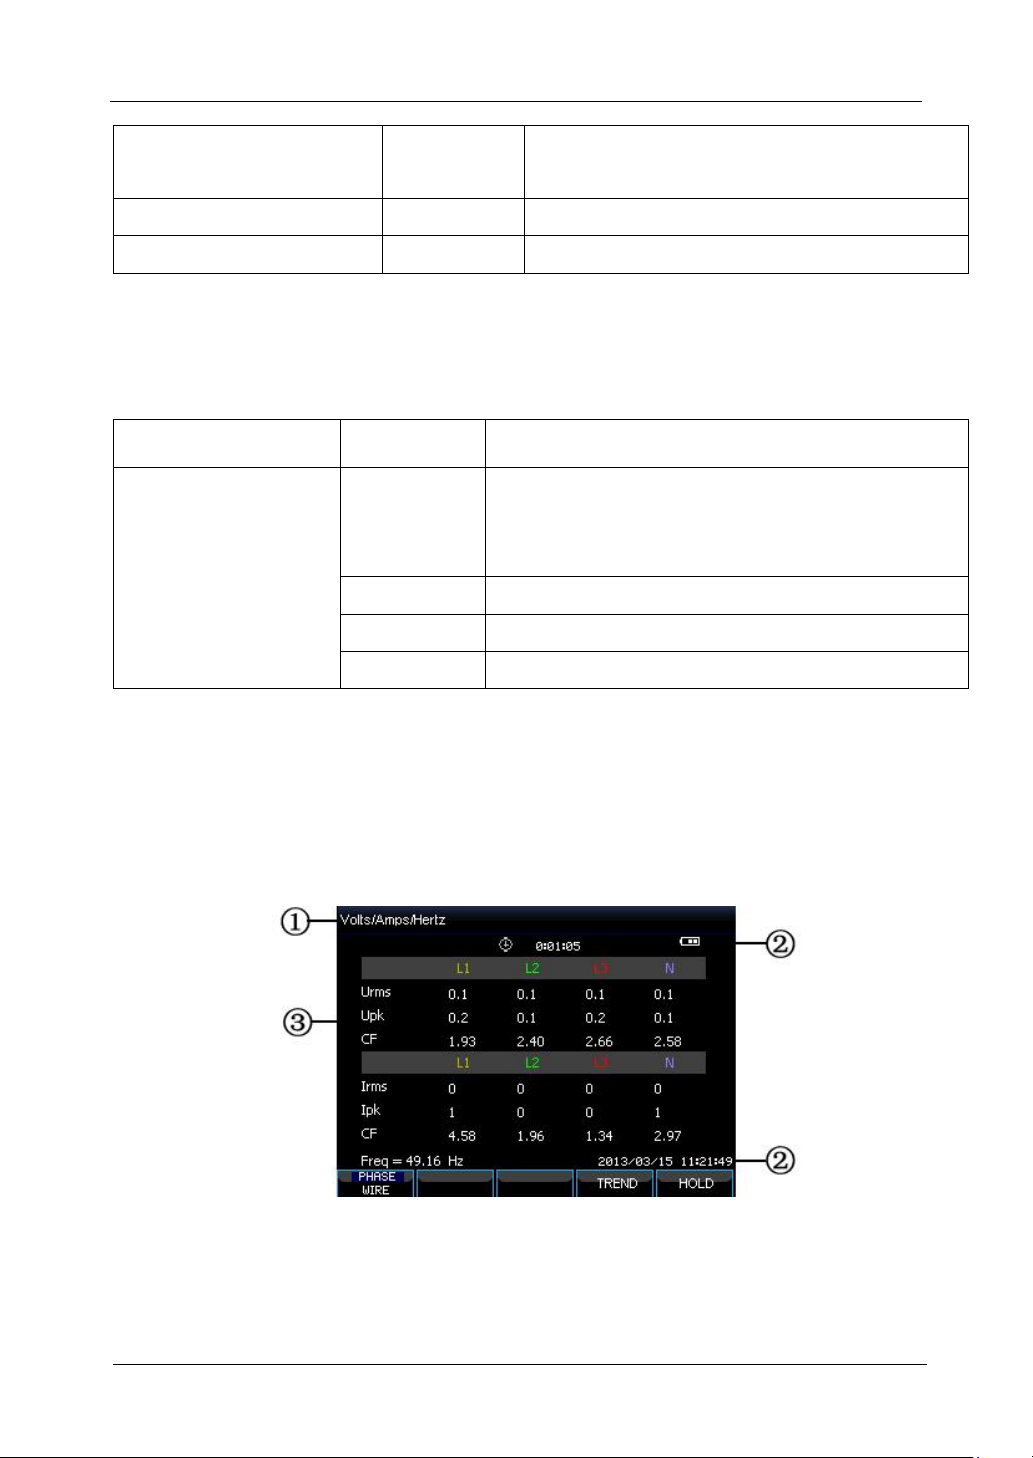
Table screen
Fig. 1-5-1 Table screen
This screen gives an instantaneous overview of important numerical measuring values. Such as
Table screen under VOLTS/AMPS/HERTZ mode.
Screen information:
Page 11
PCE-PA 8500 (HP) Power Quality Analyzer User‟s Guide
① The screen header shows current measurement mode.
② Status indicator and status line.
③ Measurement parameters and values. The content depends on the measurement
mode, phase number and wiring configuration.
Function keys:
F1: For 3-phase Y type wiring configuration, switch between phase voltage and line
voltage.
F4: Access to the Trend screen.
F5: Switch between RUN and HOLD.
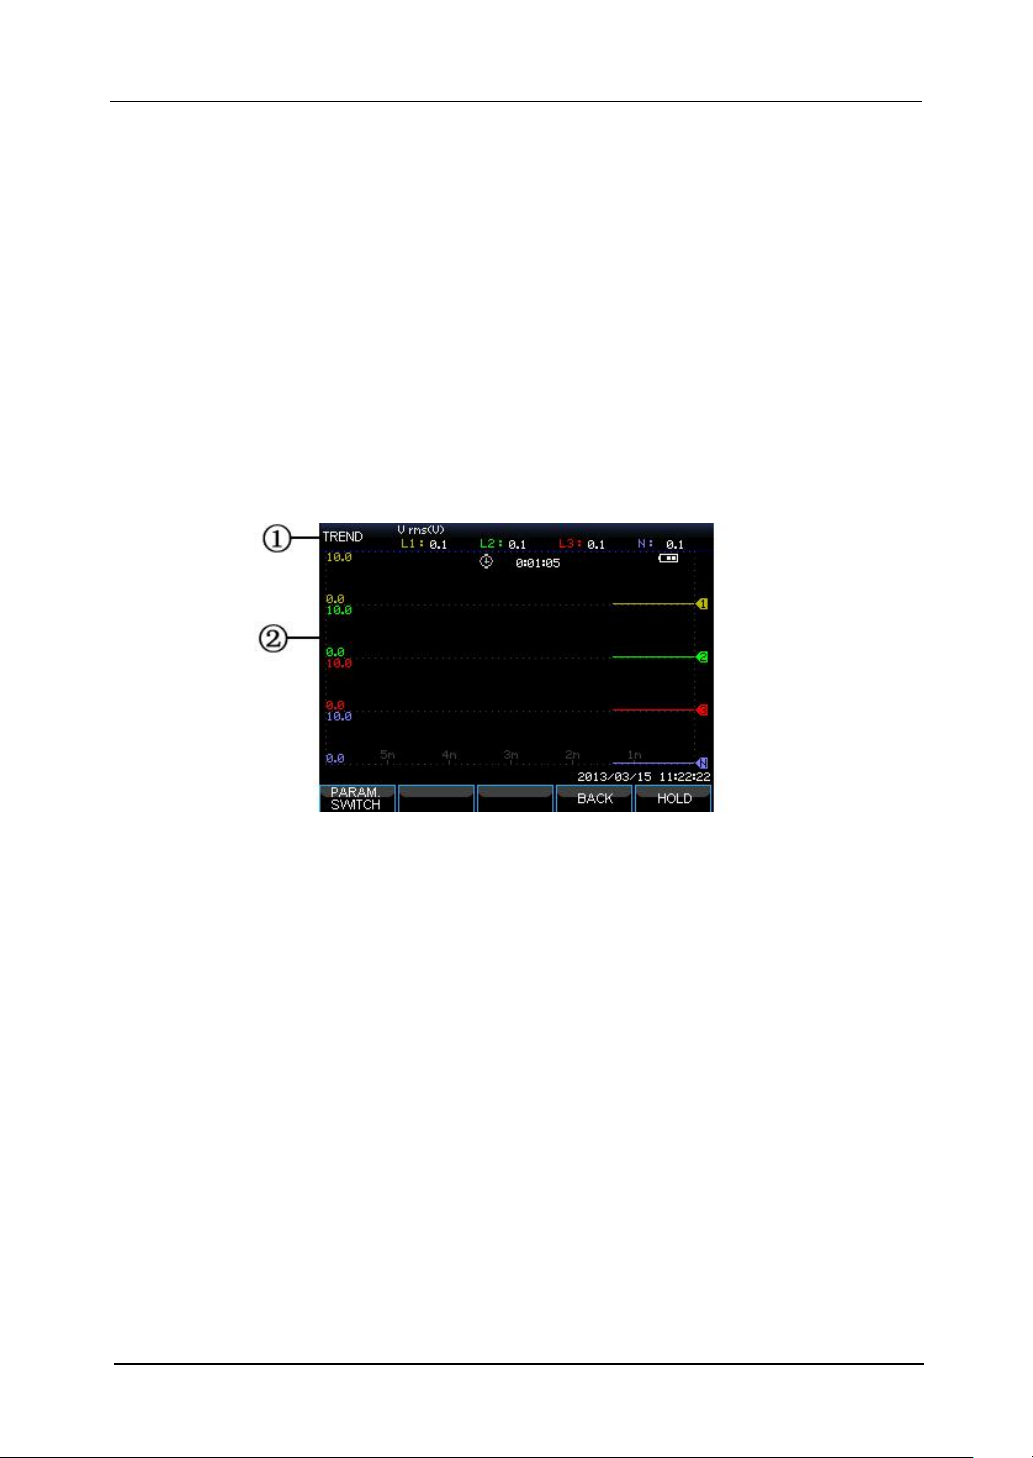
Trend screen
Fig. 1-5-2 Trend screen
Trend shows the course over time of measuring values from the table. Such as dips&swells,
time is horizontally displayed, the Trend is built up gradually from the right of the screen.
Screen information:
① Shows latest value of the Trend. If the Cursor is on, the Trend value at the cursor
is displayed.
② Display area of Trend.
Function keys:
F1: Switch parameters to display
F4: Return to table screen
F5: Switch between RUN and HOLD
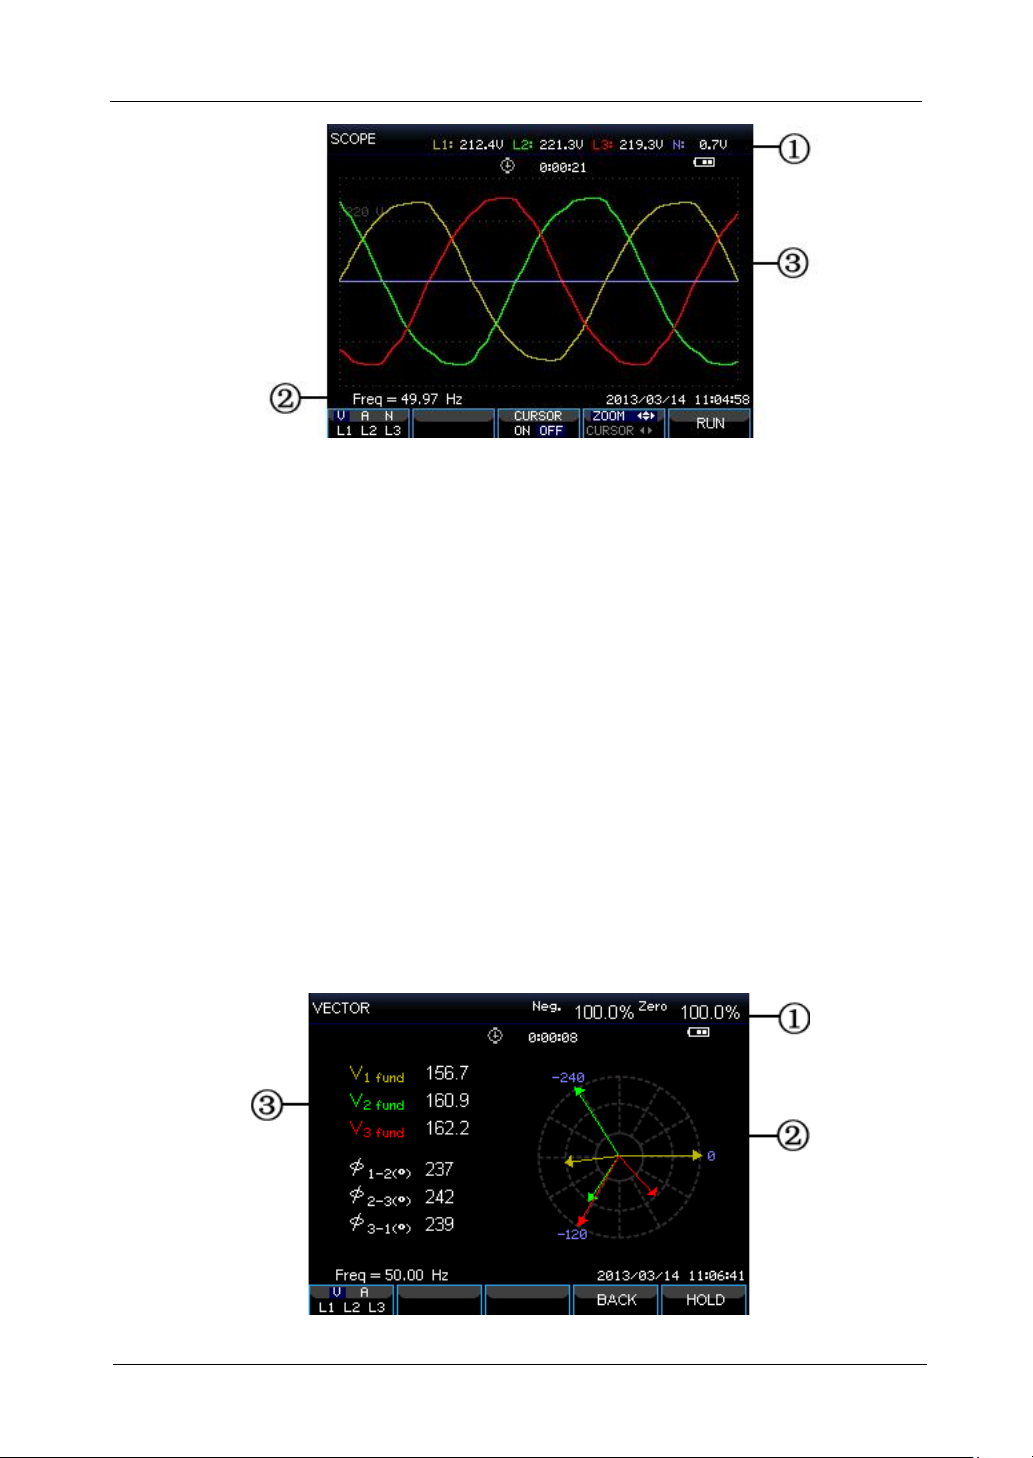
Waveform screen
-10-
Page 12
PCE-PA 8500 (HP) Power Quality Analyzer User‟s Guide
-11-
Fig. 1-5-3 Waveform screen
Screen information:
① The screen header shows the RMS value of waveforms.
② Show measured frequency
③ Display area of voltage/current waveforms
Function keys:
F1: Select waveform set to display: V displays all voltages; A displays all currents.
L1, L2, L3 and N display voltage and current of selected phase synchronously.
F3: Access to Cursor
F4: Switch between Cursor and Zoom.
F5: Switch between RUN and HOLD.
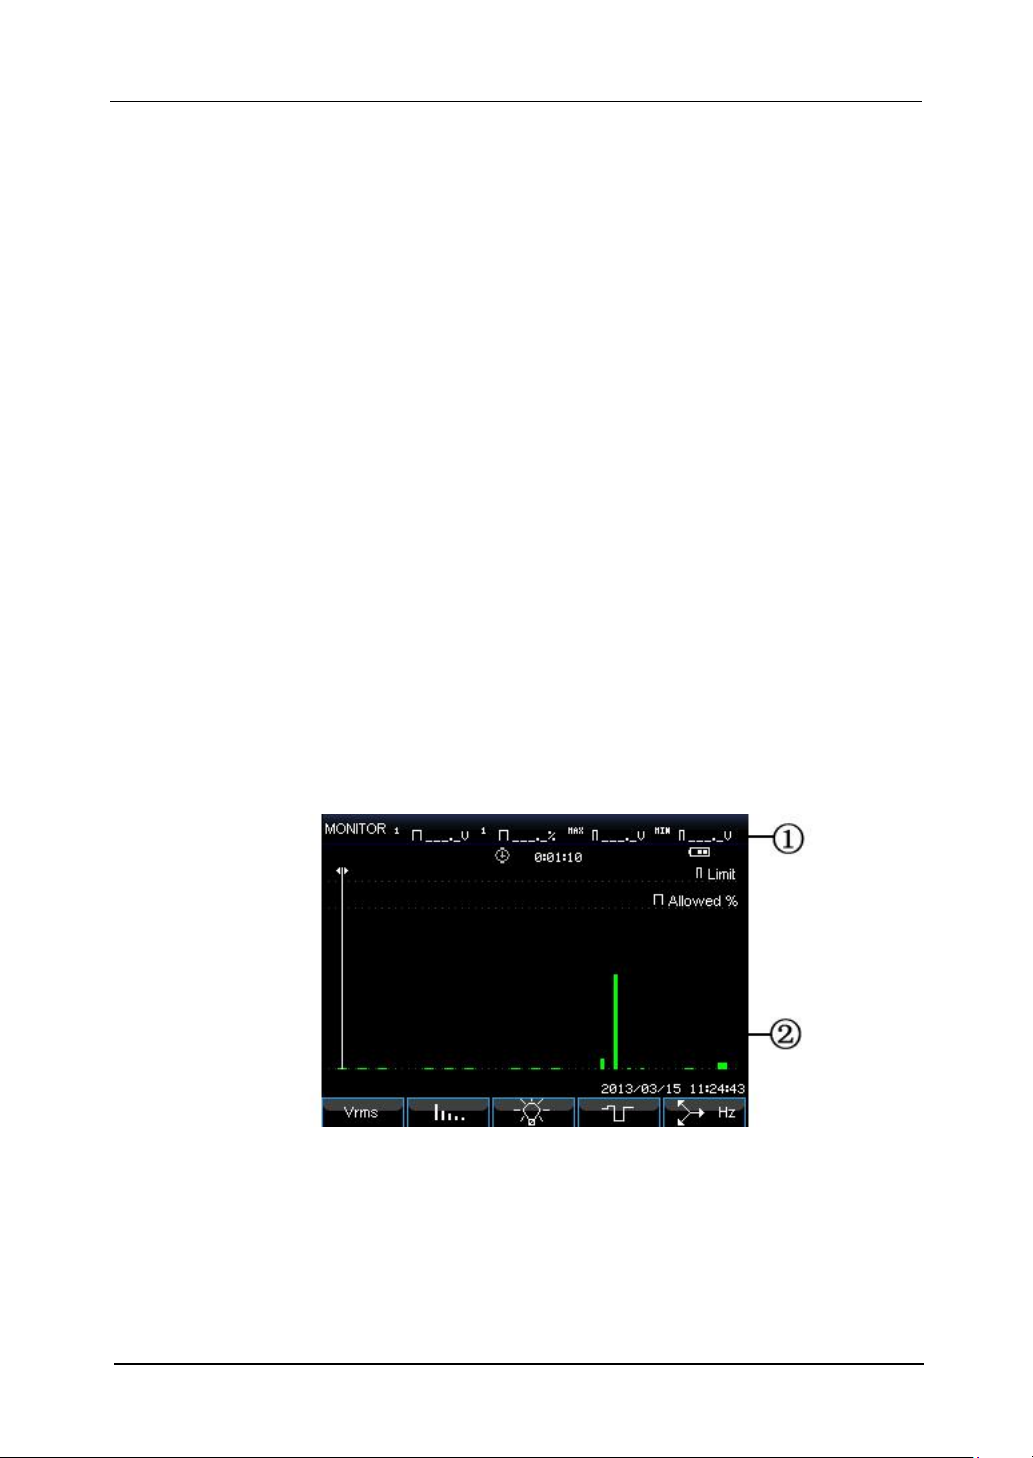
Phasor screen
The phase relation between voltages and currents are shown in a vector diagram. Phasor screen
is available under Unbalance mode. Below figure explains this:
Fig. 1-5-4 Phasor screen
Page 13
PCE-PA 8500 (HP) Power Quality Analyzer User‟s Guide
Screen information:
① The screen header shows the Unbalance value.
② Vector diagram, The vector of reference phase A(L1) points to the positive of X
axis
③ Other data. Such as fundamental voltage, phase angle.
Function keys:
F1: Select waveform set to display: V displays all voltages; A displays all currents.
L1, L2, L3 display voltage and current of selected phase synchronously.
F4: Return to table screen
F5: Switch between RUN and HOLD.
Bar graph screen
Bar graph screen contains harmonic bar graph and power quality monitoring bar graph, the bar
height indicates the percentage of represented parameter. Related parameter value will be
shown in the screen header when moving cursor to specified bar.
For instance power quality monitoring bar graph screen contains: Voltage RMS, harmonics,
flicker, rapid voltage change, dips, swells, interruption, unbalance and frequency. The related
bar length will increase if a parameter exceeds its nominal value. .
Below figure explains this:
Fig. 1-5-4 Bar graph screen
Screen information:
① Limits value of bar graph under Cursor. Use left/right arrow keys to move cursor
to another bar graph.
② Power quality monitoring screen, shows parameter time within high and low
tolerance by a bar.
-12-
Page 14

PCE-PA 8500 (HP) Power Quality Analyzer User‟s Guide
-13-
Function keys:
F1: Access to Voltage RMS submenu.
F2: Access to Harmonics submenu.
F3: Access to Flikcer submenu.
F4: Access to Dips&Swells submenu.
F5: Aceess to Unbalance and Frequency submenu.
Page 15
PCE-PA 8500 (HP) Power Quality Analyzer User‟s Guide
Chapter 2 Basic Operations
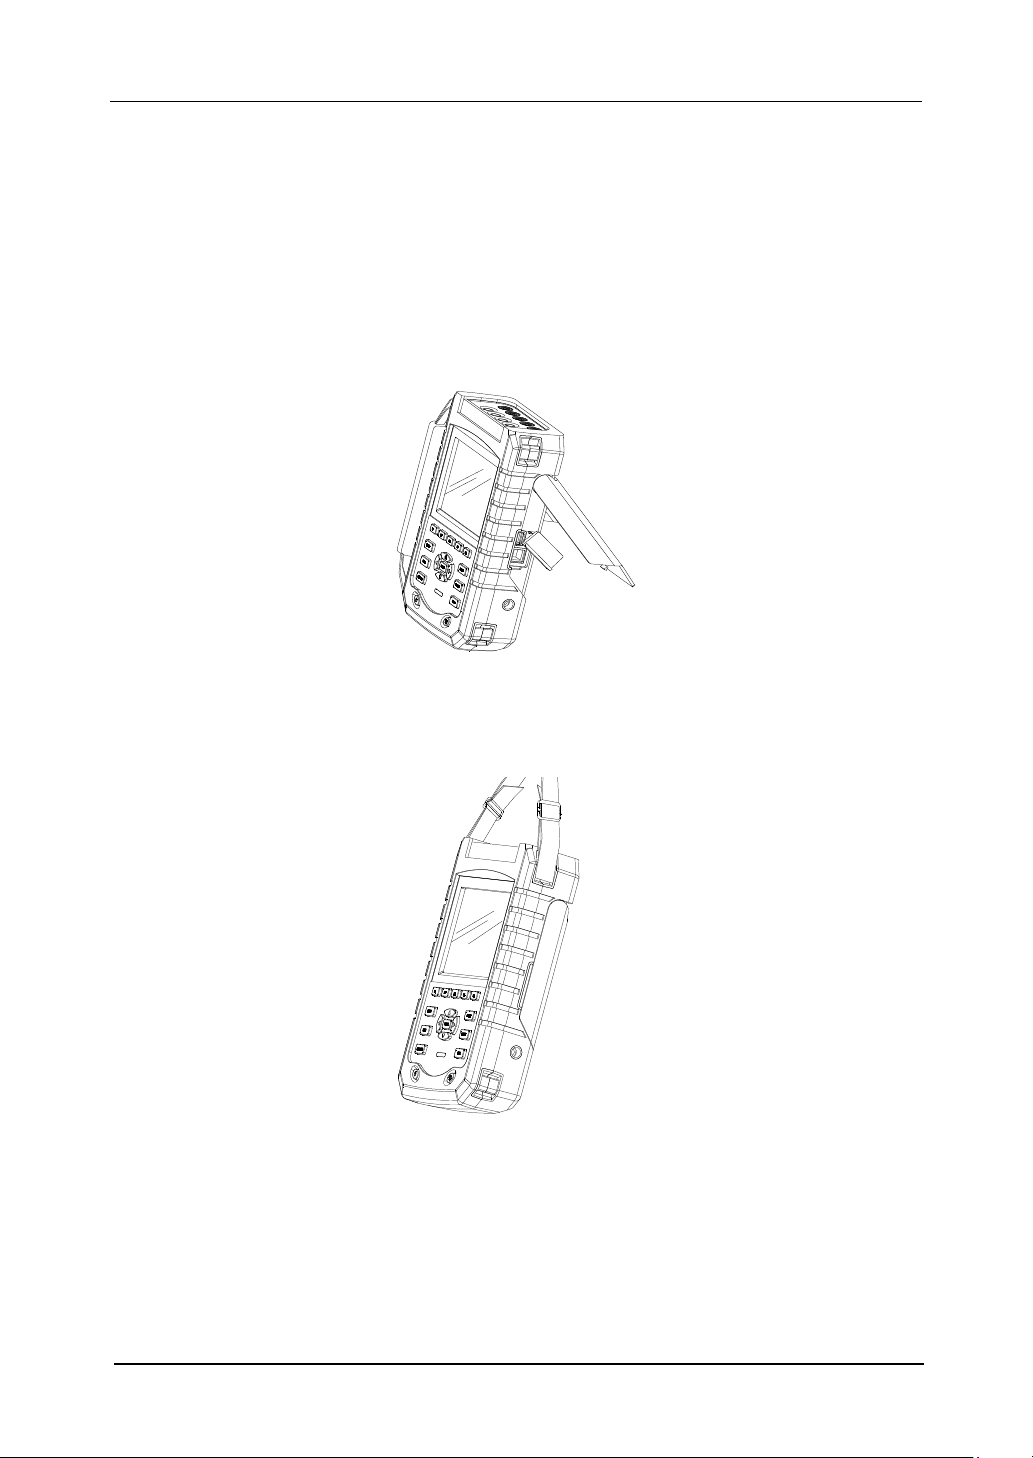
2.1 Tilt Stand and Hang Strap
The Analyzer has a tilt stand that allows viewing the screen at an angle when placed on a flat
surface. With the tilt stand folded out, the USB Host port and LAN interfaces can be accessed
as shown in the figure.
Fig. 2-1-1 Tilt stand and locations of interfaces
A hang strap shown as below figure is supplied with the Analyzer.
Fig.2-1-2 Fixing the hang strap
2.2 Power on/off
Press the Power key and a single beep can be heard, then the screen shows initial interface.
Press the Power key to cut off the power of the Analyzer under power on state.
-14-
Page 16

PCE-PA 8500 (HP) Power Quality Analyzer User‟s Guide
-15-
2.3 Display Brightness
The Analyzer provides 4 degrees of brightness, which is adjustable by pressing the brightness
adjustment key. Low brightness is suggested to save the battery power when powered by the
battery.
2.4 Update Firmware
If any defective was found during the use of the Analyzer, please contact the customer service
representative to get the update pack.
Place the update pack under the root directory of U disk before making connection to the
Analyzer. Press the Power key, then press F3 to start update, do not operate the Analyzer
during update process, or the Analyzer may be damaged and could not work normally. The
Analyzer will start properly if updated successfully.
If the update was failed, check the reason with the help of the prompt information on the screen.
Cancel the update by powering off the Analyzer if update was failed.
2.5 Input Connections
Check that the Analyzer setup meets the characteristics of the system under test. This concerns:
wiring configuration, nominal frequency, nominal voltage, current clamp ratio and range.
The Analyzer has 4 BNC inputs for current clamps and 5 banana-inputs for voltages. Deenergize power systems before making connections whenever possible, always use proper
personal safety equipment.
For a 3-phase system, make the connections as shown in Fig. 2-5-1.
First put the current clamps around the conductors of phase A (L1), B (L2), C (L3) and N
(neutral). The clamps are marked with an arrow indicating the correct signal polarity.
Next make the voltage connections: start with Ground (GND) and then in succession N, A (L1),
B (L2) and C (L3). For correct measuring results, always connect the Ground (GND) input.
Always double-check the connections.
For single phase measurements, use current input A (L1) and the voltage inputs Ground, N
(neutral) and phase A (L1). The voltage inputs A (L1) is the reference phase for all
measurements.
Before making any measurements, set the Analyzer up for the line voltage, frequency, and
wiring configuration of the power system you want to measure.
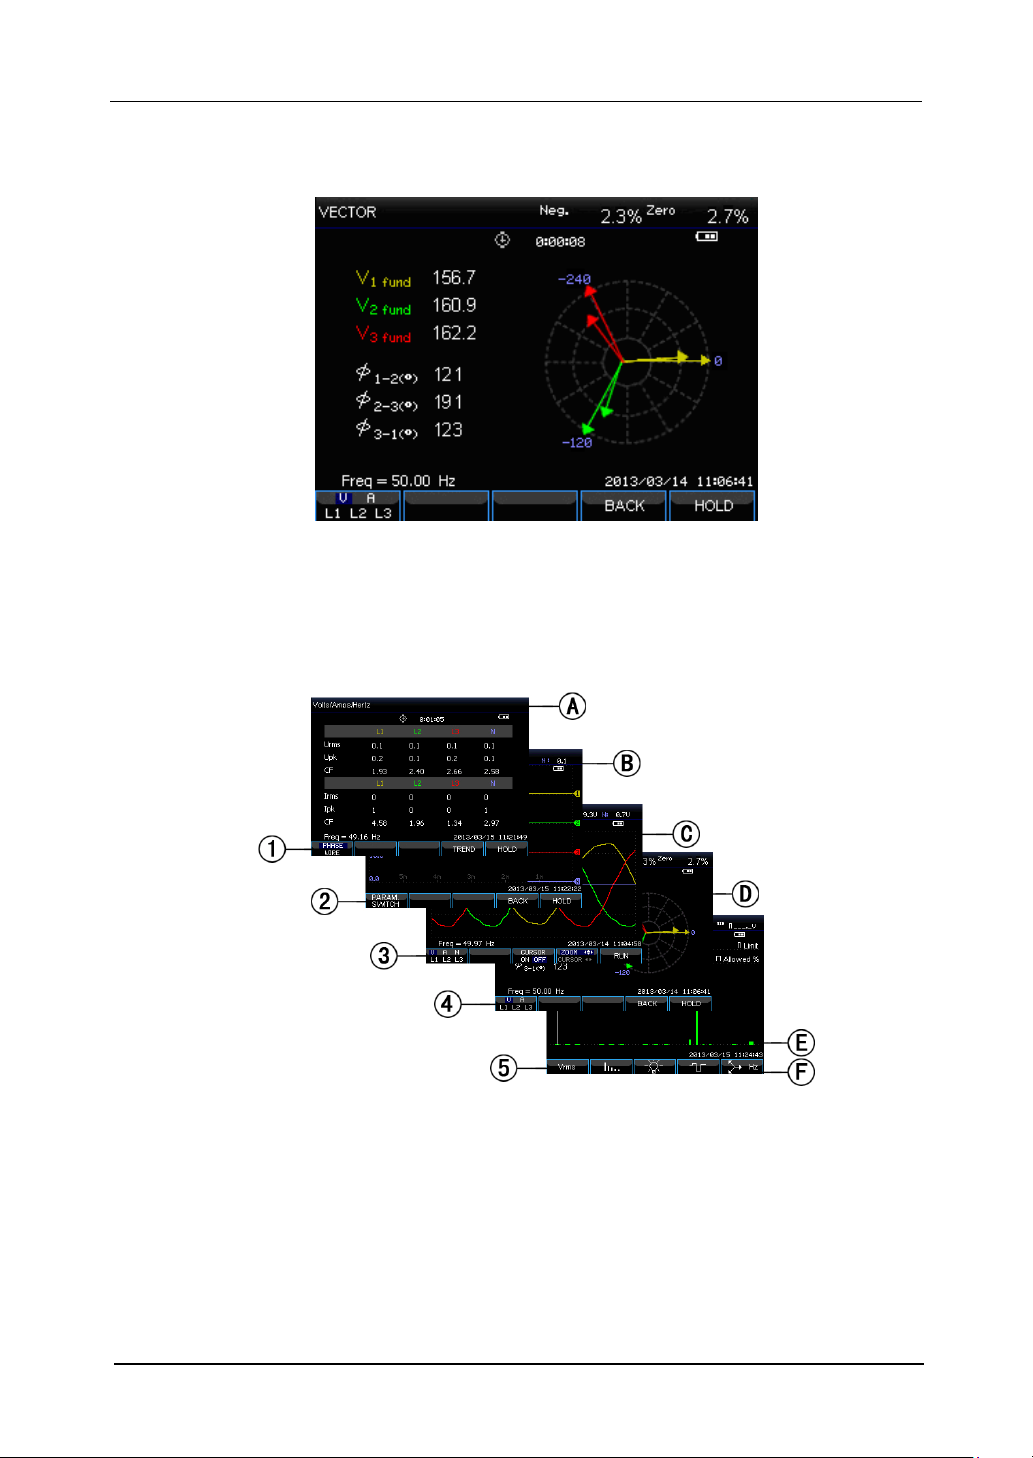
Scope Waveform and Phasor display are useful to check if voltage leads and current clamps are
connected correctly. In the vector diagram, the phase voltages and currents A (L1), B (L2) and
Page 17
PCE-PA 8500 (HP) Power Quality Analyzer User‟s Guide
C (L3) should appear in sequence when observing them in clockwise direction as shown in
below figure:
Fig. 2-5-1 Vector diagram for correctly connected Analyzer
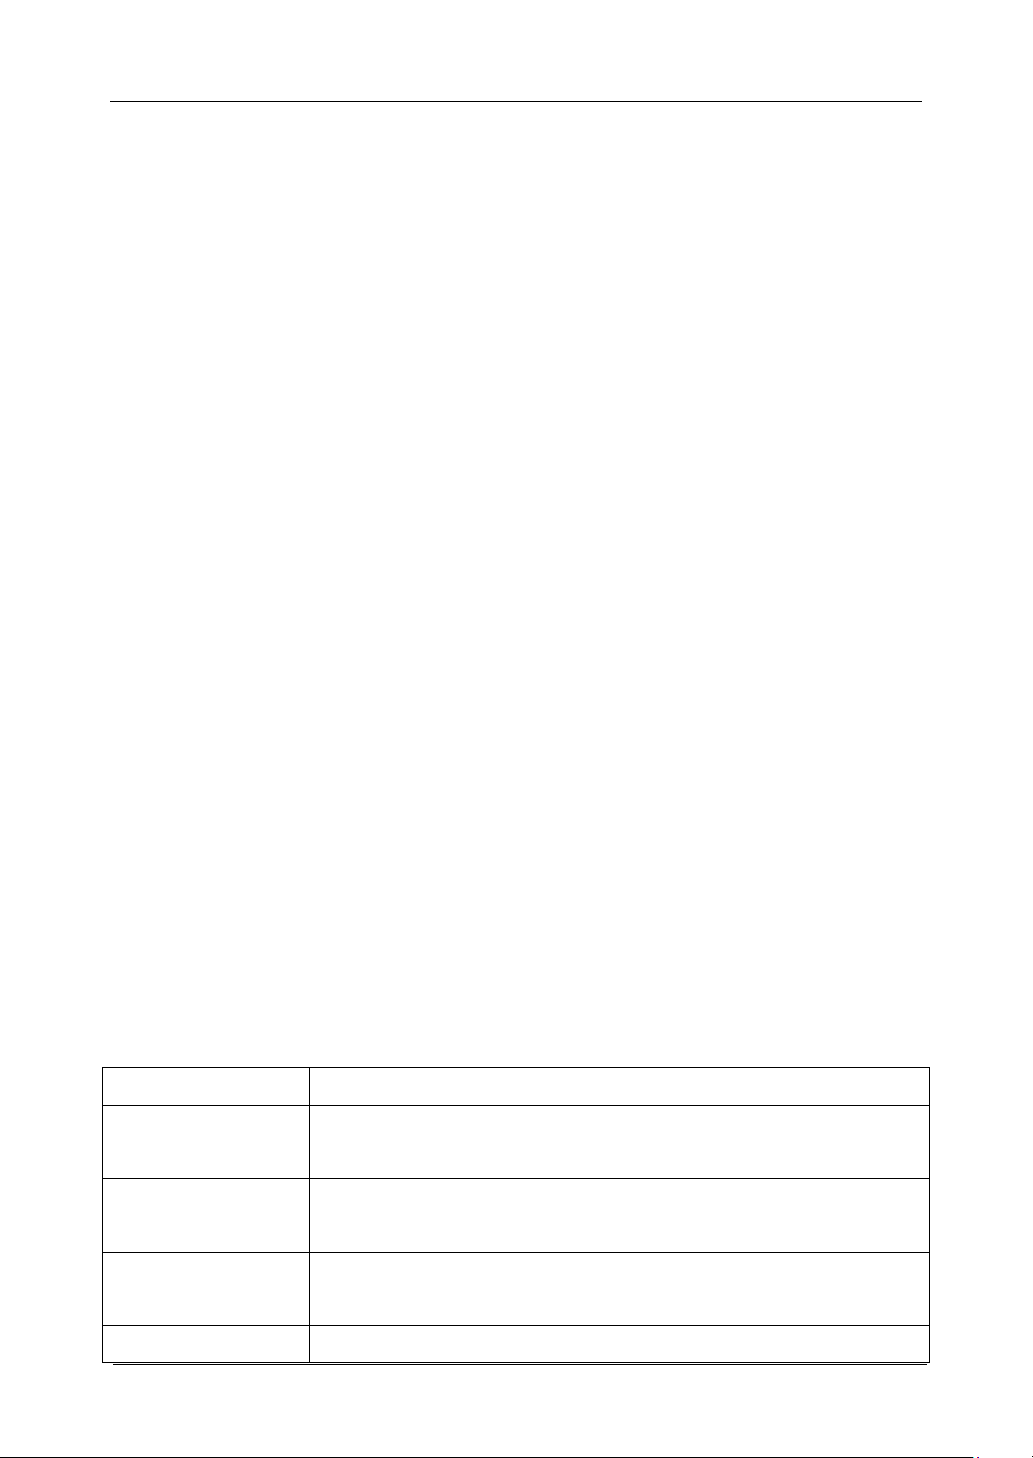
2.6 Display Information
The Analyzer uses five different screen types to present measuring results in the most effective
way.
Fig. 2-6-1 Survey of Display types
Phase colors
Measuring results belonging to different phases are presented with individual colors. The
default colors are yellow for phase A (L1), green for phase B (L2), red for C (L3), and gray for
N (neutral).
Screen types
-16-
Page 18

PCE-PA 8500 (HP) Power Quality Analyzer User‟s Guide
-17-
① Table screen: gives an instantaneous overview of important numerical measuring
values.
② Trend screen: this type of screen is related to a table screen. Trend screen shows
the course over time of measuring values from the table.
③ Waveform screen: shows voltage and current waveforms as displayed on an
oscilloscope. Channel A (L1) is reference channel.
④ Phasor screen: shows the phase relation between voltages and currents in a vector
diagram. The vector of reference channel A (L1) points to the positive horizontal
direction.
⑤ Bar Graph screen: shows the density of each measuring parameters as a
percentage by means of a Bar Graph.
Screen information common for all screen types
A
○
Measuring mode: the active measuring mode is shown in the screen header.
B
○
Measuring values: main numerical measuring values. If cursor is off, the newest
values are shown; otherwise, the values at the cursor are shown.
C
○
Status indicators: Display working states of battery or adapter, and time that a
measurement has been going on.
D
○
Main area with measuring data.
E
○
Status line: shows present date and time.
F
○
Softkey text area: softkey functions that can be selected with F1 … F5 are
indicated in white. Functions currently not available are indicated in gray. Active
function key selections are highlighted with a blue background.
2.7 Set Up the Analyzer
At power-on, a welcome screen is displayed that shows settings currently in use. Check if the
Date and Time of the system clock are correct. Also the wiring configuration must match the
configuration of the power system to be checked. The 【SETUP】 key accesses menus to view
and change Analyzer settings.
The settings are grouped in four functional sections which are explained respectively as below:
General settings: wiring configuration, nominal frequency, nominal voltage, current
clamps, current range and language.
User preference: date and time, LAN interface.
Page 19

PCE-PA 8500 (HP) Power Quality Analyzer User‟s Guide
Limits settings: For recall, save and definition of the limits for power quality
monitoring.
Setup interface
Press 【SETUP】 key to access to setup interface, use up/down arrow keys to select options to
be adjusted, then press left/right arrow keys to adjust. Settable options:
Wiring configuration: after selecting wiring configuration, press 【ENTER】
key to access to wiring configuration interface. Press【F4】to confirm selection.
Nominal frequency: adjust nominal frequency, after selecting nominal frequency,
switch between preset 50Hz, 60Hz and 400Hz with left/right arrow keys.
Nominal voltage: adjust nominal voltage, after selecting nominal voltage, press
【ENTER】key to access to voltage configuration interface and press 【F5】
key to confirm your selected nominal voltage.
Language: select language then press left/right arrow keys to switch between
Chinese and English.
Zooming: select the zooming setup and press 【ENTER】key to access to set
up interface. Current clamp type and zoom of voltage/current are selectable.
Press 【F5】to confirm the setting.
Available function keys:
F2 User preference: access to user preference interface, configure data, time, LAN
interface etc.
F3 Calibration: access to calibration interface, calibrate the Analyzer.
F4 Monitor limits: configure limits value parameters for power quality monitoring.
F5 Confirm, access to menu interface.
User preference
User preference allows you to customize time and LAN interface, press 【F4】 to access
selected parameter preference menu, and 【F5】 to return to SETUP entry menu.
Date and time: chose Date and time, then press 【F4】to select and access the time
setting interface, use the up/down arrow keys to chose parameters, and the left/right
-18-
Page 20
PCE-PA 8500 (HP) Power Quality Analyzer User‟s Guide
-19-
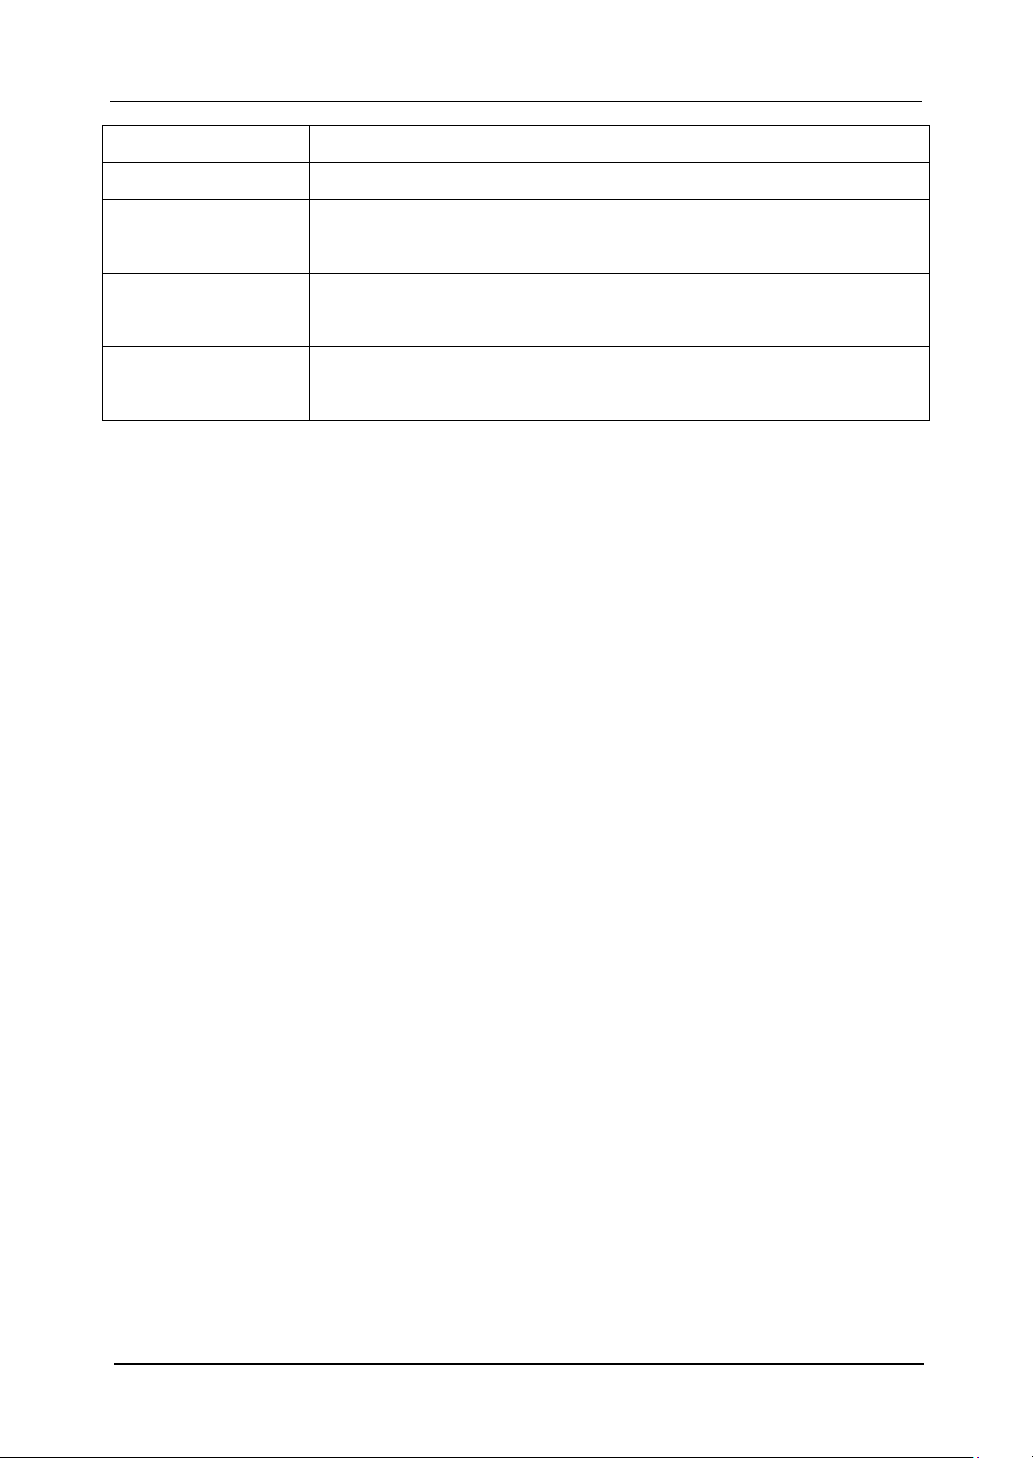
Limits
Adjustments
Voltage
2 probability percentages (100% and adjustable): each with adjustable
upper and lower limits.
Harmonics
For 2-25 harmonics and THD 2 probability percentages (100% and
adjustable): each with adjustable upper limit.
Flicker (*)
Weighing curve (lamp type). 2 probability percentages (100% and
adjustable): adjustable percentage with adjustable upper limit.
Dips (*)
Threshold, hysteresis, allowed number of week.
arrow keys to set up each parameter, press 【F5】 to confirm the selection and make
the setting active.
LAN interface configuration: Press up/down arrow keys to select LAN SETUP, then
press 【F4】 to access to setting interface of LAN interface, 【F1】 Tab keys to
switch configuration parameters. When DHCP or fixed IP is highlighted, press
【ENTER】 key radio button to select this option. Access to IP address with 【F1】
Tab key, then press up/down keys to change figure, and left/right keys to move the
cursor. Make the change active by pressing 【F4】confirmation key, press 【F5】to
cancel the change and return to previous menu.
Calibration interface
Press 【F3】 to access calibration interface which shows current firmware version, correct
password is requested for processing calibration, do not calibrate the Analyzer arbitrarily but
have it calibrated by specified institution or the manufacturer. Press 【F5】to return to setting
interface.
Monitor limits
The Analyzer presets a set of limits according to EN50160 standard, and reserves two userdefined options, which the users can modify under EN50160 standard set of limits and save as
user-defined set of limits.
Use the up/down arrow keys to move the highlighted row, then press 【ENTER】 key radio
button to select highlighted row. Selected by the radio button means this set of limits is
currently active.
Press 【F4】to access to limits edition interface and edit current highlighted set of limits, a
survey of monitor limits adjustments:
Page 21
PCE-PA 8500 (HP) Power Quality Analyzer User‟s Guide
Swells (*)
Threshold, hysteresis, allowed number of week.
Interruption (*)
Threshold, hysteresis, allowed number of week.
Rapid Voltage
Change (*)
Voltage tolerance, steady time, minimum step, minimum rate, allowed
number of week.
Unbalance
2 probability percentages (100% and adjustable): adjustable
percentage with adjustable upper limit.
Frequency
2 probability percentages (100% and adjustable): each with adjustable
upper and lower limits.
(*): Setups are also valid for measuring mode.
2.8 Using Memory and PC
The Analyzer can save screens and data into its memory, and the users can view, delete and
copy them. The Analyzer can also be connected with a PC, through which the remote control of
the Analyzer is available.
Using memory
The Analyzer has a built-in 8G TF card to store data the users saved. The Analyzer can save
screenshot of current screen, and data set of current measurement too.
SAVE interface
The 【SAVE】 key accesses save interface, select screenshot or data set as save type, the
name of the file to be saved is editable.
Press 【F1】 to switch save type. Use left/right arrow keys to move the cursor, and up/down
keys to change name, press【F4】SPACE to erase current selected character, the cursor moves
to its next position. Press 【F5】to save the setting and return to previous interface.
MEMORY interface
The MEMORY button accesses to the save list interface, which shows the save time, name and
type of saved files. Use up/down arrow keys to select specified row to save to. After accessing
to the save interface, insert a U disk and wait for a few seconds, then press F2 to copy selected
file to the U disk when “TO USB” characters become lighted, press ENTER to confirm when a
copy finished window is popped up before pulling out the U disk.
Insert the U disk to a PC and use upper computer software to view the copied file.
-20-
Page 22

PCE-PA 8500 (HP) Power Quality Analyzer User‟s Guide
-21-
Available function keys:
F2 Copy file to U disk after inserting a U disk and the characters of the key become
lighted.
F3 View selected saved file.
F4 Delete selected saved file.
F5 Return to previous interface.
Using PC
The Analyzer is equipped with a LAN interface for communication with a PC. With supplied
upper computer software you can do remote control of the Analyzer on a PC. In addition, you
can also view the data and screenshot copied from a U disk with the upper computer software.
On USER Preference interface, set the LAN interface of the Analyzer correctly before
connecting the Analyzer to the internet with a network cable. Run the upper computer software,
input the IP address of the Analyzer to make the connection, an operation interface analoging
the Analyzer will be displayed for a successful connection. The saved file also can be
downloaded from analyzer.
Page 23

PCE-PA 8500 (HP) Power Quality Analyzer User‟s Guide
Chapter 3 Application examples
3.1 Scope
Scope mode shows voltages and currents in the power system under test by means of
waveforms. Also numerical values are shown such as phase voltages, phase currents and
frequency etc. The Scope waveform screen offers an oscilloscope style of display of voltage
and current waveforms with a fast update rate. The screen header shows the related rms
voltage/current values. Channel A (L1) is the reference channel, starting at 0V are displayed.
Available function keys:
F1 Selection of waveform set to be displayed: V displays all voltages; A displays all
currents. A (L1), B (L2), C (L3), N (neutral) give simultaneous display of phase voltage and
current for the selected phase.
F3 Access to cursor, when the Cursor is on, the waveform values at the Cursor are
displayed in the screen header.
F4 Selection of Zoom function and Cursor move function. When the Cursor is selected,
press left/right arrow keys to move the cursor; when the Zoom function is selected, press
direction keys to expand or shrink waveforms.
F5 Switch between HOLD and RUN
3.2 Voltage/Current/Frequency
This function is used for measuring steady voltage, current, frequency and crest factors. The
Crest Factor (CF) indicates the amount of distortion: a CF of 1.41 means no distortion and
higher than 1.8 means high distortion. Use this screen to get a first impression of power system
performance before examining the system in detail with other measuring modes.
Table screen
The number of columns in the Table screen depends on the power system configuration. The
figures in the Table screen are present values that may update constantly. Changes in these
values over time are recorded as soon as the measurement is turned on. The recording is visible
in the Trend screen.
Available function keys:
F1 Under 3-phase Y type wiring configuration, switch between voltage readings of each
phase (A/L1, B/L2, C/L3,N)or phase-phase (AB, BC, CA).
F4 Access to the Trend screen.
F5 Switch between HOLD and RUN.
-22-
Page 24

PCE-PA 8500 (HP) Power Quality Analyzer User‟s Guide
-23-
Trend
All values in the Table screen are recorded, but the Trends from each row in the table are
displayed one at a time. Press function key F1 to switch between parameters.
The traces build up from the right side. Readings in the header correspond to the most recent
values plotted on the right.
Available function keys:
F1 Switch parameters that the current Trend screen displays, the header shows content
being displayed.
F4 Return to the Table screen.
F5 Switch between RUN and HOLD.
Tips and Hints
Voltage and frequency should be close to the nominal values of for example 120V, 230V,
480V, 60Hz or 50Hz.
The voltages and currents in the table can be e.g. used to check if power applied to a 3-phase
induction motor is in balance. Voltage unbalance causes high unbalanced currents in stator
windings resulting in overheating and reduced motor life. Each of the phase voltages should
not differ more than 1% from the average of the three. Current unbalance should not exceed
10%. In case of too high unbalance, use other measuring modes to further analyze the power
system.
A Crest Factor close to 2.0 indicates high distortion. CF=2.0 can e.g. be found if you measure
the current drawn by rectifiers that only conduct at the sine wave top.
3.3 Dips and Swells
Dips and Swells records Swells, Dips, Interruptions, and Rapid Voltage Changes.
Dips and Swells are fast deviations from the normal voltage. Magnitude may be ten up to one
hundred of volts. Duration may vary from a half cycle to a few seconds as defined in
IEC61000-4-30. The Analyzer allows you to choose nominal or sliding reference voltage.
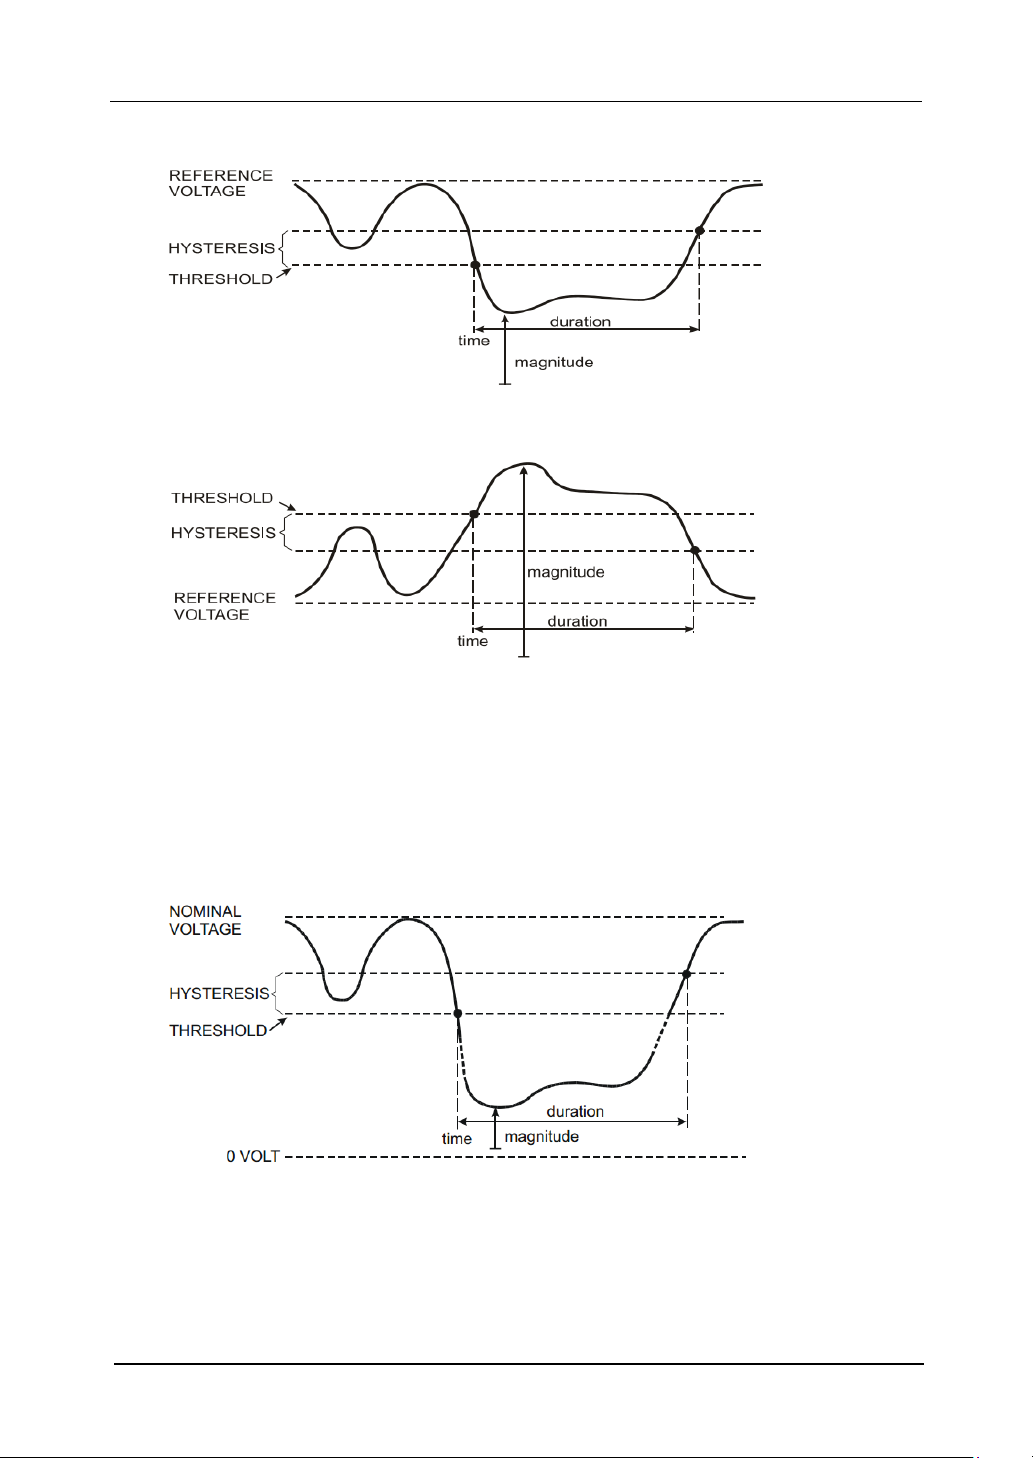
During a dip the voltage drops, during a swell the voltage rises. In 3-phase systems, a dip
begins when the voltage on one or more phases drops below the dip threshold and ends when
all phases are equal to or above the dip threshold plus hysteresis. A swell begins when the
voltage on one or more phases rises up to the swell threshold and ends when all phases are
equal to or below the swell threshold minus hysteresis. The trigger conditions for dips and
swells are threshold and hysteresis. Dips and Swells are characterized by duration, magnitude
and time of occurrence. Figure 3-3-1and 3-3-2 explains this.
Page 25
PCE-PA 8500 (HP) Power Quality Analyzer User‟s Guide
Fig.3-3-1 Characteristics of a voltage dip
Fig. 3-3-2 Characteristics of a voltage swell
During an Interruption the voltage sinks well below its nominal value. In 3-phase systems, an
Interruption begins when the voltages on all phases are below threshold and ends when one
phase is equal to or above the interruption threshold plus hysteresis. The trigger conditions for
interruptions are threshold and hysteresis. Interruptions are characterized by duration,
magnitude and time of occurrence. Figure 3-3-3 explains this.
Fig. 3-3-3 Characteristics of a voltage interruption
Rapid voltage changes are quick transitions of the RMS voltage between two steady-states.
Rapid voltage changes are captured based on steady voltage tolerance, steady time, minimum
compensation and minimum rate detected. When voltage change exceeds dip or swell threshold,
-24-
Page 26

PCE-PA 8500 (HP) Power Quality Analyzer User‟s Guide
-25-
it is considered as Dip or Swell instead of Rapid Voltage Change. The events list shows voltage
step change and transient time. The detailed events list shows maximum voltage change over
nominal voltage. Voltage change trend is shown in Fig. 3-3-4.
Fig. 3-3-4 Characteristics of a rapid voltage change
In addition to the voltage, current is also recorded. This allows you to see cause and effect of
deviations. Function key 【 F2】 accesses event tables where voltage events are listed in
sequence.
Trend
Available function keys:
F1 Switch between voltage and current trends, the header shows parameters being
displayed.
F2 Access to Events tables
F3 Access to Cursor
F4 Selection of Cursor move or Zoom
F5 Switch between RUN and HOLD.
Event criteria such as threshold, hysteresis and others are preset, but they may be adjusted. The
adjustment menu is reached via the 【SETUP】 key and limits setup.
Events tables
The Events table lists all threshold crossings of phase voltages. Thresholds according to
international standards or user –definable thresholds can be used. The Events table records
major event characteristics: start time, duration, voltage magnitude, event type, and occurrence
phase etc.
The below abbreviation is used in the events tables,
Page 27

PCE-PA 8500 (HP) Power Quality Analyzer User‟s Guide
RVC changing of fast voltage
DIP voltage dip
INT voltage interrupt
SWL voltage swell
Tips and Hints
The occurrence of Dips and Swells may indicate a weak power distribution system. In such a
system voltage will change considerably when a big motor or a welding machine is witched on
or off. This may cause lights to flicker or even show visible dimming. It may cause reset and
loss of data in computer systems and process controllers.
By monitoring the voltage and current trend at the power service entrance, you can find out of
the cause of the voltage dip is inside or outside the building. The cause is inside the building
(downstream) when voltage drops while current rises; it is outside (upstream) when both
voltage and current drop.
3.4 Harmonics
Harmonics measure and record harmonics and interharmonics up to the 50th. Related data such
as DC components, (THD) Total Harmonic Distortion, and K-factor are measured. Harmonics
are periodic distortions of voltage, current or power sinewave. A voltage or waveform can be
considered as a combination of various sinewaves with different frequencies and magnitudes.
The contribution of each of these components to the fundamental signal is measured. Readings
can be given as a percentage of the fundamental (%f), or as a percentage of full signal RMS
(%r).Results may be viewed in a Bar Graph display. Harmonics are often caused by non-linear
loads such as DC power supplies in computers, TV‟s and adjustable speed motor drives.
Harmonics can cause transformers, conductors, and motors to overheat.
Bar Graph Screen
The Bar Graph display shows the percentage contribution of each of the components related to
the fundamental or full signal. A signal without distortion should show a 1st harmonic at 100%
while the others are at 0: in practice this will not occur because there always is a certain amount
of harmonics resulting in distortion.
-26-
Page 28

PCE-PA 8500 (HP) Power Quality Analyzer User‟s Guide
-27-
A sinewave becomes distorted when harmonics components are added to it. Distortion is
represented by the Total Harmonic Distortion (THD) percentage. The display can also show the
percentage of the DC component and each harmonic ratio.
The left/right arrow keys are used to position the Cursor on particular bar. The screen header
will show for that bar phase identifier, harmonic component ratio, frequency and phase angle.
If not all bars are shown on the screen, you can bring the next set within the viewing area by
moving the Cursor off the left or right end of the screen.
Available function keys:
F1 Selection of harmonics type: voltage, current.
F2 Selection of bar set to be displayed: L1, L2, L3, N or all
F3 Interharmonics display on/off
F4 Open the table screen
F5 Switch between RUN and HOLD.
Table Screen
The table screen lists all the harmonic parameters, including Harmonic Voltage, Harmonic
Current, Interharmonic Voltage and Interharmonic Current. Select next page with up/down
keys.
Available function keys:
F3 Take fundamental voltage as percentage reference (%f) or total harmonic voltage as
percentage reference (%r)
F4 Open the bar graph screen of harmonic
F5 Switch between RUN and HOLD.
Tips and Hints
The harmonic number indicates the harmonic frequency: the first harmonic is the fundamental
frequency (60 or 50Hz); the second harmonic is the component with two times the
fundamental frequency (120 or 100Hz), and so on. The harmonics sequence can be positive (1,
4, 7…), zero (3, 6, 9…) or negative (2, 5, 8…). Positive sequence harmonics try to make a
motor run faster than the fundamental, negative sequence harmonics try to make a motor run
slower than the fundamental. In both cases the motor looses torque and heats up. Harmonics
can also cause transformers to overheat. Even harmonics disappear if waveforms are
symmetrical, i.e. as equally positive and negative.
Page 29

PCE-PA 8500 (HP) Power Quality Analyzer User‟s Guide
Zero sequence current harmonics add in Neutral conductors. This can cause overheating of
these conductors, and make ground potential rising..
3.5 Power and Energy
Power and Energy displays a table with all important power parameters. The related Trend
screen shows the changes over time of all measuring values in the table.
Table
The table displays power data for each phase and in total: real or active power (kW), apparent
power (kVA, the product of rms voltage and current), reactive power (kVAR, the reactive
component of apparent power caused by phase shift between AC current and voltage in
inductors and capacitors), power factor (TPF, the ratio of real power to apparent power for the
total rms including harmonics), displacement power factor (DPF, the ratio of real power to
apparent power for fundamental), and the rms values of voltage and current.
A popup table with energy usage by phase and in total can be activated by pressing 【F3 】 –
Energy function key. The table shows real energy (kWh), apparent energy (kVAh) and reactive
energy (kVARh). The energy measurement starts when Power&Energy is started. The readout
can be reset with function key F5.
Available function keys:
F3 Access the Energy popup screen.
F4 Access the Trend screen.
F5 Switch between RUN and HOLD.
Energy popup screen
F3 Close Energy
F4 Access the Trend
F5 Reset, the time clock starts all over again
Trend
The figures in the table are instantaneous values that update constantly. While changes in these
values over time are recorded in the Trend. The traces build up from the right side. The
readings in the header correspond to the most recent measurements plotted on the right.
Available function keys:
F1 Switch parameter being displayed.
-28-
Page 30

PCE-PA 8500 (HP) Power Quality Analyzer User‟s Guide
-29-
F4 Return to the Table screen.
F5 Switch between RUN and HOLD.
Tips and Hints
Power mode can be used to record apparent power of a transformer over several hours. Look at
the Trend and find out if the transformer is overloaded.
Interpretation of Power Factor when measured at a device:
PF = 0~1: not all supplied power is consumed by the device, a certain amount of
reactive power is present. Current leads (capacitive load) or lags(inductive load).
PF = 1: all supplied power is consumed by the device. Voltage and current are in
phase.
PF = -1: device generates power. Current leads or lags.
Reactive power (VAR)is most often due to inductive loads such as asynchronous motor,
induction furnace, and transformers, etc. Installation of correction capacitors can correct for
inductive VAR‟s.
3.6 Flicker
Flicker quantifies the luminance fluctuation of lamps caused by supply voltage variations. The
Analyzer design strictly meets the IEC61000-4-15 Flicker Meter model. The Analyzer converts
duration and magnitude of voltage variations into an „annoyance factor‟ caused by the resulting
flicker of a 60W lamp. A high flicker reading means that most people would find the
luminance changes irritating. The voltage variation can be relatively small. The measurement is
optimized to lamps powered by 120V/60Hz or 230V/50Hz. Flicker is characterized per phase
by the parameters shown in a table. The Trend screen shows changes of instantaneous flicker
sensation level over time.
Table
Flicker is characterized by: short term severity Pst (measured over 10 minutes) and a long term
severity Plt (measured over 2 hours). The Analyzer records severity measured over 1 minute
too for fast feedback. Pst and Plt are parameters showing flicker severity over a certain period
of time. Momentary flicker is shown in the PF5 submenu and is reached via function key
【F4】. Flicker PF5 is displayed as a fast Trend plot.
Available function keys:
F4 Access PF5 Trend screen.
Page 31

PCE-PA 8500 (HP) Power Quality Analyzer User‟s Guide
F5 Switch between RUN and HOLD.
3.7 Unbalance
Unbalance displays phase relations between voltages and currents. Measuring results are based
upon the fundamental frequency component (50 or 60Hz, use symmetrical components). In a 3phase power system, the phase shift between voltages and between currents should be close to
120°. Unbalance mode offers a measurement table and a Phasor display.
Table
The table screen shows all relevant numerical values: negative voltage unbalance percentage,
zero sequence voltage unbalance percentage, negative current unbalance percentage, zero
sequence current unbalance percentage, fundamental phase voltage, frequency, fundamental
phase current, angle between voltage and current for each phase relative to the reference phase
(A/L1)and angles between voltage and current for each phase.
Available function keys:
F4 Access Phasor screen.
F5 Switch between RUN and HOLD.
Phasor
Shows the phase relation between voltages and currents in a vector diagram divided in 30
degree sections. The vector of the reference channel A (L1) points to the horizontal direction.
Additional numerical values are given: negative voltage and current unbalance percentage, zero
sequence voltage and current unbalance percentage, fundamental phase voltage and current,
frequency, phase angles. With function key 【F1】, you can choose readings of all phase
voltages, phase currents or voltage and current in one phase.
Available function keys:
F1 Selection of signals to be displayed: V displays all voltages; A displays all currents.
L1, L2, L3 give simultaneous display of phase voltage and current.
F4 Return to unbalance table screen.
F5 Switch between RUN and HOLD.
Tips and Hints
The voltages and currents in the table can e.g. be used to check if power applied to a 3-phase
induction motor is in balance. Voltage unbalance causes high unbalanced currents in stator
-30-
Page 32

PCE-PA 8500 (HP) Power Quality Analyzer User‟s Guide
-31-
windings resulting in overheating and reduced motor life. Negative voltage component Vneg
should not exceed 2%, current unbalance should not exceed 10%. In case of too high unbalance,
use other measuring modes to further analyze the power system.
Each phase voltage or current can be split-up into three components: positive sequence,
negative sequence, and zero sequence.
The positive sequence component is the normal component such as present in balanced 3-phase
systems. The negative sequence component results from unbalanced phase-to-phase currents
and voltages. This component for instance causes a „braking‟ effect in 3-phase motors, which
will result in overheating and life reduction. Zero sequence components may appear in an
unbalanced load in 4-wire power systems and represent the current in the neutral wire.
Unbalance exceeding 2% is considered as too high.
3.8 Transients
The Analyzer can capture waveforms at high-resolution during a variety of disturbances. The
Analyzer will give a snapshot of the voltage and current waveforms at the precise time of the
disturbance. This allows you to see the waveforms during transients.
Transients are fast spikes on the voltages waveform. Transients can have so much energy that
sensitive electronic equipment can be affected or even damaged. A waveform is captured each
time that the voltage exceeds adjustable limits. A maximum of 100 events can be captured. The
sample rate is 20kS/s.
Waveform display
Cursor and Zoom can be used to investigate details of captured waveforms.
Available function keys:
F2 Playback captured Transients waveforms.
F3 Access to Cursor.
F4 Selection of Zoom or Cursor.
F5 Switch between RUN and HOLD.
Tips and Hints
Disturbances such as transients in a power distribution system can cause malfunctions in many
types of equipments. For example, computers may reset and equipment subjected to repeated
transients can eventually fail. Events occur intermittently, making it necessary to monitor the
Page 33

PCE-PA 8500 (HP) Power Quality Analyzer User‟s Guide
system for a period of time to find them. Look for voltage transients when electronic power
supplies are failing repeatedly or if computers reset spontaneously.
3.9 Inrush currents
Inrush currents can be captured by the Analyzer. Inrush currents are surge currents that occur
when a large, or low-impedance load comes on line. Normally the current will stabilize after
some time when the load has reached normal working condition. For example the start-up
current in induction motors can be ten times the normal working current. Inrush is a „single
shot‟ mode that records current and voltage Trends after a current event has occurred. An
Inrush occurs when the current waveform exceeds adjustable limits. The Trends builds up from
the right of the screen. Pretrigger information allows you to see what occurred in advance of
the inrush.
Trend display
Use the arrow keys in the Start menu to adjust the trigger limits: expected inrush time, nominal
current, threshold and hysteresis. The maximum current determines the vertical height of the
current display windows. Threshold is the current level that triggers the trend capture. The
inrush time is the time between trigger and the time that the current falls to the value indicated
by Hysteresis and is indicated on the trend display between two vertical markers. The screen
header displays the rms of all phases during the inrush time. If the Cursor is on, the rms
measuring values at the Cursor are displayed.
Available function keys:
F1 Switch parameters to be displayed.
F3 Access to Cursor.
F4 Selection of Zoom or Cursor.
F5 Switch between RUN and HOLD.
Tips and Hints
Check the inrush currents and their duration, use the Cursor for readout of momentary values.
Check if fuses, circuit breakers, and conductors in the power distribution system can withstand
the inrush current during this period. Check also if phase voltage stay stable enough.
High peak currents can cause circuit breakers to trip unexpectedly. Measuring Inrush current
can help in setting trip levels. Since the Analyzer simultaneously captures Inrush current and
voltage Trends, you can use this measurement to check voltage stability as large loads come on
line.
-32-
Page 34

PCE-PA 8500 (HP) Power Quality Analyzer User‟s Guide
-33-
3.10 Power Quality Monitoring
Power Quality Monitoring displays a Bar graph screen. This screen show whether important
Power Quality parameters meet requirements. Parameters include: RMS voltages, Harmonics,
Flicker, Dips&Swells/Interruptions/Rapid Voltage Changes, Unbalance, and Frequency.
The length of a bar increases if the related parameter is further away from its nominal value.
The bar turns from green to red if an allowed tolerance requirement is violated.
Use the direction keys to position the cursor on a particular bar and measuring data belonging
to that bar is displayed in the screen header.
Power Quality Monitoring is usually done during a long observation period. The function is
entered via the【MONITOR】key and start menu to define immediate or timed start of the
measurement. Minimum duration of the measurement is 2 hours, and maximum is 1 week.
The Power Quality parameters RMS voltages, Harmonics, and Flicker have a bar for each
phase. From left to right these bars are related to the phase A (L1), B (L2) and C (L3).
The parameters Dips/Interruptions/Voltage Changes/Swells, Unbalance and Frequency have a
single bar for each parameter representing performance across three phases.
Most of the Bar Graphs have a wide base indicating adjustable time related limits (for instance
95% of time within limit) and a narrow top indicating a fixed 100% limit. If one of both limits
is violated, the related bar changes from green to red. Dotted horizontal lines on the display
indicate the positions of 100% limit and the adjustable limit.
The meaning of the bar graphs with a wide base and a narrow top is explained below by way of
example this is done for the RMS voltage. This voltage for instance has a nominal value of
220V with a tolerance of ±15% (tolerance range between 187 … 253V). The momentary RMS
voltage is constantly monitored by the Analyzer, it calculates an average from these measuring
values across 10 minutes observation periods, and these averages are compared against the
tolerance range.
The 100% limit means that the 10-minute averages must always (i.e. 100% of time or with 100%
probability)be within range. The bar graph will turn to red if a 10-minute average crosses the
tolerance range.
The adjustable limit of for instance 95% (i.e. 95% probability) means that 95% of the 10minute averages must be within tolerance. The 95% limit is less stringent than the 100% limit.
Therefore the related tolerance range usually is tighter. For 220V this for instance can be ±10%
(tolerance range between 198V … 242V).
Page 35
PCE-PA 8500 (HP) Power Quality Analyzer User‟s Guide
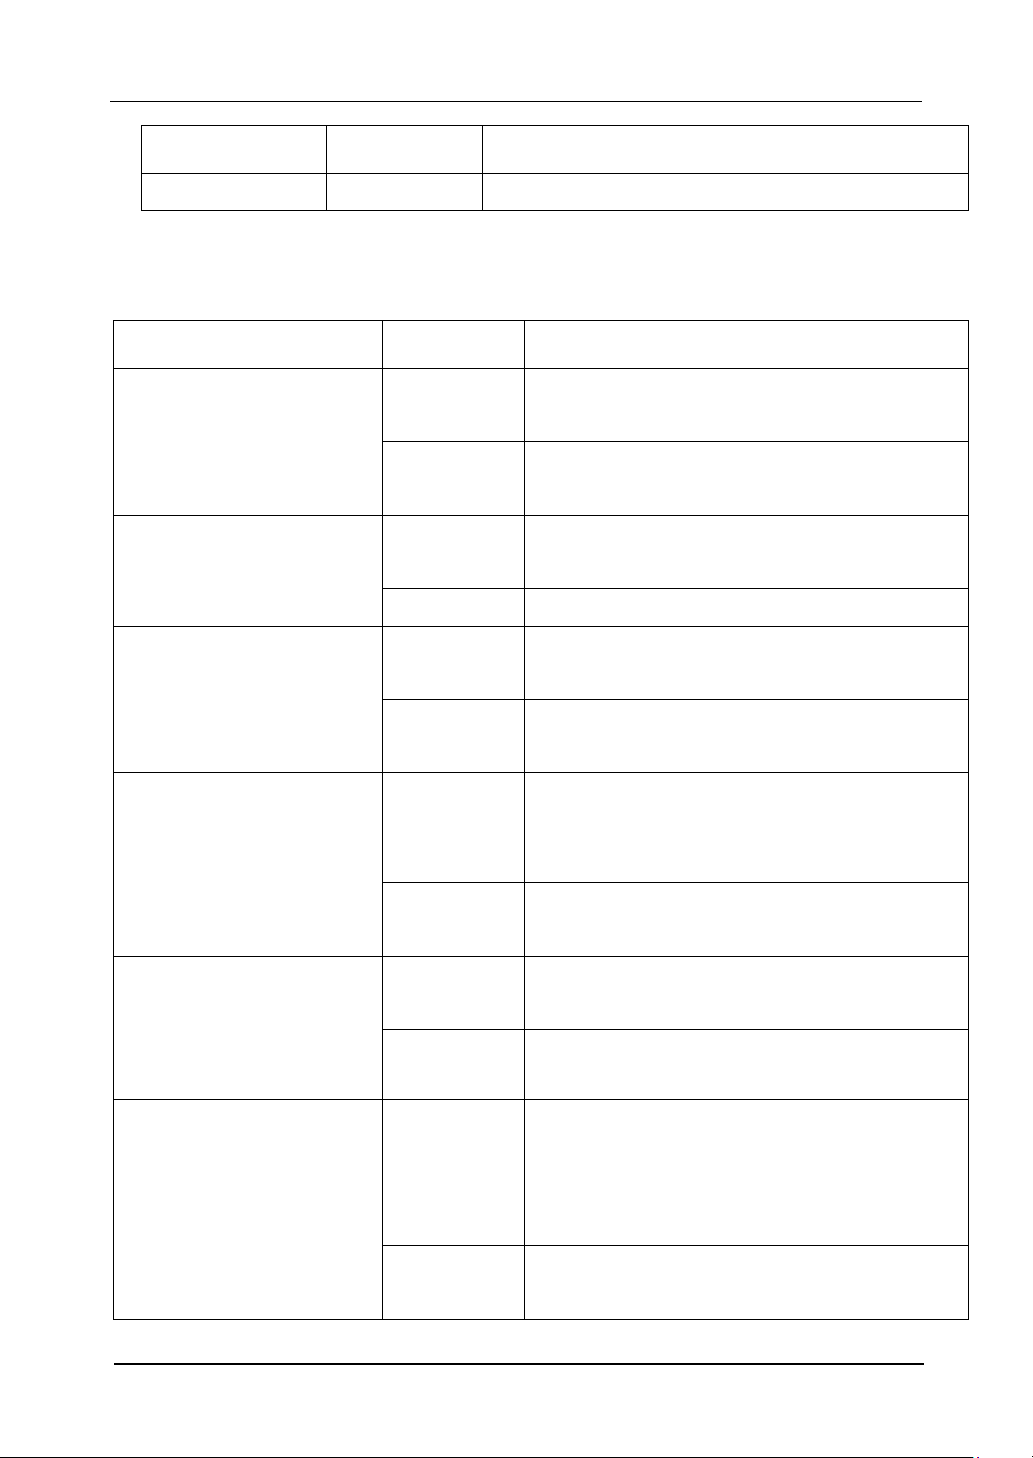
Parameter
Available Bar
Graphs
Limits
Averaging
Interval
V rms
3, one for each phase
Probability 100%: upper
& lower limits
Probability x %: upper &
lower limits
10 minutes
Harmonics
3, one for each phase
Probability 100%: upper
limit
Probability x %: upper
limit
10 minutes
Flicker
3, one for each phase
Probability 100%: upper
limit
Probability x %: upper
limit
2 hours
Dips/Interruptions/Rapid
Voltage Changes/Swells
4, one for each
parameter covering
all 3 phases
Allowed number of
events
1/2 cycle rms
based
Unbalance
1, covering all 3
phases
Probability 100%: upper
limit
Probability x %: upper
limit
10 minutes
Frequency
1, measured on
Reference Voltage
Input A/L1
Probability 100%: upper
& lower limits
Probability x %: upper &
lower limits
10 seconds
The bars for Dips/Interruptions/Rapid Voltage Changes/Swells are narrow and indicate the
number of limits violations that occurred during the observation period. The allowed number is
adjustable (for instance to 20 Dips/week). The bar turns to red if the adjusted limit is violated.
You can use a pre-defined set of limits or define your own. An example of a pre-defined set is
that according to the EN50160 standard.
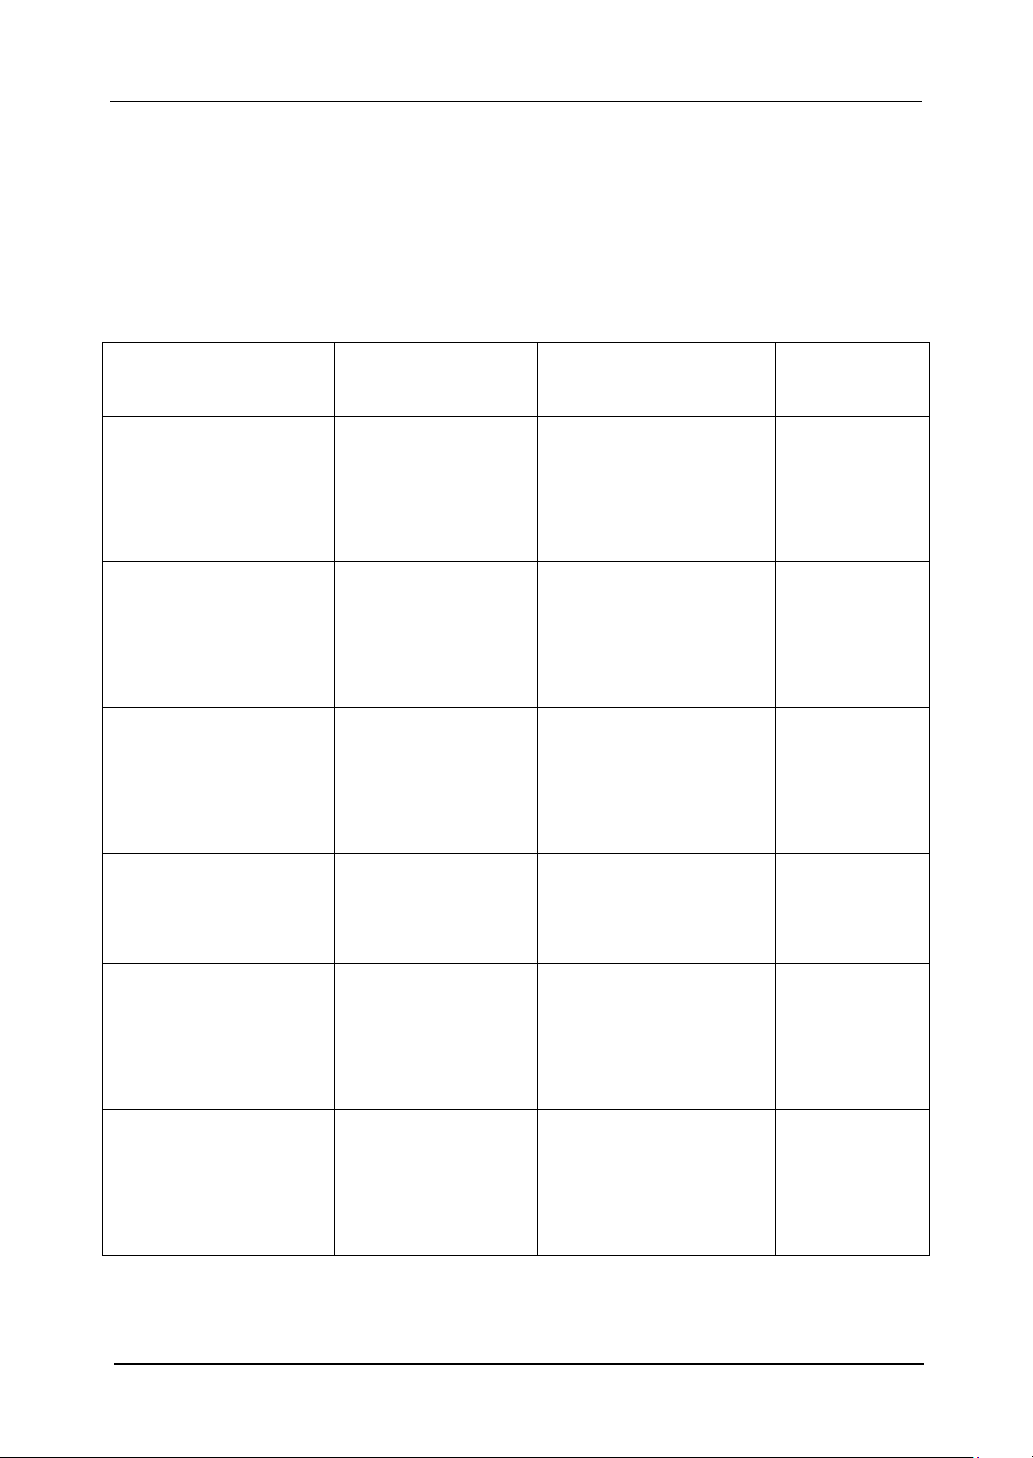
The table below gives a survey of the aspects of Power Quality Monitoring:
-34-
Page 36

PCE-PA 8500 (HP) Power Quality Analyzer User‟s Guide
-35-
Power Quality main screen
Power Quality Monitoring is reached via the 【MONITOR】 key, and Immediate or Timed
start is settable. With the direction keys you can position the Cursor on a particular Bar Graph.
Measuring data belonging to the bar is shown in the screen header.
Detailed measurement data is available under the Function keys:
F1 RMS voltage: events table, trends.
F2 Harmonics: bar graphs, events table, trends.
F3 Flicker: events table, trends.
F4 Dips/Interruption/Rapid Voltage Change/Swells: events table, trends.
F5 Unbalance, frequency: events table, trends.
The measuring data available under the Function keys is explained in the following sections.
Data is presented in the formats Events Table, Trend Display and Bar Graph Screen.
Events table
The events table shows the events that occurred during the measurement with time of start,
phase and duration. Events recording situation:
V rms events: an event is recorded each time that a 10 minute aggregated RMS value
violates its limits.
Harmonics events: an event is recorded each time a 10 minute aggregated harmonic
or THD violates its limit.
Dips/Interruption/Rapid Voltage Change/Swells events: an event is recorded each
time one of the items violates its limit.
Unbalance and Frequency events: an event is recorded each time that a 10 minute
aggregated RMS value violates its limit.
Available function keys:
F3 Access Trend Screen
F4 Switch between selected and all events.
F5 Return to previous menu.
The below abbreviation is used in the events table,
RVC changing of fast voltage
DIP voltage dip
INT voltage interrupt
SWL voltage swell
Hx the harmonic order of beyond limit value
Page 37
PCE-PA 8500 (HP) Power Quality Analyzer User‟s Guide
Item
The parameter meaning of title bar
voltage deviation
x% limiting
voltage
* the transfinite
percentage of x%
limit value
The max
voltage of
100% limit
value
The mini voltage
of 100% limit
value
Harmonic
the transfinite
percentage of
x% limit value
harmonic
* the transfinite
percentage of
100% limit value
harmonic
Flicker
the transfinite
percentage of
x% limit value
flicker
the transfinite
percentage of
100% limit value
flicker
Dips & Swell
Transfinite event
Hz Frequency
Trend
Press【F3】 in Events Table to access Trend Screen. Press left/right arrow keys to access
horizontal time base zoom.
Available function keys:
F5 Return to previous menu.
Bar Graph Screen
The main system monitor display shows the worst harmonic for each of the three phases.
Function key 【F2】 brings up a screen with Bar Graphs showing the percentage of time each
phase spent within limits for 25 harmonics and Total Harmonic Distortion (THD). Each Bar
Graph has a wide base (representing an adjustable limit of e.g. 95%) and a narrow top
(representing the limit of 100%). A Bar Graph changes from green to red if the limits for that
harmonic are violated.
With the left/right arrow keys you can position the Cursor on a particular Bar Graph and
measuring data belonging to that bar is shown in the screen header.
Available function keys:
F1 Selection of Bar Graphs belonging to phase A (L1), B (L2) or C (L3).
F4 Access to events table.
F5 Return to main menu.
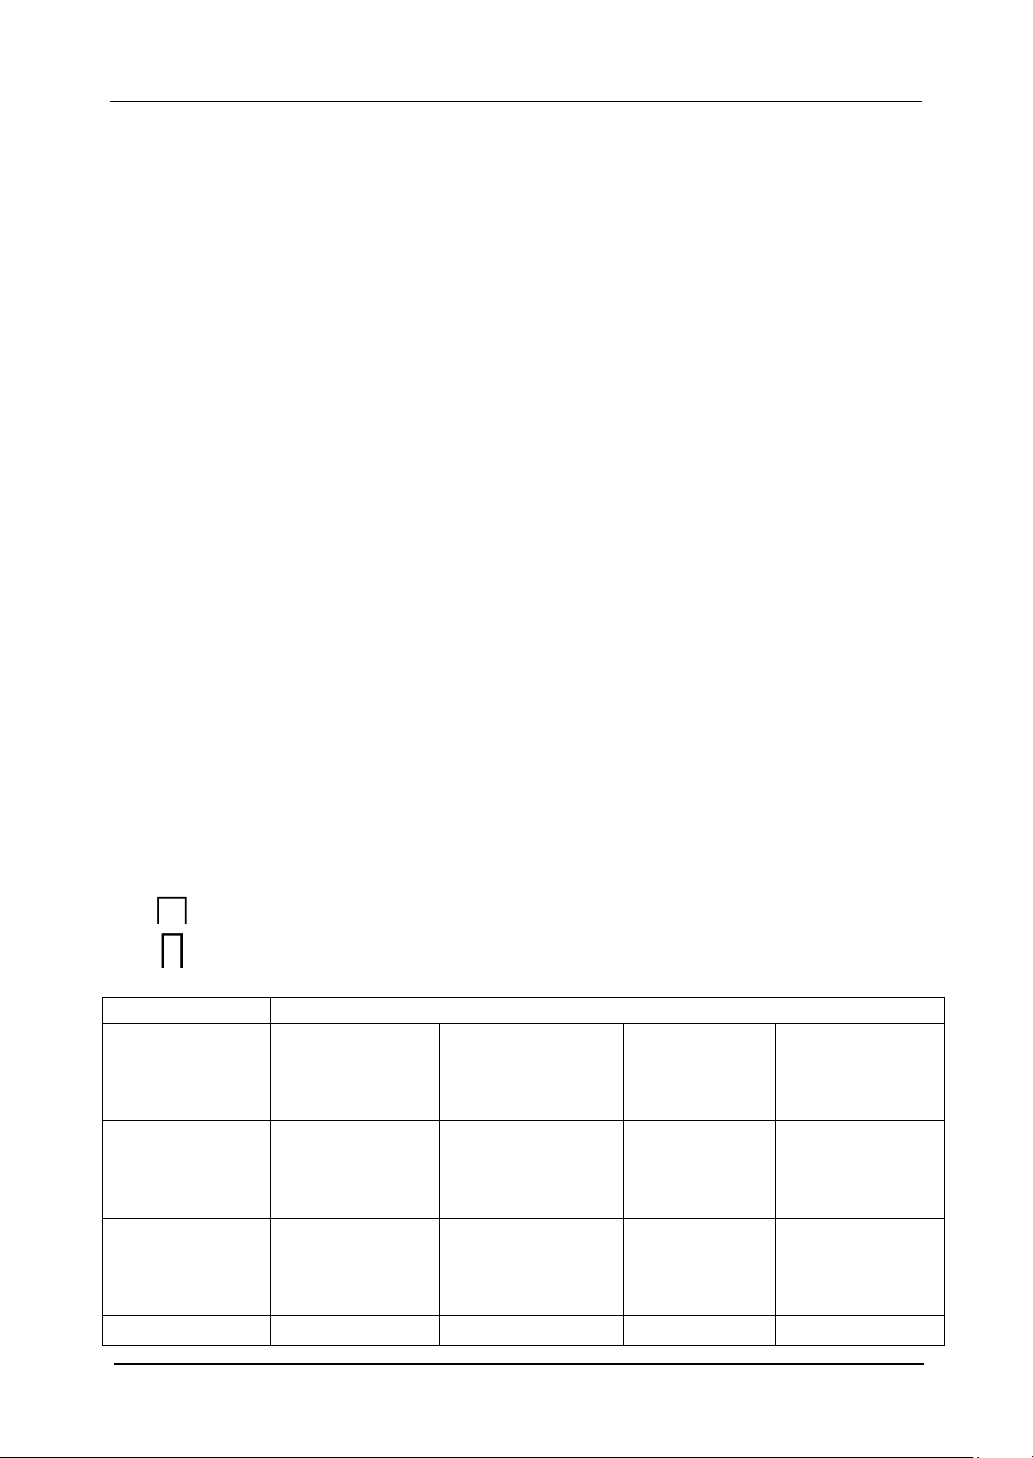
The below signs used in the title bar
:the setting x% limit value
: 100% limit value
-36-
Page 38
PCE-PA 8500 (HP) Power Quality Analyzer User‟s Guide
-37-
number
RVC
L1 event number
L2 event number
L3 event
number
Unbalance
the transfinite
percentage of
x% limit value
unbalance
the transfinite
percentage of
100% limit value
unbalance
frequency
deviation
x% limiting
frequency
the transfinite
percentage of x%
limit value
The max Fre.
of 100% limit
value
The mini Fre. of
100% limit value
*the transfinite percentage of x% limit value: the percentage between x% measured value and
setting limit value
* the transfinite percentage of 100% limit value: the percentage between 100% measured value
and setting limit value
3.11 Logger
Logger function is used to record a group of measurement data as your selected parameter, the
interval selected from 1s to 1hour. When each interval ends, the maximum, minimum and
average of selected parameters are recorded to memory and then start next interval recording.
The whole process lasts as you selected duration time and the record parameter are all
selectable for users.
Press 【MENU】key and select Logger Menu. Press 【ENTER】key to access to logger
setting interface. User can view the spare memory, set logger parameter, interval, duration time
and name of saved file. When finished the setting, press 【F5】to start the logging by timing
or immediately.
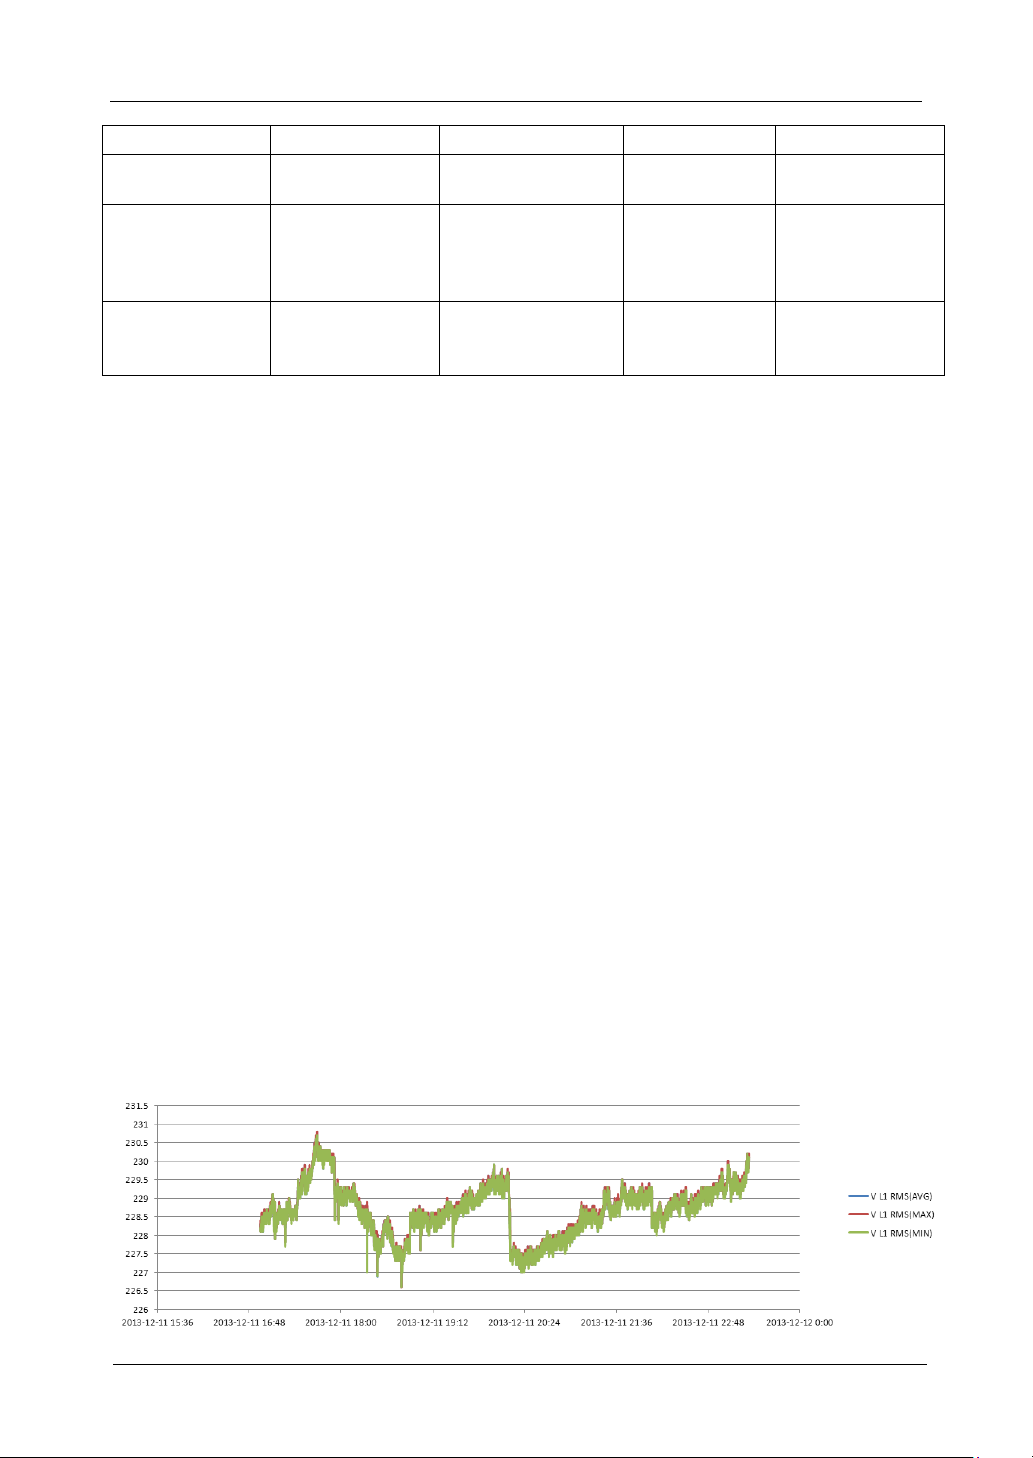
The record file is saved in SD card as CSV format, which can be opened as EXCEL table by
Office 2007 or advanced version in PC. Each logger file is allowed to record 7200 data at most,
every 7200 data will be generated as one file, for example, set logger interval 1s, logger
duration 4 hours, it will generate 2 logger files as Logger 1.csv and Logger 1_01.csv.User can
make the record data into the graph as demand. For example, select first line of logger time and
three lines of maximum, minimum, average of L1 Vrms, then insert the scatter lots with
smooth line, it will generates the graph as below picture 3-11-1.
Fig. 3-11-1
Page 39

PCE-PA 8500 (HP) Power Quality Analyzer User‟s Guide
Table Screen
The table screen displays all the real time measurement data as selected parameters. With
left/right key to refer to next page for view of the data.
Available function:
F5 Switch between RUN and Hold.
F4 Save records. The prompt of success saved will pop up after pressing this key. Press
【ENTER】to confirm and the record will automatically stop.
-38-
Page 40

PCE-PA 8500 (HP) Power Quality Analyzer User‟s Guide
-39-
Chapter 4 Service and Support
4.1 Warranty
PCE Instruments will give one year‟s warranty to maintaining or replacing since
consignment for the verified quality problem of the product. Except for this explanation and
the description in the warranty card, the company has no other warranty, in proclamation
or in implication. Under no circumstances, the company will responsible for the direct,
indirect or other secondary loss.
4.2 Contact us
If you have any questions or inconvenient during the use of our products please do not
hesitate to contact us.
PCE Deutschland GmbH
Im Langel 26
Meschede
Germany
Page 41
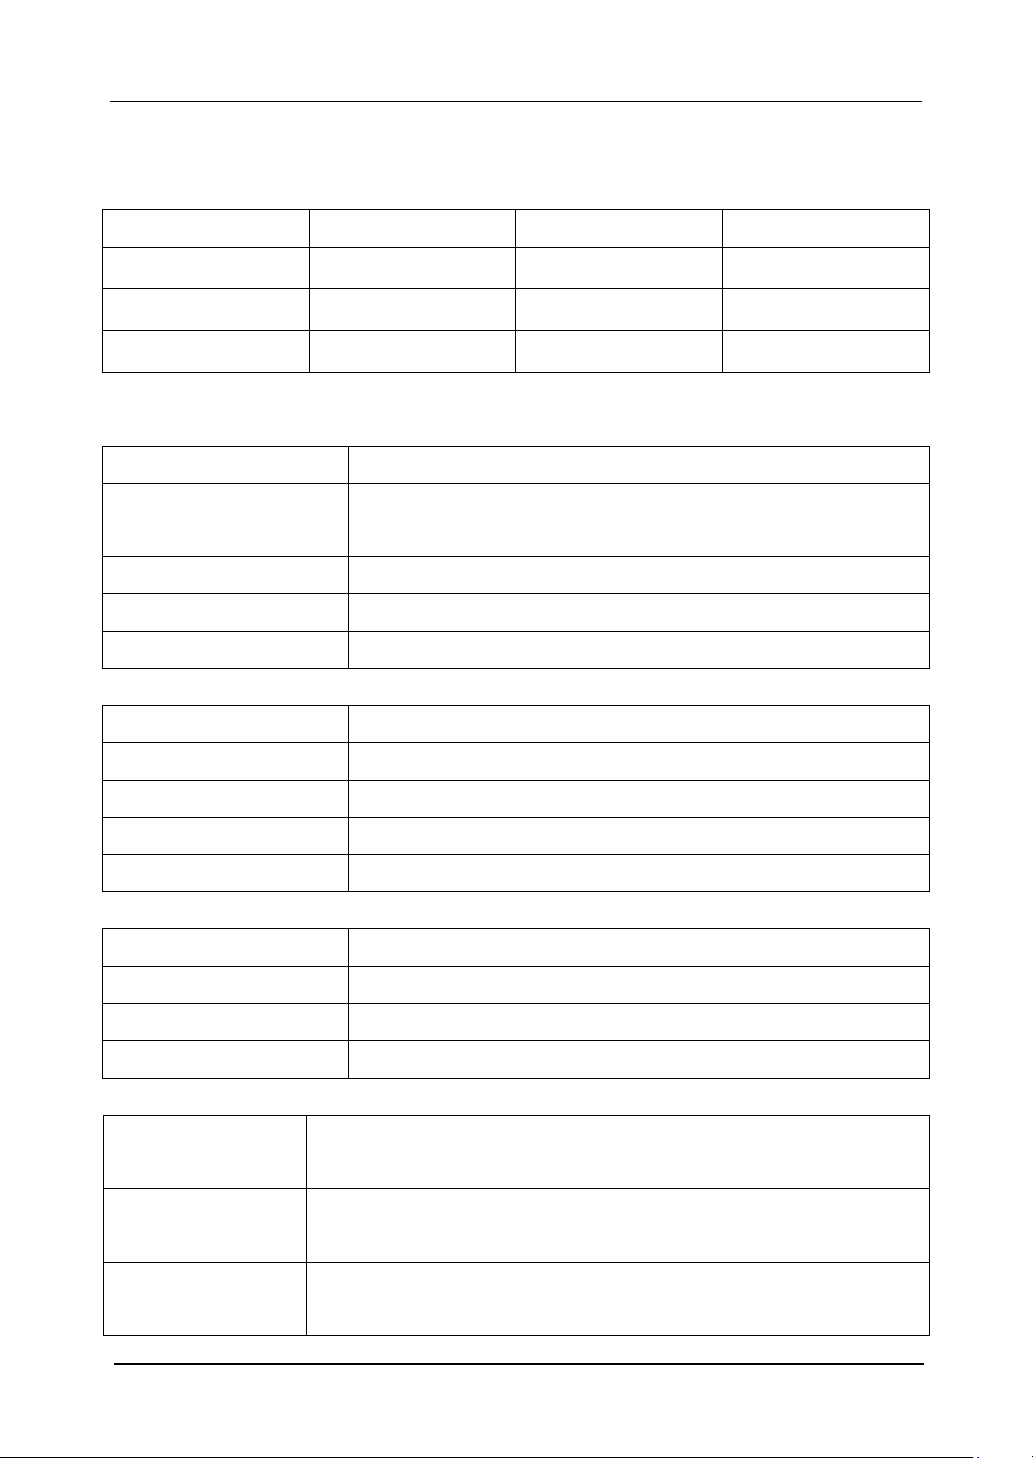
PCE-PA 8500 (HP) Power Quality Analyzer User‟s Guide
Nominal frequency
Measurement range
Resolution
Accuracy
50Hz
42.50~57.50 Hz
0.01Hz
±0.01Hz
60Hz
51.00~69.00 Hz
0.01Hz
±0.01Hz
400Hz
385-414 Hz
0.01Hz
±0.1Hz
Numbers of input
4 (3 phase + neutral) DC coupling
Max continuous input
voltage
1000Vrms
Range of nominal voltage
50 to 500V
Max pulse peak voltage
6kV
Input impedance
4MΩ/5pF
Numbers of input
4 (3 phase + neutral) DC coupling
Type
Clamp Current Sensor, with mV output
Nominal input range
0~5.625Vpeak, 0~3.97Vrms sinewave
Input range
1 to 3000Arms with supplied current clamp
Input impedance
50kΩ
Resolution
8 channels 16 bits AD
Sampling rate
20kS/s for each channel, 8 channels sample synchronously
RMS sampling
5000 points for 10/12 cycles (according to IEC 61000-4-30)
PLL sync
4096 points for 10/12 cycles (according to IEC61000-4-7)
Waveform display
4 voltages and 4 currents signal waveforms can be displayed
synchronously, displayable under Scope and Transient modes.
Phasor Display
Intuitively view voltage and current phases of each phase (Displayable
under Unbalance)
Table Display
Displayable under voltage/current/frequency, harmonic, power and
energy, flicker, unbalance modes.
Chapter 5 Specifications
5.1 Frequency Measurement
Note: measured on Reference Voltage Input A/L1.
5.2 Voltage Input
5.3 Current Input
5.4 Sampling System
5.5 Display Mode
-40-
Page 42
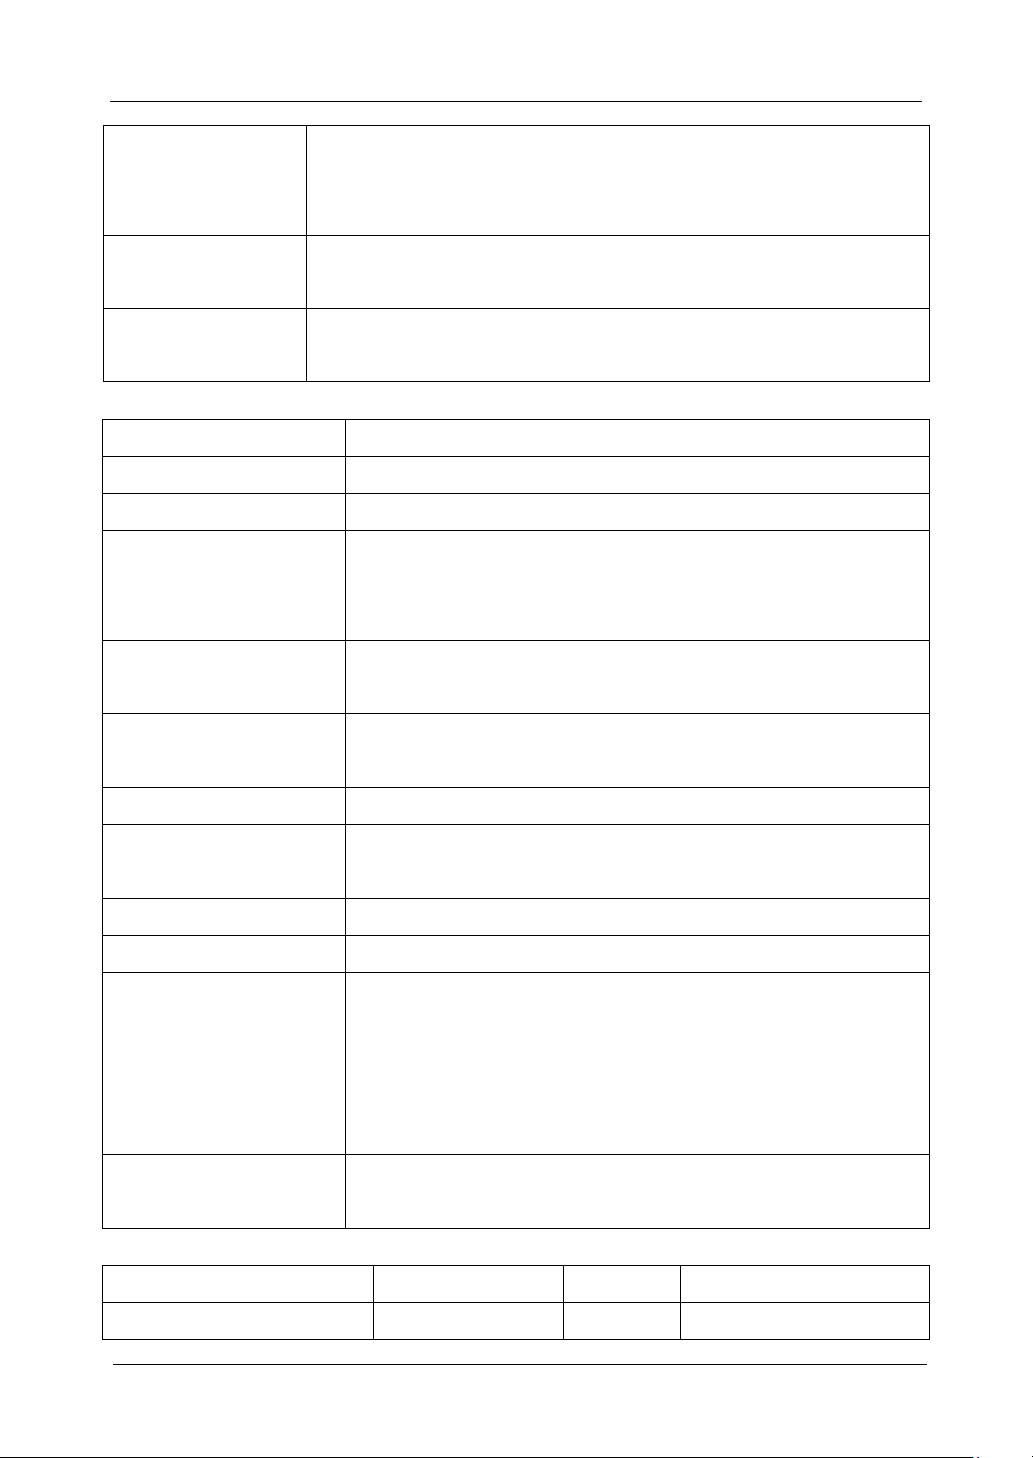
PCE-PA 8500 (HP) Power Quality Analyzer User‟s Guide
-41-
Trend Display
Display Trend record of measurement parameters changes over time
(Displayable under voltage/current/frequency, power and energy, dips
and swells, inrush current, flicker, monitoring modes)
Events Table Display
Display information of events exceeding limits value (Displayable
under Dips&Swells, Transient, Inrush current, Monitoring modes.)
Bar Graph Display
Harmonic and interharmonic bar graph display mode is more intuitive
(Displayable under harmonics and monitoring modes)
Measurement mode
Measured parameters
Oscilloscope
Vrms, Arms, Vcursor, Acursor, Hz
Voltage/current/frequency
Vrms, Vpk, Vcf, Arms, Apk, Acf, Hz
Dips&Swells
Vrms1/2, Arms1/2, capture up to 1000 events, include date, time,
duration, magnitude and phase mark, and threshold is
programmable settable.
Harmonic
1-50, harmonic voltage, THD voltage, harmonic current, THD
current, interharmonic voltage, interharmonic current
Power and energy
W, VA, VAR, power factor, shift power factor, Arms, Vrms,
kWh, kVah, kVARh
Flicker
Pst (1 minute), Pst, Plt, PF5
Unbalance
Vneg, Vzero, Aneg, Azero, Vfund, Afund, Hz, V phase angle, A
phase angle
Transient
Vrms, Vcursor
Inrush current
Inrush current, Inrush duration, Arms1/2, Vrms1/2
System monitoring
Vrms, Arms, Harmonic voltage, Total harmonic distortion
voltage, Plt, Vrms1/2, Arms1/2, Vneg, Hz, Swells, Dips,
Interruption, Rapid Voltage Change. All parameters are measured
simultaneously according to EN50160 standard.
Specify unreliable readings according to IEC61000-4-30 standard.
Logger
User-defined to select more parameter, and record of setting time
interval
Voltage/Current/Frequency
Measurement range
Resolution
Accuracy
Vrms (AC+DC)
1~1000Vrms
0.1Vrms
±0.5% of nominal voltage
5.6 Measuring Modes and Parameters
5.7 Measurement Range, Resolution, Accuracy
Page 43
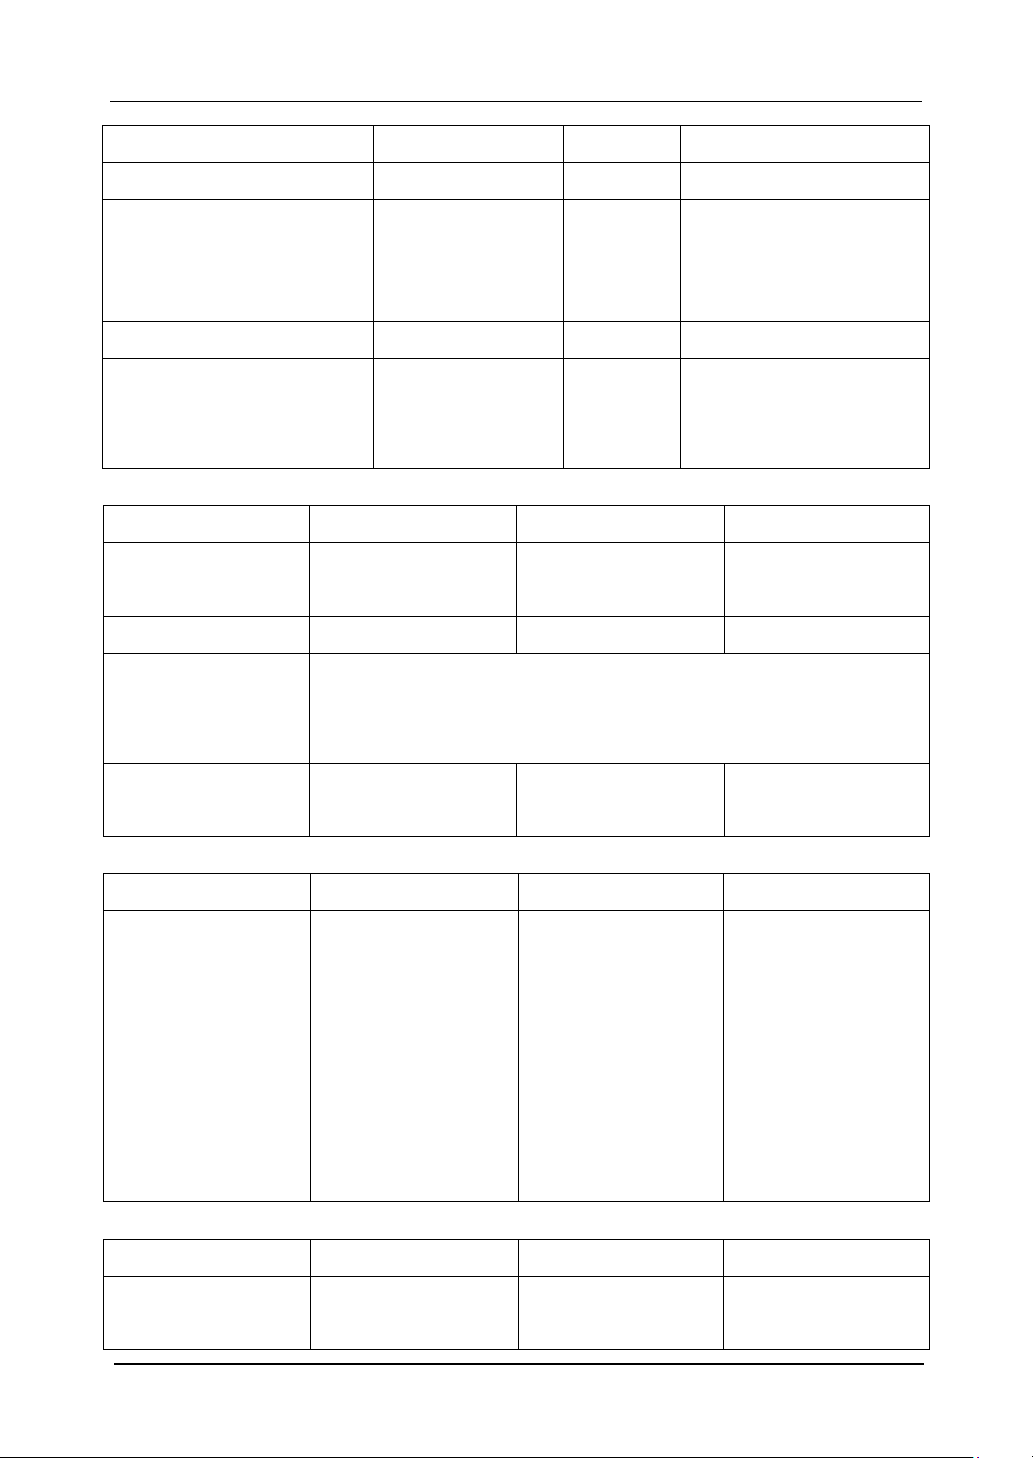
PCE-PA 8500 (HP) Power Quality Analyzer User‟s Guide
Vpk
1~1400Vpk
0.1Vpk
±0.5% of nominal voltage
V(CF)
1.0~>2.8
0.01
±5%
Arms (AC)
10mV/A
1mV/A
50mV(65mV)/1000A
0~100A
1~1000A
15~5000A
0.1A
0.1A
1A
±0.5%±0.2A
±0.5%±0.2A
±1%±2A
A(CF)
1~10
0.01
±5%
Frequency 50Hz nominal
Frequency 60Hz nominal
Frequency 400Hz nominal
42.5~57.5
51~69
385~414
0.01Hz
0.01Hz
0.01Hz
±0.01Hz
±0.01Hz
±0.1Hz
Dips&Swells
Measurement range
Resolution
Accuracy
Vrms1/2
0~200% nominal
voltage
0.1Vrms
±1%
Arms1/2
1~3000A
1A
±1%±2A
Threshold value
Threshold is settable according to nominal voltage percentage
Detectable events type: Dips, Swells, Interruption, Voltage Rapid
Change.
Duration
hour-minute-secondmicrosecond
0.5 cycle
1 period
Harmonic
Measurement range
Resolution
Accuracy
Harmonic number
Interharmonic
Harmonic voltage
Harmonic current
THD
DC relative
Frequency
Phase
1~50
1~49
0.0~100.0%
0.0~100.0%
0.0~100.0%
0.0~100.0%
0~3500Hz
-360°~ 0°
0.1%
0.1%
0.1%
0.1%
1Hz
1°
±0.1%±n×0.1%
±0.1%±n×0.1%
±2.5%
±0.2%
1Hz
±n×1.5°
Power and energy
Measurement range
Resolution
Accuracy
Active power,
apparent power,
1.0~20.00MW
0.1kW
±1.5±10 counts
-42-
Page 44
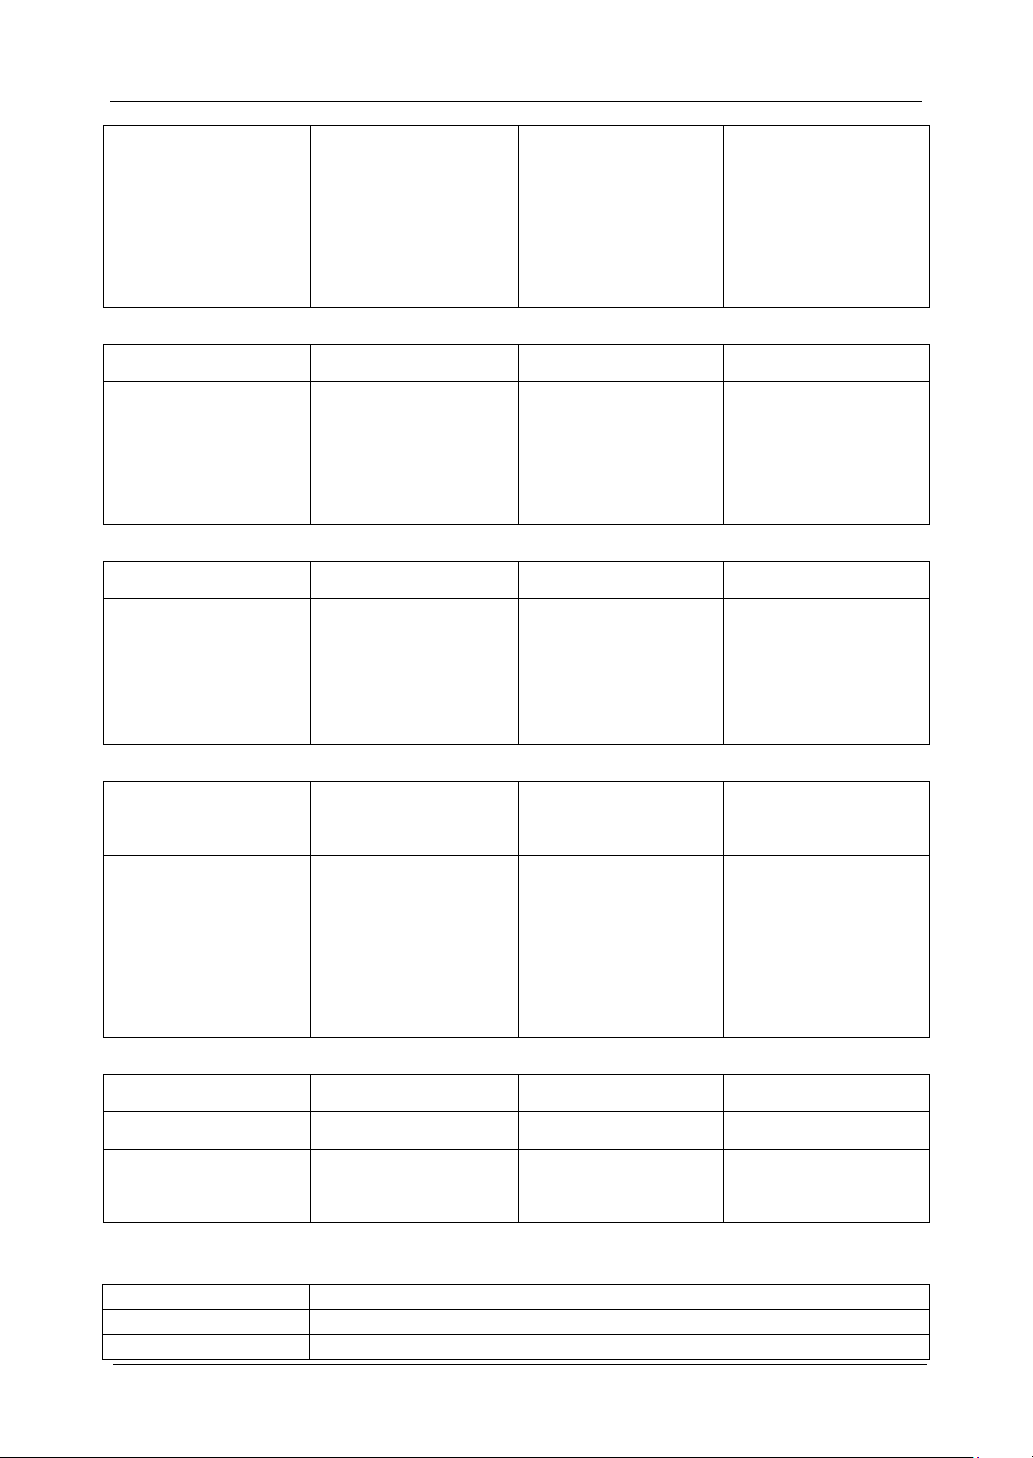
PCE-PA 8500 (HP) Power Quality Analyzer User‟s Guide
-43-
reactive power
Kilowatt-hour
Power factor
Displacement power
factor
0.00kWh~200GWh
0~1
0~1
10Wh
0.01
0.01
±1.5±10 counts
±0.03
±0.03
Flicker
Measurement range
Resolution
Accuracy
Flicker severity (Pst,
Plt) and the
instantaneous flicker
sensation level
0.00~20.00
0.01
Within ±5% of table
value according to
IEC61000-4-15
Unbalance
Measurement range
Resolution
Accuracy
Voltage unbalance
Current unbalance
Voltage phase
Current phase
0.0~5.0%
0.0~20.0%
-360°~ 0°
-360°~ 0°
0.1%
0.1%
1°
1°
±0.5%
±1%
±2 counts
±5 counts
Rapid range of
voltage
Measurement range
Resolution
Accuracy
Voltage
Vpk
Vrms
Minimum test time
Sampling rate
6000Vpk
10~1000Vrms
50μs
20kS/s
1V
1V
±15%
±2.5%
Inrush current
Measurement range
Resolution
Accuracy
Arms
0~3000Arms
0.1
±1%±5 counts
Inrush evaluation
time
6s~32min settable
10ms
±20ms
1Ø+NEUTRAL
Single phase with neutral
1Ø SPLIT PHASE
Split phase
1Ø IT NO
Single phase system with two phase voltages without neutral
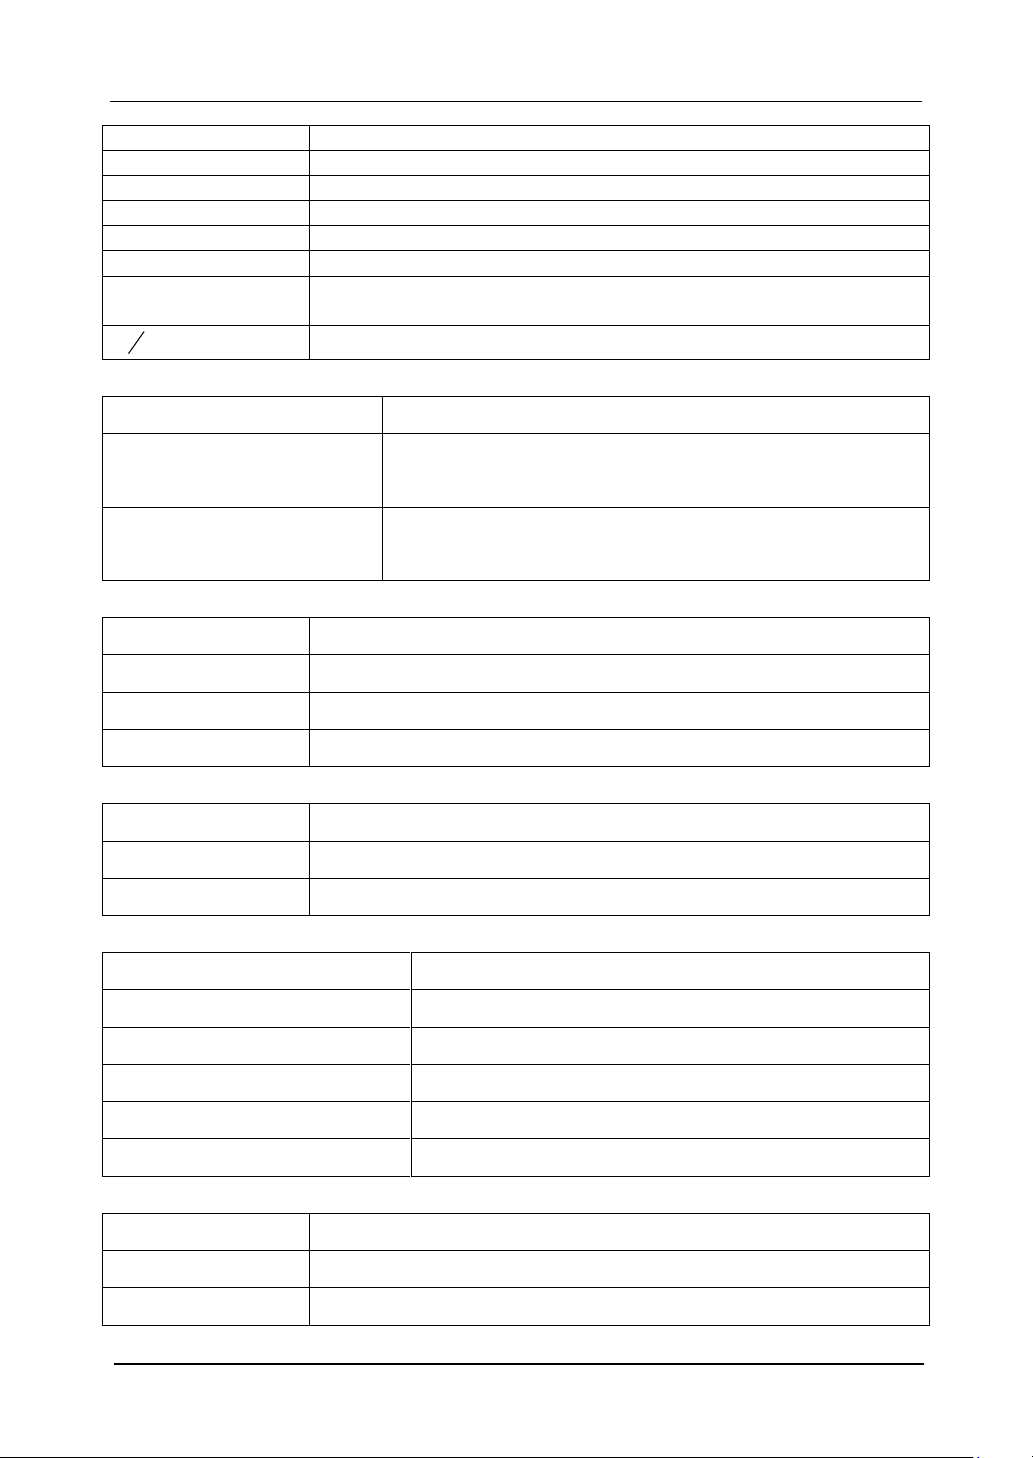
5.8 Wiring Combinations
Page 45
PCE-PA 8500 (HP) Power Quality Analyzer User‟s Guide
NEUTRAL
3Ø WYE
3-phase 4-wire system, Y type
3Ø DELTA
3-phase 3-wire system delta (Delta)
3Ø IT
3-phase Y type without neutral
3Ø HIGH LEG
4-wire 3-phase delta system (Delta) with center tapped high leg
3Ø OPEN LEG
Open-delta (Delta) 3-wire system with two transformer windings
2-ELEMENT
3-phase 3-wire system without current sensor on phase L2/B (2 Watt
meter method)
2
2
1
-ELEMENT
3-phase 4-wire system without voltage sensor on phase L2/B
Interface
Isolated USB Host interface
Copy saved file to PC from a U disk, then analyze it with
upper computer software.
Isolated LAN interface
For remote control of the Analyzer and measurement data
transmission.
Screen
Color TFT LCD
Size
5.6 inch
Resolution
320×240
Brightness
Adjustable
Memory
Flash memory
128M
TF card
Standard 8G
Standard
Measurement method
IEC61000-4-30 S degree
Measurement performance
IEC61000-4-30 S degree
Power quality monitoring
EN50160
Flicker
IEC61000-4-15
Harmonic
IEC61000-4-7
Environment
Working temperature
0°~ 40°
Storage temperature
-20°~ 60°
5.9 General Characteristics
-44-
Page 46
PCE-PA 8500 (HP) Power Quality Analyzer User‟s Guide
-45-
Humidity
90% relative humidity
Safety
Complied with
IEC61010-1
Safety Degree: 600V CAT IV 1000V CAT III
Pollution Degree: 2
Maximum voltage at voltage input
600V CAT IV 1000V CAT III
Maximum voltage at current input
42Vpk
Mechanical
Dimension
262× 173 × 66
Weight
1.6 kg
Power
Adapter input
AC 100-240V 50/60Hz
Adapter output
DC 12V 2A
Battery
NI-MH battery 7.2V 3.8Ah
Battery operating time
>7 hours
Battery charge time
6 hours
Model
Range
Turns ratio
Accuracy
Size mm
ST08
5A
10mV/A
0.2%
Φ8
CTC0080
50A
10mV/A
0.2%
Φ8
CTC0130
100A
1mV/A
0.2%
Φ13
CTC1535
1000A
1 mV/A
1.0%
Φ52
PY-3000A
3000A
65 mV/1000A
1.0% + ( 2%
position error)
Φ160
PY-5000A
5000A
50 mV/1000A
1.0% + ( 2%
position error)
Φ160
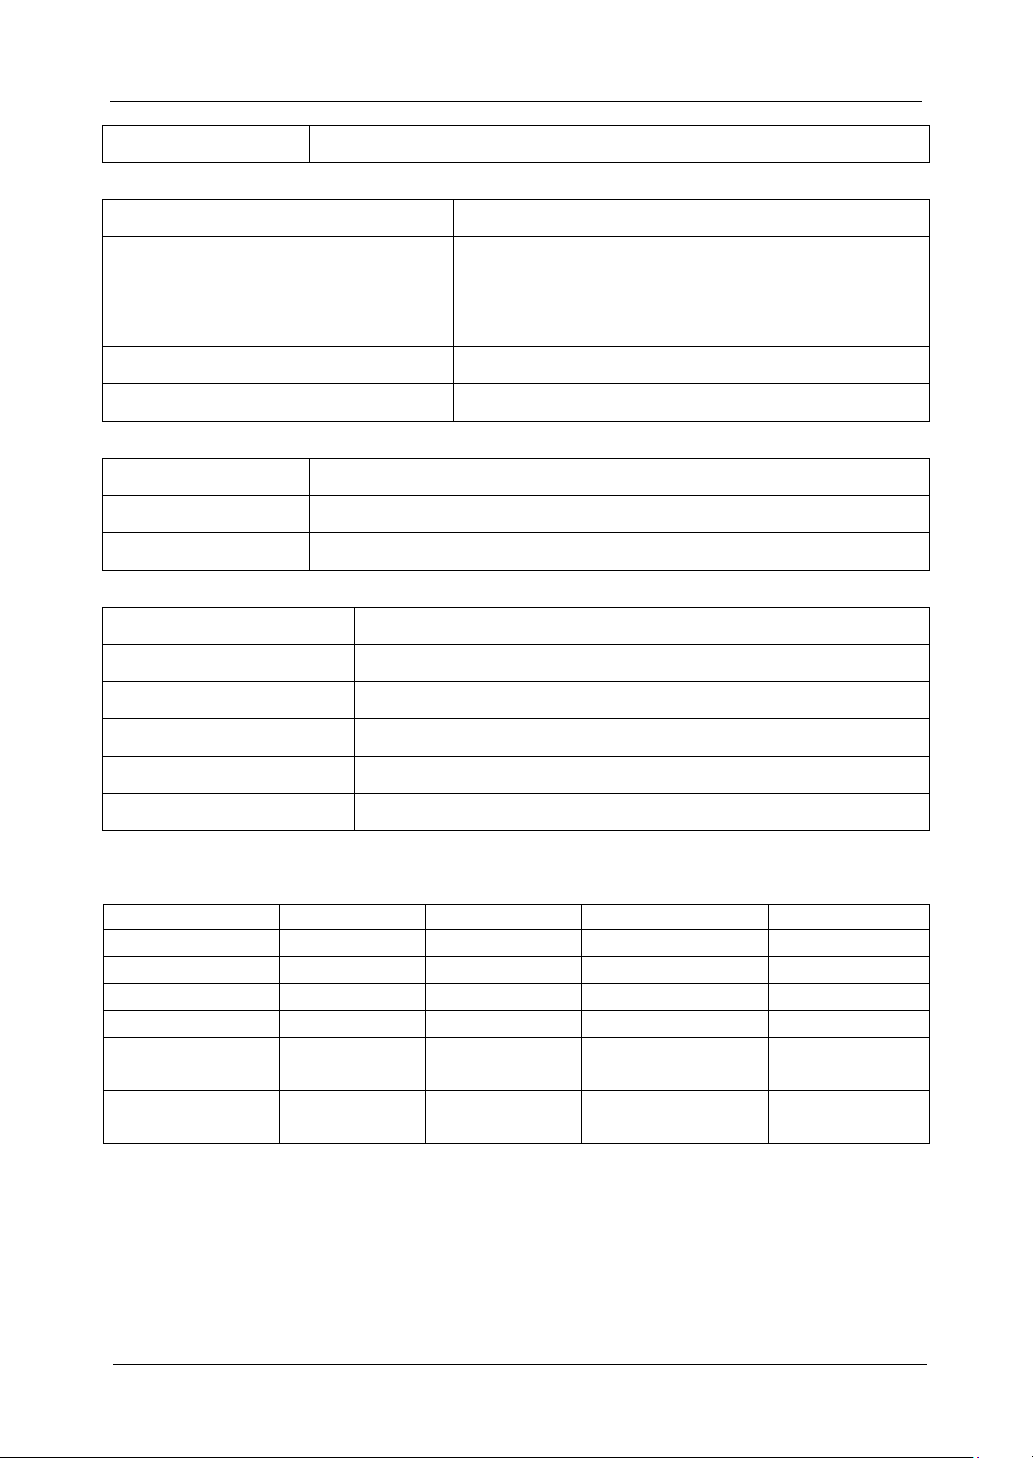
5.10 The specification of optional current clamps
Page 47
PCE-PA 8500 (HP) Power Quality Analyzer User‟s Guide
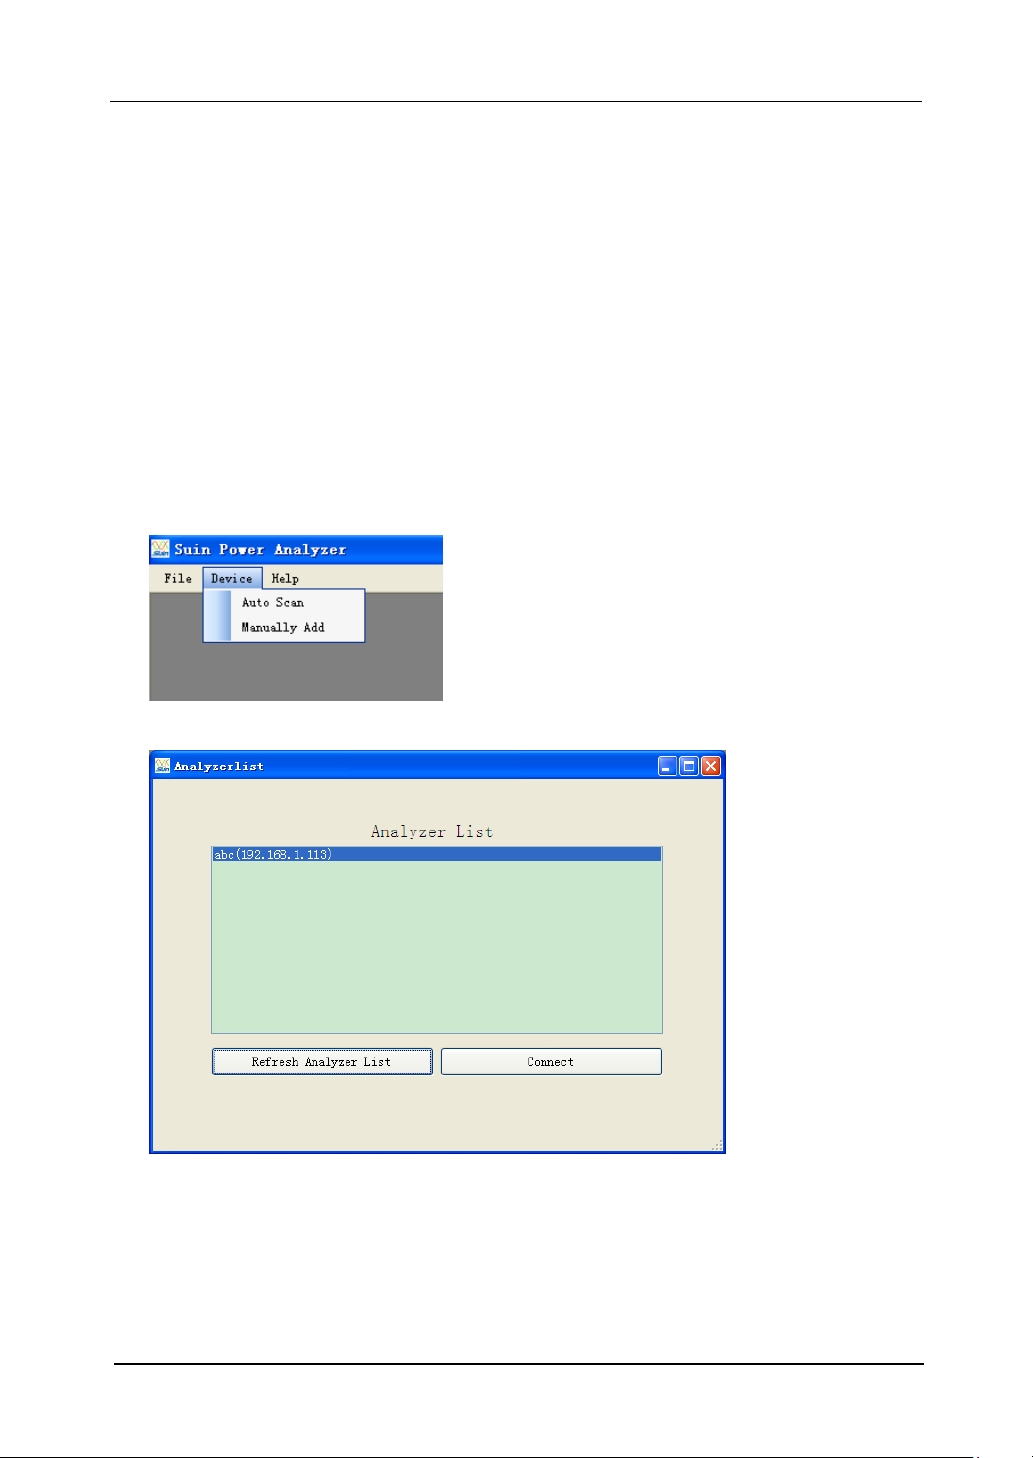
Appendix 1: The instruction of PC software
This software has two functions, separately to be remote control instrument and download and
open the saved file from instrument
1. Remote control through LAN interface
(1) Connect the device and PC using network cable and set both IP address of PC and device to
be in the same network segment.
For example, if IP address of PC is 192.168.1.xxx, then the IP address of device should also be
set to be 192.168.1.xxx.
(2) Open the software and click „Device‟ like below picture shown, pull-down menu includes
„Auto Scan‟ and „Manually Add‟, which separately means automatically scan device and
manually add IP address of device.
Click „Auto Scan‟
Or click „Manually Add‟,
-46-
Page 48
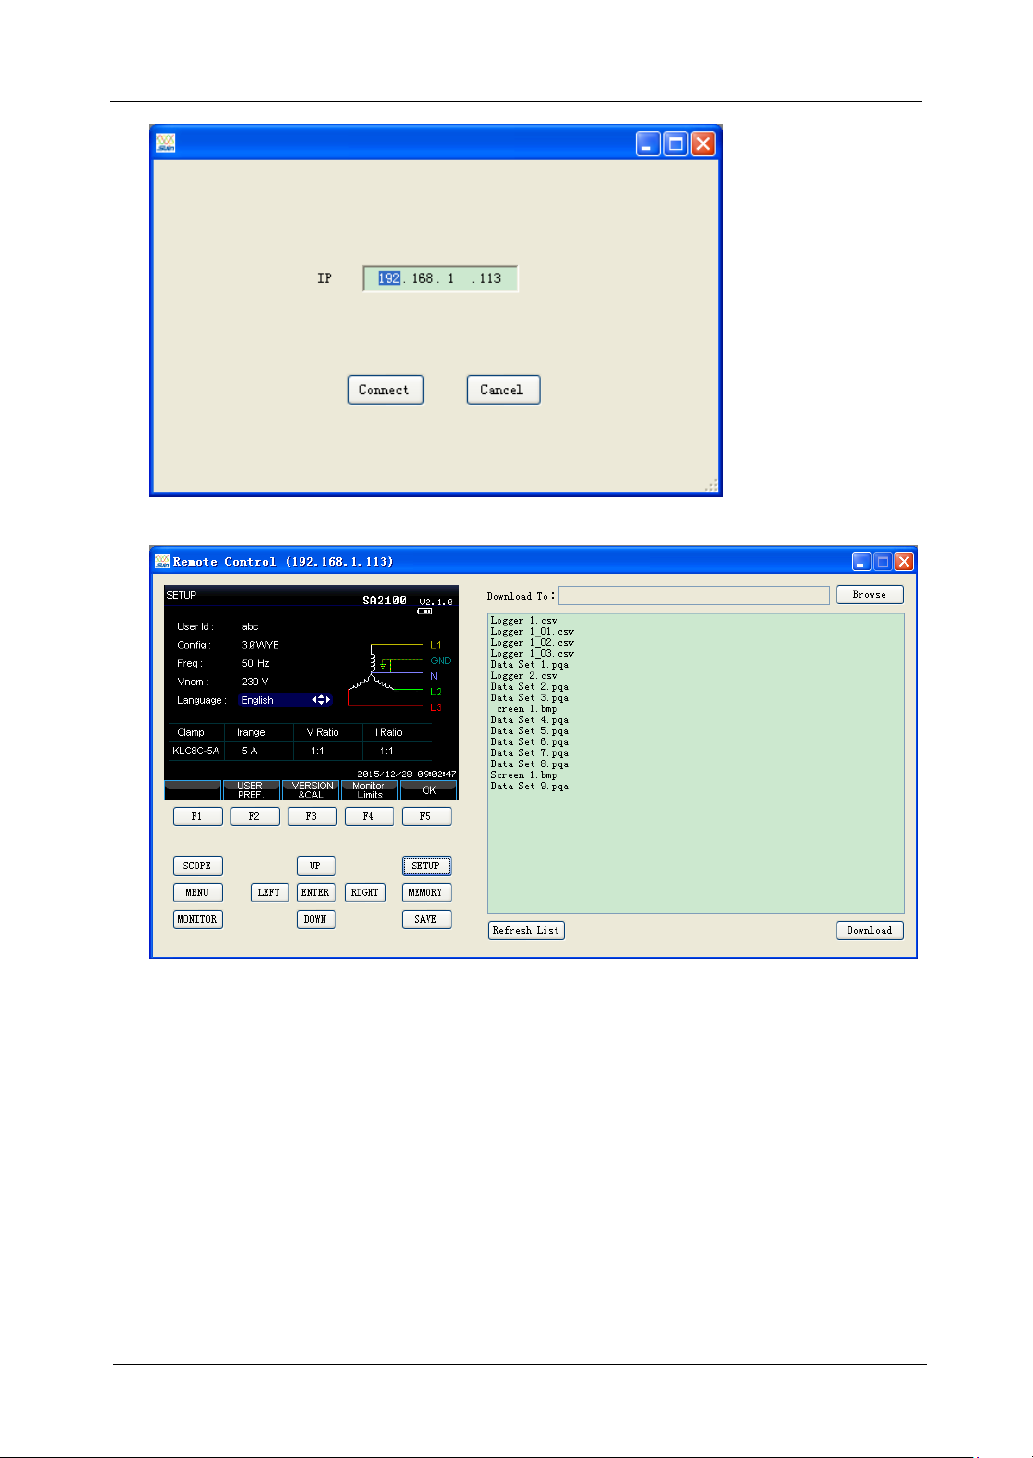
PCE-PA 8500 (HP) Power Quality Analyzer User‟s Guide
-47-
Both of ways can make the connection available. After clicking „Connect‟, the below
interface will appear,
Remote control the device through pressing buttons in left area of above interface, the right
area is the stored list files, user can click „Download‟ button to download selected files to
the computer.
2. Check stored file
The device can store below three format file:
.bmp picture file
.pqa data file
.csv log file
(1) Open the picture file and take the below screenshot for example
Page 49
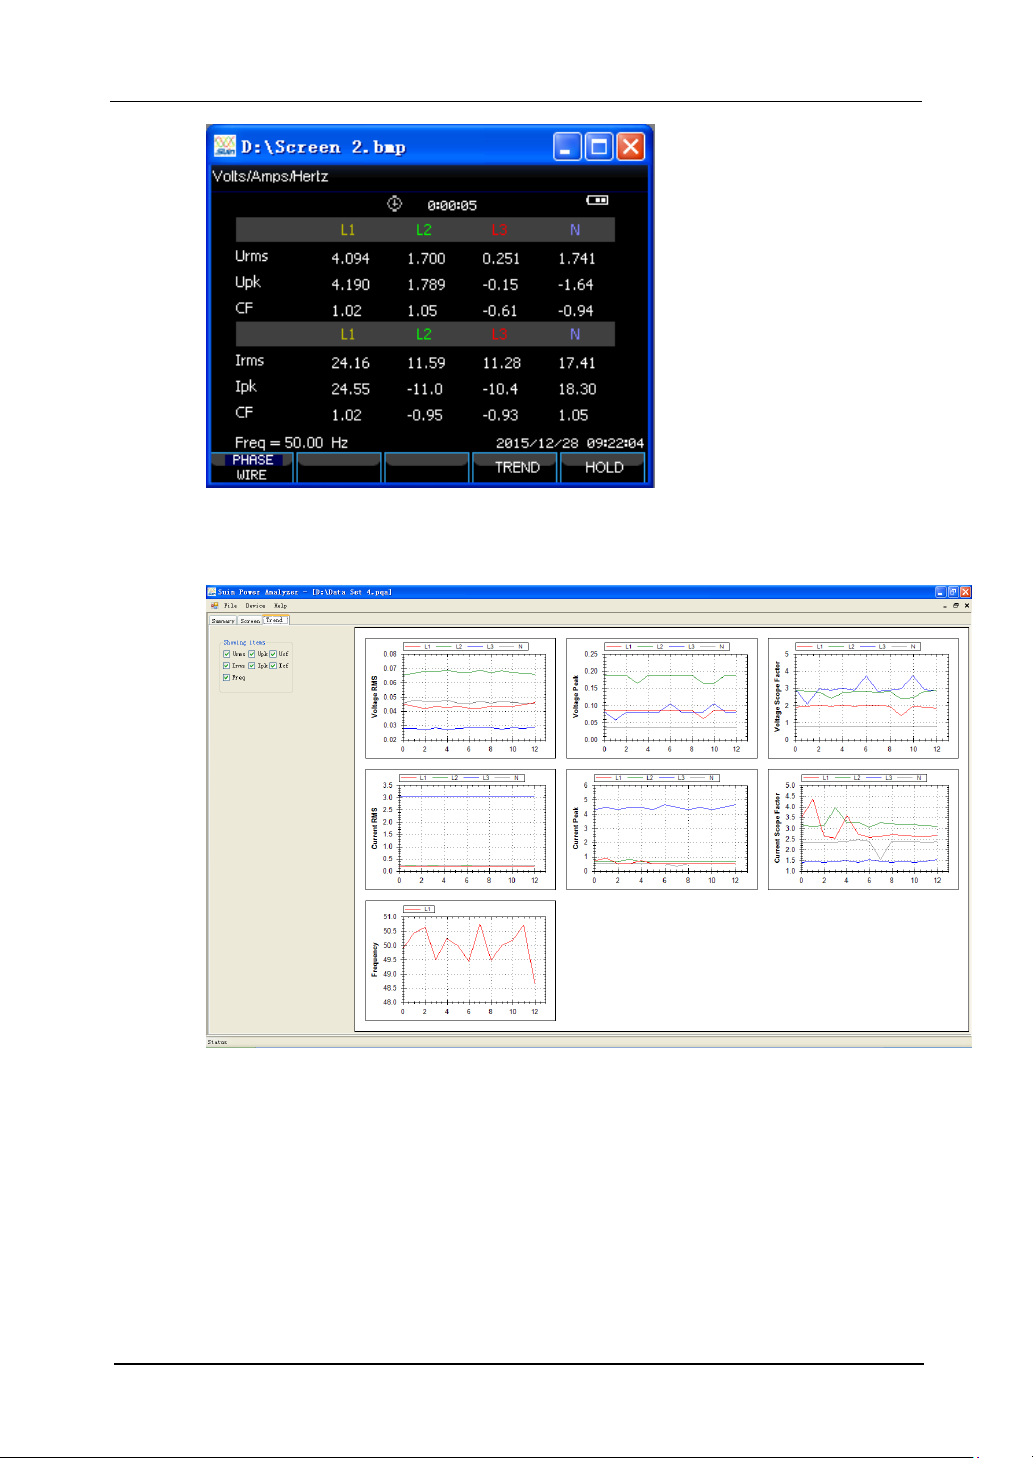
PCE-PA 8500 (HP) Power Quality Analyzer User‟s Guide
(2) Open the date file, and take the below picture saved under voltage/current
measurement for example
(3) Open log file with .csv format, user can directly open EXCEL file under windows
or open it using this software. Click Y zoom button and then click data table, scroll
up or down the mouse wheel to realize the zooming of Y-axis only. Click X zoom
button and then data table, scroll up or down the mouse wheel to realize the zooming
of X-axis only. Hold the mouse left clicking to make the left or right shifting of data
waveform.
-48-
Page 50
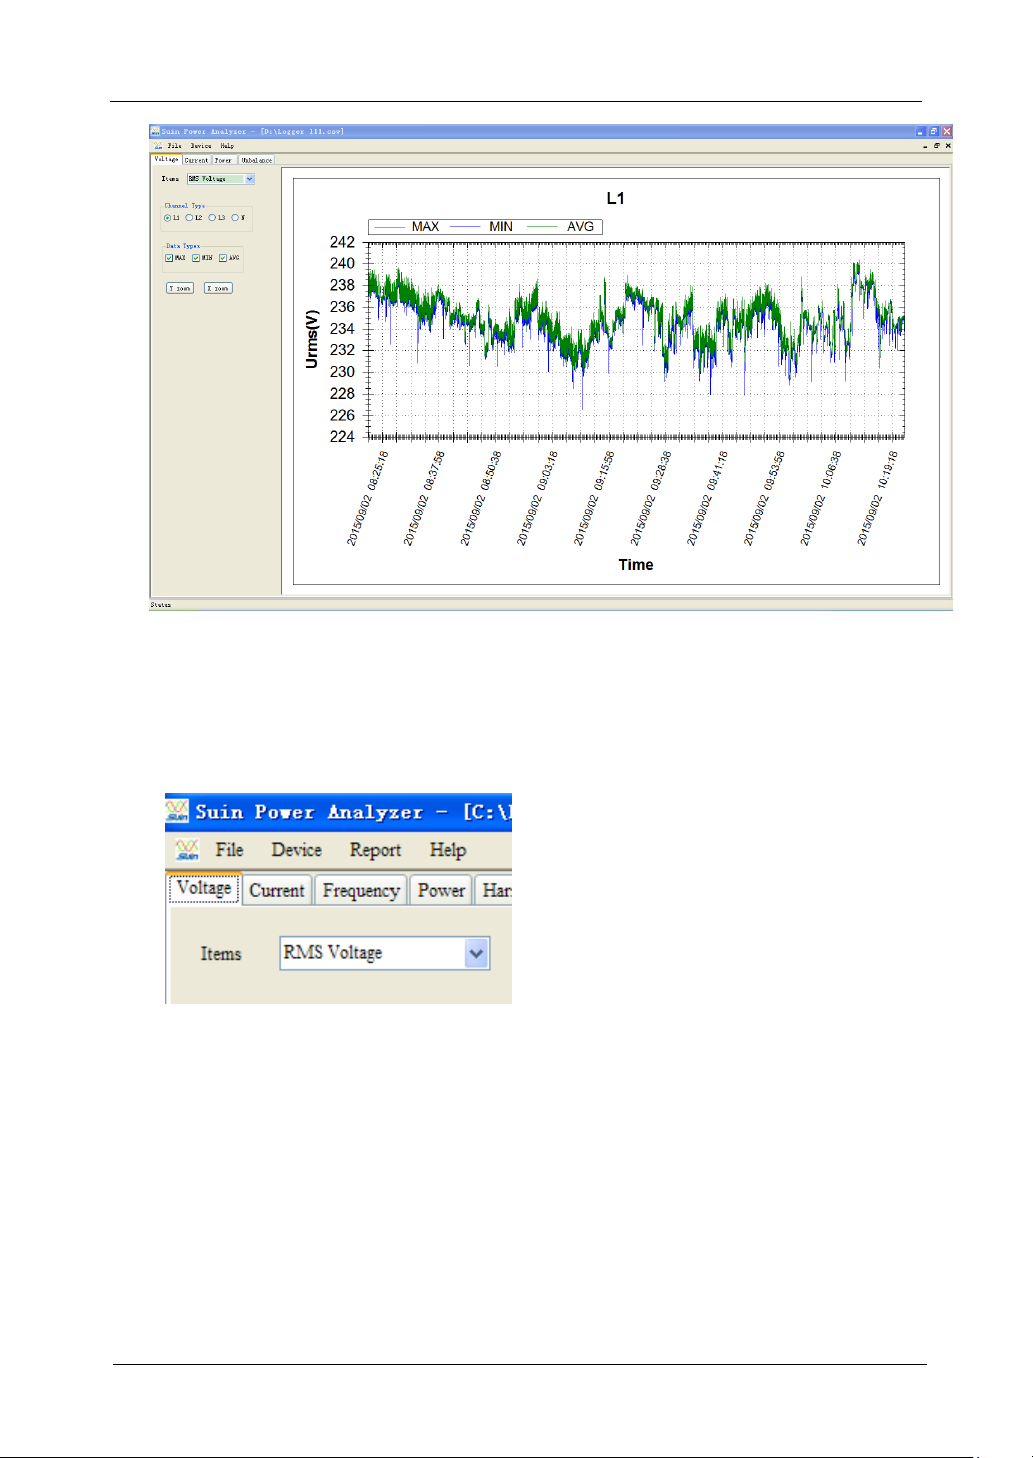
PCE-PA 8500 (HP) Power Quality Analyzer User‟s Guide
-49-
3. Report function
System requirement: operating system of Windows XP or higher, Microsoft Office Word
2007 or higher.The report can only be generated for csv. file saved under Logger function,
and generated format is doc.The Report function will be available as soon as open the csv file,
like below picture shown:
After clicking Report, partial information needs to be input manually, then select the matched
parameter, the report can be generated after selection done.
Page 51
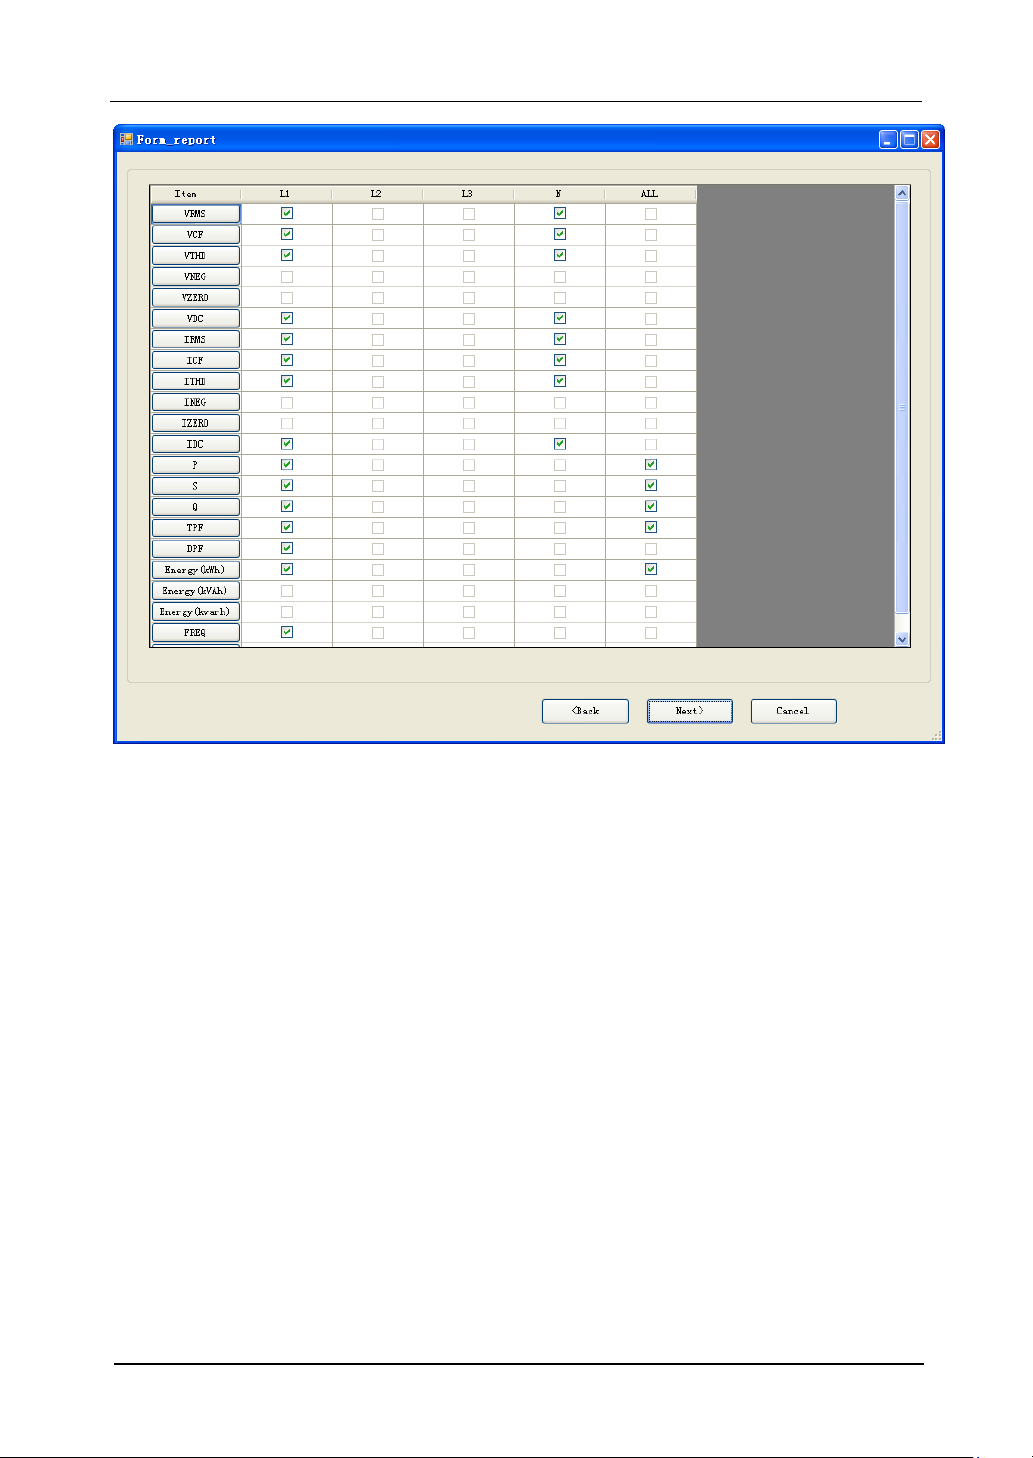
PCE-PA 8500 (HP) Power Quality Analyzer User‟s Guide
-50-
 Loading...