


Thank you for purchasing the LTE WIFI wireless data terminal (short for WIFI)
D
escription:
The p ic tur e i s for yo ur ref ere nce o nly , as f or the WI FI fu nc tion an d th e app ear an ce, p leas e adh ere to th e
actual prod uct in stead. Th e detai led i nfor mati on o f the pr oduc t sel ectio n , p leas e in qu ire th e o per ator .
Thi s b ro ch ur e intr o du c es b asic op er ati on s o f the WI FI . As to th e op er ati on s o f m an ag em en t par am e t er
co nfi gur atio n o f th e W IFI , p lea s e re fer to t h e ma n agem en t p ro ced ur es o r th e on li n e hel p o n th e w eb
man agement page.
The WIFI c an b e us ed i n th e rel ativ ely en clos ed s pac e suc h as th e poc ket o r th e ba g. H owev er, if the WIF I is
in use f or an ex ten ded p erio d of tim e, i t will b ecom e war m bec aus e it’ s hard for the WIF I to d iss ip ate th e he at
in the enclos ed sp ace and th e c ur r ent temp er ature will ri se . And at th e sam e tim e, the WIF I will au tom atic ally
turn off or cut off the network connection for to protect itself from damage. When this cas e happ ened, ple ase
pu t it in the v entilated area to hel p to di ssipate th e heat. And then, you can turn it on.
Pack i ng in fo rm atio n: the h ead, intro du ctio n b ro ch ur e, cer tifi cati on , data cab le and war ran ty card
1
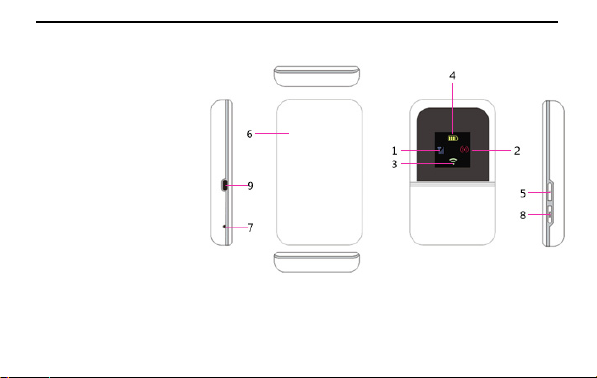
Getting to know
your MIFI
1. Signal indicator
2. WPS indicator
3. Wifi indicator
4. Batter y i nd icato r
5. Switc h b utto n
6. Batter y co ver
7. RESE T bu tton
8. WPS butto n
9. Micro USB port
2
3

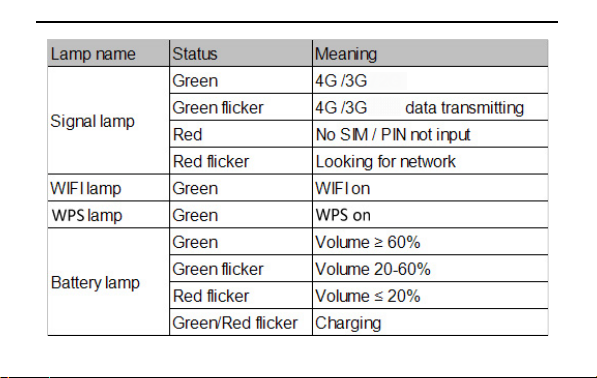
Getting to know the inform ation of the MIF I indicator
I Signal indicator
1. Green indicates 4G signal; 2. Blinking green indicates data transfer 3 . R ed in d icates 3G signal 4. Blinking
ind i cates dat a transfer
II WPS indicator
Long press the WPS button for 3 seconds to enable WPS function; WPS indicator blinks after enabling WPS
function or indicator keep long light on if WPS client connects success. WPS function will disable if no WPS client
connects in 2 minutes.
III Message indicator
Message indicator always lights on when there is unread message.
IV B attery i nd icato r
1. Alway s Green in dicates mo re than 6 0% batter y power ;
2. Blinking Green indicates 2 0-60% battery power;
3. Blinking Red in di cates less than 20 % batter y po wer;
4
4. Bli nk in g switc h b etween Green an d Red in dic ates ch argi ng.
Install the SIM card and battery
*
Steps : Remov e the batter y co ver accor ding to di rectio n o f the ab ov e blu e arrow. Remo ve batter y, Pu t SIM c ard
to en tranc e o f SIM slo t acco rdi ng to the r ight dir ection , ins ert it into slot. P ush i nto the battery fro m top do wn,
and then i nstall th e batter y c ov er acco rdi ng to the ri ght d ir ectio n.
USB stick
Co nn ect th e MIF I with th e co mp uter by data cable, and the c om pu ter wi ll read th e in ser ted T-Flash c ard o f the
MIFI. And it is used as USB stick.
5

Connecting to the internet by WIFI/WAPI
N ote: by default, th e MI FI managem ent p aram eters hav e been pr eset acc or di ng to y ou r oper ator ’s
req ui rem ents. Yo u can go q uick ly in to the in tern et by the fol lowing steps . As to h ow to co nfigu re managemen t
par ameter, please r efer to th e m anagemen t p roc edur es o r the o nlin e help o n the web man agement page.
Step1: turning on the M IFI
Step2: establishing WIFI connection or wired connection
Step3 : con necti ng to th e in ternet
I. Turning on the WIFI
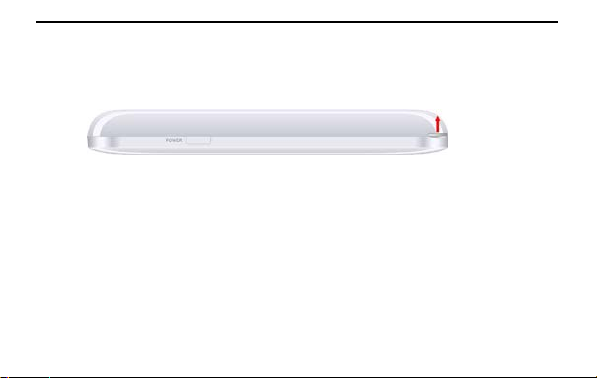
Press and hold the “power butto n” unti l the scr een is bri ght, i ndi catin g that th e WIFI i s tur ned on ; and then
press and hold it again until the screen is dark, indicating that the WIFI is tur ned o ff .(N ote: when the WI FI i s
turned on, the “p ower bu tton ” also can be us ed as page tu rn ing b utton . If it disp lays “the fi rst page”, press
“po wer b utto n”, then it wi ll sh ow “the s econd page” ; and at this mo ment, pr ess “ power bu tton ” agai n, i t wil l
app ear “th e first page”.)
II. Establishing WIFI connection or wired connection
6

1. Establishin g WIF I co n necti on . (Take th e co mp uter fo r example)
① Guar antee M IFI p ower on , indi cator i s ligh t on.
② C l ic k “ Sta rt ” —Control panel —N etwork connection—Wir eless network co nnect io n. ( No te: befo re
Establ ish in g WIFI c on nect io n, please en su re th at the co m pu ter is equip ped with a WLAN card. If the co mp uter
indicates a wireless network connection, and
the WL AN c ard can b e used. Oth erwi se, you
need to verify that y our WLAN card is working
properly. )
③ Cl ick and ch eck the av ailab le wir eles s
ne twork , and i t wi ll d is pl ay a lis t of w ir eles s
network connections.
Select t he wir eless n etwor k co n necti on with the WIF I’s SSID , and cl ic k.
If th e wir el ess ne two rk co nn ectio n i s en c ry p ted, y ou need to en ter th e correct netwo rk encryption key (the
password). To v iew the current SSID and the network encryption key, ple ase see the words printed on th e
7

Lab el o f the M IFI. (O r see th e c ontent o f “th e secon d page” on the sc reen) .
ait a m om e nt f or the wi rel ess n e twor k connec tion icon to appear in the system tr ay in the lo wer
ri ght co rn er of the co mp uter sc reen . And t he wir eless n etwor k i s then establ ish ed.
2. Establishing wired connection
After turn in g o n the MIFI, y o u can conn ect it with th e com pu ter b y data cab le.
① when the compu ter pop s up “fi nd in g n e w h ar dw are” , and on th e menu “C an Wi n dows b e lin ked wi th
Win dows U pdate to search for the so ftware? ”, select “No, temporarily not (T) ”, then click “n ext step (N ) > ”;
② After s elect “aut om atical ly ins tall software (recommended) (I)”, click “next step(N)>”;
③ When it ap pear s “un able to in stall this so ftware”, an d cl ick “ fini sh” ;
W
8

④ Repeat th e abo ve step s. T hese are the dri vers fo r o ther us es un related t o wi re co nnecti on;
⑤ U ntil “M obi le RN DIS Netwo rk Adapter ” appear s, s elect “au tom atic all y i ns tall so ftware ( r eco mm end ed) (I) ” .
And th en cl ick “nex t st ep (N )> ”, and cli ck “ fin ish” . Wh en the dr iv er h as be en i ns tal le d aut om ati call y, “ Es tabli sh
wir ed co nn ecti on ” fin ish es . C on nec ti ng t h e MIF I a nd th e com pu ter by dat a c abl e, and th e co m put er can b e
co nn ected to the in ternet by the wired net wor k.
III. Connecting to the internet
When the WIFI is connected with client, it will get in to the internet automatically. (I f your SIM card is sh ort o f
cash, it will no t be co nn ected.)
Logging into the Web Manag em ent Page
1. M ake su re the co nn ectio n b etween the M IFI and the co mp uter is wor ki ng n or mal ly .
2. Open the browser, and enter http://192.168.0.1 in the address box.
3. E nter th e p asswo rd, and clic k “ logi n”.
The ad mi ni str ator has the righ t to chec k an d m odi fy co nfi gur atio n p ermis sion . The defau lt us er nam e is
“ad mi n” , and the defau lt p ass wor d i s “adm in ”.
No te: If yo u can ’t go i nto th e web m anagem ent page whil e the MIF I is li nki ng with th e com puter by data c able,
9

y ou can start the managem ent p ro cedu res and then cou ld op en web managem ent page, an d i t will be av ailabl e
Daily use
Ch argin g the batter y
No te: If the b attery has n’t been used for a lo ng ti me, please char ge it for a while b efore usi ng.
The first method: charging by power adapte r
No te:
1 . Yo u sh ould u se the po wer adapter com patib le with th e WIF I ( 5v, 10 0mA) pro vi ded by the design ated
man ufac tur e. If yo u use an y in comp atible on e whi ch i s pro vided b y oth er pr od ucer or agen t, it m ay c ause the
WIFI to malfunction or ev en caus e dan ger. And it also vio lates the warr anty term s o f the M IFI an d som e
regulatio ns abo ut co mm un icati on term inal pr od ucts set by the gover nm ent.
10

2. Th e po wer adapter i s an op tio nal acces sor y. If it is n ot i nclu ded in the pack age, please co ntact with the
producer to buy a compatible one that is in good quality.
The second method: Charging by connecting with the computer
Please us e the data cab le pro v ided with y o ur devic e to con nec t the WIF I to the co m put er.
Sleeping mode
If you don’t do an y o peratio ns to MIF I for a per io d o f time, the screen will be dark. And in defau lt, th e M IFI wi ll
go i nto sleepi ng mo de if ther e isn’ t any i nfor mati on trans mitted with in 10 min utes.
11

WiFi devices or computers can get into the internet by the MIFI. The steps for connecting are depended on WiFi
If you forget some configuration parameters, you can restore to factory settings and then configure them again. You
Verifying the PIN code
If th e Veri fy ing f un ctio n is av ailable, please log in to the web managem ent page an d cli ck “ di al u p”.And acc or di ng
to the tip , enter th e righ t PIN code in the cor resp o ndi ng p os iti on . PIN /PU K co de and SIM c ard all togeth er ar e
pr ov ided by the op erator. Please in qui re th e o perato r f or the detai led i nfor mation. As to how to log into the web
man agemen t p age, please r efer to “loggin g web m anagem ent p age”.
Connecting with m ulti-devices
devices or the operating system of the computer. Please operate according to the detailed tips.
Re stori ng to f acto ry s etti ngs
can log into WEB UI to restore to factory settings. Or you can straighten “clip”, and in s ert it into “Reset bu tton”,
then press it for 5 seconds, and the MIFI will restart again and restore to factory settings.
Note: After these operations, all the configured parameters in the MIFI personal center will be deleted. All
configurations of the web management page will be restored to factory settings.
12

4. If all the connection and the working state are all in good condition, but your SIM card is short of cash, you are
Tip s:
If your MIFI cannot work normally, here are some tips and you can have a try:
1. Check the management procedures or the online help on the web man ag ement page.
2. Reset th e MIFI
3. Restore to factory settings
still un ab le to surf in the in ternet.
5. Consult the operator
Notes: The pictures are for reference onl y; please adhere to the actual product.
FC C State me nt
1. This device complies with Part 15 of the FCC Rules. Operation is subject to the following two conditions:
(1) This de vice may not cause harmful inte rference.
13

(2) This de vice must accept any interference received, including interference that may cause undesired operation.
2. Changes or modifications not expressly approved by the party responsible for compliance could void the user's
auth ority to ope rate the equipme nt.
NO TE:
This equipment has bee n teste d and found to comply with the limits for a Class B digital device, pursuant to Part
15 of the FCC Rules. These limits are designed to provide reasonable protection against harmful interference in a
residential installation.
This equipment ge nerates uses and can radiate radio fre quency energy and, if not installe d and used in
accordance with the instructions, may cause harm ful interference to radio communications. However, there is no
guarante e that interference will not occur in a particular instal lation. If this equipment does cause harmful
interference to radio or television reception, which can be determined by turning the equipme nt off and on, the
user is encouraged to try to correct the interference by one or more of the following measures:
Reorient or relocate the receiving antenna.
Increase the separation between the equipment and receiver.
14

U.S. Government. These limits are part of comprehensive guidelines and establish permitted levels of RF energy
Connect the equipment into an outlet on a circuit different from that to which the receiver is connecte d.
Co nsu lt the dealer or an experienced radio/TV technician for help.
SAR I n form ati on State me n t
Your wireless data terminal is a radio transmitter and receiver. It is de signed and manufactured not to exceed the
emission limits for exposure to radiofre quency (RF) energy set by the Federal C ommunications Commission of the
for the general population. The guidelines are based on standards that were developed by independent sc ien tific
organizations through periodic and thorough evaluation of scientific studies. The standards include a substantial
safety margin designed to assure the safety of all persons, regardless of age and health. The exposure standard
fo r wi rel es s mo bi le phones employs a unit of measurement known as the Specific Absorption Rate , or SAR. The
SAR limit set by the FCC is 1.6 W/kg. * Tests for SAR are conducted with the phone transmitting at its highest
certified power level in all tested frequency bands. Although the SAR is dete rmined at the highest certified power
level, the actual SAR le vel of the phone while operating can be well below the maximum value . This is because
15

the device is designed to operate at multiple power le vels so as to use only the power required to re ach the
network. In general, the closer you are to a wireless base station antenna, the lower the power output. Before a
phone model is available for sale to the public, it must be tested and certified to the FCC that it does not exceed
the limit establi shed by the government adopted requirement for safe exposure. The tests are performe d in
positions and locations (e .g., at the ear and worn on the body) as required by the FCC for each model. The
highest SAR value for this model phone when worn on the body, as described in this user guide , is
0.538W/Kg(Body-worn me asurem ents differ among phone models, depending upon available accessories and
FCC requirements). The maximum scaled SAR in hotspot mode is 0.666W/Kg. While there may be differences
between the SAR levels of various phones and at various positions, they all meet the governme nt re quirement
for safe exposure . The FCC has grante d an Equipment Authorization for this model phone with al l reported SAR
levels evaluated as in compliance with the FCC RFexposure guidelines. SAR information on this mode l phone is on
file with the FCC and can be found under the Display Grant section of http://www.fcc.gov/ oet/fccid afte r
searching on
FCC ID: 2ALJJJ500 Additional information on Specific Absorption Rates (SAR) can be found on the Cellular
16

Tele communications Industry Asso-ciation (C TIA) web -si te at http ://ww w.w ow-c om .co m. * In th e U ni ted States
and Canada, the SAR limit for mobile phones used by the public is 1.6 watts/kg (W/kg) ave raged ove r one gram
of tissue. The standard incorpo rates a su b-stantial margin of safety to give additional protection for the public
and to account for any variations in measurements.
Body-worn O pe rati o n
This device was tested for typical body-worn operations. To comply with RF exposure requirements, a minimum
separation distance
of 10mm must be maintained between the user’s body and the handset, including the antenna. Third-party be lt-
clips, holsters,
and similar accessories used by this de vice should not contain any metallic components. Body-worn accessories
that do not meet these requirements may not comply with RF exposure re quirements and should be avoided.
Use only the supplied or an approved antenna.
17
 Loading...