

Page 1

Website Payments
Standard Integration
Guide
Last updated: September 2008
Page 2

PayPal Website Payments Standard Integration Guide
Document Number: 100000.en_US-200809
© 2008 PayPal, Inc. All rights reserved. PayPal is a registered trademark of PayPal, Inc. The PayPal logo is a trademark of PayPal, Inc. Other
trademarks and brands are the property of their respective owners.
The information in this document belongs to PayPal, Inc. It may not be used, reproduced or disclosed without the written approval of PayPal, Inc.
Copyright © PayPal. All rights reserved. PayPal (Europe) S.à r.l. et Cie., S.C.A., Société en Commandite par Actions. Registered office: 22-24 Boulevard
Royal, L-2449, Luxembourg, R.C.S. Luxembourg B 118 349.
Consumer advisory: The PayPal™ payment service is regarded as a stored value facility under Singapore law. As such, it does not require the approval
of the Monetary Authority of Singapore. You are advised to read the terms and conditions carefully.
Notice of non-liability:
PayPal, Inc. is providing the information in this document to you “AS-IS” with all faults. PayPal, Inc. makes no warranties of any kind (whether express,
implied or statutory) with respect to the information contained herein. PayPal, Inc. assumes no liability for damages (whether direct or indirect), caused
by errors or omissions, or resulting from the use of this document or the information contained in this document or resulting from the application or use
of the product or service described herein. PayPal, Inc. reserves the right to make changes to any information herein without further notice.
Page 3

Contents
Preface . . . . . . . . . . . . . . . . . . . . . . . . . . . . . . . . . .13
About This Guide. . . . . . . . . . . . . . . . . . . . . . . . . . . . . . . . . . . . . . . 13
Intended Audience . . . . . . . . . . . . . . . . . . . . . . . . . . . . . . . . . . . . . . 15
Revision History . . . . . . . . . . . . . . . . . . . . . . . . . . . . . . . . . . . . . . . 15
Where to Go for More Information . . . . . . . . . . . . . . . . . . . . . . . . . . . . . . 16
Documentation Feedback . . . . . . . . . . . . . . . . . . . . . . . . . . . . . . . . . . 16
Chapter 1 Single-Item Payments – Buy Now Buttons . . . . . . . . .17
Getting Started With Buy Now Buttons. . . . . . . . . . . . . . . . . . . . . . . . . . . . 18
Using the Button Creation Tool for a Basic Buy Now Button . . . . . . . . . . . . . . 18
Creating Basic Buy Now Buttons With JavaScript Disabled. . . . . . . . . . . . . . . 19
Creating Buy Now Buttons Before You Create Your PayPal Account . . . . . . . . . . 22
The Checkout Experience With Buy Now Buttons . . . . . . . . . . . . . . . . . . . . . . 25
Begin – Buyers are Ready to Purchase Your Item on Your Website . . . . . . . . . . 26
1 – Buyers Enter Their Billing Information or They Log In to PayPal . . . . . . . . . . 27
2 – Buyers Confirm Their Transaction Details Before Paying . . . . . . . . . . . . . . 29
3 – Buyers View and Print Their PayPal Payment Confirmations . . . . . . . . . . . . 30
End – Buyers Receive Payment Authorization Notices by Email . . . . . . . . . . . . 31
Enhancing the Checkout Experience With Buy Now Buttons . . . . . . . . . . . . . . 32
Managing Buy Now Transactions . . . . . . . . . . . . . . . . . . . . . . . . . . . . . . 34
Using Email Notices to Track Buy Now Transactions . . . . . . . . . . . . . . . . . . 34
Using Recent Activity to Track Buy Now Transactions . . . . . . . . . . . . . . . . . 35
Using Transaction History to Track Buy Now Transactions . . . . . . . . . . . . . . . 35
Using Downloadable History Logs to Track Buy Now Transactions . . . . . . . . . . . 35
Using Instant Payment Notification to Track Buy Now Transactions . . . . . . . . . . 36
Advanced Features of Buy Now Buttons. . . . . . . . . . . . . . . . . . . . . . . . . . . 36
Offering Product Options With Buy Now Buttons . . . . . . . . . . . . . . . . . . . . 36
Prompting for Item Quantities With Buy Now Buttons . . . . . . . . . . . . . . . . . . 37
Creating Advanced Buy Now Buttons on the PayPal Website. . . . . . . . . . . . . . . . 37
Generating Code for Payment Buttons and Email Payment Links . . . . . . . . . . . 37
Protecting HTML Code for Payment Buttons . . . . . . . . . . . . . . . . . . . . . . 38
Using the Button Creation Tool for Advanced Buy Now Buttons . . . . . . . . . . . . 38
Creating Advanced Buy Now Buttons With JavaScript Disabled . . . . . . . . . . . . 52
Website Payments Standard Integration Guide September 2008 3
Page 4

Contents
Avoiding Problems With Pasted HTML Code . . . . . . . . . . . . . . . . . . . . . . 61
Sample HTML Code for Buy Now Buttons . . . . . . . . . . . . . . . . . . . . . . . . . 61
Sample HTML Code for a Basic Buy Now Button . . . . . . . . . . . . . . . . . . . . 61
Sample HTML Code for Buy Now Buttons With Product Options . . . . . . . . . . . . 62
Sample HTML Code for a Buy Now Button that Prompts for Quantities. . . . . . . . . 66
Sample URL Code for a Buy Now Email Payment Link . . . . . . . . . . . . . . . . . . . 67
Chapter 2 Contribution Payments – Donate Buttons . . . . . . . . . .69
Getting Started With Donate Buttons . . . . . . . . . . . . . . . . . . . . . . . . . . . . 69
Using the Button Creation Tool for a Basic Donate Button . . . . . . . . . . . . . . . 70
Creating Basic Donate Buttons With JavaScript Disabled. . . . . . . . . . . . . . . . 71
Creating Donate Buttons Before You Create Your PayPal Account . . . . . . . . . . . 74
The Checkout Experience With Donate Buttons . . . . . . . . . . . . . . . . . . . . . . . 76
Begin – Donors are Ready to Contribute on Your Website . . . . . . . . . . . . . . . 77
1 – Donors Enter Their Billing Information or They Log In to PayPal . . . . . . . . . . 78
2 – Donors Confirm Their Contribution Details Before Paying. . . . . . . . . . . . . . 80
3 – Donors View and Print Their PayPal Contribution Confirmations . . . . . . . . . . 81
End – Donors Receive Contribution Authorization Notices by Email . . . . . . . . . . 82
Enhancing the Checkout Experience With Donate Buttons . . . . . . . . . . . . . . . 83
Managing Contributions . . . . . . . . . . . . . . . . . . . . . . . . . . . . . . . . . . . 85
Using Email Notices to Track Donate Transactions . . . . . . . . . . . . . . . . . . . 85
Using Recent Activity to Track Donate Transactions . . . . . . . . . . . . . . . . . . 85
Using Transaction History to Track Donate Transactions . . . . . . . . . . . . . . . . 86
Using Downloadable History Logs to Track Donate Transactions. . . . . . . . . . . . 86
Using Instant Payment Notification to Track Donate Transactions . . . . . . . . . . . 86
Creating Advanced Donate Buttons on the PayPal Website. . . . . . . . . . . . . . . . . 87
Generating Code for Payment Buttons and Email Payment Links . . . . . . . . . . . 87
Protecting HTML Code for Payment Buttons . . . . . . . . . . . . . . . . . . . . . . 87
Using the Button Creation Tool for Advanced Donate Buttons . . . . . . . . . . . . . 87
Creating Advanced Donate Buttons With JavaScript Disabled . . . . . . . . . . . . . 97
Avoiding Problems With Pasted HTML Code . . . . . . . . . . . . . . . . . . . . . .104
Sample HTML Code for Donate Buttons . . . . . . . . . . . . . . . . . . . . . . . . . .104
Sample HTML Code for a Basic Donate Button . . . . . . . . . . . . . . . . . . . . .105
Sample HTML Code for a Donate Button With a Fixed Contribution Amount . . . . . .105
4 September 2008 Website Payments Standard Integration Guide
Page 5

Contents
Chapter 3 Recurring Payments – Subscribe Buttons . . . . . . . . 107
Getting Started With Subscribe Buttons . . . . . . . . . . . . . . . . . . . . . . . . . . .108
Using the Button Creation Tool for a Basic Subscribe Button . . . . . . . . . . . . . .108
Creating Basic Subscribe Buttons With JavaScript Disabled . . . . . . . . . . . . . .109
Creating Subscribe Buttons Before You Create Your PayPal Account . . . . . . . . . 112
The Checkout Experience With Subscribe Buttons . . . . . . . . . . . . . . . . . . . . . 115
Begin – Subscribers Are Ready to Sign Up on Your Website . . . . . . . . . . . . . .116
1 – Subscribers Enter Their Billing Information or They Log In to PayPal . . . . . . . . 116
2 – Subscribers Confirm Their Subscription Details Before Signing Up . . . . . . . . . 119
3 – Subscribers View and Print Their Subscription Confirmations. . . . . . . . . . . .120
End – Subscribers Receive Subscription Authorization Notices by Email . . . . . . . .121
Enhancing the Checkout Experience With Subscribe Buttons . . . . . . . . . . . . .122
Managing Subscriptions . . . . . . . . . . . . . . . . . . . . . . . . . . . . . . . . . . .123
Tracking Subscription Transactions . . . . . . . . . . . . . . . . . . . . . . . . . . .124
How Billing Cycles and Recurring Payments Work . . . . . . . . . . . . . . . . . . .126
Downloading Subscriber Lists . . . . . . . . . . . . . . . . . . . . . . . . . . . . . .128
Canceling Individual Subscriptions . . . . . . . . . . . . . . . . . . . . . . . . . . .128
Canceling Multiple Subscriptions at One Time . . . . . . . . . . . . . . . . . . . . .129
End of Term Messages Sent Through Instant Payment Notification. . . . . . . . . . .131
Advanced Features of Subscribe Buttons . . . . . . . . . . . . . . . . . . . . . . . . . .132
Offering Trial Periods and Introductory Rates With Subscribe Buttons . . . . . . . . .132
Limiting the Number of Billing Cycles With Subscribe Buttons . . . . . . . . . . . . .133
Offering Product Options With Subscribe Buttons . . . . . . . . . . . . . . . . . . . .134
Working With Modify Subscription Buttons . . . . . . . . . . . . . . . . . . . . . . .134
Working With Unsubscribe Buttons . . . . . . . . . . . . . . . . . . . . . . . . . . .137
Generating Usernames and Passwords With Subscribe Buttons . . . . . . . . . . . .139
Reattempting Failed Recurring Payments With Subscribe Buttons . . . . . . . . . . .141
Creating Advanced Subscribe Buttons on the PayPal Website . . . . . . . . . . . . . . .142
Generating Code for Payment Buttons and Email Payment Links . . . . . . . . . . .142
Protecting HTML Code for Payment Buttons . . . . . . . . . . . . . . . . . . . . . .142
Using the Button Creation Tool for Advanced Subscribe Buttons . . . . . . . . . . . .142
Creating Advanced Subscribe Buttons With JavaScript Disabled . . . . . . . . . . . .155
Avoiding Problems With Pasted HTML Code . . . . . . . . . . . . . . . . . . . . . .165
Sample HTML Code for Subscribe Buttons . . . . . . . . . . . . . . . . . . . . . . . . .165
Sample HTML Code for a Basic Subscribe Button . . . . . . . . . . . . . . . . . . .165
Sample HTML Code for a Subscribe Button With Trial Periods . . . . . . . . . . . . .166
Sample HTML Code for a Subscribe Button With Limits on Billing Cycles . . . . . . .167
Sample HTML Code for Subscribe Buttons With Product Options . . . . . . . . . . .168
Sample HTML Code for a Modify Subscription Button . . . . . . . . . . . . . . . . .170
Website Payments Standard Integration Guide September 2008 5
Page 6

Contents
Sample HTML Code for an Unsubscribe Button. . . . . . . . . . . . . . . . . . . . .171
Sample HTML Code for a Subscribe Button With Password Management . . . . . . .172
Sample HTML Code for a Subscribe Button That Reattempts Payments . . . . . . . .172
Sample URL Code for Subscribe Email Payment Links . . . . . . . . . . . . . . . . . . .173
Chapter 4 The PayPal Shopping Cart – Add to Cart and View Cart
Buttons . . . . . . . . . . . . . . . . . . . . . . . . . . 175
Getting Started With The PayPal Shopping Cart. . . . . . . . . . . . . . . . . . . . . . .176
Getting Started With Add To Cart Buttons . . . . . . . . . . . . . . . . . . . . . . . .176
Getting Started With View Cart Buttons . . . . . . . . . . . . . . . . . . . . . . . . .183
The Checkout Experience With the PayPal Shopping Cart . . . . . . . . . . . . . . . . .191
Begin – Buyers Add Your Items to the PayPal Shopping Cart. . . . . . . . . . . . . .193
1 – Buyers Enter Their Billing Information or They Log In To PayPal . . . . . . . . . .194
2 – Buyers Confirm Their Transaction Details Before Paying . . . . . . . . . . . . . .196
3 – Buyers View and Print Their PayPal Payment Confirmations . . . . . . . . . . . .197
End – Buyers Receive Payment Authorization Notices by Email . . . . . . . . . . . .198
Enhancing the Checkout Experience With Add to Cart Buttons . . . . . . . . . . . . .200
Managing PayPal Shopping Cart Transactions . . . . . . . . . . . . . . . . . . . . . . .201
Using Email Notices to Track PayPal Shopping Cart Transactions . . . . . . . . . . .201
Using Recent Activity to Track PayPal Shopping Cart Transactions . . . . . . . . . .202
Using Transaction History to Track PayPal Shopping Cart Transactions . . . . . . . .202
Using Downloadable History Logs to Track PayPal Shopping Cart Transactions . . . .203
Using Instant Payment Notification to Track PayPal Shopping Cart Transactions . . .203
Advanced Features of Add to Cart Buttons . . . . . . . . . . . . . . . . . . . . . . . . .203
Offering Product Options With Add to Cart Buttons . . . . . . . . . . . . . . . . . . .203
Creating Advanced PayPal Shopping Cart Buttons on the PayPal Website . . . . . . . . .204
Generating Code for Payment Buttons and Email Payment Links . . . . . . . . . . .204
Protecting HTML Code for Payment Buttons . . . . . . . . . . . . . . . . . . . . . .204
Pricing Items in Multiple Currencies . . . . . . . . . . . . . . . . . . . . . . . . . . .205
Working with View Cart Buttons . . . . . . . . . . . . . . . . . . . . . . . . . . . . .205
Using the Button Creation Tool for Advanced Add to Cart Buttons . . . . . . . . . . .205
Creating Advanced Add to Cart Buttons With JavaScript Disabled . . . . . . . . . . .220
Avoiding Problems With Pasted HTML Code . . . . . . . . . . . . . . . . . . . . . .228
Sample HTML Code for Add to Cart Buttons . . . . . . . . . . . . . . . . . . . . . . . .228
Sample HTML Code for a Basic Add to Cart Button. . . . . . . . . . . . . . . . . . .229
Sample HTML Code for Add to Cart Buttons With Product Options. . . . . . . . . . .229
Sample HTML Code for Add to Cart Buttons that Open the Shopping Cart in the Merchant
Window . . . . . . . . . . . . . . . . . . . . . . . . . . . . . . . . . . . . . . . . .233
Sample HTML Code for Add to Cart Buttons that Continue Shopping on the Current
Merchant Webpage . . . . . . . . . . . . . . . . . . . . . . . . . . . . . . . . . . .236
6 September 2008 Website Payments Standard Integration Guide
Page 7

Contents
Sample HTML Code for View Cart Buttons . . . . . . . . . . . . . . . . . . . . . . . . .238
Sample HTML Code for a View Cart Button . . . . . . . . . . . . . . . . . . . . . . .239
Sample HTML Code for a View Cart Button That Opens the Shopping Cart in the Merchant
Window . . . . . . . . . . . . . . . . . . . . . . . . . . . . . . . . . . . . . . . . .239
Sample HTML Code for View Cart Buttons that Continue Shopping on the Current
Merchant Webpage . . . . . . . . . . . . . . . . . . . . . . . . . . . . . . . . . . .240
Chapter 5 Third-Party Shopping Carts – The Cart Upload Command 243
How A Third Party Shopping Cart Works . . . . . . . . . . . . . . . . . . . . . . . . . .243
What The Buyer Sees With Third Party Shopping Carts . . . . . . . . . . . . . . . .243
What Merchants See . . . . . . . . . . . . . . . . . . . . . . . . . . . . . . . . . .248
Integrating PayPal with Third Party Shopping Carts . . . . . . . . . . . . . . . . . . . . .249
Required Third Party Shopping Cart Variables . . . . . . . . . . . . . . . . . . . . .249
Passing Individual Item Details to PayPal . . . . . . . . . . . . . . . . . . . . . . . .249
Setting the Tax for the Entire Cart . . . . . . . . . . . . . . . . . . . . . . . . . . . .251
Setting the Shipping Charge for the Entire Cart . . . . . . . . . . . . . . . . . . . . .251
Setting the Weight for the Entire Cart . . . . . . . . . . . . . . . . . . . . . . . . . .251
Passing the Aggregate Shopping Cart Amount to PayPal. . . . . . . . . . . . . . . .251
Securing Your Shopping Cart . . . . . . . . . . . . . . . . . . . . . . . . . . . . . .251
Chapter 6 Securing Your Website Payments Standard Buttons . . . 253
Creating Protected Payment Buttons on the PayPal Website . . . . . . . . . . . . . . . .254
How Protected Payment Buttons Help Prevent Fraudulent Payments . . . . . . . . .254
Using the Button Creation Tool to Create a Protected Payment Button . . . . . . . . .254
Creating a Protected Payment Button with JavaScript Disabled . . . . . . . . . . . .255
Saving Payment Buttons in Your PayPal Account . . . . . . . . . . . . . . . . . . . . . .256
Reconciling Payments Manually Through Transaction History . . . . . . . . . . . . . . .257
Reconciling Payments Through Instant Payment Notification . . . . . . . . . . . . . . . .258
Protecting Payment Buttons by Using Encrypted Website Payments . . . . . . . . . . . .258
How Encrypted Website Payments Helps Prevent Fraudulent Payments . . . . . . . .258
Public Key Encryption Used by Encrypted Website Payments . . . . . . . . . . . . .259
Setting Up Certificates Before Using Encrypted Website Payments . . . . . . . . . .260
Using Encrypted Website Payments to Protect Your Payment Buttons . . . . . . . . .262
Blocking Unprotected and Non-encrypted Website Payments. . . . . . . . . . . . . . . .264
Website Payments Standard Integration Guide September 2008 7
Page 8

Contents
Chapter 7 Using Your PayPal Account Profile . . . . . . . . . . . . 265
The Account Profile . . . . . . . . . . . . . . . . . . . . . . . . . . . . . . . . . . . . .265
Account Information . . . . . . . . . . . . . . . . . . . . . . . . . . . . . . . . . . .265
Financial Information . . . . . . . . . . . . . . . . . . . . . . . . . . . . . . . . . .265
Selling Preferences . . . . . . . . . . . . . . . . . . . . . . . . . . . . . . . . . . .266
Correspondence Between Profile Settings and HTML Variables . . . . . . . . . . . .266
Co-Branding the PayPal Checkout Pages . . . . . . . . . . . . . . . . . . . . . . . . . .267
Working With Custom Payment Pages . . . . . . . . . . . . . . . . . . . . . . . . .268
Adding or Editing a Page Style . . . . . . . . . . . . . . . . . . . . . . . . . . . . .269
Making a Page Style Primary . . . . . . . . . . . . . . . . . . . . . . . . . . . . . .270
Overriding Page Styles On Individual Payment Buttons . . . . . . . . . . . . . . . . .270
Overriding Co-Branding Options on Individual Payment Buttons . . . . . . . . . . . .271
Tailoring the Checkout Experience . . . . . . . . . . . . . . . . . . . . . . . . . . . . . .271
Auto Return . . . . . . . . . . . . . . . . . . . . . . . . . . . . . . . . . . . . . . .271
Getting Contact Telephone Numbers . . . . . . . . . . . . . . . . . . . . . . . . . .274
PayPal Account Optional . . . . . . . . . . . . . . . . . . . . . . . . . . . . . . . .276
Automatic Calculation of Sales Tax . . . . . . . . . . . . . . . . . . . . . . . . . . . . .285
Displaying the Sales Tax that PayPal Calculates During Checkout . . . . . . . . . . .286
Accessing Your Sales Tax Rates in Your Account Profile . . . . . . . . . . . . . . . .286
Setting Up Domestic Sales Tax Rates . . . . . . . . . . . . . . . . . . . . . . . . . .287
Setting Up International Sales Tax Rates . . . . . . . . . . . . . . . . . . . . . . . .289
Resolving Overlapping Sales Tax Rates . . . . . . . . . . . . . . . . . . . . . . . . .289
Editing or Deleting Sales Tax Rates . . . . . . . . . . . . . . . . . . . . . . . . . . .290
Overriding Sales Tax Calculations on Individual Transactions . . . . . . . . . . . . .290
Automatic Calculation of Shipping Charges (U.S. Merchants Only) . . . . . . . . . . . .290
Displaying the Shipping Charges that PayPal Calculates During Checkout. . . . . . .291
Shipping Regions . . . . . . . . . . . . . . . . . . . . . . . . . . . . . . . . . . . .293
Shipping Methods . . . . . . . . . . . . . . . . . . . . . . . . . . . . . . . . . . . .294
Shipping Rate Bases . . . . . . . . . . . . . . . . . . . . . . . . . . . . . . . . . .294
Shipping Rate Tables . . . . . . . . . . . . . . . . . . . . . . . . . . . . . . . . . .294
Shipping Rates and Currencies . . . . . . . . . . . . . . . . . . . . . . . . . . . . .295
Adding Shipping Rates for the First Time . . . . . . . . . . . . . . . . . . . . . . . .295
Adding Shipping Methods by Using a Wizard . . . . . . . . . . . . . . . . . . . . . .296
Viewing, Editing, and Adding Shipping Rates . . . . . . . . . . . . . . . . . . . . . .298
Viewing the Configuration of an Existing Shipping Method . . . . . . . . . . . . . . .300
Editing the Configuration Settings of an Existing Shipping Method . . . . . . . . . . .300
Deleting Shipping Methods . . . . . . . . . . . . . . . . . . . . . . . . . . . . . . .301
Examples of Rate Bases and Shipping Calculations . . . . . . . . . . . . . . . . . .302
Overriding Shipping Calculations on Individual Transactions . . . . . . . . . . . . . .303
8 September 2008 Website Payments Standard Integration Guide
Page 9

Contents
Automatic Calculation of Shipping Charges (non-U.S. Merchants Only) . . . . . . . . . .304
Examples of Cost Methods and Shipping Calculations . . . . . . . . . . . . . . . . .305
Overriding Shipping Calculation on Individual Transactions. . . . . . . . . . . . . . .306
Blocking Certain Kinds of Payments . . . . . . . . . . . . . . . . . . . . . . . . . . . . .307
Accessing Your Payment Receiving Preferences to Block Payments . . . . . . . . . .307
Blocking Payments From U.S. Payers Without a Confirmed Address. . . . . . . . . .308
Blocking Payments in Currencies That You Do Not Hold . . . . . . . . . . . . . . . .309
Blocking Payments from Payers With Non-U.S. PayPal Accounts . . . . . . . . . . .309
Blocking Payments Initiated Through the Pay Anyone Subtab . . . . . . . . . . . . .310
Blocking Payments by Credit Card Instead of Bank Account . . . . . . . . . . . . . .310
Blocking Payments Funded With eChecks . . . . . . . . . . . . . . . . . . . . . . .310
Adding Your Credit Card Statement Name. . . . . . . . . . . . . . . . . . . . . . . . . .310
Allowing Multiple Users to Access Your PayPal Account . . . . . . . . . . . . . . . . . .312
Adding a User Login to Your Account . . . . . . . . . . . . . . . . . . . . . . . . . .312
Changing the Privileges for a User Login . . . . . . . . . . . . . . . . . . . . . . . .313
Resetting the Password for a User Login . . . . . . . . . . . . . . . . . . . . . . . .314
Removing a User Login . . . . . . . . . . . . . . . . . . . . . . . . . . . . . . . . .315
Handling Multiple Currencies . . . . . . . . . . . . . . . . . . . . . . . . . . . . . . . .315
Managing Currency Balances . . . . . . . . . . . . . . . . . . . . . . . . . . . . . .316
Accepting or Denying Cross-Currency Payments . . . . . . . . . . . . . . . . . . . .317
Language Encoding Your Data. . . . . . . . . . . . . . . . . . . . . . . . . . . . . . . .317
About Language Encoding for Exchanging Data With PayPal . . . . . . . . . . . . .318
Changing Your Default Language Encoding . . . . . . . . . . . . . . . . . . . . . . .318
Chapter 8 Using Authorization & Capture . . . . . . . . . . . . . . 321
Basic Authorization Process . . . . . . . . . . . . . . . . . . . . . . . . . . . . . . . . .321
Honor Period and Authorization Period . . . . . . . . . . . . . . . . . . . . . . . . .321
Basic Authorization & Capture Scenarios . . . . . . . . . . . . . . . . . . . . . . . . . .322
Capturing A Single Authorization . . . . . . . . . . . . . . . . . . . . . . . . . . . .323
Batch Capturing Multiple Authorizations . . . . . . . . . . . . . . . . . . . . . . . . .323
Voiding an Authorization. . . . . . . . . . . . . . . . . . . . . . . . . . . . . . . . .324
Capture Within 3 Days . . . . . . . . . . . . . . . . . . . . . . . . . . . . . . . . . .325
Capture From 4 - 29 Days . . . . . . . . . . . . . . . . . . . . . . . . . . . . . . . .325
One Authorization, Multiple Captures, and a Refund . . . . . . . . . . . . . . . . . .326
Lower Capture Amount . . . . . . . . . . . . . . . . . . . . . . . . . . . . . . . . .327
Capture Up to 115% . . . . . . . . . . . . . . . . . . . . . . . . . . . . . . . . . . .328
Authorization Expires . . . . . . . . . . . . . . . . . . . . . . . . . . . . . . . . . .329
Void . . . . . . . . . . . . . . . . . . . . . . . . . . . . . . . . . . . . . . . . . . .330
Reattempted Capture . . . . . . . . . . . . . . . . . . . . . . . . . . . . . . . . . .331
Website Payments Standard Integration Guide September 2008 9
Page 10

Contents
Recommendations for Best Use of Authorization & Capture . . . . . . . . . . . . . . . .332
Capturing Funds on Basic Authorizations . . . . . . . . . . . . . . . . . . . . . . . .332
Buyer Approval for Basic Authorizations. . . . . . . . . . . . . . . . . . . . . . . . .332
Voiding Basic Authorizations. . . . . . . . . . . . . . . . . . . . . . . . . . . . . . .332
Chapter 9 Issuing Refunds . . . . . . . . . . . . . . . . . . . . . . 333
Refunding Within 60 Days of Payment. . . . . . . . . . . . . . . . . . . . . . . . . . . .333
Refunding After 60 Days . . . . . . . . . . . . . . . . . . . . . . . . . . . . . . . . . . .333
Chapter 10 Testing Payment Buttons in the PayPal Sandbox . . . . . 335
Chapter 11 HTML Form Basics for Website Payments Standard . . . 337
Form Attributes – ACTION and METHOD . . . . . . . . . . . . . . . . . . . . . . . . . .337
Hidden Input Variables . . . . . . . . . . . . . . . . . . . . . . . . . . . . . . . . . . . .337
Specifying the Kind of Payment Button – cmd . . . . . . . . . . . . . . . . . . . . . . . .338
Variations on Basic Variables . . . . . . . . . . . . . . . . . . . . . . . . . . . . . . . .338
Record Keeping with Passthrough Variables . . . . . . . . . . . . . . . . . . . . . .338
Setting the Character Set – charset . . . . . . . . . . . . . . . . . . . . . . . . . . .339
Setting The Return URL on Individual Transactions. . . . . . . . . . . . . . . . . . .339
Desired Currency on Individual Transactions . . . . . . . . . . . . . . . . . . . . . .340
Using HTML Variables With Saved Payment Buttons . . . . . . . . . . . . . . . . . . . .340
Prepopulating FORMs . . . . . . . . . . . . . . . . . . . . . . . . . . . . . . . . . . . .341
Sample HTML for FORM Prepopulation . . . . . . . . . . . . . . . . . . . . . . . . .341
Overriding Addresses Stored With PayPal. . . . . . . . . . . . . . . . . . . . . . . . . .342
Sample HTML for Overriding Addresses Stored With PayPal . . . . . . . . . . . . . .342
Instant Payment Notification – notify_url . . . . . . . . . . . . . . . . . . . . . . . . . . .343
Appendix A HTML Variables for Website Payments Standard . . . . . 345
Technical HTML Variables . . . . . . . . . . . . . . . . . . . . . . . . . . . . . . . . . .345
HTML Variables for Individual Items . . . . . . . . . . . . . . . . . . . . . . . . . . . . .347
HTML Variables for Payment Transactions . . . . . . . . . . . . . . . . . . . . . . . . .351
HTML Variables for Shopping Carts . . . . . . . . . . . . . . . . . . . . . . . . . . . . .353
HTML Variables for Subscribe Buttons . . . . . . . . . . . . . . . . . . . . . . . . . . .356
HTML Variables for Displaying PayPal Checkout Pages . . . . . . . . . . . . . . . . . .358
HTML Variables for Prepopulating PayPal Checkout Pages. . . . . . . . . . . . . . . . .361
10 September 2008 Website Payments Standard Integration Guide
Page 11

Contents
Appendix B Address Handling (U.S. Merchants Only) . . . . . . . . . 363
Address Handling With PayPal Account Optional Turned On . . . . . . . . . . . . . . . .364
Endpoint A . . . . . . . . . . . . . . . . . . . . . . . . . . . . . . . . . . . . . . . .364
Endpoints B, C, and D . . . . . . . . . . . . . . . . . . . . . . . . . . . . . . . . . .365
Endpoint E . . . . . . . . . . . . . . . . . . . . . . . . . . . . . . . . . . . . . . . .365
Endpoints F and H . . . . . . . . . . . . . . . . . . . . . . . . . . . . . . . . . . . .365
Endpoint G . . . . . . . . . . . . . . . . . . . . . . . . . . . . . . . . . . . . . . . .365
Endpoint I . . . . . . . . . . . . . . . . . . . . . . . . . . . . . . . . . . . . . . . .365
Endpoints J and L . . . . . . . . . . . . . . . . . . . . . . . . . . . . . . . . . . . .366
Endpoint K . . . . . . . . . . . . . . . . . . . . . . . . . . . . . . . . . . . . . . . .366
Address Handling With PayPal Account Optional Turned Off . . . . . . . . . . . . . . . .366
Endpoint A . . . . . . . . . . . . . . . . . . . . . . . . . . . . . . . . . . . . . . . .366
Endpoints B, C, and D . . . . . . . . . . . . . . . . . . . . . . . . . . . . . . . . . .366
Endpoint E . . . . . . . . . . . . . . . . . . . . . . . . . . . . . . . . . . . . . . . .366
Endpoints F and H . . . . . . . . . . . . . . . . . . . . . . . . . . . . . . . . . . . .367
Endpoints G and K. . . . . . . . . . . . . . . . . . . . . . . . . . . . . . . . . . . .367
Endpoint I . . . . . . . . . . . . . . . . . . . . . . . . . . . . . . . . . . . . . . . .367
Endpoints J and L . . . . . . . . . . . . . . . . . . . . . . . . . . . . . . . . . . . .367
Appendix C Country Codes . . . . . . . . . . . . . . . . . . . . . . 369
Index. . . . . . . . . . . . . . . . . . . . . . . . . . . . . . . . . . . 381
Website Payments Standard Integration Guide September 2008 11
Page 12

Contents
12 September 2008 Website Payments Standard Integration Guide
Page 13

Preface
P
About This Guide
The Website Payments Standard Integration Guide describes how to integrate your website
with PayPal by using HTML buttons and forms. Website Payments Standard lets you accept
payments for:
z Single-item purchases with Buy Now buttons – Sell from websites that offer single or
mutually exclusive products.
z Contribution payments with Donate buttons – Raise financial support for any cause.
z Recurring bills with Subscribe buttons – Collect membership dues, set up installment
plans, and offer other subscription services.
z Multiple-item purchases with Add to Cart and View Cart buttons – Sell from online
stores with catalogs and shopping carts.
The following table summarizes the contents of this guide.
TABLE P.1 Summary of the Contents of This Guide
Feature Description See
Buy Now Buttons Accept payments for single items at one time.
Donate Buttons Accept payments for donation and contributions.
Subscribe Buttons Accept recurring payments for membership dues,
installment plans, and other subscription services.
The PayPal Shopping
Cart
Third-Party Shopping
Carts
Button Protection and
Encrypted Website
Payments
Accept payments for multiple items at one time.
Develop a third-party shopping cart that is
compatible with PayPal and Website Payments
Standard.
Protect against fraudulent payments by protecting
the code in your payment buttons with the
encryption setting when you create buttons on the
PayPal website or with Encrypted Website
Payments when you write or generate payment
buttons yourself.
Chapter 1, “Single-Item
Payments – Buy Now
Buttons
Chapter 2, “Contribution
Payments – Donate Buttons
Chapter 3, “Recurring
Payments – Subscribe
Buttons
Chapter 4, “The PayPal
Shopping Cart – Add to Cart
and View Cart Buttons
Chapter 5, “Third-Party
Shopping Carts – The Cart
Upload Command
Chapter 6, “Securing Your
Website Payments Standard
Buttons
”
”
”
”
”
”
Website Payments Standard Integration Guide September 2008 13
Page 14

Preface
P
About This Guide
ABLE P.1 Summary of the Contents of This Guide
T
Feature Description See
Automatic Calculation
of Sales Tax
Automatic Calculation
of Shipping Charges
Custom Payment Pages Brand the PayPal checkout pages with your own
PayPal Account
Optional
Auto Return Redirect people to your website automatically after
Payer Contact
Telephone
Multi-User Access Create separate user names for your account with
Specify tax rates that PayPal uses to calculate taxes
automatically.
Specify shipping rates that PayPal uses to calculate
shipping charges automatically.
logo and colors.
Let people pay by credit card without having to
sign up for a PayPal account.
they pay you on PayPal.
Prompt people for their contact telephone numbers
when they pay you on Paypal.
different permission levels.
“Automatic Calculation of
Sales Tax” on page 285
“Automatic Calculation of
Shipping Charges (U.S.
Merchants Only)” on
page 290
– or –
“Automatic Calculation of
Shipping Charges (non-U.S.
Merchants Only)” on
page 304
“Co-Branding the PayPal
Checkout Pages” on page 267
“PayPal Account Optional”
on page 276
“Auto Return” on page 271
“Getting Contact Telephone
Numbers” on page 274
“Allowing Multiple Users to
Access Your PayPal Account”
on page 312
Authorization &
Capture
Refunds Refund entire payments or portions of them.
14 September 2008 Website Payments Standard Integration Guide
Authorize payments during checkout, and capture
payment amounts or portions of them later.
Chapter 8, “Using
Authorization & Capture
”
Chapter 9, “Issuing Refunds”
Page 15

Intended Audience
This guide is for:
z Merchants and developers who want to understand:
– The checkout experiences that people go through when they make payments with
Website Payments Standard payment buttons
– How account profile settings affect the way that Website Payments Standard works
z Developers who want to learn how to implement Website Payments Standard
Revision History
The following table lists the revisions made to the Website Payments Standard Integration
Guide.
TABLE P.2 Revision History for This Guide
Preface
Intended Audience
P
Date Published Description
September 2008 Revised information on creating payment buttons on the PayPal website,
including saving buttons in your PayPal account and tracking inventory; see
button -specific chapters for details.
Added sample code for Add to Cart buttons that open the PayPal Shopping Cart
in the same window as the merchant website and how to use the shopping_url
variable to control which merchant page buyers return to when they click the
Continue Shopping button; see
Buttons” on page 228
June 2008 Added chapter on Subscribe buttons; see
Subscribe Buttons
.
.” Added chapter on Third-Party Shopping Carts; see
“Sample HTML Code for Add to Cart
Chapter 3, “Recurring Payments –
Chapter 5, “Third-Party Shopping Carts – The Cart Upload Command.”
March 2008 Changes to definition of authorization honor periods; see
Authorization Period” on page 321
January 2008 Separate checkout experience and command for Donate buttons; see
“Contribution Payments – Donate Buttons
August 2007 Shipping calculations with tiered rates in different destination regions; see
.”
.”
“Honor Period and
Chapter 2,
“Automatic Calculation of Shipping Charges (U.S. Merchants Only)” on
page 290
May 2007 Added information on securing buttons; see
Website Payments Standard Buttons
.
Chapter 6, “Securing Your
.”
April 2007 Added
October 2006 Minor clarifications.
Website Payments Standard Integration Guide September 2008 15
Appendix B, “Address Handling (U.S. Merchants Only).”
Page 16
Preface
P
Where to Go for More Information
T
ABLE P.2 Revision History for This Guide
Date Published Description
August 2006 New PayPal Shopping Cart variable, shopping_url
The value _ext-enter of the cmd variable for FORM prepoulation is now no
longer necessary.
Clarification of values for the rm variable
"POST".
July 2006 Added information on how to use PayPal Authorization & Capture with Website
Payments Standard, including how to capture multiple authorizations in batches
on the PayPal website; see
March 2006 Miscellaneous minor corrections.
Expanded description of creating Encrypted Website Payments buttons.
Where to Go for More Information
– 0, 1, or 2; not the strings "GET" or
Chapter 8, “Using Authorization & Capture.”
z Merchant Gift Certificates Guide
z Order Management Integration Guide
z Sandbox User Guide
z Password Management Installation Guide
Documentation Feedback
Help us improve this guide by sending feedback to:
documentationfeedback@paypal.com
16 September 2008 Website Payments Standard Integration Guide
Page 17
1
Single-Item Payments – Buy Now
Buttons
Use Buy Now buttons to accept single-item purchase payments. A Buy Now button can sell
one or more units of a single item. Make additional Buy Now buttons for additional items that
you want to sell.
You can create Buy Now buttons that you add to your website by using a tool on the PayPal
website, or you can write the HTML code for Buy Now buttons manually. You can create
buttons with limited functionality before you create your PayPal account or with JavaScript
disabled in your browser.
Read the following topics to learn more about Buy Now buttons:
z “Getting Started With Buy Now Buttons” on page 18
z “The Checkout Experience With Buy Now Buttons” on page 25
z “Managing Buy Now Transactions” on page 34
z “Advanced Features of Buy Now Buttons” on page 36
z “Creating Advanced Buy Now Buttons on the PayPal Website” on page 37
z “Sample HTML Code for Buy Now Buttons” on page 61
z “Sample URL Code for a Buy Now Email Payment Link” on page 67
Website Payments Standard Integration Guide September 2008 17
Page 18
Single-Item Payments – Buy Now Buttons
1
Getting Started With Buy Now Buttons
Getting Started With Buy Now Buttons
The easiest way to add a Buy Now button to your website is by using the button creation tool
on the PayPal website. As soon as you add the button, you can begin accepting payments on
your website.
Follow one of these procedures to get started creating your own Buy Now buttons:
z “Using the Button Creation Tool for a Basic Buy Now Button” on page 18
z “Creating Basic Buy Now Buttons With JavaScript Disabled” on page 19
z “Creating Buy Now Buttons Before You Create Your PayPal Account” on page 22
N OTE: For more detailed instructions, see “Creating Advanced Buy Now Buttons on the
PayPal Website” on page 37.
Using the Button Creation Tool for a Basic Buy Now Button
To use the button creation tool for a basic Buy Now button:
1. Log in to your PayPal Premier or Business account at
The My Account Overview page opens.
2. Click the Profile subtab.
The Profile Summary page opens.
3. Under the Selling Preferences heading, click the Create new button link.
The Create PayPal payment button page opens.
4. In the Accept payments for dropdown menu, select “Products” or “Services”.
https://www.paypal.com.
5. Select the No; create a “Buy Now” button radio button.
6. Enter the payment details of your item.
– Item name – Enter the name of the item or service that you wish to sell.
– Price – Enter the price of your item.
18 September 2008 Website Payments Standard Integration Guide
Page 19

Single-Item Payments – Buy Now Buttons
Getting Started With Buy Now Buttons
7. Scroll to the bottom of the page, and click the Create Button button.
The You are viewing your button code page opens.
8. Click the Select Code button on the Websites tab to select all of the generated HTML
code.
9. Copy the text that you selected to the clipboard, by:
– pressing Ctrl+C.
– or –
– right-clicking your mouse, and selecting Copy.
10.In your web editing tool, open the webpage where you want the button to be seen.
IMPORTANT: Be sure that your tool is ready for you to paste HTML code, such as by
switching to an HTML view from a design view of your webpage.
11. Paste the text that you copied from the clipboard onto your webpage where you want the
button to appear, by:
1
– pressing Ctrl+V.
– or –
– right-clicking your mouse, and selecting Paste.
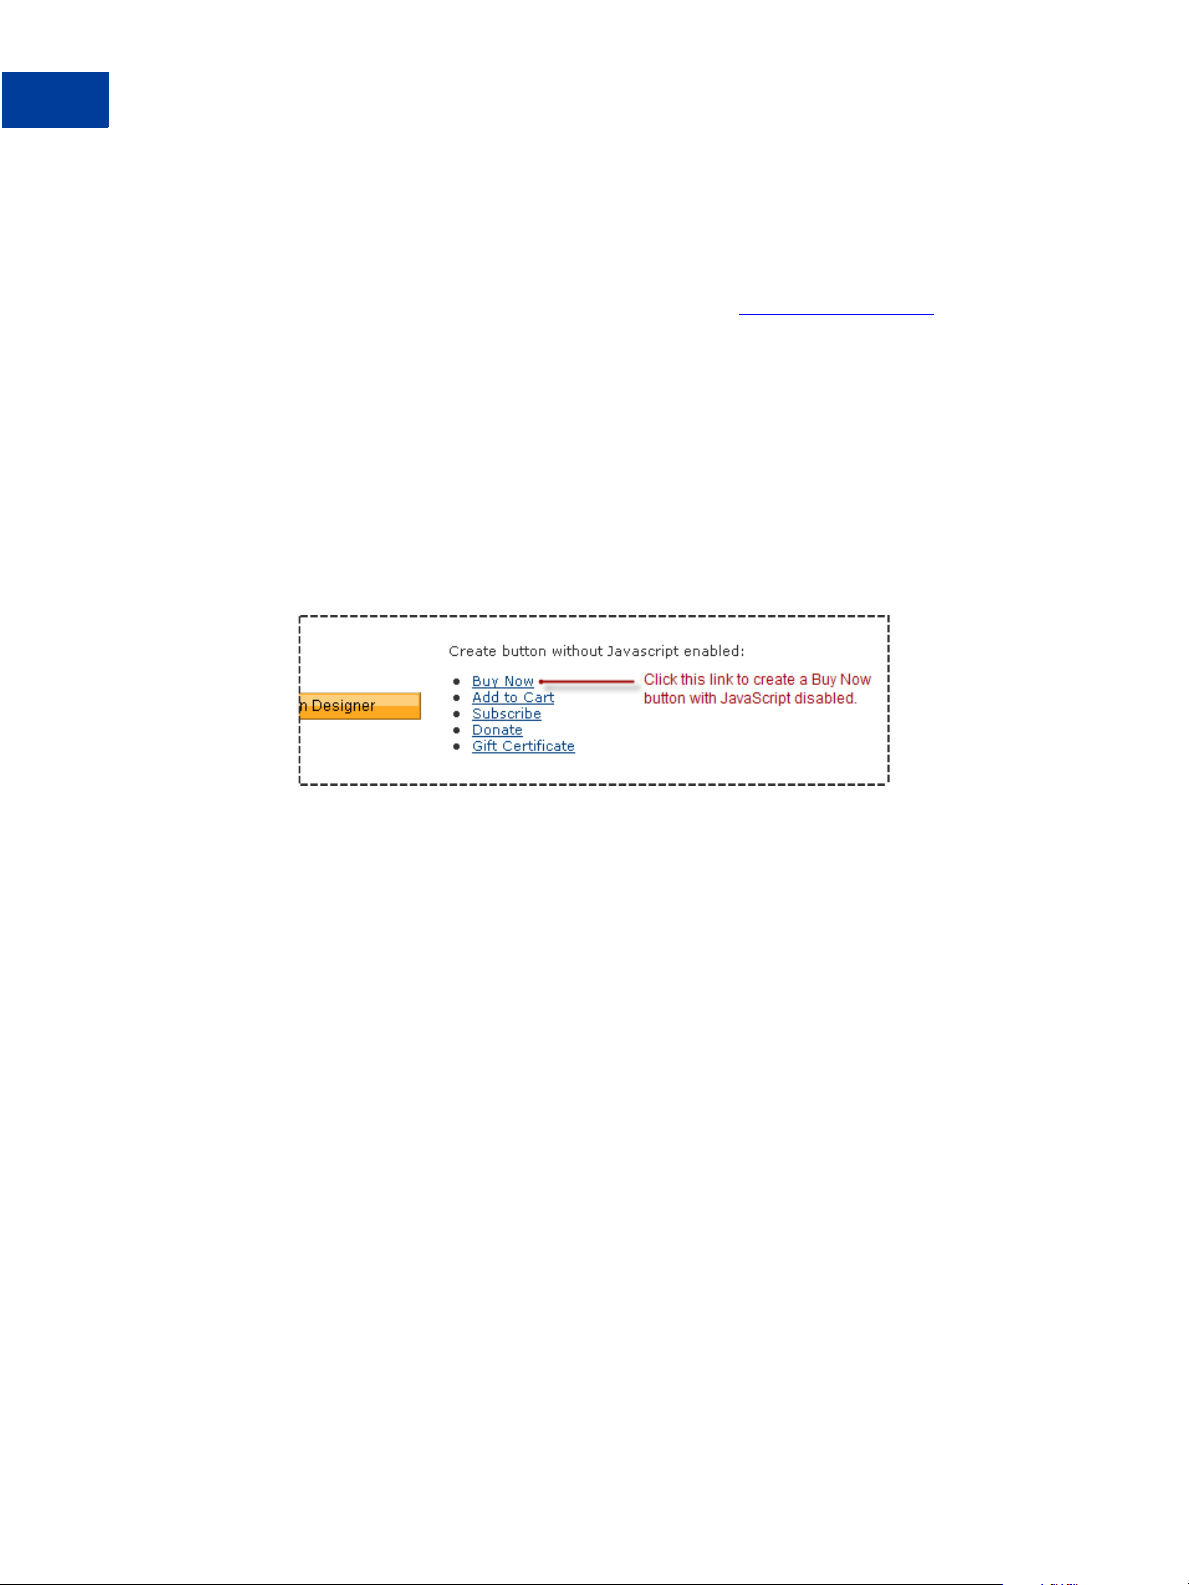
Creating Basic Buy Now Buttons With JavaScript Disabled
The button creation tool for Buy Now buttons, described above, requires JavaScript. If
JavaScript is disabled in your browser, PayPal automatically offers you an alternative button
creation tool that does not require JavaScript.
Read these topics to learn more about creating Buy Now buttons with JavaScript disabled:
z “Limitations When Creating Payment Buttons With JavaScript Disabled” on page 19
z “Creating a Basic Buy Now Button With JavaScript Disabled” on page 20
z “Enabling JavaScript in Your Browser” on page 21
Limitations When Creating Payment Buttons With JavaScript Disabled
The alternative tool that works with JavaScript disabled lets you create Buy Now buttons on
the PayPal website. However, the following features are not supported by the alternative tool:
z Saving your buttons in your PayPal account
z Tracking inventory
z Product options with separate pricing
z Language choices for button images
z Creating payment buttons before you create your PayPal account
To use any of the above features when creating payment buttons on the PayPal website, you
must enable JavaScript in your browser.
Website Payments Standard Integration Guide September 2008 19
Page 20
Single-Item Payments – Buy Now Buttons
1
Getting Started With Buy Now Buttons
For more information, see “Enabling JavaScript in Your Browser” on page 21.
Creating a Basic Buy Now Button With JavaScript Disabled
To create a basic Buy Now button for your website with JavaScript disabled:
1. Log in to your PayPal Premier or Business account at
https://www.paypal.com.
The My Account Overview page opens.
2. Click the Edit Profile link.
The Profile Summary page opens.
3. Under the Selling Preferences heading, click the Create New Button link.
The Create PayPal payment button page opens.
4. Click the Buy Now link.
The Buy Now buttons page opens.
5. Enter the details of your item.
– Item name/service – Enter the name of the item or service that you wish to sell.
– Price – (optional) Enter a fixed price for your item. If you leave the field blank, buyers
“name their own price” after they click the Buy Now button.
IMPORTANT: PayPal recommends that you enter a price so that you collect an
appropriate amount for the item.
6. Scroll to the bottom of the page, and click the Create Button Now button.
The Add a Buy Now button to your website page displays the generated code.
7. Click the HTML code for Websites text box to select all of the generated HTML code.
8. Copy the text that you selected to the clipboard, by:
– pressing Ctrl+C.
– or –
– right-clicking your mouse, and selecting Copy.
9. In your web editing tool, open the webpage where you want the button to be seen.
20 September 2008 Website Payments Standard Integration Guide
Page 21

Single-Item Payments – Buy Now Buttons
Getting Started With Buy Now Buttons
IMPORTANT: Be sure that your tool is ready for you to paste HTML code, such as by
switching to an HTML view from a design view of your webpage.
10.Paste the text that you copied from the clipboard onto your webpage where you want the
button to appear, by:
– pressing Ctrl+V.
– or –
– right-clicking your mouse, and selecting Paste.
Enabling JavaScript in Your Browser
PayPal recommends that you keep JavaScript enabled at all times. Many features of the PayPal
website require that JavaScript be enabled in your browser.
Read one of the following topics to learn how to enable JavaScript in your browser.
z “Enabling JavaScript in Internet Explorer” on page 21
z “Enabling JavaScript in FireFox” on page 22
After you enable JavaScript in your browser, you can create a basic Buy Now button by
following the instructions for “Using the Button Creation Tool for a Basic Buy Now Button”
on page 18
1
Enabling JavaScript in Internet Explorer. To enable JavaScript in Internet Explorer:
1. Select Tools > Internet Options… from the menu bar.
The Internet Options dialog box opens.
2. Click the Security tab.
3. Select the Trusted sites icon in the box of Web content zones.
4. Click the Custom level… button.
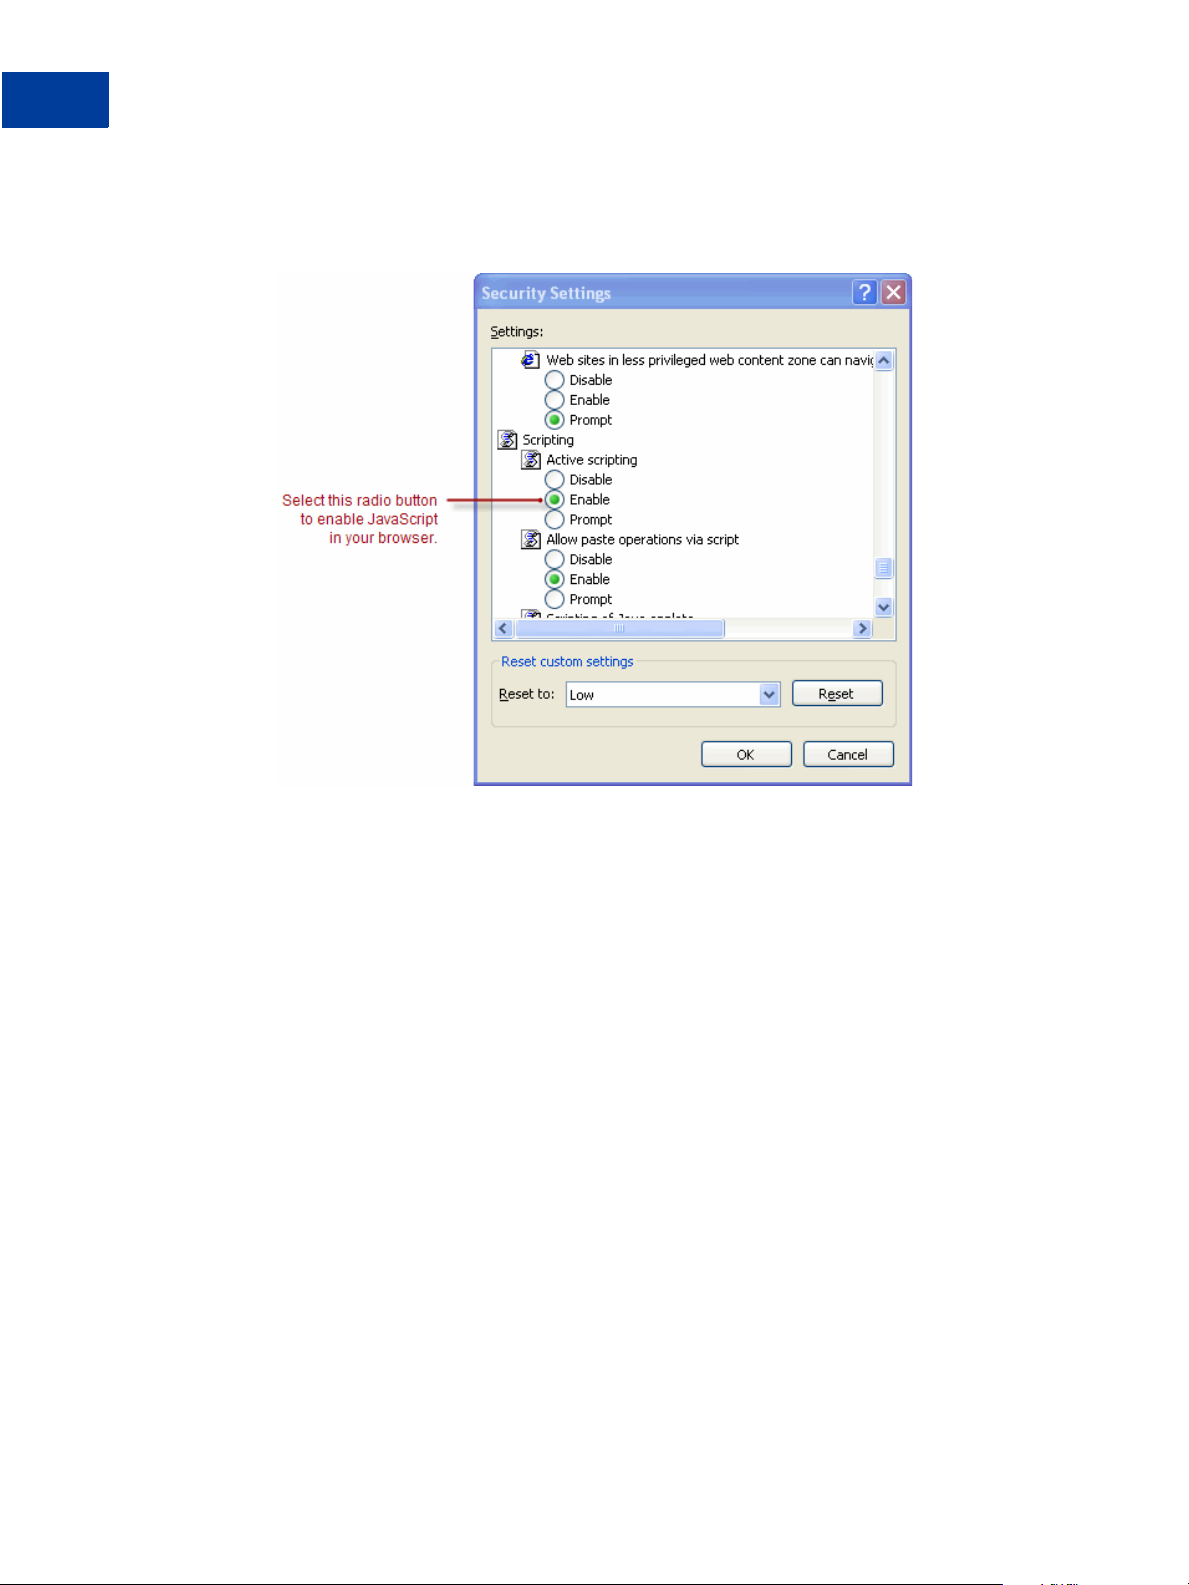
The Security Settings dialog box opens.
Website Payments Standard Integration Guide September 2008 21
Page 22
Single-Item Payments – Buy Now Buttons
1
Getting Started With Buy Now Buttons
5. Scroll down to the Scripting section, and then select the Enable radio button as the option
for active scripting.
6. Click the OK button to dismiss the Security Settings dialog box.
A War ning message box asks if you are sure you want to change the security settings.
7. Click the Ye s button to dismiss the message box.
8. Click the OK button to dismiss the Internet Options dialog box.
Enabling JavaScript in FireFox. To enable JavaScript in Firefox.
1. Select Tools > Options… from the menu bar.
The Options dialog box opens.
2. Select the Content icon at the top of the dialog box.
3. Select the Enable JavaScript checkbox.
4. Click the OK button.
Creating Buy Now Buttons Before You Create Your PayPal Account
You can create basic Buy Now buttons, add them to your website, and begin accepting
payments before you sign up for your PayPal account. Read the following topics to learn more
about creating Buy Now buttons before you create your PayPal account.
22 September 2008 Website Payments Standard Integration Guide
Page 23

Single-Item Payments – Buy Now Buttons
Getting Started With Buy Now Buttons
z “Limitations of Buy Now Buttons Created Without a PayPal Account” on page 23
z “Unclaimed Payments From Buttons Created Without a PayPal Account” on page 23
z “Creating a Basic Buy Now Button Without a PayPal Account” on page 24
Limitations of Buy Now Buttons Created Without a PayPal Account
Consider the following limitations of payment buttons that you create and add to your website
before you sign up for your PayPal account.
z You cannot claim the payments that people authorize during checkout. PayPal collects and
holds the payments as unclaimed until you sign up for your PayPal account.
z Buyers must have a PayPal account to pay you. Any ability to pay by credit card is
disabled.
z PayPal limits the features that you can specify with the button creation tool, such as:
– Saving your buttons in your PayPal account
– Tracking inventory
N OTE: You cannot create payment buttons without a PayPal account if Javascript is disabled
in your browser.
1
Unclaimed Payments From Buttons Created Without a PayPal Account
For buttons that you create without a PayPal account, payments that buyers authorize are held
as unclaimed by PayPal until you sign up. PayPal holds your unclaimed payments under the
email address that you specify when you create the buttons. Make sure to use the same email
address when you sign up for your account. Otherwise PayPal cannot transfer your unclaimed
payments to your PayPal account balance.
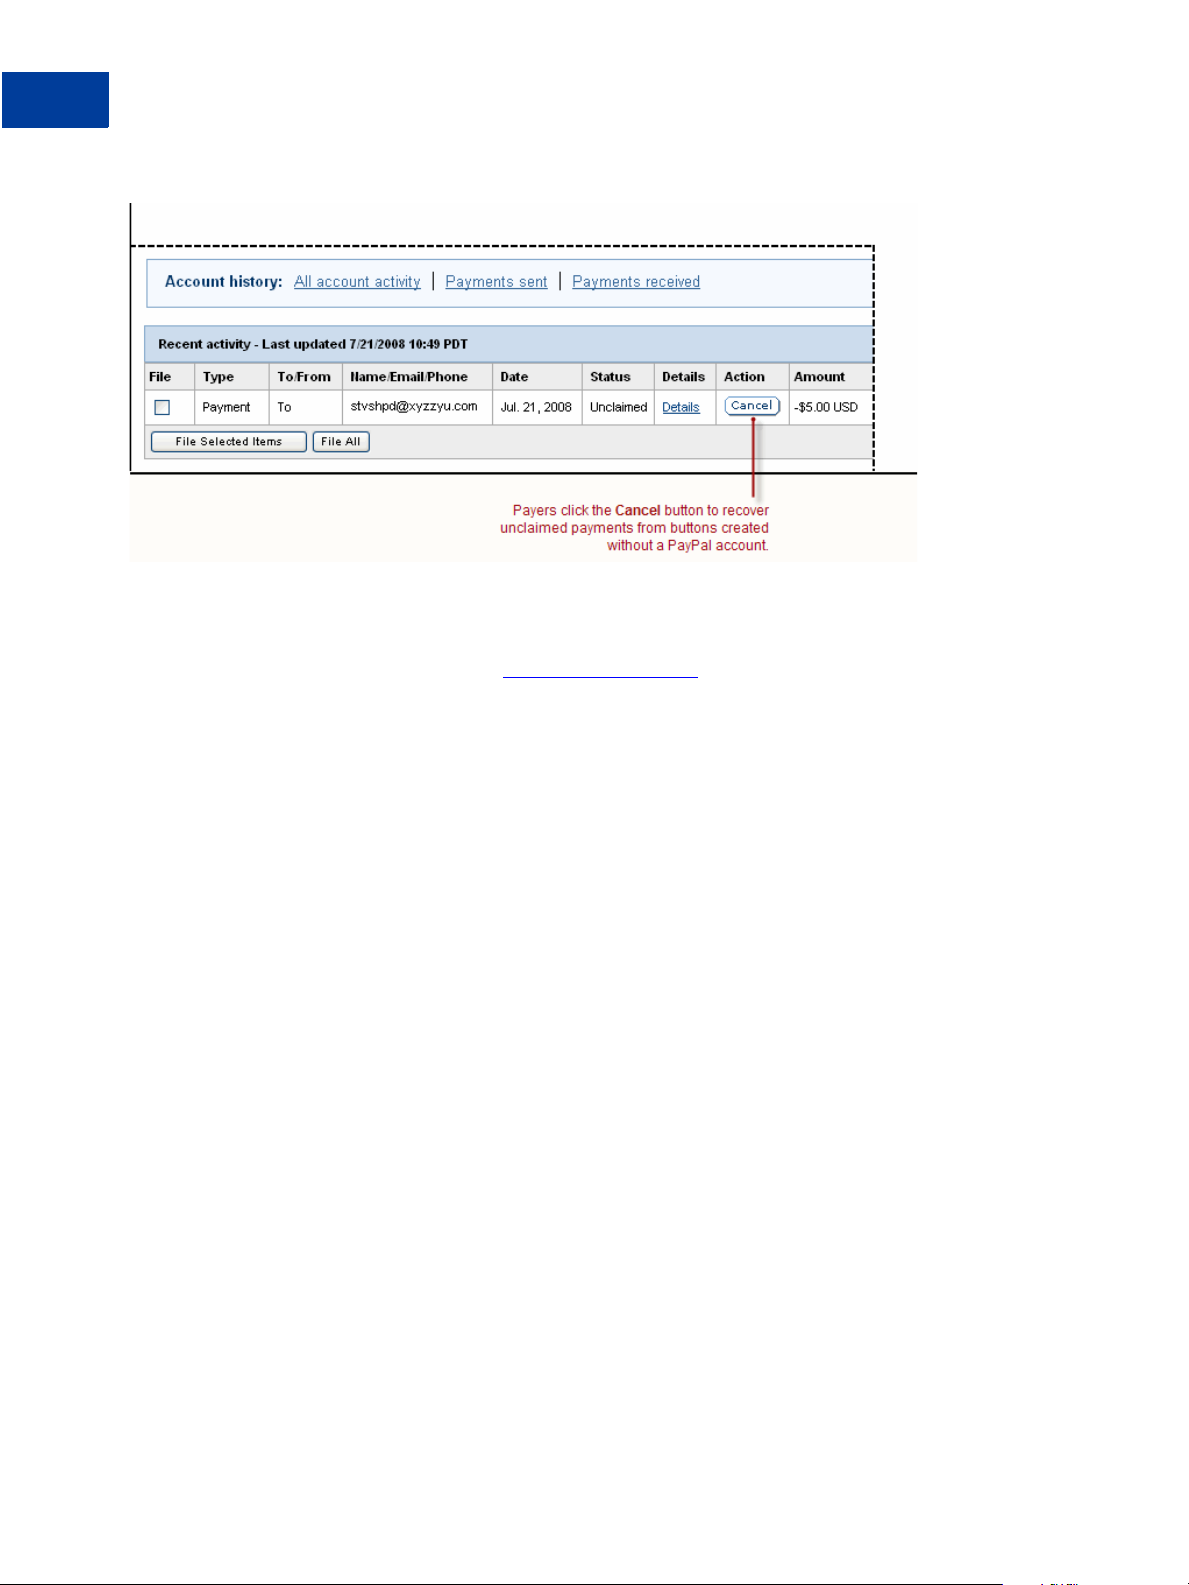
In their PayPal accounts, buyers see unclaimed payments that they made to you from Buy
Now buttons that you created without a PayPal account. Such unclaimed payments are
displayed in their recent account activity and in their transaction history. Until you finish
signing up for your PayPal account, buyers can cancel your unclaimed payments and recover
their funds.
Website Payments Standard Integration Guide September 2008 23
Page 24
Single-Item Payments – Buy Now Buttons
1
Getting Started With Buy Now Buttons
FIGURE 1.1 Unclaimed Payments From Buttons Created Without a PayPal Account
Creating a Basic Buy Now Button Without a PayPal Account
To create a basic Buy Now button without a PayPal account:
1. Visit the PayPal website at
https://www.paypal.com.
2. Click the Business tab.
3. Under the Need to accept credit cards? heading, click the On your website link.
The Choose a payment solution page opens.
4. Under the Website Payments Standard heading, click the Learn more link.
The PayPal Website Payments Standard: Overview page opens.
5. Under the Sell single items heading, click the Create payment button link.
The Create PayPal payment button page opens.
6. In the Accept payments for dropdown menu, select “Products” or “Services”.
7. Select the No; create a “Buy Now” button radio button.
8. Enter the payment details of your item.
– Item name – Enter the name of the item or service that you wish to sell.
– Price – Enter the price of your item.
– Email address to receive payments– Enter the email address that you will use when you
sign up for your PayPal account.
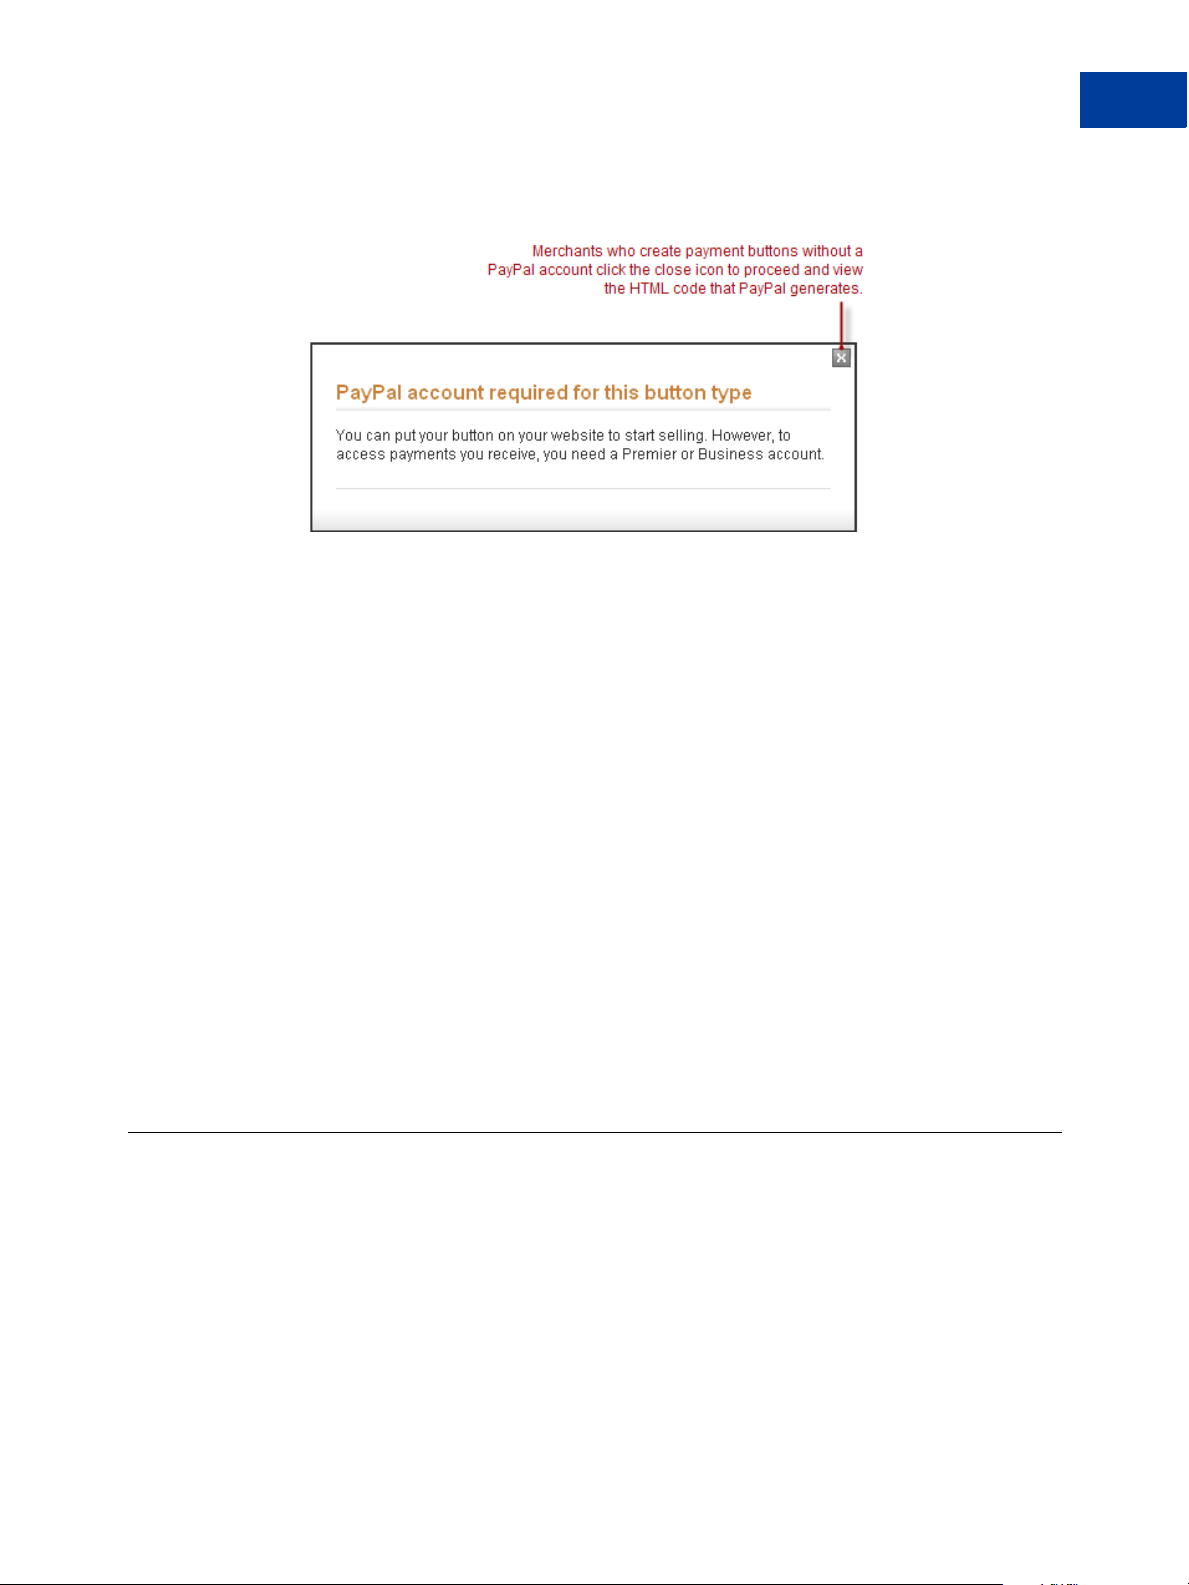
9. Click the Create Button button.
The PayPal account required for this button type message box appears.
24 September 2008 Website Payments Standard Integration Guide
Page 25
Single-Item Payments – Buy Now Buttons
The Checkout Experience With Buy Now Buttons
10.Click the close icon in the upper right corner of the message box to proceed.
The You’ve created your button page opens.
11. Click the Select Code button on the Websites tab to select all of the generated HTML
code.
12.Copy the text that you selected to the clipboard, by:
1
– pressing Ctrl+C.
– or –
– right-clicking your mouse, and selecting Copy.
13.In your web editing tool, open the webpage where you want the button to be seen.
IMPORTANT: Be sure that your tool is ready for you to paste HTML code, such as by
switching to an HTML view from a design view of your webpage.
14.Paste the text that you copied from the clipboard onto your webpage where you want the
button to appear, by:
– pressing Ctrl+V.
– or –
– right-clicking your mouse, and selecting Paste.
The Checkout Experience With Buy Now Buttons
This section demonstrates the PayPal checkout experience for people who click Buy Now
buttons on your website. The following diagram illustrates the steps.
Website Payments Standard Integration Guide September 2008 25
Page 26
Single-Item Payments – Buy Now Buttons
1
The Checkout Experience With Buy Now Buttons
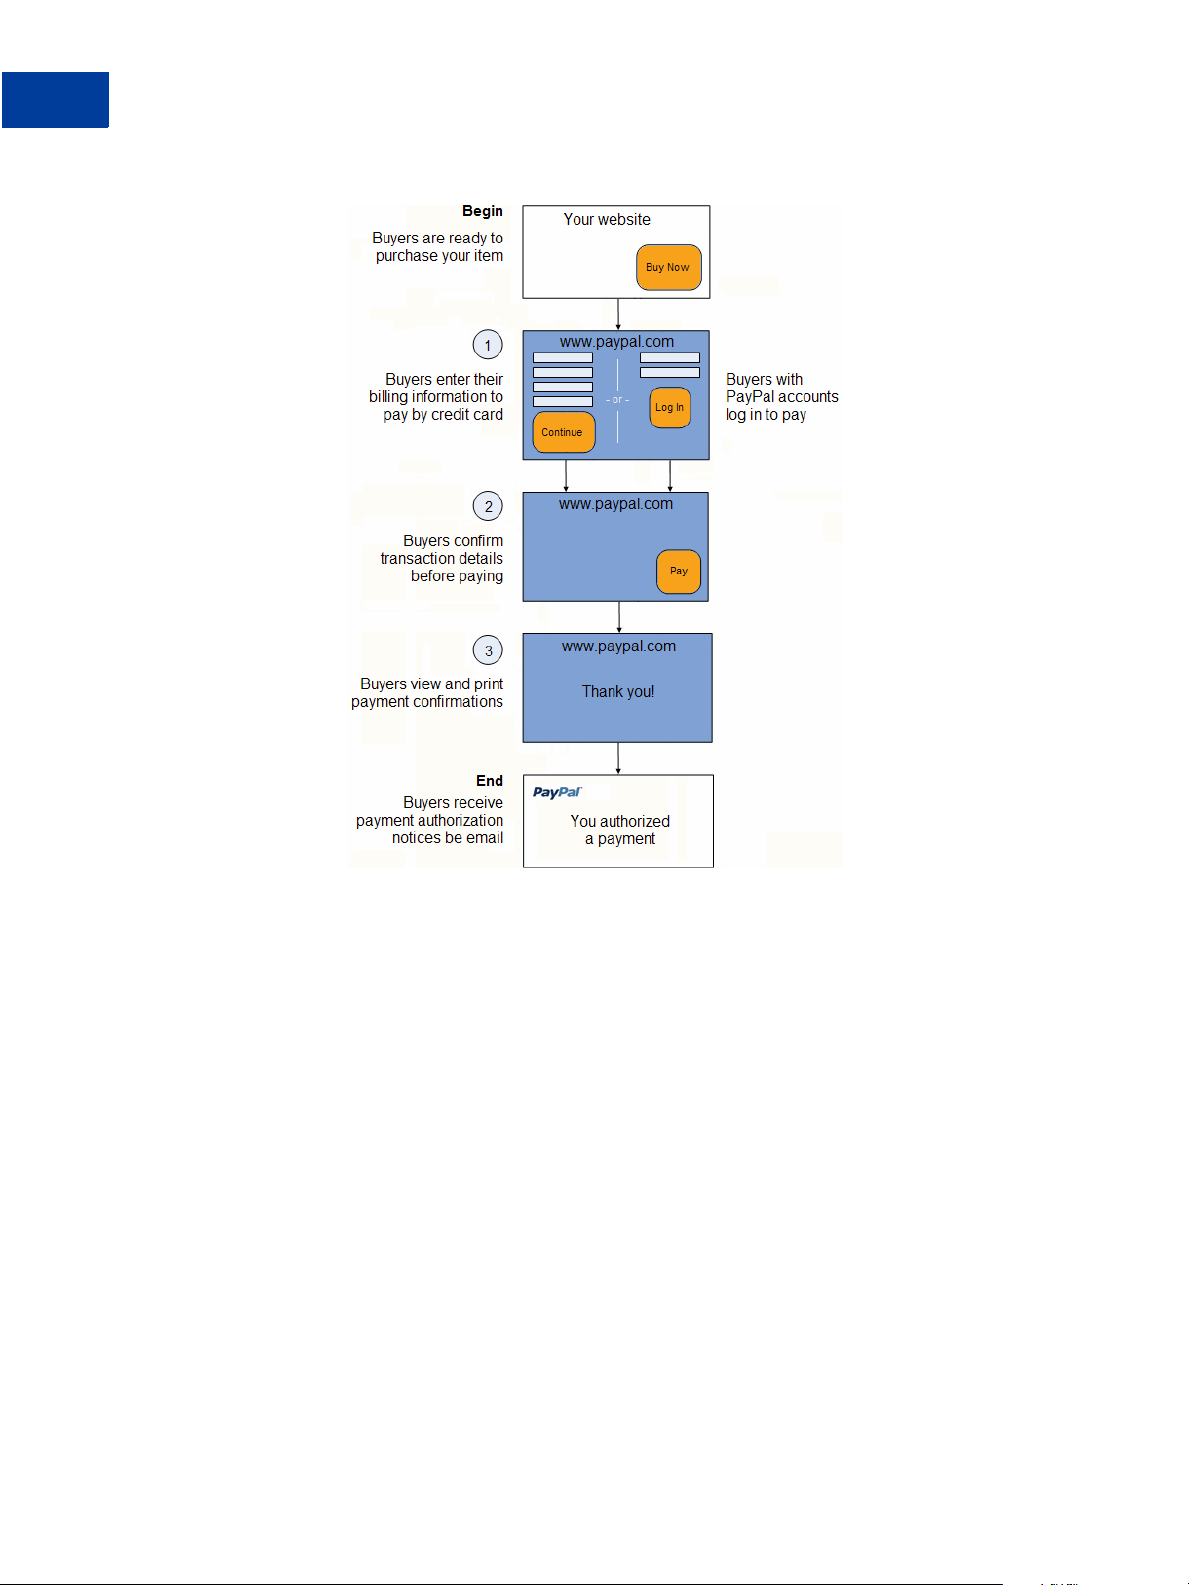
FIGURE 1.2 The Checkout Experience with Buy Now Buttons
Read these topics to better understand the checkout experience with Buy Now buttons:
z “Begin – Buyers are Ready to Purchase Your Item on Your Website” on page 26
z “1 – Buyers Enter Their Billing Information or They Log In to PayPal” on page 27
z “2 – Buyers Confirm Their Transaction Details Before Paying” on page 29
z “3 – Buyers View and Print Their PayPal Payment Confirmations” on page 30
z “End – Buyers Receive Payment Authorization Notices by Email” on page 31
z “Enhancing the Checkout Experience With Buy Now Buttons” on page 32
Begin – Buyers are Ready to Purchase Your Item on Your Website
The basic checkout experience with Buy Now begins when someone on your website is ready
to purchase your item.
26 September 2008 Website Payments Standard Integration Guide
Page 27
Single-Item Payments – Buy Now Buttons
The Checkout Experience With Buy Now Buttons
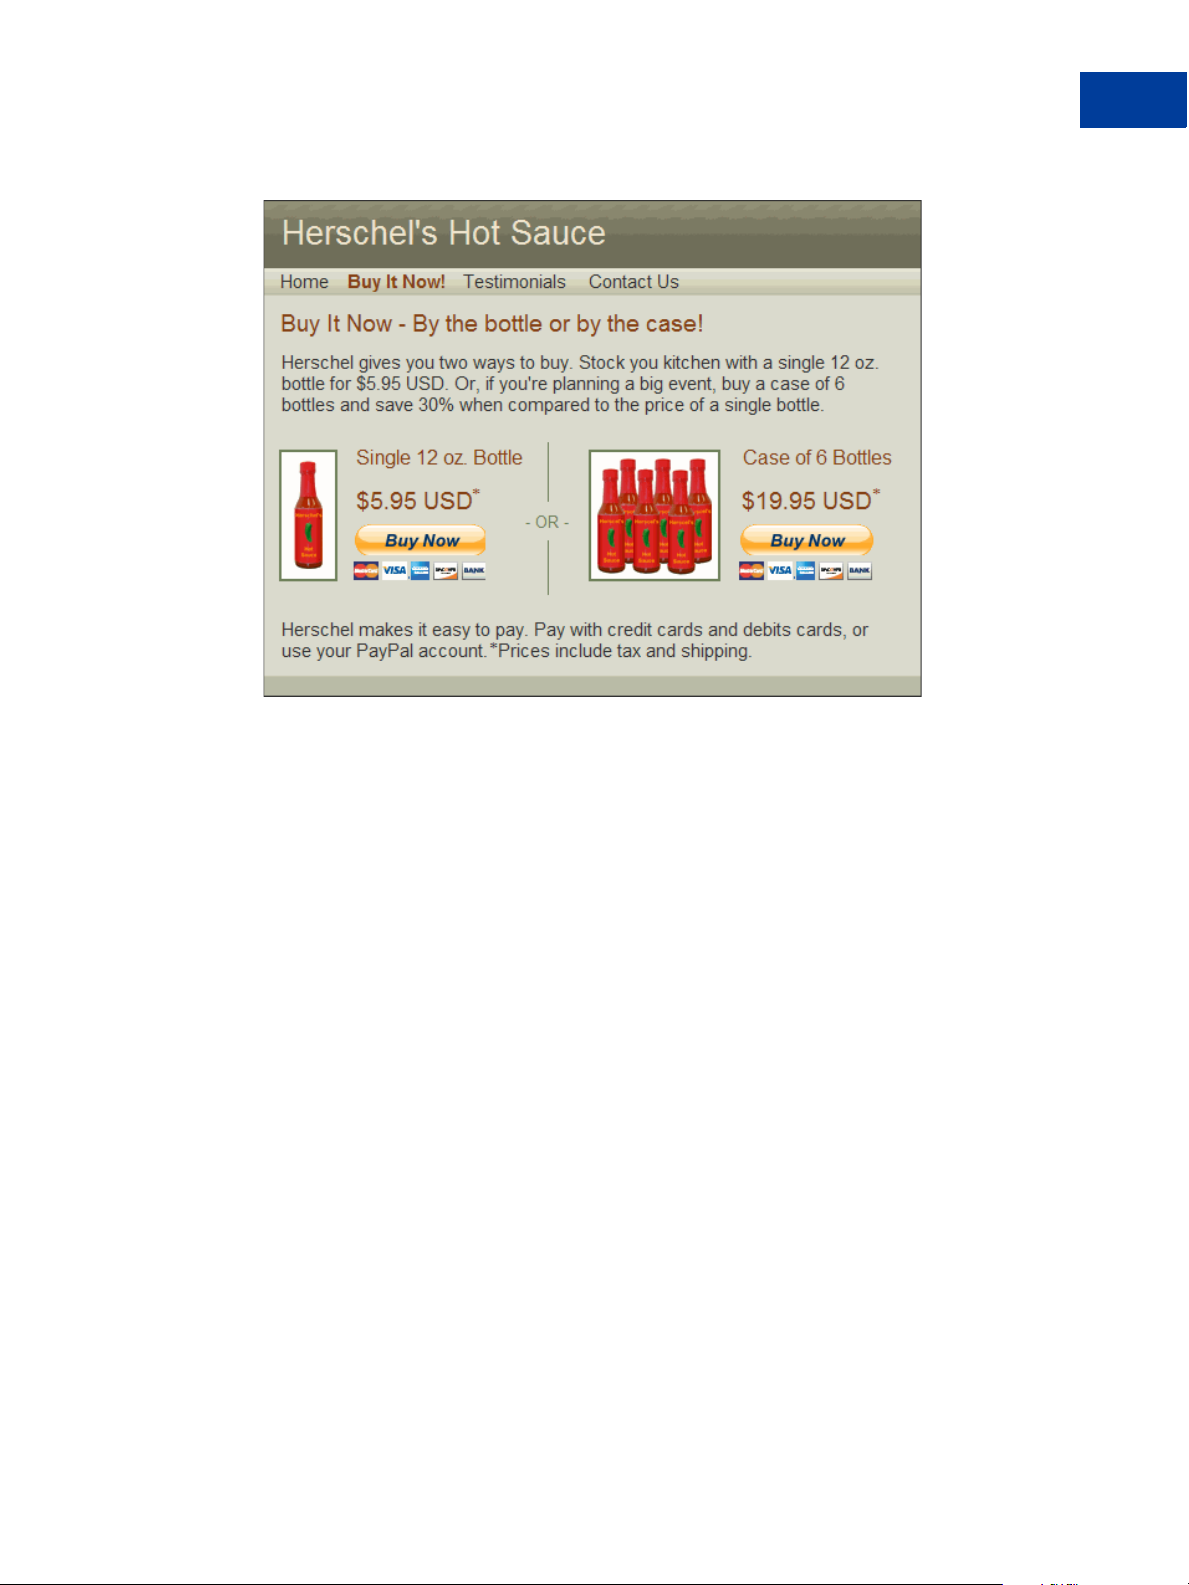
FIGURE 1.3 Buyers Begin on Your Website When They Are Ready To Buy Your Item
1
In this example, Steve begins on Herschel’s Hot Sauce website and decides to try a bottle. He
clicks the Buy Now button for a single 12 oz. bottle to check out.
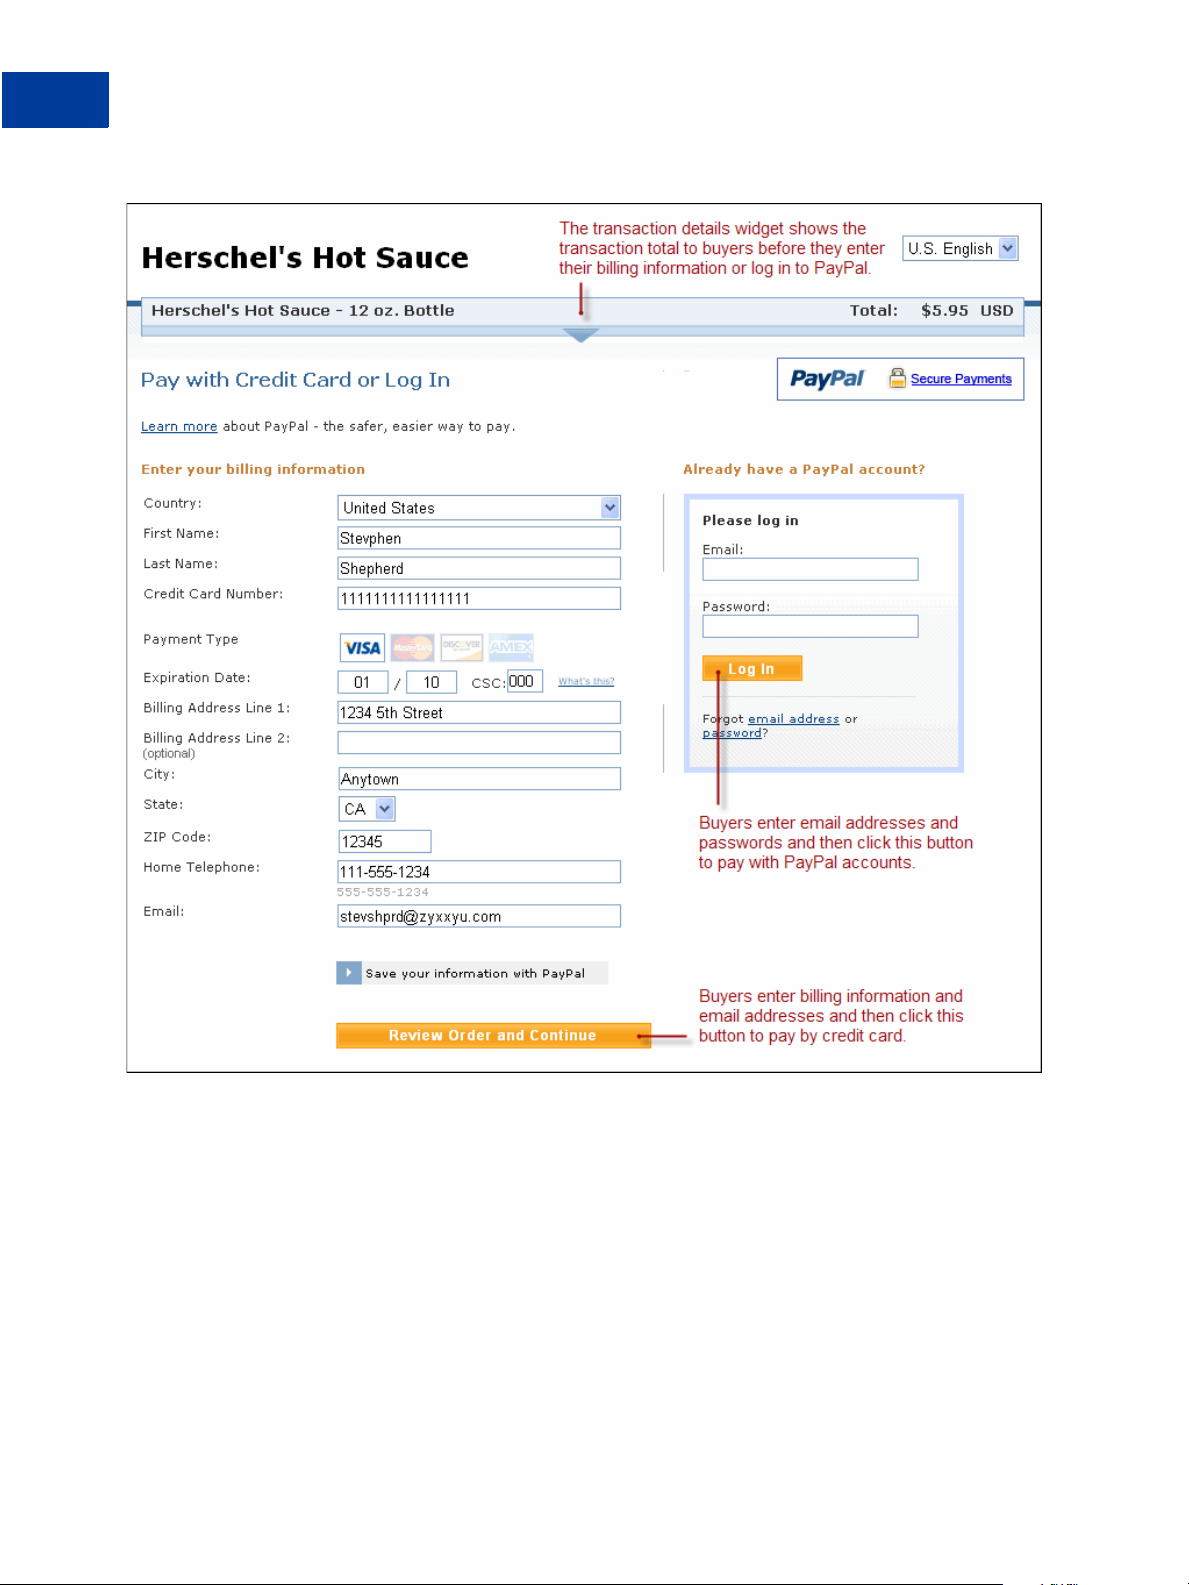
1 – Buyers Enter Their Billing Information or They Log In to PayPal
PayPal displays a billing information/log-in page, which lets buyers enter their credit card
information or log in to PayPal to pay.
Website Payments Standard Integration Guide September 2008 27
Page 28
Single-Item Payments – Buy Now Buttons
1
The Checkout Experience With Buy Now Buttons
FIGURE 1.4 Buyers Enter Their Billinng information or Log In to PayPal
For Buy Now buttons, the PayPal billing information/log-in page shows transaction details
near the top, such as item name and transaction subtotal.
If buyers are satisfied with the details, they do one of the following to select a payment
method:
z To pay with a credit card – Buyers enter their billing information. They also enter their
contact information – email address and home phone number– so that PayPal can send
them their PayPal transaction receipts and can contact them if necessary to complete the
transaction. Then, they click the Review Order and Continue button.
z To pay with a PayPal account – Buyers enter their PayPal credentials and click the Log in
button.
28 September 2008 Website Payments Standard Integration Guide
Page 29
Single-Item Payments – Buy Now Buttons
The Checkout Experience With Buy Now Buttons
In this case, Steve is satisfied with the total transaction amount of $5.95 USD. He doesn’t have
a PayPal account. Instead, he enters his billing and contact information, and then he clicks the
Review Order and Continue button.
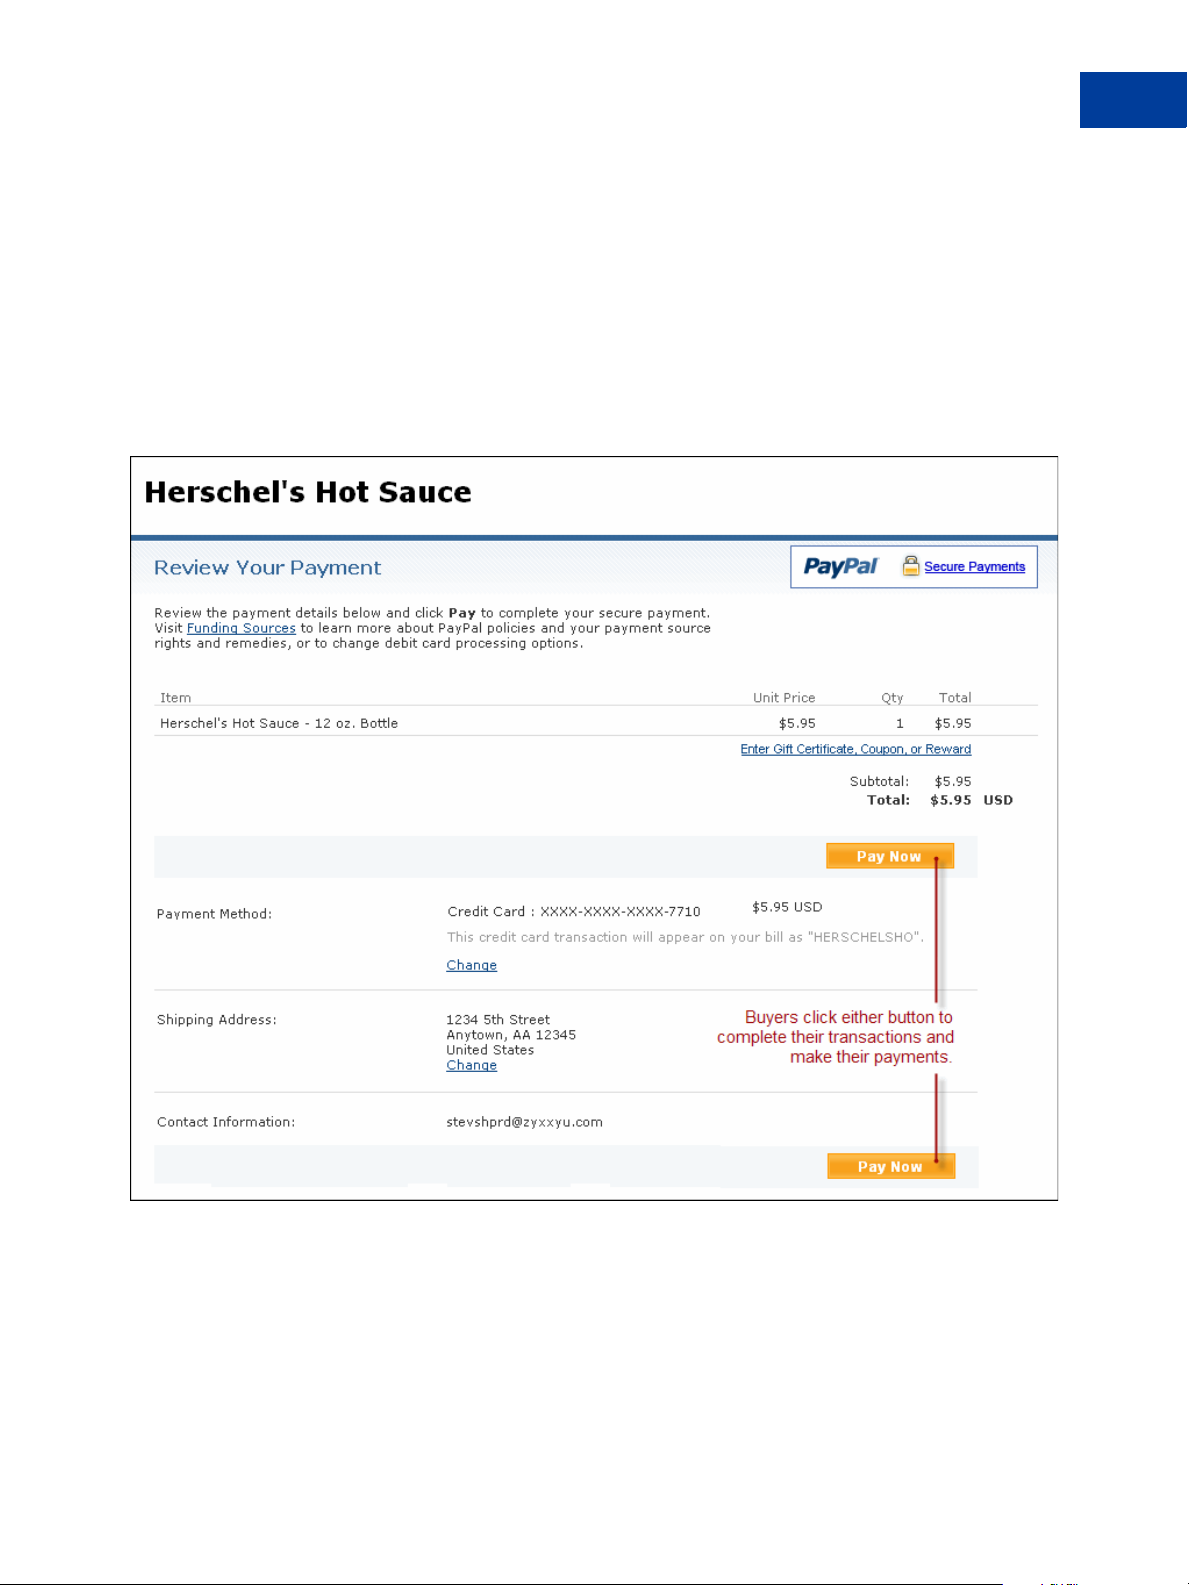
2 – Buyers Confirm Their Transaction Details Before Paying
PayPal displays a transaction confirmation page to let buyers confirm the details before they
complete their transactions and authorize their payments.
FIGURE 1.5 Buyers Confirm Their Payment Details Before Paying
1
In this case, Steve reviews the transaction details and clicks the Pay $5.95 Now button to
complete the transaction and make his payment.
Website Payments Standard Integration Guide September 2008 29
Page 30

Single-Item Payments – Buy Now Buttons
1
The Checkout Experience With Buy Now Buttons
3 – Buyers View and Print Their PayPal Payment Confirmations
PayPal displays a payment confirmation page after buyers pay to let them know that they have
completed their transactions and authorized their payments successfully.
FIGURE 1.6 Buyers View Their Payment Confirmations
From the payment confirmation page, buyers can:
z View the PayPal Receipt ID – the transaction ID – to reconcile their payments.
z Click the View Printable Receipt link to print receipts for their records.
30 September 2008 Website Payments Standard Integration Guide
Page 31

Single-Item Payments – Buy Now Buttons
The Checkout Experience With Buy Now Buttons
FIGURE 1.7 Buyers Print Their PayPal Payment Receipts
1
In this case, Steve prints the PayPal payment receipt for his records.
End – Buyers Receive Payment Authorization Notices by Email
PayPal sends buyers a payment authorization notice by email to confirm the transaction that
they made with the merchant.
Website Payments Standard Integration Guide September 2008 31
Page 32

Single-Item Payments – Buy Now Buttons
1
The Checkout Experience With Buy Now Buttons
FIGURE 1.8 Buyers Receive Payment Authorization Notices by Email
In this case, PayPal sends Steve an email message notifying him of his transaction with
Herschel’s Hot Sauce and his authorization for payment of $5.95 USD.
Enhancing the Checkout Experience With Buy Now Buttons
Website Payments Standard offers these features to enhance the basic checkout experience for
your buyers:
32 September 2008 Website Payments Standard Integration Guide
Page 33

Single-Item Payments – Buy Now Buttons
The Checkout Experience With Buy Now Buttons
z Calculating Tax and Shipping Amounts
z Co-Branding the Checkout Pages with Your Logo and Colors
z Prepopulating the Checkout Pages With Billing and Shipping Addresses
z Returning People to Your Website After They Check Out
Calculating Tax and Shipping Amounts
The basic checkout experience handles tax and shipping, if you provide the information.You
can enhance the checkout experience by specifying tax and shipping rates in your account
profile. PayPal calculates the charges automatically for each transaction. In addition, you can
specify tax and shipping charges individually for items in the payment buttons that you create.
For more information, see:
z “Automatic Calculation of Sales Tax” on page 285
z “Automatic Calculation of Shipping Charges (U.S. Merchants Only)” on page 290
z “Automatic Calculation of Shipping Charges (non-U.S. Merchants Only)” on page 304
Co-Branding the Checkout Pages with Your Logo and Colors
1
The basic checkout experience displays your email address or your business name in the upper
left corner of the checkout pages. You can enhance the checkout experience by setting up
custom page payments in your account profile to specify logos and colors that match the style
of your website. PayPal uses the logo and colors to display the checkout pages. In addition,
you can specify logos and colors with advanced HTML variables that you add to the code of
your button.
For more information, see:
z “Co-Branding the PayPal Checkout Pages” on page 267
z “HTML Variables for Displaying PayPal Checkout Pages” on page 358
Prepopulating the Checkout Pages With Billing and Shipping Addresses
The basic checkout experience has forms for filling in billing and shipping information. You
can enhance the checkout experience by prepopulating the forms with information that you
have on your website about the buyer.
To learn more, see “HTML Variables for Prepopulating PayPal Checkout Pages” on page 361.
Returning People to Your Website After They Check Out
The basic checkout experience leaves people on the PayPal website after they check out. Use
one of the following techniques to enhance the checkout experience so that people return to
your website, instead.
z Return URL – Let people return to a page on your website if they click a return link or
button on the PayPal payment confirmation page.
To learn more, see Step 5 of “Step 3 – Adding Advanced Features to Your Buy Now
Button” on page 47 or “HTML Variables for Displaying PayPal Checkout Pages” on
page 358.
z Auto Return – Have PayPal return people automatically to a page on your website.
Website Payments Standard Integration Guide September 2008 33
Page 34

Single-Item Payments – Buy Now Buttons
1
Managing Buy Now Transactions
IMPORTANT: PayPal recommends that you turn Payment Data Transfer on when you
turn Auto Return on. With Auto Return on, PayPal redirects people to your
website from an alternative PayPal payment confirmation page that does
not display a View Printable Receipt link, so people cannot print PayPal
payment receipts. Payment Data Transfer provides the transaction
information that you need to let people print receipts from your website.
To learn more, see “Auto Return” on page 271.
z Payment Data Transfer – PayPal includes information about the completed transaction
when you use a return URL or Auto Return to send people back to your website. Use the
information that Payment Data Transfer provides to display a “thank you, print your
receipt” page on your website.
To learn more, see the Order Management Integration Guide
Managing Buy Now Transactions
Read the following topics to learn how PayPal helps you manage Buy Now transactions:
z Using Email Notices to Track Buy Now Transactions
z Using Recent Activity to Track Buy Now Transactions
z Using Transaction History to Track Buy Now Transactions
z Using Downloadable History Logs to Track Buy Now Transactions
z Using Instant Payment Notification to Track Buy Now Transactions
Using Email Notices to Track Buy Now Transactions
PayPal sends you email notices when:
z Payments are made.
z Payments are pending.
z Payments are canceled.
.
Generally, PayPal sends email notices to the primary email address of your account.
PayPal can send email notices to an alternate email address, such as to someone in your
organization who handles order processing or accounting. Add the additional email address to
your account profile. Then, use that email address as the one to receive payments when you
use the button creation tool on the PayPal website. Specify the alternate email address as the
value for the business HTML variable when you write the HTML code yourself.
For more information, see Step 10 in the instructions for “Step 1 – Specifying Basic Features
of Your Buy Now Button” on page 40, or Appendix A, “HTML Variables for Website
Payments Standard.”
34 September 2008 Website Payments Standard Integration Guide
Page 35

Single-Item Payments – Buy Now Buttons
Managing Buy Now Transactions
Using Recent Activity to Track Buy Now Transactions
PayPal displays Buy Now transactions in your recent activity, soon after buyers complete their
transactions by clicking Buy Now buttons on your website.
FIGURE 1.9 Using Recent Activity to Track Buy Now Transactions
To view your recent history:
1
1. Log in to you PayPal account.
2. Navigate to My Account > Overview.
The My Account Overview opens.
3. Scroll down to the Recent Activity table near the bottom of the page.
Using Transaction History to Track Buy Now Transactions
PayPal lets you search for Buy Now transactions on the History page. The status of payments
found there can be:
z Completed – Transactions were successful, and funds were credited to your account
z Cleared – Payments cleared senders’ accounts, and funds were credited to your account
z Uncleared – Payments have not cleared sender’s accounts, and funds were not credited
To learn how to work with transaction history, see the Order Management Integration Guide
Using Downloadable History Logs to Track Buy Now Transactions
PayPal lets you download your Buy Now transactions to your computer from the History page.
You can specify a date range for the transactions and the file format of the download file.
.
To learn how to work with downloadable history logs, see the Order Management Integration
Guide.
Website Payments Standard Integration Guide September 2008 35
Page 36

Single-Item Payments – Buy Now Buttons
1
Advanced Features of Buy Now Buttons
Using Instant Payment Notification to Track Buy Now Transactions
PayPal lets your web server receive messages about Buy Now transactions and payment
activity on your account. If you activate Instant Payment Notification, PayPal sends messages
when:
z Payments are first made, with a status of completed or pending.
z Payments clear, fail, or are denied, if the initial status was pending.
To learn more about Instant Payment Notification, see “Instant Payment Notification –
notify_url” on page 343 and the Order Management Integration Guide
.
Advanced Features of Buy Now Buttons
Read the following topics to learn about these advanced features of Buy Now buttons:
z “Offering Product Options With Buy Now Buttons” on page 36
z “Prompting for Item Quantities With Buy Now Buttons” on page 37
Offering Product Options With Buy Now Buttons
Prompt buyers for product options, such as size or color. You can prompt buyers for their
option selections with dropdown menus or with text boxes. PayPal limits you to 7 product
options on a single payment button. Up to 5 options can prompt for selections with dropdown
menus, and up to 2 options can prompt for selections with text boxes.
With Buy Now buttons, you can offer a product option that has separate prices for each
selection by using 1 of the 5 allowable dropdown menus.
Specifying Product Options With Buy Now Buttons
Do one of the following to create Buy Now buttons that offer product options:
z Specify the product options when you create your Buy Now buttons by using the creation
tool on the PayPal website.
See Step 7 of “Step 1 – Specifying Basic Features of Your Buy Now Button” on page 40.
z Specify the product options in the HTML button code that you write manually.
See “Sample HTML Code for Buy Now Buttons With Product Options” on page 62.
36 September 2008 Website Payments Standard Integration Guide
Page 37

Single-Item Payments – Buy Now Buttons
Creating Advanced Buy Now Buttons on the PayPal Website
Prompting for Item Quantities With Buy Now Buttons
By default, PayPal allows buyers to purchase single quantities of your product items with Buy
Now buttons. You can have PayPal prompt buyers for item quantities, instead.
1
Do one of the following to create Buy Now buttons that prompt for item quantities:
z Select the Ye s radio button for prompting buyers for item quantities when you create Buy
Now buttons by using the creation tool on the PayPal website.
See Step 1 of “Step 3 – Adding Advanced Features to Your Buy Now Button” on page 47.
z Specify that you want PayPal to prompt buyers for item quantities in the HTML button
code that you write manually.
See “Sample HTML Code for a Buy Now Button that Prompts for Quantities” on page 66.
Creating Advanced Buy Now Buttons on the PayPal Website
Read the following topics to learn more about creating Buy Now buttons on the PayPal
website:
z “Generating Code for Payment Buttons and Email Payment Links” on page 37
z “Protecting HTML Code for Payment Buttons” on page 38
z “Using the Button Creation Tool for Advanced Buy Now Buttons” on page 38
z “Creating Advanced Buy Now Buttons With JavaScript Disabled” on page 52
Generating Code for Payment Buttons and Email Payment Links
When you create Buy Now buttons with tools on the PayPal website, PayPal generates HTML
code for website payment buttons. Then, you copy and paste the HTML code onto the pages of
your website.
Website Payments Standard Integration Guide September 2008 37
Page 38

Single-Item Payments – Buy Now Buttons
1
Creating Advanced Buy Now Buttons on the PayPal Website
In addition to HTML code, PayPal generates URL code for email payment links. Use email
payment links to add Buy Now functionality to your email messages. If your web editing tool
or your service provider does not allow you to paste HTML code onto your webpages, you
may be able to paste the URL code for email payment links onto your webpages instead.
Protecting HTML Code for Payment Buttons
When you create Buy Now code with tools on the PayPal website, PayPal lets your protect the
HTML button code that it generates by encrypting part of it. Protecting the HTML code of
your payment buttons helps protect against malicious tampering and fraudulent payments.
IMPORTANT: Merchants with significant payment volume are required to take precautions
on securing Website Payments Standard buttons.
For more information, see Chapter 6, “Securing Your Website Payments Standard Buttons
Using the Button Creation Tool for Advanced Buy Now Buttons
Read the following topics to learn how to use the button creation tool for Buy Now buttons:
z “The Basic Steps for Using the Tool With Buy Now Buttons” on page 38
z “Saving Buy Now Buttons in Your PayPal Account” on page 39
z “Tracking Inventory” on page 39
z “Adding Advanced Features to Buy Now Buttons With HTML Variables” on page 40
z “Step 1 – Specifying Basic Features of Your Buy Now Button” on page 40
z “Step 2 – Tracking Inventory With Your Buy Now Button” on page 44
z “Step 3 – Adding Advanced Features to Your Buy Now Button” on page 47
z “Copying and Pasting the Buy Now Code” on page 50
N OTE: If JavaScript is disabled in your browser, PayPal provides an alternative tool described
in “Creating Advanced Buy Now Buttons With JavaScript Disabled” on page 52.
The Basic Steps for Using the Tool With Buy Now Buttons
The button creation tool for Buy Now buttons is a single webpage with three sections:
z Step 1 – Choose button type and enter payment details – This section lets you specify
the details of your Buy Now button. You can specify product options that buyers can
choose, and you can specify item-specific charges for shipping and tax.
z Step 2 – Track inventory (optional) – This section lets you control whether to save your
button in your PayPal account. If you save your button, you can enter information that
PayPal uses to track inventory on the item.
z Step 3 – Customize advanced features (optional) – This section lets you work with
advanced features of Buy Now buttons, including letting buyers change item quantities. If
you are familiar with HTML programming and the advanced HTML variables supported
by Website Payments Standard buttons, you can enter them here.
38 September 2008 Website Payments Standard Integration Guide
Page 39

Single-Item Payments – Buy Now Buttons
Creating Advanced Buy Now Buttons on the PayPal Website
One section at a time is open for you to work with. To work with another section, click its step
bar to expand it.
You can switch between the sections as often as you like, until you click the Create Button
button at the bottom of the page. Then, PayPal generates the code for your button and displays
it on the You are viewing your button code page. Copy the code and paste it onto your
webpage, and your payment button is complete.
1
Saving Buy Now Buttons in Your PayPal Account
By default, the button creation tool saves payment buttons in your PayPal account. The tool
saves your button and generates the code when you click the Create Button. You must copy
and paste the generated code onto your webpages, whether or not you save your button at
PayPal. The generated code is shorter for saved buttons, because PayPal keeps most of the
information about your button in your account, instead of placing it in the code that you add to
your website.
Saving your payment buttons in your PayPal account has these benefits:
z Your payment buttons are more secure, because the generated code that add to your website
contains no information that can be tampered with to produce fraudulent payments.
z You can edit the details and options for your payment buttons in your PayPal account,
without changing the button code that you added to your website.
N OTE: If you change product options, you must copy and paste the code newly generated
by PayPal to replace the code that you pasted previously.
z You can track inventory.
Use the Step 2 section of the button creation tool to control whether your button is saved in
your PayPal account. You can have a maximum of 1,000 saved buttons in your PayPal
account.
Tracking Inventory
PayPal can track inventory for items that you sell with Buy Now buttons if you save them in
your PayPal account. You can track inventory for the item itself or by its product options.
Website Payments Standard Integration Guide September 2008 39
Page 40

Single-Item Payments – Buy Now Buttons
1
Creating Advanced Buy Now Buttons on the PayPal Website
If you track inventory, PayPal helps you avoid oversold situations. PayPal sends you an alert
by email when your inventory on hand falls to or below the alert level you specify. You have
the option to let oversold transactions go through or to warn buyers and prevent them from
buying more than your quantity on hand.
Use the Step 2 section of the button creation tool to specify the information that PayPal uses to
track inventory.
Adding Advanced Features to Buy Now Buttons With HTML Variables
Some advanced features of payment buttons can be specified only with HTML variables. If
you are familiar with HTML programming and the advanced HTML variables supported by
Website Payments Standard payment buttons, you can enter them in the button creation tool
before the button code is generated.
Use the Step 3 section of the button creation tool to enter advanced HTML variables that you
want to include in your payment button.
For more information, see Step 6 of “Step 3 – Adding Advanced Features to Your Buy Now
Button” on page 47.
Step 1 – Specifying Basic Features of Your Buy Now Button
To begin using the button creation tool for Buy Now buttons:
1. Log in to your PayPal Premier or Business account at
https://www.paypal.com.
The My Account Overview page opens.
2. Click the Profile subtab.
The Profile Summary page opens.
3. Under the Selling Preferences heading, do one of the following:
40 September 2008 Website Payments Standard Integration Guide
Page 41

Single-Item Payments – Buy Now Buttons
Creating Advanced Buy Now Buttons on the PayPal Website
– Click the My Saved Buttons link, and then click the Create new button link in the
upper right of the page, if you previously saved payment buttons in your PayPal account.
To create a new button that is similar to a button that you saved, find the saved button in
the list. Then, click the Action dropdown menu at the right and click the Create similar
button link.
1
– Click the Create New Button link, if you have no buttons saved in your PayPal account.
The Create PayPal payment button page opens.
4. In the Accept payments for dropdown menu, select “Products” or “Services”.
5. Select the No; create a “Buy Now” button radio button.
6. Enter the payment details of your item.
– Item name – Enter the name of the item or service that you wish to sell.
– Item ID – (optional) Enter the inventory ID or tracking number of your item, if you
assign such IDs to your products.
If you want to set up your item so that PayPal tracks inventory levels, enter a value that
is unique among all the items that you sell and want PayPal to track. For more
information, see “Step 2 – Tracking Inventory With Your Buy Now Button” on page 44.
– Price – Enter the price of your item.
If you want to add product options with different prices for each option that buyers can
select, do not enter a price here. For more information, see Step 7 below.
– Currency – Select the currency in which you priced the item; the dropdown menu
automatically selects the currency of your primary balance.
If you want to customize the country and language of the button, make sure that you
select an appropriate currency here. For more information, see Step 8 below.
7. Customize your button with product options (optional).
Do any of the following:
Website Payments Standard Integration Guide September 2008 41
Page 42

Single-Item Payments – Buy Now Buttons
1
Creating Advanced Buy Now Buttons on the PayPal Website
– Add dropdown menu with price/option – Select this checkbox to add a dropdown
menu of product options, with a separate price for each option.
Enter a name for the dropdown menu, such as “Color”. For each menu option, enter a
name, such as “Red”, “Blue”, or “Green”, and the price you want buyers to pay. Select
the currency for your prices from the dropdown menu. You can add a maximum of 10
priced options to the menu.
Click the Done button to preview the effect in the Buyer’s View pane.
Click the Edit link to change the name and options of your dropdown menu. To remove
an option, clear the menu option name and price, and then click the Done button.
Click the Delete link to remove the dropdown menu from your button.
– Add dropdown menu without prices – Select this checkbox to add a dropdown menu
of product options, without separate prices.
Enter a name for the dropdown menu, such as “Size”. For each menu option, enter a
name, such as “Small”, “Medium”, or “Large”.
Click the Done button to preview the effect in the Buyer’s View pane.
Click the Edit link to change the name and options of your dropdown menu. To remove
an option, clear the menu option name and click the Done button.
Click the Delete link to remove the dropdown menu from your button.
Click the Add another dropdown menu link to open a set of fields for another
dropdown menu of options without prices. You can add a maximum of 4 dropdown
menus, with a maximum of 10 options per menu.
– Add text field – Select this checkbox to add a text box in which buyers can enter option
information.
Enter a name for the text box, such as “Enter the text you want engraved”.
Click the Done button to preview the effect in the Buyer’s View pane.
Click the Edit link to change the name of the text field.
Click the Delete link to remove the text box from your button.
Click the Add another text box link to open a a field for the name of another text box.
You can add a maximum of 2 text boxes.
For more information, see “Offering Product Options With Buy Now Buttons” on page 36.
8. Customize the appearance and the language of your button (optional).
Click the Customize appearance link and select one of the following:
– PayPal button – Select this radio button to use a button image that is hosted by PayPal.
You can configure the size of the button, whether the button displays payment card logos,
and the country and language for the button text.
If you change the country, ensure the currency that you selected in Step 6 above is
appropriate.
– Use your own button – Select this radio button to specify the URL of your own button
image that is not hosted by PayPal. Use your own button image if the buttons hosted by
PayPal do not fit the look of your website.
If your image is hosted securely, change the text box to begin with https//.
42 September 2008 Website Payments Standard Integration Guide
Page 43

Single-Item Payments – Buy Now Buttons
Creating Advanced Buy Now Buttons on the PayPal Website
9. Add shipping charges and tax rates to your item (optional).
You can add shipping charges and tax rates for your item here. They override the tax and
shipping rates that PayPal calculates automatically based on rates that you specify in your
account profile.
– Shipping – Enter a specific amount to charge for shipping this item.
The currency for the amount is the same as the currency for the item. Enter zero (0.00)
for items that do not incur shipping charges. The amount you enter here overrides the
automatic calculation of shipping charges on the item.
N OTE: Before you can accept payments from Buy Now buttons with specific shipping
costs entered here, you must enable the override of shipping methods in the
Shipping Calculations section of your account profile. You can create your button
successfully, but you cannot accept payments from your button until you enable
shipping cost overrides. Ensure that you enable shipping cost overrides for all the
shipping methods that you set up for your account. For more information, see
“Automatic Calculation of Shipping Charges (U.S. Merchants Only)” on page 290
or “Automatic Calculation of Shipping Charges (non-U.S. Merchants Only)” on
page 304.
– Tax – Enter a percentage to calculate the tax on this item, regardless of quantity.
The currency for the calculated tax will be the same as the currency for the item. Enter
zero (0.000) for non-taxable items to override automatic sales tax calculation on the
item.
1
10.Choose between your merchant ID and your email address.
Select one of the following radio buttons to associate transactions from your button with
your PayPal account.
– Secure merchant account ID – Select this radio button to associate your button with
your PayPal account by using your merchant ID. PayPal assigns a unique merchant ID
to your account and includes it automatically in the code for your button.
Your merchant ID is a more secure way to associate your button with your account than
using your email address. Only PayPal can match your merchant ID and PayPal
account, and your PayPal email address is never exposed in the HTML button code of
your webpages.
– Plain text email – Select this radio button to associate your button with your PayPal
account by using your email address. Select from the email addresses in your PayPal
account. For example, you might select the email address of the person in your
organization who handles order fulfillment or accounting. All payments are deposited to
your PayPal account balance, regardless of which email address receives payments from
this button. Only confirmed email addresses can be used to receive payments.
IMPORTANT: Your email address is a less secure way to associate your button with your
PayPal account than by using your merchant ID. Your email address is
exposed on webpages wherever you paste the HTML code for your button.
Website Payments Standard Integration Guide September 2008 43
Page 44

Single-Item Payments – Buy Now Buttons
1
Creating Advanced Buy Now Buttons on the PayPal Website
11. Do one of the following:
– Click the Create Button button if you specified all the features for your button.
Follow the instructions for “Copying and Pasting the Buy Now Code” on page 50.
– Click the Step 2 bar if you want PayPal to track inventory levels for your item or if you
do not want to save your button in your PayPal account.
Follow the instructions for “Step 2 – Tracking Inventory With Your Buy Now Button”
on page 44.
– Click the Step 3 bar if you want to specify advanced features for your button, such as
prompting buyers for item quantities.
Follow the instructions for “Step 3 – Adding Advanced Features to Your Buy Now
Button” on page 47.
Step 2 – Tracking Inventory With Your Buy Now Button
Use the Step 2 section of the button creation tool to control whether to save the important
details your button in your PayPal account and to provide inventory tracking information for
your item.
For more information, see “Tracking Inventory” on page 39.
1. Select the Save button at PayPal checkbox to save your button in your PayPal account
and to enable your ability to track inventory for your item.
2. Select the Track inventory checkbox to enable entering information that PayPal uses to
track inventory for your item. Then, do one of the following:
– By Item – Select this radio button if you want to track inventory regardless of product
options selected by buyers.
Enter the quantity that you currently have in stock and an alert level. PayPal sends you
an alert by email when your inventory on hand falls to or below the alert level.
– By Option – Select this radio button if want to track inventory by product options that
you specified during Step 7 of “Step 1 – Specifying Basic Features of Your Buy Now
44 September 2008 Website Payments Standard Integration Guide
Page 45

Single-Item Payments – Buy Now Buttons
Creating Advanced Buy Now Buttons on the PayPal Website
Button” on page 40. If you set up product options with prices, the radio button is selected
automatically.
For each option listed, enter a unique item ID, the quantity that you currently have in
stock, and an alert level. PayPal sends you an alert by email when your inventory on
hand for any option falls to or below its alert level.
Under the Can customers buy an item when it is sold out? heading, do one of the
following:
– Ye s – Select this radio button to let buyers checkout and authorize their payments, even
when inventory tracking shows that your item would become oversold. Buyers are not
informed of oversold or out-of-stock situations nor that their items will be on back order
after they complete their transactions.
– No – Select this radio button to prevent buyers from checking out and authorizing their
payments when inventory tracking shows that your item would become oversold. In the
text box, enter the URL of a page on your website where you want PayPal to send buyers
1
Website Payments Standard Integration Guide September 2008 45
Page 46

Single-Item Payments – Buy Now Buttons
1
Creating Advanced Buy Now Buttons on the PayPal Website
of out of stock items. When PayPal detects an oversold situation, PayPal lets buyers
know that the item is out of stock.
If there are some items in stock, but not enough to fulfill a buyer’s request, PayPal
proposes the amount currently available.
Buyers can adjust their request to match the quantity on hand. Otherwise, they cannot
check out.
If there are no items in stock, PayPal lets buyers know that the item is completely sold
out.
Buyers click the Continue Shopping button to return to the webpage at the URL that
you specified.
.”No” is the default choice for this feature.
46 September 2008 Website Payments Standard Integration Guide
Page 47

Single-Item Payments – Buy Now Buttons
Creating Advanced Buy Now Buttons on the PayPal Website
3. Do one of the following:
– Click the Create Button button if you specified all the features for your button.
Follow the instructions for “Copying and Pasting the Buy Now Code” on page 50.
– Click the Step 3 bar if you want to specify advanced features for your button, such as
prompting buyers for item quantities.
Follow the instructions for “Step 3 – Adding Advanced Features to Your Buy Now
Button” on page 47.
– Scroll to the top of the page and click the Step 1 bar if you want to adjust the basic
features of your button.
Follow the instructions for “Step 1 – Specifying Basic Features of Your Buy Now
Button” on page 40, beginning with Step 6.
1
Step 3 – Adding Advanced Features to Your Buy Now Button
Use the Step 3 section of the button creation tool to specify advanced features of your button.
1. Do you want to let buyers change order quantities (optional)?
Website Payments Standard Integration Guide September 2008 47
Page 48

Single-Item Payments – Buy Now Buttons
1
Creating Advanced Buy Now Buttons on the PayPal Website
– Ye s – Select this radio button to prompt buyers for item quantities. PayPal prompts
buyers for quantities after they click your Buy Now button.
Use this feature cautiously, because buyers could specify quantities greater than you
could fulfill.
If you save your button in your PayPal account and you set up inventory tracking for
your item in “Step 2 – Tracking Inventory With Your Buy Now Button” on page 44,
PayPal can help prevent buyers from purchasing more items than you can fulfill.
– No – Select this radio button to let buyers purchase only one item at a time. “No” is the
default choice for this advanced feature.
2. Can your buyers add special instructions in a message to you (optional)?
– Ye s – Select this radio button to let buyers add special instructions to you during
checkout. In the Name of message box text box, enter the text that you want displayed
48 September 2008 Website Payments Standard Integration Guide
Page 49

Single-Item Payments – Buy Now Buttons
Creating Advanced Buy Now Buttons on the PayPal Website
for the text box in which buyers enter there special instructions; the default value is “Add
special instructions to merchant”.
“Yes” is the default choice for this feature.
– No – Select this radio button if you do not want a text box for special instructions.
1
3. Do you need your buyers’ shipping addresses (optional)?
– Ye s – Select this radio button to prompt buyers to select or enter shipping addresses
during checkout.
“Yes” is the default choice for this feature.
– No – Select this radio button if you do not want to prompt buyers for shipping addresses.
Select this option for items that do not require shipping, such as digital goods that buyers
download, or if the item is a service that does not require on-site delivery.
4. Take buyers to a specific webpage (URL) after checkout cancellation (optional)?
Select the checkbox and enter a URL in the text box if you have a special page on your
website where you want buyers to return if they cancel their checkouts before completing
their transactions.
5. Take buyers to a specific webpage (URL) after successful checkout (optional)?
Select the checkbox and enter a URL in the text box if you have a special page on your
website where you want buyers to return after they complete their checkouts successfully.
N OTE: If you have a special webpage for buyers who return to your website after checking
out successfully, consider implementing Payment Data Transfer so that you can
display information about the completed transactions. For more information, see the
Order Management Integration Guide
.
Website Payments Standard Integration Guide September 2008 49
Page 50

Single-Item Payments – Buy Now Buttons
1
Creating Advanced Buy Now Buttons on the PayPal Website
6. Add advanced variables to the HTML code of your payment button (optional).
If you are familiar with the HTML programming and the advanced HTML variables
supported by Website Payments Standard payment buttons, you can enter them here. Select
the checkbox, and then enter the variables in the text box below it.
Enter any advanced HTML variables in the following, name/value-pair format:
variableName=allowableValue
For example, if you want to handle purchases as orders rather than as final sales, use the
HTML variable paymentaction with the value order. If you were to include the
variable in HTML code that you write manually, you would use the standard HTML
format:
<input type="hidden" name="paymentaction" value="order">
Enter the variables in the text box using the shortened, name/value-pair format, instead:
paymentaction=order
Do not enclose values in quotes, even if values contain spaces. PayPal surrounds the value
from the equal sign (=) to the end of the line with quotes in the generated HTML code.
For more information, see Chapter 11, “HTML Form Basics for Website Payments
Standard.”
7. Do one of the following:
– Click the Create Button button if you specified all the features for your button.
Follow the instructions for “Copying and Pasting the Buy Now Code” on page 50.
– Scroll to the top of the page and click the Step 1 bar if you want to adjust the basic
features of your button.
Follow the instructions for “Step 1 – Specifying Basic Features of Your Buy Now
Button” on page 40, beginning with Step 6.
– Scroll to the top of the page and click the Step 2 bar if you want to adjust information
that PayPal uses to track inventory levels or if you do not want to save your button in
your PayPal account.
Follow the instructions for “Step 2 – Tracking Inventory With Your Buy Now Button”
on page 44.
Copying and Pasting the Buy Now Code
After you click the Create Button button, PayPal displays the You are viewing your button
code page. The page contains tabs with Buy Now code for specific situations:
z Website – Copy and paste the HTML button code on this tab onto the pages of your
website.
z Email – Copy and paste the URL email payment link code on this tab into email templates
and messages, or paste it onto webpages if your hosting provider does not allow you to
paste HTML code.
Regardless of saving your buttons in your PayPal account, you must copy and paste the code
that PayPal generates onto your own webpages and into email templates and messages.
50 September 2008 Website Payments Standard Integration Guide
Page 51

Single-Item Payments – Buy Now Buttons
Creating Advanced Buy Now Buttons on the PayPal Website
Copying and Pasting the HTML Code for the Buy Now Button. The Websit e tab on the
You are viewing your button code page contains the generated HTML code for your Buy
Now payment button.
If in “Step 2 – Tracking Inventory With Your Buy Now Button” on page 44 you specified that
you do not want to save your button in your Paypal account, PayPal protects the generated
HTML button code with encryption. Protected HTML code helps secure your buttons against
malicious tampering and fraudulent payments.
You can the expose the code of your payment button by clicking the Remove code protection
link at the upper right of text box. For example, you might remove protection so that you can
edit the code later to change the item price. If you remove code protection, you must use other
methods that PayPal recommends to secure your payment button. Click the Protect code link
to restore the button protection that you removed.
IMPORTANT: Merchants with significant payment volume are required to take precautions
on securing Website Payment Standard buttons. For more information,
Chapter 6, “Securing Your Website Payments Standard Buttons.”
To copy and paste the HTML code for your Buy Now payment button:
1
1. Click the Select Code button on the Websites tab to select all of the generated HTML
code.
2. Copy the text that you selected to the clipboard, by:
– pressing Ctrl+C.
– or –
– right-clicking your mouse, and selecting Copy.
3. In your web editing tool, open the webpage where you want the button to be seen.
IMPORTANT: Be sure that your tool is ready for you to paste HTML code, such as by
switching to an HTML view from a design view of your webpage.
4. Paste the text that you copied from the clipboard onto your webpage where you want the
button to appear, by:
– pressing Ctrl+V.
– or –
– right-clicking your mouse, and selecting Paste.
Copying and Pasting the Code for the Buy Now Email Payment Link. The Email tab on
the You are viewing your button code page contains the generated URL code for your Buy
Now email payment link.
N OTE: PayPal cannot protect the URL code for email payment links. Secure the payments you
receive from email payment links by using an alternative method that does not involve
encryption, as described in Chapter 6, “Securing Your Website Payments Standard
Buttons.”
To copy and paste the URL code for your Buy Now email payment link:
Website Payments Standard Integration Guide September 2008 51
Page 52

Single-Item Payments – Buy Now Buttons
1
Creating Advanced Buy Now Buttons on the PayPal Website
1. Click the Select Code button on the Email tab to select all of the generated URL code.
2. Copy the text that you selected to the clipboard, by:
– pressing Ctrl+C.
– or –
– right-clicking your mouse, and selecting Copy.
3. Open the email template or message that you want to send.
4. Paste the text that you copied from the clipboard into your email, by:
– pressing Ctrl+V.
– or –
– right-clicking your mouse, and selecting Paste.
Creating Advanced Buy Now Buttons With JavaScript Disabled
The button creation tool for Buy Now buttons, described above, requires JavaScript. If
JavaScript is disabled in your browser, PayPal automatically offers you an alternative button
creation tool that does not require JavaScript.
Read the following topics to learn how to create Buy Now buttons with JavaScript disabled.
z “The Pages in the Button Creation Tool for Buy Now Buttons” on page 52
z “Page 1 – Specifying the Basic Features of the Buy Now Button” on page 52
z “Page 2 – Specifying Advanced Features of Your Buy Now Button” on page 56
z “Copying and Pasting the Buy Now Code With JavaScript Disabled” on page 59
N OTE: The alternative tool lets you create Buy Now buttons on the PayPal website, but it does
not allow you to save your buttons in your PayPal account.
The Pages in the Button Creation Tool for Buy Now Buttons
The button creation tool for Buy Now buttons with JavaScript disabled has three pages:
z Buy Now buttons – the initial page to specify the required and most often used optional
features
z Buy Now buttons – Page 2 – an optional page to specify additional, advanced features
z Add a Buy Now button to your website – the final page that has the generated code for
your payment button
You can switch between the first and second pages until you click the Create Button Now
button to display the third page that has the generated code.
Page 1 – Specifying the Basic Features of the Buy Now Button
To create code for a Buy Now button or email payment link by using a tool on the PayPal
website with JavaScript disabled:
1. Log in to your PayPal account at
52 September 2008 Website Payments Standard Integration Guide
https://www.paypal.com.
Page 53

Single-Item Payments – Buy Now Buttons
Creating Advanced Buy Now Buttons on the PayPal Website
2. Click the Edit Profile link.
The Profile Summary page opens.
3. Under the Selling Preferences heading, click the Create New Button link.
The Create PayPal payment button page opens.
4. Under the Create button without JavaScript enabled heading, click the Buy Now link.
The Buy Now buttons page opens.
5. Enter the details of your item.
1
– Item name/service – (optional) Enter the name of the item or service that you wish to
sell. If you do not enter anything in this field, buyers can fill it in at the time of purchase.
PayPal recommends entering an item name to make it easier for you to ship the order.
– Item ID/number – (optional) Enter the inventory ID or tracking number of your item.
The value that you enter is displayed to buyers at the time of payment, and it is displayed
in the transaction details that both by merchants and buyers can view on the PayPal
website.
– Price – (optional) Enter a fixed price for your item. If you leave the field blank, buyers
“name their own price” after they click the Buy Now button.
IMPORTANT: PayPal recommends that you enter an a price so that you collect an
appropriate amount for the item.
– Currency – From the dropdown menu, select the currency in which you priced the item
or in which you want the prices that buyers name to be denominated. The dropdown
menu automatically selects the currency of your primary balance.
– Buyer’s default country – From the dropdown menu, select a country for the PayPal
log-in or sign-up page that buyers see when they click the button. The content on the page
will be appropriate for the country you select. Buyers can change the country that you
select, after the log-in or sign-up page appears.
6. Choose a button style for your Buy Now button.
Select the radio button next to the image that you want to use, if you are going to be
accepting payments from your website instead of using an email payment link. Button
images that read “Pay Now” are suitable if you accept payments for single services instead
of single goods. The image that you select is hosted by PayPal.
Website Payments Standard Integration Guide September 2008 53
Page 54

Single-Item Payments – Buy Now Buttons
1
Creating Advanced Buy Now Buttons on the PayPal Website
To display your own image that is hosted on your website:
– Click the Use your own button image link.
An additional radio button and text box appear.
–In the Button Image URL text box, enter the URL of your button image.
If your image is hosted securely, change the entry to begin with https//.
Use your own button image if the buttons hosted by PayPal do not fit the look of your
website.
7. Specify whether to use button encryption.
– Select the Ye s radio button to encrypt the generated code for the payment button.
– or –
– Select the No radio button to leave the generated code for the payment button and the
email payment link as clear text.
PayPal highly recommends that you use button encryption to protect the HTML code of
your payment button. Encryption protects payment details from fraudulent alteration by
third parties, thus increasing the security of the payments you accept. However, consider
the limitations that encryption imposes:
– Encrypted HTML code does not support option fields, which you can specify on the Buy
Now buttons – Page 2 page.
Select the No radio button if you want to add option fields to your Buy Now button.
– Encrypted HTML code cannot be edited.
Select the No radio button if you want to edit the HTML code for your button after the
code is generated.
54 September 2008 Website Payments Standard Integration Guide
Page 55

Single-Item Payments – Buy Now Buttons
Creating Advanced Buy Now Buttons on the PayPal Website
– Encrypted HTML code cannot be used for email payment links.
Select the No radio button if you want to create an email payment link instead of or in
addition to your button.
If you select the No radio button for any reason, use an alternative strategy described in
Chapter 6, “Securing Your Website Payments Standard Buttons” to secure the payments
you receive from the payment button or the email payment link.
IMPORTANT: Merchants with significant payment volume are required to take
precautions on securing Website Payment Standard buttons.
8. Specify a shipping method option.
– Select the Use my shipping calculations radio button if you set up shipping rates for
your account and you want the shipping charges for the item to be calculated
automatically.
– or –
– Select the Use a flat rate amount radio button if you have not set up shipping rates for
your account or you want to exclude the item from automatic calculation of shipping
charges.
In the text box, enter a fixed amount that will be added to the shipping charges for
purchases that include the item. Enter zero (0.00) for items that do not incur shipping
charges. The currency for the amount that you enter is the same as the currency for the
item.
For more information, see “Automatic Calculation of Shipping Charges (U.S. Merchants
Only)” on page 290 or “Automatic Calculation of Shipping Charges (non-U.S. Merchants
Only)” on page 304.
1
9. Specify a sales tax option.
– Select the Use my sales tax calculations radio button if you set up tax rates for your
account and you want taxes on the item to be calculated automatically.
– or –
– Select the Use a flat rate amount radio button if you have not set up sales tax
calculations for your account or you want to exclude the item from automatic calculation
of taxes.
In the text box, enter a fixed amount that will be added to the taxes for purchases that
include the item. Enter zero (0.00) for non-taxable items. The currency for the amount
that you enter is the same as the currency for the item.
IMPORTANT: If you specify that buyers can purchase quantities of your item, in Step 4
of “Select your quantity and shipping preferences.” on page 58, do not
specify a flat rate amount for sales tax. PayPal applies the flat rate amount
as the tax for the item, regardless of the quantity that the buyer selects.
For more information, see “Automatic Calculation of Sales Tax” on page 285.
10.If you have additional details to specify for your button, such as option fields or a custom
payment page style that has your own logo and colors, click the Add More Options button
Website Payments Standard Integration Guide September 2008 55
Page 56

Single-Item Payments – Buy Now Buttons
1
Creating Advanced Buy Now Buttons on the PayPal Website
and follow the instructions for “Page 2 – Specifying Advanced Features of Your Buy Now
Button” on page 56.
– or –
If you entered all the basic and advanced features for your button, go to “Copying and
Pasting the Buy Now Code With JavaScript Disabled” on page 59.
Page 2 – Specifying Advanced Features of Your Buy Now Button
Use the Buy Now buttons – Page 2 page to specify advanced features of your button with
JavaScript disabled.
1. Add option fields to your button.
Option fields lets buyers select or specify options when they purchase the item, such as
color or size. Options must not change the price of the item.
Buy Now buttons can have one or two option fields. You can use a dropdown menu, with
choices that you specify, or a text box, in which buyers type their option choice.
– Option Field Type – Select either “drop-down menu” or “text box” as the type of option
field.
– Option Name – Enter the name of your option, for example, “Size” or “Color”. Enter no
more than 60 characters.
– Drop-Down Menu Choices – (if applicable) If you selected “drop-down menu” as the
type of option field, enter the menu choices. Choices cannot exceed 30 characters. Use a
carriage return (press ENTER) to separate choices. Enter no more than 10 choices.
IMPORTANT: Option fields cannot be used if you are creating an email payment link. To
include Buy Now links in email messages for items with options, either
send HTML emails with links to Buy Now buttons on your website that
have option fields, or ask buyers to enter the option information in the Note
field.
2. Customize your payment pages.
Use these settings to give donors a visually seamless payment experience by customizing
the PayPal payment pages to match the visual style of your website.
– Primary Page Style – (display only) The payment pages that your donors see are
displayed with the page style that is specified here, unless you select a different custom
payment page style below.
– Custom Payment Page Style – (optional) If you already added Custom Payment Page
Styles in your account profile, they are listed here. Choose the page style that you would
like to appear when buyers click your Buy Now button.
To learn more about creating page styles, see “Co-Branding the PayPal Checkout
Pages” on page 267.
– Preview – Click the Preview button to see a mock-up of the payment page style that
donors see when they click your Buy Now button.
56 September 2008 Website Payments Standard Integration Guide
Page 57

Single-Item Payments – Buy Now Buttons
Creating Advanced Buy Now Buttons on the PayPal Website
3. Customize your buyer’s experience.
Use these settings to give buyers a payment experience that is easy to navigate.
1
– Successful Payment URL – (optional) Do one of the following:
Enter the URL of a page on your website that you want buyers redirected to after they
complete their payments. The URL that you enter is used by this payment button only.
Click the Edit button to change the return URL that this button and all your other
payment buttons use to redirect buyers to your website after they complete their
payments. For more information, see “Auto Return” on page 271.
– Payment Data Transfer – Click the Edit button to turn Payment Data Transfer on or off
for all your payment buttons.
For more information about Payment Data Transfer, see the Order Management
Integration Guide.
– Cancel Payment URL – (optional) Enter the URL for the page on your website that you
want buyers redirected to if they cancel their payments at any point before completing
the checkout. If you do not enter a URL, buyers who cancel are taken to a PayPal
webpage. The URL that you enter is used by this payment button only.
Website Payments Standard Integration Guide September 2008 57
Page 58

Single-Item Payments – Buy Now Buttons
1
Creating Advanced Buy Now Buttons on the PayPal Website
4. Select your quantity and shipping preferences.
Use these settings to control how many units of the item you want to let buyers purchase
and how you collect their shipping addresses.
– Select the Ye s radio button to let buyers purchase more than one unit of the item or
service when they click the Buy Now button that you are creating.
IMPORTANT: If you allow buyers to purchase more than one unit of your item, do not
specify a flat rate amount as your tax option in Step 9of “Page 1 –
Specifying the Basic Features of the Buy Now Button” on page 52.”
PayPal applies the flat rate amount as the tax for the item, regardless of the
quantity that the buyer selects.
If you leave the No radio button selected, buyers can purchase only a single unit of the
item when they click the Buy Now button.
– Select the radio button that matches your need to collect shipping addresses from buyers:
Make shipping optional – Select this radio button if you want to prompt buyers to
enter their shipping addresses as an option.
– or –
Yes, require shipping – Select this radio button if you want to require buyers to enter
their shipping addresses.
– or –
No shipping needed – Select this radio button if the product does not require shipping,
such as a digital good that buyers download, or if the item is a service that does not
require on-site delivery.
58 September 2008 Website Payments Standard Integration Guide
Page 59

Single-Item Payments – Buy Now Buttons
Creating Advanced Buy Now Buttons on the PayPal Website
5. Collect customer notes and special instructions from buyers.
Use these settings to prompt buyers to enter notes or special handling instructions.
– Select the Ye s radio button if you want buyers to enter notes to you when they make their
payments. If you leave the No radio button selected, buyers cannot include notes.
– Note Title – If you selected the Yes radio button, change the default value for the field
label to prompt buyers for specific information, such as their customer IDs or special
handling instructions. Enter no more than 30 characters.
1
6. Select an email address to receive payment.
(optional) In the Email Address dropdown menu, select the email address through which
you want to receive payments when people click the payment button that you are creating.
The dropdown menu selects your primary email address by default. You might select the
email address of the person in your organization who handles order fulfillment or
accounting. All payments are deposited to your PayPal account balance, regardless of
which email addresses receive particular payments. Only confirmed email addresses can be
used to receive payments.
7. If you want to change any of the details that you entered on the previous page, click the
Edit button and follow the instructions for “Page 1 – Specifying the Basic Features of the
Buy Now Button” on page 52, beginning with Step 5.
– or –
If you have entered all the details and options for your button, go to “Copying and Pasting
the Buy Now Code With JavaScript Disabled” on page 59.
Copying and Pasting the Buy Now Code With JavaScript Disabled
After you enter the basic and advanced features that you want for your Buy Now button, click
the Create Button Now button. PayPal generates Buy Now code for:
z a payment button, which you can paste onto your website
z an email payment link, which you can paste into email
The Add a Buy Now button to your website page displays the generated code.
Website Payments Standard Integration Guide September 2008 59
Page 60

Single-Item Payments – Buy Now Buttons
1
Creating Advanced Buy Now Buttons on the PayPal Website
Copying and Pasting the HTML Code for the Buy Now Button With JavaScript
Disabled. To copy and paste the HTML code for the Buy Now payment button:
1. Click the HTML code for Websites text box to select all of the generated HTML code.
2. Copy the text that you selected to the clipboard, by:
– pressing Ctrl+C.
– or –
– right-clicking your mouse, and selecting Copy.
3. In your web editing tool, open the webpage where you want the button to be seen.
4. Paste the text that you copied from the clipboard onto your webpage where you want the
button to appear, by:
– pressing Ctrl+V.
– or –
– right-clicking your mouse, and selecting Paste.
Copying and Pasting the Code for the Buy Now Email Payment Link With JavaScript
Disabled. PayPal does not generate code for email payment links if you select the Yes radio
button in the Button Encryption section on the first page of the button creation tool. To turn
button encryption off, return to the first page and click the No radio button in the Button
Encryption section. Then click the Create Button Now button again.
N OTE: You cannot use Encrypted Website Payments to encrypt the code for email payment
links. Secure the payments you receive from email payment links by using an
alternative method that does not involve encryption, as described in Chapter 6,
“Securing Your Website Payments Standard Buttons.”
To copy and paste the code for the Buy Now email payment link:
1. Click the Link for Emails text box to select all of the generated URL code.
2. Copy the text that you selected to the clipboard, by:
– pressing Ctrl+C.
– or –
– right-clicking your mouse, and selecting Copy.
3. Open the email template or message that you want to send.
4. Paste the text that you copied from the clipboard into your email, by:
– pressing Ctrl+V.
– or –
– right-clicking your mouse, and selecting Paste.
Creating More Buy Now Buttons With JavaScript Disabled. After you copy and paste the
Buy Now code, you can create another Buy Now button for a different item. Scroll to the
60 September 2008 Website Payments Standard Integration Guide
Page 61

Single-Item Payments – Buy Now Buttons
bottom of the Add a Buy Now button to your website page and click the Create Another
Button button. Then follow the instructions for “Page 1 – Specifying the Basic Features of the
Buy Now Button” on page 52, beginning with Step 5. The pages of the button creation tool
retain the options that you previously specified.
Avoiding Problems With Pasted HTML Code
After you paste the code onto your webpage or into your email, ensure that it matches exactly
the code that you copied from PayPal. Pasted code may not match the generated code for the
following reasons:
z You did not copy all of the generated code.
z Your editing tool may have special areas for pasting HTML code and other areas for
pasting URLs and display text. Be sure you paste the generated code into a field that
accepts HTML code or URLs.
z Your editing tool might change some characters in the pasted code.
Sample HTML Code for Buy Now Buttons
1
Sample HTML Code for Buy Now Buttons
The sample HTML code in this section demonstrates various features of Buy Now buttons:
z “Sample HTML Code for a Basic Buy Now Button” on page 61
z “Sample HTML Code for Buy Now Buttons With Product Options” on page 62
z “Sample HTML Code for a Buy Now Button that Prompts for Quantities” on page 66
To protect against malicious users tampering with the HTML code for your Buy Now buttons
and submitting fraudulent contributions, see Chapter 6, “Securing Your Website Payments
Standard Buttons.”
IMPORTANT: Organizations with significant payment volume are required to take
precautions on securing Website Payment Standard buttons.
Sample HTML Code for a Basic Buy Now Button
The sample HTML code below illustrates a basic Buy Now button with these features:
z An item named “Hot Sauce–12 oz. Bottle”.
z An item price of $5.95 USD.
z PayPal calculates tax and shipping based on rates that you set up in your PayPal account.
<form action="https://www.paypal.com/cgi-bin/webscr" method="post">
<!-- Identify your business so that you can collect the payments. -->
<input type="hidden" name="business" value="herschelgomez@xyzzyu.com">
Website Payments Standard Integration Guide September 2008 61
Page 62

Single-Item Payments – Buy Now Buttons
1
Sample HTML Code for Buy Now Buttons
<!-- Specify a Buy Now button. -->
<input type="hidden" name="cmd" value="_xclick">
<!-- Specify details about the item that buyers will purchase. -->
<input type="hidden" name="item_name" value="Hot Sauce-12 oz. Bottle">
<input type="hidden" name="amount" value="5.95">
<input type="hidden" name="currency_code" value="USD">
<!-- Display the payment button. -->
<input type="image" name="submit" border="0"
src="https://www.paypal.com/en_US/i/btn/btn_buynow_LG.gif"
alt="PayPal - The safer, easier way to pay online">
<img alt="" border="0" width="1" height="1"
src="https://www.paypal.com/en_US/i/scr/pixel.gif" >
</form>
Sample HTML Code for Buy Now Buttons With Product Options
When you add production options to your Buy Now buttons with HTML code that you write
yourself, you can have a maximum of ten product options, each with their own sets of choices.
The options can be either dropdown menus or text boxes. Only one of the dropdown menu
options can have options with prices.
Read the following topics for sample code that illustrates various ways to add product options
to Buy Now buttons.
z “Sample Code for a Buy Now Button With Product Options” on page 62
z “Sample Code for a Buy Now Button With Product Options With Prices” on page 63
z “Sample Code for a Buy Now Button With Product Options as a Text Box” on page 65
For more information, see “Offering Product Options With Buy Now Buttons” on page 36.
Sample Code for a Buy Now Button With Product Options
The sample code below illustrates a basic Buy Now button with a dropdown menu of product
options.
<form action="https://www.paypal.com/cgi-bin/webscr"
method="post">
<!-- Identify your business so that you can collect the payments. -->
<input type="hidden" name="business" value="herschelgomez@xyzzyu.com">
<!-- Specify a Buy Now button. -->
<input type="hidden" name="cmd" value="_xclick">
<!-- Specify details about the item that buyers will purchase. -->
<input type="hidden" name="item_name" value="Hot Sauce-12 oz. Bottle">
<input type="hidden" name="amount" value="5.95">
<input type="hidden" name="currency_code" value="USD">
62 September 2008 Website Payments Standard Integration Guide
Page 63

Single-Item Payments – Buy Now Buttons
Sample HTML Code for Buy Now Buttons
<!-- Provide a dropdown menu option field. -->
<input type="hidden" name="on0" value="Type">Type of sauce <br />
<select name="os0">
<option value="Select a type">-- Select a type --</option>
<option value="Red">Red sauce</option>
<option value="Green">Green sauce</option>
</select> <br />
<!-- Display the payment button. -->
<input type="image" name="submit" border="0"
src="https://www.paypal.com/en_US/i/btn/btn_buynow_LG.gif"
alt="PayPal - The safer, easier way to pay online">
<img alt="" border="0" width="1" height="1"
src="https://www.paypal.com/en_US/i/scr/pixel.gif" >
</form>
The sample code above produces the following result on your webpage:
1
Paste the code onto your webpage below an image or a text description of the item.
Sample Code for a Buy Now Button With Product Options With Prices
The sample code below illustrates a basic Buy Now button with a dropdown menu of product
options that have separate prices for each option. Only one of the dropdown menus in the set
product options that your Buy Now button offers can have prices.
Product options with prices specify the prices in two places:
z The dropdown menu displays the prices for each option – buyers see the prices they pay for
each option.
z A list of hidden HTML variables repeats the prices for each option – PayPal uses these
prices to charge buyers for the options they choose.
Dropdown menus with option prices use the following variables:
z currency_code – sets the currency for option prices
z item_index – identifies which dropdown menu of product option has prices
z option_select* and option_amount* – repeats the prices for each option
N OTE: You cannot specify item IDs for production options with prices to have PayPal track
inventory for your item. PayPal can track inventory by product option only for buttons
that you save in your PayPal account.
<form action="https://www.paypal.com/cgi-bin/webscr"
method="post">
<!-- Identify your business so that you can collect the payments. -->
Website Payments Standard Integration Guide September 2008 63
Page 64

Single-Item Payments – Buy Now Buttons
1
Sample HTML Code for Buy Now Buttons
<input type="hidden" name="business" value="herschelgomez@xyzzyu.com">
<!-- Specify a Buy Now button. -->
<input type="hidden" name="cmd" value="_xclick">
<!-- Specify details about the item that buyers will purchase. -->
<input type="hidden" name="item_name" value="Hot Sauce">
<input type="hidden" name="currency_code" value="USD">
<!-- Provide a dropdown menu option field. -->
<input type="hidden" name="on0" value="Type">Type of sauce <br />
<select name="os0">
<option value="Select a type">-- Select a type --</option>
<option value="Red">Red sauce</option>
<option value="Green">Green sauce</option>
</select> <br />
<!-- Provide a dropdown menu option field with prices. -->
<input type="hidden" name="on1" value="Size">Size <br />
<select name="os1">
<option value="06oz">6 oz. bottle - $5.95 USD</option>
<option value="12oz">12 oz. bottle - $9.95 USD</option>
<option value="36oz">3 12 oz. bottles - $19.95 USD</option>
</select> <br />
<!-- Specify the price that PayPal uses for each option. -->
<input type="hidden" name="option_index" value="1">
<input type="hidden" name="option_select0" value="06oz">
<input type="hidden" name="option_amount0" value="5.95">
<input type="hidden" name="option_select1" value="12oz">
<input type="hidden" name="option_amount1" value="9.95">
<input type="hidden" name="option_select2" value="36oz">
<input type="hidden" name="option_amount2" value="19.95">
<!-- Display the payment button. -->
<input type="image" name="submit" border="0"
src="https://www.paypal.com/en_US/i/btn/btn_buynow_LG.gif"
alt="PayPal - The safer, easier way to pay online">
<img alt="" border="0" width="1" height="1"
src="https://www.paypal.com/en_US/i/scr/pixel.gif" >
</form>
64 September 2008 Website Payments Standard Integration Guide
Page 65

Single-Item Payments – Buy Now Buttons
Sample HTML Code for Buy Now Buttons
The sample code above produces the following result on your webpage:
Paste the code onto your webpage below an image or a text description of the item.
Sample Code for a Buy Now Button With Product Options as a Text Box
The sample code below illustrates a basic Buy Now button with a text box for entering product
options.
<form action="https://www.paypal.com/cgi-bin/webscr"
method="post">
<!-- Identify your business so that you can collect the payments. -->
<input type="hidden" name="business" value="herschelgomez@xyzzyu.com">
1
<!-- Specify a Buy Now button. -->
<input type="hidden" name="cmd" value="_xclick">
<!-- Specify details about the item that buyers will purchase. -->
<input type="hidden" name="item_name" value="Hot Sauce-12 oz. Bottle">
<input type="hidden" name="amount" value="5.95">
<input type="hidden" name="currency_code" value="USD">
<!-- Provide the buyer with a text box option field. -->
<input type="hidden" name="on0"
value="Size">Enter your size (S, M, L, X, XX) <br />
<input type="text" name="os0" maxlength="60"> <br />
<!-- Display the payment button. -->
<input type="image" name="submit" border="0"
src="https://www.paypal.com/en_US/i/btn/btn_buynow_LG.gif"
alt="PayPal - The safer, easier way to pay online">
<img alt="" border="0" width="1" height="1"
src="https://www.paypal.com/en_US/i/scr/pixel.gif" >
</form>
The sample code above produces the following result on your webpage:
Website Payments Standard Integration Guide September 2008 65
Page 66

Single-Item Payments – Buy Now Buttons
1
Sample HTML Code for Buy Now Buttons
Paste the code onto your webpage below an image or a text description of the item.
Sample HTML Code for a Buy Now Button that Prompts for Quantities
The sample HTML code below illustrates a basic Buy Now button that prompts buyers to
specify item quantities. Use this feature cautiously, because buyers could specify quantities
greater than you could fulfill.
<form action="https://www.paypal.com/cgi-bin/webscr" method="post">
<!-- Identify your business so that you can collect the payments. -->
<input type="hidden" name="business" value="herschelgomez@xyzzyu.com">
<!-- Specify a Buy Now button. -->
<input type="hidden" name="cmd" value="_xclick">
<!-- Specify details about the item that buyers will purchase. -->
<input type="hidden" name="item_name" value="Hot Sauce-12 oz. Bottle">
<input type="hidden" name="amount" value="5.95">
<input type="hidden" name="currency_code" value="USD">
<!-- Prompt buyers to enter their desired quantities. -->
<input type="hidden" name="undefined_quantity" value="1">
<!-- Display the payment button. -->
<input type="image" name="submit" border="0"
src="https://www.paypal.com/en_US/i/btn/btn_buynow_LG.gif"
alt="PayPal - The safer, easier way to pay online">
<img alt="" border="0" width="1" height="1"
src="https://www.paypal.com/en_US/i/scr/pixel.gif" >
</form>
The sample code above produces the following result during checkout.
66 September 2008 Website Payments Standard Integration Guide
Page 67

Single-Item Payments – Buy Now Buttons
Sample URL Code for a Buy Now Email Payment Link
Use this feature cautiously, because buyers could specify quantities greater than you could
fulfill.
If you save your button in your PayPal account and you set up inventory tracking for your item
in “Step 2 – Tracking Inventory With Your Buy Now Button” on page 44, PayPal can help
prevent buyers from purchasing more items than you can fulfill.
For more information, see “Prompting for Item Quantities With Buy Now Buttons” on
page 37.
Sample URL Code for a Buy Now Email Payment Link
You can write your own URL code for Buy Now email payment links.
The same variables and values that you include in HTML code for Buy Now buttons can be
used in Buy Now email payment links. Separate the variables and their values from each other
with ampersands (&). Do not enclose values in quotation marks; use plus signs (+) as
substitutes for spaces in values, if needed.
1
N OTE: You cannot include variables for product options in email payment links.
You can use the following URL as a starting point for writing your own URL for Buy Now
email payment links.The value for the business variable must match a confirmed email
address on file with your PayPal account. You can change the values for other variables, with
the exception of _xclick.
EXAMPLE 1.1 URL for a Buy Now Email Payment Link
https://www.paypal.com/cgibin/webscr?cmd=_xclick&business=herschelgomez@xyzzyu.com&item_name=Hot
Sauce-12+oz.+Bottle&item_number=12345&amount=5%2e95¤cy_code=USD
Website Payments Standard Integration Guide September 2008 67
Page 68

Single-Item Payments – Buy Now Buttons
1
Sample URL Code for a Buy Now Email Payment Link
68 September 2008 Website Payments Standard Integration Guide
Page 69

2
Contribution Payments – Donate
Buttons
Use Donate buttons to collect contribution payments. Donate buttons let you collect predetermined amounts or amounts entered by donors.
You can create Donate buttons that you add to your website by using a tool on the PayPal
website, or you can write the HTML code for Donate buttons manually. You can create buttons
with limited functionality before you create your PayPal account or with JavaScript disabled
in your browser.
Read the following topics to learn more about Donate buttons:
z “Getting Started With Donate Buttons” on page 69
z “The Checkout Experience With Donate Buttons” on page 76
z “Managing Contributions” on page 85
z “Creating Advanced Donate Buttons on the PayPal Website” on page 87
z “Sample HTML Code for Donate Buttons” on page 104
Getting Started With Donate Buttons
The easiest way to add a Donate button to your website is by using the button creation tool on
the PayPal website. As soon as you add the button, you can begin accepting contribution
payments on your website.
Follow one of these procedures to get started creating your own Donate buttons:
Website Payments Standard Integration Guide September 2008 69
Page 70

Contribution Payments – Donate Buttons
2
Getting Started With Donate Buttons
z “Using the Button Creation Tool for a Basic Donate Button” on page 70
z “Creating Basic Donate Buttons With JavaScript Disabled” on page 71
z “Creating Donate Buttons Before You Create Your PayPal Account” on page 74
N OTE: For more detailed instructions, see “Creating Advanced Donate Buttons on the PayPal
Website” on page 87.
Using the Button Creation Tool for a Basic Donate Button
To use the button creation tool for a basic Donate button:
1. Log in to your PayPal Premier or Business account at
https://www.paypal.com.
The My Account Overview page opens.
2. Click the Profile subtab.
The Profile Summary page opens.
3. Under the Selling Preferences heading, click the Create new button link.
The Create PayPal payment button page opens.
4. In the Accept payments for dropdown menu, select “Donations”.
5. (optional) In the Organization name/service text box, enter the purpose for the donation
or the name of your organization. If you do not enter anything in this field, your donors can
complete this field during checkout.
6. Scroll to the bottom of the page, and click the Create Button button.
The You are viewing your button code page opens.
7. Click the Select Code button on the Websites tab to select all of the generated HTML
code.
8. Copy the text that you selected to the clipboard, by:
– pressing Ctrl+C.
– or –
– right-clicking your mouse, and selecting Copy.
9. In your web editing tool, open the webpage where you want the button to be seen.
IMPORTANT: Be sure that your tool is ready for you to paste HTML code, such as by
switching to an HTML view from a design view of your webpage.
10.Paste the text that you copied from the clipboard onto your webpage where you want the
button to appear, by:
– pressing Ctrl+V.
– or –
70 September 2008 Website Payments Standard Integration Guide
Page 71

Contribution Payments – Donate Buttons
Getting Started With Donate Buttons
– right-clicking your mouse, and selecting Paste.
Creating Basic Donate Buttons With JavaScript Disabled
The button creation tool for Donate buttons, described above, requires JavaScript. If
JavaScript is disabled in your browser, PayPal automatically offers you an alternative button
creation tool that does not require JavaScript.
Read these topics to learn more about creating Donate buttons with JavaScript disabled:
z “Limitations When Creating Payment Buttons With JavaScript Disabled” on page 71
z “Creating a Basic Donate Button With JavaScript Disabled” on page 71
z “Enabling JavaScript in Your Browser” on page 72
Limitations When Creating Payment Buttons With JavaScript Disabled
The alternative tool that works with JavaScript disabled lets you create Donate buttons on the
PayPal website. However, the following features are not supported by the alternative tool:
z Saving your buttons in your PayPal account
2
z Language choices for button images
z Creating payment buttons before you create your PayPal account
To use any of the above features when creating payment buttons on the PayPal website, you
must enable JavaScript in your browser.
For more information, see “Enabling JavaScript in Your Browser” on page 72.
Creating a Basic Donate Button With JavaScript Disabled
To create a basic Donate button for your website with JavaScript disabled:
1. Log in to your PayPal Premier or Business account at
https://www.paypal.com.
The My Account Overview page opens.
2. Click the Edit Profile link.
The Profile Summary page opens.
3. Under the Selling Preferences heading, click the Create New Button link.
The Create PayPal payment button page opens.
Website Payments Standard Integration Guide September 2008 71
Page 72

Contribution Payments – Donate Buttons
2
Getting Started With Donate Buttons
4. Click the Donate link.
The Donations page opens.
5. Enter the donation details of your button.
– Donation name/service – Enter the reason for the donation or the name of your
organization. If you do not enter anything in this field, your donors can complete this
field during checkout.
6. Scroll to the bottom of the page, and click the Create Button Now button.
The Add a Donate button to your website page displays the generated code.
7. Click the HTML code for Websites text box to select all of the generated HTML code.
8. Copy the text that you selected to the clipboard, by:
– pressing Ctrl+C.
– or –
– right-clicking your mouse, and selecting Copy.
9. In your web editing tool, open the webpage where you want the button to be seen.
IMPORTANT: Be sure that your tool is ready for you to paste HTML code, such as by
switching to an HTML view from a design view of your webpage.
10.Paste the text that you copied from the clipboard onto your webpage where you want the
button to appear, by:
– pressing Ctrl+V.
– or –
– right-clicking your mouse, and selecting Paste.
Enabling JavaScript in Your Browser
PayPal recommends that you keep JavaScript enabled at all times. Many features of the PayPal
website require that JavaScript be enabled in your browser.
Read one of the following topics to learn how to enable JavaScript in your browser.
z “Enabling JavaScript in Internet Explorer” on page 73
z “Enabling JavaScript in FireFox” on page 73
72 September 2008 Website Payments Standard Integration Guide
Page 73

Contribution Payments – Donate Buttons
Getting Started With Donate Buttons
After you enable JavaScript in your browser, you can create a basic Donate button by
following the instructions for “Using the Button Creation Tool for a Basic Donate Button” on
page 70
Enabling JavaScript in Internet Explorer. To enable JavaScript in Internet Explorer:
1. Select Tools > Internet Options… from the menu bar.
The Internet Options dialog box opens.
2. Click the Security tab.
3. Select the Trusted sites icon in the box of Web content zones.
4. Click the Custom level… button.
The Security Settings dialog box opens.
5. Scroll down to the Scripting section, and then select the Enable radio button as the option
for active scripting.
2
6. Click the OK button to dismiss the Security Settings dialog box.
A War ning message box asks if you are sure you want to change the security settings.
7. Click the Ye s button to dismiss the message box.
8. Click the OK button to dismiss the Internet Options dialog box.
Enabling JavaScript in FireFox. To enable JavaScript in Firefox.
Website Payments Standard Integration Guide September 2008 73
Page 74

Contribution Payments – Donate Buttons
2
Getting Started With Donate Buttons
1. Select Tools > Options… from the menu bar.
The Options dialog box opens.
2. Select the Content icon at the top of the dialog box.
3. Select the Enable JavaScript checkbox.
4. Click the OK button.
Creating Donate Buttons Before You Create Your PayPal Account
You can create basic Donate buttons, add them to your website, and begin accepting
contributions before you sign up for your PayPal account. Read the following topics to learn
more about creating Donate buttons before you create your PayPal account.
z “Limitations of Donate Buttons Created Without a PayPal Account” on page 74
z “Unclaimed Payments From Buttons Created Without a PayPal Account” on page 74
z “Creating a Basic Donate Button Without a PayPal Account” on page 75
Limitations of Donate Buttons Created Without a PayPal Account
Consider the following limitations of payment buttons that you create and add to your website
before you sign up for your PayPal account.
z You cannot claim the payments that people authorize during checkout. PayPal collects and
holds the payments as unclaimed until you sign up for your PayPal account.
z Donors must have a PayPal account to pay you. Any ability to pay by credit card is
disabled.
z PayPal limits the features that you can specify with the button creation tool, such as saving
your buttons in your PayPal account:
N OTE: You cannot create payment buttons without a PayPal account if Javascript is disabled
in your browser.
Unclaimed Payments From Buttons Created Without a PayPal Account
For buttons that you create without a PayPal account, payments that donors authorize are held
as unclaimed by PayPal until you sign up. PayPal holds your unclaimed payments under the
email address that you specify when you create the buttons. Make sure to use the same email
address when you sign up for your account. Otherwise PayPal cannot transfer your unclaimed
payments to your PayPal account balance.
In their PayPal accounts, donors see unclaimed payments that they made to you from Donate
buttons that you created without a PayPal account. Such unclaimed payments are displayed in
their recent account activity and in their transaction history. Until you finish signing up for
your PayPal account, donors can cancel your unclaimed payments and recover their funds.
74 September 2008 Website Payments Standard Integration Guide
Page 75

Contribution Payments – Donate Buttons
Getting Started With Donate Buttons
FIGURE 2.1 Unclaimed Payments From Buttons Created Without a PayPal Account
Creating a Basic Donate Button Without a PayPal Account
To create a basic Donate button without a PayPal account:
2
1. Visit the PayPal website at
https://www.paypal.com.
2. Click the Business tab.
3. Under the Need to accept credit cards? heading, click the On your website link.
The Choose a payment solution page opens.
4. Under the Website Payments Standard heading, click the Learn more link.
The PayPal Website Payments Standard: Overview page opens.
5. About half way down the page, click the accept donations link.
The Create PayPal payment button page opens.
6. In the Accept payments for dropdown menu, select “Donations”.
7. Enter the payment details for your Donate button.
– Organization name/service – Enter the purpose for the donation or the name of your
organization. If you do not enter anything in this field, your donors can complete this
field during checkout.
– Email address to receive payments– Enter the email address that you will use when you
sign up for your PayPal account.
8. Click the Create Button button.
The PayPal account required for this button type message box appears.
Website Payments Standard Integration Guide September 2008 75
Page 76

Contribution Payments – Donate Buttons
2
The Checkout Experience With Donate Buttons
9. Click the close icon in the upper right corner of the message box to proceed.
The You’ve created your button page opens.
10.Click the Select Code button on the Websites tab to select all of the generated HTML
code.
11. Copy the text that you selected to the clipboard, by:
– pressing Ctrl+C.
– or –
– right-clicking your mouse, and selecting Copy.
12.In your web editing tool, open the webpage where you want the button to be seen.
IMPORTANT: Be sure that your tool is ready for you to paste HTML code, such as by
switching to an HTML view from a design view of your webpage.
13.Paste the text that you copied from the clipboard onto your webpage where you want the
button to appear, by:
– pressing Ctrl+V.
– or –
– right-clicking your mouse, and selecting Paste.
The Checkout Experience With Donate Buttons
This section demonstrates the PayPal checkout experience for people who click Donate
buttons on your website. The following diagram illustrates the steps.
76 September 2008 Website Payments Standard Integration Guide
Page 77

Contribution Payments – Donate Buttons
The Checkout Experience With Donate Buttons
FIGURE 2.2 The Checkout Experience with Donate Buttons
2
Read these topics to better understand the checkout experience with Donate buttons:
z “Begin – Donors are Ready to Contribute on Your Website” on page 77
z “1 – Donors Enter Their Billing Information or They Log In to PayPal” on page 78
z “2 – Donors Confirm Their Contribution Details Before Paying” on page 80
z “3 – Donors View and Print Their PayPal Contribution Confirmations” on page 81
z “End – Donors Receive Contribution Authorization Notices by Email” on page 82
z “Enhancing the Checkout Experience With Donate Buttons” on page 83
Begin – Donors are Ready to Contribute on Your Website
The basic checkout experience with Donate buttons begins when someone on your website is
ready to contribute.
Website Payments Standard Integration Guide September 2008 77
Page 78

Contribution Payments – Donate Buttons
2
The Checkout Experience With Donate Buttons
FIGURE 2.3 Donors Begin on Your Website When They Are Ready to Contribute
In this example, Mary begins on the website of her favorite cause and wants to contribute to
the Fall Cleanup Campaign. Mary clicks the Donate button to check out.
1 – Donors Enter Their Billing Information or They Log In to PayPal
PayPal displays a billing information/log-in page, which lets donors enter their credit card
information or log in to PayPal to pay.
78 September 2008 Website Payments Standard Integration Guide
Page 79

Contribution Payments – Donate Buttons
The Checkout Experience With Donate Buttons
FIGURE 2.4 Donors Enter Their Billinng information or Log In to PayPal
2
For Donate buttons, the PayPal billing information/log-in page shows transaction details near
the top, such as the name of the contribution and the contribution total.
If donors are satisfied with the details, they do one of the following to select a payment
method:
z To pay with a credit card – Donors enter their billing information. They also enter their
contact information – email address and home phone number– so that PayPal can send
them their PayPal transaction receipts and can contact them if necessary to complete the
transaction. Then, they click the Review Order and Continue button.
Website Payments Standard Integration Guide September 2008 79
Page 80

Contribution Payments – Donate Buttons
2
The Checkout Experience With Donate Buttons
z To pay with a PayPal account – Donors enter their PayPal credentials and click the Log
in button.
In this case, Mary is satisfied with her contribution to Friends of the Park in the amount of
$25.00 USD. She enters her billing and contact information, and then she clicks the Review
Order and Continue button.
2 – Donors Confirm Their Contribution Details Before Paying
PayPal displays a transaction confirmation page to let donors confirm the details before they
complete their transactions and authorize their payments.
FIGURE 2.5 Donors Confirm Their Contribution Details Before Paying
In this case, Mary reviews the transaction details clicks the Donate $25.00 USD Now button
to complete the transaction and make her payment.
80 September 2008 Website Payments Standard Integration Guide
Page 81

Contribution Payments – Donate Buttons
The Checkout Experience With Donate Buttons
3 – Donors View and Print Their PayPal Contribution Confirmations
PayPal displays a payment confirmation page after donors pay to let them know that they have
made their contributions successfully.
FIGURE 2.6 Donors View Their Donation Confirmations
2
From the payment confirmation page, donors can:
z View the PayPal Confirmation number – the transaction ID – to reconcile their payments.
z Click the View Printable Receipt link to print receipts for their records.
Website Payments Standard Integration Guide September 2008 81
Page 82

Contribution Payments – Donate Buttons
2
The Checkout Experience With Donate Buttons
FIGURE 2.7 Donors Print Their PayPal Contribution Receipts
In this case, Mary prints the PayPal contribution receipt for her records.
End – Donors Receive Contribution Authorization Notices by Email
PayPal sends donors a contribution authorization notice by email to confirm the transaction
that they made with the contribution coordinator.
82 September 2008 Website Payments Standard Integration Guide
Page 83

Contribution Payments – Donate Buttons
The Checkout Experience With Donate Buttons
FIGURE 2.8 Donors Receive Payment Authorization Notices by Email
2
In this case, PayPal sends Mary an email message notifying her of her transaction with Friends
of the Park and her authorization for payment of $25.00 USD.
Enhancing the Checkout Experience With Donate Buttons
Website Payments Standard offers these features to enhance the basic checkout experience for
your donors:
z Co-Branding the Checkout Pages with Your Logo and Colors
Website Payments Standard Integration Guide September 2008 83
Page 84

Contribution Payments – Donate Buttons
2
The Checkout Experience With Donate Buttons
z Prepopulating the Checkout Pages With Billing Addresses
z Returning People to Your Website After They Check Out
Co-Branding the Checkout Pages with Your Logo and Colors
The basic checkout experience displays your email address or your business name in the upper
left corner of the checkout pages. You can enhance the checkout experience by setting up
custom page payments in your account profile to specify logos and colors that match the style
of your website. PayPal uses the logo and colors to display the checkout pages. In addition,
you can specify logos and colors with advanced HTML variables that you add to the code of
your button.
For more information, see:
z “Co-Branding the PayPal Checkout Pages” on page 267
z “HTML Variables for Displaying PayPal Checkout Pages” on page 358
Prepopulating the Checkout Pages With Billing Addresses
The basic checkout experience has forms for filling in billing addresses. You can enhance the
checkout experience by prepopulating the forms with information that you have on your
website about the donor.
To learn more, see “HTML Variables for Prepopulating PayPal Checkout Pages” on page 361.
Returning People to Your Website After They Check Out
The basic checkout experience leaves people on the PayPal website after they check out. Use
one of the following techniques to enhance the checkout experience so that people return to
your website, instead.
z Return URL – Let people return to a page on your website if they click a return link or
button on the PayPal payment confirmation page.
To learn more, see Step 2 of “Page 2 – Specifying Advanced Features of Your Donate
Button” on page 100 or “HTML Variables for Displaying PayPal Checkout Pages” on
page 358.
z Auto Return – Have PayPal return people automatically to a page on your website.
IMPORTANT: PayPal recommends that you turn Payment Data Transfer on when you
turn Auto Return on. With Auto Return on, PayPal redirects people to your
website from an alternative PayPal payment confirmation page that does
not display a View Printable Receipt link, so people cannot print PayPal
payment receipts. Payment Data Transfer provides the transaction
information that you need to let people print receipts from your website.
To learn more, see “Auto Return” on page 271.
z Payment Data Transfer – PayPal includes information about the completed transaction
when you use a return URL or Auto Return to send people back to your website. Use the
information that Payment Data Transfer provides to display a “thank you, print your
receipt” page on your website.
To learn more, see the Order Management Integration Guide
84 September 2008 Website Payments Standard Integration Guide
.
Page 85

Contribution Payments – Donate Buttons
Managing Contributions
Read the following topics to learn how PayPal helps you manage Donate transactions.
z Using Email Notices to Track Donate Transactions
z Using Recent Activity to Track Donate Transactions
z Using Transaction History to Track Donate Transactions
z Using Downloadable History Logs to Track Donate Transactions
z Using Instant Payment Notification to Track Donate Transactions
Using Email Notices to Track Donate Transactions
PayPal sends you email notices when:
z Payments are made.
z Payments are pending.
Managing Contributions
2
z Payments are canceled.
Generally, PayPal sends email notices to the primary email address of your account.
PayPal can send email notices to an alternate email address, such as to someone in your
organization who handles accounting. Add the additional email address to your account
profile. Then, use that email address as the one to receive payments when you use the button
creation tool on the PayPal website. Specify the alternate email address as the value for the
business HTML variable when you write the HTML code yourself.
For more information, see Step 5 in the instructions for “Page 2 – Specifying Advanced
Features of Your Donate Button” on page 100, or Appendix A, “HTML Variables for Website
Payments Standard.”
Using Recent Activity to Track Donate Transactions
PayPal displays Donate transactions in your recent activity, soon after donors complete their
transactions by clicking Donate buttons on your website.
Website Payments Standard Integration Guide September 2008 85
Page 86

Contribution Payments – Donate Buttons
2
Managing Contributions
FIGURE 2.9 Using Recent Activity to Track Donate Transactions
To view your recent history:
1. Log in to you PayPal account.
2. Navigate to My Account > Overview.
The My Account Overview opens.
3. Scroll down to the Recent Activity table near the bottom of the page.
Using Transaction History to Track Donate Transactions
PayPal lets you search for Donate transactions on the History page. The status of payments
found there can be:
z Completed – Transactions were successful, and funds were credited to your account
z Cleared – Payments cleared senders’ accounts, and funds were credited to your account
z Uncleared – Payments have not cleared sender’s accounts, and funds were not credited
To learn how to work with transaction history, see the Order Management Integration Guide
Using Downloadable History Logs to Track Donate Transactions
PayPal lets you download your Donate transactions to your computer from the History page.
You can specify a date range for the transactions and the file format of the download file.
To learn how to work with downloadable history logs, see the Order Management Integration
Guide.
Using Instant Payment Notification to Track Donate Transactions
.
PayPal lets your web server receive messages about Donate transactions and payment activity
on your account. If you activate Instant Payment Notification, PayPal sends messages when:
z Payments are first made, with a status of completed or pending.
86 September 2008 Website Payments Standard Integration Guide
Page 87

Contribution Payments – Donate Buttons
Creating Advanced Donate Buttons on the PayPal Website
z Payments clear, fail, or are denied, if the initial status was pending.
To learn more about Instant Payment Notification, see “Instant Payment Notification –
notify_url” on page 343 and the Order Management Integration Guide
.
Creating Advanced Donate Buttons on the PayPal Website
Read the following topics to learn more about creating advanced Donate buttons on the PayPal
website:
z “Generating Code for Payment Buttons and Email Payment Links” on page 87
z “Protecting HTML Code for Payment Buttons” on page 87
z “Using the Button Creation Tool for Advanced Donate Buttons” on page 87
z “Creating Advanced Donate Buttons With JavaScript Disabled” on page 97
Generating Code for Payment Buttons and Email Payment Links
2
When you create Donate buttons with tools on the PayPal website, PayPal generates HTML
code for website payment buttons. Then, you copy and paste the HTML code onto the pages of
your website.
In addition to HTML code, PayPal generates URL code for email payment links. Use email
payment links to add Donate functionality to your email messages. If your web editing tool or
your service provider does not allow you to paste HTML code onto your webpages, you may
be able to paste the URL code for email payment links onto your webpages instead.
Protecting HTML Code for Payment Buttons
When you create Donate code with tools on the PayPal website, PayPal lets your protect the
HTML button code that it generates by encrypting part of it. Protecting the HTML code of
your payment buttons helps protect against malicious tampering and fraudulent payments.
IMPORTANT: Merchants with significant payment volume are required to take precautions
on securing Website Payments Standard buttons.
For more information, see Chapter 6, “Securing Your Website Payments Standard Buttons
Using the Button Creation Tool for Advanced Donate Buttons
Read the following topics to learn how to use the button creation tool for Donate buttons:
z “The Basic Steps for Using the Tool With Donate Buttons” on page 88
z “Saving Donate Buttons in Your PayPal Account” on page 88
z “Adding Advanced Features to Donate Buttons With HTML Variables” on page 89
Website Payments Standard Integration Guide September 2008 87
Page 88

Contribution Payments – Donate Buttons
2
Creating Advanced Donate Buttons on the PayPal Website
z “Step 1 – Specifying Basic Features of Your Donate Button” on page 89
z “Step 2 – Saving Your Donate Button in Your PayPal Account” on page 92
z “Step 3 – Adding Advanced Features to Your Donate Button” on page 93
z “Copying and Pasting the Donate Code” on page 95
N OTE: If JavaScript is disabled in your browser, PayPal provides an alternative tool described
in “Creating Advanced Donate Buttons With JavaScript Disabled” on page 97.
The Basic Steps for Using the Tool With Donate Buttons
The button creation tool for Donate buttons is a single webpage with three sections:
z Step 1 – Choose button type and enter payment details – This section lets you specify
the details of your Donate button. You can specify whether donors enter their own
contribution amount or a fixed amount.
z Step 2 – Save your buttons (optional) – This section lets you control whether to save your
button in your PayPal account.
z Step 3 – Customize advanced features (optional) – This section lets you work with
advanced features of Donate buttons. If you are familiar with HTML programming and the
advanced HTML variables supported by Website Payments Standard buttons, you can enter
them here.
One section at a time is open for you to work with. To work with another section, click its step
bar to expand it.
You can switch between the sections as often as you like, until you click the Create Button
button at the bottom of the page. Then, PayPal generates the code for your button and displays
it on the You are viewing your button code page. Copy the code and paste it onto your
webpage, and your payment button is complete.
Saving Donate Buttons in Your PayPal Account
By default, the button creation tool saves payment buttons in your PayPal account. The tool
saves your button and generates the code when you click the Create Button. You must copy
and paste the generated code onto your webpages, whether or not you save your button at
PayPal. The generated code is shorter for saved buttons, because PayPal keeps most of the
88 September 2008 Website Payments Standard Integration Guide
Page 89

Contribution Payments – Donate Buttons
Creating Advanced Donate Buttons on the PayPal Website
information about your button in your account, instead of placing it in the code that you add to
your website.
Saving your payment buttons in your PayPal account has these benefits:
z Your payment buttons are more secure, because the generated code that add to your website
contains no information that can be tampered with to produce fraudulent payments.
z You can edit the details and options for your payment buttons in your PayPal account,
without changing the button code that you added to your website.
Use the Step 2 section of the button creation tool to control whether your button is saved in
your PayPal account. You can have a maximum of 1,000 saved buttons in your PayPal
account.
Adding Advanced Features to Donate Buttons With HTML Variables
Some advanced features of payment buttons can be specified only with HTML variables. If
you are familiar with HTML programming and the advanced HTML variables supported by
Website Payments Standard payment buttons, you can enter them in the button creation tool
before the button code is generated.
Use the Step 3 section of the button creation tool to enter advanced HTML variables that you
want to include in your payment button.
2
For more information, see Step 5 of “Step 3 – Adding Advanced Features to Your Donate
Button” on page 93.
Step 1 – Specifying Basic Features of Your Donate Button
To begin using the button creation tool for Donate buttons:
1. Log in to your PayPal Premier or Business account at
https://www.paypal.com.
The My Account Overview page opens.
2. Click the Profile subtab.
The Profile Summary page opens.
3. Under the Selling Preferences heading, do one of the following:
Website Payments Standard Integration Guide September 2008 89
Page 90

Contribution Payments – Donate Buttons
2
Creating Advanced Donate Buttons on the PayPal Website
– Click the My Saved Buttons link, and then click the Create new button link in the
upper right of the page, if you previously saved payment buttons in your PayPal account.
To create a new button that is similar to a button that you saved, find the saved button in
the list. Then, click the Action dropdown menu at the right and click the Create similar
button link.
– Click the Create New Button link, if you have no buttons saved in your PayPal account.
The Create PayPal payment button page opens.
4. In the Accept payments for dropdown menu, select “Donations”.
5. Enter the donation details for your button.
– Organization name/service – (optional) Enter the purpose for the donation or the name
of your organization. If you do not enter anything in this field, your donors can complete
this field during checkout.
– Donation ID – (optional) Enter a value to help identify different kinds of contribution
payments. For example, you might enter the name of your current fund-raising
campaign. The value that you enter is displayed to donors at the time of payment, and it
is displayed in the transaction details that both contribution coordinators and donors can
view on the PayPal website.
6. Customize the appearance and the language of your button (optional).
Click the Customize appearance link and select one of the following.
– PayPal button – Select this radio button to use a button image that is hosted by PayPal.
You can configure the size of the button, whether the button displays payment card logos,
and the country and language for the button text.
If you change the country, ensure the currency that you selected in Step 5 above is
appropriate.
90 September 2008 Website Payments Standard Integration Guide
Page 91

Contribution Payments – Donate Buttons
Creating Advanced Donate Buttons on the PayPal Website
– Use your own button – Select this radio button to specify the URL of your own button
image that is not hosted by PayPal. Use your own button image if the buttons hosted by
PayPal do not fit the look of your website.
If your image is hosted securely, change the text box to begin with https//.
7. From the Currency dropdown menu, select the currency in which contributions are made;
the dropdown menu automatically selects the currency of your primary balance.
8. Under Contribution amount, select one of the following radio buttons.
– Donors enter their own contribution amount – Select this radio button to let donors
enter their contribution amounts during checkout.
This is the default choice for this feature.
– Donors contribute a fixed amount – Select this radio button and enter a fixed amount
that donors contribute when they click this Donate button.
9. Choose between your merchant ID and your email address.
Select one of the following radio buttons to associate transactions from your button with
your PayPal account.
– Secure merchant account ID – Select this radio button to associate your button with
your PayPal account by using your merchant ID. PayPal assigns a unique merchant ID
to your account and includes it automatically in the code for your button.
Your merchant ID is a more secure way to associate your button with your account than
using your email address. Only PayPal can match your merchant ID and PayPal
account, and your PayPal email address is never exposed in the HTML button code of
your webpages.
This is the default choice for this feature.
– Plain text email – Select this radio button to associate your button with your PayPal
account by using your email address. Select from the email addresses in your PayPal
account. For example, you might select the email address of the person in your
organization who handles order fulfillment or accounting. All payments are deposited to
your PayPal account balance, regardless of which email address receives payments from
this button. Only confirmed email addresses can be used to receive payments.
2
IMPORTANT: Your email address is a less secure way to associate your button with your
PayPal account than by using your merchant ID. Your email address is
exposed on webpages wherever you paste the HTML code for your button.
Website Payments Standard Integration Guide September 2008 91
Page 92

Contribution Payments – Donate Buttons
2
Creating Advanced Donate Buttons on the PayPal Website
10.Do one of the following:
– Click the Create Button button if you specified all the features for your button.
Follow the instructions for “Copying and Pasting the Donate Code” on page 95.
– Click the Step 2 bar if you do not want to save your button in your PayPal account.
Follow the instructions for “Step 2 – Saving Your Donate Button in Your PayPal
Account” on page 92.
– Click the Step 3 bar if you want to specify advanced features for your button.
Follow the instructions for “Step 3 – Adding Advanced Features to Your Donate
Button” on page 93.
Step 2 – Saving Your Donate Button in Your PayPal Account
Use the Step 2 section of the button creation tool to control whether to save the important
details your button in your PayPal account.
1. Do one of the following:
– Clear the Save button at PayPal checkbox to avoid saving your button in your PayPal
account.
The HTML code that PayPal generates and that you paste onto your webpage contains
all payment details and information identifying your PayPal account. You may need to
take extra precautions to secure your buttons against fraudulent payments.
For more information, see Chapter 6, “Securing Your Website Payments Standard
Buttons.”
– Select the Save button at PayPal checkbox to save the payment details of your payment
button in your PayPal account.
The HTML code that PayPal generates and that you paste onto your webpage contains
no payment or identifying information.
For more information, see “Saving Donate Buttons in Your PayPal Account” on
page 88.”
92 September 2008 Website Payments Standard Integration Guide
Page 93

Contribution Payments – Donate Buttons
Creating Advanced Donate Buttons on the PayPal Website
2. Do one of the following:
– Click the Create Button button if you specified all the features for your button.
Follow the instructions for “Copying and Pasting the Donate Code” on page 95.
– Click the Step 3 bar if you want to specify advanced features for your button, such as
prompting buyers for item quantities.
Follow the instructions for “Step 3 – Adding Advanced Features to Your Donate
Button” on page 93.
– Scroll to the top of the page and click the Step 1 bar if you want to adjust the basic
features of your button.
Follow the instructions for “Step 1 – Specifying Basic Features of Your Donate Button”
on page 89, beginning with Step 5.
2
Step 3 – Adding Advanced Features to Your Donate Button
Use the Step 3 section of the button creation tool to specify advanced features of your button.
1. Can your donors add special instructions in a message to you (optional)?
– Ye s – Select this radio button to let donors add special instructions to you during
checkout.
In the Name of message box text box, enter the text that you want displayed for the text
box in which donors enter there special instructions; the default value is “Add special
Website Payments Standard Integration Guide September 2008 93
Page 94

Contribution Payments – Donate Buttons
2
Creating Advanced Donate Buttons on the PayPal Website
instructions to the seller”. Change the default value to prompt donors for specific
information, such as In memory of. Enter no more than 40 characters.
“Yes” is the default choice for this feature.
– No – Select this radio button if you do not want a text box for special instructions.
2. Do you need your donors’ shipping addresses (optional)?
– Ye s – Select this radio button to prompt donors to select or enter shipping addresses
during checkout.
“Yes” is the default choice for this feature.
– No – Select this radio button if you do not want to prompt donors for shipping addresses.
3. Take donors to a specific webpage (URL) after checkout cancellation (optional)?
Select the checkbox and enter a URL in the text box if you have a special page on your
website where you want donors to return if they cancel their checkouts before completing
their transactions.
4. Take donors to a specific webpage (URL) after successful checkout (optional)?
Select the checkbox and enter a URL in the text box if you have a special page on your
website where you want donors to return after they complete their checkouts successfully.
N OTE: If you have a special webpage for donors who return to your website after checking
out successfully, consider implementing Payment Data Transfer so that you can
display information about the completed transactions. For more information, see the
Order Management Integration Guide
.
94 September 2008 Website Payments Standard Integration Guide
Page 95

Contribution Payments – Donate Buttons
Creating Advanced Donate Buttons on the PayPal Website
5. Add advanced variables to the HTML code of your payment button (optional).
If you are familiar with the HTML programming and the advanced HTML variables
supported by Website Payments Standard payment buttons, you can enter them here. Select
the checkbox, and then enter the variables in the text box that appears below it.
Enter any advanced HTML variables in the following, name/value-pair format:
variableName=allowableValue
For example, you want PayPal to display custom payment pages during checkout that you
set up in your account profile. Use the HTML variable page_style with the name you
gave to your custom payment page. If you were to include the variable in HTML code that
you write manually, you would use the standard HTML format:
<input type="hidden" name="page_style" value="myPageStyle">
Enter the variables in the text box using the shortened, name/value-pair format, instead:
page_style=myPageStyle
Do not enclose values in quotes, even if values contain spaces. PayPal surrounds the value
from the equal sign (=) to the end of the line with quotes in the generated HTML code.
For more information, see Chapter 11, “HTML Form Basics for Website Payments
Standard.”
2
6. Do one of the following:
– Click the Create Button button if you specified all the features for your button.
Follow the instructions for “Copying and Pasting the Donate Code” on page 95.
– Scroll to the top of the page and click the Step 1 bar if you want to adjust the basic
features of your button.
Follow the instructions for “Step 1 – Specifying Basic Features of Your Donate Button”
on page 89, beginning with Step 5.
– Scroll to the top of the page and click the Step 2 bar if you want to change whether to
save your button in your PayPal account.
Follow the instructions for “Step 2 – Saving Your Donate Button in Your PayPal
Account” on page 92.
Copying and Pasting the Donate Code
After you click the Create Button button, PayPal displays the You are viewing your button
code page. The page contains tabs with Donate code for specific situations:
z Website – Copy and paste the HTML button code on this tab onto the pages of your
website.
z Email – Copy and paste the URL email payment link code on this tab into email templates
and messages, or paste it onto webpages if your hosting provider does not allow you to
paste HTML code.
Regardless of saving your buttons in your PayPal account, you must copy and paste the code
that PayPal generates onto your own webpages and into email templates and messages.
Website Payments Standard Integration Guide September 2008 95
Page 96

Contribution Payments – Donate Buttons
2
Creating Advanced Donate Buttons on the PayPal Website
Copying and Pasting the HTML Code for the Donate Button. The Website tab on the
You are viewing your button code page contains the generated HTML code for your Donate
payment button.
If in “Step 2 – Saving Your Donate Button in Your PayPal Account” on page 92 you specified
that you do not want to save your button in your Paypal account, PayPal protects the generated
HTML button code with encryption. Protected HTML code helps secure your buttons against
malicious tampering and fraudulent payments.
You can the expose the code of your payment button by clicking the Remove code protection
link at the upper right of text box. For example, you might remove protection so that you can
edit the code later to change the item price. If you remove code protection, you must use other
methods that PayPal recommends to secure your payment button. Click the Protect code link
to restore the button protection that you removed.
IMPORTANT: Merchants with significant payment volume are required to take precautions
on securing Website Payment Standard buttons. For more information,
Chapter 6, “Securing Your Website Payments Standard Buttons.”
To copy and paste the HTML code for your Donate payment button:
1. Click the Select Code button on the Websites tab to select all of the generated HTML
code.
2. Copy the text that you selected to the clipboard, by:
– pressing Ctrl+C.
– or –
– right-clicking your mouse, and selecting Copy.
3. In your web editing tool, open the webpage where you want the button to be seen.
IMPORTANT: Be sure that your tool is ready for you to paste HTML code, such as by
switching to an HTML view from a design view of your webpage.
4. Paste the text that you copied from the clipboard onto your webpage where you want the
button to appear, by:
– pressing Ctrl+V.
– or –
– right-clicking your mouse, and selecting Paste.
Copying and Pasting the Code for the Donate Email Payment Link. The Email tab on
the You are viewing your button code page contains the generated URL code for your
Donate email payment link.
N OTE: PayPal cannot protect the URL code for email payment links. Secure the payments you
receive from email payment links by using an alternative method that does not involve
encryption, as described in Chapter 6, “Securing Your Website Payments Standard
Buttons.”
To copy and paste the URL code for your Donate email payment link:
96 September 2008 Website Payments Standard Integration Guide
Page 97

Contribution Payments – Donate Buttons
Creating Advanced Donate Buttons on the PayPal Website
1. Click the Select Code button on the Email tab to select all of the generated URL code.
2. Copy the text that you selected to the clipboard, by:
– pressing Ctrl+C.
– or –
– right-clicking your mouse, and selecting Copy.
3. Open the email template or message that you want to send.
4. Paste the text that you copied from the clipboard into your email, by:
– pressing Ctrl+V.
– or –
– right-clicking your mouse, and selecting Paste.
Creating Advanced Donate Buttons With JavaScript Disabled
The button creation tool for Donate buttons, described above, requires JavaScript. If
JavaScript is disabled in your browser, PayPal automatically offers you an alternative button
creation tool that does not require JavaScript.
2
Read the following topics to learn how to create Donate buttons with JavaScript disabled.
z “The Pages in the Button Creation Tool for Donate Buttons” on page 97
z “Page 1 – Specifying the Basic Features of the Donate Button” on page 97
z “Page 2 – Specifying Advanced Features of Your Donate Button” on page 100
z “Copying and Pasting the Donate Code With JavaScript Disabled” on page 103
N OTE: The alternative tool lets you create Donate buttons on the PayPal website, but it does
not allow you to save your buttons in your PayPal account.
The Pages in the Button Creation Tool for Donate Buttons
The button creation tool for Donate buttons with JavaScript disabled has three pages:
z Donations – the initial page to specify the required and most often used optional features
z Donations – Page 2 – an optional page to specify additional, advanced features
z Add a Donate button to your website – the final page that has the generated code for your
payment button
You can switch between the first and second pages until you click the Create Button Now
button to display the third page that has the generated code.
Page 1 – Specifying the Basic Features of the Donate Button
To create code for a Donate button or email payment link by using a tool on the PayPal
website with JavaScript disabled:
1. Log in to your PayPal account at
Website Payments Standard Integration Guide September 2008 97
https://www.paypal.com.
Page 98

Contribution Payments – Donate Buttons
2
Creating Advanced Donate Buttons on the PayPal Website
2. Click the Edit Profile link.
The Profile Summary page opens.
3. Under the Selling Preferences heading, click the Create New Button link.
The Create PayPal payment button page opens.
4. Under the Create button without JavaScript enabled heading, click the Donate link.
The Donations page opens.
5. Enter the donation details of your button.
– Donation name/service – Enter the reason for the donation or the name of your
organization. If you do not enter anything in this field, your donors can complete this
field during checkout.
– Donation ID/number – (optional) Enter a value to help identify different kinds of
contribution payments. For example, you might enter the name of your current fundraising campaign. The value that you enter is displayed to donors at the time of payment,
and it is displayed in the transaction details that both contribution coordinators and
donors can view on the PayPal website.
– Amount – (optional) Enter a fixed contribution amount. If you leave the field blank,
donors enter their own contribution amount after they click the Donate button.
– Currency – From the dropdown menu, select the currency in which you specified the
fixed contribution amount or in which you want the amounts that donors enter to be
denominated. The dropdown menu automatically selects the currency of your primary
balance.
– Buyer’s default country – From the dropdown menu, select a country for the PayPal
log-in or sign-up page that donors see when they click the button. The content on the
page will be appropriate for the country you select. Donors can change the country that
you select, after the log-in or sign-up page appears.
6. Choose a button style for your Donate button.
Select the radio button next to the image that you want to use, if you are going to be
accepting payments from your website instead of by using an email payment link. The
image that you select is hosted by PayPal.
98 September 2008 Website Payments Standard Integration Guide
Page 99

Contribution Payments – Donate Buttons
Creating Advanced Donate Buttons on the PayPal Website
To display your own image that you host on your website:
– Click the Use your own button image link.
An additional radio button and text box appear.
–In the Button Image URL text box, enter the URL of your button image.
If your image is hosted securely, change the entry to begin with https//.
2
7. Specify whether to use button encryption.
– Select the Ye s radio button to encrypt the generated code for the payment button.
– or –
– Select the No radio button to leave the generated code for the payment button and the
email payment link as clear text.
PayPal highly recommends that you use button encryption to protect the HTML code of
your payment button. Encryption protects payment details from fraudulent alteration by
third parties, thus increasing the security of the payments you accept. However, consider
the limitations that encryption imposes:
– Encrypted HTML code cannot be edited.
Select the No radio button if you want to edit the HTML code for your button after the
code is generated.
– Encrypted HTML code cannot be used for email payment links.
Select the No radio button if you want to create an email payment link instead of or in
addition to your button.
If you select the No radio button for any reason, use an alternative strategy described in
Chapter 6, “Securing Your Website Payments Standard Buttons” to secure the payments
you receive from the payment button or the email payment link.
IMPORTANT: Merchants with significant payment volume are required to take
precautions on securing Website Payment Standard buttons.
8. If you have additional details to specify for your button, such as a custom payment page
that has your own logo and colors, click the Add More Options button and follow the
Website Payments Standard Integration Guide September 2008 99
Page 100

Contribution Payments – Donate Buttons
2
Creating Advanced Donate Buttons on the PayPal Website
instructions for “Page 2 – Specifying Advanced Features of Your Donate Button” on
page 100.
– or –
If you entered all the details and options for your button, go to “Copying and Pasting the
Donate Code With JavaScript Disabled” on page 103.
Page 2 – Specifying Advanced Features of Your Donate Button
Use the Donations – Page 2 page to specify advanced features of your button with JavaScript
disabled.
1. Customize your payment pages.
Use these settings to give donors a visually seamless payment experience by customizing
the PayPal payment pages to match the visual style of your website.
– Primary Page Style – (display only) The payment pages that your donors see are
displayed with the page style that is specified here, unless you select a different custom
payment page style below.
– Custom Payment Page Style – (optional) If you already added Custom Payment Page
Styles in your account profile, they are listed here. Choose the page style that you would
like to appear when donors click your Donate button.
To learn more about creating page styles, see “Co-Branding the PayPal Checkout
Pages” on page 267.
– Preview – Click the Preview button to see a mock-up of the payment page style that
donors see when they click your Donate button.
100 September 2008 Website Payments Standard Integration Guide
 Loading...