


 Loading...
Website Payments
Pro Integration Guide
Last updated: October 2009
Website Payments Pro Integration Guide
Document Number: 100001.en_US-200910
© 2009 PayPal, Inc. All rights reserved. PayPal is a registered trademark of PayPal, Inc. The PayPal logo is a trademark of PayPal, Inc. Other trademarks and brands are the property of their respective owners.
The information in this document belongs to PayPal, Inc. It may not be used, reproduced or disclosed without the written approval of PayPal, Inc. Copyright © PayPal. All rights reserved. PayPal (Europe) S.à r.l. et Cie., S.C.A., Société en Commandite par Actions. Registered office: 22-24 Boulevard Royal, L-2449, Luxembourg, R.C.S. Luxembourg B 118 349.
Consumer advisory: The PayPal™ payment service is regarded as a stored value facility under Singapore law. As such, it does not require the approval of the Monetary Authority of Singapore. You are advised to read the terms and conditions carefully.
Notice of non-liability:
PayPal, Inc. is providing the information in this document to you “AS-IS” with all faults. PayPal, Inc. makes no warranties of any kind (whether express, implied or statutory) with respect to the information contained herein. PayPal, Inc. assumes no liability for damages (whether direct or indirect), caused by errors or omissions, or resulting from the use of this document or the information contained in this document or resulting from the application or use of the product or service described herein. PayPal, Inc. reserves the right to make changes to any information herein without further notice.

Contents
Preface . . . . . . . . . . . . . . . . . . . . . . . . . . . . . . . . . . 9
Intended Audience . . . . . . . . . . . . . . . . . . . . . . . . . . . . . . . . . . . . . . . 9 Where to Go for More Information . . . . . . . . . . . . . . . . . . . . . . . . . . . . . . . 9 Revision History . . . . . . . . . . . . . . . . . . . . . . . . . . . . . . . . . . . . . . . . 9
Chapter 1 Introducing Website Payments Pro . . . . . . . . . . . . . 11 Chapter 2 Introducing Direct Payment . . . . . . . . . . . . . . . . . 13
Direct Payment Implementation . . . . . . . . . . . . . . . . . . . . . . . . . . . . . . . 13 Additional Recommendations for Checkout With Direct Payment . . . . . . . . . . . . . . 14
Chapter 3 Introducing Express Checkout . . . . . . . . . . . . . . . 17
The Express Checkout Experience . . . . . . . . . . . . . . . . . . . . . . . . . . . . . 17 Getting Started . . . . . . . . . . . . . . . . . . . . . . . . . . . . . . . . . . . . . . . . 18 Configuring and Customizing the Express Checkout Experience . . . . . . . . . . . . 19 Additional PayPal API Operations . . . . . . . . . . . . . . . . . . . . . . . . . . . . 19 Express Checkout Flow . . . . . . . . . . . . . . . . . . . . . . . . . . . . . . . . . . . 20 Checkout Entry Point . . . . . . . . . . . . . . . . . . . . . . . . . . . . . . . . . . 20 Payment Option Entry Point . . . . . . . . . . . . . . . . . . . . . . . . . . . . . . . 20 Complete Express Checkout Flow. . . . . . . . . . . . . . . . . . . . . . . . . . . . 21 Express Checkout Building Blocks. . . . . . . . . . . . . . . . . . . . . . . . . . . . . . 22 Express Checkout Buttons. . . . . . . . . . . . . . . . . . . . . . . . . . . . . . . . 23 Express Checkout API Operations . . . . . . . . . . . . . . . . . . . . . . . . . . . 23 Express Checkout Command . . . . . . . . . . . . . . . . . . . . . . . . . . . . . . 24 Express Checkout Token Usage. . . . . . . . . . . . . . . . . . . . . . . . . . . . . 24
Chapter 4 Express Checkout Button and Logo Image Integration . . . 25
About PayPal Button and Logo Images . . . . . . . . . . . . . . . . . . . . . . . . . . . 25 Express Checkout Images. . . . . . . . . . . . . . . . . . . . . . . . . . . . . . . . 25 Express Checkout Image Flavors . . . . . . . . . . . . . . . . . . . . . . . . . . . . 25 Dynamic Images . . . . . . . . . . . . . . . . . . . . . . . . . . . . . . . . . . . . . . . 26 Configuring the Dynamic Image . . . . . . . . . . . . . . . . . . . . . . . . . . . . . . . 26
October 2009 |
3 |

Contents
Set Up the Default Image . . . . . . . . . . . . . . . . . . . . . . . . . . . . . . . . 27 Set Up Image for Dynamic Use . . . . . . . . . . . . . . . . . . . . . . . . . . . . . 27 Change the Locale. . . . . . . . . . . . . . . . . . . . . . . . . . . . . . . . . . . . 28 Feedback to Buyer Meeting an Incentive . . . . . . . . . . . . . . . . . . . . . . . . 28 Choose the Image . . . . . . . . . . . . . . . . . . . . . . . . . . . . . . . . . . . . 28
Dynamic Image Command Reference . . . . . . . . . . . . . . . . . . . . . . . . . . . . 28 Dynamic Image Parameters . . . . . . . . . . . . . . . . . . . . . . . . . . . . . . . 29
Locale Codes . . . . . . . . . . . . . . . . . . . . . . . . . . . . . . . . . . . . . . |
29 |
Static PayPal Buttons and Images Source Requirements . . . . . . . . . . . . . . . . . . |
31 |
Chapter 5 PayPal Name-Value Pair API Basics . . . . . . . . . . . . . 33
PayPal API Client-Server Architecture . . . . . . . . . . . . . . . . . . . . . . . . . . . . 33 PayPal Name-Value Pair API Requests and Responses . . . . . . . . . . . . . . . . 33 Multiple API Operations . . . . . . . . . . . . . . . . . . . . . . . . . . . . . . . . . 34 Obtaining API Credentials . . . . . . . . . . . . . . . . . . . . . . . . . . . . . . . . . . 36 Creating an API Signature . . . . . . . . . . . . . . . . . . . . . . . . . . . . . . . . 36 Creating an API Certificate . . . . . . . . . . . . . . . . . . . . . . . . . . . . . . . 38 Creating an NVP Request . . . . . . . . . . . . . . . . . . . . . . . . . . . . . . . . . . 38 Specifying the PayPal API Operation . . . . . . . . . . . . . . . . . . . . . . . . . . 38 Specifying an API Credential . . . . . . . . . . . . . . . . . . . . . . . . . . . . . . 39 URL Encoding . . . . . . . . . . . . . . . . . . . . . . . . . . . . . . . . . . . . . . 40 List Syntax for Name-Value Pairs . . . . . . . . . . . . . . . . . . . . . . . . . . . . 40 Executing NVP API Operations . . . . . . . . . . . . . . . . . . . . . . . . . . . . . . . 41 Specifying a PayPal Server . . . . . . . . . . . . . . . . . . . . . . . . . . . . . . . 41 Logging API Operations . . . . . . . . . . . . . . . . . . . . . . . . . . . . . . . . . 41 Responding to an NVP Response . . . . . . . . . . . . . . . . . . . . . . . . . . . . . . 42 Common Response Fields. . . . . . . . . . . . . . . . . . . . . . . . . . . . . . . . 42 URL Decoding . . . . . . . . . . . . . . . . . . . . . . . . . . . . . . . . . . . . . . 42
Chapter 6 Implementing the Simplest Express Checkout Integration . 43
Setting Up the Express Checkout Transaction. . . . . . . . . . . . . . . . . . . . . . . . 43 Obtaining Express Checkout Transaction Details . . . . . . . . . . . . . . . . . . . . . . 45 Completing the Express Checkout Transaction . . . . . . . . . . . . . . . . . . . . . . . 45
Chapter 7 Testing an Express Checkout Integration . . . . . . . . . . 47 Chapter 8 Customizing Express Checkout . . . . . . . . . . . . . . . 53
4 |
October 2009 |

Contents
PayPal Review Page Order Details . . . . . . . . . . . . . . . . . . . . . . . . . . . . . 53 Special Instructions to Merchant. . . . . . . . . . . . . . . . . . . . . . . . . . . . . 55 Integrating Order Details into the Express Checkout Flow . . . . . . . . . . . . . . . 56 eBay-Issued Incentives . . . . . . . . . . . . . . . . . . . . . . . . . . . . . . . . . 59 Integrating eBay Incentives into the Express Checkout Flow . . . . . . . . . . . . . . 60
PayPal Page Style . . . . . . . . . . . . . . . . . . . . . . . . . . . . . . . . . . . . . . 62 Custom Page Style . . . . . . . . . . . . . . . . . . . . . . . . . . . . . . . . . . . 63 Individual Page Style Characteristics . . . . . . . . . . . . . . . . . . . . . . . . . . 63 Changing the Locale . . . . . . . . . . . . . . . . . . . . . . . . . . . . . . . . . . . . . 66 Handling Shipping Addresses . . . . . . . . . . . . . . . . . . . . . . . . . . . . . . . . 67 Confirmed Address . . . . . . . . . . . . . . . . . . . . . . . . . . . . . . . . . . . 68 Suppressing the Buyer’s Shipping Address . . . . . . . . . . . . . . . . . . . . . . . 69 Shipping Address Override . . . . . . . . . . . . . . . . . . . . . . . . . . . . . . . 71 Automatically Filling Out the PayPal Login Page . . . . . . . . . . . . . . . . . . . . . . 73 User Confirms Order on PayPal . . . . . . . . . . . . . . . . . . . . . . . . . . . . . . . 75
Chapter 9 Implementing the Instant Update API . . . . . . . . . . . . 77
About the Instant Update API . . . . . . . . . . . . . . . . . . . . . . . . . . . . . . . . |
77 |
Integration Steps. . . . . . . . . . . . . . . . . . . . . . . . . . . . . . . . . . . . . 77 |
|
Post-Integration Checkout Experience . . . . . . . . . . . . . . . . . . . . . . . . . |
78 |
How the Callback Works in the Express Checkout Flow. . . . . . . . . . . . . . . . . . . |
80 |
Following Instant Update API Best Practices . . . . . . . . . . . . . . . . . . . . . . . . |
81 |
Setting Up the Callback . . . . . . . . . . . . . . . . . . . . . . . . . . . . . . . . . . . |
82 |
GetExpressCheckoutDetails and DoExpressCheckoutPayment Changes . . . . . . . |
83 |
Other Considerations . . . . . . . . . . . . . . . . . . . . . . . . . . . . . . . . . . |
83 |
Using the Callback . . . . . . . . . . . . . . . . . . . . . . . . . . . . . . . . . . . . . . 85 |
|
SetExpressCheckout . . . . . . . . . . . . . . . . . . . . . . . . . . . . . . . . . . |
85 |
Callback Request . . . . . . . . . . . . . . . . . . . . . . . . . . . . . . . . . . . . 87 |
|
Callback Response . . . . . . . . . . . . . . . . . . . . . . . . . . . . . . . . . . . |
87 |
Chapter 10 Immediate Payment . . . . . . . . . . . . . . . . . . . . . 89
Overview of Immediate Payment . . . . . . . . . . . . . . . . . . |
. . . . . . . . . . . . 89 |
|
How Immediate Payment Works in the Express Checkout Flow |
. . . . . . . . . . . . 89 |
|
Integrating Immediate Payment into the Express Checkout Flow . . |
. . . . . . . . . . . . |
91 |
The Call to SetExpressCheckout . . . . . . . . . . . . . . . . |
. . . . . . . . . . . . |
91 |
The Call to DoExpressCheckoutPayment . . . . . . . . . . . . . . . . . . . . . . . . 92
Chapter 11 Handling Payment Settlements . . . . . . . . . . . . . . . 93
October 2009 |
5 |

Contents
Sale Payment Action . . . . . . . . . . . . . . . . . . . . . . . . . . . . . . . . . . . . . 93 Authorization Payment Action . . . . . . . . . . . . . . . . . . . . . . . . . . . . . . . . 93 Order Payment Action . . . . . . . . . . . . . . . . . . . . . . . . . . . . . . . . . . . . 94
Chapter 12 Handling Recurring Payments . . . . . . . . . . . . . . . . 97
How Recurring Payments Work . . . . . . . . . . . . . . . . . . . . . . . . . . . . . . . 97 Limitations . . . . . . . . . . . . . . . . . . . . . . . . . . . . . . . . . . . . . . . . 98 Recurring Payments Terms . . . . . . . . . . . . . . . . . . . . . . . . . . . . . . . . . 98 Recurring Payments With Express Checkout . . . . . . . . . . . . . . . . . . . . . . . . 99 Initiating the Processing Flow With SetExpressCheckout . . . . . . . . . . . . . . .101 Redirecting the Buyer’s Browser to PayPal . . . . . . . . . . . . . . . . . . . . . . .102 Getting Buyer Details Using GetExpressCheckoutDetails. . . . . . . . . . . . . . . .103 Creating the Profiles With CreateRecurringPaymentsProfile . . . . . . . . . . . . . .103 Recurring Payments With Direct Payments . . . . . . . . . . . . . . . . . . . . . . . . .103 Options for Creating a Recurring Payments Profile . . . . . . . . . . . . . . . . . . . . .104 Specifying the Regular Payment Period . . . . . . . . . . . . . . . . . . . . . . . . .104 Including an Optional Trial Period . . . . . . . . . . . . . . . . . . . . . . . . . . . .105 Specifying an Initial Payment . . . . . . . . . . . . . . . . . . . . . . . . . . . . . .106 Maximum Number of Failed Payments . . . . . . . . . . . . . . . . . . . . . . . . .106 Billing the Outstanding Amount . . . . . . . . . . . . . . . . . . . . . . . . . . . . .107 Recurring Payments Profile Status. . . . . . . . . . . . . . . . . . . . . . . . . . . . . .107 Getting Recurring Payments Profile Information . . . . . . . . . . . . . . . . . . . . . . .107 Modifying a Recurring Payments Profile . . . . . . . . . . . . . . . . . . . . . . . . . . .108 Updating Addresses . . . . . . . . . . . . . . . . . . . . . . . . . . . . . . . . . . .109 Updating the Billing Amount . . . . . . . . . . . . . . . . . . . . . . . . . . . . . . .109 Billing the Outstanding Amount of a Profile . . . . . . . . . . . . . . . . . . . . . . . . .109 Recurring Payments Notifications . . . . . . . . . . . . . . . . . . . . . . . . . . . . . .110
Chapter 13 Using Other PayPal API Operations . . . . . . . . . . . . 111
Issuing Refunds . . . . . . . . . . . . . . . . . . . . . . . . . . . . . . . . . . . . . . . 111 Handling Payment Review . . . . . . . . . . . . . . . . . . . . . . . . . . . . . . . . . .112
Chapter 14 Integrating giropay with Express Checkout . . . . . . . . 115
giropay Page Flows . . . . . . . . . . . . . . . . . . . . . . . . . . . . . . . . . . . . .115 giropay Payment Page Flow . . . . . . . . . . . . . . . . . . . . . . . . . . . . . . .115 Cancelled or Unsuccessful giropay Payment Page Flow . . . . . . . . . . . . . . . .116 giropay Integration . . . . . . . . . . . . . . . . . . . . . . . . . . . . . . . . . . . . . .117
6 |
October 2009 |

Contents
Initiate the Flow with SetExpressCheckout . . . . . . . . . . . . . . . . . . . . . . .117 Redirect the Customer to PayPal . . . . . . . . . . . . . . . . . . . . . . . . . . . .117 Complete the Transaction . . . . . . . . . . . . . . . . . . . . . . . . . . . . . . . .118 Receive Transaction Status Notification . . . . . . . . . . . . . . . . . . . . . . . . .118
October 2009 |
7 |

Contents
8 |
October 2009 |

Preface
This document describes Website Payments Pro integration.
Intended Audience
This document is intended for merchants and developers implementing Website Payments Pro.
Where to Go for More Information
For information on the administrative tasks you can perform from your PayPal account, see the Merchant Setup and Administration Guide. The guide is available on the Documentation page linked to the Library tab in Developer Central.
Revision History
Revision history for Website Payments Pro Integration Guide.
TABLE 1.1 Revision history
Date |
Description |
|
|
10/05/2009 |
Added Immediate Payment. |
|
Edited for technical accuracy. |
|
Removed PayPal placement guidelines. |
|
|
06/30/2009 |
Added a section on payment review. |
|
|
06/04/2009 |
Added a chapter on pre-populating the PayPal review page. Updated PayPal |
|
Review pages. Moved some customization topics out of this guide. They |
|
are now in the Merchant Setup and Administration Guide. |
|
|
04/08/2009 |
Added a chapter describing the Instant Update Callback API. |
|
Added Express Checkout feature of passing AMT=0 to create one or more |
|
billing agreements. |
|
|
12/11/2008 |
Revised the Website Payments Pro introduction and overview chapters. |
|
|
11/13/2008 |
Added information about integrating dynamic images and added |
|
information about order details that can be displayed on the PayPal Review |
|
page. |
|
|
Website Payments Pro Integration Guide |
October 2009 |
9 |

Revision History
TABLE 1.1 Revision history
Date |
Description |
|
|
06/30/2008 |
Complete revision. |
|
|
10 |
October 2009 |
Website Payments Pro Integration Guide |
1 |
ProIntroducing Website Payments |
PayPal’s Website Payments Pro lets you accept both credit cards and PayPal payments directly on your website. It consists of two API-based solutions: Direct Payment and Express Checkout.
Direct Payment lets you accept credit cards on your website. Your customers do not need a PayPal account to pay. Here’s how it works:
1.Your customer pays on your website with their credit card.
2.The payment information is sent to PayPal using the PayPal DoDirectPayment API operation.
3.PayPal processes the payment information.
4.The funds from the transaction are sent to your PayPal account.
Express Checkout lets you accept PayPal payments on your website. Your customers benefit because paying for items is fast. They don't have to spend time typing in financial and shipping information because their information is already stored in their PayPal account. Here’s how it works:
1.Your customer chooses to pay with PayPal by entering their email address and PayPal password, without leaving your website.
2.Your customer makes the payment using PayPal.
3.The payment information is sent to PayPal using PayPal Express Checkout API operations.
4.The funds from the transaction are sent to your PayPal account.
NOTE: If you use Website Payments Pro, you must implement both Direct Payment and Express Checkout.
NOTE: For information about administrative tasks you can perform from your PayPal account such as adding users, setting up custom page styles, and managing multiple currency balances, see the Merchant Setup and Administration Guide. The guide is located on the Documentation page linked to the Library tab on Developer Central.
Website Payments Pro Integration Guide |
October 2009 |
11 |

1 Introducing Website Payments Pro
12 |
October 2009 |
Website Payments Pro Integration Guide |
2 |
Introducing Direct Payment |
Direct Payment lets your customers who do not have a PayPal account pay using their credit cards without leaving your website. PayPal then processes the payment in the background.
Direct Payment has a single API operation: DoDirectPayment, which allows you to process a credit card transaction. This API operation also alerts you to potentially fraudulent transactions by providing you with industry-standard AVS and CVV2 responses for each transaction.
NOTE: Transactions processed using the DoDirectPayment API operation are not covered by the PayPal Seller Protection Policy.
Direct Payment Implementation
When customers choose to pay with a credit card, they enter their card number and other information on your website. After they confirm their order and click Pay, you complete the order in the background by invoking the DoDirectPayment API operation. Customers never leave your site. Although PayPal processes the order, customers aren’t aware of PayPal’s involvement; PayPal will not even appear on the customer’s credit card statement for the transaction.The following diagram shows a typical Direct Payment flow:
The numbers in the diagram correspond to the following implementation steps:
1.On your checkout pages, you need to collect the following information from your customer to be used in the DoDirectPayment request:
–Amount of the transaction
–Credit card type
–Credit card number
–Credit card expiration date
Website Payments Pro Integration Guide |
October 2009 |
13 |

2 |
Introducing Direct Payment |
|
Additional Recommendations for Checkout With Direct Payment |
|
– Credit card CVV value |
|
– Cardholder first and last name |
|
– Cardholder billing address |
|
NOTE: You must also retrieve the IP address of customer's browser and include this with |
|
the request. |
2.When your customer clicks the Pay button, invoke the DoDirectPayment API operation.
3.The PayPal API server executes the request and returns a response.
–Ack code (Success, SuccessWithWarning, or Failure)
–Amount of the transaction
–AVS response code
–CVV response code
–PayPal transaction ID
–Error codes and messages (if any)
–Correlation ID (unique identifier for the API call)
4.If the operation is successful, you should send your customer to an order confirmation page.
The Ack code determines whether the operation is a success. If successful, you should display a message on the order confirmation page.
If not successful, which is either a failure or a success with warning due to Fraud Management Filters, you should display information related to the error. In addition, you may want to provide your customer an opportunity to pay using a different payment method.
Additional Recommendations for Checkout With Direct Payment
Your checkout pages must collect all the information you need to create the DoDirectPayment request. The following recommendations make it easier for your customers to provide the needed information and aid in the correct processing of the request:
zProvide a drop-down menu for the “state” or “province” fields. For US addresses, the state must be two letters, and must be a valid two-letter state, military location, or US territory. For Canada, the province must be a two-letter Canadian province.
zEnsure customers can enter the correct number of digits for the CVV code. The value is 3 digits for Visa, MasterCard, and Discover. The value is 4 digits for American Express.
zShow information on the checkout page that explains what CVV is, and where to find it on the card.
zConfigure timeout settings to allow for the fact that the DoDirectPayment API operation can take up to 30 seconds. Consider displaying a “processing transaction” message to your customer and disabling the Pay button until the transaction finishes.
14 |
October 2009 |
Website Payments Pro Integration Guide |
Introducing Direct Payment |
2 |
Additional Recommendations for Checkout With Direct Payment |
|
zUse the optional Invoice ID field to prevent duplicate charges. PayPal ensures that an Invoice ID is used only once per account. Duplicate requests with the same Invoice ID result in an error and a failed transaction.
Website Payments Pro Integration Guide |
October 2009 |
15 |
2 |
Introducing Direct Payment |
|
Additional Recommendations for Checkout With Direct Payment |
16 |
October 2009 |
Website Payments Pro Integration Guide |

3 |
Introducing Express Checkout |
Express Checkout is PayPal’s premier checkout solution, which streamlines the checkout process for buyers and keeps them on the merchant’s site after making a purchase.
zThe Express Checkout Experience
zGetting Started
zExpress Checkout Flow
zExpress Checkout Building Blocks
NOTE: For information about administrative tasks you can perform from your PayPal account such as adding users, setting up custom page styles, and managing multiple currency balances, see the Merchant Setup and Administration Guide. The guide is located on the Documentation page linked to the Library tab on Developer Central.
The Express Checkout Experience
Express Checkout makes it easier for your customers to pay and allows you to accept PayPal while retaining control of the buyer and overall checkout flow.
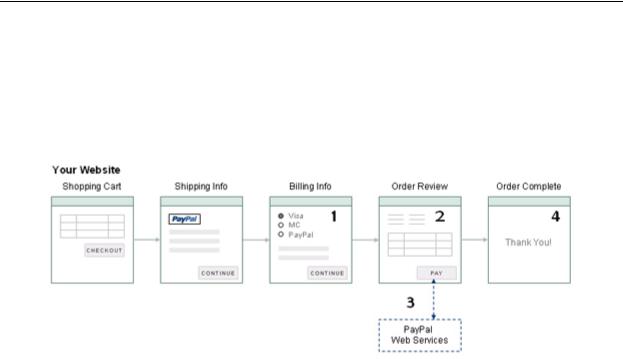
Consider your buyer’s experience before implementing Express Checkout. A generic flow probably has the following sequence of pages:
A generic checkout flow
In a typical checkout flow, the buyer
1.Checks out from the shopping cart page
2.Provides shipping information
3.Chooses a payment option and provides billing and payment information
4.Reviews the order and pays
5.Receives an order confirmation
In an Express Checkout flow, a buyer still checks out at the beginning of the flow and pays on your site; however, the buyer does not reenter shipping, billing, or payment information, because it is already available from PayPal. This simplifies and expedites the checkout
Website Payments Pro Integration Guide |
October 2009 |
17 |

3 |
Introducing Express Checkout |
|
Getting Started |
|
process. The buyer can then proceed to review the order on your site. You can include other |
|
necessary checkout steps. You can also up-sell to the buyer on your Review Order page. |
|
The following diagram shows the Express Checkout flow: |
|
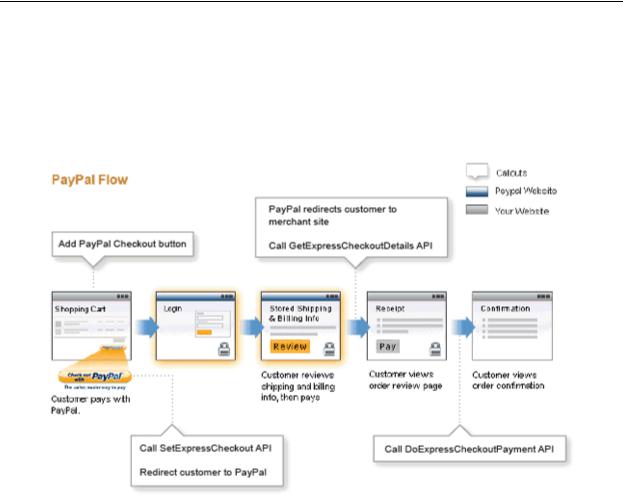
Express Checkout Flow |
In the Express Checkout flow, the buyer
1.Chooses Express Checkout by clicking the Check out with PayPal button
2.Logs into PayPal to authenticate his or her identity
3.Reviews the transaction on PayPal
4.Confirms the order and pays from your site
5.Receives an order confirmation
Getting Started
You can implement Express Checkout in just four steps.
1.Place PayPal checkout buttons and PayPal payment mark images in your checkout flow.
2.For each PayPal button that you place, modify your page to handle the button click.
Use a PayPal API Express Checkout operation to set up the interaction with PayPal and redirect the browser to PayPal to initiate buyer approval for the payment.
3.On your order confirmation page, obtain the payment authorization from PayPal and use PayPal API Express Checkout operations to obtain the shipping address and accept the payment.
4.Test your integration using the PayPal sandbox.
Because PayPal offers you the flexibility and opportunity to control your checkout process, you should understand how your current checkout flow works and become familiar with the Express Checkout flow. Start by reviewing Express Checkout Flow. For additional background information that will help you get started, see Express Checkout Building Blocks.
18 |
October 2009 |
Website Payments Pro Integration Guide |
Introducing Express Checkout |
3 |
Getting Started |
|
Configuring and Customizing the Express Checkout Experience
After you implement and test your basic Express Checkout integration, you should evaluate the additional features provided by Express Checkout.
Express Checkout can be configured and customized to fit into your site. Carefully evaluate each option because the more you do to streamline the checkout process and make Express Checkout seamless to your customers, the more likely your sales will increase.
At a minimum, you should set your logo on the PayPal site and provide order details in the transaction history. If you do not need the benefits associated with paying on your site, consider using the PayPal confirmation page as your Order Review page to further streamline the user experience. This can lead to better order completion, also know as conversion, rate.
You can configure the look and feel of PayPal pages to match the look and feel of your site by specifying the
zLogo to display
zColors for the background and border
zLanguage in which PayPal content is displayed
You should include
zOrder details, including shipping and tax, during checkout
IMPORTANT: Not displaying this information is a major cause of shopping cart abandonment during checkout.
zShipping information for non-digital goods, which can be your address information for the buyer or the address on file with PayPal; if you use the address on file with PayPal, you can specify whether or not it must be a confirmed address
You can also handle special situations, including
zAssociating a payment with an eBay auction item or an invoice number
zAccepting payments with giropay
Additional PayPal API Operations
You can use PayPal API operations to include advanced processing and “back office” processes with Express Checkout, such as
zCapturing payments associated with authorizations and orders
zHandling recurring payments
zIssuing refunds, providing a transaction search capability, and providing other “back office” operations
Website Payments Pro Integration Guide |
October 2009 |
19 |

3 |
Introducing Express Checkout |
|
Express Checkout Flow |
Express Checkout Flow
You initiate the Express Checkout flow on your shopping cart page and on your payment options page.
Express Checkout consists of one flow with two entry points:
zAt the beginning of the checkout flow; the buyer clicks the Checkout with PayPal button
zUpon payment; the buyer selects PayPal as a payment option
You must integrate Express Checkout from both entry points. They are explained separately for simplicity.
Checkout Entry Point
Buyers initiate the Express Checkout flow on your shopping cart page by clicking the
Checkout with PayPal button.
The following diagram shows how Express Checkout integrates with a typical checkout flow:
Integrating Express Checkout from the Shopping Cart page
Payment Option Entry Point
Buyers initiate the Express Checkout flow on your payment methods page by selecting PayPal as the default option.
The following diagram shows how to integrate Express Checkout from your payment methods page:
20 |
October 2009 |
Website Payments Pro Integration Guide |

Introducing Express Checkout |
3 |
Express Checkout Flow |
|
Integrating Express Checkout from the Payment Methodss page
Note that if your checkout flow omits the Merchant Review page and proceeds directly to your Confirmation page, you can change the text on the PayPal Review page from Continue to Pay Now. For details on how to change the text on the PayPal Review page from ‘Continue’ to ‘Pay Now’ see “User Confirms Order on PayPal” on page 75.
Complete Express Checkout Flow
To implement Express Checkout, you must offer it both as a checkout option and as a payment method.
You add Express Checkout to your existing flow by placing the Check out with PayPal button on your checkout page and by providing the PayPal mark on your billing payment methods page. The following diagram shows the complete flow:
Complete Express Checkout flow
Website Payments Pro Integration Guide |
October 2009 |
21 |
3 |
Introducing Express Checkout |
|
Express Checkout Building Blocks |
To implement the complete Express Checkout flow
zOn your Shopping Cart page, place the Check out with PayPal button and handle button clicks by setting up the Express Checkout transaction and redirecting your buyer’s browser to PayPal.
zOn your Payment Methods page, associate the PayPal mark with an option. Handle selection of the PayPal mark by setting up the Express Checkout transaction and redirecting your buyer’s browser to PayPal.
zAfter returning from PayPal, complete the Express Checkout transaction by obtaining shipping information from PayPal and accepting the payment.
Express Checkout Building Blocks
You implement Express Checkout flows with Express Checkout buttons, PayPal API operations, PayPal commands, and tokens.
The following conceptual diagram identifies the building blocks that you use to integrate Express Checkout on your website:
Express Checkout Integration
NOTE: Tokens are not shown in the diagram.
22 |
October 2009 |
Website Payments Pro Integration Guide |
Introducing Express Checkout |
3 |
Express Checkout Building Blocks |
|
Express Checkout Buttons
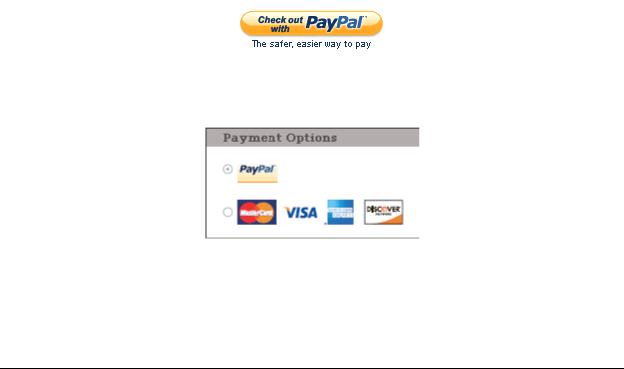
PayPal provides buttons and images for you to place on your website.
To implement Express Checkout, you must place the following button on your Shopping Cart page:
To implement PayPal as a payment option, which is part of Express Checkout, associate the PayPal mark image with the option. Using a radio button, as shown in the image below, is the recommended way to do this:
Express Checkout API Operations
The PayPal API provides three operations for Express Checkout, one to set up the transaction, one to obtain information about the buyer, and one to handle the payment and complete the transaction.
API Operation |
Description |
|
|
SetExpressCheckout |
Sets up the Express Checkout transaction. You can specify information |
|
to customize the look and feel of the PayPal site and the information it |
|
displays. You must include the following information: |
|
z URL to the page on your website that PayPal redirects to after the |
|
buyer successfully logs into PayPal and approves the payment. |
|
z URL to the page on your website that PayPal redirects to if the buyer |
|
cancels. |
|
z Total amount of the order or your best estimate of the total. It should |
|
be as accurate as possible. |
|
|
GetExpressCheckout |
Obtains information about the buyer from PayPal, including shipping |
|
information. |
|
|
DoExpressCheckoutPayment |
Completes the Express Checkout transaction, including the actual total |
|
amount of the order. |
|
|
Website Payments Pro Integration Guide |
October 2009 |
23 |
3 |
Introducing Express Checkout |
|
Express Checkout Building Blocks |
|
Express Checkout Command |
|
PayPal provides a command that you use when redirecting to PayPal, which enables your |
|
buyer to log into PayPal to approve an Express Checkout payment. |
|
When you redirect your buyer’s browser to PayPal, you must specify _ExpressCheckout |
|
command for Express Checkout. You also specify the token that identifies the transaction, |
|
which was returned by the SetExpressCheckout API operation. |
|
IMPORTANT: To enable PayPal to redirect back to your website, you must have already |
|
invoked the SetExpressCheckout API operation, specifying URLs that |
|
PayPal uses to redirect back to your site. PayPal redirects to the success URL |
|
when the buyer pays on PayPal; otherwise, PayPal redirects to the cancel |
|
URL. |
|
If the buyer approves the payment, PayPal redirects to the success URL with the following |
|
information: |
|
z The token that was included in the redirect to PayPal |
|
z The buyer’s unique identifier (Payer ID) |
|
If the buyer cancels, PayPal redirects to the cancel URL with the token that was included in the |
|
redirect to PayPal. |
|
Express Checkout Token Usage |
|
Express Checkout uses a token to control access to PayPal and execute Express Checkout API |
|
operations. |
|
The SetExpressCheckout API operation returns a token, which is used by other Express |
|
Checkout API operations and by the _ExpressCheckout command to identify the |
|
transaction. The life of the token is approximately three hours. |
24 |
October 2009 |
Website Payments Pro Integration Guide |

4 |
Express Checkout Button and |
Logo Image Integration |
PayPal hosts the PayPal button and logo images that you use on your website. Using PayPal’s buttons and logos is convenient and standardizes appearance on websites that use PayPal as a payment option.
zAbout PayPal Button and Logo Images
zDynamic Images
zConfiguring the Dynamic Image
zDynamic Image Command Reference
zStatic PayPal Buttons and Images Source Requirements
About PayPal Button and Logo Images
To inform buyers that PayPal is accepted on your website, you must place PayPal button and logo images in your checkout flow.
PayPal Express Checkout requires that you integrate two images. The Check out with PayPal button and the PayPal Acceptance mark.
Express Checkout Images
The Check out with PayPal button is the image you place on your shopping cart page. The US version of the image looks like this. PayPal also provides buttons for other locales.
The PayPal Acceptance Mark is the image you place on your payment methods page. It looks like this:
Express Checkout Image Flavors
The Check out with PayPal button and the PayPal Acceptance mark images are available in two flavors:
z Dynamic image
Website Payments Pro Integration Guide |
October 2009 |
25 |

4 |
Express Checkout Button and Logo Image Integration |
|
Dynamic Images |
|
z Static image |
|
The dynamic images enable PayPal to change their appearance dynamically. If, for example, |
|
you have signed up to participate in a PayPal campaign, PayPal can change the appearance of |
|
the image dynamically for the duration of that campaign based on parameter information you |
|
append to the image URL. By default, the Express Checkout images appears as shown above. |
|
The static images cannot be changed dynamically. To participate in a PayPal campaign, you |
|
would have to manually update the image code to change the image displayed and restore the |
|
default image when the campaign is over. The only way you can have image management |
|
taken care of for you is to replace static images in your implementation with dynamic images. |
Dynamic Images
To use dynamic images, you must pass information to PayPal as parameters appended to the image URL. Your unique ID tells PayPal whether or not you are participating in events that require image changes. Other information you pass instructs PayPal on the types of images to return.
If, for example, you are participating in a PayPal campaign that you have signed up for with PayPal and you have passed the appropriate parameter information to PayPal, PayPal automatically updates the image to reflect the campaign information. When the campaign is over, PayPal restores the default image. You are not responsible for scheduling or making changes to your website application code before, during, or after the campaign. It is all handled for you when you set up the dynamic image.
If you require localized campaign images, you can have the localized button image display for each country in which you participate. Simply assign the correct code for the country to the locale parameter you append to the dynamic image URL. PayPal will return to the default button image associated with each locale when the campaign is not available.
Configuring the Dynamic Image
To set up the dynamic image, you provide the name-value pair parameter information in the image URL. You can pass information in the image URL for any of the following options.
z Set Up the Default Image
z Set Up Image for Dynamic Use z Change the Locale
z Feedback to Buyer Meeting an Incentive z Choose the Image
26 |
October 2009 |
Website Payments Pro Integration Guide |
Express Checkout Button and Logo Image Integration |
4 |
Configuring the Dynamic Image |
|
Set Up the Default Image
The following URL points to the default Check out with PayPal image:
https://fpdbs.paypal.com/dynamicimageweb?cmd=_dynamic-image
To make the image dynamic, you need only add parameters to this URL to specify the changes you want displayed.
To test in the Sandbox environment, send the image to the following Sandbox URL:
https://fpdbs.sandbox.paypal.com/dynamicimageweb?cmd=_dynamic-image
Set Up Image for Dynamic Use
To set up the image URL for dynamic use, you associate it with your PayPal merchant account number or pal. You can obtain your pal by getting it from the Profile page, contacting PayPal, or calling the GetPalDetails API.
This is an example call to GetPalDetails request.
Request Parameters:
[requiredSecurityParameters]
&METHOD=GetPalDetails
Response Parameters
This GetPalDetails response returns the value of PAL and your country code (LOCALE), as shown below:
[successResponseFields]
&PAL=SFJCXFDLNFR5U &LOCALE=en_US
1.Append the pal parameter to the image URL, and set the parameter to the value of your encrypted PayPal merchant account number.
https://fpdbs.paypal.com/dynamicimageweb?cmd=_dynamicimage&pal=SFJCXFDLNFR5U
2.You can optionally change the value of LOCALE. See Change the Locale for details.
3.Place the URL with parameter information at the appropriate image locations in your web application.
The pal alerts PayPal to campaigns in which you are participating. PayPal obtains this information from your account and replaces the default image with the appropriate campaign image during that campaign.
NOTE: If you pass in a pal value matching a merchant account that is not yours, PayPal displays the image for that account. Be sure to pass the pal value matching your account.
Website Payments Pro Integration Guide |
October 2009 |
27 |
4 |
|
Express Checkout Button and Logo Image Integration |
|
|
Dynamic Image Command Reference |
|
Change the Locale |
|
|
|
To specify the locale of the image, append the locale parameter set to the code for the |
|
|
appropriate country to the image URL. If a country does not have a localized image or if you |
|
|
do not pass a locale value, the default US image displays. This example displays the image |
|
|
for the Spanish locale: |
|
|
https://fpdbs.paypal.com/dynamicimageweb?cmd=_dynamic- |
|
|
image&pal=SFJCXFDLNFR5U&locale=es_ES |
|
|
If you are participating in a campaign across multiple countries, you can set the image locale |
|
|
for each country in which you participate. PayPal returns the default image associated with the |
|
|
locale when the campaign is over. |
|
Feedback to Buyer Meeting an Incentive |
|
|
|
Pass the order total amount in the ordertotal parameter so PayPal can determine if the |
|
|
buyer is eligible for an incentive. Say, for example, that you are participating in a campaign in |
|
|
which the buyer is eligible for a 20% discount when their order meets a minimum of $50.00. |
|
|
You can pass that value to PayPal in the ordertotal parameter, as shown here: |
|
|
https://fpdbs.paypal.com/dynamicimageweb?cmd=_dynamic- |
|
|
image&pal=SFJCXFDLNFR5U&ordertotal=50.00 |
|
|
When a buyer’s order meets or exceeds $50.00, PayPal displays the incentive image informing |
|
|
the buyer of their eligibility for the discount. When a buyer’s order is less than $50.00, PayPal |
|
|
displays the default image. |
|
|
NOTE: If ordertotal is not passed, PayPal does not display the incentive image even if the |
|
|
buyer is eligible for the incentive. |
|
Choose the Image |
|
|
|
To specify the image that you want to display, set the value of buttontype. This example |
|
|
sets buttontype to the PayPal Acceptance Mark image: |
|
|
https://fpdbs.paypal.com/dynamicimageweb?cmd=_dynamic- |
|
|
image&pal=SFJCXFDLNFR5U&buttontype=ecmark |
|
|
The default value for buttontype is ecshortcut. |
|
|
|
|
Dynamic Image Command Reference |
|
|
|
To set up the information that enables dynamic images, you add name-value pairs to the |
|
|
dynamic image URL. Parameters and values are described below. |
28 |
October 2009 |
Website Payments Pro Integration Guide |

Express Checkout Button and Logo Image Integration |
4 |
Dynamic Image Command Reference |
|
Dynamic Image Parameters
The table below describes the dynamic image name-value pair parameters.
Dynamic-Image Command Variable Descriptions
pal |
Type: encrypted PayPal account number |
|
(Optional) Unique identification number. When merchants sign up for a PayPal |
|
business account, PayPal assigns them an account number. The pal value |
|
represents the pay-to merchant account, not a third party making the API request |
|
on behalf of this merchant. |
|
NOTE: If pal is not passed, PayPal displays the default Check out with PayPal |
|
button. |
|
|
ordertotal |
Type: numeric |
|
(Optional) The total cost of the order to the buyer. If shipping and sales tax are |
|
known, include them in this value. If not, this value should be the current subtotal |
|
of the order. |
|
NOTE: If ordertotal is not passed, PayPal does not display the incentive |
|
image even if the buyer is eligible for the incentive. |
|
Character length and limitations: Must not exceed $10,000.00 USD in any |
|
currency. No currency symbol.Must have two decimal places, decimal separator |
|
must be a period (.), and the optional thousands separator must be a comma(,). |
|
|
locale |
Type: string |
|
(Optional) The five-character locale code. See Locale Codes. |
|
Any other values default to US. |
|
NOTE: The merchant can participate in one campaign per country. |
|
|
buttontype |
Type: string |
|
(Optional) Indicates a dynamic image. The values are: |
|
z (Default) Check out with PayPal button image: ecshortcut |
|
z PayPal Acceptance Mark image: ecmark |
Locale Codes
The table below lists the locale values. Country code is the two-letter code for the country. Language priority is the language associated with the country code where language_0 is the default.
Website Payments Pro Integration Guide |
October 2009 |
29 |
4 |
|
Express Checkout Button and Logo Image Integration |
|
|
|
|
Dynamic Image Command Reference |
|
|
|
|
Country codes, language priorities, and locale values |
|
|
|
|
|
|
|
|
|
Country code |
Language priority |
Locale |
|
|
|
|
|
|
|
AT |
language_0 |
de_DE |
|
|
|
|
|
|
|
AT |
language_1 |
en_US |
|
|
|
|
|
|
|
AU |
language_0 |
en_AU |
|
|
|
|
|
|
|
BE |
language_0 |
en_US |
|
|
|
|
|
|
|
BE |
language_1 |
nl_NL |
|
|
|
|
|
|
|
BE |
language_2 |
fr_FR |
|
|
|
|
|
|
|
C2 |
language_0 |
en_US |
|
|
|
|
|
|
|
C2 |
language_1 |
zh_XC |
|
|
|
|
|
|
|
C2 |
language_2 |
fr_XC |
|
|
|
|
|
|
|
C2 |
language_3 |
es_XC |
|
|
|
|
|
|
|
CH |
language_0 |
de_DE |
|
|
|
|
|
|
|
CH |
language_1 |
fr_FR |
|
|
|
|
|
|
|
CH |
language_2 |
en_US |
|
|
|
|
|
|
|
CN |
language_0 |
zh_CN |
|
|
|
|
|
|
|
default |
language_0 |
en_US |
|
|
|
|
|
|
|
default |
language_1 |
fr_XC |
|
|
|
|
|
|
|
default |
language_2 |
es_XC |
|
|
|
|
|
|
|
default |
language_3 |
zh_XC |
|
|
|
|
|
|
|
DE |
language_0 |
de_DE |
|
|
|
|
|
|
|
DE |
language_1 |
en_US |
|
|
|
|
|
|
|
ES |
language_0 |
es_ES |
|
|
|
|
|
|
|
ES |
language_1 |
en_US |
|
|
|
|
|
|
|
FR |
language_0 |
fr_FR |
|
|
|
|
|
|
|
FR |
language_1 |
en_US |
|
|
|
|
|
|
|
GB |
language_0 |
en_GB |
|
|
|
|
|
|
|
GF |
language_0 |
fr_FR |
|
|
|
|
|
|
|
GF |
language_1 |
en_US |
|
|
|
|
|
|
|
GI |
language_0 |
en_US |
|
|
|
|
|
|
|
GP |
language_0 |
fr_FR |
|
|
|
|
|
|
|
GP |
language_1 |
en_US |
|
|
|
|
|
30 |
October 2009 |
Website Payments Pro Integration Guide |
Loading...