

Page 1

Website Payments
Pro Hosted Solution
Integration Guide
(Payflow Edition)
Last updated: December 2011
Page 2

Website Payments Pro Hosted Solution Integration Guide
Document Number: 10112.en_GB-201112
© 2011 PayPal, Inc. All rights reserved. PayPal is a registered trademark of PayPal, Inc. The PayPal logo is a trademark of PayPal, Inc. Other
trademarks and brands are the property of their respective owners.
The information in this document belongs to PayPal, Inc. It may not be used, reproduced or disclosed without the written approval of PayPal, Inc.
Copyright © PayPal. All rights reserved. PayPal (Europe) S.à r.l. et Cie., S.C.A., Société en Commandite par Actions. Registered office: 22-24 Boulevard
Royal, L-2449, Luxembourg, R.C.S. Luxembourg B 118 349.
Consumer advisory: The PayPal™ payment service is regarded as a stored value facility under Singapore law. As such, it does not require the approval
of the Monetary Authority of Singapore. You are advised to read the terms and conditions carefully.
Notice of non-liability:
PayPal, Inc. is providing the information i n this document t o you “AS-IS” with all faults. PayPal, Inc. makes no warranties of any kind (whether express,
implied or statutory) with respect to the information co ntained herein. PayPal, Inc. assumes no liability for damages (whether direct or indirect), caused
by errors or omissions, or resulting from the use of this document or the information contained in this document or resulting f rom the application or use
of the product or service described herein. PayPal, Inc. reserves the right to make changes to any information herein without further notice.
Page 3

Contents
Preface . . . . . . . . . . . . . . . . . . . . . . . . . . . . . . . . . . 5
About This Guide. . . . . . . . . . . . . . . . . . . . . . . . . . . . . . . . . . . . . . . . 5
Intended Audience . . . . . . . . . . . . . . . . . . . . . . . . . . . . . . . . . . . . . . . 5
Revision History . . . . . . . . . . . . . . . . . . . . . . . . . . . . . . . . . . . . . . . . 5
Documentation Feedback . . . . . . . . . . . . . . . . . . . . . . . . . . . . . . . . . . . 5
Chapter 1 Getting Started with Website Payments Pro Hosted Solution 7
Overview . . . . . . . . . . . . . . . . . . . . . . . . . . . . . . . . . . . . . . . . . . . . 7
Features and Benefits . . . . . . . . . . . . . . . . . . . . . . . . . . . . . . . . . . . . . 7
How Hosted Solution Works . . . . . . . . . . . . . . . . . . . . . . . . . . . . . . . . . . 8
Introduction to Integrating with Hosted Solution . . . . . . . . . . . . . . . . . . . . . . . . 9
Chapter 2 Integrating Your Website Using HTML. . . . . . . . . . . .11
Simple Hosted Solution Integration . . . . . . . . . . . . . . . . . . . . . . . . . . . . . 11
Sample Integration. . . . . . . . . . . . . . . . . . . . . . . . . . . . . . . . . . . . 12
HTML Variables . . . . . . . . . . . . . . . . . . . . . . . . . . . . . . . . . . . . . . . 13
Chapter 3 Customising Your PayPal Payment Page . . . . . . . . . . 17
Modifying Your PayPal Account Settings . . . . . . . . . . . . . . . . . . . . . . . . . . 17
Configuration. . . . . . . . . . . . . . . . . . . . . . . . . . . . . . . . . . . . . . . 17
Design . . . . . . . . . . . . . . . . . . . . . . . . . . . . . . . . . . . . . . . . . . 21
Adding HTML Variables . . . . . . . . . . . . . . . . . . . . . . . . . . . . . . . . . . . 26
Chapter 4 Integrating iFrame in Your Website . . . . . . . . . . . . .29
Integrating iFrame . . . . . . . . . . . . . . . . . . . . . . . . . . . . . . . . . . . . . . 30
HTML Integration . . . . . . . . . . . . . . . . . . . . . . . . . . . . . . . . . . . . 30
API Integration. . . . . . . . . . . . . . . . . . . . . . . . . . . . . . . . . . . . . . 31
Chapter 5 Integrating Your Website Using API . . . . . . . . . . . . . 35
Button Hosting . . . . . . . . . . . . . . . . . . . . . . . . . . . . . . . . . . . . . . . . 35
Page 4

Contents
Using the Button Manager API with Hosted Solution Checkout . . . . . . . . . . . . . . . 36
Using URL Returned in the Response (Recommended) . . . . . . . . . . . . . . . . 36
Using Form POST . . . . . . . . . . . . . . . . . . . . . . . . . . . . . . . . . . . . 37
Encrypting Buttons Using Public and Private Key . . . . . . . . . . . . . . . . . . . . 39
Example of Initiating Hosted Solution Checkout. . . . . . . . . . . . . . . . . . . . . 39
BMCreateButton API Operation . . . . . . . . . . . . . . . . . . . . . . . . . . . . . . . 42
BMCreateButton Request . . . . . . . . . . . . . . . . . . . . . . . . . . . . . . . . 42
BMCreateButton Response . . . . . . . . . . . . . . . . . . . . . . . . . . . . . . . 42
BMCreateButton Errors . . . . . . . . . . . . . . . . . . . . . . . . . . . . . . . . . 43
Chapter 6 Order Processing . . . . . . . . . . . . . . . . . . . . . . 45
Verifying Transaction Status and Authenticity . . . . . . . . . . . . . . . . . . . . . . . . 45
Validate Instant Payment Notification (IPN) . . . . . . . . . . . . . . . . . . . . . . . 45
Fulfilling Order . . . . . . . . . . . . . . . . . . . . . . . . . . . . . . . . . . . . . . . . 45
Appendix A Obtaining API Credentials. . . . . . . . . . . . . . . . . .47
Creating an API Signature . . . . . . . . . . . . . . . . . . . . . . . . . . . . . . . . . . 47
Creating an API Certificate. . . . . . . . . . . . . . . . . . . . . . . . . . . . . . . . . . 47
Encrypting Your Certificate Into PKCS12 Format . . . . . . . . . . . . . . . . . . . . . . 48
Importing Your Certificate . . . . . . . . . . . . . . . . . . . . . . . . . . . . . . . . . . 49
Appendix B Error Messages . . . . . . . . . . . . . . . . . . . . . . . 51
Appendix C Currency Codes . . . . . . . . . . . . . . . . . . . . . . .69
4
Page 5

Preface
P
About This Guide
The Website Payments Pro Hosted Solution Integration Guide (Payflow Edition) describes
how to integrate with Hosted Solution. It includes information about:
Features and benefits of Hosted Solution.
Integrating your website with Hosted Solution.
Customising your hosted payment page.
Verifying the status and authenticity of the transactions before fulfilling the orders.
Intended Audience
This guide is for Website Payments Pro Payflow Edition (UK) merchants and developers that
want to integrate with Hosted Solution to add transaction processing to their website.
Revision History
The following table lists the history of revisions made to the Website Payments Pro Hosted
Solution Integration Guide (Payflow Edition).
TABLE P.1 Revision History for This Guide
Date Published Description
August 2011 Created Website Payments Pro Hosted Solution Integration Guide
Documentation Feedback
Help us improve this guide by sending feedback to:
documentationfeedback@paypal.com
Page 6

Preface
P
Documentation Feedback
6
Page 7

1
Overview
Hosted Solution is the fast and easy way to add transaction processing to your website. It is a
secure, PayPal-hosted, web-based payment solution that allows you to securely send your
buyers to PayPal’s payment page to authorise and process transactions. Buyers pay with a
debit or credit card, or their PayPal account and you do not have to capture or store credit card
information on your website, thereby helping towards achieving PCI compliance.
Hosted Solution is the choice for merchants who prefer a solution where all financial details
are handled by PayPal.
In addition to Hosted Solution, PayPal recommends that you implement the PayPal Express
Checkout button on your website. The button appears much earlier in the payment flow and
gives existing PayPal account holders the opportunity to use PayPal, thereby increasing the
transaction completion rate.
Getting Started with Website Payments Pro Hosted Solution
Features and Benefits
Here are the features and benefits of Hosted Solution:
PCI compliance - Payment Card Industry (PCI) Data Security Standards (DSS) is a global
security standard which applies to all businesses that collect, store, process, or transmit
card holder information. You can use PayPal’s hosted payment page as part of the PCI
compliance solution for your business.
NOTE: Hosted Solution implementation helps achieving PCI compliance, and does not
necessarily guarantee it.
Supports iFrame - PayPal offers a compact payment form that can be integrated in an
iFrame on your website. The buyer completes the payment on your website and you can
maintain the checkout look and feel in the master frame that surrounds the compact
form.The credit card fields are part of the compact form so you do not have to collect this
information separately. For more information, refer to Chapter 4, “Integrating iFrame in
Your Website.
Support for 3-D Secure Buyer Authentication Protocol - 3-D Secure can help to add an
extra layer of fraud protection for online credit and debit card payments from your buyers.
It can benefit your business by helping to reduce the number of unauthorised chargebacks
you receive and the time it takes to resolve them. You can enable 3-D Secure via the
PayPal-hosted payment page quickly, easily, and at no extra cost.
7
Page 8
Getting Started with Website Payments Pro Hosted Solution
How Hosted Solution Works
Virtual Terminal - PayPal-hosted online payment form, which enables you to accept
phone fax, mail orders for all major credit cards.
Supports Major Credit and Debit Cards - Supports Visa, Visa Debit, Visa Electron,
MasterCard, and Switch/Maestro.
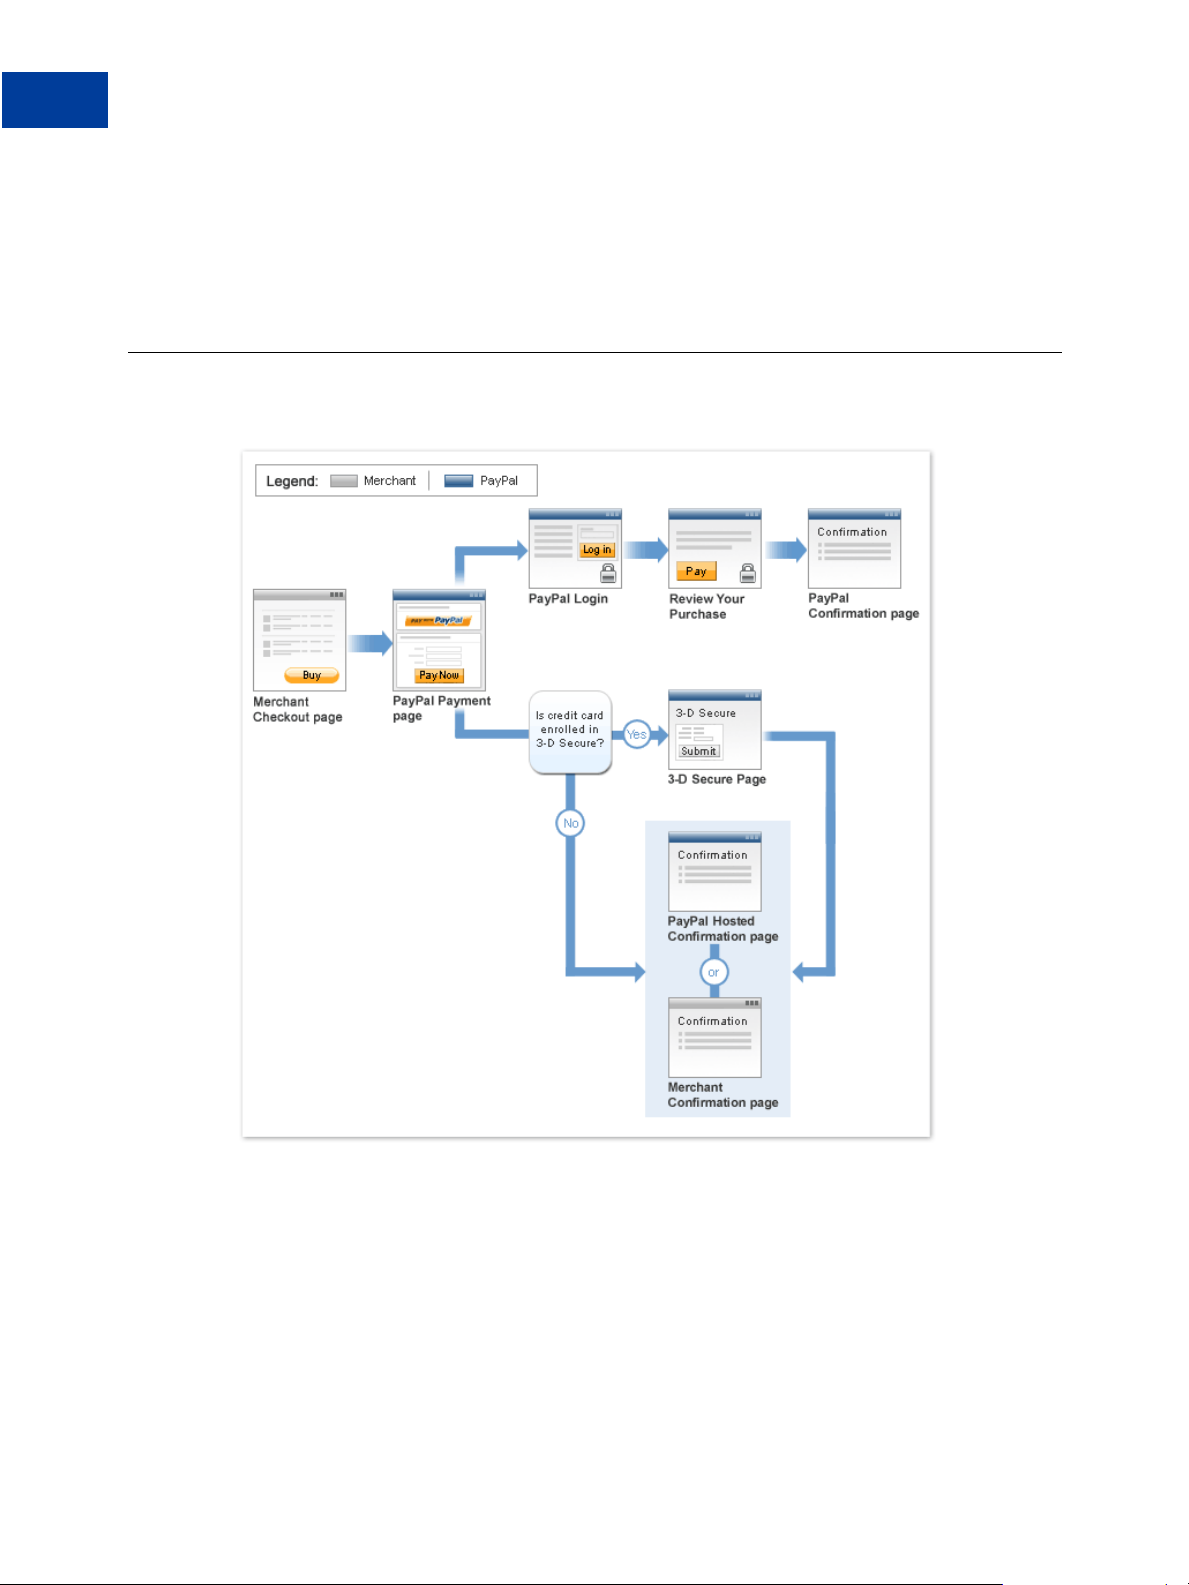
How Hosted Solution Works
In the figure above, the top flow is for paying using your PayPal account and the bottom flow
is for paying with a card.
8
Page 9

Getting Started with Website Payments Pro Hosted Solution
Introduction to Integrating with Hosted Solution
To integrate your website with Hosted Solution:
1. Generate a button in your website checkout flow using HTML or API solution. The button
could be labeled Pay or Buy or similar. When the buyer clicks this button, they are
redirected to the payment page hosted by PayPal.
2. On the payment page, the buyer enters their debit or credit card information and clicks the
Pay Now button. The buyer can also elect to use their PayPal account by clicking the Pay
with PayPal button.
3. If the transaction is successful, the buyer either sees PayPal’s confirmation page or is
redirected to a URL you specify. If the transaction is unsuccessful, an error message is
displayed, and the buyer can rectify the error and retry the transaction.
You can specify the content of the payment page and configure its appearance to reflect the
look and feel of your website (including your logo).
Introduction to Integrating with Hosted Solution
After signing up for Hosted Solution, follow these steps to integrate your website with Hosted
Solution:
1. Connect your website to Hosted Solution: Identify a point in your website checkout flow
where you want to place a Pay or similar button that the buyer clicks on to initiate the
payment. You can do this using HTML or API. Clicking on this button redirects the buyer’ s
browser to PayPal’s payment page for transaction processing. Depending on how you want
to integrate, follow the steps described in Chapter 2, “Integrating Your Website Using
HTML or Chapter 5, “Integrating Your Website Using API.
2. Optionally, customise the appearance and content of your PayPal-hosted payment page by
either sending the appropriate HTTP variables or by editing your PayPal account settings.
Refer to Chapter 3, “Customising Your PayPal Payment Page.
Page 10

Getting Started with Website Payments Pro Hosted Solution
Introduction to Integrating with Hosted Solution
10
Page 11

2
Integrating Your Website Using HTML
This chapter provides instructions for a simple integration that enables you to begin processing
transactions using Hosted Solution.
NOTE: PayPal recommends that you implement the simple integration to familiarise yourself
with Hosted Solution before implementing a more customised integration.
As part of a simple integration, you get the default settings on your payment page. To
customise the look and feel of the page so it matches your website, you can do one of the
following:
Change your settings in your Profile section on PayPal.com, as described in “Modifying
Your PayPal Account Settings” on page 17.
Add the appropriate HTML variables to the payment page, as described in Table 2.1,
“HTML Variables for Settings of Payment Page and Table 3.1, “HTML Variables for Look
and Feel of Payment Page.
IMPORTANT: HTML variables will override the settings you save on your profile page.
Simple Hosted Solution Integration
T o integrate your website with Hosted Solution, identify a point in your website checkout flow
where you want to place a button that the buyer clicks to initiate the payment. The button
should be labeled Continue to Payment, Pay or similar, and when clicked, should execute a
Form POST to PayPal. Clicking on this button redirects the buyer’s browser to the PayPal
payment page where they can pay with debit or credit card, or their PayPal account.
The Form POST contains a set of HTML variables that describe the transaction and associate
it with your Website Payments Pro account. In the Form POST, you must specify the
following:
subtotal OR total - amount of the transaction
partner - the partner must be PayPalUK.
vendor - Your merchant login ID that you created when you registered for the account.
paymentaction - Indicates whether the transaction is for payment on a final sale or an
authorisation for a final sale (to be captured later).
Page 12

Integrating Your Website Using HTML
Simple Hosted Solution Integration
The default currency is USD. Additionally, you can specify the appropriate HTML variables
listed in Table 2.1, “HTML Variables for Settings of Payment Page to customise the
information collected on the payment page or Table 3.1, “HTML Variables for Look and Feel
of Payment Page to customise the look and feel of the page. If the payment is successful, then
the buyer either sees the PayPal confirmation page or is redirected to the URL you specify in
your configuration.
The return URL is appended with a Transaction ID on the query string during the redirect back
from the payment page to your website. This Transaction ID can be used to retrieve the status
and verify the authenticity of the transaction. For detailed information on verifying the
authenticity of the transaction before fulfilling the order, refer to Chapter 6, “Order
Processing.
Sample Integration
Below is an example of a simple Hosted Solution integration:
1. Sample Hosted Solution Form POST:
<form action="https://securepa yments.paypal.com/ cgi-bin/acquiringweb"
method="post">
<input type="hidden" name="cmd " value="_hosted-p ayment">
<input type="hidden" name="tot al" value="50.00">
<input type="hidden" name="par tner" value="PayPalUK ">
<input type ="hidden" name="vendor" va lue="vendorname">
<input type="hidden" name="pay mentaction" value= "sale">
<input type="hidden" name="return"
value="https://yourwebsite.com /receipt_page.html ">
<input type="submit" name="PayButto n" value="Pay">
</form>
The bold text is the value for the corresponding variable. It is recommended that you
enclose the values in quotes. For detailed information on these values, refer to Table 2.1,
“HTML Variables for Settings of Payment Page.
12
2. Output the HTML text into your website at the point where buyers will proceed with their
checkout.
3. Open your checkout page and test the button to ensure that it opens the PayPal payment
page.
Page 13

HTML Variables
The table below lists the Hosted Solution HTML variables you can use to send in additional
transaction information along with your web request. For a list of HTML variables that you
can use to customise the look and feel of your payment page, refer to Table 3.1, “HTML
Variables for Look and Feel of Payment Page.
TABLE 2.1 HTML Variables for Settings of Payment Page
Variable Description Mandatory
Integrating Your Website Using HTML
HTML Variables
address1
address2
address_override
billing_address1
billing_address2
billing_city
billing_country
billing_first_name
billing_last_name
billing_state
billing_zip
bn
Street name of shipping address. (1 of 2 fields) No
Street name of shipping address. (2 of 2 fields) No
The payer is shown the passed-in address but cannot edit
No
it. This variable is overridden if there are errors in the
address. The allowable values are true/false. Default is
false.
Street name of the billing address. (1 of 2 fields) No
Street name of the billing address. (2 of 2 fields) No
City name of the billing address. No
Country code of the billing address. No
First name of person the item is being billed to. No
Last name of person the item is being billed to. No
State name of the billing address. No
Zip code of the billing address. No
Identifies the source that built the code for the button.
Format -
<Company>_<Service>_<Product>_<Country>
No
buyer_email
cancel_return
cbt
city
country
currency_code
Email address of the buyer. No
The browser will be redirected to this URL if the buyer
No
clicks “Return to Merchant” link. Be sure to enter the
complete URL, including http:// or https://.
Sets the text for the “Return to Merchant” link on the
No
PayPal confirmation page. For business accounts, the
return button displays your business name in the place of
the word “Merchant” by default.
City name of shipping address. No
Country name of shipping address. No
The currency of the payment. The default is USD. No
13
Page 14

Integrating Your Website Using HTML
HTML Variables
ABLE 2.1 HTML Variables for Settings of Payment Page (Continued)
T
Variable Description Mandatory
custom
discount
first_name
handling
insurance
invoice
last_name
lc
A free-form field for your own use. This variable is never
No
presented to the buyer and will be returned in IPN
messages.
Shipping discount for this order. Specify the discount as a
No
positive amount.
Nine numeric characers plus decimal (.) character. No
currency symbol. Specify the exact amount to the cent
using a decimal point—use 34.00, not 34. Do not include
comma separators—use 1199.95 not 1,199.95.
First name of person the item is being shipped to. No
Handling charged. This amount is added to subtotal for
No
the total amount.
Total shipping insurance cost for this order.
Nine numeric characers plus decimal (.) character. No
currency symbol. Specify the exact amount to the cent
using a decimal point—use 34.00, not 34. Do not
include comma separators—use 1199.95 not 1,199.95.
Order number in the merchant’s ordering/invoice system. No
Last name of person the item is being shipped to. No
The language of the login or sign-up page. No
14
night_phone_a
night_phone_b
night_phone_c
notify_url
partner
The area code of the U.S. phone number, or the country
code of the phone number outside the U.S. This prepopulates the buyer’s home phone number.
The three-digit prefix for U.S. phone numbers, or the
entire non-U.S. phone number for numbers outside the
U.S., excluding the country code. This pre-populates the
buyer’s home phone number.
NOTE: Use this variable for non-US numbers.
The four-digit phone number for U.S. phone numbers.
This pre-populates the buyer’s home phone number.
The URL to which PayPal posts information about the
transaction in the form of Instant Payment Notification. Be
sure to enter the complete URL, including http:// or
https://.
ID provided to you by the authorized PayPal reseller who
registered you for Payflow. If you purchased your account
directly from PayPal, use PayPalUK.
No
No
No
No
Yes
Page 15

Integrating Your Website Using HTML
HTML Variables
T
ABLE 2.1 HTML Variables for Settings of Payment Page (Continued)
Variable Description Mandatory
paymentaction
return
shipping
state
subtotal
tax
vendor
Indicates whether the transaction is for payment on a final
Yes
sale or an authorisation for a final sale (to be captured
later).
Allowable Values: - authorization or sale
Default Value - sale
The URL to which the buyer’s browser is redirected to
No
after completing the payment. Be sure to enter the
complete URL, including http:// or https://.
Shipping charged. This amount is added to subtotal for
No
the total amount.
State of the shipping address. No
Amount charged for the transaction. If shipping, handling,
Yes
taxes, insurance, and discount are not specified, this is the
total amount charged. The value must include a decimal
and the exact amount to the cent (42.00, not 42). Do not
include comma separators (1234.56, not 1,234.56).
You must either pass
Taxes charged. This amount is added to subtotal for the
subtotal or total.
No
total amount.
Your merchant login ID that you created when you
Yes
registered for the account.
total
zip
Total transaction amount, including shipping, handling,
taxes, insurance, and discount. The value must include a
decimal and the exact amount to the cent (42.00, not 42).
Do not include comma separators (1234.56, not 1,234.56).
Postal code of the shipping address. No
15
Page 16

Integrating Your Website Using HTML
HTML Variables
16
Page 17

Customising Your PayPal
3
Payment Page
You can customise the look and feel of the PayPal payment page in the following two ways:
Modifying Your PayPal Account Settings
Adding HTML Variables
NOTE: HTML variables will override the settings you save on your profile page.
Modifying Your PayPal Account Settings
In your Service Settings section on PayPal Manager, you can change the look and feel of the
payment page by modifying the settings on the following pages under the Hosted Checkout
Pages section.
Configuration
Design
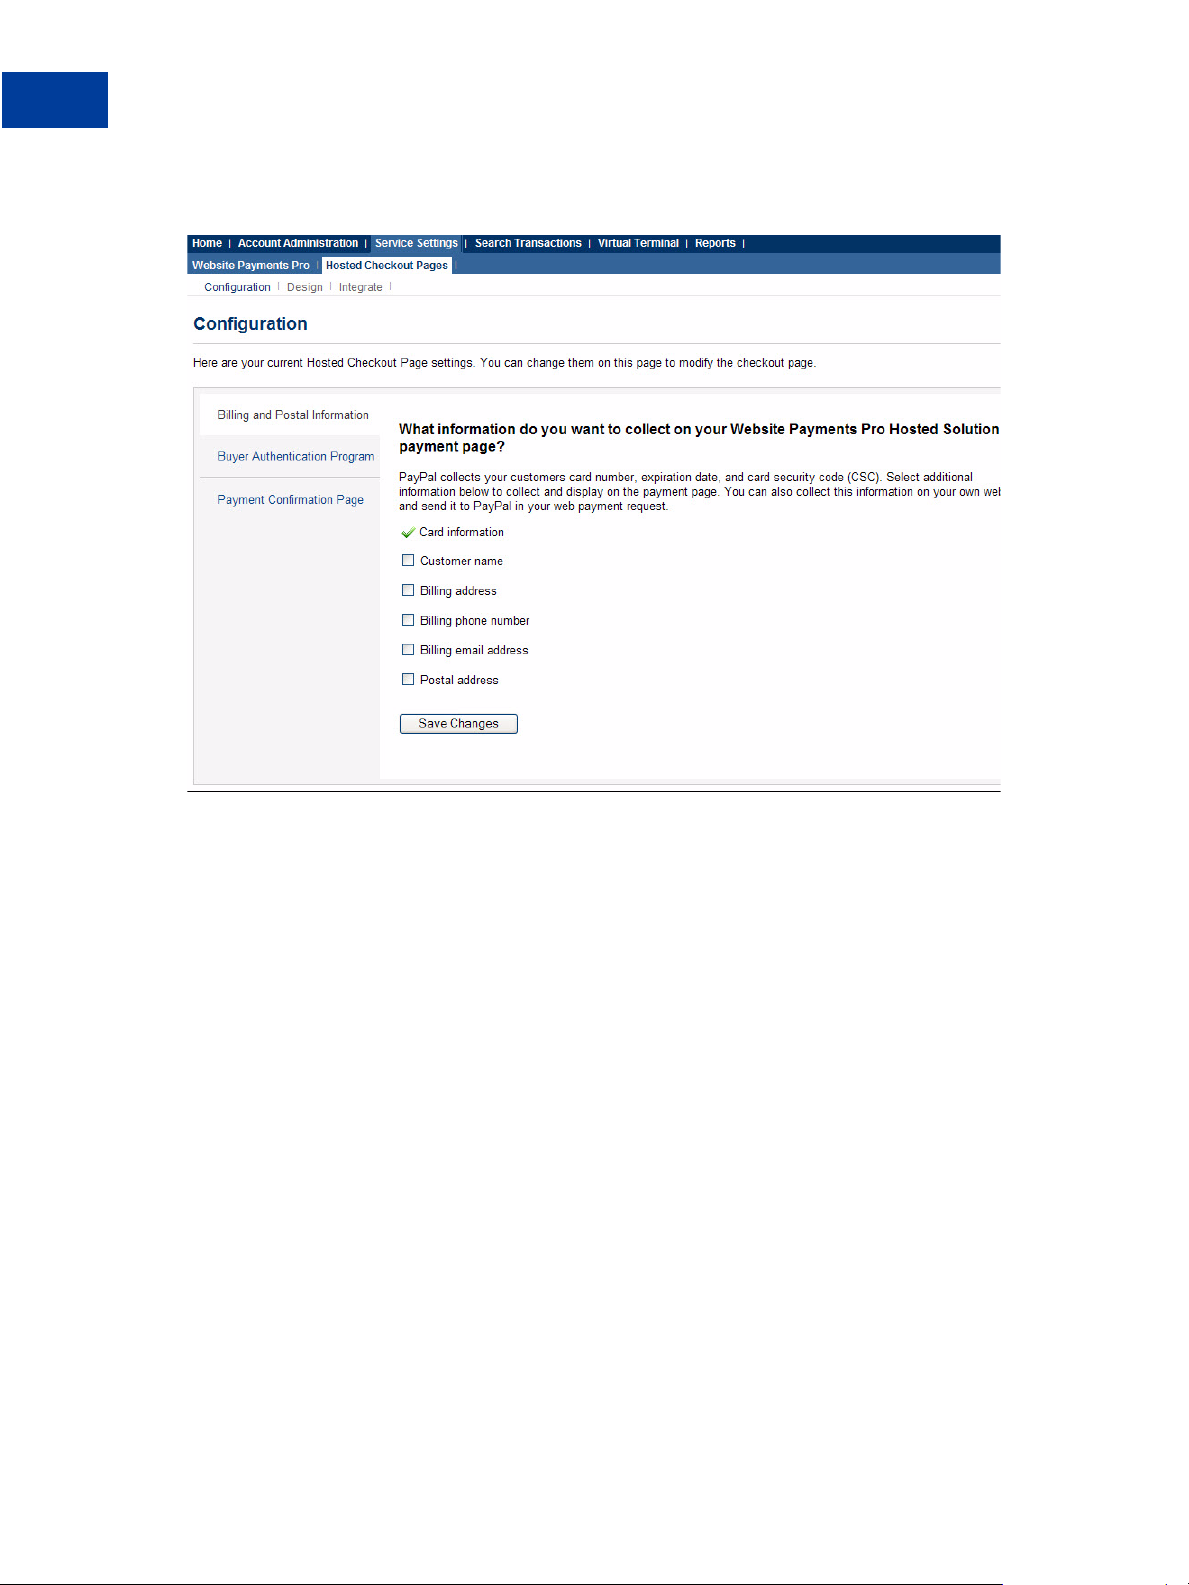
Configuration
This page allows you to select the information you want to collect and display on your
payment page, verify enrollment in a buyer authentication program, and decide how you want
to display the payment confirmation.
You can make these selections in the following sections:
Billing and Postal Information
Buyer Authentication Program
Payment Confirmation Page
17
Page 18
Customising Your PayPal Payment Page
Modifying Your PayPal Account Settings
Billing and Postal Information
PayPal recommends that you display as few options as possible on the payment page. For
example, you may have already collected shipping address on your own website in order to
calculate the shipping cost and passed it on to PayPal's payment page. Therefore, it is not
necessary to show this option on the payment page again.
You could have information that has already been collected on your website, but you may
want to pass it to PayPal and display it on the hosted payment page again. This information
will be pre-filled and editable on this page.
You can select the fields that are displayed on your hosted payment page. You have the
following options:
Card Information - Buyer's credit card information. This field is always displayed and
selected by default.
Customer Name - Buyer's first and last name
Billing Address - Buyer's billing address
Billing Phone Number - Buyer's phone number
Billing Email Address - Buyer's email address
Postal Address - Buyer's shipping address.
18
Page 19
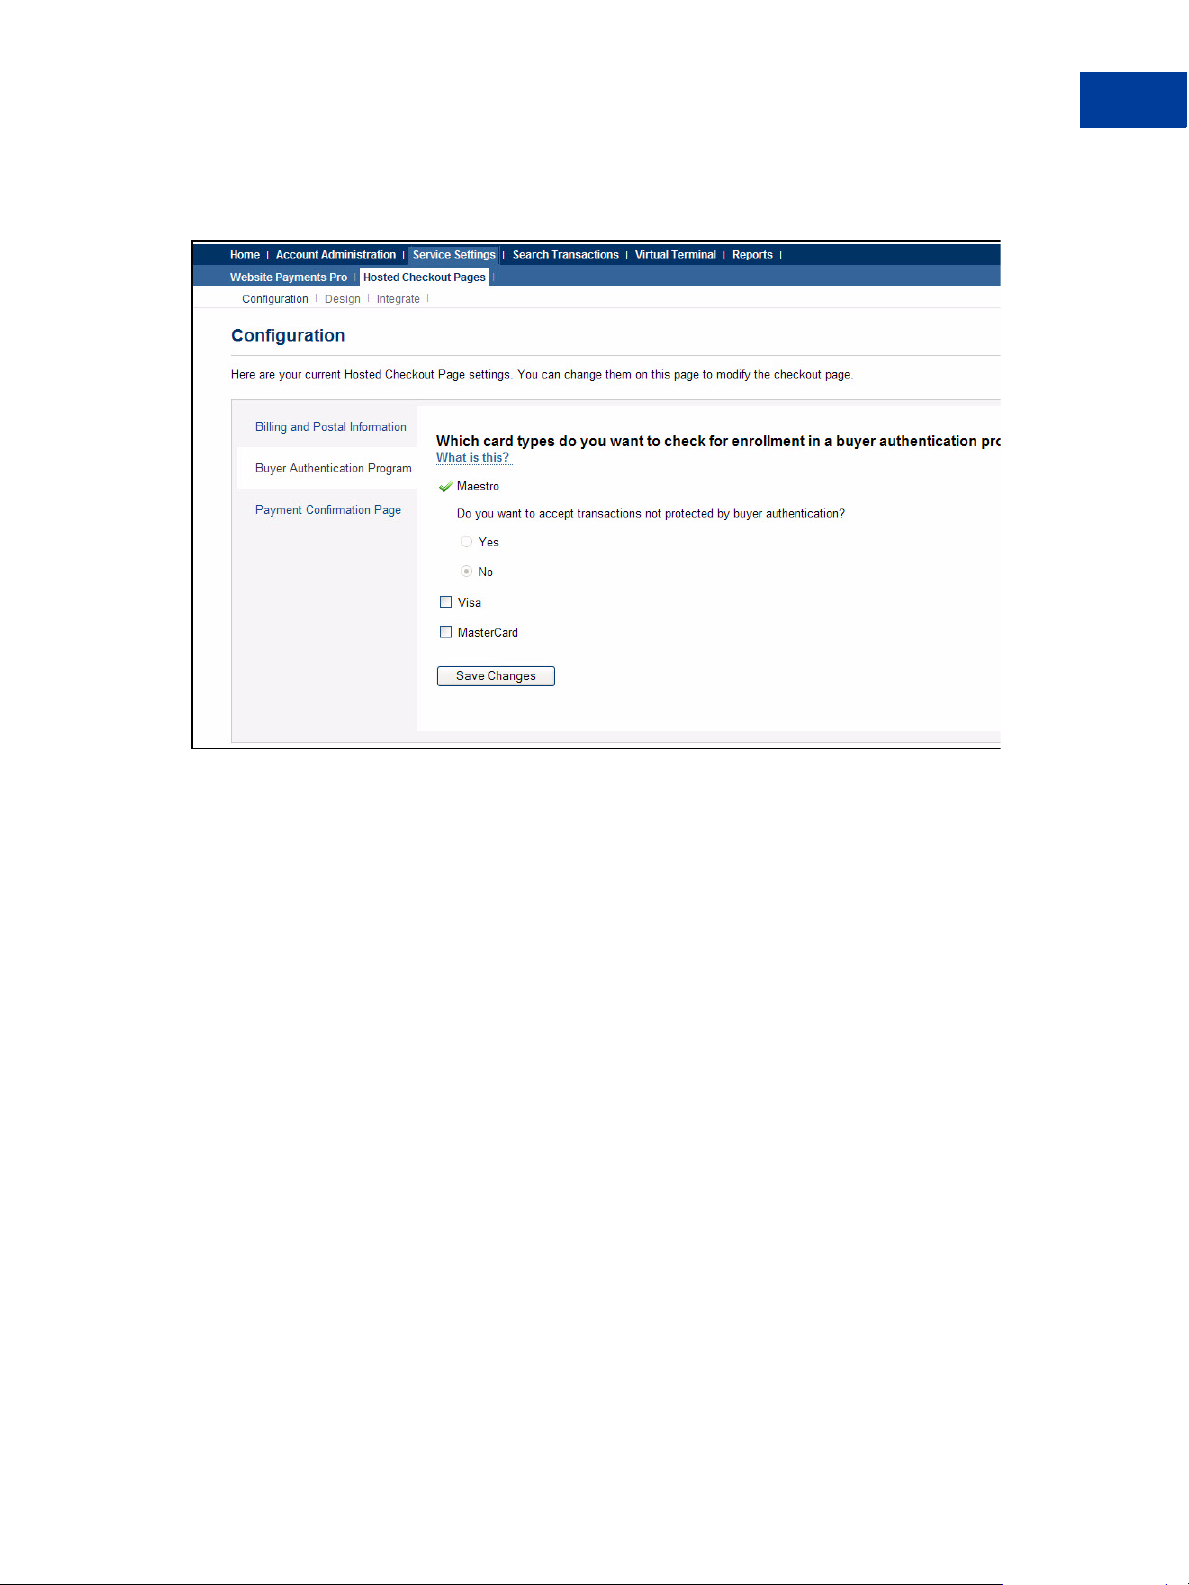
Buyer Authentication Program
Customising Your PayPal Payment Page
Modifying Your PayPal Account Settings
You can check Maestro, Visa, and MasterCard card types for enrollment in a buyer
authentication program like 3-D Secure. 3-D Secure implementation such as Verified by Visa
or MasterCard SecureCode is an additional form of authentication which provides a credit and
debit card holder another layer of security while paying for online purchases. This deters the
unauthorised use of the buyer’s credit or debit card during online purchases and also reduces
the chargeback rate for the merchants implementing this scheme.
NOTE: It is mandatory that Maestro is checked for enrollment in the buyer authentication
program.
After selecting a card type to check for enrollment, you can also choose to accept transactions
that are not protected by buyer authentication (transactions that do not pass the 3-D Secure
check). You have the following options for such transactions:
Yes - PayPal processes these transactions as non-buyer authentication transactions.
No - PayPal rejects these transactions.
Page 20
Customising Your PayPal Payment Page
Modifying Your PayPal Account Settings
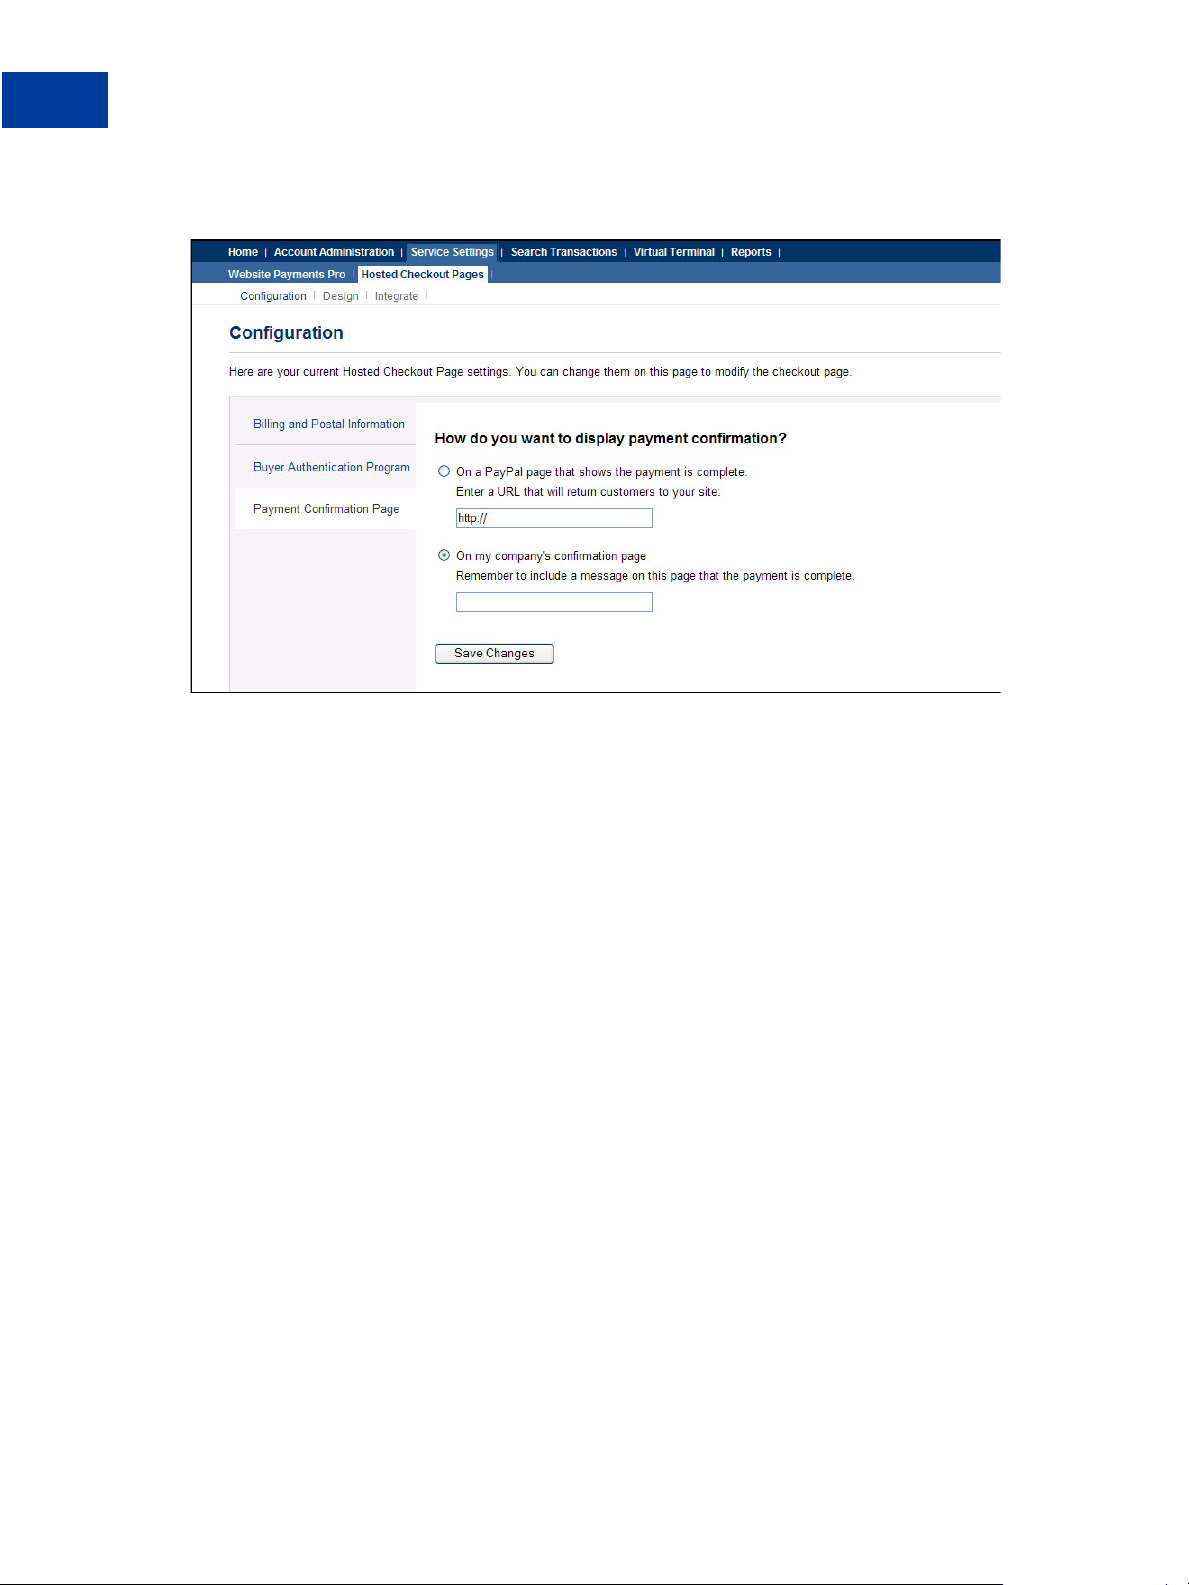
Payment Confirmation Page
Once the transaction is successful, you can choose to display your payment confirmation on
either a PayPal's confirmation page or on your own payment confirmation page.
On a PayPal page that shows the payment is complete - The payment confirmation
appears on the PayPal confirmation page. Optionally, you can also provide a URL on the
confirmation page to take your buyer back to your website. To do so, enter the appropriate
URL in the field provided.
On the Company's confirmation page - The payment confirmation will appear on your
own payment confirmation page. For this, enter the URL of the page that will display the
payment confirmation. You will have to message the outcome of the transaction to the
buyer when PayPal redirects back to this URL. Be sure to display specifics of the order so
the buyer sees a meaningful confirmation. You can get the specifics of the order using the
Transaction ID we pass back to you with the return URL.
20
Page 21
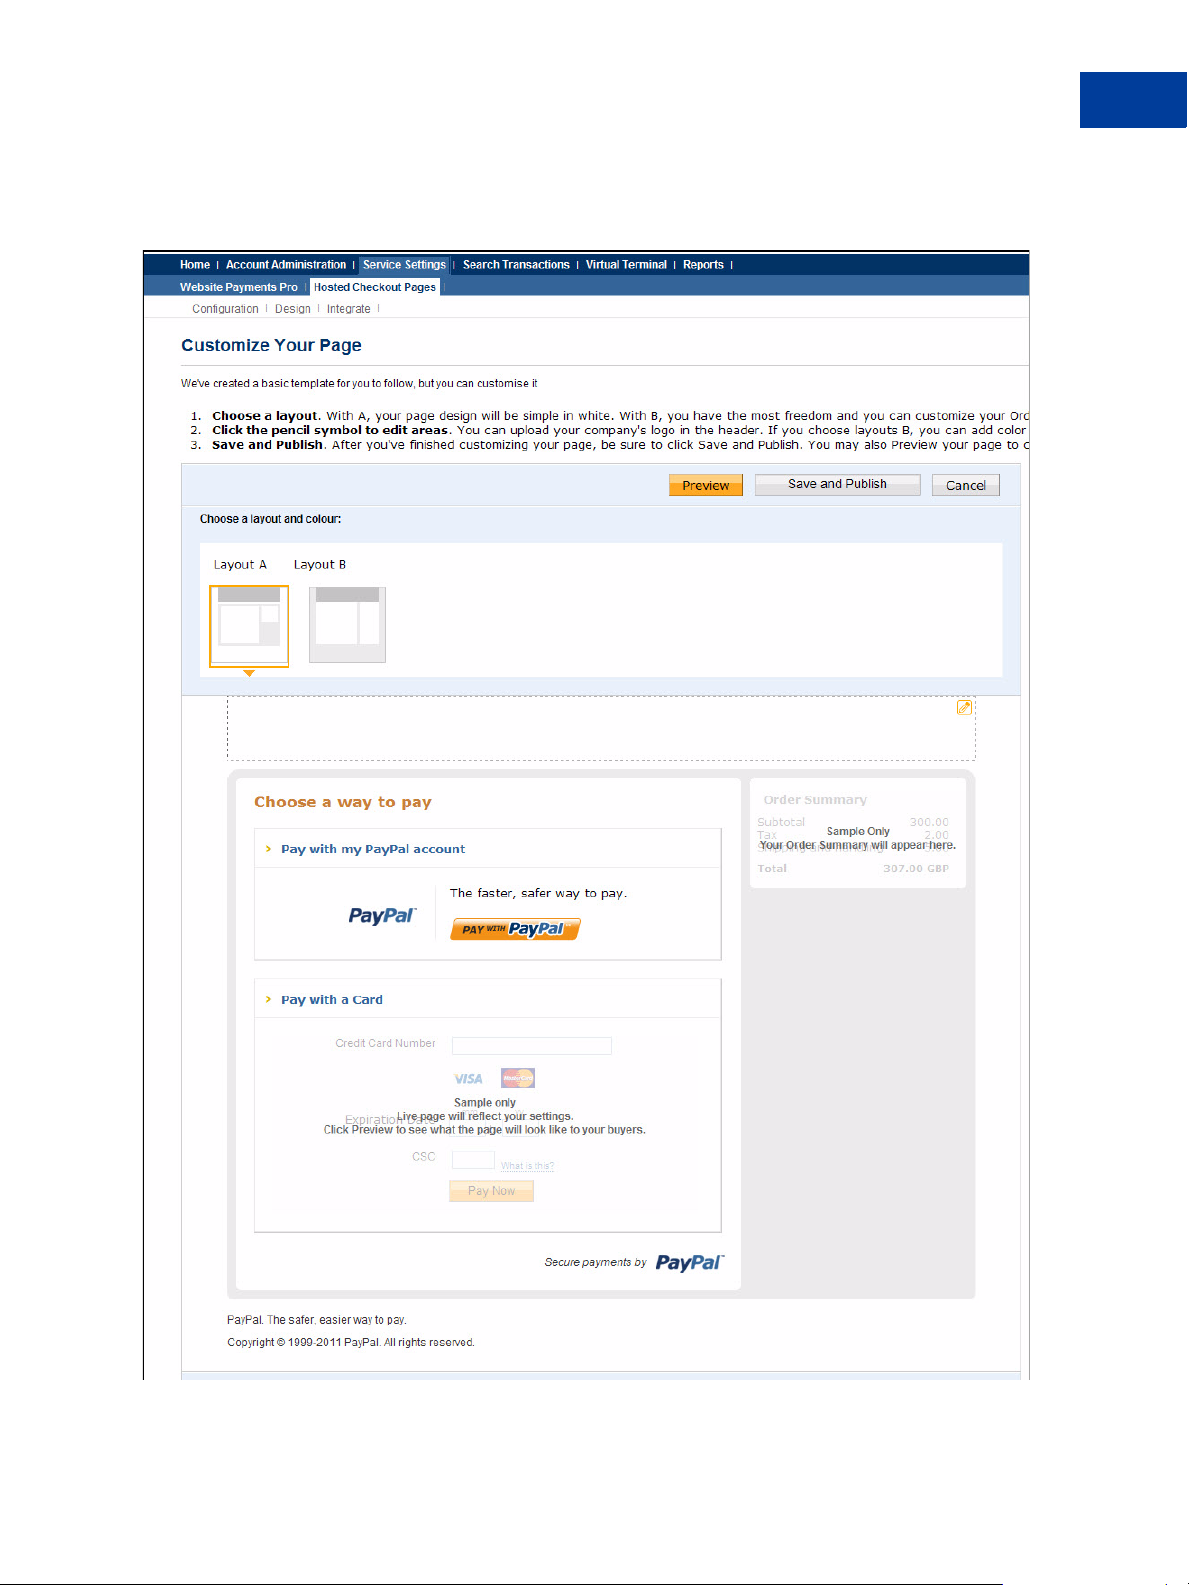
Design
Customising Your PayPal Payment Page
Modifying Your PayPal Account Settings
Page 22

Customising Your PayPal Payment Page
Modifying Your PayPal Account Settings
This page allows you to customise your payment page. You can customise the header,
background, title, button, and the order summary column of your payment page.
PayPal offers two design templates or layouts for you to choose from. Template or Layout A is
the default template, however, you can choose either templates.
NOTE: Your buyers will not see the payment page until you have completed the HTML
integration with your website.
Preview the design of your payment page. You can either change the design of your template,
or select and customise a different template on this page. To make changes, left-click on the
section you are trying to modify or the corresponding Click to Edit button for that section. On
the pop-up that appears, click the color selector to change the color, or enter the appropriate
URL, as needed.
If the buyer pays by logging into PayPal, the look and feel of that flow can be customised
through the customisation options on the Profile page.
After making the changes, click one of the following buttons:
Preview - Preview the changes you have made to your template before saving and
publishing it.
Save and Publish - Save all the changes you have made and publish the updated template.
Your buyers will see the updated payment page.
Cancel - Discard all the changes you have made in this session.
Undo Changes - Discard all changes you have made since the last time you saved the
template. Your buyers will see the last saved template.
NOTE: You must make all modifications (including changing templates) within the same
session, otherwise all changes will be lost and you will have to redo your changes. If
the session times out, the design of the template will remain at the version that was last
published.
22
Page 23

Customising Your PayPal Payment Page
Modifying Your PayPal Account Settings
Choosing a Layout
Choose from the following two design templates or layouts:
Template A Template B
Template A. Selected by default - you can customise the header.
FIGURE 3.1 Template A
Page 24

Customising Your PayPal Payment Page
Modifying Your PayPal Account Settings
Template B. Customise the header, background, title, button, and the order summary column.
FIGURE 3.2 Template B
24
Page 25

Customising Your PayPal Payment Page
Modifying Your PayPal Account Settings
Customising Your Layout
Consider the following when you customise your template:
Header (applicable to Template A and B) - By default, the business name from your
profile is shown in the header. You can change the following:
– Header height and color
– Font type, size, and color
– Swap between displaying the business name or the business logo image
– Position of the business name or the logo
NOTE: We recommend that you host your images on a secure server (https://) to avoid the
security dialog window that may hurt conversion.
Background (applicable to Template B) - You can change the following:
– Background color
– Background image URL
Title and Button (applicable to Template B) - You can change the following:
–Header color
– Title bar color and title text color
– Button color and button text color
Page 26

Customising Your PayPal Payment Page
Adding HTML Variables
Adding HTML Variables
The table below lists the Hosted Solution HTML variables you can use to customise the look
and feel of your payment page.
TABLE 3.1 HTML Variables for Look and Feel of Payment Page
Variable Description
bodyBgColor
bodyBgImg
footerTextColor
headerBgColor
headerHeight
logoFont
logoFontColor
logoFontSize
logoImage
logoImagePosition
logoText
Color of the surrounding background of the payment page.
Image of the surrounding background of the payment page. The file
extension can be .gif, .jpg, .jpeg, or .png format.
Color of the footer text.
Color of the header background.
Height of the header banner. It can be from 50 to 140 pixels. The
width cannot be changed. It is always 940 pixels.
Font type of the logo text.
Color of the logo text.
Font size of the logo text.
Image displayed in the logo. The acceptable file extension formats
are .gif, .jpg, .jpeg, or .png. The width of the image cannot be more
than 940 pixels.
Position of the image in the logo.
Business name displayed on your profile page. This fi eld is editable
and text specified here is displayed on the header if logoImage is not
specified.
26
orderSummaryBgColor
orderSummaryBgImage
pageButtonBgColor
pageButtonTextColor
pageTitleTextColor
sectionBorder
Color of the Order Summary column on the right side of the payment
page. You cannot change the color of the Order Summary box.
Background image you can put in the Order Summary Column. The
acceptable file extension formats are .gif, .jpg, .jpeg, or .png.
Background color of the Pay Now button.
Color of the Pay Now button. You cannot change the text of the
button.
Color of the text used in the title of the page. (Text that says “Choose
a way to pay.”)
Background of the section that displays “Pay with my PayPal
account” or “Pay with a Card”.
Page 27

Customising Your PayPal Payment Page
T
ABLE 3.1 HTML Variables for Look and Feel of Payment Page
Variable Description
Adding HTML Variables
showCustomerName
showBillingAddress
showBillingPhone
showBillingEmail
showHostedThankyouPage
showShippingAddress
Display customer name (first name and last name).
Default Value: true
Allowable Value: true or false, where true = show and false =
hide.
Display billing address information.
Default Value: true
Allowable Value: true or false, where true = show and false =
hide.
Display billing phone number.
Default Value: true
Allowable Value: true or false, where true = show and false =
hide.
Display email address for billing purposes.
Default Value: false
Allowable Value: true or false, where true = show and false =
hide.
Display PayPal’s confirmation page.
Default Value: true
Allowable Value: true or false, where true = show and false =
hide.
Display shipping address.
Default Value: false
Allowable Value: true or false, where true = show and false =
hide.
subheaderText
template
Color of the “Pay with my PayPal account” or “Pay with a Card”
text.
Template used for your payment page. Options are TemplateA and
T emplateB. TemplateD is used for iFrame integration only and is not
an option on the Customization page on PayPal.com.
Page 28

Customising Your PayPal Payment Page
Adding HTML Variables
28
Page 29

4
Integrating iFrame in Your Web si t e
PayPal offers a compact payment form that can be integrated in an iFrame on your website.
Since this form is integrated on your website, the buyer never leaves your website, thereby
reducing potential drop-offs. You can also maintain your checkout look and feel in the master
frame that surrounds the compact payment form. The credit card fields are part of the compact
payment form so you do not have to collect this information separately. The form also supports
3-D Secure frames.
IMPORTANT: Due to security concerns involving iFrame, the following browsers are
supported and secure to use - Internet Explorer 8.0, Opera 10.50, Firefox 8.0,
Chrome 4.1, Safari 4.0. Transactions involving users of other browsers
should not use the iFrame flow or abandon the transaction. Additionally,
there is another risk beyond the iFrame flow - should the PayPal iFrame
become the source of an attack, it would appear that the attack is originating
from the merchant site; do not use the iFrame flow if you wish to avoid this
additional risk.
NOTE: Due to spoof concerns, the form does not contain any PayPal branding.
The compact payment form contains the following fields:
Credit card number
Expiry date
CVV2 number (if applicable, based on the card type)
Any additional fields required for other card types, such as start date and issue number for
Maestro or Switch.
The form also offers the following options:
Remove the Pay with PayPal button. Although the form offers the option to pay using
PayPal account by default, you can contact your account manager or customer support to
turn this option off.
Manually customize the color of the Pay Now button.
IMPORTANT: The compact payment form does not display the buyer's billing address, even
if showBillingAddress=true is passed. However, for some merchants,
it may be necessary to pass the billing address to successfully process the
transactions.
Page 30

Integrating iFrame in Your Website
Integrating iFrame
Integrating iFrame
Choose one of the following methods to integrate the compact payment form in your website:
HTML Integration
API Integration
IMPORTANT: For optimal performance, PayPal recommends that you load the iFrame asset
before other assets such as images and JavaScripts. If there are too many
assets running on your payment page when you load iFrame, the request for
the iFrame may not be placed or might get delayed. This may result in the
buyers seeing a blank iFrame.
HTML Integration
To manually integrate the compact payment form in your website, perform the following
steps:
1. Enter the iFrame tag at the location where you want the compact payment form to appear
on your website. For example:
<iframe name="hss_iframe" widt h="570px" height=" 540px"></iframe>
The allowable size for the compact payment form is 570 pixels in width to 540 pixels in
height.
2. Below is the iFrame code, add the hidden form that is populated with the appropriate
Hosted Solution variables (including the total amount to be paid) and specify the variable
TemplateD. For example,
<form style="display:none" tar get="hss_iframe" n ame="form_iframe"
method="post"
action="https://securepayments .paypal.com/cgi-bi n/acquiringweb">
<input type="hidden" name="cmd " value="_hosted-p ayment">
<input type="hidden" name="tot al" value="50.00">
<input type="hidden" name="par tner" value="PayPa lUK">
<input type="hidden" name="vendor" val ue="vendorname">
<input type="hidden" name="pay mentaction" value= "sale">
<input type="hidden" name="tem plate" value="templat eD">
<input type="hidden" name="return"
value="https://yourwebsite.com /receipt_page.html ">
</form>
30
3. Ensure that the target name matches the iFrame name, as hig hlighted in th e exampl e below:
<iframe name="hss_iframe" widt h="570px" height=" 540px"></iframe>
<form style="display:none" tar get="hss_iframe" name ="form_iframe"
method="post"
action="https://securepayments .paypal.com/cgi-bi n/acquiringweb">
Page 31

Integrating iFrame in Your Website
Integrating iFrame
4. Submit the form using JavaScript. For example:
<script type="text/javascript" >
document.form_iframe.subm it();
</script>
Example of Manual Integration
The complete example as per the above steps is as follows:
<iframe name="hss_iframe" widt h="570px" height=" 540px"></iframe>
<form style="display:none" tar get="hss_iframe" n ame="form_iframe"
method="post"
action="https://securepayments .paypal.com/cgi-bi n/acquiringweb">
<input type="hidden" name="cmd " value="_hosted-p ayment">
<input type="hidden" name="tot al" value="50.00">
<input type="hidden" name="par tner" value="PayPa lUK">
<input type="hidden" name="vendor" val ue="vendorname">
<input type="hidden" name="pay mentaction" value= "sale">
<input type="hidden" name="tem plate" value="temp lateD">
<input type="hidden" name="return"
value="https://yourwebsite.com /receipt_page.html ">
</form>
<script type="text/javascript" >
document.form_iframe.subm it();
</script>
API Integration
To integrate the compact payment form in your website using the API, refer to “Using the
Button Manager API with Hosted Solution Checkout” on page 36.
NOTE: Use template=templateD for this type of integration.
There are two options in the response to initiate the Hosted Solution payment flow:
Using URL Returned in the Response
Using Form POST
31
Page 32

Integrating iFrame in Your Website
Integrating iFrame
Using URL Returned in the Response
In the URL identified in the response as EMAILLINK, add “src” for iFrame as per the
example below to redirect the buyer and initiate the payment flow.
<iframe src="https://www.paypa l.com/...?hosted_b utton_id=HSS-.."
width="570px" height="540px"></if rame>
The allowable size of the compact payment form is 570 pixels in width to 540 pixels in height
Using Form POST
Identify the WEBSITECODE in the response and use the code to create a Pay Now button on
your review page. When your buyer clicks the button, they are redirected to the PayPal hosted
payment page. Like the URL, the button is usable for approximately two hour or until the
payment is successful.
1. Enter the iFrame tag at the location where you want the compact payment form to appear
on your website. For example:
<iframe name="hss_iframe" widt h="570px" height=" 540px"></iframe>
The allowable size for the compact payment form is 570 pixels in width to 540 pixels in
height.
2. Insert the following in the iFrame tag:
<form action="https://www.payp al.com/cgi-bin/web scr" method="post">
<input type="hidden" name="cmd " value="_s-xclick ">
<input type="hidden" name="hos ted_button_id" val ue="HSSbXkpgPTNgZi7CyfIwWTAkWPSDbKzio kU">
<input type="image" src="https://w ww.paypal.com/i/btn/btn_paynow_LG.gif"
border="0" name="submit" alt=" PayPal - The safer , easier way to pay
online.">
<img alt="" border="0" src="ht tps://www.paypal.c om/i/scr/pixel.gif"
width="1" height="1">
</form>
3. Submit the form using JavaScript. For example:
<script type="text/javascript" >
document.form_iframe.subm it();
</script>
32
Page 33

Integrating iFrame in Your Website
Integrating iFrame
Example of API (Form POST) Integration
The complete example as per the above steps is as follows:
<iframe name="hss_iframe" widt h="570px" height=" 540px"></iframe>
<form action="https://www.payp al.com/cgi-bin/web scr" method="post">
<input type="hidden" name="cmd " value="_s-xclick ">
<input type="hidden" name="hos ted_button_id" val ue="HSSbXkpgPTNgZi7CyfIwWTAkWPSDbKzio kU">
<input type="image" src="https://ww w.paypal.com/i/btn/bt n_paynow_LG.gif"
border="0" name="submit" alt=" PayPal - The safer , easier way to pay
online.">
<img alt="" border="0" src="ht tps://www.paypal.c om/i/scr/pixel.gif"
width="1" height="1">
</form>
<script type="text/javascript" >
document.form_iframe.subm it();
</script>
33
Page 34

Integrating iFrame in Your Website
Integrating iFrame
34
Page 35

5
Integrating Your Website Using API
Using the Button Manager API, you can programmatically create the checkout button that
initiates the Hosted Solution checkout flow on your website. You create the checkout button
dynamically when the buyer attempts to checkout on your website. When the buyer clicks on
your checkout button, you call the BMCreateButton API operation to create a checkout
button and display it on your web page. When the buyer clicks on this checkout button, he or
she is redirected to the PayPal payment page where he or she can complete the payment. You
can use 3-D Secure functionality on the PayPal payment page.
HTML variables control the presentation of the PayPal payment pages, the information
contained on the pages, and pages to which your buyer can be returned to when leaving the
payment pages. For a list of HTML variables, refer to
For complete information on the Button Manager API, refer to the Button Manager API (NVP)
or Button Manager API (SOAP).
NOTE: Using the Button Manager API, you can programmatically create the checkout button,
but not manage, edit, or delete it.
“HTML Variables” on page 13.
Button Hosting
For Hosted Solution, using BUTTONTYPE=PAYMENT, you can create the following kinds of
checkout buttons:
Token buttons (BUTTONCODE=TOKEN) are not stored on PayPal. They are dynamic and
initiate the Hosted Solution checkout flow. The parameters associated with this kind of
button are secure. They have a lifetime of approximately two hours, if not used.
Encrypted buttons (BUTTONCODE=ENCRYPTED) are not stored on PayPal. The
parameters associated with this kind of button are encrypted. You must update the web
pages that use an encrypted button each time the button or the associated information
changes.
Clear text buttons (BUTTONCODE=CLEARTEXT) are not stored on PayPal. The
parameters associated with this kind of button are not encrypted. They can be used
dynamically because you can change the value of a parameter anytime. However, if you
use them, recognize the risk that sensitive information can be altered or stolen.
NOTE: Hosted buttons (BUTTONCODE=HOSTED) are not supported for Hosted Solution and
will return an error if used.
For more information about Button Manager API usage, refer to “BMCreateButton API
Operation” on page 42.
Page 36

Integrating Your Website Using API
Using the Button Manager API with Hosted Solution Checkout
Using the Button Manager API with Hosted Solution Checkout
NOTE: Before using the Button Manager API, you must acquire PayPal API credentials. For
more information, refer to
T o create a checkout butto n on your webs ite, you call th e BMCreateButton API operation.
When the buyer clicks on the checkout button, PayPal initiates the Hosted Solution checkout
flow.
You must decode the response from the BMCreateButton API. For information about URL
encoding, refer to the
Name-Value Pair API Developer Guide.
There are two options in the response to initiate the Hosted Solution payment flow:
Using URL Returned in the Response (Recommended)
Using Form POST
Using URL Returned in the Response (Recommended)
Appendix A, “Obtaining API Credentials.
36
Using the URL identified in the response as EMAILLINK, you can redirect the buyer and
initiate the payment flow.
NOTE: PayPal recommends using TOKEN or ENCRYPTED.
Page 37

Integrating Your Website Using API
Using the Button Manager API with Hosted Solution Checkout
Example of TOKEN
EMAILLINK=https://securepaymen ts.paypal.com/cgi- bin/webscr?cmd=_sxclick&hosted_button_id=HSS-1P ncRuoWdOkE2cDn3bIs Tr-5ODQUxac&HOSTEDBUTTONID=HSS-1PncRuo WdOkE2cDn3bIsTr-5O DQU-xac&TIMESTAMP=201 1-0817T22:58:45Z&CORRELATIONID=536 6c981124b1&ACK=Suc cess&VERSION=65.0&BUI LD=206
6255
Example of ENCRYPTED
EMAILLINK=https://securepaymen ts.paypal.com/acqu iringweb?cmd=_hostedpayment¤cy_code=GBP&paym entaction=sale&shi pping=1&tax=1&return= http%3
a%2f%2fwww%2epaypal%2ecom&part ner=PayPalUK&vendo r=ukpro2002&total=7&s ubtota
l=1&TIMESTAMP=2011-0817T22:59:57Z&CORRELATIONID=3b7 6bdaf28f3e&ACK=Suc cess&VERSION=65.0&BUI LD=206
6255
Example of CLEARTEXT
EMAILLINK=https://securepaymen ts.paypal.com/acqu iringweb?cmd=_hostedpayment¤cy_code=GBP&paym entaction=sale&shi pping=1&tax=1&return= http%3
a%2f%2fwww%2epaypal%2ecom&part ner=PayPalUK&vendo r=ukpro2002&total=7&s ubtota
l=1&TIMESTAMP=2011-0817T23:00:57Z&CORRELATIONID=6dc c37afaa5ec&ACK=Suc cess&VERSION=65.0&BUI LD=206
6255
The button variables control the presentation in the flow and the information that is provided
to the buyer initially . Because the URL is associated with a Hosted S olution token, the URL is
usable for approximately two hours after it is created or until the payment is successful.
Using Form POST
37
Page 38

Integrating Your Website Using API
Using the Button Manager API with Hosted Solution Checkout
Identify the WEBSITECODE in the response and use the code to create a Pay Now button on
your review page. When your buyer clicks the button, they are redirected to the PayPal hosted
payment page. Like the URL, the button is usable for approximately two hours or until the
payment is successful.
NOTE: PayPal recommends using TOKEN or ENCRYPTED.
Example for TOKEN
WEBSITECODE=<form action="https://securepayments.paypal.com/cgi-bin/webscr"
method="post">
<input type="hidden" name="cmd " value="_s-xclick ">
<input type="hidden" name="hos ted_button_id" val ue="HSS1PncRuoWdOkE2cDn3bIsTr-5ODQU-x ac">
<input type="image"
src="https://www.paypal.com/en _GB/i/btn/btn_paynow_ LG.gif" border="0"
name="submit" alt="PayPal — Th e safer, easier wa y to pay online.">
<img alt="" border="0" src="ht tps://www.paypal.c om/en_GB/i/scr/pixel. gif"
width="1" height="1">
</form>
Example for ENCRYPTED
WEBSITECODE=<form action="https://securepayments.paypal.com/cgi-bin/webscr"
method="post">
<input type="hidden" name="cmd " value="_s-xclick ">
<input type="hidden" name="encrypte d" value="-----BEGIN PKCS7 ----MIIHkwYJKoZIhvcNAQcEoIIHhDCCB4 ACAQExggE0MIIBMAIB ADCBmDCBkjELMAkGA1UEB hMCVVM
xCzAJBgNVBAgTAkNBMRYwFAYDVQQHE w1Nb3VudGFpbiBWaWV 3MRQwEgYDVQQKEwtQYXlQ YWwgSW
5jLjEVMBMGA1UECxQMc3RhZ2UyX2Nl cnRzMRMwEQYDVQQDFA pzdGFnZTJfYXBpMRwwGgY JKoZIh
vcNAQkBFg1yZUBwYXlwYWwuY29tAgE AMA0GCSqGSIb3DQEBA QUABIGAsqS5KoYWmzqj2c rl/I9v
a72rukNNWuxh2TBBhhx4P7DGcYeIzA 82FzS3MmZTJfY2VydH MEwHwweqfs3yBjMA0GCSq GSIb3D
QEBAQUABIGAdW7vFpnU+jbGW1if7YC AsMiViJbw5HKK3TNke Jvv8pxFZetWb3HO0KWM3z zaPz1v
URBuDCQa8l4RlEb3n/zT7k2/eusAq4 LbS6YEPu2od/AUTDky DSCA32XBjS78yzpJ5KHTW 4eoeff
l8pCEkrcRwfV4hyqsSgTOuvfPOBer3 yA=-----END PKCS7- ---">
<input type="image"
src="https://www.paypal.com/en _GB/i/btn/btn_paynow_ LG.gif" border="0"
name="submit" alt="PayPal — Th e safer, easier wa y to pay online.">
<img alt="" border="0" src="ht tps://www.paypal.c om/en_GB/i/scr/pixel. gif"
width="1" height="1">
</form>
38
Example of CLEARTEXT
WEBSITECODE=<form action="http s://securepayments .paypal.com/acquiring web"
method="post">
<input type="hidden" name="cmd " value="_hosted-p ayment">
<input type="hidden" name="cur rency_code" value= "GBP">
<input type="hidden" name="pay mentaction" value= "sale">
<input type="hidden" name="return" val ue="http://www.yourwe bsite.com">
<input type="hidden" name="par tner" value="PayPa lUK">
<input type="hidden" name="vendor" val ue="ukpro2002">
<input type="hidden" name="tot al" value="7">
Page 39

Integrating Your Website Using API
Using the Button Manager API with Hosted Solution Checkout
<input type="hidden" name="sub total" value="1">
<input type="image"
src="https://www.paypal.com/en _GB/i/btn/btn_paynow_ LG.gif" border="0"
name="submit" alt="PayPal — Th e safer, easier wa y to pay online.">
<img alt="" border="0" src="ht tps://www.paypal.c om/en_GB/i/scr/pixel. gif"
width="1" height="1">
</form>
NOTE: The PayPal payment page displays a button identified as Pay Now to complete the
checkout flow. The Pay Now button on the PayPal page is different than the Pay Now
button created by the BMCreateButton API operation on the review page. You may
need to change the URL for the latter in BUTTONIMAGEURL to avoid confusion.If a
URL is not specified in BUTTONIMAGEURL, then the default Pay Now is used for the
button.
Encrypting Buttons Using Public and Private Key
Using Encrypted Website Payments helps secure payment buttons that you generate or write
manually. Encrypted Website Payments protects the HTML button code that contains pricing
information by encrypting it. HTML button code that you protect by using Encrypted Website
Payments cannot be altered by malicious third parties to create fraudulent payments. For
detailed information, refer to
Payments
Chapter 7, “Protecting Buttons by Using Encrypted Website
Example of Initiating Hosted Solution Checkout
The example shows the NVP parameters using BUTTONCODE=TOKEN for creating a URL to
initiate the Hosted Solution checkout flow. Refer to
parameters in the example.
TABLE 5.1 API Credentials
Parameter Value
USER
PWD
VERSION
SIGNATURE
(Required) Your PayPal API Username
(Required) Your PayPal API Password
(Required) Version number of the NVP API service, such as 80.0
(Optional) Your PayPal API signature string. If you use an API certificate,
do not include this parameter.
Table 5.1 for more information about the
39
Page 40

Integrating Your Website Using API
Using the Button Manager API with Hosted Solution Checkout
<form method=post action=https ://api-3t.paypal.c om/nvp>
<input type=hidden size=40 nam e="USER" value=you r PayPal API usernam e>
<input type=hidden size=40 nam e="PWD" value=your PayPal API password >
<input type=hidden size=80 nam e="SIGNATURE" valu e=Your PayPal API
Signature>
<input type=hidden name="VERSION" value= 80.0>
<input type=hidden name="BUTTONCODE " value=token>
<input type=hidden name="BUTTONTYPE " value=payment>
<input type=hidden size=40 nam e="L_BUTTONVAR0" v alue="paymentaction=s ale">
<input type=hidden size=40 nam e="L_BUTTONVAR1" v alue="partner=PayPalU K">
<input type=hidden size=40 nam e="L_BUTTONVAR2" v alue="your vendor nam e">
<input type=hidden name="L_BUT TONVAR3" value="in voice=12345678">
<input type=hidden name="L_BUT TONVAR4" value="lc =GB">
<input type=hidden name="L_BUT TONVAR5 " value="to tal=0.50">
<input type=hidden name="L_BUTTONVA R6" value="subtotal=0.10">
<input type=hidden name="L_BUTTONVA R7" value="shipping=0.01">
<input type=hidden name="L_BUTTONVA R8" value="handling=0.01">
<input type=hidden name="L_BUTTONVA R9" value="tax=0.01">
<input type=hidden name="L_BUT TONVAR10" value="c urrency_code=GBP">
<input type=hidden size=40 nam e="L_BUTTONVAR11" value="showCardInfo=t rue">
<input type=hidden size=40 nam e="L_BUTTONVAR12"
value="showCustomerName=true">
<input type=hidden size=40 nam e="L_BUTTONVAR13"
value="showBillingAddress=true ">
<input type=hidden size=40 nam e="L_BUTTONVAR14"
value="showBillingPhone=true">
<input type=hidden size=40 nam e="L_BUTTONVAR15"
value="showBillingEmail=true">
<input type=hidden size=40 nam e="L_BUTTONVAR16"
value="showShippingAddress=tru e">
<input type=hidden size=40 nam e="L_BUTTONVAR17"
value="showHostedThankyouPage= true">
<input type=hidden size=40 nam e="L_BUTTONVAR18"
value="notify_url=http://your IPN URL">
<input type=hidden size=40 nam e="L_BUTTONVAR19" value="custom=custom
information here">
<input type=hidden size=40 nam e="L_BUTTONVAR20"
value="cancel_return=http://yo ur merchant URL">
<input type=hidden size=40 nam e="L_BUTTONVAR21" value="return=http:// your
merchant URL">
<input type=hidden name="L_BUT TONVAR22" value="f irst_name=Mr.">
<input type=hidden name="L_BUT TONVAR23" value="l ast_name=Chau">
<input type=hidden name="L_BUT TONVAR24" value="a ddress1=Gardens">
<input type=hidden name="L_BUT TONVAR25" value="a ddress2=99343 ba">
<input type=hidden name="L_BUT TONVAR26" value="c ity=Paris">
<input type=hidden name="L_BUT TONVAR27" value="s tate=Alsac">
<input type=hidden name="L_BUT TONVAR28" value="z ip=75002">
<input type=hidden name="L_BUT TONVAR29" value="c ountry=FR">
<input type=hidden size=40 nam e="L_BUTTONVAR30"
value="billing_first_name=John ">
40
Page 41

Integrating Your Website Using API
Using the Button Manager API with Hosted Solution Checkout
<input type=hidden size=40 nam e="L_BUTTONVAR31"
value="billing_last_name=Tiger ">
<input type=hidden size=40 nam e="L_BUTTONVAR32"
value="billing_address1=5088 C raven Hill Gardens ">
<input type=hidden size=40 nam e="L_BUTTONVAR33"
value="billing_address2=Apt# 1 99343 ba">
<input type=hidden size=40 nam e="L_BUTTONVAR34"
value="billing_city=Wolverhamp ton">
<input type=hidden size=40 nam e="L_BUTTONVAR35" value="billing_state= West
Midlands">
<input type=hidden size=40 nam e="L_BUTTONVAR36" value="billing_zip=W1 24LQ">
<input type=hidden size=40 nam e="L_BUTTONVAR37" value="billing_countr y=GB">
<input type=hidden size=40 nam e="L_BUTTONVAR38"
value="billing_phone=650212220 0">
<input type=hidden size=40 nam e="L_BUTTONVAR39"
value="billing_company_name=Co mpany name">
<input type=hidden size=40 nam e="L_BUTTONVAR40"
value="billing_fax=6502122200" >
<input type=hidden size=40 nam e="L_BUTTONVAR41"
value="billing_middle_name=V">
<input type=hidden size=40 nam e="L_BUTTONVAR42" value="night_phone_a= 408">
<input type=hidden size=40 nam e="L_BUTTONVAR43" value="night_phone_b= 398">
<input type=hidden size=40 nam e="L_BUTTONVAR44" value="night_phone_c= 3065">
<input type=hidden size=40 nam e="L_BUTTONVAR45"
value="buyer_email=john.smith@ email.com">
<input type=hidden size=40 nam e="L_BUTTONVAR46" value="bn=GBD">
<input type=hidden size=40 name="L_BUT TONVAR47" value="cbt=yo ur preferred
business display name">
<input type=hidden size=40 nam e="L_BUTTONVAR48"
value="address_override=true">
<input type=hidden size=40 nam e="L_BUTTONVAR49"
value="cpp_header_image=Red">
<input type=hidden size=40 nam e="L_BUTTONVAR50" value="logoText=PayPa l">
<input type=hidden size=40 nam e="L_BUTTONVAR51"
value="logoImage=http://images .com/logo.gif">
<input type=hidden size=40 nam e="L_BUTTONVAR52"
value="logoImagePosition=cente r">
<input type=hidden size=40 nam e="L_BUTTONVAR53" value="logoFont=Arial
Bold">
<input type=hidden size=40 nam e="L_BUTTONVAR54" value="logoFontSize=2 4px">
<input type=hidden size=40 nam e="L_BUTTONVAR55" value="bodyBgImg=sdf" >
<input type=hidden size=40 nam e="L_BUTTONVAR56" value="headerHeight=7 0px">
<input type=hidden size=40 nam e="L_BUTTONVAR57"
value="orderSummaryBgImage=htt p://images.com/ord ersummary.jpg">
<input type=hidden size=40 nam e="L_BUTTONVAR58" value="template=templ ateA">
<input type=submit name=METHOD value=BMCreateBut ton>
</form>
41
Page 42

Integrating Your Website Using API
BMCreateButton API Operation
BMCreateButton API Operation
Use the BMCreateButton API operation to create Hosted Solution checkout button.
BMCreateButton Request
BMCreateButton Response
BMCreateButton Errors
BMCreateButton Request
The request fields specify the characteristics of your button, which include associated menu
items related to the button. You can specify up to 5 menu items, each of which can include up
to 10 possible selections.
BMCreateButton Request Fields
Field Description
METHOD (Required)
BMCreateButton
BUTTONCODE (Optional) The kind of button code to create. It is one of the following values:
TO KEN - A secure button, not stored on PayPal, used only to initiate the
Hosted Solution checkout flow; default for Pay Now button. Since version
65.2
EN CRYPTED - An encrypted button, not stored on PayPal
CL EARTEXT - An unencrypted button, not stored on PayPal
BUTTONTYPE (Required) The kind of button you want to create.
PAYMENT - Pay Now button; since version 65.2
L_BUTTONVARn (Optional) HTML standard button variables
BMCreateButton Response
The response contains an ID if the button is hosted on PayPal, and code for HTML in a
website and for a link in email.
BMCreateButton Response Fields
Field Description
42
WEBSITECODE HTML code for web pages
EMAILLINK Code for URL for the Hosted Solution checkout flow
HOSTEDBUTTONID ID of a Hosted Solution token
Page 43

Integrating Your Website Using API
BMCreateButton API Operation
BMCreateButton Errors
Error Code Short Message Long Message
10001 Internal Error Internal Error
11923 Invalid Argument The button image value specified is invalid.
11924 Invalid Argument The button image URL specified is invalid.
11925 Invalid Argument The button type specified is invalid.
11926 Invalid Data One of the parameters specified using ButtonVar is invalid.
11937 Invalid Argument A text box name specified is invalid. Text box names must not exceed
64 characters.
11938 Invalid Argument The button code value specified is invalid.
11943 Invalid Argument The button country value specified is invalid.
11945 Invalid Data The button country and language code combination specified is invalid.
11947 Invalid Argument The tax rate specified is invalid. Make sure any punctuation marks are
in the correct places and value specified is in the range 0.0 to 100.
11948 Invalid Argument The amount specified is invalid. Make sure any punctuation marks are
in the correct places.
12210 Invalid Argument The currency code value specified is invalid.
13117 Invalid Argument Subtotal amount is not valid.
13118 Invalid Argument Tax amount is not valid.
13119 Invalid Argument Handling amount is not valid.
13120 Invalid Argument Shipping amount is not valid.
43
Page 44

Integrating Your Website Using API
BMCreateButton API Operation
44
Page 45

Order Processing
6
This chapter walks you through the end to end order processing experience. It includes
information about verifying the status and authenticity of the order before fulfilling it.
Verifying Transaction Status and Authenticity
When the buyer successfully completes a transaction, they are redirected either to the PayPal
confirmation page or a website you specified in the return variable or on the Settings page
in the Profile section (as outlined in “Simple Hosted Solution Integration” on page 11). When
the browser is redirected to the website you specified, a Transaction ID is appended to it.
When you receive the redirect (URL with Transaction ID), you must verify that the order was
completed successfully on PayPal before sending the items to the buyer. You can do so by
checking the confirmation email sent to you by PayPal or by verifying the transaction history.
Validate Instant Payment Notification (IPN)
IPN enables you to receive messages about transaction payments and activity from PayPal
through asynchronous, server-to-server communication. This allows you to integrate your
online payments with your order fulfillment process.
Through IPN, you receive messages for the following:
Payments and their status (pending, complete, or denied)
Authorisations, chargebacks, disputes, reversals, and refunds.
After a transaction has been processed, PayPal sends an IPN to the notification URL specified
in your transaction using the parameter notify_url, or in your PayPal Profile. You must
verify that the Transaction ID, transaction amount, and other order specific parameters such as
Invoice ID that are sent in the IPN match with the information you have in your order
processing system. For more details, refer to
Instant Payment Notification Guide.
Fulfilling Order
After you have verified the authenticity of the payment amount and status, you can fulfil the
order by shipping the item to the buyer.
45
Page 46

Order Processing
Fulfilling Order
46
Page 47

Obtaining API Credentials
A
To use the PayPal APIs, you must have API credentials that identify you as a PayPal account
holder who is authorized to perform various API operations. Although you ca n use either an
API signature or a certificate, PayPal recommends you use a signature.
IMPORTANT: Although you have both a signature and a certificate, you cannot use both at
the same time.
Creating an API Signature
An API consists of an API username along with an associated API password and signature, all
of which are assigned by PayPal. Y ou need to include this information whenever you execute a
PayPal API operation.
You must have a PayPal account to create a signature.
To create an API signature:
1. Log in to PayPal, then click Profile under My Account.
2. Under Account Information, click Request API Credentials.
3. Under Option 1 - PayPal API, click Set up PayPal API credentials and permissions.
4. Under Option 2, click View API Signature.
5. Save the information and click Done to complete the process.
Creating an API Certificate
Create an API certificate only if your website requires it. Typically, you want to create an API
signature for your credentials instead.
You must have a PayPal account to create an API certificate.
NOTE: The certificate for API credentials is not the same as an SSL certificate for your
website; they are not related to each other.
If you do need a certificate, follow these instructions:
1. Log in to PayPal, then click Profile under My Account.
2. Under Account Information, click Request API Credentials.
3. Under Option 1 - PayPal API, click Set up PayPal API credentials and permissions.
47
Page 48

Obtaining API Credentials
Encrypting Your Certificate Into PKCS12 Format
4. Under Option 2, click View API Signature.
5. Save the values for API Username and API Password, and click Done.
6. Click Download Certificate and save the file.
7. Rename the file to something familiar, such as paypal_live_cert.pem. It is not
necessary to keep the .txt file extension. Be sure to remember where you save the file.
After completing this task:
If you use the PayPal SDK for Java, the PayPal SDK for .NET, or the PayPal SDK for
Classic ASP, you must encrypt your certificate in PCKS12 format.
If you use the PayPal SDK for .NET or Classic ASP, you must take additional steps to
import the certificate.
Encrypting Your Certificate Into PKCS12 Format
PayPal SDKs for Java, .NET, and Classic ASP require the additional task of encrypting your
certificate into PKCS12 format. Perform this task for both your Sandbox certificate and your
live certificate.
NOTE: This task is not required if you are using the PayPal SDK for PHP.
The certificate you download from PayPal is in PEM format. It contains both your public
certificate and the associated private key. Although the PEM certificate is not human readable,
the file is not encrypted.
The steps in this task require you to use the OpenSSL encryption tool. On Unix, this tool is
typically installed for you. On Windows, you typically must download OpenSSL yourself; in
this case, accept the defaults when you install OpenSSL and add OpenSSL to the path.
NOTE: In Windows, the Path is a System environment variable, which is accessible from the
Advanced tab when you right-click on your My Computer icon and view its
properties. Do not confuse the System variables path with with the User variables
path. Add OpenSSL to the System variables path.
To encrypt your certificate into PKCS12 format:
1. Use OpenSSL to create the PKCS12-format certificate from the downloaded PEM-format
certificate.
openssl pkcs12 -export -in download.txt -inkey download.txt -out
certificate.p12
48
2. At the prompt, enter an Export Password for the certificate.
3. Save your Export Password.
Page 49

Importing Your Certificate
For either PayPal SDK for .NET or Classic ASP, you must download and execute the
Windows HTTP Services Certificate Configuration Tool, WinHTTPCertCfg. If you use the
.NET platform and develop with the PayPal SDK for .NET , you need to take a few more steps
before your certificate can be used.
You must use WinHTTPCertCfg to import the certificate into the Windows Certificate Store
and grant access to your private key to the user executing your web application. This is a
Windows requirement, not a PayPal requirement. You can download WinHTTPCertCfg
from the Microsoft Windows Server 2003 Resource Kit Tools page. For Microsoft
documentation, see WinHttpCertCfg.exe, a Certificate Configuration Tool.
To import a certificate:
1. Execute WinHTTPCertCfg to import the certificate into the Windows Certificate Store
and grant access to your private key to the party executing your web application.
WinHttpCertCfg -i certificate.p12 -p privateKeyPassword -c
where certificate is your PKCS12 certificate and privateKeyPassword is your Export
Password.
Obtaining API Credentials
Importing Your Certificate
2. Using WinHTTPCertCfg, change the username in LOCAL_MACHINE\My -a
username to one of the following values:
TABLE A.1
Configuration Username value
ASP. NET ASPNET
Windows IIS 5 default
configuration
Windows IIS 6 default
configuration
IWAM_machineName, where machineName is the computer
name
“NETWORK SERVICE” (You must include the quote
marks.)
Page 50

Obtaining API Credentials
Importing Your Certificate
50
Page 51

Error Messages
B
The table below lists error codes and the appropriate correction action.
TABLE B.1 Error Codes and the Corresponding Corrective Actions
Error Code Error Message Corrective Action (if applicable)
1 User authentication failed. Error is caused by one or more of the following:
Login information is incorrect. Verify that USER,
VENDOR, PARTNER, and PASSWORD have been
entered correctly. VENDOR is your merchant ID and
USER is the same as VENDOR unless you created a
Payflow Pro user. All fields are case sensitive.
Invalid Processor information entered. Contact
merchant bank to verify.
"Allowed IP Address" security feature implemented.
The transaction is coming from an unknown IP address.
See PayPal Manager online help for details on how to
use Manager to update the allowed IP addresses.
You are using a test (not active) account to submit a
transaction to the live PayPal servers. Change the host
address from the test server URL to the live server
URL.
2 Invalid tender type. Your merchant bank account does not support the
following credit card type that was submitted.
3 Invalid transaction type.
4 Invalid amount format. Transaction type is not appropriate for this transaction.
For example, you cannot credit an authorization-only
transaction.
5 Invalid merchant
information.
6 Invalid or unsupported
currency code
7 Field format error. Invalid information entered. See RESPMSG.
8 Not a transaction server
9 Too many parameters or
invalid stream
10 Too many line items
Processor does not recognize your merchant account
information. Contact your bank account acquirer to
resolve this problem.
Use valid currency code.
51
Page 52

Error Messages
T
ABLE B.1 Error Codes and the Corresponding Corrective Actions(Continued)
Error Code Error Message Corrective Action (if applicable)
11 Client time-out waiting for
response
12 Declined Check the credit card number, expiration date, and
transaction information to make sure they were entered
correctly. If this does not resolve the problem, have the
customer call their card issuing bank to resolve.
13 Referral. Transaction cannot be approved electronically but can
be approved with a verbal authorization. Contact your
merchant bank to obtain an authorization and submit a
manual Voice Authorization transaction.
14 Invalid Client Certification
ID.
19 Original transaction ID not
found.
20 Cannot find the customer
reference number
22 Invalid ABA number
23 Invalid account number. Check credit card number and re-submit.
24 Invalid expiration date. Check and re-submit.
25 Invalid Host Mapping. Error is caused by one or more of the following:
26 Invalid vendor account. Login information is incorrect. Verify that USER,
Check the HTTP header. If the tag, X-VPS-VITCLIENT-CERTIFICATION -ID, is missing, RESULT
code 14 is returned.
The transaction ID you entered for this transaction is
not valid. See RESPMSG.
Y ou are trying to process a tender type such as Discover
Card, but you are not set up with your merchant bank to
accept this card type.
You are trying to process an Express Checkout
transaction when your account is not set up to do so.
Contact your account holder to have Express Checkout
added to your account.
VENDOR, PARTNER, and PASSWORD have been
entered correctly. VENDOR is your merchant ID and
USER is the same as VENDOR unless you created a
Payflow Pro user. All fields are case sensitive.
27 Insufficient partner
permissions
28 Insufficient user permissions
29 Invalid XML document. This could be caused by an unrecognized XML tag or a
bad XML format that cannot be parsed by the system.
30 Duplicate transaction
52
Page 53

T
ABLE B.1 Error Codes and the Corresponding Corrective Actions(Continued)
Error Code Error Message Corrective Action (if applicable)
31 Error in adding the recurring
profile
32 Error in modifying the
recurring profile
33 Error in canceling the
recurring profile
34 Error in forcing the recurring
profile
35 Error in reactivating the
recurring profile
36 OLTP Transaction failed
37 Invalid recurring profile ID
50 Insufficient funds available
in account
Error Messages
51 Exceeds per transaction limit
99 General error. See RESPMSG.
100 Transaction type not
supported by host
101 Time-out value too small
102 Processor not available
103 Error reading response from
host
104 Timeout waiting for
processor response.
105 Credit error. Mak e sure you have not already credited this
106 Host not available
107 Duplicate suppression time-
out
Try your transaction again.
transaction, or that this transaction ID is for a creditable
transaction. (For example, you cannot credit an
authorization.)
53
Page 54

Error Messages
T
ABLE B.1 Error Codes and the Corresponding Corrective Actions(Continued)
Error Code Error Message Corrective Action (if applicable)
108 Void error. See RESPMSG. Make sure the transaction ID entered
has not already been voided. If not, then look at the
Transaction Detail screen for this transaction to see if it
has settled. (The Batch field is set to a number greater
than zero if the transaction has been settled). If the
transaction has already settled, your only recourse is a
reversal (credit a payment or submit a payment for a
credit).
109 Time-out waiting for host
response
110
111 C apture error. Either an attempt to capture a transaction that is not an
112 Failed AVS check. Address and ZIP code do not match. An authorization
113 Merchant sale total will
114 Card Security Code (CSC)
115 System busy, try again later
116 VPS Internal error. Failed to
117 Failed merchant rule check. One or more of the following three failures occurred:
Referenced auth (against
order) Error
authorization transaction type, or an attempt to capture
an authorization transaction that has already been
captured.
may still exist on the cardholder’s account.
exceed the sales cap with
current transaction. ACH
transactions only.
Mismatch. An authorization
may still exist on the
cardholder’s account.
lock terminal number
An attempt was made to submit a transaction that failed
to meet the security settings specified on the PayPal
Manager Security Settings page. If the transaction
exceeded the Maximum Amount security setting, then
no values are returned for AVS or CSC.
AVS validation failed. The AVS return value should
appear in the RESPMSG.
CSC validation failed. The CSC return value should
appear in the RESPMSG.
118 Invalid keywords found in
string fields
54
Page 55

T
ABLE B.1 Error Codes and the Corresponding Corrective Actions(Continued)
Error Code Error Message Corrective Action (if applicable)
119 General failure within PIM
Adapter
120 Attempt to reference a failed
transaction
121 Not enabled for feature
122 Merchant sale total will
exceed the credit cap with
current transaction. ACH
transactions only.
125 Fraud Protection Services
Filter — Declined by filters
Error Messages
126 Fraud Protection Services
Filter — Flagged for review
by filters
Result code 126 indicates
that a transaction triggered a
fraud filter. This is not an
error, but a notice that the
transaction is in a review
status. The transaction has
been authorized but requires
you to review and to
manually accept the
transaction before it will be
allowed to settle.
127 Fraud Protection Services
Filter — Not processed by
filters
128 Fraud Protection Services
Filter — Declined by
merchant after being flagged
for review by filters
131 Version 1 Payflow Pro SDK
client no longer supported.
Result code 126 is intended to give you an idea of the
kind of transaction that is considered suspicious to
enable you to evaluate whether you can benefit from
using the Fraud Protection Services.
To eliminate result 126, turn the filters off. For more
information, see the Fraud Protection Services
documentation for your payments solution. It is
available on the PayPal Manager Documentation page.
Upgrade to the most recent version of the Payflow Pro
client.
132 Card has not been submitted
for update
133 Data mismatch in HTTP
retry request
150 Issuing bank timed out
151 Issuing bank unavailable
55
Page 56

Error Messages
T
ABLE B.1 Error Codes and the Corresponding Corrective Actions(Continued)
Error Code Error Message Corrective Action (if applicable)
200 Reauth error
201 Order error
402 PIM Adapter Unavailable
403 PIM Adapter stream error
404 PIM Adapter Timeout
600 Cybercash Batch Error
601 Cybercash Query Error
1000 Generic host error. This is a generic message returned by your credit card
processor. The RESPMSG will contain more
information describing the error.
1001 Buyer Authentication
Service unavailable
1002 Buyer Authentication
Service — Transaction
timeout
1003 Buyer Authentication
Service — Invalid client
version
1004 Buyer Authentication
Service — Invalid timeout
value
1011 Buyer Authentication
Service unavailable
1012 Buyer Authentication
Service unavailable
1013 Buyer Authentication
Service unavailable
1014 Buyer Authentication
Service — Merchant is not
enrolled for Buyer
Authentication Service (3-D
Secure).
1016 Buyer Authentication
Service — 3-D Secure error
response received.
Instead of receiving a PARes response to a Validate
Authentication transaction, an error response was
received.
56
Page 57

T
ABLE B.1 Error Codes and the Corresponding Corrective Actions(Continued)
Error Code Error Message Corrective Action (if applicable)
Error Messages
1017 Buyer Authentication
Service — 3-D Secure error
response is invalid.
1021 Buyer Authentication
Service — Invalid card type
1022 Buyer Authentication
Service — Invalid or missing
currency code
1023 Buyer Authentication
Service — merchant status
for 3D secure is invalid
1041 Buyer Authentication
Service — Validate
Authentication failed:
missing or invalid PARES
1042 Buyer Authentication
Service — Validate
Authentication failed:
PARES format is invalid
1043 Buyer Authentication
Service — Validate
Authentication failed:
Cannot find successful
Verify Enrollment
An error response is received and the response is not
well formed for a Validate Authentication transaction.
1044 Buyer Authentication
Service — Validate
Authentication failed:
Signature validation failed
for PARES
1045 Buyer Authentication
Service — Validate
Authentication failed:
Mismatched or invalid
amount in PARES
1046 Buyer Authentication
Service — Validate
Authentication failed:
Mismatched or invalid
acquirer in PARES
57
Page 58

Error Messages
T
ABLE B.1 Error Codes and the Corresponding Corrective Actions(Continued)
Error Code Error Message Corrective Action (if applicable)
1047 Buyer Authentication
Service — Validate
Authentication failed:
Mismatched or invalid
Merchant ID in PARES
1048 Buyer Authentication
Service — Validate
Authentication failed:
Mismatched or invalid card
number in PARES
1049 Buyer Authentication
Service — Validate
Authentication failed:
Mismatched or invalid
currency code in PARES
1050 Buyer Authentication
Service — Validate
Authentication failed:
Mismatched or invalid XID
in PARES
1051 Buyer Authentication
Service — Validate
Authentication failed:
Mismatched or invalid order
date in PARES
1052 Buyer Authentication
Service — Validate
Authentication failed: This
PARES was already
validated for a previous
Validate Authentication
transaction
10001 Your payment can't be
processed right now. Please
try again later.
10004 Your payment can't be
processed. Please contact the
merchant directly with this
code.
Try again later.
There is a problem with your integration. Check the
parameters that you have supplied.
58
Page 59

T
ABLE B.1 Error Codes and the Corresponding Corrective Actions(Continued)
Error Code Error Message Corrective Action (if applicable)
Error Messages
10009 Your payment can't be
processed. Please contact the
merchant directly with this
code.
10010 Your payment can't be
processed. Please contact the
merchant directly with this
code.
10413 Your payment can't be
processed. Please contact the
merchant directly with this
code.
10500 Your payment can't be
processed. Please contact the
merchant directly with this
code.
10501 Your payment can't be
processed. Please contact the
merchant directly with this
code.
10502 Y our credit card has expired.
Please pay with a valid card.
Try again later.
Provide a valid invoice ID.
Subtotal, shipping, handling, and tax. Review the totals
in your integration.
You have not agreed to the billing agreement.
Billing agreement is disabled or inactive.
Credit card used has expired.
10504 Please enter a valid card
security code.
10505 Your payment can't be
processed. Please contact the
merchant directly with this
code.
10507 Your payment can't be
processed. Please contact the
merchant directly with this
code.
10508 Please enter a valid card
expiration date.
10509 Your payment can't be
processed. Please contact the
merchant directly with this
code.
CVV provided is invalid. The CVV is between 3-4
digits long.
Transaction was refused because the AVS response
returned the value of N, and the merchant account is not
able to accept such transactions.
Your PayPal account is restricted. Contact PayPal with
this error code.
Expiration date must be in the correct format.
PayPal was unable to determine the IP address of the
buyer.
59
Page 60

Error Messages
T
ABLE B.1 Error Codes and the Corresponding Corrective Actions(Continued)
Error Code Error Message Corrective Action (if applicable)
10511 Your payment can't be
processed. Please contact the
merchant directly with this
code.
10512 Please enter a first name. First name of the buyer is required.
10513 Please enter a last name. Last name of the buyer is required.
10520 Your payment can't be
processed. Please contact the
merchant directly with this
code.
10523 Your payment can't be
processed right now. Please
try again later.
10525 Please enter a valid amount. Verify your integration to ensure that the amounts are
10527 Please enter a valid card
number.
10534 Your payment can't be
processed. Please contact the
merchant directly with this
code.
Review the integration to ensure that a valid
PaymentAction value is supplied.
Amounts supplied do not match.
Try again later.
not zero.
Credit card entered is invalid.
Credit card entered is currently restricted by PayPal.
Contact PayPal with this error code.
10535 Please enter a valid credit
card number.
10536 Your payment can't be
processed. Please contact the
merchant directly with this
code.
10537 Your payment can't be
processed. Please contact the
merchant directly with this
code.
10538 Your payment can't be
processed. Please contact the
merchant directly with this
code.
10539 Your payment can't be
processed. Please contact the
merchant directly with this
code.
Credit card entered is invalid.
All shopping cart items must be in the same currency.
Transaction was declined by the country filter managed
by the merchant. To accept this transaction, change
your risk settings on PayPal.
Transaction was declined by the maximum amount
filter managed by the merchant. To accept this
transaction, change your risk settings on PayPal.
Transaction was declined by fraud filter managed by the
merchant. To accept this translation, change your risk
settings on PayPal.
60
Page 61

Error Messages
T
ABLE B.1 Error Codes and the Corresponding Corrective Actions(Continued)
Error Code Error Message Corrective Action (if applicable)
10540 Please enter a valid address. Transaction was declined by PayPal because of an
invalid address. Buyer should provide the correct
address.
10541 Please enter a valid credit
card number.
10542 Please enter a valid email
address.
10544 Your payment can't be
processed. Please contact the
merchant directly with this
code.
10545 Your payment can’t be
processed. Please pay with
another credit card.
10546 Your payment can't be
processed. Please contact the
merchant directly with this
code.
10547 Your payment can't be
processed. Please contact the
merchant directly with this
code.
10548 Your payment can't be
processed. Please contact the
merchant directly with this
code.
Credit card entered is currently restricted by PayPal.
Contact PayPal with this error code.
Email address is in an invalid format. Buyer should
provide the email address in the correct format.
Transaction was declined by PayPal. Contact PayPal
with this error code.
Transaction was declined by PayPal because of possible
fraudulent activity. Contact PayPal with this error code.
Transaction was declined by PayPal because of possible
fraudulent activity on the IP address. Contact PayPal
with this error code.
None - this is a PayPal internal error.
Merchant account attempting the transaction is not a
business account at PayPal. Check your account
settings.
10549 Your payment can't be
processed. Please contact the
merchant directly with this
code.
10550 Your payment can't be
processed. Please contact the
merchant directly with this
code.
10552 Your payment can't be
processed. Please contact the
merchant directly with this
code.
Merchant account attempting the transaction is not able
to process Direct Payment transactions. Contact PayPal
with this error code.
Access to Direct Payment was disabled for your
account. Contact PayPal with this error code.
Merchant account attempting the transaction does not
have a confirmed email address with PayPal. Check
your account settings.
61
Page 62

Error Messages
T
ABLE B.1 Error Codes and the Corresponding Corrective Actions(Continued)
Error Code Error Message Corrective Action (if applicable)
10553 Your payment can't be
processed. Please contact the
merchant directly with this
code.
10554 Your payment can't be
processed. Please contact the
merchant directly with this
code.
10555 Your payment can't be
processed. Please contact the
merchant directly with this
code.
10556 Your payment can't be
processed. Please contact the
merchant directly with this
code.
10557 Your payment can't be
processed. Please contact the
merchant directly with this
code.
10558 Your payment can't be
processed. Please contact the
merchant directly with this
code.
Merchant attempted a transaction where the amount
exceeded the upper limit for that merchant.
Transaction was declined because of a risk filter for
AVS. Specifically, the merchant has set to decline
transaction when the AVS returned a no match (AVS =
N).
Transaction was declined because of a risk filter for
AVS. Specifically, the merchant has set to decline
transaction when the AVS returned a partial match.
Transaction was declined because of a risk filter for
AVS. Specifically, the merchant has set to decline
transaction when the AVS was unsupported.
Check your payment receiving preferences. Contact
PayPal if you more help.
Credit card supplied cannot be charged in the currency
requested.
10560 Please enter a valid card
issue number.
10561 Please enter a complete
billing address.
10562 Please enter a valid year for
the credit card expiration
date.
10563 Please enter a valid month
for the credit card expiration
date.
10564 Your payment can't be
processed. Please contact the
merchant directly with this
code.
Buyer should enter a valid card number.
Buyer should enter the complete billing address.
Buyer should enter a valid year for card expiration.
Buyer should enter a valid month for card expiration.
A duplicate transaction was detected, advice buyer to
try again later.
62
Page 63

ABLE B.1 Error Codes and the Corresponding Corrective Actions(Continued)
T
Error Code Error Message Corrective Action (if applicable)
Error Messages
10565 Your payment can't be
processed. Please contact the
merchant directly with this
code.
10566 Your payment can't be
processed. Please pay with a
different card type.
10567 Please enter an issue number
or a start date.
10570 Your payment can’t be
processed. Please pay with
another credit card.
10701 Please enter a valid name for
the billing address.
10702 Please enter a valid address
in line 1 of the billing
address.
10703 Please enter a valid address
in line 2 of the billing
address.
10704 Please enter a valid city in
the billing address.
Merchant country is not supported.
Credit card type is not supported.
Buyer should enter an issue number or a start date.
Credit card supplied doesn’t support “Authorization”.
Buyer should enter a valid name in the billing address.
Buyer should enter a valid address in line 1 of the billing address.
Buyer should enter a valid address in line 2 of the billing address.
Buyer should enter a valid city in the billing address.
10705 Please enter a valid state in
the billing address.
10706 Please enter a valid ZIP code
in the billing address.
10707 Please enter a valid country
in the billing address.
10708 Please enter a complete
billing address.
10709 Please enter an address in
line 1 of the billing address.
10710 Please enter a city in the
billing address.
10711 Please enter a state in the
billing address.
10712 Please enter a valid postal
code in the billing address.
Buyer should enter a valid state in the billing address.
Buyer should enter a valid zip code in the billing
address.
Buyer should enter a valid country in the billing
address.
Buyer should enter the complete billing address.
Buyer should enter an address in line 1 of the billing
address.
Buyer should enter a city in the billing address.
Buyer should enter a state in the billing address.
Buyer should enter a valid zip code in the billing
address.
63
Page 64

Error Messages
ABLE B.1 Error Codes and the Corresponding Corrective Actions(Continued)
T
Error Code Error Message Corrective Action (if applicable)
10713 Please enter a country in the
billing address.
10714 Please enter a valid name in
the billing address.
10715 Please enter a valid state in
the billing address.
10716 Please enter a valid postal
code in the billing address.
10717 Please enter a valid postal
code in the billing address.
10718 Please enter a valid city in
the billing address.
10719 Please enter a valid
addressee name in the
shipping address.
10720 Please enter a valid address
in line 1 of the shipping
address.
10721 Please enter a valid address
in line 2 of the shipping
address.
Buyer should enter a country in the billing address.
Buyer should enter a valid name in the billing address.
Buyer should enter a valid state in the billing address.
Buyer should enter a valid zip code in the billing
address.
Buyer should enter a valid zip code in the billing
address.
Buyer should enter a valid city.
Buyer should enter a valid addressee name for shipping
address.
Buyer should enter a valid address in line 1 of the shipping address.
Buyer should enter a valid address in line 2 of the shipping address.
10722 Please enter a valid city in
the shipping address.
10723 Please enter a valid state in
the shipping address.
10724 Please enter a valid postal
code in the shipping address.
10725 Please enter a valid country
in the shipping address.
10726 Please enter a complete
shipping address.
10727 Please enter an address in
line 1 of the shipping
address.
10728 Please enter a city in the
shipping address.
Buyer should enter a valid city in the shipping address.
Buyer should enter a valid state in the shipping address.
Buyer should enter a valid postal code in the shipping
address.
Buyer should enter a valid country in the shipping
address.
Buyer should enter a complete shipping address.
Buyer should enter an address1 in the shipping address.
Buyer should enter a city in the shipping address.
64
Page 65

ABLE B.1 Error Codes and the Corresponding Corrective Actions(Continued)
T
Error Code Error Message Corrective Action (if applicable)
Error Messages
10729 Please enter a state in the
shipping address.
10730 Please enter a postal code in
the shipping address.
10731 Please enter a country in the
shipping address.
10732 Please enter a valid
addressee name in the
shipping address.
10733 Please enter a valid state in
the shipping address.
10734 Please enter a valid postal
code in the shipping address.
10735 Please enter a valid postal
code in the shipping address.
10736 Please enter a valid city and
state in the shipping address.
10744 Please enter a valid country
in the billing address.
Buyer should enter a state in the shipping address.
Buyer should enter a valid postal code in the shipping
address.
Buyer should enter a country in the shipping address.
Buyer should enter a valid addressee in the shipping
address.
Buyer should enter a valid state in the shipping address.
Buyer should enter a valid postal code in the shipping
address.
Buyer should enter a valid postal code in the shipping
address.
Buyer should enter a valid city and state in the shipping
address.
Buyer should enter a valid country in the billing
address.
10745 Please enter a valid country
in the shipping address.
10746 Your payment can't be
processed. Please contact the
merchant directly with this
code.
10747 Your payment can't be
processed. Please contact the
merchant directly with this
code.
10748 Please enter a card security
code.
10750 Please enter a valid state in
the shipping address.
10751 Please enter a valid state in
the billing address.
Buyer should enter a valid country in the shipping
address.
Credit card from this country is not supported.
Contact PayPal with this error code.
Buyer should enter a Card Security Code.
Buyer should enter a valid state in the shipping address.
Buyer should enter a valid state in the billing address.
65
Page 66

Error Messages
T
ABLE B.1 Error Codes and the Corresponding Corrective Actions(Continued)
Error Code Error Message Corrective Action (if applicable)
10752 Your payment can't be
processed. Please pay with
another card.
10754 Your payment can't be
processed. Please pay with
another card.
10755 Your payment can't be
processed. Please contact the
merchant directly with this
code.
10756 Your payment can't be
processed. Please pay with
another card.
10759 Your payment can't be
processed. Please pay with
another card.
10761 Your payment can't be
processed because this
transaction appears to be a
duplicate of a recent
transaction.
Transaction was declined by the issuing bank, not
PayPal. Buyer should attempt another card.
Buyer should use a different credit card.
Review your integration to ensure that the currency
code is supported.
Buyer should use a different credit card.
Transaction was declined by PayPal. Contact PayPal
with this error code.
Transaction was declined because PayPal is currently
processing a transaction by the same buyer for the same
amount. This error can occur when a buyer submits
multiple, identical transactions in quick succession.
10762 Your payment can't be
processed. Please pay with
another card.
10763 Your payment can't be
processed. Please contact the
merchant directly with this
code.
10764 Your payment can't be
processed. Please contact the
merchant directly with this
code.
11611 Your payment can't be
processed. Please contact the
merchant directly with this
code.
11998 Please enter the date when
your credit card became
valid.
Excessive CVV failures on the credit card. Buyer
should try a different card.
None - this is a PayPal internal error.
Transaction was declined by PayPal. Contact PayPal
with this error code.
Check your Fraud Management Filters.
Buyer should give the correct start date for their credit
card.
66
Page 67

T
ABLE B.1 Error Codes and the Corresponding Corrective Actions(Continued)
Error Code Error Message Corrective Action (if applicable)
Error Messages
12000 Your payment can't be
processed. Please contact the
merchant directly with this
code.
12001 Your payment can't be
processed. Please contact the
merchant directly with this
code.
15001 Your payment can't be
processed. Please pay with
another card.
15002 Your payment can't be
processed. Please pay with
another card.
15003 Your payment can't be
processed. Please contact the
merchant directly with this
code.
15004 Please enter a valid Card
Security Code.
15005 Your payment can't be
processed. Please pay with
another card.
This is related to insufficient 3DS parameters. Contact
PayPal with this error code.
This is related to insufficient 3DS parameters. Contact
PayPal with this error code.
Transaction was rejected by PayPal because of
excessive failures over a short period of time for this
credit card. Contact PayPal with this error code.
Transaction was declined by PayPal. Contact PayPal
with this error code.
Transaction was declined because the merchant does
not have a valid commercial entity agreement on file
with PayPal. Contact PayPal with this error code.
Transaction was declined because the CVV entered
does not match the credit card.
Transaction was declined by the issuing bank, not
PayPal. Buyer should attempt another card.
15006 Please enter a valid card
number.
15007 Your card is expired. Please
pay with a valid card.
15008 Your payment can't be
processed. Please contact the
merchant directly with this
code.
15009 Your payment can't be
processed. Please contact the
merchant directly with this
code.
99998 Your payment can't be
processed. Please contact the
merchant directly with this
code.
Transaction was declined by the issuing bank, not
PayPal. Buyer should attempt another card.
Transaction was declined by the issuing bank because
of an expired credit card. Buyer should attempt another
card.
Review your integration to ensure that the totals match.
There is a mismatch in the currency code. Contact
PayPal with this error code.
Credit card data is invalid. Contact PayPal with this
error code.
67
Page 68

Error Messages
68
Page 69

C
The table below lists all the currencies supported by PayPal.
TABLE C.1 Currency Codes
Currency Codes
Currency
Code Country Name
AUD Australian Dollar
CAD Canadian Dollar
CHF Swiss Franc
CZK Czech Koruna
DKK Danish Krone
EUR Euro
GBP British Pound Sterling
HKD Hong Kong Dollar
HUF Hungarian Forint
JPY Japanese Yen
NOK Norwegian Krone
NZD New Zealand Dollar
PLN Polish Zloty
SEK Swedish Krona
SGD Singapore Dollar
USD U.S. Dollar
Page 70

Currency Codes
70
Page 71

Index
Numerics
3-D Secure 7, 19
A
address_override 13
address1 13
address2 13
API integration 35
B
background 25
billing_address1 13
billing_address2 13
billing_city 13
billing_country 13
billing_first_name 13
billing_last_name 13
billing_state 13
billing_zip 13
BMCreateButton API 35, 36, 42
BMCreateButton API Operation 42
BMCreateButton Errors 43
BMCreateButton Request 42
BMCreateButton Request Fields 42
BMCreateButton Response 42
BMCreateButton Response Fields 42
bn 13
bodyBgColor 26
bodyBgImg 26
button 25
button hosting 35
clear text buttons 35
encrypted buttons 35
token buttons 35
Button Manager API 35
BUTTONCODE 42
BUTTONCODE=CLEARTEXT 35
BUTTONCODE=ENCRYPTED 35
BUTTONCODE=HOSTED 35
BUTTONCODE=TOKEN 35
BUTTONTYPE 42
BUTTONTYPE=PAYMENT 35
buyer_email 13
C
cancel_return 13
cbt 13
city 13
clear text buttons 35
CLEARTEXT 35
country 13
currency codes 69
currency_code 13
custom 14
customising payment page 17
customising your template 25
E
EMAILLINK 32, 36, 42
ENCRYPTED 35
encrypted buttons 35
encryption 39
error messages 51
F
first_name 14
footerTextColor 26
G
GetTransactionDetails API 47
H
handling 14
header 25
headerBgColor 26
71
Page 72

Index
headerHeight 26
HOSTED 35
HOSTEDBUTTONID 42
HTML integration 11
HTTP variables 13, 26
I
iFrames 29
API integration 31
manual integration 30
Instant Payment Notification (IPN) 45
integration
API 35
HTML 11
invoice 14
L
L_BUTTONVAR 42
last_name 14
lc 14
logoFont 26
logoFontColor 26
logoFontSize 26
logoImage 26
logoImagePosition 26
logoText 26
M
METHOD 42
modifying account settings 17
orderSummaryBgImage 26
overview 7
P
pageButtonBgColor 26
pageButtonTextColor 26
pageTitleTextColor 26
paymentaction 15
PCI complicance 7
preview 22
private key 39
public key 39
R
return 15
S
save and publish 22
sectionBorder 26
settings 17
shipping 15
showBillingAddress 27
showBillingEmail 27
showBillingPhone 27
showCustomerName 27
showHostedThankyouPage 27
showShippingAddress 27
simple integration 11
state 15
subheaderText 27
subtotal 15
72
N
night_phone_a 14
night_phone_b 14
night_phone_c 14
notify_url 14
O
optional API operations 47
order processing 45
orderSummaryBgColor 26
T
tax 15
template 27
title 25
TOKEN 35
token buttons 35
transaction status 45
Page 73

W
WEBSITECODE 32, 38, 42
Z
zip 15
Index
73
 Loading...