

Page 1

Virtual Terminal
User’s Guide
For Professional Use Only
Currently only available in English.
A usage Professional Uniquement
Disponible en Anglais uniquement pour l’instant.
Last updated: August 2009
Page 2

PayPal Virtual Terminal User’s Guide
Document Number: 10061.en_US-200908
© 2009 PayPal, Inc. All rights reserved. PayPal is a registered trademark of PayPal, Inc. The PayPal logo is a trademark of PayPal, Inc. Other
trademarks and brands are the property of their respective owners.
The information in this document belongs to PayPal, Inc. It may not be used, reproduced or disclosed without the writ ten approval of PayPal, Inc.
Copyright © PayPal. All rights reserved. PayPal (Europe) S.à r.l. et Cie., S.C.A., Société en Commandite par Actions. Registered office: 22-24 Boulevard
Royal, L-2449, Luxembourg, R.C.S. Luxembourg B 118 349.
Consumer advisory: The PayPal™ payment service is regarded as a stored value facility under Singapore law. As such, it does not require the approval
of the Monetary Authority of Singapore. You are advised to read the terms and conditions carefully.
Notice of non-liability:
PayPal, Inc. is providing the information i n this document t o you “AS-IS” with all faults. PayPal, Inc. makes no warranties of any kind (whether express,
implied or statutory) with respect to the information co ntained herein. PayPal, Inc. assumes no liability for damages (whether direct or indirect), caused
by errors or omissions, or resulting from the use of this document or the information co ntained in this d ocument or resulting f rom the ap plication or use
of the product or service described herein. PayPal, Inc. reserves the right to make changes to any information herein without further notice.
Page 3

Preface
P
About This Guide
The PayPal Virtual T erminal User’s Guide describes how to set up and use V irtual Terminal to
process credit card transactions online. It includes information about:
z capturing, voiding, refunding, and creating new transactions.
z withdrawing funds from your PayPal account.
z security features to prevent credit card fraud.
z errors encountered while using the Virtual Terminal.
z canceling Virtual Terminal account.
z reactivating Virtual Terminal account.
Intended Audience
This guide is for merchants that receive orders by phone, fax, card reader, or by mail and want
to use Virtual Terminal to process credit cards.
Documentation Feedback
Help us improve this guide by sending feedback to:
documentationfeedback@paypal.com
Virtual Terminal User’s Guide 3
Page 4

Preface
P
Documentation Feedback
4 Virtual Terminal User’s Guide
Page 5

Contents
Preface . . . . . . . . . . . . . . . . . . . . . . . . . . . . . . . . . . 3
About This Guide. . . . . . . . . . . . . . . . . . . . . . . . . . . . . . . . . . . . . . . . 3
Intended Audience . . . . . . . . . . . . . . . . . . . . . . . . . . . . . . . . . . . . . . . 3
Documentation Feedback . . . . . . . . . . . . . . . . . . . . . . . . . . . . . . . . . . . 3
Chapter 1 Getting Started with Virtual Terminal . . . . . . . . . . . . 7
What is Virtual Terminal . . . . . . . . . . . . . . . . . . . . . . . . . . . . . . . . . . . . 7
Features and Benefits . . . . . . . . . . . . . . . . . . . . . . . . . . . . . . . . . . . . . 7
Chapter 2 Security Features . . . . . . . . . . . . . . . . . . . . . . 9
Card Security Code . . . . . . . . . . . . . . . . . . . . . . . . . . . . . . . . . . . . . . 9
Address Verification System . . . . . . . . . . . . . . . . . . . . . . . . . . . . . . . . . . 9
Chapter 3 Setting Up Your Account Before Using Virtual Terminal . .11
Adding a Bank Account . . . . . . . . . . . . . . . . . . . . . . . . . . . . . . . . . . . 11
Confirming Contact Information . . . . . . . . . . . . . . . . . . . . . . . . . . . . . . . 12
Verifying an Extended Credit Card Name . . . . . . . . . . . . . . . . . . . . . . . . . . 12
Granting Secondary Access to Virtual Terminal . . . . . . . . . . . . . . . . . . . . . . . 13
Revoking Secondary Access to Virtual Terminal. . . . . . . . . . . . . . . . . . . . . . . 13
Chapter 4 Performing Transactions Using Virtual Terminal . . . . . . 15
Accessing Virtual Terminal . . . . . . . . . . . . . . . . . . . . . . . . . . . . . . . . . . 15
Processing a Virtual Terminal Transaction. . . . . . . . . . . . . . . . . . . . . . . . . . 15
Enter your order page . . . . . . . . . . . . . . . . . . . . . . . . . . . . . . . . . . 16
Review your order page . . . . . . . . . . . . . . . . . . . . . . . . . . . . . . . . . 19
Transaction confirmation page. . . . . . . . . . . . . . . . . . . . . . . . . . . . . . 20
Chapter 5 Performing Secondary Tasks Using Existing Transactions .23
Capturing an Authorization. . . . . . . . . . . . . . . . . . . . . . . . . . . . . . . . . . 23
Voiding an Authorization . . . . . . . . . . . . . . . . . . . . . . . . . . . . . . . . . . . 24
Virtual Terminal User’s Guide 5
Page 6

Contents
Processing a Refund. . . . . . . . . . . . . . . . . . . . . . . . . . . . . . . . . . . . . 24
Creating a New Transaction Using Data from a Previous Transaction . . . . . . . . . . . 25
Chapter 6 Withdrawing Funds . . . . . . . . . . . . . . . . . . . . .27
Requesting an Electronic Funds Transfer . . . . . . . . . . . . . . . . . . . . . . . . . . 27
Withdrawing Funds by Check . . . . . . . . . . . . . . . . . . . . . . . . . . . . . . . . 27
Chapter 7 Virtual TerminalResponse Codes and Messages . . . . . .29
System Response Codes . . . . . . . . . . . . . . . . . . . . . . . . . . . . . . . . . . 29
Card Security Code Responses . . . . . . . . . . . . . . . . . . . . . . . . . . . . . . . 42
Address Verification System Responses. . . . . . . . . . . . . . . . . . . . . . . . . . . 43
Chapter 8 Canceling or Reactivating Your Virtual Terminal Service . .45
Canceling Your Virtual Terminal Service. . . . . . . . . . . . . . . . . . . . . . . . . . . 45
Reactivating Your Virtual Terminal Service. . . . . . . . . . . . . . . . . . . . . . . . . . 45
6 Virtual Terminal User’s Guide
Page 7

Getting Started with Virtual
1
Terminal
What is Virtual Terminal
PayPal’s Virtual Terminal is a web-based application that allows you access through your
PayPal account to accept credit card payments. It provides your business with the functionality
similar to a stand-alone credit card-processing terminal. Virtual Terminal is ideal for
merchants that receive orders by phone, fax, card reader, or by mail and want to accept credit
cards.
You can use Virtual Terminal on any computer with an internet connection and a web browser .
NOTE:For best performance, use Internet Explorer 6.0, Netscape Navigator 7.0, or FireFox
1.0.
Features and Benefits
Here are the features and benefits of Virtual Terminal:
z Grow your business - Accept orders and process payments for major credit cards. Extend
your reach to customers who prefer not to pay online, including customers who do not have
a PayPal account.
z Use PayPal as a one-stop payment solution - Process your customers’ orders through a
PayPal-hosted online payment form. You do not need a separate merchant account.
z Keep costs low - Pay the same low processing rate for all card types.
NOTE:PayPal’s Seller Protection Policy does not apply to transactions processed using V irtual
Terminal.
Virtual Terminal User’s Guide 7
Page 8

Getting Started with Virtual Terminal
Features and Benefits
8 Virtual Terminal User’s Guide
Page 9

Security Features
2
When you process an order with Virtual Terminal, PayPal verifies the customer’s credit card
and billing address to prevent credit card fraud.
This chapter discusses the security features PayPal uses to verify this information:
z Card Security Code
z Address Verification System
Card Security Code
Card security code (CSC) is an anti-fraud security feature. It helps to protect against fraud by
helping to ensure that a person cannot use credit card details to make a transaction without
being in possession of the actual card itself.
When you process an order using the Virtual Terminal, you enter the credit card’s CSC on the
Enter your order page.
z For Visa, MasterCard, and Discover, three-digit CSC is printed on the back of the card
immediately next to the card’s account number.
z For American Express, the four-digit CSC is printed on the front of the card above the
card’s account number.
When you finish entering an order in Virtual Terminal, the CSC you entered is checked by
PayPal and a CSC response code is displayed. This code tells you about the status of the CSC
check. For details about what the codes mean, see “Card Security Code Responses” on
page 42.
Address Verification System
Address Verification System (AVS) matches the number portion of the customer’s billing
address that is on file at the cardholder’s issuing bank against the billing address you enter in
Virtual Terminal. If the information does not match, the transaction is declined.
NOTE:AVS is primarily available for US-based cards, with limited international support.
When you finish entering an order in Virtual Te rminal, PayPal perform s the AVS match and an
AVS response code is displayed. The code tells you what part of the entered customer’s billing
address was matched by AVS. If you want to only accept AVS positive transactions, then you
should process Authorization and Capture transactions based on the response. For details
about what the codes mean, see “Address Verification System Responses” on page 43.
Virtual Terminal User’s Guide 9
Page 10

Security Features
Address Verification System
10 Virtual Terminal User’s Guide
Page 11

Setting Up Your Account Before
3
Using Virtual Terminal
Before you start processing transactions using the Virtual Terminal, PayPal recommends you
make some changes to your account settings.
This chapter contains information about tasks you should perform before using Virtual
Terminal. The tasks are:
z Adding a Bank Account
z Confirming Contact Information
z Verifying an Extended Credit Card Name
z Granting Secondary Access to Virtual Terminal
z Revoking Secondary Access to Virtual Terminal
Adding a Bank Account
To add a ban k account to your PayPal account:
1. Log in to your PayPal account at
2. Click the Add a bank link in the Next Steps box.
3. On the Link your bank account page, complete the fields, and click Continue.
NOTE:You must confirm your bank account before you can add funds to your PayPal
account. PayPal automatically sends two deposits to bank account you have added.
The amount of each deposit is between 0.01 and 0.99 and usually appears in your
account in 2-3 business days.
4. Once you have received the two deposits, log in to your PayPal account, and then click the
Confirm Bank Account link in the Next Page box.
5. Enter the deposit amounts on the Confirm Bank Account page, and then click Submit.
Once you have confirmed your bank account, you can access your funds by requesting an
electronic funds transfer or a check.
https://www.paypal.com.
Virtual Terminal User’s Guide 11
Page 12

Setting Up Your Account Before Using Virtual Terminal
Confirming Contact Information
Confirming Contact Information
Before you start processing transactions using the Virtual Terminal, verify that your business
contact information is correct and complete under the Profile tab. Accurate information
ensures that customers can contact you about their purchases and that PayPal can contact you
regarding your account, if needed.
To verify and update your business contact information:
1. Log in to your PayPal account at
2. Click the Profile tab.
3. In the Account Information column, click Business Information.
4. On the Review your information page, verify the contact information.
5. If you need to make modifications, click Edit and enter your updated information. Make
sure that the following information is accurate:
– Customer Service email - This email address is included in emails from PayPal to your
customers. Customers may use this email to contact you.
– Customer Service phone -This phone number is printed on customers’ credit card
statements. Customers may use this number to contact you.
6. Click Save.
https://www.paypal.com.
Verifying an Extended Credit Card Name
The extended credit card name is the business name that appears on your customers’ credit
card statements along with the amount of the Virtual Terminal transaction.
The name can be up to 19 characters long, including spaces, and should include alpha and
numeric characters only . The name is printed in all caps on credit card statements and might be
truncated by some card processors.
To set up your extended credit card name:
1. Log in to your PayPal account at
2. Click the Profile subtab.
3. In the Security and Risk Settings column, click the Payment Receiving Preferences
link.
4. In the Extended Credit Card Statement Name field, enter your business name as you
want it to appear on your customers’ credit card statements.
5. Click Save.
12 Virtual Terminal User’s Guide
https://www.paypal.com.
Page 13

Setting Up Your Account Before Using Virtual Terminal
Granting Secondary Access to Virtual Terminal
Granting Secondary Access to Virtual Terminal
By default, Virtual Terminal is set up so that a single user can process transactions. However,
you can provide multiple users (such as employees) with the ability to process transactions
using V irtual Terminal. To do this , add them to your account as secondary users and then grant
them permission to use Virtual Terminal through PayPal’s Multi-User Access feature.
Multi-User Access enables you to grant multiple secondary users various levels of access to a
single PayPal account. You can add up to 200 secondary users to your PayPal account.
NOTE:The account owner is the only user on the account that can change the secondary users’
access privileges.The secondary users do not have full access to all features of your
PayPal account, they only have access to the features you grant them access to.
To grant a secondary user access to Virtual Terminal:
1. Log in to your PayPal account at
2. Click the Profile tab.
3. In the Account Information column, click the Manager Users link to view all your
current users.
4. On the Manager Users page, click Add User to add secondary users.
5. On the Add Users page, enter the user’s name, user ID, and password in the appropriate
fields.
6. Select the Virtual Terminal checkbox.
7. Click Save.
The user is added to your account as a secondary user with permission to use Virtual Terminal.
https://www.paypal.com.
Revoking Secondary Access to Virtual Terminal
For security reasons, you may need to revoke a user’s access to Virtual Terminal.
To revoke a user’s access to Virtual Terminal:
1. Log in to your PayPal account at
https://www.paypal.com.
2. Click the Profile tab.
3. In the Account Information column, click the Manager Users link.
4. Select the user whose access you wish to revoke, and click Edit.
5. On the Edit User Access page, deselect Virtual Terminal.
6. Click Save.
Virtual Terminal User’s Guide 13
Page 14

Setting Up Your Account Before Using Virtual Terminal
Revoking Secondary Access to Virtual Terminal
Once you revoke the privileges, the selected user is no longer be able to access Virtual
Terminal or process Virtual Terminal transactions.
14 Virtual Terminal User’s Guide
Page 15

Performing Transactions Using
4
Virtual Terminal
This chapter provides detailed instructions for performing transactions using the Virtual
Terminal. It contains the following information:
z Accessing Virtual Terminal
z Processing a Virtual Terminal Transaction
Accessing Virtual Terminal
After setting up your account to use Virtual Terminal, you are ready to process transactions.
You can access the Virtual Terminal by logging into your PayPal account at:
https://www.paypal.com
Processing a Virtual Terminal Transaction
This section explains how to perform a Sale, an Authorization, or a Credit (if applicable)
transaction using the Virtual Terminal.
Processing an order using the Virtual Terminal is a three-step process:
1. Enter the transaction information on the Enter your order page.
2. Verify the information and submit the transaction on the Review your order page.
3. If the transaction is successful, view the transaction details on the Transaction
confirmation page.
Virtual Terminal User’s Guide 15
Page 16

Performing Transactions Using Virtual Terminal
Processing a Virtual Terminal Transaction
Enter your order page
Perform the following steps on the Enter your order page to process a transaction.
FIGURE 4.1 Enter your order page
1. Complete the fields in the payment details section:
– Currency - Select the currency type of the transaction from the drop-down menu.
– Net amount - Enter the payment amount for the item, without shipping charges and
taxes.
– Shipping- Enter the shipping charges for the transaction. If you want to apply taxes to
the shipping amount, select the Apply tax to shipping checkbox.
– Tax rate- Enter the sales tax rate for the transaction.
– Tax amount- The tax amount is automatically calculated based on the numbers you
entered in the fields above.
– Total - The total amount that the customer will be charged for the transaction is
automatically calculated based on the numbers you entered in the fields above.
– Description - Provide details about this transaction for future reference. You can use this
information to search for the transaction at a later time.
NOTE:This information does not appear on your credit card statement.
– Invoice ID - Enter a unique (non-repeated) alpha, numeric, or alpha-numeric value to
prevent accidental payments (by blocking duplicate invoice IDs). The Block Accidental
Payments setting can be modified under Profile > Security and Risk Settings >
Payment Receiving Preferences > Block Accidental Payments. The default is set to
16 Virtual Terminal User’s Guide
Page 17

Performing Transactions Using Virtual Terminal
Processing a Virtual Terminal Transaction
Yes. If reset, it can be used for any information without any unique, or alpha, numeric
requirements.
NOTE:Regardless of the setting, this information does not appear on your credit card
statement. Also, this field does not appear if you are performing a Credit
transaction.
2. Select a transaction type and enter the credit card information for the transaction.
– Transaction type - Select Sale, Credit (if applicable), or Authorization from the drop-
down menu.
Sale - Instantly charges the specified amount against the account and marks the
transaction for immediate funds transfer (capture) during the next settlement period.
Use this option if you plan to ship or deliver items within 24 hours. This option is
commonly used by small and medium sized merchants.
Credit - Returns a specific amount to a transaction or credit card that was not originally
processed through your PayPal Virtual Terminal account. If you want to credit a
transaction that was processed using your PayPal Virtual Terminal account, refer to
“Processing a Refund” on page 24. Depending on your account, you may not have
access to this option. Contact PayPal Customer Service for additional information, or to
see if your account is eligible for Credit transactions.
Authorization - Initiates the transaction but collects the payment later. It is the first part
of a two-step process primarily used by large merchants who require greater flexibility
when processing payments. The first step, Authorization, sends a request to verify that
the credit card has sufficient funds and reserves the requested amount. If sufficient
funds are available, the second step is to manually capture the funds. You can capture a
transaction amount that differs slightly from the amount that was originally authorized.
This process enables the merchant to modify the order amount to reflect changes (such
as taxes, shipping, or item availability) that occur after the initial order is placed. To
learn more, see “Capturing an Authorization” on page 23
– Card type - Select a card type from the drop-down menu. Only the cards listed in the
drop-down menu are supported.
– Card number - Enter the card number without any spaces or dashes.
– Expiration date- Enter the card expiration date in the following format: mm/yyyy.
– CSC - Enter the credit card’s card security code to verify that the customer is in
possession of the actual credit card. For V isa, MasterCard, and Discover, this three-digit
number appears on the back of the card after the credit card number. For American
Express, this four-digit number appears on the front of the card above the credit card
number. For complete details, refer to “Card Security Code” on page 9.
3. Complete the billing information section.
IMPORTANT: This is the address where the customer receives their credit card
statements.
– First name - Enter the billing contact’s first name.
– Last name - Enter the billing contact’s last name.
– Country - Select the billing contact’s country of residence from the drop-down menu.
Virtual Terminal User’s Guide 17
Page 18

Performing Transactions Using Virtual Terminal
Processing a Virtual Terminal Transaction
– Billing address- Enter the street number and name of the billing address.
– City - Enter the city of the billing address.
– State - Select the state of the billing address from the drop-down menu.
– Zip- Enter the zip code of the billing address.
– Phone - Enter the phone number of the billing contact.
– Email -Enter the email address of the billing contact.
4. Select one of the following shipping options:
– No shipping address required if you are not shipping anything for this transaction.
– Shipping address is the same as billing address if the billing and shipping addresses
are the same.
– Enter a different shipping addr ess if your billing and shipping addresses are dif ferent.
This option displays the fields of the shipping address where you enter the shipping
address information. Refer to the billing information above for details regarding the
fields.
NOTE:The shipping options section does not appear if you are performing a Credit
transaction.
5. Click Review to proceed to the Review your order page to verify the information you
entered.
NOTE:If the information is incorrectly entered in the fields, you will see the corresponding
error messages on the Enter your order page when you click Review. Correct
these errors using the suggestions in the error messages and click Review again.
18 Virtual Terminal User’s Guide
Page 19
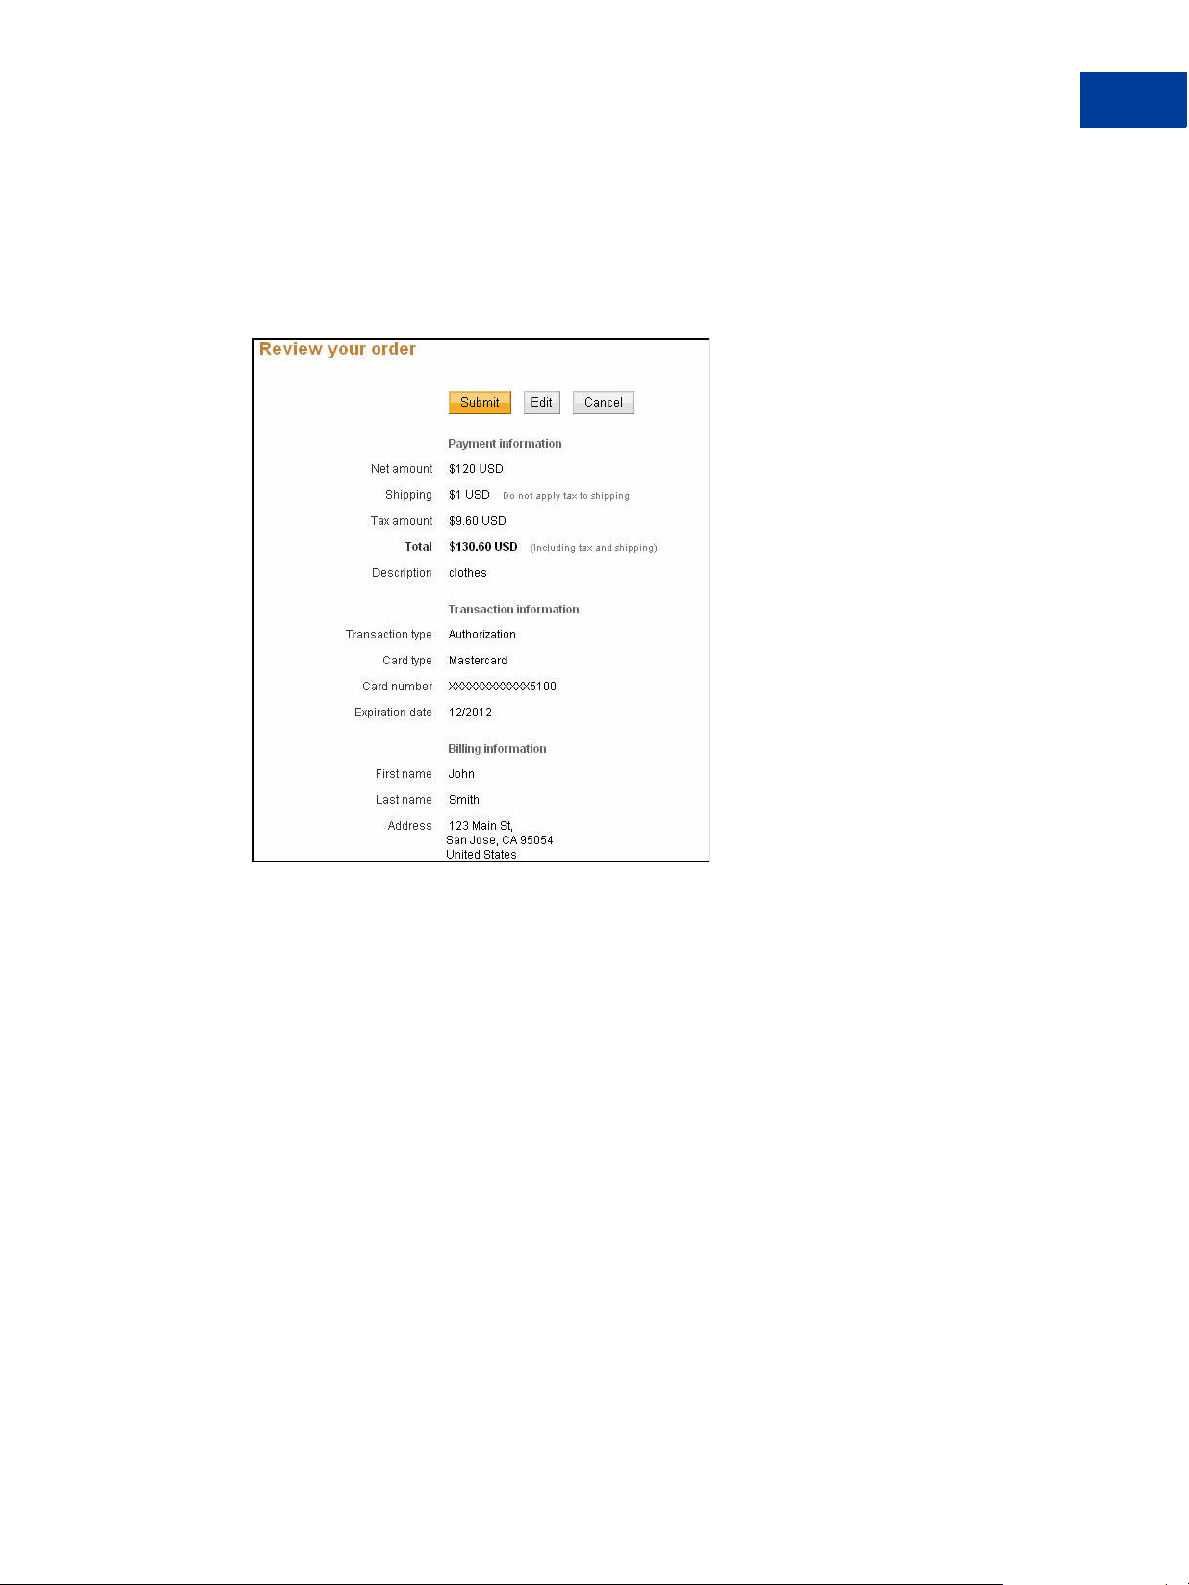
Review your order page
The Review your order page displays the information you input on the Enter your order
page.
FIGURE 4.2 Review your order page
Performing Transactions Using Virtual Terminal
Processing a Virtual Terminal Transaction
Verify the information on this page. Click Edit to return to the previous page to make
modifications or click Submit to process the transaction.
Virtual Terminal User’s Guide 19
Page 20

Performing Transactions Using Virtual Terminal
Processing a Virtual Terminal Transaction
Transaction confirmation page
The Transaction confirmation page appears when your transaction is successfully submitted.
FIGURE 4.3 Transaction confirmation page
If the transaction is not successful, you are returned to the Enter your order page instead.
There you can review the error messages and make the appropriate modifications to process
the transaction again.
The Transaction confirmation page contains the following information:
z Transaction ID - Identification number tha t PayPal assigns to each transaction. Click on
the Transaction ID to access the Transaction Details page for more information about the
transaction. On the Transaction Details page, you can perform secondary tasks such as
Void, Capture, Refund or create a new transaction based on the information provided for
this transaction.
z Date and time - Date and time of the transaction (in PST).
z Transaction type - Type of transaction performed. For example, Authorization.
z Card type - Type of credit card used for the transaction. For example, MasterCard.
z Card number - Number of the credit card used for the transaction. For security reasons,
only the last four digits are identifiable.
z Total - Monetary amount of the transaction including any shipping charges and/or taxes, if
applicable.
You can also perform the following tasks on this page:
z Enter transaction - Return to the Enter your order page to perform a new transaction.
z Print receipt - View and print a receipt of the transaction.
20 Virtual Terminal User’s Guide
Page 21

Performing Transactions Using Virtual Terminal
Processing a Virtual Terminal Transaction
z Print packing slip - Print a packing slip to include with the shipment. This is the same as
the receipt, however, it does not include the monetary amount of the transaction. If you
included information such as invoice ID and description during the transaction, it is
displayed on the packing slip.
Virtual Terminal User’s Guide 21
Page 22

Performing Transactions Using Virtual Terminal
Processing a Virtual Terminal Transaction
22 Virtual Terminal User’s Guide
Page 23

Performing Secondary Tasks
5
Using Existing Transactions
After submitting a successful transaction, you can perform several secondary tasks on that
transaction. This chapter provides information about the following secondary tasks:
z Capturing an Authorization
z Voiding an Authorization
z Processing a Refund
z Creating a New Transaction Using Data from a Previous Transaction
Capturing an Authorization
If you have performed an Authorization transaction, you must captu r e the funds in order to
receive payment.
NOTE:PayPal recommends that you capture payments within three days of the original
authorization.
To capture an Authorization transaction:
1. Log in to your PayPal account at
2. Click the History tab.
3. Click the Capture button associated with the transaction you want to capture.
4. Review the information on the Capture Funds page, input the amount to capture, and click
Continue.
5. On the Confirm Capture of Funds page, click Capture Funds.
The funds are transferred to your PayPal account.
NOTE:After performing an Authorization transaction using the Virtual Terminal, you can
immediately perform a capture by clicking the Transaction ID on the Transaction
confirmation page. Follow step 2 above to capture the transaction.
https://www.paypal.com.
Virtual Terminal User’s Guide 23
Page 24

Performing Secondary Tasks Using Existing Transactions
Voiding an Authorization
Voiding an Authorization
If you initiated an authorization, and now want to refund the customer, you must void the
authorization. Voids are available on Authorization transaction types only. After you void an
Authorization transaction, you cannot capture any funds associated with that transaction, and
the funds are returned to the customer.
NOTE:Voiding an authorization cancels the entire open amount.
You can initiate a void if:
z the authorization is pending.
z the authorized amount was captured at less than 100%.
To void an Authorization transaction:
1. Log in to your PayPal account at
2. Click the History tab.
3. Click the Details button associated with the authorization you want to void.
4. On the T ransaction Details page, click on the Void button associated with the
authorization.
5. Verify the void details on the Void Authorization section. Optionally add a note to the
buyer explaining the void, and click Continue.
6. On the Confirm Void page, click Void.
NOTE:After performing an authorization using the Virtual Terminal, you can immediately
perform a void action by clicking the Transaction ID on the Transaction confirmation
page. Follow the step 3 above to void the transaction.
Processing a Refund
If you want to refund a customer for a successful Sale transaction you previously processed,
you must process a refund. You can send your customer a refund within 60 days after
receiving the original payment by clicking the Issue Refund link on the Transaction Details
page. After 60 days of receiving the payment, you need use the Send Money tab to send the
refund.
https://www.paypal.com.
To send a refund within 60 days of receiving the original payment:
1. Log in to your PayPal account at
https://www.paypal.com.
2. Click the History tab.
3. Find the payment you would like to refund and click Details to open the Transaction
Details page.
24 Virtual Terminal User’s Guide
Page 25

Performing Secondary Tasks Using Existing Transactions
Creating a New Transaction Using Data fro m a Prev ious Transaction
4. On the T ransaction Details page, click Issue Refund.
5. Enter the full or a partial refund amount and an optional message to the customer, and click
Continue. Be sure that the refund amount does not exceed the original amount.
6. On the Review and process refund page, verify the refund amount and click Issue
Refund.
The original transaction fee is credited back to you when you perform a refund within 60 days
of receiving payment. If you perform a partial refund, a portion of the transaction fee will be
credited back to you.
To send a refund after 60 days of receiving payment:
1. Log in to your PayPal account at
2. Click the Send Money tab.
3. Enter the required information and click Continue.
4. Review the information on the confirmation page and click Send Money to complete your
transaction.
https://www.paypal.com.
Creating a New Transaction Using Data from a Previous
Transaction
PayPal enables you to use information stored from a previous transaction to quickly create a
new transaction. The transaction data from a previous transaction of your choice is
automatically transferred to populate the fields of the order page in V irtual Terminal for a new
transaction.
NOTE:Depending on your account, you may not have access to this option. Contact PayPal
Customer Service for additional information, or to see if you r acount is eligible for
such transactions.
To create a new transaction using information provided for a previously submitted transaction:
1. Log in to your PayPal account at
2. Click the History tab.
3. Find the transaction you want to use to create a new transaction and click the corresponding
Details button to open the Transaction Details page of that transaction.
4. Click the Create a Transaction link. The Create a New Order page appears. Some of the
fields are pre-populated with information from the original transaction, although you can
change them.
5. Refer to the field descriptions in the Processing a Virtual Terminal Transaction section to
complete the order form. For the credit card field on the Create a New Order page, select
one of the following options:
Virtual Terminal User’s Guide 25
https://www.paypal.com.
Page 26

Performing Secondary Tasks Using Existing Transactions
Creating a New Transaction Using Data from a Previous Transaction
– Keep existing - If you want to use the credit card used for the original transaction. The
last four digits of the credit card number and the expiration date are displayed. You can
modify the expiration date.
– Enter a new credit card - If you want to use a different credit card for this transaction,
but keep all the customer information associated with the previous transaction. Enter the
credit card number, expiration date, and CSC for that card.
6. Review the information, and submit the transaction.
You have successfully created and submitted a new transaction using the data of an existing
transaction.
26 Virtual Terminal User’s Guide
Page 27

Withdrawing Funds
6
This chapter discusses two methods for withdrawing funds associated with your Virtual
Terminal transactions.
In order to withdraw funds, you must have a bank account associated with your PayPal
account. You can do this by following the instructions in the Adding a Bank Account section.
If you already have a bank account associated with your PayPal account, you can withdraw
funds using one of the following options:
z Requesting an Electronic Funds Transfer
z Withdrawing Funds by Check
Requesting an Electronic Funds Transfer
If you have a confirmed bank account associated with your PayPal account, you can withdraw
funds from your PayPal account by requesting an electronic funds transfer.
To request an electronic funds transfer:
1. Log in to your PayPal account at
2. Click the My Account tab.
3. Click the Withdraw subtab.
4. Click Withdraw funds to your bank account link.
5. Choose the bank account to which you would like to withdraw the funds to, enter the
amount, and then click Continue.
6. Review the details of your transaction, and then click Submit.
The funds should appear in your bank account balance in 3-4 business days.
Withdrawing Funds by Check
If you have a confirmed bank account associated with your PayPal account, you can withdraw
funds from your PayPal account by requesting a check.
To withdraw funds by check:
1. Log in to your PayPal account at
https://www.paypal.com.
https://www.paypal.com.
2. Click the My Account tab.
Virtual Terminal User’s Guide 27
Page 28

Withdrawing Funds
Withdrawing Funds by Check
3. Click the Withdraw subtab.
4. Click the Request a check from PayPal link.
5. Enter the requested information on the Withdraw Funds by Check page.
6. Click the Continue button.
NOTE:Please allow 1-2 weeks to receive your check. If you have not received your check
after 14 business days, contact PayPal Customer Service.
28 Virtual Terminal User’s Guide
Page 29

Virtual TerminalResponse Codes
7
and Messages
This chapter contains the Virtual Terminal response codes that may appear on the Virtual
Terminal pages. They are arranged in the following categories:
z System Response Codes
z Card Security Code Responses
z Address Verification System Responses
System Response Codes
This section contains the system response codes and their corresponding messages.
TABLE 7.1 Virtual Terminal Response Codes
Error
Code Short Message Long Message Corrective Action
10102 PaymentAction of Order
Tem porarily Unavailable
10401 Transaction refused because of an
invalid argument. See additional
error messages for details.
10418 Transaction refused because of an
invalid argument. See additional
error messages for details.
10426 Transaction refused because of an
invalid argument. See additional
error messages for details.
10427 Transaction refused because of an
invalid argument. See additional
error messages for details.
10428 Transaction refused because of an
invalid argument. See additional
error messages for details.
10429 Transaction refused because of an
invalid argument. See additional
error messages for details.
PaymentAction of Order is
temporarily unavailable. Please
try later or use other
PaymentAction.
Order total is missing. Enter an order total.
The currencies of the shopping
cart amounts must be the same.
Item total is invalid. Enter a valid number of items.
Shipping total is invalid. Enter a valid number for
Handling total is invalid. Enter a valid number for
Tax tot al is inval id. Enter a valid number for tax
Use another PaymentAction or
try again after some time.
Use the same currency for the
shopping cart.
shipping total.
handling total.
total.
Virtual Terminal User’s Guide 29
Page 30

Virtual TerminalResponse Codes and Messages
System Response Codes
T
ABLE 7.1 Virtual Terminal Response Codes
Error
Code Short Message Long Message Corrective Action
10432 Invalid argument Invoice ID value exceeds
maximum allowable length.
10500 Invalid configuration We can’t process this transaction
because you have not accepted
your billing agreement.
10501 Invalid configuration We can’t process this transaction
because your billing agreement is
disabled or inactive.
10502 Invalid data This card has expired. Enter a
valid date.
10504 Invalid data The CSC is invalid. Enter a valid
3 digit code.
10505 Gateway decline AVS returned a response value of
N. Your merchant account
provider doesn’t accept this
value. Contact them for a list of
accepted codes.
10507 Invalid configuration We can’t process this transaction.
Contact PayPal Customer
Service.
Ensure that the Invoice ID value
does not exceed the maximum
allowable length.
Occurs when you have not
agreed to the billing agreement.
Occurs when the billing
agreement is disabled or
inactive.
The credit card used has
expired.
The CSC provided is invalid.
The CSC is between 3 digit
long.
The transaction was refused
because the AVS response
returned the value of N, and the
merchant account is not able to
accept such transactions.
Your PayPal account is
restricted - contact PayPal
Customer Service for more
information.
10508 Invalid data This card expiration date is
invalid. Enter a valid 2-digit
month and a 4-digit year
(MM/YYYY).
10509 Invalid data You must submit a buyer IP with
each API call.
10510 Invalid data W e don’t support this card. Select
another one.
10511 Invalid data You selected an unsupported
value field.
10512 Invalid data Enter the buyer’s first name. The first name of the buyer is
10513 Invalid data Enter the buyer’s last name. The last name of the buyer is
30 Virtual Terminal User’s Guide
The expiration date must be a
two-digit month and four-digit
year.
You must submit an IP address
of the buyer with each API call.
The credit card type entered is
not currently supported by
PayPal.
The merchant selected an value
for the PaymentAction field that
is not supported.
required for this merchant.
required for this merchant.
Page 31

Virtual TerminalResponse Codes and Messages
System Response Codes
T
ABLE 7.1 Virtual Terminal Response Codes
Error
Code Short Message Long Message Corrective Action
10514 Billing address is missing. Billing address is missing. Enter
the correct information.
10515 The city in the billing address is
missing.
The city in the billing address is
missing. Enter the correct
information.
10516 The state in the billing address is
missing.
The state in the billing address is
missing. Enter the correct
information.
10517 The country in the billing address
is missing.
The country in the billing address
is missing. Enter the correct
information.
10518 The zip code in the billing address
is missing.
The zip code in the billing
address is missing. Enter the
correct information.
10519 Invalid data The card field is empty. Enter a
valid card number.
10520 Invalid data The total and item amounts don’t
match. Re-enter the information.
10521 Invalid data The card number is invalid. Enter
a valid 14 digit number without
dashes or spaces.
Enter a correct billing address.
Enter the city of the billing
address.
Enter the correct state
information.
Enter the country of the billing
address.
Enter the zip code of the billing
address.
The credit card field was blank.
The total amount and item
amounts do not match.
Enter a complete credit card
number.
10522 Invalid card number The card number is invalid. Enter
a valid 14 digit number without
Enter a complete credit card
number.
dashes or spaces.
10523 Internal data We can’t process your
transaction right now. Try again
None - this is a PayPal internal
error.
later.
10525 Invalid data You entered an amount of zero.
Enter a valid amount.
10526 Invalid data We don’t support this currency
code. Re-enter the correct
information.
10527 Invalid data The card type or card number is
invalid. Re-enter the correct
information.
Virtual Terminal User’s Guide 31
The merchant entered a amount
of zero.
The currency code entered is
not supported. Re-enter the
correct information.
The credit card entered is
invalid. Re-enter the correct
information.
Page 32

Virtual TerminalResponse Codes and Messages
System Response Codes
T
ABLE 7.1 Virtual Terminal Response Codes
Error
Code Short Message Long Message Corrective Action
10528 Unable to make this transaction. We’re unable to complete this
transaction because the amount
exceeds the payer’s spending
limit.
10529 Shipping address is missing. Shipping address is missing.
Enter the correct information.
10530 The city in the shipping address is
missing.
10531 The state in the shipping address is
missing.
10532 The country in the shipping
address is missing.
10533 The zip code in the shipping
address is missing.
10534 Gateway decline The card is restricted. Contact
The city in the shipping address
is missing. Enter the correct
information.
The state in missing. Enter the
correct information.
The country in the shipping
address is missing. Enter the
correct information.
The zip code in the shipping
address is missing. Enter the
correct information.
PayPal Customer Service.
Enter the correct amount.
Enter the correct shipping
address.
Enter the correct city for the
shipping address.
Enter the correct state.
Enter the country of the
shipping address.
Enter the zip code for the
shipping address.
The credit card entered is
currently restricted by PayPal.
Contact PayPal Customer
Service for more information.
10535 Gateway decline The card type or card number is
invalid. Re-enter the information.
10536 Invalid data You already tied this invoice ID
to another transaction. By
default, invoice IDs are unique.
To change this setting, log in to
PayPal and go to Payment
receiving preferences on the
Profile page or contact Customer
Service for more information.
10537 Filter decline Your country filter declined this
transaction. Log in to PayPal and
change your risk settings.
32 Virtual Terminal User’s Guide
The credit card entered is
invalid.
The merchant entered an
invoice ID that is already
associated with a transaction by
the same merchant. By default,
the invoice ID must be unique
for all transactions. To change
this setting, log into PayPal or
contact PayPal Customer
Service.
The transaction was declined by
the country filter managed by
the merchant. To accept this
transaction, change your risk
settings on PayPal.
Page 33

Virtual TerminalResponse Codes and Messages
System Response Codes
T
ABLE 7.1 Virtual Terminal Response Codes
Error
Code Short Message Long Message Corrective Action
10538 Filter decline Your maximum amou nt filter
declined this transaction. Log in
to PayPal and change your risk
settings.
10539 Filter decline We’ve declined this transaction.
Contact Customer Service for
more information.
10540 Invalid data You entered an invalid address.
Re-enter the information.
10541 Gateway decline The card is restricted. Contact
PayPal Customer Service.
10542 Invalid data You entered an invalid email
address. Re-enter the
information.
10543 Card authorization failed We couldn’t authorize this card.
Try another card.
The transaction was declined by
the maximum amount filter
managed by the merchant. To
accept this transaction, change
your risk settings on PayPal.
The transaction was declined by
PayPal. Contact PayPal
Customer Service for more
information.
The transaction was declined by
PayPal because of an invalid
address.
The credit card entered is
currently restricted by PayPal.
Contact PayPal Customer
Service for more information.
The email address provided by
the buyer is in an invalid
format.
The card couldn’t be
authorized. Use another card.
10544 Gateway decline We’ve declined this transaction.
Contact Customer Service for
more information.
10545 Gateway decline We’ve declined this transaction.
Contact Customer Service for
more information.
10546 Gateway decline We’ve declined this transaction.
Contact Customer Service for
more information.
10547 Internal error We can’t process your
transaction right now. Try again
later.
The transaction was declined by
PayPal. Contact PayPal
Customer Service for more
information.
The transaction was declined by
PayPal because of possible
fraudulent activity. Contact
PayPal Customer Service for
more information.
The transaction was declined by
PayPal because of possible
fraudulent activity on the IP
address. Contact PayPal
Customer Service for more
information.
None - this is a PayPal internal
error.
Virtual Terminal User’s Guide 33
Page 34

Virtual TerminalResponse Codes and Messages
System Response Codes
T
ABLE 7.1 Virtual Terminal Response Codes
Error
Code Short Message Long Message Corrective Action
10548 Invalid configuration You need a PayPal Business
account for this transaction. Log
in to PayPal and check your
account settings or apply for a
Business account.
10549 Invalid configuration You aren’t set up for Direct
Payment transactions. Contact
Customer Service for more
information.
10550 Invalid configuration Direct Payment is disabled on
your account. Contact Customer
Service for more information.
10552 Invalid configuration Your email address is
unconfirmed. Log in to PayPal
and check your account settings.
10553 Gateway decline This transaction exceeds your
account’s upper limit. Contact
Customer Service for more
information.
The merchant account
attempting the transaction is not
a business account at PayPal.
Check your account settings.
The merchant account
attempting the transaction is not
able to process Direct Payment
transactions. Contact PayPal
Customer Service for more
information.
Access to Direct Payment was
disabled for your account.
Contact PayPal Customer
Service for more information.
The merchant account
attempting the transaction does
not have a confirmed email
address with PayPal. Check
your account settings.
The merchant attempted a
transaction where the amount
exceeded the upper limit for
that merchant.
10554 Filter decline Your AVS risk filter is set to
decline transactions when AVS
returns a no match code. Log in
to PayPal and check your risk
filter settings.
10555 Filter decline Your AVS risk filter is set to
decline transactions when AVS
returns a partial match code. Log
in to PayPal and check your risk
filter settings.
10556 Filter decline Your AVS risk filter is set to
decline transactions when AVS is
unsupported. Log in to PayPal
and check your risk filter
settings.
34 Virtual Terminal User’s Guide
The transaction was declined
because of a merchant risk filter
for AVS. Specifically, the
merchant has set to decline
transaction when the AVS
returned a no match (AVS = N).
The transaction was declined
because of a merchant risk filter
for AVS. Specifically, the
merchant has set to decline
transaction when the AVS
returned a partial match.
The transaction was declined
because of a merchant risk filter
for AVS. Specifically, the
merchant has set to decline
transaction when the AVS was
unsupported.
Page 35

Virtual TerminalResponse Codes and Messages
System Response Codes
T
ABLE 7.1 Virtual Terminal Response Codes
Error
Code Short Message Long Message Corrective Action
10557 Profile preference setting A profile preference has
automatically declined this
transaction. To change this
setting, log in to PayPal and go to
the Profile page.
10558 Unsupported currency for card
type
The card you selected doesn’t
support this currency. Try a
different card or currency.
10561 Invalid data The billing address is
incomplete. Enter the correct
information.
10562 Invalid expiration year The card expiration date is
invalid. Enter a valid 4-digit year
(MM/YYYY).
10563 Invalid expiration date The card expiration date is
invalid. Enter a valid 2-digit
month.
10564 Gateway decline We’ve declined this transaction.
Contact Customer Service for
more information.
10565 Merchant country not supported We don’t support the country
where your address is located.
Contact Customer Service for
more information.
Change your settings on the
Profile page.
Select a different card or
currency.
Enter the complete billing
address.
Enter a valid credit card
expiration year.
Enter a valid credit card
expiration month.
There was a problem processing
this transaction.
Select a country that is
supported by the merchant.
10566 Credit card type unsupported We don’t support the card type.
Re-enter the correct information.
10570 Authorization is not supported for
this funding source.
10571 Transaction approved, but with
invalid Card security code (CSC)
format.
Authorization is not support for
this funding source.
This transaction was approved,
although the Card security code
(CSC) had too few, too many, or
invalid characters. Based on your
Select a credit card type that is
supported.
Authorization is not support for
this funding source.
If you want to require valid
CSC values, change the risk
control settings in your account
profile.
account profile settings, the
invalid CSC was not given to the
card issuer for its approval
process.
10701 Invalid data You entered an invalid billing
Enter a valid billing address.
address. Re-enter the
information.
Virtual Terminal User’s Guide 35
Page 36

Virtual TerminalResponse Codes and Messages
System Response Codes
T
ABLE 7.1 Virtual Terminal Response Codes
Error
Code Short Message Long Message Corrective Action
10702 Invalid data Billing address is invalid. Re-
enter the correct information.
10703 Invalid data Billing address is invalid. Re-
enter the correct information.
10704 Invalid data The billing city is invalid. Re-
enter the correct information.
10705 Invalid data The billing state is invalid. Re-
enter the correct information.
10706 Invalid data The billing zip is invalid. Re-
enter the correct 5-digit zip code.
10707 Invalid data The billing country is invalid.
Re-enter the correct information.
There was a problem with a
particular field in the address.
The long error message will tell
you what field is invalid.
There was a problem with a
particular field in the address.
The long error message will tell
you what field is invalid.
There was a problem with a
particular field in the address.
The long error message will tell
you what field is invalid.
There was a problem with a
particular field in the address.
The long error message will tell
you what field is invalid.
There was a problem with a
particular field in the address.
The long error message will tell
you what field is invalid.
There was a problem with a
particular field in the address.
The long error message will tell
you what field is invalid.
10708 Invalid data The billing country is invalid.
Re-enter the correct information.
10709 Invalid data The billing address is invalid.
Re-enter the correct information.
10709 Invalid data The billing address is invalid.
Re-enter the correct information.
10710 Invalid data The billing city is invalid. Re-
enter the correct information.
36 Virtual Terminal User’s Guide
There was a problem with a
particular field in the address.
The long error message will tell
you what field is invalid.
There was a problem with a
particular field in the address.
The long error message will tell
you what field is invalid.
There was a problem with a
particular field in the address.
The long error message will tell
you what field is invalid.
There was a problem with a
particular field in the address.
The long error message will tell
you what field is invalid.
Page 37

Virtual TerminalResponse Codes and Messages
System Response Codes
T
ABLE 7.1 Virtual Terminal Response Codes
Error
Code Short Message Long Message Corrective Action
10710 Invalid data The billing city is invalid. Re-
enter the correct information.
10711 Invalid data The billing state is invalid. Re-
enter the correct information.
10712 Invalid data The billing zip is invalid. Re-
enter the correct 5-digit zip code.
10713 Invalid data The billing country is invalid.
Re-enter the correct information.
10714 Invalid data The billing address is invalid.
Re-enter the correct information.
10715 Invalid data Billing state is invalid. Re-enter
the correct information.
There was a problem with a
particular field in the address.
The long error message will tell
you what field is invalid.
There was a problem with a
particular field in the address.
The long error message will tell
you what field is invalid.
There was a problem with a
particular field in the address.
The long error message will tell
you what field is invalid.
There was a problem with a
particular field in the address.
The long error message will tell
you what field is invalid.
There was a problem with a
particular field in the address.
The long error message will tell
you what field is invalid.
There was a problem with a
particular field in the address.
The long error message will tell
you what field is invalid.
10716 Invalid data The billing zip is invalid. Re-
enter the correct information.
There was a problem with a
particular field in the address.
The long error message will tell
you what field is invalid.
10717 Invalid data The billing zip is invalid. Re-
enter the correct 5-digit zip code.
There was a problem with a
particular field in the address.
The long error message will tell
you what field is invalid.
10718 Invalid data The billing city and state are
invalid. Re-enter the correct
information.
There was a problem with a
particular field in the address.
The long error message will tell
you what field is invalid.
10719 Invalid data The shipping address is invalid.
Re-enter the correct information.
There was a problem with a
particular field in the address.
The long error message will tell
you what field is invalid.
Virtual Terminal User’s Guide 37
Page 38

Virtual TerminalResponse Codes and Messages
System Response Codes
T
ABLE 7.1 Virtual Terminal Response Codes
Error
Code Short Message Long Message Corrective Action
10720 Invalid data The shipping address is invalid.
Re-enter the correct information.
10721 Invalid data The shipping address is invalid.
Re-enter the correct information.
10722 Invalid data The shipping city is invalid. Re-
enter the correct information.
10723 Invalid data The shipping state is invalid. Re-
enter the correct information.
10724 Invalid data The shipping zip is invalid. Re-
enter the correct 5-digit zip.
10725 Invalid data The shipping country is invalid.
Re-enter the correct information.
There was a problem with a
particular field in the address.
The long error message will tell
you what field is invalid.
There was a problem with a
particular field in the address.
The long error message will tell
you what field is invalid.
There was a problem with a
particular field in the address.
The long error message will tell
you what field is invalid.
There was a problem with a
particular field in the address.
The long error message will tell
you what field is invalid.
There was a problem with a
particular field in the address.
The long error message will tell
you what field is invalid.
There was a problem with a
particular field in the address.
The long error message will tell
you what field is invalid.
10726 Invalid data The shipping address is invalid.
Re-enter the correct information.
10727 Invalid data The shipping address is invalid.
Re-enter the correct information.
10728 Invalid data The shipping city is invalid. Re-
enter the correct information.
10729 Invalid data The shipping state is invalid. Re-
enter the correct information.
38 Virtual Terminal User’s Guide
There was a problem with a
particular field in the address.
The long error message will tell
you what field is invalid.
There was a problem with a
particular field in the address.
The long error message will tell
you what field is invalid.
There was a problem with a
particular field in the address.
The long error message will tell
you what field is invalid.
There was a problem with a
particular field in the address.
The long error message will tell
you what field is invalid.
Page 39

Virtual TerminalResponse Codes and Messages
System Response Codes
T
ABLE 7.1 Virtual Terminal Response Codes
Error
Code Short Message Long Message Corrective Action
10730 Invalid data The shipping zip is invalid. Re-
enter the correct 5-digit zip code.
There was a problem with a
particular field in the address.
The long error message will tell
you what field is invalid.
10731 Invalid data The shipping zip is invalid. Re-
enter the correct 5-digit zip code.
There was a problem with a
particular field in the address.
The long error message will tell
you what field is invalid.
10732 Invalid data The shipping address is invalid.
Re-enter the correct information.
There was a problem with a
particular field in the address.
The long error message will tell
you what field is invalid.
10733 Invalid data The shipping state is invalid. There was a problem with a
particular field in the address.
The long error message will tell
you what field is invalid.
10734 Invalid data The shipping zip is invalid. Re-
enter the correct 5-digit zip code.
There was a problem with a
particular field in the address.
The long error message will tell
you what field is invalid.
10735 Invalid data The shipping zip is invalid. Re-
enter the correct 5-digit zip code.
There was a problem with a
particular field in the address.
The long error message will tell
you what field is invalid.
10736 Invalid data The shipping city and stateare
invalid. Re-enter the correct
information.
There was a problem with a
particular field in the address.
The long error message will tell
you what field is invalid.
10744 Invalid data The shipping country code is
invalid. Re-enter the correct
information.
There was a problem with a
particular field in the address.
The long error message will tell
you what field is invalid.
10745 Invalid data The shipping country code is
invalid. Re-enter the correct
information.
There was a problem with a
particular field in the address.
The long error message will tell
you what field is invalid.
10746 Invalid data The billing country is invalid.
Re-enter the correct information.
There was a problem with a
particular field in the address.
The long error message will tell
you what field is invalid.
Virtual Terminal User’s Guide 39
Page 40

Virtual TerminalResponse Codes and Messages
System Response Codes
T
ABLE 7.1 Virtual Terminal Response Codes
Error
Code Short Message Long Message Corrective Action
10747 Invalid data You entered the IP address in an
invalid format. Enter it as
123.456.123.456
10748 Invalid data Your settings require a CSC
code. Re-enter or provide the
correct 3 digit code. Contact
Customer Service to change your
settings.
10750 The field shipping address state is
invalid.
10751 Invalid data The billing state is invalid. Re-
10752 Gateway decline Your card issuer, not PayPal,
The field shipping address state
is invalid.
enter the correct information.
declined this transaction. Try
another card.
The merchant entered an IP
address that was in an invalid
format. The IP address must be
in the following format:
123.456.123.456.
The merchant's configuration
requires a CSC to be entered,
but no CSC was provided with
this transaction. Contact PayPal
if you wish to change this
setting.
There was a problem with a
particular field in the address.
The long error message will tell
you what field is invalid.
The merchant provided an
address either in the United
States or Canada, but the state
provided is not a valid state in
either country.
The transaction was declined by
the issuing bank, not PayPal.
The merchant should attempt
another card.
10754 Gateway decline We’ve declined this transaction.
Contact PayPal Customer
Service.
10755 Invalid data We don’t support this currency
code. Re-enter the correct
information.
10756 Gateway decline The country and billing address
associated with this card don’t
match. Re-enter the correct
information.
10758 Invalid configuration The API username and/or
password are invalid. Re-enter
the correct information.
40 Virtual Terminal User’s Guide
The transaction was declined by
PayPal. Contact PayPal
Customer Service for more
information.
The currency code entered by
the merchant is not supported.
None - this is a PayPal internal
error.
The API username or password
is incorrect for this merchant.
Page 41

Virtual TerminalResponse Codes and Messages
System Response Codes
T
ABLE 7.1 Virtual Terminal Response Codes
Error
Code Short Message Long Message Corrective Action
10759 Gateway decline We declined this transaction
because the card number and
type don’t match. Re-enter the
correct information or contact
Customer Service.
10760 Invalid configuration We don’t support your business
address’ country for Direct
Payment transactions.
10761 Gateway decline We declined this transaction
because we’re already processing
another transaction by the same
buyer for the same amount.
Check the status of your previous
transaction before you place
anther order.
10762 Gateway decline The CSC in invalid. Re-enter the
correct 3 digit code.
10763 Invalid data We can’t process your
transaction right now. Try again
later.
The transaction was declined by
PayPal. Contact PayPal
Customer Service for more
information.
The merchant's country of
residence listed in their PayPal
account is not currently
supported to allow Direct
Payment transactions.
The transaction was declined
because PayPal is currently
processing a transaction by the
same buyer for the same
amount. Can occur when a
buyer submits multiple,
identical transactions in quick
succession.
The CSC provide is invalid. The
CSC is between 3 digit long.
None - this is a PayPal internal
error.
15001 Gateway decline We declined this transaction
because this card had too many
failures over a short period.
Contact Customer Service for
more information.
The transaction was rejected by
PayPal because of excessive
failures over a short period of
time for this credit card. Contact
PayPal Customer Service for
more information.
15002 Gateway decline We’ve declined this transaction.
Contact Customer Service for
more information.
The transaction was declined by
PayPal. Contact PayPal
Customer Service for more
information.
15003 Invalid configuration We’ve declined th is transacti on
because you don’t have a valid
Commercial Entity Agreement
on file. Contact Customer
Service for more information.
The transaction was declined
because the merchant does not
have a valid Commercial Entity
Agreement on file with PayPal.
Contact PayPal Customer
Service for more information.
Virtual Terminal User’s Guide 41
Page 42

Virtual TerminalResponse Codes and Messages
Card Security Code Responses
T
ABLE 7.1 Virtual Terminal Response Codes
Error
Code Short Message Long Message Corrective Action
15004 Gateway decline You entered a CSC that doesn ’t
match this card. Re-enter the
correct information.
15005 Processor decline Your card issuer, not PayPal,
declined this transaction. Ask
your buyer for another card.
15006 Processor decline Your card issuer, not PayPal,
declined this transaction. Ask
your buyer for another card.
15007 Processor decline Your card issuer, not PayPal,
declined this transaction because
this card has expired. Ask your
buyer for another card.
Card Security Code Responses
If a Card security code match fails, PayPal displays the CSC response “N” and the transaction
fails. If the response is other than “N,” Paypal does not reject the transaction.
The transaction was declined
because the CSC entered does
not match the credit card.
The transaction was declined by
the issuing bank, not PayPal.
The merchant should attempt
another card.
The transaction was declined by
the issuing bank, not PayPal.
The merchant should attempt
another card.
The transaction was declined by
the issuing bank because of an
expired credit card. The
merchant should attempt
another card.
T
ABLE 7.2 CSC Response Codes for Visa, MasterCard, Discover, and American
Express
CSC Code Meaning Matched Details
M Match CSC
N No match None
P Not processed Not applicable
S Service not supported Not applicable
U Service not available Not applicable
X No response Not applicable
42 Virtual Terminal User’s Guide
Page 43

Virtual TerminalResponse Codes and Messages
Address Verification System Responses
If an AVS error occurs when processing an order, it might be due to out-of-date information in
the customer’s credit card company’s database. This can happen if the customer has changed
their billing address recently , because some credit card companies can take up to six months to
update a billing address in their database.
By default, PayPal rejects a transaction if the AVS response is C, E, N, or I. PayPal does not
reject the transaction if the customer is international or if the AVS system is unavailable.
TABLE 7.6 AVS Response Codes for Visa, MasterCard, Discover, and American
Express
AVS Code Meaning Matched Details
A Address Address only (no ZIP)
B International “A” Address only (no ZIP)
C International “N” None
Address Verification System Responses
NOTE:The transaction is declined.
D International “X” Address and Postal Code
E Not allowed for MOTO (Internet/Phone)
transactions
F UK-specific “X” Address and Postal Code
G Global Unavailable Not applicable
I International Unavailable Not applicable
N No None
P Postal (International “Z”) Postal Code only (no Address)
R Retry Not applicable
S Service not Supported Not applicable
U Unavailable Not applicable
W Whole ZIP Nine-digit ZIP code (no Address)
X Exact match Address and nine-digit ZIP code
Y Yes Address and five-digit ZIP
Not applicable
NOTE:The transaction is declined.
NOTE:The transaction is declined.
Z ZIP Five-digit ZIP code (no Address)
All others Error Not applicable
Virtual Terminal User’s Guide 43
Page 44

Virtual TerminalResponse Codes and Messages
Address Veri fication System Responses
44 Virtual Terminal User’s Guide
Page 45

Canceling or Reactivating Your
8
Virtual Terminal Service
This chapter contains information about the following topics:
z Canceling Your Virtual Terminal Service
z Reactivating Your Virtual Terminal Service
Canceling Your Virtual Terminal Service
To cancel Virtual Terminal, you must cancel your Merchant Services Billing Agreement.
If you have Virtual Terminal only, then when you cancel the billing agreement, you will
immediately lose access to Virtual Terminal and will not be able to use Virtual Terminal to
process credit card payments.
However, if you have Virtual Terminal and Website Payments Pro, you will immediately lose
access to both these services when you cancel the billing agreement.
To cancel the Merchant Services Billing Agreement for Virtual Terminal and/or Website
Payments Pro and Virtual Terminal:
1. Log in to your PayPal account at
2. Click the My Account tab, and then click the Profile tab.
3. In the Billing column, click the Manage monthly billing link.
4. On the Monthly Billing page, review the services that are being cancelled, and click
Cancel billing.
5. Verify the information again as you will lose access to these services, and click Cancel
billing again.
The Monthly billing cancelled page confirms that you have cancelled your monthly billing
agreement.
https://www.paypal.com.
Reactivating Your Virtual Terminal Service
To reactivate your Virtual Terminal service, you must reactivate your Merchant Services
Billing Agreement.
If you have Virtual Terminal only, then when you reactivate the billing agreement, you will
immediately have access to Virtual Terminal and will be able to use Vi rtual Terminal to
process credit card payments.
Virtual Terminal User’s Guide 45
Page 46

Canceling or Reactivating Your Virtual Terminal Service
Reactivating Your Virtual Terminal Service
If you have Virtual Terminal and Website Payments Pro, you will immediately have access to
both these services when you reactivate the billing agreement.
To reactivate the Merchant Services Billing Agreement for Virtual Terminaland/or Website
Payments Pro and Virtual Terminal:
1. Log in to your PayPal account at
https://www.paypal.com.
2. Click the My Account tab, and then click the Profile tab.
3. In the Billing column, click the Manage monthly billing link.
4. On the Reactivate monthly payment agreement page, click Reactivate.
The Monthly payment agreement reactivated page appears.It lists the services that have
been reactivated and the monthly fees associated with each one. You can also reactivate your
services through the Next Steps section on the Overview page.
46 Virtual Terminal User’s Guide
Page 47

Index
A
Accessing 15
accessing 15
adding extended credit card name 12
address verification system 9
responses 43
authorization 17
capturing 23
voiding 24
AVS 9
B
benefits 7
billing address 18
C
capturing
authorization 23
card number 17
card security code 9, 17
responses 42
card type 17
city 18
confirming
contact information 12
country 17
county 18
creating
new transaction 25
credit 17
CSC 9, 17
currency 16
E
email 18
enter your order page 16
errors 29
expiration date 17
F
features 7
first name 17
G
granting secondary access 13
I
invoice ID 16
L
last name 17
N
net amount 16
new transaction 25
O
overview 7
P
D
date and time 20
description 16
phone 18
print
packing slip 21
receipt 20
processing
refund 24
47
Page 48

Index
R
refund 24
responses
address verification system 43
card security code 42
review your order page 19
revoking secondary access 13
S
secondary access
granting 13
revoking 13
security features 9
address verification system 9
card security code 9
setting up account 11
shipping 16
state 18
T
tax amount 16
tax rate 16
total 16
transaction confirmation page 20
transaction ID 20
transaction type 17
V
Virtual Terminal
accessing 15
benefits 7
enter your order page 16
errors 29
features 7
overview 7
review your order page 19
transaction confirmation page 20
voiding
authorization 24
48
Z
zip 18
 Loading...