


P/N 4809606 v4.0
09/06/05
SUPERCHARGERS
Owners Installation Manual for the
PAXTON AUTOMOTIVE
NOVI 2000 Supercharger
for
1998-2001 Ford
6.8L V10
PAXTON AUTOMOTIVE 1300 BEACON PL. OXNARD CA 93033
(805) 604-1336 • FAX (805) 604-1337

P/N: 4809606
©2005 Paxton Automotive
All Rights Reserved, Intl. Copr.Secured
06SEP05 v4.0 FordV10(4809606v4.0)
ii
FOREWORD
T
his manual provides information on the installation, maintenance
and service of the Paxton supercharger kit expressly designed for
the 1998-2001 Ford 6.8L V-10 F-250, F-350/Excursion. Contact
Paxton Automotive Corporation for any additional information regarding
this kit and any of these modifications at (805) 604-1336 8:00 a.m. - 4:30
p.m. P.S.T.
An understanding of the information contained herein will help novices, as
well as experienced technicians, to correctly install and receive the greatest
possible benefit from their Paxton supercharger. When reference is made in
this manual to a brand name, number, specific tool or technique, an equivalent product may be used in place of the item mentioned. All information,
illustrations and specifications contained herein are based on the latest
product information available at the time of this publication. All rights
reserved to make changes at any time without notice.
©
2005 PAXTON AUTOMOTIVE
All rights reserved. No part of this publication may be reproduced, transmitted, transcribed,
or translated into another language in any form, by any means without written permission
of Paxton Automotive.

P/N: 4809606
©2005 Paxton Automotive
All Rights Reserved, Intl. Copr.Secured
06SEP05 v4.0 FordV10(4809606 v4.0)
iii
TABLE OF CONTENTS
FOREWORD . . . . . . . . . . . . . . . . . . . . . . . . . . . . . . . . . . . . . . . . . . . . . . . . . . . . . . . . . . . . . .ii
TABLE OF CONTENTS . . . . . . . . . . . . . . . . . . . . . . . . . . . . . . . . . . . . . . . . . . . . . . . . . . . . .iii
IMPORTANT NOTES . . . . . . . . . . . . . . . . . . . . . . . . . . . . . . . . . . . . . . . . . . . . . . . . . . . . . .iv
INTRODUCTION . . . . . . . . . . . . . . . . . . . . . . . . . . . . . . . . . . . . . . . . . . . . . . . . . . . . . . . . . .v
TOOL & SUPPLY REQUIREMENTS . . . . . . . . . . . . . . . . . . . . . . . . . . . . . . . . . . . . . . . .vii
1. INITIAL PREPARATION AND DISASSEMBLY . . . . . . . . . . . . . . . . . . . . . . . . . . .1-1
1.1 AIR INTAKE DISASSEMBLY . . . . . . . . . . . . . . . . . . . . . . . . . . . . . . . . . . . . . . .1-1
1.2 FAN AND FAN SHROUD REMOVAL . . . . . . . . . . . . . . . . . . . . . . . . . . . . . . . . .1-2
1.3 POWER STEERING LINES MODIFICATION . . . . . . . . . . . . . . . . . . . . . . . . . .1-2
1.4 WIRE ROUTING AND MODIFICATIONS . . . . . . . . . . . . . . . . . . . . . . . . . . . . .1-3
2. SUPERCHARGER ASSEMBLY INSTALLATION . . . . . . . . . . . . . . . . . . . . . . . . . .2-1
2.1 OIL DRAIN LINE INSTALLATION . . . . . . . . . . . . . . . . . . . . . . . . . . . . . . . . . . .2-1
2.2 OIL FEED ASSEMBLY INSTALLATION . . . . . . . . . . . . . . . . . . . . . . . . . . . . . .2-2
2.3 CRANK PULLEY ASSEMBLY INSTALLATION . . . . . . . . . . . . . . . . . . . . . . . .2-2
2.4 S/C MOUNTING PLATE ASSEMBLY INSTALLATION . . . . . . . . . . . . . . . . . . .2-3
2.5 BELT TENSIONER/BELT INSTALLATION . . . . . . . . . . . . . . . . . . . . . . . . . . . .2-3
3. DISCHARGE DUCT ASSEMBLY INSTALLATION . . . . . . . . . . . . . . . . . . . . . . . . .3-1
3.1 DISCHARGE DUCT ASSEMBLY INSTALLATION . . . . . . . . . . . . . . . . . . . . . .3-1
4. SUPERCHARGER AIR INLET ASSEMBLY INSTALLATION . . . . . . . . . . . . . . .4-1
4.1 SUPERCHARGER INLET DUCT . . . . . . . . . . . . . . . . . . . . . . . . . . . . . . . . . . . .4-1
4.2 AIR FILTER ENCLOSURE INSTALLATION . . . . . . . . . . . . . . . . . . . . . . . . . . .4-1
5. REINSTALLING FAN & SHROUD . . . . . . . . . . . . . . . . . . . . . . . . . . . . . . . . . . . . . . .5-1
5.1 REINSTALLING FAN & SHROUD . . . . . . . . . . . . . . . . . . . . . . . . . . . . . . . . . . .5-1
6. FUEL PUMP INSTALLATION . . . . . . . . . . . . . . . . . . . . . . . . . . . . . . . . . . . . . . . . . .6-1
6.1 FUEL PUMP INSTALLATION . . . . . . . . . . . . . . . . . . . . . . . . . . . . . . . . . . . . . . .6-1
6.2 FUEL PUMP RELAY . . . . . . . . . . . . . . . . . . . . . . . . . . . . . . . . . . . . . . . . . . . . . .6-1
6.3 FUEL CONTROL UNIT INSTALLATION . . . . . . . . . . . . . . . . . . . . . . . . . . . . . .6-1
6.4 FUEL CONTROL UNIT VACUUM LINE . . . . . . . . . . . . . . . . . . . . . . . . . . . . . .6-1
7. CHECK-OUT PROCEDURES . . . . . . . . . . . . . . . . . . . . . . . . . . . . . . . . . . . . . . . . . . .7-1
7.1 CHECK-OUT PROCEDURES . . . . . . . . . . . . . . . . . . . . . . . . . . . . . . . . . . . . . . .7-1
APPENDIX . . . . . . . . . . . . . . . . . . . . . . . . . . . . . . . . . . . . . . . . . . . . . . . . . . . . . . . . . . . . . .A-1
A. APPENDIX TABLE OF CONTENTS . . . . . . . . . . . . . . . . . . . . . . . . . . . . . . .A-1
B. 1016111 ASY, NOVI 2000 SUPERCHARGER . . . . . . . . . . . . . . . . . . . . . .A-2
C. 1016311 ASY, MOUNTING BRACKET . . . . . . . . . . . . . . . . . . . . . . . . . . .A-3
D. 1015611 ASY, CRANK PULLEY . . . . . . . . . . . . . . . . . . . . . . . . . . . . . . . .A-4
E. 1016911 ASY, BELT TENSIONER . . . . . . . . . . . . . . . . . . . . . . . . . . . . . . .A-5
F. 1015911 ASY, AIR INTAKE . . . . . . . . . . . . . . . . . . . . . . . . . . . . . . . . . . . .A-6
G. 1016011 ASY, AIR DISCHARGE . . . . . . . . . . . . . . . . . . . . . . . . . . . . . . . .A-7
H. 1017711 ASY, FUEL CONTROL UNIT . . . . . . . . . . . . . . . . . . . . . . . . . . .A-8
I. 1017721 ASY, AUXILIARY FUEL SYSTEM . . . . . . . . . . . . . . . . . . . . . . .A-9
J. 1019344 ASY, SUPERCHARGER OIL RETURN . . . . . . . . . . . . . . . . . . .A-10
K. 1019350 ASY, SUPERCHARGER OIL FEED . . . . . . . . . . . . . . . . . . . . . .A-11

P/N: 4809606
©2005 Paxton Automotive
All Rights Reserved, Intl. Copr.Secured
06SEP05 v4.0 FordV10(4809606v4.0)
iv
This kit requires ECM modification and the installation of a Paxton ECM Module.The
ECM must be sent directly to Paxton by the installing customer (the charge for this
service with module installation has been included in the purchase price).
• Included in this kit is a prepaid next-day air shipping box and a credit tag for one
(1) Paxton ECM Module.
• The modules are made specifically for each individual vehicle with respect to the
factor y ECM calibration.
• Simply contact the Paxton Service Department at (805) 247-0226 to request a
Return Authorization Number (see ECM Module Credit Tag for more details).
- Mail to Paxton the enclosed "ECM Module Credit Tag" (send original tag - no
photocopies will be accepted) and ECM in the supplied box.
- Turnaround time will be 1-2 days (each application varies). Paxton will give an
estimate at the time of your order.
Your Paxton ECM Module comes with a twelve (12) month limited warranty from the
original date of purchase of your supercharger system (see Owner's Manual for
details).
IMPORTANT NOTES
1998-2001 Models
Ford 6.8L Super Duty

P/N: 4809606
©2005 Paxton Automotive
All Rights Reserved, Intl. Copr.Secured
06SEP05 v4.0 FordV10(4809606 v4.0)
v
INTRODUCTION
C
ongratulations! You have purchased the finest street supercharger available for the Ford V10. The
centerpiece of this kit is the High Efficiency NOVI 2000 Supercharger, a mechanically driven centrifugal supercharger.
This kit comes with all of the parts you will need to install the supercharger. This instruction manual has
been grouped in order of sequence, with photographs and drawings to illustrate the text. This will allow
you quick part identification and orientation.
We suggest that you obtain a Ford shop manual and become familiar with the details of your car’s system.
Manuals may be obtained from your local Ford dealer, or you can order one from Helm Publications at
(800) 782-4356. If your vehicle is not within the normal operating parameters, we do not recommend the
use of a supercharger.
For best results, we suggest that you read this entire manual before beginning. Familiarize yourself with
the process and identify the areas of the car that you will be working on. The average installation time is 8
- 10 hours. Your actual install time will depend on your personal skill level, experience installing superchargers, working conditions, and preparedness for the job at hand. This estimate does not include time for
the initial vehicle inspection, cleaning, fine tuning, or troubleshooting. Once again, before picking up a
wrench, read this entire manual. We are available for technical assistance at (805) 604-1336.
After reading this manual, verify that all major assembly groups are present in the main kit box. You
should have ample space to lay out the components. As you remove a box or bag from the main kit, note
the identification label and compare it with the parts list.
Paxton makes every effort to ensure that all
parts are included in the box, but mistakes
do occur. If you discover that you are
missing any part, or that a part was damaged
in transit, please call Paxton for service.
DO NOT attempt installation if any part(s)
are missing from this kit. Failure to contact
Paxton prior to beginning installation will
result in a charge for any missing parts.

P/N: 4809606
©2005 Paxton Automotive
All Rights Reserved, Intl. Copr.Secured
06SEP05 v4.0 FordV10(4809606v4.0)
vi
You are undoubtedly eager to get started with your project, but take a little more time to insure
that your safety is not in jeopardy. A moment’s lack of attention can result in an accident, as
can failure to observe some simple safety precautions. The possibility of an accident always
exists, and the following points should not be considered a comprehensive list of all of the
dangers. They are only intended to make you aware of the risks and to encourage you to take a
safety conscious approach to all of the work that you will be doing on your vehicle.
Never rely solely on a jack when working
under a vehicle. Always use an approved set
of jackstands to support the vehicle and
place them under the recommended lift points.
When jacking a vehicle, make sure it is on a level surface,
preferably concrete or asphalt. The
transmission should be in “PARK” or “FIRST”,
the parking brake engaged and the wheels blocked.
Never start the car without first verifying that
the transmission is in neutral and
the parking brake is set.
Never remove the radiator cap while the engine is hot.
Always wear eye protection when using
power tools such as drills, saws, grinders, etc.,
or when working under a vehicle.
Never smoke, use an open flame, or have
spark-producing items around gasoline or
flammable solvents. Always have a
fire extinguisher rated for chemical and electrical
fires handy when working on motor vehicles.
Run engines only in well ventilated areas.
Carbon monoxide, gasoline, and solvent
vapors are colorless and sometimes
odorless. These can asphyxiate or
explode without warning.
Always disconnect at least the negative (-) or
ground terminal of the battery when
doing any electrical, fuel system,
or underdash work.

P/N: 4809606
©2005 Paxton Automotive
All Rights Reserved, Intl. Copr.Secured
06SEP05 v4.0 FordV10(4809606 v4.0)
vii
Before beginning this installation, please read through this entire instruction booklet and the Street
Supercharger System Owner's Manual which includes the Automotive Limited Warranties Program
and the Warranty Registration form.
Paxton supercharger systems are performance improving devices. In most cases, increases in torque of 30-35%
and horsepower of 35-45% can be expected with the boost levels specified by Paxton Automotive. This product is intended for use on healthy, well maintained engines. Installation on a worn-out or damaged engine is not
recommended and may result in failure of the engine as well as the supercharger. Paxton Automotive is not
responsible for engine damage.
Installation on new vehicles will not harm or adversely affect the break-in period so long as factory break-in
procedures are followed.
For best performance and continued durability, please take note of the following key points:
1. Use only premium grade fuel 91 octane or higher (R+M/2).
2. The engine must have stock compression ratio.
3. If the engine has been modified in any way, check with Paxton Automotive prior to using this product.
4. Always listen for any sign of detonation (pinging) and discontinue hard use (no boost) until problem is
resolved.
5. Perform an oil and filter change upon completion of this installation and prior to test driving your vehi-
cle. Thereafter, always use a high grade SF rated engine oil or a high quality synthetic, and change the
oil and filter at least every 3,000 miles. Never attempt to extend the oil change interval beyond 3,000
miles, regardless of oil manufacturer's claims as potential damage to the supercharger may result.
6. Before beginning installation, replace all spark plugs that are older than 2 years or 30,000 miles with
original heat range plugs as specified by the manufacturer and reset timing to factory specifications (follow the procedures indicated within the factory repair manual and/or as indicated on the factory underhood emissions tag). Do not use platinum spark plugs unless they are original equipment. Change spark
plugs at least every 30,000 miles.
TOOL & SUPPLY REQUIREMENTS:
• Metric and standard - socket set, wrench set
• Ratchet - 1/2" drive
• Extension
• 1/2" drive breaker bar
• Ford springlock tool 3/8" & 1/2"
• Pliers
• Drill motor
• Ø1/16" and #30, Ø9/32", and Ø11/16" drill bits
• Test light
• Rubber mallet or dead blow hammer
•Wire cutters and crimping tool
• Standard hex key set (Allen wrenches)
• Silicone sealer/RTV
If your vehicle has in excess of 30,000 miles since its last spark plug change, then you will also need:
• Spark Plug Socket
• NEW Spark Plugs
1998-2001
FORD SUPER DUTY
Installation Instructions
1998-2001 50 State Smog Legal, as per CARB EO #P-195-19
Congratulations on selecting the best performing and best backed automotive supercharger available
today... the NOVI 2000 Supercharger!

P/N: 4809606
©2005 Paxton Automotive
All Rights Reserved, Intl. Copr.Secured
06SEP05 v4.0 FordV10(4809606v4.0)
viii
We look forward to hearing from you, particularly if you have any comments or suggestions regarding this manual.
TRANSMISSION WARNING/DISCLAIMER:
Due to the increased horsepower and torque generated by the Paxton Novi 2000 supercharger, your transmission may require modification to prevent premature wear or damage—especially if plan to use your vehicle in high demand situations, such as towing.
In any case, it is a good idea to consider purchasing a transmission valve body kit
(commonly known as a shift improver kit) to improve transmission performance and
durability. Several companies offer valve body kits, including TransGo Performance.
Please contact TransGo or the valve body kit manufacturer of your choice for more
information, pricing, labor involved, etc.
TransGo Performance
2621 Merced Ave.
El Monte, CA. 91733
(818) 443-4953
FAX: (818) 443-1079
NOTE:
This information is provided for customer convenience only. Paxton Automotive does
not endorse any valve body kit manufacturers and does not provide warrantee or service
on said products.
PLEASE NOTE:
The 2000 Ford 6.8L V10 has several minor changes in the design of the engine.
Those changes have been included in this manual. Please be aware of the model
year of the vehicle, and follow the proper set of directions.
1-1
P/N: 4809606
©2005 Paxton Automotive
All Rights Reserved, Intl. Copr.Secured
06SEP05 v4.0 FordV10(4809606v4.0)
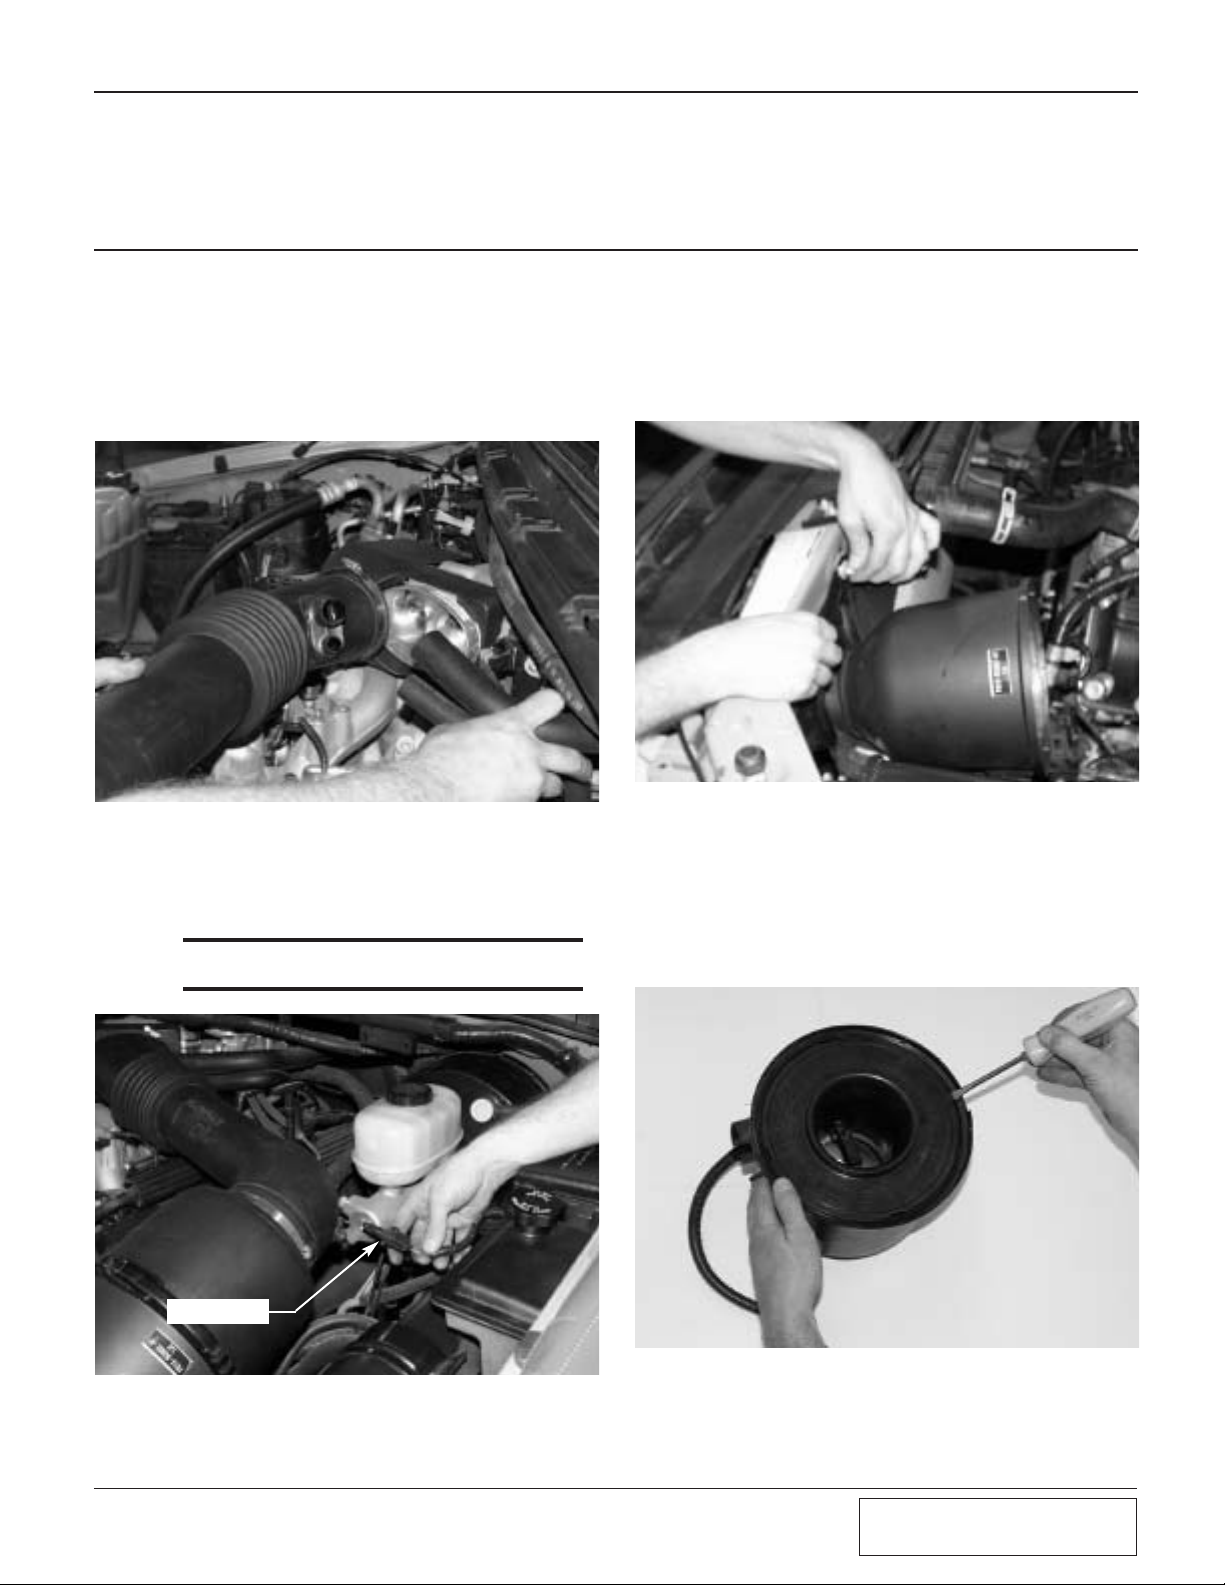
A. Using a screwdriver, remove the black rubber
tube between the throttle body and the air
cleaner by loosening the two hose clamps.
Disconnect the two rubber hoses attached to the
side of the tube. (See Fig. 1.1-a.)
B. Carefully pull the air inlet temperature sensor
out of the black rubber hose attached to the side
of the plastic inlet tube. (See Fig. 1.1-b.)
tion between the throttle body and front air filter enclosure. You will need to unplug the Mass
Airflow Sensor connector on the inner fenderwell. Using a 10mm socket and ratchet, remove
the three bolts securing the air filter bracket and
remove it from the vehicle. (See Fig. 1.1-c.)
D. Gently pry the air flow meter cover plate from
the air filter housing using a screwdriver. Next,
push the large rubber grommet (surrounding the
4 Mass Airflow Meter wires) into the housing
and finish removing the Mass Airflow Meter.
(See Fig. 1.1-d.)
*** NOTE ***
Model Year 2000 will NOT have this sensor.
Section 1
INITIAL PREPARATION AND DISASSEMBLY
1.1 AIR INTAKE DISASSEMBLY
C. Un-snap the large clamp which holds the air
cleaner housing together and remove the sec-
Fig. 1.1-a
Fig. 1.1-b
Fig. 1.1-c
Fig. 1.1-d
IAT SENSOR
1-2
P/N: 4809606
©2005 Paxton Automotive
All Rights Reserved, Intl. Copr.Secured
06SEP05 v4.0 FordV10(4809606v4.0)
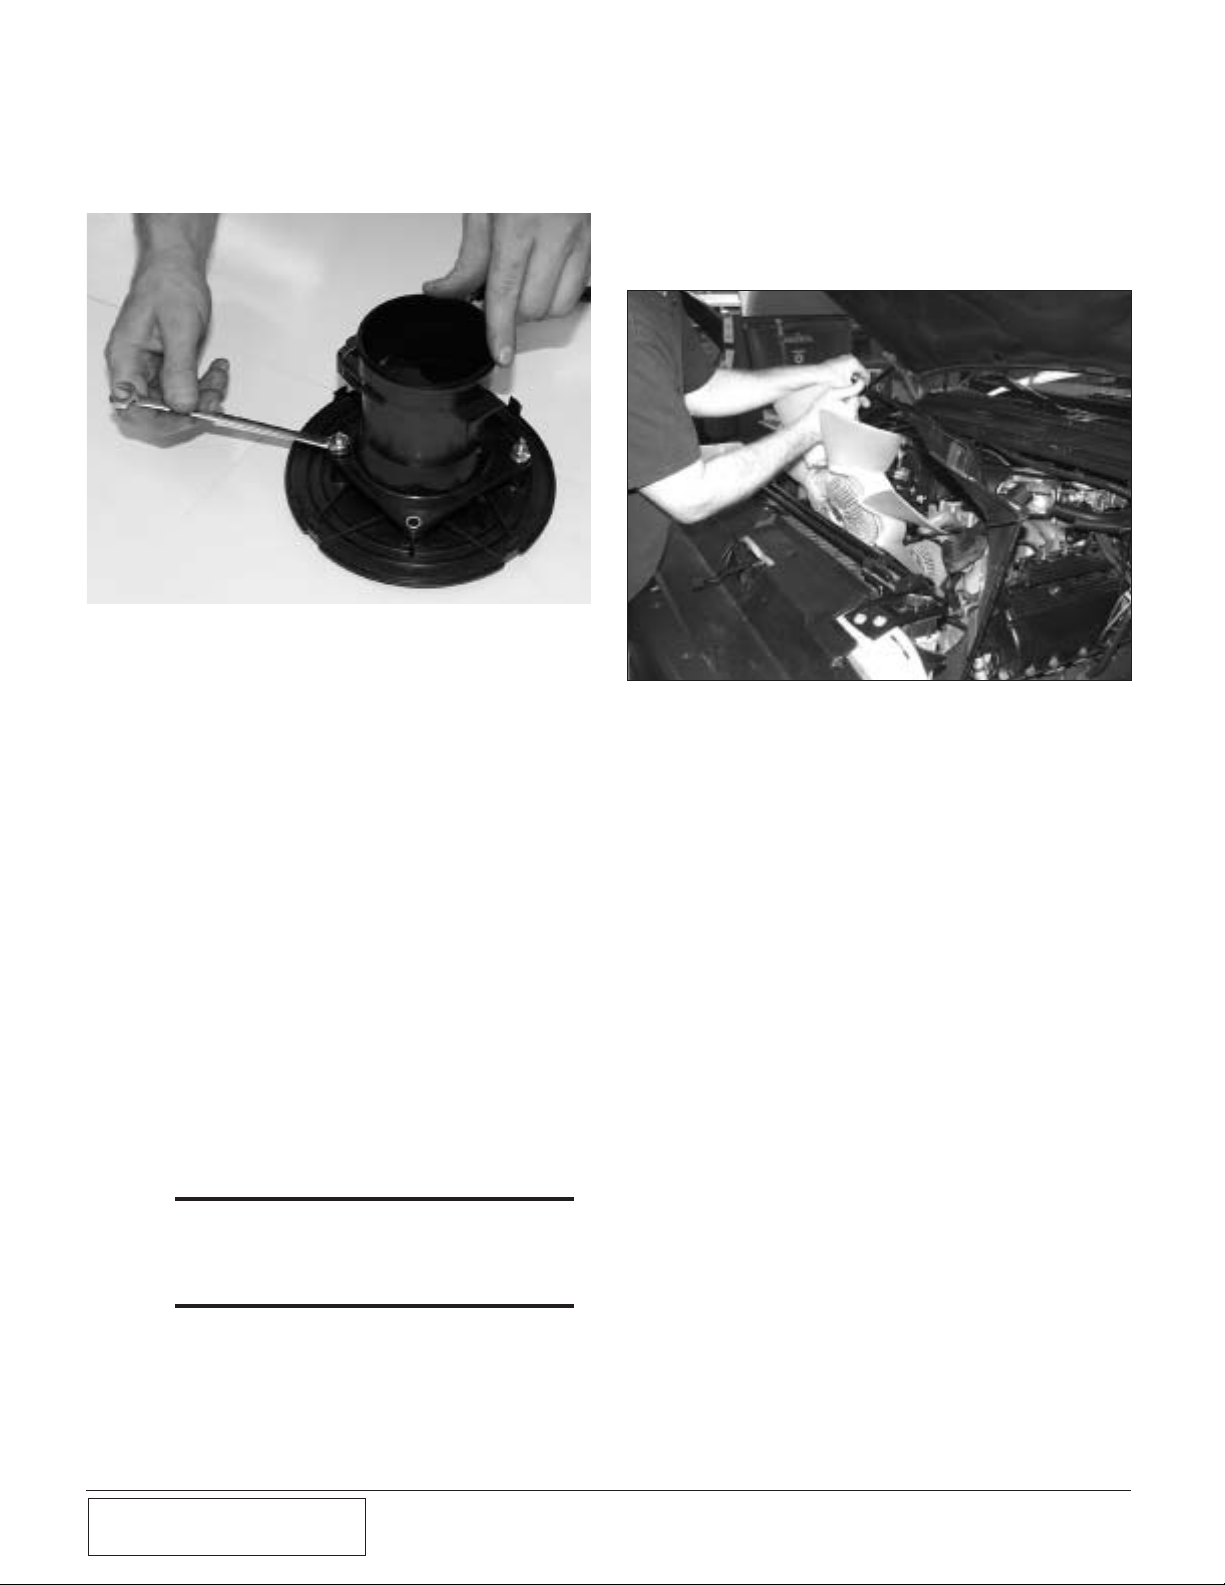
The MASS AIR FLOW METER will be used
in a later step. Discard the MASS AIR FLOW
METER housing, face plate and air cleaner
assembly.
F. Remove the large nut from the support bracket
on top of the fan shroud cover. Next, remove
the three 8mm bolts securing the coolant reservoir and set the reservoir on the passenger side
inner-fender. Next, drain the coolant from the
engine by opening the petcock on the bottom of
the radiator, driver’s side. Mark the ends of the
upper radiator hose with an “R” on the radiator
side and a “T” on the thermostat housing end.
This is required for a later step.
Fig. 1.1-e
Fig. 1.2-a
E. Remove the two 10mm nuts retaining the
MASS AIR FLOW METER and separate the
two pieces. (See Fig. 1.1-e.)
A. Unbolt the charcoal canister and the bracket,
(the large black cylinder unit on the driver’s
side inner-fenderwall). Swing the bracket back
and out of the way.
B. Next, you will need to remove the power-steer-
ing reservoir, insuring the fill cap is on tight,
turn the reservoir upside down and remove both
lines. Being careful not to spill any fluid, shorten the larger hose 1-1/4" and the smaller hose,
4".
C. Reroute both lines under the two steel brake
lines running toward the front of the engine
compartment. Re-attach the two hoses to the
power steering reservoir and the P/S Relocation
bracket provided, re-attach the reservoir and
replenish any fluid spilled during the process.
1.3 POWER STEERING LINES
MODIFICATION
C. Remove the fasteners that secure the fan shroud
to the radiator.
D. After you remove the fan from the water pump,
lift the fan and fan shroud together from the
engine compartment and set it aside to be reinstalled at a later step. (See Fig. 1.2-a.)
1.2 FAN AND FAN SHROUD REMOVAL
A. Unscrew the fan from the water pump using a
48mm open end wrench or large crescent
wrench and the supplied fan removal tool .
B. Slide the fan removal tool over the four bolts
securing the water pump pulley to the water
pump.
*** NOTE ***
The nut has right-handed threads. Remove the
two 8mm bolts retaining the fan shroud located
at the top of the fan shroud on the driver’s side
and passenger’s side.
Using a 1/2" breaker bar for leverage, hold the
pulley so it does not move and loosen the fan
assembly from the water pump snout.
1-3
P/N: 4809606
©2005 Paxton Automotive
All Rights Reserved, Intl. Copr.Secured
06SEP05 v4.0 FordV10(4809606v4.0)
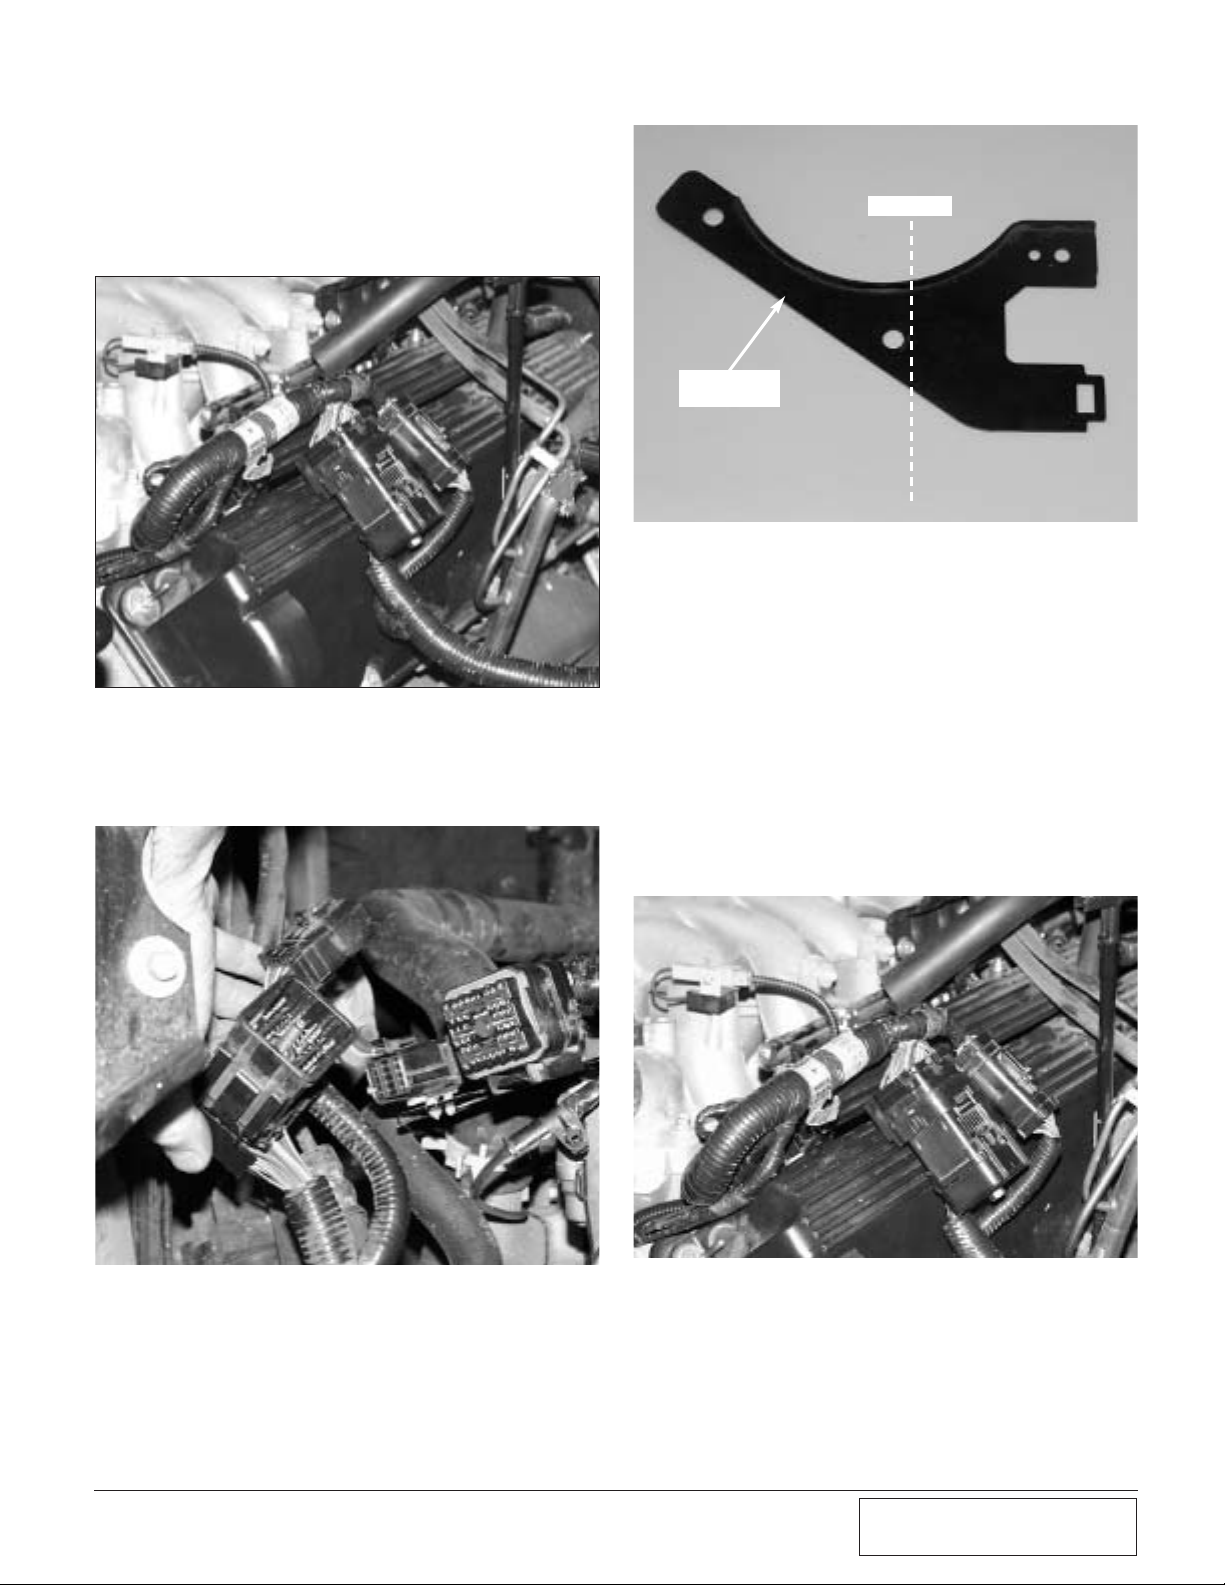
A. On the front of the engine, (driver’s side), you
will find two large black electrical connectors
attached to a bracket. (See Fig. 1.4-a.)
B. Remove plugs from the bracket (see Fig. 1.4-b)
and disconnect both plugs; one requires a
10mm socket wrench.
C. Next, unbolt the bracket that held the two elec-
trical connectors and modify the bracket as in
(See Fig. 1.4-c.)
D. Discard the part with the two holes in it and
retain the section that the electrical connectors
clip to. The two connectors and wiring harness,
will now be routed directly in front of the two
steel brake lines.
E. Lift the wiring harness in the plastic sheath off
the studs on the driver’s side valve cover. Push
it down into the area between the valve cover
and the intake manifold. Now take the large
wiring harness and two connectors that runs
along the top of the motor and fold the wiring
harness back onto itself as shown. (See Fig.
1.4-d.)
Fig. 1.4-b
Fig. 1.4-c
Fig. 1.4-a
CUT HERE
1.4 WIRE ROUTING AND MODIFICATIONS
Fig. 1.4-d
DISCARD
THIS SECTION
1-4
P/N: 4809606
©2005 Paxton Automotive
All Rights Reserved, Intl. Copr.Secured
06SEP05 v4.0 FordV10(4809606v4.0)
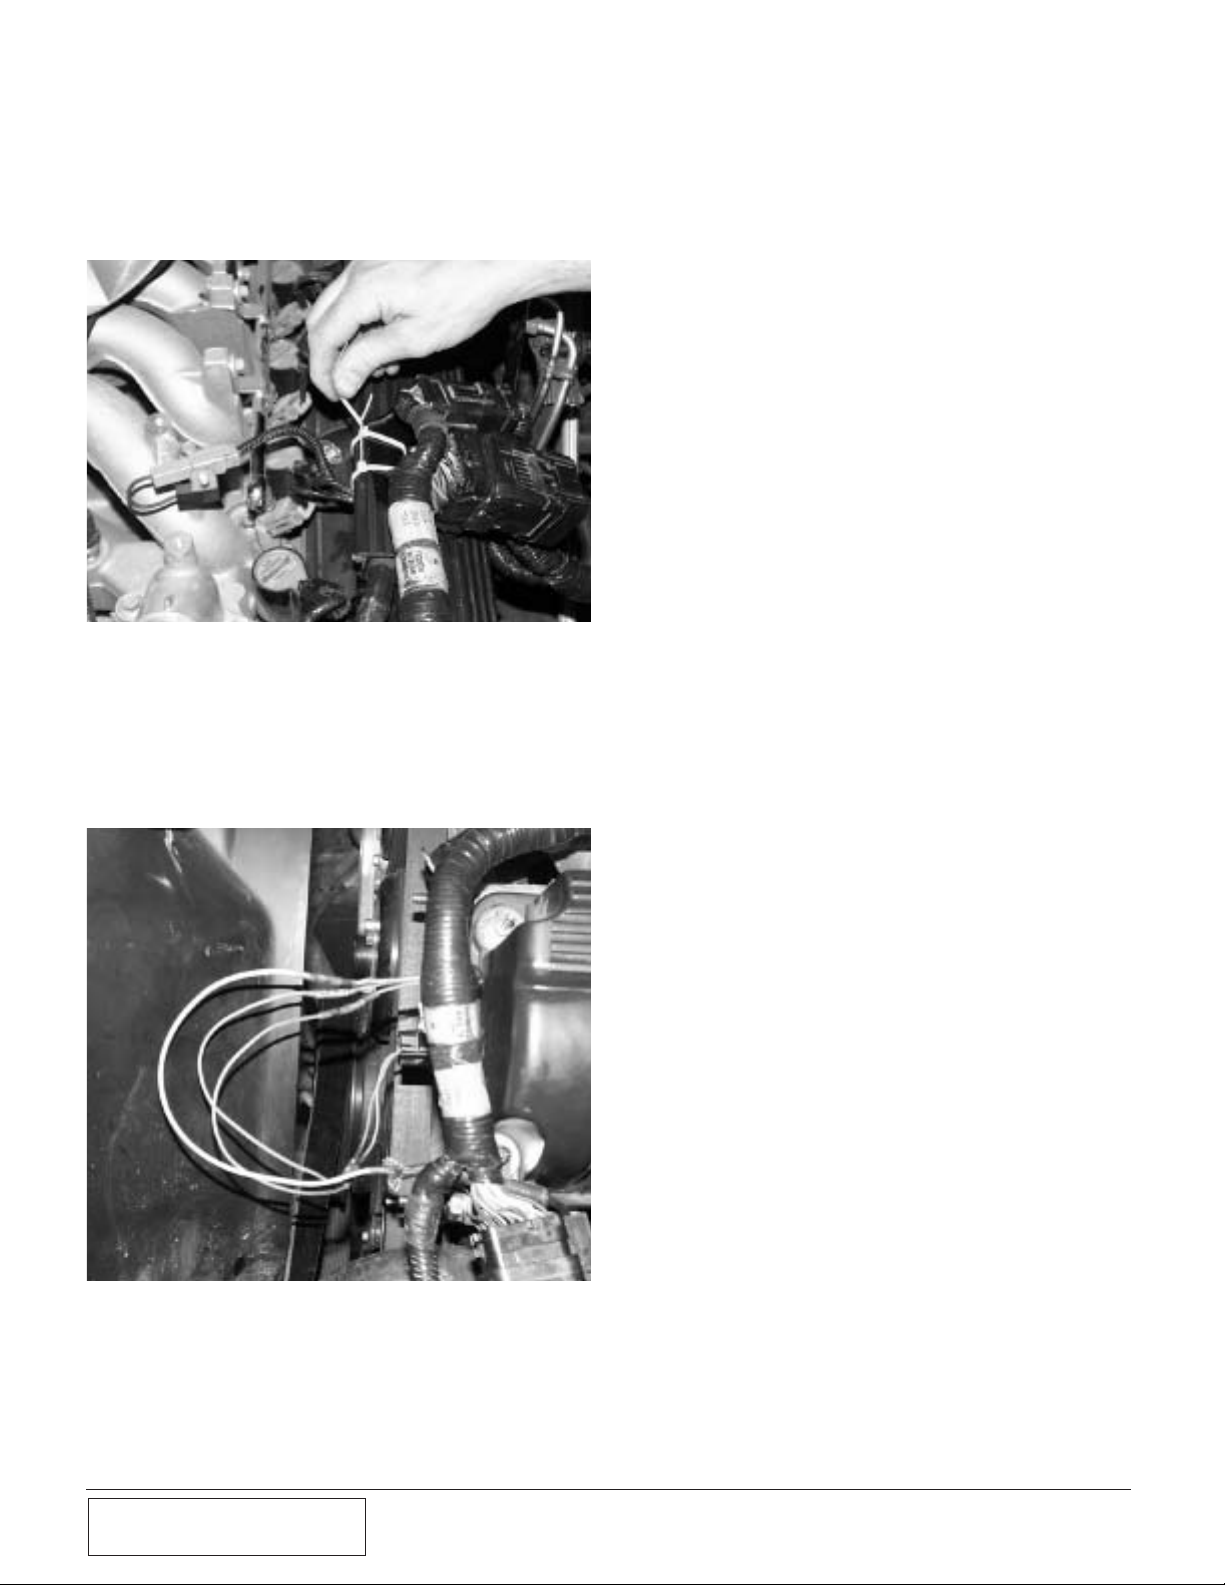
F. Reclip the two large connectors back onto the
modified stock bracket (from Step E). Attach
the bracket and connectors with the two supplied wire ties to the heavy-duty plastic wire
loom as shown. (See Fig. 1.4-e.)
Fig. 1.4-e
G. Located on the driver’s side, in front of the
cylinder head is the cam sensor. Extend the two
wires coming from the cam sensor along with
the shielded white wire that runs parallel with
the cam sensor wires, using the supplied three
wires and six Butt connectors. (See Fig. 1.4-f.)
H. Then cover the wires with the supplied split-
loom. Route the extended wires under the upper
most stud sticking out of the front of the engine
then back over toward the harness.
Fig. 1.4-f

2-1
P/N: 4809606
©2005 Paxton Automotive
All Rights Reserved, Intl. Copr.Secured
06SEP05 v4.0 FordV10(4809606v4.0)
A. Locate the supplied oil drain assembly
#1019344. Mark the front of the oil pan 1 inch
below the pan rail and between the two pan rail
bolts, directly in the center of the small “hump
(see Appendix J).
B. Drill a pilot hole with a 3/16" drill bit. Smear
the drill bit with heavy grease first to prevent
small metal particles from falling into the pan.
C. Insert a straight length of welding rod or heavy
wire (such as a coat hanger) into the hole
approximately three inches to make sure no
interference is encountered. If the path is
blocked, turn the engine over uintil the pathway
is clear.
D. Apply a small amount of anti-seize lubricant to
the tip of the punch, and insert it into the pilot
hole. Hit the punch with an air hammer carefully using small bursts, until the punch is inserted
up to the line as shown. The finished hole size
should be no larger that 9/16" in diameter. (See
Fig 2.1-a.)
Section 2
SUPERCHARGER ASSEMBLY INSTALLATION
2.1 OIL DRAIN LINE INSTALLATION
E. Apply a liberal amount of heavy grease to a
3/8"-18 NPT tap (not included), and gradually
thread into the hole. Clean the threads using a
clean rag and an approved solvent, such as carburetor cleaner. (See Fig. 2.1b.)
F. Apply an ample amount of silicone RTV to the
threads of the supplied 3/8"NPT x 1/2" hose
barb fitting installing the fitting in the previously tapped hole.
Fig 2.1-b
Fig 2.1-a
No deeper
than this line
*** NOTE ***
Do not use hand tools. Using an ordinary hammer will dent the pan. Use extreme caution not to
make the hole to big, or the drain fitting will not
fit.

2-2
P/N: 4809606
©2005 Paxton Automotive
All Rights Reserved, Intl. Copr.Secured
06SEP05 v4.0 FordV10(4809606v4.0)
A. Locate the supplied oil feed line in the Assy
1019350. On the passenger-side cylinder head,
there is a small pipe plug, near the front and
below the oil fill neck.
B. Using a 3/16" allen wrench, remove the allen
plug. Install the 1/8"NPT x -4 x 90° supplied
fitting. The 1/8"NPT x -4 x 90° fitting, when
installed, should be pointing straight up. (See
Fig. 2.2-a.)
C. After the supplied pulley is installed check and
confirm that the pulley is sitting flush with the
face of the factory pulley.
A. Locate the supercharger crank pulley Assembly
1015611 that is provided.
B. Bolt the Paxton Supercharger crank pulley to
the face of the stock crank pulley, using the
(3)supplied allen-head bolts. (See Fig. 2.3-a.)
*** NOTE ***
Apply Loc-Tite thread lock to threads.
Fig 2.2-a
Fig 2.3-a
Attach the oil feed line and route it over to the
driver-side underneath the alternator.
*** NOTE ***
Supercharger and oil feed line will be installed
during a later stage of the installation.
C. Install the 1/8"NPT x -4 x 90° oil feed line fitting
into the brass oil jet fitting into the blower. Use
only engine oil on the oil feed jet fitting. Using a
thread sealant may clog the oil jet orifice and
damage the supercharger.
*** NOTE ***
Support the oil jet with an open end wrench to
prevent snapping off the fitting during installation
of the 1/8"NPT x -4 x 90° fitting.)
2.3 CRANK PULLEY ASSEMBLY
INSTALLATION
2.2 OIL FEED ASSEMBLY
INSTALLATION

2-3
P/N: 4809606
©2005 Paxton Automotive
All Rights Reserved, Intl. Copr.Secured
06SEP05 v4.0 FordV10(4809606v4.0)
A. Slide the three black aluminum spacers, about
1/2" thick, over the three studs protruding from
the front of the driver’s side head.
B. Slide the supercharger mounting bracket over
the studs and spacers and attach with the supplied three nuts and one bolt.(Appendix “C”.)
Hand tighten only at this time.
C. Slide the mounting block between the super-
charger side-brace and the cylinder head.
Secure with the supplied 14mm x 2 x 50mm
long bolts, inserting through the side support
bracket through the mounting block and directly into the cylinder head. Tighten all of the fasteners that were left finger tight in Step “B”.
D. Bolt the supercharger to the mounting bracket
using the six 3/8-16 x 2.0" bolts and washers
provided. (See Fig. 2.4-a.)
E. Attach the oil feed line, installed during an ear-
lier step, to the 1/4"NPT x -4 x 90°NPT fitting
installed in the supercharger.
Fig 2.4-a
A. Install the spring loaded tensioner and tensioner
mounting plate to the front cover of the supercharger using two countersunk allen head bolts
and one 3/8-16 x 2.75"L bolt. (See Appendix
“E”.)
B Install the supercharger belt by looping the belt
around the crank pulley, and then around the
supercharger pulley. You will need to rotate the
tensioner out of the way to do this. The belt
must be positioned so it is against the face of
the two idler pulleys. The belt will be twisted
sideways when it goes over the front of the
idlers. Next, with the tensioner rotated out of
the way, slip the belt under the grooved idler
then under the smooth idler.(See Appendix
“D”.)
2.5 BELT TENSIONER/BELT INSTALLATION
2.4 S/C MOUNTING PLATE ASSEMBLY
INSTALLATION

2-4
P/N: 4809606
©2005 Paxton Automotive
All Rights Reserved, Intl. Copr.Secured
06SEP05 v4.0 FordV10(4809606v4.0)
This Page Left Intentionally Blank

3-1
P/N: 4809606
©2005 Paxton Automotive
All Rights Reserved, Intl. Copr.Secured
06SEP05 v4.0 FordV10(4809606v4.0)
3.1 DISCHARGE DUCT ASSEMBLY
INSTALLATION
Fig 3.1-a
A. Locate discharge Assembly 1016011.
B. Install the supplied 3.0" x 2.0"L sleeve to the
discharge duct by pushing the sleeve all the way
onto the discharge tube.
C. Attach the 4.25" x 2.0"L sleeve to the throttle
body with the clamps provided.
D. Position the discharge tube between the throttle
body and the supercharger. Slide both sleeves
into position and secure with the supplied hose
clamps.(See Fig 3.1-a.)
E. Attach idle air bypass hose to the nipple on the
discharge tube with the supplied clamp. (See
Appendix G.)
Section 3
DISCHARGE DUCT ASSEMBLY INSTALLATION
DISCHARGE TUBE
CLAMPS
SUPERCHARGER
THROTTLE BODY
COUPLINGS

3-2
P/N: 4809606
©2005 Paxton Automotive
All Rights Reserved, Intl. Copr.Secured
06SEP05 v4.0 FordV10(4809606v4.0)
This Page Left Intentionally Blank

4-1
P/N: 4809606
©2005 Paxton Automotive
All Rights Reserved, Intl. Copr.Secured
06SEP05 v4.0 FordV10(4809606v4.0)
Fig 4.1-a
Fig 4.2-a
A. Locate the supplied inlet duct Assembly
1015911 in the kit. Plug the air temp sensor,
previously removed in an earlier step, into the
open hole on the rubber elbow. (See Fig. 4.1-a.)
*** NOTE ***
Model year 2000 - engines will not have this sensor. Install the supplied plug into the location
where the IAT sensor would be. It is recommended
that sealant be used on this plug.
B. Slide the inlet hose with the attached aluminum
elbow in behind the supercharger and attach to
the inlet of the supercharger with the supplied
hose clamp. (See Appendix “F”.) The electrical
harness will go through the loop in the inlet
tube. (See Fig. 4.1-a.)
D. Rotate the rubber elbow toward the engine until
there is clearance between the electrical connection on the master cylinder and the elbow.
You will have to relocate the cruise control sensor with the supplied TEE assembly for clear-
ance. Attach the flex hose to the aluminum
elbow. Next, connect the factory PCV hose into
the hose coming from the intake elbow. (See
Fig. 4.1-a.)
C. Twist and rotate the elbow for the best possible
fit.
*** NOTE ***
The rubber elbow will point straight down, the
aluminum elbow will point outward slightly.)
IAT SENSOR
PCV HOSE
Section 4
SUPERCHARGER AIR INLET TUBE
A. Locate the new air filter cover. Attach the new
air cleaner to the aluminum four bolt flange
adapter using the supplied hose clamp. Bolt the
air flow meter to the adapter flange sandwiching the air filter cover in between. (See
Appendix “F”
.) Next, use a razor blade or
sharp knife to remove the rubber flap with the
large hole in it (located on the core support next
to the radiator on the driver
’s side). Fold the
other rubber flap against the side of the radiator.
This will help to seal the airbox. Remove the
three bolts that correspond with the mounting
holes in the filter cover and attach, re-using the
same bolts. (See Fig. 4.2-a.)
4.2 AIR FILTER ENCLOSURE
INSTALLATION
4.1 SUPERCHARGER INLET DUCT
B. Slide the inlet hose onto the Air Flow Meter
and secure with supplied hose clamps. Plug in
the Air Flow Meter wiring harness.
*** NOTE ***
There is a large Venturi that goes in after the MAF
sensor. This Venturi actually increases bottom
and mid range torque while limiting the total
boost to 8 PSI. Removal of this venturi will make
your vehicle slower and subject the engine to
damage due to overboost.

4-2
P/N: 4809606
©2005 Paxton Automotive
All Rights Reserved, Intl. Copr.Secured
06SEP05 v4.0 FordV10(4809606v4.0)
This Page Left Intentionally Blank

5-1
P/N: 4809606
©2005 Paxton Automotive
All Rights Reserved, Intl. Copr.Secured
06SEP05 v4.0 FordV10(4809606v4.0)
Fig 5.1-a
A. Install the supplied fan spacer to the factory fan
clutch. (See Fig. 5.1-a.)
B. Slide the fan and fan shroud (see Fig. 5.1-b)
simultaneously in place and screw the fan
onto the water pump.
Fig 5.1-b
5.1 REINSTALLING FAN & SHROUD
Section 5
REINSTALLING FAN AND SHROUD
C. Re-install the fan shroud, re-attach the coolant
reservoir. Re-install the upper radiator hose to
the radiator and the end marked “R” to the thermostat housing (r
e
versing the hose)
. This is
done to clear the supercharger bracket. Fill radiator reservoir per the manufacturer’s specification. (See Fig. 5.1-b.)

5-2
P/N: 4809606
©2005 Paxton Automotive
All Rights Reserved, Intl. Copr.Secured
06SEP05 v4.0 FordV10(4809606v4.0)
This Page Left Intentionally Blank

6-1
P/N: 4809606
©2005 Paxton Automotive
All Rights Reserved, Intl. Copr.Secured
06SEP05 v4.0 FordV10(4809606v4.0)
Fig 6.1-a
*** NOTE ***
Depressurize the fuel system by removing the cap
on the schraeder valve and depressing the valve
using a pen or small screwdriver to release fuel
pressure. Cover the valve with a rag while this is
being done to prevent fuel spray.
A. Locate the fuel filter inside the driver’s side
frame rail. Using the appropriate size fuel disconnect tool, disconnect the fuel line on the
output side of the fuel filter. Connect the fuel
pump inlet line to the disconnected port on the
fuel filter and the fuel pump outlet line to the
disconnected line going to the engine. (See Fig
6.1-a.)
*** NOTE ***
Hoses are left intentionally long so you have the
freedom in mounting.
B. Trim lines as necessary. Route all fuel lines
away from any heat source or moving parts and
secure using supplied clamps and wire ties.
A. Mount the relay in a safe, dry place in the
engine compartment away from any heat
source. Wire the relay as per Appendix “I”. On
terminal 86, tap in the pink with black stripe
wire that is located in the wiring harness
labeled “FS”going to the fuel pump.
A. Locate the fuel return line quick connect in the
frame rail on the driver’s side. Disconnect the
line and install the fuel control unit as per
Appendix “H”. Route all fuel lines away from
any heat source or moving parts and secure
using supplied wire-ties. Drill two 5/16" holes
in frame and mount the FCU using supplied
hardware. (See Fig 6.3-a.)
Section 6
FUEL PUMP INSTALLATION
Fig 6.3-a
*** NOTE ***
Some vehicles already have holes on the bottom
side of the frame rail that line up with the FCU
mounting holes.
6.4 FUEL CONTROL UNIT VACUUM
LINE
A. Next, run the supplied vacuum line up to the
engine compartment. On vehicles with vacuum
boosted brakes, cut the vacuum line going to
the brake booster and install the supplied vacuum TEE, connect the FCU vacuum line to the
TEE. On vehicles with Hydro-Boost brakes,
route the FCU vacuum line to the capped port
on the passenger side of the Intake manifold
next to the throttle body.
6.3 FUEL CONTROL UNIT INSTALLATION
6.2 FUEL PUMP RELAY
6.1 FUEL PUMP INSTALLATION

6-2
P/N: 4809606
©2005 Paxton Automotive
All Rights Reserved, Intl. Copr.Secured
06SEP05 v4.0 FordV10(4809606v4.0)
This Page Left Intentionally Blank

7-1
P/N: 4809606
©2005 Paxton Automotive
All Rights Reserved, Intl. Copr.Secured
06SEP05 v4.0 FordV10(4809606v4.0)
A. We know that you are anxious to get out and
drive your new vehicle, but please take a little
bit more time to perform these simple checkout steps.
B. Now that the work is done, it’s time to enjoy.
PAXTON Automotive wants to thank you for
choosing our product, and wants to remind you
that the performance and response of your vehi-
Section 7
CHECK-OUT PROCEDURES
7.1 CHECK-OUT PROCEDURES
A. Inspect all wiring harnesses and electrical connections. Make sure
that all items are properly routed, connected and secured.
B. Check all hoses, lines, and fittings for properly secured connections.
C. Make certain all fasteners, brackets, and clamps are installed and
properly tightened.
D. Check serpentine accessory belt and supercharger drive belts for
proper tension and alignment.
E. Cycle ignition key from “off” to the “on” position.
F. Check the entire fuel system for possible leaks.
G. Start engine and verify that the oil pressure is within normal range.
H. Allow the engine to come up to normal operating temperature.
I. Check the coolant level in the coolant recovery bottle and top off as
needed.
J. Check the following:
• Fluid Leaks
• Fluid Levels
• Belt Slippage
• Throttle Response
cle is now different than what you are used to.
Please drive cautiously until you have grown
accustomed to the feel of your vehicle.
C. Please see the service manual included in your
kit for information on the service and maintenance of your PAXTON Supercharger. Belt
tightening, troubleshooting, special tuning
requirements, and warranty information is also
included in the Service Manual.

7-2
P/N: 4809606
©2005 Paxton Automotive
All Rights Reserved, Intl. Copr.Secured
06SEP05 v4.0 FordV10(4809606v4.0)
This Page Left Intentionally Blank

Please understand that Paxton Automotive is constantly improving the NOVI supercharger system. As a
result, some of the parts in your kit may not look exactly like the parts pictured in this manual. This may
be due to pictures taken in pre-production, a change in materials, or even in a change in the design in the
vehicle from one model year to the next.
Rest assured that your supercharger kit is the most up-to-date kit that Paxton produces for your vehicle at
this time. All of the parts will install in the same manner as shown in this manual.
APPENDIX TABLE OF CONTENTS
APPENDIX DRAWING NO. REV TITLE OF DRAWING
A 1001911 H KIT, PARTS LIST
B 1016111 D ASY, NOVI 2000 SUPERCHARGER
C 1016311 C ASY, MOUNTING BRACKET
D 1015611 B ASY, CRANK PULLEY
E 1016911 E ASY, BELT TENSIONER
F 1015911 F ASY, AIR INTAKE
G 1016011 C ASY, AIR DISCHARGE
H 1017711 C ASY, FUEL CONTROL UNIT
I 1017721 J ASY, AUX. FUEL SYSTEM
J 1019344 NC ASY, S/C OIL RETURN
K 1019350 NC ASY, S/C OIL FEED
L 1018006 C ASY, WIRE EXT, CAM SENSOR
M 1018011 NC ASY, CRUISE CONTROL SENSOR RELOC.
A-1
P/N: 4809606
©2005 Paxton Automotive
All Rights Reserved, Intl. Copr.Secured
06SEP05 v4.0 FordV10(4809606v4.0)
APPENDIX

A-2
P/N: 4809606
©2005 Paxton Automotive
All Rights Reserved, Intl. Copr.Secured
06SEP05 v4.0 FordV10(4809606v4.0)
-----
-----
1300 BEACON PLACE OXNARD, CA 93033
TEL: (805) 604-1336 FAX: (805) 604-1337
CAD GENERATED DRAWING,
DO NOT MANUALLY UPDATE
SCALE:
SIZE DWG. NO.
D
SHEET 1 OF 1
REV.
DATE
APPROVALS
DRAWN
ENGINEERING
R&D
UNLESS OTHERWISE SPECIFIED
DIMENSIONS ARE IN INCHES
TOLERANCES ARE:
DECIMALS:
.XX± .01
.XXX±.005
MATERIAL
FINISH
NONE
SEE PARTS LIST
DO NOT SCALE DRAWING
WEIGHT
21:8 LBS
3:4
1016111
F
FRACTIONS:
ANGLES: ±1/16
±1/2•
ASY, S/C NOVI 2000
FORWARD ROTATION, 1998-2001 6.8L, SATIN
APPR.
-----
10/14/98
1998-2001 6.8L FORD F-350
RV
-----
-----
-----
3
1
3
23
2
22 6 REQD
21 3 REQD
5 4
7
32
2
4
20
33 3
17
15
2
16
26 230
AS REQD
31
32
?
4
6
9
8
34
LONG HUB AWAY
FROM S/C
11
13
14
12
194 REQD
27 2
28
29
AS REQD
S/C ROTATION
.62"
DESCRIPTION
GEARCASE ASY, N2K, CW, SAT
FTG, NIPPLE, 3/8"NPT x 5/8" HOSE BARB
FTG, PLUG, 3/8"NPT WITH MAGNET
WASHER, COPPER CRUSH, 3/8"
OIL JET, LONG
SCREW, SCHD, 3/8-16UNC-2A x 1.00"LG.
CAP, SHIPPING, T2
KEY, 1/8"SQ x 1.25"LG.
SPACER, PULLEY, .125"THK.
RET, CUP BLWR PULLEY
PULLEY RETAINER S/C
CAP, TAMPER PROOF
SCREW, HXHD, 3/8-24UNF-2A x 1.00"LG.
VOLUTE, MACH, N2K, STR, CW, EXHONE
CAP, SHIPPING, 3"
CAP, SHIPPING, 4"
NAMPLATE, NOVI 2000
DRIVE SCREW, #4 x .187", GR5
WASHER, ANTI-ROTATION
CLAMP, VOLUTE
1/4-20 x .50" SHCS
CAP, SHIPPING, T5
MATING RING, .090"THK.
SHIM, IMP, .003"THK.
SHIM, IMP, .005"THK.
SHIM, IMP, .010"THK.
MATING RING, .099"THK.
MATING RING, .103"THK.
MATING RING, .112"THK.
MATING RING, .090"THK
SHIM, IMP, .003"THK.
IMPLR, BAL, NOVI 2K, CCW
NUT, IMP 3/8" LH SL 6PT
PULLEY, S/C 8-GRV 3.75"
PART NO.
2H238-000
7P375-625
7P375-016
7J375-024
7PP375-090
7P375-104
008704
7U100-075
2H017-125
2H040-021
2H040-011
008718
7B375-110
2H018-061
008706
008719
2H100-035
7U100-021
2H017-021
2H100-045
7A250-050
008720
2H060-030
2H100-003
2H100-005
2H100-010
2H060-031
2H060-040
2H060-041
2H060-030
2H100-003
2H021-211
7F375-024
DEFAULT
QTY.
112211121111111114136100000001111
1
ITEM NO.
123456789
11121314151617181920212223242526272829303127323334
2
2
Appendix B 1016111 ASY, NOVI 2000 SUPERCHARGER

A-3
P/N: 4809606
©2005 Paxton Automotive
All Rights Reserved, Intl. Copr.Secured
06SEP05 v4.0 FordV10(4809606v4.0)
-----
-----
1300 BEACON PLACE OXNARD, CA 93033
TEL: (805) 604-1336 FAX: (805) 604-1337
CAD GENERATED DRAWING,
DO NOT MANUALLY UPDATE
SCALE:
SIZE DWG. NO.
D
SHEET 1 OF 1
REV.
DATE
APPROVALS
DRAWN
ENGINEERING
R&D
UNLESS OTHERWISE SPECIFIED
DIMENSIONS ARE IN INCHES
TOLERANCES ARE:
DECIMALS:
.XX± .01
.XXX±.005
MATERIAL
FINISH
NONE
SEE PARTS LIST
DO NOT SCALE DRAWING
WEIGHT
12.6 LBS
1:1.5
1016311
D
FRACTIONS:
ANGLES: ±1/16
±1/2•
ASY, S/C MTG BRKT
APPR.
-----
10/26/98
1998-2001 FORD 6.8L V-10
JFC
-----
-----
-----
15
14
13
17
12 10
TO TIMING
CHAIN COVER
9
10
8
TO ENGINE
STUD
11
7
2
3
8
9
10
5
6
20
6
6
TO S/C
18
19
TO ENGINE STUD
8
11
11
9
10
16
17
14
15
TO
ENGINE
ITEM NO.
123456789
1011121314151617181920
QTY.
1221121334311221266
1
PART NO.
4806913
7A437-126
7J438-072
4PFT010-150
7C140-051
7J438-091
4PFT010-021
2A017-875-10
7F008-021
7J312-000
7A250-100
7C080-025
1210501
4PFM017-071
7B312-100
1210502
4PFM017-081
7A375-200
7J375-044
7C140-055
DESCRIPTION
ASY, PLATE S/C MTG
SCREW, 7/16-14 x 1.25" HXHD GR8
WASHER, 7/16" FLAT HEA VY DUTY 15/16" x 7/64"THK GR8
BRKT, SIDE SUPPORT
SCREW, 14mm x 2 x 50mm HXHD CLASS 10.9
WASHER, 14mm FLAT 15mm I.D. x 28mm O.D. x 2.5mm
BLOCK, S/C MTG BRKT
SPACER, 7/8"O.D. x .430"LG x .406"I.D.
NUT, 8mm x 1.25" HEX w/SERRATED FLANGE CLASS B
WASHER, 5/16" FLAT SAE GR5
SCREW, 1/4-20 x 1.00" FLHS GR5
SCREW, 8mm x 1.25" x 25mm HXHD CLASS 12.9
ASY, PULLEY IDLER 8-GRV Ø3.535" P
RETAINER, IDLER PULLEY
SCREW, 5/16-24 x 1.00" HXHD SST w/NYLOCK
ASY, IDLER PULLEY SMOOTH FACE Ø3.25"
COLLAR, STEP w/THD 8-GRV
SCREW, 3/8-16 x 2.00" HXHD GR5
WASHER, .379"I.D. x .75"O.D. x .09"THK
SCREW, 14mm x 2 x 55mm HXHD CLASS 10.9
Appendix C 1016311 ASY, MOUNTING BRACKET

A-4
P/N: 4809606
©2005 Paxton Automotive
All Rights Reserved, Intl. Copr.Secured
06SEP05 v4.0 FordV10(4809606v4.0)
SCALE:
SIZE DWG. NO.
C
SHEET 1 OF 1
REV.
DATEAPPROVALS
DRAWN
ENGINEERING
R&D
UNLESS OTHERWISE SPECIFIED
DIMENSIONS ARE IN INCHES
TOLERANCES ARE:
DECIMALS:
.XX± .01
.XXX±.005
MATERIAL
FINISH
NONE
SEE PARTS LIST
DO NOT SCALE DRAWING
WEIGHT
?.? LBS
NONE
1015611
B
FRACTIONS:
ANGLES: ±1/16
±1/2•
S/C CRANK PULLEY / S/C BELT ROUTING
APPR.
-----
10/30/98
JFC
-----
-----
-----
1300 BEACON PLACE OXNARD, CA 93033
TEL: (805) 604-1336 FAX: (805) 604-1337
CAD GENERATED DRAWING,
DO NOT MANUALLY UPDATE
-----
-----
1998-2001 FORD 6.8L V10
IDLER
PULLEY
IDLE
PULLEY
S/C PULLEY
TENSIONER
PULLEY
4
STOCK HARMONIC BALANCER
1
23
DESCRIPTIONPART NUMBERQTYITEM
41
2A048-740
BELT, 8 GRV POLY COG 74.0" x 1-1/8" WIDE
11
4PFM018-011
PULLEY, CRANK 8 GRV '97-'98 5.4L F250 4WD
33
7J010-002
WASHER, FLAT 10.5mm I.D. x 20mm O.D. x 2mm THK
23
7C010-038
SCREW, 10mm x 1.5 x 35mm SHCS CLASS 12.9
Appendix D 1015611 ASY, CRANK PULLEY

A-5
P/N: 4809606
©2005 Paxton Automotive
All Rights Reserved, Intl. Copr.Secured
06SEP05 v4.0 FordV10(4809606v4.0)
-----
-----
1300 BEACON PLACE OXNARD, CA 93033
TEL: (805) 604-1336 FAX: (805) 604-1337
CAD GENERATED DRAWING,
DO NOT MANUALLY UPDATE
SCALE:
SIZE DWG. NO.
E
SHEET 1 OF 1
REV.
DATE
APPROVALS
DRAWN
ENGINEERING
R&D
UNLESS OTHERWISE SPECIFIED
DIMENSIONS ARE IN INCHES
TOLERANCES ARE:
DECIMALS:
.XX± .01
.XXX±.005
MATERIAL
FINISH
NONE
SEE PARTS LIST
DO NOT SCALE DRAWING
WEIGHT
----- LBS
NONE
1016911
E
FRACTIONS:
ANGLES: ±1/16
±1/2•
ASY, BELT TENSIONER
APPR.
-----
10/21/98
1998-2001 FORD 6.8L V10
JFC
-----
-----
-----
6
7
8
2
1
3
4
5
34567
8
2
1
ITEM
7J375-044
7A375-276
1210515
7C080-035
4PGM017-011
4PGM011-061
7A375-077
4PFT011-032
PART NO.
11111
1
2
1
QTY
DESCRIPTION
TENSIONER, BELT SPRING LOADED, MODIFIED
WASHER, 3/8"FLAT 13/16"OD x 1/16"THK
SCREW, 3/8-16 x 2.75" HXHD GR8
ASY, PULLEY 8-GRV Ø2.872" P SPRING TENSIONER
COLLAR, SPRING TENSIONER PULLEY
SCREW, 8mm x 1.25" x 35mm HXHD CLASS 8.8
SCREW, 3/8-16 x .75" FLHS GR8
PLATE, BELT TENSIONER '98 F350 V10
Appendix E 1016911 ASY, BELT TENSIONER

A-6
P/N: 4809606
©2005 Paxton Automotive
All Rights Reserved, Intl. Copr.Secured
06SEP05 v4.0 FordV10(4809606v4.0)
SCALE:
SIZE DWG. NO.
E
SHEET 1 OF 1
REV.
DATE
APPROVALS
DRAWN
ENGINEERING
R&D
UNLESS OTHERWISE SPECIFIED
DIMENSIONS ARE IN INCHES
TOLERANCES ARE:
DECIMALS:
.XX± .01
.XXX±.005
MATERIAL
FINISH
NONE
SEE PARTS LIST
DO NOT SCALE DRAWING
WEIGHT
-----
-----
1015911
G
FRACTIONS:
ANGLES: ±1/16
±1/2°
ASY, AIR INTAKE
APPR.
-----
-----
1998-2001 FORD 6.8L V-10
-----
-----
-----
1300 BEACON PLACE OXNARD, CA 93033
TEL: (805) 604-1336 FAX: (805) 604-1337
CAD GENERATED DRAWING,
DO NOT MANUALLY UPDATE
10/4/01
-----
-----
18 1 7PP375-001 PLUG, AIR INTAKE ELBOW
17 1 7P375-106 VALVE, PCV
16 1 7P625-016 COUPLING, INLINE HOSE 5/8"
15 .38' 7U033-000 HOSE, PCV 5/8" x 4.50"
14 1 7PP625-625 FTG, ELBOW 105° Ø5/8" x 5/8" HOSE PLASTIC
13 1 4PFT012-015 ELBOW, INLET 90° 4" x 4"ID MOD '98 F350 V10
12 2 7R002-064 CLAMP, HOSE #64
11 1 4PFT012-010 CST, TUBE AIR INTAKE
10 1' 7U035-001 HOSE, FLEX 3.5"I.D. x 1'
92 7R002-052 CLAMP, HOSE #52
81 4PFT017-011 RESTRICTOR, AIR INTAKE '98 F350 V10
71 7PS350-200 HOSE, TURBO 3.50" x 2" BLK
62 7R002-056 CLAMP, HOSE #56
54 7J006-093 WASHER, 1/4" ALUM AN960-D416
44 7A250-074 SCREW, 1/4-20 x .75" HXHD GR5
31 4PFT010-010 COVER, AIR FILTER '98 F350 V10
21 4PFH010-060 ADAPTER, AIR FILTER '98 F350 V10
11 8H040-095 FILTER, AIR 4.0" INLET x 5.0" w/CLAMP
ITEM QTY PART NUMBER DESCRIPTION
1. ITEM 17 IS REPLACEMENT FOR STOCK PCV VALVE.
NOTES: (UNLESS OTHERWISE SPECIFIED)
1
1
2
3
4
5
6
7
6
8
9
STOCK M.A.F.
10
9
11
18
12
13
14
15
16
2000-2001
MODEL YEAR ONLY
Appendix F 1015911 ASY, AIR INTAKE

A-7
P/N: 4809606
©2005 Paxton Automotive
All Rights Reserved, Intl. Copr.Secured
06SEP05 v4.0 FordV10(4809606v4.0)
- - - - -
- - - - -
1300 BEACON PLACE OXNARD, CA 93033
TEL: (805) 604-1336 FAX: (805) 604-1337
CAD GENERATED DRAWING,
DO NOT MANUALLY UPDATE
SCALE:
SIZE DWG. NO.
B
SHEET 1 OF 1
REV.
DATE
APPROVALS
DRAWN
ENGINEERING
R&D
UNLESS OTHERWISE SPECIFIED
DIMENSIONS ARE IN INCHES
TOLERANCES ARE:
DECIMALS:
.XX± .01
.XXX±.005
MATERIAL
FINISH
NONE
SEE PARTS LIST
DO NOT SCALE DRAWING
WEIGHT
- - - - - LBS
?:?
1016011
C
FRACTIONS:
ANGLES: ±1/16
±1/2•
ASY, AIR DISCHARGE
APPR.
- - - - -
10/28/98
1998-2001 FORD 6.8L V10
RV
- - - - -
- - - - -
- - - - -
6
5
4
STOCK IDLE AIR HOSE
3
1
2
1
5
DESCRIPTIONPART NO.QTYITEM
426
5
3
1
111
2
1
2
7PS425-200
7PS300-200
7R002-048
7R002-012
4PFT012-020
7R002-072
CST, TUBE DISCHARGE '98 F350 V10
HOSE, 4.25"I.D. x 2" LG BLK
HOSE, TURBO 3.00"I.D. x 2" LG BLK
CLAMP, HOSE #48
CLAMP, HOSE #12
CLAMP, HOSE #72
Appendix G 1016011 ASY, AIR DISCHARGE

A-8
P/N: 4809606
©2005 Paxton Automotive
All Rights Reserved, Intl. Copr.Secured
06SEP05 v4.0 FordV10(4809606v4.0)
-----
-----
1300 BEACON PLACE OXNARD, CA 93033
TEL: (805) 604-1336 FAX: (805) 604-1337
CAD GENERATED DRAWING,
DO NOT MANUALLY UPDATE
SCALE:
SIZE DWG. NO.
D
SHEET 1 OF 1
REV.
DATE
APPROVALS
DRAWN
ENGINEERING
R&D
UNLESS OTHERWISE SPECIFIED
DIMENSIONS ARE IN INCHES
TOLERANCES ARE:
DECIMALS:
.XX± .01
.XXX±.005
MATERIAL
FINISH
NONE
SEE PARTS LIST
DO NOT SCALE DRAWING
WEIGHT
----- LBS
NONE
1017711
C
FRACTIONS:
ANGLES: ±1/16
±1/2°
ASY, FUEL CONTROL
APPR.
-----
11/12/98
1998-2001 FORD 6.8L V10
JFC
-----
-----
-----
1. P/N 1010711 HOSE LENGTH IS LEFT LONG INTENTIONALLY.
CUSTOMER WILL ROUTE AND CUT HOSE TO SUITABLE LENGTH.
9
8
TO FUEL RAIL
10
6
5
SEE NOTE 1
7
TO GAS TANK
6
5
SEE NOTE 1
VEHICLE FRAME RAIL
23
43
1
INSTALL BETWEEN MANIFOLD
AND BRAKE POWER BOOSTER
ITEM
123456789
10
11
PART NO.
1211806
7A250-074
7J250-022
7F250-021
1010711
7R001-004
7P312-020
7P312-018
7P375-250
7U030-218
7T312-001
DESCRIPTION
ASY, FUEL CONTROL UNIT
SCREW, 1/4-20 x .75" HXHD GR5
WASHER, 1/4" FLAT SAE GR5
NUT, 1/4-20 HEX GR5 w/NYLON INSERT
ASY, FUEL LINE 1/4"I.D. x 30" LG '98 F350 V10 w/NOVI
CLAMP, HOSE #4
FTG, CONN. 90° FUEL RAIL TO HOSE 8.3mm HOSE x 7.9mm TUBE
FTG, FUEL STRAIGHT MALE '98 F350 V10 w/NOVI
TEE, 3/8" x 1/4" x 3/8" HOSE BARBS
HOSE, VAC 7/32"I.D. x 96" LG
TOOL, FUEL LINE RELEASE
QTY
1242221118'1
Appendix H 1017711 ASY, FUEL CONTROL UNIT

A-9
P/N: 4809606
©2005 Paxton Automotive
All Rights Reserved, Intl. Copr.Secured
06SEP05 v4.0 FordV10(4809606v4.0)
-----
-----
1300 BEACON PLACE OXNARD, CA 93033
TEL: (805) 604-1336 FAX: (805) 604-1337
CAD GENERATED DRAWING,
DO NOT MANUALLY UPDATE
SCALE:
SIZE DWG. NO.
D
SHEET 1 OF 1
REV.
DATE
APPROVALS
DRAWN
ENGINEERING
R&D
UNLESS OTHERWISE SPECIFIED
DIMENSIONS ARE IN INCHES
TOLERANCES ARE:
DECIMALS:
.XX± .01
.XXX±.005
MATERIAL
FINISH
NONE
SEE PARTS LIST
DO NOT SCALE DRAWING
WEIGHT
2.4 LBS
1:2
1017721
K
FRACTIONS:
ANGLES: ±1/16
±1/2•
ASY, AUX FUEL SYSTEM
APPR.
-----
11/17/98
1998-2001 FORD 6.8L V-10
JFC
-----
-----
-----
87
87A
85
86
30
NOT USED
DETAIL OF ITEM 15
NOTES: UNLESS OTHERWISE SPECIFIED
1. ITEM 11, HOSE LENGTH IS LEFT LONG INTENTIONALLY.
CUSTOMER WILL ROUTE AND CUT HOSE TO SUITABLE LENGTH.
2. ALL FUEL FITTTINGS MUST BE FULLY TIGHTENED PRIOR TO SHIPMENT.
3. THESE ITEMS SHIP LOOSE.
22
TO SWITCHED 12V SOURCE
(FUEL PUMP RELAY TRIGGER)
(TERM. #86)
242
TO FUSE BOX BATTERY
POS(+) (TERM. #30)
20
25
23
TO CHASSIS
GROUND
(TERM. #85)
24
3
19
21
15
164 PLACES
18
17
TO NEG.(-) TERMINAL ON FUEL
PUMP (TERM. #85)
TO POS.(+) TERMINAL
ON FUEL PUMP
(TERM. #87)
FROM FUEL
TANK
14
12
APPROX.
20" LONG
11 1
12
7
6
1
5 4
7
6
12
10 8
2
3
5 4
EXISTING VEHICLE FRAME
12
13
TO FUEL RAIL
11 1
APPROX.
20" LONG
3
ITEM NO.
123456789
101112131415161718192021222324
25
QTY.
122442221
2
3.33'
41114
2'
3'
.66'
6'
6'16'
2
2
PART NO.
8F001-002
7R003-029
7U314-002
7J250-022
7F250-021
7J375-024
7P312-017
7L010-001
7E010-052
7F006-001
7U031-018
7R001-004
7P312-016
7P312-020
5W001-016
5W001-044
5W018-010
5W018-030
5W018-020
5W018-020
5W018-010
5W001-013
5W001-032
5W001-011
5W001-045
DESCRIPTION
PUMP, FUEL, INLINE, WALBRO
CLAMP, LOOP CUSIONED 1-7/16"I.D.
MOUNT, 1.00"O.D. x .760" w/(2) 1/4-20 x .50" STUD
WASHER, 1/4" FLAT SAE GR5
NUT, 1/4-20 HEX w/NYLON INSERT GR5
WASHER, COPPER 3/8"
FTG, 9mm, BARB
WASHER, #10 LOCK INT.
SCREW, #10 x .50" PAN HD SHT MTL
NUT, 6-32 HEX GR5 w/NYLON INSERT
HOSE, FUEL INJ 5/16"I.D. x 20.00"LG
CLAMP, HOSE #4
FTG, FUEL STRAIGHT 5/16" HOSE
FTG, 90° FUEL RAIL TO HOSE 8.3mm HOSE x 7.9mm TUBE
RELAY, 30AMP, 12 VDC
DISCONNECT, FEMALE SPADE 10-12 GAUGE
WIRE, 18AWG x 24.00"LG, RED
WIRE, 18AWG x 36.00"LG, GREY
WIRE, 18AWG x 8.00"LG, BLACK
WIRE, 18AWG x 72.00"LG, BLACK
WIRE, 18AWG x 72.00"LG, RED
CONNECTOR, BUTT 14-16AWG
TUBING, SPLIT POLY LOOM 1/4" x 72.00"LG
TERMINAL, RING 14-16AWG
TERMINAL, RING 14-16AWG
Appendix I 1017721 ASY, SLUPERCHARGER OIL RETURN

A-10
P/N: 4809606
©2005 Paxton Automotive
All Rights Reserved, Intl. Copr.Secured
06SEP05 v4.0 FordV10(4809606v4.0)
-----
-----
1300 BEACON PLACE OXNARD, CA 93033
TEL: (805) 604-1336 FAX: (805) 604-1337
CAD GENERATED DRAWING,
DO NOT MANUALLY UPDATE
SCALE:
SIZE DWG. NO.
C
SHEET 1 OF 1
REV.
DATE
APPROVALS
DRAWN
ENGINEERING
R&D
UNLESS OTHERWISE SPECIFIED
DIMENSIONS ARE IN INCHES
TOLERANCES ARE:
DECIMALS:
.XX± .01
.XXX±.005
MATERIAL
FINISH
NONE
SEE PARTS LIST
DO NOT SCALE DRAWING
WEIGHT
0.8 LBS
3:4
1019344
NC
FRACTIONS:
ANGLES: ±1/16
±1/2•
ASY, OIL RETURN
APPR.
-----
8/14/01
1998-2001 FORD 6.8L V-10
G. COMPTON
-----
-----
-----
NOTES: UNLESS OTHERWISE SPECIFIED
1. SHIP THIS ITEM LOOSE.
2
3
TO OIL PAN
1
3
TO S/C ASY
OIL PAN
PUNCH HOLE
WITH ITEM 4
1.00
1.75
LOCATION FOR ITEM 2
(FRONT OF OIL PAN)
1
ITEM NO.
123
4
QTY.
2.46'
121
PART NO.
7U033-000
7P375-039
7R002-010
7T640-011
DESCRIPTION
HOSE, OIL RETURN, 5/8" x 29.5" LG.
FTG, HOSE END, 3/8"NPT x 5/8" BARB
CLAMP, HOSE, #10
PUNCH, OIL PAN
Appendix J 10179344 ASY, SLUPERCHARGER OIL RETURN

A-11
P/N: 4809606
©2005 Paxton Automotive
All Rights Reserved, Intl. Copr.Secured
06SEP05 v4.0 FordV10(4809606v4.0)
-----
-----
1300 BEACON PLACE OXNARD, CA 93033
TEL: (805) 604-1336 FAX: (805) 604-1337
CAD GENERATED DRAWING,
DO NOT MANUALLY UPDATE
SCALE:
SIZE DWG. NO.
C
SHEET 1 OF 1
REV.
DATE
APPROVALS
DRAWN
ENGINEERING
R&D
UNLESS OTHERWISE SPECIFIED
DIMENSIONS ARE IN INCHES
TOLERANCES ARE:
DECIMALS:
.XX± .01
.XXX±.005
MATERIAL
FINISH
NONE
SEE PARTS LIST
DO NOT SCALE DRAWING
WEIGHT
0.2 LBS
3:4
1019350
NC
FRACTIONS:
ANGLES: ±1/16
±1/2•
ASY, S/C OIL SUPPLY
APPR.
-----
11/15/01
1998-2001 FORD 6.8L V-10
G. COMPTON
-----
-----
-----
2
TO S/C ASY
1
TO CYLINDER HEAD
2
ITEM NO.
1
2
QTY.
1
2
PART NO.
7U250-000-465
7P125-004
DESCRIPTION
HOSE, OIL SS BRAID, AN4 x AN4, 46.5" LG.
FTG, 90° ELBOW, AN4 x 1/8"NPT
Appendix K 101793450 ASY, SLUPERCHARGER OIL FEED

09/06/05
S U P E R C H A R G E R S
Paxton Automotive . 1300 Beacon Place . Oxnard CA 93033
888 9-PAXTON . FAX (805) 604-1337 • www.paxtonautomotive.com
 Loading...