


Owner’s Installation Guide for the
Paxton Automotive
Novi 1200 Supercharger
for the
Dodge Hemi
Paxton Automotive . 1300 Beacon Place . Oxnard CA 93033
(805 604-1336 . FAX (805) 604-1337
DP/N: 4809650 - v1.0 11/09/04

FOREWORD
roper installation of this supercharger kit requires general
automotive mechanic knowledge and experience. Please
P
browse through each step of this instruction manual prior to
beginning the installation to determine if you should refer the job
to a professional installer/technician. Please call Paxton Automotive
for installers in your area.
All rights reserved. No part of this publication may be reproduced, transmitted, transcribed,
or translated into another language in any form, by any means without written permission
P/N: 4809650
©2004 Paxton Automotive
All Rights Reserved, Intl. Copr. Secured
11NOV04 v1.0 03DodgeHemi(4809650v1.0)
© 2005 PAXTON AUTOMOTIVE
of Paxton Automotive.
ii

TABLE OF CONTENTS
FOREWORD ..........................................................ii
TABLE OF CONTENTS ........................................................iii
RECOMMENDED TOOLS FOR INSTALLATION ................................iv
PARTS LIST ..........................................................v
1. COMPONENT REMOVAL . . . . . . . . . . . . . . . . . . . . . . . . . . . . . . . . . . . . . . . . . . . . . . . 1-1
2. OIL FEED ASSEMBLY . . . . . . . . . . . . . . . . . . . . . . . . . . . . . . . . . . . . . . . . . . . . . . . . . . 2-1
3. OIL DRAIN ASSEMBLY .................................................3-1
4. HEATER HOSE RELOCATION . . . . . . . . . . . . . . . . . . . . . . . . . . . . . . . . . . . . . . . . . . . 4-1
5. COOLANT RESERVOIR RELOCATION ....................................5-1
6. SUPERCHARGER MOUNTING BRACKET .................................6-1
7. AIR INTAKE ASSEMBLY ................................................7-1
8. FUEL SYSTEM ASSEMBLY ..............................................8-1
9. ENGINE CONTROL UNIT INSTALLATION ................................. 9-1
10. CHARGE COOLER INSTALLATION . . . . . . . . . . . . . . . . . . . . . . . . . . . . . . . . . . . . . .10-1
11. HEAT EXCHANGER INSTALLATION . . . . . . . . . . . . . . . . . . . . . . . . . . . . . . . . . . . . .11-1
12. SURGE AND RESERVOIR TANK INSTALLATION ..........................12-1
13. WATER HOSE ROUTING ................................................13-1
14. WATER PUMP WIRING . . . . . . . . . . . . . . . . . . . . . . . . . . . . . . . . . . . . . . . . . . . . . . . . . 14-1
15. FINAL ASSEMBLY AND CHECK . . . . . . . . . . . . . . . . . . . . . . . . . . . . . . . . . . . . . . . . . 15-1
iii
All Rights Reserved, Intl. Copr. Secured
11NOV04 v1.0 03DodgeHemi(4809650v1.0)
©2004 Paxton Automotive
P/N: 4809650

RECOMMENDED TOOLS FOR INSTALLATION
2002 Dodge Hemi
efore beginning this installation, please read
through this entire instruction booklet and
the Street Supercharger System Owner's
B
Manual which includes the Automotive Limited
Warranties Program and the Warranty Registration
form.
Paxton supercharger systems are performance
improving devices. In most cases, increases in
torque of 30-35% and horsepower of 35-45% can
be expected with the boost levels specified by
Paxton Automotive. This product is intended for
use on healthy, well maintained engines.
Installation on a worn-out or damaged engine is
not recommended and may result in failure of the
engine as well as the supercharger. Paxton
Automotive is not responsible for engine damage.
Installation on new vehicles will not harm or
adversely affect the break-in period so long as factory break-in procedures are followed.
For best performance and continued durability,
please take note of the following key points:
1. Use only premium grade fuel 91 octane or
higher (R+M/2).
2. The engine must have stock compression
ratio.
3. If the engine has been modified in any way,
check with Paxton prior to using this product.
4. Always listen for any sign of detonation
(pinging) and discontinue hard use (no
boost) until problem is resolved.
5. Perform an oil and filter change upon completion of this installation and prior to test
driving your vehicle. Thereafter, always use a
high grade SF rated engine oil or a high
quality synthetic, and change the oil and filter every 3,000 miles or less. Never attempt
to extend the oil change interval beyond
3,000 miles, regardless of oil manufacturer's
claims as potential damage to the supercharger may result.
6. Before beginning installation, replace all
spark plugs that are older than 1 year or
10,000 miles with original heat range plugs
as specified by the manufacturer and reset
timing to factory specifications (follow the
procedures indicated within the factory
repair manual and/or as indicated on the
factory underhood emissions tag). Do not
use platinum spark plugs unless they are
original equipment. Change spark plugs at
least every 15,000 miles and spark plug
wires at least every 50,000 miles.
RECOMMENDED TOOLS
FOR INSTALLATION:
1. Factory Repair Manual
2. 3/8" Socket and Drive Set: SAE & Metric
3. 1/2" Socket and Drive Set: SAE & Metric
4. 3/8" NPT Tap and Handle
5. Adjustable Wrench
6. Open End Wrenches: Metric and Standard
7. Center Punch and a 5/8" Tapered Punch
8. Springlock 3/8" and 5/8”Fuel Fitting
Disconnect Tool
9. 5 Quarts SH/CF Rated Quality Engine Oil
10. Oil Filter and Wrench
11. Flat #2 Screwdriver
12. Phillips #2 Screwdriver
13. Heavy Grease
14. Silicone Sealer
15. Drill Motor
16. 1/8", 3/16", 27/64" Drill Bits
17. Wire Strippers and Crimpers
18. Utility Knife
19. Power Steering Pulley/Puller & Installer
20. Pliers
If your vehicle has in excess of 10,000 miles
since its last spark plug change, then you will
also need:
21. Spark Plug Socket
22. NEW Spark Plugs
P/N: 4809650
©2004 Paxton Automotive
All Rights Reserved, Intl. Copr. Secured
11NOV04 v1.0 03DodgeHemi(4809650v1.0)
iv

2003 Dodge Hemi
Part No. 1201220
PARTS LIST
IMPORTANT: Before beginning installation, verify that all parts are included in the kit. Report any shortages or
damaged parts immediately.
PART NO. DESCRIPTION QTY PART NO. DESCRIPTION QTY
4PCH110-044 S/C MNTG BRKT ASSY '03 HEMI 1
4PCH 010-044 SUPERCHARGER MTG PLT 1
4PCH010-010 SUPPORT S/C MOUNTING PLT 1
4PCH010-020 SUPPORT S/C MTG PLT 1
4PCH010-030 ALTERNATOR BRACE 1
4PCH017-011 COLLAR, IDLER PULLEY 1
7A312-125 5/16" x 18 x 1.25" HXHD GR5 BOLT 2
7K312-001 WASHER AN 6
7A312-100 5/16" x 18 x 1.00" HXHD GR5 BOLT 4
7C080-120 8mm x 120mm x 1.25" 1
7C010-130 10mm x 130 x 1.5" BOLT 1
7J010-002 10mm WASHER 1
7J012-092 12mm WASHER 2
7C012-100 12mm x 1.00" x 1.75" BOLT 1
7G010-175 12mm x 1.75" NUT 1
4FR016-150 SMOOTH IDLER PULLEY 1
7A437-325 7/16" x 3.25" x 14 BOLT 1
7K437-001 WASHER AN 2
7J438-072 7/16" WASHER .94"OD x .109" THICK 1"
7F437-000 7/16" x 14 NYLOC NUT 1
4PCH130-026 OIL FEED ASSY '03 HEMI
7P125-108 1/8"NPT NIPPLE 1" 1
7P125-104 1/8"NPT FEMALE TEE 1
7P125-004 1/8"NPT TO -4 x 90° JIC FITTING 1
7U250-090-240 OIL FEED HOSE -4 x 26" LONG 1
7P125-005 1/4" x -4 JIC FITTING 1
4PCH130-036 OIL DRAIN ASSY '03 HEMI
7P375-053 3/8"NPT x -8 FTG 1
7P500-500 - 8 x 90° ALUM FITTING 1
7U030-036 1/2" OIL DRAIN HOSE 48"
7R004-002 STEPLESS CLAMP 17.0-70 2
7R001-006 #6 STNL HOSE CLAMP, NARROW 2
7R004-687 CLAMP, 13/16" ONE EAR 2
7P375-055 3/8"NPT x 1/2" HOSE BARB 1
4PCH112-020 DISCHARGE ASSY '03 HEMI
4PCH012-020 DISCHARGE DUCT, '03 DODGE HEMI 1
7P156-082 5/32" TEE 2
7PS350-275 SLEEVE REDUCER 3.5"-2.75" 1
7R002-016 #16 HOSE CLAMP 5
7R002-056 #56 HOSE CLAMPS 1
7U030-046 5/32" VAC HOSE 3'
7U034-016 1" GS HOSE 2'
8D001-001 STANDARD COMPRESSOR BYPASS 1
7P100-103 1" WELD ON BUNG 1
7PS275-200 SLEEVE 2.75" x 2" 2
7R002-044 #44 HOSE CLAMP 4
4PCH212-010 AIR INTAKE ASSY
4PCH013-010 AIR BOX, WELDED, ROTO 1
4HS110-010 FLANGE ASSY, AIR BOX 1
8H040-050 AIR FILTER 3.5" FLG x 7"L 1
7R002-056 # 56 HOSE CLAMPS 4
7R002-060 #60 HOSE CLAMP 2
8H040-050 FILTER 3.50" x 7.0" LONG 1
7U035-001 FLEX HOSE 3.5" x 12" 1'
4PCH112-010 INLET DUCT, ASSY 1
7P100-103 BUNG WELD ON,
7P500-112 BUNG WELD ON, 1/2"NPT 1
7P100-578 AIR TEMP SENSOR BUNG 1
7PS275-200 SLEEVE, 2.75" x 2.00" 2
7PS350-200 SLEEVE,3.5" x 2.00" 1
7P500-026 1/2"NPT x 3/4" HOSE BARB 1
7U038-012 3/4" x 90° HOSE 4" x 12" LONG 2
7P375-075 3/4" HOSE MENDER 1
7A250-126 1/4" x 20 x 1" HXHD BOLT 4
7F250-021 1/4" NYLOC 4
7K250-001 1/4"AN WASHERS 8
4PCH101-001 FUEL PUMP ASSY '03 HEMI
7U031-018 5/16" EFI FUEL HOSE 24"
7U031018 5/16" EFI FUEL HOSE 9"
7U031018 5/16" EFI FUEL HOSE 1.8"
7U031018 5/16" EFI FUEL HOSE 1.8"
7U031018 5/16" EFI FUEL HOSE 6.5"
7U033-010 FUEL/PWR STEERING HOSE 5/8" 2.0"
7P312-017 FUEL PUMP FITTING 1
7P312-020 FUEL LINE FITTING 90° 1
7P312-016 5/16" x 5/16" FORD FITTING 1
8F001-500 FUEL PUMP PURBURG 1
7R003-028 ADEL CLAMP 2-3/8" .26" HOLE 2
7P312-082 TEE HOSE BARB 2
7R004-003 14.5 STEPLESS CLAMP 14
7E010-075 SHEET METAL SCREW 2
7A250-101 1/4" x 20 x 1.0" BOLT 2
7F250-021 NYLOC NUT 2
7J006-094 6mm SS WASHER 4
7F010-024 NYLOC NUT 2
7C010-075 BOLT 2
7J010-001 # 10 WASHER 4
4PCH010-070 FUEL PUMP/FMU MTG BRKT 1
4PCH238-068 FMU ASSY '03 HEMI
6PZ001-001 DECAL PAXTON FMU 1
6Z010-101 FMU HOUSING (BLUE ANODIZED) 1
6Z010-111 FMU VALVE COVER 1
6Z010-132 COVER FMU w/SPRING NO LZR, 1
6Z020-130 SML DIAPHRAM 1
6Z020-140 LRG DIAPHRAM 1
6Z030-150 BRACKET FMU 1
6Z040-160 PISTON, FMU 1
6Z050-161 FMU WASHER, 6:1/30LB PLATED 1
6Z060-181 SHIM, FMU 1
6Z070-010 FMU RING SPCER 6:1 1
6Z080-011 RETAINER,FMU SPRING 4.3 GM 2
6Z090-010 SPRING FMU 1
7C010-050 10-24 x .50" SHCS GR8 PLT 6
7C010-075 10-24 x 3/4" SHCS GR5 ZINC 4
7C024-025 10-24 x 1/4" PHIL HEAD 3
7P125-025 1/8"NPT x 5/32" HOSE 90° 1
7P125-031 1/8"NPT x 90° 5/16" HOSE BARB 1
7P125-032 1/8"NPT x 5/16" STR HOSE BARB 1
7u030-218 7/32" VAC HOSE 12"
7P157-219 5/32" x 7/32" UNION 1
7P156-082 5/32" TEE 1
7U030-046 5/32" VACUUM HOSE 10'
7U100-030 O-RING, FMU 1
8PN101-180 POWER CHARGE COOLER ASSY '03 HEMI
8N003-070 COOLER DUC T,LT1,GROUND
8N101-001 WELDED CORE, ASSY W/ENDS ONLY
8N003-011 INLET DUCT, MACH
8PN105-010 WATER TANK MTG ASSY '03 HEMI
8N055-030 RESERVOIR 1
4PCH010-110 BRKT RESERVOIR 1
7A250-050 1/4-20 SHD 1/2" LONG 3
7A250-074 1/4-20 HHD, 3/4" LONG PLTD 3
7J006-093 1/4" WASHER 8
7U038-000 3/4" HEATER HOSE CUT TO FIT 14"
7U038-012 3/4" 90° HOSE 4" x 12" 5
7U030-065 3/4" HOSE (TANK-PUMP) 1
7R007-001 NYLON CLAMP 1-1/8" 16
7P500-026 1/2" TO 3/4" 90° HOSE BARB 2
7U038-150 3/4" x 150° HOSE 2
7P375-075 3/4" HOSE MENDER 1
7F250-021 1/4" NYLOCK NUTS 3
7J250-150 1/4" FENDER WASHERS 3
v
All Rights Reserved, Intl. Copr. Secured
11NOV04 v1.0 03DodgeHemi(4809650v1.0)
©2004 Paxton Automotive
P/N: 4809650

2003 Dodge Hemi
Part No. 1201220-P
PARTS LIST
IMPORTANT: Before beginning installation, verify that all parts are included in the kit. Report any shortages or
damaged parts immediately.
PART NO. DESCRIPTION QTY
8PN104-010 ASSY SURGE TANK '03 HEMI
8N056-060 SURGE TANK 1
7E010-075 #12 SHEET METAL SCREWS 2
7P500-078 1/2" x 3/4" STR HOSE BARB 2
8N055-050 PLASTIC CAP, SURGE TANK 1
7J006-093 6mm WASHER, PLATED 4
7C060-016 M6 x 1.00" x 16 HXHD 2
7U100-055 6" TIE-WRAP 10
7P500-078 1/2" x 3/4" STR HOSE BARB 3
7P500-026 1/2" x 3/4" 90° HOSE BARB 1
7U100-044 4" TIE-WRAP 5
7A250-050 1/4-20 SHCS 1/2" LONG 2
8N010-130 MTG TAB 1
8PN107-010 WATER PUMP MTG ASSY, '03 HEMI
8F001-402 PUMP, HELLA WATER 1
7R003-027 ADEL CLAMP 1
5W001-009 16-14GA MALE SLIDE INSULATED 2
5W001-010 16-14GA FEMALE INSULATED 2
5W001-019 10-12GA BUTT CON INSUL 1
5W001-042 12-10GA x 3/16" RING TERMINAL 1
5W001-017 3/8" RING TERMINAL 12GA 1
5W001-030 14GA STRD WIRE BLACK 3'
5W001-014 FUSE HOLDER 10GA WIRE 1
5W001-011 16-14GA EYELET .25" HOLE 2
5W001-015 FUSE, BLADE TYPE 20AMP 1
5WOO1-009 16-14GA MALE SLIDE INSULATED 1
7A250-050 1/4-20 x .50" SHCS ZINC PLTD 1
7J006-093 6mm WASHER, PLTD 1
5W001-022 T-TAP CONN 14-16AWG 1
8F101-510 H
8PN106-010 WATER CLR MTG ASSY, '03 HEMI
8N006-010 WATER COOLER 1
7P500-026 1/2"NPT TO 3/4" HOSE BARB 90° 2
7A250-074 1/4-20 HHD 3/4" LONG 8
7F250-021 1/4-20 NYLOCK NUT 8
7J250-001 1/4" FLAT WASHER 16
1016419 SUPERCHARGER ASSY
2A047-119 ACCESSORY DRIVE BELT
4PCH114-018 COOLANT RESV ASSY
7R002-016 # 16 HOSE CLAMPS 3
2A017-876-01 .875" x .328" x .952" LONG SPACERS 3
7C060-050 6mm x 1.0" x 50mm LONG BOLTS 3
7J006-093 6mm LARGE OD FLAT WASHERS 3
4PCH014-010 FORMED COOLANT TUBE 1
7U038-012 3/4" x 90° HOSE 4" x 12" 1
7P375-045 45° STREET ELBOW 2
7R002-012 #12 HOSE CLAMP 2
7U133-065 “J” SHAPED HOSE
7P500-001 1/2" HOSE UNION 1
5A001-110 ENGINE CONTROL UNIT
5A001-111 PROGRAMMED ENGINE CONTROL UNIT
2O PUMP WIRING ASSY 1
P/N: 4809650
©2004 Paxton Automotive
All Rights Reserved, Intl. Copr. Secured
11NOV04 v1.0 03DodgeHemi(4809650v1.0)
vi

2003 Dodge Hemi
Part No. 1201220-P
PARTS LIST
IMPORTANT: Before beginning installation, verify that all parts are included in the kit. Report any shortages or
damaged parts immediately.
PART NO. DESCRIPTION QTY PART NO. DESCRIPTION QTY
4PCH110-044 S/C MNTG BRKT ASSY '03 HEMI 1
4PCH 010-044 SUPERCHARGER MTG PLT 1
4PCH010-010 SUPPORT S/C MOUNTING PLT 1
4PCH010-020 SUPPORT S/C MTG PLT 1
4PCH010-030 ALTERNATOR BRACE 1
4PCH017-011 COLLAR, IDLER PULLEY 1
7A312-125 5/16" x 18 x 1.25" HXHD GR5 BOLT 2
7K312-001 WASHER AN 6
7A312-100 5/16" x 18 x 1.00" HXHD GR5 BOLT 4
7C080-120 8mm x 120mm x 1.25" 1
7C010-130 10mm x 130mm x 1.5" BOLT 1
7J010-002 10mm WASHER 1
7J012-092 12mm WASHER 2
7C012-100 12mm x 100 x 1.75" BOLT 1
7G010-175 12mm x 1.75" NUT 1
4FR016-150 SMOOTH IDLER PULLEY 1
7A437-325 7/16" x 3.25" x 14 BOLT 1
7K437-001 WASHER AN 2
7J438-072 7/16" WASHER .94"OD x .109" THICK 1
7F437-000 7/16" x 14 NYLOC NUT 1
4PCH130-026 OIL FEED ASSY '03 HEMI
7P125-108 1/8"NPT NIPPLE 1" 1
7P125-104 1/8"NPT FEMALE TEE 1
7P125-004 1/8"NPT TO -4 x 90° JIC FITTING 1
7U250-090-240 OIL FEED HOSE -4 x 26" LONG 1
7P125-005 1/4" x -4 JIC FITTING 1
4PCH130-036 OIL DRAIN ASSY '03 HEMI
7P375-053 3/8"NPT x -8 FTG 1
7P500-500 -8 x 90° ALUM FITTING 1
7U030-036 1/2" OIL DRAIN HOSE 48"
7R004-002 STEPLESS CLAMP 17.0-70 2
7R001-006 #6 STNL HOSE CLAMP, NARROW 2
7R004-687 CLAMP, 13/16" ONE EAR 2
7P375-055 3/8"NPT x 1/2" HOSE BARB 1
4PCH112-028 DISCHARGE ASSY '03 HEMI
4PCH012-020 DISCHARGE DUCT, '03 DODGE HEMI 1
7P156-082 5/32" TEE 2
7PS350-275 SLEEVE REDUCER 3.5" - 2.75" 1
7R002-016 #16 HOSE CLAMP 5
7R002-056 #56 HOSE CLAMPS 1
7U030-046 5/32" VAC HOSE 3'
7U034-016 1" GS HOSE 2'
8D001-001 STANDARD COMPRESSOR BYPASS 1
7P100-103 1" WELD ON BUNG 1
7PS275-200 SLEEVE 2.75" x 2" 2
7R002-044 #44 HOSE CLAMP 4
4PCH212-010 AIR INTAKE ASSY
4PCH013-010 AIR BOX, WELDED, ROTO 1
4HS110-010 FLANGE ASSY, AIR BOX 1
8H040-050 AIR FILTER 3.5" FLG x 7L 1
7R002-056 # 56 HOSE CLAMPS 4
7R002-060 #60 HOSE CLAMP 2
8H040-050 FILTER 3.50" x 7.0" LONG 1
7U035-001 FLEX HOSE 3.5" x 12" 1'
4PCH112-010 INLET DUCT, ASSY 1
7P100-103 BUNG WELD ON,
7P500-112 BUNG WELD ON, 1/2"NPT 1
7P100-578 AIR TEMP SENSOR BUNG 1
7PS275-200 SLEEVE, 2.75" x 2.00" 2
7PS350-200 SLEEVE,3.5" x 2.00" 1
7P500-026 1/2"NPT x 3/4" HOSE BARB 1
7U038-012 3/4" x 90° HOSE 4" x 12" LONG 2
7P375-075 3/4" HOSE MENDER 1
7A250-126 1/4" x 20 x 1" HXHD BOLT 4
7F250-021 1/4" NYLOC 4
7K250-001 1/4"AN WASHERS 8
4PCH101-001 FUEL PUMP ASSY '03 HEMI
7U031-018 5/16" EFI Fuel hose 24"
7U031-018 5/16" EFI Fuel hose 9"
7U031-018 5/16" EFI Fuel hose 1.8"
7U031-018 5/16" EFI Fuel hose 1.8"
7U031-018 5/16" EFI Fuel hose 6.5"
7U033-010 FUEL/PWR STEERING HOSE 5/8" 2.0"
7P312-017 FUEL PUMP FITTING 1
7P312-020 FUEL LINE FITTING 90° 1
7P312-016 5/16" x 5/16" FORD FITTING 1
8F001-500 FUEL PUMP PURBURG 1
7R003-028 ADEL CLAMP 2-3/8", .26" HOLE 2
7P312-082 TEE, HOSE BARB 2
7R004-003 14.5 STEPLESS CLAMP 14
7E010-075 SHEET METAL SCREW 2
7A250-101 1/4" x 20 x 1.0" BOLT 2
7F250-021 NYLOC NUT 2
7J006-094 6mm SS WASHER 4
7F010-024 NYLOC NUT 2
7C010-075 BOLT 2
7J010-001 #10 WASHER 4
4PCH010-070 FUEL PUMP/ FMU MTG BRKT 1
4PCH238-068 FMU ASSY '03 HEMI
6PZ001-001 DECAL PAXTON FMU 1
6Z010-101 FMU HOUSING (BLUE ANODIZED) 1
6Z010-111 FMU VALVE COVER 1
6Z010-132 COVER FMU w/SPRING NO LZR, 1
6Z020-130 SML DIAPHRAM 1
6Z020-140 LRG DIAPHRAM 1
6Z030-150 BRACKET FMU 1
6Z040-160 PISTON, FMU 1
6Z050-161 FMU WASHER,6:1/30LB PLATED 1
6Z060-181 SHIM, FMU 1
6Z070-010 FMU RING SPACER 6:1 1
6Z080-011 RETAINER,FMU SPRING 4.3 GM 2
6Z090-010 SPRING FMU 1
7C010-050 10-24 x .50" SHCS GR8 PLT 6
7C010-075 10-24 x 3/4" SHCS GR5 ZINC 4
7C024-025 10-24 x 1/4" PHIL HEAD 3
7P125-025 1/8"NPT x 5/32" HOSE 90° 1
7P125-031 1/8"NPT x 90° 5/16" HOSE BARB 1
7P125-032 1/8"NPT x 5/16" STR HOSE BARB 1
7u030-218 7/32" VAC HOSE 12"
7P157-219 5/32" x 7/32" UNION 1
7P156-082 5/32" TEE 1
7U030-046 5/32" VAC HOSE 10'
7U100-030 O-RING, FMU 1
8PN101-188 POWER CHARGE COOLER ASSY '03 HEMI
8N003-078 COOLER DUCT,LT1,GROUND
8N101-001 WELDED CORE, ASSY W/ENDS ONLY
8N003-018 INLET DUCT, MACH
8PN105-010 WATER TANK MTG ASSY '03 HEMI
8N055-030 RESERVOIR 1
4PCH010-110 BRKT RESERVOIR 1
7A250-050 1/4-20 SHD 1/2" LONG 3
7A250-074 1/4-20 HHD,3/4" LONG PLTD 3
7J006-093 1/4" WASHER 8
7U038-000 3/4" HEATER HOSE CUT TO FIT 14"
7U038-012 3/4" 90° HOSE 4" x 12" 5
7U030-065 3/4" HOSE (TANK-PUMP) 1
7R007-001 NYLON CLAMP 1-1/8" 16
7P500-026 1/2" TO 3/4" 90° HOSE BARB 2
7U038-150 3/4" x 150° HOSE 2
7P375-075 3/4" HOSE MENDER 1
7F250-021 1/4" NYLOCK NUTS 3
7J250-150 1/4" FENDER WASHERS 3
vii
All Rights Reserved, Intl. Copr. Secured
11NOV04 v1.0 03DodgeHemi(4809650v1.0)
©2004 Paxton Automotive
P/N: 4809650

2003 Dodge Hemi
Part No. 1201220
PARTS LIST
IMPORTANT: Before beginning installation, verify that all parts are included in the kit. Report any shortages or
damaged parts immediately.
PART NO. DESCRIPTION QTY PART NO. DESCRIPTION QTY
8PN104-010 ASSY SURGE TANK '03 HEMI
8N056-060 SURGE TANK 1
7E010-075 #12 SHEET METAL SCREWS 2
7P500-078 1/2" x 3/4" STR HOSE BARB 2
8N055-050 PLASTIC CAP, SURGE TANK 1
7J006-093 6mm WASHER, PLATED 4
7C060-016 M6 x 1.00" x 16 HXHD 2
7U100-055 6" TIE-WRAP 10
7P500-078 1/2" x 3/4" STR HOSE BARB 3
7P500-026 1/2" x 3/4" 90° HOSE BARB 1
7U100-044 4" TIE-WRAP 5
7A250-050 1/4-20 SHCS 1/2" LONG 2
8N010-130 MTG TAB 1
8PN107-010 WATER PUMP MTG ASSY, '03 HEMI
8F001-402 PUMP, HELLA WATER 1
7R003-027 ADEL CLAMP 1
5W001-009 16-14GA MALE SLIDE INSULATED 2
5W001-010 16-14GA FEMALE INSULATED 2
5W001-019 10-12GA BUTT CON INSUL 1
5W001-042 12-10GA x 3/16" RING TERMINAL 1
5W001-017 3/8" RING TERMINAL 12GA 1
5W001-030 14GA STRD WIRE BLACK 3'
5W001-014 FUSE HOLDER 10GA WIRE 1
5W001-011 16-14GA EYELET .25" HOLE 2
5W001-015 FUSE, BLADE TYPE 20AMP 1
5WOO1-009 16-14GA MALE SLIDE INSULATED 1
7A250-050 1/4-20 x .50" SHCS ZINC PLTD 1
7J006-093 6mm WASHER, PLTD 1
5W001-022 T-TAP CONN 14-16AWG 1
8F101-510 H
8PN106-010 WATER CLR MTG ASSY, '03 HEMI
8N006-010 WATER COOLER 1
7P500-026 1/2"NPT TO 3/4" HOSE BARB 90° 2
7A250-074 1/4-20 HHD 3/4" LONG 8
7F250-021 1/4-20 NYLOCK NUT 8
7J250-001 1/4" FLAT WASHER 16
1016419-P SUPERCHARGER ASSY
2A047-119 ACCESSORY DRIVE BELT
4PCH114-018 COOLANT RESV ASSY
7R002-016 # 16 HOSE CLAMPS 3
2A017-876-01 .875" x .328" x .952" LONG SPACERS 3
7C060-050 6mm x 1.0" x 50mm LONG BOLTS 3
7J006-093 6mm LARGE OD FLAT WASHERS 3
4PCH014-010 FORMED COOLANT TUBE 1
7U038-012 3/4" 90° HOSE 4" x 12" 1
7P375-045 45° STREET ELBOW 2
7R002-012 #12 HOSE CLAMP 2
7U133-065 “J” SHAPED HOSE
7P500-001 1/2" HOSE UNION 1
5A001-110 ENGINE CONTROL UNIT
5A001-111 PROGRAMMED ENGINE CONTROL UNIT
2O PUMP WIRING ASSY 1
P/N: 4809650
©2004 Paxton Automotive
All Rights Reserved, Intl. Copr. Secured
11NOV04 v1.0 03DodgeHemi(4809650v1.0)
viii

1. COMPONENT REMOVAL
Section 1
COMPONENT REMOVAL
1. COMPONENT REMOVAL
A. Using a suitable container drain the engine
coolant. On the driver’s side of the vehicle
at the lower corner of the radiator locate the
drain petcock using a 16mm open-end
wrench rotate the petcock and drain the
coolant.
B. Locate the coolant over flow reservoir locat-
ed on the top of the radiator, loosen the hose
clamp securing the large 1" coolant hose and
remove the hose from the reservoir.
Disconnect the smaller coolant hose from
the over flow reservoir that connects to the
radiator. (See Figs. 1-a, 1-b.)
D. Using a pair of needle nose pliers or a spring
hose clamp tool remove the spring clamps
that retain the two heater hoses that are
located on the passenger side of the front
cover. Remove the hoses.
*** NOTE ***
Set the hoses aside in the engine compartment to
be modified in a later step of the installation)
Fig. 1-a
C. Remove the three 10mm headed screws that
retain the reservoir to the top of the radiator
fan shroud and set the reservoir aside to be
reinstalled at a later stage of the installation.
(See Fig. 1-b.)
COOLANT OVERFLOW HOSE
10mm BOLTS
Fig. 1-b
Fig. 1-c
E. Using a 19mm deep socket or wrench
remove the heater hose barbed fitting at the
front cover. Set the fitting aside to be
installed in a later step of the installation.
F. Locate the hose clamp securing the factory
air ducting attached to the large plastic throttle body enclosure to the air filter cover.
Using a 8mm socket or flat blade screwdriver loosen the clamp and remove the duct
from the plastic throttle body enclosure.
(See Fig. 1-d.)
Fig. 1-d
1
All Rights Reserved, Intl. Copr. Secured
11NOV04 v1.0 03DodgeHemi(4809650v1.0)
©2004 Paxton Automotive
P/N: 4809650
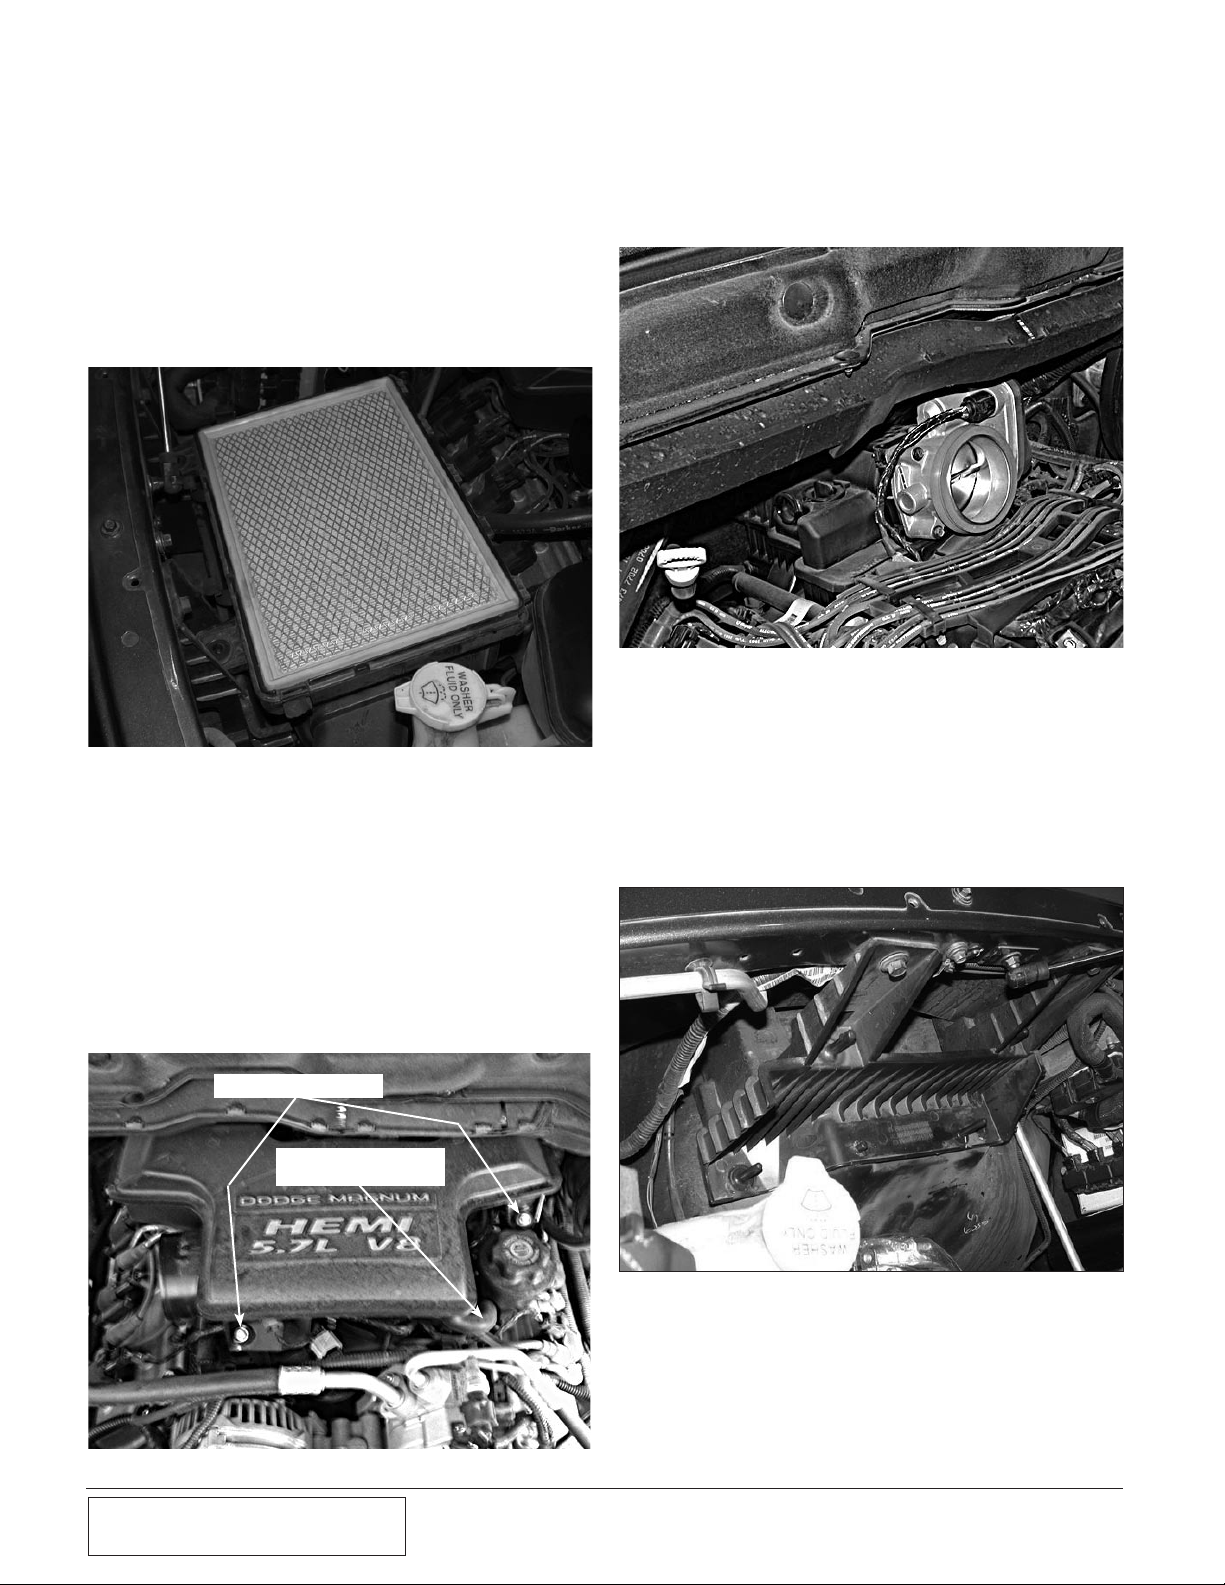
G. Unclip the 4 clips that retain the top portion
of the factory air filter housing and set the
housing and rubber duct aside it will not be
reused.
H. Remove the air filter and lift up on the lower
portion of the factory air filter housing and
remove it from the air filter support bracket
set the lower portion of the housing aside it
will not be reused. (See Fig. 1-e.)
Fig. 1-e
I. Locate the intake air temperature sensor on
the passenger side of the large plastic throttle body enclosure. Disconnect the wire harness plug, remove the sensor using a twisting motion and set the sensor aside to be
reinstalled in a later step of the installation.
J. Remove the two 10mm headed bolts secur-
ing the plastic throttle body enclosure.
Remove the rubber hose going to the oil fill
neck and remove the enclosure and set aside
it will not be reused. (See Fig. 1-f.)
K. Remove the factory orange silicone ring
from the throttle body and set aside. Remove
the accessory drive belt. (See Fig. 1-g.)
Fig. 1-g
L. Using a 8mm socket, remove the eight fac-
tory screws securing the underside of the
passenger side inner fender well cover.
Remove the four 13mm head screws securing the air filter enclosure bracket to the
fender and remove the bracket it will not be
reused. Reinstall the inner fender well cover
using the factory hardware. (See Fig. 1-h.)
10mm HEADED BOLTS
CRANKCASE BREATHER
Fig. 1-f
P/N: 4809650
©2004 Paxton Automotive
All Rights Reserved, Intl. Copr. Secured
11NOV04 v1.0 03DodgeHemi(4809650v1.0)
HOSE
Fig. 1-h
2
2. OIL FEED ASSEMBLY
Section 2
OIL FEED ASSEMBLY
2. OIL FEED ASSEMBLY
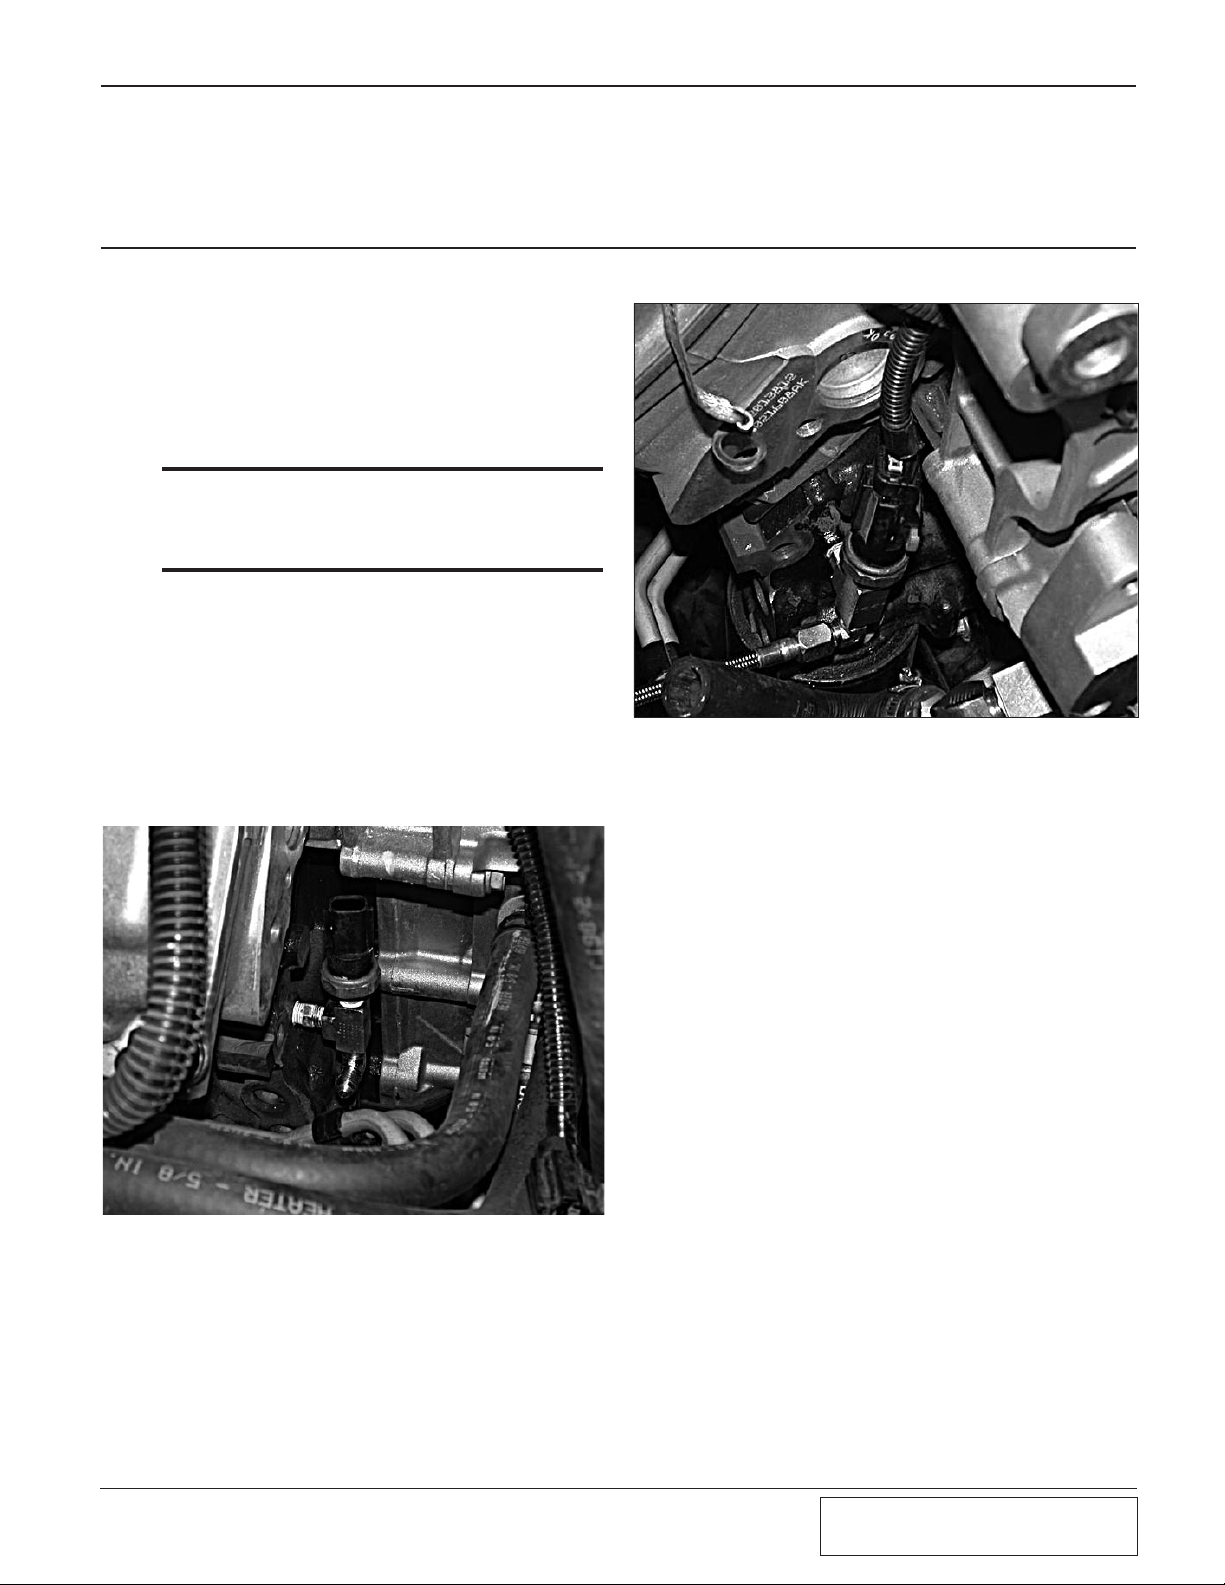
A. Disconnect the factory oil pressure sending
unit wire harness from the sending unit.
Remove and set aside the factory oil pressure sender located on the passenger of the
engine. Using the supplied fitting install the
short 1" nipple into the side of the supplied
TEE fitting.
*** NOTE ***
Do not use Teflon paste or Teflon tape on this fitting
as it may clog the supercharger oil jet and lead to
premature supercharger failure.
B. Install the supplied TEE fitting into the
location were the factory sending unit was
originally located. With the supplied TEE
fitting installed and the outlets facing up and
down install the factory sending unit into
the outlet of the tee that is facing up. Install
the supplied 1/8" NPT x –4 x 90º fitting into
the outlet that is facing down and orientate
the supplied 90º fitting to face to the passenger side of the vehicle. (See Fig. 2-a.)
Fig. 2-b
Fig. 2-a
C. Install the straight portion of the supplied
steel braided –4 hose to the 90º fitting. The
90º end will attach to the supercharger oil jet
in a later step.
D. Reattach the oil pressure sending unit wire
harness. (See Fig. 2-b.)
1
All Rights Reserved, Intl. Copr. Secured
11NOV04 v1.0 03DodgeHemi(4809650v1.0)
©2004 Paxton Automotive
P/N: 4809650

This Page Left Intentionally Blank.
P/N: 4809650
©2004 Paxton Automotive
All Rights Reserved, Intl. Copr. Secured
11NOV04 v1.0 03DodgeHemi(4809650v1.0)
2
3. OIL DRAIN ASSEMBLY
Section 3
3. OIL DRAIN ASSEMBLY
OIL DRAIN ASSEMBLY
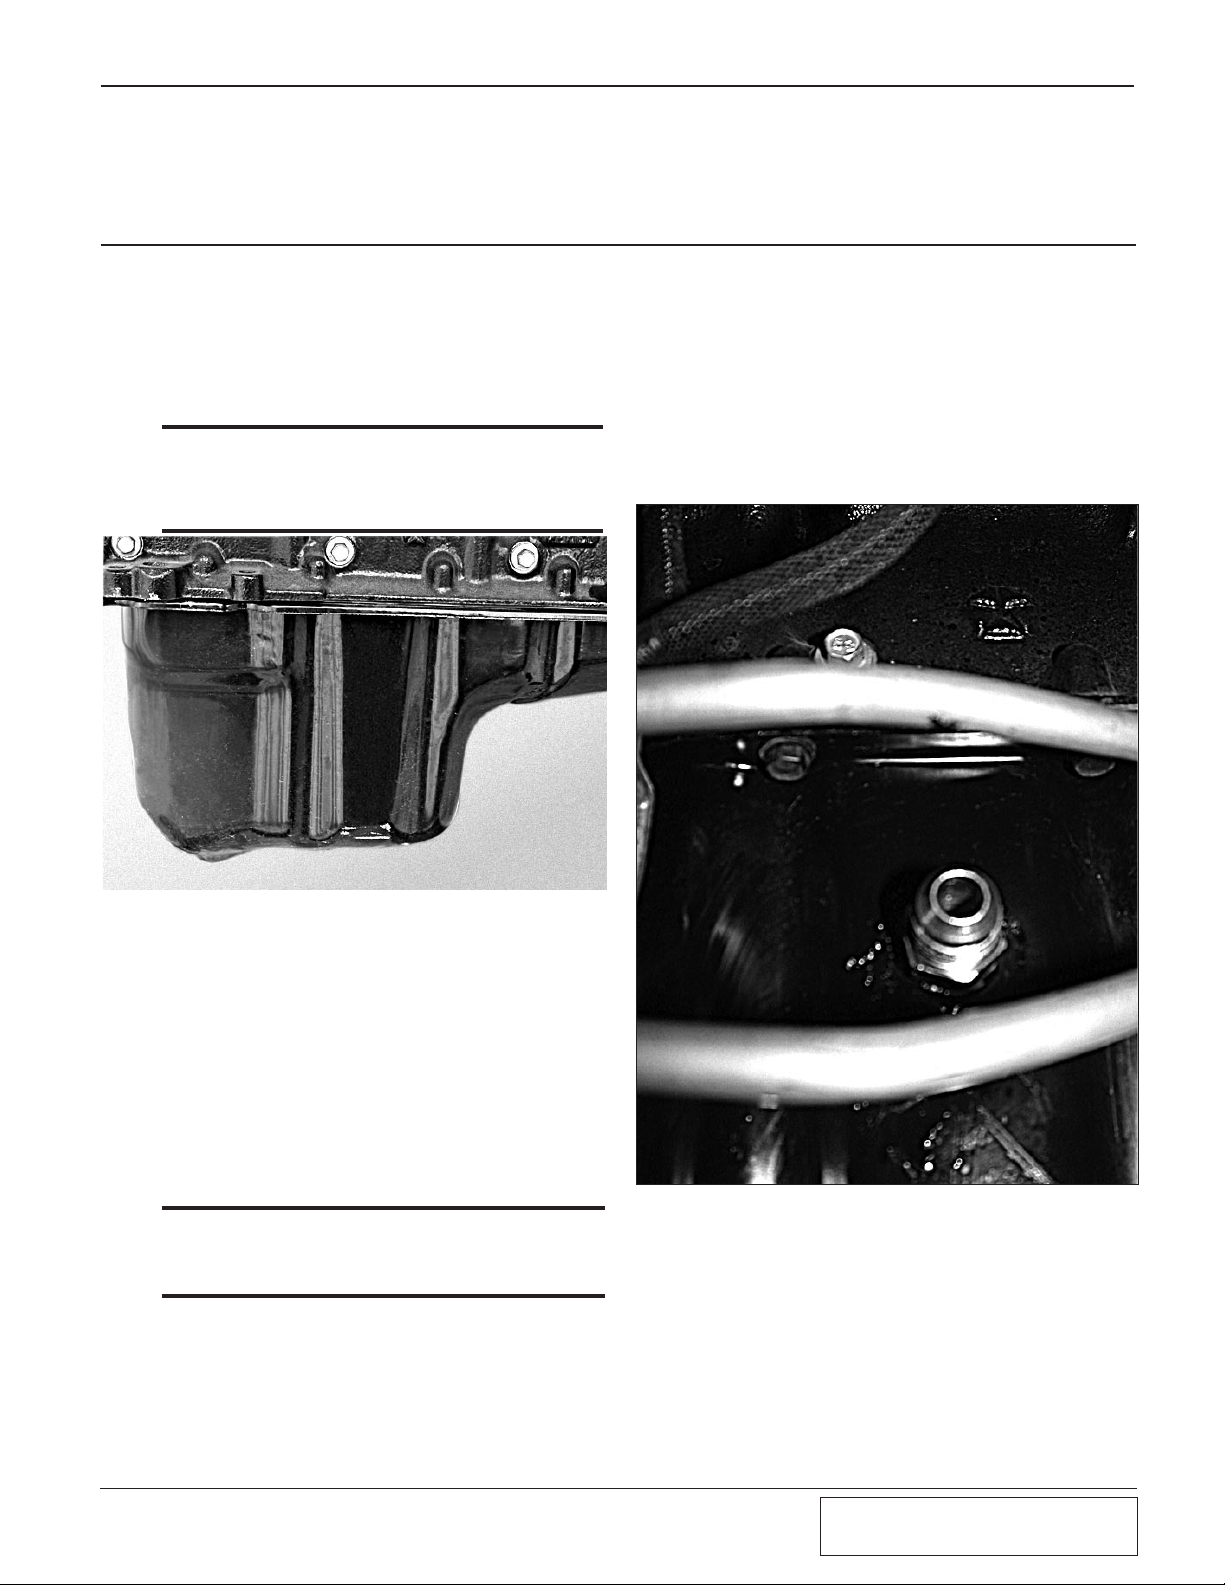
A. On the passenger side of the oil pan locate
the large hump in the oil pan measure
down1-3/4" from the lip of the oil pan and
make a mark. Center the mark between the
two oil pan retaining bolts. (See Fig 3-a.)
*** NOTE ***
It may be necessary to slightly bend the transmission cooler lines to gain access to the oil drain location.
E. Thoroughly clean the threaded area. Reach
inside the oil pan and retrieve any stray
chips. Apply a small amount of sealer to the
new threads. Apply more sealer to the supplied 3/8" x 16 x –8 fitting and secure in the
hole using a 13/16" open end wrench. Make
sure a seal is formed all around the fitting.
(See Fig. 3-b.)
Fig. 3-a
B. Using a 3/16" drill bit drill a pilot hole at the
designated mark, use grease on the drill bit
to catch any metal shavings from falling into
the oil pan. With a small piece of wire confirm that there is nothing to interfere with
the punch that is provided.
C. Using an air hammer and the supplied punch
start to enlarge the hole to 9/16" of an inch.
It is recommended to use anti seize or grease
on the punch, which will allow the punch to
role the pan correctly.
*** NOTE ***
Using a hammer can damage the oil pan, extra care
is required.)
D. When you have the hole enlarged to 9/16"
pack the flutes of a 3/8" NPT tap (not supplied). Tap the hole until the fitting can be
started.
Fig. 3-b
F. Drain the engine oil, install a new oil filter,
and refill the engine with fresh oil.
1
All Rights Reserved, Intl. Copr. Secured
11NOV04 v1.0 03DodgeHemi(4809650v1.0)
©2004 Paxton Automotive
P/N: 4809650

This Page Left Intentionally Blank.
P/N: 4809650
©2004 Paxton Automotive
All Rights Reserved, Intl. Copr. Secured
11NOV04 v1.0 03DodgeHemi(4809650v1.0)
2

4. HEATER HOSE RELOCATION
Section 4
HEATER HOSE RELOCATION
4. HEATER HOSE RELOCATION
A. Install a supplied 3/8" x 45° street elbow
into the front cover of the engine, install the
second supplied 3/8" x 45° street elbow into
the previously installed elbow. Install the
factory hose barb fitting that was removed
in Step 1-e and install into the open end of
the street elbow.
*** NOTE ***
Assemble the fittings using Teflon paste to aid in
sealing. Attach the “J” shaped hose to the hose barb
and secure with a supplied hose clamp. Orientate
the fittings and hose as seen in Fig 4-a.
*** NOTE ***
These fittings may need to be re-oriented to clear
the supercharger support bracket.
Fig. 4-a
B. Install the supplied 5/8" hose mender into
the open end of the “J” shaped hose and
secure with a supplied hose clamp.
C. Trim the factory coolant hose for best fit-
ment and connect to the open end of the
supplied 5/8" hose mender. Secure using a
supplied hose clamp.
1
All Rights Reserved, Intl. Copr. Secured
11NOV04 v1.0 03DodgeHemi(4809650v1.0)
©2004 Paxton Automotive
P/N: 4809650

This Page Left Intentionally Blank.
P/N: 4809650
©2004 Paxton Automotive
All Rights Reserved, Intl. Copr. Secured
11NOV04 v1.0 03DodgeHemi(4809650v1.0)
2

5. COOLANT RESERVOIR RELOCATION
Section 5
COOLANT RESERVOIR RELOCATION
5. COOLANT RESERVOIR RELOCATION
A. Locate the lower radiator hose. Locate the
TEE fitting in the lower radiator hose that
the 1" hose attaches measure up approximately 2-1/2" from the TEE fitting and cut
the upper portion of the hose.
B. Locate the three spacers, screws, and wash-
ers in the coolant relocation assembly. Raise
the coolant reservoir using the spacers and
secure with the supplied 6mm screws and
washers. (See Fig. 5-a.)
Fig. 5-a
C. Locate the supplied 1" “L” shaped hose,
hose clamps and the polished formed coolant tube in the coolant reservoir assembly.
Install the straight section of the tube into
the modified 1" lower radiator hose and
secure with a supplied hose clamp. (See Fig
5-b.)
TO MODIFIED
LOWER COOLANT
HOSE
Fig. 5-b
D. Attach the “L” shaped hose to the outlet of
the coolant reservoir. Measure and trim to
the appropriate length and secure with the
supplied hose clamps. (See Fig. 5-c.)
Fig. 5-c
1
All Rights Reserved, Intl. Copr. Secured
11NOV04 v1.0 03DodgeHemi(4809650v1.0)
©2004 Paxton Automotive
P/N: 4809650

This Page Left Intentionally Blank.
P/N: 4809650
©2004 Paxton Automotive
All Rights Reserved, Intl. Copr. Secured
11NOV04 v1.0 03DodgeHemi(4809650v1.0)
2

6. SUPERCHARGER MOUNTING BRACKET
Section 6
SUPERCHARGER MOUNTING BRACKET
6. SUPERCHARGER MOUNTING BRACKET
A. Locate the supplied two small supercharger
mounting plate support brackets bolts and
washers. Assemble the two brackets using
the four 5/16" x 18 x 1.0" bolts and washers
that are provided.
B. Using the supplied support bracket and the
supplied 8mm x 120 bolts and 10mm x 130
bolts confirm that the heater hose fittings
and hose previously installed clear the support bracket.
C. Remove the 15mm headed bolt closest to the
passenger side on the alternator that secures
the alternator to the front cover. (See Fig.
6-a.) This bolt will be reused to secure the
alternator in a later step.
15mm ALTERNATOR BELT
E. Loosen the remaining alternator retaining
bolt and rotate the alternator up leaving it
attached to the front cover. (See Fig. 6-c.)
Fig. 6-c
F. Remove the 13mm headed bolt just to the
left of the upper Idler pulley. Set it aside as
it will be reused in a later step. (See Fig.
6-d.)
Fig. 6-a
D. Remove and set aside the factory plate that
secures the alternator, A/C compressor, and
front cover together. (See Fig. 6-b.)
Fig. 6-b
13mm HEADED BOLT
Fig. 6-d
1
All Rights Reserved, Intl. Copr. Secured
11NOV04 v1.0 03DodgeHemi(4809650v1.0)
©2004 Paxton Automotive
P/N: 4809650

G. Remove the casting flash from the lower
mounting location using a file or small disc
sander.
*** NOTE ***
Care must be taken to not damage the machined
surface, as this surface is critical to proper mounting
bracket alignment.
CASTING FLASH TO BE REMOVED
Fig. 6-d
H. With the supplied support brackets assem-
bled using the 5/16" x 18 x 1" bolts, and
washers confirm that the support bracket sits
flush with the cylinder head and engine
block.
I. Remove the support bracket after confirming
that it sits flush with the head and block.
Using the three 5/16"- 18 x 1" bolts and
washers provided attach the support bracket
to the supercharger mounting plate leave
these bolts loose. Align the supplied support
bracket using the supplied 8mmx120 x 1.25"
bolt and 10mm x 130 x 1.5" bolt. (See Fig.
6-e.)
INSTALL THE 12mm x 100 x 1.75 BOLT
THROUGH THE ORIGINAL MOUNTING
HOLE IN THE FRONT COVER
13mm HEADED BOLT
REMOVED IN AN EARLIER
STEP
Fig. 6-e
J. Install the supplied supercharger mounting
plate as an assembly using the cylinder head
and the engine block mounting locations.
Leaving the 8mm and the 10mm bolts loose
at this time.
K. Install the supplied 12mm x 100mm x 1.75"
bolt through the supercharger mounting
plate and into the alternator-mounting boss.
Reattach the ground strap sandwiching it
between the nut and the alternator boss,
secure the bolt with the nut provided leaving
the nut loose at this time.
L. Install the factory 13mm headed bolt
removed in a previous step. (See Fig. 6-e.)
M. Locate the supplied supercharger idler pul-
ley, idler pulley stand off and the supplied
7/16" x 3.25" bolt, washers, and nut. Install
the idler pulley and standoff in the location
noted using the supplied hardware. (See Fig.
6-f.)
P/N: 4809650
©2004 Paxton Automotive
All Rights Reserved, Intl. Copr. Secured
11NOV04 v1.0 03DodgeHemi(4809650v1.0)
2

Fig. 6-f
A/C
COMPRESSOR
PULLEY
MAIN BELT
FACTORY IDLER PULLEY
ALTERNATOR
PULLEY
SUPERCHARGER
IDLER PULLEY
FACTORY IDLER
TENSIONER
FACTORY IDLER
PULLEY
CRANK
SHAFT
PULLEY
WATER
PUMP
PULLEY
POWER
STEERING
PULLEY
S/C
PULLEY
N. Attach the supplied 1/2" supercharger oil
drain line and supplied hose clamp to the
3/8" NPT barbed fitting on the supercharger,
tighten the hose clamp. Lower the supercharger into place and secure using the five
supplied 3/8" x 24 x 1.25" long bolts and
washers.
O. Tighten all mounting hardware. Route the
oil drain line down towards the fitting previously installed in the oil pan. Trim the hose
for best fitment and install the supplied 90°
push-lock fitting into the open end of the
supplied oil drain hose. Attach the 90° fitting and drain hose to the fitting previously
installed into the oil pan. Secure the hose
away from any sharp edges, sources of heat
or moving parts using the supplied wire ties.
(See Fig 6-g.)
P. Install the supercharger/accessory drive belt
using the belt routing diagram provided.
Q. Install the supplied 1/8" NPT x –4 fitting
into the supercharger oil jet, attach the open
end of the supplied braided oil feed line to
the –4 fitting previously installed. (See Fig.
6-h.)
90° -4 OIL SUPPLY HOSE
AND 1/8 NPT FITTING
Fig. 6-h
R. Reinstall the factory heater hose onto the
factory fitting on the side of the front cover
using the factory hose clamp. This hose was
removed in an earlier step of the installation.
Fig. 6-g
All Rights Reserved, Intl. Copr. Secured
3
11NOV04 v1.0 03DodgeHemi(4809650v1.0)
©2004 Paxton Automotive
P/N: 4809650

This Page Left Intentionally Blank.
P/N: 4809650
©2004 Paxton Automotive
All Rights Reserved, Intl. Copr. Secured
11NOV04 v1.0 03DodgeHemi(4809650v1.0)
4

7. AIR INTAKE ASSEMBLY
Section 7
AIR INTAKE ASSEMBLY
7. AIR INTAKE ASSEMBLY
A. Locate the supplied air filter, formed enclo-
sure, mounting flange, and 1/4"-20 mounting hardware.
B. Attach the flange to the air filter enclosure
using the 1/4"-20 nuts, bolts, and washers
provided. (See Fig. 7-a.)
*** NOTE ***
The upper mounting tab should be about 1/8" down
from the top of the fender. (See Fig 7-x.)
F. Place the supplied 3-1/2" sleeve and the sup-
plied #56 hose clamps onto the inlet of the
supercharger. Leave the hose clamps loose at
this time.
G. Locate the supplied 180º inlet duct. Install
the supplied 90º x 3/8" NPT x 1/2" hose
barb into the tapped bung on the 180° inlet
duct using Teflon paste to seal the threads.
This fitting should face straight up. (See Fig.
7-b.)
Fig. 7-a
C. Attach the supplied air filter to the air filter
mounting flange and secure with the hose
clamp provided.
D. Remove the aluminum A/C line from its
plastic clip on the passenger side inner fender. Remove the plastic clip from the vehicle
it will not be reused. Gently bend the A/C
line up for clearance for the air filter enclosure.
E. Mount the supplied air filter enclosure to the
passenger side inner fender using the supplied sheet metal fasteners provided in the
assembly.
Fig. 7-b
H. Install the supplied 180º inlet duct to the
supplied 3-1/2" sleeve previously attached to
the supercharger. Attach a 6" length of supplied flex hose to the open end of the inlet
duct and connect the opposite end to the previously mounted air filter enclosure. Secure
all connections using the hose clamps provided. (See Fig. 7-h.)
1
All Rights Reserved, Intl. Copr. Secured
11NOV04 v1.0 03DodgeHemi(4809650v1.0)
©2004 Paxton Automotive
P/N: 4809650

Fig. 7-c
I. Locate the air intake temperature sensor pre-
viously removed, install into the unthreaded
bung on the 180° inlet elbow. Locate the air
temperature sensor factory plug, strip back
the tape to expose the wires and cut the
wires approximately 3" from the connector
plug. Using the supplied 12" length of wires
extend the connector plug to reach the relocated air temperature sensor.
*** NOTE ***
It is recommended that these wire connections be
soldered and heat shrink used to insulate the connections to ensure the best contact.
J. Cut 2" off the short end of a supplied 3/4"
90° elbow hose. Attach the cut end onto the
oil fill neck breather barb. Install a supplied
3/4" hose mender into the open end of the
installed elbow hose.
K. Cut a 13" long section of the supplied
straight 3/4" hose and connect one end onto
the hose mender previously installed, connect the opposite end onto the 3/4" 90° hose
barb previously installed into the supplied
180° air inlet duct.
L. Tighten all hose clamps.
P/N: 4809650
©2004 Paxton Automotive
All Rights Reserved, Intl. Copr. Secured
11NOV04 v1.0 03DodgeHemi(4809650v1.0)
2

8. FUEL SYSTEM ASSEMBLY
Section 8
FUEL SYSTEM ASSEMBLY
8. FUEL SYSTEM ASSEMBLY
A. Locate the supplied supplemental fuel sup-
ply assembly 4PCH101-001. Assemble the
supplied fuel pump to the supplied fuel
pump/FMU mounting bracket using the provided adel clamps and 1/4"-20 bolts, nuts,
washers as shown in Fig. 8-a.
*** NOTE ***
Verify that the fuel pump outlet fitting is a 5/16"
brass barbed fitting and that a copper washer is
installed and the fitting is tight, if the fitting 5/16"
brass barbed fitting has not been installed it will be
necessary to remove the existing fitting from the
fuel pump and install the supplied 5/16" brass
barbed fitting with a copper washer.
B. Mount the supplied FMU to the fuel pump/
FMU mounting bracket using supplied
10-24 bolts, nuts, and washers. Assemble
per Fig 8-a.
Fig. 8-a
C. From beneath the vehicle mark two mount-
ing locations on the inner driver’s side frame
rail near the factory fuel lines for the fuel
pump/FMU bracket assembly to mount. Use
the bracket as a template and mount the
bracket using the supplied self-tapping sheet
metal screws to mount the bracket to the
inner frame rail. (See Fig. 8-b.)
FUEL OUTLET
D. Using a 5/16" spring lock disconnect tool
disconnect the flexible fuel line from the
hard line. Attach a length of 5/16" fuel hose
to the outlet of the fuel pump and secure
with a supplied clamp, route the hose to the
open end of the fuel line leading to the
engine. Trim the hose for best fit, install the
supplied male 5/16" fuel line adapter fitting
into the open end of the hose and secure
with a supplied clamp. Attach the male
adapter fitting to the factory fuel line.
E. Attach a 2-1/2" length of supplied 5/8" fuel
line onto the inlet of the fuel pump, two of
the supplied clamps must be used to secure
this hose onto the fuel pump. Install the supplied 5/8" to 5/16" barbed reducer into the
open end of the previously installed 5/8"
hose, secure using the supplied clamp.
Install a section of 5/16" fuel hose onto the
previously installed barb and secure the end
with a supplied clamp. Route the open end
of the hose to the open end of the fuel line
leading to the vehicle’s gas tank, trim the
hose for best fitment and install a provided
5/16" plastic female fitting into the hose and
secure with a supplied hose clamp. Attach
the supplied female adapter fitting to the
factory fuel line.
F. Cut the 5/16" fuel hose previously installed
from the supplied fuel pump inlet to the factory fuel line, install the supplied TEE fitting
at this connection and secure it using two
supplied hose clamps. Attach a length of
FUEL PUMP
Fig. 8-b
FUEL INLET
FMU
1
All Rights Reserved, Intl. Copr. Secured
11NOV04 v1.0 03DodgeHemi(4809650v1.0)
©2004 Paxton Automotive
P/N: 4809650

5/16" fuel hose to the inlet of the FMU and
secure using a supplied clamp. Route the
open end of the 5/16" fuel hose to the open
barb of the TEE fitting, trim the hose for
best fitment and secure using a supplied
hose clamp.
G. Cut the 5/16" fuel hose previously installed
from the supplied fuel pump outlet to the
factory fuel line, install the supplied TEE fitting at this connection and secure it using
two supplied hose clamps. Attach a length of
5/16" fuel hose to the outlet of the FMU and
secure using a supplied clamp. Route the
open end of the 5/16" fuel hose to the open
barb of the TEE fitting, trim the hose for
best fitment and secure using a supplied
hose clamp.
H. Route the hoses away from sharp or hot
objects and secure using the supplied wire
ties.
I. Attach an open end of the supplied 5/32"
vacuum line onto the vacuum port of the
previously installed FMU. Route the vacuum line along the frame rail and into the
engine compartment near the factory brake
booster mounted on the vehicle’s firewall.
Secure the hose line away from any sharp,
hot, or moving objects using the supplied
wire ties. The vacuum line with be attached
to a vacuum source at a later step.
P/N: 4809650
©2004 Paxton Automotive
All Rights Reserved, Intl. Copr. Secured
11NOV04 v1.0 03DodgeHemi(4809650v1.0)
2

MAP SENSOR
CAM/SENSOR
CRANK/SENSOR
GREEN/RED
TAN/YELLOW
GREY/BLACK
GREEN/RED
TAN/YELLOW
GREY/BLACK
EC U PL UG /B LA CK
P/ N #3 5 P/ N #34 P /N #23
CRANK IN CAM IN MAP/S ENSO R
TO MANIFOLD
VACUUM/BOOST
G RE Y/ BL AC K
TAN /Y ELL OW
GR EE N/ RE D
GR EE N
TA N
G RE Y
B LA CK
R ED
CR A NK O UT
C AM O UT
MAP/ SEN SO R
OU T
CR AN K IN
C AM I N
MAP/ SEN SO R
IN
PAXTON ENGINE CONTROL UNIT
9. ENGINE CONTROL UNIT INSTALLATION
Section 9
ENGINE CONTROL UNIT INSTALLATION
9. ENGINE CONTROL UNIT INSTALLATION
A. Using a T-15 torx bit remove the two factory
screws securing the panel below the steering
column on the driver’s side of the vehicle
and remove the panel. In a suitable location
in the driver’s compartment under the dash
secure the PECU with the Velcro hook/latch
that is provided.
B. Locate the two 15mm headed bolts that
retain the cover that the clutch actuating
cable would pass through, remove the cover
and drill a 9/16" hole that will allow the
PECU harness and the 5/32" vacuum line to
pass through. Reinstall the cover and route
the PECU wire harnesses and vacuum hose
through the 9/16" opening. (See Fig. 9-a.)
E. Locate pin 34 at the C2 plug on the Factory
ECU. Cut the tan/yellow wire (Cam Sensor).
Connect the tan wire from the PECU to the
tan/yellow wire leading to the cam sensor on
the factory ECU. Connect the tan/yellow
wire from the PECU to the tan/yellow wire
leading to the factory ECU plug.
F. Locate pin 23 at the C2 plug on the factory
ECU. Cut the green/red wire (Map Sensor).
Connect the green wire from the PECU to
the green/red wire leading to the map sensor.
Connect the green/red wire from the PECU
to the wire leading to the factory ECU plug.
G. Tape up the violet wire, as it will not be
used. Tap the small red wire coming from
the PECU to the C1 plug pin 11. Tap the
small black wire coming from the PECU to
the C1 plug pin 18.
H. Route the supplied 5/32" vacuum line into
the engine compartment near the brake
booster, it will be connected at a later step.
C. Run the PCEU harness across the firewall
thru the factory wire harness cover to the
Factory engine control unit.
D. Locate the C2 plug at the factory ECU pin
35, cut the gray/black wire (crank sensor).
Using the connectors provided connect the
gray wire from the PECU to the gray/black
wire leading to the crank sensor. Connect
the gray/black wire from the PECU to the
gray/black wire going to factory ECU plug.
*** NOTE ***
that it is recommended that these and all other connections be soldered.
Fig. 9-a
Fig. 9-b
1
All Rights Reserved, Intl. Copr. Secured
11NOV04 v1.0 03DodgeHemi(4809650v1.0)
©2004 Paxton Automotive
P/N: 4809650

This Page Left Intentionally Blank.
P/N: 4809650
©2004 Paxton Automotive
All Rights Reserved, Intl. Copr. Secured
11NOV04 v1.0 03DodgeHemi(4809650v1.0)
2

10. CHARGE COOLER INSTALLATION
Section 10
CHARGE COOLER INSTALLATION
10. CHARGE COOLER INSTALLATION
A. Install a supplied reducer sleeve onto the
throttle body, install the aftercooler core into
the reducer sleeve and secure with the supplied hose clamps. Install the supplied 2.75"
x 2" sleeve onto the discharge of the supercharger and another on the open end of the
aftercooler core previously installed.
B. Install the supplied discharge duct between
the supercharger and the aftercooler core
with the welded bung facing the vehicle’s
firewall, secure all connections using the
supplied hose clamps.
E. Attach an end of the supplied 5/32" vacuum
hose onto the vacuum nipple on the previously installed bypass valve. Route the
length of supplied vacuum hose to the brake
booster mounted on the driver’s side firewall
and secure the hose as necessary using the
supplied wire ties.
F. Remove the small vacuum cap from the fac-
tory fitting on the vehicle’s brake booster.
Attach the supplied vacuum hose onto the
open port on the brake booster, install a supplied 5/32" brass reducer into the vacuum
line previously installed. Trim the supplied
5/32" vacuum line connected to the bypass
valve for the best fitment and install onto the
open port of the previously installed reducer.
G. Install a supplied 5/32" brass vacuum TEE
fitting into the bypass valve vacuum line
previously installed and attach the vacuum
line from the FMU to the supplied TEE.
Install another supplied 5/32" brass TEE into
the bypass valve vacuum line; attach the
vacuum hose from the PECU to the previously installed TEE.
Fig. 10-a
*** NOTE ***
It may be necessary to gently bend the air conditioning line to gain clearance between it and the supercharger discharge.
C. Install the supplied 3/4" NPT x 90° brass fit-
ting into the lower threaded opening of the
aftercooler core; the fitting must face
towards the firewall of the vehicle. Install
the supplied 1/2" x 3/4" straight brass fitting
into the upper threaded opening in the aftercooler core.
D. Install the short end of the supplied 1" 90°
elbow hose onto the bung on the 180° air
inlet duct. Attach a 6" section of 1" hose
onto the bung on the supercharger discharge
duct. Install the supplied bypass valve into
the hose lines per Fig. 10-c.
1
All Rights Reserved, Intl. Copr. Secured
11NOV04 v1.0 03DodgeHemi(4809650v1.0)
©2004 Paxton Automotive
P/N: 4809650

This Page Left Intentionally Blank.
P/N: 4809650
©2004 Paxton Automotive
All Rights Reserved, Intl. Copr. Secured
11NOV04 v1.0 03DodgeHemi(4809650v1.0)
2

11. HEAT EXCHANGER INSTALLATION
Section 11
HEAT EXCHANGER INSTALLATION
11. HEAT EXCHANGER INSTALLATION
A. Install the two supplied ?" 90° brass fittings
into the supplied heat exchanger, both must
be pointing in the same direction to the side.
(See Fig 11-a.)
Fig. 11-a
B. Using the supplied heat exchanger as a tem-
plate mark two mounting locations on the
radiator core support, the heat exchanger
should be mounted towards the passenger
side.
C. Mount the supplied heat exchanger with the
previously installed ?" x 90° brass fittings
pointing toward the passenger side of the
vehicle, use the supplied 1/4"-20 nuts, bolts,
and washers to secure to the radiator core
support. (See Fig. 11-b.)
Fig. 11-b
1
All Rights Reserved, Intl. Copr. Secured
11NOV04 v1.0 03DodgeHemi(4809650v1.0)
©2004 Paxton Automotive
P/N: 4809650

This Page Left Intentionally Blank.
P/N: 4809650
©2004 Paxton Automotive
All Rights Reserved, Intl. Copr. Secured
11NOV04 v1.0 03DodgeHemi(4809650v1.0)
2

12. SURGE AND RESERVOIR TANK INSTALLATION
Section 12
SURGE AND RESERVOIR TANK INSTALLATION
12. SURGE AND RESERVOIR TANK INSTALLATION
A. Screw two supplied 3/4" x 1/2" NPT straight
brass fittings into the plastic surge tank.
B. Using the supplied 1/4"-20 x .50" SHCS
screw and washers attach the supplied surge
tank to the supplied surge tank-mounting
bracket. (See Fig 12-a.)
Fig. 12-a
C. The factory ground wire located on the pas-
senger side of the firewall will need to be
relocated. Using a 10mm socket remove the
nut securing the ground strap to the stud as
well as the nut secured on the stud to the
right of it. Secure the ground strap to the
second stud using the factory hardware.
D. Attach the surge tank to the stud the ground
strap had been originally secured to using
the factory 10mm headed nut.
E. Mark and drill a hole using the supplied
sheet metal screw to secure the open mounting location on the bracket. See Fig 12-b.)
Fig. 12-b
F. Mount the supplied water pump to the side
of the supplied triangle water reservoir using
the supplied 1/4"-20 hardware and adel
clamp.
G. Install the supplied 3/4" x 1/2" NPT 90°
brass fittings into the water reservoir. Mount
the supplied triangle water reservoir to the
supplied reservoir mounting bracket using
the 1/4"-20 hardware provided. (See Fig.
12-c.)
Fig. 12-c
1
All Rights Reserved, Intl. Copr. Secured
11NOV04 v1.0 03DodgeHemi(4809650v1.0)
©2004 Paxton Automotive
P/N: 4809650

H. Attach the supplied 3/4" short 90° hose to
the inlet of the water pump and connect to
the previously installed brass fitting at the
bottom of the reservoir. Secure the hose
using the supplied nylon ratchet clamps.
I. Mark two mounting locations using the
water pump reservoir assembly bracket as a
template on the passenger side inner frame
rail. Drill and secure the water pump reservoir assembly to the frame rail using the
supplied sheet metal screws.
Fig. 12-d
J. Cut the harness for the water pump leaving
as much of the wires intact from the pump.
Install a supplied ring terminal onto the
brown (negative) wire and secure to one of
the water pump reservoir assembly mounting screws.
Fig. 12-e
P/N: 4809650
©2004 Paxton Automotive
All Rights Reserved, Intl. Copr. Secured
11NOV04 v1.0 03DodgeHemi(4809650v1.0)
2

7E010-075 SHEET METAL SCREWS (SECURES
SURGE TANK BRACKET TO FIEWALL)
1/4 x 20 x 1/2 BOLTS 7A250-051
6mm WASHER 7J006-093
3/4 HOSE UNION
BARDED 7P375-075
3/4" HOSE
(7U038-000)
CUT TO FIT
90° 1/2 NPT TO
4" HOSE BARB
(7P500-026)
SURGE TANK
(8N156-050)
AIR CHARGE COOLER ???
(8PN101-180)
90° 1/2 NPT TO
4" HOSE BARB
(7P500-026)
3/4" HOSE (7U038-000)
CUT TO FIT
WATERCOOLER (8N006-010)
WATERCOOLER (8N006-010)
90° MOLDED HOSE ELBOW (7U030-065) CONNECTS FITTING ON BOTTOM
TANK TO INLET OF WATER PUMP
WATER PUMP
(8F001-402)
1/2" SOCKET HEAD CAP SCREW (7A250-050)
INSTALL THROUGH ADEL CLAMP AND INTO
WATER TANK TO HOLD WATER PUMP
WATER PUMP CLAMP (8N010-080)
WATER
RESERVOIR
(8N055-030)
1" NPT HOLE
NOT USEDHOLE SHOULD
BE BLIND OR
PLUGGED
13. WATER HOSE ROUTING
Section 13
WATER HOSE ROUTING
13. WATER HOSE ROUTING
*** NOTE ***
Make sure to leave the hose slightly long to allow for
engine movement.
A. Using a 3/4" 90° molded hose, trim 2" off
from the short hose leg, attach the cut end
onto the 3/4" x 1/2" NPT 90° brass fitting on
the passenger side of the supplied heat
exchanger previously installed. Install a supplied 3/4" brass hose mender into the long
end of the hose.
B. Using a supplied 3/4" 90° molded hose, trim
2" off of the short end, install the short end
onto the 3/4" 90° brass fitting previously
installed in the aftercooler core. Install a
supplied 3/4" brass hose mender into the
long end of the molded hose.
C. Cut a 55" section of 3/4" hose, connect one
end onto the 3/4" hose mender previously
installed in the molded hose attached to the
aftercooler. Route the hose along the passenger side inner fender, under the radiator, and
connect to the open end of the 3/4" brass
hose mender/elbow hose connected to the
heat exchanger.
D. Using another 3/4" 90° molded hose trim
2-1/2" off of the short end of the hose,
install the short end onto the outlet of the
previously installed water pump. Install a
3/4" brass hose mender into the open end of
the hose.
E. Cut a 27" long section of the supplied 3/4"
hose, attach an end to the open end of the
previously installed brass hose mender.
Attach the open end of the hose to the open
fitting on the supplied heat exchanger, trim
the hose for best fitment.
F. Cut a 14" long section of the supplied 3/4"
hose, attach one end to the straight fitting on
the aftercooler core, connect the open hose
end to the fitting on the side of the surge
tank, trim the hose length for best fitment.
G. Cut a 60" long section of the supplied 3/4"
hose, attach one end to the 3/4" x 1/2" NPT
brass fitting previously installed in the bottom of the supplied surge tank. Route the
hose along the passenger side inner fender
and connect the open end of the hose to the
3/4" x 1/2" NPT 90° brass fitting on the top
of the water reservoir, trim the hose for best
fitment.
H. Secure all hose connections using the sup-
plied nylon hose clamps. Check to ensure all
hose lines are free of kinks, secure hose
lines as needed away from sharp, hot, or
moving objects using the supplied wire ties.
Fig. 13-a
1
All Rights Reserved, Intl. Copr. Secured
11NOV04 v1.0 03DodgeHemi(4809650v1.0)
©2004 Paxton Automotive
P/N: 4809650

This Page Left Intentionally Blank.
P/N: 4809650
©2004 Paxton Automotive
All Rights Reserved, Intl. Copr. Secured
11NOV04 v1.0 03DodgeHemi(4809650v1.0)
2

14. WATER PUMP WIRING
Section 14
14. WATER PUMP WIRING
WATER PUMP WIRING
A. Using a supplied sheet metal screw, attach
the supplied relay to the driver’s side radiator core support per Fig. 14-a.
Fig. 14-a
B. Attach a supplied ring terminal to the
ground wire (black) on terminal 86 of the
supplied relay; attach a supplied ring terminal to the relay mounting screw.
C. Route the red wire on terminal 87 down and
along the backside of the front bumper and
connect to the green wire using the supplied
butt connector at the previously installed
water pump. Use the supplied wire ties to
secure as necessary.
D. Route the yellow wire from terminal 85 and
the ???
E. Route the red wire from terminal 30 on the
relay into the engine compartment and
attach a supplied ring terminal to the wire
end. The ring terminal must be connected to
a constant battery power source. Remove the
cover from the remote battery lug next to the
engine compartment’s fuse/relay center.
Secure the ring terminal to this lug using
factory hardware and use wire ties to secure
the wire as needed away from sharp or hot
objects.
F. With the key on, make sure the charge cool-
er water pump is operating and that water is
flowing through the surge tank. Fill the
surge tank if necessary with a 50/50 coolant/
water mix. If the water is not flowing,
remove the charge cooler supply hose and
lower until water flows out of the hose. If
necessary, provide light suction to the hose
to help prime the pump. Verify water flow.
Do not let the pump run for extended periods (30 seconds or more) without water
flow. Fill the charge cooler tank until the
level stabilizes.
1
All Rights Reserved, Intl. Copr. Secured
11NOV04 v1.0 03DodgeHemi(4809650v1.0)
©2004 Paxton Automotive
P/N: 4809650

This Page Left Intentionally Blank.
P/N: 4809650
©2004 Paxton Automotive
All Rights Reserved, Intl. Copr. Secured
11NOV04 v1.0 03DodgeHemi(4809650v1.0)
2

15. FINAL ASSEMBLY AND CHECK
Section 15
FINAL ASSEMBLY AND CHECK
15. FINAL ASSEMBLY AND CHECK
A. If your battery was disconnected, reconnect
it.
B. If your vehicle has gone over 10,000 miles
since its last spark plug change, you will
need to change the spark plugs now before
test driving the vehicle.
C. Check all fittings, nuts, bolts and clamps for
tightness. Pay particular attention to oil and
fuel lines around moving parts, sharp edges
and exhaust system parts. Make sure all
wires and lines are properly secured with
clamps or wire ties.
D. Check all fluid levels, making sure that your
tank(s) is/are filled with 91 octane or higher
fuel before commencing test drive.
E. Start the engine and allow to idle for a few
minutes.
F. Recheck to be sure no hoses, wires, etc. are
near exhaust headers or moving parts and
check for any signs of fluid leakage.
Recheck all fluid levels.
G. PLEASE TAKE SPECIAL NOTE:
Operating the vehicle without ALL subassemblies completely and properly installed
may cause FAILURE OF MAJOR
COMPONENTS.
H. Test drive the vehicle.
I. Read the Street Supercharger System
Owner’s Manual and RETURN THE
Warranty REGISTRATION FORM within
thirty (30) days of purchasing your supercharger system to qualify for the 3-year limited warranty.
1
All Rights Reserved, Intl. Copr. Secured
11NOV04 v1.0 03DodgeHemi(4809650v1.0)
©2004 Paxton Automotive
P/N: 4809650

This Page Left Intentionally Blank.
P/N: 4809650
©2004 Paxton Automotive
All Rights Reserved, Intl. Copr. Secured
11NOV04 v1.0 03DodgeHemi(4809650v1.0)
2

This Page Left Intentionally Blank.
3
All Rights Reserved, Intl. Copr. Secured
11NOV04 v1.0 03DodgeHemi(4809650v1.0)
©2004 Paxton Automotive
P/N: 4809650

1300 Beacon Place • Oxnard, CA 93033-9901 • (805) 604-1336
FAX (805) 604-1337 • paxtonautomotive.com • M-F 8:00 AM - 4:30 PM PST
DP/N: 4809650 - v1.0 11/09/04
 Loading...