

Page 1
1
PaxLock Pro – Installation
and Commissioning Guide
Overview
Checks to make prior to installation
Through door holes
When installing a PaxLock Pro it is important to
ensure the environment the PaxLock Pro is to be
installed in is t for purpose.
This application note covers the preparation that
should be carried out before, during and after
installation to ensure the longevity of the PaxLock
Pro as well as correct installation.
Before installing the PaxLock Pro onto the door it is important to check that the door, frame and any
relevant door furniture are in good working order. This is important to ensure both the longevity and
smooth operation of the PaxLock Pro once installed
.
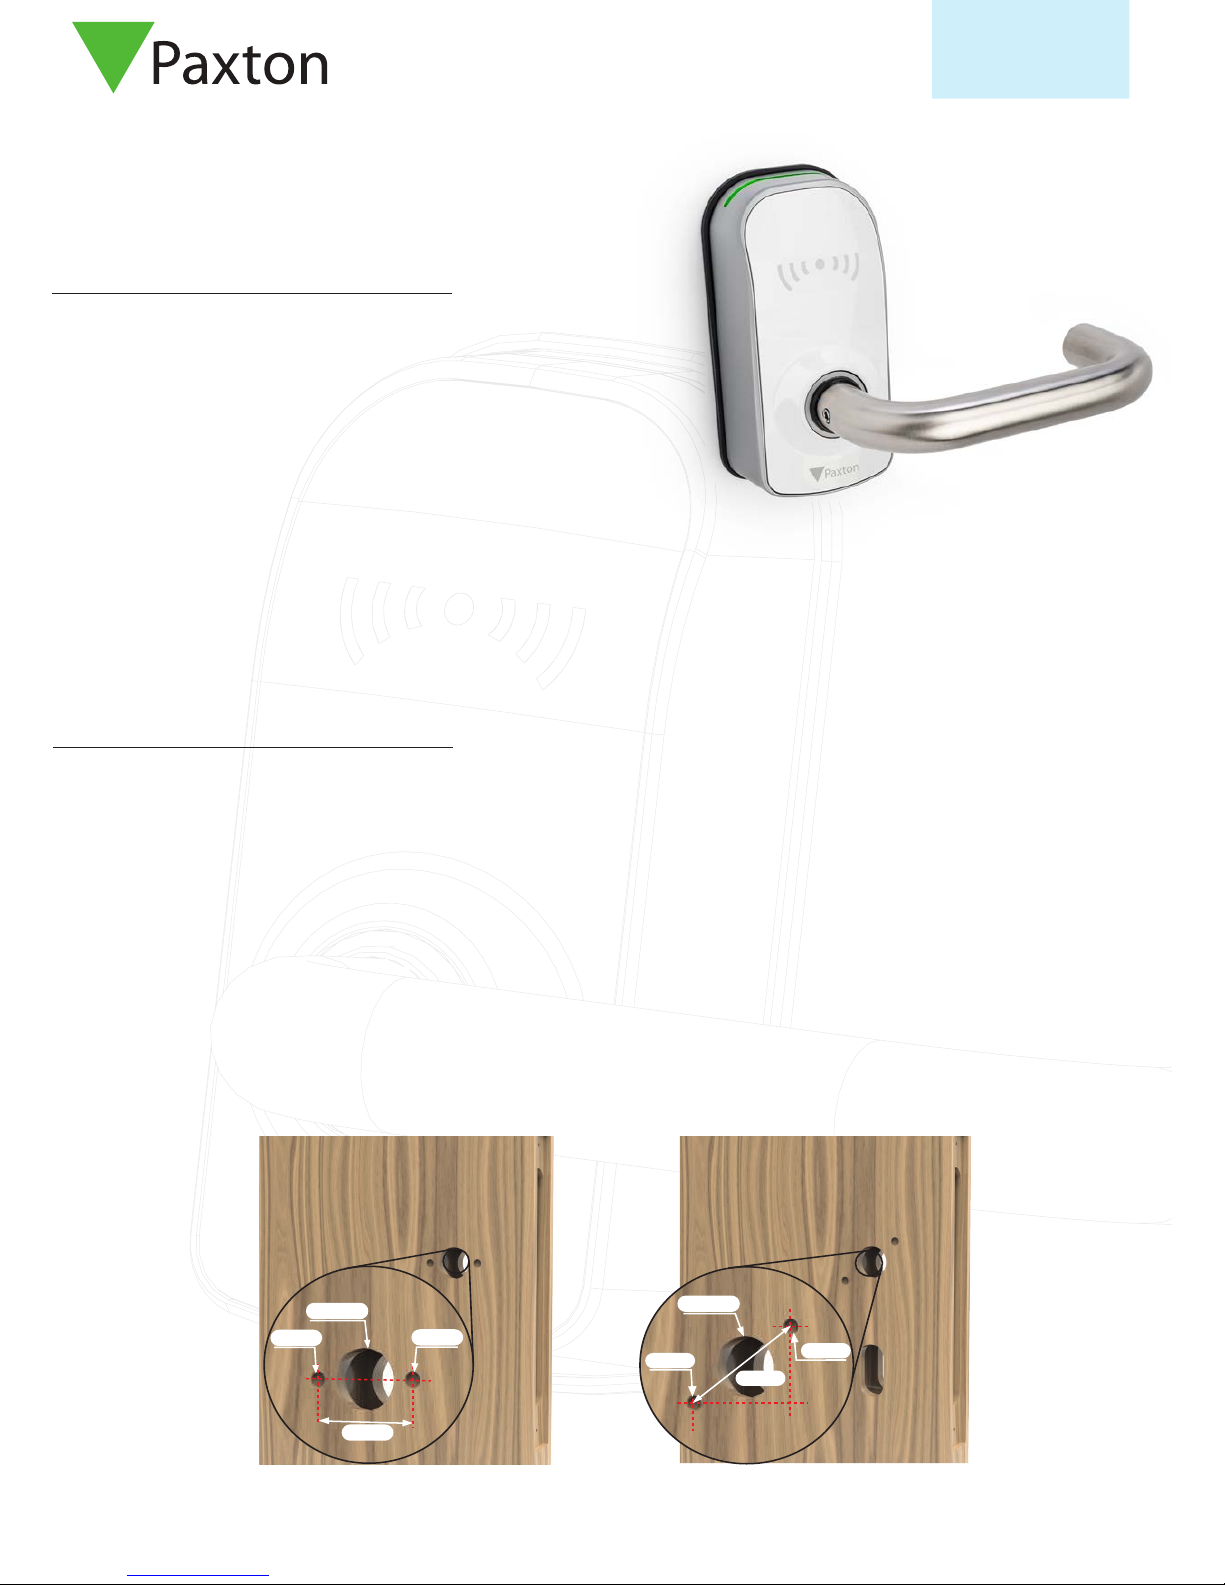
The PaxLock Pro has been designed to work with locksets that are either European (DIN 18251-1) or
Scandinavian prole as shown in Figure 1.
The through door holes must be 8mm diameter and the central follower must have at least 20mm
clearance around it.
Figure 1 – European drilling holes (left) & Scandinavian drilling holes (right)
AN1173-AE
Net2
20mm
8mm
38mm
8mm
34mm
20mm
8mm
8mm
This application note also covers a few common problems which may impact the performance
and quality of the PaxLock Pro
Page 2
AN1173-AE
Net2
2
90°
Lockset
Door Frame
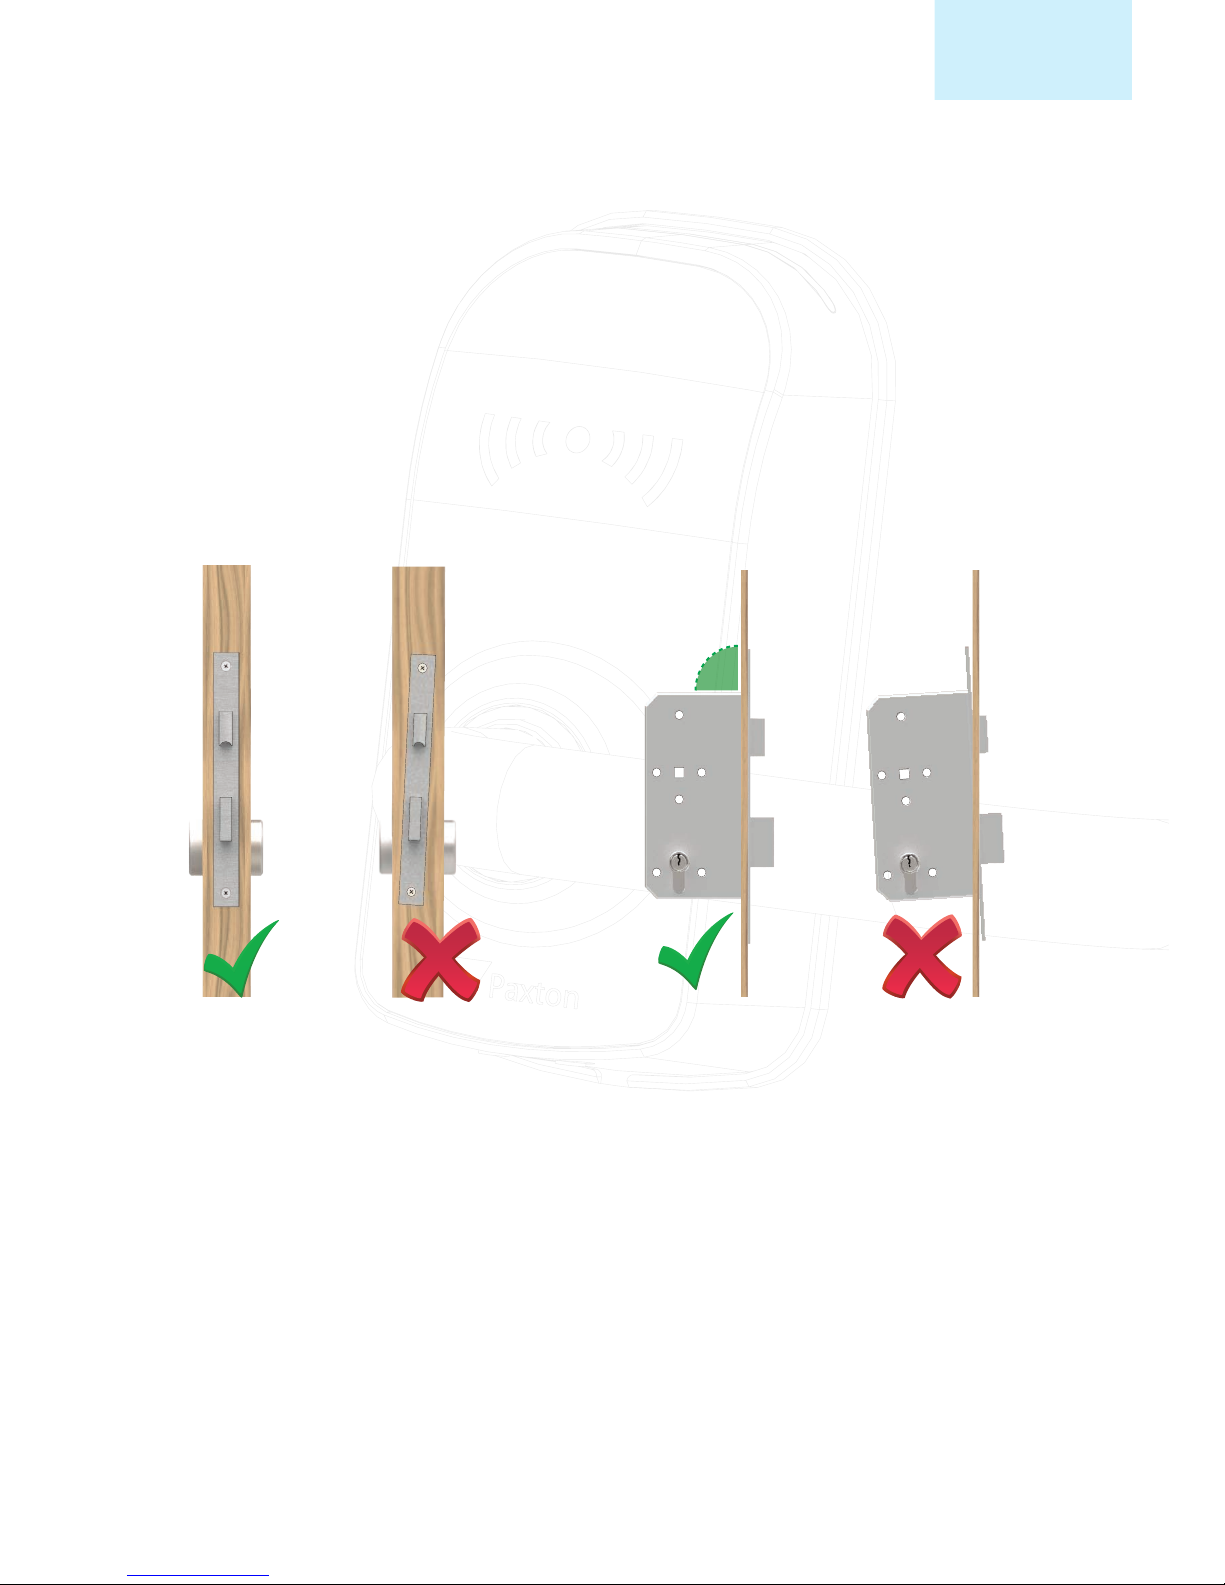
It is recommended that the PaxLock Pro is installed with a new lockcase to ensure the smooth operation
of the PaxLock Pro.
If an existing lock set is being used it must meet the following specications:
• DIN 18251-1 certied for European locksets
• Backset of ≥55mm
• Centres measurement of ≥70mm if using key override for European style locksets
• Centres measurement of ≥105mm if using key override for Scandinavian style locksets
• Turning angle of ≤45°
The lockset must be both horizontally and vertically aligned to the door as shown in gure 2.
It is best practice to ensure there is a gap of ≤3mm from the door edge to the frame. This is to ensure that
if an anti-cord plunger is present on the lock case, it can function correctly.
The door keep should also be ≤15mm to avoid clashing with the PaxLock Pro when the door is closed.
Figure 2
Page 3
AN1173-AE
Net2
3
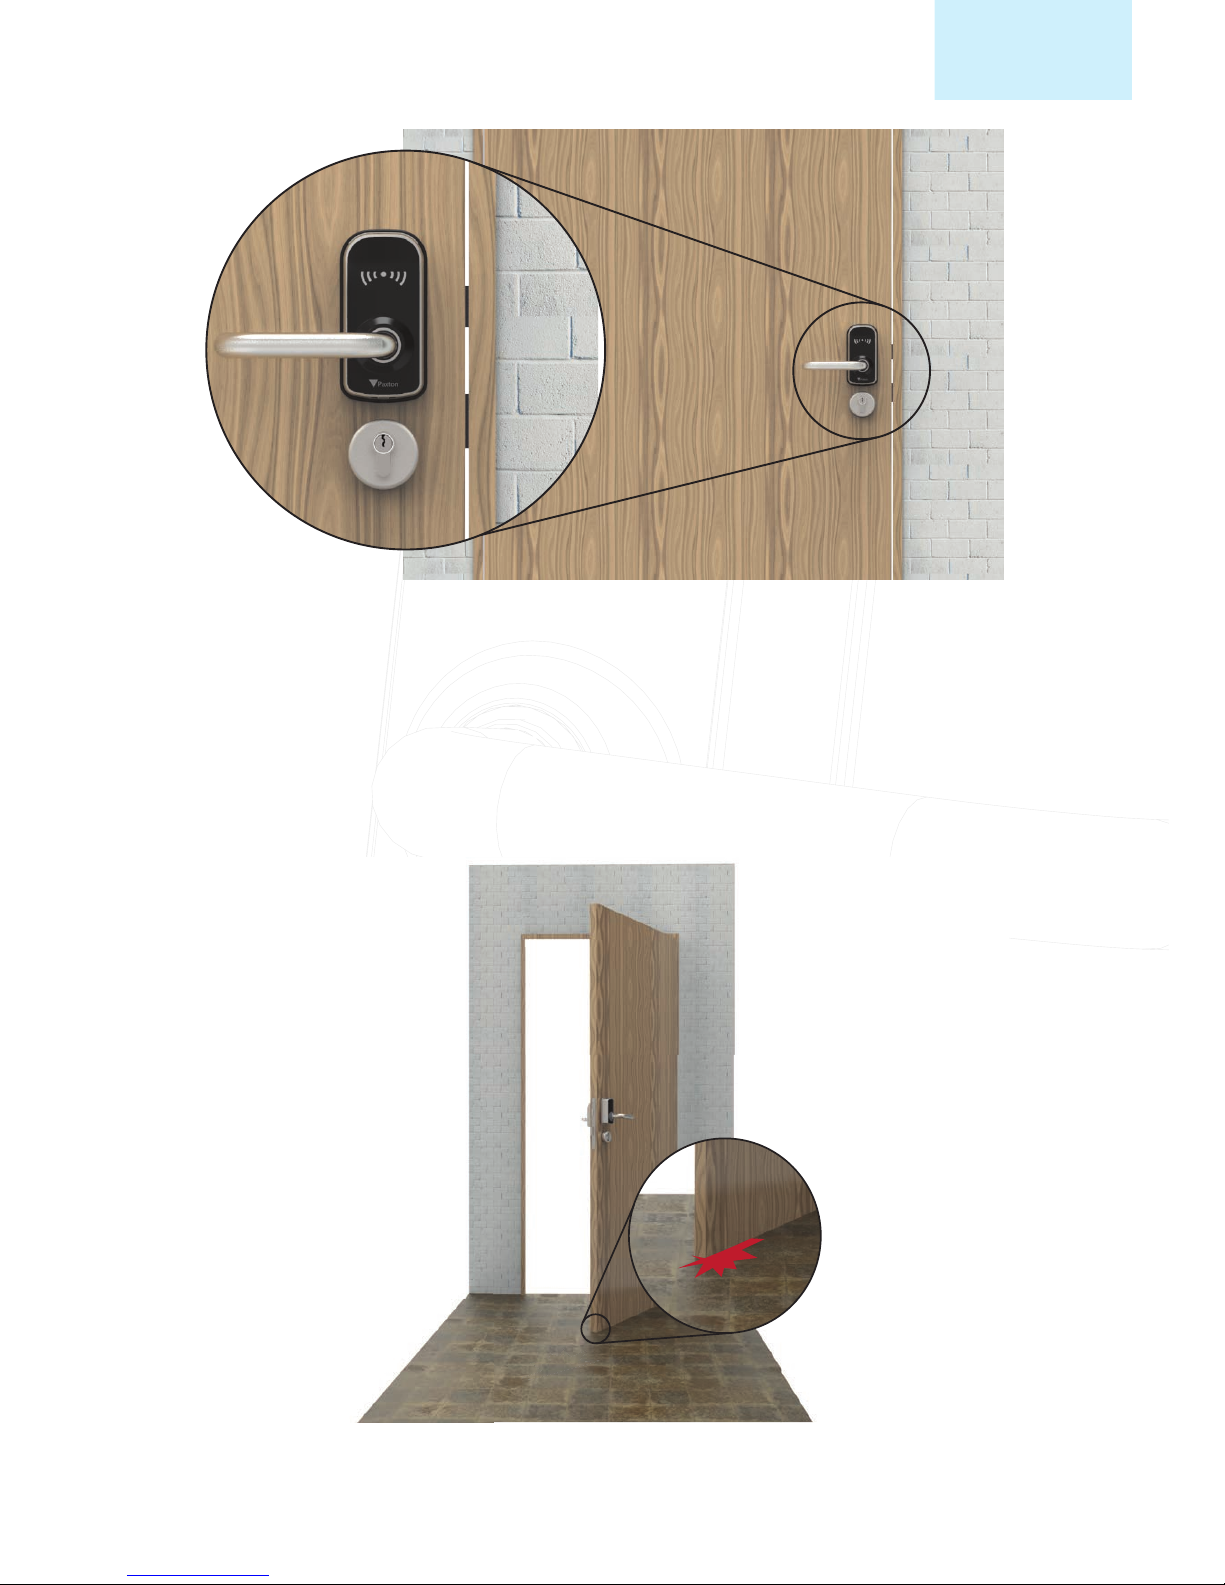
Floor
The distance between the bottom of the door and the oor must be sucient to allow the door to freely
open and close without rubbing on the oor.
Figure 3
Page 4

AN1173-AE
Net2
4
Acoustic and draft seals
Metal doors
Should a door have either an acoustic or draft seal around the outer edge it is important that the door can
still easily close without putting undue stress on the latch and strike plate. If this is not the case the strike
plate may need adjusting.
The PaxLock Pro is suitable for installation onto metal doors providing both the width and lockset are
within the specications outlined on the PaxLock Pro datasheet. To ensure correct operation the following
must be checked:
• If using in online mode, the bridge may have to be positioned well within the 15m of range as a
metal door will reduce the range of the bridge. To ensure reliable operation, standalone mode may
be more appropriate.
• The anti-rotation tee nut should be replaced with an equivalent M4, self-tapping pan head screw
suitable for installation into metal (not supplied).
Door Closer
If a door closer is being used it must be adjusted to ensure the door closes without slamming but does
not require excessive force to open.
Door Stop
The use of a door stop is advised on doors that can hit an adjacent wall when fully opened. This will
prevent damage being caused to the PaxLock Pro.
Page 5

AN1173-AE
Net2
5
Cover plates
Door Widths
If a slimline electronic door handle is being replaced with the PaxLock Pro, cover plates are available to
cover any unused holes in the door. The cover plates can be tted over the top of the PaxLock Pro and
secured with 4 supplied wood screws; one in each corner.
The appropriate cover plate will need to be ordered depending on whether a key override is present and
matched to the centre measurement of the lockset.
Notes will need to be taken on the door thicknesses across a potential site, this information will be required
when ordering the PaxLock Pro.
• Out of the box the PaxLock Pro will work with 40-44mm door widths.
• Before installing a PaxLock Pro on a unit that is 35-37mm, both the spindle and
through door bolts will need to be cut down to the correct length as per the
drilling template.
• For door widths of 50-54mm or 57-62mm, a separate Wide Door kit will need to be
purchased.
Once you are happy the site is suitable for the PaxLock Pro you will need to ensure you have the right
information to order the correct products.
There are 4 sales codes to choose from depending on whether you want an internal or external PaxLock
Pro in either black or white.
Ordering the right kit
When choosing the external version, it is important to note that only the external side of the lockset is IP
rated, meaning the PaxLock Pro should never be installed externally where the whole unit is exposed to
the elements.
Also see: Cover plates dimensional drawing < paxton.info/3560 >
BS EN179 is a standard for devices to be used in emergency situations where people are familiar with the
emergency exit and its hardware, therefore a panic situation is unlikely to develop. This means lever handle
operated escape mortice locks or push pads may be used.
BS EN179 – Emergency Exit devices for use on escape routes
The PaxLock Pro is certied to the BS EN179 standard meaning the product is suitable for use
on emergency exits in areas where a panic situation is unlikely to develop.
!
The PaxLock Pro must be used with the PaxLock Pro - Euro, EN179 kit or the door system will not be compliant
to BS EN179.
Page 6

AN1173-AE
Net2
6
The PaxLock Pro is certied to EN 1634-1 covering both FD30 and FD60 rated timber re doors. All door
furniture used in the installation must have equivalent re certication in order to comply. This includes
the use of interdens as recommended by the lockset manufacturer.
The Union HD72 lock case is designed so that the front and rear of the lock case work independently of
each other, allowing for single action egress. For this reason, a split spindle must be used with the lock
case. The split spindle may need to be cut down, depending on the door width, there are marks on the
split spindle to aid in cutting it down.
Note: When cutting down the split spindle we recommend a hack saw with 24 TPI (teeth per inch)
It is important to note that when installing the Union HD72 lock case the screws on the follower must
always be located on the inside of door as this denotes the direction of escape. If they need to be moved
over to the other side of the lock case, they must be removed and replaced one at a time.
Note: If both screws are removed at the same time you will be unable to screw them back in.
EN179 Kit
During installation
Fire Doors
Sales Code: 901-015 PaxLock Pro - Euro, EN179 kit
You can view the PaxLock Pro’s BS EN179 certication at the following link < paxton.info/3689 >
Page 7

AN1173-AE
Net2
7
PaxLock Pro Installation
The supplied template < Paxton.info/3585 > should be used to check that the holes in the door are in the
right location and correctly sized for the PaxLock Pro.
To ensure the PaxLock Pro is perpendicular to the door edge it is important to mark and drill the antirotation screw in the correct location, as indicated below.
When passing the PaxLock Pro through the door to t it, the unit must sit completely ush against the face of
the door. If this is not the case the holes in the door may need adjusting.
Page 8

AN1173-AE
Net2
8
After terminating the power and data cables it is important to tuck the cables behind the PCB in the
centre of the device, as indicated below
Once the PaxLock Pro has been installed there are several checks that can be made to ensure the PaxLock
Pro has been installed and is functioning correctly.
When the PaxLock Pro is rst powered up it will remain in an unlocked state. This will give you the chance
to check the following;
1. Does the latch fully retract when depressing the handle?
2. Does the door open smoothly without rubbing on the frame, latch or oor?
3. When letting go of the handle does the latch fully return to its natural position?
4. Is it smooth and easy to open the door?
5. When closing the door does the latch sit within the keep?
6. When the door is closed does the deadbolt (if present) project smoothly into the keep?
If the answer is yes to all the above, then either a standalone pack can be enrolled, or the unit can be
bound to a Net2Air bridge. If the answer is no, refer to the troubleshooting guide below.
Post installation commissioning
Page 9

AN1173-AE
Net2
9
Problem Recommendation
Lockcase is old, worn or not freely moving
Lockset
The latch bolt is not fully retracting when the
handle is fully depressed?
When the door is closed the latch does not sit
in the keep
The lock cases will not retract the latch when
the door is closed, even from the secure side
of the door.
Applying a silicone-based lubricant may
improve this operation. If not, a replacement
lockcase is recommended. A broken or worn
lock case could cause permanent damage to
the PaxLock Pro which would not be covered
under the warranty.
The turning angle of the lock case must be 45°
or lower for the PaxLock Pro to fully retract the
latch. If it is over this, the lockcase will need
replacing.
The position of the keep and strike plate should
be adjusted so that the latch sits comfortably in
the keep when the door is closed. Failure to do
this compromises the security of the door.
Check the distance from edge of door to frame
is no more than 3mm. Failure to do this can
in some cases can cause lock case issues or
compromise the security of the door.
To help improve the quality of the installation and the longevity of the product several common issues
and potential solutions are listed below.
Troubleshooting
PaxLock Pro
The edge of the PaxLock Pro or handle is
clipping the door frame when opening and
closing the door.
The PaxLock Pro will not sit ush against the
door when tting.
If this occurs, it may be a result of the backset
on the lock case being too low. We recommend
a minimum measurement of 55mm to be
suitable for most doors. The lockcase will need
replacing with one with an increased backset
measurement if this is the case.
The through door holes must be 8mm
diameter and the central follower must have
at least 20mm clearance around it. If this is not
the case it will need correcting before installing
the PaxLock Pro.
Page 10

AN1173-AE
Net2
10
The door is hitting the wall when opened.
Door seals installed post install are applying too
much pressure to the latch and deadbolt.
The door rubs against the frame/oor when
opened.
It is important that a door stop is installed to
prevent the handle hitting a wall or object
when the door is opened fully. Failure to do
this can damage the PaxLock Pro when swung
open.
Door seals must be routed into the frame to
prevent excessive force on the latch when the
door is closed. The keep and strike plate may
need to be moved if seals have been tted
without routing.
The door or frame may need shaving down to
ensure smooth operation.
Door Furniture
The through door cables have sheered when
tting the chassis.
There is free play in the handles.
The PaxLock Pro is not responding when I
present a token
This may be because the door is too narrow
for the bolts that have been used. Refer to the
template for the correct bolt and spindles sizes
for each door thickness.
It is important the grub screws on both handles
are fully tightened to remove any free play.
Make sure the secure side chassis is tted. This
is required for the PaxLock Pro to function.
 Loading...