

Page 1
Monarch
Pathfinder
Ultra
Gold
Printer
TC6037EM Rev. AD 5/04 ©2002 Paxar Corporation. All rights reserved.
Page 2

This device has been tested and found to comply with the limits for a
Class A digital device pursuant to Part 15 of the Federal Communications
Commissions Rules and Regulation. These limits are designed to provide
reasonable protection against harmful interference when the equipment is
operated in a commercial environment. This equipment generates, uses,
and can radiate radio frequency energy and, if not installed and used in
accordance with the instruction manual, may cause harmful interference
to radio communications. Operation of this equipment in a residential
area is likely to cause harmful interference in which case the user will be
required to correct the interference at his own expense. However, there
is no guarantee that interference will not occur in a particular installation.
If the equipment does cause harmful interference to radio or television
reception, which can be determined by turning the equipment off and on,
the user is encouraged to try to correct the interference by one or more of
the following measures:
♦ Re-orient or relocate the receiving antenna.
♦ Increase the separation between the equipment and receiver.
♦ Connect the equipment into an outlet on a circuit different from that
which the receiver is connected.
This Class A digital apparatus meets the requirements of the Canadian
Interference-Causing Equipment Regulations.
Cet appareil numérique de la Classe A respecte toutes les exigencies du
Reglement sur le Materiél Brouilleur du Canada.
Trademarks
Monarch®, Pathfinder®, Ultra®, 6037, 9462, and 9464 are registered trademarks of
Paxar Americas, Inc.
Systems, Inc.
Paxar is a trademark of Paxar Corporation.
Paxar Americas, Inc.
170 Monarch Lane
Miamisburg, OH 45342
Page 3

TABLE OF CONTENTS
Introduction .....................................................................................1-1
Using this Manual ...........................................................................1-2
Using Batteries ................................................................................2-1
Using the Main Battery....................................................................2-1
Charging the Main Battery............................................................2-2
Changing the Main Battery ...........................................................2-2
Using the Backup Battery ................................................................2-3
Replacing the Backup Battery.......................................................2-4
Main Battery Safety Information .......................................................2-6
Loading Supplies .............................................................................3-1
Loading Supplies ............................................................................3-1
Loading for Peel Mode.................................................................3-4
Loading for Non-Peel Mode ..........................................................3-6
Removing Supplies .........................................................................3-7
Basic Operations..............................................................................4-1
Using the Keypad ...........................................................................4-1
Entering Data .............................................................................4-3
Using the Display ...........................................................................4-3
Reading the Status Line...............................................................4-3
Scanning Bar Codes .......................................................................4-4
Certification Note............................................................................4-6
Printing..........................................................................................4-7
Power Management.........................................................................4-7
Radio Frequency Communications....................................................4-7
Table of Contents i
Page 4

Attaching the Safety Strap...............................................................4-8
Helpful Reminders ..........................................................................4-9
Care and Maintenance ......................................................................5-1
Cleaning ........................................................................................5-1
Printhead ...................................................................................5-2
Platen Roller ..............................................................................5-3
Pinch and Feed Rollers................................................................5-4
Sensors .....................................................................................5-5
Scanner Window .........................................................................5-6
Scanner Flex Cable .....................................................................5-7
Clearing Supply Jams .....................................................................5-7
Storing the Printer ..........................................................................5-8
Troubleshooting...............................................................................6-1
Error Codes................................................................................6-2
Specifications and Accessories....................................................... A-1
Specifications................................................................................ A-1
Accessories/Options ...................................................................... A-2
Table of Contents ii
Page 5

INTRODUCTION
1
The Monarch® Pathfinder® Ultra®
data and prints labels or tags. Your System Administrator must configure
it for you to use.
Gold
6037™ printer collects
Getting Started
To start using the printer, you must:
1. Charge the main battery. See “Charging the Main Battery” in
Chapter 2.
NOTE: You must charge the battery before using it.
2. Insert the main battery and the backup coin cell battery (if needed) in
the printer. See “Changing the Main Battery“ and “Replacing the
Backup Battery“ in Chapter 2.
3. Attach the safety strap found in the documentation package. See
“Attaching the Safety Strap“ in Chapter 4.
4. Load supplies in the printer. See “Loading the Supplies” in
Chapter 3.
5. Turn on the printer.
NOTE: Your System Administrator must load an application in the printer
before you can use it.
Introduction 1-1
Page 6

Using this Manual
Following is a summary of the contents of this manual.
Chapter Contents
1 Introduction Information you should know before using the printer.
2 Using the Battery Charging, changing, and using batteries safely.
3 Using Supplies Supply loading and removal.
4 Basic Operations Everyday printer usage.
5 Care and
Maintenance
6 Troubleshooting Common problems and their solutions.
A Reference
Information
Clearing supply jams and cleaning the printer.
Printer specifications and accessories/options.
Audience
This manual is for the operator who scans or manually enters data and
prints and applies labels.
Introduction 1-2
Page 7
USING BATTERIES
The 6037 printer uses two batteries: a main battery and a backup
battery. Both are located in a compartment at the bottom of the printer’s
handle.
Battery Use
Main Running the printer.
Backup Maintaining the system settings. Already installed in the
printer.
2
Using the Main Battery
The printer’s main power source is a 7.4V lithium-ion battery.
NOTE: The printer takes
from any other manufacturer.
IMPORTANT: You must charge the battery when you receive the
printer, even if you do not use it right away.
only
this battery. Do Not substitute batteries
Using Batteries 2-1
Page 8
Charging the Main Battery
To charge the main battery, use either the Monarch 9462™ single-station
or 9464™ four-station battery chargers. See the documentation for those
chargers for more information. Charging time is approximately 1.5 – 3
hours.
WARNING: The battery might explode if placed on a different charger.
Changing the Main Battery
IMPORTANT: Take the battery out of the printer when storing the
printer.
To change the main battery:
1. Turn the printer over and press the button on the battery compartment
door (at the bottom of the printer’s handle) and slide it.
Battery
Compartment
Door
Button
Using Batteries 2-2
Page 9
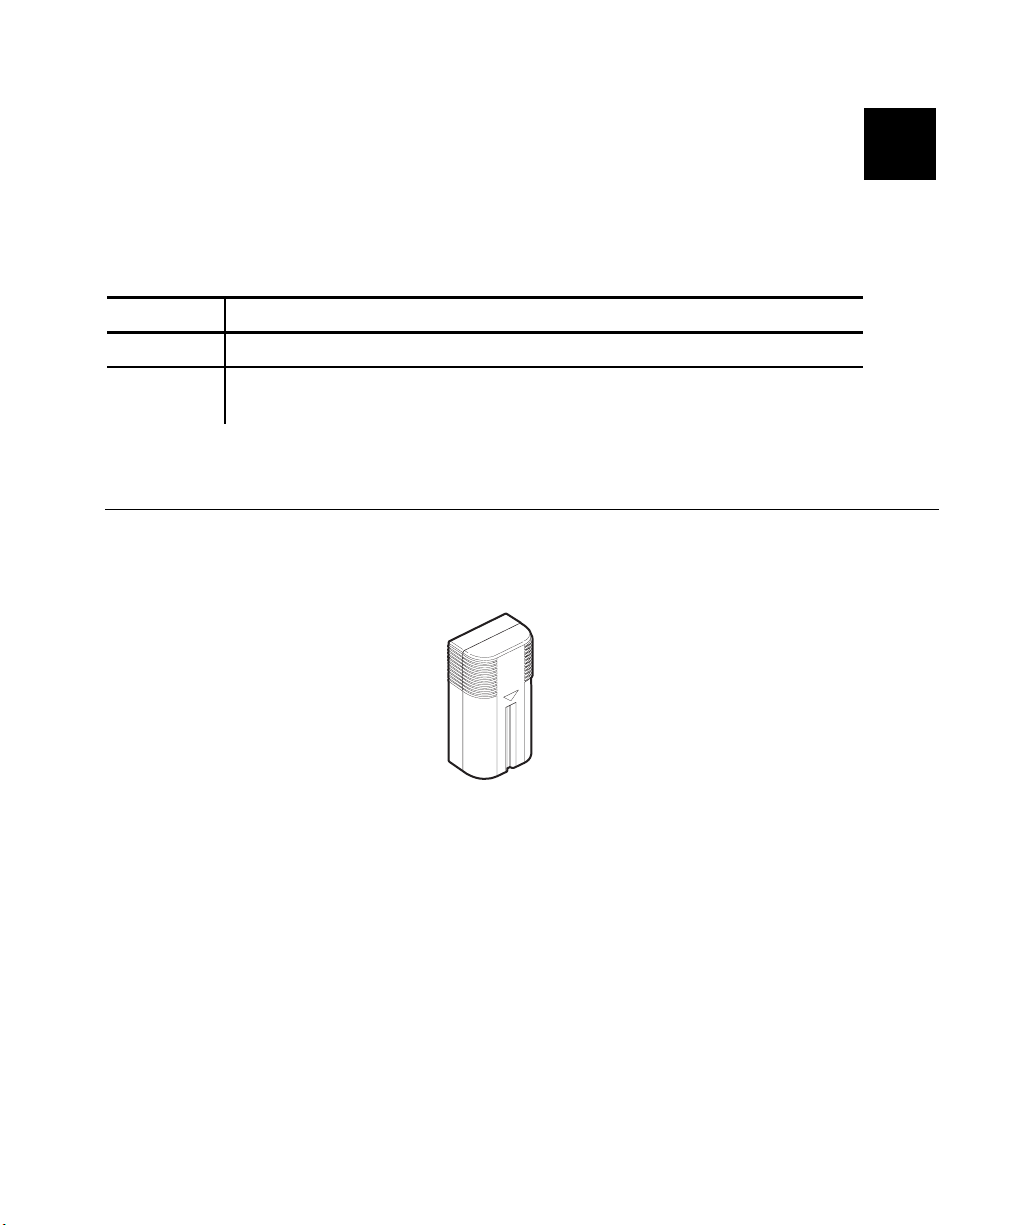
2. Turn the printer upright, holding your palm beneath the open battery
compartment. Hit the printer on your hand and catch the battery as it
slides out.
Main
Battery
3. Insert a new battery into the compartment (non-ribbed end first).
4. Slide the compartment door shut. You will have to press the battery
in slightly so the door fits over it. When the door shuts, you hear it
click into place.
Using the Backup Battery
You should have received a printer with a coin cell
battery already installed in the printer.
The backup battery is a 3-volt lithium coin cell.
You can buy additional backup batteries at most
stores, part # CR2032.
NOTE: You must use a fully charged main battery when replacing the
coin cell.
You must turn the printer on, wait until the printer fully
initializes, then turn the printer off again. This will help to further
reduce the coin cell life.
Switch backup batteries when you receive a CMOS error.
Using Batteries 2-3
Page 10
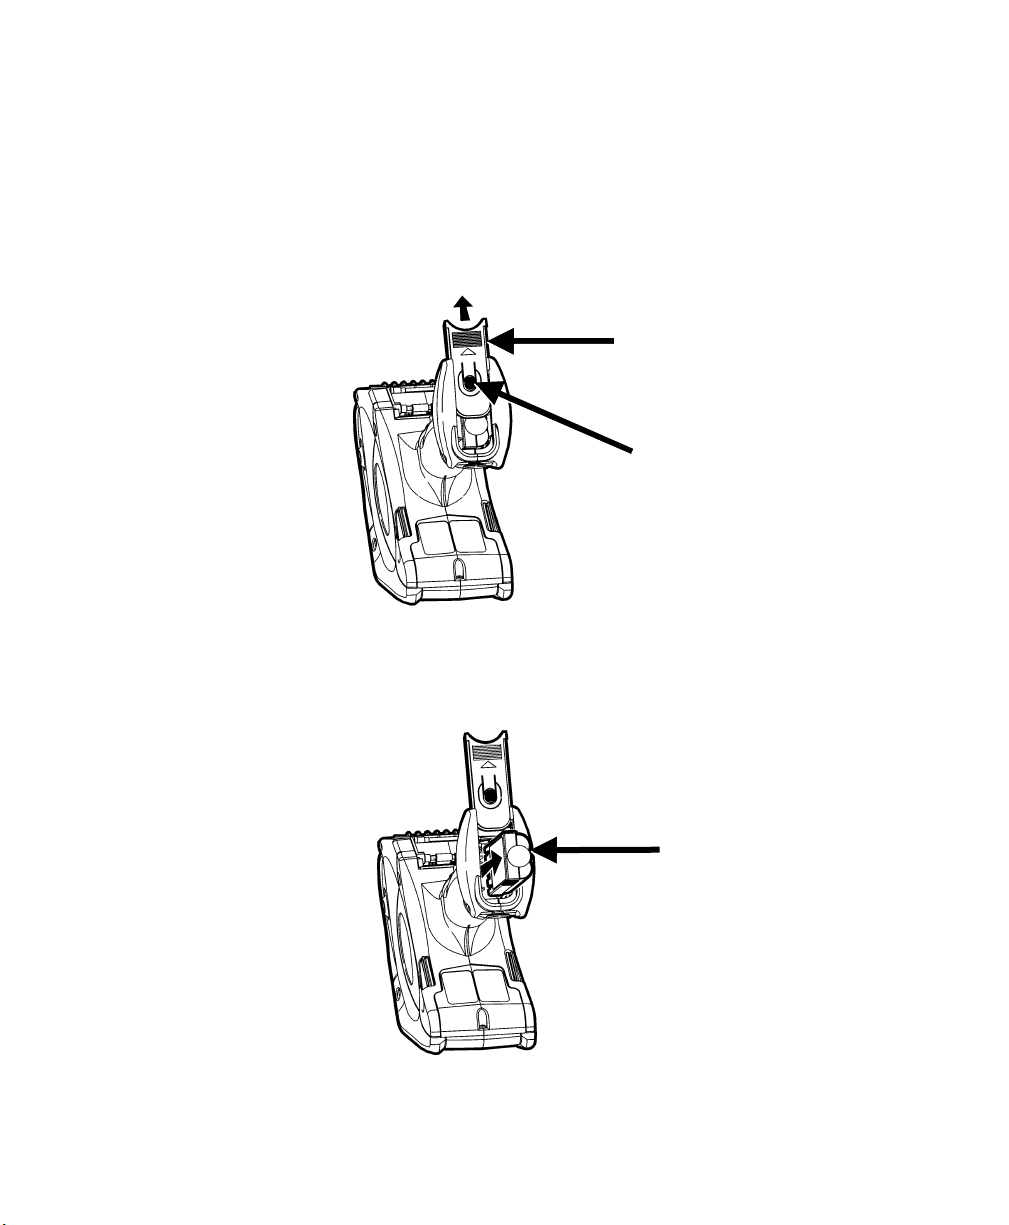
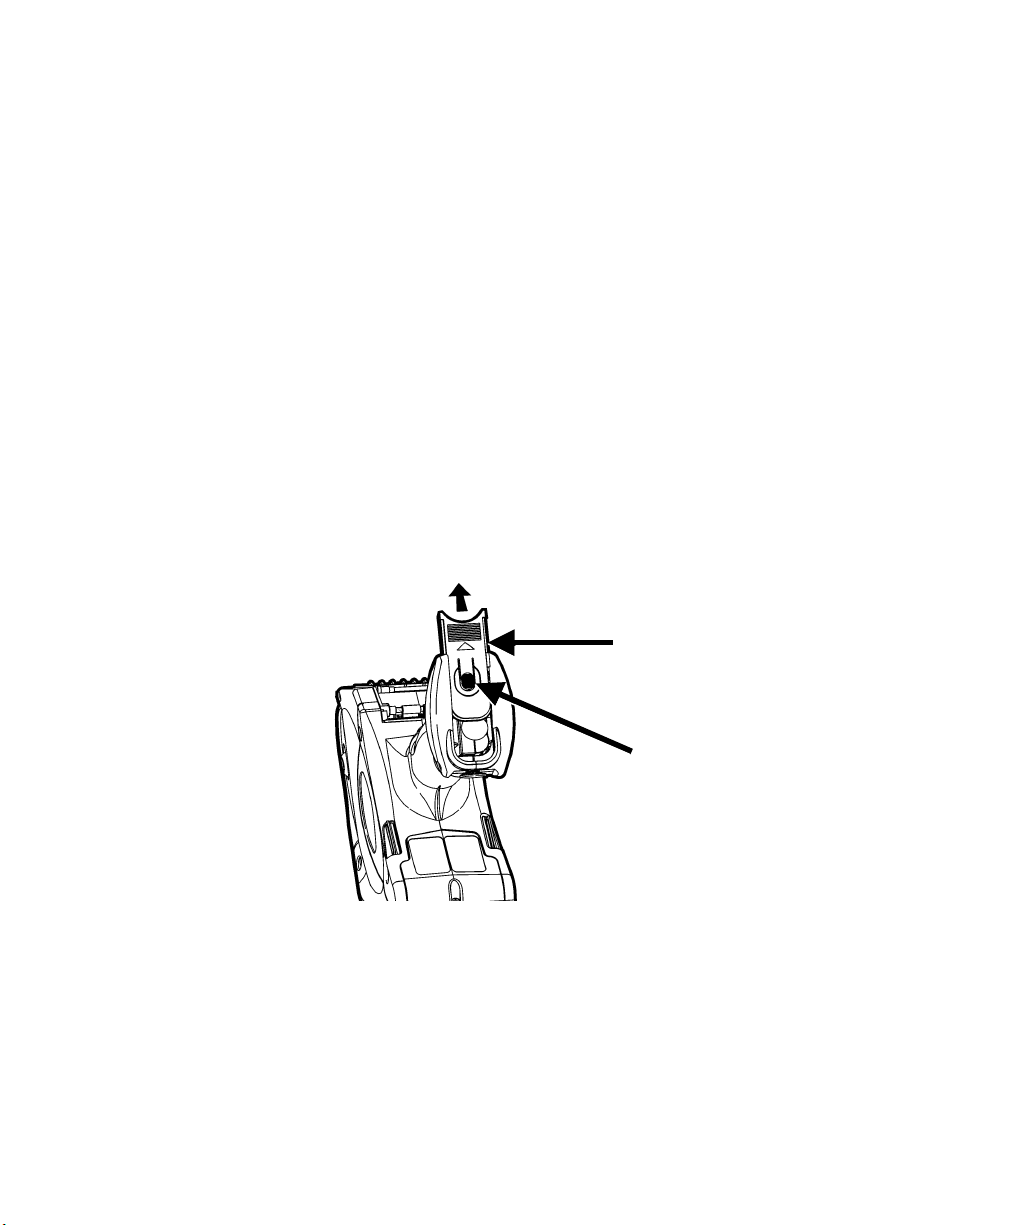
Replacing the Backup Battery
To replace the backup battery:
1. Turn the printer over and press the button on the battery compartment
door (at the bottom of the printer’s handle) and slide it open (the door
stays attached).
Battery
Compartment
Door
Button
2. Turn the printer upright, holding your palm beneath the open battery
compartment. Hit the printer on your hand and catch the battery as it
slides out.
Main
Battery
Using Batteries 2-4
Page 11
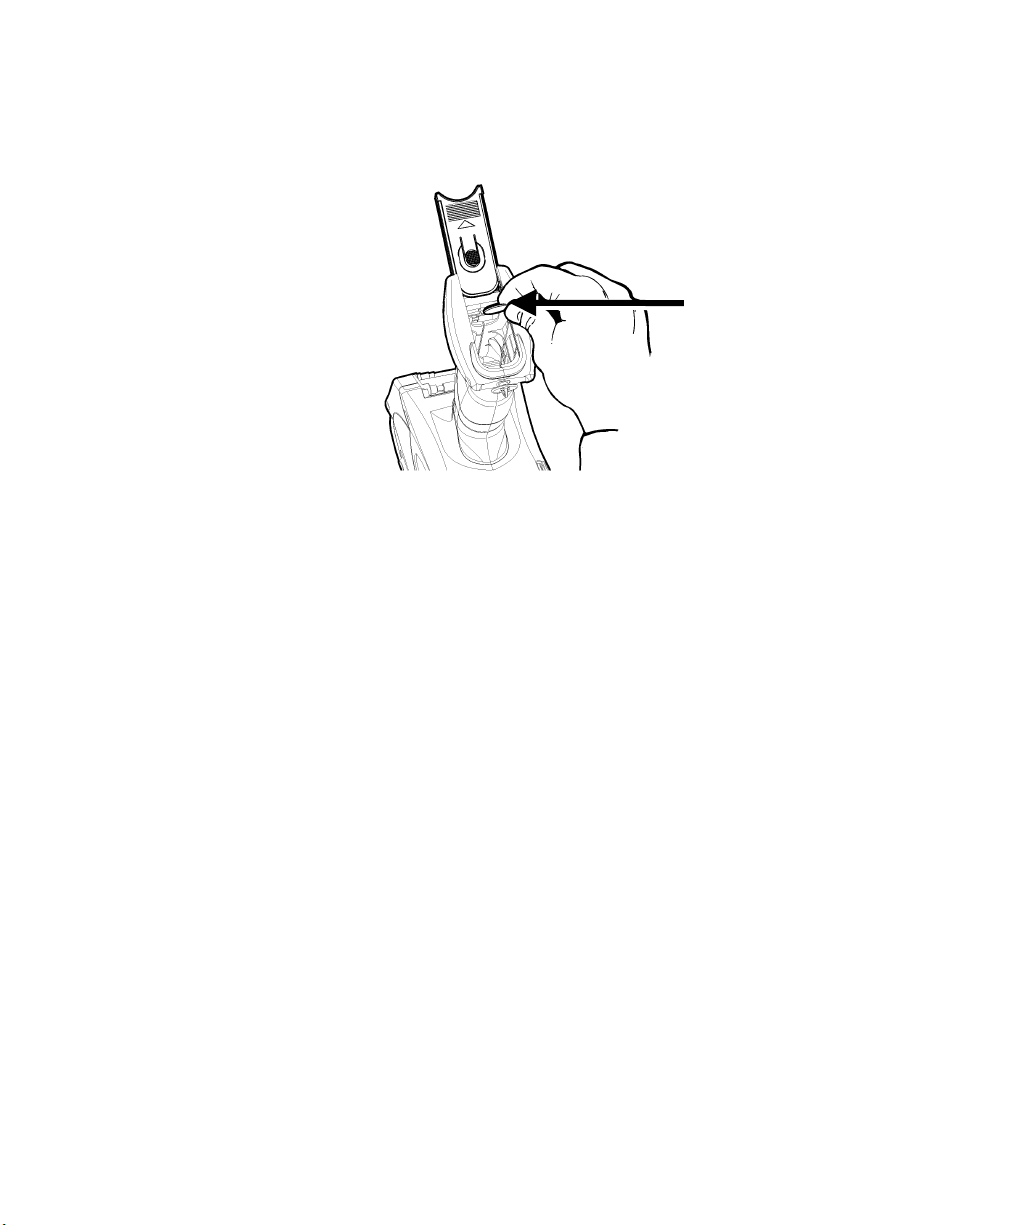
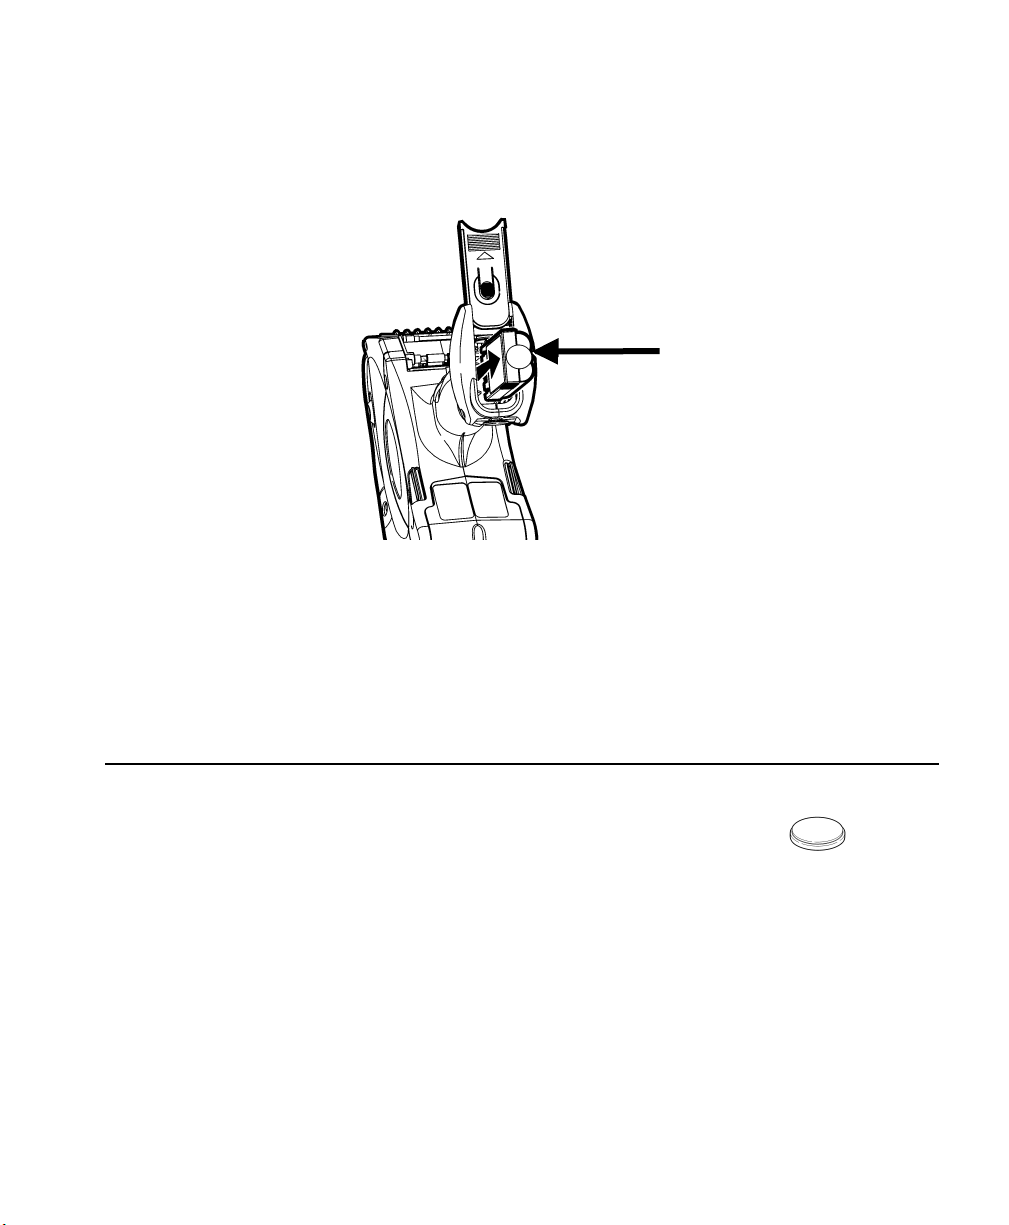
3. Remove the backup battery by turning it slightly counterclockwise,
and pulling it out.
Backup
Battery
4. At the same angle, place the new battery (positive side facing away
from the main battery) at the edge of the track and under the spring
contact. As you push it in, it will straighten itself. Make sure that the
battery lays flat.
5. Immediately replace a fully charged main battery.
6. Slide the compartment door shut. You will have to press the main
battery in slightly so the door fits over it. When the door shuts, you
hear it click into place.
7. Turn the printer on and wait for it to completely initialize.
8. Turn the printer off again.
The last two steps will help avoid reducing the coin cell life.
Using Batteries 2-5
Page 12

Main Battery Safety Information
♦ You must charge the battery before using it. For optimal battery life,
charge the battery within three months of receipt.
WARNING: The battery might explode if placed on a different charger.
♦ Take the battery out of the printer when storing the printer for a month
or longer.
♦ The optimal battery storage temperature is 50°F – 73°F (10°C – 23°C),
with a maximum of 104°F (40°C). The battery may lose its charge
capacity permanently if stored at temperatures less than 32°F (0°C) or
greater than 104°F (40°C). For longest life, the battery should be
stored in a cool, dry place.
♦ The recommended charging temperature is 68°F – 77°F (20°C – 25°C)
♦ Disposal Information – Do not throw in trash. Dispose to your local
regulations. The Rechargeable Battery Recycling Corporation
(RBRC
rechargeable batteries. For more information about how to recycle
batteries in your area, visit www.rbrc.org. Batteries can also be
returned postage-paid to: ERC; 200 Monarch Lane Door #39;
Miamisburg, OH 45342.
CAUTION: Do Not disassemble, short-circuit, heat above 80°C, or
♦ Do not let the battery come into contact with metal objects.
♦ Do not use a battery with a cracked case.
♦ Do not let the battery get wet.
♦ The operating temperature for the battery is the same as for the
printer. See “Specifications.”
♦ It is normal for battery capacity to decrease up to 20% over the first
300 cycles of use.
♦ The battery should be charged before long-term storage or after the
battery has been exhausted from a printing session. Frequent
charging will actually prolong battery life and has no negative effects
such as memory issues.
♦ The printer uses battery power even when the printer is not printing.
Remove the printer’s battery and place on a charger when the printer
is not in use.
♦ Many factors affect your battery’s performance, including the quantity
of labels printed, intervals of batches printed, percentage of black per
label, and power management.
) is a non-profit organization created to promote recycling of
incinerate the battery. It may explode.
Using Batteries 2-6
Page 13

LOADING SUPPLIES
The printer can use three types of supplies:
♦ Labels
♦ Tags
♦ Receipt Paper
There are two print modes. The way you load the supplies depends on
the print mode you use.
3
Peel mode
♦
the labels. This mode allows you to apply the label immediately. It is
only for labels. When using the on-demand sensor, you press the
trigger to print a label or the next label prints automatically when the
previous one is applied to a product.
Non-Peel mode
♦
printed in a continuous strip, tags, or receipt paper.
removes the backing paper from the supplies as it prints
does not remove the backing paper. It is for labels
Loading Supplies
To load supplies:
1. Turn on the printer. The application starts running.
2. Scroll through selections on the display until you are prompted to
load the supplies.
Using Supplies 3-1
Page 14
3. Press the latch buttons and open the supply cover.
Cover
Latch
Buttons
4. Open the spring-loaded supply holder.
Supply Holder
Using Supplies 3-2
Page 15

5. Place the supply roll in the supply holder so the supply feeds labels
from the bottom.
Load the supplies for the print mode you want. See “Loading for Peel
Mode“ or “Loading for Non-Peel Mode.”
Using Supplies 3-3
Page 16

Loading for Peel Mode
To load supplies for peel mode:
A. Peel and discard the first four inches of labels from the backing
paper.
Label
Deflector
B. Hold the printer upright and gently press down on the label deflector.
(It may be stiff.)
C. Feed all four inches of the backing paper over the peel bar and
under the applicator roller and the label deflector.
Applicator Roller
Peel Bar
Label Deflector
Using Supplies 3-4
Page 17

D. Push the label deflector up until it snaps into place.
E. Partially close the cover to the first position.
F. Pull the backing paper over the guide roller, down to the pinch and
feed rollers.
Guide Roller
(behind supply)
Feed Roller
(behind Pinch
Roller)
Pinch Roller
G. Hold the backing paper edge between the feed and pinch rollers, and
press the trigger.
H. Close the cover and press Esc to exit.
Using Supplies 3-5
Page 18

Loading for Non-Peel Mode
To load supplies for non-peel mode:
A. Feed the supply under the applicator roller and over the label
deflector.
Applicator Roller
Label Deflector
B. Close the supply cover.
C. Press Esc to exit.
Using Supplies 3-6
Page 19

Removing Supplies
To remove supplies:
1. Peel mode only. Tear the backing paper just above the pinch roller.
2. Open the supply cover completely.
3. Spread the supply holder tabs apart with one hand and remove the
supply roll.
4. Peel mode only. Carefully pull out the supply backing paper still in
place between the pinch and feed rollers.
Using Supplies 3-7
Page 20

Using Supplies 3-8
Page 21

BASIC OPERATIONS
This chapter explains the printer’s features and how to use them.
Using the Keypad
The printer keypad appears below.
4
Basic Operations 4-1
Page 22

Key(s) Description
Enter Accepts data or a menu selection.
Space Enters a space character.
Shift ♦ Enters Upper-Case or Lower-Case alphabetic mode.
♦ Deletes all data on the current line when pressed with
Bksp.
Alt Displays a special character when you press and hold the key
with one hand while entering a 3-digit number with the other
hand. Your System Administrator will tell you what number(s)
to use.
Ctrl For future use.
Esc Moves to the previous menu, or exits the current module or
program.
Fct Performs a specially-defined function when pressed with a
single-digit number. See your System Administrator for
information about the function key.
Tab For future use.
Delete Clears the entire line that the cursor is currently on.
Bksp Moves the cursor one space to the left deleting the character
in that position. Or, deletes the current line when pressed with
Shift.
On/Off Turns the printer on and off.
LCD Contrast Controls the lightness or darkness of the characters on the
display. See “Adjusting the Display Contrast” for more
information.
Arrows Moves between items in a menu.
Numeric/
Alphabetic
Symbols Displays the character shown on the face of the key.
Displays a numeric digit or letter.
Basic Operations 4-2
Page 23

Entering Data
There are three data entry modes:
♦ Normal mode (
Default
) – Press the key to display what appears on
the face of the key (numbers or symbols).
♦ Upper-Case Alphabetic mode – Press Shift once to display upper-
case letters.
♦ Lower-Case Alphabetic mode – Press Shift twice to display lower-
letters.
♦ Special Key mode – Press a special key (Fct or Alt) to access
functions or display special characters).
Using the Display
The display has eight lines and one status line.
Reading the Status Line
The status line has the following indicators:
Indicator Description
F You pressed the Fct key, and the printer is in Special Key mode.
This mode remains in effect through the next key press. Press the
Fct key again to return to Normal mode.
A You have pressed the Alt key, and the printer is in Special Key
mode. This mode remains in effect until you enter a 3-digit
number. Press the Alt key again to return to Normal.
C For future use.
↑ You have pressed the Shift key once, and the printer is in Upper-
Case Alphabetic mode. Press the Shift key to return to to LowerCase Alphabetic mode.
↓ You have pressed the Shift key twice, and the printer is in Lower-
Case Alphabetic mode. Press the Shift key again to return to
Normal mode.
The printer is in Normal mode if no indicator is on the display.
Basic Operations 4-3
Page 24

Adjusting the Display Contrast
You can lighten or darken the display using the LCD contrast buttons at
the bottom of the keypad.
♦ Press the
♦ Press the
(left arrow) to lighten the display.
(right arrow) to darken the display.
Scanning Bar Codes
Your printer may have a built-in scanner.
When you scan depends on the application in the printer. It will most
likely prompt you on the display to press a certain key (probably the
trigger). Press the trigger or a designated key to activate the scanner.
To scan a bar code:
1. Attach the safety strap to
your wrist.
2. Point the scanner at a slight
angle approximately four –
eight inches from the bar
code symbol.
3. Press the trigger or other
key specified by your
System Administrator.
CAUTION: Do Not stare into the beam.
Scanner LED Description
Green Successful scan.
Amber Unsuccessful scan.
This scanner LED is at the top right of the keypad left of the On/Off key.
Basic Operations 4-4
Page 25

If the bar code does not scan:
♦ Change the scanner’s angle slightly and try again.
♦ Clean the scanner window. See “Cleaning” in Chapter 5 for more
information.
♦ Move the scanner 4 – 8 inches away from the bar code. Adjust this
distance as needed to find the correct distance.
♦ Try scanning another bar code that you have scanned successfully. If
that scan is successful, the scanning problem is with the bar code.
♦ Move to a more dimly lit area.
♦ Ensure there are no voids (streaks) in the bar code symbol.
If the scan is still unsuccessful, ask your System Administrator to perform
a scanner test.
Basic Operations 4-5
Page 26

Certification Note
This product is certified to be a Class II laser product with the United
States DHHS Center for Devices and Radiological Health. The scanner
emits less than 1.3 milliwatt beam of laser light from the scanning window. Laser
light in excess of Class I limits must be inside a protective cover. No
maintenance is required to keep this product in compliance with IEC 825
and DHHS Regulation 21, Subchapter J. No controls are provided for
operation or maintenance.
Basic Operations 4-6
Page 27

Printing
When and how you print depends on your printer’s application. It may
print
♦ only after you press a certain key or the trigger.
♦ automatically as soon as you press a key.
♦ automatically with no input from you.
♦ one or many labels at once.
Power Management
If the printer stays on, but you do not use it for a while, it goes into sleep
mode to conserve power. The printer wakes up when you start using it
again.
Radio Frequency Communications
Your printer may be able to communicate with other printers or a base
station via radio frequency (RF) communications. Your System
Administrator can tell you if you have this feature and any special
procedures you need to perform.
Basic Operations 4-7
Page 28

Attaching the Safety Strap
1. Turn the printer upside down, resting its top on the table.
2. Take the thin end of the safety strap, and push it through the loop at
the bottom of the printer handle (near the battery compartment).
3. Push the thick end of the safety strap through the thin end’s loop.
4. Pull the strap. It may be necessary to help the thin end’s loop fit over
the plastic piece in the middle of the strap.
Basic Operations 4-8
Page 29

5. Pull the strap tight.
Helpful Reminders
♦ Always start with a fully-charged battery.
♦ Attach the safety strap to your wrist before using the printer.
♦ Do Not pound the printer when applying labels printed in peel mode.
♦ Switch to a fully-charged battery every time you load a new roll of
supplies (doing so ensures optimum print quality).
♦ Turn the printer off when not using it.
♦ Operate and store the printer with the recommended temperature and
humidity ranges. See Appendix B, “Reference Information,” for more
information.
Basic Operations 4-9
Page 30

Basic Operations 4-10
Page 31

CARE AND MAINTENANCE
Caring for and properly maintaining your printer protects it and
keeps it running smoothly. This chapter explains how to
♦ clean the printhead, platen roller, sensors, and scanner window.
♦ clear supply jams.
♦ store the printer.
5
Cleaning
It is important to keep the printer clean. There are four main areas that
you must clean:
♦ Printhead
♦ Platen Roller
♦ Sensors
♦ Scanner Window
♦ Scanner Flex Cable
Do Not use sharp objects to clean the printer.
Care and Maintenance 5-1
Page 32

Printhead
Clean the printhead
♦ after using 7-10 rolls of supplies.
♦ in extreme temperatures, humid conditions, or a dirty environment.
♦ when you see voids in the print.
♦ after a supply jam.
Do Not use silicone to clean or lubricate. Do Not use sharp objects to
remove adhesive or label particles from the printhead area. Do Not
touch the printhead with your fingers. These actions may damage the
printhead and void your warranty.
To clean the printhead:
1. Turn off the printer.
2. Open the supply cover and remove the supply roll. See “Removing
Supplies” in Chapter 3.
3. Check the supply holder for adhesive buildup, and clean it, if
necessary.
4. Ground yourself by touching metal on something other than the
printer. Grounding prevents electrostatic discharge, which may
damage your printer.
Care and Maintenance 5-2
Page 33

5. Clean the printhead area of all adhesive and label particles using a
Monarch Cleaning Pen (#114226) or a soft cloth moistened with
isopropyl alcohol.
Printhead
6. Reload the supply roll and close the supply cover.
Platen Roller
Clean the platen roller when you see significant adhesive build-up or a
label is wrapped around the platen roller.
1. Turn the printer off and open the supply cover.
2. Remove the supplies. See “Removing Supplies“in Chapter 3.
3. Hold the printer upright and gently press down on the label deflector.
It may be stiff.
Care and Maintenance 5-3
Page 34

4. Use a dry, soft-bristle brush, such as a toothbrush, to clean either the
standard (black) or linerless (red/orange textured) platen roller.
Platen Roller
5. Turn the platen roller with your finger, and then continue cleaning.
6. Reload the supplies and close the label deflector and supply cover.
NOTE: Do Not use alcohol or solvents on linerless (red/orange textured)
platen rollers.
If the brush does not remove all the adhesive:
♦ use isopropyl alcohol ONLY on the standard (black) platen roller.
Moisten a cotton swab with isopropyl alcohol and run the cotton swab
across the platen roller. Turn the platen roller with your finger to make
sure the platen roller is clean all the way around. After cleaning, feed
several inches of supply through without printing to remove any
remaining isopropyl alcohol.
♦ Call Service to clean the linerless (red/orange textured) platen roller.
Pinch and Feed Rollers
To clean the pinch and feed rollers:
1. Turn the printer off and open the supply cover.
2. Remove the supplies. See “Removing Supplies” in Chapter 3.
3. Turn the platen roller with your fingers and run a dry, lint-free cloth
across the pinch and feed rollers as they turn. Make sure the rollers
Care and Maintenance 5-4
Page 35

are clean all the way around. If that does not work, use a cloth
dampened slightly with distilled water.
4. Reload the supplies after the printer dries.
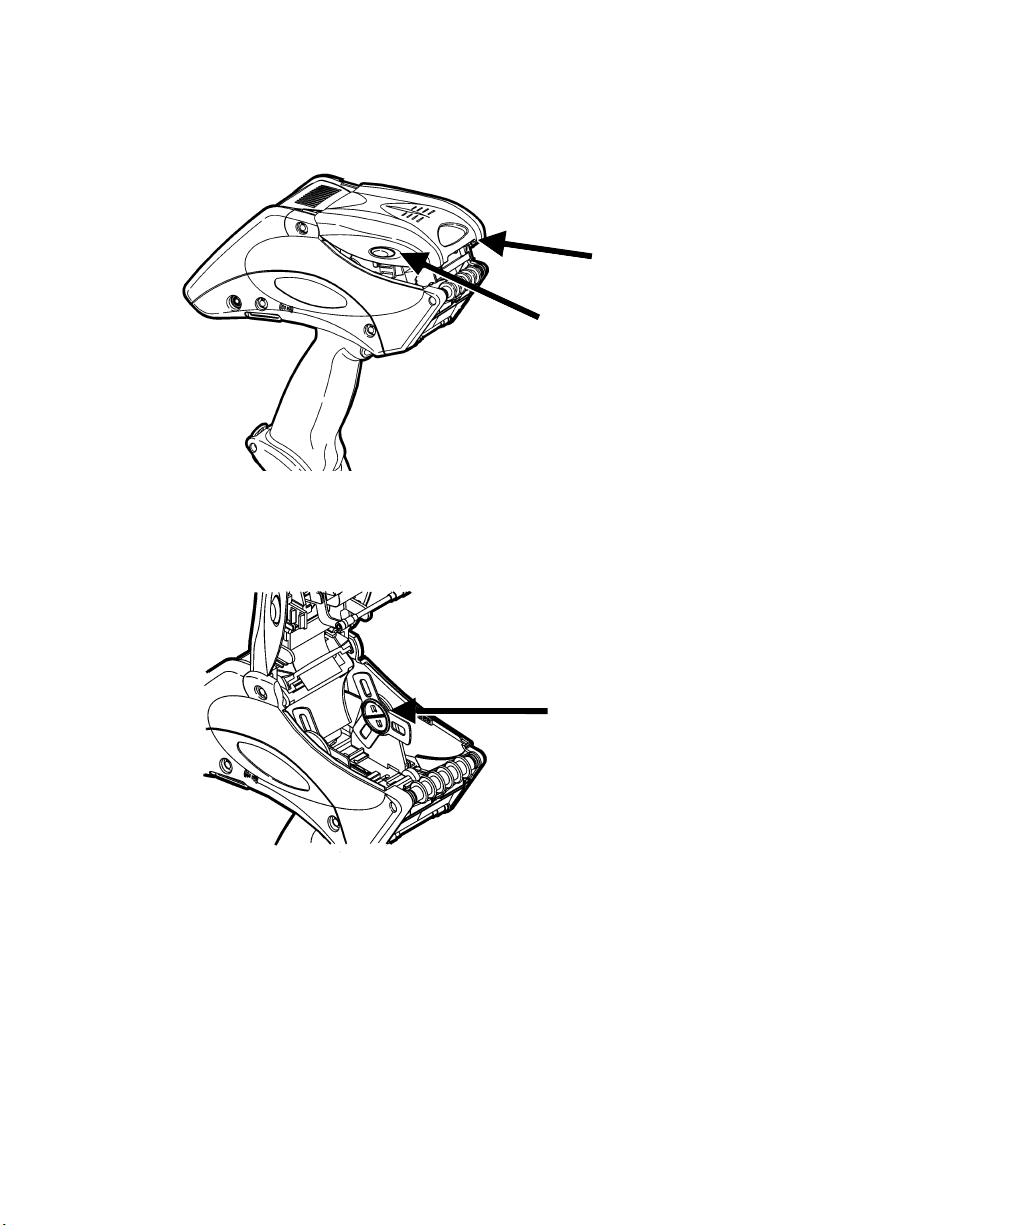
Sensors
To clean the on-demand sensor:
1. Turn the printer off and open the supply cover.
2. Remove the supplies. See “Removing Supplies” in Chapter 3.
3. Open the label deflector by gently pressing down with two fingers.
4. Clean the on-demand sensor with a soft cloth moistened with water.
On-Demand Sensor
5. Reload the supplies and close the label deflector and supply cover.
Care and Maintenance 5-5
Page 36

To clean the black mark sensor:
1. Turn the printer off and open the supply cover.
2. Remove the supplies. See “Removing Supplies” in Chapter 3.
3. Clean the black mark sensor with a dry cotton swab.
Black Mark
Sensor
4. Reload the supplies and close the supply cover.
Scanner Window
Clean the scanner window whenever it appears to be dirty or smeared.
To clean it:
1. Moisten a soft cloth with water.
2. Wipe the window until it is completely clean.
Care and Maintenance 5-6
Page 37

Scanner Flex Cable
Occasionally, adhesive buildup will appear on the scanner flex cable. To
clean the cable:
1. Turn the printer off and open the supply cover.
2. Inspect the scanner flex cable. At any place that adhesive buildup
appears, clean the cable with 99% isopropyl alcohol.
Adhesive
Buildup
Scanner Flex
Cable
3. Close the supply cover.
Clearing Supply Jams
To clear a supply jam:
1. Turn off the printer.
2. Open the supply cover completely.
3. Open the label deflector by gently pressing down on it with two
fingers.
4. Remove the supplies. See “Removing Supplies” in Chapter 3.
Care and Maintenance 5-7
Page 38

5. Carefully remove any jammed supply and close the deflector.
)
NOTE: Do Not pull the jammed supply out through the front of the label
deflector. Do Not use sharp objects to remove jammed supplies.
6. Carefully remove any jammed supply between the pinch and feed
rollers.
Pinch Roller
(Feed Roller is
behind it
7. Reload the supplies and close the label deflector.
Storing the Printer
Do Not store the printer in or near
♦ magnetic fields
♦ wet or damp areas
♦ dirty or dusty areas
♦ areas of intense vibration or shock.
Care and Maintenance 5-8
Page 39

TROUBLESHOOTING
Following are some common printer problems and their solutions.
Problem Solution
Printer will not feed. Switch to a fully-charged battery.
Close the supply cover completely.
Load the supply correctly.
Check the platen roller for jammed labels.
Printer will not print. Switch to a fully-charged battery.
Load the supply correctly.
Clean the printhead.
Print has voids or is too light. Load the supply correctly.
Close the supply cover completely.
Switch to a fully-charged battery.
Clean the printhead.
Check the supply for damage or defects.
Printer partially prints on the
supply and fails to respond
to the keypad or trigger.
Clean the printhead.
Switch to a fully-charged battery.
CMOS Error Replace the backup battery. See “Using the
Scanner will not scan a bar
Code.
The display does not turn on. Make sure the power is on.
Switch to a fully-charged battery.
Load the supply correctly or load new supplies,
if necessary.
Clear any supply jams.
Backup Battery” in Chapter 2.
See “Scanning Bar Codes” in Chapter 4.
6
Troubleshooting 6-1
Page 40

Error Codes
Following are some common error codes you may receive and their
meanings.
Code(s) Description
004 - 005 Supply size is incorrect. Reload the correct supplies.
267 – 271
410 - 413
703 - 704 Supply Error. Load supplies or make sure they are loaded
706 The printer is not running at the correct speed. Check for a
750 Printhead is overheated. Turn off the printer to let it cool.
751 - 753 The printer sensed a problem with a mark on the supplies.
756 The printer is out of supplies. Load supplies.
757 Load supplies. The calibrated supply length differs by plus
758 Check supply. Either the supply is not seen, or the on-
762 Low battery. Recharge the battery.
763 Waiting to dispense label. Press Enter.
768 Printhead error. See your System Administrator.
790 - 791 The printer is busy or has an error pending. Turn off the
904 – 911 System error. See your System Administrator.
SYSTEM
ERROR
VECTOR ##
Communication error. See your System Administrator.
correctly.
paper jam. Clear the paper jam. Or, the printer's motor may
need to be replaced. Call Service.
Check the supplies to see if they are loaded correctly.
or minus .25 inches from the format.
demand sensor is broken (purchase optional). Check for a
label jam. Clear the supply path or reload supplies. The
printer does not recalibrate after this error.
printer. Wait two seconds and turn it back on.
System error. See your System Administrator.
If these solutions do not work or you have a problem or error code not
listed, see your System Administrator or call Service at the number listed
on the back of this manual.
Troubleshooting 6-2
Page 41

A
SPECIFICATIONS AND
ACCESSORIES
Specifications
Dimensions: Width – 7.75" (197mm)
Length – 3.25" (83mm)
Height – 6.50" (165mm)
Weight – 2.2 lbs. (1 kg)
Shipping Weight – 5.86 lbs. (2.66 kg)
Printhead: 1.89" (48mm/384 dots) (203 dots per inch)
Printing: Thermal direct (no ink /ribbon)
Print Speed: Up to 4" (102 mm) per second
Memory: 1MB RAM and 2MB Flash
Battery Type: 7.4V Lithium Ion (110V – 240V AC adapter)
3V Lithium Coin Cell
Battery Recharge
Time:
Supply Sizes: Width: 1.2", 1.5", and 2.0" (30mm, 38mm, and 51mm)
Operating
Temperature:
Humidity (Operating
& Storage):
1 – 3 hours, depending on the charger used.
Lengths: .785" – 4.0" (20mm – 102mm)
Peel mode supports .785" (20 mm) or greater lengths.
Non-Peel mode supports .55" (13.97mm) or greater
lengths.
40°F – 110°F (4°C – 43°C)
5% – 90% non-condensing
Reference Information A-1
Page 42

Accessories/Options
♦ On-demand sensor
♦ 9462 Single-Station Battery Charger
♦ 9464 4-Station Battery Charger
♦ AC Power Supply (110V – 240V)—operating range is 95V – 264V
♦ Integrated Laser Scanner (regular or high-speed)
♦ Extra Battery
♦ Documentation*
♦ Wrist Strap
♦ Coin Cell, Paxar part # 120889 (Common part # CR2032)
*Available on our Web site.
Reference Information A-2
Page 43

Page 44

 Loading...