

Page 1
Quick
Reference
Quick
Reference
Monarch
9855 RFID
Printer
®
®
TC9855RFIDQR Rev. AN 4/08 ©2007 Paxar Americas, Inc. a subsidiary of Avery Dennison Corp. All rights reserved.
Page 2

Each product and program carries a respective written warranty, the only warranty on
which the customer can rely. Paxar reserves the right to make changes in the product, the
programs, and their availability at any time and without notice. Although Paxar has made
every effort to provide complete and accurate information in this manual, Paxar shall not be
liable for any omissions or inaccuracies. Any update will be incorporated in a later edition
of this manual.
© 2007 Paxar Americas, Inc. a subsidiary of Avery Dennison Corp. All rights reserved. No
part of this publicat ion may be reproduced, transmi tted, stored in a retrieval syst em, or
translated into any language in any form by any means, without the prior written permission
of Paxar Americas, Inc.
WARNING
This equipment has been tested and found to comply with the limits for a Class A digital device,
pursuant to Part 15 of the FCC Rules. These limits are designed to provide reasonable protection
against harmful interference when the equipment is operated in a commercial environment. This
equipment generates, uses, and can radiate radio frequency energy and, if not installed and used in
accordance with the i nstruction manual, may cause ha rmful interference to radio commu nications.
Operation of this equipment in a residential area is likely to cause harmful interferen ce in which case
the user will be required to correct the interference at his own expense.
CANADIAN D.O.C. WARNING
This digital apparatus does not exceed the Class A limits for radio noise emissions from digital
apparatus set out in the Radio Interference Regulations of the Canadian Department of
Communications.
Le présent appareil numérique n'émet pas de bruits radioélectriques dépassant les limites
applicables aux appareils numériques de la classe A prescrites dans l e Réglement sur le brouillage
radioélectrique édicte par le ministère des Communications du Can ada.
Radio Frequency Interference Requirements
This device complies with part 15 of the FCC Rules. Operation is subject to the following two
conditions: (1) This devi ce may not cause harmful interfe rence, and (2) this device must accept an y
interference received, including interference that may cause undesired operation.
Trademarks
Monarch® and 9855 are trade marks of Paxar Americas, Inc.
Avery Dennison® is a trademark of Avery Dennison Corp.
EPCglobal, Inc.™ and Electronic Product Code™ (EPC) are tradema rks of Uniform Code
Council, Inc. Uniform Code Council, Inc.® is a trademark of Uniform Code Council, Inc.
Avery Dennison Printer Systems Division
170 Monarch Lane
Miamisburg, OH 45342
Visit www.monarch.com for sales, service, supplies, information, and telephone numbers
for our International locations.
TOLL FREE:
1-800-543-6650 (U.S.A.)
1-800-363-7525 (Canada)
Page 3

1
Introduction
This Quick Reference contains supply loading an d general maintenance
procedures. Additional RFID documents are available on the enclosed CD-ROM
and on our Web site (www .monarch.com).
Note: Information in this document supercedes information in previous versions .
Check our Web site for the latest documentation and release information.
RFID Overview
Your printer has been engineer ed to program (encode) an RFID (Radio Fre quency
Identification) label (commonly called “RFID tags”) before the label’s forma t is
printed. RFID tags contain an embedded RFID inlay (chip and antenna) .
RFID is only available on the Monarch® 9855™ printer using die cut or black mark
supplies. Linerless supplies are not current ly supported. The RFID printer is also
capable of printing standard (non-RFID) supplies. For more information about
supplies, see “RFID Supply Specifications.”
The UHF printer supports multi-protocol encoding , including Class 1 Generation 1
(C1Gen1), Class 1 Generation 2 (C1Gen2), and EM4122 supplies.
The HF printer supports multi-protocol encoding, including ISO15693 and I•CODE®
UID protocols.
About Professional Services
Our Professional Services group can develo p custom RFID scripts (applications) or
other types of data manipulation scripts. Our experts can ensure your RFID
requirements are met. Custom programming can be factory-loaded at the time of
shipment. Call Customer Service for more infor mation.
Page 4
2
Web Sites with RFID Information
AIM G lobal
The association for Automatic Identification and Mobility.
www.aimglobal.org
EPCglobal, Inc.™
A joint venture between EAN International and the Uniform
Code Council, Inc., creating RFID standards for the
Electronic Product Code™ (EPC).
www.epcglobalinc.org
RFID Journal
An independent media company specializing in RFID.
www.rfidjournal.com
Uniform Code Council, Inc.®
A global standards organization in supply chain management.
www.uc-council.org
Avicon
Provides software to translate legacy codes to electronic
product codes (EPC) for Class 1 96-bit (and more)
representations.
www.epctransl ator.com
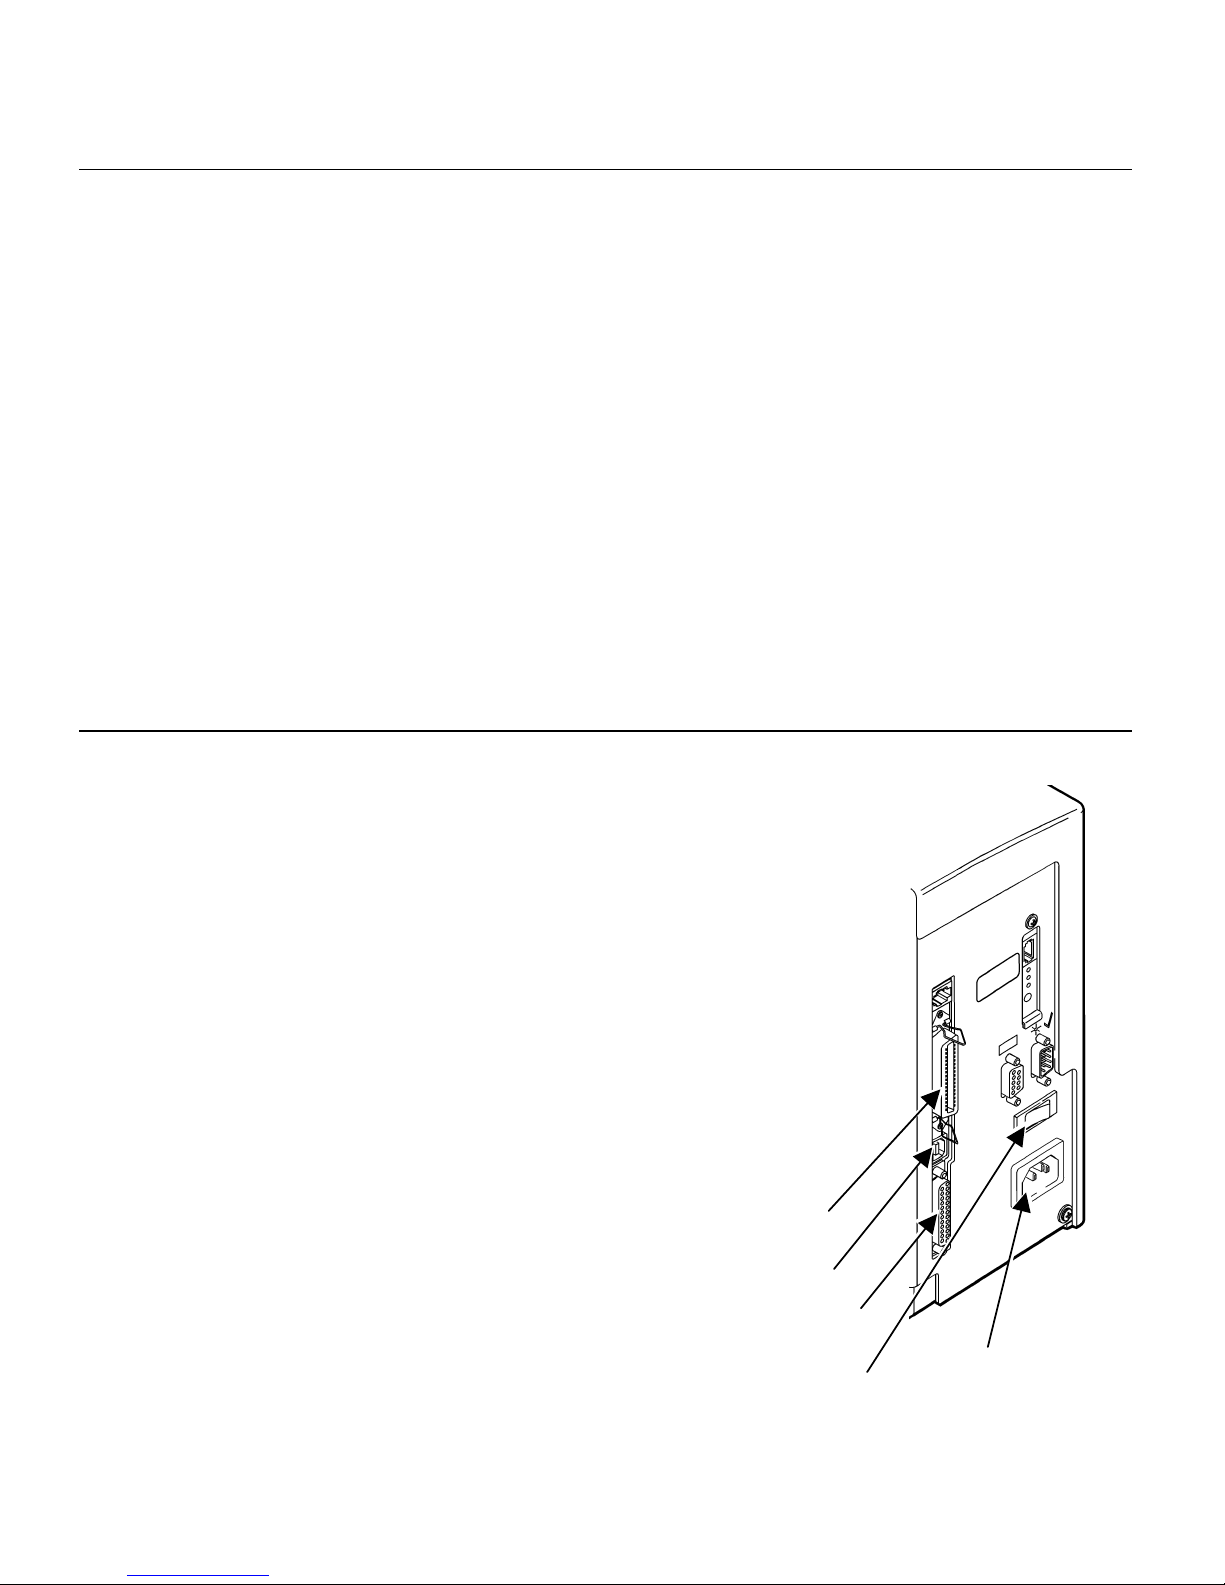
Connecting the Cables
The power supply automatically switches between 1 15V or 230V. There are no
operator settings required.
1. Plug the power cable into the socket. Plug the other end of
the cable into a grounded electrical ou tlet.
2. Connect the communication cable into th e appropriate port.
Secure the cable with the connecting screws (serial) or
spring clips (parallel).
If you are communicating with the host through the serial
port, make sure the printer's communica tion values match
those at the host. The factory default values are 9600 Baud,
8 bit data frame, 1 stop bit, no parity, and DTR flow control
(9600, N, 8, 1, DTR). Set the communication values on the
printer to match those at the host.
The printer also has a U SB (Universal Serial Bus) version
2.0 communications port, which is compatible with
version 1.1.
Drivers are available on our Web site
for a variety of operating systems.
3. Turn on the printer. Press ( I ) to turn on
and ( O ) to turn o ff the printer.
Parallel Port
USB Port
Serial Port
Power Cable
Goes Here
Power Switch
Page 5
3
Using the Control Panel
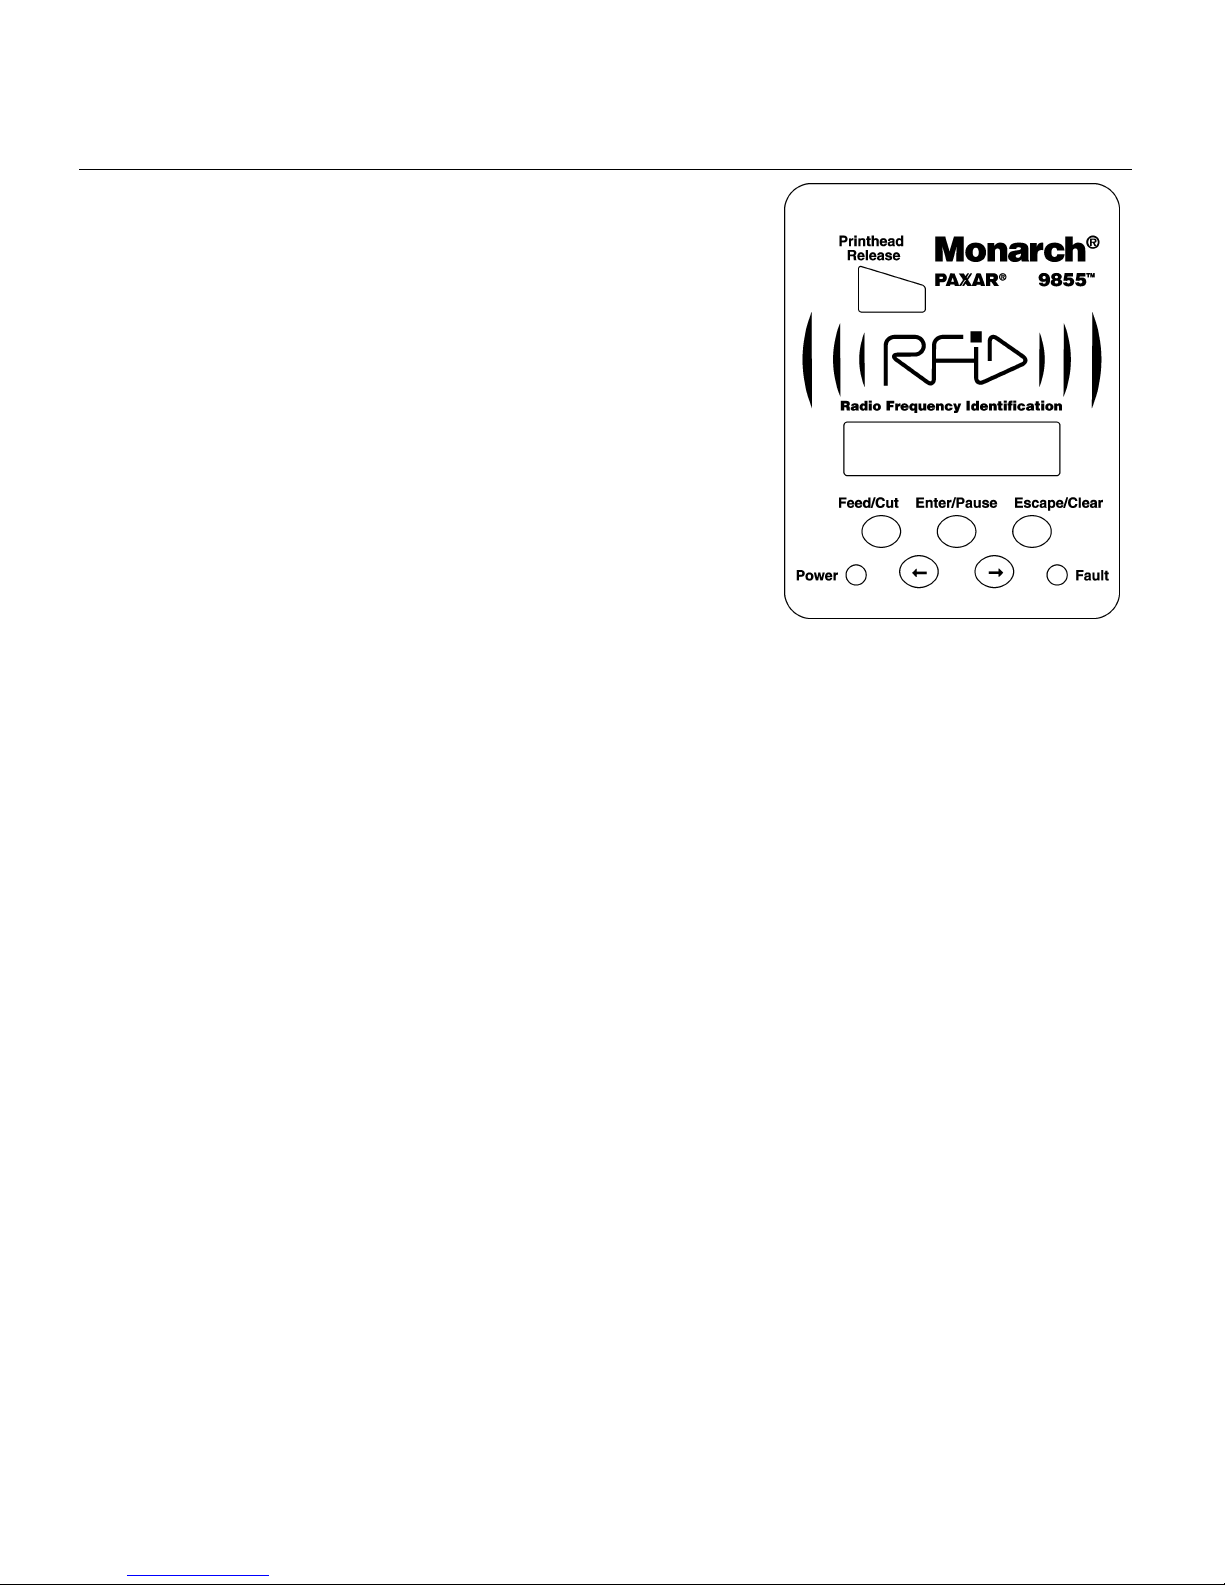
The control panel has a two-line LCD display, two
status lights, and five buttons. The control panel
displays error codes/messages, and a llows you to
setup/configure the printer.
Power: The printer shows a steady green
light when it is on.
Fault: The printer shows a steady amber
light when it is out of labels or
ribbon, or when you have a supp ly
jam.
Feed/Cut: Prints a label in the on-demand
mode, feeds a blank label if there is
no print job, and prints a label with
error information that is useful to
your System Administrator if an error is displayed. When the
printer is offline, changes the displayed value by one or ten.
Enter/Pause: Pauses the current print job or resumes a paused print job.
Selects the displayed menu item.
Escape/Clear: When an error is present, clears the error. When a job (batch) is
printing, cancels th e print job (batch). Enters the offline menu
mode or returns the displa y to the next higher menu.
Å Displays the previous menu ite m.
Æ Displays the next menu item.
Å and Æ Prints a test label when you press the buttons at the same time.
Hold for one second and release.
Page 6
4
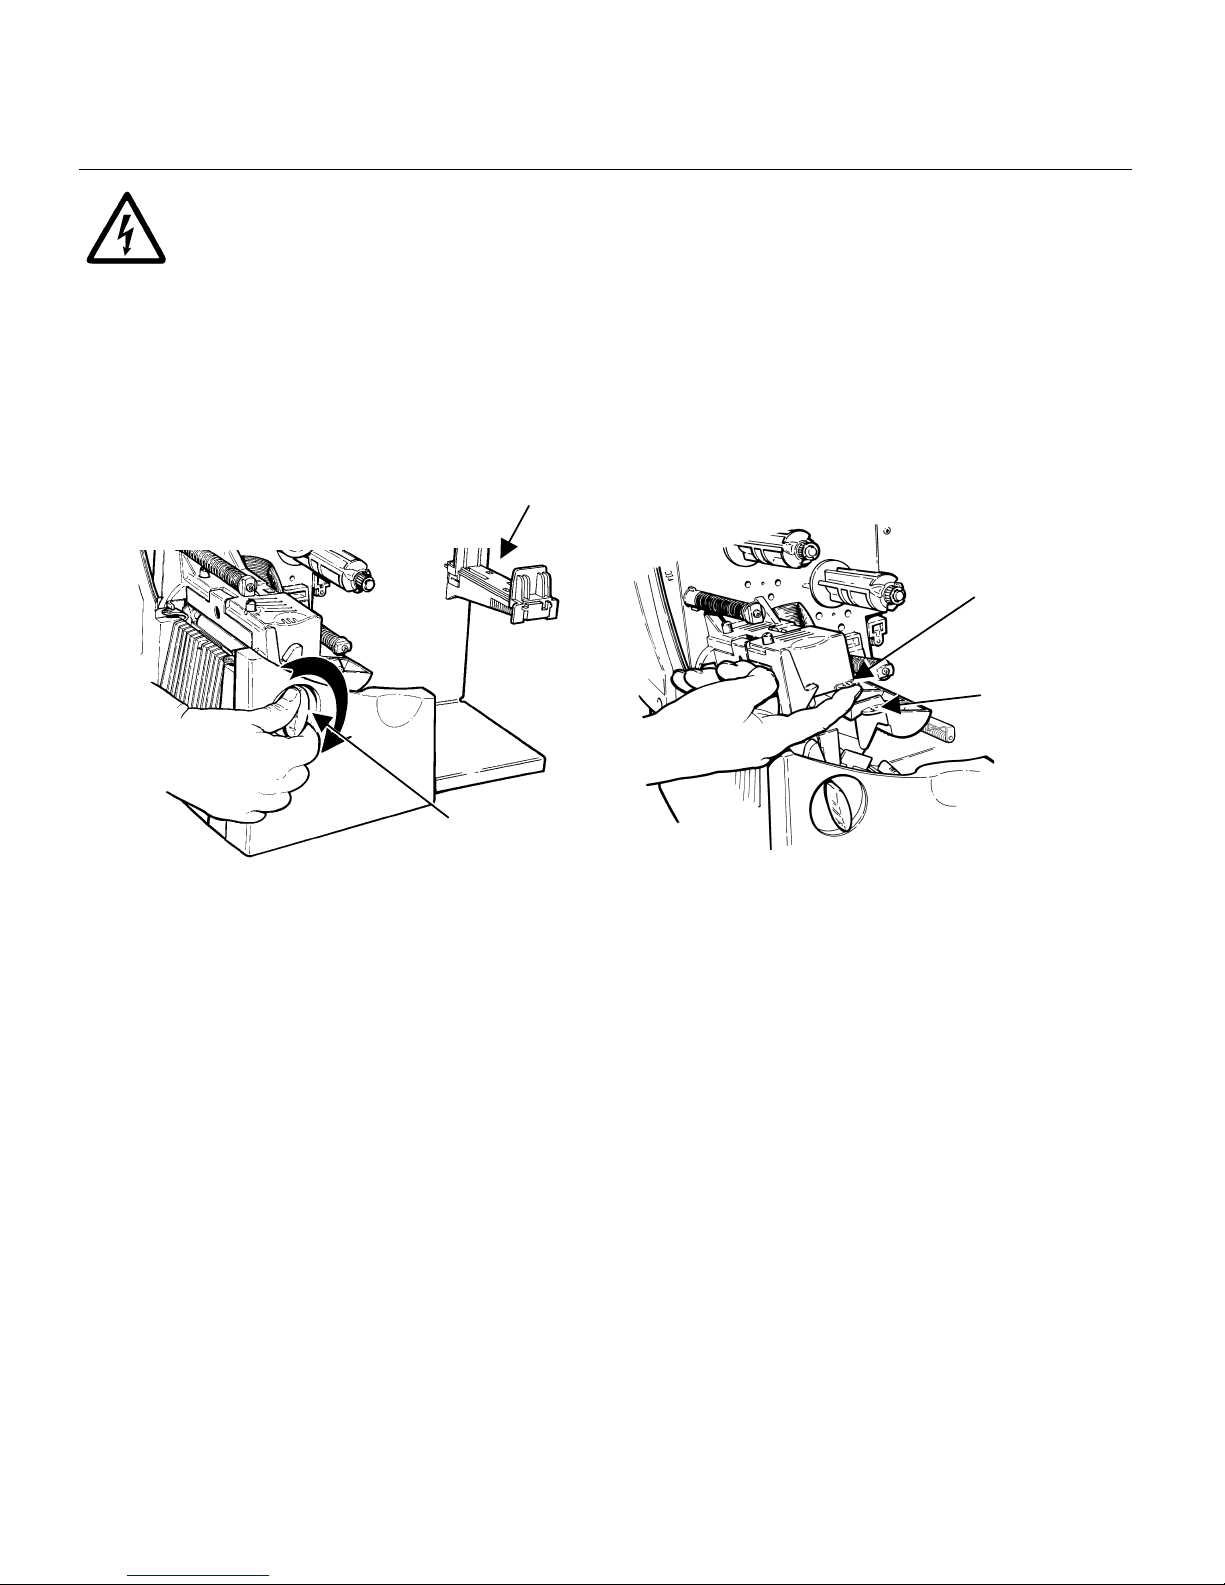
Printhead
Tab
Deflector
Tab
Loading RFID Labels
The RFID supplies are sensitive to static electricity and can be damage d
by static electricity. Ground yourse lf by touching some metal, such as the
printer’s metal base, before handling the supplies.
Refer to the 9855 Operator's Handbo ok for additional supply loading instructions if
using non-RFID supplies in your RF ID printer.
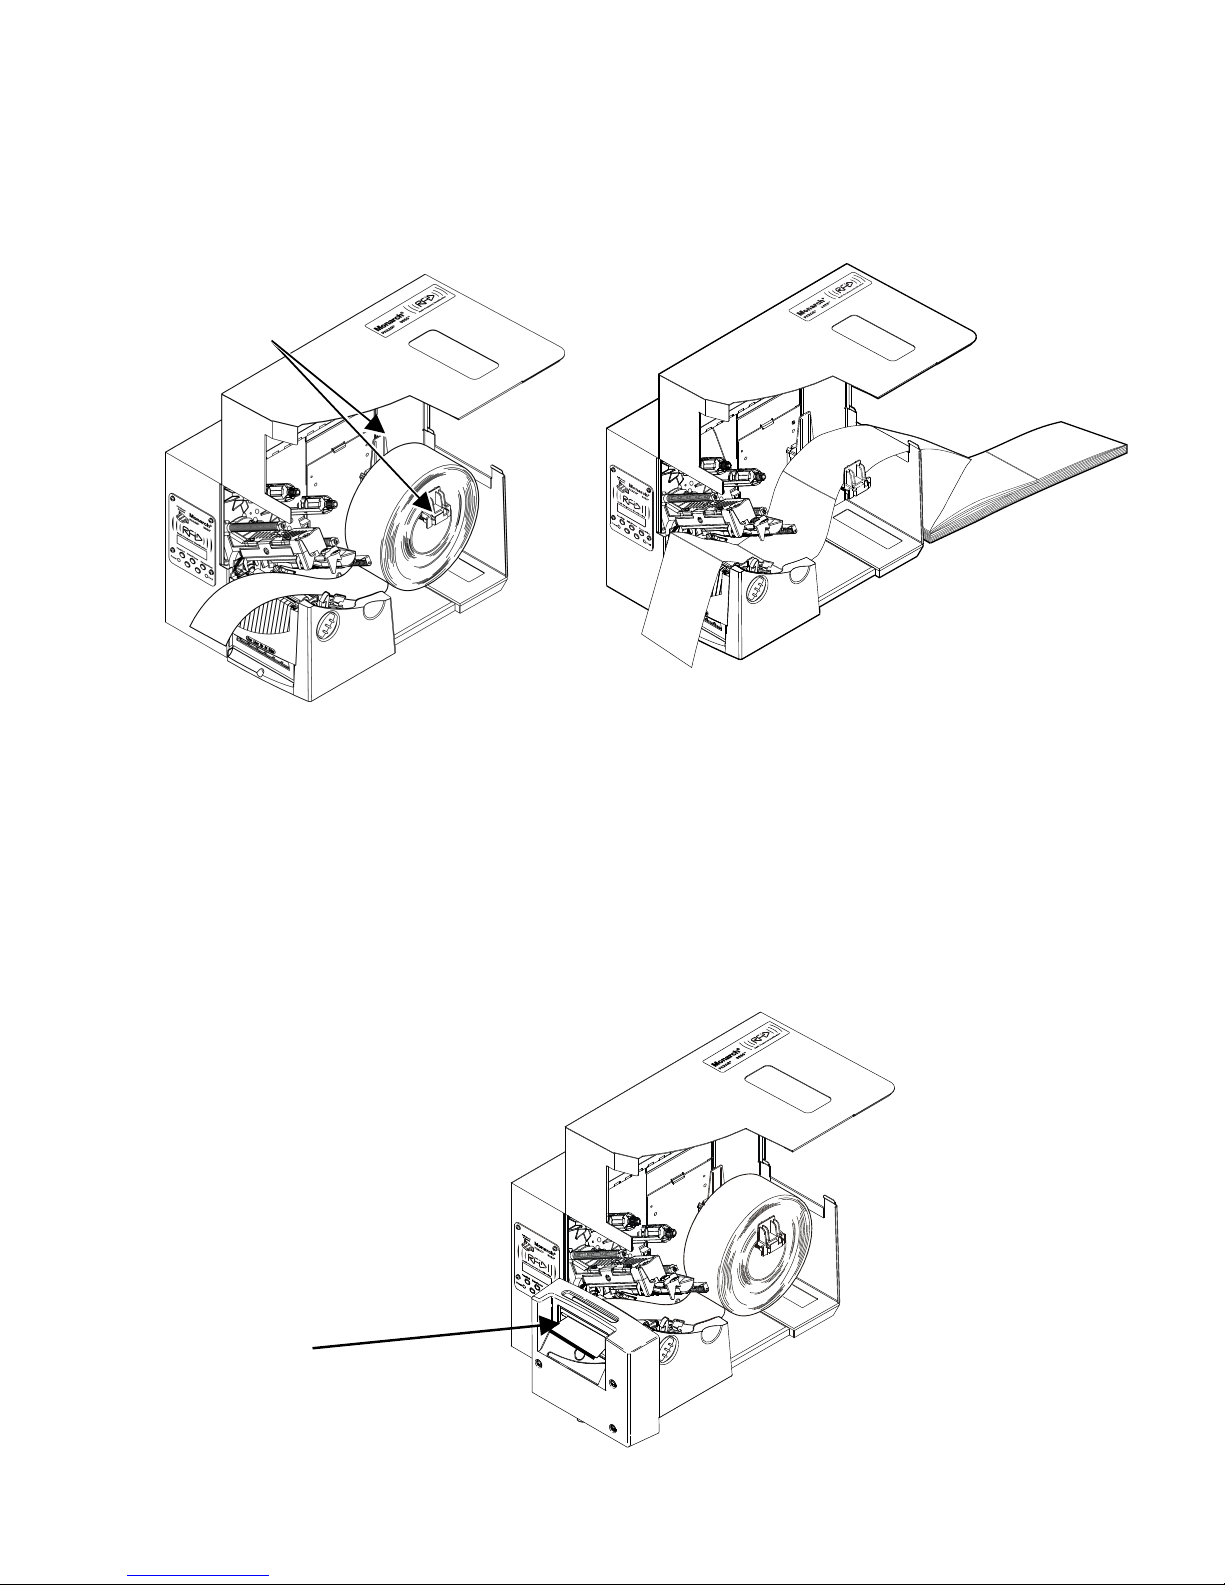
1. Open the cover.
2. Unlock the printhead by turning the reta ining latch.
3. Lift the printhead assembly using the prin thead tab until the assembly locks
into place.
4. Place the roll of supply on the supply holder. For labels, the supply unro lls
from the top or the bottom. Do not p ick up the printer by the supply hol der.
Supply Holder
Retaining Latch
Page 7
5
5. Adjust the supply holder guides so the sides barely touch the roll. Make sure
the supply roll turns freely.
If you are using fan-fold supplies, place the supply stack behind the printer,
label side facing up.
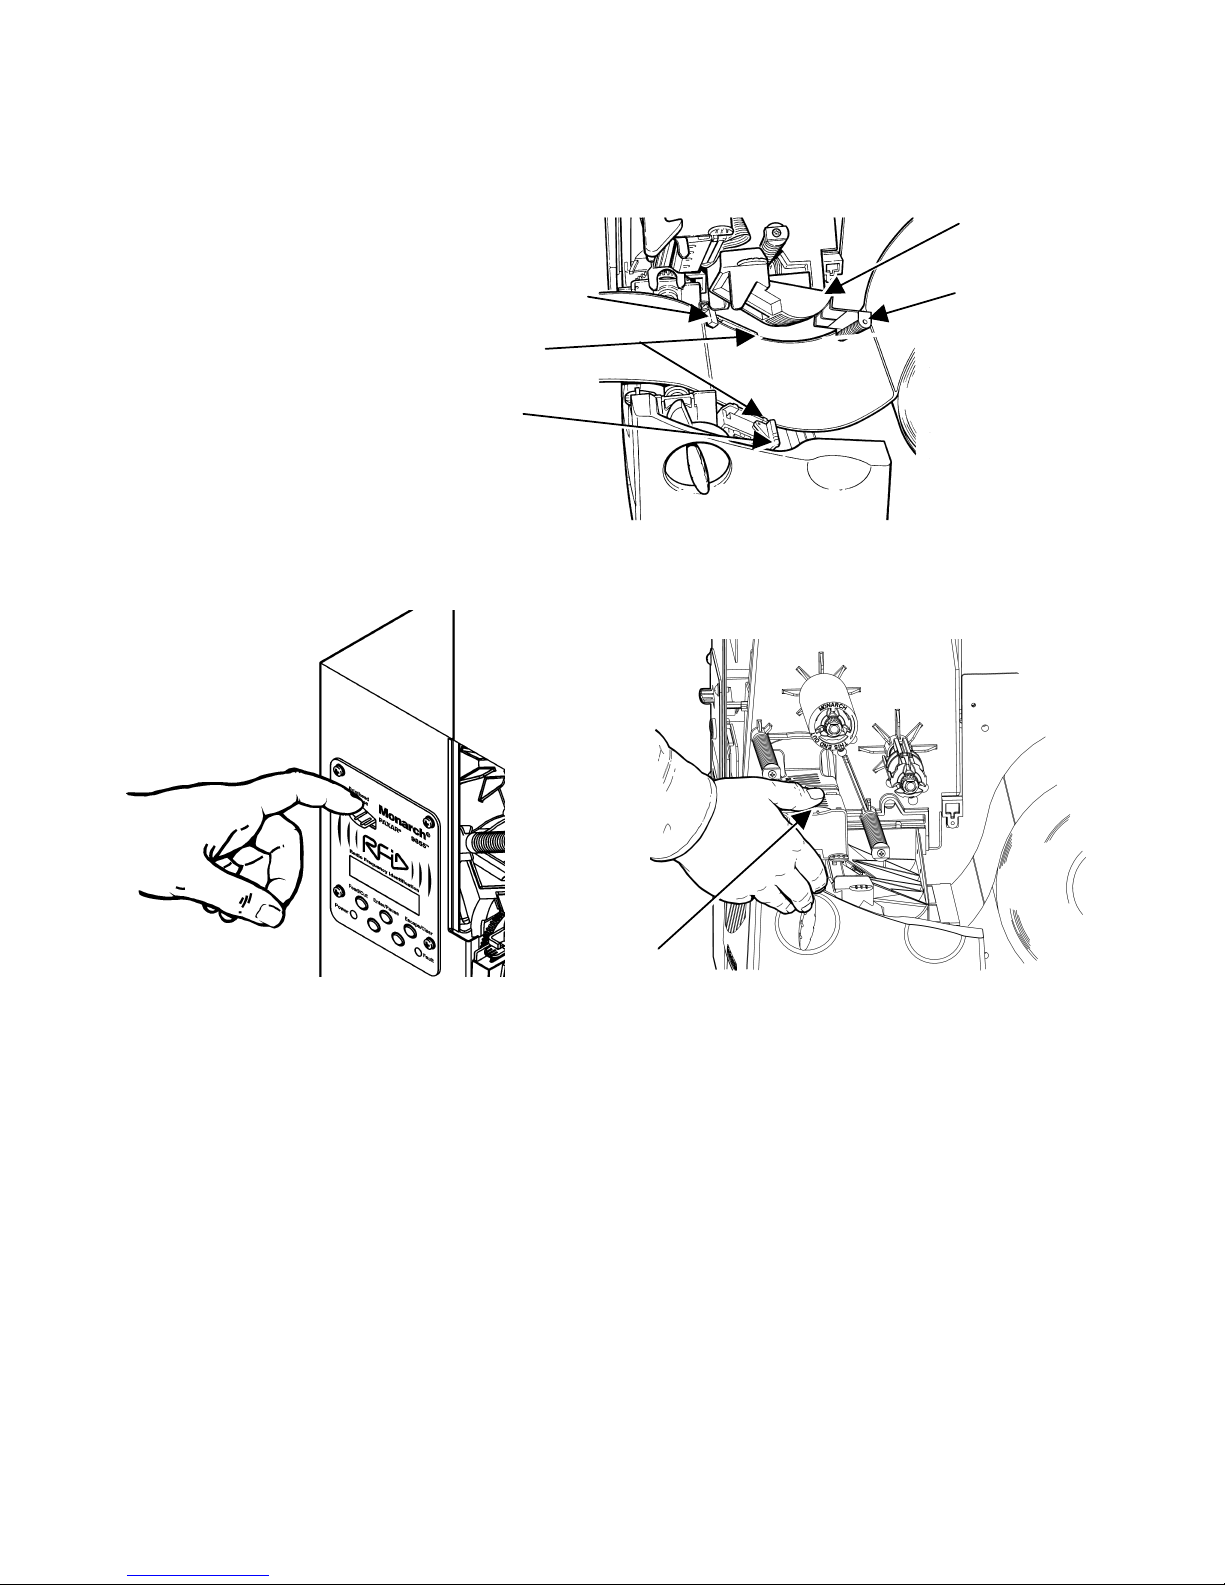
6. Push down on the supply lever to un lock the supply guides.
7. Lay the label strip across the supply guide so that a few inches extend past the
front of the printer. Tuck the supply under the nibs and in between the die cut
sensor. Do not feed supply between the supply roller and deflector.
For fan-fold supplies, lay the labe l strip over the supply holder and across the
supply guide so that a few inches extend past the front of the printer. Tuck the
supply under the nibs and in between the die cut sensor.
8. For tag supplies using the optional knife, feed the supply through the knife.
Make sure at least 0.5 inches of supply is past the knife.
Supply Holder Guides
Tag
Page 8
6
Die Cut Sensor
Supply
Lever
Deflector
Supply Roller
9. Adjust the supply guides so they touch the supply. Push up on the supply le ver
to lock the supply guides into place.
10. Hold the printhead assembly by the printhead tab while pressing down on the
printhead release.
11. Close the printhead by pressing down on the thumb well until you hear it click
into place.
12. Press Feed/Cut several times to feed at least three labels/tags to properly
position the supply and the ribbon.
Thumb Well
Page 9
7
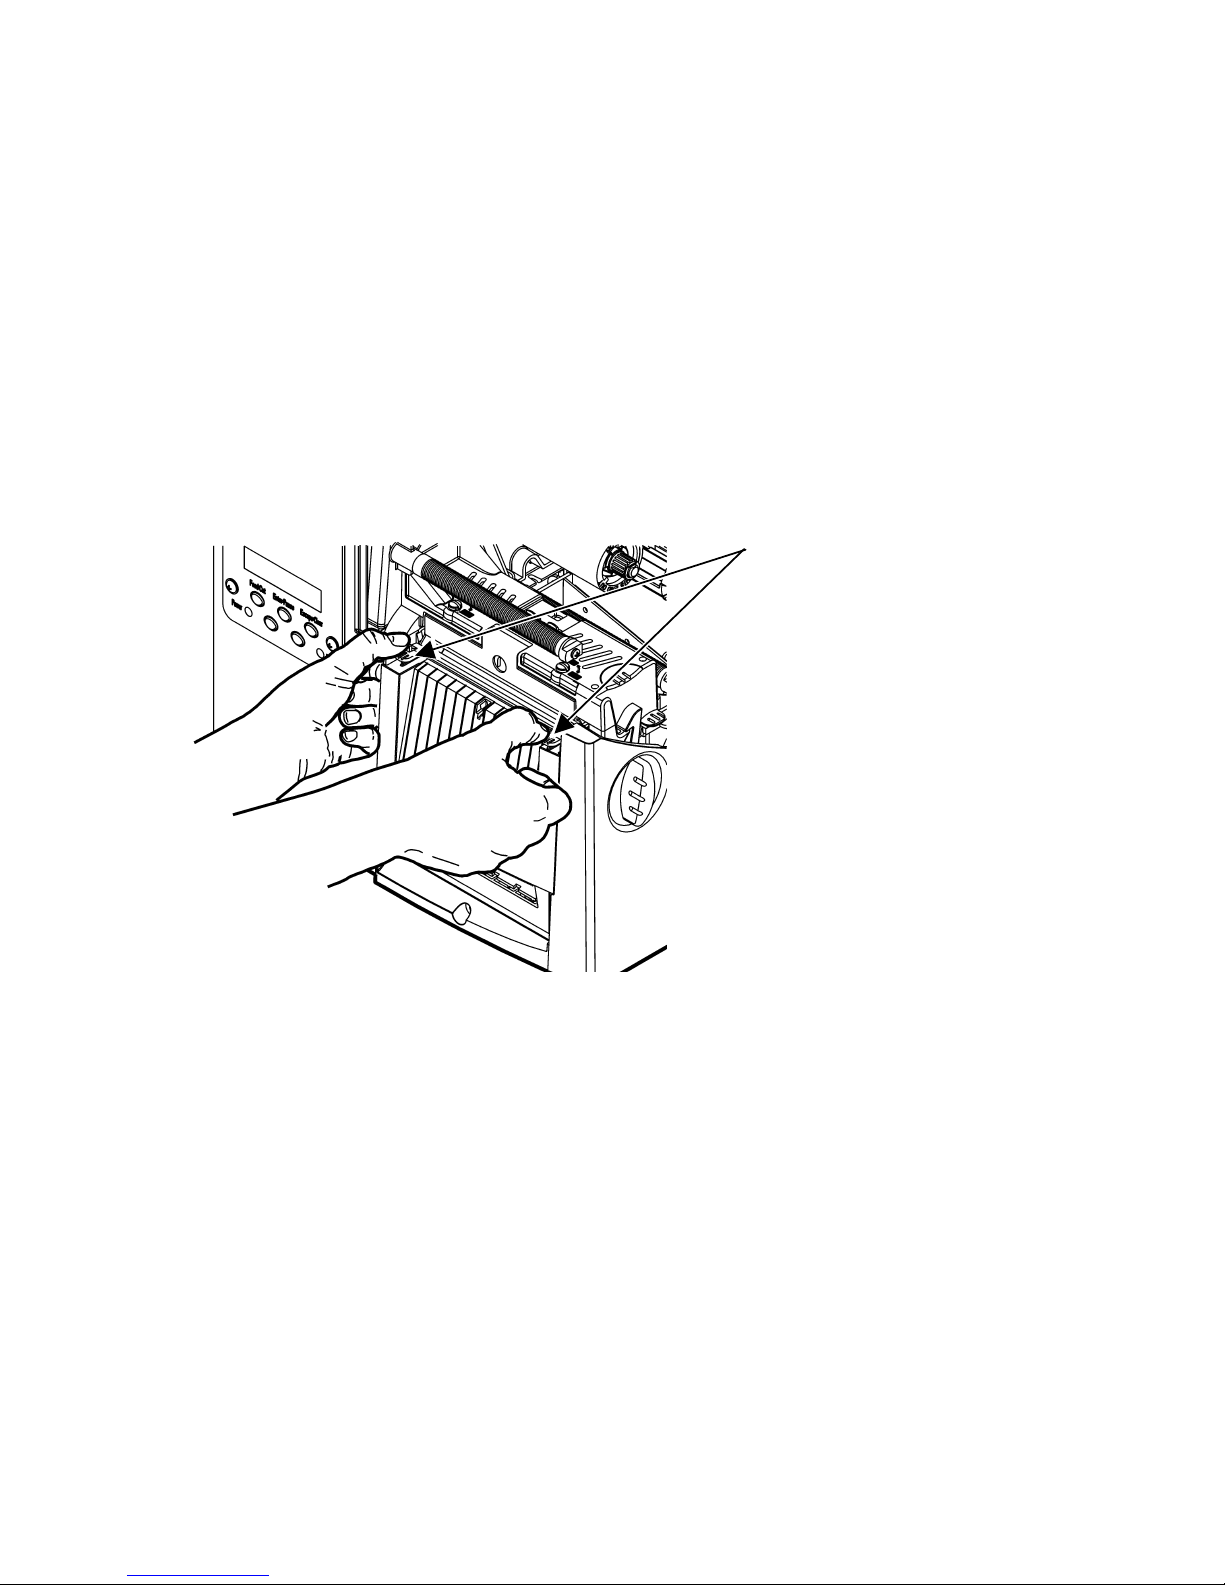
Loading Labels for the Optional Peel Mode
Peel mode (on-demand) must be purchased separ ately. In peel mode, the printer
separates the backing paper from the label. The next label is not pr inted until the
completed one is removed from the printer. Make s ure the printer is con figured for
on-demand mode and the correct sup ply type is installed. The minimum feed
length is 1.5 inches for peel mode. Hold the leading edge of peeled labels when
printing labels longer tha n six inches. You must use non-perforated supplies for
peel mode. Follow the steps for loading supplies from the previous section. Then,
follow these steps after you close the printhead.
1. Remove the labels from the first 10 inches of the backing paper.
2. Press down on the exit cover tabs to open the exit cover on the front of the
printer.
3. Feed the backing paper over the pe el bar.
Exit Cover Tabs
Page 10
8
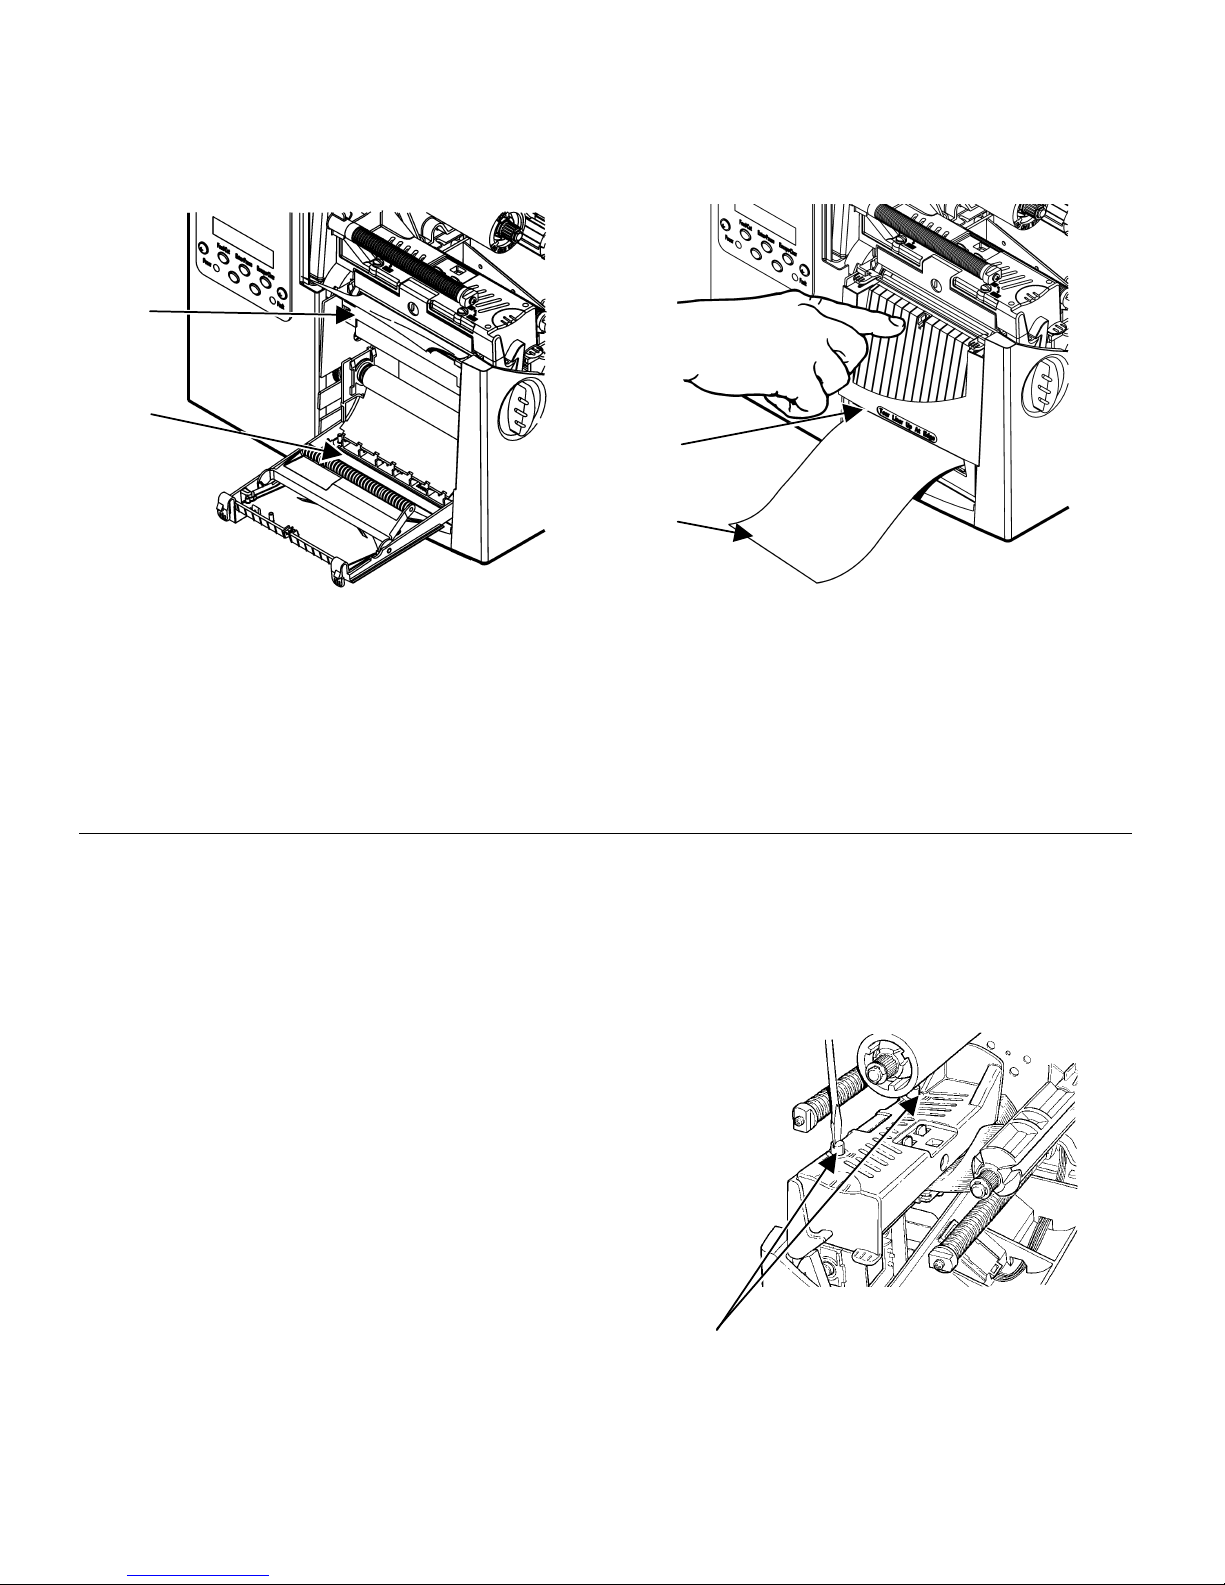
4. Feed the backing paper through the lower opening of the exit cover. Close the
exit cover. Pull down on the back ing paper to remove any slack.
When removing the backing paper, pull up across the saw-toothed tear
edge. Make sure the backing paper tears at the edge.
5. Close the printer's cover.
6. Press Feed/Cut several times to feed at least three labels/tags to properly
position the supply and the ribbon.
Adjusting the Wide/Narrow Knobs
You may need to adjust the two wide/narrow knobs according to the width of your
supply. For supply that is more than two inches, adjust the knobs to the wide
setting. For supply that is two inches or less, adjust the knobs to the narrow
setting.
You must adjust both of the knobs to the same position.
If you experience ribbon smudging in co ld, dry
environments, adjust the wide/narrow knobs to the
wide setting.
For wide supplies, push down and turn the
wide/narrow knobs clockwise with a screwdriver.
For narrow supplies, turn the wide/narr ow knobs
counter-clockwise with a screwdriver until it pops
back up.
The adjustment is shown in the w ide position.
Peel
Bar
Lower
Opening
Wide/Narrow Knobs
Tear
Edge
Backing
Paper
Page 11
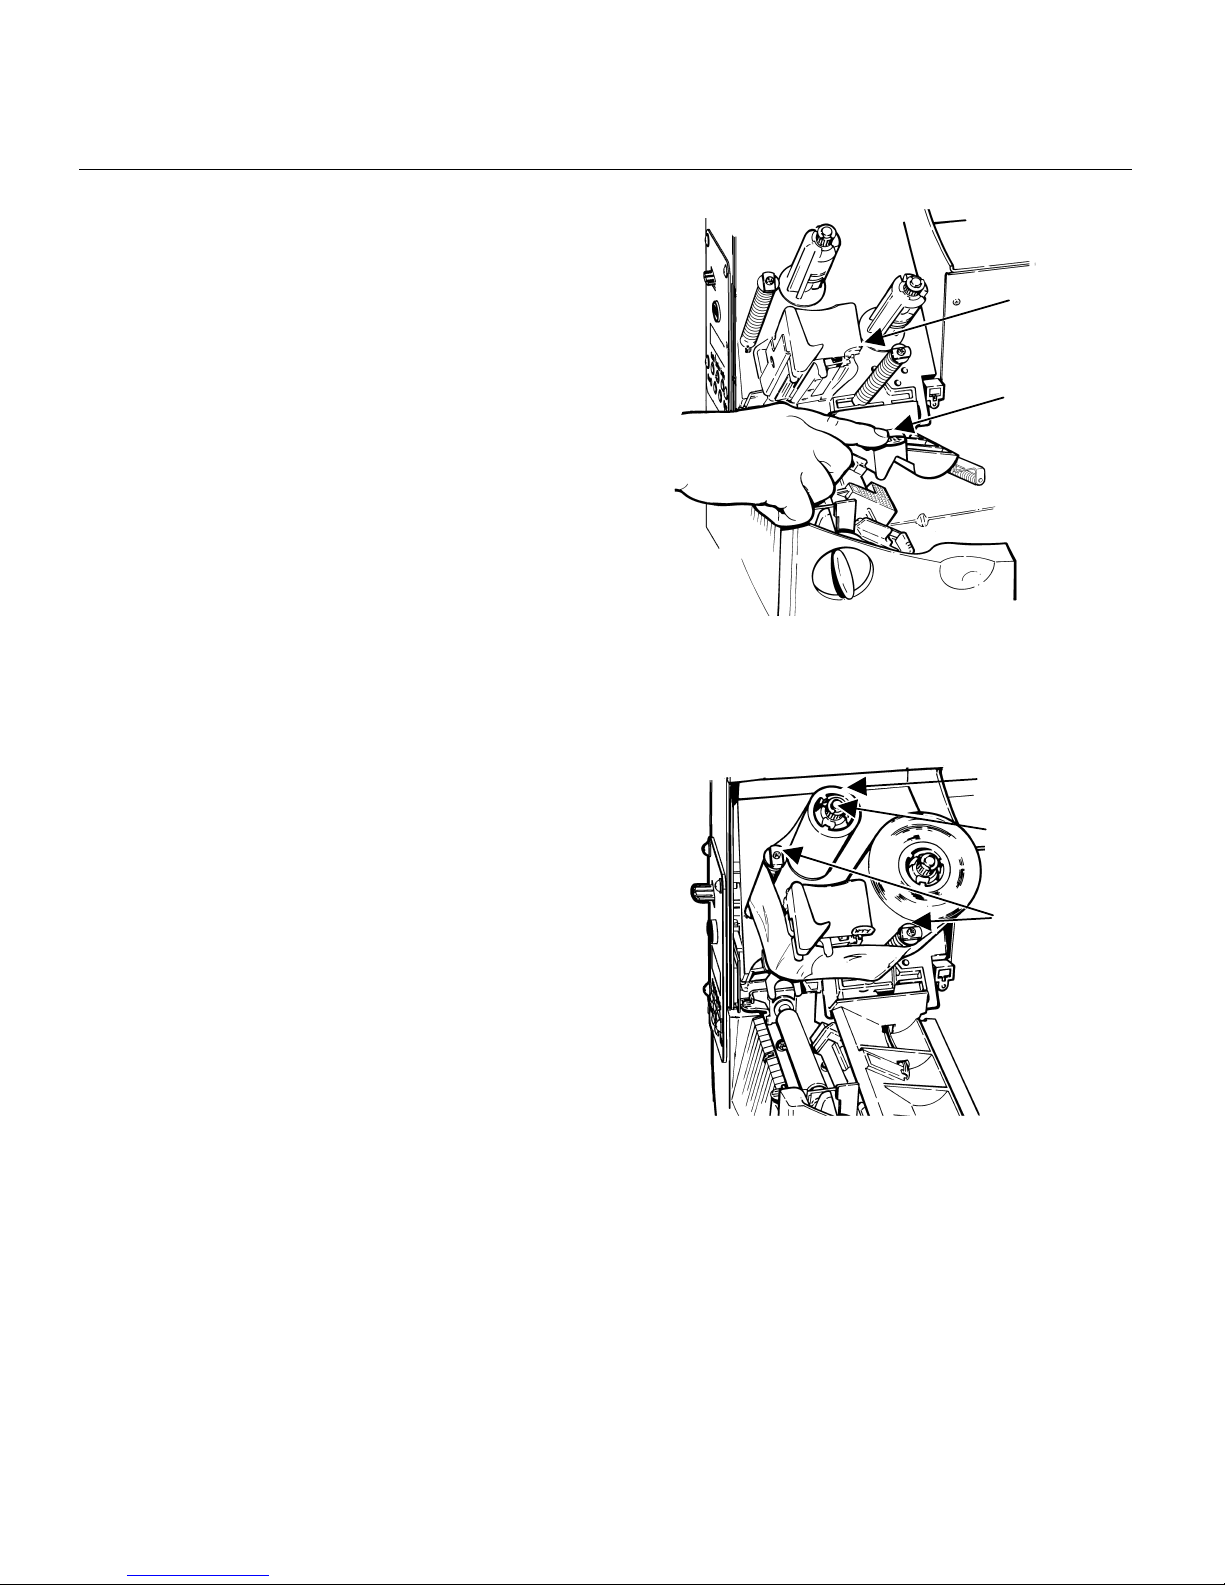
9
Loading Ribbon
1. Open the cover.
2. Unlock the printhead by turning the
retaining latch.
3. Lift printhead assembly using the
printhead tab until the assembly locks
into place.
4. Push the deflector tab down.
5. Slide the extra ribbon core on th e
take-up reel as far as it will go with the
"This End Out" writing facing out. Use
your empty ribbon core as the take-up
core. The take-up core only fits on the
take-up reel one way.
6. Remove the new ribbon from the
package. Do not wrinkle or crush the new ribbon.
7. Slide the ribbon onto the b ack reel as far as it will go. The ri bbon roll only fits
on the reel one way. Carefully unwind a few inches of ribbon from the bo ttom
of the roll.
Note: Make sure the “Monarch This End
Out” writing is facing out. The
ribbon roll only fits on the reel
one way.
8. Carefully feed the ribbon u nder both
ribbon rollers and printhead .
9. Align the ribbon and make sure it is
straight and centered throughout the
path.
10. Tape the ribbon to the take-up core. Do
not tape the ribbon to the take-up reel.
11. Rotate the take-up core unt il the leader
is past the printhead.
12. Remove any slack in the ribbon by turning the take-up reel clockwise.
13. Hold the printhead assembly by the printhead tab while pressing down on the
printhead release.
13. Close the printhead by pressing down on the thumb well until you hear it click
into place. Close the cover. Press Feed/Cut several times to feed at least
three labels/tags to properly position the sup ply and the ribbon.
Printhead
Tab
Deflector
Tab
Take-up Core
Take-up Reel
Ribbon
Rollers
Page 12
10
Adjusting the Print Contrast
The print contrast controls the darkness of the printing on your supply.
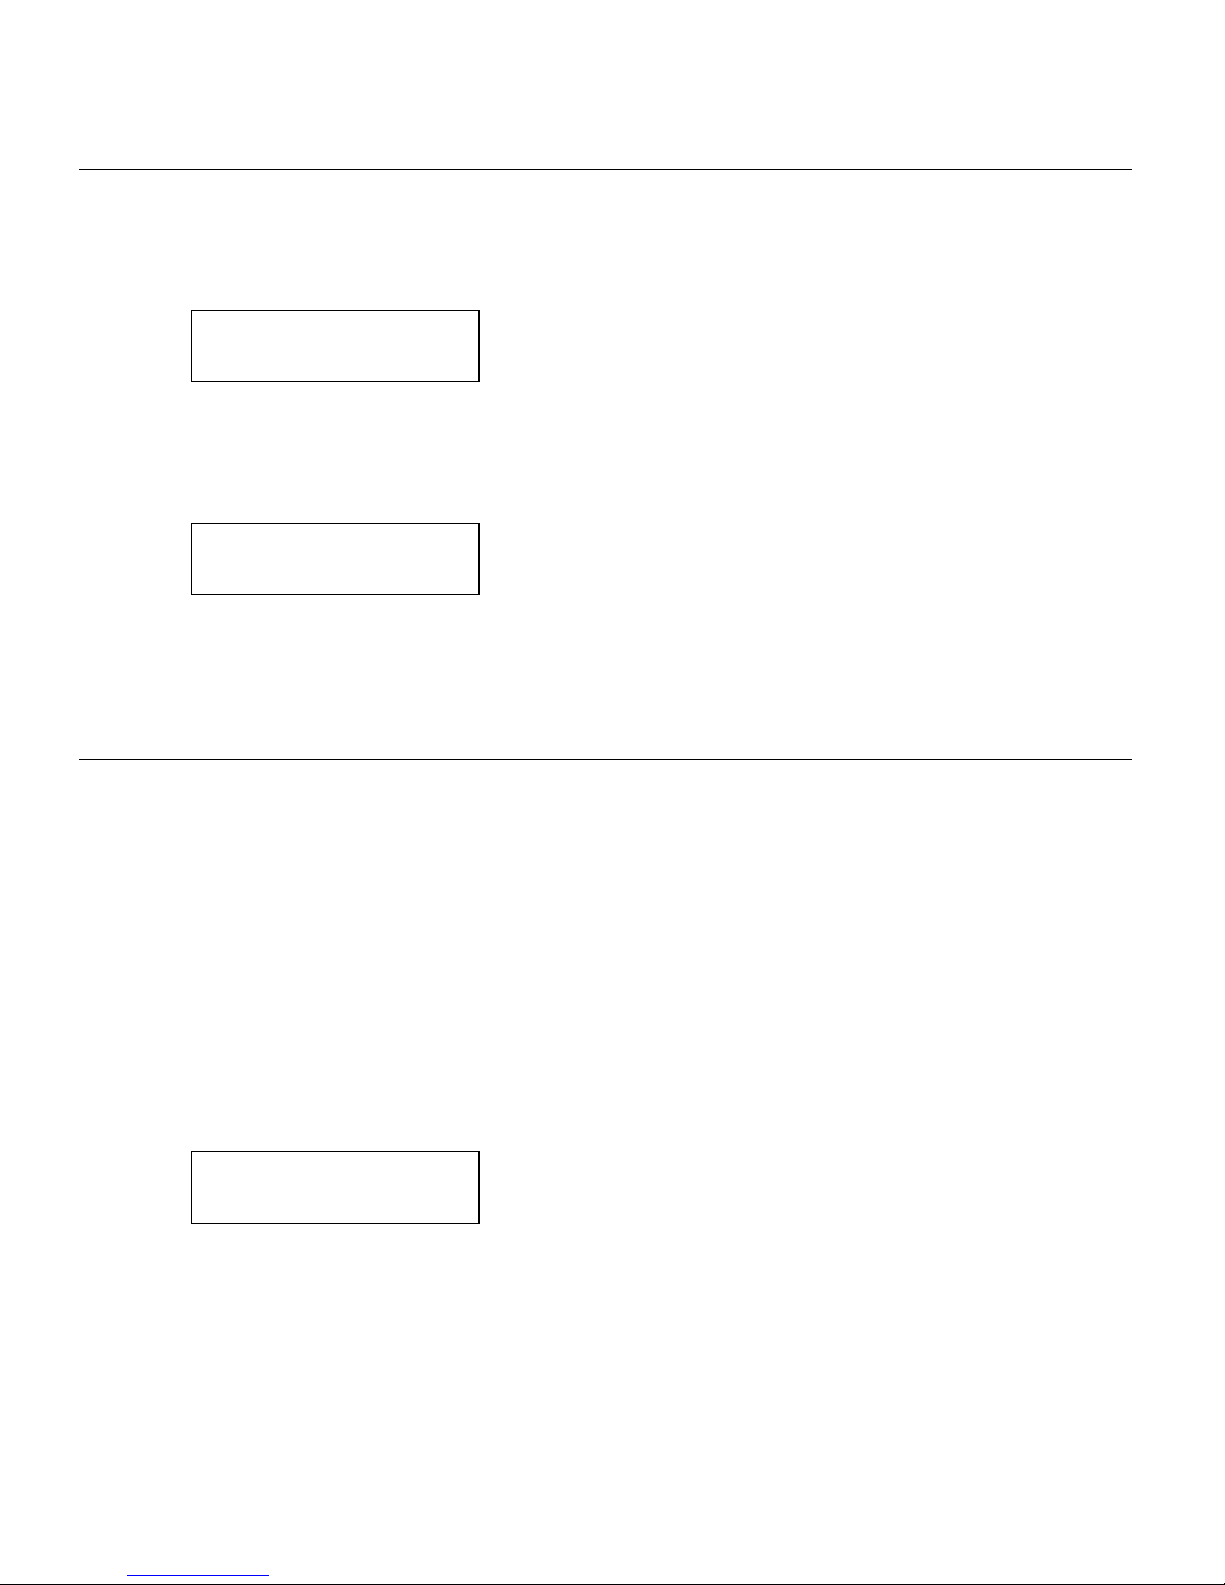
1. From the Main Menu, select Setup, then Contrast.
You see the current setting, for example:
Enter contrast
[-699/699]: +0
2. Press Å or Æ to change the contrast. Pressing Æ darkens the print; Å lighte ns
the print. Feed/Cut acts as a toggle switch to change the value by 10 or 1 .
For example, to make the contrast 50 (from the default 0), press Feed/Cut,
then press Æ five times (50). Press Enter/Pause to select the displayed va lue.
Test Label?
No Æ
3. Press Å or Æ to select either “Yes” or “No” to prin t a test label and check the
print contrast. Press Enter/Pause.
4. Press Escape/Clear until you see the Main Menu.
Printing
Before you print, mak e sure the printer is con nected and ready to receive data.
When you turn on the RFID printer , “Monarch Initializing” flashes briefly and then
you see “Print Mode Ready.” If an error occurs while the printer is initializing, the
error message flashes briefly on the display and then you see “Print Mode R eady.”
The printer displays “Not a vailable” when you try to select the RFID menus if the
module is inoperative.
The printer accepts RFID and non-RFID batches once you see “Print Mode R eady.”
1. Download a format and a batch. Re fer to the optional Packet Reference
Manual for information on d ownloading print jobs.
2. The printer prints a strip of labels or labels in on-deman d mode. If printing
RFID supplies, you see
RFID Printing…
1 of 10
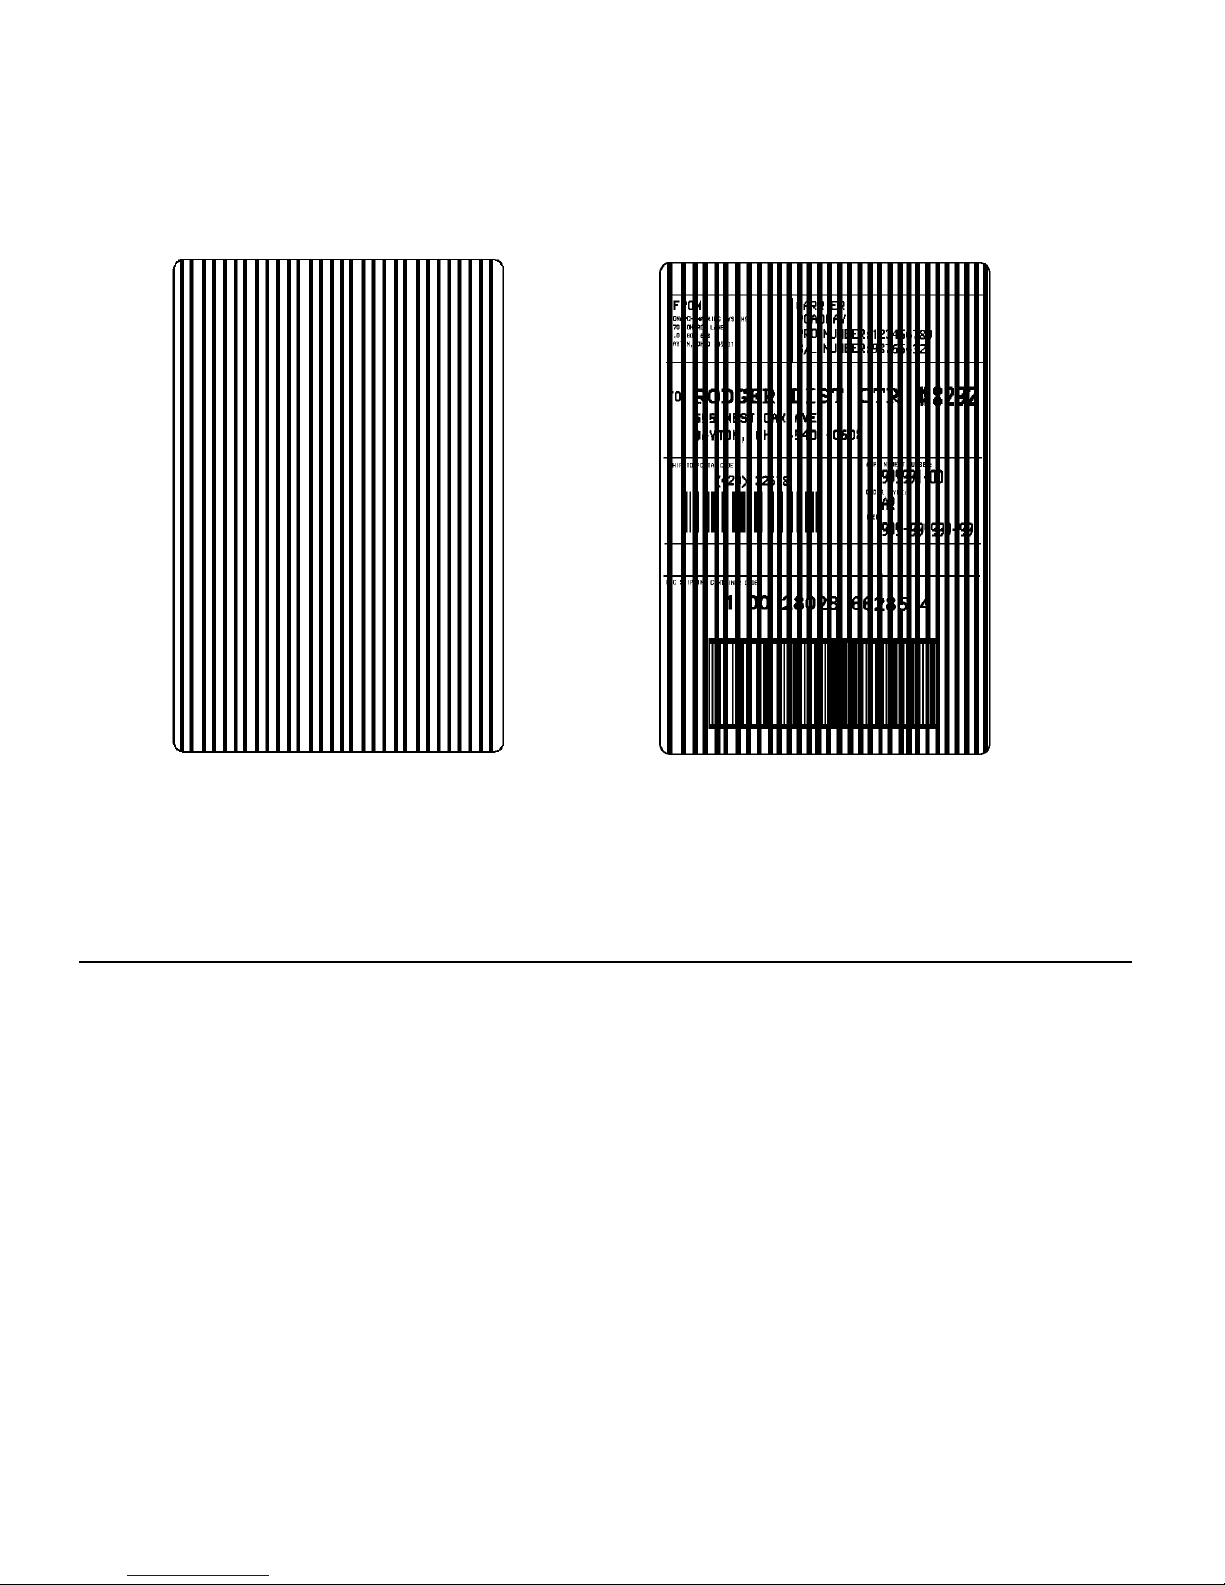
If the RFID tag is not programma ble for any reason, the label may prin t
with an overstrike pattern, indica ting that it should not be used. Your
System Administrator should set the desired Error Action accordingly.
Page 13
11
When printing on non-RFID supp lies, you may also see a label with an
overstrike pattern. Do not use tha t label. When using “overstrike” as the
Error Action, the data prin ts on the non-RFID label, but there is no data
printed on the RFID label.
Note: The RFID printer pauses while programming the RFID tag.
3. Remove the printed labels. If the printer will be unused for extend ed periods of
time, we recommend leaving the pr inthead unlatched.
Menu Changes
Some changes were made to the menu structure for RFID. These menus should
only be accessed by your System Administrator. Refer to the RFIDMP (Multi-
Protocol) Application Notes or the HF (High Frequency) Application Notes available
on our Web site for more information.
RFID Overstrike
Non- RFID Overstrike
Page 14

12
Voids
Streaks
Clearing Jams
When you are printing and a jam occurs, the Fault light on the printer's front panel
blinks.
1. Turn off the printer and open the cover and printhead assembly.
2. If necessary, remove the label roll and ribbon.
3. Remove the jammed labels and reload the label roll.
4. Close the printhead assembly and turn on the printer.
5. Press Feed/Cut several times to feed at least three labels/tags to properly
position the supply and the ribbon.
Cleaning
CAUTION: Do not use sharp objects to clean the printhead or touch the pr inthead.
This may damage the prin thead and require a service charge.
Note: You must clean the printhead as described below to maintain printhead
life.
The rate and frequency at which you print determines how often you must clean the
printer. You may need to clean the printhead, sensor, and pla ten roller:
♦ if there is any adhesive build-up in the supply path.
♦ after printing approximately three rolls of thermal
transfer/thermal direct supplies or after each ribbon .
♦ daily if your printer is in an excessively dirty, hot, or humid
environment.
♦ if you frequently receive supply error codes or when you see
voids or streaking in the prin t as shown.
1. Turn off the printer and open the cover and printhead assembly.
2. Remove the label roll and ribbon (when cleaning the printhead).
3. Press down on the exit cover tabs to open the exit cover on the front of the
printer.
Page 15
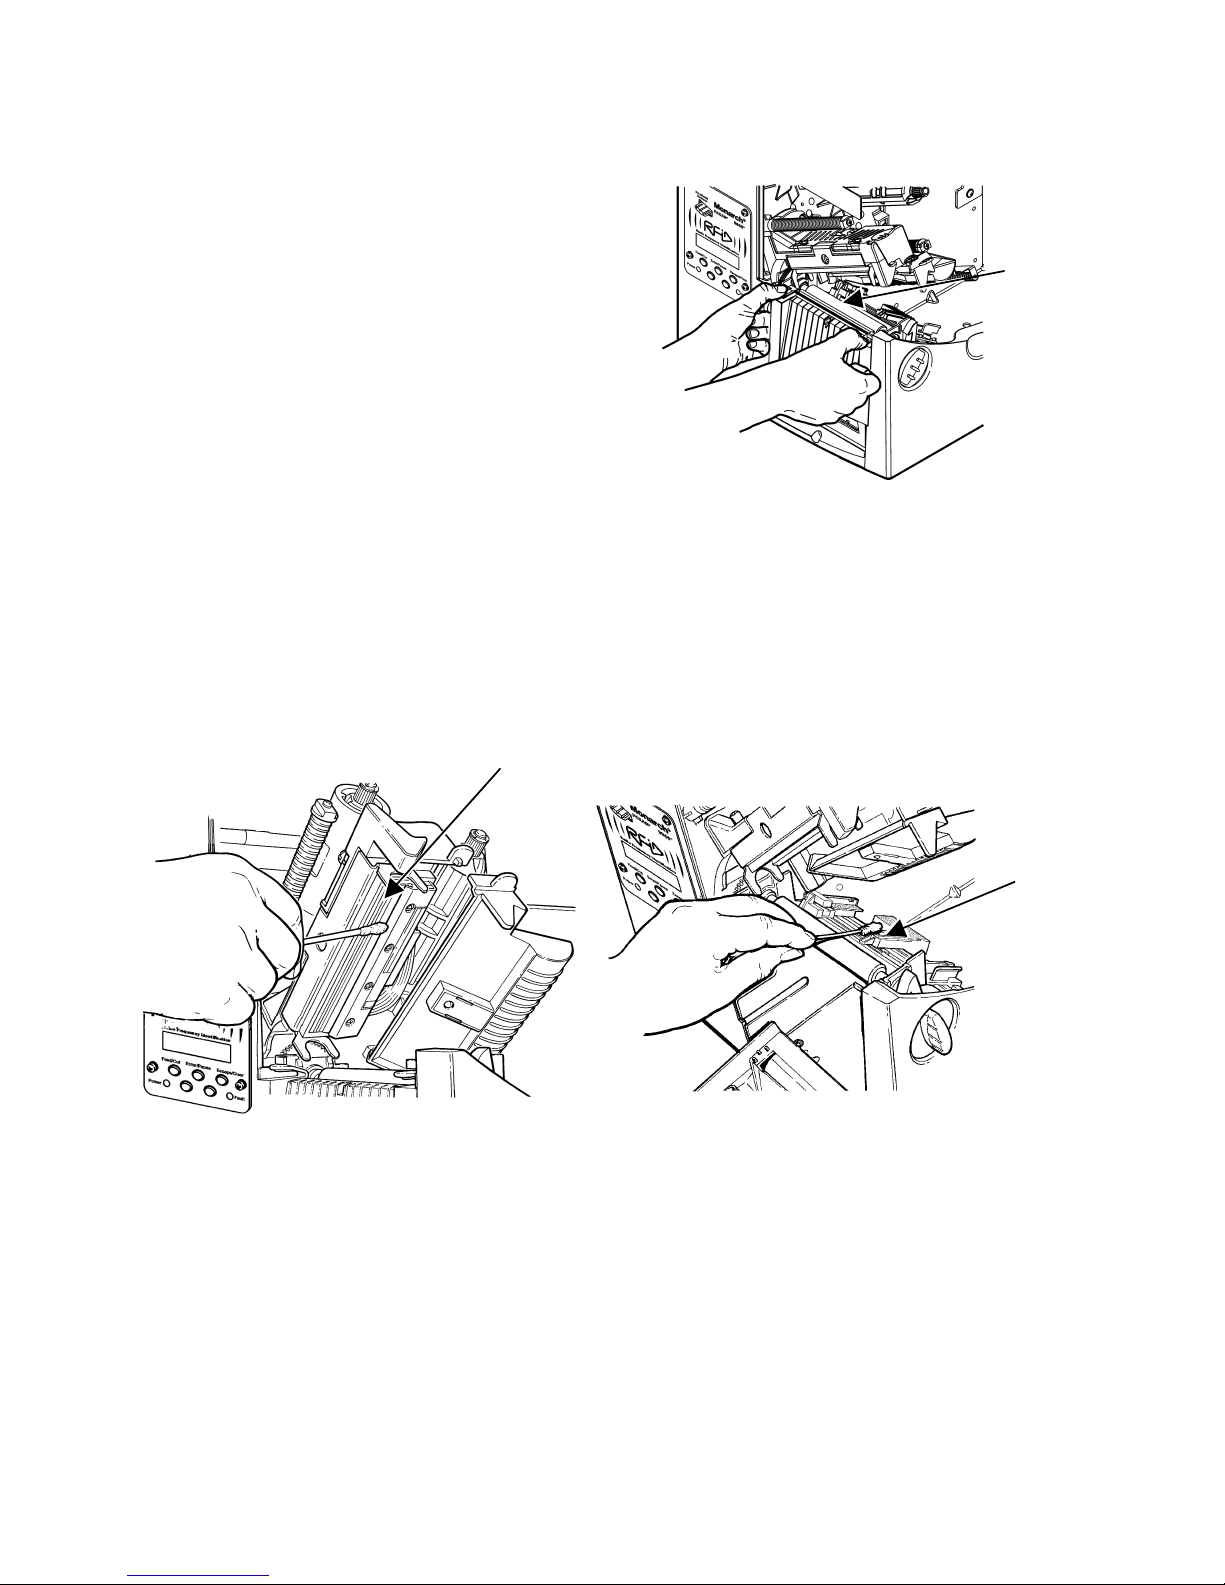
13
Platen
Roller
4. Clean the platen roller when you see significant adhesive build-up or a label is
wrapped around the platen roller. Use
a dry, soft-bristle brush, such as a
toothbrush, to clean the platen roller .
If the brush does not remove
all the adhesive, use isoprop yl alcohol
on the platen roller. Moisten a cotton
swab with isopropyl alcohol and run the
cotton swab across the platen roller .
Turn the platen roller with your finger
to make sure the platen roller is clean
all the way around. After cleaning,
feed several inches of supply through
without printing to re move any remaining isopropyl alcohol.
5. Rub the cotton swab moistened with is opropyl alcohol across the peel bar and
remove any build-up .
6. Moisten another cotton swab with iso propyl alcohol. Rub the cotton swab
across the printhead and remove any build-up. You may need to use a
printhead CLEAN-STRIP if the printhead is extremely dirty or you see streaks
on the supply.
7. Rub the cotton swab across the supply sensor and die cut sensor and remove
any build-up.
8. Clean the build-up in the supply path.
9. Let the printer dry before you reload supplies.
Printhead
Supply
Sensor
Page 16
14
10. Push on the exit cover firmly to clos e it. Both latches w ill click into place.
11. Close the cover and prin thead assembly.
12. Turn on the printer and press Feed/Cut several times to feed at least three
labels/tags to properly position the supp ly and the ribbon. Resend your format,
batch, and check digit packets.
Troubleshooting
This section provides solutions to minor printing problems.
Problem Action
Error message appears
during startup
Turn OFF the printer, wait fifteen seconds and
then turn ON the printer. Call Service if the error
message reappears.
Does not print.
Check supply.
Check ribbon.
Send a corrected format and batch packet.
Does not feed. Set wide/narrow knobs correctly.
Partially printed data.
Clean the printhead.
Send a corrected format packet.
Printing shadows or
smears.
Clean the printhead.
Change supply.
Check ribbon.
Light Printing.
Change supply.
Adjust the print contrast.
Check wide/narrow knobs.
Check ribbon.
Heavy Printing.
Clean the printhead.
Change supply. Adjust the print contrast.
Check wide/narrow knobs.
Check ribbon.
Voids in printing.
Clean the printhead.
Change supply type.
Check ribbon.
Serial bar codes do not
scan.
Leave printhead unlatched when not in us e.
Use a print speed of 2.5 IPS.
Adjust the print contrast.
Backing paper is wrapped
around platen or peel
roller.
Carefully remove the backing paper. Make sure
the backing paper tears at the saw-toothed tear
edge when using backfeed and peel mode.
Page 17

15
Problem Action
Blank labels print or 750
series errors.
Clean supply sensors.
Printer does not read or
program the RFID tag.
See your System Administrator. Make sure the
following are set correctly for your inla y (RFID tag)
type: Protocol (C1Gen1, EM4122), Read Power,
and Write Power. Refer to your RFID Setup Guide
& Supply Chart or HF Setup Gu ide & Supply Chart
for more information.
Common Errors
If the action does not resolve the proble m, call Service at the number listed on the
inside front cover of this manual.
Error Description/Action
002
Name must be 1 to 8 characters inside quotes.
005
Supply width is invalid.
018
Code page selection defined in the field is invalid.
025
Data length is too long.
052
Data type in the RF ID Data Field must be 0, 1 , 2, or 3. See your System
Administrator for more in formation.
053
The starting block in the RFID Data Field is invalid.
101
Format referenced by batch not in memory.
226
Rule Record Line xx. Upload device must be H (Host) for Option 6.
228
Memory class identifier is invalid. The identi fier must be A (AFI),
D (DSFID), or E (EAS) for Option 64. For more information, refer to the
HF Application Notes.
229
Byte code is inva lid. Byte code must be an 8-bit (1 byte) character for
Option 64. For more i nformation, refer to the HF Application Notes.
230
Lock code is invalid. Lock code must be 0 (Unlock) or 1 (Lock) for Op tion
64. For more informa tion, refer to the HF App lication Notes.
400
Invalid character following {.
403
Field separator was not found.
409
Printer memory is full. Delete unnecessary for mats or graphics from
memory.
410
Parity mismatch.
411
Framing error (baud rate mismatch).
Page 18

16
412
Flow control mismatch.
413
Online receive buffer is full. Check for a flow control problem.
611
Font, bar code, or density in the batch does not fit the format.
612
The data in this line of the batch is either missing or does not ma tch the
format.
613
Reference point off supply.
614
Portion of field off supply or ther e may be an invalid character in the
packet.
703
The printer sensed a calibration of different-sized black marks. Make
sure the correct supply type is loaded.
704
Printer has not sensed a supply mark when expected or is out of
supplies. Press Escape/Clear and try to continue printing. Change
supply.
715
Invalid data length /data mismatch. The data in the RFID Data Field has
an incorrect data length or there is a data type mismatch between
selected data type and actual data entered. For more information about
the data length and data type, refer to the RFIDMP Application Notes or
the HF Application Notes. This error also occurs when there is an error
in the Expanded C1Gen2 fields. Check with your System Administrator
about your format.
740
Command, hardware, inventory, or memor y allocation error. There may
be an RFID hardware or memory allocation error.
741
RFID tag missing. Tag not found in RF Field. The RFID tag was no t
found in the RF Field (area inside the printer where RFID tag is
programmed.) Check supply loading. If you made supply or print
position settings, make sure the RFID tag was not moved out of the
programmable range.
742
Tag erase failed. The RFID tag was found in the RF Field, bu t could not
be erased. Increase the number of retries. For more information, refer
to the RFIDMP Application Notes or the HF Application Notes.
743
Program tag failed. The RF ID tag was found in the RF Field , but could
not be programmed. Increase the number of retries. For more
information, refer to the RFIDM P Application Notes or the HF Application
Notes.
744
Tag locked fail. The RFID tag is unable to be programmed because it is
already locked. This is considered a bad RFID tag. For more
information, refer to the RFIDM P Application Notes or the HF Application
Notes.
Page 19

17
746
Lock tag fail. The RFID tag has not been locked to prevent
reprogramming. This is considered a b ad RFID tag. For more
information, refer to the RFIDMP Application Notes or the HF Application
Notes.
747
Time out failure. An RF ID command (read, program, etc.) has failed to
complete in the maximum amount of allowed time .
748
Invalid data length/data mismatch from RF ID interrogator module. The
RFID interrogator module found a problem with the data received from
the printer. For more information, refer to the RFIDMP Application Notes
or the HF Application Notes.
749
RFID Verify Fail. The RFID verification process fa iled after writing
(programming) tag. This is considered a bad RFID tag. For more
information, refer to the RFIDMP Application Notes or the HF Application
Notes.
751
Printer did not sense a black mark when e xpected. Press Escape/Clear
and try to continue pr inting. Change supply.
752
Printer sensed a mark in the wrong place.
753
Printer sensed a mark that is too long.
754
Check for a ribbon jam or remove any slack in the ribbon by turning the
take-up reel clockwise. Load a new ribbon .
755
Printhead is open. Close the printhead.
756
Load supplies.
757
Load supplies (supply length mismatch) . Press Feed/Cut.
758
Either the supply is not seen, the on-demand sensor is broken, or a label
was removed too quickly. Check for a label jam or reload supplies.
763
Waiting to dispense label. Press Fe ed/Cut.
765
The printhead has less than 8 bad dots and can shift bar code fields to
avoid bad dots. Pres s Escape/Clear to continue printing.
768
Printhead has more than 8 bad dots within the format area or is not
connected. Replace or connect printhe ad as necessary.
The printer does not recalibrate (feed a blank label) after any RFID error. Refer to
the RFIDMP Application Notes or the HF Application Notes (on our Web site) for
more information.
Page 20

18
RFID Printer Specifications
Height:
13 inches (330 mm)
Width:
12.5 inches (318 mm)
Depth:
17.3 inches (439 mm)
Weight:
29 lb. (13.2 kg)
Shipping Weight:
34 lb. (15.5 kg)
Power Source:
90-132V
AC
with autoselect 50/ 60Hz
180-264V
AC
with autoselect 50 /60Hz
Printhead:
Thermal at 4 inches (1012 mm) wide
203 dpi (8.0 dots per mm)
Optional 300 dpi (11.8 dots per mm)
Speed:
2.5, 4.0, 6.0, 8.0, and 10.0 ips (inches per second). 12 .0
ips (305 mm) printing is a n option that must be purchased
separately. 2.5 is the default for serial bar codes.
Note: The RFID printer pauses while progr amming the
RFID tag.
Operating Temperatures
Direct:
40°F to 104° F (4° C to 40°C)
Transfer:
40°F to 95° F (4° C to 35°C)
Storage:
15°F to 120° F (-9° C to 49°C)
Humidity:
5% to 90% non-condensing
Page 21

19
RFID Supply Specifications
RFID supplies are available in a variety of sizes. Printing over the RFID inlay
causes printing irregular ity. Refer to the RF ID Setup Guide & Supply Chart or the
HF Setup Guide & Supply Chart for i llustrations to determine which t ype of RFID
supplies you are using and basic printer configuration information .
Supply Types:
Thermal Transfer or Thermal Direct
Die Cut or Black Mark
Supply Widths:
0.75 inch (19 mm) minimum
4.0 inches (102 mm) maximum
Supply Lengths:
1.0 inch (25.4 mm) minimum
13.0 inches (330 mm) maximum
Note: The supply length depends on the in lay selected.
Roll Inside
Diameter:
4.0 inches (102 mm)
Roll Outside
Diameter:
8.0 inches (203 mm) maximum
Ribbon Width:
4.3 inches (110 mm) for 4.0 inch (102 mm) supply
Ribbon Length:
23,600 inches (600 meters)
Additional RFID supplies may be ava ilable by request. Contact your RFID
Representative for more information.
Tag Cut Dimensions
Use these specifications for the 926™ Knife with the RFMP printer. Use on ly
Monarch®/Paxar® appro ved RFID tag supplies.
Widths: 1.5 inches to 4.0 inches (38 mm to 102 mm)
Lengths: 1.5 inches to 16.0 inches (38 mm to 406 mm)
Thickness: 7 mils to 14 mils
Batch Separator: 3.66 inches (93 mm)
Note: The limited warranty on knives used in or w ith RFID printers is one (1)
year from the date of shipment, or 500 ,000 cuts, whichever occurs first.
Page 22

20
RF Specifications
The UHF radio operates in the 9 02 – 928 MHz frequency range in accordance with
FCC Rules and Regulations.
The HF radio operates at 13.56 MHz in accordance with FCC Rules and
Regulations.
Additional frequencies may be available for international locations by request.
Contact your RFID Representative for more information.
Page 23

Page 24

 Loading...