

Page 1

Monarch
6017
HandiPrint
Printer
TC6017OI Rev. AB 4/01 ©2000 Monarch Marking Systems, Inc. All rights reserved.
Page 2

Each product and program carries a respective written warranty, the only warranty on
which the customer can rely. Monarch reserves the right to make changes in the
product, the programs, and their availability at any time and without notice. Although
Monarch has made every effort to provide complete and accurate information in this
manual, Monarch shall not be liable for any omissions or inaccuracies. Any update
will be incorporated in a later edition of this manual.
©2000 Monarch Marking Systems, Inc. All rights reserved. No part of this publication
may be reproduced, transmitted, stored in a retrieval system, or translated into any
language in any form by any means, without the prior written permission of Monarch
Marking Systems, Inc.
WARNING
This equipment has been tested and found to comply with the
limits for a Class A digital device, pursuant to Part 15 of the
FCC Rules. These limits are designed to provide reasonable
protection against harmful interference when the equipment is
operated in a commercial environment. This equipment
generates, uses, and can radiate radio frequency energy and,
if not installed and used in accordance with the instruction
manual, may cause harmful interference to radio
communications. Operation of this equipment in a residential
area is likely to cause harmful interference in which case the
user will be required to correct the interference at his own
expense.
CANADIAN D.O.C. WARNING
This digital apparatus does not exceed the Class A limits for
radio noise emissions from digital apparatus set out in the
Radio Interference Regulations of the Canadian Department
of Communications.
Le présent appareil numérique n’émet pas de bruits
radioélectriques dépassant les limites applicables aux
appareils numériques de la classe A prescrites dans le
Réglement sur le brouillage radioélectrique édicte par le
ministère des Communications du Canada.
Trademarks
Monarch
Systems, Inc.
Paxar is a trademark of Paxar Corporation.
SYMBOL, SPT and PPT are registered trademarks of Symbol Technologies, Inc.
VELCRO is a registered trademark of Velcro Industries B.V.
Monarch Marking Systems
170 Monarch Lane
Miamisburg, Ohio 45342
,
HandiPrint, 6017, 9461, and 9464 are trademarks of Monarch Marking
Page 3

TABLE OF CONTENTS
GETTING STARTED................................................. 1-1
Unpacking the Printer ............................................ 1-1
Programming Information ....................................... 1-1
Battery and Safety Information................................ 1-2
Installing the Battery.............................................. 1-2
Charging the Battery .............................................. 1-4
Reading the LED ................................................ 1-6
Recycling Your Batteries ..................................... 1-6
Connecting the Printer ........................................... 1-7
Attaching the Printer’s Strap and Button .................. 1-7
LOADING SUPPLIES ...............................................2-1
Tearing Supply ...................................................... 2-2
USING THE PRINTER .............................................. 3-1
Printing................................................................. 3-1
Using the Magnetic Stripe Reader........................... 3-1
Scanning Bar Codes .............................................. 3-3
Scanner Information ........................................... 3-3
Scanning Tips .................................................... 3-4
CLEANING .............................................................. 4-1
TROUBLESHOOTING............................................... 5-1
SPECIFICATIONS ....................................................A-1
Printer Specifications .............................................A-1
Supply Specifications.............................................A-2
Options.................................................................A-2
Using the Optional Stand ....................................A-3
i
Page 4

ii
Page 5

GETTING STARTED
1
Use these operating instructions with your Monarch
6017
HandiPrint Printer. The printer works with the
SYMBOL
(“handheld”).
The printer can print text, bar codes, and limited graphics
on thermal direct receipt paper.
Use these instructions to
♦ connect the printer
♦ load supplies
♦ charge the battery
♦ clean the printhead.
SPT 1700 or PPT 2700 handheld computer
Unpacking the Printer
The printer comes packaged with two rolls of supply (one
already loaded in the printer), a battery, an elastic strap,
a mounting button, and an AC power adaptor.
Programming Information
You may need to refer to the Programmer's Manual
available from the Monarch Web site
(www.monarch.com). It provides an explanation of how
to use the printer's command language.
Refer to the Symbol Web site (www.symbol.com) for the
Symbol Application Programming Interface (API)
documentation. Refer to the Monarch Web site for a print
utility that allows users to print data from their handheld
using the Appointment Book, Address Book, Memo, ToDo
List, Clipboard, and print simple receipts. For more
information about using your handheld device, refer to
your handheld owner’s manual.
Getting Started 1-1
Page 6

Battery and Safety Information
The printer is powered by a 7.4V Lithium Ion (LiIon)
battery. There are no memory effects with LiIon batteries
and reconditioning is not required. Lithium ion batteries
do not have to be completely drained before charging.
♦ Charging time is approximately 1.5 to 3 hours.
♦ Take the battery out of the printer when storing the
printer for long periods of time.
♦ The battery storage temperature is 40° F to 104°F
(4
°C to 40°C). Do not store a fully charged battery
at temperatures greater than 104
periods of time. The battery may permanently lose
charge capacity.
♦ Be sure to use a fully charged battery before long
or battery-intensive printing sessions. Certain
operations (for example, printing receipts with a lot
of bar codes and graphics) drain the battery more
quickly than others.
♦ Disposal information – Do not throw in trash.
Dispose according to your local regulations.
CAUTION
Do not disassemble, short circuit, heat
above 80
♦ The recommended temperature for charging is
68
°F (20°C) to 77°F (25°C).
°C, or incinerate. The
battery may explode.
°F (40°C) for long
Installing the Battery
One battery is included with the printer.
Similar to a cordless phone battery,
the printer’s battery must be charged
before using it.
1. Remove the handheld. (This step is optional.)
2. Turn over the printer.
1-2 Getting Started
Page 7
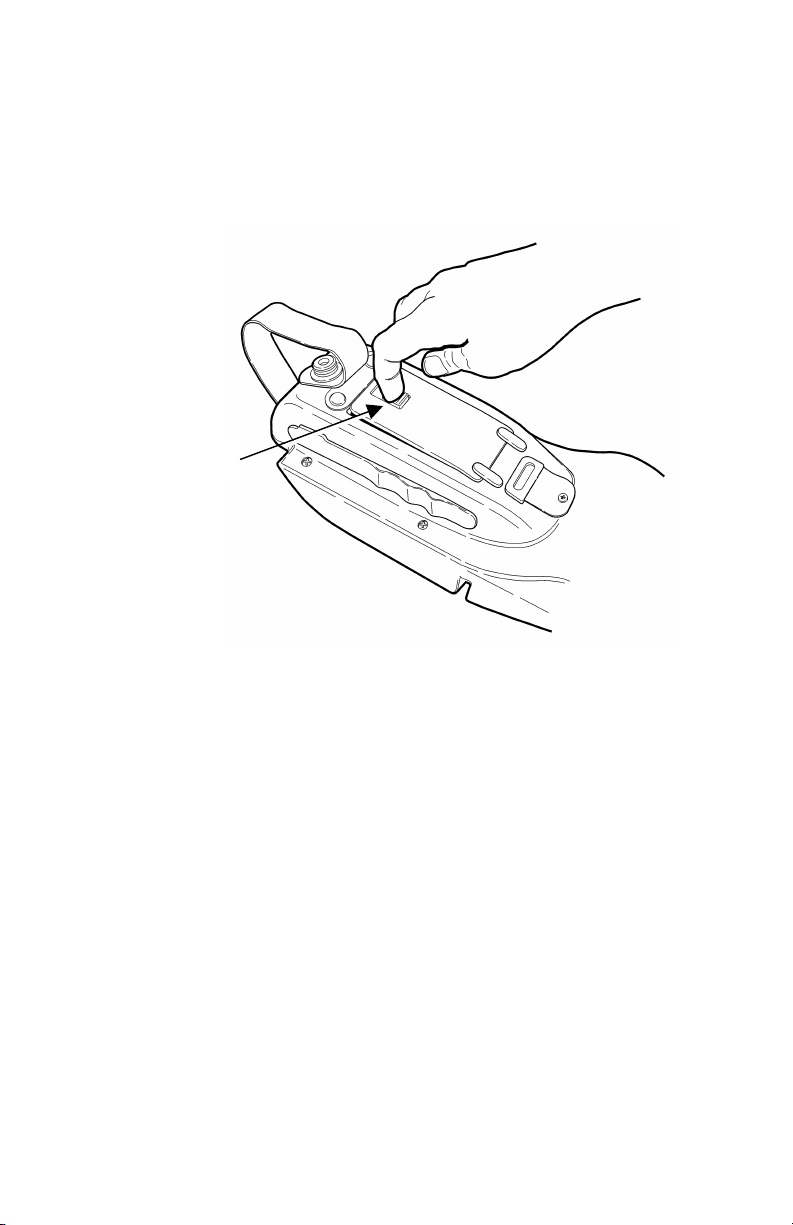
3. Open the strap at the VELCRO tab and pull the
Tab
strap through the slot. You now have access to the
battery door. Move the strap out of the way.
4. Unlock the battery door by sliding down the battery
tab.
5. Open the battery door.
Getting Started 1-3
Page 8
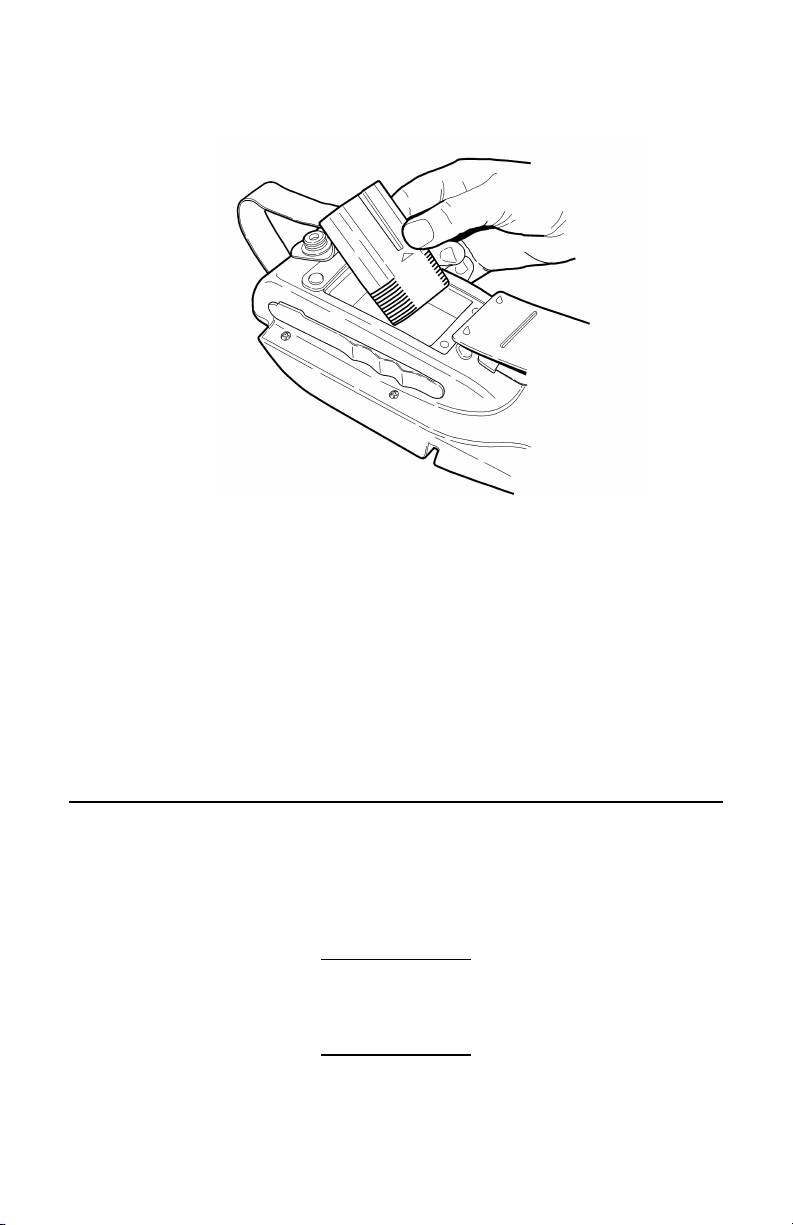
6. Insert the battery into the printer as shown.
7. Press the battery into place.
8. Lock the battery door by pushing up the battery tab.
9. Thread the strap through the slot and secure the
strap at the VELCRO tab. Make sure the strap is
adjusted to fit your hand.
10. Charge the battery.
To remove the battery, open the battery door and tip the
battery out of the printer.
Charging the Battery
The battery can be charged
♦ inside the printer using the AC power adapter
provided.
♦ in the optional single station or four-station
charger.
Similar to a cordless phone battery,
the printer’s battery must be charged
before using it.
1-4 Getting Started
Page 9

You can print while the battery is charging; however, the
battery may not receive a full charge.
You can also charge the handheld while it is connected to
the printer. However, the batteries (printer and
handheld) may not receive a full charge.
To print with the AC power adapter
connected, you must have a battery
inside the printer.
1. Plug the cable into the socket located on the side of
the printer as shown (under the symbol).
2. Connect the angle plug into the AC power adapter.
3. Plug the AC power adapter into an electrical outlet.
Charging time is approximately 1.5 to 3 hours.
It will take longer to charge the
battery if you are printing while
charging.
Getting Started 1-5
Page 10

Reading the LED
LED Indicator
This table explains the
LED indicator.
LED Indicator Status
Red On The charger is charging the battery at a
fast rate. If the battery voltage is below
5.0V, the battery is “trickle” charged until
the battery reaches 5.0V. The LED is off
when the battery is fully charged.
Green On Printer is on and ready to accept data.
The LED is off when the printer is off and
the battery is not charging.
Orange On
♦ If the battery charger is not connected,
there is a printer error. The printer is
not ready to accept data. See your
System Administrator to clear the error
or remove the handheld from the
printer and re-connect the handheld to
the printer.
♦ If the battery charger is connected,
the battery is charging or there is a
printer error.
Recycling Your Batteries
The Rechargeable Battery Recycling Corporation
(RBRC
recycling of rechargeable batteries. Beginning in 2001,
the RBRC will accept Li-lon batteries. For more
information about how to recycle batteries in your area,
visit www.rbrc.org.
1-6 Getting Started
) is a non-profit organization created to promote
Page 11

Connecting the Printer
Connector
Cutout
Bottom Lip
Attach the handheld to the printer's 14-pin connector as
shown.
14-Pin
The handheld’s bottom lip fits snugly under the printer’s
cutout.
If your handheld has a strap, you may
remove the strap or keep it attached
to the handheld (allows for a more
secure fit) before inserting the
handheld into the printer.
Attaching the Printer’s Strap and Button
The printer is shipped with the strap and mounting button
already attached. With the button attached to the printer,
you can order the optional belt clip (120296) and wear
the printer clipped to your belt.
To attach the elastic strap and button to the printer:
1. Remove the handheld. (This step is optional.)
2. Turn over the printer.
Getting Started 1-7
Page 12

3. Using the grommet provided, secure the strap into the
Button
Phillips screw
attaching hole.
4. Thread the strap through the slot and secure the
strap at the VELCRO tab. Make sure the strap is
adjusted to fit your hand.
Self-tapping
5. Using the self-tapping Phillips screw provided, secure
the button to the strap grommet. The screw threads
itself while you tighten it.
Make sure the button is securely
fastened to the printer.
Do not over tighten the screw. You
may strip the threads.
1-8 Getting Started
Page 13

LOADING SUPPLIES
2
The printer can print text, bar codes, and some limited
graphics on thermal direct receipt paper. See Appendix
A, “Specifications” for the width and thickness
requirements.
1. Open the supply cover by inserting your fingers into
the rubber pull tab and pulling up firmly on the supply
cover as shown.
Do not pull too hard on the
rubber pull tab.
Loading Supplies 2-1
Page 14

2. Drop the supply into the well. Make sure the supply
Printhead Guide
Platen Roller
Tear Bar
unwinds from the top as shown.
3. Position the supply between the printhead guides.
4. Make sure some supply extends past the platen
roller.
5. Close the supply cover.
Tearing Supply
The printer’s supply door acts as a tear bar. Tear down
against the tear bar to remove receipts.
2-2 Loading Supplies
CAUTION
The tear bar may have sharp edges.
Page 15

USING THE PRINTER
3
This chapter includes information about printing, using
the magnetic stripe reader, and scanning bar codes.
Printing
You must have a printing application installed on your
handheld before you can print receipts. Monarch offers a
print utility that is free to download from our Web site.
Refer to the printing instructions included with your print
utility.
Make sure your printer’s battery is
charged before printing.
Using the Magnetic Stripe Reader
The magnetic card stripe reader is a factory-installed
option that must be ordered when the printer is ordered.
This option requires special application software to read
and process cards with a magnetic stripe, such as a
credit card or driver’s license.
Read the following if your printer has the optional
magnetic stripe reader.
Using the Printer 3-1
Page 16

Quickly swipe the card through the reader either left-to-
toward handheld
right or right-to-left with the magnetic stripe in the reader.
The magnetic stripe must be facing toward the handheld
while it is passed through the reader.
Stripe is facing
The green LED on the printer indicates the following:
LED Indicator Status
On Ready/waiting for card.
Blinks once Error reading card’s data.
Off Good swipe (card’s data read). OR
Not ready for card.
Refer to your application for more magnetic stripe reader
information.
3-2 Using the Printer
Page 17

Scanning Bar Codes
grip
Scanning bar codes is application specific. You should
only scan a bar code when prompted by your application.
1. Point the scanner at a slight angle approximately four
to eight inches from the bar code symbol.
Scanner
button
located on
rubber
2. You can press either button (on the left and right side
of the printer) or both buttons at the same time
instead of using the button on the handheld.
Scanning buttons are identified by the symbol.
3. If the bar code does not scan, see “Scanning Tips.”
For more information about using the scanner,
cleaning the scanner, and scanner safety, refer to
your handheld owner’s manual.
Scanner Information
The scanner is certified to be a Class II laser product
with the United States DHHS Center for Devices and
Radiological Health. The scanner emits less than 1.0
milliwatt beam of laser light from the scanning window.
CAUTION
Laser light - Do Not stare into the
beam.
Using the Printer 3-3
Page 18

Scanning Tips
♦ Make sure there are no voids in the bar code
symbol.
♦ Hold the scanner four to eight inches from the bar
code. Move the scanner toward and away from the
bar code to find the correct distance for a
successful scan.
♦ Aim the scanner at a slight angle to the bar code.
♦ Keep the scanner window clean.
♦ Move to a more dimly lit area if you have several
unsuccessful scans.
♦ Direct sunlight may cause unsuccessful scans.
Refer to your handheld owner’s manual for more
information about using the scanner.
3-4 Using the Printer
Page 19

CLEANING
4
Printhead
You may need to clean the printhead
and platen roller after printing
approximately six rolls of supply,
whenever you load new supplies, or
when you see voids in the print as
shown.
CAUTION
Do not use sharp objects to clean the
printhead. This may damage the
printer and require a service charge.
1. Open the supply cover by inserting your fingers into
the rubber pull tab and pulling up firmly on the supply
cover.
2. Remove the supply roll (when cleaning the
printhead).
3. Moisten a cotton swab with isopropyl alcohol and
clean the printhead as shown.
Cleaning 4-1
Page 20

Sensor
Platen Roller
Tear Bar
4. Clean the platen roller with a dry cloth or small brush.
You can also use another cotton swab moistened with
isopropyl alcohol. Turn the platen roller with your
finger and run the cotton swab or dry cloth across it.
Make sure the platen roller is clean all the way
around.
Black Mark
5. Moisten another cotton swab with isopropyl alcohol.
Rub the cotton swab across the black mark sensor to
remove any build-up.
6. Moisten another cotton swab with isopropyl alcohol.
Rub the cotton swab across the tear bar to remove
any build-up.
4-2 Cleaning
Page 21

TROUBLESHOOTING
5
If you cannot fix a problem, call Technical Support.
Problem Action
Does not feed or
has a paper jam.
Does not print.
Remove any jammed supplies.
Reload supplies.
♦ Check or replace the
printer’s battery.
♦ Your handheld’s application
may include a query for the
battery voltage. Refer to the
Programmer's Manual for
more information.
♦ Make sure the supplies are
loaded correctly and not
upside down.
♦ Verify communications
between the handheld and
printer by removing the
handheld from the printer
and re-connecting the
handheld to the printer, or
see your System
Administrator.
♦ The printer’s duty cycle may
be exceeded. Allow a
10-second pause between
labels.
NOTE: This is not a continuous
printer.
Troubleshooting 5-1
Page 22

Problem Action
Light/heavy
printing or voids in
printing.
Clean the printhead.
Check or recharge the battery.
See “Charging the Battery” in
Chapter 1 for more information.
Your System Administrator may
need to adjust the print contrast.
Your handheld’s application may
include a print contrast
adjustment. Refer to the
Programmer's Manual for more
information.
5-2 Troubleshooting
Page 23

SPECIFICATIONS
A
Printer Specifications
Height: 2.8 inches (71 mm)
Width: 4.25 inches (108 mm)
Length: 9.5 inches (241 mm)
Weight:
w/ battery & supply
Shipping Weight: 3 lbs. (1.4 kg)
Power: 7.4V Lithium Ion battery
Operating Limits:
Storage:
Operating Humidity:
Storage:
Printhead:
Printing
Method:
Print
Speed:
Supported Fonts
(Bitmap):
Supported
Bar codes:
Memory:
1.41 lbs. (0.64 kg)
41
° to 104°F (5° to 40°C)
-4
° to 140°F (-20° to 60°C)
20% to 85% non-condensing
5% to 95% non-condensing
3 inches (76 mm) wide
203 dpi (8 dots per mm)
Thermal Direct
Up to 2.0 inches per second (for
standard receipts)
NOTE: The speed is dependent
on the application.
Standard (normal and bold),
Large (normal), Reduced (normal
and bold), and Large Rotated.
Codabar, Code 39, UCC/EAN –
128, UPC/EAN/JAN, Interleaved
2 of 5, Code 128.
32K SRAM
128K Flash
Specifications A-1
Page 24

Charging Time:
Approximately 3 hours with no
printing
Communications: RS-232 port
Print Ratio
25% black maximum per square
inch
Supply Specifications
Supplies: Thermal direct receipt paper
Supply
Thickness:
Supply Width: 3.125 inches (79 mm)
Supply Length:
Supply Sensing:
Roll Diameters:
Maximum Print
Area:
2.2 to 3.5 mils (receipt paper)
1.0 inch (25.4 mm) minimum feed
8.0 inch (203 mm)
1 roll of receipt paper is
approximately 600 inches
(15,240 mm)
Black mark (on the face of the
supply)
Inside: .25 inches (6 mm)
Outside: 1.5 inches (38 mm)
2.85 inches (72 mm) by 8.0 inches
(203 mm)
NOTE: Maximum length depends
on format.
Options
♦ Magnetic Card Reader (factory-installed)
♦ Printer Stand (120611)
♦ Belt Clip (120296)
♦ Monarch Single Station Battery Charger
(can be wall-mounted)
♦ Monarch Four Station Battery Charger
A-2 Specifications
Page 25

Using the Optional Stand
Wire Bar
Button catches here
Read the following if you purchased the optional printer
stand. The stand can be
♦ used on a table top or wall-mounted.
♦ adjusted to minimize glare on the handheld’s
display
♦ folded flat for storage.
For a Table Top:
1. Place the stand on the table top.
2. Unfold the stand and lock into place with the wire bar.
3. Slide the printer into the stand until the button
catches in the stand.
The button must be attached to the
4. Adjust the height of the stand by moving the wire bar
into different grooves if you notice glare on the
handheld’s display.
printer.
Specifications A-3
Page 26

For Wall-Mounting:
Keyhole
Wall-mounting hardware is not
included.
Use two screws or nails that support
at least 5 pounds (2.3 kg.).
1. Place the unfolded stand against the wall.
2. Use a pencil to mark inside the two keyholes for the
screws or nails.
3. Attach the screws or nails through the keyholes and
into the wall.
4. Slide the printer into the stand until the button
catches in the stand.
5. Adjust the height of the stand by moving the wire bar
into different grooves if you notice glare on the
handheld’s display.
A-4 Specifications
Page 27

Page 28

For supplies, service, or assistance call :
1-800-543-6650 (In the U.S.A.)
021 869 97 70 (In Switzerland)
www.gomaro.ch
 Loading...