

Page 1
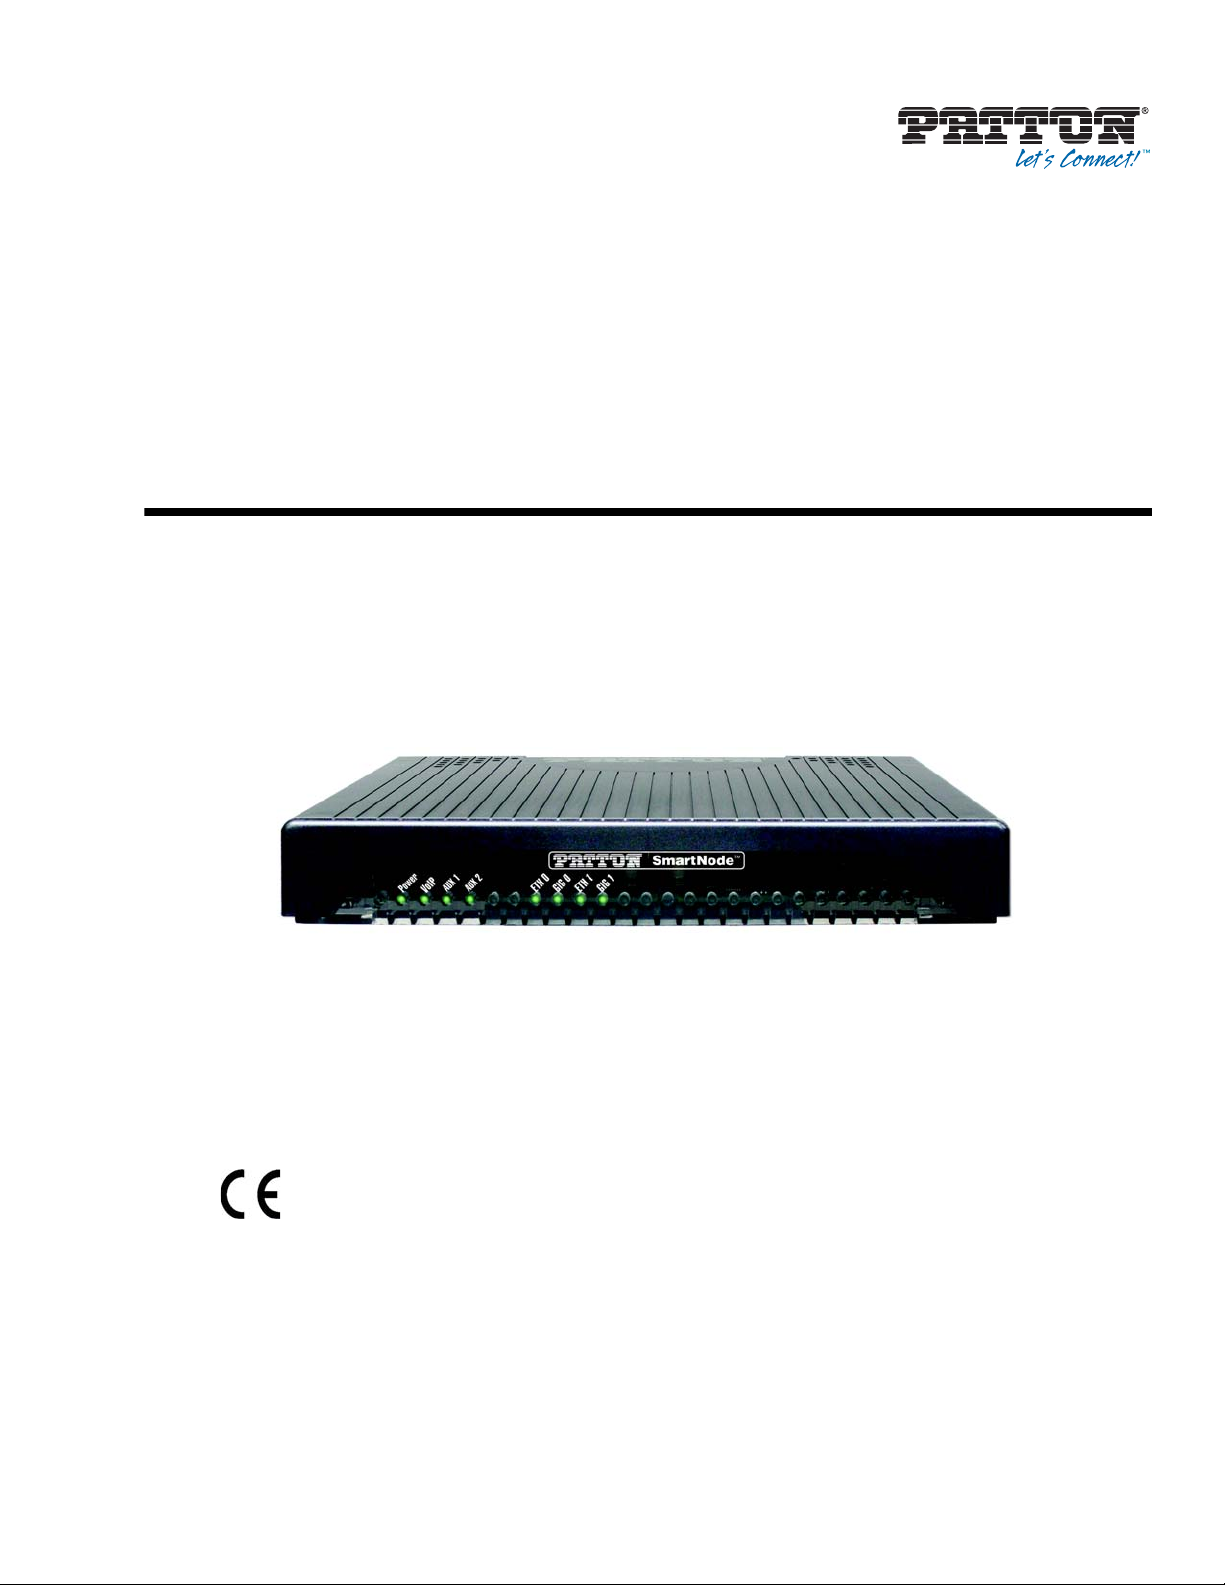
SmartNode 5501
Enterprise Session Border Controller
User Manual
This is a Class A device and is not intended for use in a residential environment.
REGULATORY MODEL NUMBER: 13269D4-001
Sales Office: +1 (301) 975-1000
Technical Support: +1 (301) 975-1007
E-mail: [email protected]
WWW: www.patton.com
Part Number: 07MSN5501-UM, Rev. C
Revised: January 25, 2019
:
Page 2

Patton Electronics Company, Inc.
7622 Rickenbacker Drive
Gaithersburg, MD 20879 USA
tel: +1 (301) 975-1000
fax: +1 (301) 869-9293
support: +1 (301) 975-1007
web: www.patton.com
e-mail: [email protected]
Trademark Statement
The term SmartNode is trademarks of Patton Electronics Company. All other
trademarks presented in this document are the property of their respective
owners.
Copyright © 2017–2019, Patton Electronics Company. All rights reserved.
The information in this document is subject to change without notice. Patton
Electronics assumes no liability for errors that may appear in this document.
Warranty Information
The software described in this document is furnished under a license and may
be used or copied only in accordance with the terms of such license.
Patton Electronics warrants all SmartNode extender components to be free
from defects, and will—at our option—repair or replace the product should it
fail within one year from the first date of the shipment.
This warranty is limited to defects in workmanship or materials, and does not
cover customer damage, abuse or unauthorized modification. If the product
fails to perform as warranted, your sole recourse shall be repair or replacement
as described above. Under no condition shall Patton Electronics be liable for
any damages incurred by the use of this product. These damages include, but
are not limited to, the following: lost profits, lost savings and incidental or
consequential damages arising from the use of or inability to use this product.
Patton Electronics specifically disclaims all other warranties, expressed or
implied, and the installation or use of this product shall be deemed an accep
tance of these terms by the user.
-
Page 3

Summary Table of Contents
1 General Information ..........................................................................................................................................14
2 Applications Overview ............................................................
3 SmartNode Installation........................
4 Initial Configuration..........................................................................................
5 Contacting Patton for Assistance...................................................
A Compliance Information .............................
B Specifications .................................................................................................
C Cabling ...............................................
D Port pin-outs ..........................................................................................
E SmartNode 5501 Factory Configuration .........................................
F Reset Button Functions ................................
G End User License Agreement .............................................................................................................................53
..............................................................................................................21
......................................................................................................34
..............................................................................................................40
.....................................................................................................49
...........................................................................19
................................................26
.....................................................................31
...................................................36
..........................................................44
..................................................................47
3
Page 4

Table of Contents
Summary Table of Contents ...................................................................................................................................3
Table of Contents ...................................................................................................................................................4
List of Figures .........................................................................................................................................................7
List of Tables ..........................................................................................................................................................8
About this guide .....................................................................................................................................................9
Safety when working with electricity............................................................................................................... 10
Deutsch ..........................................................................................................................................................11
General observations .......................................................................................................................................12
General conventions .......................................................................................................................................12
1 General Information ........................................................................
SmartNode 5501 Overview ...................................................................................................................................15
SmartNode 5501 Rear Panel ...........................................................................................................................15
SmartNode 5501 Front Panel .........................................................................................................................17
2 Applications Overview ..........................
Introduction..........................................................................................................................................................20
Typical Application ...............................................................................................................................................20
3 SmartNode Installation.....................................................................................
Planning the Installation........................................................................................................................................22
Site log ............................................................................................................................................................22
Network information ......................................................................................................................................22
Network Diagram ...........................................................................................................................................22
IP related information .....................................................................................................................................22
Software tools .................................................................................................................................................23
Power source ...................................................................................................................................................23
Location and mounting requirements .............................................................................................................23
Installing the Patton SmartNode eSBC .................................................................................................................23
Placing the SmartNode device .........................................................................................................................23
Installing cables ...............................................................................................................................................24
4 Initial Configuration....................
Introduction..........................................................................................................................................................27
Connecting the SmartNode to Your Laptop PC....................................................................................................27
Configure the Desired IP Address..........................................................................................................................28
Factory-default IP Settings ..............................................................................................................................28
Login ..............................................................................................................................................................28
Changing the WAN IP address .......................................................................................................................28
Connecting the SmartNode to the Network..........................................................................................................29
Loading the Configuration (optional)....................................................................................................................30
Additional Information .........................................................................................................................................30
.............................................................................................................19
......................................................................................................................26
..................................................................14
.................................................21
5 Contacting Patton for Assistance...........................................................
.............................................................31
4
Page 5

SmartNode 5501 User Manual Table of Contents
Introduction..........................................................................................................................................................32
Contact information..............................................................................................................................................32
Contacting Patton Technical Services for Free Support ...................................................................................32
Warranty Service and Returned Merchandise Authorizations (RMAs)...................................................................32
Warranty coverage ..........................................................................................................................................32
RMA numbers ................................................................................................................................................33
A Compliance Information ................................................................................
...................................................34
Compliance ...........................................................................................................................................................35
EMC ...............................................................................................................................................................35
Safety ..............................................................................................................................................................35
Radio and TV Interference (FCC Part 15) ............................................................................................................35
EC Declaration of Conformity ..............................................................................................................................35
Authorized European Representative .....................................................................................................................35
B Specifications ...............................
.....................................................................................................................36
DSP.......................................................................................................................................................................37
Data Connectivity .................................................................................................................................................37
Voice Processing (signalling dependent) ................................................................................................................37
Fax and modem support........................................................................................................................................37
Voice Signalling.....................................................................................................................................................37
Voice Routing—Session Controller.......................................................................................................................38
IP Services .............................................................................................................................................................38
Management .........................................................................................................................................................38
System...................................................................................................................................................................39
Physical .................................................................................................................................................................39
C Cabling ......................................................
.......................................................................................................40
Introduction..........................................................................................................................................................41
Serial Console........................................................................................................................................................41
Ethernet ................................................................................................................................................................42
D Port pin-outs ........................................................................................
............................................................44
Introduction..........................................................................................................................................................45
Console port..........................................................................................................................................................45
Ethernet ...............................................................................................................................................................45
E SmartNode 5501 Factory Configuration ..............................
.............................................................................47
Introduction..........................................................................................................................................................48
F Reset Button Functions ..................
...................................................................................................................49
Introduction..........................................................................................................................................................50
Resetting the SmartNode device when it is operating and the Power LED is lit.....................................................50
Resetting the SmartNode device when it is initially powered off............................................................................51
Very exceptional case—minimal config recovery .............................................................................................51
G End User License Agreement ...........................................................................
..................................................53
End User License Agreement .................................................................................................................................54
1. Definitions ..................................................................................................................................................54
5
Page 6

SmartNode 5501 User Manual Table of Contents
2. Title ............................................................................................................................................................54
3. Term ...........................................................................................................................................................54
4. Grant of License ..........................................................................................................................................54
5. Warranty ....................................................................................................................................................55
6. Termination ................................................................................................................................................55
7. Notices .......................................................................................................................................................55
8. Other Licenses ............................................................................................................................................55
9. Unenforceable Provisions ............................................................................................................................56
10. Governing Law .........................................................................................................................................56
11. Waiver ......................................................................................................................................................56
6
Page 7

List of Figures
1 SmartNode 5501 eSBC . . . . . . . . . . . . . . . . . . . . . . . . . . . . . . . . . . . . . . . . . . . . . . . . . . . . . . . . . . . . . . . . . . 15
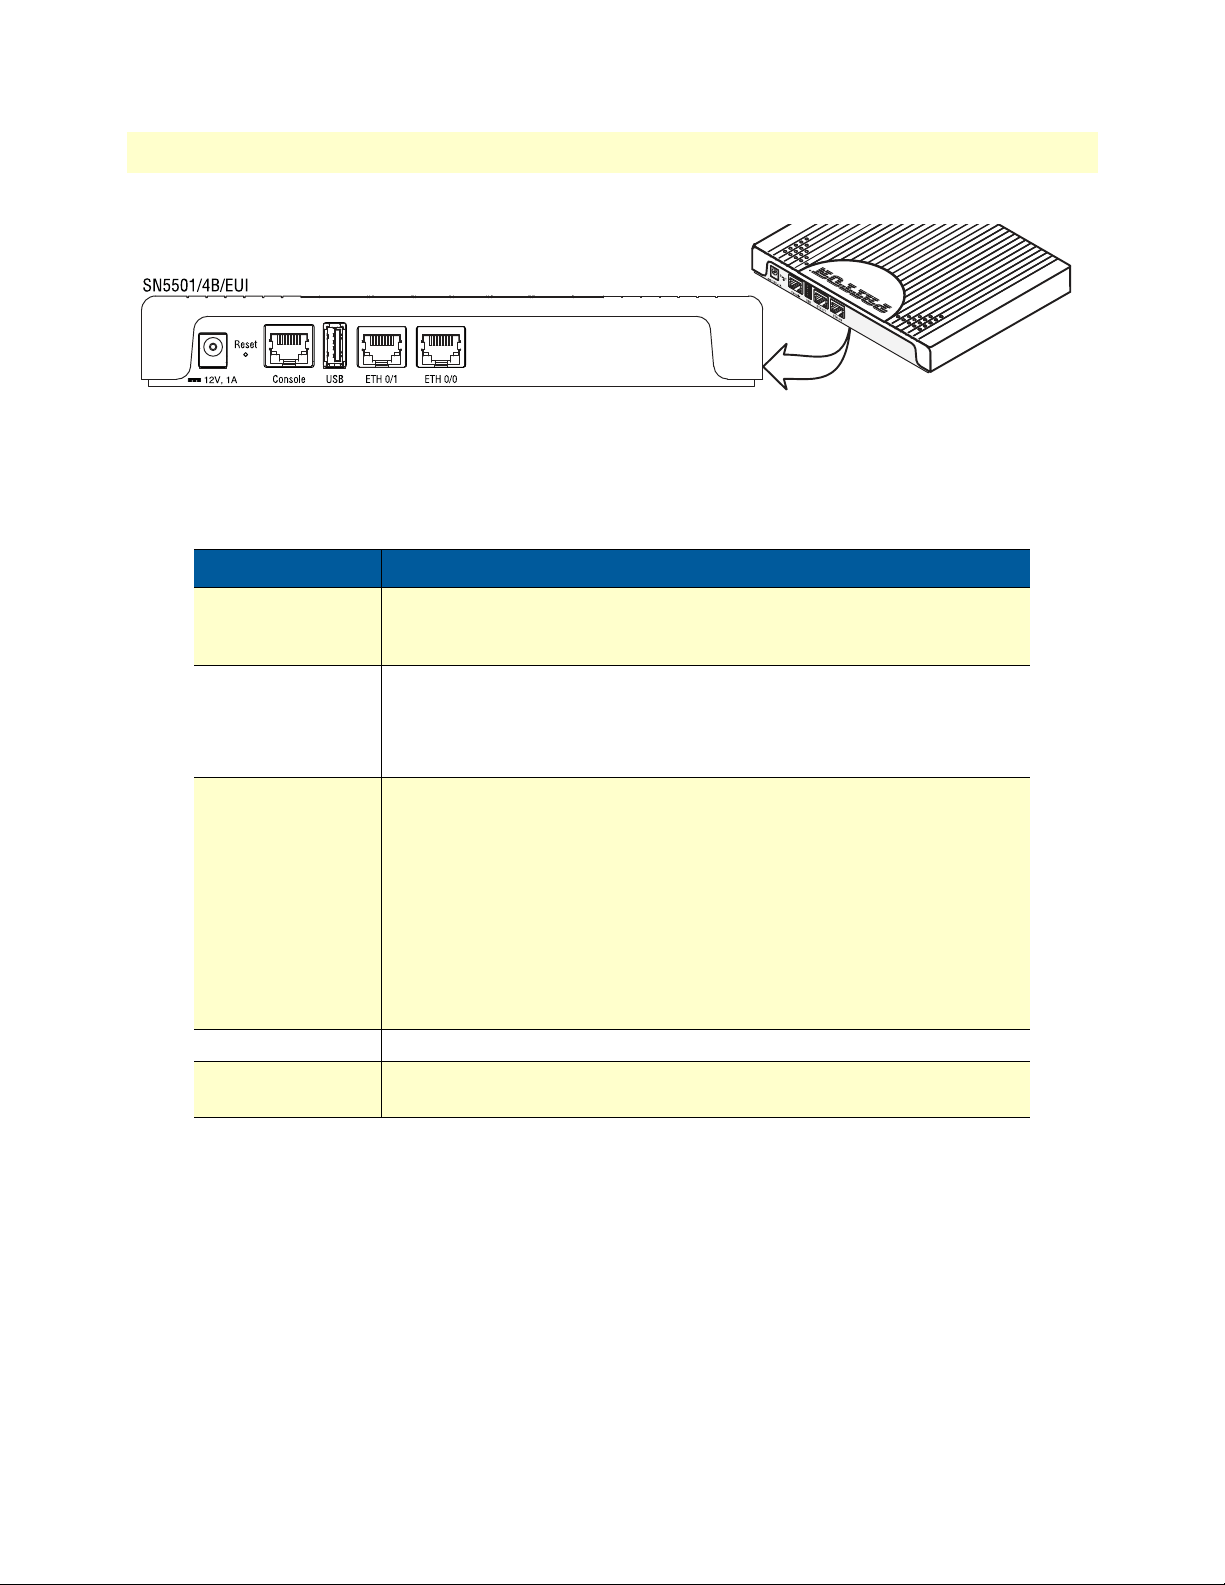
2 SN5501 rear panel . . . . . . . . . . . . . . . . . . . . . . . . . . . . . . . . . . . . . . . . . . . . . . . . . . . . . . . . . . . . . . . . . . . . . . 16
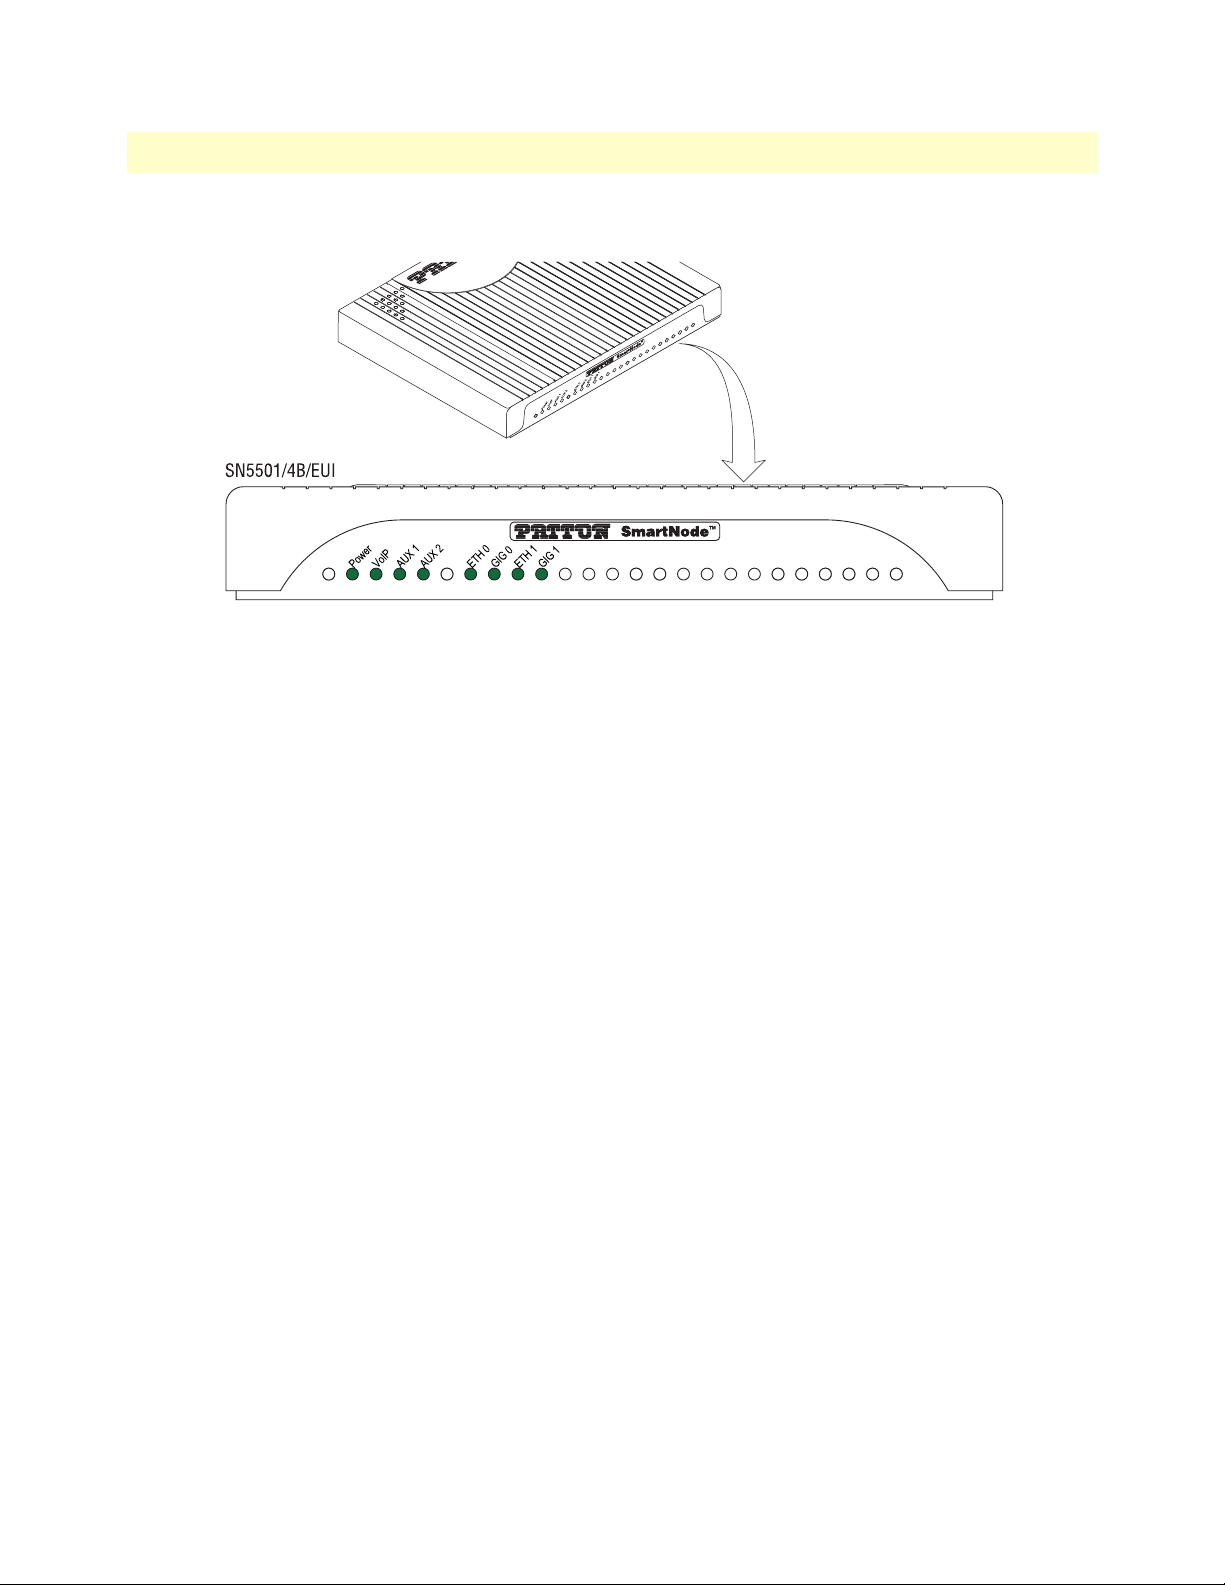
3 SmartNode 5501 front panels . . . . . . . . . . . . . . . . . . . . . . . . . . . . . . . . . . . . . . . . . . . . . . . . . . . . . . . . . . . . . . 17
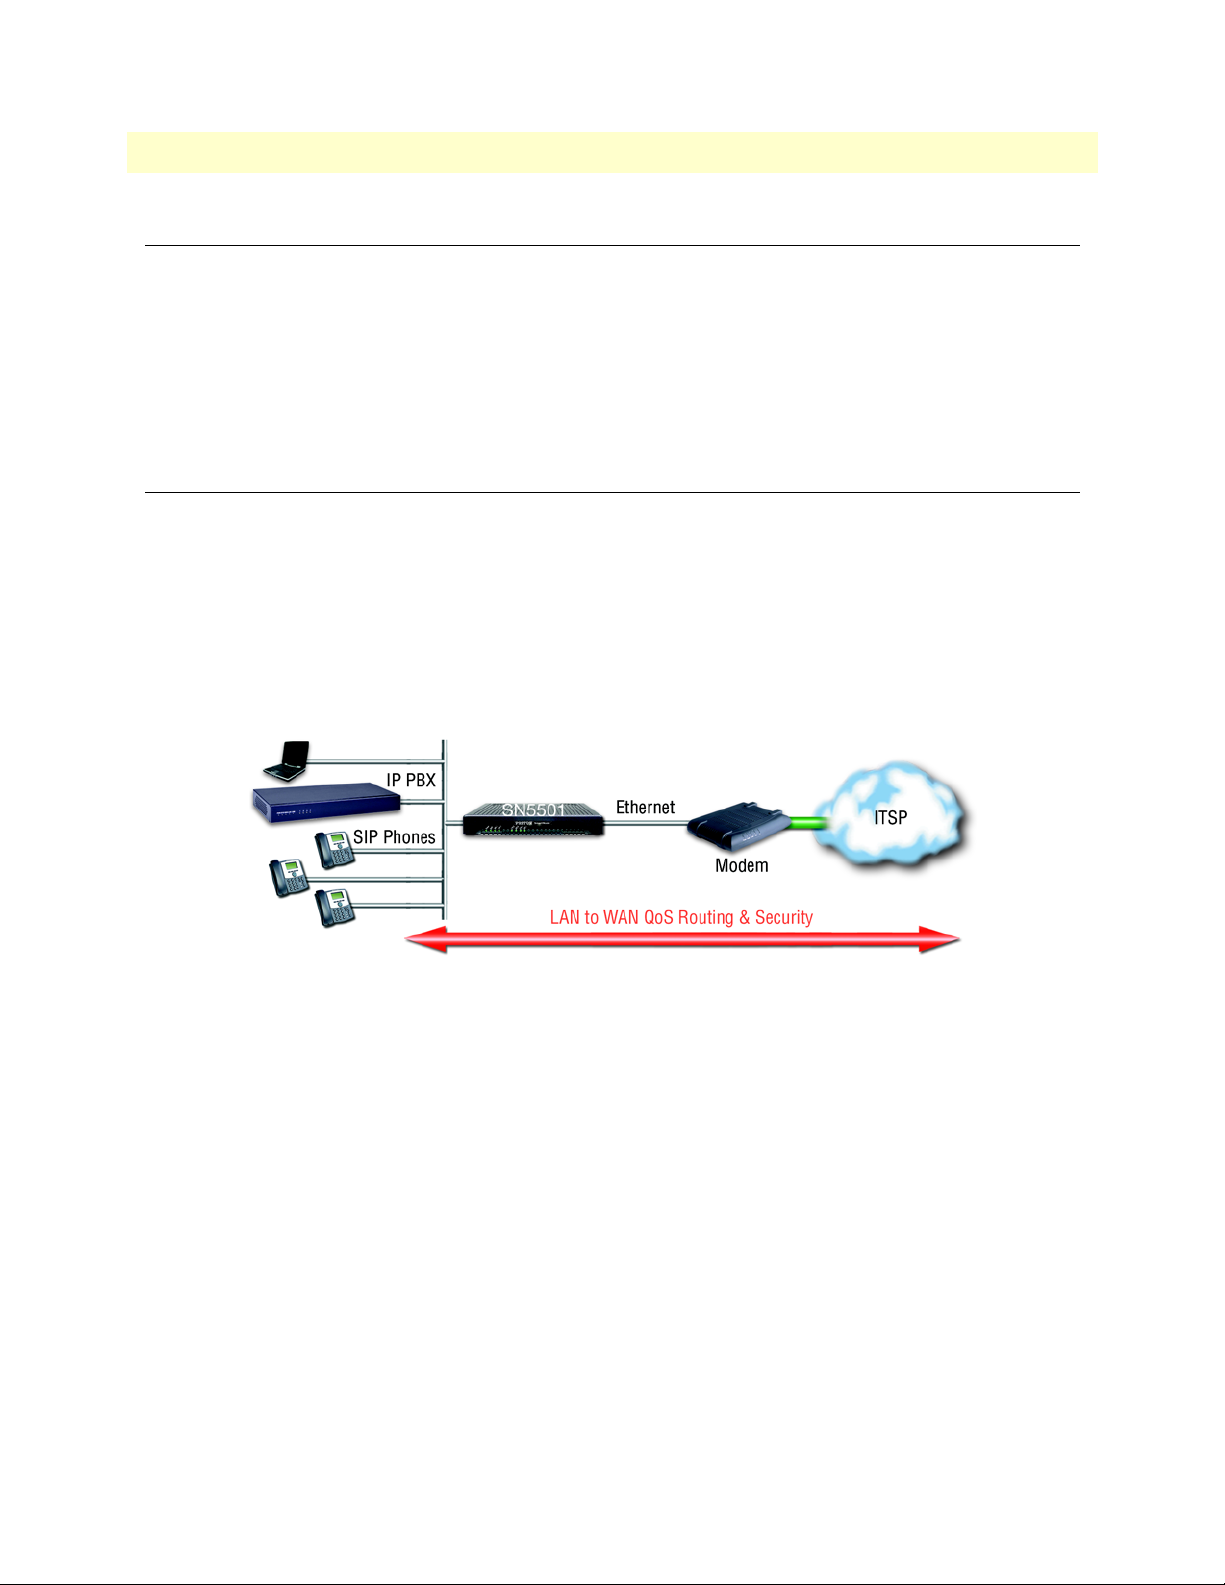
4 SmartNode 5501 typical application . . . . . . . . . . . . . . . . . . . . . . . . . . . . . . . . . . . . . . . . . . . . . . . . . . . . . . . . . 20
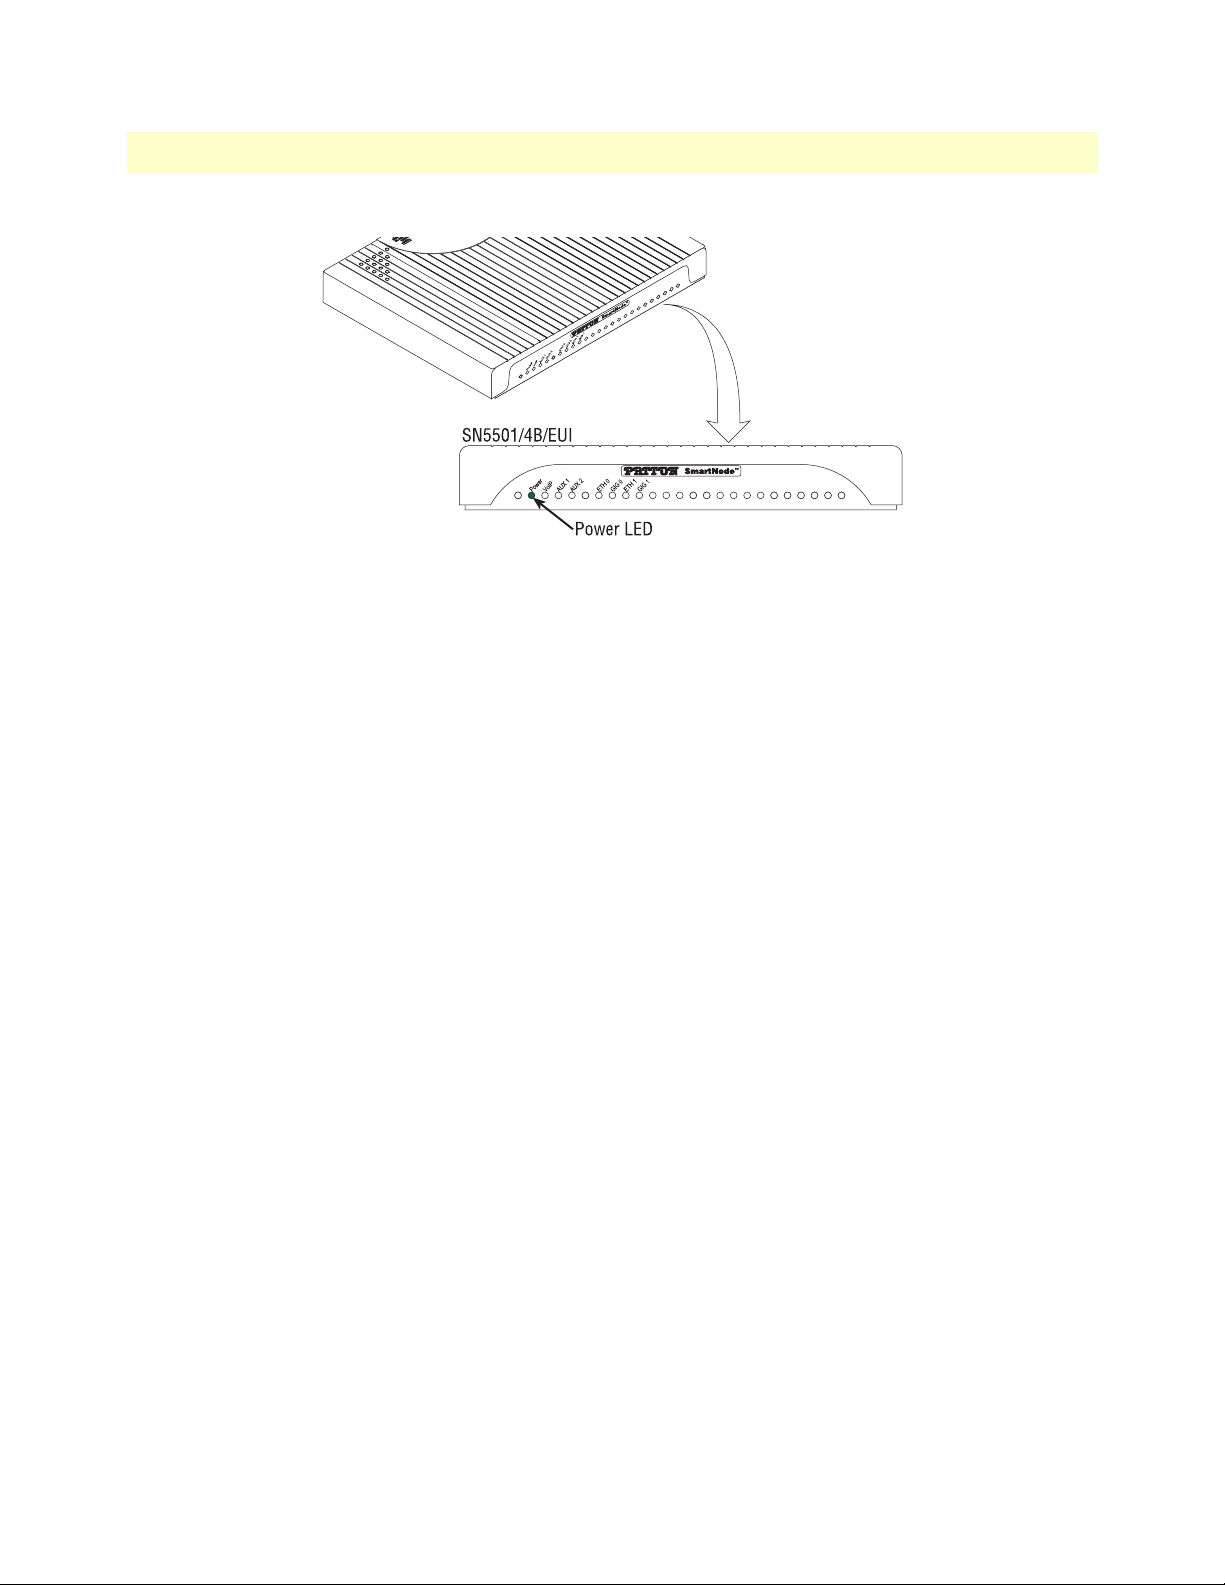
5 Power LED . . . . . . . . . . . . . . . . . . . . . . . . . . . . . . . . . . . . . . . . . . . . . . . . . . . . . . . . . . . . . . . . . . . . . . . . . . . . 25
6 Connecting the SmartNode to your Laptop PC . . . . . . . . . . . . . . . . . . . . . . . . . . . . . . . . . . . . . . . . . . . . . . . . 27
7 Connecting the SmartNode to the network . . . . . . . . . . . . . . . . . . . . . . . . . . . . . . . . . . . . . . . . . . . . . . . . . . . 29
8 Connecting a serial terminal . . . . . . . . . . . . . . . . . . . . . . . . . . . . . . . . . . . . . . . . . . . . . . . . . . . . . . . . . . . . . . . 41
9 Typical Ethernet straight-through cable diagram for 10/100Base-T . . . . . . . . . . . . . . . . . . . . . . . . . . . . . . . . . 42
10 Typical Ethernet straight-through cable diagram for 1000Base-T . . . . . . . . . . . . . . . . . . . . . . . . . . . . . . . . . . . 43
11 EIA-561 (RJ-45 8-pin) port . . . . . . . . . . . . . . . . . . . . . . . . . . . . . . . . . . . . . . . . . . . . . . . . . . . . . . . . . . . . . . . 45
12 SN5500 Reset button . . . . . . . . . . . . . . . . . . . . . . . . . . . . . . . . . . . . . . . . . . . . . . . . . . . . . . . . . . . . . . . . . . . . 50
13 Reset button periods (in seconds) for performing actions . . . . . . . . . . . . . . . . . . . . . . . . . . . . . . . . . . . . . . . . . 50
7
Page 8

List of Tables
1 General conventions . . . . . . . . . . . . . . . . . . . . . . . . . . . . . . . . . . . . . . . . . . . . . . . . . . . . . . . . . . . . . . . . . . . . . 12
2 Rear panel button and ports . . . . . . . . . . . . . . . . . . . . . . . . . . . . . . . . . . . . . . . . . . . . . . . . . . . . . . . . . . . . . . . 16
3 SmartNode 5501 LEDs . . . . . . . . . . . . . . . . . . . . . . . . . . . . . . . . . . . . . . . . . . . . . . . . . . . . . . . . . . . . . . . . . . 18
4 Sample site log entries . . . . . . . . . . . . . . . . . . . . . . . . . . . . . . . . . . . . . . . . . . . . . . . . . . . . . . . . . . . . . . . . . . . . 22
5 Factory Default IP Address and Network Mask Configuration . . . . . . . . . . . . . . . . . . . . . . . . . . . . . . . . . . . . . 28
6 10/100 Base-T RJ-45 socket . . . . . . . . . . . . . . . . . . . . . . . . . . . . . . . . . . . . . . . . . . . . . . . . . . . . . . . . . . . . . . . 45
7 1000Base-T RJ-45 Socket . . . . . . . . . . . . . . . . . . . . . . . . . . . . . . . . . . . . . . . . . . . . . . . . . . . . . . . . . . . . . . . . . 46
8 Results from pressing the Reset button . . . . . . . . . . . . . . . . . . . . . . . . . . . . . . . . . . . . . . . . . . . . . . . . . . . . . . . 50
9 Using the Reset button to switch to a backup image . . . . . . . . . . . . . . . . . . . . . . . . . . . . . . . . . . . . . . . . . . . . . 51
10 Using the Reset button to switch to erase flash memory . . . . . . . . . . . . . . . . . . . . . . . . . . . . . . . . . . . . . . . . . . 52
8
Page 9

About this guide
This guide describes the SmartNode 5501 Enterprise Session Border Controller (eSBC) hardware, installation
and basic configuration. For detailed software configuration information refer to the
ration Guide and the available Knowledgebase, as well as the Wizard portal.
Audience
This guide is intended for the following users:
• Operators
• Installers
• Maintenance technicians
Structure
This guide contains the following chapters and appendices:
• Chapter 1 on page 14 provides information about eSBC features and capabilities
• Chapter 2 on page 19 contains an overview describing eSBC operation and applications
• Chapter 3 on page 21 provides quick start hardware installation procedures
• Chapter 4 on page 26 provides quick-start procedures for configuring the SmartNode eSBC
• Chapter 5 on page 31 contains information on contacting Patton technical support for assistance
• Appendix A on page 34 contains compliance and regulatory information for the eSBC
• Appendix B on page 36 contains specifications for the eSBC
• Appendix C on page 40 provides cable recommendations
• Appendix D on page 44 describes the eSBC’s ports and pin-outs
• Appendix E on page 47 lists the factory configuration settings for SmartNode 5501
• Appendix F on page 49 describes the Reset button functions
• Appendix G on page 53 provides license information that describes acceptable usage of the software pro-
vided with the SmartNode 5501
For best results, read the contents of this guide before you install the eSBC.
Trinity Software Configu-
9
Page 10
SmartNode 5501 User Manual
WARNING
WARNING
WARNING
WARNING
WARNING
Precautions
Notes, cautions, and warnings, which have the following meanings, are used throughout this guide to help you
become aware of potential extender problems. Wa rn in gs are intended to prevent safety hazards that could result
in personal injury. Cautions refer to potential property damage or impaired functioning.
Note Calls attention to important information.
The shock hazard symbol and WARNING heading indicate
a potential electric shock hazard. Strictly follow the warn
ing instructions to avoid injury caused by electric shock.
The alert symbol and WARNING heading indicate a potential safety hazard. Strictly follow the warning instructions
to avoid personal injury.
WARNING
The shock hazard symbol and CAUTION heading indicate a
potential electric shock hazard. Strictly follow the instructions to
avoid property damage caused by electric shock.
CAUTION
-
The alert symbol and CAUTION heading indicate a potential hazard. Strictly follow the instructions to avoid property damage.
CAUTION
Safety when working with electricity
The SmartNode device contains no user serviceable parts, and is not be opened
by the user. The equipment shall be returned to Patton Electronics for repairs or
repaired by qualified service personnel.
Mains Voltage: In systems without a power switch, line voltages are present in the
power supply when the power cord is connected. The mains outlet used to power
the SmartNode device shall be within 10 feet (3 meters) of the device, be easily
accessible, and protected by a circuit breaker.
For AC powered units, ensure that the power cable used meets all applicable standards for the country in which it is to be installed, and that it is connected to a wall
outlet which has earth ground.
For units with an external power adapter, the adapter shall be a listed Limited
Power Source.
10
Page 11

SmartNode 5501 User Manual
WARNING
WARNING
WARNING
WARNUNG
Hazardous network voltages are present in WAN ports regardless of whether
power to the SmartNode is ON or OFF. To avoid electric shock, use caution when
near WAN ports. When detaching the cables, detach the end away from the Smart
Node first.
Before handling the device, disconnect the telephone network cables to avoid
contact with telephone line voltages. When detaching the cables, detach the end
away from the SmartNode device first.
Do not work on the system or connect or disconnect cables during periods of
lightning activity.
Deutsch
Wa rn hi nw ei se :
Dieses Gerät ist NICHT für den Anschluss an das Telefonnetz (PSTN) bestimmt
und auch NICHT dafür zugelassen. Es ist nur für den Anschluss an Endgeräte
beim Kunden vorgesehen.
WARNUNG
-
• Das Gerät entält keine austauschbaren Komponenten und ist vom Benutzer nicht zu
öffnen. Bei Systemen ohne Netzschalter und ohne externes Netzteil liegt Netzspan
nung im Gerät an, wenn das Netzkabel angeschlossen ist.
-
• Bei Geräten mit externem Netzteil muss das Netzteil die Anforderungen an eine zuge-
lassene Stromquelle mit begrenzter Leistung erfüllen. Die Steckdose, die für die
Stromversorgung des Gerätes verwendet wird, sollte höchstens 3 Meter vom Gerät
entfernt und leicht zugänglich sein sowie durch einen den örtlichen regulatorischen
Anforderungen entsprechenden Schutzschalter abgesichert sein.
• Für mit Wechselstrom betriebene Geräte muss sichergestellt sein, dass das verwen-
dete Netzkabel alle gültigen Normen des Landes erfüllt, in dem es eingesetzt werden
soll.
• Für mit Wechselstrom betriebene Geräte, die 3-polige Netzstecker haben (L1, L2 u.
GND oder Phase, Neutralleiter u. Schutzleiter), muss die Steckdose geerdet sein.
• Für mit Gleichstrom betriebene Geräte muss sichergestellt sein, dass die Verbindung-
skabel für Spannung, Strom, erwartete Temperatur, Entflammbarkeit und mechanische Wartbarkeit geeignet sind.
• WAN-, LAN- u. PSTN-Ports (Anschlüsse) können unter gefährlicher Spannung ste-
hen, unabhängig davon, ob das Gerät ein- oder ausgeschaltet ist. PSTN bezieht sich
auf Schnittstellen wie Telefon, FXS, FXO, DSL, xDSL, T1, E1, ISDN, Voice, usw. Diese
sind als „gefährliche Netzwerkspannungen“ bekannt. Um einen elektrischen Schlag
zu vermeiden, muss in der Nähe dieser Anschlüsse mit Vorsicht gearbeitet werden.
Werden Kabel von diesen Anschlüssen getrennt, zuerst das Kabel am anderen Ende
herausziehen.
• Während eines Gewitters darf nicht am Gerät gearbeitet werden und es dürfen keine
Kabel angeschlossen oder vom Netz getrennt werden.
11
Page 12
SmartNode 5501 User Manual
CAUTION
In Übereinstimmung mit den Anforderungen der Richtlinie 2002/96/EG über Elektro- und
Elektronik-Altgeräte (WEEE) muss sichergestellt sein, dass Altgeräte von anderem Abfall
und Schrott getrennt werden und dem Sammel- und Verwertungssystem für Elektro- und
Elektronik-Altgeräte in Ihrem Land zum Recycling zugeführt werden.
General observations
Do not stack multiple SmartNode devices directly on top of one another, and do not place
items on top of the device. If you will be installing equipment above the SmartNode device,
leave at least 2 inches (5 cm) of clearance between the devices.
Furthermore, leave at least 2 inches (5 cm) to the left, right, front, and rear of the SmartNode
device for proper ventilation.
• Clean the case with a soft slightly moist anti-static cloth
• Place the unit on a flat surface and ensure free air circulation
• Avoid exposing the unit to direct sunlight and other heat sources
• Protect the unit from moisture, vapors, and aggressive liquids
Typographical conventions used in this document
This section describes the typographical conventions and terms used in this guide.
General conventions
The procedures described in this manual use the following text conventions:
Table 1. General conventions
Convention Meaning
Garamond blue type
Helvetica bold type Commands and keywords are in boldface font.
Helvetica bold-italic type Parts of commands, which are related to elements already named by the user,
Italicized Helvetica type Variables for which you supply values are in italic font
Helvetica type Indicates the names of fields or windows.
Garamond bold type Indicates the names of command buttons that execute an action.
< > Angle brackets indicate function and keyboard keys, such as <SHIFT>, <CTRL>,
[ ] Elements in square brackets are optional.
{a | b | c} Alternative but required keywords are grouped in braces ({ }) and are separated
blue screen Information you enter is in blue screen font.
screen Terminal sessions and information the system displays are in screen font.
node The leading IP address or nodename of a SmartNode is substituted with node in
Indicates a cross-reference hyperlink that points to a figure, graphic, table, or section heading. Clicking on the hyperlink jumps you to the reference. When you
have finished reviewing the reference, click on the Go to Previous View
button
in the Adobe® Acrobat® Reader toolbar to return to your starting point.
are in boldface italic font.
<C>, and so on.
by vertical bars ( | )
boldface italic font.
12
Page 13

SmartNode 5501 User Manual
Table 1. General conventions (Continued)
Convention Meaning
SN The leading SN on a command line represents the nodename of the SmartNode
# An hash sign at the beginning of a line indicates a comment line.
13
Page 14

Chapter 1 General Information
Chapter contents
SmartNode 5501 Overview ...................................................................................................................................15
SmartNode 5501 Rear Panel ...........................................................................................................................15
Ports descriptions ......................................................................................................................................16
SmartNode 5501 Front Panel .........................................................................................................................17
14
Page 15
SmartNode 5501 User Manual 1 • General Information
SmartNode 5501 Overview
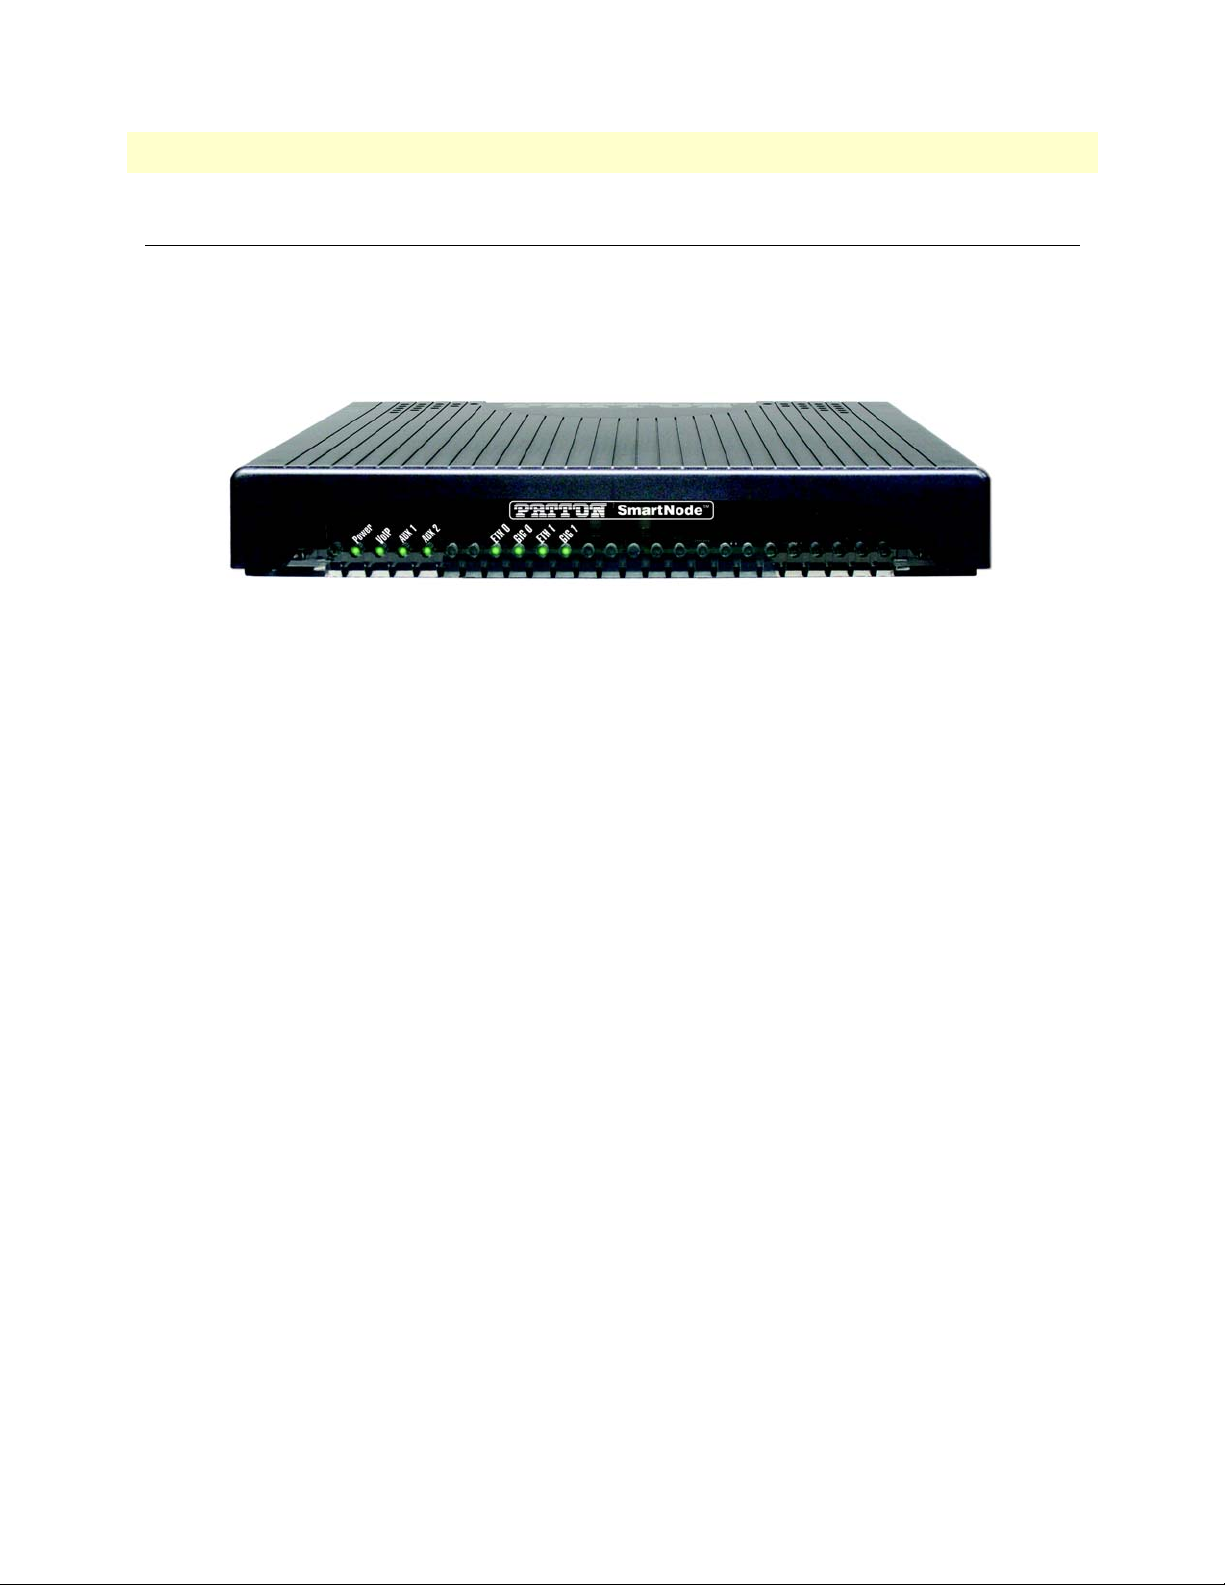
The SmartNode 5501 Enterprise Session Border Controller (eSBC) (see figure 1) comes with built-in security
features such as SIP TLS, SRTP, stateful firewall, and secure provisioning to protect the LAN networks from
fraud strikes out of the Internet. Like all SmartNode eSBC devices, the SN5501 comes with the built in Web
Wizard for ease of use and zero touch provisioning features such as HTTPS, TR-069, etc.
Figure 1. SmartNode 5501 eSBC
The SmartNode 5501 consists of several models: see the complete SKU list on the corresponding product page
on www.patton.com.
All the SN5501 models come equipped with two 10/100/1000 Base-T Ethernet ports and one USB port.
The SmartNode 5501 eSBC performs the following major functions:
• Up to 200 sessions between IPPBX customer premise equipment and ITSP`s SIP Trunks. Protocol conver-
sion between SIP UDP and SIP TCP including SIP-TLS.
• Non transcoded SIP calls; Supports 4 SIP to SIP calls and can be license upgraded to a total of 200* (addi-
tional cost)
• Transcoded SIP calls; from 4 up to 16 (licenses to be purchased at additional cost), dependend on model (8/
P, / 1 6 P )
• Secure Enterprise: Enable NAT/NAPT, Access Control Lists with QoS to ensure the most efficient use of
your bandwidth
• IP Routing: Policy based routing, Packet filtering, protocol based routing, packet length routing
• SIP registrar, SIP TLS, and SRTP
• USB 2.0 host port for 3G/4G modem support, which can be used for Survivability applications as a data
backup link.
Note A list of supported USB Models can be found in the release notes and in the
Software Configuration Guide.
*Supported under ideal conditions. Transcoding, debugging, and/or IP routing reduce processing capacity.
SmartNode 5501 Rear Panel
The SmartNode 5501 is a compact Enterprise Session Border Controller that supports up to 200 VoIP or Fax
calls, by using either G.711, G.722, T.38 or any other codec as indicated under section
“Voice Processing (sig-
nalling dependent)” on page 37. The SmartNode 5501 rear panel ports are described in table 2 on page 16.
SmartNode 5501 Overview 15
Page 16
SmartNode 5501 User Manual 1 • General Information
Figure 2. SN5501 rear panel
Ports descriptions
The SmartNode 5501 rear panel ports are described in table 2.
Table 2. Rear panel button and ports
Button/Port Description
ETH 0/0 & ETH 0/1 Auto-MDX Fast-/Gigabit-Ethernet port, RJ-45 (see figure 2), connects
the unit to an Ethernet WAN device (for example, a cable modem, DSL
modem, or fiber modem).
USB 2.0 USB 2.0 host port (see figure 2) to connect a USB 3G/4G Cellular
Modem.
A list of supported USB Models can be found in the release notes and in
the Software Configuration Guide
Console
Used for service and maintenance, the console port (see figure 2 on
page 16) an RS-232 RJ-45 connector, connects the product to a serial
terminal such as a PC or ASCII Terminal (also called a dumb terminal).
Configuration settings:
• 19200 bps
• 8 bits, no parity
• 1 stop bit
• flow control off
12V DC, 1A
Reset The reset button has several functions, as described in appendix F,
Electricity supply socket. (see figure 2 on page 16)
“Reset Button Functions” on page 49.
SmartNode 5501 Overview 16
Page 17
SmartNode 5501 User Manual 1 • General Information
SmartNode 5501 Front Panel
Figure 3. SmartNode 5501 front panels
Figure 3 shows SmartNode 5501 LEDs, the LED definitions are listed in table 3 on page 18.
SmartNode 5501 Overview 17
Page 18

SmartNode 5501 User Manual 1 • General Information
Table 3. SmartNode 5501 LEDs
LED Description
Note If an error occurs, all LEDs will flash solid for MORE
than 5 seconds before the device reboots
Power When lit, indicates power is applied. Blinks fast during bootloader phase
and blinks slow during boot process of Trinity Software. Becomes solid
when the system is up and running.
VoIP Link
• On indicates the gateway is registered to a SIP server, or, a SIP
device has registered to the SN5501.
• Off indicates the unit is not configured or registered, or has no active
direct routed VoIP connection.
AUX 1 & AUX 2 Auxiliary LEDs for future use.
ETH 0 – ETH 1
• On when the Ethernet connection on the corresponding port has a
link indication.
• Flashes when data is received or transmitted at the corresponding
Ethernet port.
GIG 0 – GIG 1
• On when the Ethernet is connected to a 1000Mb network.
• Off when the Ethernet is connected to a 10Mb or 100Mb network or
not connected
SmartNode 5501 Overview 18
Page 19

Chapter 2 Applications Overview
Chapter contents
Introduction..........................................................................................................................................................20
Typical Application ...............................................................................................................................................20
19
Page 20
SmartNode 5501 User Manual 2 • Applications Overview
Introduction
Patton’s SmartNode eSBC deliver the features you need for advanced multiservice voice and data network
applications. They combine high quality voice-over-IP with powerful quality of service routing functions to
build professional, secure and reliable VoIP and data networks. This chapter describes typical applications for
which this SmartNode is uniquely suited.
Note Detailed configuration information for SmartNode applications can be
found online at: http://www.patton.com/session-border-controller/.
Typical Application
The SN5501 enables universal SIP trunking and provides features like IP routing, redundancy, security and a
SIP registrar for survivability.
In addition, the SN5501 enables protocol conversion between two networks to solve interop problems for
devices using SIP TCP signaling only. The SmartNode is able to convert SIP TCP or SIP TLS signaling into
SIP UDP signaling.
Using the built-in QoS engine, the SmartNode ensures that voice traffic gets top priority resulting in good
voice quality across the SIP trunk over a public network.
Figure 4. SmartNode 5501 typical application
Introduction 20
Page 21

Chapter 3 SmartNode Installation
Chapter contents
Planning the Installation........................................................................................................................................22
Site log ............................................................................................................................................................22
Network information ......................................................................................................................................22
Network Diagram ...........................................................................................................................................22
IP related information .....................................................................................................................................22
Software tools .................................................................................................................................................23
Power source ...................................................................................................................................................23
Location and mounting requirements .............................................................................................................23
Installing the Patton SmartNode eSBC .................................................................................................................23
Placing the SmartNode device .........................................................................................................................23
Installing cables ...............................................................................................................................................24
Connecting the 10/100/1000Base-T Ethernet LAN and WAN cables ......................................................24
Connecting the Power Supply ...................................................................................................................24
21
Page 22

SmartNode 5501 User Manual 3 • SmartNode Installation
Planning the Installation
Before installing the SmartNode device, the following tasks should be completed:
• Create a network diagram (see section “Network information” on page 22)
• Gather IP related information (see section “IP related information” on page 22 for more information)
• Install the hardware and software needed to configure the SmartNode. (See section “Software tools” on
page 23)
• Verify power source reliability (see section “Power source” on page 23).
When you finish preparing for SmartNode installation, go to section “Installing the Patton SmartNode eSBC”
on page 23 to install the device.
Site log
Patton recommends that you maintain a site log to record all actions relevant to the system, if you do not
already keep such a log. Site log entries should include information such as listed in
Table 4. Sample site log entries
Entry Description
Installation Make a copy of the installation checklist and insert it into the site log
table 4.
Upgrades and maintenance Use the site log to record ongoing maintenance and expansion history
Configuration changes Record all changes and the reasons for them
Maintenance Schedules, requirements, and procedures performed
Comments Notes, and problems
Software Changes and updates to SmartWare software
Network information
Network connection considerations that you should take into account for planning are described for several
types of network interfaces in the following sections.
Network Diagram
Draw a network overview diagram that displays all neighboring IP nodes, connected elements and telephony
components.
IP related information
Before you can set up the basic IP connectivity for your SmartNode 5501 you should have the following information:
• IP addresses used for Ethernet LAN and WAN ports
• Subnet mask used for Ethernet LAN and WAN ports
Planning the Installation 22
Page 23

SmartNode 5501 User Manual 3 • SmartNode Installation
• IP addresses and/or URL of SIP servers or Internet telephony services (if used)
• Login and password for PPPoE Access
• Login and Password for SIP based telephony services
• IP addresses of central TFTP server used for configuration upload and download (optional)
Software tools
You will need a PC (or equivalent) with Windows Telnet or a program such as Tera Term Pro or Putty to configure the software on your SmartNode eSBC.
Also you may use your WEB browser to configure the unit. The Web wizard in this case reduces time to get
your unit up and running. See more details on the
Knowledgebase.
Power source
If you suspect that your AC power is not reliable, for example if room lights flicker often or there is machinery
with large motors nearby, have a qualified professional test the power. Patton recommends that you include an
uninterruptible power supply (UPS) in the installation to ensure that VoIP service is not impaired if the power
fails.
Location and mounting requirements
The SmartNode eSBC is intended to be placed on a desktop or similar sturdy, flat surface that offers easy access
to cables. Allow sufficient space at the rear of the chassis for cable connections. Additionally, you should con
-
sider the need to access the unit for future upgrades and maintenance.
Installing the Patton SmartNode eSBC
Install the SmartNode device as follows:
• Placing the device at the desired installation location (see section “Placing the SmartNode device”)
• Installing the interface and power cables (see section “Installing cables” on page 24)
When you finish installing the SmartNode, go to Chapter 4, “Initial Configuration” on page 26.
Placing the SmartNode device
Place the SmartNode device on a desktop or similar sturdy, flat surface. Allow sufficient space at the rear of the
chassis for cable connections. Additionally, you should consider the need to access the unit for future upgrades
and maintenance.
To prevent overheating and damaging the unit, proper ventilation
is required when placing the device; leave at least 2 inches (5
cm) to the left, right, front, and rear of the SmartNode device.
CAUTION
The device should be installed in a dry environment with sufficient space to allow air circulation for cooling. Do not stack multiple SmartNode devices directly on top of one another, and do not
place items on top of the device. If you will be installing equip
ment above the SmartNode device, leave at least 2 inches (5
cm) of clearance between the devices.
-
Installing the Patton SmartNode eSBC 23
Page 24

SmartNode 5501 User Manual 3 • SmartNode Installation
WARNING
WARNING
Installing cables
Do not work on the system or connect or disconnect
cables during periods of lightning activity.
The Interconnecting cables shall be acceptable for external
use and shall be rated for the proper application with
respect to voltage, current, anticipated temperature, flam
mability, and mechanical serviceability.
-
Connect the cables in the following order:
1. Connect the 10/100/1000Base-T Ethernet LAN and WAN (see section “Connecting the 10/100/
1000Base-T Ethernet LAN and WAN cables”)
2. Connect the power mains cable (see section“Connecting the Power Supply” on page 24)
Connecting the 10/100/1000Base-T Ethernet LAN and WAN cables
The SmartNode 5501 has automatic MDX (auto-cross-over) detection and configuration on the Ethernet
ports. Any of the two ports can be connected to a host or hub/switch with a straight-through wired cable.
1. Connect to the subscriber port of the broadband access modem (DSL, cable, WLL) to ETH 0/0.
2. Connect port ETH 0/1 to your LAN.
For details on the Ethernet port pinout and cables, refer to Appendix C, “Cabling” on page 40 and Appendix
D, “Port pin-outs” on page 44.
Connecting the Power Supply
Do the following to connect the main power to the Model SN5501:
Note Do not connect the power cord to the AC Mains at this time.
1. Insert the female end of the AC power supply cable to the mains port (see figure 2 on page 16).
There are no user-serviceable parts in the power supply section
of the model SN5501. Contact Patton Electronics Technical
Support at [email protected] for more information
CAUTION
2. Verify that the AC power cord included with your device is compatible with local standards. If it is not,
refer to
“Contacting Patton for Assistance” on page 31 to find out how to replace it with a compatible
power cord.
3. Connect the male end of the power cord to an appropriate power outlet.
Installing the Patton SmartNode eSBC 24
Page 25
SmartNode 5501 User Manual 3 • SmartNode Installation
Figure 5. Power LED
4. Verify that the green Power LED is lit (see figure 5). Blinks fast during bootloader phase and blinks slow
during boot process of Trinity Software. Becomes solid when the system is up and running.
Congratulations, you have finished installing the SmartNode Enterprise Session Border Controller! Now go to
Chapter
4, “Initial Configuration” on page 26.
Installing the Patton SmartNode eSBC 25
Page 26

Chapter 4 Initial Configuration
Chapter contents
Introduction..........................................................................................................................................................27
Connecting the SmartNode to Your Laptop PC....................................................................................................27
Configure the Desired IP Address..........................................................................................................................28
Factory-default IP Settings ..............................................................................................................................28
Login ..............................................................................................................................................................28
Changing the WAN IP address .......................................................................................................................28
Connecting the SmartNode to the Network..........................................................................................................29
Loading the Configuration (optional)....................................................................................................................30
Additional Information .........................................................................................................................................30
26
Page 27
SmartNode 5501 User Manual 4 • Initial Configuration
Introduction
This chapter leads you through the basic steps to set up a new SmartNode and to download a configuration.
Setting up a new SmartNode consists of the following main steps:
Note If you haven’t already installed the SmartNode, refer to Chapter 3, "Smart-
Node Installation" on page 21.
• Connecting the SmartNode to your laptop PC
• Configuring the desired IP address
• Connecting the SmartNode to the network
• Loading the configuration (optional)
Connecting the SmartNode to Your Laptop PC
First, the SmartNode must be connected to the main power supply with the power cable. Wait until the Power
LED stops blinking and stays lit constantly. Now the SmartNode is ready.
The interconnecting cables shall be acceptable for external use
CAUTION
and shall be rated for the proper application with respect to volt
age, current, anticipated temperature, flammability, and
mechanical serviceability.
-
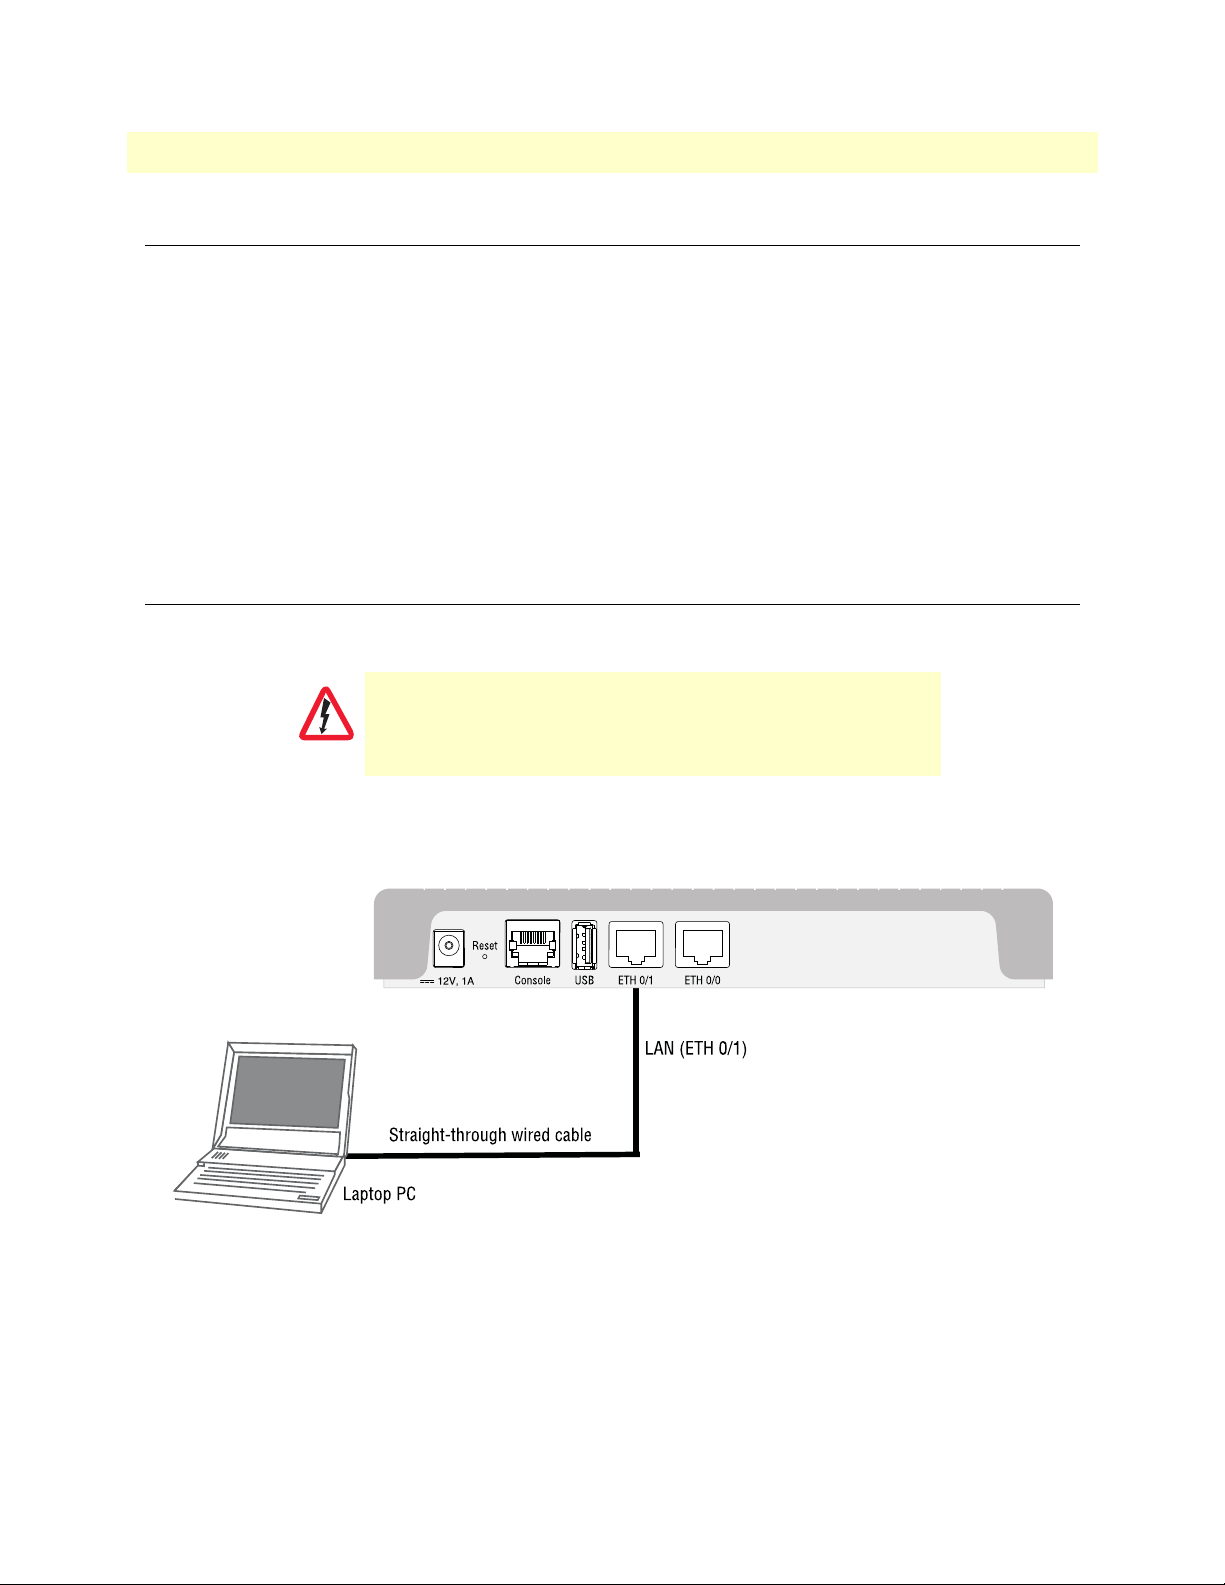
The SmartNode 5501 is equipped with Auto-MDX Ethernet ports, so you can use straight-through cables for
host or hub/switch connections (see
Figure 6. Connecting the SmartNode to your Laptop PC
figure 6).
The SmartNode comes with a built-in DHCP server to simplify configuration. Therefore, to automatically
configure the PC for IP connectivity to the SmartNode, the Laptop PC must be configured for DHCP. The
SmartNode will provide the PC with an IP address. You can check the connection to the SmartNode by execut
ing the ping command from the PC command window as follows:
-
ping 192.168.1.1
Introduction 27
Page 28

SmartNode 5501 User Manual 4 • Initial Configuration
Configure the Desired IP Address
Factory-default IP Settings
The factory default configuration for the Ethernet interface IP addresses and network masks are listed in Ta b le 5.
Both Ethernet interfaces are activated upon power-up. LAN interface ETH 0/1 (LAN) provides a default
DHCP server, the WAN interface uses DHCP client to automatically assign the IP address and network mask.
Table 5. Factory Default IP Address and Network Mask Configuration
IP Address Network Mask
WAN Interface Ethernet 0 (ETH 0/0) DHCP DHCP
LAN Interface Ethernet 1 (ETH 0/1) 192.168.1.1 255.255.255.0
DHCP Address Range 192.168.1.10–192.168.1.99 255.255.255.0
If these addresses match with those of your network, go to section “Connecting the SmartNode to the Net-
work” on page 29. Otherwise, refer to the following sections to change the addresses and network masks.
Login
To access the SmartNode, start the Telnet application. Type either the host name
smartnode.local
or the default IP address into the address field of the Telnet application:
192.168.1.1
Accessing your SmartNode via a Telnet session displays the login screen. Type the factory default login: admin
and leave the password empty. Press the Enter key after the password prompt.
login:admin
password: <Enter>
192.168.1.1>
After you have successfully logged in you are in the operator execution mode, indicated by > as command line
prompt. With the commands enable and configure you enter the configuration mode.
192.168.1.1>enable
192.168.1.1#configure
192.168.1.1(cfg)#
Changing the WAN IP address
Select the context IP mode to configure an IP interface.
192.168.1.1 (cfg) #context ip ROUTER
192.168.1.1 (ctx-ip) [ROUTER} #
Now you can set your IP address and network mask for the interface ETH 0/0 (WAN). Within this example a
network 172.16.1.0/24 address is assumed. The IP address in this example is set to 172.16.1.99 (you should set
the IP address given to you by your network provider).
Configure the Desired IP Address 28
Page 29
SmartNode 5501 User Manual 4 • Initial Configuration
192.168.1.1(ctx-ip)[Router]#interface WAN
192.168.1.1(if-ip)[WAN]#no ipaddress DHCP
192.168.1.1(if-ip)[WAN]#ipaddress WAN 172.16.1.99/24
2002-10-28T00:09:40 : LOGINFO : Link down on interface WAN.
2002-10-29T00:09:40 : LOGINFO : Link up on interface WAN.
172.16.1.99(if-ip)[WAN]#
Copy this modified configuration to you new start-up configuration. This will store your changes in
non-volatile memory. Upon the next start-up the system will initialize itself using the modified configuration.
Note The modified configuration is applied immediately. It is not necessary to
reboot the device when changing any configuration parameter.
172.16.1.99(if-ip) [WAN]#copy running-config startup-config
172.16.1.99(if-ip) [WAN]
The SmartNode can now be connected to your network.
Connecting the SmartNode to the Network
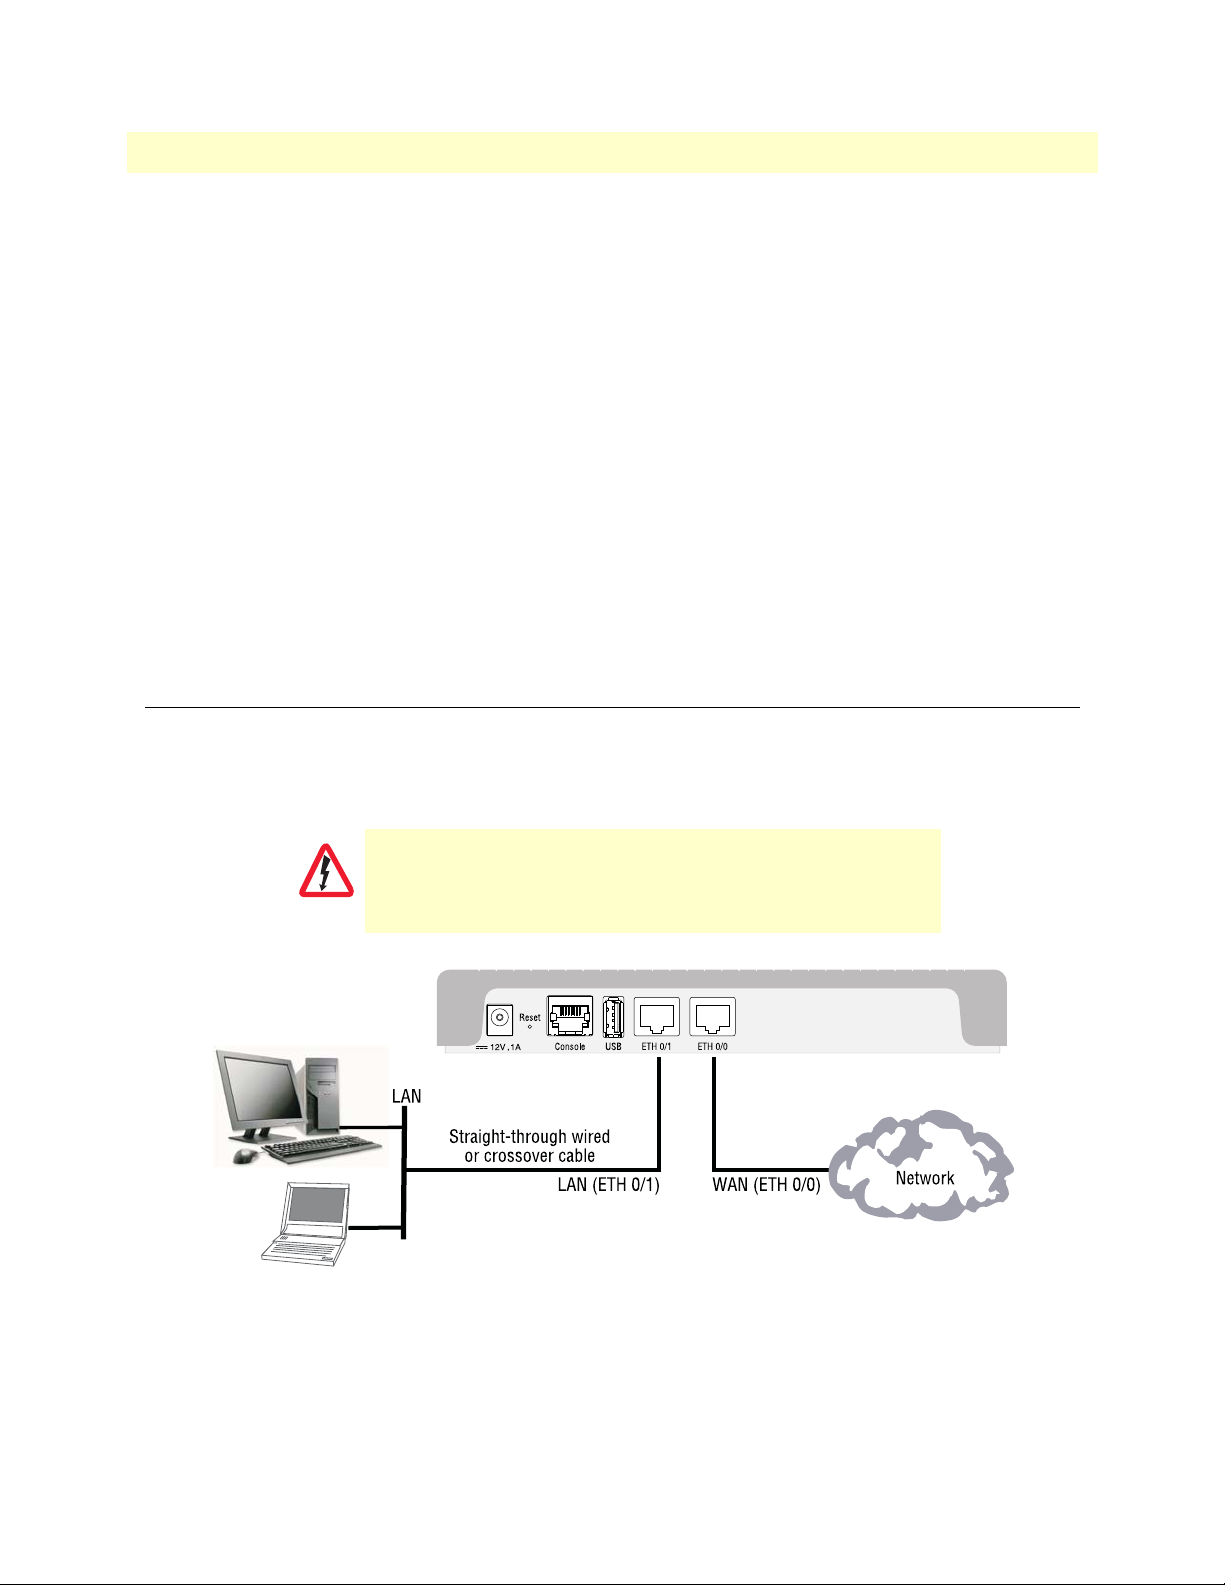
In general, the SmartNode will connect to the network via the WAN ( ETH 0/0) port. This enables the SmartNode to offer routing services to the PC hosts on LAN (ETH 0/1) port. The SmartNode 5501 is equipped with
Auto-MDX Ethernet ports, so you can use straight through or crossover cables for host or hub/switch connec
tions. (see figure 7).
-
CAUTION
The interconnecting cables shall be acceptable for external use
and shall be rated for the proper application with respect to volt
age, current, anticipated temperature, flammability, and
mechanical serviceability.
Figure 7. Connecting the SmartNode to the network
-
Connecting the SmartNode to the Network 29
Page 30

SmartNode 5501 User Manual 4 • Initial Configuration
You can check the connection with the ping command from the SmartNode to another host on the network.
172.16.1.99(if-ip)[WAN]#ping <IP Address of the host>
Note If the WAN address is not set to DHCP, to ping a device outside your local
LAN you must first configure the default gateway. (For information on con
figuring the default gateway, refer to section “Set IP addresses” in the Trinity
Software Configuration Guide.)
Note Connecting both ethernet ports to the same switch will only work if the
switch has separate ARP tables for each connection.
Loading the Configuration (optional)
Patton provides a collection of configuration templates on the support page at:
http://www.patton.com/support/kb.asp —one of which may be similar enough to your application that you
can use it to speed up configuring the SmartNode. Simply download the configuration note that matches your
application to your PC. Adapt the configuration as described in the configuration note to your network
(remember to modify the IP address) and copy the modified configuration to a TFTP server. The SmartNode
can now load its configuration from this server.
Note If your application is unique and not covered by any of Patton’s configura-
tion templates, you can manually configure the SmartNode instead of loading a configuration file template. In that case, refer to the SmartNode Series
Trinity Configuration Guide for information on configuring the SmartNode
device.
In this example we assume the TFTP server on the host with the IP address 172.16.1.11 and the configuration
named SN.cfg in the root directory of the TFTP server.
172.16.1.99(if-ip)[WAN]#copy tftp://172.16.1.11/sn.cfg startup-config
172.16.1.99(if-ip)[WAN]#
After the SmartNode has been rebooted the new startup configuration will be activated.
172.16.1.99(if-ip)[WAN]#reload
Press ‘yes’ to restart, ‘no’ to cancel :yes
The system is going down NOW
Additional Information
For detailed information about configuring and operating guidance, set up procedures, and troubleshooting,
refer to the Trinity Software Configuration Guide available online at www.patton.com/manuals.
Loading the Configuration (optional) 30
Page 31

Chapter 5 Contacting Patton for Assistance
Chapter contents
Introduction..........................................................................................................................................................32
Contact information..............................................................................................................................................32
Contacting Patton Technical Services for Free Support ...................................................................................32
Warranty Service and Returned Merchandise Authorizations (RMAs)...................................................................32
Warranty coverage ..........................................................................................................................................32
Out-of-warranty service .............................................................................................................................33
Returns for credit ......................................................................................................................................33
Return for credit policy .............................................................................................................................33
RMA numbers ................................................................................................................................................33
Shipping instructions ................................................................................................................................33
31
Page 32
SmartNode 5501 User Manual 5 • Contacting Patton for Assistance
Introduction
This chapter contains the following information:
• “Contact information”—describes how to contact Patton technical support for assistance.
• “Warranty Service and Returned Merchandise Authorizations (RMAs)”—contains information about the
warranty and obtaining a return merchandise authorization (RMA).
Contact information
Patton Electronics offers a wide array of free technical services. If you have questions about any of our other
products we recommend you begin your search for answers by using our technical knowledge base. Here, we
have gathered together many of the more commonly asked questions and compiled them into a searchable
database to help you quickly solve your problems.
Contacting Patton Technical Services for Free Support
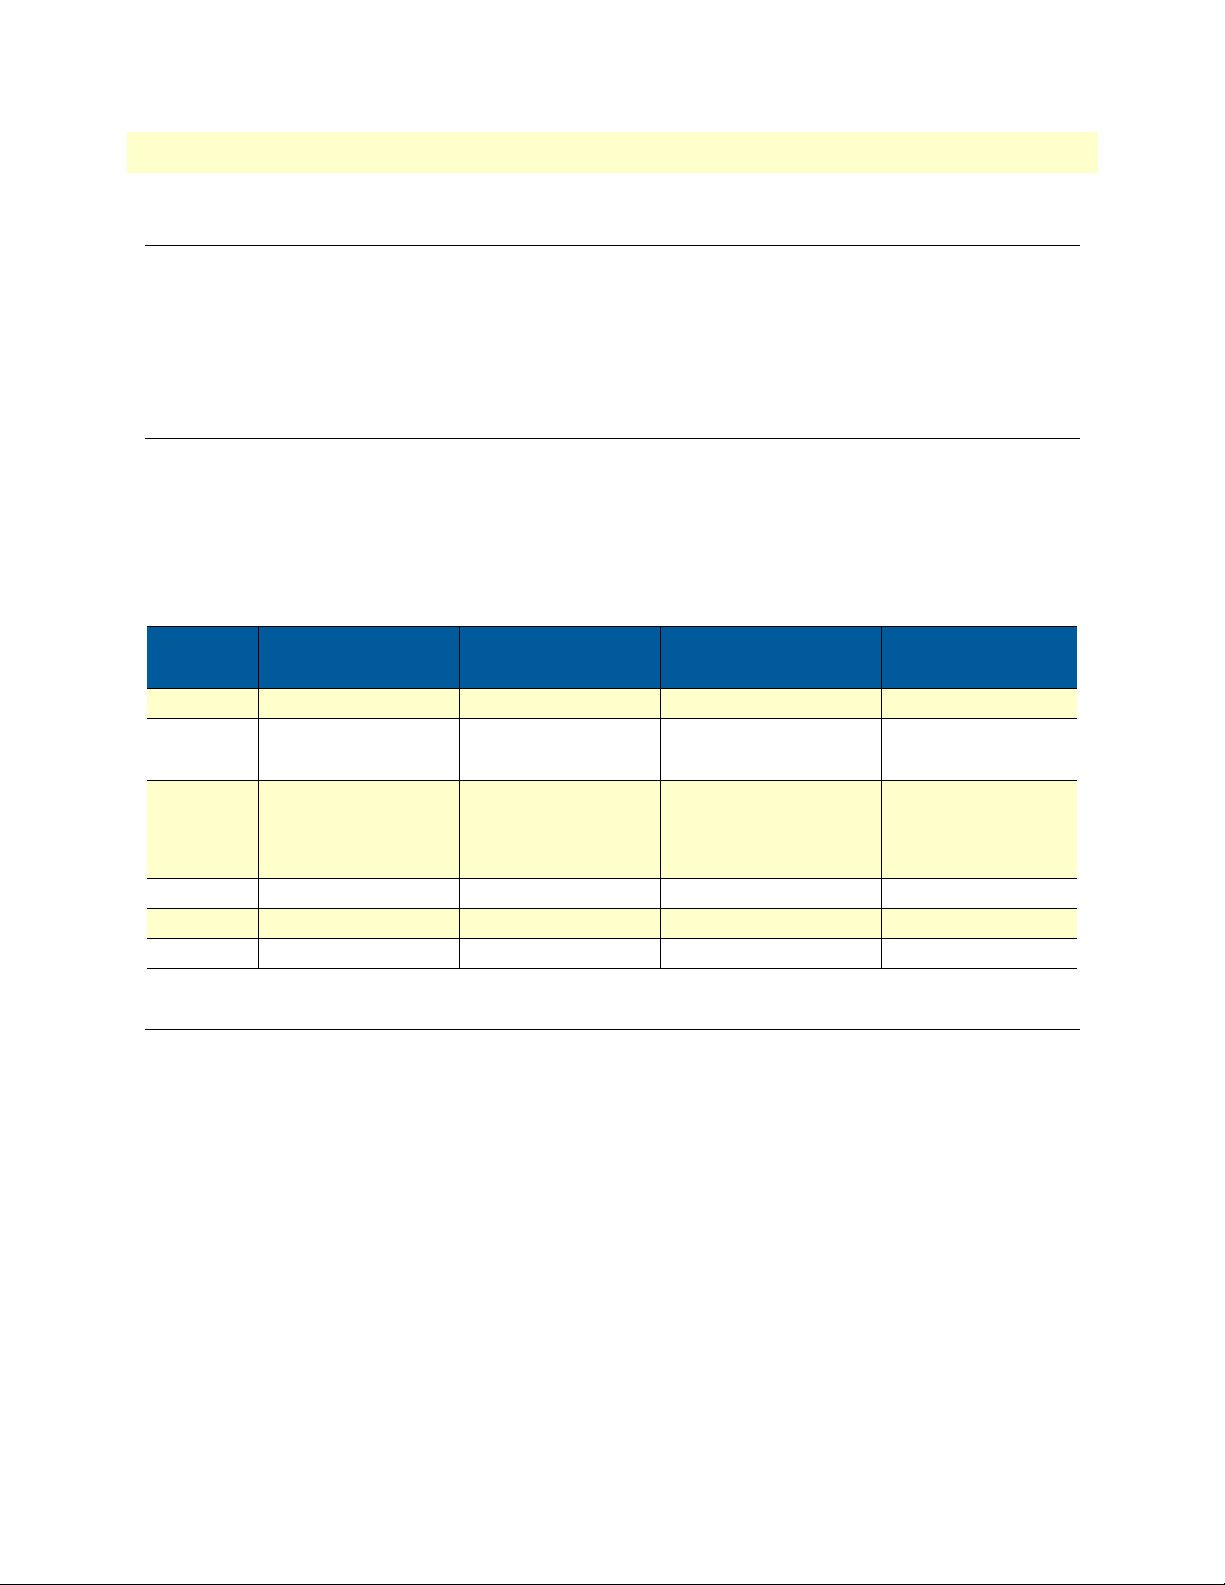
REGION North America Western Europe
Location Maryland, USA Bern, Switzerland Budapest, Hungary Beirut, Lebanon
Time Zone EST/EDT
UTC/GMT - 4/5 hours
Business
Hours
Phone + 1 301 975 1007 +41 31 985 25 55 +36 439 3835 +96 1 359 1277
Fax +1 301 869 9293 +41 31 985 2526
Monday-Friday
8:00am to 5:00pm
CET/CEDT
UTC/GMT + 1/2 hours
Monday-Friday
09:00 to 12:00
13:30 to 17:30
Central & Eastern
Europe
CET/CEDT
UTC/GMT + 1/2 hours
Monday-Friday
8:30 to 17:00
Middle East North
Africa
EET/EEDT
UTC/GMT + 2/3 hours
Monday-Friday
8:00am to 5pm
Warranty Service and Returned Merchandise Authorizations (RMAs)
Patton Electronics is an ISO-9001 certified manufacturer and our products are carefully tested before shipment. All of our products are backed by a comprehensive warranty program.
Note If you purchased your equipment from a Patton Electronics reseller, ask your
reseller how you should proceed with warranty service. It is often more con
venient for you to work with your local reseller to obtain a replacement.
Patton services our products no matter how you acquired them.
-
Warranty coverage
Our products are under warranty to be free from defects, and we will, at our option, repair or replace the product should it fail within one year from the first date of shipment. Our warranty is limited to defects in workmanship or materials, and does not cover customer damage, lightning or power surge damage, abuse, or
unauthorized modification.
Introduction 32
Page 33

SmartNode 5501 User Manual 5 • Contacting Patton for Assistance
Out-of-warranty service
Patton services what we sell, no matter how you acquired it, including malfunctioning products that are no
longer under warranty. Our products have a flat fee for repairs. Units damaged by lightning or other catastro
-
phes may require replacement.
Returns for credit
Customer satisfaction is important to us, therefore any product may be returned with authorization within 30
days from the shipment date for a full credit of the purchase price. If you have ordered the wrong equipment or
you are dissatisfied in any way, please contact us to request an RMA number to accept your return. Patton is
not responsible for equipment returned without a Return Authorization.
Return for credit policy
• Less than 30 days: No Charge. Your credit will be issued upon receipt and inspection of the equipment.
• 30 to 60 days: We will add a 20% restocking charge (crediting your account with 80% of the purchase price).
• Over 60 days: Products will be accepted for repairs only.
RMA numbers
RMA numbers are required for all product returns. You can obtain an RMA by doing one of the following:
• Completing a request on the RMA Request page in the Support section at www.patton.com
• By calling +1 (301) 975-1007 and speaking to a Technical Support Engineer
• By sending an e-mail to [email protected]
All returned units must have the RMA number clearly visible on the outside of the shipping container. Please use
the original packing material that the device came in or pack the unit securely to avoid damage during shipping.
Shipping instructions
The RMA number should be clearly visible on the address label. Our shipping address is as follows:
Patton Electronics Company
RMA#: xxxx
7622 Rickenbacker Dr.
Gaithersburg, MD 20879-4773 USA
Patton will ship the equipment back to you in the same manner you ship it to us. Patton will pay the return
shipping costs.
Warranty Service and Returned Merchandise Authorizations (RMAs) 33
Page 34

Appendix A Compliance Information
Chapter contents
Compliance ...........................................................................................................................................................35
EMC ...............................................................................................................................................................35
Safety ..............................................................................................................................................................35
Radio and TV Interference (FCC Part 15) ............................................................................................................35
EC Declaration of Conformity ..............................................................................................................................35
Authorized European Representative .....................................................................................................................35
34
Page 35

SmartNode 5501 User Manual A • Compliance Information
Compliance
EMC
• FCC Part 15, Class A
• EN55032, Class A
• EN55024
Safety
• UL 62368-1/CSA C22.2 N0. 62368-1
• IEC/62368-1
• AS/NZS 62368-1
Radio and TV Interference (FCC Part 15)
This equipment generates and uses radio frequency energy, and if not installed and used properly—that is, in
strict accordance with the manufacturer's instructions—may cause interference to radio and television recep
tion. This equipment has been tested and found to comply with the limits for a Class A computing device in
accordance with the specifications in Subpart B of Part 15 of FCC rules, which are designed to provide reason
able protection from such interference in a commercial installation. However, there is no guarantee that interference will not occur in a particular installation. If the equipment causes interference to radio or television
reception, which can be determined by disconnecting the cables, try to correct the interference by one or more
of the following measures: moving the computing equipment away from the receiver, re-orienting the receiving
antenna, and/or plugging the receiving equipment into a different AC outlet (such that the computing equip
ment and receiver are on different branches).
-
-
-
EC Declaration of Conformity
We certify that the apparatus identified above conforms to the requirements of Council Directive 2014/30/EU
on the approximation of the laws of the member states relating to electromagnetic compatibility; Council
Directive 2014/35/EU on the approximation of the laws of the member states relating to electrical equipment
designed for use within certain voltage limits; Council Directive 2011/65/EU as modified by Council Directive
2015/863/EU on the approximation of the laws of the member states relating to RoHS and REACH compli
ance; and Council Directive 2009/125/EC establishing a framework for the setting of ecodesign requirements
for energy-related products.
-
Authorized European Representative
Martin Green
European Compliance Services Limited
Milestone house
Longcot Road
Shrivenham
SN6 8AL, UK
Compliance 35
Page 36

Appendix B Specifications
Chapter contents
DSP.......................................................................................................................................................................37
Data Connectivity .................................................................................................................................................37
Voice Processing (signalling dependent) ................................................................................................................37
Fax and modem support........................................................................................................................................37
Voice Signalling.....................................................................................................................................................37
Voice Routing—Session Controller.......................................................................................................................38
IP Services .............................................................................................................................................................38
Management .........................................................................................................................................................38
System...................................................................................................................................................................39
Physical .................................................................................................................................................................39
36
Page 37

SmartNode 5501 User Manual B • Specifications
Note Refer to the software feature matrix for the most up-to-date specifications.
DSP
One or two 16-channel DSPs (depending on model)
Data Connectivity
Two 10/100/1000Base-TX Ethernet ports
All ports full duplex, autosensing, auto-MDX
Voice Processing (signalling dependent)
8 or 16 full-duplex SIP Calls with transcoding:
• G.711 A-Law/-Law (64 kbps)
• G.722 (64 kbps)
• G.726 (ADPCM 16,24,32,40 kbps)
• G.723.1 (5.3 or 6.3 kbps)
• G.729ab (8kbps)
• Transparent ISDN data
G.168 echo cancellation (128ms)
DTMF detection and generation
Carrier tone detection and generation
Silence suppression and comfort noise
Adaptive and configurable dejitter buffer
Configurable tones (dial, ringing, busy, etc.)
Configurable transmit packet length
RTP/RTCP (RFC 1889)
SRTP (RFC 3711)
Fax and modem support
Automatic fax and modem detection
Codec fallback for modem-bypass
T.38 Fax-Relay (Gr. 3 Fax, 9.6 k, 14.4 K)
G.711 Fax-Bypass
Voi ce Sig nalli ng
SIPv2, SIPv2 over TLS
SIP call transfer, redirect
DSP 37
Page 38

SmartNode 5501 User Manual B • Specifications
Overlap or en-bloc dialing
DTMF in-band, out-of-band
Configurable progress tones
Voice Routing—Session Controller
Local switching (hairpinning)
Least cost routing
Interface huntgroups
Call-Distribution groups
Number blocking
Call Routing Criteria:
• Interface
• Calling/called party number
• Time of day, day of week, date
• Wildcard and regular expression matching
Regular expression number manipulation functions:
• Replace numbers
• Add/remove digits
• Pattern matching and replacement
IP Services
IPv4 router; IPv6 basic functionalities
Programmable static routes and policy-routing
ICMP redirect (RFC 792); Packet fragmentation
DiffServe/ToS set or queue per header bits
Packet Policing discards excess traffic
DHCP client and server
DNS client and relay-server, DynDNS
Management
Web-based GUI; Trinity WEB Wizard
Industry standard CLI with remote Telnet and SSH access, fully documented
TR-069 for configuration & firmware provisioning through auto-configuration server (ACS)
Radius, TACACS+
HTTP web management and firmware loading
Voice Routing—Session Controller 38
Page 39

SmartNode 5501 User Manual B • Specifications
TFTP configuration & firmware loading
HTTPS configuration & firmware provisioning
SNMP v1 agent (MIB II and private MIB)
Built-in diagnostic tools (trace, debug)
Secure Auto-provisioning
System
Dual Core CPU Broadcom BCM53012 operating at 1GHz
Memory:
• 256 Mbytes DRAM
• 128 Mbytes Flash
Physical
Dimensions: 8.2 x 1.3H x 6.5D inch (20.8W X 3.4H x 16.5D cm)
Weight: <15.9 oz. (<450 g)
Power Consumption: <10W
Operating Temperature: 32–104°F (0–40°C)
Operating Humidity: up to 90%, non condensing
System 39
Page 40

Appendix C Cabling
Chapter contents
Introduction..........................................................................................................................................................41
Serial Console........................................................................................................................................................41
Ethernet ................................................................................................................................................................42
40
Page 41
SmartNode 5501 User Manual C • Cabling
Introduction
This section provides information on the cables used to connect the SmartNode to the existing network infrastructure and to third party products.
Serial Console
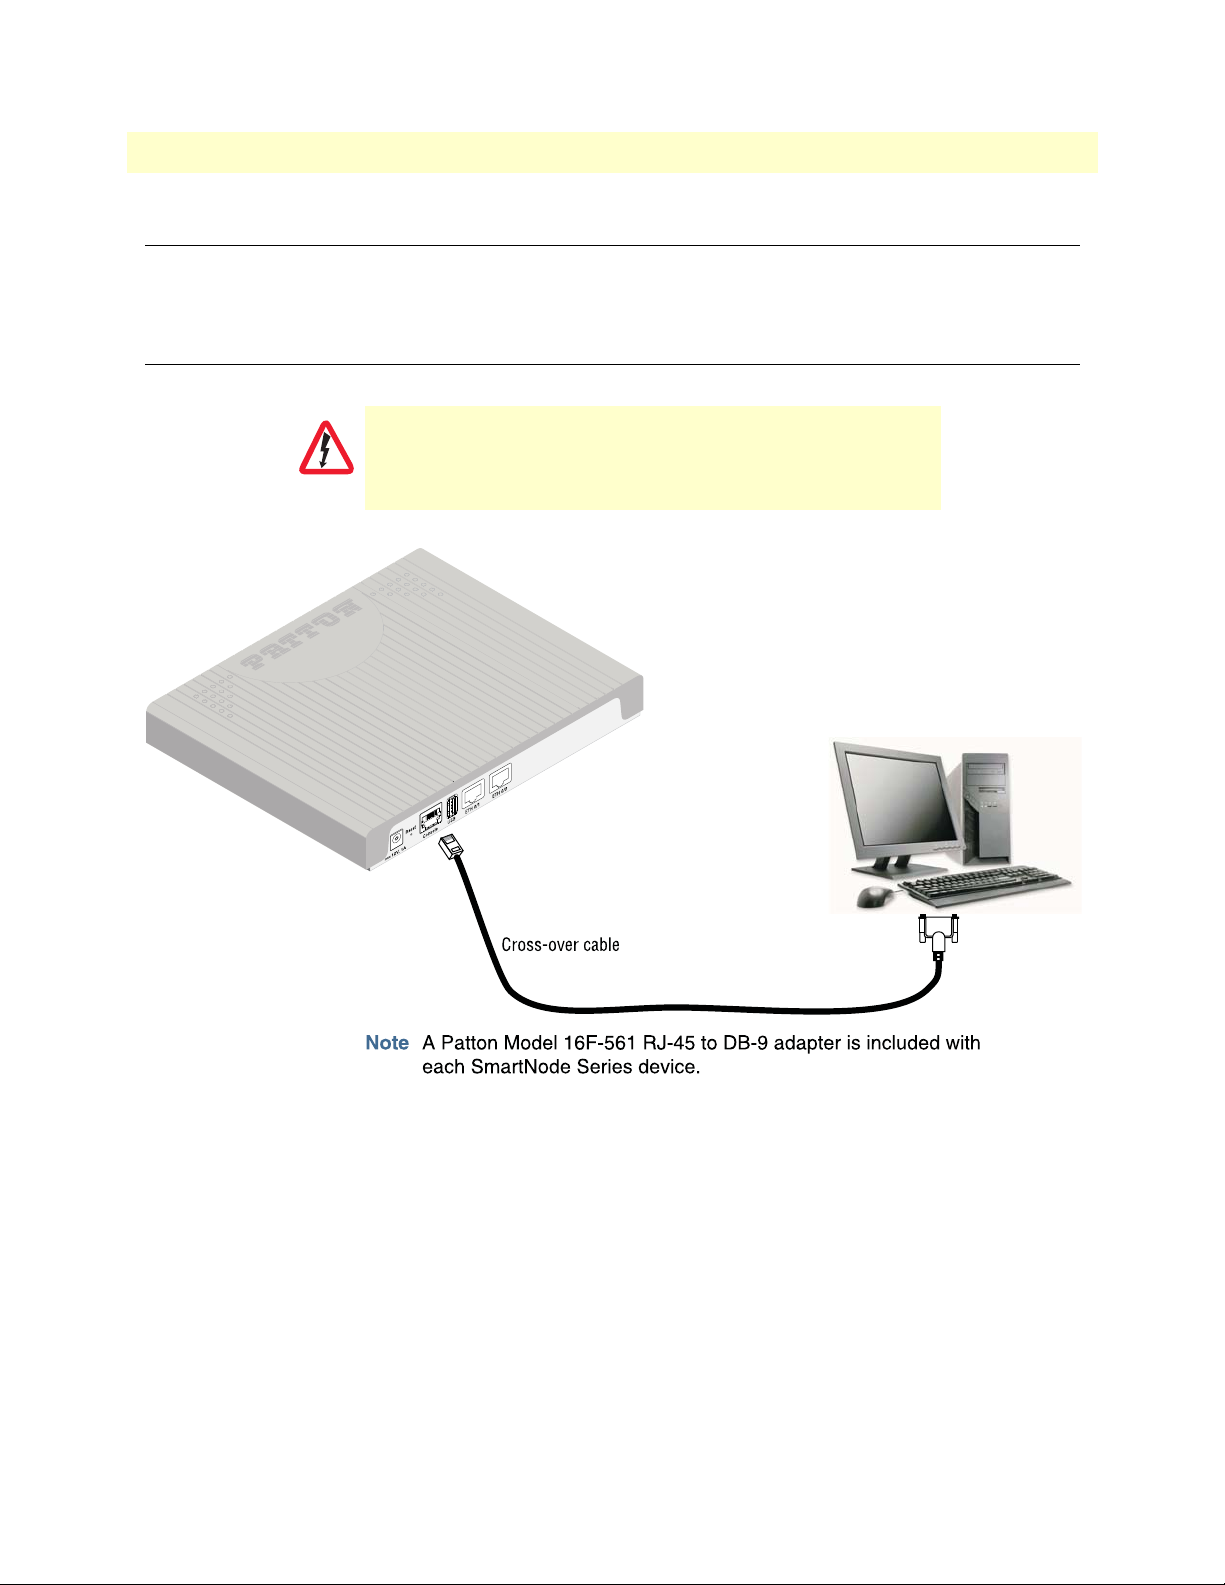
The SmartNode can be connected to a serial terminal over its serial console port, as depicted in figure 8.
The interconnecting cables shall be acceptable for external use
CAUTION
and shall be rated for the proper application with respect to volt
age, current, anticipated temperature, flammability, and
mechanical serviceabilty.
-
Figure 8. Connecting a serial terminal
Console Connection settings:
• 19200 Bps
• 8bits, no parity
• 1stop bit
• flow control off
Note See section “Console port” on page 45 for console port pin-outs.
Introduction 41
Page 42
SmartNode 5501 User Manual C • Cabling
Ethernet
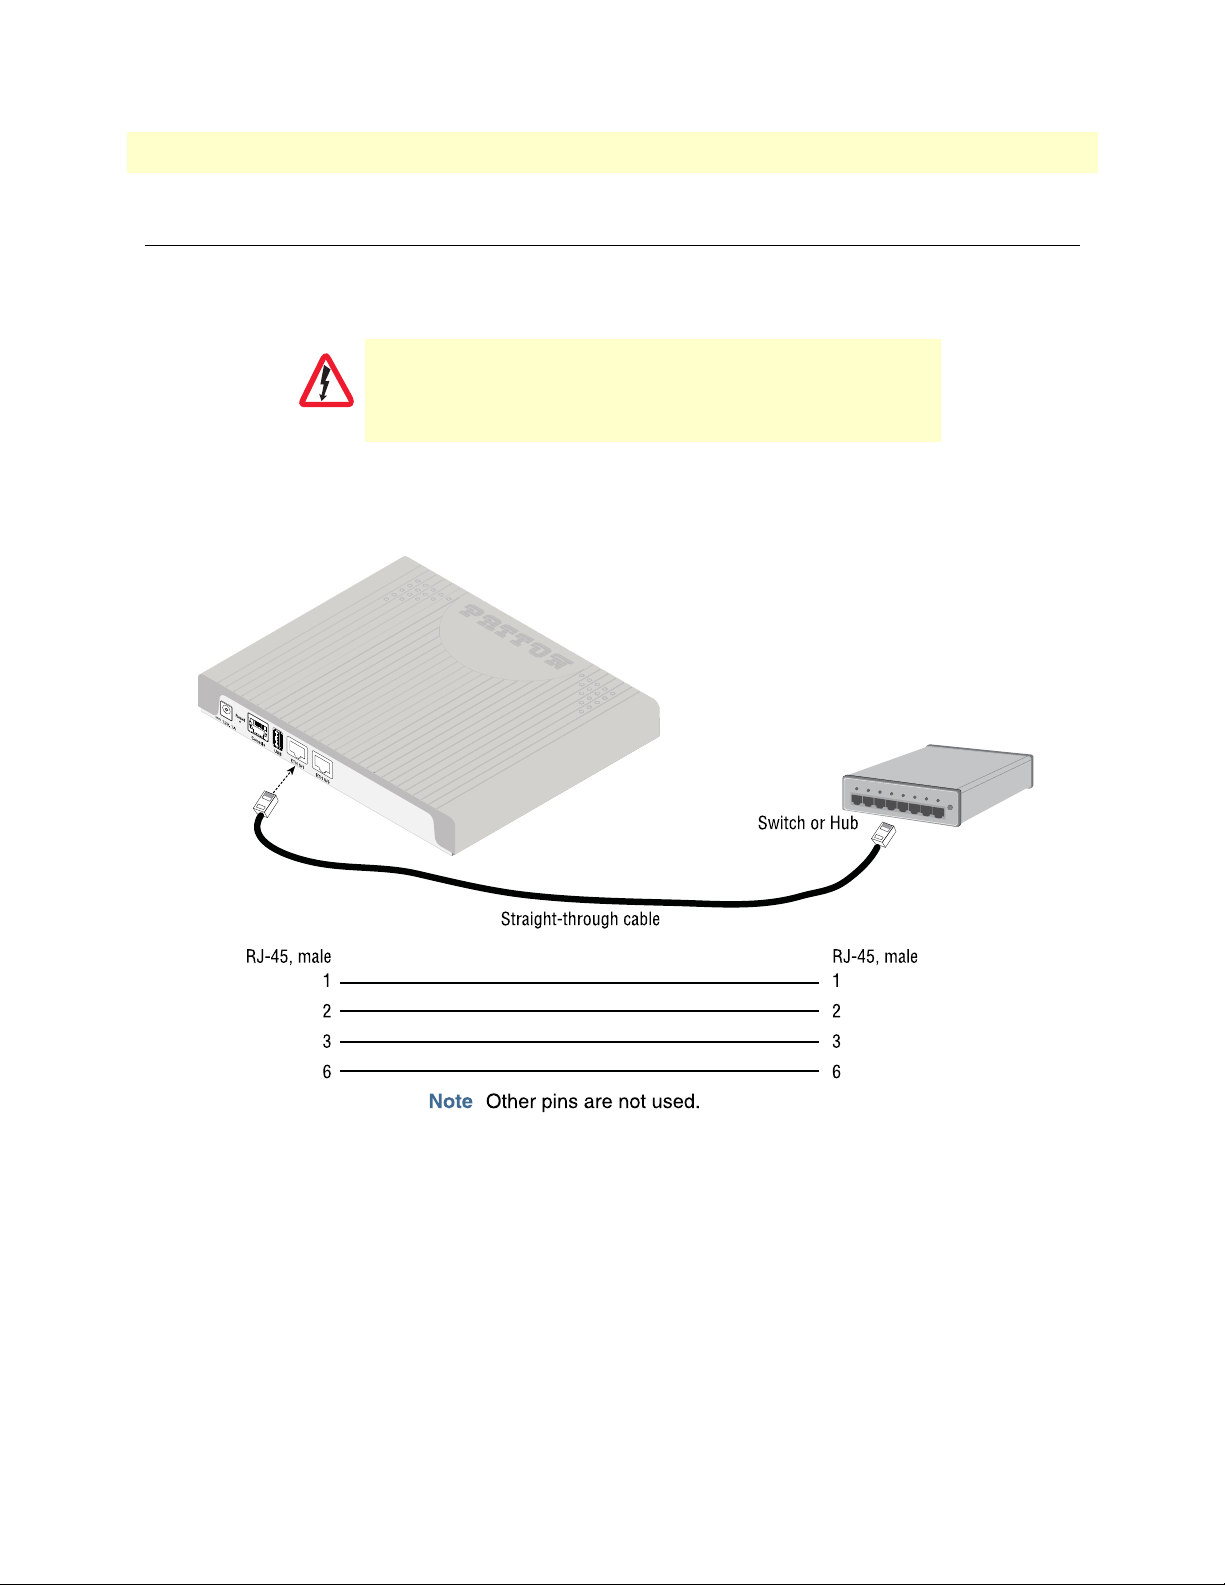
Ethernet devices (10/100/1000 Base-T) are connected to the SmartNode over a cable with RJ-45 plugs. All
Ethernet ports on the SN5501 are Auto-MDX. Use any straight or crossover cable to a host, hubs, switches,
PCs or other devices.
The interconnecting cables shall be acceptable for external use
an shall be rated for the proper application with respect to volt
age, current, anticipated temperature, flammability, and
CAUTION
Note Connecting both Ethernet ports to the same switch will only work is the
mechanical serviceability.
switch has separate ARP table for each connection.
-
Figure 9. Typical Ethernet straight-through cable diagram for 10/100Base-T
Ethernet 42
Page 43

SmartNode 5501 User Manual C • Cabling
Figure 10. Typical Ethernet straight-through cable diagram for 1000Base-T
Ethernet 43
Page 44

Appendix D Port pin-outs
Chapter contents
Introduction..........................................................................................................................................................45
Console port..........................................................................................................................................................45
Ethernet ...............................................................................................................................................................45
44
Page 45
SmartNode 5501 User Manual D • Port pin-outs
Introduction
This section provides pin-out information for the ports of the SmartNode.
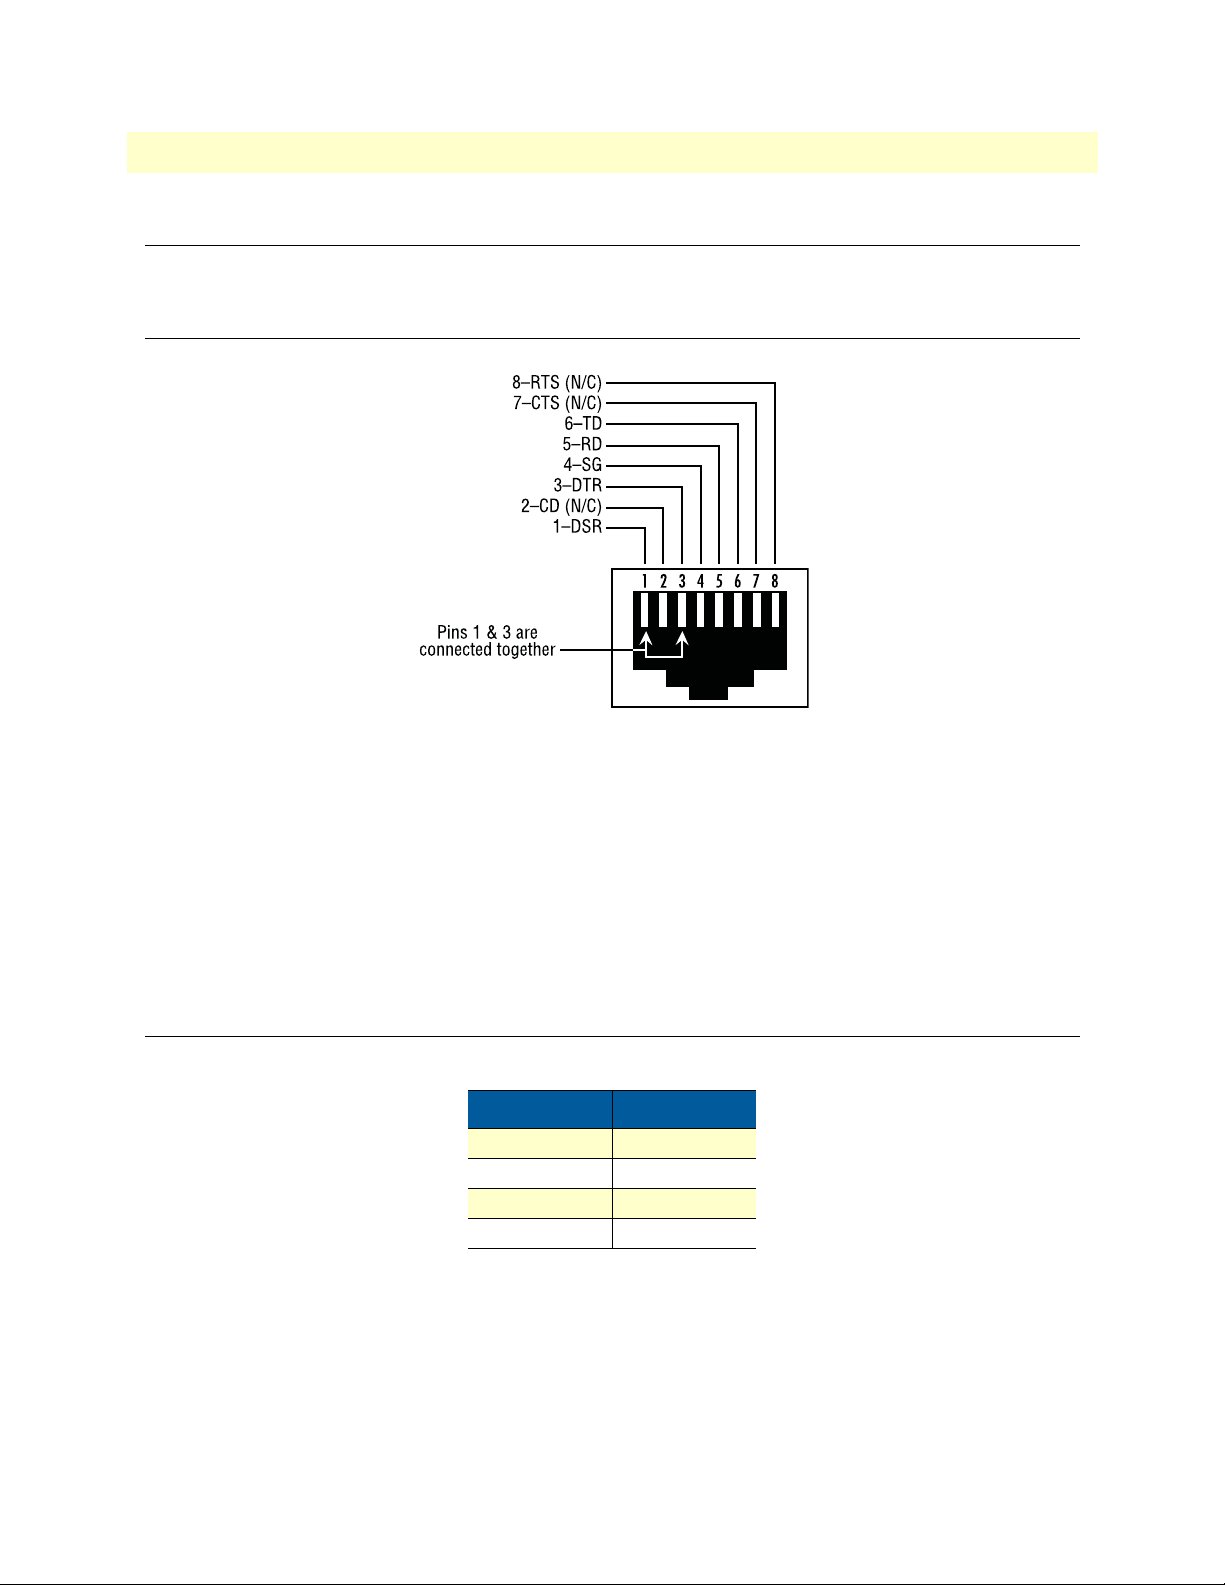
Console port
Note N/C means no internal electrical connection.
Ethernet
Note Pins not listed are not used.
Figure 11. EIA-561 (RJ-45 8-pin) port
Console Connection Settings:
• 19200bps
• 8 bits, no parity
• 1 stop bit
• flow control off
Table 6. 10/100 Base-T RJ-45 socket
Pin Signal
1 TX+
2 TX3 RX+
6 RX-
Introduction 45
Page 46

SmartNode 5501 User Manual D • Port pin-outs
Table 7. 1000Base-T RJ-45 Socket
Pin Signal
1 TRD0+
2 TRD03 TRD1+
4 TRD15 TRD2+
6 TRD27 TRD3+
8 TRD3-
Ethernet 46
Page 47

Appendix E SmartNode 5501 Factory
Configuration
Chapter contents
Introduction..........................................................................................................................................................48
47
Page 48

SmartNode 5501 User Manual E • SmartNode 5501 Factory Configuration
Introduction
The factory configuration settings for SmartNode 5501 can be obtained with the following command through
the CLI;
login: admin
password: <Enter>
192.168.1.1>show config:shipping-config
Refer to Chapter 4, "Initial Configuration" on page 26 for more details about IP address settings for initial
configuration.
Introduction 48
Page 49

Appendix F Reset Button Functions
Chapter contents
Introduction..........................................................................................................................................................50
Resetting the SmartNode device when it is operating and the Power LED is lit.....................................................50
Resetting the SmartNode device when it is initially powered off............................................................................51
Very exceptional case—minimal config recovery .............................................................................................51
49
Page 50
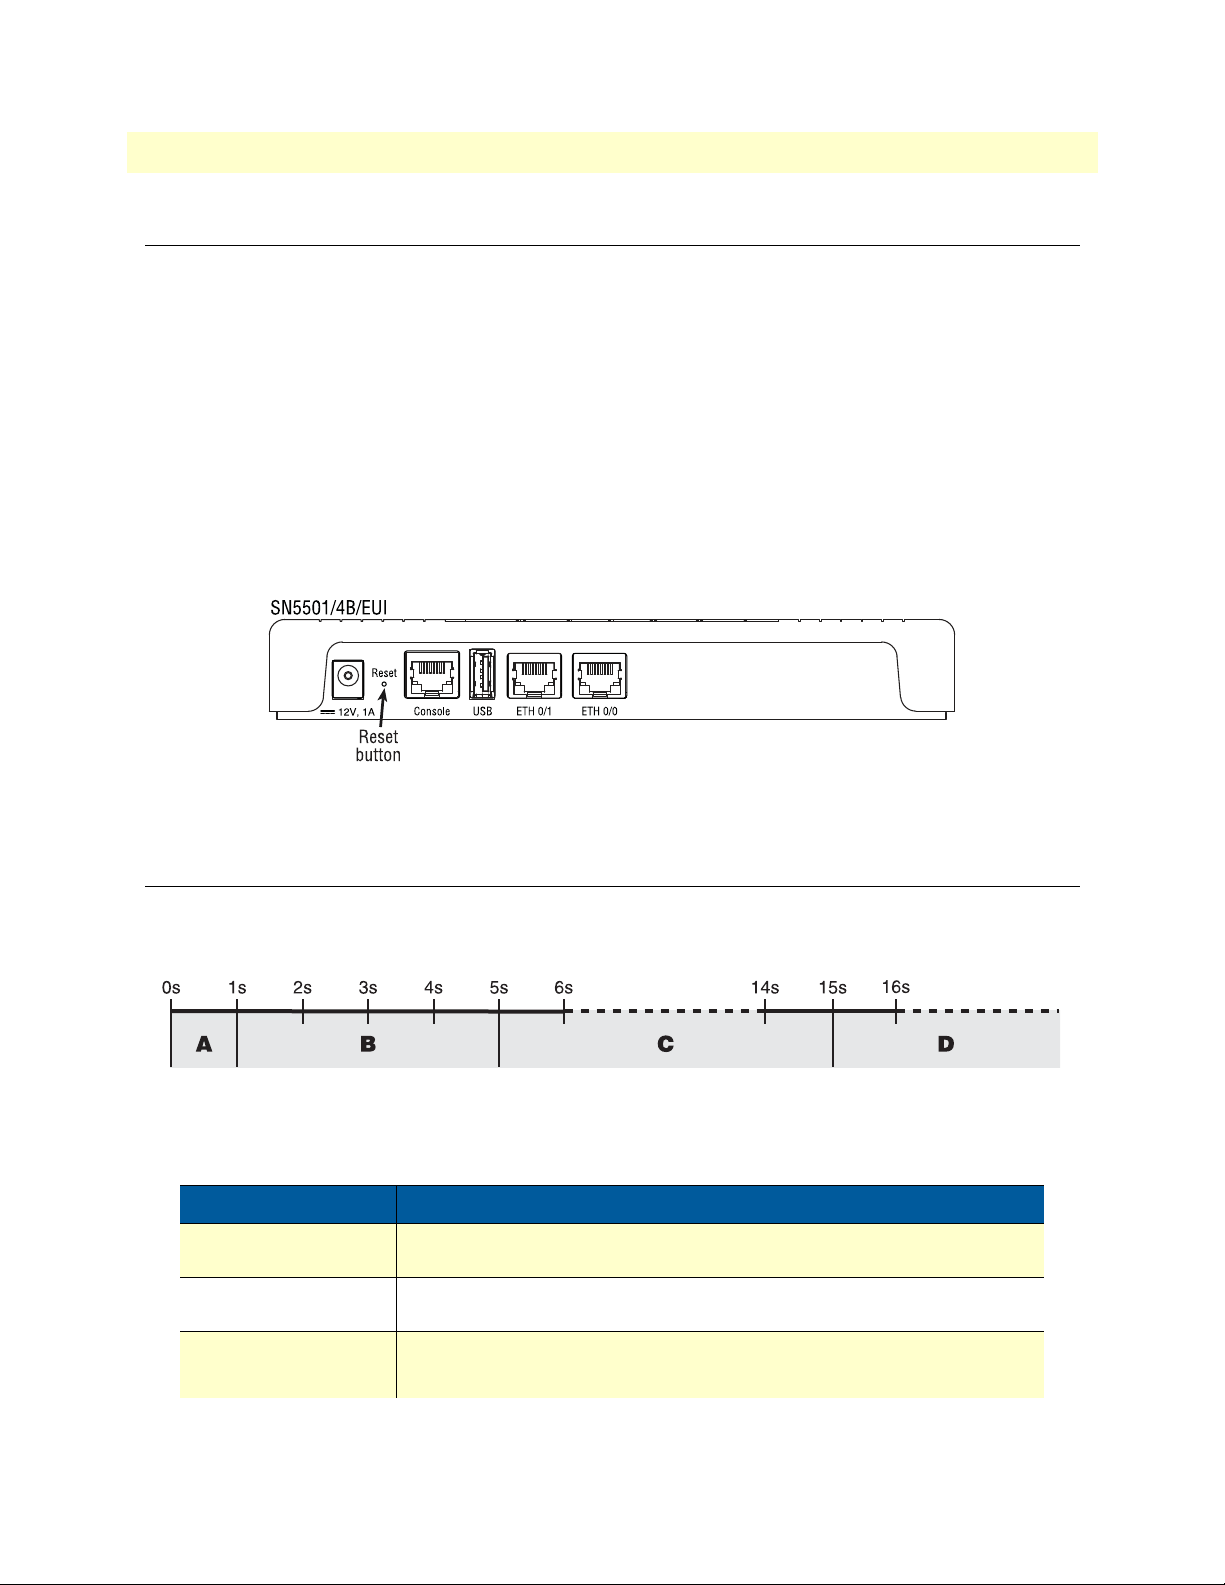
SmartNode 5501 User Manual F • Reset Button Functions
Introduction
The Reset button (see figure 12) is used to do the following:
• Reboot the SmartNode device (see section “Resetting the SmartNode device when it is operating and the
Power LED is lit” on page 50)
• Erase the startup-config settings, which is followed by a SmartNode device reboot as indicated by the slow
blinking of all LEDs (see section
is lit” on page 50)
• Factory reset, which is followed by a device reboot as indicated by the fast blinking of all LEDs (see section
“Resetting the SmartNode device when it is operating and the Power LED is lit” on page 50)
• Troubleshoot the SmartNode device if it is not booting properly (see section “Resetting the SmartNode device
when it is initially powered off” on page 51)
“Resetting the SmartNode device when it is operating and the Power LED
Figure 12. SN5500 Reset button
Resetting the SmartNode device when it is operating and the Power LED
is lit
The Reset button has the following behaviors depending on how many seconds (see figure 13) the button is
pressed (see table 8 on page 50 for the results from pressing the button).
Figure 13. Reset button periods (in seconds) for performing actions
Table 8. Results from pressing the Reset button
Period Action
A
(less than 1 second)
B
(1 to 4 seconds)
C
(5 to 14 seconds)
Reboot device
No action
• Erase startup-config
• Reboot (indicated by the slow blinking of all LEDs
Introduction 50
Page 51
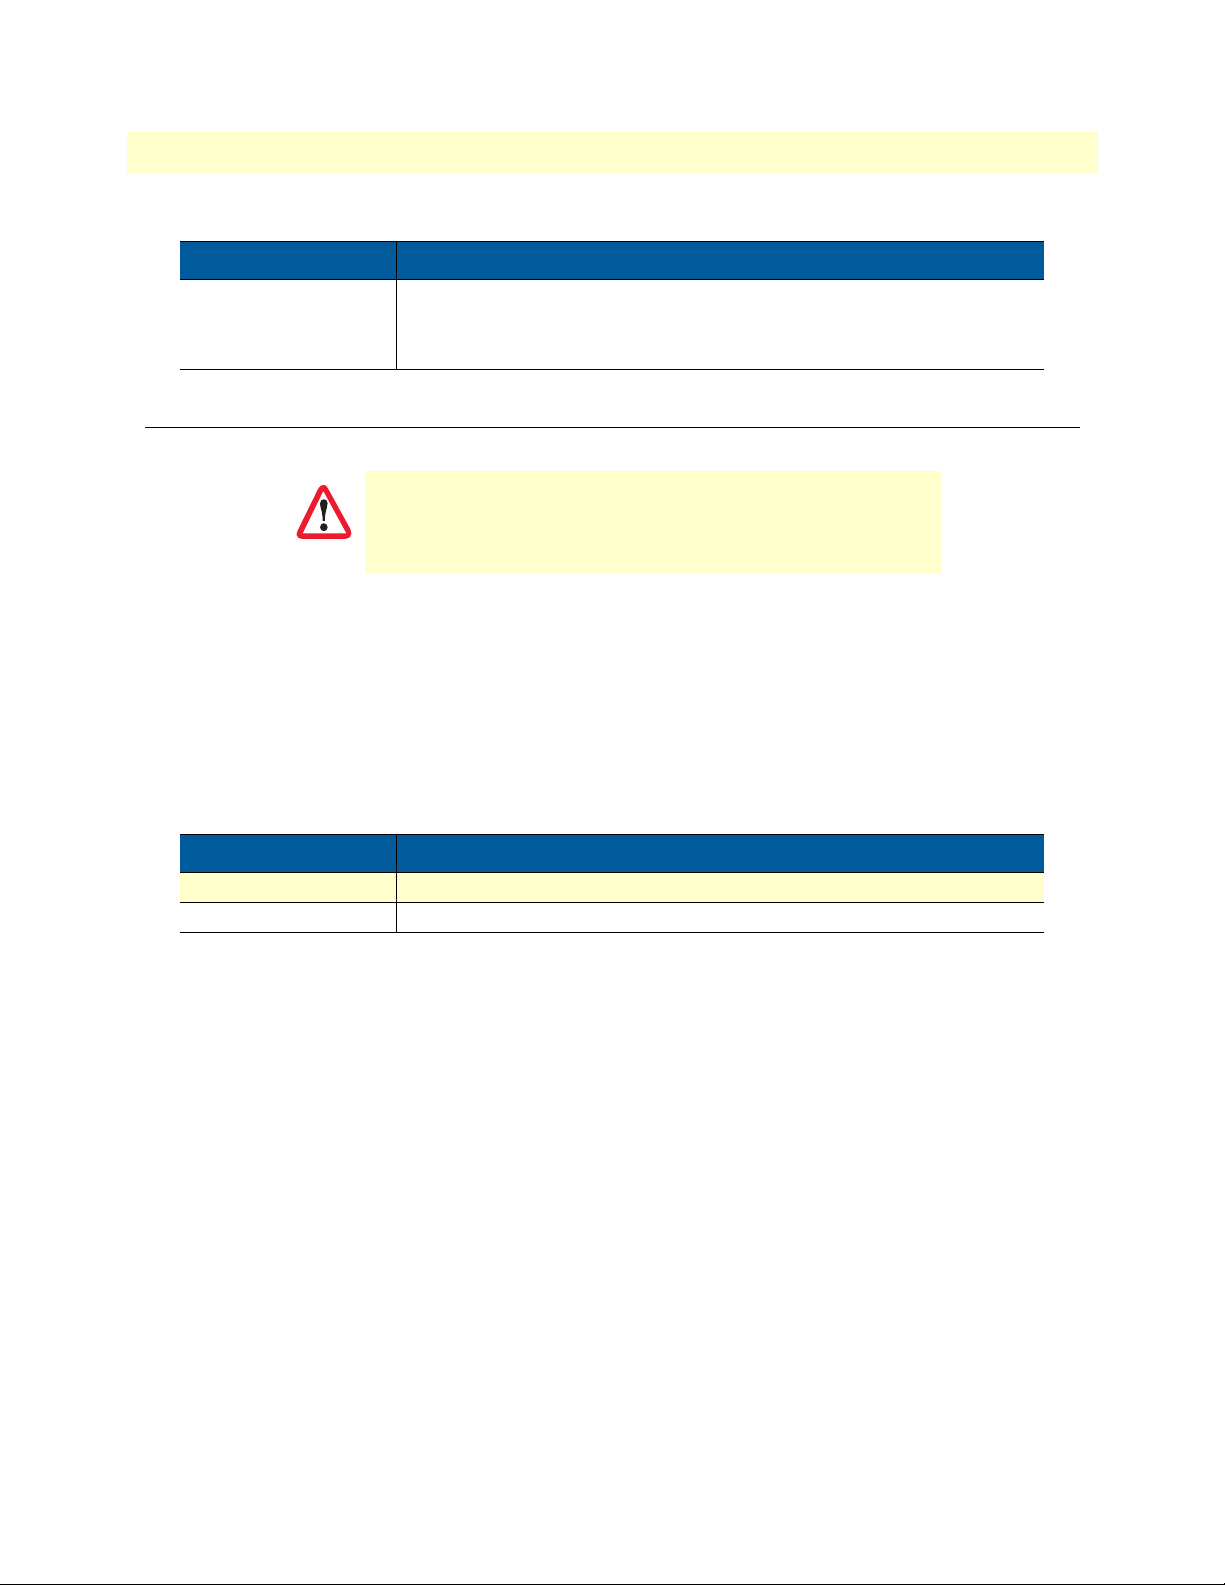
SmartNode 5501 User Manual F • Reset Button Functions
Table 8. Results from pressing the Reset button (Continued)
Period Action
D
(15 to 20 seconds)
• Factory reset which erases entire flash memory except for shipping-
config, shipping wizards, default root CAs and software licenses
• Reboot (indicated by fast blinking of all LEDs)
Resetting the SmartNode device when it is initially powered off
This procedure should only be performed if the SmartNode
device is not booting properly. It should used by trained Smart
Node technicians and Patton Support personnel only.
CAUTION
If the SmartNode device is not booting properly, the Reset button may remedy the problem by switching to the
backup image.
The following procedure must be performed starting with the SmartNode device in a powered off state:
1. While pressing and holding the Reset button, apply power to the SmartNode device. The Power LED
flashes quickly for 2 seconds, during which time the Reset button must remain pressed.
-
2. The Power LED will begin a series of blink pattern starting with 1-blink, pause (see table 9).
Table 9. Using the Reset button to switch to a backup image
LED Blink Pattern Action
1-blink, pause Boot normally
2-blinks, pause Switch to backup image, then Boot normally
3. Repeatedly pressing and releasing the Reset button will cycle through the blink patterns.
4. When you get to the 2-blink pattern that will switch to backup image, release the Reset button. 10 seconds
later, the device will switch to the backup image, then boot normally.
If the SmartNode device is still not working properly, see section “Very exceptional case—minimal config
recovery”.
Very exceptional case—minimal config recovery
If, after performing the procedure in section “Resetting the SmartNode device when it is initially powered off”
on page 51, the SmartNode device is still not operational, the following may remedy the problem by erasing
the entire contents of flash memory (no exceptions). However it is recommended that in such a case the device
be sent to Patton for analysis and repair. See section
“Warranty Service and Returned Merchandise Authoriza-
tions (RMAs)” on page 37 for details.
Resetting the SmartNode device when it is initially powered off 51
Page 52
SmartNode 5501 User Manual F • Reset Button Functions
IMPORTANT
The following procedure is NOT standard and is NOT to be used
to perform a factory reset. It should ONLY be used as a last
resort for a minimal recovery of the device when it is in an unde
fined state, and if the instructions in section “Resetting the Smart-
-
Node device when it is initially powered off” on page 51 did not
provide a remedy.
Performing the following procedure will result in loss of all data,
including the shipping-config, software licenses, Wizards,
backup-configs, etc. The device will have to be manually set up
CAUTION
afterward.
Do the following:
1. While pressing and holding the Reset button, apply power to the SmartNode device. The Power LED
flashes quickly for 2 seconds, during which time the Reset button must remain pressed.
2. The Power LED will begin a series of blink pattern starting with 1-blink, pause.
Table 10. Using the Reset button to switch to erase flash memory
LED Blink Pattern Action
3-blinks, pause Erase entire contents of flash memory (no exceptions), then boot.
Note Erasing flash memory also deletes previously pur-
chased and loaded software license keys.
3. Repeatedly pressing and releasing the Reset button will cycle through the blink patterns.
4. When you get to the 3-blink pattern that will erase the entire flash memory (see table 10), release the Reset
button. 10 seconds later, flash memory will be erased, then the device will boot.
Resetting the SmartNode device when it is initially powered off 52
Page 53

Appendix G End User License Agreement
Chapter contents
End User License Agreement .................................................................................................................................54
1. Definitions ..................................................................................................................................................54
2. Title ............................................................................................................................................................54
3. Term ...........................................................................................................................................................54
4. Grant of License ..........................................................................................................................................54
5. Warranty ....................................................................................................................................................55
6. Termination ................................................................................................................................................55
7. Notices .......................................................................................................................................................55
8. Other Licenses ............................................................................................................................................55
9. Unenforceable Provisions ............................................................................................................................56
10. Governing Law .........................................................................................................................................56
11. Waiver ......................................................................................................................................................56
53
Page 54

SmartNode 5501 User Manual G • End User License Agreement
End User License Agreement
By opening this package, operating the Designated Equipment or downloading the Program(s) electronically,
the End User agrees to the following conditions:
1. De fi ni ti o ns
A) “Effective Date” shall mean the earliest date of purchase or download of a product containing the Patton
Electronics Company Program(s) or the Program(s) themselves.
B) “Program(s)” shall mean all software, software documentation, source code, object code, or executable
code.
C) “End User” shall mean the person or organization which has valid title to the Designated Equipment.
D) “Designated Equipment” shall mean the hardware on which the Program(s) have been designed and
provided to operate by the End User.
2. Title
Title to the Program(s), all copies of the Program(s), all patent rights, copyrights, trade secrets and proprietary
information in the Program(s), worldwide, remains with Patton Electronics Company or its licensors.
Patton does not convey any intellectual property title or rights in the Licensed Products to Licensee. All
Licensed Products furnished by Patton, and all copies thereof, and compilations, programmatic extension, and
all Patches, Updates, Upgrades and Platform Releases, are and shall remain the property of Patton or Patton’s
licensors, as applicable. Further, the Licensed Products provided under this Agreement are not custom software
but are standard commercial software. Except for the license use rights otherwise expressly provided in this
Agreement, no right, title or interest in Patton Licensed Products is granted hereunder. Licensee shall not use
any proprietary information of Patton to create any computer software program or user documentation, which
is substantially similar to the Licensed Products.
3. Term
The term of this Agreement is from the Effective Date until title of the Designated Equipment is transferred by
End User or unless the license is terminated earlier as defined in section
“6. Termination” on page 55.
4. Grant of License
A) During the term of this Agreement, Patton Electronics Company grants a personal, non-transferable,
non-assignable and non-exclusive license to the End User to use the Program(s) only with the Desig
-
nated Equipment at a site owned or leased by the End User.
B) The End User may copy licensed Program(s) as necessary for backup purposes only for use with the Des-
ignated Equipment that was first purchased or used or its temporary or permanent replacement.
C) The End User is prohibited from disassembling; decompiling, reverse-engineering or otherwise attempt-
ing to discover or disclose the Program(s), source code, methods or concepts embodied in the Program(s) or having the same done by another party.
D) Should End User transfer title of the Designated Equipment to a third party after entering into this
license agreement, End User is obligated to inform the third party in writing that a separate End User
License Agreement from Patton Electronics Company is required to operate the Designated Equipment.
End User License Agreement 54
Page 55

SmartNode 5501 User Manual G • End User License Agreement
5. Warranty
The Program(s) are provided “as is” without warranty of any kind. Patton Electronics Company and its licensors disclaim all warranties, either express or implied, including but not limited to the implied warranties of
merchantability, fitness for a particular purpose or non-infringement. In no event shall Patton Electronics
Company or its licensors be liable for any damages whatsoever (including, without limitation, damages for loss
of business profits, business interruption, loss of business information, or other pecuniary loss) arising out of
the use of or inability to use the Program(s), even if Patton Electronics Company has been advised of the possi
bility of such damages. Because some states do not allow the exclusion or limitation of liability for consequential or incidental damages, the above limitation may not apply to you.
If the Program(s) are acquired by or on behalf of a unit or agency of the United States Government, the Government agrees that such Program(s) are “commercial computer software” or “computer software documentation” and that, absent a written agreement to the contrary, the Government’s rights with respect to such
Program(s) are limited by the terms of this Agreement, pursuant to Federal Acquisition Regulations 12.212(a)
and/or DEARS 227.7202-1(a) and/or sub-paragraphs (a) through (d) of the “Commercial Computer Soft
-
ware—Restricted Rights” clause at 48 C.F.R. 52.227-19 of the Federal Acquisition Regulations as applicable.
6. Termination
A) The End User may terminate this agreement by returning the Designated Equipment and destroying all
copies of the licensed Program(s).
-
B) Patton Electronics Company may terminate this Agreement should End User violate any of the provi-
sions of section “4. Grant of License” on page 54.
C) Upon termination for A or B above or the end of the Term, End User is required to destroy all copies of
the licensed Program(s)
7. N o t i c e s
Patton devices may log, collect and report data related to installed software, licenses, feature utilization, product
performance, device management, service quality and other parameters which is used for quality control, prod
uct improvement, license management, service level management and technical support. Collected data may be
reported to Patton or a service provider delivering its services connected to the device.
Patton may use this information for other business purposes, such as to alerting you to updated products or services, securing access to software updates, and assisting in order processing.
Any and all information collected by Patton or its assigns will be kept strictly confidential and will not be sold,
rented, loaned, or otherwise disclosed to any third party except as required by law.
8. Other Licenses
The Program may be subject to licenses extended by third parties. Accordingly, Patton Electronics Company
licenses the Programs subject to the terms and conditions dictated by third parties. Third party software identi
fied to the Programs includes:
• The LGPL (Lesser General Public License) open source license distributed to you pursuant to the LGPL
license terms (http://www.gnu.org/licenses/lgpl.html).
-
-
• RedBoot (Red Hat Embedded Debug and Bootstrap) embedded system debug/bootstrap environment from
Red Hat distributed to you pursuant to the eCos license terms (ecos.sourceware.org/license-overview.html)
and GNU General Public License (GPL) terms (www.gnu.org/copyleft/gpl.html). Source code is available
upon request.
End User License Agreement 55
Page 56

SmartNode 5501 User Manual G • End User License Agreement
9. Unenforceable Provisions
If any part of these terms and conditions are found to be invalid or unenforceable under applicable law, such
part will be ineffective to the extent of such invalid or unenforceable part only, without in any way affecting the
remaining parts of these terms and conditions.
10. Governing Law
The rights and obligations of the parties pursuant to these terms and conditions are governed by, and shall be
construed in accordance with, the laws of the State of Maryland, USA.
User may be subject to other local, provincial or state and national laws. User hereby irrevocably submits to the
exclusive jurisdiction of the courts of the State of Maryland, USA for any dispute arising under or relating to
this agreement and waives user’s right to institute legal proceedings in any other jurisdiction. Patton shall be
entitled to institute legal proceedings in connection with any matter arising under this agreement in any juris
diction where User resides, does business, or has assets.
11. Wa ive r
No waiver of any of the provisions of these terms and conditions will be deemed to constitute a waiver of any
other provision nor shall such a waiver constitute a continuing waiver unless otherwise expressly provided in
writing duly executed by the party to be bound thereby. Any other terms and conditions of sale, to the extent
not inconsistent herein, regarding a Patton device, program, license or service remain in full force and effect.
-
End User License Agreement 56
 Loading...