

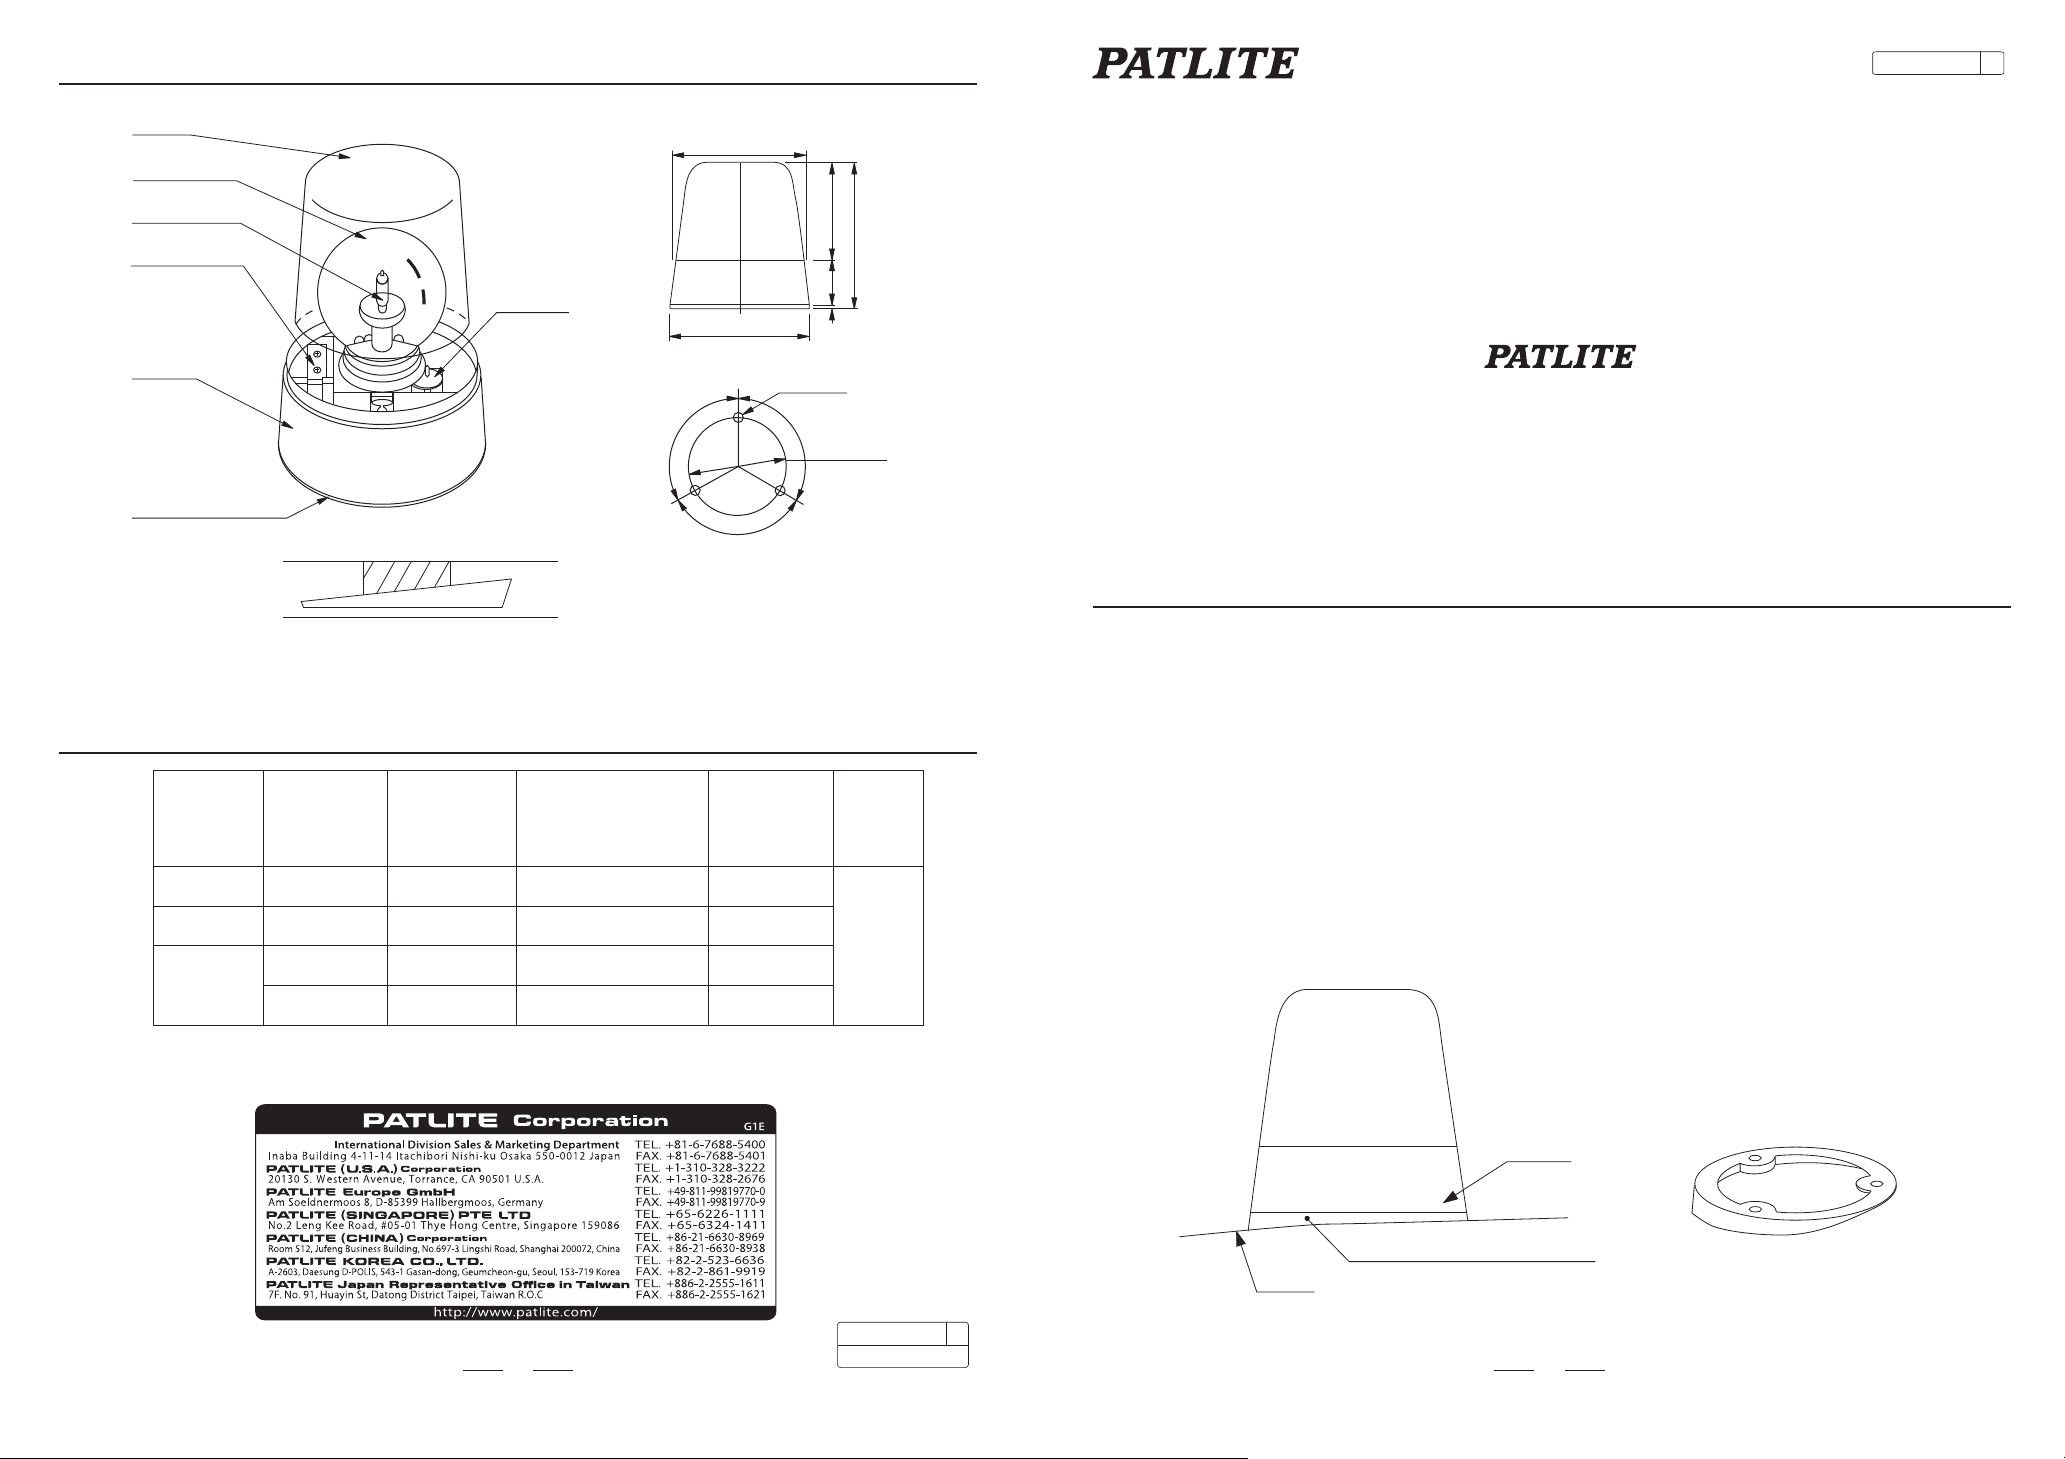
6. Assembly・Dimensions
A95100105 E
Dome
Reflector
Bulb
Terminal
Body
Sealing ring
7. Specifications
VOLTAGEMODEL CURRENT Mass
HP-12
HP-24
Motor
120°
Mounting Diagram
Lock position for dome (shaped portion)
FLASHES
PER
MINUTE
12V DC
24V DC
4.7A
2.7A
140Flashes per minute
160Flashes per minute
φ162
φ180
3-φ7
120°
120°
HALOGEN
BULB
12V 55W H1
24V 70W H1
Unit (mm)
12960
192
(3)
φ130
Rotating Warning Lights
(H1 Halogen Bulb Type)
Instruction Manual
[MODEL : HP Series]
Thank you for your purchasing our rotating warning lights.
Read this manual carefully beforehand to use this rotating warning lights.
Manual whenever you perform the maintenance, inspection, and repair of this
rotating warning lights.
For any ambiguous points, contact to one of our business offices or service desks
show on the last page.
1. Features
● The dome is made of SAN.
A polycarbonate dome (option) is available.
● The body is made of heat resistant ABS resin.
● A large-size reflector radiates powerful flash.
● A powerful motor drives the revolving lamp, featuring durable life and
minimum (about 50mA) power consumption.
● Patented gear-less drive mechanism for silent operation.
● Built to withstand the extreme shock and vibration.
● Diameter of base (φ180mm), overall height (H193mm), and diameter of mounting
holes (φ130mm) are conforming to DIN, ISO, JIS.
● The wedge-shaped sealing ring is optionally available.
※
HP-12/24
※Motor of this model can be used with both 12V DC and 24V DC.
Be sure to fit a bulb to suit the supply voltage.
12V DC
24V DC
4.8A
2.7A
115Flashes per minute
150Flashes per minute
12V 55W H1
24V 70W H1
4 1
1.0Kg
A95100105
‘13.11
UBC
Body
Wedge-shaped sealing ring
Roof
E
2. Cautions
2 3
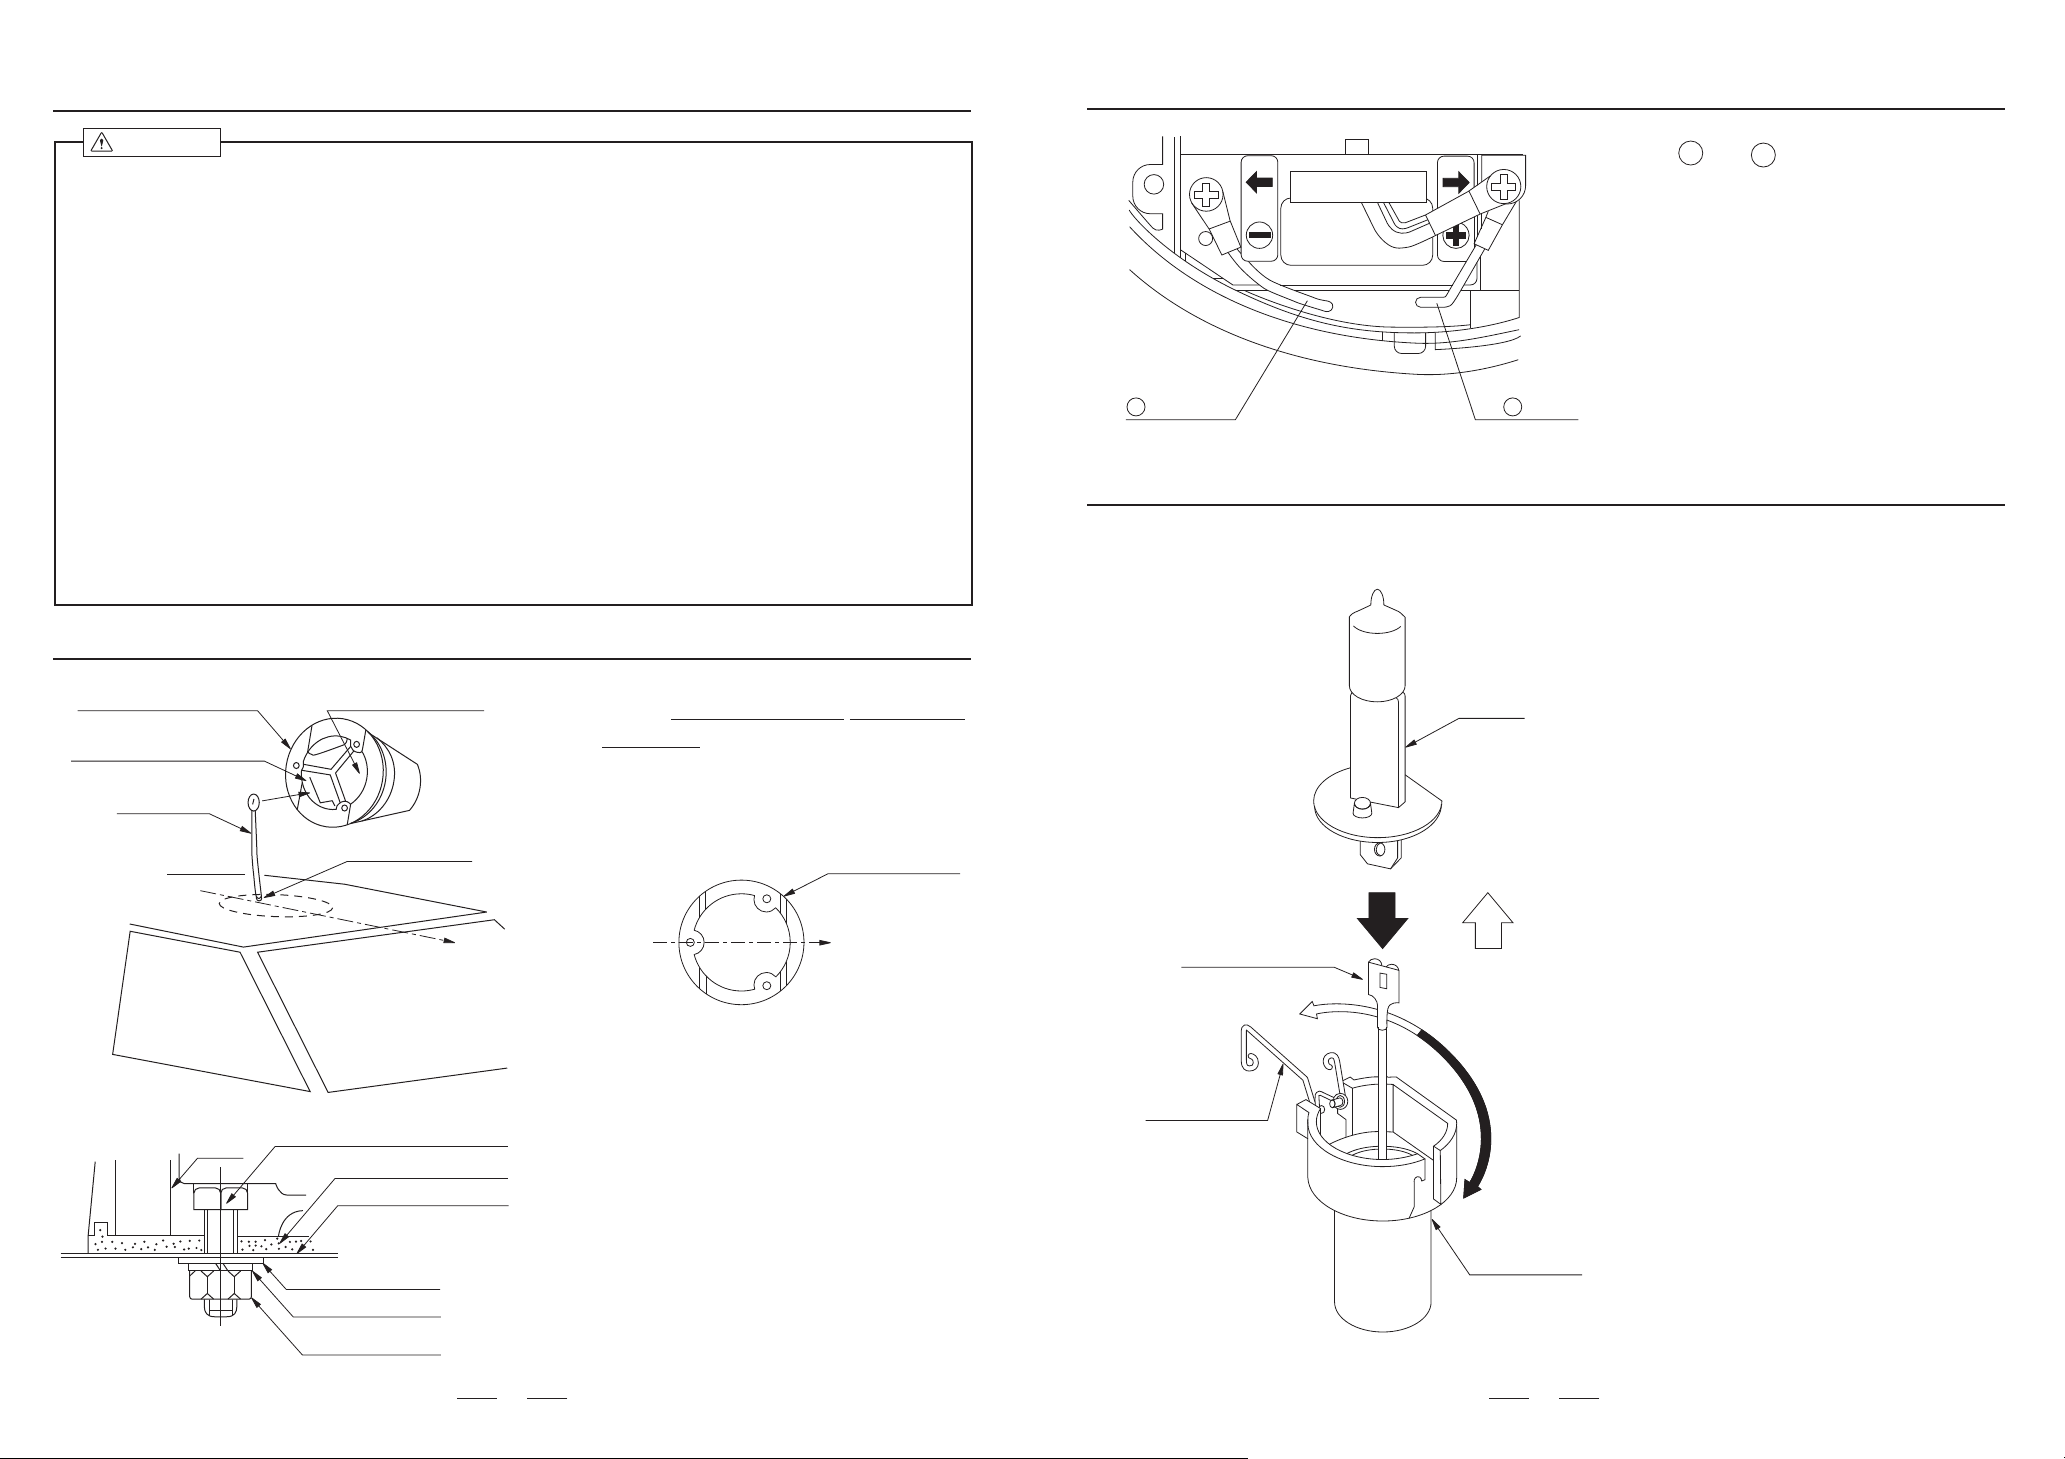
4. To connect the wire
Cautions
● Check the voltage before use.
● Do not operate without the dome.
● Switch off the light when changing the bulb.
● Do not touch the bulb just after turning it off, as it may cause a burn.
● Close the dome firmly to appropriate lock position.
● Do not rotate the reflector with fingers.
● Do not wash our product with high pressure water.
● When cleaning the dome, wipe carefully with the water moistened linen.
Do not use thinners, benzine, gasoline or oil.
● Do not supply oil to the motor and rotor.
● Do not touch the glass of bulb when changing the halogen bulb.
When the glass of bulb becomes soiled, dampen a cloth with alcohol to wipe
clean.
※ No guarantee shall be given to any defect caused by the use and remodeling
beyond the scope of the instruction manual.
3. Installation
①Sealing ring
Wire entry areas
(Wire ↑)
Wire
C.L
Body
②Body bottom
Sealing
Front or rear
HEX. HD. Bolt (M6×20)
Sealing ring
Mounting surface
1). Mount the sealing ring① on the body
bottom②.
Mounting direction of the sealing ring
is according to the drawing.
C.L
(Bottom view)
2). Lead the wire into revolving lamp
through the wire entry areas
(WIRE↑) on the rear side of the
body.
Drain way
Front or rear
Secure + and − wire according to the
drawing, wires are led in through the
wire entry areas, paying attention to the
polarity of them.
+
−WIRE
WIRE
5. To change the bulb
For safety operation and to ensure best bulb performance, please wear
working gloves.
● Cautions
Bulb
Pull out
Install
Connector
Unlock
Spring
Lock
1). Do not change the bulb before
turning off the switch.
2). Do not touch the bulb just after
turning it off, as it may cause a burn.
● How to remove the bulb
1). Unlock the spring for the bulb.
2). Pull out the bulb from the connector.
● How to install the bulb
1). insert the bulb firmly into the
connector.
2). Put the bulb in the socket, along the
flat side.
3). Secure the bulb with the spring.
Flat washer
Lock washer
HEX. Nut (M6)
Socket
 Loading...