

Page 1

DMXQConnect
for
DMXPathfinder CR
User Guide
Version 2.2
August 2005
Pathway Connectivity
1439 17th Avenue SE, Unit 103
Calgary, AB, T2G 1J9
Canada
Phone: (403) 243-8110
Fax: (403) 287-1281
E-mail: support@pathwayconnect.com
Web site: www.pathwayconnect.com
Page 2

DMXQConnect for CR - User Guide Contents
CONTENTS
INTRODUCTION.............................................................. 1
WELCOME TO DMXQCONNECT!................................................... 1
CHAPTER 1: ABOUT DMXQCONNECT............................................ 2
QUICK START ............................................................... 2
WHAT IS DMX Q-CONNECT?..................................................... 2
CHAPTER 2: SYSTEM REQUIREMENTS AND INSTALLATION.......................... 5
SYSTEM REQUIREMENTS........................................................ 5
Operating Systems......................................................... 5
Video................................................................... 5
CPU and Memory.......................................................... 5
Hard Disk Space .......................................................... 5
Mouse .................................................................. 5
COM Ports............................................................... 5
Printer .................................................................. 6
INSTALLING DMXQCONNECT..................................................... 6
TESTING THE SOFTWARE INSTALLATION.............................................. 6
COMMUNICATIONS SETUP ....................................................... 7
CHAPTER 3: GETTING FAMILIAR WITH DMXQCONNECT ............................ 11
NEW SHOW................................................................ 11
PATCHING................................................................. 12
ICONS & DESCRIPTIONS ....................................................... 12
PATCHING MULTIPLE STATIONS .................................................. 13
UN-PATCH A STATION......................................................... 13
SAVING .................................................................. 13
TALKBACK ................................................................ 14
COMMUNICATING WITH THE DMXPATHFINDER ........................................ 14
SETTING UP THE SYSTEM ...................................................... 15
CONFIGURE UNIVERSE ........................................................ 16
SOURCE CONFIGURATION ...................................................... 19
STATION CONFIGURATION ...................................................... 20
CONFIGURING YOUR INFORMATION DISPLAY .......................................... 20
CONNECTED STATIONS DISPLAY.................................................. 21
SORTING ................................................................. 21
PRINTED REPORTS........................................................... 21
COMMAND LINE .............................................................22
BACKUP YOUR DATA! .........................................................22
OPENING A DIFFERENT SHOW ................................................... 23
CHAPTER 4: COMMAND REFERENCE........................................... 24
FILE MENU ................................................................ 24
VIEW MENU ............................................................... 25
CONFIGURE MENU ...........................................................27
REPORT .................................................................. 29
CHAPTER 5: DIAGNOSTICS AND TROUBLESHOOTING ............................. 30
Page 3

DMXQConnect for CR - User Guide Contents
SYSTEM HEALTH CHECK ....................................................... 30
FILE TRANSFER ERRORS....................................................... 30
LOOPBACK TEST ............................................................ 31
Graphical Screen Method ................................................... 32
Terminal Window Method................................................... 34
ACCESS CODES AND SERIAL NUMBERS ............................................. 36
A - Access Code Input ..................................................... 37
N - Serial Number and Access Code Support Status................................ 37
INDEX .................................................................... 38
Page 4

DMXQConnect for CR - User Guide Introduction
INTRODUCTION
W
ELCOME TO DMXQCONNECT!
This User Guide is intended to familiarize you with the setup and use of the
DMXQConnect routing software, the "human interface" for your new DMX
distribution system. In preparing the User Guide, it has been assumed that
you are reasonably familiar with the Microsoft Windows 95 operating system,
and that Windows 95 is installed on your personal computer. It has been
further assumed that you have some working experience with DMX512 and the
various control systems, dimming systems, lighting instruments and
accessories that utilize this lighting control protocol.
We do encourage you to follow this guide closely as you become familiar with
your new DMX distribution system, so that upon completing the familiarization
you will be able to use the software and hardware with the utmost confidence
and effectiveness. The importance of this will become obvious the first time
something in your lighting system fails to work properly and suspicion tends to
fall upon the DMX distribution system, since it's the "glue" that connects
everything together. Being able to track down and isolate the cause of these
problems and solve them quickly, thereby minimizing loss of valuable
production time, is one of the most sought-after skills in the entertainment
lighting field. You'll find that DMXQConnect is designed to assist you in
developing such skills.
The Users Guide is divided into five chapters:
• About DMXQConnect is an overview of the origins, purpose
and function of the DMXQConnect software package.
• System Requirements and Installation describes what kind
of computer DMXQConnect needs, and how to get the whole
system up and running quickly.
• Getting Familiar with DMXQConnect is an easy to follow
tutorial that leads you through the "basics" of setting up and
changing DMX routing configurations.
• Command Reference is a good place to look whenever a
menu item or function needs a quick explanation.
• Diagnostics and Troubleshooting describes those built-in
features that help you develop your fault-finding skills.
1
Page 5

DMXQConnect for CR - User Guide About DMXQConnect
Chapter 1: About DMXQConnect
Q
UICK START
Like most users of new lighting control equipment, you
probably want to get your system up and running and
performing useful work right away. You may already be
familiar with the basic concepts of DMX signal line patching,
or routing as it commonly known. You may be the person
installing and commissioning a new system, not the end user.
If any of these accurately describes your particular situation,
you may wish to skip this chapter and go immediately to
Chapter 2, install the DMXQConnect software and verify that
your PC and the patch system are "communicating". Go on
to Chapter 3 to learn how to use the software. Return to this
chapter and read through at your leisure when and if you are
interested in background information.
WHAT IS DMX Q-CONNECT?
The proliferation of DMX512 controlled equipment in the entertainment lighting
industry, and indeed related industries such as special effects and motorized
scenery control, has resulted in various schemes to interconnect this
equipment with control systems. DMXQConnect, together with the Pathway
DMXPathfinder, represents the first fully electronic, software based method of
routing DMX signals to and from control consoles and receiving equipment.
Previous attempts at creating DMX networks around off-the-shelf hardware
usually involved cumbersome cord and plug patches to provide a data path
between control systems and receiving equipment, via optically isolated
repeater units (DMX opto-splitters). A single data path would require one cord
to connect a source jack to the input of an opto-repeater, and another to
connect the output of the repeater to the send jack. By the time all input and
output connections were made for a given production, the patch rack bore an
unsettling resemblance to the old load patch panels that have been obsolete
for almost twenty years.
DMXQConnect is a software tool enabling the user to construct a virtual DMX
data communications network on a personal computer. It will permit the user
to add descriptive text notes and device address information, and then transmit
the resulting interconnectivity data to an electronic matrix patch system, or
crosspoint router, that physically interconnects all of the control system's
elements in an organized, logical manner. High-speed solid-state crosspoint
2
Page 6
DMXQConnect for CR - User Guide About DMXQConnect
matrix devices that are commonly used in digital telephone switching systems
carry out the patching function.
Unlike most common local area networks, a DMX512 network often requires
many separate data paths to handle the number of device addresses and
codes necessary for medium to large-scale installations. Each data path can
accommodate only 512 eight-bit codes. As well, it is common practice to use
more than one control console in larger productions, or to provide more than
one location within a facility to "plug in" control consoles. Yet another
complication arises when equipment using communications protocols other
than DMX512, or even running on entirely different electrical signals, must be
connected to the installed DMX wiring system. These and other factors drove
the development of the Pathway Connectivity DMXPathfinder and
DMXQConnect as a comprehensive solution to the network problems faced by
all DMX system designers and users.
We designed DMXQConnect to be a simple to learn and use utility. Its main
function is to facilitate the creation of "patch" files on a personal computer, then
to allow the user to send these files to the DMXPathfinder electronics rack
where they are implemented as actual patch configurations. Of course,
QConnect also supports file editing, disk archiving and hardcopy printing
functions. Additional features include the ability to add text notes to each
connection record, and a useful device address calculator that displays (and
prints) the DMX port number and absolute DMX device address for receiving
equipment being operated by control system numbers greater than 512.
3
Page 7

DMXQConnect for CR - User Guide About DMXQConnect
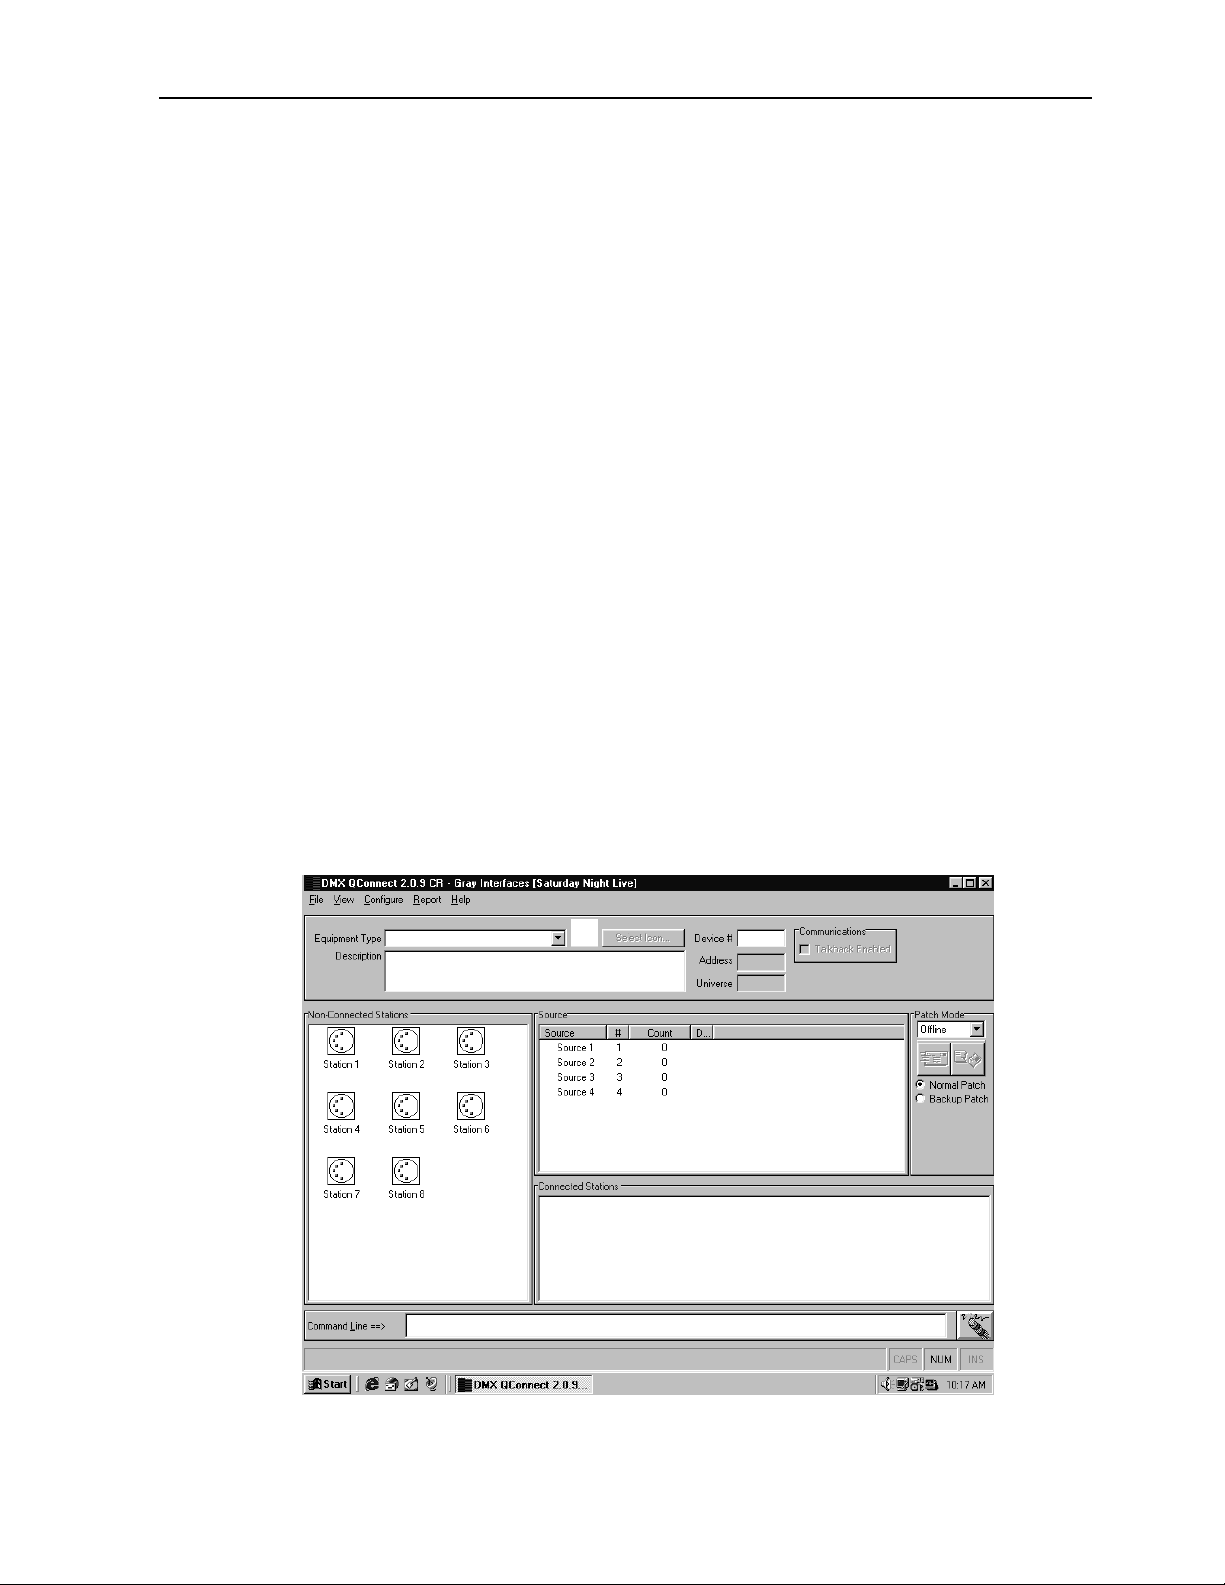
Launching DMXQConnect, the user is presented with a combination status
screen and work area made up of several window “panes”. It is here that the
main work of creating a patch file is done. An old file can be retrieved from the
archive, edited, and saved as a different one, or a new patch can be started
from scratch. The basic connectivity information needed by the system can be
described simply: where do we get the signal from to control a given piece of
equipment?
All DMX input (source) locations in the installation are shown, ready for
immediate use, in the Source pane (these names can be edited at any time in
a separate Configure Sources window). Similarly, all DMX output stations are
shown in either the Non-Connected Stations or Connected Stations panes
(these names can be edited at any time in a separate Configure Stations
window). Both Sources and Stations include a description field to allow
optional text notes to be added to each connection record.
Clicking on any station (connected or unconnected) will provide you with
additional information in a station detail pane at the top of the screen. Here
you will find (and be able to change) the optional device type and icon for the
station, as well as provide a detailed description or note. The Device # cell
allows you to enter the control console's idea of how to find the color scroller
(or other receiving equipment) that you are connecting via a given record -typically a value ranging from one to several thousand. DMXQConnect
automatically computes the "real" address for the scroller which of course can
be no higher than 512, and pops it into an Address cell for all to see, especially
whoever is in charge of hanging lights and setting thumbwheel address
switches.
DMXQConnect also allows the user to specify which stations will be handling
bi-directional communications; that is, where the connected equipment is
capable of both sending and receiving data on separate wire pairs. The
DMXPathfinder will, incidentally, handle any manufacturer's native protocol
provided that it meets the basic requirements of EIA (Electronic Industries
Association) RS-422 or RS-485, and its baud rate doesn't exceed 2 megabits
per second.
What about using the network for signals that don't meet RS422/485 specs?
That's where the DMXPathfinder’s cable isolation feature comes in. If you
don't select a given input or output path in the workspace, the actual installed
DMX wiring for that node remains physically and electrically isolated from the
Pathfinder’s transceiver electronics. This means that you can use the wiring to
handle almost any low voltage, low power application you can think of, for
example: headsets, contact closures, or analog control signals.
4
Page 8

DMXQConnect for CR - User Guide System Requirements and Installation
Chapter 2: System Requirements and Installation
S
UMMARY:
This Chapter describes:
• What kind of PC you need to run DMXQConnect
• How to install the DMXQConnect software
• How to get the system communicating properly
S
YSTEM REQUIREMENTS
OPERATING SYSTEMS
DMXQConnect runs under Windows 95 and Windows NT.
VIDEO
DMXQConnect works best with SVGA displays at a resolution of 800x600 or
1024x768.
Standard VGA monitors (640x480) or notebook computer displays can be
used, but more screen scrolling will be required.
CPU AND MEMORY
DMXQConnect will run on any 486 or higher PC with at least 8 megabytes of
RAM (real physical memory). However, it is recommended to use at least a
Pentium level CPU with 16 megabytes of RAM to minimize the time
DMXQConnect requires to perform certain operations such as data sorting.
HARD DISK SPACE
DMXQConnect will occupy approximately 2.5 megabytes of hard disk space
plus space for your patch files.
MOUSE
DMXQConnect works best with a pointing device (mouse). Any mouse that
works with Windows will work properly with DMXQConnect. Two-button
operations are supported. If no mouse is available, DMXQConnect makes use
of certain keyboard keys. Most functions are accessible this way.
COM PORTS
The DMXQConnect program utilizes one asynchronous communications port
(COM port) for file data transfer and control between the PC and the
5
Page 9

DMXQConnect for CR - User Guide System Requirements and Installation
DMXPathfinder rack. Any COM port in the range of 1 to 4 will work.
DMXQConnect supports baud rates of 300 to 19,200.
PRINTER
Patch files created by DMXQConnect can be printed out as hard copies. Any
printer supported by Windows will work well.
INSTALLING DMXQCONNECT
1. To begin, start Windows 95. Close all open applications and disable any
virus-detection software.
2. Insert the CD-ROM (or the 3½” diskette labeled Disk 1) for DMXQConnect
in your drive. (Depending on your computer, the Setup program may start
automatically. If it does, skip steps 3 through 6, and follow the instructions
on the screen.)
3. Use your left mouse button and click Start on the Task Bar.
4. Select Settings and then choose Control Panel.
5. Double-click Add/Remove Programs.
6. Click the Install button.
7. Follow the on-screen instructions to carry out the installation.
TESTING THE SOFTWARE INSTALLATION
1. Clicking on the DMXQConnect icon will start DMXQConnect. A
DMXQConnect graphic will appear briefly. Verify that the user name shown
is correct. Then after a few seconds, a combination status and work area
screen will appear.
2. A small window will appear, prompting you to enter an initial show name.
You can use any number of characters for this, then click on OK.
3. The user name should appear at the top of the screen, along with the new
show name.
4. Three separate areas (panes) should now fill most of the screen. The
largest, at left, is identified as “Non-Connected Stations”. Point your mouse
at the top left-most header in this pane and click and drag the right side of
this header to the right until you can read “Station Name” in the header and
the full default station names in the column below. Do the same for the top
right pane, identified as “Source”, and the lower right “Connected Stations”
pane. Default station and source names should appear only in the NonConnected Stations and Source panes.
5. Try clicking once on one of the default station names. This name should
now appear in the Station Detail pane directly above the Non-Connected
Station pane.
The test is finished! Your PC has now been verified to run DMXQConnect
properly.
6
Page 10

DMXQConnect for CR - User Guide System Requirements and Installation
COMMUNICATIONS SETUP
1. Determine which COM port your computer will utilize for PC comm data
communications with the DMXPathfinder rack (COM1, 2, 3 or 4). Don't
attempt to use one that's already in use for an internal fax/modem or other
device. If your mouse uses COM1, you shouldn't use COM3 for the comm
link to the Pathfinder since it shares the same IRQ number as COM1.
Choose COM2 instead. If no devices are currently assigned any COM
ports, you can use any port you like.
2. If your PC will be connected to the 9-pin female RS232 jack on the face of
the Master Control Module in the rack, use the appropriate serial data cable.
Usually this will be 9-pin male to 9-pin female. The cable must be wired pinto-pin (no swapping); null modem cables will not work.
3. If the PC will be communicating with the DMXPathfinder via a permanently
installed data line, determine whether you will be using an RS232 or RS485
interface for the physical link. Both types of interfaces are provided at
terminal blocks in the rear wiring bay of the Pathfinder rack. A good rule of
thumb for making this decision is whether the line will be longer than 15
meters (50 feet). Longer runs should use RS485 (up to 500 meters / 1600
feet). The advantage of using RS232 is that no special hardware is needed;
you can connect your PC's COM port directly to the Pathfinder. For RS485,
a 232-485 or 232-422 converter, or an RS422/485 serial adapter card is
required; this must be near or inside the PC. It is acceptable to connect two
or even three PCs to the Pathfinder at the same time; one at the front panel
and one each to the RS232 and RS485 terminal blocks.
4. Pay particular attention to possible ground loop problems when connecting
the PC comm data line, since signal common at the DMXPathfinder is
connected to electrical ground. This should not be a problem when using
RS232 since the PC and the Pathfinder will never be far apart, hence there
will be little or no difference in voltage between ground at the PC and ground
at the Pathfinder. However, RS485 lines can be very long and differences in
ground potential may be significant in some installations. In this case we
suggest that you disconnect the data cable shield at one end of the wire run,
or use an optical isolator to create an electrical barrier in the data link
between the PC and the Pathfinder.
5. To establish that the PC comm function is working properly, for conveience,
you could use a laptop or notebook computer plugged into the front panel
RS232 jack. This will allow you to see the face of the DMXPathfinder, so
that you can view the front panel LED displays.
6. Energize the DMXPathfinder rack, and check that the RUN LEDs on all of
the plug-in modules are illuminated. No ERR LEDs should be lit up. Also
7
Page 11

DMXQConnect for CR - User Guide System Requirements and Installation
ensure that the BACK/NORM switch on the Master Control Module is set to
NORM.
7. Launch DMXQConnect. First click on View, DMX Pathfinder Options.
Choose the DMXPathfinder Hardware Configuration tab. If you know how
many input and output modules your system was supplied with, assign
those values in the # of Input Cards / # of Output Cards fields. Click OK.
Now choose View, DMX QConnect Options from the top menu bar, then
select the Comm Port tab. Select the COM port your PC is using for router
communications, then the speed (the factory default baud rate is 9600 -- if
you want to use a different speed, refer to the DMXPathfinder - Operation &
Maintenance Manual and change the DIP switch settings on the Master
Control Module). The other port settings should be Parity: none, Data Bits:
8, Stop Bits: 1, Handshaking: No. Click OK.
8. Now choose View, DMXPathfinder Control from the menu bar. The
Terminal tab will automatically be selected. A blank terminal
communications window should occupy the center of the screen. Click on
the Connect button at the lower left. At this point the COM LEDs on each
DMXPathfinder module should illuminate for about two seconds, and three
or four lines of text should appear in the terminal window. This text has
been sent back to your PC from the Pathfinder, and it indicates that the
communications function is working properly.
9. If you get no response from the DMXPathfinder and instead get a COMM
FAILURE message, this means that DMXQConnect has “timed out” waiting
for the expected reply. The most common causes for this are incorrectly
wired cables and incorrect PC hardware configuration. Check once again
for COM LED activity at the Pathfinder. If present, the transmitted-data
wiring to the Pathfinder is OK but not the received-data wiring. Another
cause might be a defective PC COM port. If the terminal window contains
unrecognizable characters, you probably have a baud rate mismatch
between your PC and the Pathfinder. Select a different speed from the
View, DMX QConnect Options - Comm Port tab (try 19,200 first). Some
PCs can also experience communication problems due to hardware
conflicts. In this case you may get a “Runtime Error” message and
immediate exit from QConnect. In this case it is necessary to review the
hardware setup of your PC. Check the Port settings by clicking on the
Windows 95 Start button, then Settings, Control Panel, System, Device
Manager, Ports. Also check in the PC’s CMOS setup to ensure that the
COM ports are set at their default addresses and IRQs. Consult the Factory
if you are unsuccessful at getting the PC comm function working properly.
8
Page 12
DMXQConnect for CR - User Guide System Requirements and Installation
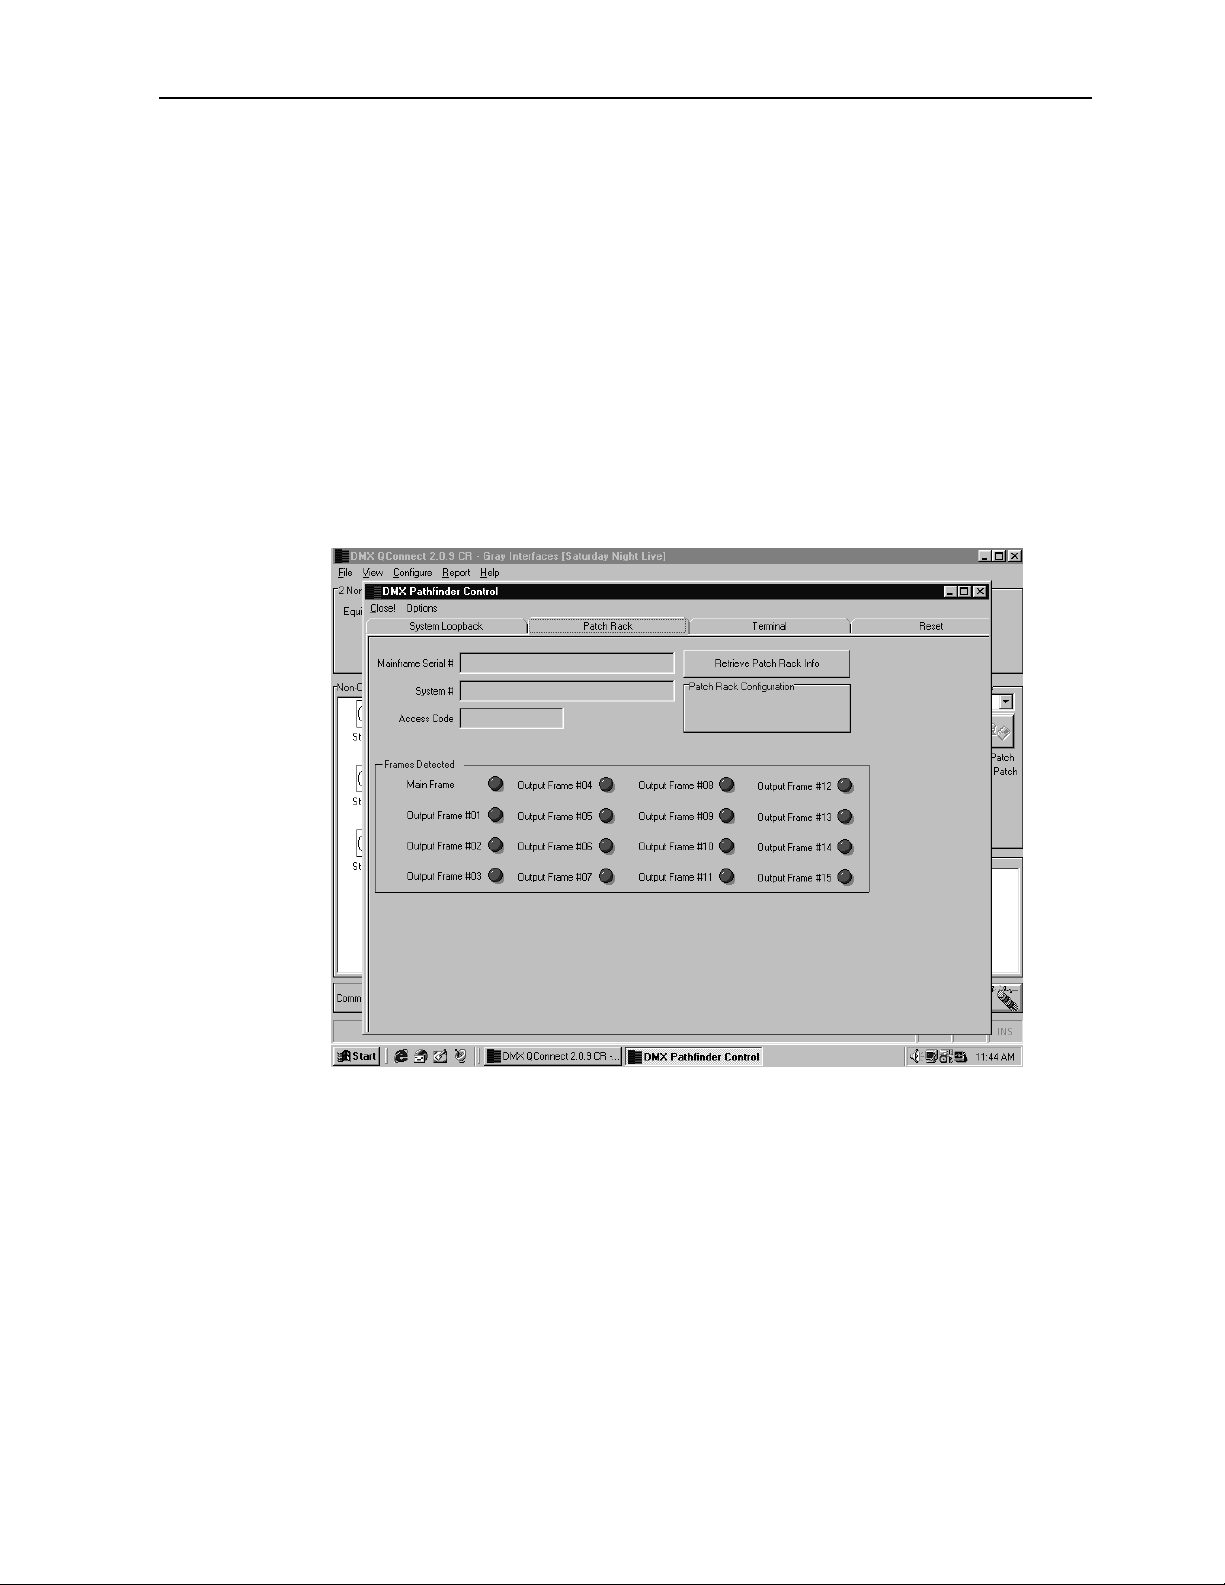
10. Once the PC-to-Pathfinder communications function is working correctly as
described previously in item 8, you should verify that all of the
DMXPathfinder module frames are responding to commands from the PC.
Click on View, DMXPathfinder Control, then choose the Patch Rack tab.
This screen contains sixteen graphical red LEDs, each corresponding to a
module frame in the largest possible DMXPathfinder system. Click on the
Retrieve Patch Rack Info button, and one or more of the LEDs should turn
green according to the actual installed configuration of your system. Any
LEDs that remain red when they should be green points to hardware
configuration or installation errors – refer to the DMXPathfinder Operation &
Maintenance Manual or consult with the Factory for assistance. The most
likely causes, however, will be incorrectly addressed modules or internal
cabling problems.
11. Click on the Close button to exit from the DMXPathfinder Control window.
12. The last thing to do is enable DMXQConnect to send patch files to the
DMXPathfinder rack. At the top right of the main screen you will see the
Patch Mode pane. Change the mode from Offline to Batch, then click on
the “send” icon below. A “DMXQConnect Serialization” window will appear if
the software has not been previously enabled. (If QConnect has already
been enabled, a moving bar graph will appear under the send button -- skip
the remaining steps). You should see a 15-digit Activation Serial Number;
record this on a piece of paper and contact the Factory at (403) 243-8110 or
fax (403) 287-1281 to obtain an authorization number. When you receive
the 8-digit number, enter it into the Activation Key window and click OK.
9
Page 13

DMXQConnect for CR - User Guide System Requirements and Installation
The window should now close and a moving bar graph will appear briefly
under the send button. If it’s not convenient to call for the number at this
time, click on Cancel and go on to Chapter 3. You can repeat this process
when you have your authorization number, and all other functions except
patch file transfers will work fine in the meantime.
Software and hardware setup is now complete! You can now proceed to
Chapter 3 and learn to use DMXQConnect.
10
Page 14

DMXQConnect for CR - User Guide Getting Familiar with DMXQConnect
Chapter 3: Getting Familiar with DMXQConnect
S
UMMARY
Follow this Chapter to learn how to create, edit and save patch files and send
them to the DMXPathfinder. Station and Source configuration is covered here.
B
EFORE WE GET STARTED
Our discussion assumes that you, the user, have at least a basic
understanding of Microsoft Windows 95, and how to navigate around its
various menus and controls using a mouse. We will also assume that the
DMXQConnect software has been properly installed on your computer's hard
disk, and that communication between the PC and the DMXPathfinder rack
has been set up to function correctly.
Make sure that power to the DMXPathfinder electronics has been switched on,
and check that all of the faceplate RUN LEDs are illuminated, but none of the
ERR LEDs are on. Also ensure that the BACK/NORM (backup/normal) switch
on the Master Control Module is set to the NORM position. If you need to
change the switch from backup to normal, you must also press the adjacent
RESET pushbutton to put the Pathfinder into Normal Mode. It's worth
remembering that when in Backup Mode the Pathfinder will not respond to any
commands from the PC. A Reset command from the front panel or from a PC
will always activate the mode selected by the position of the BACK/NORM
switch.
N
EW SHOW
Launch the DMXQConnect program by clicking on its program icon. A graphic
window will appear briefly, then the combination status screen and work area
screen will appear.
To get a fresh start, click on File, New Show. Enter the working title for the
show file (20 characters maximum) in the box marked Name. An optional
Description may be entered to provide additional information. When done click
OK.
11
Page 15

DMXQConnect for CR - User Guide Getting Familiar with DMXQConnect
P
ATCHING
First go to the Patch Mode pane at the far right of your screen. Make sure that
Offline is selected. This will ensure that DMXQConnect won’t try to send patch
information to the DMXPathfinder until you are ready.
We're now set to patch a few stations. First, left-click on one of the stations in
the Non-Connected Stations pane. Then, holding the left mouse button down,
“drag” the selected station over to the Sources pane and over top the desired
source (the source will highlight to indicate your selection), and release the
mouse. Your station will now appear in the Connected Stations pane. You
have now made your first patch connection. Try patching a few more of the
unconnected stations in the same manner. If you make a mistake simply drag
the station from the Connected Stations pane to the correct source in the
Sources pane.
ICONS & DESCRIPTIONS
Whenever you click on a Station, either Connected or Non-Connected,
information associated with that station appears in the Station Detail pane at
the top of your screen. Click on any station. The station name and connected
status appear as the title of the Station Detail pane. Now click in the
description area of the Station Detail pane and type in a description such as:
This description can be modified to include reminders or notes at any time by
repeating the above process. Right-clicking on the description area gives you
Scrollers for cyc wash
12
Page 16

DMXQConnect for CR - User Guide Getting Familiar with DMXQConnect
access to the usual Windows commands of Undo, Cut, Copy, Paste and
Delete, making it easy to edit this information.
Since our description indicates that scrollers are attached to this station, let’s
get the station icon to match, to make it easier to identify. Click on the ∇ button
at the right of the Equipment Type box in the Station Detail pane and select
Color Scroller from the choices offered. An icon representing a color scroller
will now appear with that station.
P
ATCHING MULTIPLE STATIONS
There are various ways to patch several Stations to a single Source. You can
use whichever suits your situation best.
To select non-sequential stations, hold down the [Ctrl] key on your keyboard
as you click the Stations you want to patch. Then click and drag one of the
stations chosen to the Source desired. The selected group will follow.
To select sequential stations, hold down the [Shift] key on your keyboard as
you click the first and then the last Station in the range you want to patch. Then
click and drag one of the stations chosen to the Source desired. The selected
group will follow.
U
N-PATCH A STATION
It’s easy to un-patch a station, that is, to return a connected station to nonconnected status. In the Connected Stations pane, either:
Right-click on the desired station and select Disconnect
Or
Left click on the desired station and drag it to the Non-Connected pane
The conventions for selecting multiple stations, if desired, described in
patching multiple stations, also apply here.
S
AVING
You don’t need to do anything special to save a patch as everything you do is
saved to your computer’s hard disk as you work. To create backups, see
Backup Your Data later in this chapter.
You’ve now completed the basics of creating a patch. In the chapters ahead
we’ll discuss how to get your patch information from DMXQConnect to the
DMXPathfinder as well as system configuration.
13
Page 17

DMXQConnect for CR - User Guide Getting Familiar with DMXQConnect
T
ALKBACK
If you are using IPS dimmers, Wybron Scrollers or any othe receiving
equipment that uses XLR pins 4 and 5 for DMX “talkback”, you’ll need to
enable the DMXPathfinder’s bi-directional mode for the station(s) involved.
Click on the station(s) in either the Non-Connected or Connected panes that
you wish to enable talkback for. Then, click the check-box Talkback Enabled
in the Communications pane at the top of the screen. It is good practice to
enable talkback only for those stations where it is being used. Remember that
in order for talkback to work, equipment and wiring must use separate wire
pairs for transmit and receive data.
C
OMMUNICATING WITH THE DMXPATHFINDER
When you're ready to convert your work from a "virtual" patch to an actual one,
you'll want to upload, or transfer, the patch file from the computer to the
DMXPathfinder rack. All patch file transmissions between DMXQConnect and
the Pathfinder are controlled and initiated by the Patch Mode pane. This
discussion assumes that PC-to-Pathfinder communications have been properly
set up and verified to be working properly. See Communications Setup in
Chapter 2 if this has not been done, then you can proceed as follows:
Go to the Patch Mode pane. Available patch modes are Live, Batch and
Offline. Batch is the most commonly used mode. In Batch, the patch is
transferred to the rack only when the Send Patch button is clicked. In Live
mode every change you make is communicated to the DMXPathfinder rack as
you do it. You may find this useful in a rehearsal situation, but since there is a
small (3-sec.) delay every time the rack is communicated with, it is not practical
for extended use. Use the Offline mode when you are not connected to the
Pathfinder rack or do not wish to inadvertently send patch files the rack (note
that Offline mode is always activated whenever QConnect is launched). In any
case, the Patch Mode can be changed on the fly, at any time.
Set the Patch Mode to Batch. Now press the Send Patch button . You
should see a small bar graph appear to show you the progress of the patch
transmission to the rack. In any case no more than 5 seconds should pass. If
it takes longer, there is a communications problem and you should check the
Event Log.
If all has gone well with our first file transfer, let's do it again -- this time, we'll
transfer the patch file to the DMXPathfinder as a Backup patch. Follow the
same procedure as before, except now choose Backup Patch in the Patch
14
Page 18

DMXQConnect for CR - User Guide Getting Familiar with DMXQConnect
Mode pane. The bar graph will confirm, as before, that the file transfer function
was successful, the Backup patch is now stored in the Pathfinder’s backup
patch memory.
Now we have two files (albeit with the same data) stored in the
DMXPathfinder’s internal memory. Let's try swapping patch configurations.
Using the Main Menu, click on View, DMXPathfinder Options. Select the
DMXPathfinder Patch Mode tab. Click on the Select Backup Patch Mode
button. You will see a message asking you to confirm the command – click
Yes. “Backup Patch Selected” will appear in the black response window. The
backup patch has now been activated in the Pathfinder rack. Note that this
time we didn't transfer any data from the PC to the Pathfinder, instead we sent
a command to change its active patch configuration from Normal to Backup.
Let's try another communications function. Using the Main Menu, click on
View, DMXPathfinder Options. Select the DMXPathfinder Patch Mode tab.
Click on the Clear Existing Patch Mode and Normal Patch Data button.
Again, you will see a message asking you to confirm the command – click Yes.
“Patch Cleared” will appear in the black response window. What happened?
The Clear command has struck the entire active DMXPathfinder configuration
to an unpatched state, the electronic equivalent of pulling all the cords from a
conventional patch panel. It has also erased the Normal Patch data from the
rack’s internal memory (but not the Backup Patch data). This is, of course,
another function to use carefully but it should always be used when a
production ends to ensure that the Pathfinder is completely isolated from the
installed DMX wiring.
There are two more communications functions available: System Loopback
and Reset. The System Loopback function is fully described in Chapter 5:
Diagnostics and Troubleshooting. This function is not likely to be used in day-
to-day operations. Reset will remotely re-activate the currently selected patch
file at the DMXPathfinder, and it's useful when a module has been replaced
and the local reset switch was not pressed afterwards. Avoid using the Reset
command during live performance, however, since it will result in a momentary
pause in DMX data transmission.
S
ETTING UP THE SYSTEM
Now that we've had a chance to get familiar with DMXQConnect’s patch
creation, editing and communications features, it's time to customize the
software installation to suit the particular requirements, or parameters, of the
DMX distribution system as installed in your facility.
15
Page 19

DMXQConnect for CR - User Guide Getting Familiar with DMXQConnect
Select View from the main menu. Choose DMXPathfinder Options. Click on
the DMXPathfinder Hardware Configuration tab.
Notice that there are several panes of parameter information contained in this
window. The # of Input Cards and # of Output Cards define the actual size of
your installation in terms of input and output lines; these parameters should
only be set once when your system is commissioned, and changed only if the
system is expanded. Contact the Factory or your local customer support if you
are unsure about the correct values for these fields.
C
ONFIGURE UNIVERSE
DMX Universes need to be set up properly to take full advantage of the
optional DMX address calculation features in DMXQConnect.
On the main menu, click Configure, Universe.
16
Page 20

DMXQConnect for CR - User Guide Getting Familiar with DMXQConnect
There are two tabs, Show Specific and Defaults. The values entered under
the Default tab will be used unless there are values entered in Show Specific.
Show Specific values will supersede the Default values. DMXQConnect uses
the values entered here to calculate the numbers displayed in the Address box
of the Station Detail pane at the top of the working screen. DMX Universe
Parameters are not essential information for the DMXPathfinder to patch
correctly, they only serve as a utility for the user.
Select the Defaults tab. Notice that initially there are three universes set up as
defaults. The number (1, 2, 3 etc.) in the Universe # box at the top refers to an
actual control console DMX output port, or Universe. Each DMX Universe
carries a large number of DMX device codes (sometimes called dimmer or
channel numbers), usually the maximum 512, but sometimes fewer. These
values will vary with different installations, but in any case should match those
assigned in your control console's port parameters. The numeric ranges of
these device codes are assigned in the Start Device # and End Device #
boxes. No overlapping device numbers are permitted between universes. If
your lighting control system uses values different from those shown, you can
edit the defaults by clicking on the desired Universe in the table below and
entering the new values in the appropriate boxes above. When done, click on
the Update button and the new values will now appear in the Universe table.
To add a new universe record, click on the Add New button, then enter the
new data and again click on Update. When finished, click on Close.
It is unnecessary to enter any universe information under the Show Specific
tab unless the requirements of, say, a touring show requires different values to
be used. When that show moves out, be sure to use the Delete button to
17
Page 21

DMXQConnect for CR - User Guide Getting Familiar with DMXQConnect
erase all information contained in the Show Specific tab so that the Default
values will be used again. Remember that Show Specific values take
precedence over Default values.
When back in the main working screen, select a Connected or Non-Connected
Station by clicking once on it. Then enter 1234 in the Device # box in the
Station Detail pane at the top of the screen. Notice that the Address box now
displays 210, and the Universe box shows 3. What good are these figures?
Let's say you have a color scroller that you want your console to control on
channel #1234. How do you set the scroller's address switches when they
have a maximum allowable range of 1 to 512? DMXQConnect has saved you
the trouble of using mental math or carrying a calculator to figure out the real
address for the scroller, and which console port it will connect to.
18
Page 22

DMXQConnect for CR - User Guide Getting Familiar with DMXQConnect
SOURCE CONFIGURATION
Next we will assign working names to the various DMX sources (control
console outputs) using the Configure, Source window and table. Access it
from the main menu now.
To add a new Source, Click the Add New button to clear the Source Name
and Description boxes at the top of the window. Click on the Source Name
box and type in the name of Source (e.g. Main Console DMX 1). Use the [Tab]
key or click in the Description field. An optional description may be entered
here. When done click the Update button or use the [Enter] key to complete
the addition to the Sources table. It’s best to use [Enter] if you are continuing
to add more sources, as it automatically increments the Source # and
repositions the cursor in the Source Name box. After entering the last Source
Name or Description, don’t hit [Enter] or the Update button to avoid adding
another source. Click elsewhere in the Source table or click on Close.
To modify an existing Source, click on it in the Source table to highlight it, then
click on the Source name or Description box (whichever you wish to modify).
The regular text editing conventions of Windows 95 apply, including the rightclick editing tools. When your editing is complete, click the Update button or
use the [Enter] key to complete the modification to the Sources table.
To delete any existing default Sources and start fresh, click on the bottom (last)
Source in the table. While it is highlighted, click the Delete button in the
Configure Sources window. A prompt message to confirm your action will
19
Page 23

DMXQConnect for CR - User Guide Getting Familiar with DMXQConnect
appear. Click Yes to confirm. Continue until all Sources in the table have
been deleted. Note: Only the last Source in the table can be deleted with
each Delete action.
S
TATION CONFIGURATION
Like Sources, Stations should be configured in advance to make your patching
intuitive and easy. Go to the main menu and click Configure, Station.
The Station Configuration window is similar to the Source Configuration
window. We have a table of Stations, as well as Station Name and Description
boxes. To configure, edit, add or delete Stations, follow the same procedures
as outlined above in Source Configuration.
C
ONFIGURING YOUR INFORMATION DISPLAY
Pane Sizes
There are many useful ways to configure your workspace to suit your own
preferences. Pane size can be change to display more information, and
station information can be displayed in a number of ways.
To change the pane size, move the cursor over the vertical divider between the
Non-Connected Stations and Sources panes until it becomes the resize cursor.
Then click and drag the vertical divider to where you want it. Similarly, the
horizontal pane divider between the Sources and Connected Stations panes
can also be moved. Pane sizes will be retained from this session next time
you launch DMXQConnect.
Station Icons & Detail
While some like the ease of identification afforded with the use of Station
Icons, others prefer more station information to be presented. Until now we’ve
looked at stations in large icon view. To change to small icons or detail view,
move your cursor to the Non-Connected or Connected pane and right-click.
Choose View, Detail.
Now instead of large icons, Stations are presented in a table format showing a
small icon, Station Name, number, Equipment Name, Description, etc. The
Non-Connected and Connected panes can be individually set to create
workspace you find useful. You can enlarge the pane to see more. Similarly
the individual columns of the table can be resized in the same way. Move the
cursor to the table column heading area, between two columns. Again the
cursor should change to the resize cursor. When it does, click and drag the
column border until it is the desired width.
20
Page 24

DMXQConnect for CR - User Guide Getting Familiar with DMXQConnect
C
ONNECTED STATIONS DISPLAY
To see which stations are connected to a specific source, simply click on the
desired source in the Source pane. The Connected Stations display will
change to show you only the stations connected to that Source. To remind
you that you are only looking at the stations connected to a particular source, a
green “LED” appears beside the Source referenced.
You may wish to see all the Connected stations, not just those connected to a
single Source. If this is the case, right-click inside the Connected Stations
pane and select Show All. Then if you wish to see which source that station is
connected to, simply click on the desired station. The green “LED” will appear
beside the source that station is connected to. In Detail view, the associated
source number will appear in the last column.
S
ORTING
Station information displayed in Detail View can be quickly re-sorted to display
the information in a manner relevant to your needs. Click on a column heading
to sort the table by the values in that column. Clicking on the same column
heading toggles the sort order between ascending and descending.
P
RINTED REPORTS
Provided that Windows 95 has been configured with your printer and it is
connected, printed reports detailing your patch data in an organized format can
be obtained from DMXQConnect. Reports can be useful backup and
documentation tools, as well as great designer’s reference. In addition, reports
can be exported to a variety of formats including Lotus, Excel and Word, for
incorporation into other documents.
To view a report, select Report, Connected Stations by Source from the
main menu. This will generate the actual report and open the Reports
window.
Maximize the report window so that it fills the screen. If the report form looks
empty, you probably don’t have any stations patched. Close the report window
and patch a few stations before re-opening report. Controls for the report
display appear along the bottom of the window.
21
Page 25

DMXQConnect for CR - User Guide Getting Familiar with DMXQConnect
C
OMMAND LINE
As an alternative to the “drag and drop” style of patching, you can work in a
“Command Line” mode, without the mouse. Similar to many lighting control
consoles, in this mode the numeric keypad on your keyboard can be used to
assign stations to sources. TIP: You’ll find that the selecting the Detail view
for both Non-Connected and Connected panes will make this process easier.
With the mouse, click on the Command Line box at the bottom of the
workspace (if the Command Line box isn’t there, make sure it is checked in
the main menu under View). Make sure that your keyboard Num Lock is
enabled and the keyboard LED is illuminated. Patch information is entered by
using the numeric keypad to key in the station number followed by the [*] or
[@] key, then the source number followed by the [Enter] key. To clear the
Command Line for the next entry, press the [Delete] key on your keyboard. If
the Command Line is no longer highlighted, use the mouse to click on the
“eraser” button to the right of the Command Line to clear it. To patch several
stations to the same source, use the [+] as “and” or the [/] key as “thru”. For
example to patch stations 1, 3, 5, and 7 to source 1, key in:
1 + 3 + 5 + 7 * 1 [Enter]
Similarly to patch Stations 8 thru 15 to Source 2, key in:
8 / 15 * 2 [Enter]
Or you can mix it up to patch 1and 7 and 12 thru 15 to Source 3 by keying:
1 + 7 + 12 / 15 * 3 [Enter]
B
ACKUP YOUR DATA!
To protect yourself from an accidental loss of patch data, we suggest that you
make archive copies of your data. Select File from the main menu, followed
by Create Backup… Use the standard Windows 95 file management
conventions to specify where you want the data archived to. If you need to
restore a show from an archive, Use File, Restore From Backup… You will
be asked if you wish to make a backup of the existing data first since this
action will replace the current data with the backup copy. Note that this
process archives all show patches and configuration data.
22
Page 26

DMXQConnect for CR - User Guide Getting Familiar with DMXQConnect
O
PENING A DIFFERENT SHOW
You may wish to work with a show other than the one that you used during
your last session. If that is the case, choose File, Open Show from the main
menu. A dialog box will open with the shows residing in DMXQConnect’s
archives. Simply click on the desired show to highlight it, then click on the
Open button.
23
Page 27

DMXQConnect for CR - User Guide Command Reference
Chapter 4: Command Reference
S
UMMARY
This Section describes the function and use of DMXQConnect main menu
commands. For a step-by-step procedure on how to create patch files and
send them to the DMXPathfinder, refer to Chapter 3: Getting Familiar with
DMXQConnect .
F
ILE MENU
The File menu deals with the functions of saving, retrieving, and deleting
individual patch files. Exiting the DMXQConnect program is also done from the
File menu.
New Show
Opens the New Show dialog box and erases the currently loaded patch data
from the work area. You are prompted for a name and description for the new
show. Show names of up to 20 characters (including spaces) are supported.
Open Show
Opens the Open Show dialog box containing the names of all show patch files
in the database. The user highlights a show file name and loads it into the
work area by clicking Open. Shows can also be deleted from this dialog box.
Rename Show As
Used to save the current show with a new name.
Save Show As
This function can be used to make the current show the base for a new show
by entering the name of the new show. Conversely, if the show name is left
unchanged, the current show is saved as a separate file and “stamped” with
the current date and time. A given show name can be used any number of
times as all show names are stored in a queue, with the oldest files on top and
the newest at the bottom of the list.
Create Backup
If you wish to archive your DMXQConnect database, this is where it’s done.
Note that this process archives all show patches and configuration data.
24
Page 28

DMXQConnect for CR - User Guide Command Reference
Use the standard Windows 95 file management conventions to specify where
you want the archive saved to.
Restore from Backup
A database that has been archived, can later be restored using this dialog box.
When Restore From Backup… is selected, the user is first prompted to
create a backup of the existing database. This is always recommended, since
the Restore function will over-write all existing show files and system
configuration data. Specify the location of the file.
Exit
Closes the DMXQConnect program. Note that when QConnect is re-launched,
the last open show file is automatically opened.
V
IEW MENU
DMXPathfinder Event Log F5
Opens the DMXPathfinder Event Log window, displaying a record of all
communications “events” and messages sent to or from the Pathfinder. This
will include patch commands, acknowledgements, and a date/ time stamp for
each message. Outgoing commands appear in green, while incoming
messages are in blue. Communication failures appear in red.
Log entries should be cleared from time to time, such as at the end of a
production run, or before setting up for a new show. This will keep the log
relevant and current. Click on the Clear Event Log button when you wish to
perform this function. Be warned, however, there us no “undo” function on this
operation.
Click on the Refresh button to redraw the log and go to the most recent event.
DMXPathfinder Control
This brings up a window with a number of displays relating to direct control of
the DMXPathfinder’s internal functions. Here you’ll find tabs for Terminal,
Patch Rack, System Loopback and Reset. Full instructions can be found in
Chapter 5: Diagnostics and Troubleshooting.
DMXQConnect Options
This brings up a window with a number of displays relating to your preferences
when using DMXQConnect. You’ll find the following tabs:
25
Page 29

DMXQConnect for CR - User Guide Command Reference
Splash: This refers to the initial screen and graphic seen when
DMXQConnect is first started. You can specify a specific display time duration
or have the splash hold until “a Key is Pressed or a Mouse is Clicked”.
Display: You can choose to have the Command Line and Status Line display
at the bottom of your screen, by click-checking the appropriate boxes.
Comm Port: This screen defines the hardware connection parameters
between your PC and the DMXPathfinder. See Chapter 2: Communications
Setup for instructions. WARNING: Changing these settings may result in a
loss of your DMXPathfinder connection.
Database Backup: As with any other computer application, it is wise to make
backups of your DMXQConnect data. QConnect will remind you to make a
backup as the program is being closed, after the specified number of uses.
DMXPathfinder Options
These will provide the means to remotely select patch mode and configure
your DMXPathfinder interface. A display with two tabs appears:
DMXPathfinder Patch Mode: Lets the user remotely toggle the
DMXPathfinder patch configuration between the two file data stores (Backup
and Normal) from the PC. A Clear function is included which, when chosen,
completely strikes the current patch configuration from the Pathfinder and
erases the Normal patch data from its memory. The Backup patch data in the
Pathfinder’s memory is not affected.
DMXPathfinder Hardware Configuration: Use the mouse to click on your
selections. IMPORTANT: These settings are typically made once during
system setup, and will not need to be changed unless your system
hardware is modified. WARNING: Incorrect settings or modifications
may result in incorrect operation.
The model (DMXPathfinder LR or Classic) must be set to match the connected
hardware. DMXPathfinder LR is identified as such on the front face of the
modules. Classic hardware is only identified as DMXPathfinder on the face.
The Diagnostic Patch selection provides a means for the user or technician to
analyze the patch file output data format and content. When Display Patch
Debug Form is click-checked, a debug window will open every time a PC-toPathfinder patch file transfer is initiated. The window contains a “dump” of the
actual bit-by-bit patch data that was just sent to the Pathfinder. Normally you
should leave this selection set to Do NOT Display Patch Debug Form.
Input and Output card selection is discussed in detail in Chapter 3: Setting Up
the System.
26
Page 30

DMXQConnect for CR - User Guide Command Reference
Show Command Line & Show Status Bar
You can choose to have the Command Line and Status Line display at the
bottom of your screen, by click-checking the appropriate items.
CONFIGURE MENU
Station
To add a new Station, click the Add New button to clear the Station Name and
Description boxes at the top of the window. Notice that the next undefined
station number is displayed in the station number box. Click in the Station
Name box and type in the name of the station (e.g. FOH 1). Use the [Tab] key
or click in the Description field. An optional description may be entered here.
When done click the Update button or use the [Enter] key to complete the
addition to the Stations table.
To delete any existing Station and start fresh, click on the bottom (last) Station
in the table. While it is highlighted, click the Delete button in the Configure
Stations window. A message to confirm your decision will appear. Click Yes
to confirm. Note: Only the last Station in the table can be deleted with
each Delete action.
To modify an existing Station, click on it in the Station table to highlight it, then
click on the Station Name or Description box (whichever you wish to modify).
The regular text editing conventions of Windows 95 apply, including the rightclick editing tools. When your editing is complete, click the Update button or
use the [Enter] key to complete the modification to the Stations table.
Source
To add a new Source, click the Add New button to clear the Source Name and
Description boxes at the top of the window. Notice that the next undefined
source number is displayed in the source number box. Click in the Source
Name box and type in the name of Source (e.g. Main Console DMX 1). Use
the [Tab] key or click in the Description field. An optional description may be
entered here. When done click the Update button or use the [Enter] key to
complete the addition to the Sources table.
To modify an existing Source, click on it in the Source table to highlight it, then
click on the Source name or Description box (whichever you wish to modify).
The regular text editing conventions of Windows 95 apply, including the rightclick editing tools. When your editing is complete, click the Update button or
use the [Enter] key to complete the modification to the Sources table.
To delete any existing Sources and start fresh, click on the bottom (last)
Source in the table. While it is highlighted, click the Delete button in the
Configure Sources window. A message to confirm your decision will appear.
27
Page 31

DMXQConnect for CR - User Guide Command Reference
Click Yes to confirm. Note: Only the last Source in the table can be deleted
with each Delete action.
Equipment Type
The Equipment Type selection provides information about a station and
determines the icon displayed with the station. The list of available equipment
types for selection is determined here.
To add a new Equipment Type, click the Add New button to clear the
Equipment Type and Description boxes at the top of the window. Click in the
Equipment Type box and type in the name of Equipment (e.g. Color Scroller).
Use the Browse button to point to the icon you wish to be associated with that
Equipment Type. Icons are normally found in Program Files\QConnect\Icons.
To modify an existing Equipment Type, click on it in the Equipment Type table
to highlight it, then click on the Equipment Type box to edit. The regular text
editing conventions of Windows 95 apply, including the right-click editing tools.
When your editing is complete, click the Update button or use the [Enter] key
to complete the modification to the Equipment Type table. Use the Browse
button to point to the icon you wish to have associated with each Equipment
Type. Icons are normally found in Program Files\QConnect\Icons.
To delete any existing Equipment Type, click on the desired Equipment Type in
the table. While it is highlighted, click the Delete button. A message to
confirm your decision will appear. Click Yes to confirm.
You can edit existing icons or add new icons to your icon library. Icons are
standard .ico files and can be created and modified with a number of
shareware utilities.
Universe
DMX Universes need to be set up properly to take full advantage of the
optional DMX address calculation features in DMXQConnect.
There are two tabs, Show Specific and Defaults. The values entered on the
Defaults tab will be used unless there are values in Show Specific. Show
Specific will supersede the Default values.
The Universe # refers to an actual DMX console (or control system) output
port. Universe Parameters are the number and range of DMX device codes
configured on that port. DMXQConnect uses the values entered here to
calculate the numbers displayed in the Address box of the station detail pane
at the top of the working screen. DMX Universe parameters are not essential
information for the DMXPathfinder to patch correctly, they only serve as a
utility for the user.
28
Page 32

DMXQConnect for CR - User Guide Command Reference
To add a new Universe, click the Add New button to clear Universe and
Description boxes at the top of the window. Click in the Universe # box and
type in the number of the Universe.
To delete any existing Universe, click on the desired Universe in the table.
While it is highlighted, click the Delete button. A message to confirm your
decision will appear. Click Yes to confirm.
To modify an existing Universe, click on it in the Universe table to highlight it,
then click on the Universe box to edit. The regular text editing conventions of
Windows 95 apply, including the right-click editing tools. When your editing is
complete, click the Update button or use the [Enter] key to complete the
modification to the Universe table.
R
EPORT
To view a report, select Report, Connected Stations by Source from the
main menu. This will generate the actual report and open the Report window.
Maximize the Report window so that it fills the screen. If the report form looks
empty, you probably don’t have any stations patched. Controls for the Report
display appear along the bottom of the window.
As well, reports can be exported to a variety of formats including Lotus, Excel
and Word, by clicking on the “suitcase” button and selecting the format
desired.
29
Page 33

DMXQConnect for CR - User Guide Diagnostics and Troubleshooting
Chapter 5: Diagnostics and Troubleshooting
S
UMMARY
This Chapter explains how to use DMXQConnect and the DMXPathfinder’s
built-in diagnostic software to check for possible problems with file transfers or
in the DMXPathfinder modules, to assist in verifying new DMX wiring
installations and how to enter the system Access Code. It will also deal with
what corrective action can be taken by the user. For a detailed overview of the
theory of operation, functional description and troubleshooting of the
DMXPathfinder’s internal hardware and firmware systems, please refer to a
separate document, DMXPathfinder CR - Operation & Maintenance Manual.
S
YSTEM HEALTH CHECK
DMXQConnect incorporates a simple user function to determine whether the
Personal Computer and DMXPathfinder are communicating properly with each
other and if all of the Pathfinder’s module frames are connected and
responding properly. If not already running, launch QConnect and click on
View, DMXPathfinder Control. Choose the Patch Rack tab. This screen
contains sixteen graphical red LEDs, each corresponding to a module frame in
the largest possible DMXPathfinder system. Click on the Retrieve
DMXPathfinder Info button, and one or more of the LEDs should turn green
according to the actual installed configuration of your system. Any LEDs that
remain red indicate missing, miswired or defective module frames as no
response was received.
The Mainframe Serial # field at upper left should now be displaying a series of
numbers that identify the first frame in the system. The System # field will also
contain some characters if a system identifying number was assigned. The
Access Code field may or may not display an 8-character user access code. If
it does, the word “VALID” will display in the Patch Rack Configuration pane to
the right. If not, “INVALID” will display. If this is the case, you will need to
contact the Factory to obtain an Access Code for your system. Refer to
Access Codes and Serial Numbers in this chapter for instructions on entering
the Access Code.
F
ILE TRANSFER ERRORS
As described in Chapter 3, patch file transfers are checked on two different
levels for errors. First, a CRC (Cyclic Redundancy Check) is performed at the
30
Page 34

DMXQConnect for CR - User Guide Diagnostics and Troubleshooting
DMXPathfinder on the received file to ensure data integrity. The response
message "Successful patch file transfer" should be seen in QConnect’s
DMXPathfinder Event Log for every file send operation. If the message
"Unsuccessful patch file transfer" appears, there is probably hardware trouble,
most likely with the Master Control Module (MCM) in the Pathfinder. Replace
the MCM with a spare unit and retry the file transfer. Another possible cause
for this error would be incompatible software versions between DMXQConnect
and the MCM EPROM.
The second and more likely cause of error, would be a defective or missing
Input or Output Module. In this instance the file transfer would be successful,
but the end result would not be. The ERR LED on the face of the MCM, and
possibly on the suspect IPM or OPM, would be illuminated. The message
"Output [or Input] Card nnn Communications timeout error" would appear in
the Event Log, where nnn indicates the sequential number of a suspect input
or output module. Locating a defective input module is easy since there are no
more than eight in any system (001 - 008), but it may take some counting to
find a bad output module (001 - 128). Replace the suspect module with a
known good one, making sure that the replacement's rotary address switches
are set to the correct module number, and retry the file transfer. The MCM
ERR LED should now be off, and the response message should not indicate
any problems.
L
OOPBACK TEST
DMXQConnect incorporates a link to a built-in set of input/output diagnostic
test routines in the DMXPathfinder firmware. The purpose of the System
Loopback Test is to allow the user to verify the proper operation of each and
every data receiver or transmitter, crosspoint matrix device, cable and
connection used for passing DMX signals through the Pathfinder. To
accomplish this, QConnect provides the means of sequentially checking all
Pathfinder hardware or selecting a specific set of input or output circuitry for
testing. The Pathfinder will respond with confirmation of the currently selected
hardware I/O device channel and the status of the test (passed or failed).
CAUTION: before running the Loopback Test routines, first ensure that
any Input or Output modules to be tested are not connected by the
installed wiring or portable cabling to any external transmitting or
receiving equipment whatsoever. As well, when Loopback Test is started
all DMX data moving through the DMXPathfinder will be cut off until you
exit from the DMXPathfinder Control screen.
There are two ways to run the Loopback Tests: using a graphical screen or
using a terminal window method. We suggest that if you are simply checking
for cable integrity, the graphic screen is most convenient. If you are carrying
31
Page 35

DMXQConnect for CR - User Guide Diagnostics and Troubleshooting
out “deep” testing of the DMXPathfinder crosspoint electronics, the terminal
window will be faster. Both methods can be used for either test, however.
These tests require that a "loopback connector" be plugged into either the
optional insert jack on the face of the I/O module or the source/station jack at
the far end of the installed DMX wiring. Loopback connectors are standard 5pin XLRs with pins 2&4, and 3&5 connected. A female connector will be
required for testing the source (input) modules and wiring, while a male
connector is used to test the station (output) modules and wiring.
When a loopback test is initiated, the DMXPathfinder’s Master Control Module
generates a pseudo-DMX signal and creates a routing path through the
Pathfinder electronics according to the I/O parameters that the user has
assigned. The signal is transmitted on the selected Output Module’s send data
pair (XLR pins 2 and 3) and received back on the same module’s return data
pair (XLR pins 4 and 5). If an Input Module is being tested, the signal is
transmitted on the return data pair (XLR pins 4 and 5) and received back on
the receive data pair (XLR pins 2 and 3). Loopback Test does not check for
pin 1 continuity.
GRAPHICAL SCREEN METHOD
If not already open, launch DMXQConnect and select View, DMXPathfinder
Control from the main menu. Choose the System Loopback tab. In general,
the left side of this screen is for selecting the test parameters, and the right
side is for starting the test and viewing the results. You might recognize the
green/yellow LED bar display in the center as a duplicate of what you would
see on the face of the DMXPathfinder’s Master Control and Frame Control
modules. At the top of the screen are buttons for setting manual or automatic
32
Page 36

DMXQConnect for CR - User Guide Diagnostics and Troubleshooting
test mode.
To do a continuity test for a given output line, say Station #15, follow these
simple steps:
1. Set the System Select button for your particular DMXPathfinder
configuration, single-frame or multi-frame (default is multi-frame)
2. Select Output module as the I/O Card type.
3. Increment the I/O Card Address to 004 (since each I/O module has 4
inputs or outputs, output #15 will be on module #4)
4. For I/O Channel to Test, select button C (output #15 is the third channel)
5. Leave the Send/Return Channel Increment Mode set at the default
Manual.
6. Click on the Execute Loopback Test button. The word TESTING will
appear in the black Loopback Status window, changing after about 1
second to PASSED or FAILED. A record of the test results will appear in
the Send/Return Channel Loopback Status display.
7. A PASSED result indicates that the line has been wired correctly and the
transmit/receive circuitry on that Output Module is functional.
8. If the response shows FAILED and it’s a new installation that’s being tested,
the most likely cause is a mis-wired cable to the station. You can determine
whether the fault is with the cable or the Output Module by reconnecting the
suspect cable to a known good output or swapping the Output Module with
another (remember to set the three address switches correctly!).
To carry out a complete check of all crosspoint router and transmit/receive
circuitry which could possibly affect the selected input or output line, change
the Send/Return Channel Increment Mode to Automatic, then execute the
test again. This time you will see the green/yellow LED bar display
incrementing as the test checks every input/output crosspoint combination and
I/O bus connection in sequence. The process will take about one minute for
each line being tested (versus 15 seconds when the test is run from the
terminal window). If a problem is encountered during automatic testing, the
test will terminate at the suspect I/O bus channel location as shown on the
LED bar display and in the Loopback Status window. It is a good idea at this
point to try restarting the test by clicking on the next Send (TxD) channel green
LED following the one where the testing stopped, then executing again. If the
problem was with the previous Send channel, the test should now continue
normally. If the problem was a Return (RxD) channel, the test will not continue
unless you click on the next RxD yellow LED.
Send/Return bus channel problems discovered during loopback testing can be
traced to a defective Input or Output Module, Master Control or Frame Control
Module, or the I/O bus cabling that links the DMXPathfinder ‘s module frames.
In general, problems that affect only one input or output line point to the actual
Input or Output Module. Problems that affect all lines in a given frame point to
33
Page 37

DMXQConnect for CR - User Guide Diagnostics and Troubleshooting
the Frame or Master Control Module, and problems that affect every line in the
system are most likely caused by a I/O bus cable connection. Make a note of
the defective I/O channel and which lines are affected, then refer to the
DMXPathfinder CR – Operation & Maintenance Manual for further assistance
in correcting the fault.
TERMINAL WINDOW METHOD
Launch DMXQConnect and select View, DMXPathfinder Control from the
main menu. The Terminal window is open in the foreground. Click on the
Connect button below the window, and several lines of text will appear. Your
personal computer is now in direct text-mode "conversation" with the
DMXPathfinder. The heading will read “DMX Crosspoint Router Ver.2.0
Diagnostics” or something similar depending on the vintage of the Pathfinder
firmware. Below the heading is a list of single-letter keyboard commands for
various functions. Three menu choices are listed: System Loopback Test,
Access Code Input, and Serial Number and Access Code Support Status. Use
upper-case characters to select from these items.
Choose L for Loopback Test. Notice that the window now lists a menu
consisting of single-keystroke commands with short form descriptions, and at
the bottom there is a response area with a set of headings. The response
section provides an indication of the currently selected hardware I/O device
channel and the status of the test (Passed or Failed).
The following is a detailed explanation of the use of the Loopback Test terminal
command menu to test the DMXPathfinder electronics. Note that the response
area updates each time a command is given at the keyboard, and that
commands may be in upper or lower case characters.
f - Single/multiframe system select
Pressing "f" toggles the selected system configuration between single
frame or multiple frame systems. A single-frame system is the smallest
possible configuration, with all Input and Output modules in the same
frame. Most systems are multi-frame, that is, where Input Modules are
in the first rack frame and Output Modules are in one or more
subsequent frames. This setting must match the installed Pathfinder
hardware for the tests to work properly.
t - Input/output card type select
Pressing "t" toggles the I/O module type between Input and Output,
allowing the user to select the type of module to be tested.
m - Manual/automatic mode
34
Page 38

DMXQConnect for CR - User Guide Diagnostics and Troubleshooting
Pressing "m" toggles the test mode between manual and automatic. In
manual mode, the user manually increments or decrements the internal
send/return bus channel to be tested (range 01-16), allowing a specific
bus channel to be targeted for testing. This mode might be used to
check for a possible defective internal bus channel, or when the external
cable installation is being checked for continuity and it is unnecessary to
deal with any of the Pathfinder's internal circuitry. Automatic mode
sequentially scans all 16 internal send/return bus channels and tests all
possible crosspoint matrix combinations for the I/O module channel
being tested. This constitutes a complete and thorough check of all
internal wiring and circuitry affecting the selected I/O channel, and a
passed test will guarantee proper functionality of that channel.
c - Card I/O Channel select
Pressing "c" increments the Input or Output Module's I/O channel
between A, B, C , and D, allowing the user to select one of the four
channels on each I/O module to be tested.
s - Send channel increment
Pressing "s" increments the internal send bus channel (range 01-16),
allowing the user to select a specific bus channel for testing in Manual
test mode or where to start testing in Automatic mode.
S - Send channel decrement
Pressing "S" decrements the internal send bus channel (range 01-16),
allowing the user to select a specific bus channel for testing in Manual
test mode or where to start testing in Automatic mode.
r - Return channel increment
Pressing "r" increments the internal return bus channel (range 01-16),
allowing the user to select a specific bus channel for testing in Manual
test mode or where to start testing in Automatic mode.
R - Return channel decrement
Pressing "R" decrements the internal return bus channel (range 01-16),
allowing the user to select a specific bus channel for testing in Manual
test mode or where to start testing in Automatic mode.
i - Initiate test /continue test /pause test
Pressing "i" after setting up the test parameters and plugging in the
loopback connector, will start running the selected test. A test run in
Manual mode will complete almost instantly since there is only one send
and return channel to be tested. The response section in the terminal
display window should update and first show "Testing" in the Status
column, then it should update again to show "Passed". If the display
shows "Failed", check that the loopback connector is wired properly and
35
Page 39

DMXQConnect for CR - User Guide Diagnostics and Troubleshooting
plugged in to the I/O channel indicated on the display. Re-run the test
on a known good input or output channel.
In Automatic mode, pressing "i" will start running the test at the currently
selected internal send/return bus channel, with the progress and results
of every individual crosspoint test (Testing, Passed) displayed as it
completes. The Source Line TxD and RxD LEDs on the face of the
Pathfinder's Master Control Module will track the progress of the test. If
a problem with any aspect of the test occurs, the test will halt at the
point where trouble was encountered. Both the Pathfinder LED display
and the PC terminal window response will indicate the send and return
channel where there is a problem. In most cases, troubles pinpointed
by these diagnostic tests can be easily corrected by simple replacement
of the suspect module, or by correcting mistakes in the installed DMX
wiring. In rare cases, there may be a connection problem in one of the
rack frames or their interconnecting cables. Please refer to the DMX
Pathfinder CR - Operation & Maintenance Manual for more assistance
if you suspect that this is the source of trouble.
Pressing "i" after starting an Automatic test will pause the test, and
pressing it again will allow the test to continue.
a xxx (Enter) - Board address select (001-008 input, 001-128 output card)
Pressing "a" followed by the 3-digit card number and [Enter] will select
a specific Input or Output Module for testing. All key presses are
echoed in the terminal display window and the new selected number will
be confirmed by an update in the response area. The short form
description above gives the maximum possible numeric ranges for the
two types of I/O modules. Spaces between the characters are not
required.
Enter - redisplay command menu
Pressing the [Enter] key at any time will reprint the entire command
menu on the PC display. This is useful if there is no printed version of
the menu handy for reference during Loopback Test operations.
A
CCESS CODES AND SERIAL NUMBERS
To view or enter the system Access Code, launch DMXQConnect and select
View, DMXPathfinder Control from the main menu. The Terminal window is
now open in the foreground. Click on the Connect button below the window,
and several lines of text will appear. Your personal computer is now in direct
text-mode "conversation" with the DMXPathfinder. The heading will read
“DMX Crosspoint Router Ver.2.0 Diagnostics” or something similar depending
on vintage of the Pathfinder firmware. Below the heading is a list of single-
36
Page 40

DMXQConnect for CR - User Guide Diagnostics and Troubleshooting
letter keyboard commands for various functions. Three menu choices are
shown: System Loopback Test, Access Code Input, and Serial Number and
Access Code Support Status. Use upper-case characters to select from these
items.
CCESS CODE INPUT
A - A
When the DMX Pathfinder system is origi nally installed, and if/when the Master
Control Module is replaced, the user must enter a unique access code to
enable PC-to-Pathfinder patch file transfers. The access code has been
determined at the Factory, and relates to the actual rack hardware supplied for
a given system. Additional I/O modules may be added or removed from the
system by the user at any time, but adding more output frames requires that a
new access code be used. The access code, once correctly entered, is stored
in non-volatile memory in each Master Control Module supplied with the
system and no further action is ever required unless hardware is changed as
described above. If your system includes a spare Master Control Module,
make sure it is enabled by plugging it in and going through the access code
input procedure again.
To enter the access code, turn on [Caps Lock] and select "Access Code
Input" by pressing "A".
Type in the 8-character code that was supplied with your system. When the
8th character has been entered, you will be prompted to confirm your Access
Code. Press "Y" to accept the code, "N" to reject the code and try again, or
[Esc] to abort the entry function altogether. When you have entered the
correct code and accepted it, the message "Done!" will appear.
N - S
ERIAL NUMBER AND ACCESS CODE SUPPORT STATUS
The main purpose of this function is to allow the user to poll the system and
detect the installed module frame hardware. Each frame in a given system
has a unique serial number, and these numbers are displayed along with an
"OK" status flag which indicates proper functioning of each Frame Control
Module.
A frame that has a missing or defective Frame Control Module, a frame that is
disconnected from the system Comm Bus, or frames not present, will not be
detected by the poll. The poll response will also display the current system
configuration (Single frame or Multiframe) as set on DIPswitch #6 on the
Master Control Module.
These Diagnostics menu functions can be terminated at any time by clicking
on the Close icon [X] at the top right of the DMXPathfinder Control screen.
When the screen is closed, a soft reset command is issued to the Pathfinder to
re-establish its current patch configuration.
37
Page 41

DMXQConnect for CR - User Guide Index
INDEX
defective output module · 31
delete · 27, 28
[
[*] key · 22
[/] key · 22
[@] key · 22
[+] key · 22
[Caps Lock] key · 37
[Delete] key · 22
[Enter] key · 22, 27, 28, 29, 36
[Esc] key · 37
[Tab] key · 27
“
“eraser” button · 22
“suitcase” button · 29
A
Access Code · 30, 34, 36
Access Code Input · 37
Access Code Support Status ·
37
Activation Key · 9
Activation Serial Number · 9
Add New · 17, 19, 27, 28, 29
add new icons · 28
Address · 4, 17
Address box · 28
address switches · 18, 33
and · 22
archive · 24, 25
authorization number · 9
automatic · 35
Automatic · 33, 35, 36
B
BACK/NORM switch · 8, 11
Backup · 15, 26
Backup data · 22
Backup Mode · 11
Backup patch · 14
Backup Patch · 15
Batch · 9, 14
baud rate · 6, 8
bi-directional communications ·
4
bi-directional mode · 14
Board address select · 36
Browse · 28
C
cable integrity · 31
cabling problems · 9
Card I/O Channel select · 35
channel · 17
Clear · 26
Clear command · 15
Clear Event L
Clear Existing Patch Mode
and Normal Patch Data · 15
CMOS setup · 8
column · 20, 21
COM LED · 8
COM port · 7
COM Port · 5
COMM FAILURE · 8
Comm Port · 8, 26
Command Line · 22, 26, 27
Command Reference · 24
Communication failures · 25
Communications pane · 14
Communications Setup · 7
configuration data · 24
Configure Menu · 27
Configure Sources · 27
Configure Universe · 16
Configuring your information
display · 20
Connect · 8, 34, 36
Connected · 12
Connected stations · 21
Connected Stations · 6, 12, 21
Connected Stations by
Source · 21, 29
Connected Stations Display · 21
connection · 26
console · 3
console port · 18
Copy · 13
CPU · 5
CRC · 30
Create Backup · 22, 24
crosspoint router · 2
customize · 15
Cut · 13
og · 25
D
Database Backup · 26
date/ time stamp · 25
decrement · 35
Defaults · 17, 28
defective input module · 31
Delete · 13, 17, 27, 28, 29
Description · 11, 12, 20, 27
Detail · 20, 22
Detail View · 21
device codes · 17
Device Manager · 8
Device # · 4
diagnostics · 31
Diagnostics · 30, 38
dimmer · 17
Disconnect · 13
Display · 26
DMX · 1, 2, 15, 31, 36
DMX address · 28
DMX device codes · 28
DMX distribution system · 1
DMX network · 3
DMX networks · 2
DMX Pathfinder Options · 8
DMX QConnect Options · 8
DMX Talkback · 14
DMX Universe · 17, 28
DMXPathfinder · 2
DMXPathfinder Control · 8, 9,
25, 30, 31, 32, 34, 36
DMXPathfinder Event Log · 25
DMXPathfinder Hardware
Configuration · 16, 26
DMXPathfinder Options · 15,
16, 26
DMXPathfinder Patch Mode ·
26
DMXQConnect Options · 25
DMXQConnect Serialization · 9
E
edit icons · 28
electrical ground · 7
End Device # · 17
Equipment Name · 20
Equipment Type · 13, 28
ERR LED · 7, 11, 31
Event Log · 25, 31
events · 25
Excel · 21, 29
Execute Loopback Test · 33
Exit · 25
F
Failed · 34, 36
FAILED · 33
38
Page 42

DMXQConnect for CR - User Guide Index
File Menu · 24
File Transfer Errors · 30
Frame Control module · 32
Frame Control Module · 37
G
ground loop problems · 7
H
Hard Disk Space · 5
I
I/O Card Address · 33
I/O card type · 33
I/O Channel to Test · 33
icon library · 28
icons · 4, 20, 28
Icons · 12, 28
incoming messages · 25
increment · 35
Initiate test /continue test
/pause test · 35
Input Card nnn
Communications timeout
error · 31
Input Cards · 8, 16
input module · 31
Input Module · 32, 33, 34, 35,
36
Input/output card type select
· 34
Installation · 5
Installing DMXQConnect · 6
INVALID · 30
IPS dimmers · 14
IRQs · 8
L
LEDs · 7, 30
Live · 14
Loopback · 25
loopback connector · 32, 35
Loopback Status · 33
loopback test · 33
Loopback Test · 31, 32, 33, 34
Loopback Test terminal
command menu · 34
Lotus · 21, 29
M
Mainframe Serial # · 30
Manual · 33, 35
Manual/automatic mode · 35
Master Control Module · 7, 8,
31, 32, 37
Memory · 5
modify · 27, 28, 29
Mouse · 5
Multiframe · 33, 37
multiple frame · 34
N
Name · 11
New Show · 11, 24
Non-Connected Stations · 6, 12
NORM · 8
Normal · 15, 26
Normal Mode · 11
Normal Patch · 15
Num Lock · 22
numeric keypad · 22
O
Offline · 9, 12, 14
Open Show · 23, 24
Opening a Different Show · 23
Operating Systems · 5
optical isolator · 7
Outgoing commands · 25
Output [Card nnn
Communications timeout
error · 31
Output Cards · 8, 16
output module · 31
Output module · 33, 34
Output Module · 32, 33, 35, 36
P
Pane Sizes · 20
parameters · 15, 16
Passed · 34, 36
PASSED · 33
Paste · 13
Patch Cleared · 15
patch file transfers · 10
Patch Mode · 9, 12, 14
Patch Rack · 9, 25, 30
Patching · 12
Patching Multiple Stations · 13
port · 3, 28
port settings · 8
preferences · 25
Printed Reports · 21
printer · 21
Printer · 6
Q
Quick Start · 2
R
Refresh · 25
Rename Show As · 24
Reports · 21, 29
Reset · 15, 25
RESET · 11
restore · 25
Restore from Backup · 25
Restore From Backup… · 22
Retrieve DMXPathfinder Info ·
30
Retrieve Patch Rack Info · 9
Return (RxD) · 33
Return channel decrement ·
35
Return channel increment ·
35
rotary address switches · 31
RS232 · 7
RS422 · 4
RS422/485 serial adapter card ·
7
RS485 · 4, 7
RUN LEDs · 7, 11
Runtime Error · 8
RxD LED · 36
S
Save Show As · 24
Saving · 13
Select Backup Patch Mode ·
15
send · 9
Send (TxD) LED · 33
Send channel decrement · 35
Send channel increment · 35
Send Patch · 14
Send/Return bus channel
problems · 33
Send/Return Channel
Increment Mode · 33
Serial Number · 34, 36, 37
Serial Number and Access
Code Support Status · 37
Setting up · 15
show · 23
Show All · 21
39
Page 43

DMXQConnect for CR - User Guide Index
Show Command Line & Show
Status Bar · 27
Show names · 24
show patches · 24
Show Specific · 17, 18, 28
signal common · 7
single frame · 33, 34
Single frame · 37
Single/multiframe system
select · 34
software versions · 31
Sorting · 21
Source · 4, 6, 12, 21, 27
Source Configuration · 19
Source Name · 19, 27
source number · 27
Splash · 26
Start Device # · 17
station · 28
Station · 4, 12, 27
Station Configuration · 20
Station detail · 28
Station Detail · 12, 17
Station Icons · 20
Station information · 21
Station Name · 6, 20, 27
stations · 29
status · 4
Status Bar · 27
Status Line · 26
Successful patch file transfer ·
31
System # · 30
System Health Check · 30
System Loopback · 25, 32
System Loopback Test · 31, 34,
37
System Requirements · 5
System Select · 33
T
Talkback · 14
Talkback Enabled · 14
terminal · 31, 35, 36
Terminal · 8, 25, 34, 36
Testing the Software Installation
· 6
thru · 22
transfer · 14
Troubleshooting · 30
TxD LED · 36
U
Undo · 13
Universe · 28
Universe # · 28, 29
Universe Parameters · 28
Un-Patch a Station · 13
Unsuccessful patch file transfer
· 31
Update · 17, 19, 27, 28
Update button · 29
upload · 14
V
VALID · 30
Video · 5
View Menu · 25
W
Windows 95 · 1, 5, 8, 11, 13,
19, 21, 22, 25, 27, 28, 29
Windows NT · 5
Word · 21, 29
Wybron Scrollers · 14
X
XLR · 32
40
 Loading...