

Page 1
pass
TM
May 18, 2006
XA160 Owner’s Manual
XA160 Owner’s Manual
1
Page 2

Introduction
Analog designer Nelson Pass has over the years produced some
truly great solid-state amplifiers, each unique in it’s own way. Not
surprisingly, the Pass Laboratories ™ XA160 monoblock amplifier
is no exception. The XA160’s sleek industrial design is a stunning
understatement of artistic form integrated with state of the art
function.
Since the introduction in 1997, the X amplifier series using the
patented Supersymmetry™ circuit topology have been the mainstay
of amplifier offerings from Pass Laboratories™. These amplifiers
are heavily biased Class A/B designs with only two gain stages and
an absolutely minimal component count in the signal path. In spite
of this simplicity and thanks to the unique characteristic of the X
topology, these amplifiers achieve very high power with outstanding
subjective and objective performance.
With the introduction of the XA160 Pass Laboratories™
significantly raises the performance standard of excellence by
introducing an entirely new series of power amplifiers. The new
“XA” series of amplifiers feature a refined and elegantly simple, very
highly biased, pure Class A mode of operation. This is a new and
unique circuit topology that we descriptively characterize as being
Single-ended Class A. This new topology combines the very best
characteristics of Pass Laboratories™ “X” series amplifiers and the
highly rated “Pass Laboratories Aleph™”. The XA series is the
marriage of a highly refined Aleph™ output stage with the patented
Supersymmetry™ “X” front end.
XA160 Owner’s Manual
The emphasis of the XA series is to accentuate performance over
power. The XA series has the characteristic warm midrange and
sweet top end of the Aleph™ product conjoined with the extreme
dynamic range and definitive bass control of the X series amplifiers.
The XA160 is packaged in an artistically refined variant of the
massive chassis previously reserved for the 600 watt X-600.5
monoblock amplifier, but running more than twice the Class A bias
current of our other amplifiers.
The Pass Laboratories™ XA160 will deliver 160 watts rms into
8 ohms of impedance. This is the amplifiers class A limit, driving
the XA160 harder or reducing the impedance of the load will not
convey any additional power. Driving into a short will not convey
any additional power. These are not design oversights or flaws in
the XA160, but rather a condition of the very highly biased Class A
operation. However; as an interesting point of reference, 160 watts
driving a 87dB/1W/1m speaker will deliver close to 110 dB (quite
loud) average acoustic signal in a 100 cubic meter room.
2
Page 3

The XA160 has a massive toroidal transformer coupled to a high
current DC reservoir. Recognizing that the XA160’s ability to resolve
microdynamics is best experienced with clean power, the extreme
low-level resolution of the XA-series benefits from a specially
designed power supply that significantly reduces and rejects power
line borne noise.
The XA amps open the sonic soundstage to the very limits of the
recording format. Through the XA160 complex musical passages
reveal themselves in the most dramatic manner. With the XA160
you will hear everything within the upper octaves, which includes any
recording, source or loudspeaker issues. Keep this in mind when
choosing complementary equipment, remembering that recordings
and the other components in the signal chain will strongly dictate
soundstage width and imaging and likely be the limiting factors in
your listening environment. The room itself will also add its acoustic
signature, and should be considered an audio component.
Speaker selection should be strictly a matter of personal taste.
The XA160 is unconditionally stable into any load presented by a
loudspeaker, but will provide less power into other than 8 ohms. The
XA160 accommodates both single ended (RCA) and balanced inputs
(XLR). Input impedance’s are 11 kohm unbalanced and 22 kohm
balanced to permit integration with the widest possible range of
upstream components.
Requirements
You can position this amplifier anywhere you wish, but it must have
ventilation. We do not recommend placing it in enclosed cabinets
or small closets without means for air to circulate freely. Stacking
these power amplifiers directly upon each other is not recommended
for the same reason. This amplifier idles at approximately 550 watts,
the equivalent of a small hand held hair dryer. At idle most of that
energy is dissipated across the heat sinks, so the heat generated by
each XA160 is equivalent to a small hair dryer. To dissipate this heat
the product should have about 6 inches clearance to the top and
sides for adequate air circulation.
Let’s talk about power requirements. The amplifier draws about 5
amps (continuous rms) at 120 volts out of the wall during operation,
and this reflects mostly the idle current that we run through the
output stage. When not actually intending to play music the XA160
should be left in standby mode. In standby mode it draws only a few
watts of power, that necessary to keep the capacitors charged.
We have provided a standard IEC power cord that fits into the
standard 15 amp IEC receptacle at the rear of the amplifier chassis.
XA160 Owner’s Manual
3
Page 4

Two XA160’s may be run on a single 15-amp circuit. This amplifier
is equipped for operation with an earth ground provided by the
users AC outlet. Never defeat this ground connection. The signal
ground of this amplifier is connected to earth through a power
thermistor, which provides a safety ground but provides protection
from irritating ground loops.
As a safety issue we suggest that the power cord should be the
last cable installed on your power-amplifier. You may, if you
wish, substitute a 15-amp aftermarket power cord for the one
we have supplied. Only use power cords, which meet all local
safety standards and carry acceptance marks from the local
regulatory authority. The power cord should be attached to the
amplifier prior to plugging into house power. Place the rear
mounted switch in the off (down) position before plugging in
this amplifier.
The amplifier’s voltage and current rating are indicated on the rear
panel. It will be either 240 volts, 220 volts, 120 volts or 100 volts,
all with a restorable type circuit breaker of the appropriate ampacity.
The inclusion of this re-settable circuit breaker does away with the
need for disposable fuses. The frequency rating of the AC line
source is 50 to 60 Hz in all cases. Please verify that the amplifiers
indicated voltage requirements are consistent with the supplied
voltage and current at your location. Transformers are input voltage
specific and their change is not a trivial matter.
Setup
XA160 Owner’s Manual
Looking at the rear panel you will see the AC power cord receptacle,
a power switch / breaker, two pairs of output connectors which
allow for speaker bi-wiring, a single pair of 5 way connectors for
remote turn-on, a single RCA input connector and a single XLR
balanced input connector.
Make sure that the rear panel power switch/breaker is off (down).
Plug the AC cord into the back of the amplifier, and then into the
wall. Then turn the power switch/breaker on (up). The lights in
your house will blink when the power supply charges the capacitors.
(Note: The power switch/breaker is never to be used as a “safety
device” or “emergency disconnect” for this product. This device
provides current limiting which will protect the amplifier, it will not
provide personal shock protection in the event of a reversed hot /
neutral, lack of grounding or other improper wiring in the supplied
mains voltage.)
On the front panel, the “Standby” LED indicator should be glowing
blue, indicating that AC power is available and the capacitor banks
4
Page 5

are charged. The “Power” LED should not be on. If the “Power”
LED is on, don’t get excited, just use the front panel stand-by button
to go to stand-by mode, with the “Standby” LED on and the “Power “
LED off.
OK, so the amplifier is sitting there in stand-by mode with just the
single blue LED lit. No speaker connected yet. You can go ahead
and connect the source and speakers. Make sure you are in standby
mode to protect your speakers from transients. The prudent installer
will unplug the XA160’s power cord from the mains while attaching
speaker cables.
To avoid the possibility of short circuits always connect speaker cables
to the speakers prior to connecting to the amplifier. The output
binding posts will accept either bare wire or spades. (Regulatory
agencies in many countries have banned binding posts that will accept
a banana plug, forcing us to abandon this option.) Make sure that your
speaker wires only attach to the outputs of the amplifier, not to each
other and never to the amplifier case.
Some powered subwoofers require an audio signal ground reference
and their makers may suggest that a black speaker terminal is
where this voltage reference might be found. On complementary
designs, which would be typical of all power amps produced by Pass
Laboratories™, this is an incorrect and unsafe assumption. On all
Pass Laboratories™ power amplifiers a reference of 0 volts will be
found only at pin 1 of the XLR input or at the shell of the RCA input.
XA160 Owner’s Manual
Reference connections for these devices require special consideration
when used with our product. If you have such a device, and wish to
use it with our product, please contact our Foresthill, California factory
for specific instructions.... you have been warned.
The amplifier may be driven single-end or balanced, your choice.
Single-ended input will always occur through the RCA connector
and balanced input will always occur through the XLR connector. If
driving the amplifier single-ended leave the supplied jumpers in place
between pins 1 & 3 on the input XLR. On the XLR connector pin 1 is
ground, pin two is positive input and pin 3 is inverted (negative) input.
Pin numbers are marked on the XLR. If you re-install the jumper
incorrectly or leave it lying about, the amplifier will not work properly.
You must choose either XLR or RCA inputs it is not advised to try and
run both concurrently.
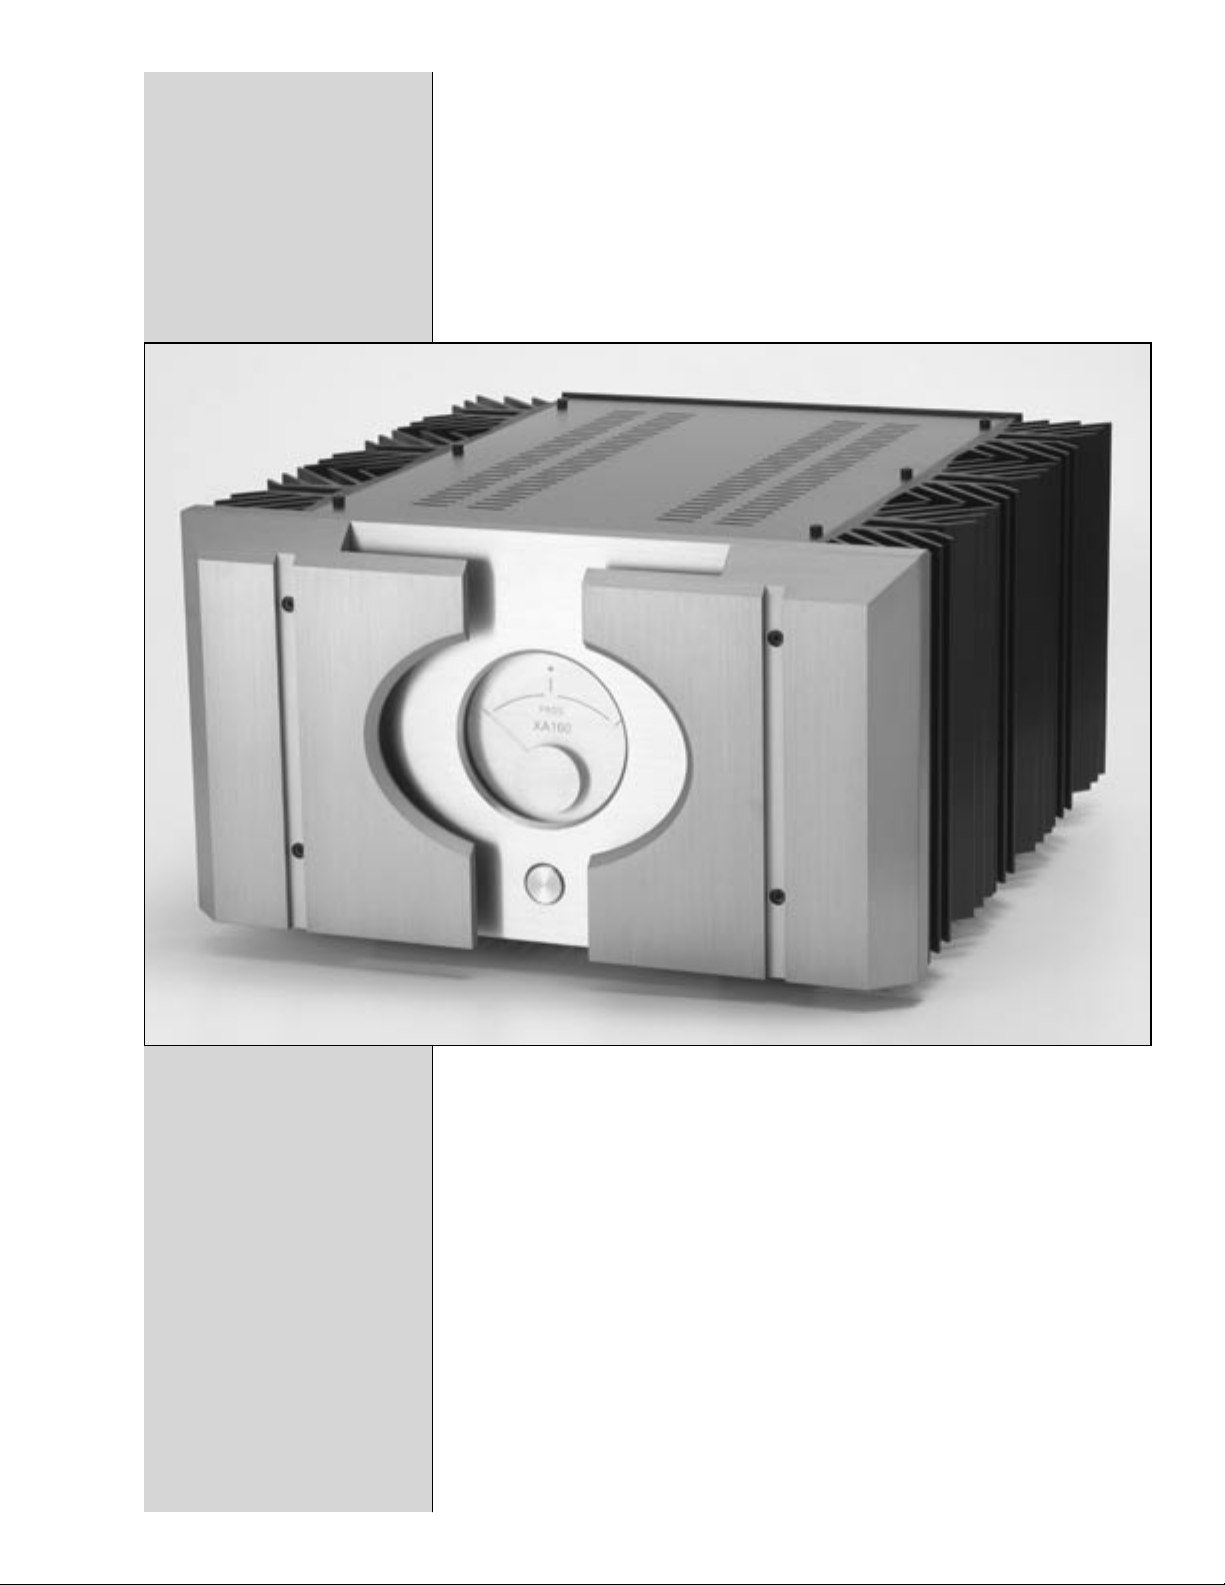
XLR input connector showing proper
placement of jumper pin for use with
single-ended (RCA) input.
5
Page 6

You are ready to play music
Now that the source component is connected, make sure there is no
signal coming from it, probably by turning the volume all the way
down.
With the speakers connected, make sure the power cord is attached
and plugged into mains power; push the front panel button to
activate the amplifier. The “Power” LED will come on.
Do everybody a favor and try not to have shorted output cables. It
happens accidentally all the time, and the amplifier is designed to
survive, but why tempt fate. If you accidentally cause the breaker
to trip, it can be reset by first cycling the breaker handle to the off
position (down) and then on (up). The fault, which caused the “trip”,
will need to be corrected prior to resetting this breaker.
Of course it’s always possible that something may go wrong. If so,
don’t get excited. It’s really aggravating when a product doesn’t work,
we understand, but it will get fixed. We go to a lot of trouble to make
products reliable, and the failure rate of our amplifiers is very low.
This is small comfort to the few, but take it easy and give us a call if
you have problems.
People are interested in how long it takes for these amplifiers to break
in. Depending on the resolution of the rest of your audio chain,
you may or may not notice any break in of the XA160 beyond the
first 50 hours of operation. You will likely notice the difference in
sonic character between cold and normal operating temperature, so
we recommend letting these amplifiers warm up before any serious
listening.
It takes about an hour for them to warm up, and this is where we
adjust them first. Then we adjust them again and again over a
couple of days, keeping the bias and offset in the sweet spot. Our
environment is about 23 degrees Centigrade, room temperature, and
the heat sinks will rise to about 25 degrees C. above that, for a heat
sink temperature of about 48 degrees C. This is where they operate
best.
In your setup the heatsink temperature may vary a bit due to line
voltage and ventilation, but it is not a big deal. You should be able to
put your hands on the heat sinks without discomfort for 10 seconds or
so.
XA160 Owner’s Manual
The amplifier has a thermal cutout that will disconnect AC power if
the temperature exceeds 75 degrees Centigrade. This thermal cutout
should never occur in real life.
6
Page 7

More things to know
You may remotely operate the stand-by mode by applying 12
volts DC to the single pair of 5 way connectors on the rear of the
amplifier. The positive of the 12 volts DC goes to the red connector,
negative to the black. This connection has an actual operating range
of about 9 volts to 15 volts. This switching feature will override
the front panel button, only when the front panel button is in the
standby position.
Speaker Interface
Interconnects and Speaker
Cables
The XA160 is optimized for 8-ohm speaker loads. Having said that;
we are not aware of any speaker on the market that presents an
unusual or difficult load for these amplifiers.
The XA amplifiers do not care particularly about the reactivity of
the load. Reactive loads typically will have slightly less distortion at
a given voltage/current level than resistive loads. The XA circuit
was designed to be quite happy driving electrostatic speakers and any
other esoteric loads we know of.
We have a general recommendation about interconnects, and speaker
cables; which is that they should cost less than the amplifier, and
contain at least some conductive material. We have tried a lot of
products and most work well, but as a practical matter we cannot
make blanket recommendations.
The amplifier is not sensitive to source interconnects. It is also not
sensitive to radio frequency pickup, which allows some flexibility
in choosing source interconnects without shields, though shields
are always in good taste. For long runs balanced cables are highly
recommended for their inherent rejection of common mode noise.
XA160 Owner’s Manual
We prefer speaker cables that are short and stout, oxygen free
copper and silver are the suggested materials. If you find any really
exceptional cable made of gold, please gift us a couple hundred feet.
Fortunately this amplifier is not sensitive to the capacitive/inductive
character of some of the specialty speaker cables, so feel free to
experiment.
We have found that about 90 per cent of bad sounding cables are
really bad sounding connections, and we recommend that attention
be paid to cleanliness of electrical contact surfaces and proper
connector fit.
7
Page 8

Speaker cables should be firmly tightened down at the speaker
output terminals, but not with a wrench. Output terminals will not
withstand the levels of torque that may be easily applied by wrench.
Hand tightening without excessive force is plenty. Cleaning contact
surfaces with one of the commercially available electronic contact
cleaners should be part of your annual system maintenance.
Fun Hardware Facts
The XA160 has a single large power transformer, under actual
conditions in the amplifier, it supplies but a fraction of its rated
power. This very conservative rating contributes to exceptional
voltage regulation figures and low noise figures at the loudspeaker.
The XA160 has a significant number of power supply filter
capacitors. These caps are used to create the unregulated output stage
rails at plus and minus 30 volts at 7 amps. RC filtering is used to
passively remove ripple from the supply rails.
All the power transistors in the product are hyper-matched parts,
with gate voltages matched to 0.5% and all devices taken from the
same manufacturing lot codes (made on the same wafer).
So how long will this hardware last? It is our experience that, barring
abuse or the odd failure of a component, the first things to go will
be the power supply capacitors, and from experience, they will last
15 to 30 years. Fortunately they die gracefully and are easily replaced
by a good technician. After that, the longevity will depend upon the
number of operating thermal cycles, but we can say that we have
had amplifiers operating in the field in excess of 20 years with no
particular mortality, and we don’t have good information beyond
that. More to the point, you should not worry about it. This is a
conservatively built industrial design, not a frail tube circuit run on
the brink of catastrophic failure. If it breaks, we will simply get it
fixed, so sleep well.
XA160 Owner’s Manual
8
Page 9

XA160 Specifications
All figures obtained after 1 hour warm-up, with regulated 120 VAC
power line. See manual notes about AC power line regulation.
Gain 26 dB
Freq. Response -3 dB at 1.5 Hz, -3 dB at 100 kHz
Power Output 160 watts max @ 1% THD,
1 kHz, 8 ohms
Maximum Output Voltage plus, minus approx. 30 volts
Maximum Output Current plus, minus approx. 7 amps
Input Impedance 22 kohm balanced
11 kohm unbalanced
Damping factor 30 ref @ 8 ohms nominal
Slew rate plus, minus 50 V/uS
Output Noise 300 uV unweighted 20-20 kHz
Balanced CMRR approx. -60 dB @ 1 kHz
DC offset < 100 mv
Power Consumption approx. 550 watts
Temperature 25 degrees C. above ambient at idle
Dimensions 19 “ W x 11.25” H x 22” D
Shipping Weight 150 lbs.
For more information please contact:
Pass Laboratories Inc.
P.O. Box 219,
24449 Foresthill Rd.,
Foresthill, CA 95631
Tel: 530.367.3690
Fax: 530.369.2193
www.passlabs.com
© 2006, Pass Laboratories Inc.
“Pass”, “pass”, “Pass Labs”, “Pass Laboratories”, Supersymmetery”,
“Aleph”, and “Zen” and are all registered trademarks of Pass
Laboratories, Inc., and all rights thereto are protected by law.
XA160 Owner’s Manual
9
Page 10

Warranty Information
Please check with the factory-authorized distributor in the country you are
purchasing this product for specific warranty information.
All Pass Laboratories products purchased from an authorized Pass Laboratories dealer in North America are covered by a transferable, limited 3-year
warranty. This warrantee includes all parts and labor charges incurred at the
repair facility in addition to return shipping to the domestic customer, exclusive of subsequent damages. Damage due to physical abuse is specifically
not covered under this warranty.
For this warranty to apply the customer is responsible for returning the
product unmodified to the factory within the warranty period. The customer
assumes all responsibility for shipping and insurance to the factory or a factory specified repair facility. The conditions and stipulations of this Pass
Laboratories warranty only applies to units sold new in North America.
Non-North America customers should consult with their original Pass Labs
dealer or distributor for warrantee repair instruction prior to contacting the
factory or shipping product for repair.
Non-North American product must be returned to the country of origin for
warrantee service. Foreign distributors are only required to offer warranty
service on Pass Laboratories product that they have imported.
Please note: Conditions of warranty service and customer rights for product
purchased outside the United States may vary depending upon the distributor and local laws. Please check with your local distributor for specific rights
and details.
Any modifications to Pass Laboratories products that have not received
written factory approval nullify all claims and void the warrantee. Should a
modified product be returned to the factory for repair the owner will be required to pay all necessary charges for the repair in addition to those charges
required to return the product to it’s original configuration.
In the case of safety issues, no product shall be returned to the customer
without those safety issues being corrected to the most recent accepted
standards.
Removal or alteration of original Pass Labs serial numbers voids the factory
warranty. Product with altered or missing serial numbers will be suspected
as counterfeit product.
Pass Laboratories will not repair or in any way indemnify any counterfeit or
cloned product.
XA160 Owner’s Manual
Pass Laboratories does not offer products in voltages intended for international markets either to authorized Pass Labs dealers or to third parties
located in the United States or Canada.
10
Page 11

For your protection please
read the following:
Water and moisture: Electrical devices should not be used near
water ( as per example, near a bathtub, washbasin, kitchen sink,
laundry tub, wet basement or swimming pool ). Care should be
taken such that objects do not have the opportunity to fall, and that
liquid is never spilled onto or into the device enclosure through
openings.
Power Sources: An electrical device must be connected to a mains
power source in strict accordance with the supplied product owner’s
manual. Please verify that the AC mains voltage specified in the
product manual matches those requirements indicated on the unit
and the AC voltage provided to your location by the power company.
Grounding: Adequate precautions should be taken so that the
grounding provisions built into an electrical product are never
defeated.
Power Cords: Pass Laboratories provides a power supply cord that
meets all legislated requirements for the market in which the product
was originally sold. If you choose to substitute an after-market
product we urge you to choose one that is fully safety rated by the
necessary local authority.
Power Cord Protection: Power supply cords should be routed so
that they are not likely to be walked on, abraded, or pinched by items
placed on or against them, paying particular attention to cords where
they enter plugs or exit from a device. Never under any circumstance
insert a cut or damaged power cord into a mains power socket.
Power and Signal: Cables should never be connected /
disconnected with equipment powered up. Failure to heed this
warning may damage or destroy equipment.
Ventilation: Power-amplifiers run hot, but you should be able to
place your hands on them without discomfort. You must allow for
this heat in installation, by providing for free air circulation around
the product. Electronics should not be subjected to sources of
excessive radiant heat. Excessive heat can shorten the life of the
product and may cause the electronics to self-protect and shut down.
Servicing: To reduce the risk of fire, electrical shock or other
injuries, the user should not attempt to service the device beyond
that which is described in the operating instructions. All other
servicing must be referred to qualified service personnel.
XA160 Owner’s Manual
11
Page 12

XA White Paper:
Like Peanut Butter and
Chocolate
© Nelson Pass
Sometimes two designs complement each other so well that you are
surprised when you learn they weren’t invented together. So it is with
the X Supersymmetery™ amplier and the Aleph single-ended Class A
output circuit.
The Supersymmetery™ “X” amplier repeatedly demonstrates the possibilities for very high power, dramatic dynamic contrast, and effortless
control by a simple circuit utilizing absolutely minimal feedback. As
with the art of Aikido, the X circuit works with the intrinsic character
of a balanced circuit and deftly turns that character toward perfection.
This has been the basis for a very successful Pass Laboratories™ product series, which has won numerous prestigious awards and garnered
critical acclaim worldwide.
For over ten years, the Aleph™ series of single-ended Class A ampliers have received praise for their outstanding sonic denition, warmth,
and smoothness; and have often been compared favorably with the very
best tube ampliers. The Aleph™ topology achieves state-of-the-art
performance with a very simple linear design, and is additionally one of
the most stable and reliable audio ampliers in existence.
X Supersymmetry™
A considerable number of audiophiles have found themselves bi-amping their loudspeakers, putting Pass Laboratories™ X ampliers on the
bottom for power and control, conjoined with Alephs™ on the top
for that smooth warm midrange and top end. We well appreciate these
complementary differences, and for the past few years Pass Laboratories™ has been at work marrying these two design concepts into a single
amplier topology. The trick was to create an amplier, which carries
the best of both designs, and not otherwise.
The Supersymmetry™ X amplier uses a new radical approach to
achieving high performance from a simple 2-stage circuit. The design
exploits the symmetry of a matched balanced amplier so that distortion and noise are cancelled at the output to the loudspeaker, then uses
a small dose of a unique new form of feedback to make that symmetry
more perfect.
US Patent # 5,376,899 describes our topology, which takes advantage
of the character of specially matched balanced ampliers that are crosscoupled to provide cancellation of distortion and noise. The result
provides high performance with very simple linear circuits, better than
previous similar efforts by an order of magnitude. It was named Supersymmetry™ as an homage to particle physics, but it is popularly known
as the X circuit.
XA160 Owner’s Manual
Balanced ampliers improve performance by differentially rejecting distortion and noise. To the extent that distortion and noise are identical,
12
Page 13

they vanish at the output, typically by a factor of 10 or so for matched
single-ended Class A circuits.
Supersymmetry™ extends this concept by using feedback only to make
the distortion and noise more identical on each half of a balanced circuit, not to eliminate it as such. This gives as much as a 100:1 reduction in unwanted distortion and noise without requiring the equivalent
amount of negative feedback. It is simply much easier to tweak the two
halves of the circuit into identical symmetry than to eliminate all the
distortion in each half of the circuit.
The result has been a successful series of high power ampliers offering
low distortion, and stunning dynamic range and control, with only two
gain stages and very minimal feedback.
Supersymmetry™ is ideally used to obtain high quality performance
from very simple gain circuits, and particularly favors single-ended Class
A topologies due to their smooth second harmonic characteristic, which
cancels easily.
Aleph Single-Ended Class A
Single-ended Class A has long been known as the “King of the Class
A’s”, the simplest, most pure and least efcient form of audio amplication. Before the Aleph™ ampliers, it was reserved for preamplier
circuits, high quality amplier front-ends, and other very low power
output stages.
US Patent # 5,710,522 describes the single-ended Class A power amplier biased by a constant DC current source which negatively “ghosts”
the speaker load with simple but effective current modulation. If you
have followed developments in audio for the last 10 years, you know this
design as the Pass Laboratories Aleph™. The Aleph™ is an incredibly
successful ground breaking amplier design, hailed in Stereophile magazine as “The Amplier of the Decade” and winner of virtually every
international design award for audio that we know of.
The key virtue of the Aleph™ design lies in its simplicity and effectiveness. With only two stages and no adjustments it delivers measured
performance rivaling the most complex designs, but retains the sonic
elegance and nuance of a truly minimalist gain path – only two gain
devices in series from input to output.
The Supersymmetery
Aleph™
XA160 Owner’s Manual
The two design concepts are not mutually exclusive, and we approached
the development of the XA series with an eye to creating a warm/sweet
X amplier, or conversely, a powerfully dynamic Aleph™. The successful result is a circuit which is described as balanced single-ended Class
A, consisting of two balanced Aleph™ ampliers sharing a single differential input pair of transistors.
13
Page 14

The amplier has only the two stages, an input stage of a balanced pair of
input devices, and the output stage, a balanced pair of single-ended Class
A power Mosfets. Like the Aleph™, you can trace a path from input to
output through only two gain devices. Like the X amps, feedback is used
only to set the gain and correct for dissimilarities between the two matched
output stages.
There are no adjustments. There are no frequency compensation capacitors. The ampliers are unconditionally stable and reliable into any load.
They are not fragile, temperamental or prone to failure.
The XA ampliers operate at approximately 33% efciency, which is to
say they idle at three times their rated output. The XA200 is rated at 200
watts output into 8 ohms and draws something over 600 watts of AC
power. This design is an exercise in highly conservative engineering, which
provides exceptional reliability and product longevity. The output devices
are exposed to no more than a fraction of the voltage and wattage they are
designed to endure.
These rugged power devices are matched to about .3% and mounted on
Mica insulators. Their massive heat sinks run at about 25 degrees C. above
ambient temperature, so that actual chip temperatures are about 70 degrees
below their rating. The output devices are designed to last a very long time
under these conditions, with a probable life of about 50,000 hours.
The power supply of the XA 200 uses elaborate RF ltering and noise suppression designed to block AC noise and line DC. The substantial toroidal
power transformer is followed by high speed rectiers, and signicant uF
of computer grade capacitors in a passive lter arrangement. In addition
to a main power switch the amplier has a standby mode, which shuts
down the bias to the circuit while keeping the supply active, signicantly
extending the life of the lter capacitors.
The sound of the XA ampliers is a quantum leap over the parents. They
retain the sweet warmth and lushness of the Aleph™ series without the
uffy coloration’s. The dynamic contrast is even better than the X series;
transients leaping from black to crescendo and back again with no telegraphing or hangover.
The bass has as much control over the speaker as the original X amps, but
is a bit more neutral and carries subtler nuance. The midrange is a little
deeper and the soundstage wider than the Alephs™.
Are the XA’s better than Alephs™ and X’s in every respect?
Yes, except for the higher power/current ratings of the X amps.
XA160 Owner’s Manual
Are they the best audio ampliers that money can buy? Absolutely!
14
 Loading...