

Page 1
®
Instruction Manual
1
2
34
× 50× 10
012-09864C
*012-09864*
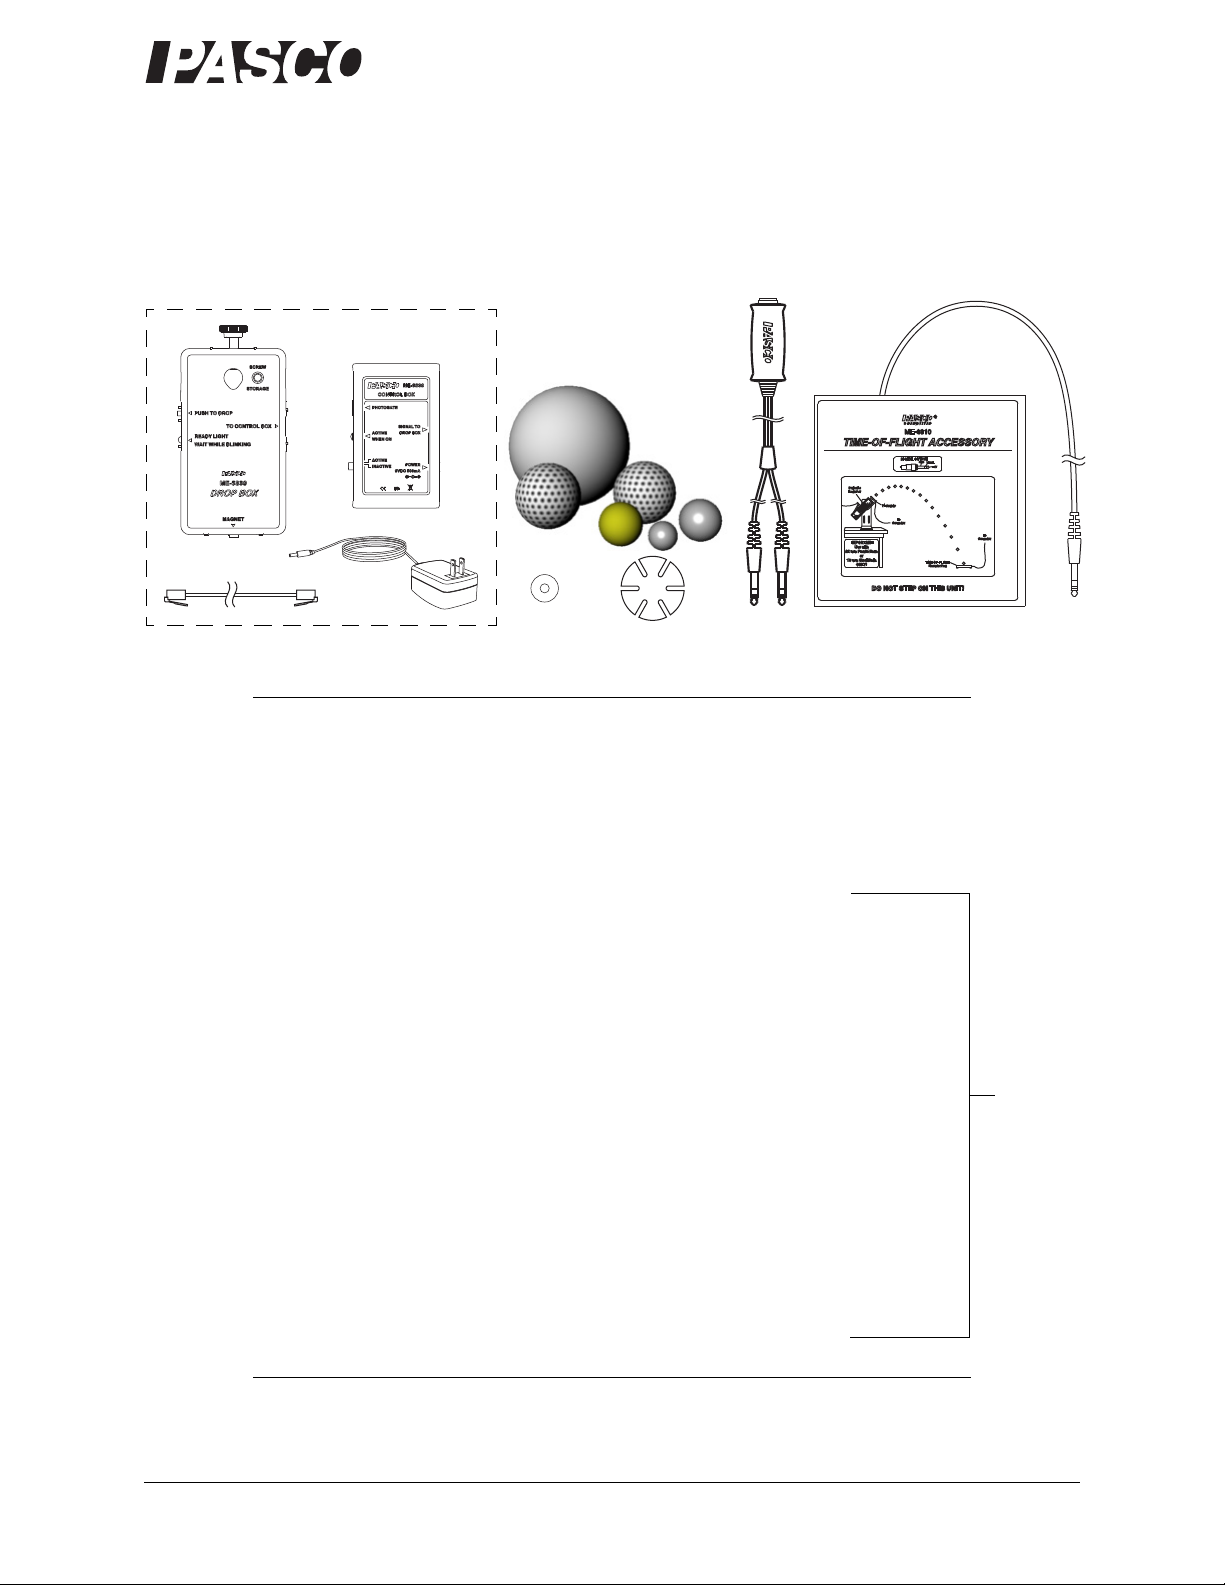
Discover Free Fall System
ME-9889
Discover Free Fall Accessory
ME-9893
Included Equipment ME-9889 Part Number
1. Drop Box assembly: ME-6839
Drop Box, main unit
Control Box
AC Adapter
Cable
2. Free Fall Ball Accessory: ME-9890
Release Washers (qty. 10)
Release Stickers (qty. 50)
Yellow Nylon Ball (2.5 cm diameter, 10 g)
Larger Stainless Steel Ball (2.5 cm diameter, 70 g)
Smaller Stainless Steel Ball (1.6 cm diameter, 16 g)
Regular Golf Ball (4.4 cm diameter, 50 g)
Practice Golf Ball (4.2 cm diameter, 6 g)
Large Hollow Plastic Ball (10 cm diameter, 40g)
ME-9893
800-772-8700 www.pasco.com
3. Timer Switch ME-9819
4. Time-of-Flight Accessory ME-6810
Required Equipment
Timing device (see page 3) See PASCO catalog
Mounting rods and base (see page 3) See PASCO catalog
Page 2
®
Discover Free Fall System Introduction
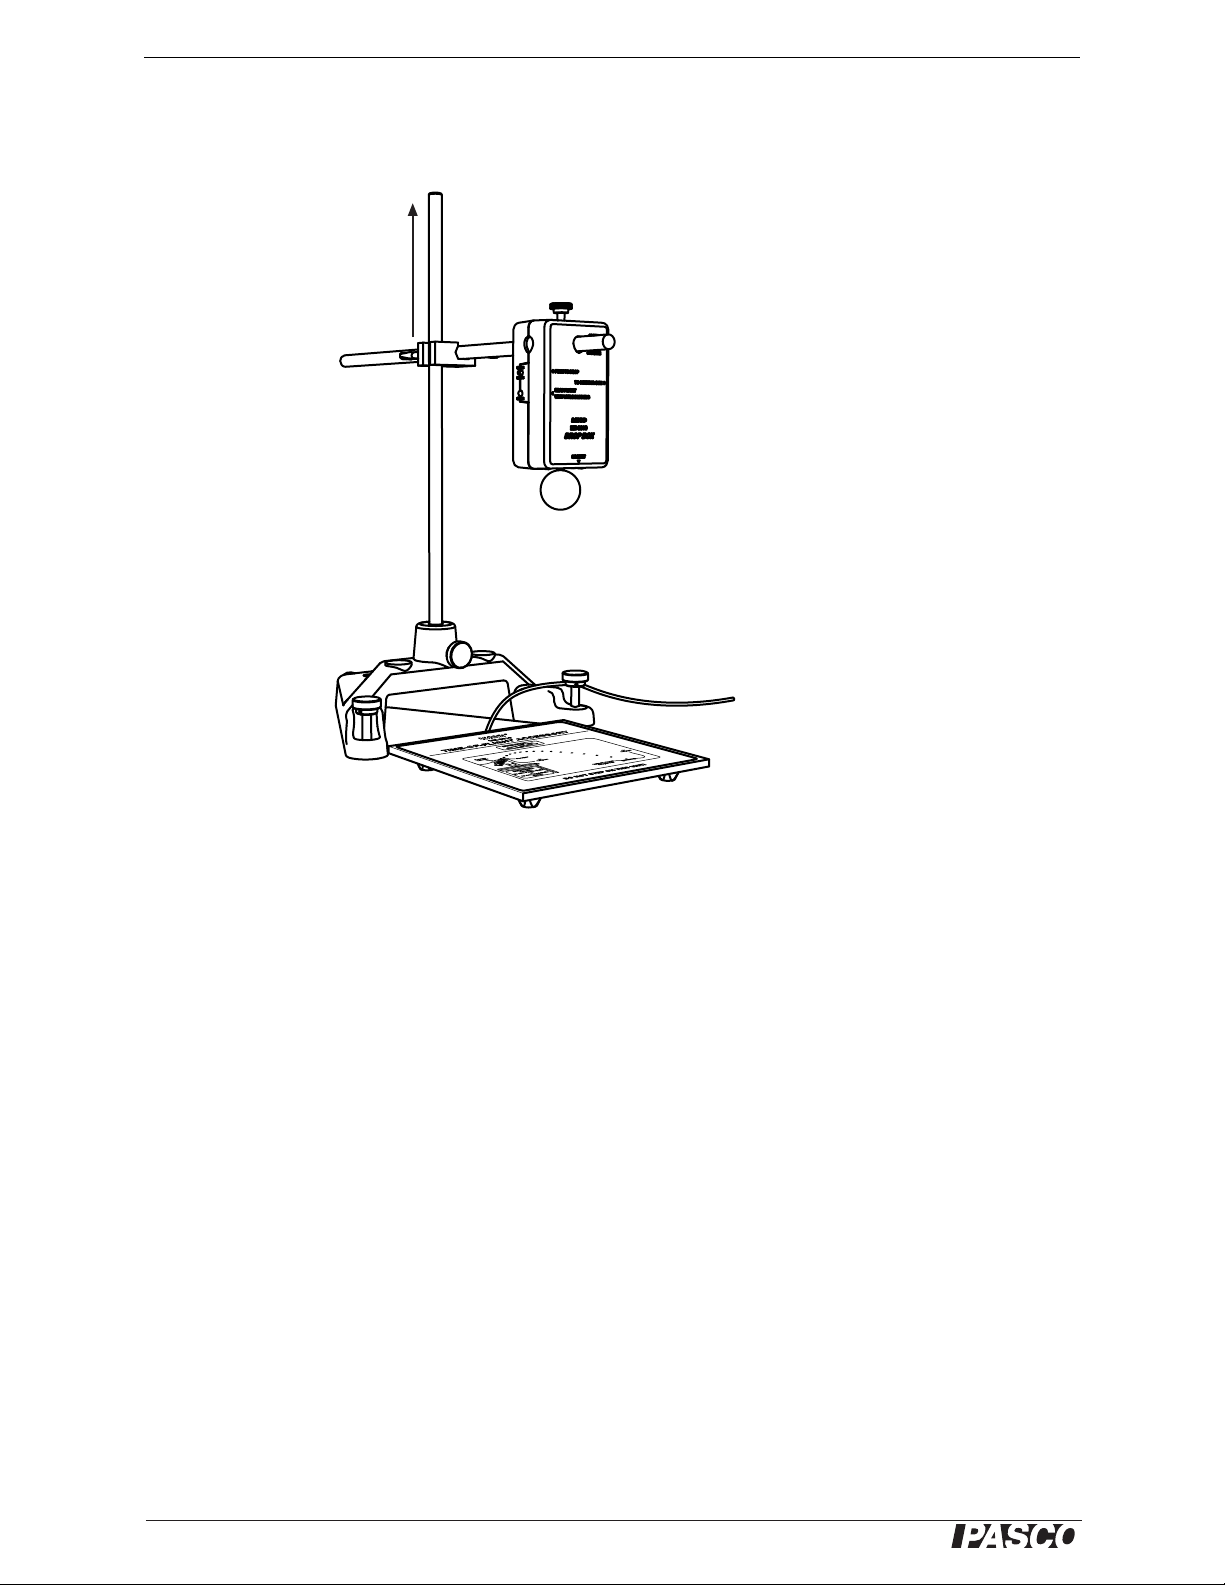
Drop Box
Time-of-Flight Accessory
Clamp higher
on rod for
increased fall
height
Figure 1: Drop box mounted on a rod stand
Introduction
The PASCO Discover Free Fall System consists of the ME-6839 Drop Box plus the
ME-9893 Discover Free Fall Accessory. The Discover Free Fall Accessory consists
of the Free Fall Ball Accessory (ME-9890), the Timer Switch (ME-9819) and the
Time-of-Flight Accessory (ME-6810).
The PASCO Discover Free Fall System allows students to precisely time falling
objects. The system includes several balls of various sizes and masses (ranging from
about 6 g to 70 g). Other objects of similar mass can also be used.
The object to be dropped is suspended from a magnet. When the timer switch is
pushed, the object is released and the timing starts. Timing stops when the object hits
the time-of-flight pad. The system includes steel washers and adhesive stickers to
allow non-steel objects to be suspended from the magnet.
The timer switch is a push-button device that simultaneously causes the drop box to
release the object and triggers the timing device to start timing.
The time-of-flight accessory is a pad that triggers the timing device to stop timing
when an object hits it.
2
Page 3
®
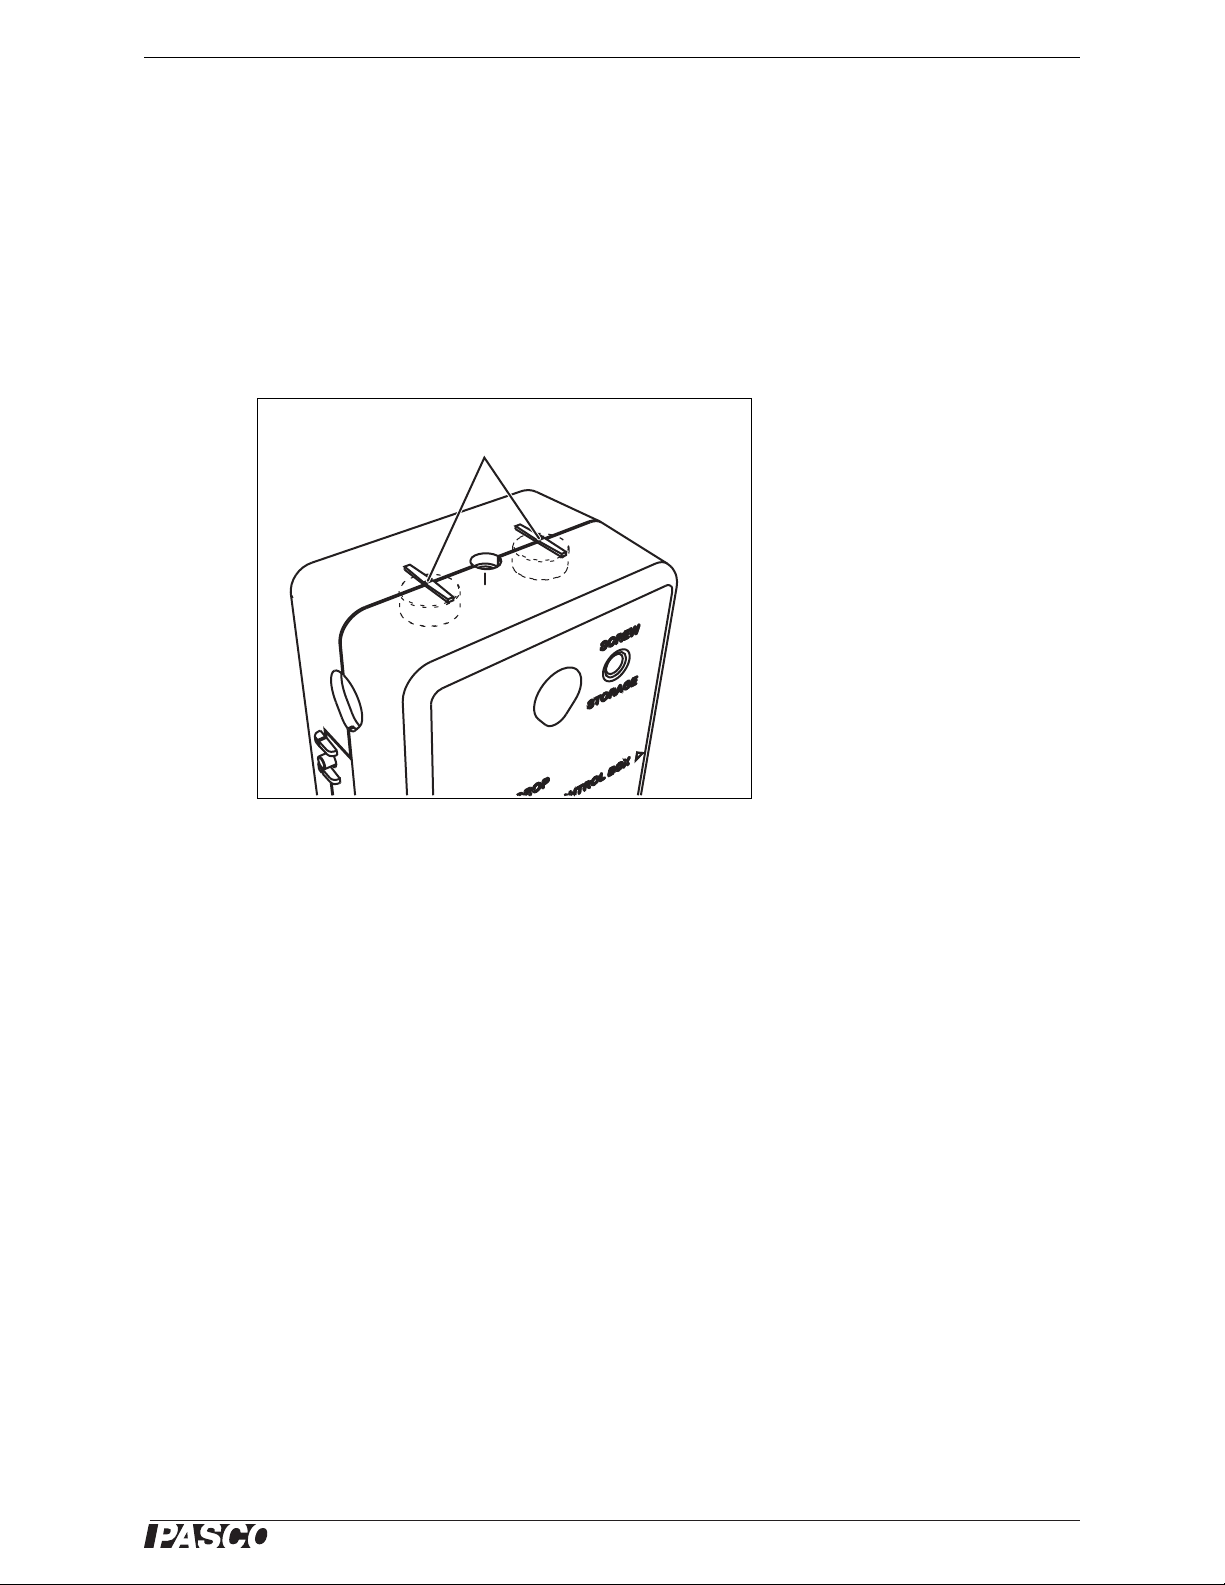
Model No. ME-9889 Mounting Options
Magnets for attaching
to ceiling
Remove
screw
Mounting Options
Mount the drop box on a horizontal rod attached with a right angle clamp to a tall rod.
Figure 1 shows a typical setup using a rod stand (ME-8735), a 120 cm vertical rod
(ME-8741), a 45 cm horizontal rod (ME-8736), and a right angle clamp (SE-9444).
Any similar configuration will work just as well. For a greater fall height, place the
rod stand on a table and the time-of-flight pad on the floor.
The drop box can also be attached magnetically to a steel part of the ceiling (see
Figure 2). This mounting method works well for maximizing the height from which
objects will be dropped.
Figure 2: Magnets for attaching to ceiling
Timing Device Options
In order to time the object, the system must be connected to one of the following timing devices:
• Smart Timer (ME-9830)
• ScienceWorkshop 500 or 750 interface connected to a computer running
DataStudio.
• PASPORT interface with a Digital Adapter (PS-2159). Any PASPORT interface
can be used connected to a computer running DataStudio. The Xplorer GLX
(PS-2002) can also be used in standalone mode without a computer.
For more information about these devices, see the PASCO catalog, visit
www.pasco.com, or contact PASCO Technical Support (see page 10).
3
Page 4

®
Discover Free Fall System Equipment Set-up
Figure 3: Attaching a washer to a non-steel object
Time-of-Flight Accessory
Control Box
Drop Box
Timer Switch
AC Adapter
To timing device
Equipment Set-up
1. Connect the included AC Adapter to the POWER jack on
the control box.
2. Connect one plug of the timer switch to the PHOTO-
GATE port on the control box.
3. Use the included cable to connect the SIGNAL TO
DROP BOX jack on the control box to the TO CONTROL BOX jack on the drop box.
4. Mount the drop box as shown in Figure 1.
5. Place the time-of-flight pad directly below the drop box.
6. If the object to be dropped is not steel, attach one of the
included washers to it using one of the included stickers
(see Figure 3). The sticker is pressure activated; press hard to make it stick permanently.
7. Hang the object from the drop box magnet.
8. Set the ACTIVE/INACTIVE switch on the control box to ACTIVE.
9. Select one of the timing options (Smart Timer, ScienceWorkshop, or PASPORT)
and follow the instructions on pages 5–8 to configure the timing device and take
data.
4
Figure 4: Equipment Set-up
Page 5

®
Model No. ME-9889 Test Drop
ME-8930
SMART TIMER
SPEED
Select
Mode
Start/ Stop
One Gate Fence Two Pendulum Stopwatch
One Gate
(cm/s)
Collision
(cm/s)
Pulley
(rad/s)
Pulley
(rev/s)
ACCEL
One Gate
(cm/s2)
Linear Pulley
(cm/s2)
Angular Pulley
(rad/s2)
Two
Gates
COUNT
Counts For:
60 seconds 5 minutes Manual30 seconds
TEST
Blocked Unblocked
Select
Measurement
TIME
123
121
Select
Time
Select
Two Gates
Press before
releasing ball
Time: Two Gates
*
Test Drop
1. Press the PUSH TO DROP button on the drop box.
• If the object drops immediately, no adjustment is necessary.
• If the object does not drop or drops after a delay, add a sticker to the object to
increase the space between the steel part of the object and the drop box magnet.
2. Hang the object from the drop box and retest if necessary.
Timing Option 1: Smart Timer
Set-up
1. Connect the Smart Timer’s AC adapter to its power port.
Data Collection
2. Turn on the Smart Timer.
3. Connect the remaining plug of the timer switch to channel 1 of the Smart
Timer.
4. Connect the time-of-flight pad to channel 2 of the Smart Timer.
5. On the Smart Timer, press the 1 Select Measurement button once to
select Time.
6. Press the 2 Select Mode button several times to select Two Gates mode.
1. On the Smart Timer, press the 3 Start/Stop button.
Result: The Smart Timer beeps and an asterisk (*) appears on the display
to indicate that it is ready to start timing.
2. Press the timer switch button.
Result: The object is released from the drop box. When the object hits the
time-of-flight pad, the Smart Timer displays the fall time.
To time another object: hang the object from the drop box, wait until the LED on the
drop box stops blinking, and repeat steps 1 and 2.
5
Page 6
®
Discover Free Fall System Timing Option 2: ScienceWorkshop Interface
Choose for
Channel 1
Choose for
Channel 2
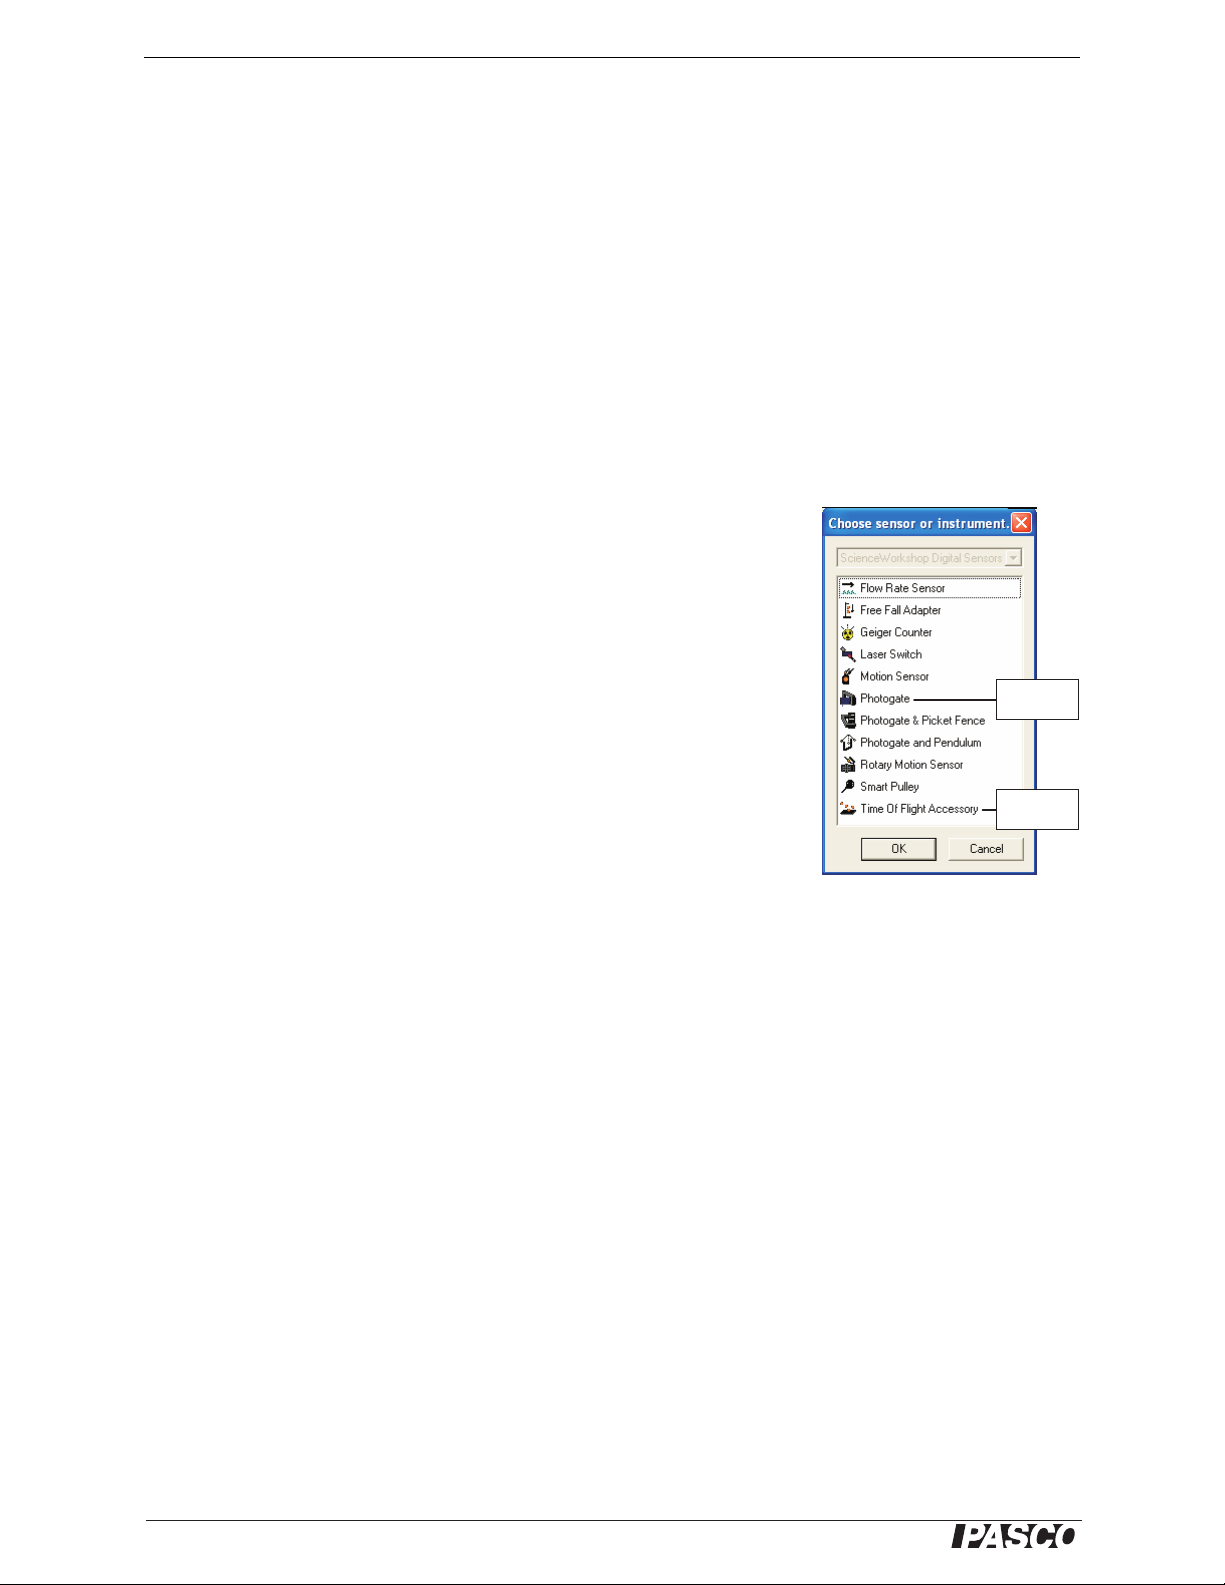
Timing Option 2: ScienceWorkshop Interface
Set-up
1. Connect your ScienceWorkshop interface to your computer (refer to the instructions that came with the interface).
2. Start DataStudio. If you see the Welcome to DataStudio window, select Create
Experiment.
3. Connect the remaining plug of the timer switch to Channel 1 of the interface.
4. Connect the time-of-flight pad to Channel 2 of the interface.
5.
In the
Experiment Setup
Result: The Choose Sensor or Instrument window appears.
Note: If you do not see the Experiment Setup window, click the Setup
button. If you do not see a picture of your interface in the window, click
the Choose Interface button and select your interface.
window, click Channel 1 on the picture of the interface.
6. In the Choose Sensor or Instrument window, double-click Photogate.
7. In the Experiment Setup window, deselect the Ve l oci t y I n G at e mea-
surement.
8. In the Experiment Setup window, click Channel 2 on the picture of the
interface.
Result: The Choose Sensor or Instrument window appears.
9. In the Choose Sensor or Instrument window, double-click Time Of Flight
Accessory.
10. In the Summary Bar (on the left side of the screen), double-click Tab le .
Result: A table appears configured to display Elapsed Time.
Note: If you do not see the Summary Bar, click the Summary button.
Data Collection
1. In DataStudio, click the Start button.
Result: DataStudio’s experiment clock starts running, indicating that it is ready to
collect data.
2. Press the timer switch button.
Result: The object is released from the drop box. When the object hits the
time-of-flight pad, the table in DataStudio displays the fall time.
To time another object: hang the object from the drop box, wait until the LED on the
drop box stops blinking, and repeat steps 1 and 2.
When you have finished timing all objects, click the Stop button.
6
Page 7

®
Model No. ME-9889 Timing Option 3: PASPORT Interface with Computer
Timing Option 3: PASPORT Interface with Computer
Set-up
1. Connect your PASPORT interface to your computer (refer to the instructions that
came with the interface).
2. Connect the remaining plug of the timer switch to channel 1 of your Digital
Adapter (PS-2159).
3. Connect the time-of-flight pad to channel 2 of the Digital Adapter.
4. Connect the Digital Adapter to the PASPORT interface.
Result: DataStudio starts automatically and the Choose Sensor or Instrument
window appears.
5. In the Choose Sensor or Instrument window, double-click Time Of Flight.
Result: A table appears configured to display Elapsed Time.
Note: This table is also configured to show Initial Velocity, which is not relevant
in this case. Follow the next step to remove Initial Velocity.
6. Click once on the blank cells of the Initial Velocity column. Click the Remove
button ( ) to delete the column.
Data Collection
1. In DataStudio, click the Start button.
Result: DataStudio’s experiment clock starts running, indicating that it is ready to
collect data.
2. Press the timer switch button.
Result: The object is released from the drop box. When the object hits the
time-of-flight pad, the table in DataStudio displays the fall time.
To time another object: hang the object from the drop box, wait until the LED on the
drop box stops blinking, and repeat steps 1 and 2.
When you have finished timing all objects, click the Stop button.
7
Page 8

®
Discover Free Fall System Timing Option 4: Xplorer GLX in Standalone Mode
Timers List
Timing Screen
Table Display
F2
Timing Option 4: Xplorer GLX in Standalone Mode
Set-up
1. Connect the remaining plug of the timer switch to channel 1 of the
Digital Adapter.
2. Connect the time-of-flight pad to channel 2 of your Digital Adapter
(PS-2159).
3. Turn on the GLX
4. Connect the Digital Adapter to the GLX.
Result: The Timers list appears.
5. Press the down arrow several times to highlight Time Of Flight. Press
.
Result: The Timing screen appears.
6. Press the down arrow to highlight Initial Velocity. Press to set it
to Not Visible.
7. Press , to open the Table display.
Data Collection
1. Press .
Result: The clock icon ( ) appears at the top of the screen to indicate
that the GLX is ready to collect data.
2. Press the timer switch button.
Result: The object is released from the drop box. When the object hits
the time-of-flight pad, the GLX displays the elapsed time.
To time another object: hang the object from the drop box, wait until the
LED on the drop box stops blinking, and repeat steps 1 and 2.
When you have finished timing all objects, click .
8
Page 9

®
Model No. ME-9889 Suggested Experiments
t
2
2
a
---
h=
Suggested Experiments
Fall Time of Different Objects
Keeping the drop-height constant, measure the free-fall time of different objects.
Measure the drop height from the time-of-flight pad to the bottom of the object when
it is hanging from the drop box. (You will need to adjust the drop box position slightly
for different sized balls.) Time each ball several times to make sure you get an accurate measurement.
Compare objects of various size, mass, and density.
If the only force acting on the balls is gravitational force, you would expect the fall
time to be the same for every ball. Do you find this to be the case?
Fall Time Versus Height
Time a stainless steel ball dropping from several different heights. Use as wide a
range of heights as possible.
Plot fall time (t) versus height (h ). Is the relationship linear?
2
Plot t
versus h. Is that relationship linear?
For an object falling with constant acceleration, a, the relationship between t and h is
given by
Use your data to find a.
Repeat the procedure with the large hollow ball. Does it accelerate at a constant rate?
How can you tell?
9
Page 10

®
Discover Free Fall System Technical Support
Technical Support
For assistance with any PASCO product, contact PASCO at:
Address: PASCO scientific
10101 Foothills Blvd.
Roseville, CA 95747-7100
Phone: 916-786-3800 (worldwide)
800-772-8700 (U.S.)
Fax: (916) 786-7565
Web: www.pasco.com
Email: support@pasco.com
Limited Warranty
For a description of the product warranty, see the PASCO catalog.
Copyright
The PASCO scientific 012-09864C Discover Free Fall System Instruction Manual is copyrighted with all rights reserved. Permission is
granted to non-profit educational institutions for reproduction of any part of this manual, providing the reproductions are used only in
their laboratories and classrooms, and are not sold for profit. Reproduction under any other circumstances, without the written consent of PASCO scientific, is prohibited.
Trademarks
PASCO, PASCO scientific, DataStudio, PASPORT, ScienceWorkshop, Xplorer, and Xplorer GLX are trademarks or registered trademarks of PASCO scientific, in the United States and/or in other countries. All other brands, products, or service names are or may be
trademarks or service marks of, and are used to identify, products or services of, their respective owners. For more information visit
www.pasco.com/legal.
10
 Loading...